11 Setting Up Vehicles
This chapter contains the following topics:
11.1 Understanding Vehicle Setup
To create a load, you must define the vehicles that you use in shipping. Vehicle setup enables you to define specific vehicles or vehicle types. You set up vehicles to specify the type and quantity of products that can be loaded onto them.
Common types of vehicles include tractors, trailers, and vans. These general descriptions of vehicles are the basis for which you later define each physical vehicle that you use. For example, if you use tanker trucks to ship items, you might set up a vehicle type named TANKER.
After you define a vehicle type, you define specific information about that vehicle type, such as:
-
Dimension information
-
Compartments
-
Equipment information
Use vehicle dimensions to define the physical dimensions of a vehicle. For example, when the TANKER vehicle type is defined, you set up the exterior and interior measurements of the tankers. You can define how many compartments a type of vehicle has within it. For example, a tanker might have six compartments. You can also define the equipment that is on board the vehicle. For example, a tanker may have hoses as required equipment for pumping out product. If these hoses always accompany the tanker, you define them as equipment on the TANKER vehicle type.
After you set the vehicle types, you then define specific vehicle information in Vehicle Master Maintenance (P4930). For example, you can set up:
| Vehicle Type | Description |
|---|---|
| License information | For each vehicle that you use, you can enter specific license information that might be required by various transportation agencies. |
| Out-of-service dates | Out-of-service dates help you to plan maintenance schedules. They can help you to route shipments by allowing the system to assign only those vehicles that are available for use. |
| Connected vehicle information | Connected vehicle information enables you to define two or more vehicles that are attached and given one connected vehicle ID. |
11.2 Setting Up Vehicle Information
This section provides overviews of vehicle type setup, vehicle information setup, vehicle dimension setup, vehicle compartment setup, and vehicle equipment setup, lists a prerequisite, and discusses how to:
-
Set up vehicle types
-
Set up vehicle dimensions
-
Set up vehicle compartments
-
Set up vehicle equipment
11.2.1 Understanding Vehicle Type Setup
Use the Vehicle Type Maintenance program (P4931) to set up vehicle types to record each type of vehicle that is operated by the company. You can then define further information about the vehicles.
The system enables you to set up extra features for vehicles in a private fleet such as a vehicle ID. You can also set up license and out-of-service dates for specific physical vehicles. You can set up physically connected vehicles as a single logical entity called a connected vehicle. A connected vehicle can be rail cars that are joined temporarily as a train, or trucks and trailers that are attached to one another. You can use connected vehicles to streamline the trip building and load confirmation processes.
11.2.2 Understanding Vehicle Information Setup
You must define a vehicle type so that the JD Edwards EnterpriseOne Transportation Management system can use the type to create loads. After you enter vehicles types, you then define further information for each type of vehicle, such as dimensions, compartments, and equipment.
11.2.3 Understanding Vehicle Dimension Setup
Vehicle dimensions specify the length, width, and height of the vehicles in the system. This information enables you to better fill the vehicles to capacity.
11.2.4 Understanding Vehicle Compartment Setup
You must specify the capacity of each compartment on each vehicle that you use. This ensures that you do not build a load with a capacity greater than that of the vehicle.
11.2.5 Understanding Vehicle Equipment Setup
Use the Vehicle Type Maintenance program (P4931) to specify the equipment that is associated with individual vehicles. When you build a load, you can view the vehicle master to determine whether a vehicle has the appropriate equipment for a specific delivery requirement. For example, the dispatcher might be building a load that is destined for a delivery site that is known to not have a delivery dock. In this case, the dispatcher must assign a vehicle equipped with a hydraulic liftgate so that the driver can easily deliver the product.
11.2.6 Prerequisite
Before you complete the tasks in this section, set up user-defined codes for equipment in the Option/Equipment table (49/BG).
See User-Defined Codes.
11.2.7 Forms Used to Set Up Vehicle Information
| Form Name | Form ID | Navigation | Usage |
|---|---|---|---|
| Vehicle Type Revisions | W4931B | Vehicle Setup (G49413), Work With Vehicle Types
On Work With Vehicle Types, click Add. |
Set up vehicle types. |
| Dimension Revisions | W4931C | Vehicle Setup (G49413), Work With Vehicle Types
On Work With Vehicle Types, click Find, and then select a line in the grid. Select Dimensions from the Row menu. |
Set up vehicle dimensions. |
| Compartment Revisions | W4930F | Vehicle Setup (G49413), Work With Vehicle Types
On Work With Vehicle Types, select Compartments from the Row menu. |
Set up vehicle compartments. |
| Equipment Revisions | W4930D | Vehicle Setup (G49413), Work With Vehicle Types
On Work With Vehicle Types, select Equipment row. |
Set up vehicle equipment. |
11.2.8 Setting Up Vehicle Types
Access the Vehicle Type Revisions form.
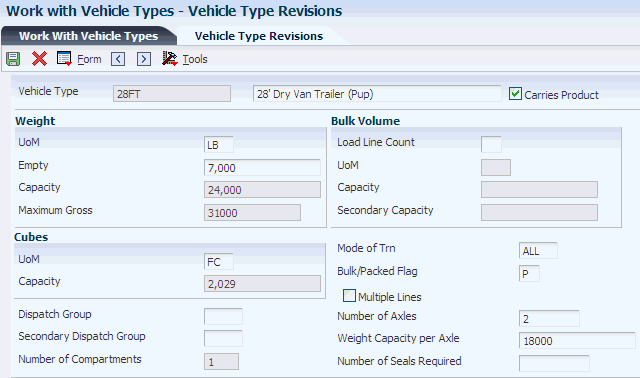
- Vehicle Type
-
Specify the type of vehicle that you use to transport items. The vehicle type identifies the mode of transport and assignments to dispatch groups.
- Weight UoM
-
Specify the unit of measure that indicates the weight of an individual item. Typical weight units of measure are:
GM: Gram
KG: Kilogram
CW: Hundredweight
TN: Ton
OZ: Ounce
LB: Pound
- Empty Weight
-
Enter the certified weight of this vehicle, including fuel but excluding cargo.
- Volume UoM
-
Enter the user-defined code (00/UM) that identifies the unit of measure that the system uses to indicate volume for this item. You can specify cubes, liters, gallons, and so on as volume standards. The system uses this unit of measure for the item or overrides it for an individual item or container.
- Carries Product
-
Select to indicate whether the vehicle carries products. When this option is selected, this vehicle carries products.
- Dispatch Group
-
Enter the user-defined code that identifies the dispatch group. A dispatch group is a grouping that you make for products according to the physical characteristics that are important when storing and transporting those products. During the load building process, the system checks whether the dispatch group for the item and the vehicle are compatible. The system only allows products belonging to the allowed dispatch groups to be assigned to the vehicle.
- Secondary Dispatch Group
-
Enter the code that the JD Edwards EnterpriseOne Transportation Management system uses to group products for dispatch.
- Number of Compartments
-
Enter the number of compartments in a vehicle.
- Load Line Count
-
Enter the number of load lines in a vehicle compartment.
- Cubic UoM
-
Specify the unit of measure for the cubic space that is occupied by an inventory item. Typical volume units of measure are:
ML: Milliliter
CF: Cubic foot
CY: Cubic yard
CM: Cubic meter
PT: Pint
LT: Liter
- Mode of Trn
-
Enter the user-defined code (00, TM) that describes the nature of the carrier being used to transport goods to the customer, such as by rail, by road, and so on.
- Bulk/Packed Flag
-
Indicate whether the vehicle can transport bulk liquid product or packaged products. If it is a bulk vehicle, temperature and density/gravity conversions must be performed. Therefore, product movements must be recorded using screens that are designed specifically for bulk products. Edits are performed by transportation screens to ensure that the appropriate products are being processed. Values are:
P: Packaged item (product)
B: Bulk liquid item (product)
- Number of Axles
-
Enter the number of axles on this vehicle. This information is applicable only to road trucks. It is vital in those situations in which governmental authorities either restrict the operation of large (high axle count) vehicles or control the maximum weight that is allowed per vehicle axle.
- Weight Capacity per Axle
-
Enter the weight capacity per axle for this vehicle.
- Number of Seals Required
-
Enter the number of seals that a vehicle requires.
- Multiple Lines
-
Select to indicate whether multiple lines are allowed per compartment. When this option is selected, multiple lines are allowed.
11.2.9 Setting Up Vehicle Dimensions
Access the Dimension Revisions form.
- Vehicle Exterior Height
-
Enter the vehicle's exterior height.
- Vehicle Exterior Length
-
Enter the vehicle's exterior length.
- Vehicle Exterior Width
-
Enter the vehicle's exterior width.
- Vehicle Side Door Height
-
Enter the vehicle's side door height.
- Vehicle Side Door Width
-
Enter the vehicle's side door width.
- Vehicle Rear Door Height
-
Enter the vehicle's rear door height.
- Vehicle Rear Door Width
-
Enter the vehicle's rear door width.
- Vehicle Interior Front Height
-
Enter the vehicle's interior height at the front.
- Vehicle Interior Center Height
-
Enter the vehicle's interior height at the center.
- Vehicle Interior Rear Height
-
Enter the vehicle's interior height at the rear.
- Vehicle Interior Length
-
Enter the vehicle's interior length.
- Vehicle Interior Width
-
Enter the vehicle's interior width.
- Vehicle Floor Height
-
Enter the vehicle's floor height.
- Linear Unit of Measure
-
Specify the width, height, or length unit of measure for a vehicle.
11.2.10 Setting Up Vehicle Compartments
Access the Compartment Revisions form.
- Weight Capacity
-
Enter the weight capacity of this compartment. If you did not set a capacity for each compartment, you can still load product.
- Cubes Capacity
-
Enter the volume, referred to as cubes, of a vehicle or space.
- Volume Capacity
-
Enter the volume capacity of this compartment for this dispatch group.
- B P
-
Indicates whether the vehicle can transport bulk liquid product or packaged products. If it is a bulk vehicle, temperature and density/gravity conversions must be performed. Therefore, product movements must be recorded using screens that are designed specifically for bulk products. Edits are performed by transportation screens to ensure that the appropriate products are being processed. Values are:
P: Packaged item (product)
B: Bulk liquid item (product)
11.3 Setting Up Vehicle Maintenance Information
This section provides an overview of vehicle master information setup and discusses how to:
-
Set up vehicle master information.
-
Set processing options for Vehicle Master Maintenance (P4930).
-
Set up vehicle licenses.
-
Set up vehicle out-of-service dates.
-
Set up connected vehicles.
11.3.1 Understanding Vehicle Maintenance Information Setup
After you set up vehicle types, compartments, and equipment, you can set up license, staff, and vehicle availability information.
11.3.1.1 Vehicle Master Information Setup
After you set up types of vehicles, you can specify information that is specific to each vehicle, such as its associated branch/plant, its serial number, and its owner.
The system retrieves default values for each physical vehicle based on the assigned vehicle type. You can override the default vehicle type information. For example, if you have a typical truck that represents most of the fleet, you can use these features as the default setup. If some trucks are outfitted with special equipment, you can override the default information for those vehicles.
11.3.1.2 Vehicle License Setup
You enter vehicle license and registration information, the types of licenses and registrations, and their effective dates in the License Maintenance program (P49020). During the load building process, the system uses this information to verify vehicle license and registration information.
11.3.1.3 Vehicle Out-of-Service Date Setup
You can use status codes and dates in the Vehicle Master Maintenance program (P4930) to indicate when the vehicle is scheduled for routine maintenance or is otherwise unavailable. The dispatcher uses this information to avoid assigning orders and loads to an out-of-service vehicle.
11.3.1.4 Connected Vehicle Setup
Use the Connected Vehicles program (P4935) to set up connected vehicles to indicate when two or more vehicles are to be considered a single connected vehicle with a unique ID. When you specify that two or more vehicles are connected, you can indicate:
-
The vehicle ID for each of the vehicles that form the connected vehicle.
-
The ID number of the connected vehicle.
-
The type of vehicle, such as train or attached trailers.
11.3.2 Forms Used to Set Up Vehicle Maintenance Information
| Form Name | Form ID | Navigation | Usage |
|---|---|---|---|
| Vehicle Master Revisions | W4930B | Vehicle Setup (G49413), Work With Vehicles
On Work With Vehicles, click Add. |
Set up vehicle master information. |
| License Revisions | W49020B | Vehicle Setup (G49413), Work With Licenses
On Work With License, select a vehicle. |
Set up vehicle licenses. |
| Vehicle Out of Service Dates | W4930C | Vehicle Setup (G49413), Work With Vehicles
On Work With Vehicles, select a vehicle in the grid and then select Out of Service from the Row menu. |
Set up vehicle out-of-service dates. |
| Connected Vehicle Revisions | W4935F | Vehicle Setup (G49413), Work With Connected Vehicles
On Work With Connected Vehicles, click Add. |
Set up connected vehicles. |
11.3.3 Setting Up Vehicle Master Information
Access the Vehicle Master Revisions form.
Figure 11-5 Vehicle Master Revisions form
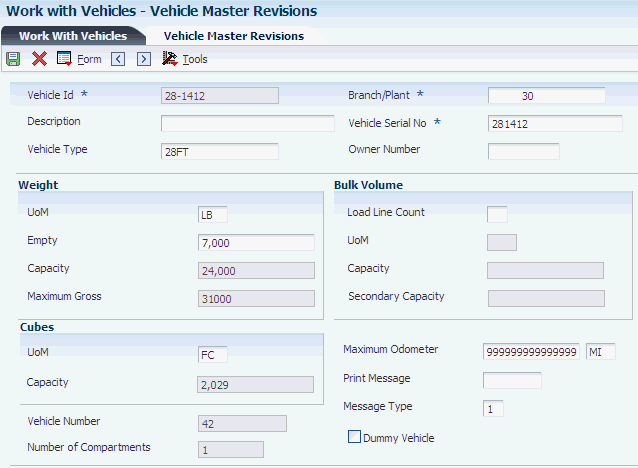
Description of "Figure 11-5 Vehicle Master Revisions form"
- Vehicle Type
-
Specify the type of vehicle that you use to transport items. The vehicle type identifies the mode of transport and assignments to dispatch groups.
- Vehicle Serial No
-
Enter the alternate vehicle identification number. This number is commonly used to track vehicles by the manufacturer's serial number.
The Vehicle Serial Number field must contain a unique number.
- Owner Number
-
Enter the address book number that identifies the organization that owns or operates this vehicle or tank. The owner number may be the address book number that is assigned to the company number.
- Maximum Odometer
-
Enter the maximum value that is allowed on the odometer.
- Print Message
-
Enter the user-defined code that you assign to each print message. Examples of text that is used in messages are engineering specifications, hours of operation during holiday periods, and special delivery instructions.
- Message Type
-
Select the method of communication that is used for print messages. You can select to print the message on documents, display the message in a window during processing, or both. Values are:
1: Display message
2: Print message
3: Display and print message
- Dummy Vehicle
-
Select to indicate whether the vehicle is a dummy vehicle that can be used temporarily for an actual vehicle for trip assignment. When you assign a dummy vehicle, the system automatically displays the Vehicle Registration Entry window during load confirm by trip. At this time, you must supply a registration number for the dummy vehicle.
11.3.4 Set Processing Options for Vehicle Master Maintenance (P4930)
Processing options enable you to specify the default processing for programs and reports.
- 1. Enter 1 to display Vehicle Compartment, Vehicle License, and Vehicle Equipment revision forms when adding a vehicle.
-
Specify whether to display Vehicle Compartment, Vehicle License, and Vehicle Equipment revision forms when adding a vehicle.
11.3.5 Setting Up Vehicle Licenses
Access the License Revisions form.
- Registration/License Nbr
-
Enter the identification number that appears on the license, permit, or certificate.
- RL Ty
-
Enter the number that indicates the type of authorization or document that is required, such as general driving license, safety training certification, yard access, and loading rack access.
- Issuing Agency
-
Enter the address book number for the agency that is responsible for issuing this license.
- Ctry
-
Enter the user-defined code (00/CN) that identifies a country. The country code has no effect on currency conversion. The JD Edwards EnterpriseOne Address Book system uses the country code for data selection and address formatting.
- Effective Date
-
Enter the date when the license becomes effective.
- Expired Date
-
Enter the date on which the license expires.
- MT
-
Select the message type that is used for print messages. You can select to print the message on documents, display the message in a window during processing, or both. Values are:
1: Display message
2: Print message
3: Display and print message
- Print Messages
-
Enter the user-defined code that you assign to each print message. Examples of text that is used in messages are engineering specifications, hours of operation during holiday periods, and special delivery instructions.
- Display Owner
-
Select this option to indicate whether to display the vehicle owner.
11.3.6 Setting Up Vehicle Out-of-Service Dates
Access the Vehicle Out of Service Dates form.
Figure 11-7 Vehicle Out of Service Dates form
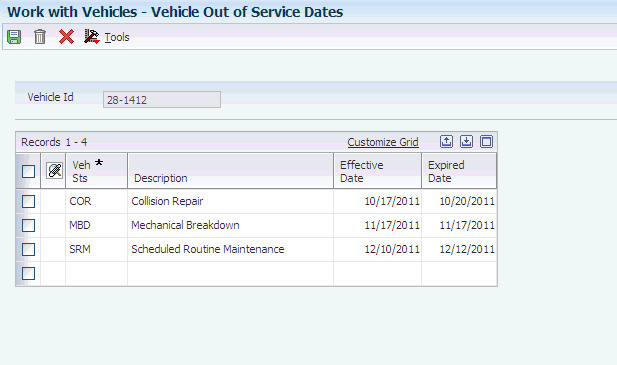
Description of "Figure 11-7 Vehicle Out of Service Dates form"
- Veh Sts
-
Enter the user-defined code (49/VS) that indicates why the vehicle is out of service, such as Scheduled Routine Maintenance (SRM), Mechanical Breakdown (MB), or Collision Repair (CR).
11.3.7 Setting Up Connected Vehicles
Access the Connected Vehicle Revisions form.
Figure 11-8 Connected Vehicle Revisions form
Description of "Figure 11-8 Connected Vehicle Revisions form"
- Connected Vehicle ID
-
Enter the unit ID that represents two or more connected vehicles. This ID can represent several situations, including these:
-
Two or more vehicles (often rail cars or barges) are connected to each other temporarily as a train.
-
Two or more vehicles (typically, road trucks and trailers) are attached to each other for a somewhat longer period, for example, a day, week, month, or more.
-
- Mode of Trn
-
Enter the user-defined code (00, TM) that describes the nature of the carrier that is being used to transport goods to the customer, such as by rail, by road, and so on.
- Dispatch Group
-
Enter the user-defined code that identifies the dispatch group. A dispatch group is a grouping that you make for products according to the physical characteristics that are important when you are storing and transporting those products. During the load building process, the system checks whether the dispatch group for the item and the vehicle are compatible. The system allows only products belonging to the allowed dispatch groups to be assigned to the vehicle.
- Secondary Dispatch Group
-
Enter the code that the JD Edwards EnterpriseOne Transportation Management system uses to group products for dispatch.