9 Setting Up the System for Excise Tax
This chapter contains the following topics:
-
Section 9.4, "Creating Cross-References Between Excise Units and Business Units"
-
Section 9.5, "Uploading AII, CII, and PLA Opening Balances, and Next Numbers"
-
Section 9.8, "Entering Excise Account Credit Redistribution Setup Details"
9.1 Entering Excise Unit Setup Details
This section provides an overview of the excise setup master and discusses how to:
-
Set processing options for Excise Setup Master Maintenance (P75I301).
-
Set up excise unit master details.
9.1.1 Understanding the Excise Unit Setup Master
You use the Excise Setup Master Maintenance program (P75I301) to assign transaction, order, and document types to an excise unit.
The system stores the excise setup master information in the Excise - Setup Master table (F75I301). You use this information to print excise statutory forms and other reports for excise taxes.
9.1.2 Forms Used to Enter Excise Unit Setup Details
| Form Name | Form ID | Navigation | Usage |
|---|---|---|---|
| Work With Excise Unit | W75I301A | Excise System Setup (G75IEXC4), Excise Setup Master Maintenance | Review a list of excise units. |
| Work With Excise Unit Setup Details | W75I301B | Select a record and click Select on the Work With Excise Unit form. | Enter excise unit setup details. |
9.1.3 Setting Processing Options for Excise Setup Master Maintenance (P75I301)
Processing options enable you to specify the default processing for programs and reports.
9.1.3.1 Defaults
- Enter the search type for the excise unit in the address book
-
Specify a user-defined code from UDC table 01/ST that specifies the type of address book record. You must specify the value EXU for the excise unit.
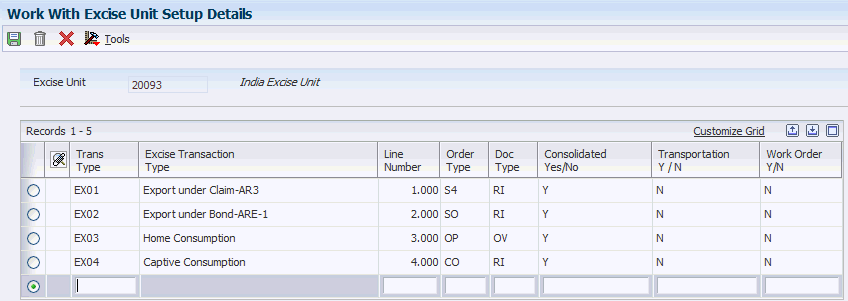
9.1.4 Setting Up Excise Unit Master Details
Access the Work With Excise Unit Setup Details form.
Figure 9-1 Work With Excise Unit Setup Details form
Description of ''Figure 9-1 Work With Excise Unit Setup Details form''
- Trans Type (transaction type)
-
Enter a value from UDC table 75I/TT that indicates the code for excise transaction type. Examples are:
EX01: Export under Claim-AR3
EX02: Export under Bond-ARE-1
EX03: Home Consumption
- Line Number
-
Enter a number that identifies multiple occurrences, such as line numbers on a purchase order or other document type. Generally, the system assigns this number, but in some cases you can override it.
- Order Type
-
Enter a value from UDC table 00/DT that identifies the order type for the selected transaction type. Examples are:
$A: Eventual Withholdings
$B: Gross Income Withholdings
%: Percentage Journal Entry
JD Edwards EnterpriseOne software reserves several prefixes for various document types, such as, vouchers, invoices, receipts, and time sheets. The reserved document type prefixes for codes are:
P: Accounts Payable documents
R: Accounts Receivable documents
T: Payroll documents
I: Inventory documents
O: Purchase Order Processing documents
J: General Accounting/Joint Interest Billing documents
S: Sales Order Processing documents
- Doc Type (document type)
-
Enter a value from UDC table 00/DT that identifies the document type for the selected transaction type. Examples are:
$A: Eventual Withholdings
$B: Gross Income Withholdings
%: Percentage Journal Entry
JD Edwards EnterpriseOne reserves several prefixes for various document types, such as, vouchers, invoices, receipts, and time sheets. The reserved document type prefixes for codes are:
P: Accounts Payable documents
R: Accounts Receivable documents
T: Payroll documents
I: Inventory documents
O: Purchase Order Processing documents
J: General Accounting/Joint Interest Billing documents
S: Sales Order Processing documents
- Consolidated Yes/No, Transportation Yes/No, and Work Order Yes/No
-
Enter a value to indicate yes or no responses on prompt screens. Values are:
Y: Yes
N: No
9.2 Defining Current Periods for Excise Units
This section provides an overview of the excise period master and discusses how to:
-
Set processing options for the Excise - Period Master Maintenance program (P75I302).
-
Define a current period for an excise unit.
9.2.1 Understanding the Excise Period Master
You use the Excise Period Master Maintenance program (P75I302) to define a period for an excise unit. The system uses this period to build data for the RG-1 and RG23A-1 reports. You should increase this period on a monthly basis. To be able to change the period for an excise unit, enable the Modify processing option.
The system stores the period for an excise unit in the Excise - Period Master table (F75I302).
9.2.2 Forms Used to Define Current Periods for Excise Units
| Form Name | Form ID | Navigation | Usage |
|---|---|---|---|
| Excise - Work With Period Master | W75I302B | Excise System Setup (G75IEXC4), Excise Period Master Maintenance | Review a list of excise units and periods. |
| Excise - Period Master Maintenance | W75I302C | On the Excise - Work With Period Master form, click Add. | Define a period for an excise unit. |
9.2.3 Setting Processing Options for the Excise - Period Master Maintenance program (P75I302)
Processing options enable you to specify the default processing for programs and reports.
9.2.3.1 Updation
- Allow Modification Deletion
-
Specify whether the item is currently active in the simulation process for current cost. Values are:
Blank: The item is inactive, and the user is restricted from updating the period in the Current Period (YYYY/MM) field.
1: The item is active, and the user can update the fiscal period and year for an excise unit.
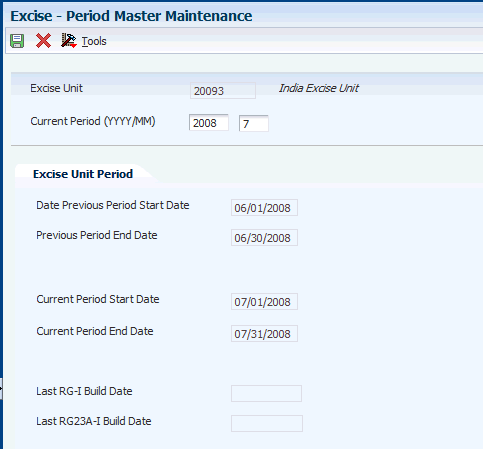
9.2.4 Defining a Current Period for an Excise Unit
Access the Excise - Period Master Maintenance form.
Figure 9-2 Excise - Period Master Maintenance form
Description of ''Figure 9-2 Excise - Period Master Maintenance form''
- Excise Unit
-
Enter the address number of the excise unit to define a period for the unit. The search type for the excise unit should be EXU.
- Current Period (YYYY/MM)
-
Enter the current period for an excise unit. You enter the period in terms of year and month.
9.3 Entering Excise Account Setup Details
You use the Excise Account Master Maintenance program (P75I306) to set up accounts for various types of excise duties. The system stores the account information in the Excise Account Master table (F75I306).
The system retrieves information from the F75I306 table to print statutory forms and other reports related to excise taxes.
This section discusses how to:
-
Set processing options for Excise Account Master Entry (P75I306).
-
Enter details for excise account master.
9.3.1 Forms Used to Enter Excise Account Setup Details
| Form Name | Form ID | Navigation | Usage |
|---|---|---|---|
| Work With Excise Account Master | W75I306A | Excise System Setup (G75IEXC4), Excise Account Master Maintenance | Review a list of excise units. |
| Excise Account Master Entry | W75I306D | On the Work With Excise Account Master form, select a record and click Select. | Enter details for excise account master. |
9.3.2 Setting Processing Options for Excise Account Master Entry (P75I306)
Processing options enable you to specify the default processing for programs and reports.
9.3.2.1 Default
- Excise Search Type
-
Specify a user-defined code from UDC table 01/ST that specifies the type of address book record. You must specify EXU for excise units.
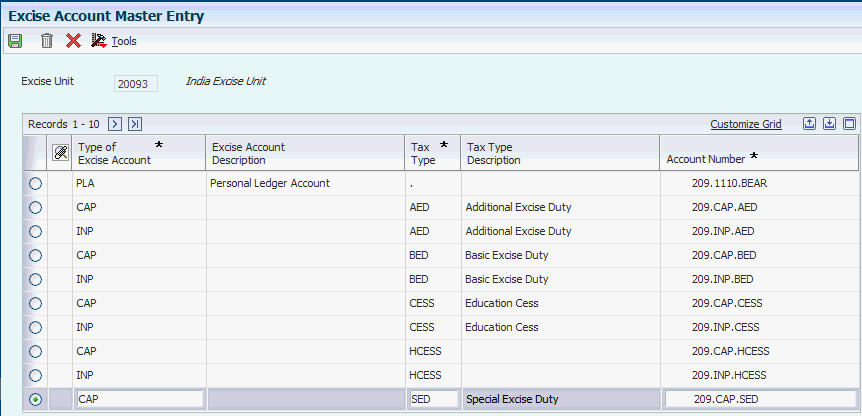
9.3.3 Entering Details for Excise Account Master
Access the Excise Account Master Entry form.
Figure 9-3 Excise Account Master Entry form
Description of ''Figure 9-3 Excise Account Master Entry form''
- Type of Excise Account
-
Enter a user-defined code from UDC table 75I/EA that specifies the type of excise account. Examples are:
All: Account for Inputs
CII: Account for Capital goods
All: Account for Inputs
PLA: Personal Ledger Account
- Tax Type
-
Enter a tax type for a tax regime, such as AED, BED, and CES.
- Account Number
-
Enter a value that identifies an account in the general ledger. The first character of the account number indicates its format. You define the account format in the General Accounting constants. Formats to enter account numbers are:
-
Standard account number, business unit.object.subsidiary format
-
Flex format
You use the Review and Revise Accounts program (P0901) to set up an account in the general ledger
-
9.4 Creating Cross-References Between Excise Units and Business Units
You use the Excise Unit Branch Plant Cross Reference program (P75I304) to create a relationship between an excise unit and a business unit. You can attach more than one business unit to an excise unit, but not at the same time. The system stores the cross-reference between business and excise units in the Excise - Cross Reference File table (F75I304).
This section discusses how to:
-
Set processing options for Excise Unit Branch Plant Cross Reference (P75I304).
-
Create a cross-reference between an excise unit and business unit.
9.4.1 Forms Used to Create Cross-References Between Excise and Business Units
| Form Name | Form ID | Navigation | Usage |
|---|---|---|---|
| Work with Cross Reference Information | W75I304A | Excise System Setup (G75IEXC4), Excise Unit Branch Plant Cross Reference | Review a list of excise unit and business unit cross-references. |
| Cross Reference Revision | W75I304B | On the Work with Cross Reference Information form, click Add. | Create a cross-reference between an excise unit and a business unit. |
9.4.2 Setting Processing Options for Excise Unit Branch Plant Cross Reference (P75I304)
Processing options enable you to specify the default processing for programs and reports.
9.4.2.1 Defaults
- Enter the search type for Excise Unit in the address book (Required)
-
Specify a user-defined code from UDC table 01/ST that specifies the type of address book record. You must specify EXU to search for excise units.
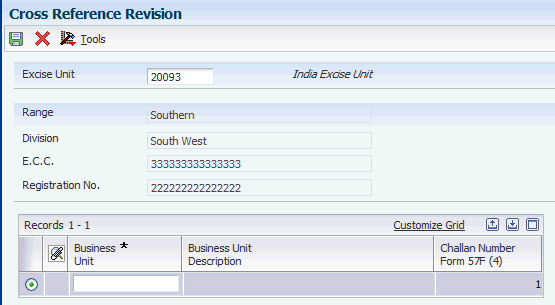
9.4.3 Creating a Cross-Reference Between an Excise Unit and a Business Unit
Access the Cross Reference Revision form.
Figure 9-4 Cross Reference Revision form
Description of ''Figure 9-4 Cross Reference Revision form''
- Business Unit
-
Enter an alphanumeric code that identifies a separate entity within a business for which you want to track costs. For example, a business unit might be a warehouse location, job, project, work center or a branch/plant.
You can assign a business unit to a document, entity, or a person for responsibility reporting. For example, the system provides reports of open accounts payable and accounts receivable by business unit to track equipment by responsible department.
Business unit security prevents you from viewing information about business units for which you have no authority.
You must use the Review and Revise Business Units program (P0006) to link a business unit to a company.
9.5 Uploading AII, CII, and PLA Opening Balances, and Next Numbers
This section provides an overview of AII, CII, and personal ledger account (PLA) opening balances, and next number upload, lists prerequisites, and discusses how to:
-
Set processing options for Upload AII/CII/PLA Open. Balance/Next No. (P75I381).
-
Enter AII, CII, and PLA opening balances and next numbers.
9.5.1 Understanding AII, CII, and PLA Opening Balance and Next Number Upload
You use the Upload AII/CII/PLA Open. Balance/Next No. program (P75I381) to enter opening balances for AII, CII, and PLA registers. You also use this program to enter next numbers for documents related to cenvat credit, export, trading items, and local export.
You enter the opening balances for excise duty, education cess, secondary higher education cess, CVD, CVD Cess, CVD HCess, special excise duty, and additional excise duty for each excise unit for the respective month and year. The system automatically calculates the total opening balances for the subsequent months for the excise unit. The system stores the opening balance, closing balance, and next number information in the Excise - MODVAT / PLA Summary table (F75I310Y) for all values, but it stores the balances of CVD Hcess in the F75I310Y - Tag File table (F75I311).
You use this program only once before the India Localization system goes live.
|
Note: If you leave the opening balance for an account blank, the system considers the opening balance as zero. |
9.5.2 Prerequisites
Before you complete the tasks in the following sections, complete these actions:
-
Create the excise unit.
-
Set up the excise unit branch plant cross-reference.
9.5.3 Forms Used To Upload AII, CII, PLA Opening Balances, and Next Numbers
| Form Name | Form ID | Navigation | Usage |
|---|---|---|---|
| Work With Excise AII/CII/PLA Opening Balance | W75I381A | Excise System Setup (G75IEXC4), Upload A2/C2/PLA Opening Balance / Next Number | Review opening balances and next numbers. |
| Upload AII/CII/PLA Opening Balance | W75I381B | On the Work With Excise AII/CII/PLA Opening Balance form, click Add. | Enter AII, CII, and PLA opening balances and next numbers. |
9.5.4 Setting Processing Options for Upload AII/CII/PLA Open Balance/Next No. (P75I381)
Processing options enable you to specify the default processing for programs and reports.
9.5.4.1 Tax Type
- Secondary Higher Education Cess
-
Specify a user-defined code from UDC table 75I/GT that identifies the tax type for the secondary higher education cess.
- CVD Higher Education Cess (Release 9.1 Update)
-
Specify a user-defined code from UDC table 75I/GT that identifies the tax type for the CVD higher education cess.
9.5.4.2 Item Type
- Raw Materials
-
Specify the item type for raw material.
- Capital Goods
-
Specify the item type for capital goods.
- Personal Ledger Account
-
Specify the item type for PLA.
9.5.5 Entering AII, CII, and PLA Opening Balances and Next Numbers
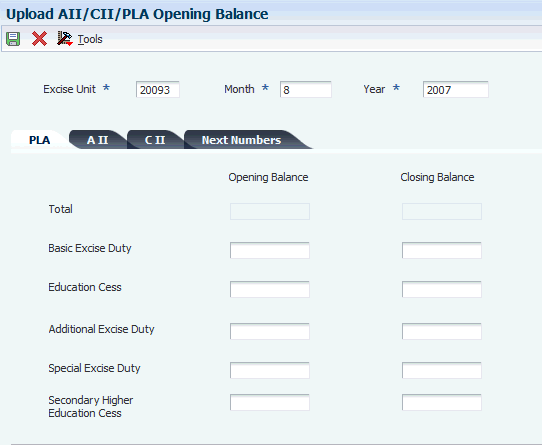
Access the Upload AII/CII/PLA Opening Balance form.
Figure 9-5 Upload AII/CII/PLA Opening Balance form
Description of ''Figure 9-5 Upload AII/CII/PLA Opening Balance form''
9.5.5.1 PLA, A II, and C II
- Basic Excise Duty: Opening Balance and Closing Balance
-
Enter the opening and closing balances for basic excise duty in the PLA, A II, or C II account.
- Education Cess: Opening Balance and Closing Balance
-
Enter the opening and closing balances for the education cess in the PLA, A II, or C II account.
- Additional Excise Duty: Opening Balance and Closing Balance
-
Enter the opening and closing balances for the additional excise duty in the PLA, A II, or C II account.
- Special Excise Duty: Opening Balance and Closing Balance
-
Enter the opening and closing balances for the special excise duty in the PLA, A II, or C II account.
- Secondary Higher Education Cess: Opening Balance and Closing Balance
-
Enter the opening and closing balances for the secondary higher education cess in the PLA, A II, or C II account.
9.5.5.2 Next Numbers
- PLA
-
Enter the next number for the PLA account.
- RG23A II
-
Enter the next number for the RG23A II register.
- RG23C II
-
Enter the next number for the RG23C II register.
- ARE 3
-
Enter the next number for the ARE 3 document.
- ARE 1
-
Enter the next number for the ARE 1 bond.
- RG23 D
-
Enter the next number for the RG23D register.
9.6 Assigning Category Codes to Item Attributes
You use the Service Tax Category Codes Mapping program (P75I009) to assign category codes to attributes of an item. You assign one category code to each item attribute and the system stores the item attributes and the associated category codes in the Item Attributes/Category Codes table (F75I009).
This section lists a prerequisite and discusses how to assign a category code to an item attribute.
9.6.1 Prerequisite
Before you perform the task in this section, define the attributes for an item.
9.6.2 Forms Used to Assign Category Codes to Item Attributes
| Form Name | Form ID | Navigation | Usage |
|---|---|---|---|
| Work with Item Attributes/Category Codes Mapping | W75I009A | System Setup (G75ISVT3), Service Tax Category Codes Mapping
Category Code Constants (G75ICAT), Item Attributes/Cat. Codes |
Review category codes assigned to item attributes. |
| Item Attributes/Category Codes Mapping | W75I009B | On the Work with Item Attributes/Category Codes Mapping form, click Add. | Assign a category code to an item attribute. |
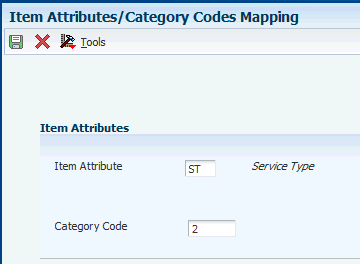
9.6.3 Assigning a Category Code to an Item Attribute
Access the Item Attributes/Category Codes Mapping form.
Figure 9-6 Item Attributes/Category Codes Mapping form
Description of ''Figure 9-6 Item Attributes/Category Codes Mapping form''
- Item Attribute
-
Enter a value from UDC table 75I/IA that identifies the attribute of an item. Values are:
CCT: Collection Code For TCS
CNC: Chapter Number Custom
CNE: Chapter Number Excise
FG: Finished Goods
IT: Item Type
ST: Service Type
- Category Code
-
Enter a category code to assign to the item attribute. You can assign a category code to only one item attribute.
9.7 Setting Up Chapter Numbers and Descriptions
This section provides an overview of chapter number setup, lists a prerequisite, and discusses how to set up chapter number details.
9.7.1 Understanding the Chapter Number Setup
You use the Chapter Number Set Up program (P75I016) to set up the chapter number values and their descriptions. You define the chapter number values for the items that are stored in the F75I009 table.
The chapter number code generation is based on the next number concept. The system generates the chapter number code for a combination of chapter number and chapter number type.
The system stores the chapter number details in the Chapter Number Set Up table (F75I016).
9.7.2 Prerequisite
Before you complete the task in this section, assign the category code to the item attribute for which you want to generate the chapter number code.
9.7.3 Forms Used to Set Up Chapter Number Details
| Form Name | Form ID | Navigation | Usage |
|---|---|---|---|
| Work With Chapter Number Set Up | W75I016A | Category Code Constants (G75ICAT), Chapter Number Set Up | Review chapter numbers and their descriptions. |
| Chapter Number Set Up | W75I016B | On the Work With Chapter Number Set Up form, click Add. | Set up chapter number details. |
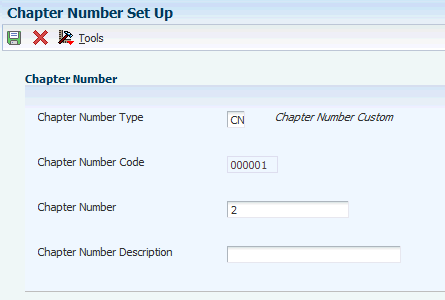
9.7.4 Setting Up Chapter Number Details
Access the Chapter Number Set Up form.
- Chapter Number Type
-
Enter a value from UDC table 75I/CT that identifies a chapter number type. Values are:
CNC: Chapter Number Custom
CNE: Chapter Number Excise
VAT: VAT item
- Chapter Number
-
Enter the chapter number for the chapter number type.
- Chapter Number Description
-
Enter a description for the item chapter.
9.8 Entering Excise Account Credit Redistribution Setup Details
You use the Excise Account Credit Redistribution Entry program (P75I3061) to set up credit accounts for various types of excise duties. The system stores the account information in the Excise Account Master - Credit Redistribution table (F75I3061).
The system retrieves information from the F75I3061 table to write the general ledger account information for the credit accounts in the F0911 table.
This section discusses how to:
-
Set processing options for Excise Account Credit Redistribution Entry (P75I3061).
-
Enter details for the excise account credit master.
9.8.1 Forms Used to Enter Excise Account Credit Redistribution Setup Details
| Form Name | Form ID | Navigation | Usage |
|---|---|---|---|
| Work With Excise Account Credit Redistribution Entry | W75I3061A | Excise System Setup (G75IEXC4), Excise Account Credit Redistribution Entry | Review a list of excise units. |
| Excise Account Credit Redistribution Entry | W75I3061B | On the Work With Excise Account Credit Redistribution Entry form, select a record and click Select. | Enter details for the excise account credit redistribution master. |
9.8.2 Setting Processing Options for Excise Account Credit Redistribution Entry (P75I3061)
Processing options enable you to specify the default processing for programs and reports.
9.8.2.1 Default
- Excise Search Type
-
Specify a user-defined code from UDC table 01/ST that specifies the type of address book record. You must specify EXU for excise units.
9.8.3 Entering Details for Excise Account Credit Master
Access the Excise Account Credit Redistribution Entry form.
- Tax Type
-
Enter a tax type for a tax regime, such as AED, BED, or CES.
- Account Number
-
Enter a value that identifies an account in the general ledger. The first character of the account number indicates its format. You define the account format in the General Accounting constants. Formats to enter account numbers are:
-
Standard account number, business unit.object.subsidiary format
-
Flex format
You use the Review and Revise Accounts program (P0901) to set up an account in the general ledger.
-
