5 Viewing Job and Billing Data
This chapter contains the following topics:
5.1 Understanding the Project Management Console Program
After you specify the job and billing data that you want to view, you can process the data to view immediately or to view later. To view data immediately, you click the View Now button on the Work with Project Management Console form. The system populates the Project Management Console Worktable (F51X10) and opens the Project Management Console form of the Project Management Console program (P51X0210).
If you chose to save your results to view later, the system populates the F51X10 table with the job and project data, and creates a record in the Project Management Results Header table (F51X30). You access the saved results using the information in the header record to identify the results that you want, and then view the results in the Project Management Console form. You must set the Allow View Later Processing processing option in the Work with Project Management Console program (P51X0200) to enable view later processing before you can save job and billing data results.
This image illustrates that you can view results now, or save results to view later in the Project Management Console form:
Figure 5-1 View Now and View Later Process Flow
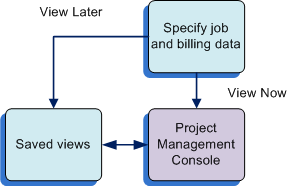
Description of "Figure 5-1 View Now and View Later Process Flow"
You use the Project Management Console form to sort, summarize, and view job and financial information. You can specify display options, and view your generated data in a chart or grid format. Note that you cannot access the Project Management Console program or form from a menu option or from the Fast Path. You can access it from the Work with Project Management Console program (P51X0200) or the Work with Project Management Console View program (P51X0310) only.
|
Note: When you process records to view in the Project Management Console form, the system includes job data from the Business Unit Master table (F0006) and includes cost and billing data for the columns that you specified in the column layout or on the Columns 1–20 and Columns 21–40 tabs on the Work with Project Management Console form. In this chapter, the term job columns refers to the columns in which the Project Management Console form displays data from the F0006 table. The term user-defined columns refers to the columns that you set up in the Project Management Console Column Definitions program (P51X90) and specified in the Work with Project Management Console form. |
The Project Management Console form includes these four subforms:
-
Options
-
Chart
-
Summary
-
Account Details
You use the subforms to specify parameters and view the job and financial data in chart and grid formats.
The Project Management Console form also enables you to access many programs related to jobs and contracts. You use options on the Form and Row menus to access related programs. The system does not reflect changes that you make in the related programs unless you reprocess your job and billing data records.
When you close the Project Management Console form, the system clears the F51X10 table unless you are viewing records that were previously saved or you select the Save Results option from the form menu. You can save the results only if view later processing is enabled. If you save the results, you can use the Work with Project Management Console View program to locate the saved records and open them in the Project Management Console form.
See Working With Saved Results.
|
Note: The Project Management Console program does not include processing options. Instead, you set processing options in the Work with Project Management Console program (P51X0200) that affect how you view or work with records on the Project Management Console form.See Setting Processing Options for Work with Project Management Console (P51X0200). |
5.1.1 Options Subform
The Options subform includes the same list of options for summarization as appears in the Work with Project Management Console form. When you first access the Project Management Console form, the system summarizes the job and project data in the Summary subform according to the value that you selected on the Work with Project Management Console form.
The value that you select in the Summarize by list determines the order in which the Project Management Console program displays the job columns. For example, if you select the Supervisor list item in the Summarize by list, the system displays the Supervisor and Supervisor Description data from the Business Unit Master table (F0006) immediately after the project number. If you summarize by a job category code, then the category code and description appear at the beginning (left side) of the grid. If you select a different list item, the system refreshes the grid to summarize the job records by the new value.
See Also Summarization.
The date options that you selected in the Work with Project Management program (P51X0200) appear on the Options tab. The date options here are for display purposes only. You cannot change the date options on the Project Management Console form.
5.1.2 Chart Subform
The chart subform includes two tabs: Display and Selection.
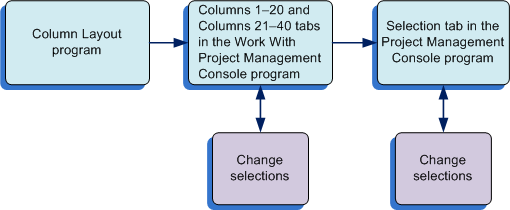
The Display tab of the Chart subform includes a graphical representation of the data in your user-defined columns. You can specify which columns to include in the graph by selecting the check boxes that correspond to the column names on these forms:
-
Column Layout form in the Project Management Console Column Layout program (P51X91).
-
Work with Project Management Console form (Columns 1–20 and Columns 21–40 tabs) in the Work with Project Management Console program (P51X0200).
-
Project Management Console form (Selection tab on the Chart subform) in the Project Management Console program (P51X0210).
The system retains your column selections from the Project Management Console Column Layout program to the Work with Project Management Console program and then to the Project Management Console program.
You can select up to 40 user-defined columns to include in your data selection, and you can display on the Display tab of the Chart subform up to 40 user-defined columns. Select or clear the check boxes next to the columns that you want to view or suppress and then click the Display tab to refresh the chart. You cannot select the check box for Visual Alert columns.
The check boxes for the columns include an orange square in the upper left corner of the check box. When you click on the square, the system opens a column information hover form that includes information such as the totaling method, whether as if currency is enabled for the column, and other factors.
See Column Information Hover Forms.
This image illustrates where you can select and modify column selections:
The system builds the chart only when one or more columns are selected in one of the programs that enable you to select the columns. The system displays the chart columns in the order in which they appear on the Columns 1–20 and Columns 21–40 tabs, which is also the order in which they appear on the Selection tab. The system displays the chart columns in system-determined colors. You cannot change the column order or the chart colors.
As you select different records in the Summary subform, the chart refreshes to show the data for the record that you selected.
You can set the Expand Chart Control Upon Entry processing option in the Work with Project Management Console program (P51X0200) to display or suppress the expansion of the Charts subform when you first access the Project Management Console form.
5.1.3 Summary Subform
The Summary subform displays both the job columns and user-defined columns. The system arranges the columns according to the value that you select in the Summarize by list and according to the order in which you specified columns on the Columns 1–20 and Columns 21–40 tabs in the Work with Project Management Console program. The columns at the beginning of the grid (left side) include the project, job, company, and business unit job columns. Then, if you summarize by an option other than project or job, the job columns that include the specified summary information appear after the project number. The user-defined columns that you specified when you processed records appear in the grid after the project, job, company, business unit, and summary job-column information. You can change your selected summary option as often as you like.
The Show Job Totals check box appears on the Summary subform when you select any summary list item except Job, Account Category Code, or Alternate Cost Code. You can set a processing option to initialize the Project Management Console form with the Show Job Totals check box selected.
Each line in the Summary subform includes a link in a description field. The value that you select in the Summarize by field on the Options subform determines which description field includes the link. For example, if you summarize by company, the Company Description field includes the link. If you summarize by a contract type, then the Contract Type Description field includes the link. Single-click on the link in a summary line to display the account details for each job for the summary line in the Account Details subform. Amounts in the Summary subform and the Account Details subform are in bold text if the amounts displayed are totals of other amounts.
If you specified to show amounts in an as if currency, the amount columns for which you enabled as if currency processing show the amounts in the as if currency. See As If Currency Processing.
The method of totaling that you assigned to the columns affects how the amounts are calculated and displayed in the Project Management Console form. See Understanding Totaling Methods.
If you included visual alert columns and a job or summary line includes an amount that triggers the visual alert, the system displays the icon associated with the threshold in the Summary subform and the Account Details subform. See Threshold Amounts and Viewing Visual Alerts.
5.1.4 Account Details Subform
When you generate the job and project records, you can select a line in the Summary subform and display account information for the summary line in the Account Details subform. The subform displays columns for the data in the Account Balances table (F0902) and Account Ledger table (F0911), and the user-defined columns that you defined when you selected the records to process. The system includes values from the F0911 table for only the AA and AU ledgers, and only if you set the date options and the G/L Posted Code option so that the system reads the F0911 table records.
See G/L Posted Code.
When the system first displays the Account Details subform, the subform includes the accounts that are associated with the first row of the Summary subform. Click on a value in the Description field for one of the lines in the Summary subform to populate the grid in the Account Details subform with all levels of detail for the record that you selected.
5.1.4.1 Links and Breadcrumbs
Some of the grid lines in the Account Details subform include blue-colored links in the Account Description field. Some grid lines do not include links and have gray-colored text. The links enable you to navigate to a lower level of detail. If the grid line does not have a link and the text appears in gray text, then no lower level of detail exists for the record.
When you click a link in the Account Description field, the grid-line display refreshes to show the next level of detail. The system also creates a new link above the grid. This link is a breadcrumb, which is a link that enables you to return to the beginning of the levels of detail, or to any other level that you have viewed. As you click links in the Account Details subform, or click a breadcrumb link, the display of records changes.
The first breadcrumb is a link to the job or project that you selected on the Summary subform. The system continues to build the bread crumb trail as you click additional links in the Account Details subform. You can continue to navigate to lower levels by clicking links in the Account Description field. You can also navigate to higher levels of detail by clicking one of the breadcrumbs. Clicking a breadcrumb refreshes the display to show the detail records for the breadcrumb-level that you select.
5.1.4.1.1 Example of Links and Breadcrumbs
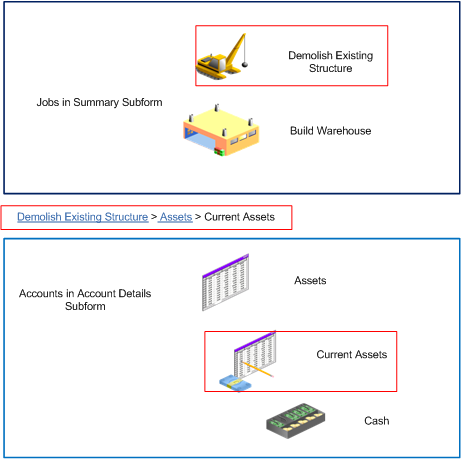
This example illustrates how the system builds the breadcrumb trail as you click links in the Summary and Account Details subforms.
Suppose that you have these jobs in the Summary subform:
-
Demolish Existing Structure
-
Build Warehouse
Suppose further that the Demolish Existing Structure job includes these accounts:
-
Assets (level of detail 3).
-
Current Assets (level of detail 4).
-
Cash (level of detail 5).
This image illustrates the jobs and accounts, and shows that the system selects the first job in the Summary subform when you first access the form. The name of the selected job appears in the breadcrumb line, but it is not an active link:
Figure 5-3 Initial View of Summary and Account Details
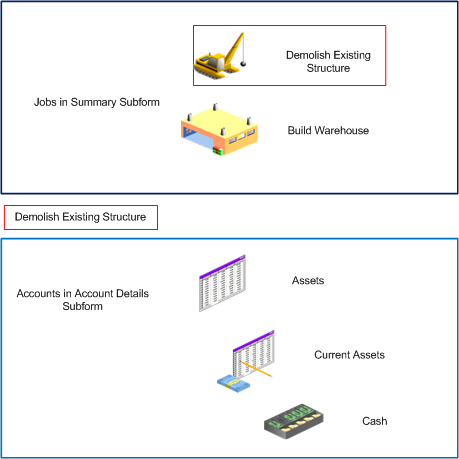
Description of "Figure 5-3 Initial View of Summary and Account Details "
If you click the link for the Assets record in the Account Details subform, the system adds a non-link breadcrumb and makes the Demolish Existing Structure text a blue link. This image illustrates the breadcrumb path:
Figure 5-4 Summary and Account Details Subforms after Selecting Assets
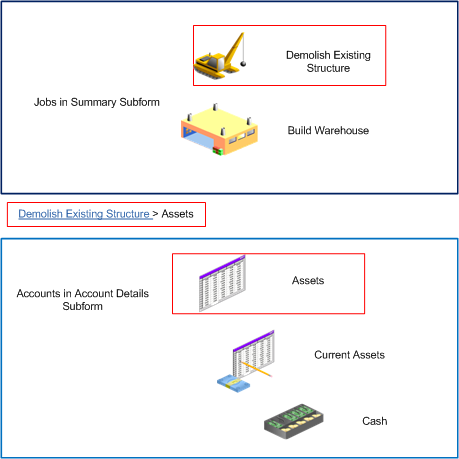
Description of "Figure 5-4 Summary and Account Details Subforms after Selecting Assets"
When you click the link for the Current Assets line, the system makes the Assets text a clickable link and adds the text for Current Assets to the breadcrumb path as shown in this image:
Figure 5-5 Summary and Account Details Subforms after Selecting Current Assets
Description of "Figure 5-5 Summary and Account Details Subforms after Selecting Current Assets"
5.1.4.2 Display Options
The Account Details subform includes check boxes that control the data displayed in the subform. The Suppress Zero Accounts check box enables you to hide or display accounts that have zero balances. The Suppress Header Accounts check box enables you to hide or display header accounts. The Display Cost Code Description check box enables you to hide or display the description associated with the cost codes.
You can set a processing option for each of these check boxes to control whether the check box is selected or cleared when you initially access the Project Management Console form.
5.1.4.3 Viewing Visual Alerts
When you include a visual alert column, the system displays the icon associated with the threshold level if an amount in the basis column triggers the visual alert. If the amount in the basis column does not meet or exceed any threshold set, then the cell in the visual alert column is blank.
In the Summary subform of the Project Management Console form, the system shows the visual alert icon (yellow circle, orange triangle, or red square) for only the highest-level threshold exceeded in the accounts associated with the job or project. The system displays the accounts associated with the job or project in the Account Details subform. For example, if you set up threshold levels for amounts that are greater than or equal to 1000 (level 1), 2000 (level 2), and 3000 (level 3), and the highest detail amount for the job is 2500, the system displays the level 2 icon (orange triangle) in the Summary subform.
In the Account Details subform, the system displays the appropriate icon for each detail record that exceeds a threshold. If you specified in the Work with Project Management Console form to use level of detail totaling, the system enables you to view each level of detail and the rolled-up (accumulated) totals for accounts. When you view the accumulated totals, the amount shown for the total includes amounts from lower level accounts. However, the system provides the icon for the alert level based on the actual account value, not on the accumulated total of the account level.
For example, suppose that you set up a visual alert column to show alerts when amounts are greater than or equal to these levels:
-
Level 1 threshold = 10,000
-
Level 2 threshold = 20,000
-
Level 3 threshold = 30,000
This tables illustrates how the system accumulates lower-level amounts into a total at a higher level of detail when the display of detail levels (LOD) is on, and the alert levels that the system applies based on the actual amounts of each account instead of on the accumulated amounts:
| Account | LOD | Actual Amount | Amount Displayed with LOD Off | Amount Displayed with LOD On | Alert Level |
|---|---|---|---|---|---|
| 1400 | 6 | 0 | 0 | 57,500 | 0 |
| 1430 | 8 | 12,000 | 12,000 | 57,500 | 1 |
| 1431 | 9 | 18,000 | 18,000 | 18.000 | 1 |
| 1432 | 9 | 27,500 | 27,500 | 27,500 | 2 |
In this example, the system assigns an alert icon based on the value in the Actual Account column, not on the accumulated amounts shown in the Amount Displayed with LOD On column. The system does not assign an alert icon to account 1400 because the actual amount in the account is 0. The system assigns the alert icon for the Level 1 Threshold for the accounts 1430 and 1431 because those amounts exceed the threshold limit of 10,000. The system assigns the icon for Level 2 Threshold to account 1432 because the amount for that account exceeds the threshold limit of 20,000.
You can select the name of a visual alert column from the Filter Alerts list in the Account Details subform of the Project Management Console form to view only the rows of a basis column that triggered an alert. If you filter by a visual alert column and no amounts meet or exceed the thresholds, then the Account Details subform shows no records. The system maintains the alert filter that you set as you select different jobs and accounts in the Summary subform and the Account Details subform. To remove the filtering action, select --Select One -- from the Filter Alert list.
5.1.4.4 Access to Additional Programs from the Account Details Subform
You can access related programs by selecting the record in the subform and then selecting a list item from the More Row Exits list, which appears on the right side of the Account Details subform. After you select the list item, you must click the arrow button.
You can select from these list items:
-
Account Ledger
The system opens the Account Ledger Inquiry program (P09200) when you select this list item.
-
Account Balance
The system opens the Account Balance by Subledger program (P092131) when you select this list item.
-
Account Progress Entry
The system opens the Account Progress Entry program (P510211) when you select this list item.
-
Performance Labor Entry
The system opens the Performance Based Labor Progress Entry program (P510312) when you select this list item.
-
Commitment Inquiry
The system opens the Commitment Inquiry program (P40230A) when you select this list item.
-
Account Inquiry
The system opens the Work with Account Change Request Inquiry program (P53220) when you select this list item.
-
Budget by Ledger Type
The system opens the Revised Budget by Ledger Type program (P51216) when you select this list item.
-
Regional info
This option functions only when the localization country code in your user profile is set to UK (United Kingdom).
-
Attachments
The system opens the Media Object Viewer when you select this list item.
5.1.5 Form and Row Menus
You can access many programs from the Summary subform on the Project Management Console form. Note that if you update a record in another program, you must reprocess records in the Work with Project Management Console program before you see the changes in the Project Management Console form.
The Project Management Console form includes three lists of menu options. The options on the Form menu open a program without populating the newly opened program with data from the Project Management Console form. The options on the Row menu open programs and populate some of the fields in the program with data from the record that you selected in the Summary subform. The options in the More Row Exits list in the Account Details subform open programs with data from the selected record in the Account Details subform.
See Access to Additional Programs from the Account Details Subform.
You set processing options to specify the versions of the program to launch when you access programs from the Form or Row menu.
You can access these programs from the Form menu on the Project Management Console form:
-
Contract Status Inquiry (P52200)
-
Billing Workfile Revisions (P4812)
-
Billing Detail History (P4812H)
-
Work with Time Entry (P051121)
-
Parent Work Order Inquiry (P48220)
You can access these programs from the Row menu after you select a record in the Summary subform:
-
Work w/ Contract Detail (P4310)
-
Work with Change Requests (P5310)
-
Work Order Cost by Job (P48210)
-
Scheduling Workbench (P48201)
-
Work with Profit Recognition (P5144)
-
Original Budget (P510121)
-
Budget Revisions (P510171)
-
Job Progress Entry (P510212)
5.2 Viewing Job and Billing Data
This section provides an overview of generated and saved records, lists prerequisites, and discusses how to:
-
View jobs and financial data for jobs.
-
Filter records by visual alerts.
-
Identify columns to include in the chart.
5.2.1 Understanding Generated and Saved Records
You can generate results to view now or to view later. When you click the View Now button on the Work with Project Management Console form, the system validates the data selection, calculates values, and displays the results in the Project Management Console form of the Project Management Console program (P51X0210). When you exit the Project Management Console form, the system does not save the results. You can, however, select to save the results that you viewed, and can generate records that the system saves for later viewing instead of immediately displaying them in the Project Management Console form.
You can use the following methods to save results to view later:
-
Complete the data selection on the Work with Project Management Console form, click the View Now button to display the records in the Project Management Console form, and then use the Save Results option on the Form menu to save the results that you viewed.
The system includes the Save Results option on the Form menu only when view later processing is enabled.
-
Specify job selection data in the Work with Project Management Console form and then click the View Later button.
The system includes the View Later button on the Work with Project Management Console form only when view later processing is enabled.
-
Run the Submit Project Management View program (R51X0300).
When you run the Submit Project Management View program, the system uses processing options and Data Selection to identify records to process instead of using the data that you specify on the Work with Project Management Console form.
For all saved results, the system saves the results to the F51X10 table and creates a record in the Project Management Results Header table (F51X30). You use the Work with Project Management Console View program (P51X0310) to locate the saved records and open the saved results in the Project Management Console form.
5.2.2 Prerequisites
Before you complete the tasks in this section, you must specify the columns, sequencing, date range, and other parameters that determine the data selection for the Project Management Console program.
5.2.3 Viewing Jobs and Financial Data for Jobs
To view job and financial data:
-
Access the Project Management Console form.
Form Name Form ID Navigation Project Management Console W51X0210A Use one of these navigations: -
In-Memory Project Portfolio Mgmt (G5114).
Work with Project Management Console (P51X0200).
Specify the data selection criteria, and then click View Now on the Work with Project Management Console form.
-
In-Memory Project Portfolio Mgmt (G5114).
Work with Project Management View (P51X0310).
Select the record to view and click Select, or click the link for the record in the View ID field.
Figure 5-6 Project Management Console form: Summary subform
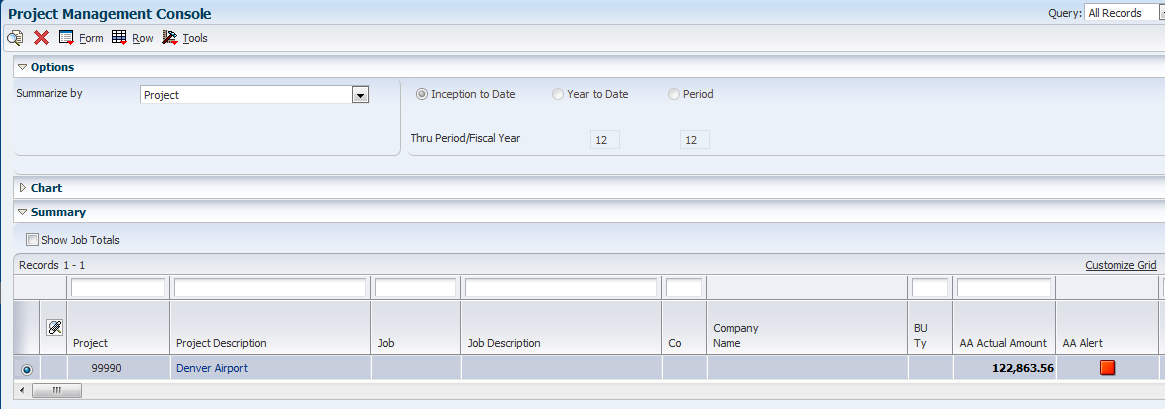
Description of "Figure 5-6 Project Management Console form: Summary subform"
-
-
(Optional) On the Options subform, select a list item from the Summarize by list.
You specified a Summarize by list item on the Work with Project Management Console form. You do not need to select a different option on the Options subform unless you want to summarize by a different list item. You can resummarize by different options as often as you choose.
The grid in the Summary subform includes the summary lines for jobs that met the parameters that you specified on the Work with Project Management Console form.
-
(Optional) On the Summary subform, select or clear the Show Job Totals check box to show or suppress job total summary lines.
The Show Job Totals check box does not appear if you selected Job in the Summarize by list on the Options subform. If you summarize by job, the Summary subform includes job totals.
-
Select a summary line on the Summary subform.
The system displays the account details in the Account Details subform for the summary line you select and refreshes the chart.
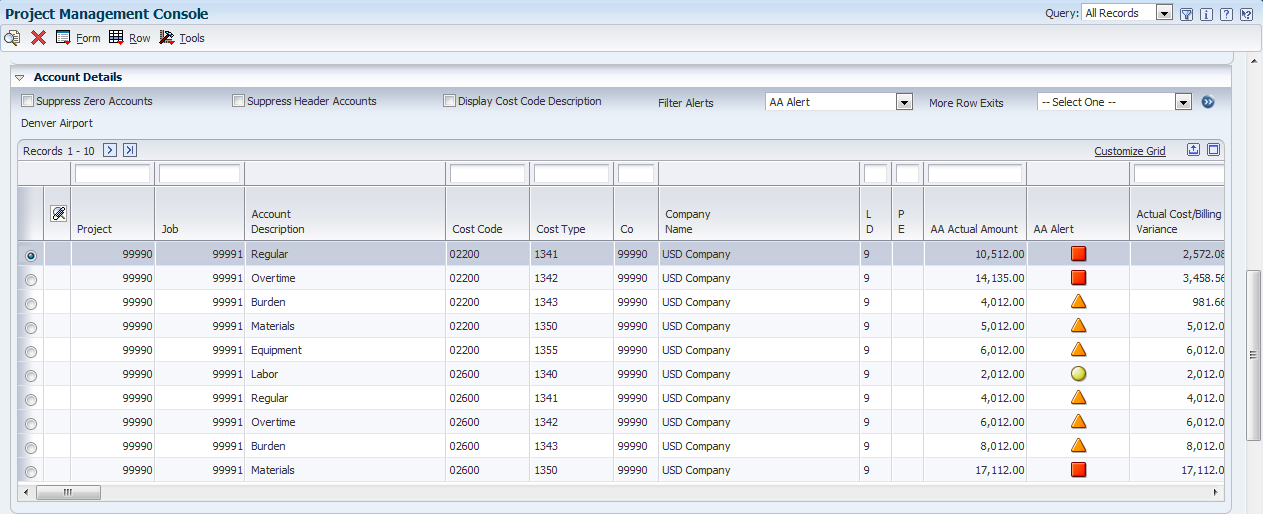
Figure 5-7 Project Management Console form: Account Details subform

Description of "Figure 5-7 Project Management Console form: Account Details subform"
-
Select or clear these options on the Account Details subform to show or hide information:
-
Suppress Zero Accounts
-
Suppress Header Accounts
-
Display Cost Code Description
-
-
Click a link in the Account Description field for an account in the Account Details subform to refresh the display to show a lower level of account detail.
You can sort the results in the Account Description subform by column rows with visual alert icons. See Filtering Records by Visual Alerts.
-
(Optional) Expand the Chart subform to view the columns in a chart format.
Figure 5-8 Project Management Console form: Chart subform
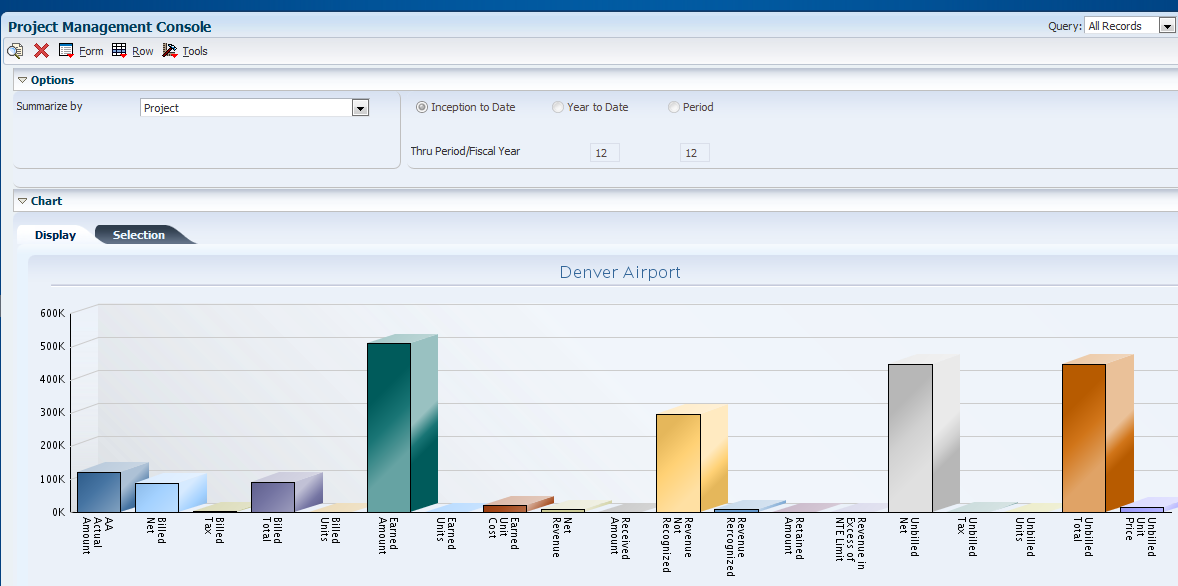
Description of "Figure 5-8 Project Management Console form: Chart subform"
You use the check boxes on the Selection tab of the Chart subform to select the columns to display on the Display tab of the Chart subform. See Identifying Columns to Include in the Chart.
-
When you finish reviewing the results, click Close to exit without saving records, or, if view later processing is enabled, select Save Results from the Form menu to save the results.
5.2.4 Filtering Records by Visual Alerts
To filter records by visual alerts:
-
Access the Project Management Console form.
Form Name Form ID Navigation Project Management Console W51X0210A Use one of these navigations: -
In-Memory Project Portfolio Mgmt (G5114).
Work with Project Management Console (P51X0200).
Specify the data selection criteria, and then click View Now on the Work with Project Management Console form.
-
In-Memory Project Portfolio Mgmt (G5114).
Work with Project Management View (P51X0310).
Select the record to view and click Select, or click the link for the record in the View ID field.
-
-
In the Account Details subform, select an alert column name from the Filter Alerts list.
The system displays only the rows for which an alert appears in the selected alert column.
Figure 5-9 Project Management Console form: Visual Alert sort
Description of "Figure 5-9 Project Management Console form: Visual Alert sort"
-
Select --Select One-- from the Filter Alert to clear the sort by alert filter.
5.2.5 Identifying Columns to Include in the Chart
To identify the columns to include in the chart:
-
Access the Project Management Console form.
Form Name Form ID Navigation Project Management Console W51X0210A Use one of these navigations: -
In-Memory Project Portfolio Mgmt (G5114).
Work with Project Management Console (P51X0200).
Specify the data selection criteria, and then click View Now on the Work with Project Management Console form.
-
In-Memory Project Portfolio Mgmt (G5114).
Work with Project Management View (P51X0310).
Select the record to view and click Select, or click the link for the record in the View ID field.
-
-
Expand the Chart subform.
-
Select the Selection tab.
Figure 5-10 Project Management Console form: Selection tab
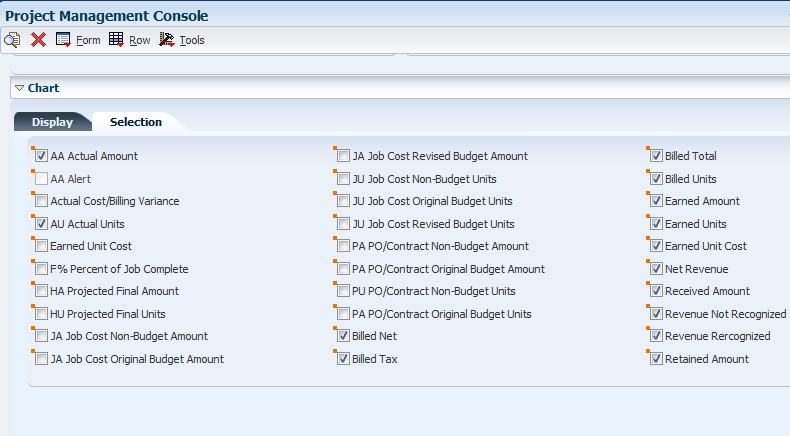
Description of "Figure 5-10 Project Management Console form: Selection tab"
-
Select the check box next to each column that you want to include the column in the chart.
You can click the orange square in the upper left corner of the check boxes to view information about the column.
You cannot include visual alert columns in the chart.
-
Click the Display tab.
The system shows the columns that you selected in a bar chart.