33 Employee Time Entry Mobile Application (Release 9.1 update)
This chapter discusses these topics:
-
Section 33.1, "Employee Time Entry Mobile Applications Overview"
-
Section 33.2, "Setting Up the Employee Time Entry Mobile Applications"
-
Section 33.3, "Using the Employee Time Entry Mobile Tablet Application (M0511213)"
-
Section 33.4, "Using the Employee Time Entry Mobile Smartphone Application (M0511214)"
|
Important Note: Before using the mobile application, Oracle strongly recommends that users have a complete understanding of how to use the associated processes and applications in the JD Edwards EnterpriseOne base software.For additional information about the processes and applications associated with the mobile applications discussed in this chapter, see: Entering Timecards for Employees in the JD Edwards EnterpriseOne Applications Time and Labor Implementation Guide. Setting Up Self-Service Time Entry in the JD Edwards EnterpriseOne Human Capital Management Self-Service Implementation Guide. |
33.1 Employee Time Entry Mobile Applications Overview
You use the Employee Time Entry mobile applications to allow employees to enter, review, update, and submit timecards. The tablet and smartphone applications enable you to enter timecards using these entry methods:
-
You can view a list of pay periods. You can select a pay period and enter a new timecard.
-
You can review any existing timecard. You can update timecards that are saved or rejected. You cannot update timecards that are approved or submitted for approval.
-
You can copy any timecard from a historical pay period.
This table lists the applications that are available to review and update existing employee timecards, and to enter new timecards:
| Type of Application | Additional Information |
|---|---|
| Base EnterpriseOne application | To update existing timecards and to enter new timecards, use these applications in the JD Edwards EnterpriseOne system:
|
| Tablet application | Employee Time Entry (M0511213)
To download the application to your tablet, search on the following text in the application store:
|
| Smartphone application | Employee Time Entry (M0511214)
To download the application to your device, search on the following text in the application store:
|
Before using the Employee Time Entry tablet application, you must set up the versions and processing options for the following programs. You then specify, in the processing options for the mobile tablet application, the versions that you have set up to process timecard data on the mobile devices.
-
Time Entry Self-Service Director program (P051125)
-
Employee Organizational Assignments program (P0801ORG)
-
Employee Basic Compensation program (P0801CMP)
33.1.1 Differences and Limitations: Employee Time Entry
Mobile applications are intended to be a simplified version of the applications that are available in the base software. In most cases, these applications provide a subset of the functionality available in the base software.
While the Employee Time Entry mobile application does not function differently than base EnterpriseOne applications, it does offer the mobile user a subset of time entry information.
33.2 Setting Up the Employee Time Entry Mobile Applications
Before using the Employee Time Entry mobile applications, verify that the processing options for each application are set correctly. The processing options for both the tablet and smartphone applications specify which versions of the base EnterpriseOne applications the mobile applications use.
The system administrator must set the processing options for the mobile application before the application is made available to end users.
See ”Setting Processing Options for Time Entry Self Service Director program (P051125)” in the JD Edwards EnterpriseOne Applications Human Capital Management Self-Service Implementation Guide.
33.2.1 Setting Processing Options for the Employee Time Entry Mobile Tablet Application (M0511213)
You use processing options to specify default processing information for a program.
33.2.1.1 Versions
- 1. Time Entry Self Service Director (P051125) Version
-
Use this processing option to specify the version of the Time Entry Self Service Director program (P051125) the system uses to run the Employee Time Entry mobile tablet application (M0511213). If you leave this processing option blank, the system uses version ZJDE0001.
- 2. Employee Organizational Assignments (P0801ORG) Version
-
Use this processing option to specify the version of the Employee Organizational Assignments program (P0801ORG) the system uses to run the Employee Time Entry mobile tablet application (M0511213). If you leave this processing option blank, the system uses version ZJDE0001.
- 3. Employee Basic Compensation (P0801CMP) Version
-
Use this processing option to specify the version of the Employee Basic Compensation program (P0801CMP) the system uses to run the Employee Time Entry mobile tablet application (M0511213). If you leave this processing option blank, the system uses version ZJDE0001.
33.2.2 Setting Processing Options for the Employee Time Entry Mobile Smartphone Application (M0511214)
You use processing options to specify default processing information for a program.
33.2.2.1 Versions
- 1. Time Entry Self Service Director (P051125) Version
-
Use this processing option to specify the version of the Time Entry Self Service Director program (P051125) the system uses to run the Employee Time Entry mobile smartphone application (M0511214). If you leave this processing option blank, the system uses version ZJDE0001.
- 2. Employee Organizational Assignments (P0801ORG) Version
-
Use this processing option to specify the version of the Employee Organizational Assignments program (P0801ORG) the system uses to run the Employee Time Entry mobile smartphone application (M0511214). If you leave this processing option blank, the system uses version ZJDE0001.
- 3. Employee Basic Compensation (P0801CMP) Version
-
Use this processing option to specify the version of the Employee Basic Compensation program (P0801CMP) the system uses to run the Employee Time Entry mobile smartphone application (M0511214). If you leave this processing option blank, the system uses version ZJDE0001.
33.3 Using the Employee Time Entry Mobile Tablet Application (M0511213)
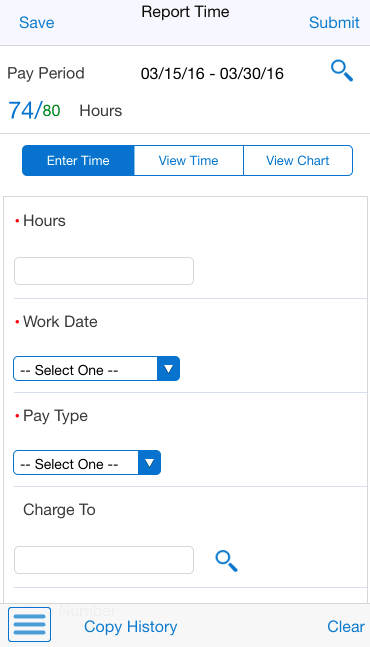
The Employee Time Entry tablet application enables you to enter, review, update, and submit timecards for a selected pay period.
Before you can use the application, you must download the application from the application store, and install it on your device.
To open the application, tap the Employee Time Entry icon and log in.
33.3.1 Entering Timecards Using the Mobile Tablet Application
To enter timecards:
-
Open the application by tapping the icon on your device, and then log in.
See Chapter 3, "Logging Into Mobile Enterprise Applications."
-
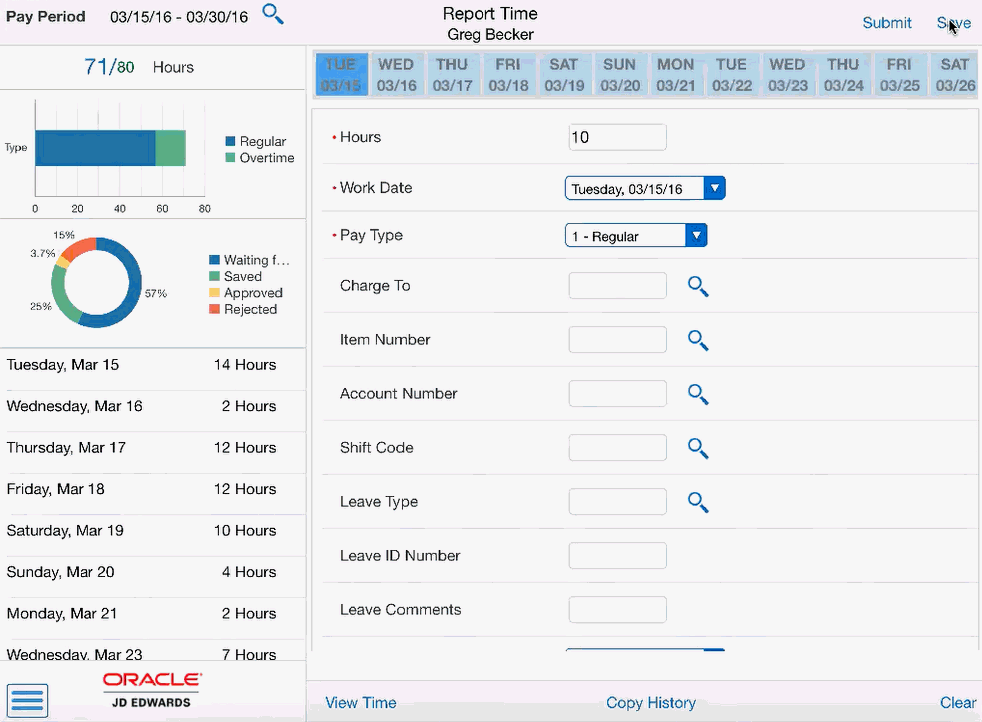
The Employee Time Entry home screen appears, and by default, it displays the current Pay Period on the left side as defined in the Time Entry Self-Service Director program (P051125). You can also tap the Search button to search and select a different pay period to enter your timecard.
-
The Pay Period is followed by Hours that displays the hours you have entered out of the total hours for the mentioned pay period.
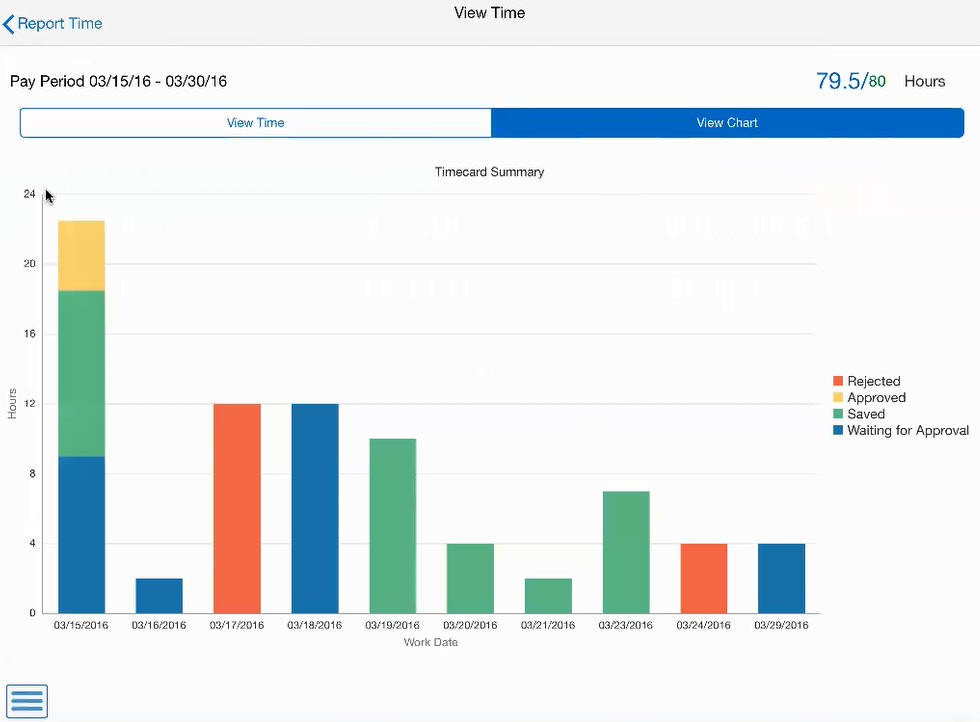
Note that the hours are also graphically displayed with hours entered in the mentioned pay period by type. Tap on each bar to get more information as a pop-up box.
The graph is followed by a pie chart that displays the percentage of hours entered in the mentioned pay period by status. Tap on each section to get more information as a pop-up box.
The left side of the screen also displays a summarized list of hours you have entered in the mentioned pay period by each day. You can select any day to view the timecard.
-
You can enter a new timecard on the right side of the screen. The top of the screen displays each day of the mentioned pay period as a Calender. You can select any day from the Calender or you can tap Work Date and select any day from the drop-down menu to enter a new timecard.
-
Complete the time entry fields on the timecard; the following time entry fields are mandatory to enter details:
-
Work Date
-
Hours
-
Pay Type
Note:
The time entry fields displayed on the screen are set and sequenced in the Employee Self-Service Time Entry Setup program (P051123) by the system administrator. -
-
After you complete entering the data in the time entry fields on the timecard, tap one of these options:
-
Clear
Tap this option if you want to clear the values on the timecard without saving it.
-
Save
Tap this option if you want to save the timecard, but do not yet want to submit it.
-
Submit
Tap this option if you want to save and submit the timecard for approval.
-
-
To enter additional timecards for the pay period, repeat steps 2 through 4 in this task.
You can also add a timecard from the View Time screen:
-
Tap the View Time button at the bottom left of the Report Time screen to open it.
-
Tap the Add icon on the top right of the View Time screen.
-
Complete the time entry fields on the timecard.
-
Tap either the Save or the Submit button.
-
33.3.2 Reviewing, Editing, and Submitting Timecards Using the Mobile Tablet Application
-
Open the application by tapping the icon on your device, and then log in.
See Chapter 3, "Logging Into Mobile Enterprise Applications."
The Employee Time Entry home screen appears, and by default, displays the summarized list of hours you have entered each day during the current pay period.
-
You can tap on any record in the summarized list to review the timecards you have entered on the particular day within the pay period.
-
Alternatively, to view the details of all timecards that have been entered for the entire pay period, tap the View Time button at the bottom left of the screen.
-
On the View Time screen, review the list of all timecards for the pay period. You can tap the arrow on the right side of the record to display additional details.
-
You can edit a timecard that have the following status:
-
Saved
-
Rejected
To edit a timecard, swipe the record to the left side and tap the Edit button. You can make changes, and then tap either the Save or the Submit button.
If the timecard is at a status that does not allow you to update it, the Edit button does not appear when you swipe the record towards the left side. You can tap on the View button to view the timecard. The fields are read-only, and the timecard cannot be changed.
-
-
To select timecards for submission, tap the circle on the left side of the records you want to select, or tap the Select All button. After selecting one or more timecards, tap the Submit button at the top right of the screen. The Submit button appears only after you have selected one or more timecards. Tap the Clear All button to clear your selection.
-
To delete timecards, swipe the record towards the left side and tap the Delete button.
-
You can copy an existing timecard. To copy an existing timecard within the current pay period, swipe the record towards the left side and tap the Copy button. You can make changes, and then tap either the Save or the Submit button.
You can also copy a timecard from a historical pay period.
-
On the Report Time screen, tap the Copy History button at the bottom. The Copy History screen opens.
-
Tap the Search button next to Pay Period End Date to search and select your pay period. The list of timecards for the selected pay period is displayed.
-
Tap the Copy button on the right side of a record to copy the existing timecard.
-
You can make changes, and then tap either the Save or the Submit button. The new timecard is saved or submitted within the current pay period.
-
-
To view a summary chart of the timecards in the pay period, tap the View Chart tab on the View Time screen.
33.4 Using the Employee Time Entry Mobile Smartphone Application (M0511214)
The Employee Time Entry smartphone application enables you to enter, review, update, and submit timecards for a selected pay period.
Before you can use the application, you must download the application from the application store, and install it on your device.
To open the application, tap the Employee Time Entry icon and log in.
33.4.1 Entering Timecards Using the Mobile Smartphone Application
To enter timecards:
-
Open the application by tapping the icon on your device, and then log in.
See Section 3, "Logging Into Mobile Enterprise Applications"
-
The Employee Time Entry home screen appears, and by default, it displays the current Pay Period as defined in the Time Entry Self-Service Director program (P051125). You can also tap the Search button to search and select a different pay period to enter your timecard.
The Pay Period is followed by Hours that displays the hours you have entered out of the total hours for the mentioned pay period.
-
You can enter a new timecard. The Employee Time Entry home screen displays the Enter Time tab by default. You can tap Work Date and select any day from the drop-down menu to enter a new timecard.
-
Complete the time entry fields on the timecard; the following time entry fields are mandatory to enter details:
-
Work Date
-
Hours
-
Pay Type
Note:
The time entry fields displayed on the screen are set and sequenced in the Employee Self-Service Time Entry Setup program (P051123) by the system administrator. -
-
After you complete entering the data in the time entry fields on the timecard, tap one of these options:
-
Clear
Tap this option at the bottom right if you want to clear the values on the timecard without saving it.
-
Save
Tap this option at the top left if you want to save the timecard, but do not yet want to submit it.
-
Submit
Tap this option at the top right if you want to save and submit the timecard for approval.
-
-
To enter additional timecards for the pay period, repeat steps 2 through 4 in this task.
33.4.2 Reviewing, Editing, and Submitting Timecards Using the Mobile Smartphone Application
-
Open the application by tapping the icon on your device, and then log in.
See Section 3, "Logging Into Mobile Enterprise Applications"
-
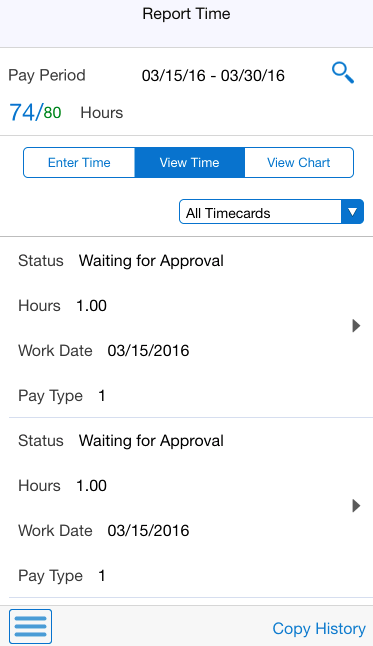
To view the details of all timecards that have been entered for the entire pay period, tap the View Time tab.
-
On the View Time screen, review the list of all timecards for the pay period. You can tap the arrow on the right side of the record to display additional details.
-
You can edit a timecard that have the following status:
-
Saved
-
Rejected
To edit a timecard, swipe the record to the left side and tap the Edit button. You can make changes, and then tap either the Save or the Submit button.
If the timecard is at a status that does not allow you to update it, the Edit button does not appear when you swipe the record towards the left side. You can tap on the View button to view the timecard. The fields are read-only, and the timecard cannot be changed.
-
-
To delete timecards, swipe the record towards the left side and tap the Delete button.
-
You can copy an existing timecard. To copy an existing timecard within the current pay period, swipe the record towards the left side and tap the Copy button. You can make changes, and then tap either the Save or the Submit button.
You can also copy a timecard from a historical pay period.
-
On the Enter Time screen, tap the Copy History button at the bottom. The Copy History screen opens.
-
Tap the Search button next to Pay Period End Date to search and select your pay period. The list of timecards for the selected pay period is displayed.
-
Tap the Copy button on the right side of a record to copy the existing timecard.
-
You can make changes, and then tap either the Save or the Submit button. The new timecard is saved or submitted within the current pay period.
-
-
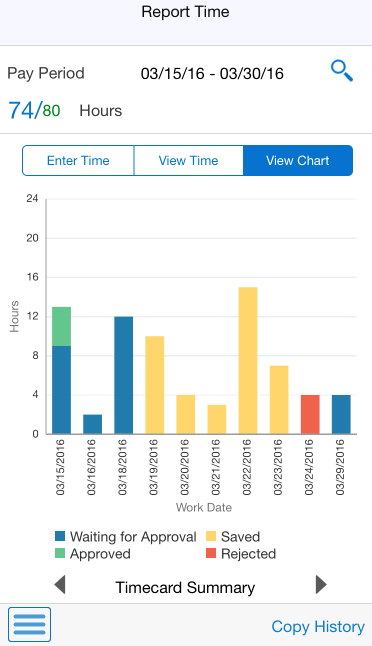
To view a summary chart of the timecards in the pay period, tap the View Chart tab on the View Time screen.
You can tap the View Chart tab to view the following charts:
-
Timecard Summary
A summary chart of the timecards in the pay period with different status.
-
Hours by Status
A pie chart that displays the percentage of hours entered in the pay period by status. Tap on each section to get more information as a pop-up box.
-
Hours by Type
A graph that displays hours entered in the pay period by type. Tap on each bar to get more information as a pop-up box.
-