32 Customizing the Self-Care Manager Interface
This chapter introduces the Oracle Communications Billing and Revenue Management (BRM) Self-Care Manager architecture and provides information on how to customize Self-Care Manager.
For basic information about Self-Care Manager, including configuration, see "About Self-Care Manager" in BRM Managing Customers.
To customize Self-Care Manager using Customer Center SDK, you should have:
-
Knowledge of the BRM architecture, Portal Communication Module (PCM) opcodes, flists (field lists), and storable classes. For more information, see:
-
Knowledge of the Java PCM Application Programming Interface (API)
-
Knowledge of the model-view-controller (MVC) architecture
See "Understanding the BRM Business Application SDK Framework".
-
Knowledge of how Customer Self-Care is set up and used with Self-Care Manager
See "Setting up Customer Self Care With Self-Care Manager" in BRM Managing Customers.
-
Experience in building Java applications and servlets
-
Experience writing HTML
For installation instructions and for information on the contents of Customer Center SDK, see "Contents of Customer Center SDK".
About Customizing Self-Care Manager
You can customize Self-Care Manager:
-
By editing the HTML code in the Java Server pages (JSPs) or the Infranet_general.css file to change the appearance of the page.
See "Changing Web Pages" in BRM Managing Customers.
-
By editing the Java Server pages (JSPs) to change the layout of the interface and to remove elements included in the JSPs.
See "Editing JSPs" in BRM Managing Customers.
-
By editing the JSPs to use a different set of components or by adding new JSPs.
-
By creating new components and modifying existing components to extend the functionality of Self-Care Manager.
See "Extending the Functionality of Self-Care Manager".
Important:
Self-Care Manager files must be used for reference only. When you customize Self-Care Manager, you must implement security that prevents unauthorized access to the BRM system.
Hardware and Software
You require the following hardware and software to develop and test components for Self-Care Manager:
-
Customer Center SDK
For information on installing Customer Center SDK, see "Contents of Customer Center SDK".
-
Java Development Kit.
-
An application server that supports Servlet API and JSP.
About the BAS Architecture
Self-Care Manager uses the Business Application SDK (BAS) framework. This architecture supports the model view controller (MVC) paradigm. See "Understanding the BRM Business Application SDK Framework".
Understanding Self-Care Manager Components
This section describes the components and objects used by Self-Care Manager and how you use them to customize the Self-Care Manager interface.
Self-Care Manager Components
Self-Care Manager consists of:
-
JSPs and servlets, which act as view components.
-
Business logic (BAS) beans that act as controller components.
-
The BAS framework, which handles connections to BRM and caches BRM data accessed by multiple components. See "Understanding the BRM Business Application SDK Framework".
About PInfranetServlet
PInfranetServlet is the main servlet which initializes BAS. It is a generic servlet that loads WebKit.properties and sets PPooledConnectionClientServices as the BAS client service. The BAS Connection Pooling Service tracks the connections in the pool. (These connections are shared by all Self-Care Manager users.) It also sets the start directories and the start page based on its configuration with the servlet engine.
PInfranetServlet servlet:
-
Sets up a new connection to Connection Manager (CM) for new sessions by performing an explicit login on the BAS client service based on the properties defined in the WebKit.properties file. The connection is saved and used throughout the session and is only removed when the session is invalidated.
Most components that the user interacts with use this connection. The exceptions are CreateFormPage1.jsp and CreateFormPage2.jsp. These components set up their own connections.
Note:
The CreateFormPage1.jsp and CreateFormPage2.jsp. These jsps are used to create an account and account creation is not supported in this release. It continues to be supported in the previous releases.-
Handles the user login component, validates the user, and saves this user's account model handle.
The account model handle and connection are used by the other components that display account and product information, allow account modification, and so on. For more information on the account model handle, see "About PModelHandle".
Using PInfranetServlet to Process Requests
To process requests using PInfranetServlet, you might need to specify the following in the HTML/JSP pages:
-
Specify "page=<page_to_be_loaded_next>" to forward the request to the page after creating the controller.
-
Specify Component=<Class> to:
-
Call BAS to create the controller.
-
Call the setters to set input data.
-
Call the public methods with either HttpSession or PModelHandle and ResourceBundle as arguments.
Important:
The ResourceBundle is a deprecated parameter and should not be used in the business logic of the controller.
-
-
(Optional) Specify sessionstate=start to create a new session:
-
It creates a data structure to be passed to BAS with the character set and pricing plan information. The character set is based on the browser and is used to display invoices. The pricing plan is defined inWebKit.properties to retrieve the plans list.
-
It calls registerApp with the program name, locale, and the data structure created in the earlier step.
-
-
(Optional) Specify sessionState=end to invalidate the session.
Note:
You can use either sessionState=start or sessionState=end. -
(Optional) Specify validateBean=<Class> to create the class and call the setters and the validate method for validation before calling the controller. If the validation fails, a RemoteException is thrown; otherwise, it sets the input data of the controller and calls the public methods. For example, specify the following in invoice_selection.jsp to use DateValidator to validate the user entered dates:
<INPUT Type="hidden" Name="validateBean" Value="com.portal.web.fmt.DateValidator">
Example Data Flow Designs
This section describes three example designs for communication between the servlet and controller that you can implement in your Self-Care Manager customizations. Information on how to choose the appropriate design from the samples is described in "Designing a Component".
Note:
These designs are examples. You can implement other designs according to your business needs.Figure 32-1 summarizes the three example design architectures:
Figure 32-1 Example Design Architectures Summary
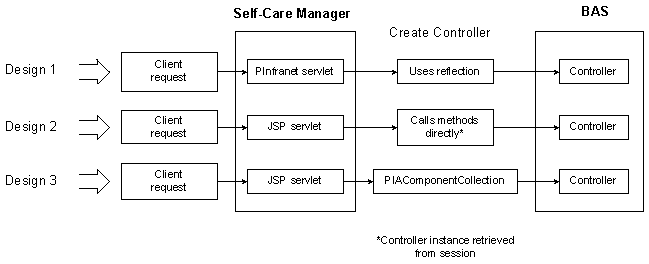
Description of ''Figure 32-1 Example Design Architectures Summary''
-
When a client requests information, an HTTP request is sent to the application server and is processed by a servlet engine.
-
The servlet engine sends a request to the appropriate JSP servlet as specified in the request.
For example, this request is sent to the change_acct_form JSP servlet:
<FORM Action="change_acct_form.jsp" Method="post">This request is sent to PInfranetServlet:
response.encodeURL ("PInfranetServlet?page=change_status_form&Component=com.portal.web.comp.PServicesBeanImpl&loadBean=yes")Note:
Do not include the servlet path in the request.The HTTP request arrives at the application server and is dispatched to the appropriate servlet. Then one of three possible designs is followed:
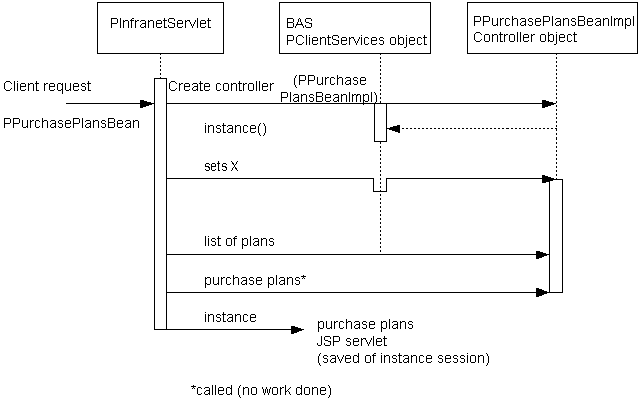
Design 1
In Design 1, communication between the servlet and the controller occurs using introspection:
-
The request is received by the main servlet, PInfranetServlet.
This is a generic servlet that performs some common Self-Care Manager tasks.
-
PInfranetServlet collects all the input data and creates the BAS controller beans specified in the "component" hidden variable.
-
The servlet uses introspection to call all the setters to set the input data properties for this bean (if any) and to call all public methods.
-
The JSP servlet then forwards this bean instance to the JSP specified in the page hidden variable.
-
The JSP servlet loads the data from the bean and returns the HTML output to the browser.
In some cases, this bean is saved in the session for use in later requests.
This Design 1 example UML sequence diagram in Figure 32-2 shows the data flow for displaying the plans available for purchase:
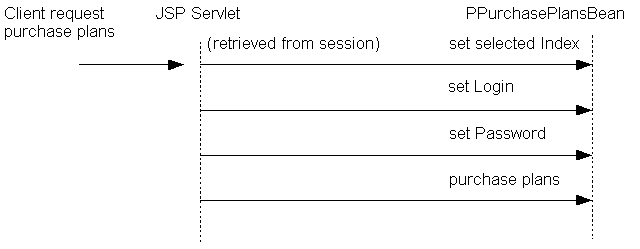
Design 2
In Design 2, communication between the servlet and the controller occurs by calling methods directly:
-
The request is received by a specific JSP servlet.
-
If the controller bean associated with this JSP servlet does not exist, one is created to perform the necessary operation(s).
-
If the bean exists, the servlet uses the bean saved in session.
-
-
The servlet:
-
Collects all the input data.
-
Uses the bean saved in the session to set the input data properties of this bean.
-
Calls the methods directly to perform the necessary operation for data.
-
Returns the HTML output to the browser.
-
This Design 2 example UML sequence diagram in Figure 32-3 shows the data flow for purchasing the plan that the user selected:
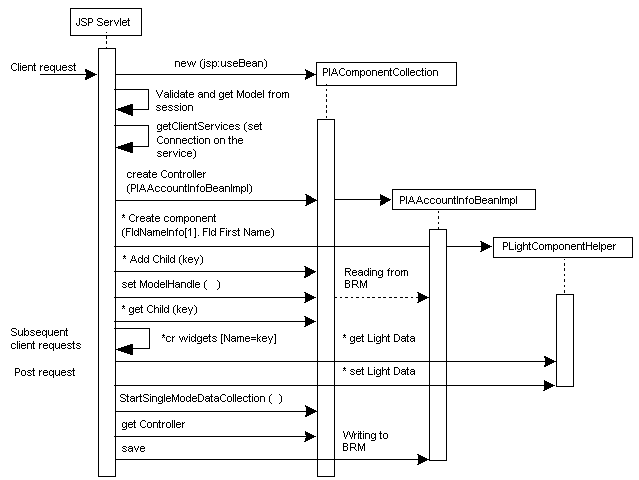
Design 3
In Design 3, communication between the servlet and the controller occurs through PIAComponentCollection:
-
The request is received by a specific JSP servlet.
In this design, the bean is not the controller, but is a component collection bean, that is, an instance of PIAComponentCollection.
-
The createController() method is called on the component collection bean to specify the controller bean that should be delegated to perform the necessary operation.
-
The lightweight components are added to the collection to specify the fields that should be retrieved from the database.
For more information on lightweight components, see "About Lightweight Components (Self-Care Manager Only)".
-
It calls setModelHandle() on the component collection bean instance to retrieve the data of the model from the database.
Data can be displayed using the getLightData() method.
-
This JSP servlet collects any data needed and calls the setLightData() method on each of the lightweight components to set the input data properties.
-
To save data to the database, the servlet calls the methods of the controller bean directly to perform the necessary operation and then returns the HTML output to the browser.
This Design 3 example UML sequence diagram in Figure 32-4 shows the data flow for displaying account information. It is an example of a customizable JSP, where you can add or remove new account fields to be displayed to the user:
Extending the Functionality of Self-Care Manager
All Self-Care Manager components follow the model view controller (MVC) paradigm. A component in Self-Care Manager includes the controller, which contains the logic of the component, and the view, which handles the display of data on the UI. The view in Self-Care Manager is HTML/JSP. When you create a component for a Customer Care application by using the SDK, you need to create the view of the data and the controller that determines the behavior and display of the data.
Self-Care Manager includes a set of components that provide the basic functionality for customer self-care. All the properties that the default beans support are included in the JSPs.
You can extend the functionality of Self-Care Manager to collect additional information from customer accounts or to provide customers with additional options. For more information, see:
-
Note:
The controllers used in Self-Care Manager have getters and setters; that is, they are true beans.
Adding Fields
You add fields by adding to the component collection using the ServletUtil.addComponent(…), which is a wrapper for the BAS API to add a lightweight component to the collection. In addition to the collection bean object, this method requires the name of this lightweight component, the model field description, and the display field description for updating and retrieving the data to and from BRM.
The name of the lightweight component is the same as specified for the UI field; that is, for firstname if the UI field specification is:
<INPUT Name="firstname" Value="<%=fname%>" Size="21" Tabindex="2">
Then the name passed to addComponent is the value of NAME, that is, firstname.
The model field description is FldNameinfo[1].FldFirstName. In this case, the display field description is the same "FldNameinfo[1].FldFirstName". However, for the credit card number, the model field description is FldPayinfo[1].FldInheritedInfo[0].FldCcInfo[0].FldDebitNum and the display field description is FldPayinfoObj.FldCcInfo[0].FldDebitNum.
Note:
When the collection is saved in the session, you can retrieve the lightweight components from the collection by using getChild().-
Retrieve the lightweight component data by using getLightData().
-
When a customer enters data, ServletUtil.gatherFormInput() retrieves the user data. It then calls setLightData() of PLightComponentHelper to update the data of the component.
Note:
ServletUtil.setLightDataForAll() is a wrapper function that calls PLightComponentHelper.setLightData() for every input field that has a lightweight component in the collection. However, if the input data needs massaging or there is no mapping between the UI field and the lightweight component, then you need to explicitly call setLightData(). -
The return flists are parsed by calling ServletUtil.parseErrorData, which identifies lightweight components that are in error. You can mark the lightweight components that are in error by checking if the field is in the error flist. To check the error flist, call ServletUtil.checkError(…).
Removing Fields
To remove a field that is not required, for example, the middle name field, you remove all references to it.
Important:
Before you remove a field, make sure that no opcode requires it by checking opcode input flist specifications.-
Remove the ServletUtil.addComponent(…) of that field so it is no longer added to the collection.
For example, to remove the middle name field, delete:
ServletUtil.addComponent(<BEAN>, MIDDLENAME,
"FldNameinfo[1].FldMiddleName"); and <BEAN>.
getChild(MIDDLENAME).
-
Remove the calls to checkError and getLightData().
For the middle name field, remove the following:
<% if (ServletUtil.checkError(errorMap, cbMname)) { %> <TH Align="right" Class="optional">__MiddleName__*</TH> <% } else { %> <TH Align="right" Class="optional">__MiddleName__</TH> <% } %> <TD Colspan="3" Align="left"><INPUT Name="middlename" Value="<%=cbMname.getLightData()%>" Size="21" Tabindex="3"></TD>2. -
If setLightData() is called explicitly on this lightweight component, remove that line.
Creating a New Component
When adding a component to Self-Care Manager, you create the view component of the data, and if necessary, the controller component that determines the behavior of the data.
-
Create a link in the existing JSPs or HTML pages for loading the next or new JSPs.
-
Create the component.
For a view component, subclass either an existing controller from app/ccare/comp or web/comp, or design a new one.
-
Develop the customizable component.
-
Develop the non-customizable component.
Creating a Link for the JSP Pages for a Get Request
If you are using PInfranetServlet and the HTTP request is a get request, add the page_to_load_next and component_to_be_created values in the response.encodeURL parameter entry in the appropriate JSP:
A HREF="<%=response.encodeURL("PInfranetServlet?page=
       page_to_load_next&Component=component_to_be_created")%>"
For example:
A HREF="<%=response.encodeURL("PInfranetServlet?page=
       change_login_form&Component=com.portal.web.comp.PServicesBeanImpl")%>"
Creating a Link for the JSP Pages for a Post Request
If you are using PInfranetServlet and the HTTP request is a post request, add the following entry, specify the page to load next, the Component to be created and a submit button:
<FORM Action="PInfranetServlet"
       Method="post"><INPUT Type="hidden" Name="page"
       Value=page_to_load_next>
       <INPUT Type="hidden" Name="Component" Value=Component_to_be created>
For example:
<FORM Action="PInfranetServlet"
       Method="post"><INPUT Type="hidden" Name="page" Value="view_invoice"><INPUT        Type="hidden" Name="Component" Value="com.portal.web.comp.PInvoiceBeanImpl">
If you are not using PInfranetServlet, use the same link you would for HTML pages.
Designing a Component
To design a component:
-
Plan the UI and functionality.
-
Determine if the component UI involves updating as well as displaying of data.
-
If the UI displays the data, then Design 1 or Design 3 is appropriate. See Choosing Design 3 to determine if you need to use it; if not, use Design 1.
-
If the UI displays and updates data, use one of the following:
- A combination of Design 1 to retrieve data and Design 2 to update it.
- Design 3. To determine if you need to use Design 3, see Choosing Design 3; if you do not, use a combination of Design 1 and Design 2.
-
-
Determine the design that the data flow of your component resembles:
-
See Choosing Design 3, to determine if you need to use it to build a customizable component.
-
Choose Design 1 if you want most of the work to be done by PInfranetServlet; otherwise, choose Design 2.
-
To share the same controller bean instance between multiple HTTP requests, choose the combination of Design 1 to retrieve data and Design 2 to update data.
-
Choosing Design 1 and Design 2
You can use Design 1 and Design 2 to display data and update it on user interaction. For example, you can display all the plans available for purchase. When the user selects a plan, the controller bean updates the user information. Use Design 1 to display all the plans. The bean is saved in session. When the user selects a plan, the same bean that has the model handle to the data is called with the index of the plan. When the save method is called, the plan flist of the plan at the selected index is retrieved from the model.
Use Design 3 when you have a one-to-one correspondence between the fields in the view and fields in the object. Each of these fields can be a lightweight component. For example, fields such as First Name and Last Name in the View Balance page have object fields that map exactly to the display, so you have a light component for first name and last name. To display FldBalances, there is a specific controller which you specify by using the createController() method in PIAComponentCollection. This allows you to override the update method, which takes an integer reason code and object as parameters to do special processing, such as retrieving the balance information. For more information, see "Display Fields and Controllers".
Important:
When you override an update you have to call super.update() so that any FieldBeans that are part of the collection also get updated; that is, their update method is called, so the opcode to retrieve data is executed.Developing the Customizable Component
This component has a view component and one or more controllers. For example, CreateFormPage2.jsp servlet has a few controllers.
Note:
To extend Self-Care Manager functionality, you must subclass the controllers provided in Customer Center SDK.The view component displays the data and provides user interaction with the system.
To develop the view component, create a new HTML page and then follow these steps to edit it to build the JSP.
-
Add a page directive that sets the value for errorPage to error.jsp:
<%@ page errorPage="error.jsp" %>This redirects all exception handling to the defined page. For information about handling exceptions, see "Error Handling".
-
Add a jsp:useBean statement, with the following values shown for scope and class:
<jsp:useBean id="myBeanInstanceName" type="InterfaceName" class="concrete Implementation of the interface" scope="request"/>
Note:
You are saving the collection bean instance in session, not the data. -
Follow the steps in Account creation or Account maintenance:
-
If you're adding functionality that is independent of an individual user logging in, such as account creation, follow the steps in Account creation.
-
If you're building functionality that is dependent on the user logging in, for example, account maintenance, follow the steps in Account maintenance.
Note:
Account creation and maintenance is not supported in this release. It continues to be supported in the previous releases.
-
Important:
This is an example for developing a customizable component. Account creation is not supported in this release.Follow these steps for account creation:
-
If a client service exists for the session, retrieve it:
PPooledConnectionClientServices pCS = (PPooledConnectionClient)session.getAttribute
(CREATE_CONNECTION);
-
For a first-time access, that is, the collection bean was just created and the controller was not set:
-
Create a new instance of PPooledConnectionClientServices:
pCS = new PPooledConnectionClientServices((PClientServices) application.getAttribute(ServletUtil.PARENT_SERVICE));
>
-
Call setServices with the new instance of PPooledConnectionClientServices on the collection bean:
accountCreationBean.setServices(pCS);
>
-
Create a ConnectionListener and save it in the session:
ConnectionListener listener = new
ConnectionListener(session.getCreationTime(), pCS);
-
Call ServletUtil.saveLocaleInfo and registerApp.
-
Specify the controller associated with this component.
-
Create the lightweight components. See "Creating a New Component".
-
-
If the collection bean was created by a previous HTTP request, retrieve the lightweight components in the collection by calling getChild on the collection bean saved in the session.
-
Call getLightData on the lightweight component to display the data.
-
If the data can be updated by the user, use a POST request to handle the update. In the JSP code, check for POST requests, as follows:
-
Call ServletUtil.gatherFormInput.
-
To set data, call ServletUtil.setLightDataForAll.
This function loops through the components. If there is a mapping between the component and user input, setLightDataForAll calls setLightData on the component.
-
For user input for which where there is no mapping, such as a billing address, you can explicitly call setLightData on the component.
-
After setting the user input values on all the components in the collection, collect the data for storing:
accountInfoBean.startSingleModelDataCollection
     (PCollectDataEvent.FOR_STORING, <model>);
The value for model is either null or the model handle previously created with some data. In the case of payment method, for example, create an untyped model but modify it with the payment info flist.
-
-
Call session.invalidate to release the connection.
Important:
This is an example for developing a customizable component. Account maintenance is not supported in this release.Follow these steps for account maintenance:
-
Retrieve the model handle.
PModelHandle mH = ServletUtil.getModelFromSession(session); -
Use ServletUtil.CONNECTION as the key to retrieve the PPooledConnectionClientServices instance from the session.
Note:
A PPooledConnectionClientServices instance is created and saved in a session using ServletUtil.CONNECTION when a user logs in. Additional functionality provided for the user, such as account maintenance, can use ServletUtil.CONNECTION to retrieve the PPooledConnectionClientServices instance from the session. -
Call setServices with the retrieved instance on the collection bean:
accountInfoBean.setServices(pCS); -
If this is a first-time access; that is, the collection bean was just created and the controller was not set:
-
Specify the controller associated with this component.
-
Create the lightweight components. See "Creating a New Component".
-
Call setModelHandle to retrieve data from the database.
-
-
If the collection bean was created in a previous HTTP request, you can retrieve the lightweight components in the collection by calling getChild on the collection bean saved in the session.
-
Call getLightData on the lightweight component to display the data.
-
If data can be updated by the user, use a POST request to handle the update. In the JSP code, check for POST requests:
-
Call ServletUtil.gatherFormInput.
-
To set data, call ServletUtil.setLightDataForAll.
This function loops through the components. If there is a mapping between the component and user input, it calls setLightData on the component.
-
For user input where there is no mapping, such as a billing address, you can explicitly call setLightData on the component.
-
After setting the user input values on all the components in the collection, collect the data for storing:
accountInfoBean.startSingleModelDataCollection
     (PCollectDataEvent.FOR_STORING, <model>);
The value for model is either null or the model handle previously created with some data. In the case of payment method, for example, create an untyped model but modify it with the payment info flist.
-
Developing the Controller Component
You must create a controller for each view element. The controller component performs the functions, for example, reading fields from the database.
To create the component controller:
-
Declare the controller's API in the interface:
-
Declare all the setters to set input data.
-
Declare all the getters to retrieve the output data.
-
Declare all the public methods.
-
-
Define a class derived from com.portal.bas.comp.PIAComponentCollectionBean, which implements the interface.
Implement all the public methods, setters and getters.
Developing a Noncustomizable Component
This component has a view component and one controller.
The view component displays the data and provides user interaction with the system.
To develop the view component, create the HTML page and then build the JSP as follows:
-
Add the page declarative which has the errorpage set to error.jsp.
This redirects all exception handling to this page.
-
Add the jsp:useBean statement whose type is the controller interface and scope is request or session.
If the bean was already created through the main servlet and placed in the request object, you can load the bean using the jsp:useBean clause and use the getters to get the data.
-
Call the getters to get any data.
-
If data can be updated by the user, it requires special handling. Use a POST request to handle the update. So in the JSP code, check if POST.
-
Gets the model from the session, if it exists.
-
Calls ServletUtil.gatherFormInput.
-
Calls the setters of the light components to update them with user inputs.
-
Calls the method to save the data into the database.
-
For information about error handling, see "Error Handling".
Developing the Controller Component
You must create a controller for each view element. The controller component performs the functions, for example, reading fields from the database.
To create the component controller:
-
Declare the controller's API in the interface, for example, in PCAAccountInfoBean:
-
Declare all the setters to set input data.
-
Declare all the getters to retrieve the output data.
-
Declare all the public methods.
-
-
Define a class derived from com.portal.bas.PControllerImpl, which implements the interface defined in the previous step. Note these rules:
-
Implement all the public methods, setters and getters.
-
Use the connection pool to connect to BRM.
-
For error handling, see "Error Handling".
-
When developing a noncustomizable component, you must use connections from the connection pool to connect to BRM.
For more information on connection pooling, see "About PInfranetServlet".
Important:
The Self-Care Manager Connection pool implementation is expected to change in a future release of BRM.When using the connection pool, note these rules:
-
Use getConnection to get a connection from the connection pool.
-
Use releaseConnection to release the connection back to the connection pool.
Important:
-
You must use releaseConnection to release connections.
-
You must pair a getConnection with a releaseConnection.
-
-
Adjust the values of the infranet.bas.connectionpool.size and infranet.bas.connectionpool.timeout parameters in the Self-Care_Manager_install_dir/WebKit.properties file.
Tip:
If you add noncustomizable components to your Self-Care Manager implementation, Self-Care Manager performance may improve if you increase the value for the infranet.bas.connectionpool.size parameter from the default value 4.For more information on these parameters, see "Optimizing Self-Care Manager Connection Pool Performance" in BRM Managing Customers.
Error Handling
The controller handles exceptions and errors shown in Table 32-1:
Table 32-1 Exceptions, Errors, and Responses
| Exception/Error | Response |
|---|---|
|
EbufException |
Calls PControllerImpl.createClientException() in the BAS API |
|
Other exception |
Throws RemoteException with the resource string |
|
Error returned in flist |
Returns CustomerValErrorData |
If the exception is received in PInfranetServlet, it redirects to error.jsp
If the exception is received by a JSP Servlet with the error attribute in <page > directive, set to error.jsp, which redirects the exception to error.jsp.
If you return CustomerValErrorData, call ServletUtil.parseErrorData(...) to gather the lightweight components in error, and call ServletUtil.checkError(...) to mark any data in error.
Using Branding in Your Custom Beans
This section explains how Self-Care Manager handles branding in your custom JSPs and beans that connect to a BRM system with Branded service management.
Self-Care Manager uses connection pooling to communicate with BRM. In a branding environment, you need to establish credentials on these anonymous connections from the pool before executing an opcode. When you get a BRM connection from BAS, you establish credentials using the setUserCredtials (...) in PBrandBeanImpl.
Note:
Once the user logs in, Self-Care Manager retains the user credentials throughout the client session. So any JSP servlets or custom beans that execute after the user logs in are not required to handle branding.To handle branding in your JSPs or custom beans:
-
Specify the brand properties in the WebKit.properties file.
This includes brand manager login, brand manager password, and the service object for each brand manager.
brand_name = brand_login, brand_password, service_object
-
Specify the brand name in an href link or as a hidden variable.
For example, to get all the plans associated with a brand in the create account page, specify the brand name in the index.html file:
a href = "CreateFormPage1.jsp"?brand=brand_name -
Create the brand bean, com.portal.web.comp.PBrandBeanImpl.
-
Get the brand name from the input parameters.
-
If you are developing branding in a custom bean, you have to provide a set method for setting the brand name. Retrieve the brand properties by using PClientContext.getServices()getDefaultProperties().
The brand properties are in WebKit.properties:
-
Brand service
-
Brand login
-
Brand password
-
-
Create com.portal.web.comp.PLoginBeanImpl:
-
Set the login, service, and password.
-
Get the account model handle that corresponds to the above data by using PLoginBeanImpl.login_verify.
-
Formatting Your Data
You can customize the display format of your data by using one of these methods:
Method 1: Add Java Code to Your JSP Pages
You can specify the date in month-day-year format by using the following Java code in a JSP page:
<%Date lastBill = accountBean.getLastBillT();%>
<%=lastBill.getMonth()%>/<%=lastBill.getDate()%>/ <%=lastBill.getYear()%>
See the view_balance.jsp file included with Customer Center SDK in CCSDK_Home/CustomerCareSDK/WebKit/htmliu_en.
You can edit the entry to change the format to day-month-year by changing the order:
<%Date lastBill = accountBean.getLastBillT();%>
<%=lastBill.getDate()%>/<%=lastBill.getMonth()%>/ <%=lastBill.getYear()%>
Method 2: Use a Formatting Bean that Contains the Presentation Logic for the Data.
The JSP calls the formatting bean to obtain the instructions on how to display the data. By using a formatting bean, you reduce the amount of Java code in the JSP, such as localizing the data for your environment.
To use a bean to format data:
-
Create a Java class with setters and getters to set the data and get the formatted data.
-
Compile the file and save the class file in a directory included in the CLASSPATH.
-
Add entries in your JSP page to do the following:
-
Point to the formatting bean.
-
Set the property of the data.
-
Get the property of the formatted data from the formatting bean.
-
Example 32-1 Formulating the Date in the view_balance.jsp
This example shows the entries for formatting the date in the view_balance.jsp.
-
Define a class, such as PSampleFmt, with a setDate() and getFormattedDate() method. The getFormattedDate() method retrieves the date set and returns the formatted date.
-
In the view_balance.jsp file, replace the Java code for formatting the date with these lines:
<jsp:useBean id="fmtBean"class="com.portal.web.fmt.PSampleFmt"
scope="request"/>
<jsp:setProperty name="fmtBean" property="date"
value=<%=accountBean.getLastBillT()%>
</jsp:useBean>
<jsp:getProperty name="fmtBean" property="formattedDate"/>
Building the Self-Care Manager Components
To build or rebuild the webkit_en.war file for Self-Care Manager, follow these steps:
-
If you created custom source to extend Self-Care Manager, copy it to the CCSDK_Home/CustomerCareSDK/WebKit/custom directory.
-
Copy any HTML or JSP pages you modified for the HTML version of Self-Care Manager to CCSDK_Home/CustomerCareSDK/WebKit/htmlui_en.
-
Make the appropriate entries in the WebKit.properties file as required to accompany your source.
-
Open a command shell and enter the buildAll command with the appropriate syntax for the application you're customizing. See "Syntax for the buildAll Script".
For example, to clean and rebuild the webkit_en.war file for Self-Care Manager, enter the following:
buildAll WebKit clean
buildAll WebKit
Note:
For more information on the buildAll script, see "About Compiling and Packaging Your Customizations".
Self-Care Manager Customization Examples
Customer Center SDK includes Self-Care Manager customization example code in CCSDK_Home/CustomerCareSDK/WebKitExamples.
When you install Customer Center SDK, separate folders with the appropriate source and support files provide examples for extending Customer Center and Self-Care Manager. Many of the example folders include Readme.txt files that explain the purpose of each example.
You can execute many of the examples in place by using the testExamples.bat script.
Table 32-2 describes the Self-Care Manager extension examples in the SDK_Home/CustomerCenterSDK/WebKitExamples directory. Read the readme.txt files and the comments in the source files of each example for further information on their functionality and how to use them for creating your own customizations.
Table 32-2 Self-Care Manager Extension Examples
| Directory Under SDK_Home/CustomerCareSDK/WebKitExamples | Contents |
|---|---|
|
Controllers |
PIAWKCreateAccountBeanImpl.java, an example of subclassing PIACreateAccountBeanImpl to override its validatePage and validate methods. This example can also be used for learning how to subclass controllers for Customer Center. |
|
Currency |
CreateFormPage1.java and CreateFormPage2.java, examples that demonstrate how to include the currency field as input for account creation. Note: Account creation is not supported in this release. |
|
Profile |
CreateFormPage1.jsp and CreateFormPage2.jsp, examples that demonstrate how to add support for a profile object to Self-Care Manager. The profile object used for this example is /profile/customertype. |