4 Setting Up Customer Self Care with Self-Care Manager
This chapter describes how to set up Oracle Communications Billing and Revenue Management (BRM) Self-Care Manager to display Web pages that your customers can use to access their accounts. It includes a procedure for configuring the application server.
For additional information about Self-Care Manager, see the following topics:
-
For more information on Web registration and account access, see "Ways to Implement a Web Interface".
-
To add or change Self-Care Manager functionality, see "Customizing the Self-Care Manager Interface" in BRM Developer's Guide.
About Self-Care Manager
Self-Care Manager includes the following components:
-
A set of Java Server Pages (JSPs) that display HTML forms in a standard Web browser. The JSPs can display data, such as a list of available plans, from the BRM database.
You can customize the JSPs to change the appearance of the Web pages or to change the data that you receive from or display to customers. For more information on JSPs, see Sun Microsystems' Java documentation.
-
A set of BRM Business Application SDK (BAS) beans that provides an interface between the JSPs and BRM. The BAS beans connect to a Connection Manager (CM) and transfer data to and from BRM.
A programmer can create custom controllers and other Java components to customize the data that you display or receive from customers. For more information, see "Customizing the Self-Care Manager Interface" in BRM Developer's Guide.
-
An application server that processes requests originating from customer Web browsers, manages customer sessions, and transfers data to and from the BAS beans. For more information, see the JavaSoft documentation.
The JSPs and the application server are run by your Web server.
Supported Application Servers
Self-Care Manager supports the Tomcat, WebLogic, and WebSphere application servers. For more information on supported versions, see "BRM Software Compatibility" in BRM Developer's Guide. Figure 4-1 shows the flow of information.
Figure 4-1 Self-Care Manager System Architecture
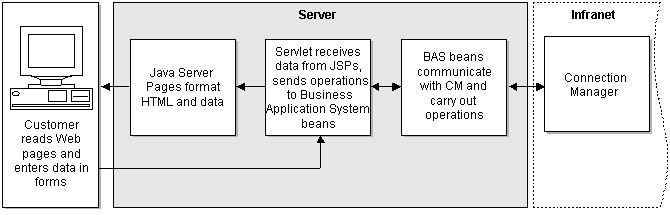
Description of ''Figure 4-1 Self-Care Manager System Architecture''
About Customizing Self-Care Manager
Self-Care Manager can be customized as follows:
-
You can change the appearance of Self-Care Manager pages by editing the HTML files, JSPs, and style sheet. This requires HTML knowledge. See "Changing Web pages" for more information.
-
You can modify or add source code to collect additional information from your customers or to provide your customers with additional options. This requires the Customer Center SDK as well as Java programming knowledge.
About Currencies
All accounts created in Self-Care Manager use the default account currency for your BRM system. Your customers do not have the option of selecting a currency when they register through Self-Care Manager.
You can change the default currency Self-Care Manager uses by changing the default account currency. See "Setting the Default Account Currency".
If you want customers to have the option of selecting a currency, a programmer can customize Self-Care Manager to add a currency field. See "Customizing the Self-Care Manager Interface" in BRM Developer's Guide.
Installing Self-Care Manager
Install the software in this order:
-
BRM
-
Application server
-
Self-Care Manager
The application server and Self-Care Manager must be installed on the same system.
Note:
The Connection Manager (CM) need not be on the same system as Self-Care Manager.See "Installing Self-Care Manager on Windows" in BRM Developer's Guide or "Installing Self-Care Manager".
Configuring the Application Server
You can deploy your Self-Care Manager application with these application servers:
-
Apache Tomcat. See "Setting up Apache Tomcat".
-
WebLogic. See "Setting Up Oracle WebLogic".
-
WebSphere. See "Setting Up IBM WebSphere".
Setting up Apache Tomcat
This section explains how to deploy your Self-Care Manager application with Apache Tomcat.
Note:
Self-Care Manager is not compatible with Tomcat in a clustered environment. Self-Care Manager should not have the <distributable /> element set in the web.xml file.Requirements
-
Your Self-Care Manager WAR file. See "Customizing the Self-Care Manager Interface" in BRM Developer's Guide.
-
The directory in which Self-Care Manager is installed. The default is BRM_Home/WebKit/WebKit, where BRM_Home is the directory in which you installed the BRM software.
Deploying Your Application with Apache Tomcat
To deploy your Self-Care Manager application with Apache Tomcat:
-
Install Apache Tomcat. For more information, see the Apache Tomcat documentation.
-
Deploy your WAR file as a new Web component by using the Apache Tomcat interface.
-
Copy the WebKit.properties and Infranet.properties files from BRM_Home/WebKit/WebKit to Tomcat_home\lib.
-
Stop and restart the Tomcat server.
Your Self-Care Manager application is now deployed.
Setting Up Oracle WebLogic
This section explains how to deploy your Self-Care Manager application with Oracle WebLogic.
Requirements
-
Creating a new WebLogic domain.
-
Your Self-Care Manager WAR file. See "Customizing the Self-Care Manager Interface" in BRM Developer's Guide.
-
The default directory in which Self-Care Manager is installed. The default is C:\Program Files\Portal Software\Self Care Manager.
Deploying Your Application with Oracle WebLogic
To deploy your Self-Care Manager application with WebLogic:
-
Install WebLogic. For more information, see the WebLogic documentation.
-
Create WebLogic domain. For more information, see the WebLogic documentation.
-
Copy the WebKit.properties and Infranet.properties files from C:\Program Files\Portal Software\Self Care Manager to WebLogic_home\mydomain\applications\webkit_en\WEB-INF\classes.
-
Start the WebLogic server.
-
Deploy your WAR file as a new Web component by using the WebLogic interface. For more information, see the WebLogic documentation.
-
Stop and restart the WebLogic server.
Your Self-Care Manager application is now deployed.
Setting Up IBM WebSphere
This section explains how to deploy your Self-Care Manager application with IBM WebSphere.
Requirements
-
Your Self-Care Manager WAR file. See "Customizing the Self-Care Manager Interface" in BRM Developer's Guide.
-
The default directory in which Self-Care Manager is installed. The default is BRM_Home/WebKit/WebKit.
Deploying Your Application with IBM WebSphere
To deploy your Self-Care Manager application with WebSphere:
-
Install WebSphere. For more information, see the WebSphere documentation.
-
Deploy your WAR file by using the WebSphere application installation wizard.
Important:
-
Even though you have a Self-Care Manager WAR file, deploy your application within WebSphere as an Enterprise Application (*.ear) rather than as a WAR file.
-
Install your WAR file as a standalone application.
-
-
When prompted for enterprise application information, select the defaults, then click Finish to complete the wizard.
-
Copy the WebKit.properties and Infranet.properties files from BRM_Home/WebKit/WebKit to Websphere_home/AppServer/installedApps/myapplication.
-
Stop and restart the WebSphere server.
Your Self-Care Manager application is now deployed.
Uninstalling Self-Care Manager
To uninstall Self-Care Manager:
-
Uninstall Self-Care Manager from your application server. See your application server documentation.
Note:
You may also have to remove any temporary directories created for Self-Care Manager from your application server. -
In Windows, do one of the following to start the uninstaller:
-
(Windows 8.1) Use the Windows uninstall feature.
-
(Other Windows versions) From the start options, choose Uninstall Self-Care Manager, which is under Portal or use the Windows uninstall feature.
-
Deploying Self-Care Manager
Your Self-Care Manager installation includes the user interface files (JSPs, HTML files, and GIFs) for the standard browser version of Self-Care Manager. The files are in the htmlui_en directory.
Note:
This is the directory name for the English locale. Directory names for localized versions use the appropriate locale in place of en.One approach to deploying Self-Care Manager so your subscribers can access it:
-
Configure your Web server to look for index.html as the default HTML home page.
-
Have subscribers enter http://hostname/WebKit/htmlui_en in the Web browser.
Note:
If your Web server does not support specifying a default home page for each application, subscribers will need to enter the full URL, including the file name for the home page. For example, http://hostname/WebKit/htmlui_en/index.html.
Supporting Localized Versions of Self-Care Manager
If you have customers in different countries, you can set up localized versions of the Self-Care Manager pages. You obtain localized versions of Self-Care Manager from BRM or use the Localization SDK to create localized versions. In both cases, you install a Self-Care Manager WAR file just as you do for English.
You can deploy multiple localized versions of Self-Care Manager in one of these ways:
-
Set up a separate application server for each locale. You set up multiple application servers with a single Web server. For more information, see your application server documentation.
You can then follow the standard procedure for configuring your application server for each combination of server and locale. For each server, deploy the WAR file for a different locale.
-
Set up a separate Web application in your application server for each locale.
Caution:
If you use this method, you will encounter problems later if you try to use opcode and flist logging for troubleshooting.
For more information on creating localized versions of Self-Care Manager, see "Localizing Self-Care Manager" in BRM Developer's Guide.
Using Self-Care Manager
This section describes how to set up Self-Care Manager for use.
Setting Connection Parameters
Self-Care Manager uses information in the WebKit.properties file to establish a connection to BRM. This properties file includes the standard BRM connection parameters, such as database number, login type, and password.
Note:
BRM connection parameters are also in the Infranet.properties file.To set connection parameters:
-
Open the Self-Care Manager properties file (SelfCareManager_install_dir/WebKit.properties).
-
Edit these entries:
user=root.0.0.0.1
password=password
host=hostname
port=11960
-
Save and close the file.
-
Open the Infranet.properties file (SelfCareManager_install_dir/Infranet.properties).
-
Edit the infranet.connection entry; for example:
infranet.connection=pcp://root.0.0.0.1:password@host:40010/service/pcm_client 1In this example:
-
The login name is root.0.0.0.1.
-
The password is password.
-
The hostname is host.
-
The port is 40010.
-
-
Save and close the file.
Important:
To improve security, change the default root login name (root.0.0.0.1) and the default password (password). See "Configuring Login Names and Passwords for BRM Access" in BRM System Administrator's Guide.
Specifying which Plan List to Display
By default, Self-Care Manager displays plans included in the webclient plan list. If the webclient plan list does not exist, Self-Care Manager displays plans included in the default-new plan list.
To specify a plan list for Self-Care Manager:
-
Open the Self-Care Manager properties file (SelfCareManager_install_dir/WebKit.properties).
-
Enter the name of the plan list in the Infranet.PricingPlan entry; for example:
pricingplan=webclient -
Save the file.
Setting the Timeout
You can specify the length of time before a timeout when there is no customer activity.
You change the timeout setting in your application server.
Enabling a Single Login for Multiple Services
By default, Self-Care Manager requires your customers to enter a separate login and password for each service when they purchase deals with more than one service.
You can set up Self-Care Manager to require only a single login and password that applies to all services. To do this, edit the Self-Care Manager properties file as follows:
-
Open the Self-Care Manager properties file (SelfCareManager_install_dir/WebKit.properties).
-
Change the singleLogin entry to:
singleLogin=true -
Save and close the file.
Optimizing Self-Care Manager Connection Pool Performance
Self-Care Manager uses connection pooling. When a BRM connection is required for an opcode call, the connection is made for a brief period of time, instead of for the entire duration of a user session, and is then released back to the connection pool. This enables each BRM connection to handle multiple customer connections.
To optimize Self-Care Manager performance, you can change the following connection pooling parameters in the Self-Care Manager properties file (SelfCareManager_install_dir/WebKit.properties):
-
infranet.bas.connectionpool.size: The maximum number of connections in the connection pool. More connections can improve performance but put a heavier load on the BRM server. Any value greater than 0 is valid. The default is 4.
infranet.bas.connectionpool.size = 4Note:
If your BRM license limits the number of BRM connections you can have, consider this limit when specifying the number of connections that Self-Care Manager can use. -
infranet.bas.connectionpool.timeout: The maximum time in milliseconds that customers wait for a BRM connection before getting notified that a connection is not available. If customers do not get a connection within this time, they get an ”error communicating with BRM” message.
You must add this parameter to the Self-Care Manager properties file (WebKit.properties) using a value appropriate for your installation. Any value greater than 0 is valid.
infranet.bas.connectionpool.timeout = connection_timeout_in_milliseconds
The default is 30000 (30 seconds).
Adding a Service to the Self-Care Manager Home Page
The Self-Care Manager home page includes a list of services available to your customers. If you add an optional manager to your BRM system, and that optional manager uses Self-Care Manager, you need to add those service types to the list in the home page.
Important:
If you have multiple Self-Care Manager home pages, because your BRM system supports brands or for any other reason, you need to add those service types to each home page.To add a service:
-
Open the Self-Care Manager home page with an HTML editor or text editor. The default Self-Care Manager home page is index.html.
-
Locate this section of the file:
<SELECT Name="service" Size="1"> <OPTION Value="ip" SELECTED>ip <OPTION Value="email">email <OPTION Value="telephony">telephony </SELECT> -
For each service you want to appear on the list, add a new option to this list. For Value, enter the BRM name of the service. The name outside the OPTION tag is the name displayed on the Web page.
For example:
<OPTION Value="gsm/sms">GSM SMS
<OPTION Value="gsm/telephony">GSM Telephony
<OPTION Value="gsm/data">GSM Data
-
Save and close the file.
Troubleshooting Self-Care Manager
This section contains troubleshooting information about these Self-Care Manager issues:
-
The error logs show an ”error communicating with Portal” message
-
Brands are enabled in BRM, but you want some accounts created in Brand Host
The error logs show an ”error communicating with Portal” message
To debug this type of error, you turn on opcode and flist logging for the Java PCM. This logs the input and output flists for each opcode that Self-Care Manager calls. You can use these flists to see problems communicating with BRM.
To turn on opcode and flist logging:
-
Open the Infranet.properties file in a text editor. The file is located in your Self-Care Manager installation directory.
-
Add these lines to the file:
infranet.log.opcodes.enabled=true
infranet.log.opcodes.file=pathname/opcodes.log
where pathname is the path to the directory for the log file. For example:
infranet.log.opcodes.file=d:/temp/opcodes.logImportant:
You must use forward slashes in the directory paths. -
Stop and restart the application server.
-
Save and close the file.
-
Reproduce the error and check the file applicationserver_install_dir/servers/default/javaPCM.log.
The Web pages might display an error message or display ”Click to continue” in place of the correct page. To debug this type of problem, you enable debugging in the error.jsp file so that exceptions are written to the log file debug_errorlog.jsp. This prints a stack trace, which can help developers locate where an exception occurred.
To enable debugging in the error.jsp file:
-
Open the appropriate version of the error.jsp, located in the htmlui_en directory in the Self-Care Manager installation directory.
-
Uncomment this line by removing <% and %>:
<%@ include file = "debug_errorlog.jsp" %>
-
Save and close the file.
Internet Explorer shows a ”page not found” error
Internet Explorer masks the actual error by giving the error message ”page not found.” You can turn off the error messages and see the actual error message by changing a setting in Internet Explorer:
To disable Internet Explorer error messages:
-
Choose Tools - Internet Options.
-
Click the Advanced tab.
-
Clear the Show friendly HTTP error messages check box.
Brands are enabled in BRM, but you want some accounts created in Brand Host
If your BRM system has branding enabled but no brands have been created, or you want to have accounts that do not belong to a specific brand, you need to set up root as a brand:
To set up root as a brand:
-
Open the Self-Care Manager properties file (SelfCareManager_install_dir/WebKit.properties).
-
Add the following line to the file:
brand.root=admin_client,root.0.0.0.1,password -
Open the file htmlui_en/index.html.
Locate the following line:
<a href="CreateFormPage1.jsp">Set up a new account</a></TD>
Replace it with this line:
<a href="CreateFormPage1.jsp?brand=root">Set up a new account</a></TD>
Using the Default HTML Web Pages
Self-Care Manager supplies a set of JSPs that you can use as part of your customer self-care Web site. These JSPs serve HTML pages.
This section describes Self-Care Manager's default HTML pages and provides an overview of the functionality they offer.
For more information on customizing these pages, see "Changing Web pages" and "Customizing the Self-Care Manager Interface" in BRM Developer's Guide.
Logging In
Figure 4-2 shows the login page your customers see when they access your self-care Web site:
Figure 4-2 Login Page for Self-Care Web Site
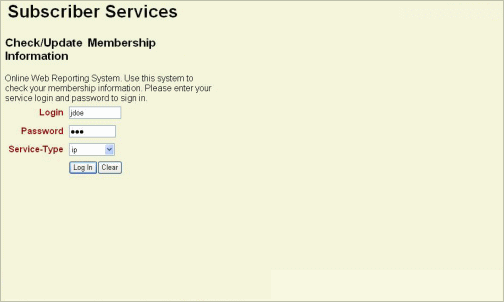
Description of ''Figure 4-2 Login Page for Self-Care Web Site''
Self-Care Manager supports email, IP, and telephony service types.
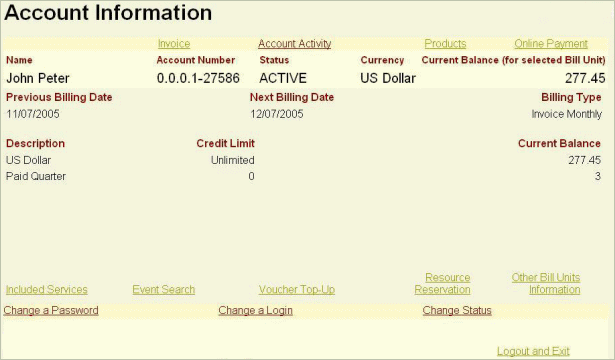
Accessing Account Information
After customers log in to your Web site on the login page, the Account Information page appears. This page displays the details of the account-level bill unit and balance groups associated with the bill unit, and the current balance of all the balance groups.
To view the details of the other bill units in the account, customers click the Other Bill Units Information link on the Account Information page and select the bill unit. The details will be displayed in the Account Information page as shown in Figure 4-3. For more information, see "Accessing Account Information".
From this page, customers can perform the following tasks:
Finding or Searching for and Viewing Events
Customers can specify the search criteria and view the events of the selected bill unit. To enable this feature, you must configure the item types in the WebKit.properties file.
To specify the search criteria, customers click the Event Search link on the Account Information page. The Event Search page appears. Customers then specify the search criteria and click Search.
To view the events of other bill units in the account, see "Viewing Bill Units in an Account".
Based on the search criteria and the item types configured in WebKit.properties, events are retrieved and displayed in the Event Search page as shown in Figure 4-4.
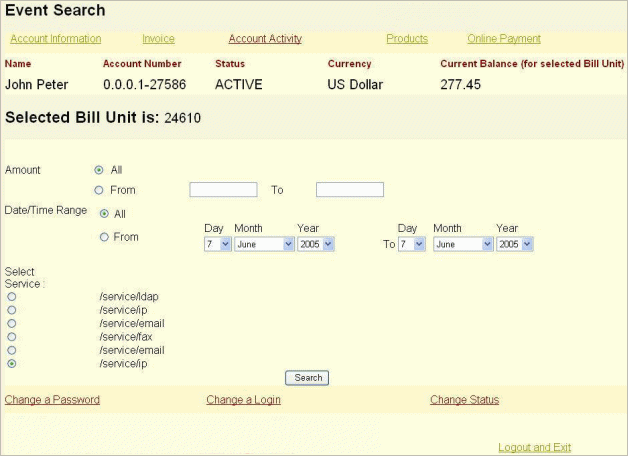
For example:
-
To view all the events related to cycle_forward, add /cycle_forward to the key EventSearch.ItemTypes in WebKit.properties:
EventSearch.ItemTypes=/cycle_forward
-
To view all the events related to adjustment and payment, add /adjustment and /payment to the key EventSearch.ItemTypes in WebKit.properties:
EventSearch.ItemTypes=/adjustment,/payment
Applying Voucher Top-Ups
Customers use vouchers to top-up their currency and non-currency account balances. They can top-up one currency resource and an unlimited number of non-currency resources. For more information, see "About Standard Top-Ups" in BRM Configuring and Collecting Payments.
To top-up their account with a voucher, customers click the Voucher Top-Up link on the Account Information page. The Voucher Top-Up page appears. Customers can then enter the voucher ID and pin and click Validate to check the resources and validity of the specified voucher. If the voucher is valid, the Apply button is enabled.
If there are multiple balances in the bill unit, customers can select the balance groups whose account balance they want to top up.
To apply the vouchers immediately and top-up the account balances, customers select the required balance groups, select Allocate Now and click Apply. See Figure 4-5.
Customers can also choose to just apply the voucher on the balance groups and not top-up the account balance. To do this, the customer clicks Apply without selecting Allocate Now. The voucher can later be allocated, but only through Customer Center.
Figure 4-5 Voucher Top-Up Information for an Example Account

Description of ''Figure 4-5 Voucher Top-Up Information for an Example Account''
Viewing Resource Reservation Details
Customers can view the resource reservation details of a bill unit if you have installed Resource Reservation Manager. To do this, customers click the Resource Reservation link on the Account Information page. The Resource Reservation page appears as shown below in Figure 4-6. It displays available credit limit, total bill amount, amount reserved, and available balance of all the balance groups in a bill unit.
Figure 4-6 Resource Reservation for a Selected Account
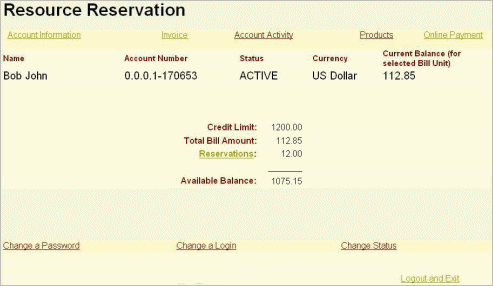
Description of ''Figure 4-6 Resource Reservation for a Selected Account''
To view the reservation details, customers click the Reservations link and the details are displayed in the Resource Reservations Details page.
If the credit limit of any of the balance groups is unlimited, the Credit Limit value is displayed as Unlimited as shown below in Figure 4-7.
Figure 4-7 Resource Reservation with Unlimited Credit Limit
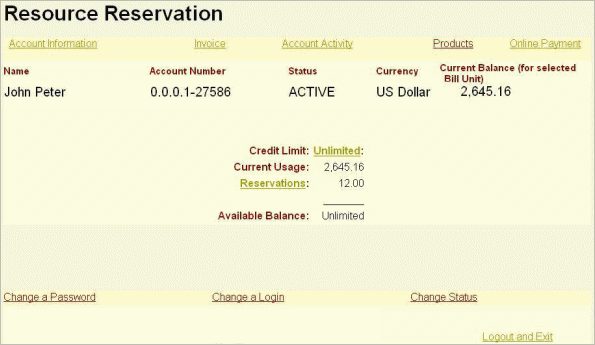
Description of ''Figure 4-7 Resource Reservation with Unlimited Credit Limit''
To find the balance group, which has unlimited credit balance customers, click the Unlimited link displayed next to the Credit Limit. The Included Services page appears. See "Viewing Service Details for a Bill Unit".
Viewing Invoices
Customers can view their invoice details by generating a report of their past bills. To view the invoice details, customers click the Invoice link on the Account Information page. The Invoice Selection page appears as shown in Figure 4-8.
Figure 4-8 Selecting the Invoices to View
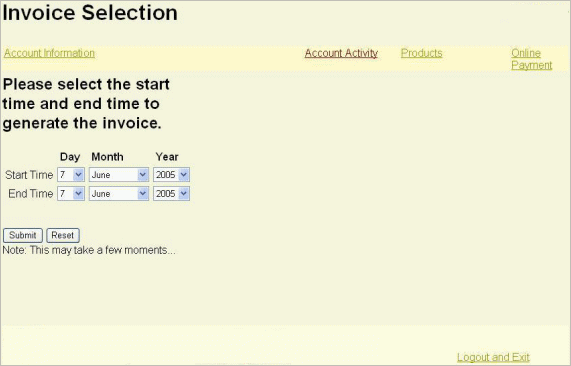
Description of ''Figure 4-8 Selecting the Invoices to View''
Customers can then select new start and end dates for the report or keep the default dates that represent the last billing cycle. After clicking Submit, the Invoice page appears, which lists invoices available for the selected period. In this page, customers click the invoice they want to view.
Viewing Account Activity
To view their account details, customers can generate a report. To generate a report, customers click the Account Activity link on the Account Information page. The Account Activity Selection page appears as shown in Figure 4-9:
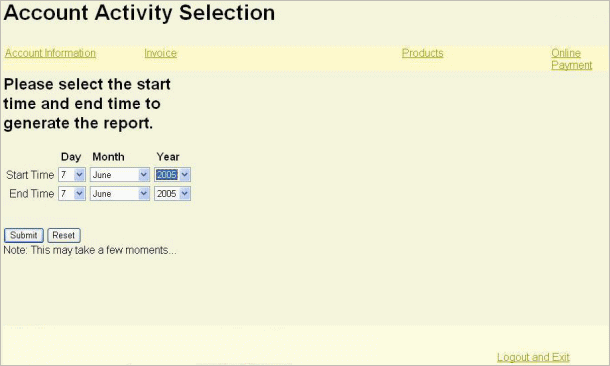
Customers can then select new start and end dates for the report or keep the default dates which represent the last billing cycle.
After clicking Submit, the Account Activity page appears which shows the account's details; for example, customer's name, address, and event details in chronological order.
If the customer uses additional services, some types of usage activity appear on separate pages. Links for the additional pages appear on the line just above the list of events.
Viewing Products Purchased
To view the products and discounts purchased, customers click the Products link on the Account Information page. The Product Information page appears as shown in Figure 4-10:
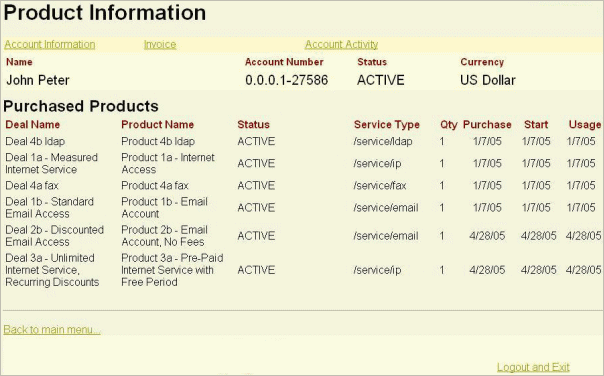
If a discount was purchased as part of a deal, an icon appears before the deal name.
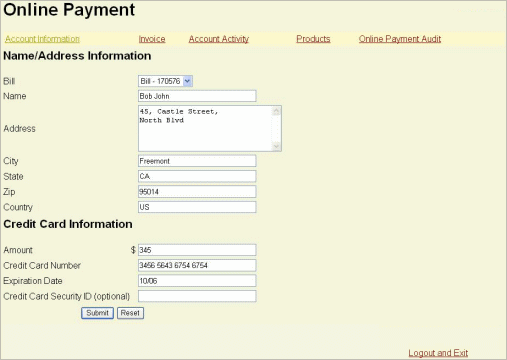
Paying Bills Online
To pay bills online, customers click the Online Payment link on the Account Information page. The Online Payment page appears as shown below in Figure 4-11:
Figure 4-11 Online Payment for Selected Account
Description of ''Figure 4-11 Online Payment for Selected Account''
To pay the bill, customers enter an amount and credit card information and click Submit.
BRM updates the customer's balance the next time you run billing and collects the BRM-initiated payment.
For more information, see "About Collecting BRM-Initiated Payments" in BRM Configuring and Collecting Payments.
To view online bill payment records, customers click the Online Payment Audit link on the Online Payment page. A page appears on which they enter start and end dates. Self-Care Manager displays the payments made between the start and end dates.
Viewing Service Details for a Bill Unit
To view the list of services and the details associated with all the balance groups in a bill unit, customers click the Included Services link on the Account Information page. The Service Details page appears (as shown in Figure 4-12) and displays the details of the services.
Figure 4-12 Service Details for Selected Account
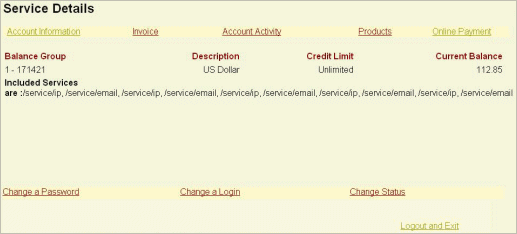
Description of ''Figure 4-12 Service Details for Selected Account''
Viewing Bill Units in an Account
To view all the bill units in an account, customers click the Other Bill Units Information link on the Account Information page. The Service Level Bill Unit Information page appears and displays all the bill units as shown below in Figure 4-13.
Figure 4-13 Service Level Bill Unit Information for Selected Account
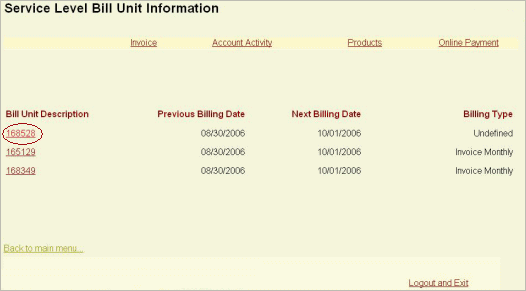
Description of ''Figure 4-13 Service Level Bill Unit Information for Selected Account''
To view the details of a specific bill unit, click on the bill unit. The details are displayed in the Account Information page. For more information, see "Accessing Account Information".
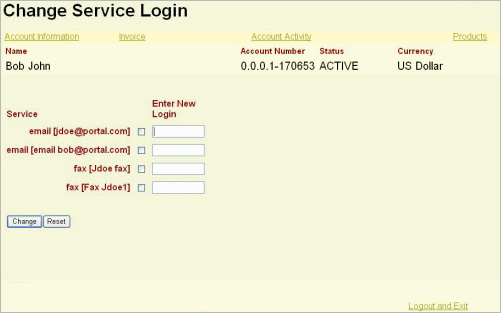
Changing Login Name, Password, or Account Status
Customers can change their login name, password, or account status by clicking the appropriate link on the Account Information page.
If customers click Change a Login or Change Status, pages similar to Figure 4-14 appear.
The account status can be active, inactive, or closed. For more information, see "About Activating, Inactivating, and Closing Accounts".
Changing Web pages
This section describes editing Self-Care Manager files to change the appearance of the pages and to make other modifications. You can make these types of changes if you are familiar with HTML tags and JSP tags. For more information on making more extensive customizations to Self-Care Manager, see "Customizing the Self-Care Manager Interface" in BRM Developer's Guide.
Editing Self-Care Manager Files
To change the appearance of Web pages, edit the following user interface files, located by default in the htmlui_en directory:
-
JSPs: The files containing the text and forms that provide the user interface on the pages. JSPs are HTML pages with added JSP tags. You can use any text editor and some HTML editors to edit the JSPs.
For more information on modifying these pages, see "Editing JSPs".
-
HTML pages: The HTML registration page and files with common HTML code used by the JSPs. For example, the header.html file includes the HTML HEAD tag. You can use a text editor or HTML editor to edit these files.
-
Cascading style sheet (CSS): The file that defines the appearance of the HTML pages. Edit this file to make global formatting changes, including fonts, text alignment, and margins. You can use a text editor or a CSS editor to edit this file.
-
GIF files: The graphics displayed in the HTML pages. You can edit the files with a graphics program or replace them with your own graphics.
Important:
Before editing, make a copy of the default pages, including all HTML pages and JSPs, and edit and test the copies.
When you edit a Self-Care Manager file, you should edit the version located in the Self-Care Manager WAR file. This ensures that the customized files are used if you reconfigure your servlet engine for Self-Care Manager in the future. See "Modifying the Self-Care Manager WAR File".
You can also use the Customer Center SDK to modify Self-Care Manager files from the WAR file. See "Using Customer Center SDK" and "Customizing the Self-Care Manager Interface" in BRM Developer's Guide.
Editing JSPs
JSPs use standard HTML formatting. In addition, the JSPs use special code to display information, or to display a text entry field for customer input. Each JSP tag starts with <% and ends with %>.
You can move data input and display codes from one location on the page to another. You can also delete them. For example, if you do not offer the IP telephony service, you can delete all code that displays IP telephony information.
Important:
-
When editing JSPs, be careful to maintain the syntax when moving or deleting code. For example, a missing %> from a JSP tag will cause problems.
-
When removing code, do not remove input entry points for more information that is required for registration. See "Customizing the Self-Care Manager Interface" in BRM Developer's Guide.
-
Do not copy data input and display codes from one page to another. Each code works only on the page that includes it.
For more information On editing JSPs, see Sun Microsystems' JSP documentation or other JSP reference documents. For more extensive JSP customization, see "Customizing the Self-Care Manager Interface" in BRM Developer's Guide.
Modifying the Self-Care Manager WAR File
When you edit Self-Care Manager files, you should edit the versions in the Self-Care Manager Web Application Archive (WAR) file. This file is created when you install Self-Care Manager, and it is the source for the Self-Care Manager files that the servlet engine copies when you configure it to run Self-Care Manager.
If you configured your servlet engine before modifying individual JSPs or other files, you also must copy your modified files to the servlet engine directory where Self-Care Manager files are located.
By modifying the files in the WAR file, you make sure that you do not overwrite your modified files if you reconfigure your servlet engine for Self-Care Manager in the future.
Following are instructions for modifying the Self-Care Manager WAR file. Alternatively, you can use the Customer Center SDK to create a customized WAR file. See "Using Customer Center SDK" in BRM Developer's Guide.
To modify the Self-Care Manager WAR file, you need to install the Java Development Kit (JDK) on your system. The system running your application server already has the JDK. For more information on supported versions, see "BRM Software Compatibility" in BRM Developer's Guide.
To modify the Self-Care Manager WAR file:
-
Copy the SelfCareManager_install_dir/WebKit/webkit_en.war file to a temporary directory.
-
Extract the files from the WAR file using the jar command, as follows:
jar xvf webkit_en.war -
Delete or move the copy of webkit_en.war in the temporary directory.
-
Edit any files in the htmlui_en directory.
-
Create a new WAR file using the jar command from the temporary directory where you extracted the original files:
jar cvf webkit_en.war . -
Copy this WAR file to SelfCareManager_install_dir/WebKit.
When you set up Self-Care Manager as an application in your servlet engine, it will include the files you modified.
If you have already set up Self-Care Manager in the servlet engine, copy the modified files to the correct location in the servlet engine's directory.
Files Used by Self-Care Manager
This section describes the various types of files used by Self-Care Manager.
JSPs Used by Self-Care Manager
Table 4-1 describes the JSPs used by Self-Care Manager:
Note:
These pages use the Business Application SDK (BAS) component collection (PIAComponentCollection) to hold BAS lightweight components (that is, PLightComponentHelper).Table 4-1 Self-Care Manager JSPs
| File Name | Description |
|---|---|
|
BrandSelect.jsp |
If the BRM server is brand-enabled, this JSP sets the scope to the correct brand, so that all information and data is specific to the subscriber's brand. |
|
change_login_form.jsp |
Enables customers to change the login name for a service. |
|
change_passwd_form.jsp |
Enables customers to change a password. |
|
change_status_form.jsp |
Enables customers to change account status. |
|
constants.jsp |
Defines strings for constants commonly used in other Self-Care Manager files. |
|
debug_errorlog.jsp |
Enables error logging for debugging. |
|
error.jsp |
Handles errors and displays error messages for all JSPs. |
|
footer.jsp |
Contains standard information displayed at the end of all JSPs. |
|
invoice_selection.jsp |
Enables customers to select the start time and end time used for generating the invoice. |
|
load_session.jsp |
Used by other JSPs to retrieve commonly used account data saved during the session, such as the name and address for the account. |
|
login_verify.jsp |
Verifies the login name and password and displays confirmation when a customer logs in. |
|
logout.jsp |
Displays confirmation that a customer logged out and ends the session. |
|
online_payment.jsp |
Enables customers to pay an outstanding bill online with a credit card. |
|
online_payment_audit.jsp |
Enables customers to search for records of online bill payments. The customer specifies a start date and end date. |
|
purchase_plan_form.jsp |
Enables customers to purchase additional plans. |
|
selection.jsp |
Enables customers to select the day, month, and year when specifying a time range for viewing account activity or invoices. |
|
session_id.jsp |
Saves the current user's session ID. |
|
show_invoice.jsp |
Displays a customer invoice. |
|
usage_report.jsp |
Displays details about customer activity, such as a list of IP telephony calls. HTML pages use UsageReportGeneral.jsp instead. |
|
usage_selection.jsp |
Enables customers to set the start and end dates for a usage report. For example, a customer can specify to see IP telephony calls for more than a single month. |
|
UsageReportCommon.jsp |
Included in the other usage report JSPs to do event search tasks that are common to all the usage report JSPs. |
|
UsageReportContent.jsp |
Displays details about a customer's content usage. |
|
UsageReportGeneral.jsp |
Displays details about general customer activity, including cycle forward fees, purchase fees, adjustments, and IP and email usage. Other usage report JSPs display activity for specific types of usage. |
|
UsageReportGprs.jsp |
Displays details about a customer's mobile data (GPRS) usage. |
|
UsageReportGsm.jsp |
Displays details about a customer's mobile voice (GSM) usage. |
|
UsageReportSms.jsp |
Displays details about a customer's mobile messaging (SMS) usage. |
|
UsageReportView.jsp |
Included in the other usage report JSPs to display the data from a usage report on the Web page. |
|
view_balance.jsp |
Displays the customer's account balance summary and has links to resource reservation, event search, and voucher top-up pages. |
|
view_invoice.jsp |
Enables customers to specify which invoice to display. |
|
view_product.jsp |
Displays information about a customer's purchased products. |
|
AccountBalancePrepaid.jsp AccountBalancePrepaidView.jsp ReservationInfo.jsp ReservationInfoView.jsp |
Display the resource reservation details of a bill unit. |
|
Event_details.jsp Event_search.jsp eventsearch_dateselection.jsp |
Enable customers to view the events of the selected bill unit. |
|
Voucher_details.jsp |
Enables customers to top-up account balances by using a voucher. |
HTML Pages Used by Self-Care Manager
Table 4-2 shows the HTML files used by Self-Care Manager:
Table 4-2 HTML Files Used by Self-Care Manager
| File Name | Description |
|---|---|
|
footer.html |
HTML code that you can use as a footer on every JSP page by including this file name in the JSP. For example: <jsp:include page="footer.html"/> |
|
header.html |
HTML code that you can use as a header on every JSP page by including the file name in the JSP. |
|
index.html |
The default registration home page. Customers see this page first when they go to your Web site. |
Other Files Used by Self-Care Manager
Self-Care Manager also uses these files:
-
Style sheet: The HTML version of the JSPs use the style sheet infranet_general.css.
-
GIF files: The HTML version of the JSPs use several GIF files. Most are stored in htmlui_en/graphics, others are stored in htmlui_en.