17 Integrating BRM with Enterprise Applications
This chapter describes the Oracle Communications Billing and Revenue Management (BRM) Enterprise Application Integration (EAI) Manager framework and explains how to build a connector application to integrate BRM with other enterprise applications.
Important:
The EAI Manager is an optional feature that requires a separate license.To build a connector application using EAI Manager and to publish additional events, you must be familiar with:
-
BRM flists and storable classes. See "Understanding Flists and Storable Classes".
-
BRM event notification. See "Using Events to Trigger Operations".
-
XML.
About Integrating BRM with Enterprise Applications
You can integrate BRM with other applications in your enterprise by using EAI Manager. Integrating BRM with enterprise applications ensures data synchronization across applications in your enterprise and avoids data duplication among applications.
EAI Manager integrates BRM with enterprise applications by publishing business events. EAI Manager includes a default set of business events to be published. You can add additional events or remove unnecessary events by modifying a configuration file. A connector application built by you or a middleware vendor provides access to these events. The EAI Manager framework includes a set of functions that you implement in the connector application.
By default, EAI Manager publishes events in XML format. You can publish events in BRM flist format by specifying that format in the configuration file.
To integrate BRM with enterprise applications, you need to perform the following tasks:
-
Install EAI Manager. See "About Installing EAI Manager".
-
(Optional) Edit the configuration file to publish additional business events or change the data for default events. See "About Publishing Additional Business Events".
-
Build your connector application. See "About Building a Connector Application".
-
Configure BRM to connect to EAI Manager and your connector application. See "Configuring EAI Manager".
How EAI Manager Publishes Events
To collect and publish BRM events, EAI Manager performs these tasks:
-
EAI Manager uses event notification to cache events in the Payload Generator.
-
When the cached events form a complete business event as defined in the payloadconfig.xml configuration file, the Payload Generator generates the data (payload) to be published.
The payload is generated in one of two ways, depending on the option you choose in the configuration file:
-
By reading the fields in the incoming flists for the event
-
By accessing the BRM database
The Payload Generator generates the payload in XML or flist format as specified in the configuration file and sends it to the EAI Data Managers (DMs) through the Connection Manager (CM).
-
-
The EAI DM publishes the payload as a business event to external systems.
Figure 17-1 shows the EAI Manager architecture and data flow:
Figure 17-1 EAI Manager Architecture and Data Flow
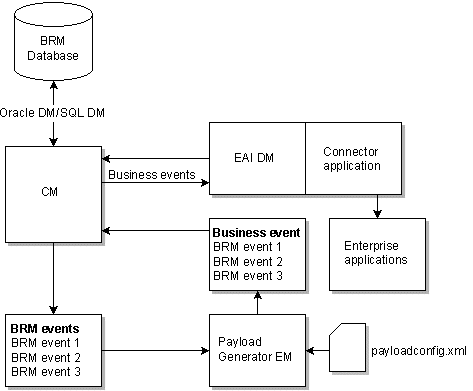
Description of ''Figure 17-1 EAI Manager Architecture and Data Flow''
About Installing EAI Manager
You can install EAI Manager on the HP-UX IA64, Solaris, Linux, and AIX operating systems.
To ensure proper load balancing on your BRM system, you can install these three EAI features on different computers:
-
EAI Connection Manager (CM) module
You must install this module on the same machine where the CM is running. The EAI CM module includes the opcodes required by EAI.
-
EAI Data Manager
You can install the EAI Data Manager (DM) on any system accessible to the BRM server.
-
Payload Generator External Module (EM)
You can install the Payload Generator EM (also called the EAI Java Server or eai_js) on any system accessible to the BRM server.
Software Requirements
Before installing EAI Manager, you must install:
-
Third-Party software, which includes the Perl libraries and JRE required for installing BRM components. See "Installing the Third-Party Software" in BRM Installation Guide.
-
BRM. See "Putting Together Your BRM System" in BRM Installation Guide.
Installing EAI Manager
Note:
If you have already installed the product, features that are already installed cannot be reinstalled without uninstalling them first. To reinstall a feature, uninstall it and then install it again.The EAI Manager downloadable package includes the installer for both EAI Manager and Synchronization Queue Data Manager. You must download the EAI Manager package and extract these two components before you can install EAI Manager. For more information about Synchronization Queue Data Manager, see "Understanding the Synchronization Queue Data Manager" in BRM Synchronization Queue Manager.
When you install EAI Manager, the installation program assigns default values in the Connection Manager (CM) and EAI DM configuration (pin.conf) files as well as the Payload Generator properties (Infranet.properties) file.
For information on changing the entries in the pin.conf and properties files, see "Configuring EAI Manager".
Follow the instructions in the appropriate section to install all EAI Manager features on the same system or to install them on separate computers. See "Installing EAI Features on the Same Computer" and "Installing EAI Features on Separate Computers".
Installing EAI Features on the Same Computer
To install EAI Manager:
-
Download the EAI Manager package (7.5.0_EAI_FrameworkMgr_platform_opt.tar.Z) where platform is the operating system name. Download this file to a temporary directory (temp_dir). For information on downloading the software, see "Downloading the BRM Applications Software" in BRM Installation Guide.
Important:
-
If you download to a Windows workstation, use FTP to copy the package to a temporary directory on your server.
-
You must increase the heap size used by the Java Virtual Machine (JVM) before running the installation program to avoid "Out of Memory" error messages in the log file. For information, see "Increasing Heap Size to Avoid "Out of Memory" Error Messages" in BRM Installation Guide.
-
-
Go to temp_dir and uncompress and extract the .tar.Z file. The following files are extracted:
-
7.5.0._EAI_FrameworkMgr_platform_opt.bin - EAI Manager
-
7.5.0_DM_AQ_platform_opt.bin - Synchronization Queue Data Manager
where platform is the operating system name.
-
-
Go to the directory where you installed the Third-Party package and source the source.me file.
Caution:
You must source the source.me file to proceed with installation, otherwise "suitable JVM not found" and other error messages appear.Bash shell:
source source.me.shC shell:
source source.me.csh -
Go to the temp_dir and enter this command:
7.5.0_EAI_FrameworkMgr_platform_opt.bin
where platform is the operating system name.
Note:
You can use the -console parameter to run the installation in command-line mode. To enable a graphical user interface (GUI) installation, install a GUI application such as X Windows and set the DISPLAY environment variable before you install the software. -
Follow the instructions displayed during installation.
Note:
The installation program does not prompt you for the installation directory if BRM or EAI Manager is already installed on the machine and automatically installs the package at the BRM_Home location, where BRM_Home is the directory in which you installed BRM components. -
Go to the directory where you installed the EAI Manager package and source the source.me file:
Bash shell:
source source.me.shC shell:
source source.me.csh -
Go to the BRM_Home/setup directory and run the pin_setup script.
-
Open the BRM_Home/sys/cm/pin.conf file in a text editor, change the value of the enable_publish entry to 1, and then save and close the file.
-
Load information for EAI Manager into your system's event notification list.
-
(Solaris and Linux) Stop and restart all BRM processes.
See "Starting and Stopping the BRM System" in BRM System Administrator's Guide for more information.
Installing EAI Features on Separate Computers
To install EAI features on separate computers, you must download the EAI Manager software package and then complete a separate installation procedure for each component.
Note:
The EAI Connection Manager (CM) module must be installed on the same system as the CM.-
Download the software to a temporary directory (temp_dir).
-
Log in as user pin.
-
Go to the temp_dir where you downloaded the BRM software and enter this command:
7.5.0_EAI_FrameworkMgr_platform_opt.bin
where platform is the operating system name.
Note:
You can use the -console parameter to run the installation in command-line mode. To enable a graphical user interface (GUI) installation, install a GUI application such as X Windows and set the DISPLAY environment variable before you install the software.This starts the installation program.
-
Enter Custom when asked to specify the setup type. Select EAI_CM by typing its respective number. Click Next.
-
Follow the instructions displayed during installation. Your responses are written to the BRM_Home/setup/pin_setup.values file.
-
Go to the directory where you installed the EAI Manager software and source the source.me file:
Bash shell:
source source.me.shC shell:
source source.me.csh -
Open the BRM_Home/setup/pin_setup.values file in a text editor.
-
Set the value of the EAI hostname parameter to the name of the system where you will install the EAI DM:
$EAI{'hostname'} = "hostname"; -
On the system where the Oracle DM is running, perform these steps:
-
Open the Oracle DM configuration file (BRM_Home/sys/dm_oracle/pin.conf) in a text editor.
-
Set the three dd_write_enable parameters to 1:
- dm dd_write_enable_fields 1
- dm dd_write_enable_objects 1
- dm dd_write_enable_portal_objects 1
-
Save and close the file.
-
Stop and restart the Oracle DM.
-
-
Log in as user pin.
-
Go to the BRM_Home/setup directory and run the pin_setup script.
-
Open the BRM_Home/sys/cm/pin.conf file, change the value of fm_publish entry to 1, and then save and close the file.
-
On the system where the Oracle DM is running, perform these steps:
-
Open the Oracle DM configuration file (BRM_Home/sys/dm_oracle/pin.conf) file in a text editor.
-
Reset the three dd_write_enable parameters to their original values, probably 0:
- dm dd_write_enable_fields 0
- dm dd_write_enable_objects 0
- dm dd_write_enable_portal_objects 0
-
Save and close the file.
-
Stop and restart the Oracle DM.
-
-
Load information for EAI Manager into your system's event notification list.
-
Log in as user pin.
-
Go to the temp_dir where you downloaded the BRM software and enter this command:
7.5.0_EAI_FrameworkMgr_platform_opt.bin
where platform is the operating system name.
Note:
You can use the -console parameter to run the installation in command-line mode. To enable a graphical user interface (GUI) installation, install a GUI application such as X Windows and set the DISPLAY environment variable before you install the software.This starts the installation program.
-
Enter Custom when asked to specify the setup type. Select EAI_DM by typing its respective number. Click Next.
-
Follow the instructions displayed during installation. Your responses are written to the BRM_Home/setup/pin_setup.values file.
-
Go to the directory where you installed the EAI Manager software and source the source.me file:
Bash shell:
source source.me.shC shell:
source source.me.csh -
Log in as user pin.
-
Go to the BRM_Home/setup directory and run the pin_setup script.
-
On the computer where the Connection Manager (CM) is installed, perform these steps:
-
Open the BRM_Home/sys/cm/pin.conf file in a text editor.
-
Edit the dm_eai_pointer entry to point to the computer where you installed the EAI DM:
- cm dm_pointer db_no ip host_name port_number # dm_eai
where:
db_no specifies the database number for the EAI DM
host_name specifies the host name where the EAI DM is installed
port_number specifies the port used by the EAI DM
-
Stop and restart all BRM processes.
See "Starting and Stopping the BRM System" in BRM System Administrator's Guide.
-
Installing the EAI Payload Generator
-
Log in as user pin.
-
Go to the temp_dir where you downloaded the BRM software and enter this command:
7.5.0_EAI_FrameworkMgr_platform_opt.bin
where platform is the operating system name.
Note:
You can use the -console parameter to run the installation in command-line mode. To enable a graphical user interface (GUI) installation, install a GUI application such as X Windows and set the DISPLAY environment variable before you install the software.This starts the installation program.
-
Enter Custom when asked to specify the setup type. Select EAI_JS by typing its respective number. Click Next.
-
Follow the instructions displayed during installation. Your responses are written to the BRM_Home/setup/pin_setup.values file.
-
Go to the directory where you installed the EAI Manager software and source the source.me file:
Bash shell:
source source.me.shC shell:
source source.me.csh -
Go to the BRM_Home/setup directory and run the pin_setup script.
Configuring Event Notification for EAI Manager
When a BRM event that is included in a business event occurs, EAI Manager uses event notification to call the opcode that caches the BRM event in the Payload Generator.
Before you can use EAI Manager, you must configure the event notification feature as follows:
-
If your system has multiple configuration files for event notification, merge them. See "Merging Event Notification Lists".
-
Ensure that the merged file includes the entire event notification list in the BRM_Home/sys/data/config/pin_notify_eai file.
Note:
The BRM events listed in the pin_notify_eai file are not business events. A business event comprises one or more BRM events. You define business events in the payloadconfig.xml file. See "About BRM Business Events". -
If you configured EAI Manager to publish to an HTTP port, ensure that the merged file also includes the entire event notification list in the BRM_Home/sys/data/config/pin_notify_plugin_http file.
-
(Optional) If necessary, add, modify, or delete entries in your final event notification list. See "Editing the Event Notification List".
Important:
If you changed the default set of BRM events to be published by adding business events or by modifying the existing business events, you must edit your final event notification list to include all the BRM events in the new or modified business events. -
Load your final event notification list into the BRM database. See "Loading the Event Notification List".
For more information, see "Using Events to Trigger Operations".
About BRM Business Events
A business event is a BRM operation that you define in the Payload Generator EM configuration file (payloadconfig.xml). A number of business events are defined by default; for example, one of the default business events is ProductPurchase, which is created when a customer buys a product.
A business event is created only after EAI Manager has been notified that a qualifying BRM event has occurred. For example, several BRM events, including /event/customer/billinfo, /event/billing/product/action/purchase, and /event/customer/nameinfo, must occur before the CustCreate business event is created.
BRM uses event notification to cache the events that make up a business event in the Payload Generator. See "Configuring Event Notification for EAI Manager".
Business event definitions include data or pointers to data from the flists of events included in the definition. For an example of the relationship between the event flist and the definition of the business event to publish, see "Event Flist, Event Definition, and XML Output Example".
The default set of business events that BRM publishes is defined in the Payload Generator EM configuration file, payloadconfig.xml. You can edit the configuration file to:
-
Add events that you want to publish.
-
Remove events that you do not want to publish.
-
Specify whether you want the events to be published in XML or flist format.
For the definitions of the default set of business events, see the payload configuration file (BRM_Home/sys/eai_js/payloadconfig.xml).
About Publishing Additional Business Events
To publish additional business events, you include definitions of the events in the payloadconfig.xml configuration file. For information on the syntax of the entries, see "About the Payload Configuration File Syntax".
You use the fields in the event flist or storable class to define the business event. You need to specify the BRM events to publish, the data to publish, where to get the values for the fields, and how to present the data in the XML output.
For information on how to define events, see "Defining Business Events".
For an example of the relationship between the flist, event definition, and XML output, see "Event Flist, Event Definition, and XML Output Example".
If you need to publish valid XML documents for events, you must create data type definitions (DTDs) for the events. For a sample, see the DTDs for the default events in the BRM_Home/sys/eai-js/dtds directory.
Setting Up Multiple Publishers and Events
You can define multiple publishers in EAI Manager to publish separate sets of business events. You define a publisher by including a <PublisherDefs> tag for it in the payloadconfig.xml file. See "Publisher Definitions" for more information.
Using multiple publishers, you can ensure that applications receive only the events they need. For example, one publisher could publish the customer creation event to one application, while another publisher publishes the service creation event to another application.
Events can be published separately even if one event is part of another. For example, service creation can take place during customer creation, but the subscriber interested in service creation receives only that event, not the larger customer creation event.
Defining Business Events
-
In a text editor, open the payload configuration file (BRM_Home/sys/eai_js/payloadconfig.xml).
-
In the <Publisher> section, specify the business events you want to publish.
For information on the syntax, see "Publisher Definitions".
-
(Optional) In the <Publisher> section, specify attributes for business events that will cause identifiers to be returned.
-
For each business event you specified, define the following attributes in the <EventDefs> section:
-
(Optional) EndEvent
-
(Optional) DataFrom
-
(Optional) UseOnlyElement
-
(Optional) Include the following elements in the <EventDefs> section:
-
For each SubElement in the <ElementDefs> section, include the following attributes to define the sub-element:
-
(Optional) Include the following attributes:
-
Important:
If you are using the flist (field list) output format, you must specify PinFld.
-
Include the following elements in the element definition:
-
(Optional) To check the configuration file for errors, run the ValidateConfig program.
For more information, see "Validating Your Changes to the Payload Configuration File".
-
Save and close the file.
-
Ensure that the BRM events included in each newly defined business event are in your system's event notification list.
-
Stop and restart the Payload Generator External Module (EM):
cd BRM_Home/bin
pin_ctl bounce eai_js
Important:
If you rename the file, make sure you also change the file name in the Payload Generator EM Infranet.properties file. For more information, see "Configuring the Payload Generator EM". -
If your custom event is used by Pipeline Manager, configure the DAT_BalanceBatch CustomEvents registry entry. See "Configuring Custom Business Events for Pipeline Discounting" and "DAT_BalanceBatch" in BRM Configuring Pipeline Rating and Discounting.
Configuring Custom Business Events for Pipeline Discounting
To enable custom business events in Pipeline Manager, you need to list them in the DAT_BalanceBatch CustomEvents registry entry. For example, this entry enables an event named CycleRollover20days:
CustomEvents
{
   CycleRollover20days
 }
Removing Events that You Do Not Want to Publish
-
In a text editor, open the payload configuration file (BRM_Home/sys/eai_js/payloadconfig.xml).
-
Remove the events that you do not want to publish from the event list in the <Publisher> section.
-
(Optional) To check the configuration file for errors, run the ValidateConfig program.
For more information, see "Validating Your Changes to the Payload Configuration File".
-
Save and close the file.
-
Stop and restart the Payload Generator EM:
cd BRM_Home/bin
pin_ctl bounce eai_js
Returning Identifiers from Enterprise Applications
You can configure EAI Manager to receive identifiers returned from enterprise applications. For example, if data is published to a contact management application, that application may return user IDs. You can store those IDs in the BRM database.
You specify additional attributes in the payloadconfig.xml file when you define a business event that returns an identifier. These attributes are necessary only for business events that return an identifier.
See "Publisher Definitions" for more detailed information about the syntax.
In addition to including information about identifiers in the <Publisher> section of the payloadconfig.xml file, you must implement the SetIdentifier function in your connector application. See "SetIdentifier" for more information.
Changing the Format of Published Events
By default, EAI Manager publishes business events in XML format. You can publish events in flist format by editing the configuration file.
-
In a text editor, open the payload configuration file (BRM_Home/sys/eai_js/payloadconfig.xml).
-
In the <PublisherDefs> section, change the value of Format from XML to FLIST:
<PublisherDefs> <Publisher DB="0.0.9.1" Format="FLIST"> -
(Optional) To check the configuration file for errors, run the ValidateConfig program.
For more information, see "Validating Your Changes to the Payload Configuration File".
-
Save and close the file.
-
Stop and restart the Payload Generator EM:
cd BRM_Home/bin
pin_ctl bounce eai_js
Validating Your Changes to the Payload Configuration File
After you edit the payloadconfig.xml configuration file, you can check the validity of the file by using the ValidateConfig program. This program checks the configuration file for errors and displays the list of events to be published along with a message that the file is valid. If there are errors, the ValidateConfig program specifies them.
To validate your changes to the configuration file, run the ValidateConfig program using the following syntax:
java com.portal.eai.ValidateConfig [config_file_name]
For example:
java com.portal.eai.ValidateConfig BRM_Home/sys/eai_js/payloadconfig.xml
Note:
If the configuration file name is not specified, the ValidateConfig program uses the configuration file specified in the Infranet.properties file.About the Payload Configuration File Syntax
This section describes the syntax of the configuration file used to define the business events.
The configuration file has three sections:
-
"Publisher Definitions" (<PublisherDefs>) lists the publisher and the events to publish. Each event in the list is defined in the event definition section.
-
"Event Definitions" (<EventDefs>) defines the contents, source, and format of the events to publish. Each sub-element in the event definition is defined in the element definition section.
-
"Element Definitions" (<ElementDefs>) defines the sub-elements specified in the event definitions.
Figure 17-2 shows the relationship between the elements in the different sections of the configuration file:
Figure 17-2 Sample Payload Configuration File
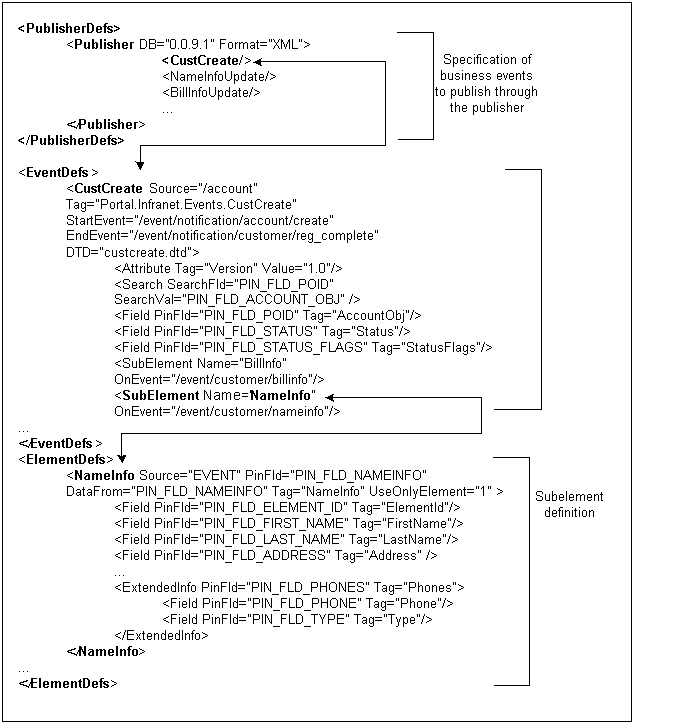
Description of ''Figure 17-2 Sample Payload Configuration File''
Publisher Definitions
You specify each business event that needs to be published, such as customer account creation, in the <PublisherDefs> section between the <Publisher> tags. The publisher definition is a list of all the business events to publish.
The <PublisherDefs> section defines the publisher to which the events are sent. You can include multiple publishers. You define each publisher as an element with the tag <Publisher>.
The publisher definition includes the following elements:
-
The mandatory attribute, DB, which specifies the database number of the EAI DM.
Important:
The database number must match the database number in the dm_pointer entry of the CM pin.conf file and the dm_db_no entry of the EAI DM pin.conf file. -
An optional attribute, Format, which specifies the format for the published output. Possible values are XML, which is the default, and FLIST.
-
A list of events to publish. Each event is listed in a separate tag. If an event triggers an identifier to be returned from a third-party application, the tag must include attributes specifying where the identifier will be stored in BRM. These attributes are required only for events that trigger identifiers.
This example includes one event (CustCreate) that triggers an identifier:
<PublisherDefs>
<Publisher DB="0.0.9.1" Format="XML">
<CustCreate ObjectPoid="PIN_FLD_POID" IdentifierFld="PIN_FLD_ACCOUNT_NO"/>
<NameInfoUpdate/>
<BillInfoUpdate/>
...
</Publisher>
</PublisherDefs>
Note:
In previous versions of EAI Manager, a different syntax was used for event definitions. The events were defined in a comma-separated list, not as tags. This syntax is still supported when no events trigger an identifier. If any of the defined events returns an identifier, all of the events must be defined with tags.
Event Definitions
Each event listed in the publisher definition is defined in the event definition between the <EventDefs> and </EventDefs> tags. The event definition contains a list of events to publish, each of which contains elements and attributes that specify the following information:
-
Where to get the fields and the data for the event
-
The sub-elements that make up the event
-
The start and end event for the business event if multiple events are generated for the business event
-
How the elements should be presented in the final XML output
Note:
If only one BRM event is generated during a business event, you need to specify only the start event.
The <EventDefs> tag defines a business event. Event definitions must have the following attributes:
Optionally, the event definition can include the following elements and attributes:
This example shows the definition of the customer creation business event in the default configuration file:
<EventDefs>
   <CustCreate Source="/account"
   Tag="Portal.Infranet.Events.CustCreate"
   StartEvent="/event/notification/account/create"
   EndEvent="/event/notification/customer/reg_complete"
   DTD="custcreate.dtd">
   <Attribute Tag="Version" Value="1.0"/>
      <Search SearchFld="PIN_FLD_POID"
      SearchVal="PIN_FLD_ACCOUNT_OBJ"/>
      <Field PinFld="PIN_FLD_POID" Tag="AccountObj"/>
      <Field PinFld="PIN_FLD_STATUS" Tag="Status"/>
      <Field PinFld="PIN_FLD_STATUS_FLAGS" Tag="StatusFlags"/>
      <SubElement Name="BillInfo"
      OnEvent="/event/customer/billinfo"/>
      <SubElement Name="PayInfo"
      OnEvent="/event/notification/customer/reg_complete"/>
      <SubElement Name="NameInfo"
      OnEvent="/event/customer/nameinfo"/>
      <SubElement Name="DealInfo"
      OnEvent="/event/billing/deal/purchase"/>
      <SubElement Name="ProductInfo"
      OnEvent="/event/billing/product/action/purchase"/>
      <SubElement Name="ProductDetail"
      OnEvent="/event/billing/product/action/purchase"/>
      <SubElement Name="Service"
      OnEvent="/event/notification/customer/reg_complete"/>
      <SubElement Name="Profile"/>
   </CustCreate>
</EventDefs>
Element Definitions
Each sub-element in the event definition must be defined as an element in the element definition (<ElementDefs>). An array or substructure (at element level 0) in the BRM event flist or the storable object flist is defined in the element definition.
Each element definition specifies the following information:
-
Where to get the data for the element
-
The BRM field name for the data
-
How to present the data in the final XML output
The <ElementDefs> tag is used to define elements. The element definition includes the following elements and attributes:
-
The optional attributes, "PinFld" and "UseOnlyElement"
Important:
If the output format for the payload is FLIST, PinField is mandatory. -
The elements "Field" and "ExtendedInfo"
This example shows the definition of the sub-element NameInfo in the default configuration file:
<ElementDefs>
   <NameInfo Source="EVENT" PinFld="PIN_FLD_NAMEINFO"
   DataFrom="PIN_FLD_NAMEINFO" Tag="NameInfo" UseOnlyElement="1" >
      <Field PinFld="PIN_FLD_ELEMENT_ID" Tag="ElementId"/>
      <Field PinFld="PIN_FLD_FIRST_NAME" Tag="FirstName"/>
      <Field PinFld="PIN_FLD_MIDDLE_NAME" Tag="MiddleName"/>
      <Field PinFld="PIN_FLD_LAST_NAME" Tag="LastName"/>
      <Field PinFld="PIN_FLD_ADDRESS" Tag="Address"/>
      <Field PinFld="PIN_FLD_CITY" Tag="City"/>
      <Field PinFld="PIN_FLD_STATE" Tag="State"/>
      <Field PinFld="PIN_FLD_ZIP" Tag="Zip"/>
      <ExtendedInfo PinFld="PIN_FLD_PHONES" Tag="Phones">
          <Field PinFld="PIN_FLD_PHONE" Tag="Phone"/>
          <Field PinFld="PIN_FLD_TYPE" Tag="Type"/>
      </ExtendedInfo>
   </NameInfo>
</ElementDefs>
Syntax of Elements and Attributes
This section describes the attributes and elements you use to define events and elements.
For an example of the relationship between the events, elements, and the flist data, see "Event Flist, Event Definition, and XML Output Example".
Source
Specifies where to get the data for fields specified in the event or element definitions.
Source can be a BRM storable class name or EVENT. If you set the Source attribute to EVENT, the Payload Generator EM reads the fields for the element from the incoming flist of the event. If you specify a class name, the Payload Generator EM reads the fields from the BRM database.
If all the data for the fields you need to publish is present in the event flist, specify EVENT for the source. If the event flist has a pointer to data through a POID (Portal object ID), specify Source to be a storable class.
For example:
<!-- Source is a Portal class name-->
PayInfo Source="/payinfo"

<!-- Source is the Event flist -->
NameInfo Source="EVENT"
Tag
Specifies the XML tag to be associated with the event, element, or field in the final XML output file.
For example, this entry in the configuration file appears as <FirstName>Name</FirstName> in the XML output:
<Field PinFld="PIN_FLD_FIRST_NAME" Tag="FirstName"/>
StartEvent
Specifies the BRM event that triggers the beginning of the business event. The Payload Generator EM starts caching event data when the event specified in the StartEvent attribute occurs. This element is mandatory in event definitions. If there is only one BRM event generated for the business event, the Payload Generator generates and publishes the business event as soon as it receives the event specified in StartEvent. If more than one BRM event is generated for a business event, the Payload Generator caches all the events starting with this event up to the event specified in EndEvent, and then generates and publishes the business event.
For example:
<-- StartEvent for customer creation business event -->
StartEvent="/event/notification/account/create"
EndEvent
Specifies the BRM event that marks the end of the business event. When the Payload Generator has cached all the events from the event specified in the StartEvent attribute to the event specified in the EndEvent attribute, the Payload Generator generates and sends the payload to the EAI DM.
When this attribute isn't present, the business event begins and ends with the BRM event specified in StartEvent.
For example:
<!-- EndEvent for customer creation business event -->
EndEvent="/event/notification/customer/reg_complete"
DataFrom
Specifies the array or substructure field in an flist from which to retrieve data for the event or the element.
If the source for the element data is specified as EVENT, the array or substructure is read from the incoming flist for the event. If the source for the element data is specified as a storable class, the array or substructure is read from the storable class in the BRM database.
For example:
<!-- Data to be read from PIN_FLD_NAMEINFO array for the NameInfo element -->

DataFrom="PIN_FLD_NAMEINFO"
UseOnlyElement
Specifies an element of an array to publish. Use this tag when you want to publish only one of the elements of the array in the flist.
For example, suppose the BillInfo element of a business event is constructed when an /event/customer/billinfo event occurs. To publish only element 1, specify UseOnlyElement="1".
UseElementId
Determines whether element IDs are retained with array fields. If you set UseElementId to 1, element IDs are retained with array elements. If you set UseElementId to 0, array elements are published in sequential order without their original element IDs.
Note:
If the data is published in flist format with UseElementID set to 0, elements are numbered sequentially starting from 0. These numbers do not correspond to the original element IDs. They are included only to ensure that the flist is in a valid format.For example:
<!-- This tag will cause element IDs to be retained for elements in this array -->

<NameInfo Source="EVENT" PinFld="PIN_FLD_NAMEINFO"
DataFrom="PIN_FLD_NAMEINFO" Tag="NameInfo" UseElementId="1" >
Attribute
Adds an attribute to the XML output of the events.
Note:
Attribute is used only in event definitions.You must specify two entries for the Attribute field:
-
Tag to specify the name of the attribute you want to add.
-
Value to specify the value of the attribute.
For example:
<!-- This Attribute adds the version number to a customer creation business event definition -->
<CustCreate ... Tag="Portal.Infranet.Events.CustCreate"
<Attribute Tag="Version" Value="1.0"/>
The XML output for this business event includes a Version attribute:
<Portal.Infranet.Events.CustCreate Version="1.0">
DTD
Specifies the data type definition (DTD) used for the XML output for this business event.
Note:
You need to specify a DTD only if you publish valid XML documents.You must use the Name attribute to specify the name of the DTD file.
This example specifies that the custcreate.dtd file be used for the output:
<!-- Specifies the custcreate.dtd as the file to use for the XML output -->

<DTD Name="custcreate.dtd">
The XML output for that example includes the DTD file in its DOCTYPE tag:
<!DOCTYPE Portal.Infranet.Events.CustCreate SYSTEM "custcreate.dtd">
PinFld
Specifies the BRM field name.
For element and ExtendedInfo definitions, the data type of the BRM field must be an array or substructure.
Important:
This field is mandatory if you specify FLIST as the output format for the published event.<--! Specifies that the data for the NameInfo element is from the PIN_FLD_NAMEINFO field of the event flist--> <NameInfo Source="EVENT" PinFld="PIN_FLD_NAMEINFO"
Field
Specifies the BRM field to include in the definition of an event, element, or ExtendedInfo.
You must specify two attributes:
-
PinFld to specify the name of the field in BRM.
-
Tag to specify the XML tag to use for the value in the XML file generated for this business event.
This example specifies that the data is retrieved from the PIN_FLD_FIRST_NAME field and assigned to the <FirstName> tag in the XML output:
<Field PinFld="PIN_FLD_FIRST_NAME" Tag="FirstName"/>
The XML output:
<FirstName> Name </FirstName>
ExtendedInfo
Specifies an array or substruct field within an element definition.
For example, if the array that defines the element contains a nested array that you want to include in your element definition, use ExtendedInfo.
You must use the following attributes:
-
PinFld to specify the BRM field name. The data type must be an array or substruct.
-
Tag to specify the XML tag used for the value in the XML file generated for this business event.
You can optionally specify the "UseOnlyElement" attribute to read only the element specified from the array.
Search
Specifies the search criteria to read data from a storable class when Source is specified as a storable class.
Note:
You can specify Search only in event and element definitions.EAI Manager searches the database by creating an SQL query using the attributes specified:
-
SearchFld specifies the field to search in the database.
-
SearchVal specifies the value in the input flist to be used in the search arguments.
-
SearchValFrom specifies that the value for the search needs to be read from an array or substruct element in the input flist.
For example, when this Search field is specified:
<PayInfo Source="/payinfo" PinFld="PIN_FLD_PAYINFO"
   Tag="PayInfo" >
      <Search SearchFld="PIN_FLD_ACCOUNT_OBJ"
      SearchVal="PIN_FLD_ACCOUNT_OBJ"/>
...
EAI Manager creates this query:
Select from /payinfo where PIN_FLD_ACCOUNT_OBJ equals the value of the field PIN_FLD_ACCOUNT_OBJ in the event flist.
When this Search field is specified:
<ProductDetail Source="/product" PinFld="PIN_FLD_PRODUCT"
   Tag="ProductDetail">
      <Search SearchFld="PIN_FLD_POID"
      SearchVal="PIN_FLD_PRODUCT_OBJ"
      SearchValFrom="PIN_FLD_PRODUCT"/>
....
EAI Manager creates this query:
Select from /product where PIN_FLD_POID equals the value of the field PIN_FLD_PRODUCT_OBJ in the PIN_FLD_PRODUCT array of the event flist.
SubElement
Specifies the element to add to an event in the event definition.
You must specify the Name attribute, which must match the tag of the element in the <ElementDefs> section. If you have an element called NameInfo in the <ElementDefs> tag:
<ElementDefs>
<NameInfo Source="EVENT"...>
the Name attribute in the SubElement must be:
<SubElement Name="NameInfo">
You can optionally include the OnEvent attribute if the Source for the sub-element is "Event". If you specify OnEvent, the data for the sub-element is generated when the event occurs.
If the Source for the data is a storable class, the data is read from the database before the business event is published.
For example, this entry specifies that the data for the NameInfo Sub-element is read when the nameinfo event occurs in BRM:
<SubElement Name="NameInfo"
OnEvent="/event/customer/nameinfo"/>
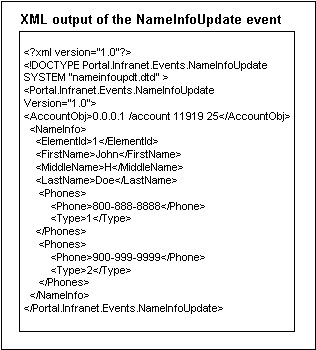
Event Flist, Event Definition, and XML Output Example
The following figures show the NameInfoUpdate business event definition, how the data in the event flist is used to construct the business event, and the published XML document.
Note:
These examples show only a few of the fields in the event flist and event definition.Figure 17-3 shows a partial NameInfoUpdate event flist and the NameInfoUpdate definition:
Figure 17-3 NameInfoUpdate Event Flist and Event Definition

Description of ''Figure 17-3 NameInfoUpdate Event Flist and Event Definition''
Figure 17-4 shows the published XML output of the NameInfoUpdate event in the previous example:
About Filtering which Business Events Are Published
You can configure EAI Manager to filter which business events are published or not published based on business event attributes. You define the criteria a business event must meet, and only business events meeting the criteria are published.
You filter which business events are published and not published by creating a condition, which consists of the following:
-
The Condition attribute. See "About the Condition Attribute".
-
The criteria that the business event must meet to be published. See "About the Condition Definition".
About the Condition Attribute
The Condition attribute specifies the name of your condition. You can use any name, such as MyCondition. You specify the condition name in the <PublisherDefs> section of the payloadconfig.xml file using the following format:
Condition=ConditionName
You indicate whether to apply the condition to a specific business event or to all business events in the publisher through the placement of the Condition attribute:
-
For a specific business event, you add the Condition attribute after the appropriate business event. For example, to apply the condition to BillInfoUpdate business events:
<PublisherDefs>
   <Publisher DB="0.0.9.9" Format="FLIST">
      CustCreate,
      CustDelete,
      BillInfoUpdate Condition=MyCondition
   </Publisher>
</PublisherDefs>
In this example, only the BillInfoUpdate business event will be filtered by MyCondition.
-
For all business events in the publisher, you add the Condition attribute, surrounded by quotes, to the <Publisher> tag. For example:
<PublisherDefs>
   <Publisher DB="0.0.9.9" Condition="MyCondition" Format="FLIST"/>
      CustCreate,
      CustDelete,
      BillInfoUpdate
   </Publisher>
</PublisherDefs>
In this example, the CustCreate, CustDelete, and BillInfoUpdate business events will be filtered by MyCondition.
About the Condition Definition
The condition definition defines the criteria that a business event must meet to be published. The condition definition must appear at the end of the payloadconfig.xml file in its own <ConditionDefs> section and follow this format:
<ConditionDefs>
   <ConditionName>
      <BooleanOperator>
         <BooleanExpression PinFld="FieldName" Value="FieldValue" Operator="OpValue"/>
      </BooleanOperator>
   </ConditionName>
</ConditionDefs>
Table 17-1 lists the elements in the <ConditionDefs> section.
Table 17-1 Elements in ConditionDefs
| Element | Syntax | Description |
|---|---|---|
|
ConditionName |
<MyCondition> |
Opens the condition definition. ConditionName must match the name you defined in the Condition attribute. See "About the Condition Attribute". |
|
BooleanOperator |
<AndExpression> |
The Boolean operator to apply. Possible values are:
|
|
BooleanExpression |
<BooleanExpression PinFld="PIN_FLD_FLAGS" Value="128" Operator="GT"/> |
Contains the definition for the Boolean expression, including the field name, field value, and operator. PinFld specifies the business event flist field name. You can also use OP_FLAGS, which is the flag with which the business event was generated. Value specifies the value of the business event flist field. Operator can be one of the following:
Note: The operators that can be used with each field depend on the field's data type:
|
About Building a Connector Application
To provide access to BRM event data for enterprise applications, you need to build a module connector application that handles transaction management and transformation schemes specific to your environment.
The EAI DM calls the functions listed in Table 17-2 when it starts, processes event data, and shuts down. You must implement these functions in your connector application.
Table 17-2 Functions Called by EAI Data Manager
| Function | Description |
|---|---|
|
Called by the EAI DM after the transaction is aborted in BRM. |
|
|
Called by the EAI DM after BRM commits the transaction to its database. |
|
|
Called when the EAI DM process is shutting down. |
|
|
Called from a connector application to access the context initialized with InitializeGlobalContext. |
|
|
Called by the EAI DM when it starts. |
|
|
Called by the EAI DM before it calls PublishEvent. |
|
|
Called by the EAI DM when BRM is about to commit the transaction to the database. |
|
|
Called by the EAI DM when there is a business event to be published. |
|
|
Called from the connector application to set a return identifier for a published business event. |
|
|
Called by the EAI DM when it shuts down. |
The plugin_flist.c and plugin_xml.c files in the BRM_Home/sys/dm_eai directory provide sample implementations of the EAI functions in flist and XML format.
After you build your connector application, configure EAI Manager. See "Configuring EAI Manager".
Configuring EAI Manager
When you install EAI Manager, the installation program adds entries to the EAI DM and the CM pin.conf files and to the Infranet.properties file. After you build the connector application, you need to enable EAI by editing the pin.conf and Infranet.properties files to specify values for the entries relevant to EAI Manager.
Configuring the Connection Manager for EAI
-
In a text editor, open the CM configuration file (BRM_Home\sys\cm\pin.conf).
This pin.conf file contains descriptions of all the entries and instructions for editing the entries.
-
In the EAI_CM section of the file, assign values to the entries shown in Table 17-3:
Entry Description Example - fm_publish enable_publish
Specifies whether to publish events.
To publish events, specify 1. To not publish events, specify 0.
- fm_publish enable_publish 1
- cm em_pointer
Specifies the host name and port number of the computer on which the Payload Generator EM runs.
The em_pointer entry includes the following values:
-
Tag that refers to the EM type; for example, publish for the EAI EM.
-
The address type tag, ip.
-
IP address or host name of the computer where the Payload Generator EM runs.
-
Port number of the computer where the Payload Generator EM runs.
Important: The port number must match the port number in the Infranet.properties file in the BRM_Home\sys\eai_js directory.
- cm em_pointer publish ip 127.0.0.1 11930
- cm em_group
Specifies a member opcode in a group of opcodes provided by the Payload Generator EM.
Note: This entry is automatically inserted in the configuration file by the installation program.
The em_group entry includes the following values:
-
Tag that refers to the EM type; for example, publish for the EAI EM.
-
The opcode name or number.
- cm em_group publish 1301
- cm dm_pointer
Specifies the database number, the IP address or host name, and port number of the computer where the EAI DM runs.
Important: The database number must match the DB entry of the publisher definition in the payloadconfig.xml file. The database number and port number must match the dm_db_no and dm_port entries in the EAI DM pin.conf file.
- cm dm_pointer 0.0.9.1 ip 127.0.0.1 11970
-
-
Save and close the file.
-
Stop and restart the CM:
cd BRM_Home/bin
pin_ctl bounce cm
Configuring the EAI DM
-
In a text editor, open the EAI DM configuration file (BRM_Home\sys\dm_eai\pin.conf).
-
In the EAI_PINCONF entries section, assign values to the entries shown in Table 17-4:
Table 17-4 EAI_PINCONF Entries
Entry Description Example - dm plugin_name
Specifies the name of the module connector application that you implemented.
- dm plugin_name ./dm_eai_plugin.so
- dm dm_db_no
Specifies the database number assigned to the EAI DM.
The format of the entry is 0.0.0.n. 0, where n is your database number.
Important: This number must match the DB entry for the publisher definition in the payloadconfig.xml file and the dm_pointer entry in the CM pin.conf file.
- dm dm_db_no 0.0.9.1 0
- dm dm_port
Specifies the port number of the computer where the EAI DM runs.
Important: This number must match the port number in the dm_pointer entry in the CM pin.conf file.
- dm dm_port 11970
- dm loglevel
Specifies the log level of the EAI DM:
0 = no logging
1 = log only error messages (default)
2 = log error messages and warnings
3 = log error messages, warnings, and debugging messages
- dm loglevel 1
-
Save and close the file.
-
Stop and restart the EAI DM:
cd BRM_Home/bin
pin_ctl bounce dm_eai
Configuring the Payload Generator EM
The Payload Generator has an Infranet.properties file that specifies the location of the payloadconfig.xml file:
To configure the Payload Generator:
-
In a text editor, open the Payload Generator configuration file (BRM_Home\sys\eai_js\Infranet.properties).
-
Specify the name and location of the payloadconfig.xml file:
-
If you are not using the plugin_http module, verify that the infranet.eai.configFile entry points to the location of the payloadconfig.xml file.
Important:
If you edited the payloadconfig.xml file and saved it with a different name, make sure you also change the name in this entry. -
If you are using the plugin_http module, change the infranet.eai.configFile entry to point to the location of the payloadconfig_plugin_http.xml file.
-
-
Verify that the file contains the following entry:
infranet.opcode.handler.PUBLISH_GEN_PAYLOAD=com.portal.eai.PublishHandler
-
Verify that the port number specified in the infranet.server.portNR entry matches the port number in the em_pointer publish entry in the CM pin.conf file.
-
Save and close the file.
-
Stop and restart the Payload Generator EM:
cd BRM_Home/bin
pin_ctl bounce ePai_js
Specifying the Date and Time Format for Business Events
In business events, the date field value uses the default EAI Manager format in the server's local time zone. You can configure the date field to use a different date and time format by using the following entry in the Payload Generator Infranet.properties file:
infranet.eai.date_pattern: Specifies the date and time format based on the ISO-8601 standard. For example, you can set this entry to any of the following formats:
-
infranet.eai.date_pattern=dd/MMM/yyyy:hh:mm:ss
-
infranet.eai.date_pattern=yyyy-MM-dd'T'hh:mm:ss. Use this format if EAI Manager uses Oracle AIA to exchange data with external applications.
To specify the date and time format in business events:
-
In a text editor, open the Payload Generator configuration file (BRM_Home\sys\eai_js\Infranet.properties).
-
Specify the date format in the infranet.eai.date_pattern entry:
infranet.eai.date_pattern = Format
-
Save and close the file.
-
Stop and restart the Payload Generator EM:
cd BRM_Home/bin
pin_ctl bounce eai_js
Defining Infinite Start Date and End Date Values
In some external applications, the infinite date value is represented as a NULL (empty XML element) value and in other external applications as the epoch time (01-01-1970 1200 AM UTC).
By default, when EAI Manager sends data to your external application, the infinite date value is the start of the epoch time.
You can define how EAI Manager sets infinite date values by using the infranet.eai.xml_zero_epoch_as_null entry in the Payload Configurator Infranet.properties file.
Note:
The infranet.eai.xml_zero_epoch_as_null entry does not affect the flist payload.To configure how EAI Manager sets infinite date values:
-
Open the BRM_Home/sys/eai_js/Infranet.properties file in a text editor.
-
Add the following entry:
infranet.eai.xml_zero_epoch_as_null = valuewhere value is:
-
TRUE to use NULL to represent an infinite start or end date.
-
FALSE to use the epoch time to represent an infinite start or end date. This is the default.
-
-
Save and close the file.
-
Stop and restart the Payload Generator EM:
cd BRM_Home/bin
pin_ctl bounce eai_js
Configuring EAI Manager to Publish to an HTTP Port
You can use EAI Manager to publish information from your BRM database to an HTTP port for use by a third-party application. For example, you can send product information to a customer relationship manager (CRM), such as Siebel Communications. Information about the new products is posted to a specific HTTP port to enable the CRM to create product information.
To configure EAI Manager to publish to an HTTP port:
-
Configure Connection Manager for EAI. See "Configuring the Connection Manager for EAI".
-
Open the dm_eai configuration file (BRM_Home\sys\dm_eai\pin.conf) with a text editor such as vi.
-
Add the following line to specify the name of the dm_http module:
- dm plugin_name plugin_http.extension
where extension is the library extension for your operating system: so for Solaris, Linux, and HP-UX IA64; and a for AIX.
-
Add the following line to configure the header delimiter:
- dm dm_http_delim_crlf value
where value is:
-
0 to specify the delimiter \n
-
1 to specify the delimiter \r\n
The default is 0.
-
-
Specify the HTTP host name and port number of the server to which the data should be sent:
- dm dm_http_agent host_name port_number
-
If required, specify the HTTP error handling options.
- dm dm_http_error_opt value
where value is:
-
0 to indicate the EAI plug-in to report the error.
-
1 to indicate the EAI plug-in to ignore the error.
-
-
If required, specify the custom header attributes that a user want to post.
- dm dm_http_header_attrs attr_name1=attr_value1; attr_name2=attr_value2
where attr_name1=attr_value1; attr_name2=attr_value2 is the custom header attribute. For example,
- dm dm_http_header_attrs accept=text; content-length= 200
-
If required, specify the response time for the HTTP server.
- dm dm_http_recv_timeout value
where value is:
-
Time after which the HTTP server return a time out error.
The default is 30 seconds.
-
-
If required, specify the URL for the HTTP server; for example:
- dm dm_http_url http://10.1.6.78/HTTP_Infranet/BTSHTTPRECEIVE.soNote:
The URL might be required; for example, when you deploy EAI Manager in an IIS environment. -
If your HTTP server requires the host name in the header, add this line to the pin.conf file:
- dm dm_http_header_send_host_name value
where value is:
-
0 to indicate that the host name won't be included in the header.
-
1 to indicate that the host name will be included in the header.
-
2 to indicate that both the host name and the port number will be included in the header.
The default is 0.
-
-
If your HTTP server sends a 100-Continue status code to clients that do not send a 100-Continue expectation, add this line to the pin.conf file:
- dm dm_http_100_continue value
where value is:
-
0 to indicate that a 100-Continue status is not expected.
-
1 to indicate that a 100-Continue status is expected.
Important:
Set value to 1 only if your server sends the 100-Continue status code to clients that do not send an expectation for it. Most servers do not send unexpected 100-Continue codes, but some do.
The default is 0.
-
-
Specify whether or not dm_http should read the response codes sent by the HTTP server:
- dm dm_http_read_success value
where value is:
-
0 to indicate that the module should not wait for a response code from HTTP receiver.
-
1 to indicate that the module should wait for a response code to be read from HTTP receiver.
The dm_http module supports the success response codes 200 (OK) and 202 (request accepted for asynchronous processing).
The default is 0.
-
-
Save and close the file.
-
Configure the payload generator. See "Configuring the Payload Generator EM".
-
Load information for the dm_http module into your system's event notification list.
-
Stop and restart BRM. See "Starting and Stopping the BRM System" in BRM System Administrator's Guide.
AbortTransaction
This function is called by the EAI DM after the transaction is aborted in BRM. For transactional systems, the transaction started with the OpenTransaction function needs to be rolled back with this function.
CommitTransaction
This function is called by the EAI DM after BRM commits the transaction to its database. You commit the transaction opened to your system with this function.
FreeGlobalContext
This function is called when the EAI DM process is shutting down. All resources allocated by the InitializeGlobalContext function are freed with this function.
GetGlobalContext
This function is called from a connector application to access the context initialized with InitializeGlobalContext.
Initialize
This function is called by the EAI DM when it starts. This function all the initialization tasks such as resource allocations in this function implementation.
Note:
Initialize is called once for each EAI DM back end. The number of back ends is specified in the EAI DM pin.conf file.- **context
-
A pointer to an open context. context is a transparent Binary Large Object (BLOB) or cookie that is passed to the connector application during subsequent calls. You need to manage memory in your application for the context.
- *output_type
-
Specifies the output format type: TYPE_XML or TYPE_FLIST. The format must match the value of the Format entry in the payloadconfig.xml file.
OpenTransaction
This function is called by the EAI DM before it calls the PublishEvent function. Open a transaction to your system during this call.
- *context
-
A pointer to the context returned by the Initialize function. You can save any transaction-specific information in the context.
PrepareCommit
This function is called by the EAI DM when BRM is about to commit the transaction to its database. If this function returns an error, the transaction within BRM is aborted.
PublishEvent
This function is called by the EAI DM when there is a business event to be published. There could be more than one PublishEvent call during a single transaction.
- *context
-
A pointer to the context returned by the Initialize function.
- *payload
-
A pointer to the event payload.
- *servicep
-
A pointer to the service that was used to log in when this business event was generated. You can use this parameter to identify duplicate logins.
SetIdentifier
This function is called from the connector application to set a return identifier for a published business event. If an identifier is set when the event is published, the DM returns the identifier when it sends a response flist.
Shutdown
This function is called by the EAI DM when it shuts down. You free all the resources allocated during initialization with this function.
Note:
To ensure an orderly shutdown and make sure that resources are reallocated, the connector application should send a SIGQUIT signal to the EAI_DM main process.