9 Managing Backup and Restore Jobs
This chapter describes how to manage backup and restore jobs.This includes viewing jobs, running jobs, viewing job properties and transcripts, editing jobs, and removing jobs.
This chapter consists of the following sections:
9.1 Overview of Managing Backup and Restore Jobs
A backup or restore request is distinct from a job. A request is not yet eligible to run. When you send a file-system backup or restore request to the Oracle Secure Backup scheduler, the request becomes a job and is eligible to run.
This section describes Oracle Secure Backup jobs and how to manage them.
9.1.1 Displaying the Jobs Page
To display the Jobs page:
- Follow the steps in "Displaying the Oracle Secure Backup Web Tool Home Page"
- Click Manage.
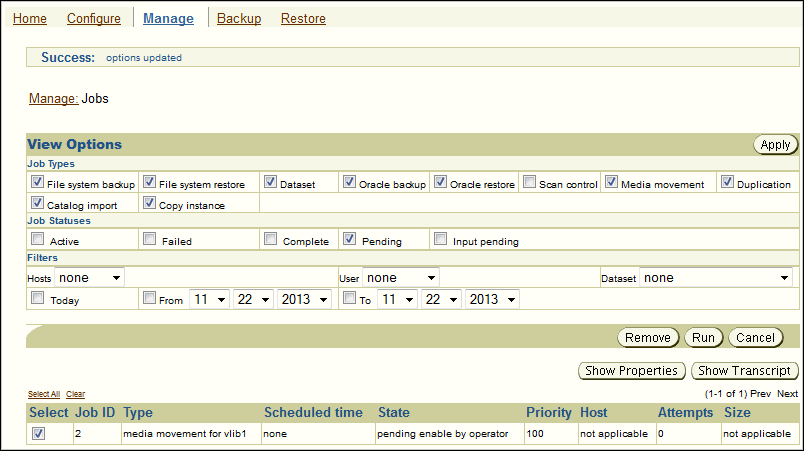
- On the Manage page, click Jobs to display the page shown in Figure 9-1. You can perform all job-related tasks in this page or in pages to which it provides links.
The View Options section enables you shows only jobs of specific types, status values, and hosts. The central text box contains details for each backup job, including the following information:
-
Job ID, which specifies the Oracle Secure Backup-assigned job identifier
-
Type, which specifies the type of job
-
State, which specifies the job status: pending, completed, or failed
You can also monitor and manage jobs from the Oracle Secure Backup Home page, which contains sections that show failed, active, pending, and completed jobs.
See Also:
Oracle Secure Backup Reference to learn about the job commands in obtool
9.2 Displaying Jobs
This section describes how to display information about Oracle Secure Backup jobs. If you are attempting to list another user's jobs, then you must have the right to list any job, regardless of its owner. If you are attempting to list your own jobs, then you must have the right to list any jobs owned by user.
To display jobs:
-
Follow the steps in "Displaying the Jobs Page".
-
In the Job Types section, select one or more of the following job display options:
-
File system backup
Select this option to display backup jobs for files in the file system, that is, backups other than database backups.
-
File system restore
Select this option to display restore jobs for files in the file system.
-
Dataset
Select this option to display the status of jobs in which a dataset is specified (see "File-System Backup Types" to learn about datasets).
-
Oracle backup
Select this option to view the status of database backup jobs.
-
Oracle restore
Select this option to view the status of database restore jobs.
-
Scan control
Select this option to display scan control jobs (see "About Vaulting Scans").
-
Media movement
Select this option to view the status of media movement jobs (see "About Media Movement Jobs").
-
Duplication
Select this option to view the status of volume duplication jobs (see "About Volume Duplication").
-
Catalog Import
Select this option to view the status of catalog import jobs.
-
Copy Instance
Select this option to view the status of copy instance jobs.
Oracle Secure Backup displays jobs that match any of the selected properties. For example, selecting File system backup and Oracle backup shows all jobs that are either file system backup or RMAN backups.
-
-
In Job Status section, check one or more of the following job display options:
-
Active
Select this option to display the status of each backup job currently in progress.
-
Failed
Select this option to display the status of backup jobs that failed.
-
Complete
Select this option to display the status of completed jobs, whether they succeeded or not.
-
Pending
Select this option to view the status of jobs that are pending, but not presently running.
-
Input pending
Select this option to view the status of jobs currently running and requesting input.
Oracle Secure Backup displays jobs that match any of the selected properties. For example, selecting Active and Failed shows all jobs that are either active or failed.
-
-
Optionally, further restrict the display of the jobs of the selected status and type.
In the Filters section, check one or more of the following job display options:
-
In Host, optionally select a host to limit the jobs displayed to those pertinent to a specific host.
The default is none, which means that no hosts are excluded from the job list.
-
In the User list, optionally select an Oracle Secure Backup user to limit the jobs displayed to those instantiated by the specified user.
The default is none, which means that no users are excluded from the job list.
-
In the Dataset list, select a dataset file to limit the jobs displayed to a particular dataset file or directory.
The default is none, which means that no datasets are excluded from the job list.
-
Do one of the following to display jobs scheduled within a time range:
-
Select Today to show only jobs created today.
-
Select the From date box and enter a date and time to show only jobs whose state was updated at or later than the indicated time.
-
Select the To date box and enter a date and time to show only jobs whose state was updated at or before the indicated time.
The format for dates is year/month/day.hour:minute[:second], for example, 2009/5/19.12:43.
-
Oracle Secure Backup displays jobs that match all of the selected properties. For example, selecting Host and Today lists jobs for the specified host that occurred today and are of the specified job status and type.
-
-
Click Apply to accept your selections.
The page refreshes to show jobs that meet the criteria you selected.
9.3 Displaying Job Properties
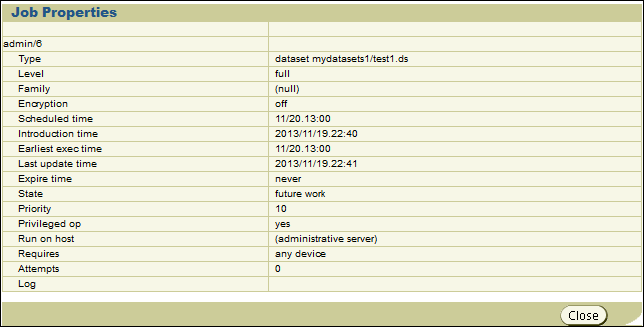
This section explains how to view job properties. Job properties include the type, level, family, scheduled time, and so on.
To display job properties:
-
Follow the steps in "Displaying the Jobs Page".
-
Select a job from the central text box.
Figure 9-2 selects the
admin/1file system backup job. -
Click the Show Properties button.
The Job Properties page appears as shown in Figure 9-3.
-
Click Close to return to the Jobs page.
9.4 Displaying Job Transcripts
This section explains how to view job transcripts. Oracle Secure Backup maintains a running transcript for each job. The transcript describes the details of the job's operation. To display a transcript, you must be a member of a class that has the list any jobs owned by user or list any job, regardless of its owner right.
See Also:
Oracle Secure Backup Reference for more information about Oracle Secure Backup rights
To display a job transcript:
-
Follow the steps in "Displaying the Jobs Page".
-
Select a job and click Show Transcript.
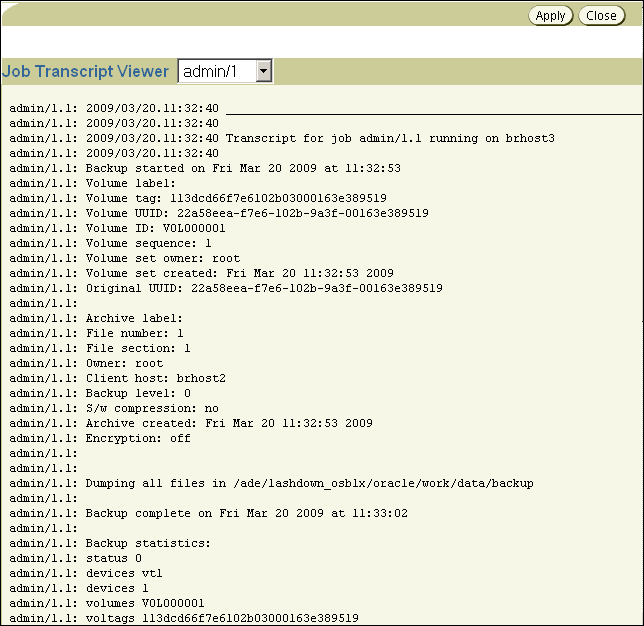
The Oracle Secure Backup Web tool displays a page with the transcript.
Figure 9-4 shows a portion of a transcript for job
admin/1.1. -
Scroll down the page to view more information.
At the end of the page, you can modify the transcript viewing criteria.
-
In the Level list, optionally select a message level.
Oracle Secure Backup tags each message it writes to a transcript with a severity level. These levels range from 0 to 9. The severity level describes the importance of the message.
When displaying a transcript, you can direct Oracle Secure Backup to display only messages of a certain severity level or higher. Its default level is 4 (Request), meaning normal messages produced by Oracle Secure Backup. Refer to the
catxcrcommand description in Oracle Secure Backup Reference for more information. -
Optionally, check Suppress input to suppress input requests. When a request for input is recognized, Oracle Secure Backup prompts for a response. Specifying this option suppresses this action.
-
Optionally, check Show line numbers to prefix each line with its message number.
-
Optionally, select one of these options to control the transcript display:
-
Start at line
Select this option and enter a number with which you want the transcript view to start. For example, if you enter '10,' then the view starts with message 10. Message 1 through 9 are not displayed.
-
Head lines
Select this option and enter a number to display the first specified number of lines of the transcript having a message severity level at or higher than the value you selected.
-
Tail lines
Select this option and enter a number to display the last specified number lines of the transcript having a message severity level at or higher than the value you selected.
-
-
In the Page refresh (in seconds) box, optionally enter a value in seconds. The default is 60 seconds.
-
Choose one of these:
-
Click Apply to apply your selections.
-
Click Close to close the page.
-
9.4.1 Backup Statistics
The transcript for a backup job contains the statistics shown in Table 9-1.
Table 9-1 Job Transcript Backup Statistics
| Statistic | Description |
|---|---|
|
Overall status of backup. See |
|
|
Name(s) of tape drive(s) or disk pool(s) used during the backup |
|
|
Number of tape drives or disk pools used |
|
|
Volume ID(s) used during the backup |
|
|
Volume tags (barcodes) used during the backup |
|
|
File number |
|
|
Name of client host |
|
|
This field displays |
|
|
Time at which backup started |
|
|
Time at which backup completed |
|
|
Time at which backup started. This is normally the same as start_time. It might differ if an archive is being read, in which case the backup_time comes from the archive label. |
|
|
Number of file-system entries scanned |
|
|
Number of file-system kilobytes scanned |
|
|
Number of file-system entries excluded, either because the file matches an exclusion statement in the dataset or it is an Oracle file that is being excluded |
|
|
Number of file-system entries skipped, either because the file was not modified sufficiently recently during an incremental backup or because the file is an obfuscated wallet. An obfuscated wallet ( |
|
|
Number of file-system entries that were skipped because they were mount points, either local or remote, and |
|
|
Number of files scanned |
|
|
Number of directories scanned |
|
|
Number of hard links scanned |
|
|
Number of symbolic (soft) links scanned |
|
|
Number of files that were discovered to be sparse. A sparse file is a file that has areas that do not correspond to any valid data. |
|
|
Number of file-system errors encountered |
|
|
Number of files of unknown type that were encountered |
|
|
Total kilobytes of file-system data written to tape |
|
|
Total kilobytes of data written to tape |
|
|
Total seconds that the tape drive was open, beginning with the |
|
|
Rate at which data was written to tape |
|
|
Total seconds during which data was being written to tape. This excludes time spent on such activities as positioning the tape and reading labels. |
|
|
Rate at which data was written to tape during write operations |
|
|
Number of physical blocks written, as reported by the tape drive |
|
|
Number of physical blocks that encountered unrecoverable write errors and therefore had to be rewritten to tape |
|
|
Number of physical blocks read, as reported by the tape drive |
|
|
Number of physical blocks that encountered unrecoverable read errors and therefore had to be reread from tape |
|
|
The sum of read errors and write errors divided by the sum of total blocks read and total blocks written |
|
|
Final status of the backup of the path path_name. There are separate entries for each path named in the dataset. |
Note:
Both dev_iorate and wrt_iorate are calculated using the same amount of data written, but the elapsed times used in the calculations are different. Because dev_iosecs is typically larger than wrt_iosecs, dev_iorate is typically less than wrt_iorate.
9.5 Removing a Job
This section explains how to remove a job. Removing a job has the effect of canceling it and deleting all record of its, and its subordinates, existence. You can remove a job only if it is not running. After removing a job, you can no longer view its status.
Note:
As explained in "Canceling a Job", you can cancel a job and retain its history and transcript.
To remove a job:
-
Follow the steps in "Displaying the Jobs Page".
-
Select a job from the central text box.
-
Click Remove.
The Oracle Secure Backup Web tool prompts you to confirm the job removal.
-
Click Yes to remove the job.
9.6 Running a Job
This section explains how to direct Oracle Secure Backup to run a job at other than the scheduled time or priority, or using a specific backup container. To use this function, you must be a member of a class that has the modify any jobs owned by user or the modify any job, regardless of its owner right enabled.
See Also:
Oracle Secure Backup Reference for more information about Oracle Secure Backup rights
You can direct Oracle Secure Backup to start a job:
-
Immediately
-
In an order different from that chosen by the scheduler
-
On a specific tape device or a tape device from which the job was previously restricted
To alter when Oracle Secure Backup runs a job:
-
Follow the steps in "Displaying the Jobs Page".
-
Select a job from the central text box.
-
Click Run.
-
In Devices, optionally select a tape device on which to run the job.
If the job was restricted to another tape device or set of tape devices, then your selection here overrides that restriction. Note that if you select Now in the next step, then you must choose a tape device.
-
Optionally select one of these options:
-
Now
Select this option to run the job immediately. If the preceding tape device you selected is not currently available, then Oracle Secure Backup displays an error and this operation has no effect.
-
ASAP
Select this option to run the job as soon as possible by lowering it to priority 1.
-
Job Priority
Select this option and enter a job priority in the Priority box. The default priority is 100.
The priority for a job is a positive numeric value. The lower the value, the greater the priority assigned to the job by the scheduler. For example, priority 20 jobs are higher priority than priority 100 jobs. The scheduler dispatches higher priority jobs over lower priority ones, providing all resources required to run the job are available.
-
-
Do one of the following:
-
Click Apply to accept your changes and remain in the page.
-
Click Cancel to void the operation and move back one page.
-
9.7 Canceling a Job
This section explains how to cancel a job. Canceling a job aborts the job if it is running, then marks its job record as "canceled." Oracle Secure Backup considers canceled jobs as no longer runnable. If you cancel a job that has subordinates, then each of its subordinate jobs is also canceled.
To cancel a job:
-
Follow the steps in "Displaying the Jobs Page".
-
Select a job from the central text box.
-
Click Cancel.


