| Oracle® Identity Manager Connector Guide for SAP User Management Release 9.1.2 E11212-14 |
|
 Previous |
 Next |
| Oracle® Identity Manager Connector Guide for SAP User Management Release 9.1.2 E11212-14 |
|
 Previous |
 Next |
The procedure to deploy the connector can be divided into the following stages:
|
Note: Some of the procedures described in this chapter must be performed on the target system. To perform these procedures, you must use an SAP administrator account to which the SAP_ALL and SAP_NEW profiles have been assigned. |
Preinstallation information is divided across the following sections:
This section contains the following topics:
Section 2.1.1.1, "Files and Directories on the Installation Media"
Section 2.1.1.2, "Determining the Release Number of the Connector"
Section 2.1.1.3, "Creating a Backup of the Existing Common.jar File"
Table 2-1 describes the files and directories on the installation media.
Table 2-1 Files and Directories On the Installation Media
| File in the Installation Media Directory | Description |
|---|---|
|
configuration/SAPUM-CI.xml |
This XML file contains configuration information that is used during connector installation. |
|
Files in the DataSets directory |
These XML files specify the information to be submitted by the requester during a request-based provisioning operation. |
|
deploy/SAPCUP.jar |
This JAR file contains class files that are used when you configure the Compliant User Provisioning feature. |
|
lib/SAPUserMgmt.jar |
This JAR file contains the class files that are used in connector operations. During connector deployment, this file is copied to the following location:
|
|
lib/SAPCommon.jar |
This JAR file contains the class files that are common to all SAP connectors. During connector deployment, this file is copied to the following location:
|
|
lib/Common.jar |
This JAR file contains the class files that are common to all connectors. During connector deployment, this file is copied to the following location:
|
|
Files in the resources directory |
Each of these resource bundles contains language-specific information that is used by the connector. During connector deployment, this file is copied to the following location:
Note: A resource bundle is a file containing localized versions of the text strings that are displayed on the Administrative and User Console. These text strings include GUI element labels and messages. |
|
Sample/TransformLookup1.java |
This file contains the code to work around the Oracle Identity Manager issue described by Bug 9237745. See Section 2.3.15, "Addressing the Issue Related to Non-Unique Values in Lookup Definitions Synchronized with the Target System" for more information. |
|
xml/SAP-UserMgmt-Main-ConnectorConfig.xml |
This XML file contains definitions for the following connector objects:
|
|
xml/SAP-UserMgmt-RequestApproval-ConnectorConfig.xml |
This file contains definitions of the connector components for request-based provisioning when you configure the Compliant User Provisioning feature. See Section 2.3.4, "Enabling Request-Based Provisioning" for instructions on importing this file. |
|
This file contains definitions of the connector components to configure the Compliant User Provisioning feature. See Section 2.3.11.1, "Importing the XML File for the Compliant User Provisioning Feature" for instructions on importing this file. |
|
|
xml/SAP-UserMgmt-CUP-RequestApproval-ConnectorConfig.xml |
This file contains definitions of the connector components for request-based provisioning when you configure the Compliant User Provisioning feature. See Section 2.3.11.2, "Enabling Request-Based Provisioning for the Compliant User Provisioning Feature" for instructions on importing this file. |
You might have a deployment of an earlier release of the connector. While deploying the latest release, you might want to know the release number of the earlier release. To determine the release number of the connector that has already been deployed:
|
Note: If you are using Oracle Identity Manager release 9.1.0.x, then the procedure described in this section is optional.If you are using Oracle Identity Manager release 11.1.1, then skip this section. |
In a temporary directory, extract the contents of the connector JAR file that is in the OIM_HOME/xellerate/JavaTasks directory.
Open the Manifest.mf file in a text editor. The Manifest.mf file is one of the files bundled inside the connector JAR file.
In the Manifest.mf file, the release number of the connector is displayed as the value of the Version property.
The Common.jar file is in the deployment package of each release 9.1.x connector. With each new release, code corresponding to that particular release is added to the existing code in this file. For example, the Common.jar file shipped with Connector Y on 12-July contains:
Code specific to Connector Y
Code included in the Common.jar files shipped with all other release 9.1.x connectors that were released before 12-July.
If you have already installed a release 9.1.x connector that was released after the current release of the SAP User Management connector, then back up the existing Common.jar file, install the SAP User Management connector, and restore the Common.jar file. The steps to perform this procedure are as follows:
|
Caution: If you do not perform this procedure, then your release 9.1.x connectors might not work. |
Determine the release date of your existing release 9.1.x connector as follows:
Extract the contents of the following file in a temporary directory:
OIM_HOME/xellerate/ScheduleTask/Common.jar
|
Note: On Oracle Identity Manager release 11.1.1, use the Oracle Identity Manager Download JARs utility to download the Common.jar file from the database, and then extract the contents of this file into a temporary directory.See Oracle Fusion Middleware Developer's Guide for Oracle Identity Manager 11g Release 1 (11.1.1) for instructions about using the Download JARs utility. |
Open the Manifest.mf file in a text editor.
Note down the Build Date and Build Version values.
Determine the Build Date and Build Version values of the current release of the SAP User Management connector as follows:
On the installation media for the connector, extract the contents of the lib/Common.jar and then open the Manifest.mf file in a text editor.
Note down the Build Date and Build Version values.
If the Build Date and Build Version values for the SAP User Management connector are less than the Build Date and Build Version values for the connector that is already installed, then:
If you are using Oracle Identity Manager release 9.1.x, then:
Copy the OIM_HOME/xellerate/JavaTasks/Common.jar file to a temporary location.
After you perform the procedure described in Section 2.2, "Installation" overwrite the new Common.jar file in the OIM_HOME/xellerate/JavaTasks directory with the Common.jar file that you backed up in the preceding step.
If you are using Oracle Identity Manager release 11.1.1, then run the Oracle Identity Manager Upload JARs utility to post the Common.jar file to the Oracle Identity Manager database. This utility is copied into the following location when you install Oracle Identity Manager:
|
Note: Before you use this utility, verify that the WL_HOME environment variable is set to the directory in which Oracle WebLogic Server is installed. |
For Microsoft Windows:
OIM_HOME/server/bin/UploadJars.bat
For UNIX:
OIM_HOME/server/bin/UploadJars.sh
When you run the utility, you are prompted to enter the login credentials of the Oracle Identity Manager administrator, URL of the Oracle Identity Manager host computer, context factory value, type of JAR file being uploaded, and the location from which the JAR file is to be uploaded. Specify 1 as the value of the JAR type.
|
See Also: Oracle Fusion Middleware Developer's Guide for Oracle Identity Manager for detailed information about the Upload JARs utility |
Preinstallation on the target system involves performing the following procedures:
The connector uses a target system account to connect to the target system during each connector operation. This target system account must be one of the following:
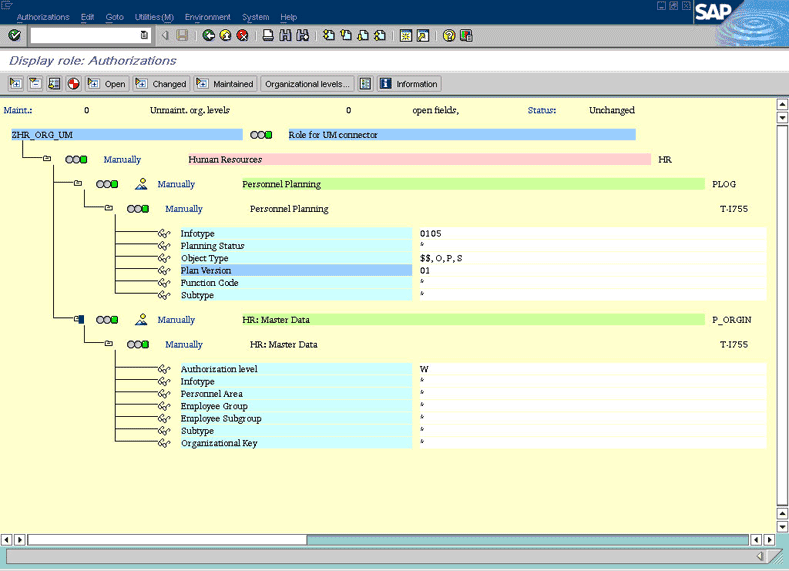
If you are using a target system in which the SAP HRMS module is enabled, then the target system account must be a user to whom you assign a customized role (for example, ZHR_ORG_UM) with the PLOG and P_ORIGIN authorization objects. Note that the P_ORIGIN authorization object is related to the SAP HRMS module. Therefore, you can assign a customized role with the P_ORIGIN authorization object only if the SAP HRMS module is enabled.
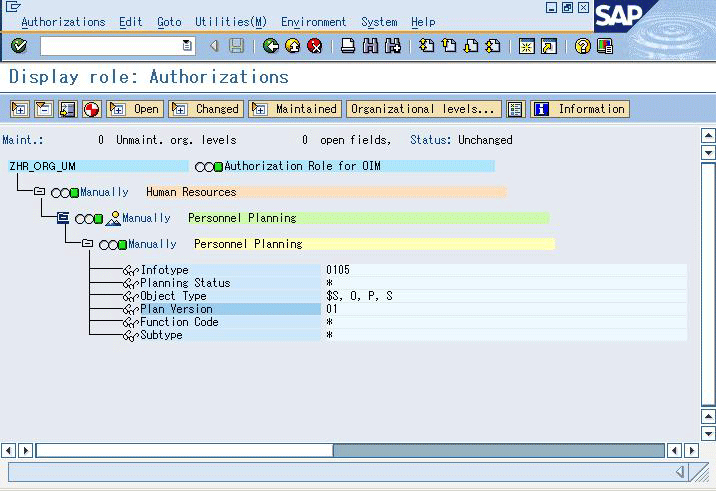
If you are using a target system in which the SAP HRMS module is not enabled, then the target system account must be a user to whom you assign a customized role (for example, ZHR_ORG_UM) with the following authorization objects:
PLOG
Authorization objects that run BAPIs corresponding to each provisioning function.
For example, consider a provisioning function that adds a multivalued attribute (such as role) to a user. If you want the connector to perform this provisioning operation, then you must create a target system user account to which you assign a customized role with the PLOG authorization object and an authorization object that runs the BAPIs to create, modify, or display roles.
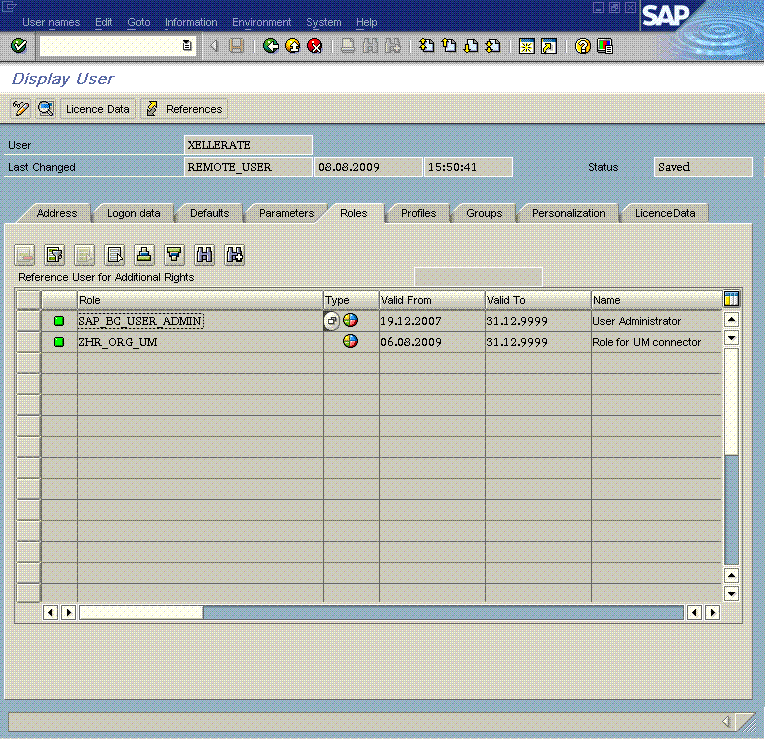
For the target system account that is to be created, the Roles tab of the Maintain User form is displayed in the following screenshot:
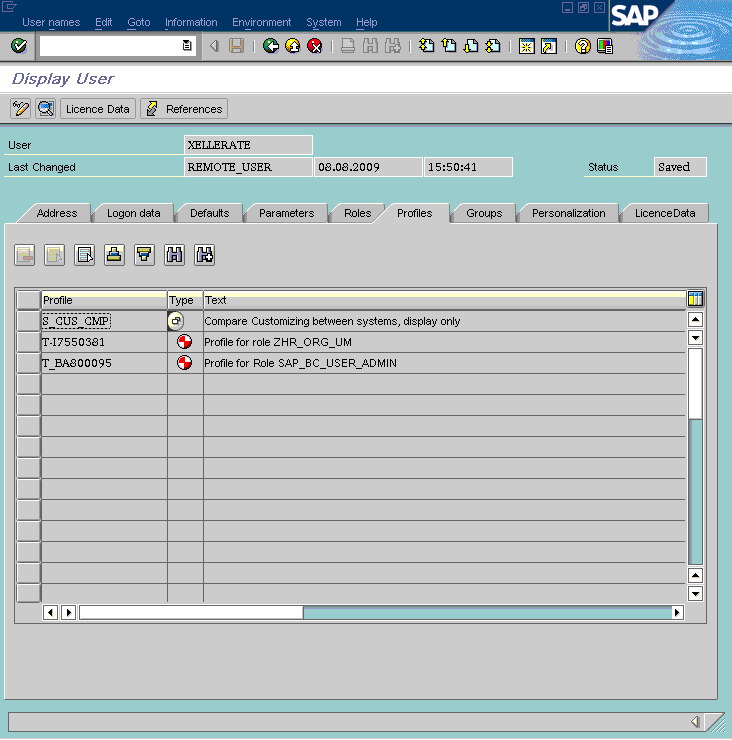
For the target system account that is to be created, the Profiles tab of the Maintain User form is displayed in the following screenshot:
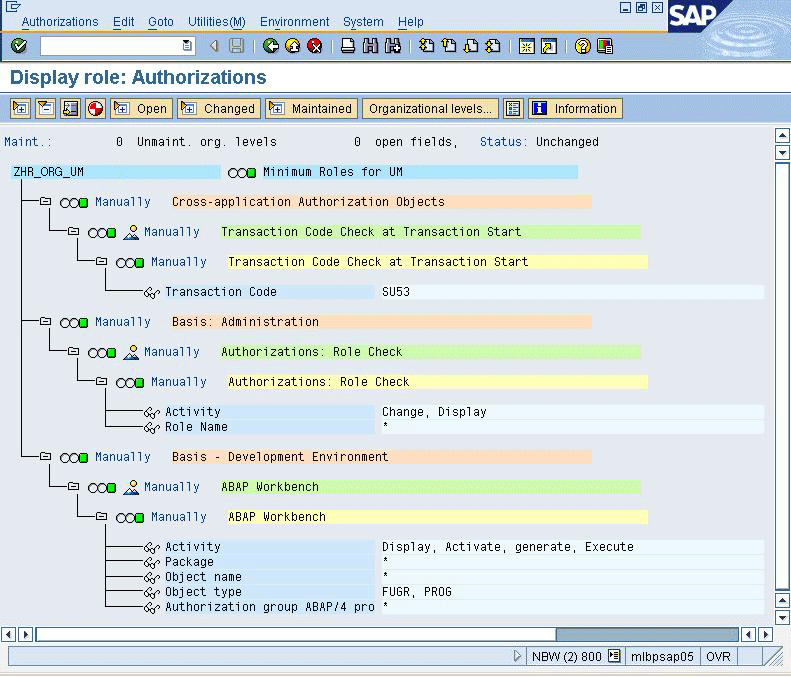
The following screenshot shows the authorization objects, PLOG and P_ORIGIN that are assigned to a customized role (ZHR_ORG_UM) when the SAP HRMS module is enabled in the target system:
The following screenshot shows the authorization object (PLOG) that is assigned to a customized role (ZHR_ORG_UM) when the SAP HRMS module is not enabled in the target system:
The following screenshot shows the authorization objects (that run BAPIs corresponding to the add multivalued attribute (for example, role) provisioning function) that are assigned to a customized role (ZBC_ROLES_UM) when the SAP HRMS module is not enabled in the target system:
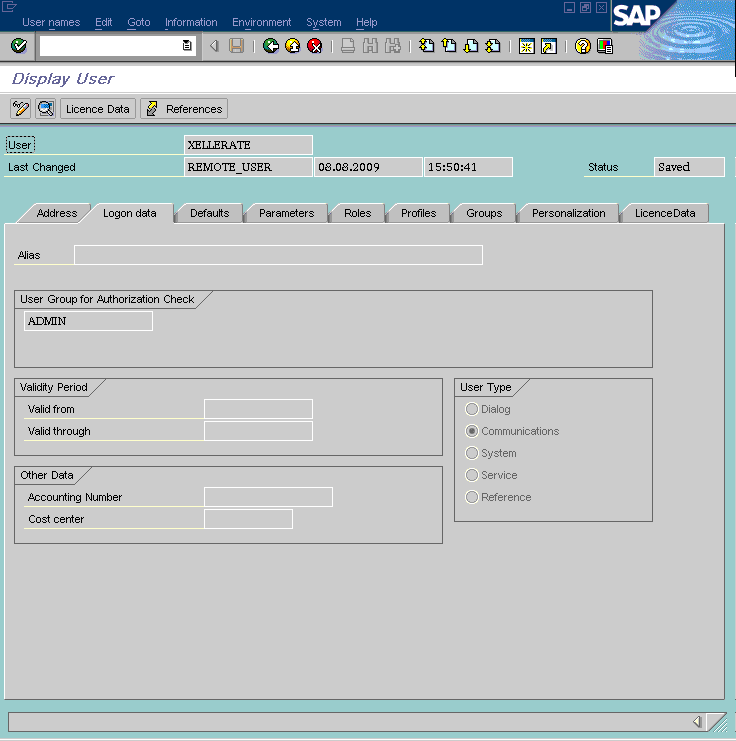
There are no changes to the logon data, as shown in the following screenshot:
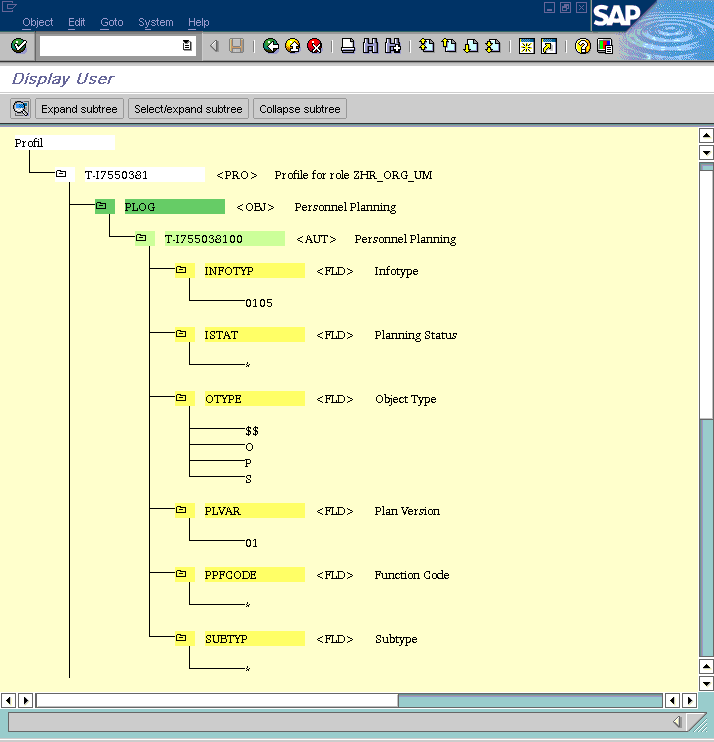
The following screenshot displays details of the PLOG authorization object:
|
Note: You must configure the PLOG authorization object so that the values assigned to this object match the ones shown in the screenshot. The Plan Version (PLVAR) object can be set according to your requirements. |
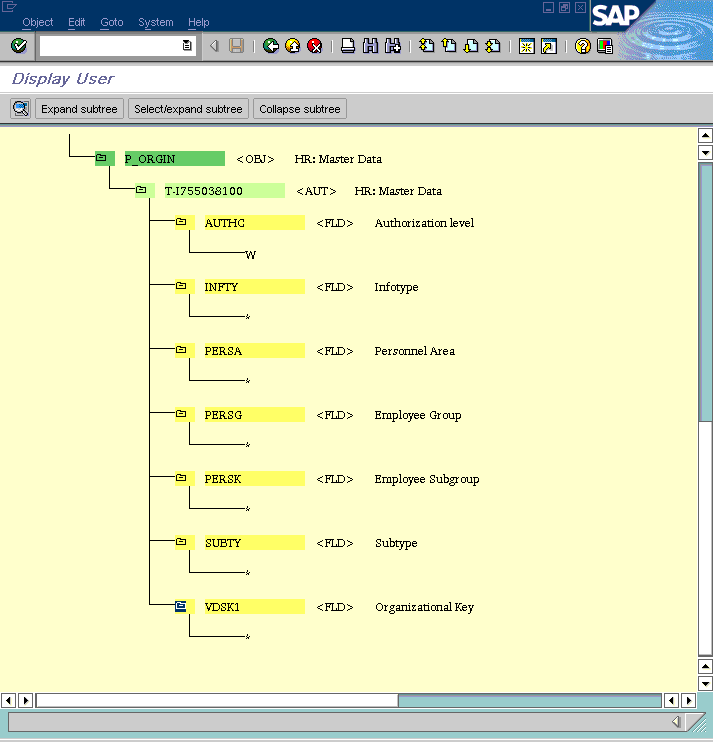
The following screenshot displays details of the P_ORIGIN authorization object:
|
Note: To download files from the SAP Web site, you must have access to the SAP service marketplace with Software Download authorization. In an Oracle Identity Manager cluster, copy the JAR files and the contents of the connectorResources directory to the corresponding directories on each node of the cluster. |
To download and copy the external code files to the required locations:
Download the SAP Java connector file from the SAP Web site as follows:
Open the following page in a Web browser:
Open the SAP JAVA Connector page by selecting Application Platform, Connectivity, Connectors, SAP Java Connector, and Tools & Services.
On the SAP JAVA Connector page, links for files that you can download are displayed on the right pane. Click the link for the SAP JCo release that you want to download.
In the dialog box that is displayed, specify the path of the directory in which you want to save the file.
Extract the contents of the file that you download.
Copy the sapjco3.jar file into the OIM_HOME/Xellerate/ThirdParty directory.
|
Note: Ensure that you are using version 3.0 of the sapjco3.jar file. In an Oracle Identity Manager cluster, copy this JAR file to each node of the cluster. |
Copy the RFC files into the required directory on the Oracle Identity Manager host computer, and then modify the appropriate environment variable so that it includes the path to this directory:
On Microsoft Windows:
Copy the sapjco3.dll file into the winnt\system32 directory. Alternatively, you can copy these files into any directory and then add the path to the directory in the PATH environment variable.
On Solaris and Linux:
Copy the sapjco3.so file into the /usr/local/jco directory, and then add the path to this directory in the LD_LIBRARY_PATH environment variable.
On a Microsoft Windows platform, ensure that the msvcr80.dll and msvcp80.dll files are in the c:\WINDOWS\system32 directory. If required, both files can be downloaded from various sources on the Internet.
Restart the server for the changes in the environment variable to take effect.
|
Note: You can either restart the server now or after the connector is installed. |
To check if SAP JCo is correctly installed, in a command window, run one of the following commands:
java –jar JCO_DIRECTORY/sapjco3.jar
java –classpath JCO_DIRECTORY/sapjco3.jar com.sap.conn.jco.rt.About
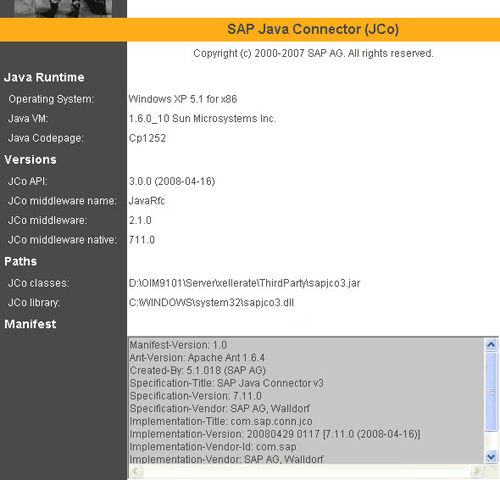
Figure 2-1 shows the dialog box that is displayed. The JCo classes and JCo library paths must be displayed in this dialog box.
Figure 2-1 Dialog Box Displayed on Running the SAP JCo Test
|
Note: In this guide, the term Connector Installer has been used to refer to the Connector Installer feature of the Oracle Identity Manager Administrative and User Console. Direct provisioning is automatically enabled after you run the Connector Installer. If required, you can enable request-based provisioning in the connector. Direct provisioning is automatically disabled when you enable request-based provisioning. See Section 2.3.4, "Enabling Request-Based Provisioning" if you want to use the request-based provisioning feature for this target system. |
To run the Connector Installer:
Copy the contents of the connector installation media into the following directory:
|
Note: In an Oracle Identity Manager cluster, perform this step on each node of the cluster. |
For Oracle Identity Manager release 9.1.0.x: OIM_HOME/xellerate/ConnectorDefaultDirectory
For Oracle Identity Manager release 11.1.1: OIM_HOME/server/ConnectorDefaultDirectory
Log in to the Administrative and User Console by using the user account described in the "Creating the User Account for Installing Connectors" section of Oracle Identity Manager Administrative and User Console.
Depending on the Oracle Identity Manager release you are using, perform one of the following steps:
For Oracle Identity Manager release 9.1.0.x:
Click Deployment Management, and then click Install Connector.
For Oracle Identity Manager release 11.1.1:
On the Welcome to Identity Manager Advanced Administration page, under the System Management section, click Install Connector.
From the Connector List list, select SAP UM RELEASE_NUMBER. This list displays the names and release numbers of connectors whose installation files you copy into the default connector installation directory:
For Oracle Identity Manager release 9.1.0.x:
OIM_HOME/xellerate/ConnectorDefaultDirectory
For Oracle Identity Manager release 11.1.1:
OIM_HOME/server/ConnectorDefaultDirectory
If you have copied the installation files into a different directory, then:
In the Alternative Directory field, enter the full path and name of that directory.
To repopulate the list of connectors in the Connector List list, click Refresh.
From the Connector List list, select SAP UM RELEASE_NUMBER.
Click Load.
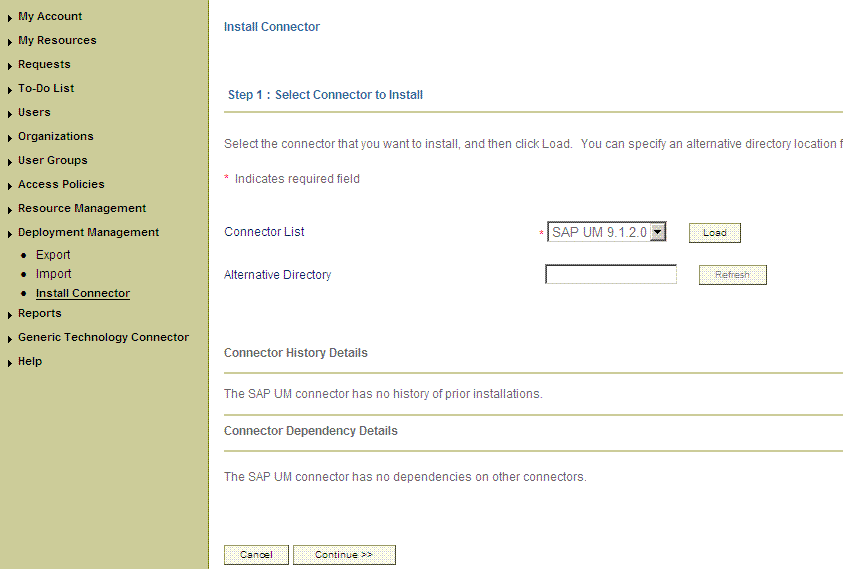
The following screenshot shows this Administrative and User Console page:
To start the installation process, click Continue.
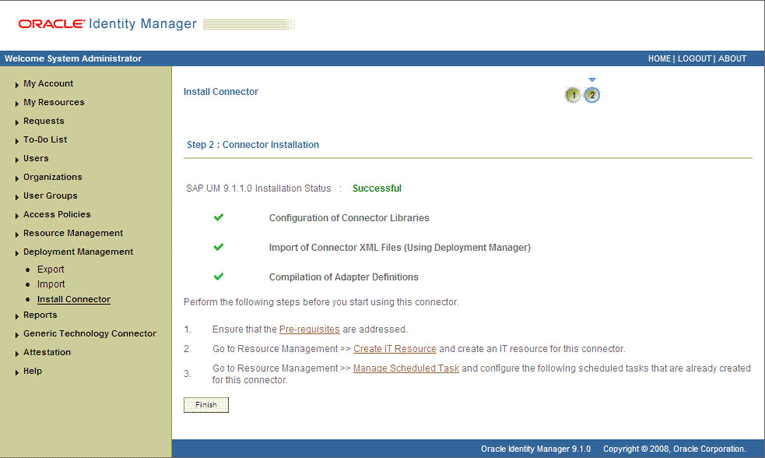
The following tasks are performed in sequence:
Configuration of connector libraries
Import of the connector XML files (by using the Deployment Manager)
Compilation of adapters
On successful completion of a task, a check mark is displayed for the task. If a task fails, then an X mark and a message stating the reason for failure are displayed. If a task fails, then make the required correction and perform one of the following steps:
Retry the installation by clicking Retry.
Cancel the installation and begin again from Step 3.
If all three tasks of the connector installation process are successful, then a message indicating successful installation is displayed.
In addition, a list of the steps that you must perform after the installation is displayed. These steps are as follows:
Ensuring that the prerequisites for using the connector are addressed
|
Note: At this stage, run the PurgeCache utility to load the server cache with content from the connector resource bundle in order to view the list of prerequisites. See Section 2.3.6, "Clearing Content Related to Connector Resource Bundles from the Server Cache" for information about running the PurgeCache utility.There are no prerequisites for some predefined connectors. |
Configuring the IT resource for the connector
Record the name of the IT resource displayed on this page. The procedure to configure the IT resource is described later in this guide.
Configuring the scheduled tasks that are created when you installed the connector
Record the names of the scheduled tasks displayed on this page. The procedure to configure these scheduled tasks is described later in this guide.
Restart Oracle Identity Manager.
|
Note: When you run the Connector Installer, it copies the connector files and external code files to destination directories on the Oracle Identity Manager host computer. These files are listed in Table 2-1. |
Installing the Connector in an Oracle Identity Manager Cluster
While installing Oracle Identity Manager in a cluster, you must copy all the JAR files and the contents of the connectorResources directory into the corresponding directories on each node of the cluster. Then, restart each node. See Section 2.1.1.1, "Files and Directories on the Installation Media" for information about the files that you must copy and their destination locations on the Oracle Identity Manager server.
Restoring the Common.jar File
If required, restore the Common.jar file that you had backed up by following the procedure described in Section 2.1.1.3, "Creating a Backup of the Existing Common.jar File".
Postinstallation steps are divided across the following sections:
Section 2.3.3, "Setting Up the Configuration Lookup Definition in Oracle Identity Manager"
Section 2.3.6, "Clearing Content Related to Connector Resource Bundles from the Server Cache"
Section 2.3.8, "Setting Up the Lookup.SAP.UM.ExclusionList Lookup Definition"
Section 2.3.10, "Copying the SAPCUP.jar File for User Provisioning"
Section 2.3.11, "Configuring the Compliant User Provisioning Feature of the Connector"
To enable communication between the target system and Oracle Identity Manager, you must ensure that the ports listed in Table 2-2 are open.
Table 2-2 Ports for SAP Services
| Service | Port Number Format | Default Port |
|---|---|---|
|
Dispatcher |
32SYSTEM_NUMBER |
3200 |
|
33SYSTEM_NUMBER |
3300 |
|
|
48SYSTEM_NUMBER |
4800 |
|
|
Message server |
36SYSTEM_NUMBER |
3600 |
To check if these ports are open, you can, for example, try to establish a Telnet connection from Oracle Identity Manager to these ports.
This section describes the procedures involved in configuring the target system to enable propagation user password changes from the SAP CUA parent system to its child systems. You may need the assistance of the SAP Basis administrator to perform some of these procedures.
Configuring the target system involves the following tasks:
The following information is required to configure the target system:
|
Note: During SAP installation, a system number and client number are assigned to the server on which the installation is carried out. These items are mentioned in the following list. |
Login details of an admin user having the permissions required to import requests
Client number of the server on which the request is to be imported
System number
Server IP address
Server name
User ID of the account to be used for connecting to the SAP application server
Password of the account to be used for connecting to the SAP application server
The User Group field is one of the fields that hold user data in SAP. F4 values are values of a field that you can view and select from a list. You must create an entry in the BAPIF4T table to be able to view F4 values of the User Group field. To create this entry in the BAPIF4T table:
Run the SM30 transaction on the SAP system.
Enter BAPIF4T as the table name, and then click Maintain. Ignore any warnings or messages that may be displayed.
Click New Entries.
Enter XUCLASS as the data element and ZXL_PARTNER_BAPI_F4_AUTHORITY as the function name.
|
Note: If an entry already exists for theXUCLASS data element, then do not change its value. |
Save the entry that you create, and then exit.
You must import the request to create the following custom objects in the SAP system.
| Object Type | Object Name |
|---|---|
| Package | ZXLC |
| Function Group | ZXLCGRP
ZXLCHLPVALUES ZXLCPRF ZXLCRL ZXLCUSR |
| Message class | ZXLCBAPI |
| Program | ZLCF4HLP_DATA_DEFINITIONS
ZLCMS01CTCO ZLCMS01CTCO1 ZLCMS01CTP2 ZXLCGRP ZXLCHLPVALUES ZXLCPRF ZXLCRL ZXLCUSR |
| Search Help | ZXLC_ROLE
ZXLC_SYS |
| Business object types | ZXLCGRP
ZXLCHLP ZXLCPRF ZXLCRL ZXLCUSR |
| Table | ZXLCBAPIMODE
ZXLCBAPIMODM ZXLCGROUPS ZXLCPRF ZXLCROLE ZXLCSTRING ZXLCSYSNAME |
The xlsapcar.sar file contains the definitions for these objects. When you import the request represented by the contents of the xlsapcar.sar file, these objects are automatically created in SAP. This procedure does not result in any change in the existing configuration of SAP.
Importing the request into SAP involves the following steps:
|
Note: You must import the request represented by the contents of the xlsapcar.sar file to the parent and the child systems. |
The two files, Data file and Cofile, that constitute the request are compressed in the xlsapcar.sar. You can use the SAPCAR utility to extract these files.
To download the SAPCAR utility from the SAP Help Web site:
Log on to the SAP Web site at
Click OK to confirm that the certificate displayed is the certificate assigned for your SAP installation.
Enter your SAP user name and password to connect to the SAP service marketplace.
Click Downloads, SAP Support Packages, Entry by Application Group, and Additional Components.
Select SAPCAR, SAPCAR 6.20, and the operating system. The download object is displayed.
Select the Object check box, and then click Add to Download Basket.
Specify the directory in which you want to download the SAPCAR utility. For example: C:/xlsapcar.
To extract the Data file and Cofile components of the request:
Copy the xlsapcar.sar file into the directory in which you download the SAPCAR utility.
The xlsapcar.sar file is in the BAPI directory inside the installation media directory.
In a command window, change to the directory in which you store the SAPCAR utility and the xlsapcar.sar file.
Enter the following command to extract the Data file and Cofile components of the request:
sapcar -xvf xlsapcar.sar
The format of the extracted files is similar to the following:
K900863.I47 (Cofile)
R900863.I47 (Data file)
To perform the request import operation:
|
Note: You would need the SAP Basis administrator's assistance to perform the following steps. |
Copy the Data file and Cofile to the required locations on the SAP server.
Import the request into SAP.
Check the log file to determine whether or not the import was successful.
To display the log file:
Run the STMS transaction.
The list of transport requests is displayed.
Select the transport request number corresponding to the request that you import.
The transport request number is the same as the numeric part of the Cofile or Data file names. In Step 3 of the preceding procedure, for the sample Cofile (K900863.I47) and Data file (R900863.I47), the transport request number is 900863.
Click the log file icon.
If the return code displayed in the log file is 4, then it indicates that the import ended with warnings. This may happen if the object is overwritten or already exists in the SAP system. If the return code is 8 or a higher number, then there were errors during the import.
Confirm the import of the request by running the SE80 transaction, and checking the ZBAPI package in the ABAP objects.
|
Note: In an Oracle Identity Manager cluster, perform this procedure on each node of the cluster. Then, restart each node. |
The following sections discuss the entries in the Lookup.SAP.UM.Configuration lookup definition:
Section 2.3.3.1, "Linking of SAP HRMS and SAP R/3 or SAP CUA Accounts"
Section 2.3.3.2, "Configuring Password Changes for Newly Created Accounts"
Section 2.3.3.3, "Setting Values in the Lookup.SAP.UM.Configuration Lookup Definition"
Section 2.3.11.7, "Setting Values in the Lookup.SAP.CUP.Configuration Lookup Definition"
An SAP HRMS account created for a particular user can be linked with the SAP R/3 or SAP CUA account created for the same user. For a particular user, an attribute of SAP HRMS holds the user ID of the corresponding SAP R/3 or SAP CUA account.
You can duplicate this link in Oracle Identity Manager by using the following entries of the Lookup.SAP.UM.Configuration lookup definition:
Support HRMS 0105 Infotype Linking: You enter yes as the value if you want to enable linking.
Validate Personnel Number before Linking: You enter yes as the value if your operating environment contains multiple SAP HRMS installations. If there is only one SAP HRMS installation, then enter no.
Overwrite Link: You enter yes as the value if you want existing links in SAP to be overwritten by the ones set up through provisioning operations.
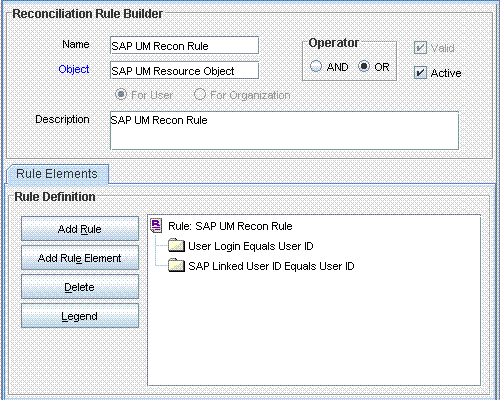
If you enable linking, then you must also add the SAP Linked User ID Equals User ID element to the reconciliation rule as follows:
In the Design Console, expand Development Tools and then double-click Reconciliation Rules.
Search for and open SAP UM Recon Rule.
In the Operator region, select OR.
Click Add Rule Element.
In the Add Rule Element dialog box, enter the following data:
User Profile Data: SAP Linked User ID
Operator: Equals
Attribute: User ID
Save and close the dialog box.
Click the Save icon to save changes to the reconciliation rule. Figure 2-2 shows the reconciliation rule with the element for linking added.
Figure 2-2 Reconciliation Rule with the Element for Linking
The following example describes the manner in which the linking process is performed:
An OIM User record is created for user John Doe through trusted source reconciliation with SAP HRMS. During creation, the user ID value is put in the User ID and Personnel Number attributes of the record.
|
Note: The Personnel Number field is a hidden UDF on the OIM User form. |
To provision an SAP R/3 or SAP CUA account for John, you enter and submit the required data on the Administrative and User Console. The remaining steps are performed if you have set the value of Support HRMS 0105 Infotype Linking to yes.
The connector looks for the user's SAP HRMS account. If you entered yes as the value of Validate Personnel Number before Linking, then the connector checks for a match for the Personnel Number attribute on SAP HRMS.
After a match is found with an existing SAP HRMS account, the connector performs one of the following steps:
If the value of Overwrite Link is yes, then the connector posts the User ID value of the SAP R/3 or SAP CUA account into the 0001 subtype in the Communication (0105) infotype of the SAP HRMS account. This is regardless of whether that infotype contains a value.
If the value of Overwrite Link is no, then the connector posts the User ID value of the SAP R/3 or SAP CUA account into the 0001 subtype in the Communication (0105) infotype of the SAP HRMS account only if that subtype does not hold a value.
The Create Link task is one of the tasks that are run during the Create User provisioning operation. If you set the Support HRMS 0105 Infotype Linking entry to no, then the status of this task is automatically set to Completed even though it is not run. You can, if required, remove this task so that it is not displayed in the list of tasks that are run. Use the Design Console for this operation.
|
See Also: See one of the following guides for information about removing process tasks:
|
When you log in to SAP by using a newly created account, you are prompted to change your password at first logon. For accounts created through Oracle Identity Manager, password management can be configured by using the Dummy password parameter of the IT resource and the Change Password entry of the Lookup.SAP.UM.Configuration lookup definition.
You can apply one of the following approaches:
Configure the connector so that users with newly created accounts are prompted to change their passwords at first logon.
To achieve this, set the Change Password entry to no. With this setting, the password entered on the process form for a new user account is used to set the password for the new account on the target system. When the user logs in to the target system, the user is prompted to change the password.
|
Note: If the password feature is disabled for users on the target system, then set this entry tono. |
Configure the connector so that the password set while creating the account on Oracle Identity Manager is set as the new password on the target system. The user is not prompted to change the password at first logon.
To achieve this, set the Change Password entry to yes and enter a string in the Dummy password parameter of the IT resource. With these settings, when you create a user account through Oracle Identity Manager, the user is first created with the dummy password. Immediately after that, the connector changes the password of the user to the one entered on the process form. When the user logs in to the target system, the user is not prompted to change the password.
Configure the connector so that a password is optional during Create User provisioning operations.
To achieve this, set the Password Disabled entry to yes.
Table 2-3 describes the entries in the Lookup.SAP.UM.Configuration lookup definition.
|
Note: You must not change any of the Code Key values of this lookup definition. |
Table 2-3 Entries in the Lookup.SAP.UM.Configuration Lookup Definition
| Code Key | Description |
|---|---|
|
See Section 2.3.3.2, "Configuring Password Changes for Newly Created Accounts" for information about the value to be specified for this entry. Default value: |
|
|
This entry holds the name of the lookup definition that is used to map check box attributes of the target system with their values when selected and deselected. This lookup definition is used during provisioning. By default, there are no entries in this lookup definition. You must add entries only if you want to add a check box attribute on the target system for provisioning. Information about using this feature is given in one of the steps in Section 4.4, "Adding New Standard Attributes for Provisioning." Value: |
|
|
This entry holds the name of the lookup definition that is used to map check box attributes of the target system with their values when selected and deselected. This lookup definition is used during reconciliation. By default, there are no entries in this lookup definition. You must add entries only if you want to add a check box attribute on the target system for reconciliation. Information about using this feature is given in one of the steps in Section 4.2, "Adding New Attributes for Reconciliation". Value: |
|
|
This entry holds the name of the lookup definition that stores values used by the connector. The connector development team can use this lookup definition to make minor configuration changes in the connector. Value: |
|
|
This entry holds the name of the lookup definition that you can use to configure custom attribute values for reconciliation. For more information, see the sections that describe procedures to add attributes for reconciliation in Chapter 4. Value: |
|
|
Custom Child Attribute Mapping Lookup |
This entry holds the name of the lookup definition that you can use to configure custom multivalued attribute values for reconciliation. For more information, see the sections that describe procedures to add attributes for reconciliation in Chapter 4. Value: |
|
This entry holds the name of the lookup definition that stores configuration values for the Compliant User Provisioning feature. Value: |
|
|
Enter |
|
|
This entry holds the name of the lookup definition in which you enter user IDs of target system accounts for which you do not want to perform reconciliation and provisioning. See Section 2.3.8, "Setting Up the Lookup.SAP.UM.ExclusionList Lookup Definition" for more information. Value: |
|
|
Is CUA Enabled |
Enter Enter Default value: |
|
This entry holds the name of the lookup definition that stores default mappings between SAP JCo connection parameters and IT resource parameters. If your target system installation uses JCo parameters that are not covered in this lookup definition, then you can add them. See Section 2.3.14.4, "Mapping New Connection Properties" for more information about this lookup definition. Value: |
|
|
Overwrite Link |
See Section 2.3.3.1, "Linking of SAP HRMS and SAP R/3 or SAP CUA Accounts" for information about the value to be specified for this entry. Default value: |
|
Enter If you want to use the Compliant User Provisioning feature of the connector, then set the value to |
|
|
This entry holds the name of the lookup definition that maps process form fields to target system attributes. See Section 1.7.2, "User Attributes for Provisioning" for more information. Value: |
|
|
This entry holds the name of the lookup definition that maps child form fields to multivalued attributes on the target system. See Section 1.7.2, "User Attributes for Provisioning" for more information. Value: |
|
|
Reconcile future dated roles |
Enter |
|
Reconcile past dated roles |
Enter |
|
See Section 2.3.3.1, "Linking of SAP HRMS and SAP R/3 or SAP CUA Accounts" for information about the value to be specified for this entry. Default value: |
|
|
This entry holds the name of the lookup definition that you can use to configure transformation of attribute values that are fetched from the target system during reconciliation. See Section 4.10, "Configuring Transformation of Data During User Reconciliation" for more information. Value: |
|
|
This entry holds the name of the lookup definition that you can use to configure transformation of lookup field values fetched from the target system during lookup field synchronization. See Section 4.11, "Configuring Transformation of Data During Lookup Field Synchronization" for more information. |
|
|
Enter See Section 4.10, "Configuring Transformation of Data During User Reconciliation" for more information. Default value: |
|
|
Enter See Section 4.11, "Configuring Transformation of Data During Lookup Field Synchronization" for more information. Default value: |
|
|
Use Validation For Prov |
Enter yes if you want to configure validation of attribute values entered on the process form during provisioning operations. See Section 4.9, "Configuring Validation of Data During Reconciliation and Provisioning" for more information. Default value: |
|
Use Validation For Recon |
Enter yes if you want to configure validation of attribute values that are fetched from the target system during reconciliation. See Section 4.9, "Configuring Validation of Data During Reconciliation and Provisioning" for more information. Default value: |
|
Validate Personnel Number before Linking |
See Section 2.3.3.1, "Linking of SAP HRMS and SAP R/3 or SAP CUA Accounts" for information about the value to be specified for this entry.Default value: |
|
This entry holds the name of the lookup definition that you can use to configure validation of attribute values entered on the process form during provisioning operations. See Section 4.9, "Configuring Validation of Data During Reconciliation and Provisioning" for more information. Value: |
|
|
This entry holds the name of the lookup definition that you can use to configure validation of attribute values entered on the process form during reconciliation. See Section 4.9, "Configuring Validation of Data During Reconciliation and Provisioning" for more information. Value: |
|
|
Is Password Propagate To Child System |
In the Decode column, enter Value: |
In request-based provisioning, an end user creates a request for a resource or entitlement by using the Administrative and User Console. Administrators or other users cannot create requests for a particular user. Requests can be viewed and approved by approvers designated in Oracle Identity Manager.
The following are features of request-based provisioning:
A user can be provisioned only one resource (account) on the target system.
Direct provisioning cannot be used if you enable request-based provisioning.
Depending on the Oracle Identity Manager release that you are using, perform the procedure in one of the following sections:
Section 2.3.4.1, "Enabling Request-Based Provisioning in Oracle Identity Manager Release 9.1.0.x"
Section 2.3.4.2, "Enabling Request-Based Provisioning in Oracle Identity Manager Release 11.1.1"
When you install the connector on Oracle Identity Manager release 9.1.0.x, request-based provisioning of accounts is automatically enabled. Perform the procedure described in this section only if you want to enable request-based provisioning of entitlements such as roles.
Prerequisites
You must run Oracle Identity Manager in INFO mode when you import the XML file for request-based provisioning. If Oracle Identity Manager is running in DEBUG mode when you import the XML file, then the import operation does not work correctly.
Before you perform this procedure, set your browser to use JRE version 1.6.0_07. If you try to import the XML file with your browser set to any other JRE version, then the browser stops responding.
To enable request-based provisioning:
|
Note: In an Oracle Identity Manager cluster, perform this procedure on each node of the cluster. Then, restart each node. |
Open the Oracle Identity Manager Administrative and User Console.
Click the Deployment Management link on the left navigation bar.
Click the Import link under Deployment Management. A dialog box for opening files is displayed.
Locate and open the SAP-UserMgmt-RequestApproval-ConnectorConfig.xml file, which is in the xml directory on the installation media. Details of this XML file are shown on the File Preview page.
Click Add File. The Substitutions page is displayed.
Click Next. The Confirmation page is displayed.
Click Import.
At this stage, the Deployment Manager Import page shows an error because the process form version for request-based provisioning is the same as the process form version for direct provisioning.
The following screenshot shows this page:
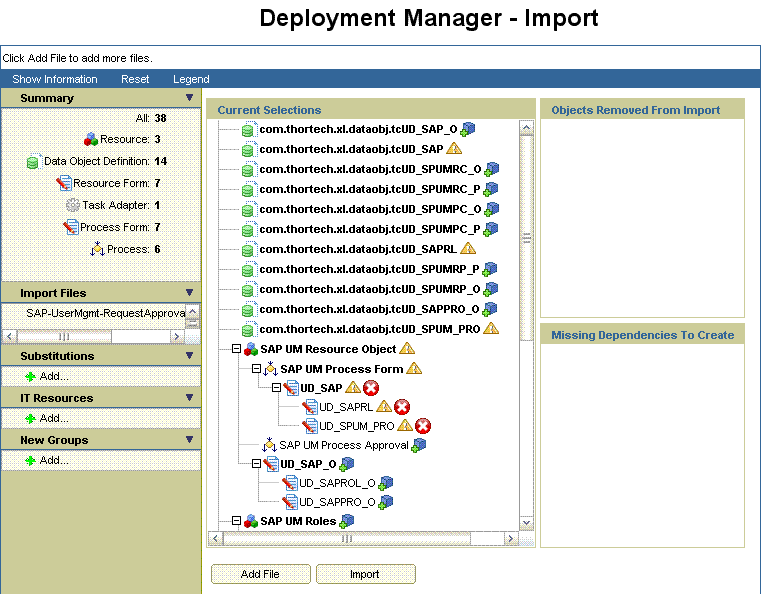
Note down the names of the forms that show errors, that is, the red cross sign against their names.
On the left pane, click Add under Substitutions.
The Add link is shown in the following screenshot:
In the pop-up window that is displayed, enter new version names for process forms that had name conflicts.
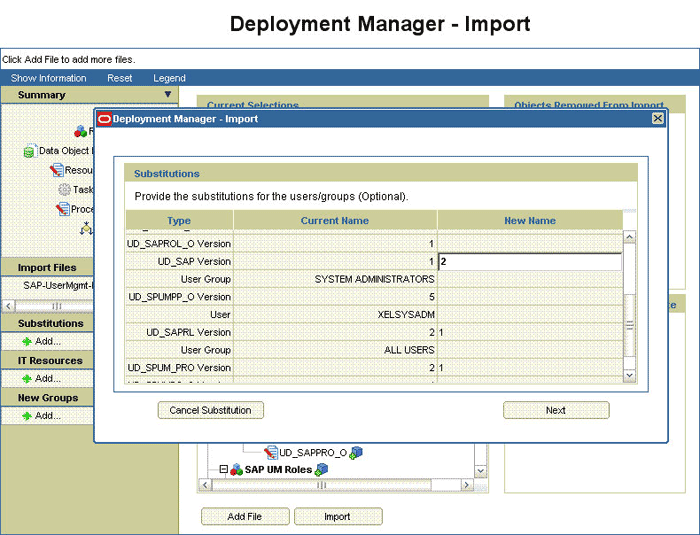
Click Next. The forms for which you enter new form versions are displayed.
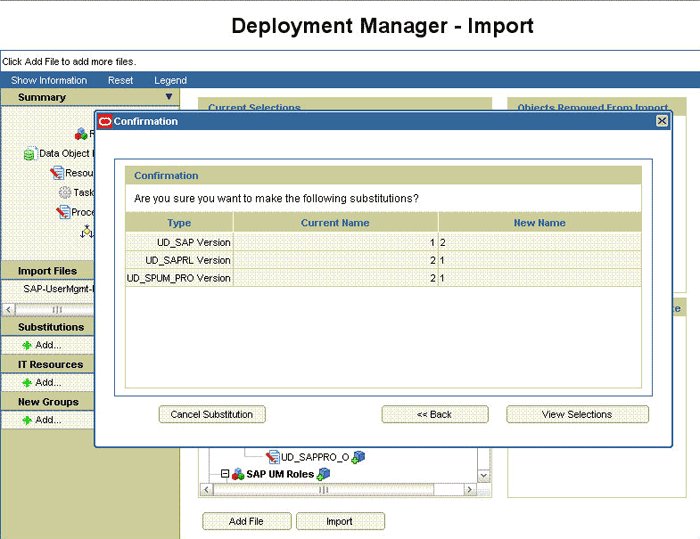
Click View Selections.
At this stage, the Deployment Manager Import page should not show an error. See the following screenshot:
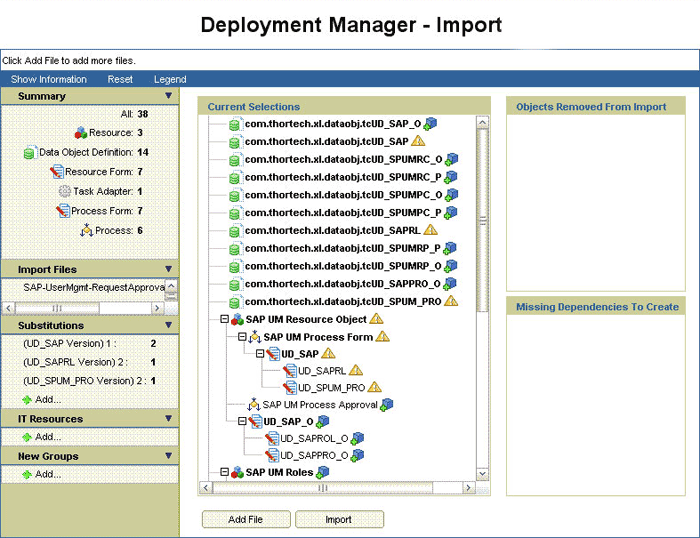
Click Import.
In the message that is displayed, click Import to confirm that you want to import the XML file and then click OK.
To suppress the Standard Approval process definition:
On the Design Console, expand Process Management and double-click Process Definition.
Search for and open the Standard Approval process definition.
On the Tasks tab, double-click the Approve task.
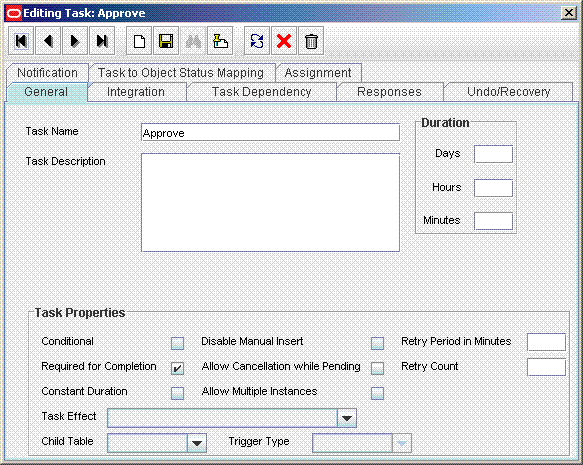
On the Integration tab of the Editing Task dialog box, click Add.
In the Handler Selection dialog box:
Select System.
Select the tcCompleteTask handler.
Click the Save icon, and then close the dialog box.
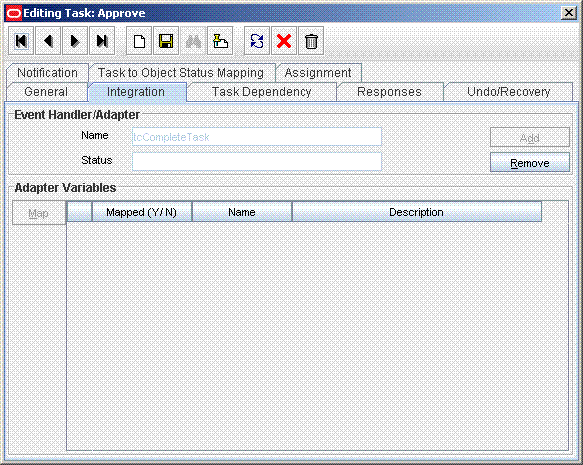
In the Editing Task dialog box, click the Save icon and close the dialog box.
Click the Save icon to save changes made to the process definition.
|
Note: Perform the procedure described in this section only if you are using Oracle Identity Manager release 11.1.1 and you want to configure request-based provisioning. |
In request-based provisioning, an end user creates a request for a resource by using the Administrative and User Console. Administrators or other users can also create requests for a particular user. Requests for a particular resource on the resource can be viewed and approved by approvers designated in Oracle Identity Manager.
To enable request-based provisioning, perform the following procedures:
A request dataset is an XML file that specifies the information to be submitted by the requester during a provisioning operation. Predefined request datasets are shipped with this connector. These request datasets specify information about the default set of attributes for which the requester must submit information during a request-based provisioning operation.
In an SAP environment, you can set up SAP R/3, SAP CUA, or Compliant User Provisioning (CUP) as the front end for provisioning requests. You can switch from an SAP R/3 target to a SAP CUP target. See Section 2.3.4.2.2, "Importing Request Datasets into MDS" for more information.
The following is the list of predefined request datasets available in the DataSets directory on the installation media:
For SAP R/3 or SAP CUA:
ProvisionResourceSAP UM Resource Object.xml
ModifyResourceSAP UM Resource Object.xml
For SAP CUP:
SAP-UserMgmt-CUP-ModifyResourceSAP UM Resource Object.xml
SAP-UserMgmt-CUP-ProvisionResourceSAP UM Resource Object.xml
Copy these files from the installation media to any directory on the Oracle Identity Manager host computer. It is recommended that you create a directory structure as follows:
/custom/connector/RESOURCE_NAME
For example:
E:\MyDatasets\custom\connector\SAPUM
|
Note: Until you complete the procedure to configure request-based provisioning, ensure that there are no other files or directories inside the parent directory in which you create the directory structure. In the preceding example, ensure that there are no other files or directories inside the E:\MyDatasets directory. |
The directory structure to which you copy the dataset files is the MDS location into which these files are imported after you run the Oracle Identity Manager MDS Import utility. The procedure to import dataset files is described in the next section.
Depending on your requirement, you can modify the file names of the request datasets. In addition, you can modify the information in the request datasets. See Oracle Fusion Middleware Developer's Guide for Oracle Identity Manager for information on modifying request datasets.
All request datasets (predefined or generated) must be imported into metadata store (MDS), which can be done by using the Oracle Identity Manager MDS Import utility.
|
Note: You must import the appropriate request datasets depending on your target. For example, for SAP R/3 or SAP CUA target import the following request datasets:
|
To import a request dataset definition into the MDS:
Ensure that you have set the environment for running the MDS Import utility. See Oracle Fusion Middleware Developer's Guide for Oracle Identity Manager for detailed information about setting up the environment for MDS utilities.
|
Note: While setting up the properties in the weblogic.properties file, ensure that the value of the metadata_from_loc property is the parent directory of the /custom/connector/RESOURCE_NAME directory. For example, while performing the procedure in Section 2.3.4.2.1, "Copying Predefined Request Datasets," if you copy the files to the E:\MyDatasets\custom\connector\SAPUM directory, then set the value of the metada_from_loc property toE:\MyDatasets. |
In a command window, change to the OIM_HOME/server/bin directory.
Run one of the following commands:
On Microsoft Windows
weblogicImportMetadata.bat
On UNIX
weblogicImportMetadata.sh
When prompted, enter values for the following:
Please enter your username [weblogic]
Enter the username used to log in to the Oracle WebLogic Server
Sample value: WL_User
Please enter your password [weblogic]
Enter the password used to log in to the Oracle WebLogic Server
Please enter your server URL [t3://localhost:7001]
Enter the URL of the application server in the following format:
t3://HOST_NAME_IP_ADDRESS:PORT
In this format, replace:
HOST_NAME_IP_ADDRESS with the host name or IP address of the computer on which Oracle Identity Manager is installed.
PORT with the port on which Oracle Identity Manager is listening.
The request dataset is imported into the MDS.
To enable the Auto Save Form feature:
Log in to the Design Console.
Expand Process Management, and then double-click Process Definition.
Search for and open the SAP UM Process Form process definition.
Select the Auto Save Form check box.
Click the Save icon.
Run the PurgeCache utility to clear content belonging to the Metadata category from the server cache. See Section 2.3.6, "Clearing Content Related to Connector Resource Bundles from the Server Cache" for instructions.
The procedure to enable enabling request-based provisioning ends with this step.
|
Note: In an Oracle Identity Manager cluster, perform this procedure on each node of the cluster. Then, restart each node. |
Changing to the required input locale (language and country setting) involves installing the required fonts and setting the required input locale.
You may require the assistance of the system administrator to change to the required input locale.
|
Note: In an Oracle Identity Manager cluster, you must perform this step on each node of the cluster. Then, restart each node. |
When you deploy the connector, the resource bundles are copied from the resources directory on the installation media into the OIM_HOME/xellerate/connectorResources directory for Oracle Identity Manager release 9.1.0.x and Oracle Identity Manager database for Oracle Identity Manager release 11.1.1. Whenever you add a new resource bundle to the connectorResources directory or make a change in an existing resource bundle, you must clear content related to connector resource bundles from the server cache.
To clear content related to connector resource bundles from the server cache:
In a command window, perform one of the following steps:
If you are using Oracle Identity Manager release 9.1.0.x, then switch to the OIM_HOME/xellerate/bin directory.
If you are using Oracle Identity Manager release 11.1.1, then switch to the OIM_HOME/server/bin directory.
|
Note: You must perform Step 1 before you perform Step 2. An exception is thrown if you run the command described in Step 2 as follows:For Oracle Identity Manager release 9.1.0.x: OIM_HOME/xellerate/bin/SCRIPT_FILE_NAME For Oracle Identity Manager release 11.1.1: OIM_HOME/server/bin/SCRIPT_FILE_NAME |
Enter one of the following commands:
|
Note: You can use the PurgeCache utility to purge the cache for any content category. RunPurgeCache.bat CATEGORY_NAME on Microsoft Windows or PurgeCache.sh CATEGORY_NAME on UNIX. The CATEGORY_NAME argument represents the name of the content category that must be purged.
For example, the following commands purge Metadata entries from the server cache:
|
For Oracle Identity Manager release 9.1.0.x:
On Microsoft Windows: PurgeCache.bat ConnectorResourceBundle
On UNIX: PurgeCache.sh ConnectorResourceBundle
|
Note: You can ignore the exception that is thrown when you perform Step 2. This exception is different from the one mentioned in Step 1. |
In this command, ConnectorResourceBundle is one of the content categories that you can delete from the server cache. See the following file for information about the other content categories:
OIM_HOME/xellerate/config/xlconfig.xml
For Oracle Identity Manager release 11.1.1:
On Microsoft Windows: PurgeCache.bat All
On UNIX: PurgeCache.sh All
When prompted, enter the user name and password of an account belonging to the SYSTEM ADMINISTRATORS group. In addition, you are prompted to enter the service URL in the following format:
t3://OIM_HOST_NAME:OIM_PORT_NUMBER
In this format:
Replace OIM_HOST_NAME with the host name or IP address of the Oracle Identity Manager host computer.
Replace OIM_PORT_NUMBER with the port on which Oracle Identity Manager is listening.
See Oracle Fusion Middleware System Administrator's Guide for Oracle Identity Manager for more information about the PurgeCache utility.
Depending on the Oracle Identity Manager release you are using, perform instructions in one of the following sections:
Section 2.3.7.1, "Enabling Logging on Oracle Identity Manager Release 9.1.0.x"
Section 2.3.7.2, "Enabling Logging on Oracle Identity Manager Release 11.1.1"
|
Note: In an Oracle Identity Manager cluster, perform this procedure on each node of the cluster. Then, restart each node. |
When you enable logging, Oracle Identity Manager automatically stores in a log file information about events that occur during the course of provisioning and reconciliation operations. To specify the type of event for which you want logging to take place, you can set the log level to one of the following:
ALL
This level enables logging for all events.
DEBUG
This level enables logging of information about fine-grained events that are useful for debugging.
INFO
This level enables logging of messages that highlight the progress of the application at a coarse-grained level.
WARN
This level enables logging of information about potentially harmful situations.
ERROR
This level enables logging of information about error events that might allow the application to continue running.
FATAL
This level enables logging of information about very severe error events that could cause the application to stop functioning.
OFF
This level disables logging for all events.
The file in which you set the log level and the log file path depend on the application server that you use:
Oracle WebLogic Server
To enable logging:
Add the following lines in the OIM_HOME/xellerate/config/log.properties file:
log4j.logger.XELLERATE=log_level
log4j.logger.OIMCP.SAPU=log_level
In these lines, replace log_level with the log level that you want to set.
For example:
log4j.logger.XELLERATE=INFO
log4j.logger.OIMCP.SAPU=INFO
After you enable logging, log information is written to the following file:
WEBLOGIC_HOME/user_projects/domains/DOMAIN_NAME/SERVER_NAME/SERVER_NAME.log
IBM WebSphere Application Server
To enable logging:
Add the following lines in the OIM_HOME/xellerate/config/log.properties file:
log4j.logger.XELLERATE=log_level
log4j.logger.OIMCP.SAPU=log_level
In these lines, replace log_level with the log level that you want to set.
For example:
log4j.logger.XELLERATE=INFO
log4j.logger.OIMCP.SAPU=INFO
After you enable logging, log information is written to the following file:
WEBSPHERE_HOME/AppServer/logs/SERVER_NAME/SystemOut.log
JBoss Application Server
To enable logging:
In the JBOSS_HOME/server/default/conf/jboss-log4j.xml file, locate or add the following lines if they are not already present in the file:
<category name="XELLERATE">
   <priority value="log_level"/>
</category>
<category name="OIMCP.SAPU">
   <priority value="log_level"/>
</category>
In the second XML code line of each set, replace log_level with the log level that you want to set. For example:
<category name="XELLERATE">
   <priority value="INFO"/>
</category>
<category name="OIMCP.SAPU">
   <priority value="INFO"/>
</category>
After you enable logging, log information is written to the following file:
JBOSS_HOME/server/default/log/server.log
Oracle Application Server
To enable logging:
Add the following lines in the OIM_HOME/xellerate/config/log.properties file:
log4j.logger.XELLERATE=log_level
log4j.logger.OIMCP.SAPU=log_level
In these lines, replace log_level with the log level that you want to set.
For example:
log4j.logger.XELLERATE=INFO
log4j.logger.OIMCP.SAPU=INFO
After you enable logging, log information is written to the following file:
ORACLE_HOME/opmn/logs/default_group~home~default_group~1.log
|
Note: In an Oracle Identity Manager cluster, perform this procedure on each node of the cluster. Then, restart each node. |
Oracle Identity Manager release 11.1.1 uses Oracle Java Diagnostic Logging (OJDL) for logging. OJDL is based on java.util.logger. To specify the type of event for which you want logging to take place, you can set the log level to one of the following:
SEVERE.intValue()+100
This level enables logging of information about fatal errors.
SEVERE
This level enables logging of information about errors that might allow Oracle Identity Manager to continue running.
WARNING
This level enables logging of information about potentially harmful situations.
INFO
This level enables logging of messages that highlight the progress of the application.
CONFIG
This level enables logging of information about fine-grained events that are useful for debugging.
FINE, FINER, FINEST
These levels enable logging of information about fine-grained events, where FINEST logs information about all events.
These message types are mapped to ODL message type and level combinations as shown in Table 2-4.
Table 2-4 Log Levels and ODL Message Type:Level Combinations
| Java Level | ODL Message Type:Level |
|---|---|
|
SEVERE.intValue()+100 |
INCIDENT_ERROR:1 |
|
SEVERE |
ERROR:1 |
|
WARNING |
WARNING:1 |
|
INFO |
NOTIFICATION:1 |
|
CONFIG |
NOTIFICATION:16 |
|
FINE |
TRACE:1 |
|
FINER |
TRACE:16 |
|
FINEST |
TRACE:32 |
The configuration file for OJDL is logging.xml, which is located at the following path:
DOMAIN_HOME/config/fmwconfig/servers/OIM_SERVER/logging.xml
Here, DOMAIN_HOME and OIM_SEVER are the domain name and server name specified during the installation of Oracle Identity Manager.
To enable logging in Oracle WebLogic Server:
Edit the logging.xml file as follows:
Add the following blocks in the file:
<log_handler name='sap-um-handler' level='[LOG_LEVEL]' class='oracle.core.ojdl.logging.ODLHandlerFactory'>
<property name='logreader:' value='off'/>
     <property name='path' value='[FILE_NAME]'/>
     <property name='format' value='ODL-Text'/>
     <property name='useThreadName' value='true'/>
     <property name='locale' value='en'/>
     <property name='maxFileSize' value='5242880'/>
     <property name='maxLogSize' value='52428800'/>
     <property name='encoding' value='UTF-8'/>
   </log_handler>
<logger name="OIMCP.SAPU" level="[LOG_LEVEL]" useParentHandlers="false">
     <handler name="sap-um-handler"/>
     <handler name="console-handler"/>
   </logger>
Replace both occurrences of [LOG_LEVEL] with the ODL message type and level combination that you require. Table 2-4 lists the supported message type and level combinations.
Similarly, replace [FILE_NAME] with the full path and name of the log file in which you want log messages to be recorded.
The following blocks show sample values for [LOG_LEVEL] and [FILE_NAME]:
<log_handler name='sap-um-handler' level='NOTIFICATION:1' class='oracle.core.ojdl.logging.ODLHandlerFactory'>
<property name='logreader:' value='off'/>
     <property name='path' value='F:\MyMachine\middleware\user_projects\domains\base_domain1\servers\oim_server1\logs\oim_server1-diagnostic-1.log'/>
     <property name='format' value='ODL-Text'/>
     <property name='useThreadName' value='true'/>
     <property name='locale' value='en'/>
     <property name='maxFileSize' value='5242880'/>
     <property name='maxLogSize' value='52428800'/>
     <property name='encoding' value='UTF-8'/>
   </log_handler>
<logger name="OIMCP.SAPU" level="NOTIFICATION:1" useParentHandlers="false">
     <handler name="sap-um-handler"/>
     <handler name="console-handler"/>
   </logger>
With these sample values, when you use Oracle Identity Manager, all messages generated for this connector that are of a log level equal to or higher than the NOTIFICATION:1 level are recorded in the specified file.
Save and close the file.
Set the following environment variable to redirect the server logs to a file:
For Microsoft Windows:
set WLS_REDIRECT_LOG=FILENAME
For UNIX:
export WLS_REDIRECT_LOG=FILENAME
Replace FILENAME with the location and name of the file to which you want to redirect the output.
Restart the application server.
|
Note: In an Oracle Identity Manager cluster, perform this procedure on each node of the cluster. Then, restart each node. |
In the Lookup.SAP.UM.ExclusionList lookup definition, enter the user IDs of target system accounts for which you do not want to perform reconciliation and provisioning:
On the Design Console, expand Administration and then double-click Lookup Definition.
Search for and open the Lookup.SAP.UM.ExclusionList lookup definition.
Click Add.
In the Code Key and Decode columns, enter the first user ID that you want to exclude. You must enter the same value in both columns.
|
Note: You must enter the user ID in the same case (uppercase and lowercase) in which it is stored on the target system. |
Repeat Steps 3 and 4 for all the user IDs that you want to exclude.
Click the Save icon.
While logging in to SAP, you can specify a two-letter language code for the UI. Some of the entries in the Lookup.SAP.UM.LookupMappings and Lookup.SAP.CUA.LookupMappings lookup definitions require you to specify this language code.
The determine the language code and make the required change in the lookup definition:
To determine the two-letter language code set on the target system:
In the SAP logon dialog box, right-click the system that you are using.
Select Properties from the shortcut menu.
In the Properties dialog box, click Advanced.
In the Advanced Options dialog box, the Language field displays the two-letter language code set for your installation of the target system.
Log in to the Design Console.
On the Design Console, expand Administration and then double-click Lookup Definition.
Search for and open the Lookup.SAP.UM.LookupMappings or Lookup.SAP.CUA.LookupMappings lookup definition.
In the following entries, change EN to the two-letter language code that you determined in Step 1:
Save and close the lookup definition.
|
Note: Perform the procedure described in this section only if you are using IBM WebSphere Application Server. |
You must copy the SAPCUP.jar file to avoid errors while performing regular provisioning operations. Copy the deploy/SAPCUP.jar file from the installation media to the WEBSPHERE_HOME/lib directory.
If you are using Oracle Identity Manager release 11.1.1, then you must also copy the SAPCUP.jar file to the OIM_HOME/server/apps/oim.ear/APP-INF/lib directory.
Oracle Identity Manager can be configured as the medium for sending provisioning requests to SAP GRC Compliant User Provisioning. A request from Oracle Identity Manager is sent to Compliant User Provisioning, which forwards the provisioning data contained within the request to the target system (SAP R/3 or SAP CUA). The outcome is the creation of or modification to the user's account on the target system.
|
Note: Before you configure the Compliant User Provisioning feature, it is recommended that you read the guidelines described in Section 1.3.5, "Guidelines on Using a Deployment Configuration." |
The following sections provide information about configuring the Compliant User Provisioning feature:
Section 2.3.11.1, "Importing the XML File for the Compliant User Provisioning Feature"
Section 2.3.11.2, "Enabling Request-Based Provisioning for the Compliant User Provisioning Feature"
Section 2.3.11.3, "Specifying Values for the GRC-ITRes IT Resource"
Section 2.3.11.4, "Specifying Values in the Lookup.SAP.UM.Configuration Lookup Definition"
Section 2.3.11.5, "Setting Up the Link with the Web Services for SAP Compliant User Provisioning"
Section 2.3.11.6, "Configuring Request Types and Workflows on SAP GRC Compliant User Provisioning"
Section 2.3.11.7, "Setting Values in the Lookup.SAP.CUP.Configuration Lookup Definition"
The xml/SAP-UserMgmt-CompliantUserProv-ConnectorConfig.xml file on the installation media contains definitions of the connector objects that are used by the Compliant User Provisioning feature. You must import the XML file to create these connector objects in Oracle Identity Manager.
To import the XML file:
|
Note: Before you perform this procedure, set your browser to use JRE version 1.6.0_07. If you try to import the XML file with your browser set to any other JRE version, then the browser stops responding. In an Oracle Identity Manager cluster, perform this procedure on each node of the cluster. Then, restart each node. |
Open the Oracle Identity Manager Administrative and User Console.
Click the Deployment Management link on the left navigation bar.
Click the Import link under Deployment Management. A dialog box for opening files is displayed.
Locate and open the SAP-UserMgmt-CompliantUserProv-ConnectorConfig.xml file, which is in the xml directory on the installation media. Details of this XML file are shown on the File Preview page. The following screenshot shows this page:
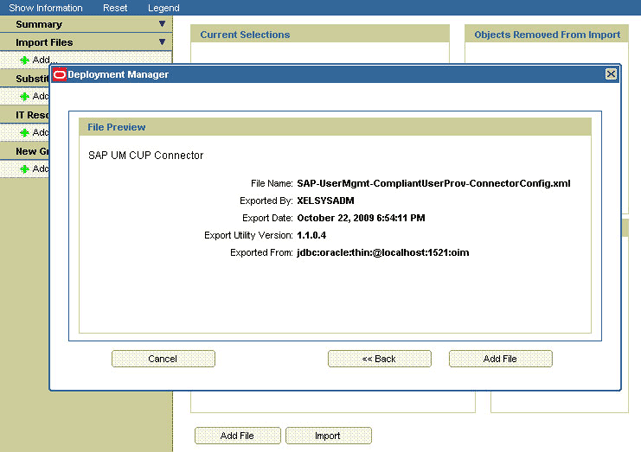
Click Add File. The Substitutions page is displayed.
Click Next. The Confirmation page is displayed.
Click Import.
At this stage, the Deployment Manager Import page shows an error because the process form version for request-based provisioning is the same as the process form version for direct provisioning.
The following screenshot shows this page:
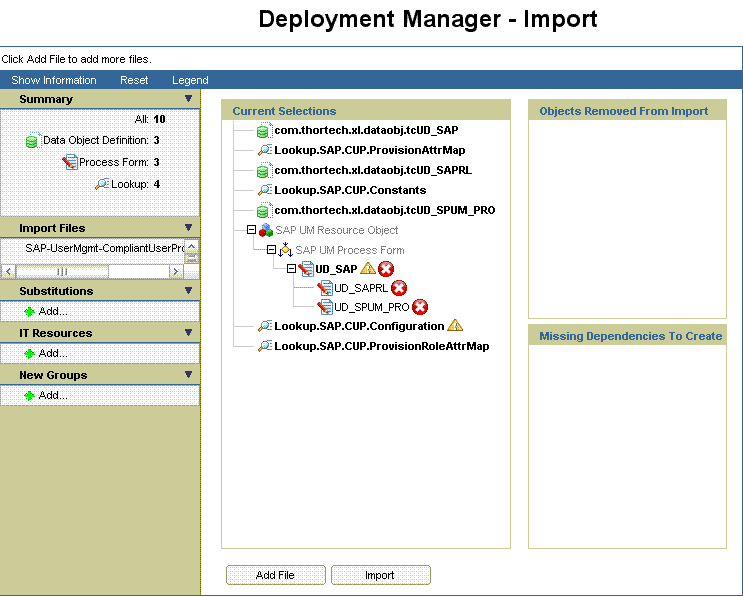
Note down the names of the forms that show errors, that is, the red cross sign against their names.
On the left pane, click Add under Substitutions.
The Add link is shown in the following screenshot:
In the pop-up window that is displayed, enter new version names for process forms that had name conflicts.
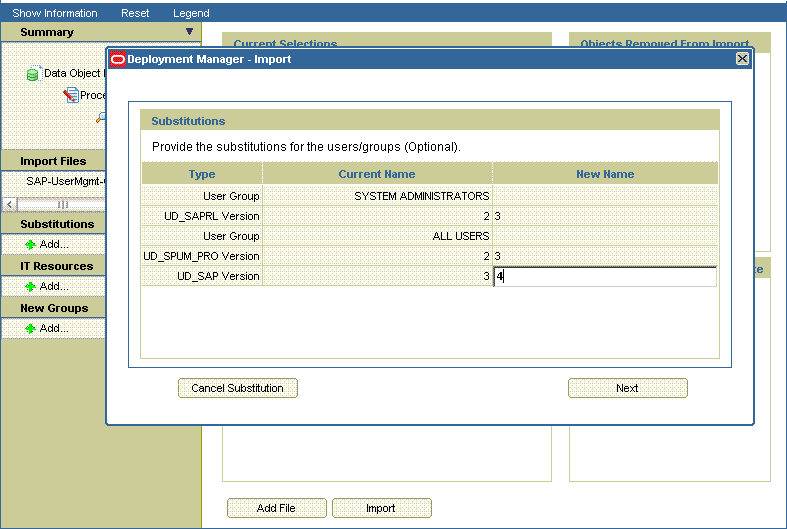
Click Next. The forms for which you enter new form versions are displayed.
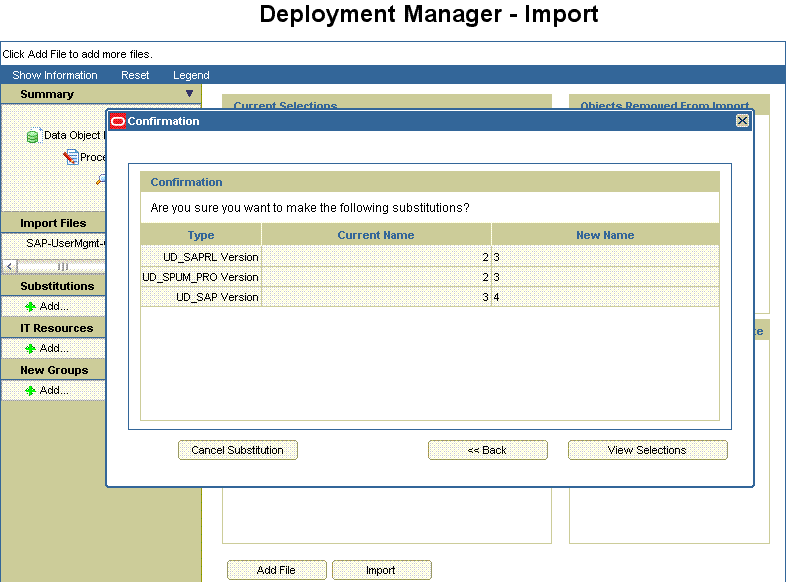
Click View Selections.
At this stage, the Deployment Manager Import page should not show an error. See the following screenshot:
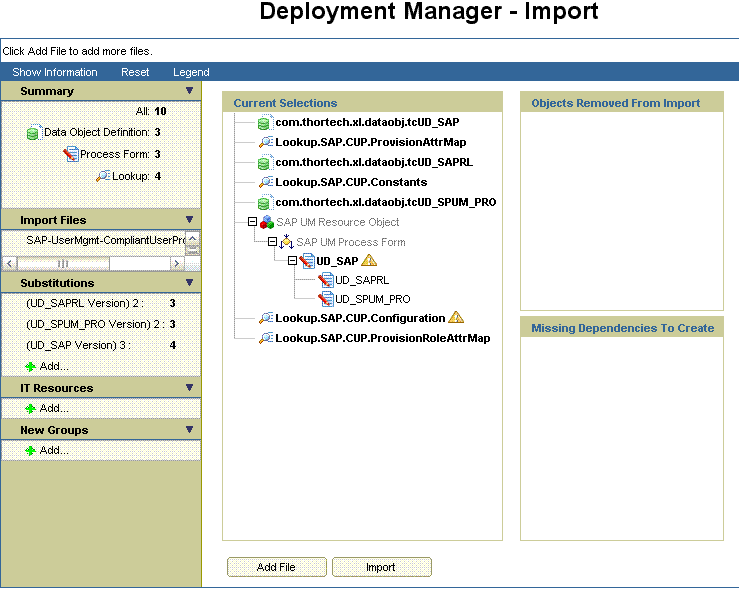
Click Import.
In the message that is displayed, click Import to confirm that you want to import the XML file and then click OK.
In request-based provisioning, an end user creates a request for a resource or entitlement by using the Administrative and User Console. Administrators or other users cannot create requests for a particular user. Requests can be viewed and approved by approvers designated in Oracle Identity Manager.
The following are features of request-based provisioning:
A user can be provisioned only one resource (account) on the target system.
Direct provisioning cannot be used if you enable request-based provisioning.
Prerequisites
You must run Oracle Identity Manager in INFO mode when you import the XML file for request-based provisioning. If Oracle Identity Manager is running in DEBUG mode when you import the XML file, then the import operation does not work correctly.
Before you perform this procedure, set your browser to use JRE version 1.6.0_07. If you try to import the XML file with your browser set to any other JRE version, then the browser stops responding.
To enable request-based provisioning:
|
Note: In an Oracle Identity Manager cluster, perform this procedure on each node of the cluster. Then, restart each node. |
Open the Oracle Identity Manager Administrative and User Console.
Click the Deployment Management link on the left navigation bar.
Click the Import link under Deployment Management. A dialog box for opening files is displayed.
Locate and open the SAP-UserMgmt-CUP-RequestApproval-ConnectorConfig.xml file, which is in the xml directory on the installation media. Details of this XML file are shown on the File Preview page.
Click Add File. The Substitutions page is displayed.
Click Next. The Confirmation page is displayed.
Click Import.
At this stage, the Deployment Manager Import page shows an error because the process form version for request-based provisioning is the same as the process form version for direct provisioning.
The following screenshot shows this page:

Note down the names of the forms that show errors, that is, the red cross sign against their names.
On the left pane, click Add under Substitutions.
The Add link is shown in the following screenshot:
In the pop-up window that is displayed, enter new version names for process forms that had name conflicts.

Click Next. The forms for which you enter new form versions are displayed.

Click View Selections.
At this stage, the Deployment Manager Import page should not show an error. See the following screenshot:

Click Import.
In the message that is displayed, click Import to confirm that you want to import the XML file and then click OK.
To suppress the Standard Approval process definition:
On the Design Console, expand Process Management and double-click Process Definition.
Search for and open the Standard Approval process definition.
On the Tasks tab, double-click the Approve task.

On the Integration tab of the Editing Task dialog box, click Add.
In the Handler Selection dialog box:
Select System.
Select the tcCompleteTask handler.
Click the Save icon, and then close the dialog box.

In the Editing Task dialog box, click the Save icon and close the dialog box.
Click the Save icon to save changes made to the process definition.
The GRC-ITRes IT resource holds information that is used during communication with SAP GRC Compliant User Provisioning. To set values for the parameters of this IT resource:
Log in to the Administrative and User Console.
Depending on the Oracle Identity Manager release you are using, perform one of the following steps:
If you are using Oracle Identity Manager release 9.1.0.x, expand Resource Management, and then click Manage IT Resource.
If you are using Oracle Identity Manager release 11.1.1, then:
On the Welcome to Oracle Identity Manager Self Service page, click Advanced.
On the Welcome to Oracle Identity Manager Advanced Administration page, in the Configuration region, click Manage IT Resource.
In the IT Resource Name field on the Manage IT Resource page, enter GRC-ITRes and then click Search.
Click the edit icon for the IT resource.
From the list at the top of the page, select Details and Parameters.
Specify values for the parameters of the IT resource. Table 2-10 describes each parameter.
|
Note: Entries in this table are sorted in alphabetical order of parameter names. |
Table 2-10 lists the parameters of the GRC-ITRes IT resource.
Table 2-5 Parameters of the GRC-ITRes IT Resource
To save the values, click Update.
Specify values for the following entries in the Lookup.SAP.UM.Configuration lookup definition:
|
See Also: Section 2.3.3.3, "Setting Values in the Lookup.SAP.UM.Configuration Lookup Definition" for information about setting up this lookup definition. |
To set up the link with the Web services for SAP Compliant User Provisioning:
Copy the deploy/SAPCUP.jar file from the installation media to one of the following directories:
|
Note:
|
For IBM Websphere Application Server: WEBSPHERE_HOME/lib
For JBoss Application Server: JBOSS_HOME/server/default/lib
For Oracle Application Server: ORACLE_HOME/j2ee/home/lib
For Oracle WebLogic Server: WEBLOGIC_DOMAIN_HOME/lib
If you are using Oracle WebLogic Server, then you must also copy the SAPCUP.jar file to the WEBLOGIC_HOME/wlserver_10.3/server/lib directory.
If you are using Oracle Identity Manager release 11.1.1, then you must also copy the SAPCUP.jar file to the OIM_HOME/server/apps/oim.ear/APP-INF/lib directory.
If Oracle Identity Manager is running on Oracle Application Server, then perform the following additional steps:
In the temporary directory, extract the contents of the ORACLE_HOME/j2ee/home/oc4j.jar file.
In a text editor, open the boot.xml file. This file is bundled in the oc4j.jar file.
In the boot.xml file, add the following lines under the <system-class-loader> tag:
<code-source path="lib/SAPCUP.jar"/>
Save and close the boot.xml file.
Re-create the oc4j.jar file with the updated boot.xml file bundled inside.
Copy the log4j-1.2.8.jar file from the OIM_HOME/xellerate/ext directory into the ORACLE_HOME/j2ee/home/lib directory.
|
Note: In an Oracle Identity Manager cluster, perform this step on each node of the cluster. |
You must create and configure request types and workflows on SAP GRC Compliant User Provisioning for provisioning operations.
The following sections describe these procedures in detail:
In SAP GRC Compliant User Provisioning, a request type defines the action that is performed when a request is processed. Oracle Identity Manager is a requester. It works with request types defined in SAP GRC Compliant User Provisioning. The Lookup.SAP.CUP.Configuration lookup definition maps request types to provisioning operations submitted through Oracle Identity Manager.
You can create request types in SAP GRC Compliant User Provisioning. Compliant User Provisioning also allows you to set default values for some user attributes. You can define these user defaults and then create user default mappings that specify conditions under which the user defaults must be applied.
To create a request type:
Log in to SAP GRC Access Control as an administrator.
On the Configuration tab, expand Request Configuration, click Request Type, and then click Create.
The following screenshot shows this page:
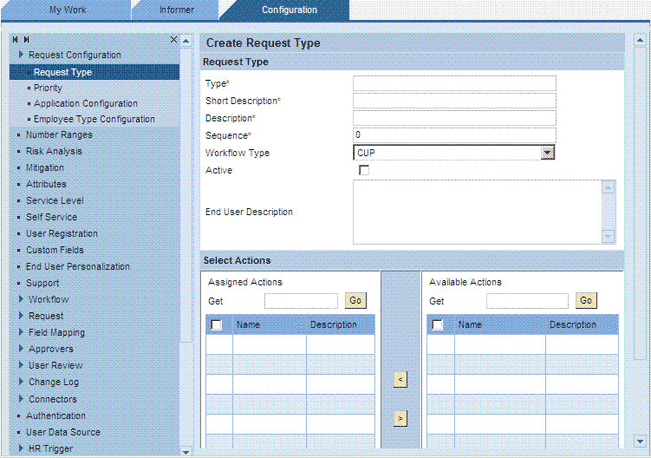
Enter the following information about the request type:
Type: Enter a unique name for the request type. The name must be in uppercase.
Short Description: Enter a short description for the request type.
Description: Enter a description for the request type.
Sequence: Enter a numeric value for the sequence in which this request type must be displayed on the Request Access page. If you assign 0, then the request type does not appear on the Request Access page. However, if the request type is Active, then it appears in the Request Type list throughout SAP GRC Compliant User Provisioning.
Workflow Type: Select CUP as the workflow type.
Active: Select the check box to make the request type active.
End User Description: Enter a description for display to users.
The Select Actions region displays assigned actions and available actions. Assigned actions are actions that will be performed during provisioning. Available actions are actions that are available to be performed during provisioning. You can use the arrow icons to move actions from the Available Actions list to the Assigned Actions list.
Select an action, and then click the left arrow to assign the action.
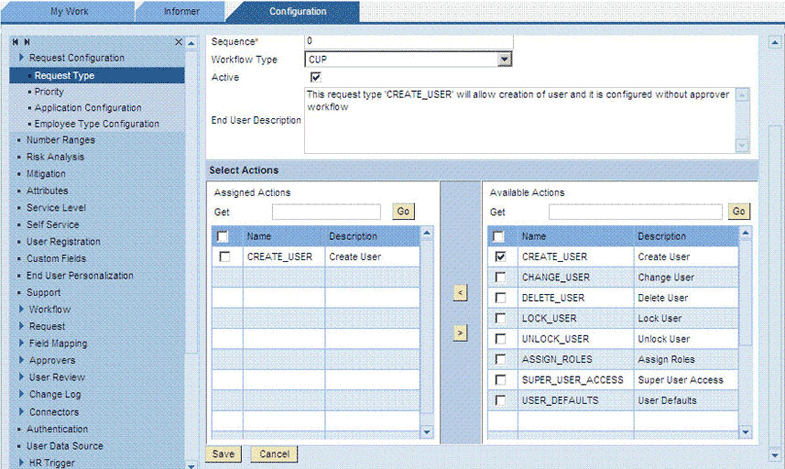
Click Save.
A workflow defined in SAP GRC Compliant User Provisioning acts upon a particular type of request. A workflow consists of an initiator, stage, and path. You can set up one workflow that contains all the request types. Alternatively, you can create a separate workflow for each request type.
An initiator is a combination of a request type and the workflow designed to handle that request type. Initiators and workflows function as matched pairs. A particular initiator can call only one workflow.
To create the initiator:
Log in to the SAP GRC Access Control as an administrative user.
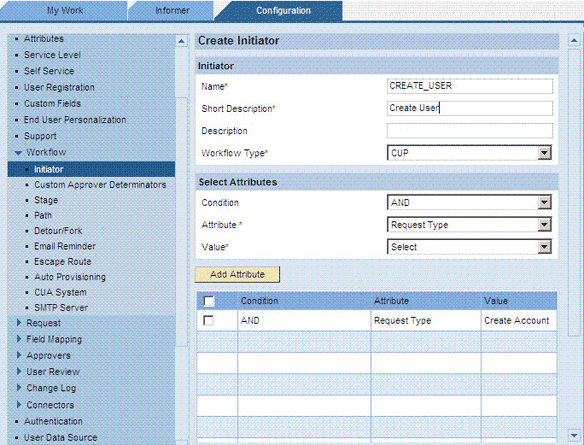
On the Configuration tab, click Workflow, select Initiator, and then click Create.
Enter the following information about the initiator:
Name: Enter a name for the initiator. The name must be in uppercase. For example, enter CHANGE_USER.
Short Description: Enter a short description for the initiator.
Description: Enter a description for the initiator.
Workflow Type: Select CUP as the workflow type.
Select attribute information for the initiator:
Condition: Select AND, NOT, or OR as the condition. For this example, the OR condition is selected.
Attribute: Select Request Type as the attribute.
Value: Select a request type.
Click Add Attribute, and then repeat Step 3 for each request type that you create.
Click Save.
The following screenshot shows this page:
A stage is a decision point in a workflow. At each stage in a workflow, an approver must approve or deny the request. The stage also specifies the action to be taken based on the decision of the approver. The request process proceeds beyond a stage only after the approver responds by approving or rejecting the request.
To create the stage:
Click Workflow, select Stage, and then click Create.
Enter the following information about the stage:
Name: Enter a name for the initiator. The name must be in uppercase, and it must not contain spaces. For example, enter NO_STAGE.
Short Description: Enter a short description for the initiator.
Description: Enter a description for the initiator.
Workflow Type: Select CUP as the workflow type.
Approver Determinator: From this list, it is recommended that you select No Stage for all operations other than the Add Role operation. See Section 1.3.6, "Considerations to Be Addressed When You Enable Compliant User Provisioning" for information about this guideline.
The following screenshot shows this page:
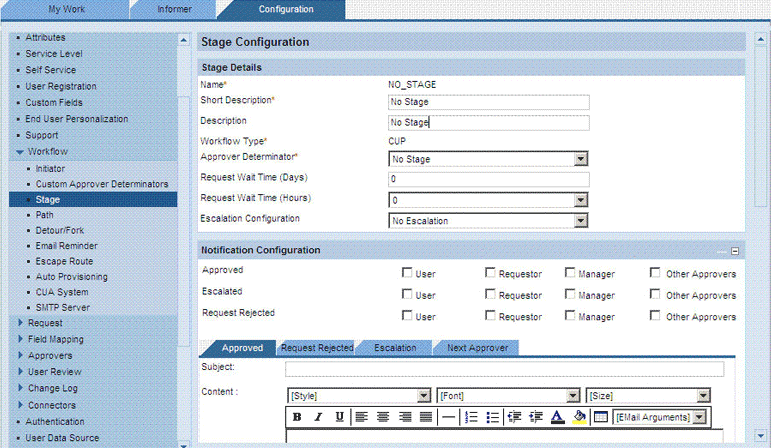
Request Wait Time (Days): Enter the number of days for which Compliance User Provisioning must wait for an approver to respond to a request before escalating the request. In this example it is 0, because no escalation is configured.
Request Wait Time (Hours): Enter the number of hours for which Compliance User Provisioning must wait for an approver to respond to a request before escalating the request. In this example it is 0, because no escalation is configured.
Escalation Configuration: From the list, select No Escalation.
Notification Configuration: Specify whether and to whom the system notifies about actions taken at this point in the stage.
Additional Configuration: Define any additional functionality required at this stage.
Additional Security Configuration: Specify whether or not approvers must reaffirm their actions by entering their password.
The following actions can be configured to require password reaffirmation:
Approve
Reject
Create User (automatic creation of a user record)
Click Save.
A path defines the sequence of stages in a workflow. The stages in a workflow are related to other stages by the path.
To create the path:
Click Workflow, select Path, and then click Create.
Enter the following information about the path:
Name: Enter a name for the path. The name must be in uppercase, and it must not contain spaces.
Short Description: Enter a short description for the path.
Description: Enter a description for the path.
Workflow Type: Select CUP as the workflow type.
Number of Stages: Enter the number of stages that you want to include in the path.
Initiator: From the list, select the initiator that you created earlier.
Active: Select Active to make the path active.
Click Save to create the path.
The following screenshot shows this page:
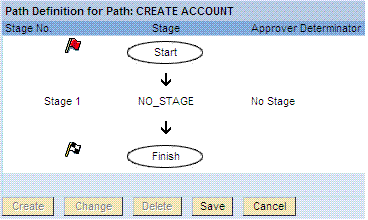
You can define a set of user defaults and also create user default mappings that define conditions under which the user defaults must be applied.
To define user defaults:
On the Configuration tab, expand User Defaults and then click User Defaults.
The following screenshot shows this page:
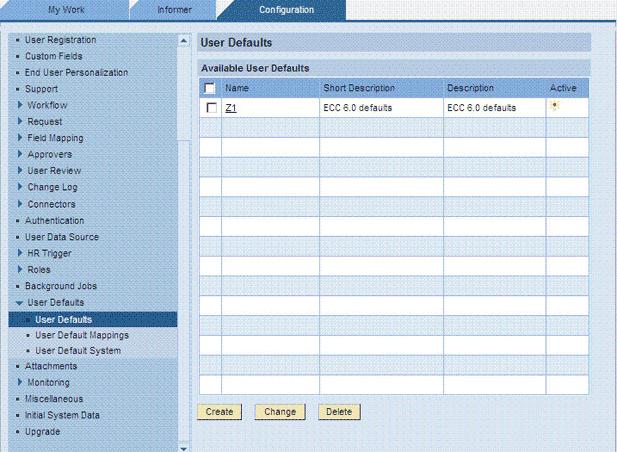
Enter values in the following fields:
Name: Enter a name for this set of user defaults.
System: Select the SAP R/3 or SAP CUA system.
Short Description: Enter a short description for this set of user defaults.
Description: Enter a description for this set of user defaults.
Specify default values for the Logon Language, Time Zone, Decimal Notation, Date Format, Output Device, and User Group attributes.
The following screenshot shows this page:
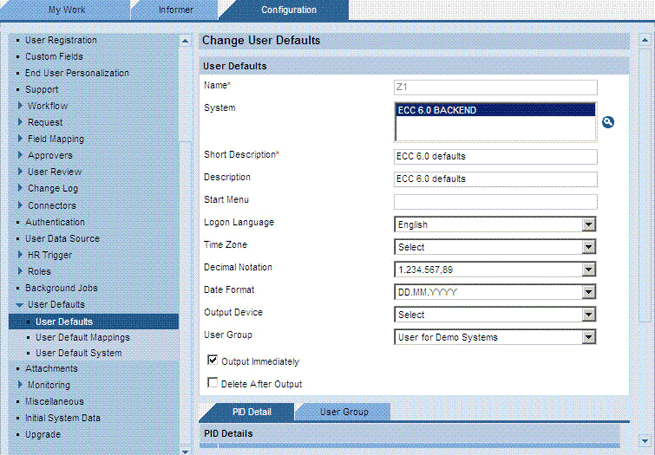
Click Save.
To define a user default mapping:
On the Configuration tab, expand User Defaults and then click User Default Mappings.
Enter values in the following fields:
Name: Enter a name for this set of user defaults.
Short Description: Enter a short description for this set of user defaults.
Description: Enter a description for this set of user defaults.
User Defaults: Select the default that you create.
In the Select Attributes region, use the Condition, Attribute, and Value lists to specify the attributes (conditions) under which the defaults must be applied.
For example, suppose you select the following attributes:
Request Type: New
Functional Area: Finance
A request that has these two attributes is automatically assigned the user defaults.
Click Save.
The following screenshot shows this page:
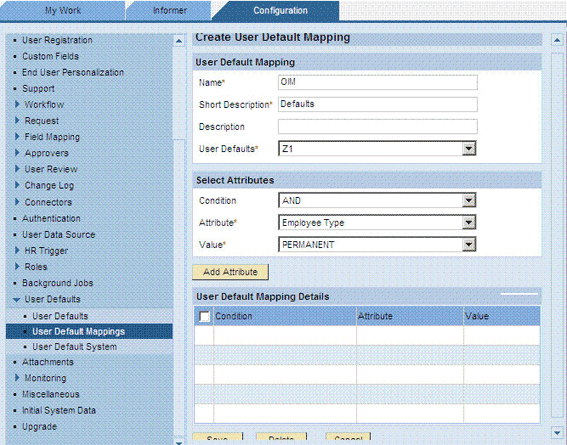
Table 2-6 describes the entries in the Lookup.SAP.CUP.Configuration lookup definition.
|
Note: You must not change any of the Code Key values of this lookup definition. |
Table 2-6 Entries in the Lookup.SAP.CUP.Configuration Lookup Definition
| Code Key | Description |
|---|---|
|
Application |
Enter the system name of the SAP R/3 or SAP CUA installation. Sample value: |
|
Assign Role |
Enter the name of the request type that you create for Modify User provisioning operations. See Section 2.3.11.6.1, "Creating Request Types" for more information. Sample value: |
|
This entry holds the name of the lookup definition that stores child form attribute mappings for the Compliant User Provisioning feature. Value: |
|
|
This entry holds the name of the lookup definition that stores values used by the connector in the Compliant User Provisioning feature. The connector development team can use this lookup definition to make minor configuration changes in the connector. Value: |
|
|
Create User |
Enter the name of the request type that you create for Create User provisioning operations. See Section 2.3.11.6.1, "Creating Request Types" for more information. Sample value: |
|
Delete User |
Enter the name of the request type that you create for Delete User provisioning operations. See Section 2.3.11.6.1, "Creating Request Types" for more information. Sample value: |
|
Ignore OPEN status |
Use this entry to specify that new requests can be sent for a particular user, even if the last request for the user is in the Open status. If you set this entry to If you set this entry to Default value: Note: If Ignore OPEN status is set to |
|
Ignore User Created Check For Add Role |
When an Add Role request is submitted through Oracle Identity Manager, the connector first checks if the specified user exists on the target system. If an approver is defined for the Create User request type and if the Add Role request is sent immediately after the Create User request is sent, then the process task for adding the role might be rejected. This is because the user is not created on the target system until SAP GRC Compliant User Provisioning clears the Create User request. If you want the connector to skip the check for the user on the target system during Add Role operations, then enter Enter Default value: |
|
IT Resource |
This entry holds the name of the GRC IT resource. Default value: |
|
Lock User |
Enter the name of the request type that you create for Modify User provisioning operations. See Section 2.3.11.6.1, "Creating Request Types" for more information. Sample value: |
|
Modify User |
Enter the name of the request type that you create for Modify User provisioning operations. See Section 2.3.11.6.1, "Creating Request Types" for more information. Sample value: |
|
This entry holds the name of the lookup definition that stores process form attribute mappings for the Compliant User Provisioning feature. Value: |
|
|
Priority |
Enter the priority level at which SAP GRC Compliant User Provisioning must process requests sent from Oracle Identity Manager:
|
|
Unlock User |
Enter the name of the request type that you create for Modify User provisioning operations. See Section 2.3.11.6.1, "Creating Request Types" for more information. Sample value: |
This section discusses the following procedures:
Section 2.3.12.1, "Configuring SAP GRC to Act As the SoD Engine"
Section 2.3.12.3, "Modifying the SoD-Related Lookup Definitions"
Section 2.3.12.4, "Specifying Values for the GRC-ITRes IT Resource"
Section 2.3.12.5, "Verifying Entries Created in the Lookup.SAP.UM.System Lookup Definition"
Section 2.3.12.6, "Specifying a Value for the TopologyName IT Resource Parameter"
|
Note: The ALL USERS group has INSERT, UPDATE, and DELETE permissions on the UD_SAP, UD_SAPRL, and UD_SPUM_PRO process forms. This is required to enable the following process:During SoD validation of an entitlement request, data first moves from a dummy object form to a dummy process form. From there data is sent to the SoD engine for validation. If the request clears the SoD validation, then data is moved from the dummy process form to the actual process form. Because the data is moved to the actual process forms through APIs, the ALL USERS group must have INSERT, UPDATE, and DELETE permissions on the three process forms. |
See "Configuring SAP GRC" in the "Segregation of Duties (SoD) in Oracle Identity Manager" chapter in Oracle Identity Manager Tools Reference for information about this procedure.
If you are using Oracle Identity Manager release 11.1.1, then see the "Configuring SAP GRC" section in the "Segregation of Duties (SoD) in Oracle Identity Manager" chapter in Oracle Fusion Middleware Developer's Guide for Oracle Identity Manager for information about this procedure.
The Lookup.SAP.UM.SoDConfiguration lookup definition holds configuration values that are used by the connector during SoD operations. Table 2-7 lists the entries in this lookup definition.
Table 2-7 Entries in the Lookup.SAP.UM.SoDConfiguration Lookup Definition
To specify values for the entries in the Lookup.SAP.UM.SoDConfiguration lookup definition:
On the Design Console, expand Administration and then double-click Lookup Definition.
Search for and open the Lookup.SAP.UM.SoDConfiguration lookup definition.
Click Add.
In the Decode column, specify values for the following Code Key entries:
GRC version
is CUA Enabled
Risk Level
If you create a copy of the connector, then you must also specify values for some of the other entries in this lookup definition. See Section 4.14, "Configuring the Connector for Multiple Installations of the Target System" for more information.
Click the Save icon.
Table 2-8 lists entries in the Lookup.SAP.UM.ProfileChildformMappings lookup definition.
Table 2-8 Entries in the Lookup.SAP.UM.ProfileChildformMappings Lookup Definition
| Code Key | Decode |
|---|---|
|
UD_SPUMPC_P_SYSTEMNAME |
UD_SPUM_PRO_SYSTEMNAME |
|
UD_SPUMPC_P_USERPROFILE |
UD_SPUM_PRO_USERPROFILE |
Table 2-9 lists entries in the Lookup.SAP.UM.RoleChildformMappings lookup definition.
Table 2-9 Entries in the Lookup.SAP.UM.RoleChildformMappings Lookup Definition
| Code Key | Decode |
|---|---|
|
UD_SPUMRC_P_SYSTEMNAME |
UD_SAPRL_SYSTEMNAME |
|
UD_SPUMRC_P_USERROLE |
UD_SAPRL_USERROLE |
|
UD_SPUMRC_P_VALID_FROM |
UD_SAPRL_STARTDT,DATE |
|
UD_SPUMRC_P_VALID_TO |
UD_SAPRL_ENDDT,DATE |
If you make changes in the child process forms, then you must also make the required changes in these lookup definitions.
The GRC-ITRes IT resource holds information that is used by the connector during SoD operations. To set values for the parameters of this IT resource:
|
Note: This IT resource is the same as the one used by the Compliant User Provisioning feature for both Oracle Identity Manager release 9.1.0.x and Oracle Identity Manager release 11.1.1. |
Log in to the Administrative and User Console.
Depending on the Oracle Identity Manager release you are using, perform one of the following steps:
If you are using Oracle Identity Manager release 9.1.0.x, expand Resource Management, and then click Manage IT Resource.
If you are using Oracle Identity Manager release 11.1.1, then:
On the Welcome to Oracle Identity Manager Self Service page, click Advanced.
On the Welcome to Oracle Identity Manager Advanced Administration page, in the Configuration region, click Manage IT Resource.
In the IT Resource Name field on the Manage IT Resource page, enter GRC-ITRes and then click Search.
Click the edit icon for the IT resource.
From the list at the top of the page, select Details and Parameters.
Specify values for the parameters of the IT resource. Table 2-10 describes each parameter.
|
Note: Entries in this table are sorted in alphabetical order of parameter names. |
Table 2-10 lists the parameters of the GRC-ITRes IT resource.
Table 2-10 Parameters of the GRC-ITRes IT Resource
| Parameter | Description |
|---|---|
|
dbuser |
Enter the user name of the schema owner on the database used by SAP GRC. This account is used to access the database used by SAP GRC. Sample value: |
|
dbpassword |
Enter the password of the schema owner on the database used by SAP GRC. |
|
jdbcURL |
Enter the JDBC URL for connecting to the database used by SAP GRC. Sample value: |
|
password |
Enter the password of the account created on SAP GRC for API calls. |
|
port |
Enter the number of the port at which SAP GRC is listening. Sample value: |
|
server |
Enter the IP address of the host computer on which SAP GRC is running. Sample value: |
|
Source Datastore Name |
Enter the name of the source data store (the target system) that you defined on SAP GRC. You specify a source data store name while performing the procedure described in Section 2.3.12.1, "Configuring SAP GRC to Act As the SoD Engine". Sample value: |
|
sslEnable |
Enter Sample value: |
|
username |
Enter the user name of an account created on SAP GRC. This account is used to call the SoD engine APIs that are used during SoD validation. Sample value: |
To save the values, click Update.
The Lookup.SAP.UM.System lookup definition is automatically populated with system names when you run lookup field synchronization. After synchronization, you must open this lookup definition and ensure that only entries for systems that you want to use for the SoD validation process are retained in this table.
The TopologyName IT resource parameter holds the name of the combination of the following elements that you want to use for SoD validation:
Oracle Identity Manager installation
SAP GRC installation
SAP ERP installation
For Oracle Identity Manager release 9.1.0.x:
The value that you specify for the TopologyName parameter must be the same as the value of the topologyName element in the SILConfig.xml file.
For Oracle Identity Manager release 11.1.1:
Enter sodgrc as the value of the TopologyName parameter.
See one of the following for more information about this element:
For Oracle Identity Manager release 9.1.0.x, the "Segregation of Duties (SoD) in Oracle Identity Manager" chapter in Oracle Identity Manager Tools Reference for Release 9.1.0.2.
For Oracle Identity Manager release 11.1.1, the "Configuring SoD Validation" chapter in Oracle Fusion Middleware Developer's Guide for Oracle Identity Manager.
See Section 2.3.14, "Configuring the IT Resource" for information about specifying values for parameters of the IT resource.
This section describes the procedures to disable and enable SoD.
Section 2.3.12.7.1, "Disabling and Enabling SoD on Oracle Identity Manager Release 9.1.0.x"
Section 2.3.12.7.2, "Disabling and Enabling SoD on Oracle Identity Manager Release 11.1.1"
The following sections describe the procedure to disable and enable SoD on Oracle Identity Manager on release 9.1.0.x:
Disabling SoD on Oracle Identity Manager Release 9.1.0.x
To disable SoD:
|
Note: The SoD feature is disabled by default. Perform the following procedure only if the SoD feature is currently enabled and you want to disable it. |
Log in to the Design Console.
Set the XL.SoDCheckRequired system property to FALSE as follows:
Expand Administration, and double-click System Configuration.
Search for and open the XL.SoDCheckRequired system property.
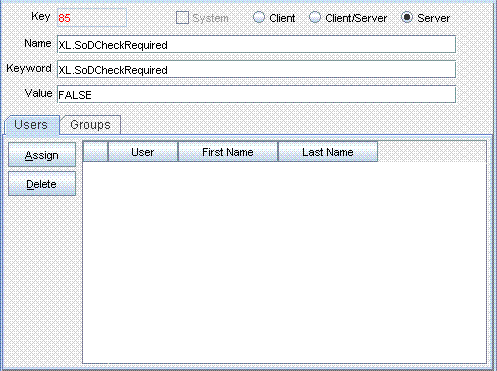
Set the value of the system property to FALSE.
|
Note: You need not change the values of the XL.SIL.Home.Dir and Triggers Synchronous SoD checks offline system properties. |
Click the Save icon.
Disable the Holder andSODChecker process tasks as follows:
Expand Process Management, and double-click Process Definition.
Search for and open the SAP UM Process Form process definition.
On the Tasks tab, double-click the Holder task.
On the Integration tab of the Editing Task dialog box, click Add.
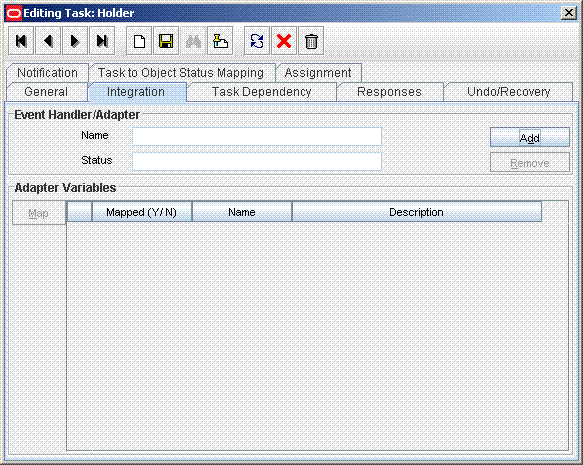
In the Handler Selection dialog box:
Select System.
Select the tcCompleteTask handler.
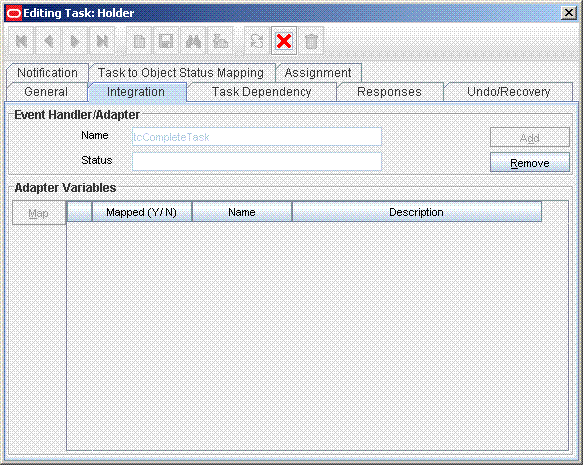
Click the Save icon, and then close the dialog box.
In the Editing Task dialog box, click the Save icon and close the dialog box.
On the Tasks tab, double-click SODChecker.
On the Integration tab of the Editing Task dialog box, click Remove and then click the save icon.
Click Add.
In the Handler Selection dialog box:
Select System.
Select the tcCompleteTask handler.
Click the Save icon, and then close the dialog box.
Click the Save icon in the Editing Task dialog box, and then close the dialog box.
Click the Save icon to save the changes made to the process definition.
If you are going to perform the procedure described in Section 2.3.4, "Enabling Request-Based Provisioning", then in the SAP UM Process Approval, SAP UM Roles Approval, and SAP UM Process Approval process definitions, the human approval tasks must be made unconditional as follows:
On the Design Console, expand Process Management and then double-click Process Definition.
Search for and open the approval-type process definition for the connector that you are using.
On the Task tab, search for the Approval task.
Make this task unconditional by deselecting the Conditional check box. See the following screenshot:
Save the changes to the process definition.
Restart Oracle Identity Manager.
Enabling SoD on Oracle Identity Manager Release 9.1.0.x
To enable SoD:
|
Note: If you are enabling SoD for the first time, then see Oracle Identity Manager Readme for Release 9.1.0.2 for detailed information. |
Log in to the Design Console.
Expand Administration, and double-click System Configuration.
Set the XL.SoDCheckRequired system property to TRUE as follows:
Search for and open the XL.SoDCheckRequired system property.
Set the value of the system property to TRUE.
Click the Save icon.
Search for and open the XL.SIL.Home.Dir system property.
Verify that the value of this system property is set to the full path and name of the SIL_HOME directory.
Enable the Holder andSODChecker process tasks as follows:
Expand Process Management and double-click Process Definition.
Search for and open the SAP UM Process Form process definition.
On the Tasks tab, double-click the Holder task.
On the Integration tab of the Editing Task dialog box, click Remove to remove the tcCompleteTask handler
Click the Save icon, and then close the dialog box.
On the Tasks tab, double-click SODChecker.
On the Integration tab of the Editing Task dialog box, click Add.
In the Handler Selection dialog box:
Select System.
Select the InitiateSODCheck handler.
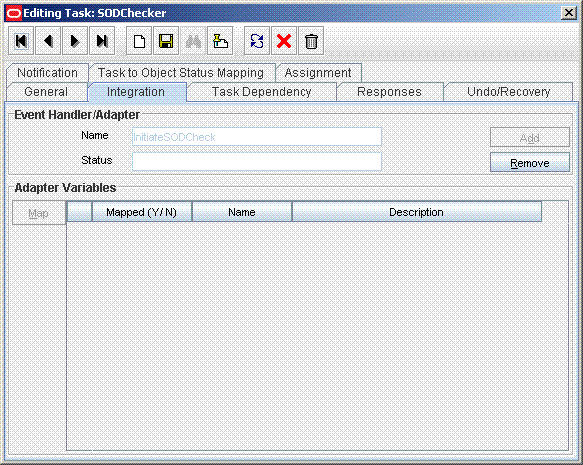
Click the Save icon, and then close the dialog box.
Click the Save icon in the Editing Task dialog box, and then close the dialog box.
Click the Save icon to save the changes made to the process definition.
If you are going to perform the procedure described in Section 2.3.4, "Enabling Request-Based Provisioning", then in the SAP UM Process Approval, SAP UM Roles Approval, and SAP UM Process Approval process definitions, the human approval tasks must be made conditional as follows:
Expand Process Management, and then double-click Process Definition.
Search for and open the approval-type process definition for the connector that you are using.
On the Task tab, search for the Manager Approval task.
Make this task conditional by selecting the Conditional check box. See the following screenshot:
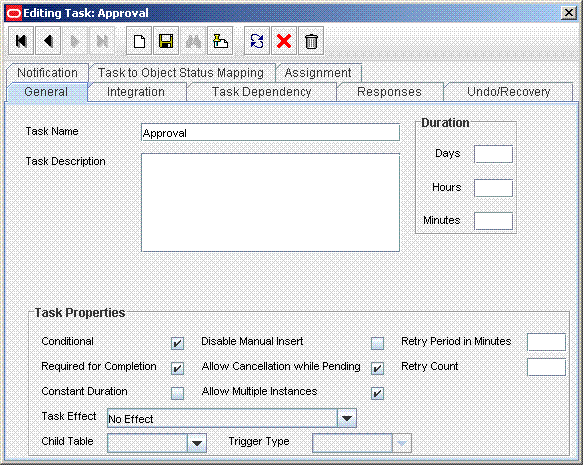
Save the changes to the process definition.
Restart Oracle Identity Manager.
This section describes the procedure to disable and enable SoD on Oracle Identity Manager release 11.1.1.
Disabling SoD on Oracle Identity Manager Release 11.1.1
To disable SoD:
Log in to the Administrative and User Console.
On the Welcome to Oracle Identity Manager Self Service page, click Advanced.
On the Welcome to Oracle Identity Manager Advanced Administration page, click the System Management tab.
In the Search System Configuration box, enter XL.SoDCheckRequired and then click Search.
A list that matches your search criteria is displayed in the search results table.
Click the XL.SoDCheckRequired property name.
System properties for SoD are displayed on the right pane.
In the Value box, enter FALSE to disable SoD.
Click Save.
Enabling SoD on Oracle Identity Manager Release 11.1.1
To enable SoD:
Log in to the Administrative and User Console.
On the Welcome to Oracle Identity Manager Self Service page, click Advanced.
On the Welcome to Oracle Identity Manager Advanced Administration page, click the System Management tab.
In the Search System Configuration box, enter XL.SoDCheckRequired and then click Search.
A list that matches your search criteria is displayed in the search results table.
Click the XL.SoDCheckRequired property name.
System properties for SoD are displayed on the right pane.
In the Value box, enter TRUE to enable SoD.
Click Save.
Oracle Identity Manager uses a Java application server. To connect to the SAP system application server, this Java application server uses the SAP Java connector (JCo). If required, you can use Secure Network Communication (SNC) to secure communication between Oracle Identity Manager and the SAP system.
|
Note: The Java application server used by Oracle Identity Manager can be IBM WebSphere Application Server, Oracle WebLogic Server, or JBoss Application Server. |
This section discusses the following topics:
The following are prerequisites for configuring the connector to use SNC:
SNC must be activated on the SAP application server.
You must be familiar with the SNC infrastructure. You must know which Personal Security Environment (PSE) the application server uses for SNC.
To install the security package on the Java application server used by Oracle Identity Manager:
Extract the contents of the SAP Cryptographic Library installation package.
The SAP Cryptographic Library installation package is available for authorized customers on the SAP Service Marketplace Web site at
http://service.sap.com/download
This package contains the following files:
SAP Cryptographic Library (sapcrypto.dll for Microsoft Windows or libsapcrypto.ext for UNIX)
A corresponding license ticket (ticket)
The configuration tool, sapgenpse.exe
Copy the library and the sapgenpse.exe file into a local directory. For example: C:/usr/sap
Check the file permissions. Ensure that the user under which the Java application server runs is able to run the library functions in the directory into which you copy the library and the sapgenpse.exe file.
Create the sec directory inside the directory into which you copy the library and the sapgenpse.exe file.
|
Note: You can use any names for the directories that you create. However, creating the C:\usr\sap\sec (or /usr/sap/sec) directory is SAP recommendation. |
Copy the ticket file into the sec directory. This is also the directory in which the Personal Security Environment (PSE) and credentials of the Java application server are generated.
Set the SECUDIR environment variable for the Java application server user to the sec directory.
|
Note: From this point onward, the term SECUDIR directory is used to refer to the directory whose path is defined in SECUDIR environment variable. |
For Oracle Application Server:
Remove the SECUDIR entry from the Windows environment variables, if it has been set.
Edit the ORACLE_HOME\opmn\config\opmn.xml file as follows:
Change the following:
<ias-instance id="home.BMPHKTF120" name="home.BMPHKTF120">
  <environment>
    <variable id="TMP" value="C:\DOCUME~1\login user\LOCALS~1\Temp"/>
  </environment>
To:
<ias-instance id="home.BMPHKTF120" name="home.BMPHKTF120">
  <environment>
    <variable id="TMP" value="C:\DOCUME~1\login user\LOCALS~1\Temp"/>
    <variable id="SECUDIR" value="D:\snc\usr\sec"/>
  </environment>
|
Note: Oracle Application Server automatically creates the temporary folder based on the operating system of the computer on which it is installed. |
Restart Oracle Application Server.
Set the SNC_LIB and PATH environment variables for the user of the Java application server to the cryptographic library directory, which is the parent directory of the sec directory.
To configure SNC:
Either create a PSE or copy the SNC PSE of the SAP application server to the SECUDIR directory. To create the SNC PSE for the Java application server, use the sapgenpse.exe command-line tool as follows:
To determine the location of the SECUDIR directory, run the sapgenpse command without specifying any command options. The program displays information such as the library version and the location of the SECUDIR directory.
Enter a command similar to the following to create the PSE:
sapgenpse get_pse -p PSE_Name -x PIN Distinguished_Name
The following is a sample distinguished name:
CN=SAPJ2EE, O=MyCompany, C=US
The sapgenpse command creates a PSE in the SECUDIR directory.
Create credentials for the Java application server.
The Java application server must have active credentials at run time to be able to access its PSE. To check whether or not this condition is met, enter the following command in the parent directory of the SECUDIR directory:
Sapgenpse seclogin
Then, enter the following command to open the PSE of the server and create the credentials.sapgenpse file:
seclogin -p PSE_Name -x PIN -O [NT_Domain\]user_ID
The user_ID that you specify must have administrator rights. PSE_NAME is the name of the PSE file.
The credentials file, cred_v2, for the user specified with the -O option is created in the SECUDIR directory.
Exchange the public key certificates of the two servers as follows:
|
Note: If you are using individual PSEs for each certificate of the SAP server, then you must perform this procedure once for each SAP server certificate. This means that the number of times you must perform this procedure is equal to the number of PSEs. |
Export the Oracle Identity Manager certificate by entering the following command:
sapgenpse export_own_cert -o filename.crt -p PSE_Name -x PIN
Import the Oracle Identity Manager certificate into the SAP application server. You may require the SAP administrator's assistance to perform this step.
Export the certificate of the SAP application server. You may require the SAP administrator's assistance to perform this step.
Import the SAP application server certificate into Oracle Identity Manager by entering the following command:
sapgenpse maintain_pk -a serverCertificatefile.crt -p PSE_Name -x PIN
Configure the following parameters in the SAP UM IT Resource IT resource object:
SAP lib
SAP mode
SAP myname
SAP partnername
SAP qop
The following sections provide information about features that can be enabled using the IT resource:
Section 2.3.14.1, "Parameters for Enabling the Use of a Logon Group"
Section 2.3.14.2, "Parameters for Enabling SNC-Based Communication"
Section 2.3.14.3, "Parameters for Enabling Multiple Attempts to Update Multivalued Attributes"
The following section describes the parameters of the IT resource:
In SAP, a logon group is used as a load-sharing mechanism. When a user logs in to a logon group, the system internally routes the connection request to the logon group member with the least load.
The following parameters of the IT resource are used to enable this feature. These parameters are explained in Table 2-12.
App server host
Logon group name
Message server
R3 name
In addition, perform the following procedure on the Oracle Identity Manager host computer to enable SAP JCo connectivity:
Open the following file in a text editor:
For Microsoft Windows:
C:\WINDOWS\system32\drivers\etc\services
For Solaris or Linux, open the following file:
/etc/services
Add an entry in the following format:
|
Note: Ensure that you add the entry in the correct ascending order of the port number as shown in the example. |
sapmsSYSTEM_ID 36SYSTEM_NUMBER/tcp
For example:
. . .
ipx               213/udp               #IPX over IP
ldap              389/tcp               #Lightweight Directory Access Protocol
sapmsE60          3600/tcp
. . .
Save and close the file.
Create the sapmsg.ini file and add the following lines in the file:
[Message Server]
o01=oss001.wdf.sap-ag.de
SYSTEM_ID=HOST_NAME
For example:
[Message Server]
o01=oss001.wdf.sap-ag.de
E60=mysap08.corp.example.com
Save and close the file.
On the Oracle Identity Manager host computer, copy the file into the C:\Windows directory or the root directory (depending on the operating system running on the host).
Secure Network Communication (SNC) is the SAP-proprietary mechanism for securing communication between SAP and applications with which SAP interacts. See Section 2.3.13, "Configuring SNC to Secure Communication Between Oracle Identity Manager and the Target System" for detailed information to enable SNC-based communication. The names of the SNC parameters are prefixed with SNC.
During provisioning operations, there is a possibility that more than one user tries to update the multivalued attribute (for example, a role) of a particular user. The following parameters of the IT resource are used to automatically manage simultaneous update attempts:
Timeout count: Enter the time (in milliseconds) for which the connector must wait before retrying the operation to update a multivalued attribute on the target system.
Timeout retry count: Enter the maximum number of retry attempts for updating a multivalued attribute on the target system.
The IT resource holds connection properties that are used by SAP JCo. These connection properties are the ones accepted by the SAP JCo. The Lookup.SAP.UM.ITResourceMapping lookup definition holds mappings between the connection properties accepted by the SAP JCo API and the names of IT resource parameters.
|
Note: See the Javadocs shipped with SAP JCo 3.0 for detailed information about connection properties used by the target system. |
To meet the requirements of your operating environment, you might need to add connection properties to this default set of properties. For example, if the target system is behind a firewall, then you must also provide a value for the jco.client.saprouter connection property.
To map a new connection property:
Add the connection property as a parameter in the SAP UM IT resource type definition as follows:
On the Design Console, expand Resource Management, and then click IT Resources Type Definition.
Search for and open the SAP UM IT resource type.
Click Add.
A new row is displayed in the IT Resource Type Parameter table.
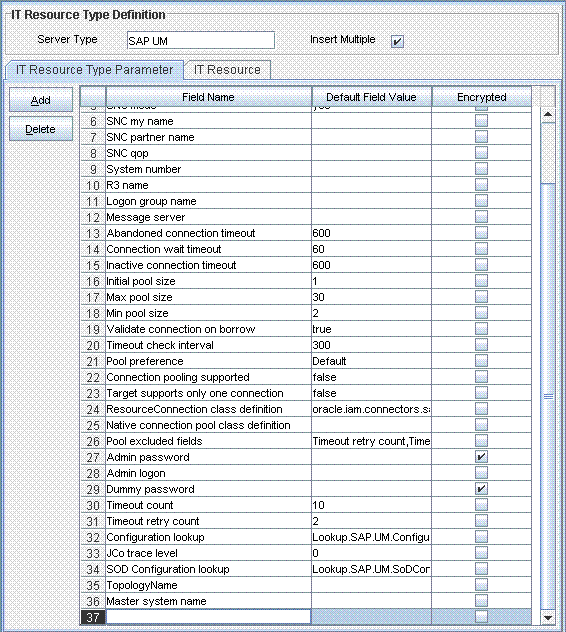
In the Field Name column, enter a name for the parameter.
Do not enter values in any other field.
Click the Save icon.
Specify a value for the new parameter in the IT resource. See Section 2.3.14.5, "Specifying Values for the IT Resource Parameters" for instructions.
In the Lookup.SAP.UM.ITResourceMapping lookup definition, create a mapping between the connection property and the IT resource parameter as follows:
On the Design Console, expand Administration, and then double-click Lookup Definition.
Search for and open the Lookup.SAP.UM.ITResourceMapping lookup definition.
Click Add.
In the Code Key column, enter the connection property defined in the ServerDataProvider or DestinationDataProvider interface of SAP JCo 3.0
Table 2-11 lists the default entries in this lookup definition.
Table 2-11 Entries in the Lookup.SAP.UM.ITResourceMapping Lookup Definition
| SAP JCo Parameter | IT Resource Parameter |
|---|---|
|
jco.client.ashost |
App server host |
|
jco.client.client |
Client logon |
|
jco.client.group |
Logon group name |
|
jco.client.lang |
Language |
|
jco.client.mshost |
Message server |
|
jco.client.passwd |
Admin password |
|
jco.client.r3name |
R3 name |
|
jco.client.snc_lib |
SNC lib |
|
jco.client.snc_mode |
SNC mode |
|
jco.client.snc_myname |
SNC my name |
|
jco.client.snc_partnername |
SNC partner name |
|
jco.client.snc_qop |
SNC qop |
|
jco.client.sysnr |
System number |
|
jco.client.trace |
JCo trace level |
|
jco.client.user |
Admin logon |
In the Decode column, enter the name of the IT resource parameter
Click the Save icon.
The SAP UM IT Resource IT resource is automatically created when you run the Connector Installer. You must specify values for the parameters of the IT resource.
To specify values for the parameters of the IT resource:
Log in to the Administrative and User Console.
Depending on the Oracle Identity Manager release you are using, perform one of the following steps:
If you are using Oracle Identity Manager release 9.1.0.x, expand Resource Management, and then click Manage IT Resource.
If you are using Oracle Identity Manager release 11.1.1, then:
On the Welcome to Oracle Identity Manager Self Service page, click Advanced.
On the Welcome to Oracle Identity Manager Advanced Administration page, in the Configuration region, click Manage IT Resource.
In the IT Resource Name field on the Manage IT Resource page, enter SAP UM IT Resource and then click Search.
Click the edit icon for the IT resource.
From the list at the top of the page, select Details and Parameters.
Specify values for the parameters of the IT resource. Table Table 2-12 describes each parameter.
|
Note: Entries in this table are sorted in alphabetical order of parameter names. |
Table 2-12 Parameters of the IT Resource
| Parameter | Description |
|---|---|
|
Admin logon |
Enter the user ID of the target system user account that you create for connector operations See Section 2.1.2.1, "Creating a Target System User Account for Connector Operations" for more information. |
|
Admin password |
Enter the password of the target system user account that you create for connector operations See Section 2.1.2.1, "Creating a Target System User Account for Connector Operations" for more information. |
|
App server host |
If the target system provides the logon groups feature, then enter the system name as the value of this parameter. Otherwise, enter the host name or IP address of the target system. |
|
Client logon |
Enter the client ID of the target system. |
|
This parameter holds the name of the lookup definition containing configuration information. Value: |
|
|
Enter the dummy password that you want the connector to use during a Create User provisioning operation. The connector first sets the password as this value and then changes it to the password specified on the process form. See Section 2.3.3.2, "Configuring Password Changes for Newly Created Accounts" for more information about this parameter. |
|
|
JCo trace level |
Enter a trace level from 0 through 10.The amount of data that is traced increases with the trace level that you select. In addition, a particular trace level also contains all the trace data from the lower trace levels. See the "Java Connectivity" section on the following Web site for more information about the JCo trace level parameter: Default value: |
|
Language |
Enter the two-letter code for the language set on the target system. See Section 2.3.9, "Setting Up the Lookup.SAP.UM.LookupMappings and Lookup.SAP.CUA.LookupMappings Lookup Definitions" for more information. |
|
Logon group name |
|
|
Master system name |
Enter the RFC Destination value that is used for identification of the SAP system. |
|
Message server |
Enter the host name of the message server. |
|
R3 name |
|
|
SNC lib |
Enter the full path and name of the crypto library on the target system host computer. This is required only if SNC is enabled. Sample value: |
|
SNC mode |
If SNC is enabled on the SAP server, then set this field to Note: It is recommended that you enable SNC to secure communication with the target system. Default value: |
|
SNC my name |
SNC system name Specify a value for this parameter only if you enable SNC communication between the target system and Oracle Identity Manager. Sample value: |
|
SNC partner name |
Enter the domain name of the target system host computer. Specify a value for this parameter only if you enable SNC communication between the target system and Oracle Identity Manager. Sample value: |
|
SNC qop |
Enter the protection level (quality of protection, QOP) at which data is transferred. The value can be any one of the following numbers:
Specify a value for this parameter only if you enable SNC communication between the target system and Oracle Identity Manager. Default value: |
|
This parameter holds the name of the lookup definition that stores configuration information for SAP GRC. Value: |
|
|
System number |
Enter the system number of the SAP R/3 or SAP CUA installation. You need not enter a value for this parameter if you are using a logon group. However, you must enter a value if you are not using a logon group. |
|
Timeout count |
Enter the delay in milliseconds that the connector method that is trying to add a role or profile to a user must wait after a timeout is encountered. See Section 2.3.14.3, "Parameters for Enabling Multiple Attempts to Update Multivalued Attributes" for more information. Default value: |
|
Timeout retry count |
Enter the number of times the connector method that is trying to add a role or profile to a user must be retried. See Section 2.3.14.3, "Parameters for Enabling Multiple Attempts to Update Multivalued Attributes" for more information. Default value: |
|
Enter the value of the Topology Name element in the SIL configuration file. This parameter is used by the SoD feature. See Oracle Identity Manager Tools Reference for more information. For Oracle Identity Manager release 9.1.0.x: Sample value: For Oracle Identity Manager release 11.1.1: Sample value: |
|
|
Abandoned connection timeout |
Enter the time (in seconds) after which a connection must be automatically closed if it is not returned to the pool. Note: You must set this parameter to a value that is high enough to accommodate processes that take a long time to complete (for example, full reconciliation). Default value: |
|
Connection pooling supported |
Enter Default value: |
|
Connection wait timeout |
Enter the maximum time (in seconds) for which the connector must wait for a connection to be available. Default value: |
|
Inactive connection timeout |
Enter the time (in seconds) of inactivity after which a connection must be dropped and replaced by a new connection in the pool. Default value: |
|
Initial pool size |
Enter the number of connections that must be established when the connection pool is initialized. The pool is initialized when it receives the first connection request from a connector. Default value: Sample value: |
|
Max pool size |
Enter the maximum number of connections that must be established in the pool at any point of time This number includes the connections that have been borrowed from the pool. Default value: Sample value: |
|
Min pool size |
Enter the minimum number of connections that must be in the pool at any point of time. This number includes the connections that have been borrowed from the pool. Default value: |
|
Native connection pool class definition |
This parameter holds the name of the wrapper to the native pool mechanism that implements the GenericPool. Note: Do not specify a value for this parameter. |
|
Pool excluded fields |
This parameter holds a comma-separated list of IT parameters whose change must not trigger a refresh of the connector pool. Value:
Note: Do not change the value of this parameter unless you are adding or deleting a parameter from the IT resource. You must ensure that the total length of the list does not exceed 2000 characters. If you are adding a parameter to the IT resource, then that parameter name must be added to the above list with a comma separator. If you are deleting a parameter from the IT resource, then that parameter must be removed from the list if it exists in the list. You must restart Oracle Identity Manager for changes that you make to this parameter to take effect. |
|
Pool preference |
This parameter specifies the preferred connection pooling implementation. Value: Note: Do not change this value of this parameter. |
|
ResourceConnection class definition |
This parameter holds the name of the implementation of the ResourceConnection class. Value:
Note: Do not change the value of this parameter. |
|
Target supports only one connection |
This parameter indicates whether the target system can support one or more connections at a time. Value: Note: Do not change the value of this parameter. |
|
Timeout check interval |
Enter the time interval (in seconds) at which the other timeouts specified by the other parameters must be checked Default value: |
|
Validate connection on borrow |
Specify whether or not a connection must be validated before it is lent by the pool. The value can be Default value: |
To save the values, click Update.
If Decode values in a lookup definition are not unique, then the wrong Code Key value might be saved in Oracle Identity Manager. This known issue in Oracle Identity Manager will be fixed when you deploy the Oracle Identity Manager release 9.1.0.2 bundle patch that addresses Bug 9237745.
|
Note: The bundle patch that addressed Bug 9237745 had not been released at the time of release of this connector. |
To work around this issue, use the Transformation of Lookup Field Data feature of the connector as follows:
Copy the Sample/TransformLookup1.java file from the installation media to a temporary directory.
Create a JAR file out of this Java file, and place the JAR file in the OIM_HOME/xellerate/ScheduleTask directory for Oracle Identity Manager release 9.1.0.x and Oracle Identity Manager database for Oracle Identity Manager release 11.1.1.
Open the Lookup.SAP.UM.Configuration lookup definition, and set the value of the Use Transformation For Lookup Recon entry to yes.
Open the Lookup.SAP.UM.LookupReconTransformation lookup definition, and add the following row:
Code Key: ALL
Decode: oracle.iam.connectors.common.transform.TransformLookup1
When you run lookup field synchronization, the Java program appends Code Key values to the Decode values. This ensures the uniqueness of each entry in the Decode column. The procedure to run lookup field synchronization is described later in this guide.