| Oracle® Identity Manager Connector Guide for SAP User Management Release 9.1.2 E11212-14 |
|
 Previous |
 Next |
| Oracle® Identity Manager Connector Guide for SAP User Management Release 9.1.2 E11212-14 |
|
 Previous |
 Next |
This chapter discusses the following optional procedures:
Section 4.1, "Determining the Names of Target System Attributes"
Section 4.3, "Adding New Standard and Custom Multivalued Attributes for Reconciliation"
Section 4.4, "Adding New Standard Attributes for Provisioning"
Section 4.5, "Adding New Standard SAP GRC Compliant User Provisioning Attributes for Provisioning"
Section 4.6, "Adding New Standard Multivalued Attributes for Provisioning"
Section 4.8, "Adding Custom Multivalued Attributes for Provisioning"
Section 4.9, "Configuring Validation of Data During Reconciliation and Provisioning"
Section 4.10, "Configuring Transformation of Data During User Reconciliation"
Section 4.11, "Configuring Transformation of Data During Lookup Field Synchronization"
Section 4.12, "Configuring Synchronization of New Lookup Definitions with the Target System"
Section 4.14, "Configuring the Connector for Multiple Installations of the Target System"
This section describes the procedure to determine the names of standard target system attributes that you want to add for reconciliation or provisioning. These attributes can be single-valued or multivalued. The names that you determine are used to build values for the Decode column of the lookup definitions that hold attribute mappings. These lookup definitions and their corresponding Decode column formats are listed in the following table:
| Lookup Definition | Format of Value in the Decode Column |
|---|---|
| Lookup.SAP.UM.ReconAttrMap | FIELD_TYPE;FIELD_NAME;STRUCTURE_NAME
See Section 1.6.1, "User Attributes for Reconciliation" for more information. |
| Lookup.SAP.UM.ReconChildAttrMap | FIELD_TYPE;FIELD_NAME;TABLE_NAME;OIM_CHILD_TABLE_NAME
See Section 1.6.1, "User Attributes for Reconciliation" for more information. |
| Lookup.SAP.UM.ProvAttrMap and Lookup.SAP.UM.ProvChildAttrMap | FIELD_TYPE;FIELD_NAME;STRUCTURE_NAME;FIELD_NAME_X;STRUCTURE_NAME_X
See Section 1.7.2, "User Attributes for Provisioning" for more information. |
To determine the name of a target system attribute that you want to add for reconciliation or provisioning:
Log in to the SAP system.
Run transaction SU01.
In the User field, enter the user ID of the target system account that you have created for connector operations. See Section 2.1.2.1, "Creating a Target System User Account for Connector Operations" for more information.
Click the Change icon.
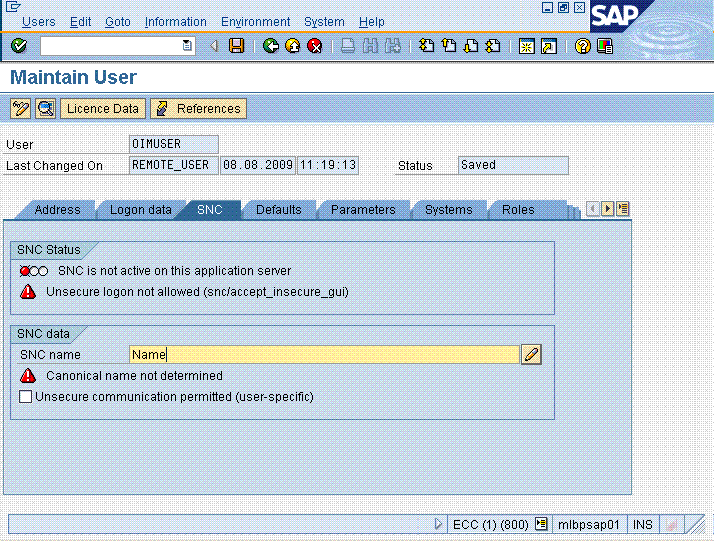
Click the tab on which the attribute that you want to add is displayed. For example, if you want to add the SNC Name attribute, click the SNC tab.
In the field for the attribute that you want to add, enter a value. For example, enter a value in the SNC name field. The following screenshot shows this page:
Click the Save icon.
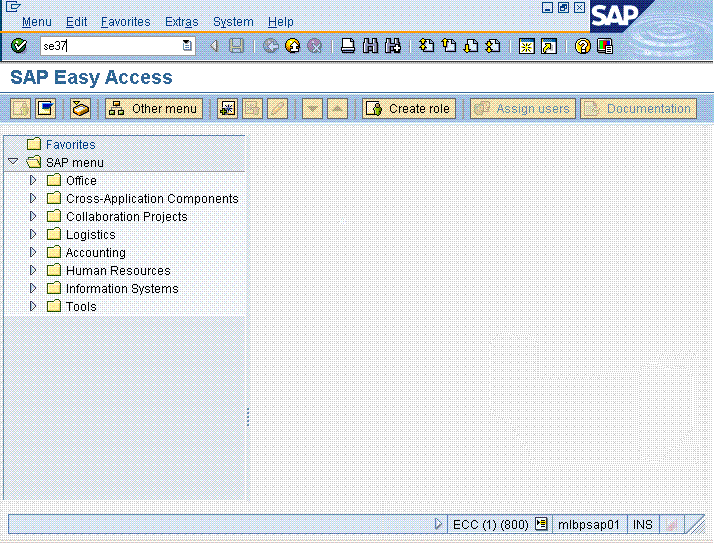
Run transaction SE37. The following screenshot shows this page:
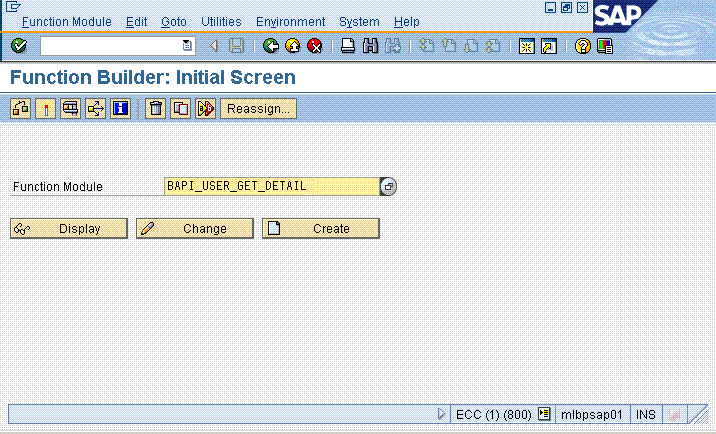
In the Function Module field, enter BAPI_USER_GET_DETAIL. The following screenshot shows this page:
Click the Test/Execute icon.
In the USERNAME field, enter the user ID of the account described in Section 2.1.2.1, "Creating a Target System User Account for Connector Operations".
Click the Execute icon.
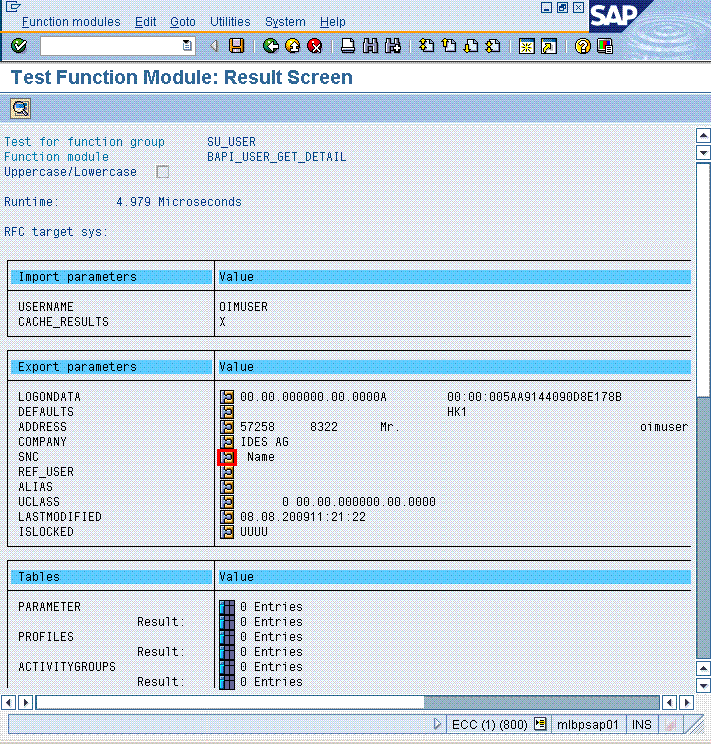
Single-valued attributes are listed in the Export parameters table. Similarly, multivalued attributes are listed in the Tables table.
For the attribute that you are adding, click the icon displayed in the Value column. The following screenshot shows this page:
On the page that is displayed, click the Single Entry icon. The following screenshot shows this page:
The target system name for the attribute is displayed along with the value that you entered. Write down the names of the attribute (FIELD_NAME) and the structure (STRUCTURE_NAME).
|
Note: TheFIELD_NAME and STRUCTURE_NAME values can be used in the Decode value for both reconciliation and provisioning attribute mapping.
You must write down the names in the same case (uppercase or lowercase) as given on the target system. This is because the attribute names are case-sensitive. |
The following screenshot shows this page:
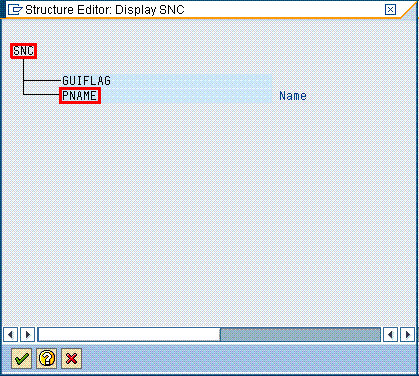
Using the values that you have written down, create the Decode column value for reconciliation. See the table at the start of this section for information about the required format of the Decode column.
|
Note: If you are going to add the attribute for provisioning, then perform the remaining steps of this procedure. |
To determine the names of the structureX and attributeX fields, which indicate that the attribute is ready for modification:
Run transaction SE37.
In the Function Module field, enter BAPI_USER_CHANGE.
Click the Test/Execute icon.
Click the icon in the Value column for the structureX containing the attributeX that you want to add.
Write down the names of attributeX (FIELD_NAME_X) and structureX (STRUCTURE_NAME_X).
Using the values that you have written down, create the Decode column value for provisioning. See the table at the start of this section for information about the required format of the Decode column.
|
Note:
|
By default, the attributes listed in Table 1-4 are mapped for reconciliation between Oracle Identity Manager and the target system. If required, you can add new attributes for reconciliation.
Summary of the procedure to add a new attribute for reconciliation
Add the new attribute on the process form.
Add the attribute to the list of reconciliation fields in the resource object.
Create a reconciliation field mapping for the attribute in the process definition.
If the new attribute is a standard attribute, create an entry for the field in the Lookup.SAP.UM.ReconAttrMap lookup definition.
If the new attribute is a custom attribute, then create an entry in the Lookup.SAP.UM.CustomAttrMap lookup definition.
If the new attribute is a check box, then create an entry in the Lookup.SAP.UM.ReconCheckBoxMapping lookup definition.
To add a new attribute for reconciliation:
|
Note: See one of the following guides for detailed information about the steps of this procedure:
If you have already added an attribute for provisioning, then you need not repeat steps performed as part of that procedure. |
Log in to the Oracle Identity Manager Design Console.
Add the new attribute on the process form as follows:
Expand Development Tools, and double-click Form Designer.
Search for and open the UD_SAP process form.
Click Create New Version, and then click Add.
Enter the details of the field.
For example, if you are adding the SNC Name field, enter UD_SAP_SNCNAME in the Name field and then enter other details such as Variable Type, Length, Field Label, and Field Type.
Click the Save icon, and then click Make Version Active. The following screenshot shows the new field added to the process form:
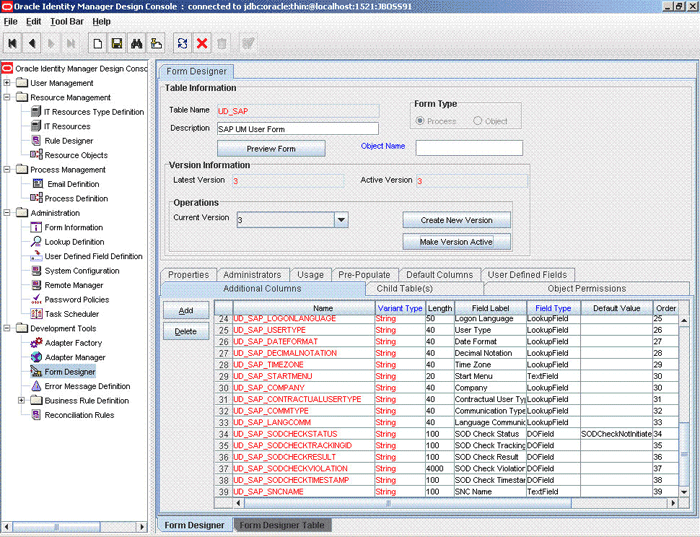
Add the new attribute to the list of reconciliation fields in the resource object as follows:
Expand Resource Management, and double-click Resource Objects.
Search for and open the SAP UM resource object.
On the Object Reconciliation tab, click Add Field.
Enter the details of the field.
For example, enter SNC Name in the Field Name field and select String from the Field Type list.
Later in this procedure, you will enter the field name as the Code value of the entry that you create in the lookup definition for reconciliation.
Click the Save icon. The following screenshot shows the new reconciliation field added to the resource object:
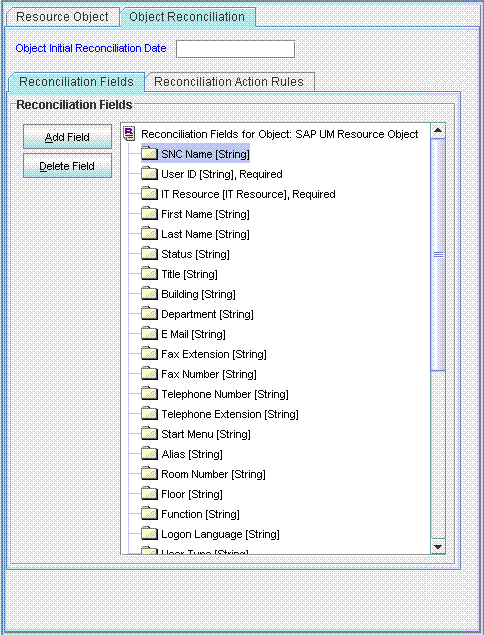
If you are using Oracle Identity Manager release 11.1.1, then click Create Reconciliation Profile. This copies changes made to the resource object into the MDS.
Create a reconciliation field mapping for the new attribute in the process definition as follows:
Expand Process Management, and double-click Process Definition.
Search for and open the SAP UM Process Form process definition.
On the Reconciliation Field Mappings tab of the SAP UM Process Form process definition, click Add Field Map.
In the Field Name field, select the value for the field that you want to add.
Double-click the Process Data Field field, and then select UD_SAP_SNCNAME.
Click the Save icon. The following screenshot shows the new reconciliation field mapped to a process data field in the process definition:
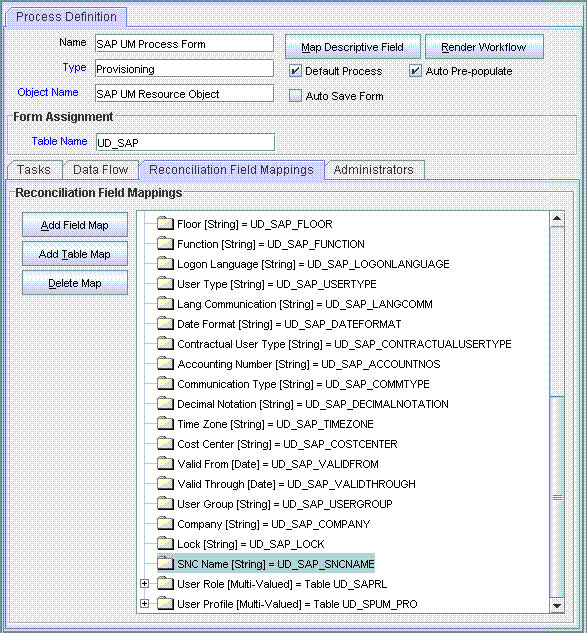
Create an entry for the field in the lookup definition for reconciliation as follows:
|
Note: Skip this step if you are adding a custom attribute. |
Expand Administration.
Double-click Lookup Definition.
Search for and open the Lookup.SAP.UM.ReconAttrMap lookup definition.
|
Note: For the target system fields, you must use the same case (uppercase or lowercase) as given on the target system. This is because the field names are case-sensitive. |
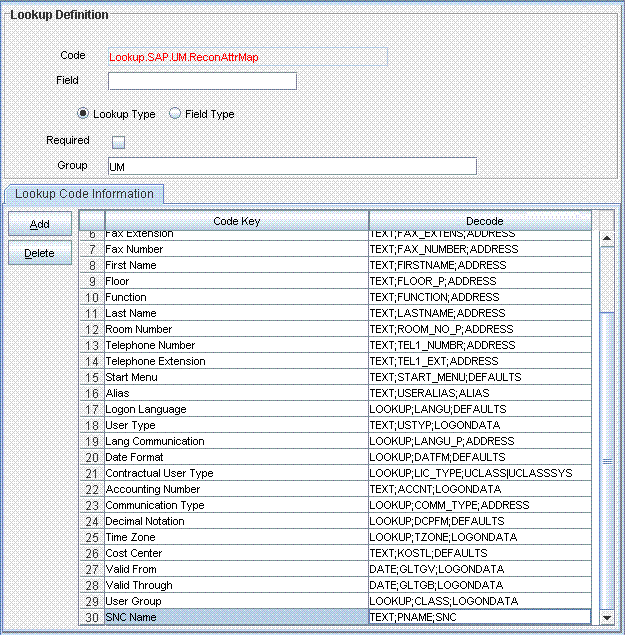
Click Add and enter the Code Key and Decode values for the field. The Code Key value must be the name of the field in the resource object. The Decode value is what you determine by performing the procedure described in Section 4.1, "Determining the Names of Target System Attributes".
For example, enter SNC Name in the Code Key field and then enter TEXT;PNAME;SNC in the Decode field.
Click the Save icon. The following screenshot shows the entry added to the lookup definition:
The target system allows you to create custom structures and tables that hold custom fields. If you are mapping a custom attribute for reconciliation, then create an entry for the attribute in the Lookup.SAP.UM.CustomAttrMap lookup definition as follows:
In the Code Key column of the Lookup.SAP.UM.CustomAttrMap lookup definition, enter the name of the resource object field that you created for the custom attribute.
In the Decode column of the lookup definition, enter a value in one of the following formats:
If you want a custom BAPI to fetch values from this attribute, then:
CUSTOM_BAPI_NAME;FIELD_TYPE;TABLE_NAME;FIELD_NAME;KEY_USER_ID_FIELD
If you want a custom RFC table to fetch values from this attribute, then:
RFC_READ_TABLE;FIELD_TYPE;TABLE_NAME;FIELD_NAME;KEY_USER_ID_FIELD
In these formats:
CUSTOM_BAPI_NAME is the name of the custom BAPI that you created for fetching values from the custom attribute.
FIELD_TYPE is the type of data that is stored in the custom attribute. It can be TEXT, DATE, or CHECKBOX.
TABLE_NAME is the name of the custom table that contains the attribute.
FIELD_NAME is the name of the attribute in the custom table.
KEY_USER_ID_FIELD is the attribute in the custom table that holds user ID values.
The following is a sample value for the Decode column:
ZBAPI_CUSTFIELDS;TEXT;ZCUSTFIELDS;FIELD1;USERNAME
Oracle Identity Manager stores the state of a check box as either 1 (selected) or 0 (deselected). In SAP, the state of check boxes is stored using different characters. If you are adding a check box attribute on the target system for reconciliation, then:
Search for and open the Lookup.SAP.UM.ReconCheckBoxMapping lookup definition.
If the attribute is a standard check box attribute, then create one of the entries given in the following table:
| Field Label in SAP | Value to Be Entered in the Code Key Column (Sample Resource Object Field Name) | Value to Be Entered in the Decode Column |
|---|---|---|
| Output Immediately | Output Immediately | GH |
| Delete After Output | Delete After Output | DK |
| Check Indicator | Check Indicator | X |
| Unsecure communication permitted (user-specific) | Unsecure communication permitted | X |
If the attribute is a standard check box attribute, then create the following entry in the Lookup.SAP.UM.ReconCheckBoxMapping lookup definition:
Code Key: Enter the name of the process form field that you created for the attribute.
Decode: Enter the characters for representing the check box state when it is selected and deselected. For example, suppose you use X to represent the selected state of the check box and Y to represent the deselected state, then enter XY in the Decode column.
Save and close the lookup definition.
|
Note: This section describes the procedure to add standard multivalued attributes of the target system for reconciliation. Addition of custom multivalued attributes is not supported. You must ensure that new fields you add for reconciliation contain only string-format data. Binary fields must not be brought into Oracle Identity Manager natively. |
By default, the multivalued attributes listed in Table 1-5 are mapped for reconciliation between Oracle Identity Manager and the target system. If required, you can add new multivalued fields for reconciliation.
Summary of the procedure to add a new multivalued attribute for reconciliation
Create a child form for the new multivalued attribute.
Associate the child form with the parent form.
Add the multivalued attribute to the list of reconciliation fields in the resource object.
Create a reconciliation field mapping for the multivalued attribute.
Create an entry for the multivalued attribute in the Lookup.SAP.UM.ReconChildAttrMap lookup definition.
If the attribute is a custom multivalued attribute, then add it in Lookup.SAP.UM.CustomChildAttrMap lookup definition.
To add a new multivalued attribute for reconciliation:
Log in to the Oracle Identity Manager Design Console.
Create a child form for the multivalued attribute as follows:
Expand Development Tools.
Double-click Form Designer.
Create a form by specifying a table name and description, and then click the Save icon.
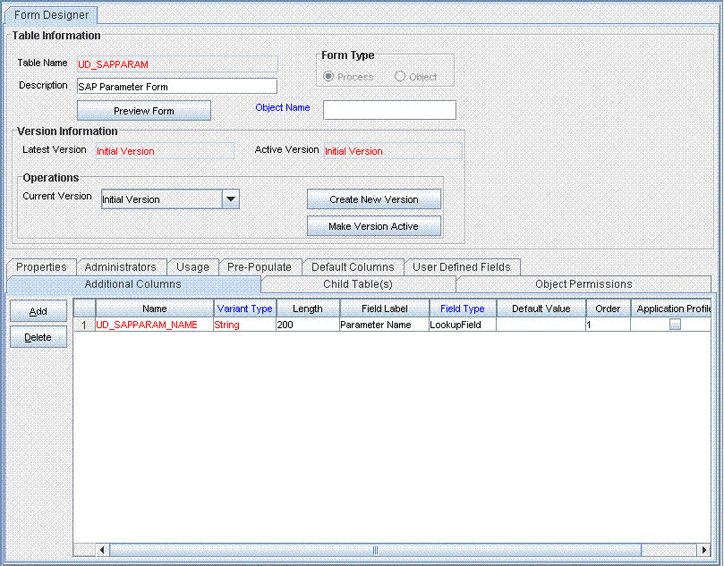
Click Add and enter the details of the attributes.
Click the Save icon and then click Make Version Active. The following screenshot shows the multivalued attributes added on a new form:
Associate the child form with the process form as follows:
Search for and open the UD_SAP process form.
Click Create New Version.
Click the Child Table(s) tab.
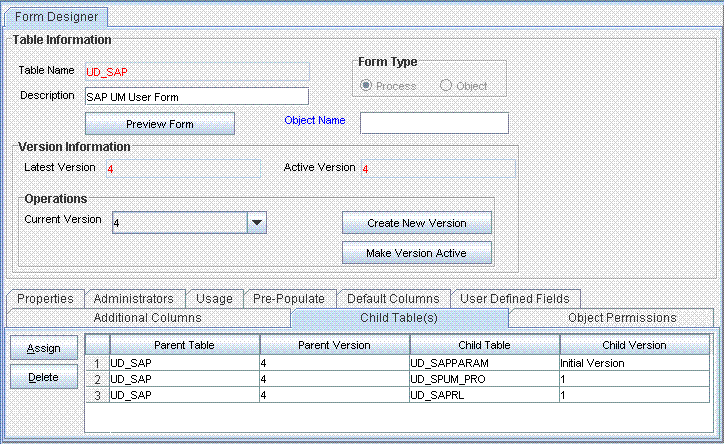
Click Assign.
In the Assign Child Tables dialog box, select the newly created child form, click the right arrow, and then click OK.
Click the Save icon and then click Make Version Active. The following screenshot shows the child form added to the process form:
If you are using Oracle Identity Manager release 11.1.1, then click Create Reconciliation Profile. This copies changes made to the resource object into the MDS.
Add the new multivalued attribute to the list of reconciliation fields in the resource object as follows:
Expand Resource Management.
Double-click Resource Objects.
Search for and open the SAP UM resource object.
On the Object Reconciliation tab, click Add Field.
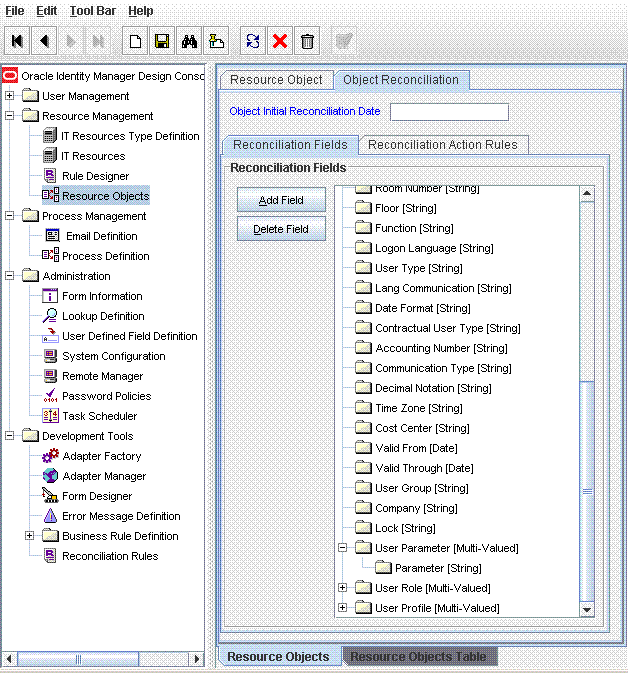
In the Add Reconciliation Fields dialog box, enter the details of the field.
For example, enter User Parameter in the Field Name field and select Multi Valued Attribute from the Field Type list.
Click the Save icon and then close the dialog box.
Right-click the newly created attribute.
Select Define Property Fields.
In the Add Reconciliation Fields dialog box, enter the details of the newly created attribute.
For example, enter Parameter in the Field Name field and select String from the Field Type list.
Click the Save icon, and then close the dialog box. The following screenshot shows the new reconciliation field added in the resource object:
Create a reconciliation field mapping for the new multivalued attribute in the process definition as follows:
Expand Process Management, and double-click Process Definition.
Search for and open the SAP UM Process Form process definition.
On the Reconciliation Field Mappings tab of the SAP UM Process Form process definition, click Add Table Map.
In the Add Reconciliation Table Mapping dialog box, select the attribute name and table name from the list, click the Save icon, and then close the dialog box.
Right-click the newly created attribute, and select Define Property Field Map.
In the Field Name field, select the value for the attribute that you want to add.
Double-click the Process Data Field field, and then select UD_SAPPARAM_NAME.
Select Key Field for Reconciliation Field Matching and click the Save icon. The following screenshot shows the new reconciliation field mapped to a process data field in the process definition:
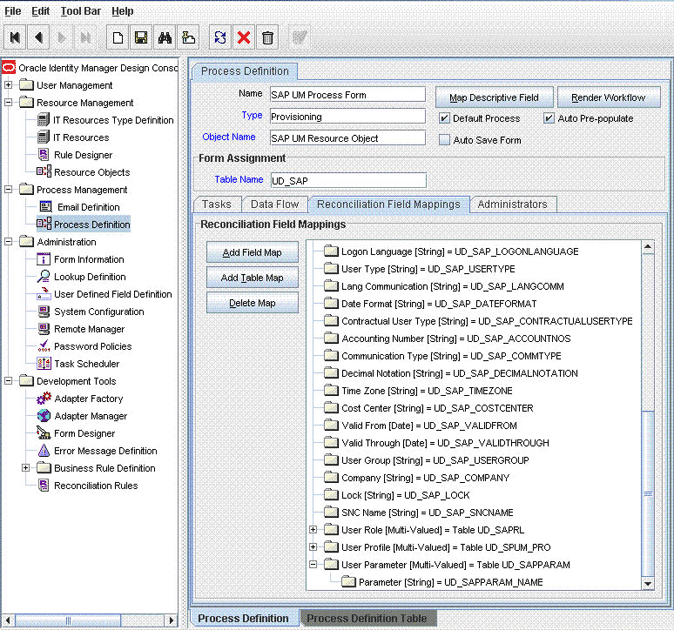
Create an entry for the new multivalued attribute in the lookup definition for reconciliation as follows:
Expand Administration.
Double-click Lookup Definition.
Search for and open the Lookup.SAP.UM.ReconChildAttrMap lookup definition.
|
Note: For the target system fields, you must use the same case (uppercase or lowercase) as given on the target system. This is because the attribute names are case-sensitive. |
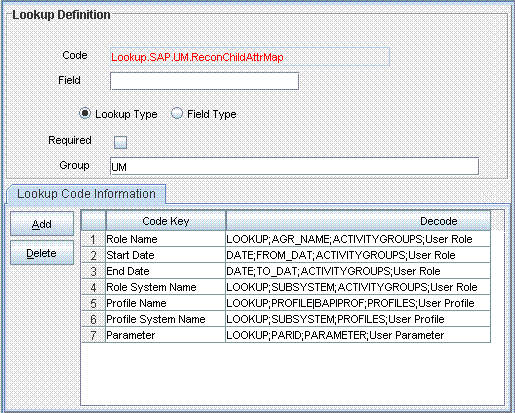
Click Add and enter the Code Key and Decode values for the attribute, and then click the Save icon. The Code Key value must be the name of the field in the resource object. The Decode value is what you determine by performing the procedure described in Section 4.1, "Determining the Names of Target System Attributes".
For example, enter Parameter in the Code Key field and then enter LOOKUP;PARID;PARAMETER;User parameter in the Decode field. The following screenshot shows the entry added to the lookup definition:
If the attribute is a custom multivalued attribute, then add it in Lookup.SAP.UM.CustomChildAttrMap lookup definition as follows:
|
Note: For a change in a custom attribute to be detected during incremental reconciliation, at least one standard attribute in the same record must be modified. |
Expand Administration.
Double-click Lookup Definition.
Search for and open the Lookup.SAP.UM.CustomChildAttrMap lookup definition.
Click Add.
In the Code Key column, enter the name of the resource object field that you create for the custom attribute.
In the Decode column of the lookup definition, enter a value in one of the following formats:
|
Note: For the target system fields, you must use the same case (uppercase or lowercase) as given on the target system. This is because the attribute names are case-sensitive. |
If you want a custom BAPI to fetch values from this attribute, then enter a value in the following format:
CUSTOM_BAPI_NAME;FIELD_TYPE;TABLE_NAME;FIELD_NAME;KEY_USER_ID_FIELD;CHILD_TABLE_NAME
If you want a custom RFC table to fetch values from this attribute, then enter a value in the following format:
RFC_READ_TABLE;FIELD_TYPE;TABLE_NAME;FIELD_NAME;KEY_USER_ID_FIELD;CHILD_TABLE_NAME
In these formats:
CUSTOM_BAPI_NAME is the name of the custom BAPI that you created for fetching values from the custom attribute.
FIELD_TYPE is the type of data that is stored in the custom attribute. It can be TEXT, DATE, or CHECKBOX.
TABLE_NAME is the name of the custom table that contains the attribute.
FIELD_NAME is the name of the attribute in the custom table.
KEY_USER_ID_FIELD is the attribute in the custom table that holds user ID values.
CHILD_TABLE_NAME is the child table name of OIM
The following is a sample value for the Decode column:
ZBAPI_CUSTFIELDS;TEXT;ZCUSTFIELDS;FIELD1;USERNAME;CustomFields
Click the Save icon.
By default, the attributes listed in Table 1-8 are mapped for provisioning between Oracle Identity Manager and the target system. If required, you can map additional attributes for provisioning.
|
Note: Perform the procedure described in this section only if you want to map standard target system attributes for provisioning. If you want to add a standard multivalued attribute for provisioning, then see Section 4.6, "Adding New Standard Multivalued Attributes for Provisioning". If you want to add a custom attribute for provisioning, then see Section 4.7, "Adding Custom Attributes for Provisioning". |
Summary of the procedure to add a new standard attribute for provisioning
Add the new standard attribute on the process form.
Create an entry for the attribute in the Lookup.SAP.UM.ProvAttrMap lookup definition.
If the attribute is a check box, then create an entry in the Lookup.SAP.UM.ProvCheckBoxMapping lookup definition.
Create a task to enable update of the attribute during provisioning operations.
To add a new standard attribute for provisioning:
|
Note: See one of the following guides for detailed information about the steps of this procedure:
If you have already added an attribute for reconciliation, then you need not repeat steps performed as part of that procedure. |
Log in to the Oracle Identity Manager Design Console.
Add the new standard attribute on the process form as follows:
Expand Development Tools, and double-click Form Designer.
Search for and open the UD_SAP process form.
Click Create New Version, and then click Add.
Enter the details of the attribute.
For example, if you are adding the Room No field, enter UD_SAP_ROOM_NO in the Name field, and then enter the rest of the details of this field.
Click the Save icon, and then click Make Version Active. The following screenshot shows the new field added to the process form:

Create an entry for the attribute in the lookup definition for provisioning as follows:
Expand Administration.
Double-click Lookup Definition.
Search for and open the Lookup.SAP.UM.ProvAttrMap lookup definition.
Click Add and then enter the Code Key and Decode values for the attribute.
The Code Key value must be the name of the field on the process form. The Decode value is what you determine by performing the procedure described in Section 4.1, "Determining the Names of Target System Attributes".
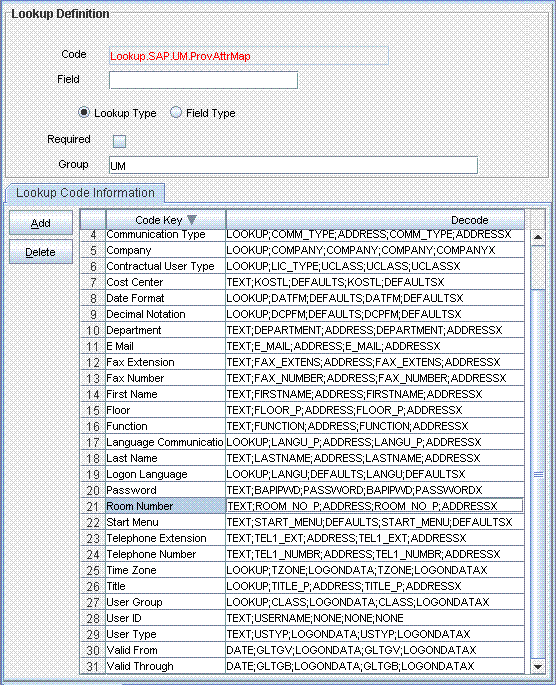
For example, enter Room Number in the Code Key column and then enter TEXT;ROOM_NO_P;ADDRESS;ROOM_NO_P;ADDRESSX in the Decode column. The following screenshot shows the entry added to the lookup definition:
Oracle Identity Manager stores the state of a check box as either 1 (selected) or 0 (deselected). In SAP, the state of check boxes is stored using different characters. If you are adding a check box attribute on the target system for provisioning, then:
Search for and open the Lookup.SAP.UM.ProvCheckBoxMapping lookup definition.
Depending on the check box that you want to add, create one of the entries given in the following table:
| Field Label in SAP | Value to Be Entered in the Code Key Column (Sample Process Form Field Name) | Value to Be Entered in the Decode Column |
|---|---|---|
| Output Immediately | Output Immediately | GH |
| Delete After Output | Delete After Output | DK |
| Check Indicator | Check Indicator | X |
| Unsecure communication permitted (user-specific) | Unsecure communication permitted | X |
Save and close the lookup definition.
Create a task to enable update of the attribute during provisioning operations.
If you do not perform this procedure, then you will not be able to modify the value of the attribute after you set a value for it during the Create User provisioning operation.
To enable the update of the attribute during provisioning operations, add a process task for updating the attribute:
|
See Also: One of the following guides for detailed information about these steps:
|
Expand Process Management, and double-click Process Definition.
Search for and open the SAP UM Process Form process definition.
Click Add.
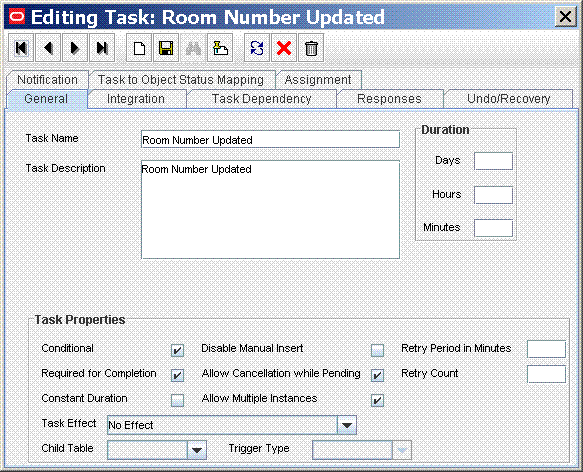
On the General tab of the Creating New Task dialog box, enter a name and description for the task and then select the following:
Conditional
Required for Completion
Allow Cancellation while Pending
Allow Multiple Instances
Click the Save icon. The following screenshot shows the new task added to the process definition:
On the Integration tab of the Creating New Task dialog box, click Add.
In the Handler Selection dialog box, select Adapter, click adpSAPUMODIFYUSER, and then click the Save icon.
The list of adapter variables is displayed on the Integration tab. The following screenshot shows the list of adapter variables:
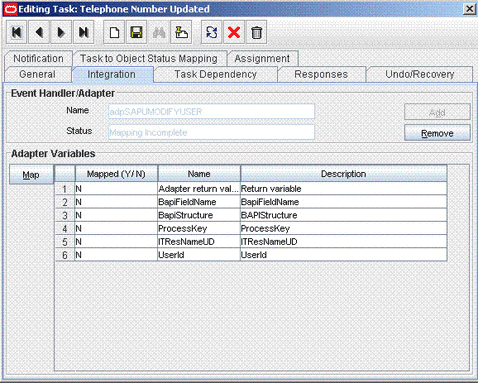
To create the mapping for the first adapter variable:
Double-click the number of the first row.
In the Edit Data Mapping for Variable dialog box, enter the following values:
Variable Name: Adapter return value
Data Type: Object
Map To: Response code
Click the Save icon.
To create mappings for the remaining adapter variables, use the data given in the following table:
| Variable Number | Variable Name | Map To | Qualifier |
|---|---|---|---|
| Second | BapiFieldName | Literal | String
For example: ROOM_NO_P |
| Third | BapiStructure | Literal | String
For example: ADDRESS |
| Fourth | ProcessKey | Process Data | Process Instance |
| Fifth | ITResNameU | Literal | String
For example: UD_SAP_ITRESOURCE |
| Sixth | UserId | Process Data | User ID |
Click the Save icon in the Editing Task dialog box, and then close the dialog box.
Click the Save icon to save changes to the process definition.
Update the request dataset.
When you add an attribute on the process form, you also update the XML file containing the request dataset definitions. To update a request dataset:
In a text editor, open the XML file located in the OIM_HOME/DataSet/file directory for editing.
Add the AttributeReference element and specify values for the mandatory attributes of this element.
|
See Also: The "Configuring Requests" chapter of the Oracle Fusion Middleware Developer's Guide for Oracle Identity Manager for more information about creating and updating request datasets |
For example, while performing Step 1 of this procedure, if you added City as an attribute on the process for, then enter the following line:
<AttributeReference
name = "City"
attr-ref = "City"
type = "String"
widget = "text"
length = "50"
available-in-bulk = "false"/>
In this AttributeReference element:
For the name attribute, enter the value in the Name column of the process form without the tablename prefix.
For example, if UD_SAP_CITY is the value in the Name column of the process form, then you must specify CITY is the value of the name attribute in the AttributeReference element.
For the attr-ref attribute, enter the value that you entered in the Field Label column of the process form while performing Step 1.
For the type attribute, enter the value that you entered in the Variant Type column of the process form while performing Step 1.
For the widget attribute, enter the value that you entered in the Field Type column of the process form, while performing Step 1.
For the length attribute, enter the value that you entered in the Length column of the process form while performing Step 1.
For the available-in-bulk attribute, specify true if the data value is available for bulk modification. Otherwise specify false.
While performing Step 1, if you added more than one attribute on the process form, then repeat this step for each attribute added.
Save and close the XML file.
Run the PurgeCache utility to clear content related to request datasets from the server cache.
See Oracle Fusion Middleware System Administrator's Guide for Oracle Identity Manager for more information about the PurgeCache utility.
Import into MDS, the request dataset definitions in XML format.
See Section 2.3.4.2.2, "Importing Request Datasets into MDS" for detailed information about the procedure.
By default, the attributes listed in Table 1-10 are mapped for sending requests from Oracle Identity Manager to SAP GRC Compliant User Provisioning. If required, you can map additional single-valued attributes.
|
Note: Perform the procedure described in this section only if you want to map additional standard Compliant User Provisioning attributes for requests sent from Oracle Identity Manager to Compliant User Provisioning. |
Summary of the procedure to add a new SAP GRC Compliant User Provisioning attribute for provisioning
Determine the name of the attribute on Compliant User Provisioning.
Add the attribute on the process form.
Create an entry for the attribute in the Lookup.SAP.CUP.ProvAttrMap lookup definition.
Create a task to enable update of the attribute during provisioning operations.
To add a new SAP GRC Compliant User Provisioning attribute for provisioning:
To determine the name of the attribute on Compliant User Provisioning:
In a browser, open the Web Services Navigator for SAP GRC Access Control.
The URL that you use to open the Web Services Navigator is of the following format:
http://SERVER:PORT/wsnavigator/enterwsdl.html
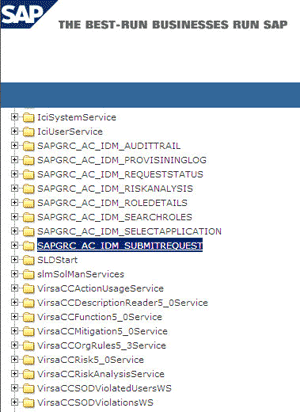
In the list of Web services that is displayed, search for and click the SAPGRC_AC_IDM_SUBMITREQUEST Web service.
The following screenshot shows this page:
Click the Test option on the menu bar.
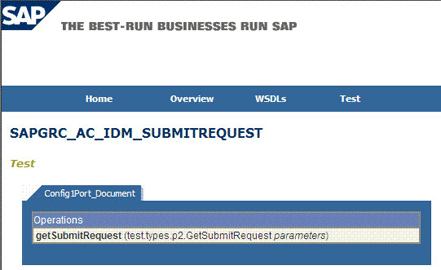
Click the getSubmitRequest (test.types.p2.GetSubmitRequest parameters) operation.
The following screenshot shows this page:
From the list of attributes that is displayed, copy the name of the attribute that you want to add. Do not copy the data type of the attribute. For example, copy telephone.
Log in to the Oracle Identity Manager Design Console.
|
Note: See one of the following guides for detailed information about the steps of this procedure:
|
If the attribute does not already exist on the process form, then add it on the process form as follows:
Expand Development Tools, and double-click Form Designer.
Search for and open the UD_SAP process form.
Click Create New Version, and then click Add.
Enter the details of the attribute.
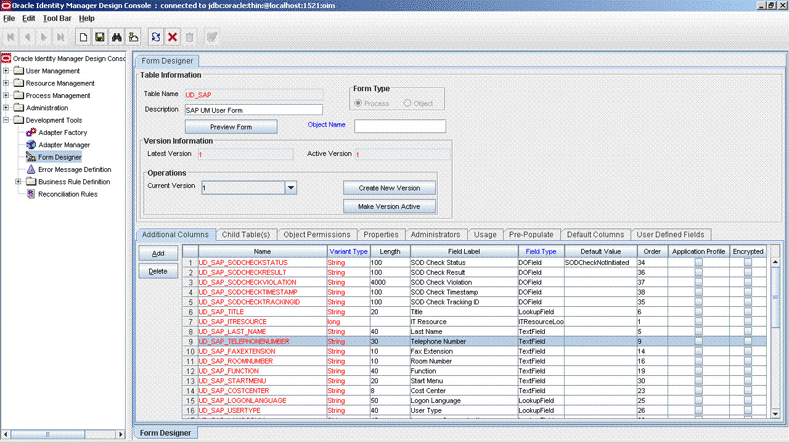
For example, if you are adding the Telephone field, enter UD_SAP_TELEPHONE in the Name field, and then enter the rest of the details of this field.
The following screenshot shows this page:
Click the Save icon, and then click Make Version Active. The following screenshot shows the new field added to the process form:
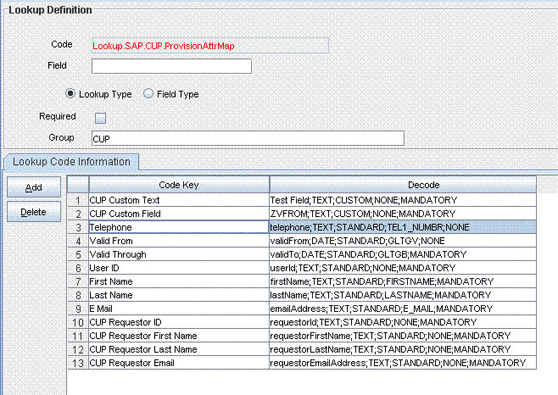
Create an entry for the attribute in the Lookup.SAP.CUP.ProvAttrMap lookup definition as follows:
Expand Administration.
Double-click Lookup Definition.
Search for and open the Lookup.SAP.CUP.ProvAttrMap lookup definition.
Click Add and then enter the Code Key and Decode values for the attribute.
The Code Key value must be the name of the field on the process form. The Decode value is in the following format:
FIELD_NAME;FIELD_TYPE;STANDARD_OR_CUSTOM;BAPI_FIELD_NAME;MANDATORY_OR_NONE
In this format:
FIELD_TYPE can be TEXT or DATE.
FIELD_NAME is the name of the attribute. You determine this name by performing the procedure described in Step 1.
STANDARD_OR_CUSTOM is used to specify whether the attribute is a standard or custom on SAP GRC Compliant User Provisioning.
BAPI_FIELD_NAME is the BAPI name of the field added in the Lookup.SAP.UM.ProvAttrMap lookup definition when you performed Step 3 of Section 4.4, "Adding New Standard Attributes for Provisioning." If the attribute that you are adding exists only on SAP GRC Compliant User Provisioning and not on the target system, then enter NONE as the value of BAPI_FIELD_NAME.
MANDATORY_OR_NONE is used to specify whether the attribute is a mandatory or nonmandatory attribute in the request submitted to SAP GRC Compliant User Provisioning.
The following screenshot shows this page:
Create a process task to enable update of the attribute during provisioning operations if the following conditions are true:
The task does not already exist.
This attribute exists on both SAP GRC Compliant User Provisioning and the target system.
|
Note: If you do not perform this procedure, then you will not be able to modify the value of the attribute after you set a value for it during the Create User provisioning operation. |
To enable the update of the attribute during provisioning operations, add a process task for updating the attribute:
|
See Also: One of the following guides for detailed information about these steps:
|
Expand Process Management, and double-click Process Definition.
Search for and open the SAP UM Process Form process definition.
Click Add.
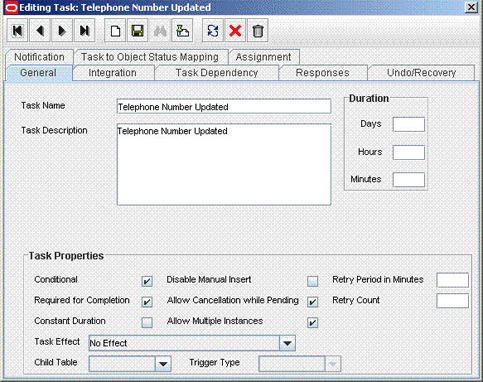
On the General tab of the Creating New Task dialog box, enter a name and description for the task and then select the following:
Conditional
Required for Completion
Allow Cancellation while Pending
Allow Multiple Instances
Click the Save icon. The following screenshot shows the new task added to the process definition:
On the Integration tab of the Creating New Task dialog box, click Add.
In the Handler Selection dialog box, select Adapter, click adpSAPUMODIFYUSER, and then click the Save icon.
The list of adapter variables is displayed on the Integration tab. The following screenshot shows the list of adapter variables:

To create the mapping for the first adapter variable:
Double-click the number of the first row.
In the Edit Data Mapping for Variable dialog box, enter the following values:
Variable Name: Adapter return value
Data Type: Object
Map To: Response code
Click the Save icon.
To create mappings for the remaining adapter variables, use the data given in the following table:
| Variable Number | Variable Name | Map To | Qualifier |
|---|---|---|---|
| Second | BapiFieldName | Literal | String
For example: ROOM_NO_P |
| Third | BapiStructure | Literal | String
For example: ADDRESS |
| Fourth | ProcessKey | Process Data | Process Instance |
| Fifth | ITResNameU | Literal | String
For example: UD_SAP_ITRESOURCE |
| Sixth | UserId | Process Data | User ID |
Click the Save icon in the Editing Task dialog box, and then close the dialog box.
Click the Save icon to save changes to the process definition.
|
Note: This section describes the procedure to add standard multivalued attributes of the target system for provisioning. Addition of custom multivalued attributes is not supported. |
By default, the multivalued attributes listed in Table 1-9 are mapped for provisioning between Oracle Identity Manager and the target system. If required, you can add new multivalued fields for provisioning.
Summary of the procedure to add a new multivalued attribute for provisioning
Create a child form for the new multivalued attribute.
Associate the child form with the process form.
Create an entry for the attribute in the Lookup.SAP.UM.ProvChildAttrMap lookup definition.
Create tasks for adding, modifying, and deleting values of the attribute during provisioning operations.
To add a new multivalued attribute for provisioning:
|
Note: See one of the following guides for detailed information about the steps of this procedure:
If you have already added a multivalued attribute for reconciliation, then you need not repeat steps performed as part of that procedure. |
Log in to the Oracle Identity Manager Design Console.
Create a child form for the new multivalued attribute as follows:
Expand Development Tools, and then double-click Form Designer.
In the Table Name field, enter a name for the child table. For example, enter UD_USR_PARAM.
In the Description field, enter a description for the child form.
In the Form Type region, select Process.
Click the Save icon.
On the Additional Columns tab, click Add.
In the Name column, enter a name for the attribute.
Enter values in the remaining columns, and then click the Save icon.
If you want to add more fields, then click Add and enter values for each field.
Associate the child form with the process form as follows:
|
Note: Only the most basic instructions to create a child form are given in this section. See one of the following guides for detailed instructions:
|
Search for and open the UD_SAP form.
Click Create New Version.
Enter a version name, and then click the Save icon.
From the Current Version list, select the version that you created.
On the Child Tables tab, click Assign.
From the list on the left, select the child table and then move it to the list on the right. Then, click OK.
Click Make Version Active.
Create an entry for the attribute in the lookup definition for multivalued attribute provisioning as follows:
Expand Administration, and double-click Lookup Definition.
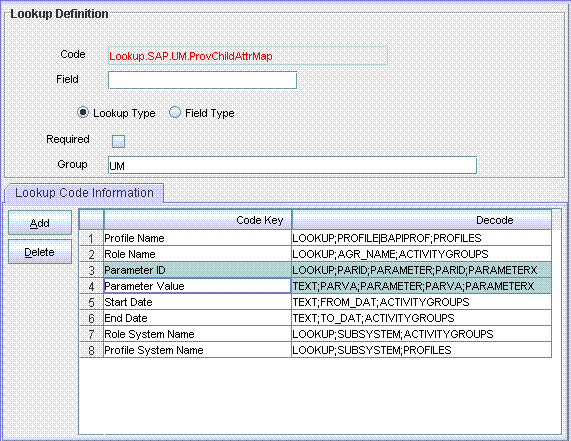
Search for and open the Lookup.SAP.UM.ProvChildAttrMap lookup definition.
Click Add and then enter the Code Key and Decode values for the attribute.
The Code Key value must be the name of the field on the process form. The Decode value is what you determine by performing the procedure described in Section 4.1, "Determining the Names of Target System Attributes".
For example, suppose you want to add the Parameters child table, which has two attributes: Parameter ID and Parameter Value. For these attributes, you can create the following Decode entries:
LOOKUP;PARID;PARAMETER;PARID;PARAMETERX
TEXT;PARVA;PARAMETER;PARVA;PARAMETERX
The following screenshot shows the entry added to the lookup definition:
Expand Process Management, and double-click Process Definition.
Search for and open the SAP UM Process Form process definition.
In the process definition, create a process task for adding values in the attribute:
Click Add.
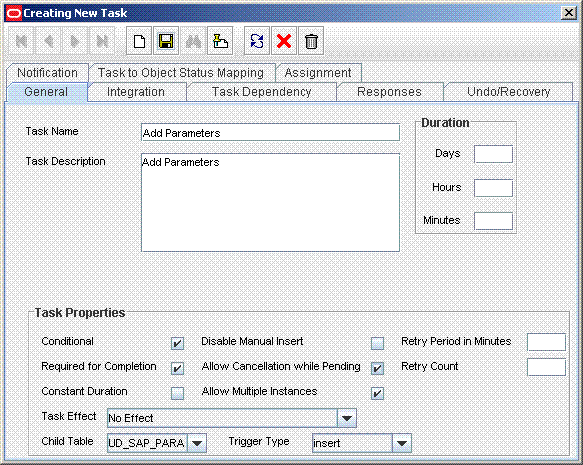
On the General tab of the Creating New Task dialog box, enter a name and description for the task and then select the following:
Conditional
Required for Completion
Allow Cancellation while Pending
Allow Multiple Instances
From the Child Table list, select the child table name.
From the Trigger Type list, select Insert.
Click the Save icon. The following screenshot shows the new task added to the process definition:
On the Integration tab of the Creating New Task dialog box, click Add.
In the Handler Selection dialog box, select Adapter, click adpSAPUAddMultiValueData, and then click the Save icon.
The list of adapter variables is displayed on the Integration tab. The following screenshot shows the list of adapter variables:
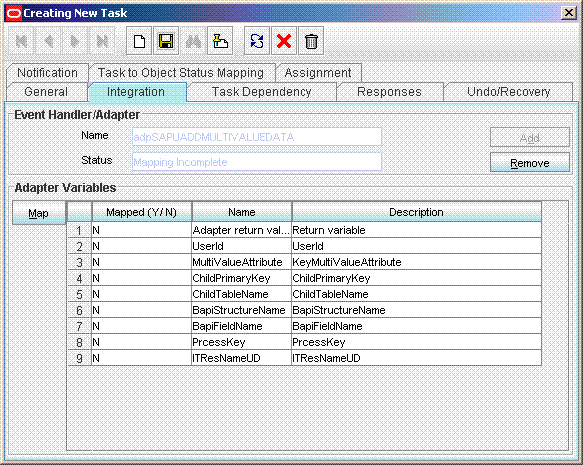
To create the mapping for the first adapter variable:
Double-click the number of the first row.
In the Edit Data Mapping for Variable dialog box, enter the following values:
Variable Name: Adapter return value
Data Type: Object
Map To: Response code
Click the Save icon.
To create mappings for the remaining adapter variables, use the data given in the following table:
| Variable Number | Variable Name | Map To | Qualifier |
|---|---|---|---|
| Second | UserId | Process Data | User ID |
| Third | MultiValueAttribute | Process Data / Child Form Name | Key Multi Valued Attribute present in child form
For example: Parameter ID |
| Fourth | ChildPrimaryKey | Literal | String
UD field of key multivalued Attribute taken from the child form For example: UD_SPUM_PARAM_ID |
| Fifth | ChildTableName | Literal | String
UD field of the child form For example: UD_SPUM_PARAM |
| Sixth | BapiStructureName | Literal | String
For example: PARAMETER |
| Seventh | BapiFieldName | Literal | String
For example: PARID |
| Eighth | ProcessKey | Process Data | Process Instance |
| Ninth | ITResNameUD | Literal | StringFor example: UD_SAP_ITRESOURCE |
Click the Save icon in the Editing Task dialog box, and then close the dialog box.
Click the Save icon to save changes to the process definition.
To enable updates of the multiValued attribute during provisioning operations, create a process task in the process definition as follows:
Click Add.
On the General tab of the Creating New Task dialog box, enter a name and description for the task and then select the following:
Conditional
Required for Completion
Allow Cancellation while Pending
Allow Multiple Instances
From the Child Table list, select the child table name.
From the Trigger Type list, select Update.
Click the Save icon. The following screenshot shows the new task added to the process definition:
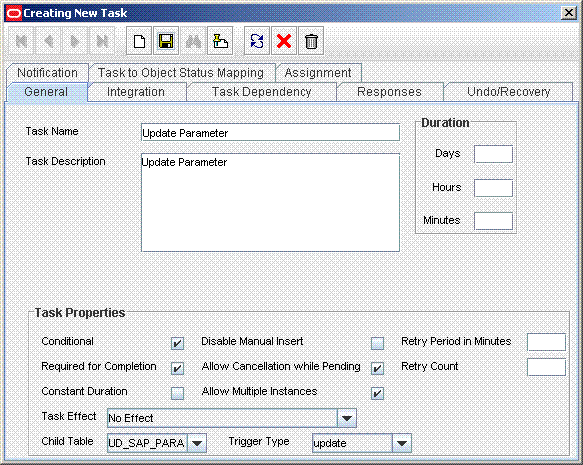
On the Integration tab of the Creating New Task dialog box, click Add.
In the Handler Selection dialog box, select Adapter, click adpSAPUUpdateMultiValueData, and then click the Save icon.
The list of adapter variables is displayed on the Integration tab. The following screenshot shows the list of adapter variables:
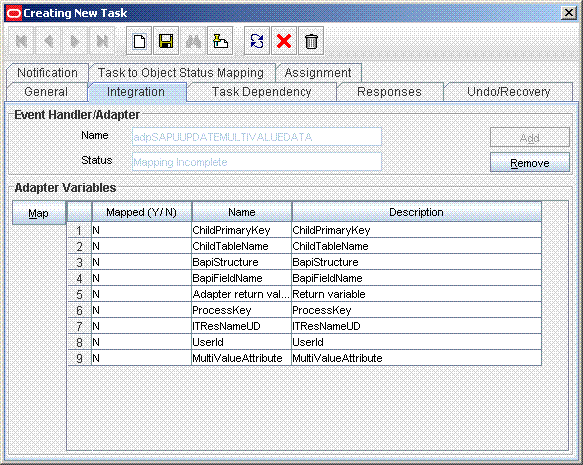
To create the mapping for the first adapter variable:
Double-click the number of the first row.
In the Edit Data Mapping for Variable dialog box, enter the following values:
Variable Name: Adapter return value
Data Type: Object
Map To: Response code
Click the Save icon.
To create mappings for the remaining adapter variables, use the data given in the following table:
| Variable Number | Variable Name | Map To | Qualifier |
|---|---|---|---|
| Second | UserId | Process Data | User ID |
| Third | MultiValueAttribute | Process Data / Child Form Name | Key multivalued attribute present in the child form
For example: Parameter Id |
| Fourth | ChildPrimaryKey | Literal | String
UD field of key multivalued attribute taken from the child form For example: UD_SPUM_PARAM_ID |
| Fifth | ChildTableName | Literal | String
UD field of the child form For example: UD_SPUM_PARAM |
| Sixth | BapiStructureName | Literal | String
For example: PARAMETER |
| Seventh | BapiFieldName | Literal | String
For example: PARID |
| Eighth | ProcessKey | Process Data | Process Instance |
| Ninth | ITResNameUD | Literal | String
For example: UD_SAP_ITRESOURCE |
Click the Save icon in the Editing Task dialog box, and then close the dialog box.
Click the Save icon to save changes to the process definition.
In the process definition, create a process task to delete values in the attribute:
Click Add.
On the General tab of the Creating New Task dialog box, enter a name and description for the task and then select the following:
Conditional
Required for Completion
Allow Cancellation while Pending
Allow Multiple Instances
From the Child Table list, select the child table name.
From the Trigger Type list, select Delete.
Click the Save icon. The following screenshot shows the new task added to the process definition:
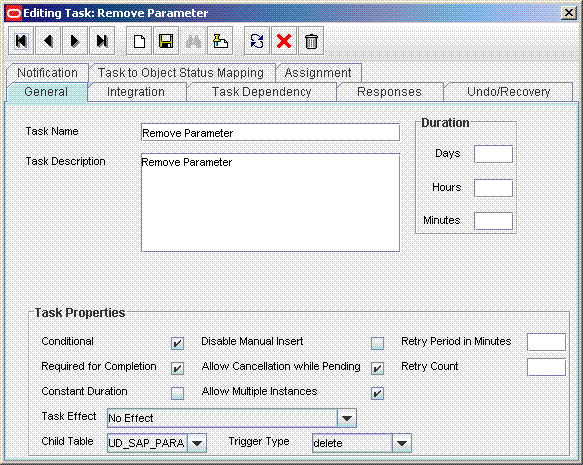
On the Integration tab of the Creating New Task dialog box, click Add.
In the Handler Selection dialog box, select Adapter, click adpSAPURemoveMultiValueData, and then click the Save icon.
The list of adapter variables is displayed on the Integration tab. The following screenshot shows the list of adapter variables:
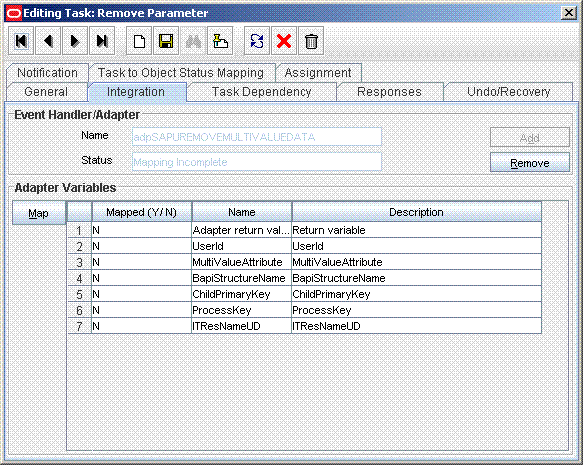
To create the mapping for the first adapter variable:
Double-click the number of the first row.
In the Edit Data Mapping for Variable dialog box, enter the following values:
Variable Name: Adapter return value
Data Type: Object
Map To: Response code
Click the Save icon.
To create mappings for the remaining adapter variables, use the data given in the following table:
| Variable Number | Variable Name | Map To | Qualifier |
|---|---|---|---|
| Second | UserId | Process Data | User ID |
| Third | MultiValueAttribute | Process Data / Child Form Name | Key multivalued attribute present in the child form
For example: Parameter Id Note: Select the Old Value check box. |
| Fourth | ChildPrimaryKey | Literal | String
BAPI field name of Key multivalued attribute taken from the child form For example: PARID |
| Fifth | BapiStructureName | Literal | String
For example: PARAMETER |
| Sixth | ProcessKey | Process Data | Process Instance |
| Seventh | ITResNameUD | Literal | String
For example: UD_SAP_ITRESOURCE |
Click the Save icon in the Editing Task dialog box, and then close the dialog box.
Click the Save icon to save changes to the process definition.
Save the changes to the process definition.
By default, the attributes listed in Table 1-8 are mapped for provisioning between Oracle Identity Manager and the target system. If required, you can map additional attributes for provisioning.
|
Note: Perform the procedure described in this section only if you want map for provisioning custom attributes that you add on the target system. If you want to add standard target system attributes for provisioning, then see Section 4.4, "Adding New Standard Attributes for Provisioning" |
Summary of the procedure to add a custom attribute for provisioning
Add the custom attribute on the process form.
If the attribute is a check box, then create an entry in the Lookup.SAP.UM.ReconCheckBoxMapping lookup definition.
Create a task to enable update of the attribute during provisioning operations.
To add a custom attribute for provisioning:
|
Note: See one of the following guides for detailed information about the steps of this procedure:
If you have already added a custom attribute for reconciliation, then you need not repeat steps performed as part of that procedure. |
Log in to the Oracle Identity Manager Design Console.
Add the custom attribute on the process form as follows:
Expand Development Tools.
Double-click Form Designer.
Search for and open the UD_SAP process form.
Click Create New Version, and then click Add.
Enter the details of the attribute.
For example, if you are adding the Job Description field, enter UD_SAP_JOB_DESC in the Name field, and then enter the rest of the details of this field.
Click the Save icon and then click Make Version Active. The following screenshot shows the new field added to the process form:
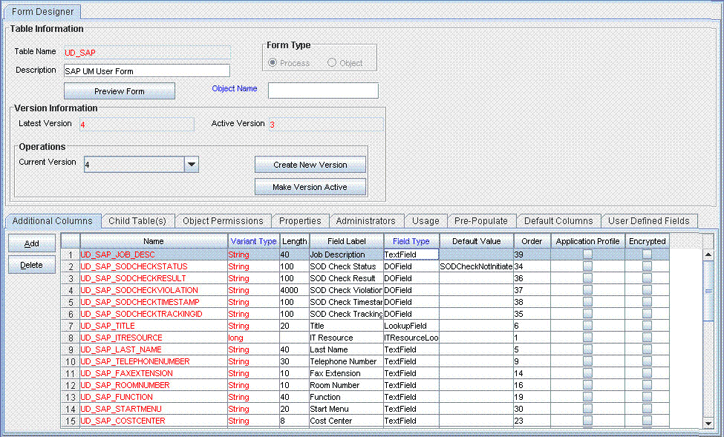
Oracle Identity Manager stores the state of a check box as either 1 (selected) or 0 (deselected). In SAP, the state of check boxes is stored using different characters. If you are adding a check box attribute on the target system for provisioning, then:
Search for and open the Lookup.SAP.UM.ProvCheckBoxMapping lookup definition.
Create the following entry in this lookup definition:
Code Key: Enter the name of the process form field that you created for the attribute.
Decode: Enter the characters for representing the check box state when it is selected and deselected. For example, suppose you use X to represent the selected state of the check box and Y to represent the deselected state, then enter XY in the Decode column.
Save and close the lookup definition.
Create a task to enable setting of and updates to the custom attribute during provisioning operations.
To enable the update of the attribute during provisioning operations, add a process task for updating the attribute:
|
See Also: One of the following guides for detailed information about these steps:
|
Expand Process Management, and double-click Process Definition.
Search for and open the SAP UM Process Form process definition.
Click Add.
On the General tab of the Creating New Task dialog box, enter a name and description for the task and then select the following:
Conditional
Required for Completion
Allow Cancellation while Pending
Allow Multiple Instances
Click the Save icon. The following screenshot shows the new task added to the process definition:
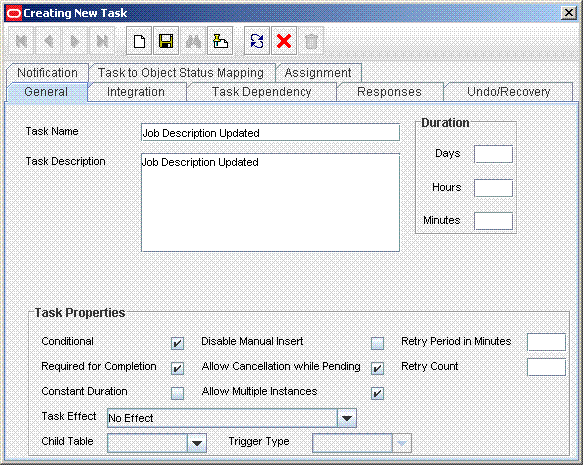
On the Integration tab of the Creating New Task dialog box, click Add.
In the Handler Selection dialog box, select Adapter, click adpSAPUCustomAttrModify, and then click the Save icon.
The list of adapter variables is displayed on the Integration tab. The following screenshot shows the list of adapter variables:
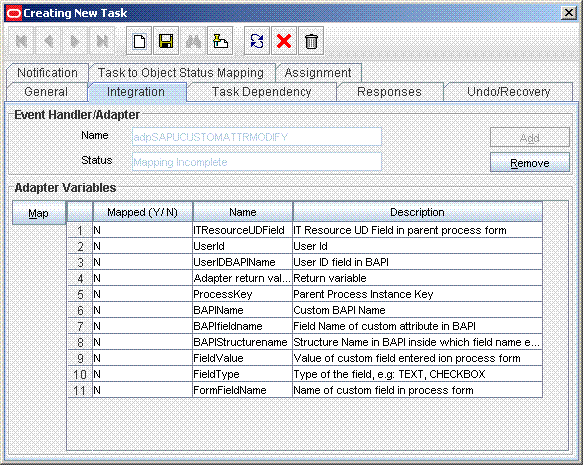
To create the mapping for the first adapter variable:
Double-click the number of the first row.
In the Edit Data Mapping for Variable dialog box, enter the following values:
Variable Name: Adapter return value
Data Type: Object
Map To: Response code
Click the Save icon.
To create mappings for the remaining adapter variables, use the data given in the following table:
| Variable Number | Variable Name | Map To | Qualifier |
|---|---|---|---|
| Second | UserId | Process Data | User ID |
| Third | UserIDBAPIName | Literal | String
User ID field in the BAPI For example: BNAME |
| Fourth | BAPIName | Literal | String
BAPI Name For example: ZXLCBAPI_ZXLCUSR_CHANG_ATTR |
| Fifth | BAPIStructureName | Literal | String
For example: ADDRESS |
| Sixth | BAPIFieldName | Literal | String
BAPI field name of custom attribute For example: JOB_DESC1 |
| Seventh | FormFieldName | Literal | String
For example: Job Description |
| Eighth | FieldType | Literal | String
For example: TEXT |
| Ninth | ProcessKey | Process Data | Process Instance |
| Tenth | ITResourceUDField | Literal | String
For example: UD_SAP_ITRESOURCE |
| Eleventh | FieldValue | Process Data | Custom field in process form
For example: Job Description |
Click the Save icon in the Editing Task dialog box, and then close the dialog box.
Click the Save icon to save changes to the process definition.
Update the request dataset.
When you add an attribute on the process form, you also update the XML file containing the request dataset definitions. To update a request dataset:
In a text editor, open the XML file located in the OIM_HOME/DataSet/file directory for editing.
Add the AttributeReference element and specify values for the mandatory attributes of this element.
|
See Also: The "Configuring Requests" chapter of the Oracle Fusion Middleware Developer's Guide for Oracle Identity Manager for more information about creating and updating request datasets |
For example, while performing Step 1 of this procedure, if you added JobDesc as an attribute on the process for, then enter the following line:
<AttributeReference
name = "JobDesc"
attr-ref = "JobDesc"
type = "String"
widget = "text"
length = "50"
available-in-bulk = "false"/>
In this AttributeReference element:
For the name attribute, enter the value in the Name column of the process form without the tablename prefix.
For example, if UD_SAP_JOBDESC is the value in the Name column of the process form, then you must specify JOBDESC is the value of the name attribute in the AttributeReference element.
For the attr-ref attribute, enter the value that you entered in the Field Label column of the process form while performing Step 1.
For the type attribute, enter the value that you entered in the Variant Type column of the process form while performing Step 1.
For the widget attribute, enter the value that you entered in the Field Type column of the process form, while performing Step 1.
For the length attribute, enter the value that you entered in the Length column of the process form while performing Step 1.
For the available-in-bulk attribute, specify true if the data value is available for bulk modification. Otherwise specify false.
While performing Step 1, if you added more than one attribute on the process form, then repeat this step for each attribute added.
Save and close the XML file.
Run the PurgeCache utility to clear content related to request datasets from the server cache.
See Oracle Fusion Middleware Administrator's Guide for Oracle Identity Manager for more information about the PurgeCache utility.
Import into MDS, the request dataset definitions in XML format.
See Section 2.3.4.2.2, "Importing Request Datasets into MDS" for detailed information about the procedure.
By default, the attributes listed in Table 1-8 are mapped for provisioning between Oracle Identity Manager and the target system. If required, you can map additional attributes for provisioning.
|
Note: Perform the procedure described in this section only if you want to map for provisioning custom multivalued attributes that you add on the target system. |
Summary of the procedure to add a new multivalued attribute for provisioning
Create a child form for the new multivalued attribute.
Associate the child form with the process form.
Create an entry for the attribute in the Lookup.SAP.UM.ProvChildAttrMap lookup definition.
Create tasks for adding and deleting values of the new multivalued attribute during provisioning operations.
To add a custom multivalued attribute for provisioning:
|
Note: See one of the following guides for detailed information about the steps of this procedure:
If you have already added a custom multivalued attribute form for reconciliation, then you need not repeat steps performed as part of that procedure. |
Log in to the Oracle Identity Manager Design Console.
Add the custom attribute on the process form as follows:
Expand Development Tools.
Double-click Form Designer.
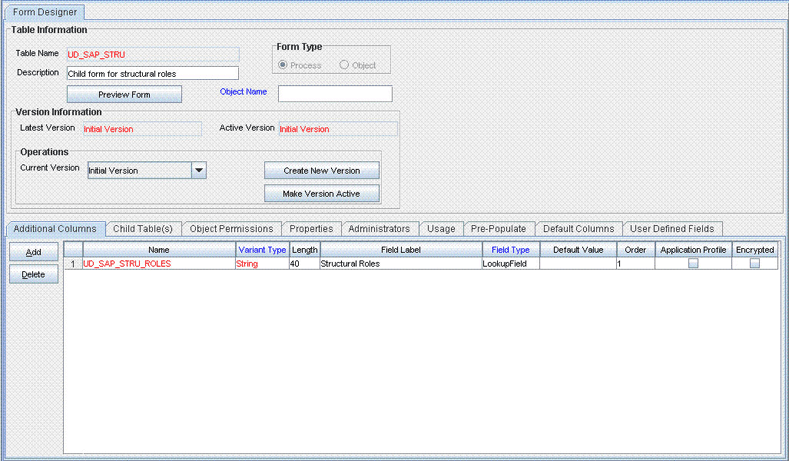
Click Create New Form, enter the form name (for example, UD_SAP_STRUCT) and then click the Save icon.
To add a column, click Add.
Enter the details of the attribute.
For example, if you are adding the Structural Role field, enter UD_SAP_STRUCT_ROLE in the Name field, and then enter the rest of the details of this field.
Click the Save icon, and then click Make Version Active. The following screenshot shows the new field added to the process form:
Associate the child form with the process form as follows:
|
Note: Only basic instructions to create a child form are given in this section. See one of the following guides for detailed instructions:
|
Search for and open the UD_SAP form.
Click Create New Version.
Enter a version name, and then click the Save icon.
From the Current Version list, select the version that you created.
On the Child Tables tab, click Assign.
From the list on the left, select the child table and then move it to the list on the right. Then, click OK.
Click Make Version Active.
Create an entry for the attribute in the lookup definition for multivalued attribute provisioning as follows:
Expand Administration, and double-click Lookup Definition.
Search for and open the Lookup.SAP.UM.ProvChildAttrMap lookup definition.
Click Add, and then enter the Code Key and Decode values for the attribute.
The Code Key value must be the name of the field on the process form. The Decode value is what you determine by performing the procedure described in Section 4.1, "Determining the Names of Target System Attributes."
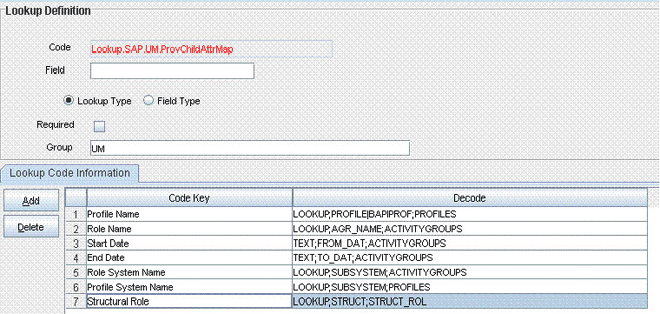
For example, suppose you want to add the Structural Roles child table, which has one attribute: Structural Roles. For this attribute, you create the following Decode entries:
LOOKUP;STRUCT;STRUCT_ROL
The following screenshot shows the entry added to the lookup definition:
Expand Process Management, and double-click Process Definition.
Search for and open the SAP UM Process Form process definition.
In the process definition, create a process task for adding values in the attribute:
Click Add.
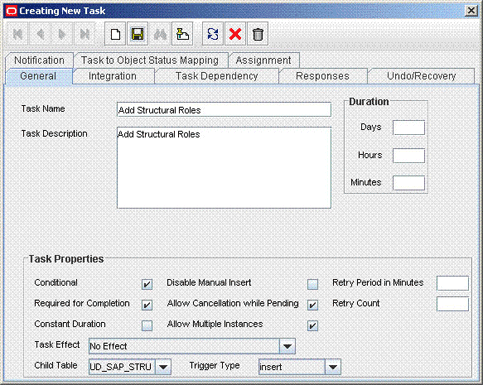
On the General tab of the Creating New Task dialog box, enter a name and description for the task and then select the following:
Conditional
Required for Completion
Allow Cancellation while Pending
Allow Multiple Instances
From the Child Table list, select the child table name.
From the Trigger Type list, select Insert.
Click the Save icon. The following screenshot shows the new task added to the process definition:
On the Integration tab of the Creating New Task dialog box, click Add.
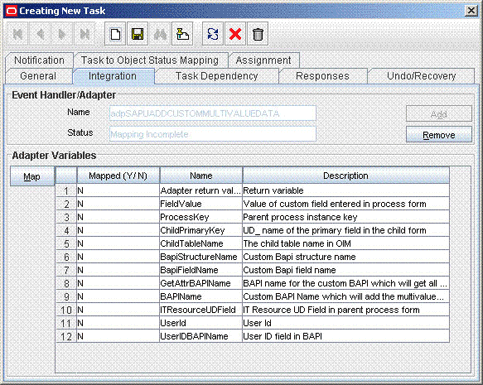
In the Handler Selection dialog box, select Adapter, click adpSAPUAddCustomMultiValueData, and then click the Save icon.
The list of adapter variables is displayed on the Integration tab. The following screenshot shows the list of adapter variables:
To create the mapping for the first adapter variable:
Double-click the number of the first row.
In the Edit Data Mapping for Variable dialog box, enter the following values:
Variable Name: Adapter return value
Data Type: Object
Map To: Response code
Click the Save icon.
To create mappings for the remaining adapter variables, use the data given in the following table:
Click the Save icon in the Editing Task dialog box, and then close the dialog box.
Click the Save icon to save the changes to the process definition.
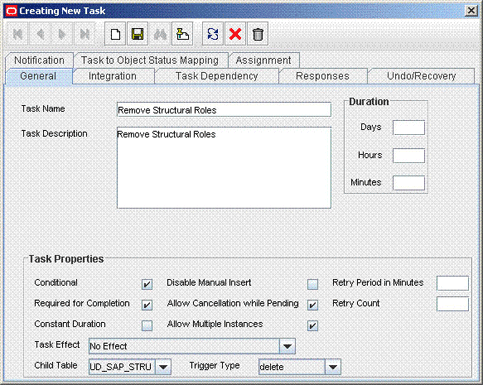
In the process definition, create a process task to delete values in the attribute:
Click Add.
On the General tab of the Creating New Task dialog box, enter a name and description for the task and then select the following:
Conditional
Required for Completion
Allow Cancellation while Pending
Allow Multiple Instances
From the Child Table list, select the child table name.
From the Trigger Type list, select Delete.
Click the Save icon. The following screenshot shows the new task added to the process definition:
On the Integration tab of the Creating New Task dialog box, click Add.
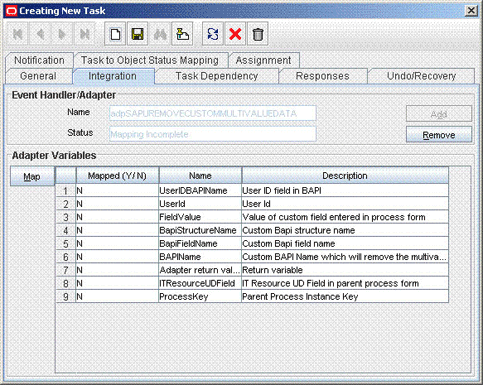
In the Handler Selection dialog box, select Adapter, click adpSAPURemoveMultiValueData, and then click the Save icon.
The list of adapter variables is displayed on the Integration tab. The following screenshot shows the list of adapter variables:
To create the mapping for the first adapter variable:
Double-click the number of the first row.
In the Edit Data Mapping for Variable dialog box, enter the following values:
Variable Name: Adapter return value
Data Type: Object
Map To: Response code
Click the Save icon.
To create mappings for the remaining adapter variables, use the data given in the following table:
Click the Save icon in the Editing Task dialog box, and then close the dialog box.
Save the changes to the process definition.
Update the request dataset.
When you add an attribute on the process form, you also update the XML file containing the request dataset definitions. To update a request dataset:
In a text editor, open the XML file located in the OIM_HOME/DataSet/file directory for editing.
Add the AttributeReference element and specify values for the mandatory attributes of this element.
|
See Also: The "Configuring Requests" chapter of the Oracle Fusion Middleware Developer's Guide for Oracle Identity Manager for more information about creating and updating request datasets |
For example, while performing Step 1 of this procedure, if you added CustRoles as an attribute on the process for, then enter the following line:
<AttributeReference
name = "CustRoles"
attr-ref = "CustRoles"
type = "String"
widget = "lookup"
length = "50"
available-in-bulk = "false"/>
In this AttributeReference element:
For the name attribute, enter the value in the Name column of the process form without the tablename prefix.
For example, if UD_SAPRL_CUSTROLES is the value in the Name column of the process form, then you must specify CUSTROLES is the value of the name attribute in the AttributeReference element.
For the attr-ref attribute, enter the value that you entered in the Field Label column of the process form while performing Step 1.
For the type attribute, enter the value that you entered in the Variant Type column of the process form while performing Step 1.
For the widget attribute, enter the value that you entered in the Field Type column of the process form, while performing Step 1.
For the length attribute, enter the value that you entered in the Length column of the process form while performing Step 1.
For the available-in-bulk attribute, specify true if the data value is available for bulk modification. Otherwise specify false.
While performing Step 1, if you added more than one attribute on the process form, then repeat this step for each attribute added.
Save and close the XML file.
Run the PurgeCache utility to clear content related to request datasets from the server cache.
See Oracle Fusion Middleware Administrator's Guide for Oracle Identity Manager for more information about the PurgeCache utility.
Import into MDS, the request dataset definitions in XML format.
See Section 2.3.4.2.2, "Importing Request Datasets into MDS" for detailed information about the procedure.
You can configure validation of reconciled and provisioned single-valued data according to your requirements. For example, you can validate data fetched from the First Name attribute to ensure that it does not contain the number sign (#). In addition, you can validate data entered in the First Name field on the process form so that the number sign (#) is not sent to the target system during provisioning operations.
For data that fails the validation check, the following message is displayed or recorded in the log file:
Value returned for field FIELD_NAME is false.
|
Note: This feature cannot be applied to the Locked/Unlocked status attribute of the target system. |
To configure validation of data:
Write code that implements the required validation logic in a Java class.
This validation class must implement the oracle.iam.connectors.common.validate.Validator interface and the validate method.
|
See Also: The Javadocs shipped with the connector for more information about this interface |
The following sample validation class checks if the value in the First Name attribute contains the number sign (#):
public boolean validate(HashMap hmUserDetails,
              HashMap hmEntitlementDetails, String field) {
            /*
         * You must write code to validate attributes. Parent
         * data values can be fetched by using hmUserDetails.get(field)
         * For child data values, loop through the
         * ArrayList/Vector fetched by hmEntitlementDetails.get("Child Table")
         * Depending on the outcome of the validation operation,
         * the code must return true or false.
         */
         /*
         * In this sample code, the value "false" is returned if the field
         * contains the number sign (#). Otherwise, the value "true" is
         * returned.
         */
            boolean valid=true;
            String sFirstName=(String) hmUserDetails.get(field);
            for(int i=0;i<sFirstName.length();i++){
              if (sFirstName.charAt(i) == '#'){
                    valid=false;
                    break;
              }
            }
            return valid;
      }
Create a JAR file to hold the Java class.
Copy the JAR file in the following directory:
For Oracle Identity Manager release 9.1.0.x:
JavaTasks or ScheduleTask directory
For Oracle Identity Manager release 11.1.1:
Oracle Identity Manager database
Run the Oracle Identity Manager Upload JARs utility to post the JAR file to the Oracle Identity Manager database. This utility is copied into the following location when you install Oracle Identity Manager:
|
Note: Before you use this utility, verify that theWL_HOME environment variable is set to the directory in which Oracle WebLogic Server is installed. |
For Microsoft Windows:
OIM_HOME/server/bin/UploadJars.bat
For UNIX:
OIM_HOME/server/bin/UploadJars.sh
When you run the utility, you are prompted to enter the login credentials of the Oracle Identity Manager administrator, URL of the Oracle Identity Manager host computer, context factory value, type of JAR file being uploaded, and the location from which the JAR file is to be uploaded. Specify 1 as the value of the JAR type.
|
See Also: Oracle Fusion Middleware Developer's Guide for Oracle Identity Manager for detailed information about the Upload JARs utility |
If you created the Java class for validating a process form field for reconciliation, then:
Log in to the Design Console.
Search for and open the Lookup.SAP.UM.ReconValidation lookup definition.
In the Code Key, enter the resource object field name. In the Decode, enter the class name.
Save the changes to the lookup definition.
Search for and open the Lookup.SAP.UM.Configuration lookup definition.
Set the value of the Use Validation For Recon entry to yes.
Save the changes to the lookup definition.
If you created the Java class for validating a process form field for provisioning, then:
Log in to the Design Console.
Search for and open the Lookup.SAP.UM.ProvValidation lookup definition.
In the Code Key column, enter the process form field name. In the Decode column, enter the class name.
Save the changes to the lookup definition.
Search for and open the Lookup.SAP.UM.Configuration lookup definition.
Set the value of the Use Validation For Prov entry to yes.
Save the changes to the lookup definition.
You can configure transformation of reconciled single-valued user data according to your requirements. For example, you can use First Name and Last Name values to create a value for the Full Name field in Oracle Identity Manager.
|
Note: This feature cannot be applied to the Locked/Unlocked status attribute of the target system. |
To configure transformation of single-valued user data fetched during reconciliation:
Write code that implements the required transformation logic in a Java class.
This transformation class must implement the oracle.iam.connectors.common.transform.Transformation interface and the transform method.
|
See Also: The Javadocs shipped with the connector for more information about this interface |
The following sample transformation class creates a value for the Full Name attribute by using values fetched from the First Name and Last Name attributes of the target system:
package oracle.iam.connectors.common.transform;

import java.util.HashMap;

public class TransformAttribute implements Transformation {

      /*
      Description:Abstract method for transforming the attributes

      param hmUserDetails<String,Object>

      HashMap containing parent data details

      param hmEntitlementDetails <String,Object>

      HashMap containing child data details

      */
      public Object transform(HashMap hmUserDetails, HashMap       hmEntitlementDetails,String sField) {
      /*
       * You must write code to transform the attributes.
       Parent data attribute values can be fetched by
       using hmUserDetails.get("Field Name").
       *To fetch child data values, loop through the
       * ArrayList/Vector fetched by hmEntitlementDetails.get("Child          Table")
       * Return the transformed attribute.
       */
      String sFirstName= (String)hmUserDetails.get("First Name");
      String sLastName= (String)hmUserDetails.get("Last Name");
      String sFullName=sFirstName+"."+sLastName;
      return sFullName;
      }
}
Create a JAR file to hold the Java class.
Copy the JAR file in the following directory:
For Oracle Identity Manager release 9.1.0.x:
JavaTasks or ScheduleTask directory
For Oracle Identity Manager release 11.1.1:
Oracle Identity Manager database
Run the Oracle Identity Manager Upload JARs utility to post the JAR file to the Oracle Identity Manager database. This utility is copied into the following location when you install Oracle Identity Manager:
|
Note: Before you use this utility, verify that theWL_HOME environment variable is set to the directory in which Oracle WebLogic Server is installed. |
For Microsoft Windows:
OIM_HOME/server/bin/UploadJars.bat
For UNIX:
OIM_HOME/server/bin/UploadJars.sh
When you run the utility, you are prompted to enter the login credentials of the Oracle Identity Manager administrator, URL of the Oracle Identity Manager host computer, context factory value, type of JAR file being uploaded, and the location from which the JAR file is to be uploaded. Specify 1 as the value of the JAR type.
|
See Also: Oracle Fusion Middleware Developer's Guide for Oracle Identity Manager for detailed information about the Upload JARs utility |
If you created the Java class for transforming a process form field for reconciliation, then:
Log in to the Design Console.
Search for and open the Lookup.SAP.UM.ReconTransformation lookup definition.
In the Code Key column, enter the resource object field name. In the Decode column, enter the class name.
Save the changes to the lookup definition.
Search for and open the Lookup.SAP.UM.Configuration lookup definition.
Set the value of the Use Transformation For Recon entry to yes.
Save the changes to the lookup definition.
You can configure transformation of lookup field data synchronized from the target system.
To configure transformation of lookup field data fetched during lookup field synchronization:
Write code that implements the required transformation logic in a Java class.
This transformation class must implement the oracle.iam.connectors.common.transform.Transformation interface and the transform method.
|
See Also: The Javadocs shipped with the connector for more information about this interface |
Create a JAR file to hold the Java class.
Copy the JAR file in the following directory:
For Oracle Identity Manager release 9.1.0.x:
JavaTasks or ScheduleTask directory
For Oracle Identity Manager release 11.1.1:
Oracle Identity Manager database
Run the Oracle Identity Manager Upload JARs utility to post the JAR file to the Oracle Identity Manager database. This utility is copied into the following location when you install Oracle Identity Manager:
|
Note: Before you use this utility, verify that theWL_HOME environment variable is set to the directory in which Oracle WebLogic Server is installed. |
For Microsoft Windows:
OIM_HOME/server/bin/UploadJars.bat
For UNIX:
OIM_HOME/server/bin/UploadJars.sh
When you run the utility, you are prompted to enter the login credentials of the Oracle Identity Manager administrator, URL of the Oracle Identity Manager host computer, context factory value, type of JAR file being uploaded, and the location from which the JAR file is to be uploaded. Specify 1 as the value of the JAR type.
|
See Also: Oracle Fusion Middleware Developer's Guide for Oracle Identity Manager for detailed information about the Upload JARs utility |
Run lookup field synchronization for the lookup definition containing the lookup field that you want to transform. See Section 3.2, "Scheduled Task for Lookup Field Synchronization" for more information.
Open the lookup definition in the Design Console, and copy the Code Key value for the entry whose Decode value you want to transform.
Search for and open the Lookup.SAP.UM.LookupReconTransformation lookup definition.
In the Code Key column, enter the Code Key string that you copy by performing Step 5. In the Decode column, enter the class name.
Save the changes to the lookup definition.
Search for and open the Lookup.SAP.UM.Configuration lookup definition.
Set the value of the Use Transformation For Lookup Recon entry to yes.
Save the changes to the lookup definition.
Table 1-2 lists the lookup definitions that are synchronized with the target system. If you want to add to this list of lookup definitions, then:
|
Note: See one of the following guides for detailed information about the steps of this procedure:
|
To configure synchronization of a new lookup definition with the target system:
Create the lookup definition in Oracle Identity Manager
Add the lookup definition to the process form.
Create an entry for the new lookup definition in the Lookup.SAP.UM.LookupMappings or Lookup.SAP.CUA.LookupMappings lookup definition.
In the Code Key column of this lookup definition, enter a name for the new lookup definition.
In the Decode column, create an entry in the following format:
BAPI_HELPVALUES_GET;METHOD_NAME;PARAMETER_NAME;FIELD_NAME;FIELDNAME_VALUE_FOR_CODEKEY;FIELDNAME_VALUE_FOR_DECODE
In this format:
METHOD_NAME is the name of the method.
PARAMETER_NAME is the name of the parameter.
FIELD_NAME is the name of the field.
FIELDNAME_VALUE_FOR_CODEKEY is the name of the field from which the Code Key column on Oracle Identity Manager is to be populated.
FIELDNAME_VALUE_FOR_DECODE is the name of the field from which the Decode column on Oracle Identity Manager is to be populated.
To determine the Decode value:
|
Note: The sample values given in this procedure are from existing values mapped for lookup field synchronization. When you perform this procedure, replace these sample values with values for the lookup definition that you want to synchronize. |
Log in to the target system.
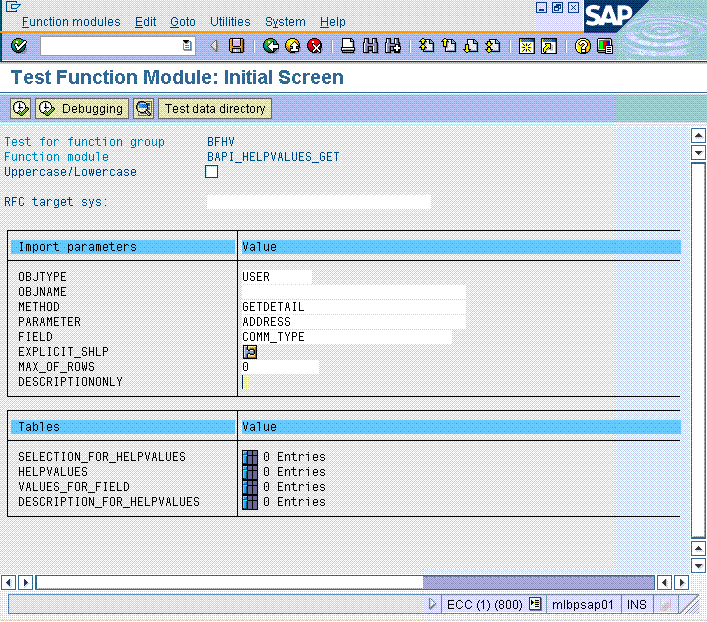
Run transaction SE37.
In the Function Module field, enter BAPI_HELPVALUES_GET and then click the Test/Execute icon.
In the OBJTYPE field, enter USER.
In the METHOD field, enter the name of the BAPI method. For example, enter GETDETAIL. This is the replacement for METHOD_NAME.
In the PARAMETER field, enter the name of the parameter. For example, enter ADDRESS. This is the replacement for PARAMETER_NAME.
In the FIELD field, enter the name of the field. For example, enter COMM_TYPE. This is the replacement for FIELD_NAME.
The following screenshot shows this page:
Click the Execute icon.
In the table that is displayed, click the icon to display the entries in the DESCRIPTION_FOR_HELPVALUES column.
The following screenshot shows this page:
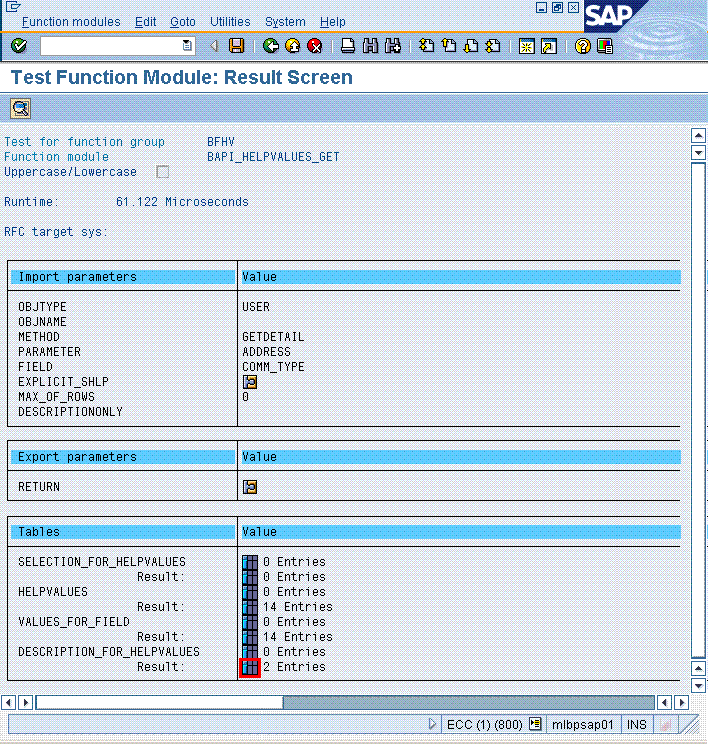
In the FIELDNAME column of the table that is displayed, copy the contents of the first row. For the COMM_TYPE example, this value is COMM_TYPE. This is the replacement for FIELDNAME_VALUE_FOR_CODEKEY.
In the FIELDNAME column of the table that is displayed, copy the contents of the second row. For the COMM_TYPE example, the second value is COMM_TEXT. This is the replacement for FIELDNAME_VALUE_FOR_DECODE.
The following screenshot shows this page:
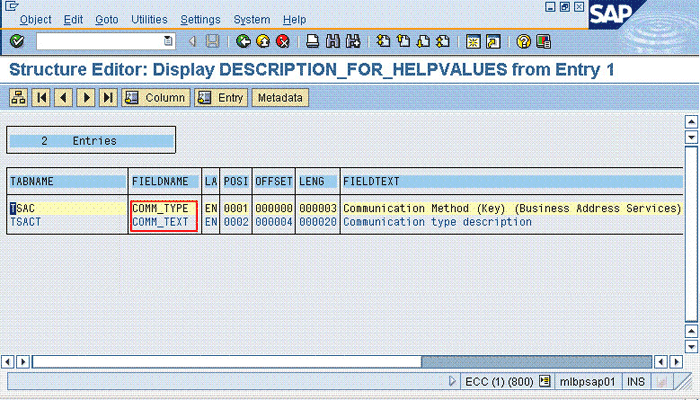
For the sample values given in this procedure, the Decode entry that you would create is as follows:
BAPI_HELPVALUES_GET;GETDETAIL;ADDRESS;COMM_TYPE;COMM_TYPE;COMM_TEXT
You might want to modify the lengths of fields (attributes) on the process form. For example, if you use the Japanese locale, then you might want to increase the lengths of process form fields to accommodate multibyte data from the target system.
|
Note: On mySAP ERP 2005 (ECC 6.0 running on WAS 7.0), the default length of the password field is 40 characters. The default length of the password field on the process form is 8 characters. If you are using mySAP ERP 2005, then you must increase the length of the password field on the process form. |
If you want to modify the length of a field on the process form, then:
Log in to the Design Console.
Expand Development Tools, and double-click Form Designer.
Search for and open the UD_SAP process form.
Click Create New Version.
Enter a label for the new version, click the Save icon, and then close the dialog box.
From the Current Version list, select the version that you create.
Modify the length of the required field.
Click the Save icon.
Click Make Version Active.
You might want to configure the connector for multiple installations of the target system. The following example illustrates this requirement:
The London and New York offices of Example Multinational Inc. have their own installations of the target system. The company has recently installed Oracle Identity Manager, and they want to configure Oracle Identity Manager to link all the installations of the target system.
To meet the requirement posed by such a scenario, you can create copies of connector objects, such as the IT resource and resource object.
The decision to create a copy of a connector object might be based on a requirement. For example, an IT resource can hold connection information for one target system installation. Therefore, it is mandatory to create a copy of the IT resource for each target system installation.
With some other connector objects, you do not need to create copies at all. For example, a single attribute-mapping lookup definition can be used for all installations of the target system.
All connector objects are linked. For example, a scheduled task holds the name of the IT resource. Similarly, the IT resource holds the name of the configuration lookup definition, Lookup.SAP.UM.Configuration. If you create a copy of an object, then you must specify the name of the copy in associated connector objects. Table 4-1 lists associations between connector objects whose copies can be created and the other objects that reference these objects. When you create a copy of a connector object, use this information to change the associations of that object with other objects.
|
Note: On a particular Oracle Identity Manager installation, if you create a copy of a connector object, then you must set a unique name for it. |
Table 4-1 Connector Objects and Their Associations
| Connector Object | Name | Referenced By | Comments on Creating a Copy |
|---|---|---|---|
|
IT resource |
SAP UM IT Resource |
SAP User Management User Recon (scheduled task) SAP User Management Delete Recon (scheduled task) SAP User Management Lookup Recon (scheduled task) |
Create a copy of the IT resource. See Section 2.3.14, "Configuring the IT Resource" for more information. |
|
Resource object |
SAP UM Resource Object |
SAP User Management User Recon (scheduled task) SAP User Management Delete Recon (scheduled task) SAP User Management Lookup Recon (scheduled task) |
Create copies of the resource object only if there are differences in attributes between the various installations of the target system and if the same user ID exists in different target systems. See Section 3.4.3, "Reconciliation Scheduled Tasks" for more information. |
|
Process definition |
SAP UM Process Form |
NA |
Create copies of this process definition only if there are differences in attributes between the various installations of the target system and if the same user ID exists in different target systems. |
|
Attribute Mapping Lookup Definition |
Lookup.SAP.UM.ProvAttrMap Lookup.SAP.UM.ProvChildAttrMap Lookup.SAP.UM.ReconAttrMap Lookup.SAP.UM.ReconChildAttrMap |
NA |
Create copies of these lookup definition only if you want to map a different set of attributes for the various installations of the target system. See the following sections for more information: |
|
Process form |
UD_SAP |
NA |
Create a copy of a process form if there are differences in attributes between the various installations of the target system and if the same user ID exists in different target systems. |
|
Configuration lookup definition |
Lookup.SAP.UM.Configuration |
SAP UM IT Resource (IT resource) |
Create copies of this lookup definition only if you want to use a different set of configuration values for the various installations of the target system. See Section 2.3.3, "Setting Up the Configuration Lookup Definition in Oracle Identity Manager" for more information. |
|
Lookup mappings lookup definitions |
Lookup.SAP.UM.LookupMappings Lookup.SAP.CUA.LookupMappings |
SAP User Management Lookup Recon (scheduled task) |
Create copies of these lookup definition only if you want to use a different set of lookup mappings for the various installations of the target system. |
|
Note: When you create new forms, you must create new copies of the Lookup.SAP.UM.SoDConfiguration lookup definition and specify the names of the forms in the Lookup.SAP.UM.SoDConfiguration lookup definition. |
When you configure reconciliation:
To reconcile data from a particular target system installation, specify the name of the IT resource for that target system installation as the value of the scheduled task attribute that holds the IT resource name. For example, you enter the name of the IT resource as the value of the IT resource attribute of the SAP User Management User Recon scheduled task.
When you perform provisioning operations:
When you use the Administrative and User Console to perform provisioning, you can specify the IT resource corresponding to the target system installation to which you want to provision the user.
When you perform a provisioning operation, lookup fields on the Administrative and User Console allow you to select values from lists. Some of these lookup fields are populated with values copied from the target system.
In earlier releases of the connector, if you had multiple installations of the target system, then entries in the lookup field were linked with the target system installation from which the entries were copied. This allowed you to select lookup field values that were specific to the target system installation on which the provisioning operation was to be performed.
For release 9.1.2 of the connector, the Dependent Lookup Fields feature is disabled by default. You can enable this feature after you deploy the Oracle Identity Manager release 9.1.0.2 bundle patch that addresses Bug 9181280.
|
Note: Check with Oracle Support about the bundle patch that addresses Bug 9181280. |
To enable the Dependent Lookup Fields feature after you deploy the bundle patch that addresses Bug 9181280, you must make changes in the forms listed in Table 4-2. This table lists the forms, the lookup fields on the forms, and the lookup query that you must use for each lookup field. The procedure is described after the table.
Table 4-2 SQL Queries for Lookup Fields
| Form | Lookup Field | Oracle Database Query for the Lookup Field | Microsoft SQL Server Query for the Lookup Field |
|---|---|---|---|
|
UD_SPUM_PRO |
select lkv_encoded,lkv_decoded from lkv lkv,lku lku where lkv.lku_key=lku.lku_key and lku_type_string_key='Lookup.SAP.UM.System' and substr(lkv_encoded, 1, length(concat('$Form data.UD_SAP_ITRESOURCE$','~')))= concat('$Form data.UD_SAP_ITRESOURCE$','~') |
select lkv_encoded,lkv_decoded from lkv lkv,lku lku where lkv.lku_key=lku.lku_key and lku_type_string_key='Lookup.SAP.UM.System' and CHARINDEX('$Form data.UD_SAP_ITRESOURCE$' + '~' , lkv_encoded)>0 |
|
|
UD_SPUM_PRO |
select lkv_encoded,lkv_decoded from lkv lkv,lku lku where lkv.lku_key=lku.lku_key and lku_type_string_key='Lookup.SAP.UM.Profile' and instr(lkv_encoded,concat('$Form data.UD_SPUM_PRO_SYSTEMNAME$','~'))>0 |
select lkv_encoded,lkv_decoded from lkv lkv,lku lku where lkv.lku_key=lku.lku_key and lku_type_string_key='Lookup.SAP.UM.Profile' and CHARINDEX('$Form data.UD_SPUM_PRO_SYSTEMNAME$' + '~' , lkv_encoded)>0 |
|
|
UD_SAPRL |
select lkv_encoded,lkv_decoded from lkv lkv,lku lku where lkv.lku_key=lku.lku_key and lku_type_string_key='Lookup.SAP.UM.System' and substr(lkv_encoded, 1, length(concat('$Form data.UD_SAP_ITRESOURCE$','~')))= concat('$Form data.UD_SAP_ITRESOURCE$','~') |
select lkv_encoded,lkv_decoded from lkv lkv,lku lku where lkv.lku_key=lku.lku_key and lku_type_string_key='Lookup.SAP.UM.System' and CHARINDEX('$Form data.UD_SAP_ITRESOURCE$' + '~' , lkv_encoded)>0 |
|
|
UD_SAPRL |
select lkv_encoded,lkv_decoded from lkv lkv,lku lku where lkv.lku_key=lku.lku_key and lku_type_string_key='Lookup.SAP.UM.Roles' and instr(lkv_encoded,concat('$Form data.UD_SAPRL_SYSTEMNAME$','~'))>0 |
select lkv_encoded,lkv_decoded from lkv lkv,lku lku where lkv.lku_key=lku.lku_key and lku_type_string_key='Lookup.SAP.UM.Roles' and CHARINDEX('$Form data.UD_SAPRL_SYSTEMNAME$' + '~' , lkv_encoded)>0 |
|
|
UD_SAP |
select lkv_encoded,lkv_decoded from lkv lkv,lku lku where lkv.lku_key=lku.lku_key and lku_type_string_key='Lookup.SAP.UM.UserTitle' and substr(lkv_encoded,1,length(concat('$Form data.UD_SAP_ITRESOURCE$','~')))=concat('$Form data.UD_SAP_ITRESOURCE$','~') |
select lkv_encoded,lkv_decoded from lkv lkv,lku lku where lkv.lku_key=lku.lku_key and lku_type_string_key='Lookup.SAP.UM.UserTitle' and CHARINDEX('$Form data.UD_SAP_ITRESOURCE$' + '~' ,lkv_encoded)>0 |
|
|
UD_SAP |
select lkv_encoded,lkv_decoded from lkv lkv,lku lku where lkv.lku_key=lku.lku_key and lku_type_string_key='Lookup.SAP.UM.UserGroups' and substr(lkv_encoded,1,length(concat( '$Form data.UD_SAP_ITRESOURCE$','~')))=concat( '$Form data.UD_SAP_ITRESOURCE$','~') |
select lkv_encoded,lkv_decoded from lkv lkv,lku lku where lkv.lku_key=lku.lku_key and lku_type_string_key='Lookup.SAP.UM.UserGroups' and CHARINDEX('$Form data.UD_SAP_ITRESOURCE$' + '~' ,lkv_encoded)>0 |
|
|
UD_SAP |
Logon Language |
select lkv_encoded,lkv_decoded from lkv lkv,lku lku where lkv.lku_key=lku.lku_key and lku_type_string_key='Lookup.SAP.UM.LangComm' and substr(lkv_encoded,1,length(concat( '$Form data.UD_SAP_ITRESOURCE$','~')))=concat( '$Form data.UD_SAP_ITRESOURCE$','~') |
select lkv_encoded,lkv_decoded from lkv lkv,lku lku where lkv.lku_key=lku.lku_key and lku_type_string_key='Lookup.SAP.UM.LangComm' and CHARINDEX('$Form data.UD_SAP_ITRESOURCE$' + '~' ,lkv_encoded)>0 |
|
UD_SAP |
select lkv_encoded,lkv_decoded from lkv lkv,lku lku where lkv.lku_key=lku.lku_key and lku_type_string_key='Lookup.SAP.UM.DateFormat' and substr(lkv_encoded,1,length(concat( '$Form data.UD_SAP_ITRESOURCE$','~')))=concat( '$Form data.UD_SAP_ITRESOURCE$','~') |
select lkv_encoded,lkv_decoded from lkv lkv,lku lku where lkv.lku_key=lku.lku_key and lku_type_string_key='Lookup.SAP.UM.DateFormat' and CHARINDEX('$Form data.UD_SAP_ITRESOURCE$' + '~' ,lkv_encoded)>0 |
|
|
UD_SAP |
select lkv_encoded,lkv_decoded from lkv lkv,lku lku where lkv.lku_key=lku.lku_key and lku_type_string_key='Lookup.SAP.UM.DecimalNotation' and substr(lkv_encoded,1,length(concat( '$Form data.UD_SAP_ITRESOURCE$','~')))=concat( '$Form data.UD_SAP_ITRESOURCE$','~') |
select lkv_encoded,lkv_decoded from lkv lkv,lku lku where lkv.lku_key=lku.lku_key and lku_type_string_key='Lookup.SAP.UM.DecimalNotation' and CHARINDEX('$Form data.UD_SAP_ITRESOURCE$' + '~' ,lkv_encoded)>0 |
|
|
UD_SAP |
select lkv_encoded,lkv_decoded from lkv lkv,lku lku where lkv.lku_key=lku.lku_key and lku_type_string_key='Lookup.SAP.UM.TimeZone' and substr(lkv_encoded,1,length(concat( '$Form data.UD_SAP_ITRESOURCE$','~')))=concat( '$Form data.UD_SAP_ITRESOURCE$','~') |
select lkv_encoded,lkv_decoded from lkv lkv,lku lku where lkv.lku_key=lku.lku_key and lku_type_string_key='Lookup.SAP.UM.TimeZone' and CHARINDEX('$Form data.UD_SAP_ITRESOURCE$' + '~' ,lkv_encoded)>0 |
|
|
UD_SAP |
select lkv_encoded,lkv_decoded from lkv lkv,lku lku where lkv.lku_key=lku.lku_key and lku_type_string_key='Lookup.SAP.UM.Company' and substr(lkv_encoded,1,length(concat( '$Form data.UD_SAP_ITRESOURCE$','~')))=concat( '$Form data.UD_SAP_ITRESOURCE$','~') |
select lkv_encoded,lkv_decoded from lkv lkv,lku lku where lkv.lku_key=lku.lku_key and lku_type_string_key='Lookup.SAP.UM.Company' and CHARINDEX('$Form data.UD_SAP_ITRESOURCE$' + '~' ,lkv_encoded)>0 |
|
|
UD_SAP |
select lkv_encoded,lkv_decoded from lkv lkv,lku lku where lkv.lku_key=lku.lku_key and lku_type_string_key='Lookup.SAP.UM.ContractualUserType' and substr(lkv_encoded,1,length(concat( '$Form data.UD_SAP_ITRESOURCE$','~')))=concat( '$Form data.UD_SAP_ITRESOURCE$','~') |
select lkv_encoded,lkv_decoded from lkv lkv,lku lku where lkv.lku_key=lku.lku_key and lku_type_string_key='Lookup.SAP.UM.ContractualUserType' and CHARINDEX('$Form data.UD_SAP_ITRESOURCE$' + '~' ,lkv_encoded)>0 |
|
|
UD_SAP |
select lkv_encoded,lkv_decoded from lkv lkv,lku lku where lkv.lku_key=lku.lku_key and lku_type_string_key='Lookup.SAP.UM.CommType' and substr(lkv_encoded,1,length(concat( '$Form data.UD_SAP_ITRESOURCE$','~')))=concat( '$Form data.UD_SAP_ITRESOURCE$','~') |
select lkv_encoded,lkv_decoded from lkv lkv,lku lku where lkv.lku_key=lku.lku_key and lku_type_string_key='Lookup.SAP.UM.CommType' and CHARINDEX('$Form data.UD_SAP_ITRESOURCE$' + '~' ,lkv_encoded)>0 |
|
|
UD_SAP |
Language Communication |
select lkv_encoded,lkv_decoded from lkv lkv,lku lku where lkv.lku_key=lku.lku_key and lku_type_string_key='Lookup.SAP.UM.LangComm' and substr(lkv_encoded,1,length(concat( '$Form data.UD_SAP_ITRESOURCE$','~')))=concat( '$Form data.UD_SAP_ITRESOURCE$','~') |
select lkv_encoded,lkv_decoded from lkv lkv,lku lku where lkv.lku_key=lku.lku_key and lku_type_string_key='Lookup.SAP.UM.LangComm' and CHARINDEX('$Form data.UD_SAP_ITRESOURCE$' + '~' ,lkv_encoded)>0 |
|
UD_SAPPRO_O |
select lkv_encoded,lkv_decoded from lkv lkv,lku lku where lkv.lku_key=lku.lku_key and lku_type_string_key='Lookup.SAP.UM.System' and substr(lkv_encoded, 1, length(concat('$Form data.UD_SAP_O_ITRESOURCE$','~')))= concat('$Form data.UD_SAP_O_ITRESOURCE$','~') |
select lkv_encoded,lkv_decoded from lkv lkv,lku lku where lkv.lku_key=lku.lku_key and lku_type_string_key='Lookup.SAP.UM.System' and CHARINDEX('$Form data. UD_SAP_O_ITRESOURCE$' + '~' , lkv_encoded)>0 |
|
|
UD_SAPPRO_O |
select lkv_encoded,lkv_decoded from lkv lkv,lku lku where lkv.lku_key=lku.lku_key and lku_type_string_key='Lookup.SAP.UM.Profile' and instr(lkv_encoded,concat('$Form data.UD_SPUM_PRO_O_SYSTEMNAME$','~'))>0 |
select lkv_encoded,lkv_decoded from lkv lkv,lku lku where lkv.lku_key=lku.lku_key and lku_type_string_key='Lookup.SAP.UM.Profile' and CHARINDEX('$Form data. UD_SPUM_PRO_O_SYSTEMNAME$' + '~' , lkv_encoded)>0 |
|
|
UD_SAPRL_O |
select lkv_encoded,lkv_decoded from lkv lkv,lku lku where lkv.lku_key=lku.lku_key and lku_type_string_key='Lookup.SAP.UM.System' and substr(lkv_encoded, 1, length(concat('$Form data.UD_SAP_O_ITRESOURCE$','~')))= concat('$Form data.UD_SAP_O_ITRESOURCE$','~') |
select lkv_encoded,lkv_decoded from lkv lkv,lku lku where lkv.lku_key=lku.lku_key and lku_type_string_key='Lookup.SAP.UM.System' and CHARINDEX('$Form data.UD_SAP_O_ITRESOURCE$' + '~' , lkv_encoded)>0 |
|
|
UD_SAPRL_O |
select lkv_encoded,lkv_decoded from lkv lkv,lku lku where lkv.lku_key=lku.lku_key and lku_type_string_key='Lookup.SAP.UM.Roles' and instr(lkv_encoded,concat('$Form data.UD_SAPRL_O_SYSTEMNAME$','~'))>0 |
select lkv_encoded,lkv_decoded from lkv lkv,lku lku where lkv.lku_key=lku.lku_key and lku_type_string_key='Lookup.SAP.UM.Roles' and CHARINDEX('$Form data.UD_SAPRL_O_SYSTEMNAME$' + '~' , lkv_encoded)>0 |
|
|
UD_SAP_O |
select lkv_encoded,lkv_decoded from lkv lkv,lku lku where lkv.lku_key=lku.lku_key and lku_type_string_key='Lookup.SAP.UM.UserTitle' and substr(lkv_encoded,1,length(concat('$Form data.UD_SAP_O_ITRESOURCE$','~')))=concat('$Form data.UD_SAP_O_ITRESOURCE$','~') |
select lkv_encoded,lkv_decoded from lkv lkv,lku lku where lkv.lku_key=lku.lku_key and lku_type_string_key='Lookup.SAP.UM.UserTitle' and CHARINDEX('$Form data.UD_SAP_O_ITRESOURCE$' + '~' ,lkv_encoded)>0 |
|
|
UD_SAP_O |
select lkv_encoded,lkv_decoded from lkv lkv,lku lku where lkv.lku_key=lku.lku_key and lku_type_string_key='Lookup.SAP.UM.UserGroups' and substr(lkv_encoded,1,length(concat( '$Form data.UD_SAP_O_ITRESOURCE$','~')))=concat( '$Form data.UD_SAP_O_ITRESOURCE$','~') |
select lkv_encoded,lkv_decoded from lkv lkv,lku lku where lkv.lku_key=lku.lku_key and lku_type_string_key='Lookup.SAP.UM.UserGroups' and CHARINDEX('$Form data.UD_SAP_O_ITRESOURCE$' + '~' ,lkv_encoded)>0 |
|
|
UD_SAP_O |
Logon Language |
select lkv_encoded,lkv_decoded from lkv lkv,lku lku where lkv.lku_key=lku.lku_key and lku_type_string_key='Lookup.SAP.UM.LangComm' and substr(lkv_encoded,1,length(concat( '$Form data.UD_SAP_O_ITRESOURCE$','~')))=concat( '$Form data.UD_SAP_O_ITRESOURCE$','~') |
select lkv_encoded,lkv_decoded from lkv lkv,lku lku where lkv.lku_key=lku.lku_key and lku_type_string_key='Lookup.SAP.UM.LangComm' and CHARINDEX('$Form data.UD_SAP_O_ITRESOURCE$' + '~' ,lkv_encoded)>0 |
|
UD_SAP_O |
select lkv_encoded,lkv_decoded from lkv lkv,lku lku where lkv.lku_key=lku.lku_key and lku_type_string_key='Lookup.SAP.UM.DateFormat' and substr(lkv_encoded,1,length(concat( '$Form data.UD_SAP_O_ITRESOURCE$','~')))=concat( '$Form data.UD_SAP_O_ITRESOURCE$','~') |
select lkv_encoded,lkv_decoded from lkv lkv,lku lku where lkv.lku_key=lku.lku_key and lku_type_string_key='Lookup.SAP.UM.DateFormat' and CHARINDEX('$Form data.UD_SAP_O_ITRESOURCE$' + '~' ,lkv_encoded)>0 |
|
|
UD_SAP_O |
select lkv_encoded,lkv_decoded from lkv lkv,lku lku where lkv.lku_key=lku.lku_key and lku_type_string_key='Lookup.SAP.UM.DecimalNotation' and substr(lkv_encoded,1,length(concat( '$Form data.UD_SAP_O_ITRESOURCE$','~')))=concat( '$Form data.UD_SAP_O_ITRESOURCE$','~') |
select lkv_encoded,lkv_decoded from lkv lkv,lku lku where lkv.lku_key=lku.lku_key and lku_type_string_key='Lookup.SAP.UM.DecimalNotation' and CHARINDEX('$Form data.UD_SAP_O_ITRESOURCE$' + '~' ,lkv_encoded)>0 |
|
|
UD_SAP_O |
select lkv_encoded,lkv_decoded from lkv lkv,lku lku where lkv.lku_key=lku.lku_key and lku_type_string_key='Lookup.SAP.UM.TimeZone' and substr(lkv_encoded,1,length(concat( '$Form data.UD_SAP_O_ITRESOURCE$','~')))=concat( '$Form data.UD_SAP_O_ITRESOURCE$','~') |
select lkv_encoded,lkv_decoded from lkv lkv,lku lku where lkv.lku_key=lku.lku_key and lku_type_string_key='Lookup.SAP.UM.TimeZone' and CHARINDEX('$Form data.UD_SAP_O_ITRESOURCE$' + '~' ,lkv_encoded)>0 |
|
|
UD_SAP_O |
select lkv_encoded,lkv_decoded from lkv lkv,lku lku where lkv.lku_key=lku.lku_key and lku_type_string_key='Lookup.SAP.UM.Company' and substr(lkv_encoded,1,length(concat( '$Form data.UD_SAP_O_ITRESOURCE$','~')))=concat( '$Form data.UD_SAP_O_ITRESOURCE$','~') |
select lkv_encoded,lkv_decoded from lkv lkv,lku lku where lkv.lku_key=lku.lku_key and lku_type_string_key='Lookup.SAP.UM.Company' and CHARINDEX('$Form data.UD_SAP_O_ITRESOURCE$' + '~' ,lkv_encoded)>0 |
|
|
UD_SAP_O |
select lkv_encoded,lkv_decoded from lkv lkv,lku lku where lkv.lku_key=lku.lku_key and lku_type_string_key='Lookup.SAP.UM.ContractualUserType' and substr(lkv_encoded,1,length(concat( '$Form data.UD_SAP_O_ITRESOURCE$','~')))=concat( '$Form data.UD_SAP_O_ITRESOURCE$','~') |
select lkv_encoded,lkv_decoded from lkv lkv,lku lku where lkv.lku_key=lku.lku_key and lku_type_string_key='Lookup.SAP.UM.ContractualUserType' and CHARINDEX('$Form data.UD_SAP_O_ITRESOURCE$' + '~' ,lkv_encoded)>0 |
|
|
UD_SAP_O |
select lkv_encoded,lkv_decoded from lkv lkv,lku lku where lkv.lku_key=lku.lku_key and lku_type_string_key='Lookup.SAP.UM.CommType' and substr(lkv_encoded,1,length(concat( '$Form data.UD_SAP_O_ITRESOURCE$','~')))=concat( '$Form data.UD_SAP_O_ITRESOURCE$','~') |
select lkv_encoded,lkv_decoded from lkv lkv,lku lku where lkv.lku_key=lku.lku_key and lku_type_string_key='Lookup.SAP.UM.CommType' and CHARINDEX('$Form data.UD_SAP_O_ITRESOURCE$' + '~' ,lkv_encoded)>0 |
|
|
UD_SAP_O |
Language Communication |
select lkv_encoded,lkv_decoded from lkv lkv,lku lku where lkv.lku_key=lku.lku_key and lku_type_string_key='Lookup.SAP.UM.LangComm' and substr(lkv_encoded,1,length(concat( '$Form data.UD_SAP_O_ITRESOURCE$','~')))=concat( '$Form data.UD_SAP_O_ITRESOURCE$','~') |
select lkv_encoded,lkv_decoded from lkv lkv,lku lku where lkv.lku_key=lku.lku_key and lku_type_string_key='Lookup.SAP.UM.LangComm' and CHARINDEX('$Form data.UD_SAP_O_ITRESOURCE$' + '~' ,lkv_encoded)>0 |
|
UD_SPUMRC_O |
select lkv_encoded,lkv_decoded from lkv lkv,lku lku where lkv.lku_key=lku.lku_key and lku_type_string_key='Lookup.SAP.UM.System' and substr(lkv_encoded, 1, length(concat('$Form data.UD_SPUMRP_O_SERVER$','~')))=concat('$Form data.UD_SPUMRP_O_SERVER$','~') |
select lkv_encoded,lkv_decoded from lkv lkv,lku lku where lkv.lku_key=lku.lku_key and lku_type_string_key='Lookup.SAP.UM.System' and CHARINDEX('$Form data.UD_SPUMRP_O_SERVER$' + '~' , lkv_encoded)>0 |
|
|
UD_SPUMRC_O |
select lkv_encoded,lkv_decoded from lkv lkv,lku lku where lkv.lku_key=lku.lku_key and lku_type_string_key='Lookup.SAP.UM.Roles' and instr(lkv_encoded,concat('$Form data.UD_SPUMRC_O_SYSTEMNAME$','~'))>0 |
select lkv_encoded,lkv_decoded from lkv lkv,lku lku where lkv.lku_key=lku.lku_key and lku_type_string_key='Lookup.SAP.UM.Roles' and CHARINDEX('$Form data.UD_SPUMRC_O_SYSTEMNAME$' + '~' , lkv_encoded)>0 |
|
|
UD_SPUMPC_O |
select lkv_encoded,lkv_decoded from lkv lkv,lku lku where lkv.lku_key=lku.lku_key and lku_type_string_key='Lookup.SAP.UM.System' and substr(lkv_encoded, 1, length(concat('$Form data.UD_SPUMPP_O_SERVER$','~')))=concat('$Form data.UD_SPUMPP_O_SERVER$','~') |
select lkv_encoded,lkv_decoded from lkv lkv,lku lku where lkv.lku_key=lku.lku_key and lku_type_string_key='Lookup.SAP.UM.System' and CHARINDEX('$Form data.UD_SPUMPP_O_SERVER$' + '~' , lkv_encoded)>0 |
|
|
UD_SPUMPC_O |
select lkv_encoded,lkv_decoded from lkv lkv,lku lku where lkv.lku_key=lku.lku_key and lku_type_string_key='Lookup.SAP.UM.Profile' and instr(lkv_encoded,concat('$Form data.UD_SPUMPC_O_SYSTEMNAME$','~'))>0 |
select lkv_encoded,lkv_decoded from lkv lkv,lku lku where lkv.lku_key=lku.lku_key and lku_type_string_key='Lookup.SAP.UM.Profile' and CHARINDEX('$Form data.UD_SPUMPC_O_SYSTEMNAME$' + '~' , lkv_encoded)>0 |
|
|
UD_SPUMRC_P |
select lkv_encoded,lkv_decoded from lkv lkv,lku lku where lkv.lku_key=lku.lku_key and lku_type_string_key='Lookup.SAP.UM.System' and substr(lkv_encoded, 1, length(concat('$Form data.UD_SPUMRP_P_SERVER$','~')))=concat('$Form data.UD_SPUMRP_P_SERVER$','~') |
select lkv_encoded,lkv_decoded from lkv lkv,lku lku where lkv.lku_key=lku.lku_key and lku_type_string_key='Lookup.SAP.UM.System' and CHARINDEX( (select CONVERT(varchar,svr_key) from svr where svr_name='$Form data.UD_SPUMRP_P_SERVER$') + '~' ,lkv_encoded)>0 |
|
|
UD_SPUMRC_P |
select lkv_encoded,lkv_decoded from lkv lkv,lku lku where lkv.lku_key=lku.lku_key and lku_type_string_key='Lookup.SAP.UM.Roles' and instr(lkv_encoded,concat('$Form data.UD_SPUMRC_P_SYSTEMNAME$','~'))>0 |
select lkv_encoded,lkv_decoded from lkv lkv,lku lku where lkv.lku_key=lku.lku_key and lku_type_string_key='Lookup.SAP.UM.Roles' and CHARINDEX( (select CONVERT(varchar,svr_key) from svr where svr_name='$Form data.UD_SPUMRC_P_SYSTEMNAME$') + '~' ,lkv_encoded)>0 |
|
|
UD_SPUMPC_P |
select lkv_encoded,lkv_decoded from lkv lkv,lku lku where lkv.lku_key=lku.lku_key and lku_type_string_key='Lookup.SAP.UM.System' and substr(lkv_encoded, 1, length(concat('$Form data.UD_SPUMPP_P_SERVER$','~')))=concat('$Form data.UD_SPUMPP_P_SERVER$','~') |
select lkv_encoded,lkv_decoded from lkv lkv,lku lku where lkv.lku_key=lku.lku_key and lku_type_string_key='Lookup.SAP.UM.System' and CHARINDEX( (select CONVERT(varchar,svr_key) from svr where svr_name='$Form data.UD_SPUMPP_P_SERVER$') + '~' ,lkv_encoded)>0 |
|
|
UD_SPUMPC_P |
select lkv_encoded,lkv_decoded from lkv lkv,lku lku where lkv.lku_key=lku.lku_key and lku_type_string_key='Lookup.SAP.UM.Profile' and instr(lkv_encoded,concat('$Form data.UD_SPUMPC_P_SYSTEMNAME$','~'))>0 |
select lkv_encoded,lkv_decoded from lkv lkv,lku lku where lkv.lku_key=lku.lku_key and lku_type_string_key='Lookup.SAP.UM.Profile' and CHARINDEX( (select CONVERT(varchar,svr_key) from svr where svr_name='$Form data.UD_SPUMPC_P_SYSTEMNAME$') + '~' ,lkv_encoded)>0 |
To enable lookup fields on each form:
On the Design Console, expand Development Tools and double-click Form Designer.
Search for and open the form. For example, open the UD_SAP form.
Click Create New Version, enter a new version number, and then save the version.
From the Current Version list, select the version that you created.
Open the Properties tab, and expand Components.
Add properties for each lookup field on the form as follows:
Select the Lookup Code property, and then click Delete Property.
Select the first lookup field on the form, and then click Add Property. For example, select Profile System Name on the UD_SAP form.
In the Add Property dialog box:
From the Property Name list, select Lookup Column Name.
In the Property Value field, enter lkv_encoded.
Click the Save icon, and then close the dialog box.
Select the lookup field, and then click Add Property.
In the Add Property dialog box:
From the Property Name list, select Column Names.
In the Property Value field, enter lkv_encoded.
Click the Save icon, and then close the dialog box.
Select the lookup field, and then click Add Property.
In the Add Property dialog box:
From the Property Name list, select Column Widths.
In the Property Value field, enter 234.
Select the lookup field, and then click Add Property.
In the Add Property dialog box:
From the Property Name list, select Column Captions.
In the Property Value field, enter lkv_decoded.
Click the Save icon, and then close the dialog box.
Select the lookup field, and then click Add Property.
In the Add Property dialog box:
From the Property Name list, select Lookup Query.
In the Property Value field, enter the query given in Table 4-2.
Click the Save icon, and then close the dialog box.
Repeat Step 6 for each lookup field on the form.
Click the Save icon to save the changes to the form.
Click Make Version Active.