Defining Case Management Options
Case management functionality is a highly configurable tool your organization can use to manage many situations, including (but certainly not limited to) the following:
· a formal appeal,
· a bankruptcy,
· a collection case,
· refund voucher processing,
· a taxpayer's request for literature,
· … (the list is only limited by your time and imagination)
Obviously the steps involved in the resolution of the above cases are very different. The topics in this section describe how to configure the system to manage your cases as per your organization's desires.
Separate module. Please note that the Case Management functionality is associated with a separate module. If the Case Management module is not applicable to your business you may turn it off. Refer to Turn Off A Function Module for more information.
Refer to Case Management for a description of how end-users use cases.
Contents
Setting Up Case Management Options
The topics in this section provide background information about how to configure the system to support your case management requirements.
Contents
Case Type Controls Everything
Whenever a user creates a case, they must specify the type of case (e.g., formal appeal, audit, etc.). The case type controls how the case is handled.
Case types hold the business rules that control cases. Since these business rules can sometimes be quite complicated, setting up case types requires planning and foresight. The topics in this section describe the type of business rules that can be configured on your case types.
Contents
Person / Account / Location Applicability
Contact Information Applicability
Status-Specific Business Rules
Responsible User Applicability
Person / Account / Location Applicability
Some types of cases may be person-oriented, others may be location-oriented, and still others may be account-oriented. For example:
· Cases used to keep track of a literature request would reference the person who requested the literature.
· Cases used to keep track of the inspection of a property would reference the location being inspected.
· Cases used to keep track of a formal appeal would reference the account associated with the bill(s) being questioned.
When you set up a case type, you define if its cases must reference a person, account, and/or location. Note, any combination of these objects is permitted on a case.
Contact Information Applicability
When a case is created as a result of contact from an outside party, you may want to keep track of how to contact its originator. For example, you may want to record the originator's email address or phone number. When you set up a case type, you define if contact information is required, optional or not allowed on its cases.
Business Object Association
A case type may reference a business object, which serves as a link between cases of that type and the options that are associated with the business object.
Additional Information
Some of your cases may require additional information (in the form of characteristics). For example, a formal appeal may require at least one bill. When you set up a case type, you can define the additional fields that are required. In addition, you can define default values for these fields.
The case functionality also allows you to require characteristics when a case enters a given state. Refer to Required Fields Before A Case Enters A State for the details.
Requiring supporting documents. Because any type of characteristic can be referenced on a case, you can require references to supporting documents by requiring a file location characteristic.
Access Rights
You can take advantage of the system's security to restrict cases of a given type to certain users. For example, you can restrict bankruptcy cases to specific user groups.
The following points describe how to implement this type of security:
· Create an application service for each type of case you need to secure
· Define the access modes Add, Inquire and Change for each application service
· Define the applicable application service on each case type
· Link the appropriate user groups to each application service
· For user groups that are allowed to add cases of a given type, define Add as a valid access mode.
· For user groups that are allowed to view cases of a given type, define Inquire as a valid access mode
· For user groups that are allowed to change cases of a given type, define Change as a valid access mode
If you restrict access to a case type's cases, you can further restrict which users can work on cases given the status of the case. Refer to Which Users Can Transition A Case for more information.
Restricting access to cases is optional. If you don't specify an application service on a case type, all users (who have access to the case transaction) may access its cases.
Lifecycle
Many objects in the system have predefined lifecycles whose rules are governed by the base-package and cannot be changed. For example, an obligation starts out in the Pending Start state and eventually becomes Closed when it's been final billed (and paid). You can't change the system to allow an obligation to starts its life in the Closed state.
The lifecycle of cases is not governed by the base package. Rather, you define the lifecycle of your cases when you set up their case types. Examine the following diagrams; the one on the left shows the potential lifecycle of a case that manages a formal appeal, the one on the right shows the potential lifecycle of a case that manages a taxpayer's documentation request.
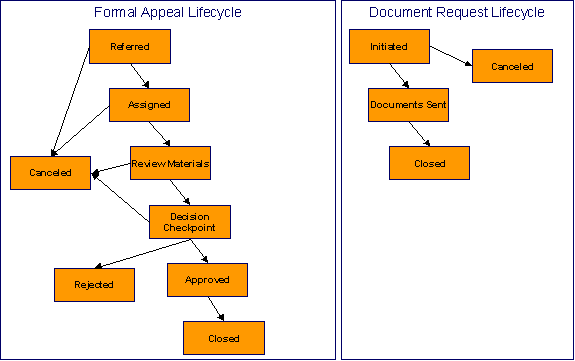
Potential Lifecycles Of Two Types Of Cases
Just examples. The above lifecycles are just examples. When you set up your case types, you must define the valid states for your case type.
The topics that follow describe important concepts that are illustrated in the above diagrams.
Valid States versus State Transition Rules
One Initial State and Multiple Final States
Allowing A Case To Be Reopened
Make Sure To Have A Canceled State
Buttons Allow A User To Transition A Case From Status To Status
Reports and Analytics Highlight Productivity
Valid States versus State Transition Rules
The orange boxes in the above diagram show the potential valid states a given case can have. The lines between the boxes indicate the state transition rules. These rules govern the states a case can move to while it's in a given state. For example, the above diagram indicates a formal appeal that's in the Referred state can be either Canceled or moved into the Assigned state.
When you set up a case type, you define both its valid states and the state transition rules.
Transitory States
You can define a state in a case type as Transitory if you do not wish the case to exist in a particular state. For example, let’s assume that an algorithm is associated with the Decision Checkpoint state (Enter Processing) that would automatically determine the next state for the case (i.e. Approved or Rejected) and also contains logic to transition the case accordingly. In this scenario, you may not ever want the case to exist in the Decision Checkpoint state, so that a user won’t ever see a formal appeal in that state. If the other states were marked as non-transitory, and an error were to occur during the transition from Decision Checkpoint to Approved, the case would roll back any changes to data made in the Approved (Enter Processing) state along with the changes made in the Decision Checkpoint state, and would end up in the Review Materials state - the last non-transitory state prior to Decision Checkpoint.
One Initial State and Multiple Final States
When you set up a case type's states, you must pick one as the initial state. The initial state is the state assigned to new cases of a given type. For example, formal appeal cases have an initial state of Referred, whereas document request cases have an initial state of Initiated.
You must also define which statuses are considered to be "final". When a case enters a "final" state, it is complete and no further action is necessary. You might want to think of the "final" states as the potential outcomes of a case. For example, a formal appeal has potential outcomes of Closed, Rejected, and Canceled.
The "final" states are used by the system to differentiate between open and closed cases. For example, an alert highlights when the person / account / location in context has open cases (this alert only exists if you've plugged-in the appropriate installation alert).
Allowing A Case To Be Reopened
You can set up your state transition rules to allow a case to be reopened (i.e., to be moved from a final state to a non-final state). Neither of the above examples allows this, but it is possible if you configure a case type accordingly.
Make Sure To Have A Canceled State
The system does not allow you to delete a case. Therefore, if you want to support logical deletion, you should have a status of Canceled early in a case type's lifecycle. Doing this allows a user to cancel (i.e., logically delete) a case.
Cancel reason. You might want to consider setting up your case types to require a cancel reason (in the form of a predefined value characteristic) when a user cancels a case. Refer to Required Fields Before A Case Enters A State for more information.
Buttons Allow A User To Transition A Case From Status To Status
When a case is displayed on Case - Main, a separate button is shown for each state into which the case can be transitioned. For example, a formal appeal case that is in the Referred state would show two buttons: Assign and Cancel. If the user presses the Assign button, the case is transitioned to the Assigned state. If the user presses the Cancel button, the case is moved to the Canceled state.
You may define the text displayed on the button differently for each state transition. This allows the action description to be varied according to the previous status. For example, the button to transition from New to Active may be labeled Activate, but the button to change from Closed to Active may be labeled Reactivate.
Refer to Which Users Can Transition A Case for instructions describing how to restrict users to specific actions.
State Transitions Are Audited
The system maintains an audit trail whenever a case transitions from one state to another. This audit is shown in the case's log.
Reports and Analytics Highlight Productivity
When you set up a case type's lifecycle, keep in mind that several reports and analytics highlight how long it took cases to transition into a state. For example, you can use a report to see how long it took formal appeal to be completed (or initially worked on or …). Refer to the Reports chapter for the details of case reports.
Status-Specific Business Rules
As described in Lifecycle, when you set up a case type, you define the possible states its cases can pass through. The following topics describe business rules that can be configured for each state.
Contents
A Script That Helps A User Work Through A Case
Required Fields Before A Case Enters A State
Validation Before A Case Enters A State
Additional Processing When Entering A State
Validation Before A Case Exits A State
Additional Processing When Exiting A State
Which Users Can Transition A Case Into A State
A Script That Helps A User Work Through A Case
You can define a Business Process Assistant script that helps a user work a case while it's in a given state. For example, when you set up the Review Materials state for the formal appeal case type, you can define a script. A user can then easily launch this script to help them work through a case in this state.
Please keep the following in mind when you’re designing how to integrate BPA scripts with your cases:
· You can have a different script for each state. For example, you could develop a script to help a user work on a case while it's in the Review Materials state and a different script to help them work in a case while it's in the Approved state.
· Rather than make a user launch a script by pressing a hyperlink on the case page, you can have the system automatically launch the script while the case is in a given state. Refer to Script Launching Option for more information.
· You can also have the system automatically launch a script when a user selects a ToDo entry. Refer to Launching Scripts When ToDo Entries Are Selected for more information.
Refer to Scripts and Cases for more information about how to streamline your case processing with scripts.
Required Fields Before A Case Enters A State
You can define additional fields (i.e., characteristics) that are required before a case can enter a given state. For example,
· You can indicate a formal appeal must reference at least one bill before it enters the Referred state.
· You can indicate a case must reference a cancel reason before it enters the Canceled state.
You do this by indicating that characteristics (that were optional when the case was added) are required when a case enters a given state.
Validation Before A Case Enters A State
You can define validation that executes before a case can enter a given state. For example, you can indicate the case must have been assigned a responsible user before it can enter the Assigned state. This validation logic is held in algorithms that are plugged in on the case type and therefore you can define any type of validation.
Additional Processing When Entering A State
You can define additional processing that should happen when a case enters a given state. For example, you can have a letter created when a formal appeal case is Rejected. Similarly, you can have a To Do entry created when a formal appeal enters the Assigned state. This additional processing is held in algorithms that are plugged in on the case type and therefore you can define any type of additional processing.
You can also incorporate state transitioning logic within routines that are executed when a case enters a state, so that you do not need to rely upon CASETRAN to transition your cases. For example, when the state entry routines of the Decision Checkpoint status for a formal appeal are executed, they may be designed to transition the case into either the Rejected or Approved state without waiting based on fields linked to the case. Note that your Exit Validation and Exit Processing logic, if configured for the case state, will still be executed as part of the state transition. Auto-Transition logic for this state will be ignored during this transition.
Validation Before A Case Exits A State
You can define validation that executes before a case can exit a given state. For example, you might want to check the account's balance is less than a given value before a collection case can exit a given state. This validation logic is held in algorithms that are plugged in on the case type and therefore you can define any type of validation.
Additional Processing When Exiting A State
You can define additional processing that should happen when a case exits a given state. For example, you can have a To Do entry automatically completed when a formal appeal leaves the Decision Checkpoint state. This additional processing is held in algorithms that are plugged in on the case type and therefore you can define any type of additional processing.
Automatic Transition Rules
You can define rules that automatically transition a case into a different state using auto transition rules. For example, if you have a case that sends a letter to a taxpayer, it can be configured to transition to the Follow Up state 1 week after the letter is sent. For a collection case, you can configure any state to automatically transition to Canceled if the taxpayer pays their debt in full. These rules are held in algorithms that are plugged in on the case type and therefore you can define any type of automatic transition rules.
Cases in a state with automatic transition rules are monitored by the CASETRAN background process. Each time this program runs, the respective automatic transition plug-in is called for each such case and it transitions the case if the condition applies.
When the user adds a new case or changes the state of a case manually the system attempts to auto-transition the case to subsequent statuses as necessary. If auto-transition rules apply to the new state (and to subsequent ones) they would be executed right away. In other words, you don't need to wait for the auto-transition background process to be executed. An indication that the case was auto-transitioned online is displayed right below the action buttons section.
Auto-Transition Errors. Online auto-transition is performed recursively committing each successful state transition to the database. It is performed up to 100 times or until an error is encountered during the process. If this happens, auto-transition stops at the last non-transitory state into which a successful transition had occurred. Two case log entries will be generated automatically - one containing the message that a transition error has occurred, and a second containing the actual error message. A To Do entry will also be generated automatically upon rollback. The type of this To Do entry will be taken from 1) the Case Transition Exception To Do Type option for the Business Object associated with the case type, and if this is not populated, 2) the Exception To Do Type indicated on the Case Options Feature Configuration. All of the above error handling is true for both batch and online processing of cases.
Triggering Auto-Transition. If you have a customized process that affects the state of a case and you want the case to be auto-transitioned right away, i.e. not wait for the next scheduled CASETRAN background process to execute, you can customize that process to trigger auto-transition for the specific case, or you can put the state transition logic into the routines that execute at state entry time.
Script Launching Option
You can define whether the script associated with a given state is to be automatically launched while the case is in that state. The system supports the following options:
· Launch the script only if no script is currently active.
· Always launch the script unless this specific script is currently active.
Warning! With this option, if a script is currently open in the page’s BPA script area then it will be automatically closed and the case script will open.
· Do not automatically launch the script.
You do this by plugging-in a Script Launching algorithm for the given state. If no such plug-in is provided the script is not automatically launched.
Which Users Can Transition A Case Into A State
If you have restricted access to a case type, you can further restrict which user groups are allowed to transition a case into specific states. For example, you can control which user group can transition a formal appeal into the Assigned state. The following points describe how this is done:
· Define actions on the application service defined on the case type. You must define an action for each status that you need to secure.
· Define each status's corresponding action. Note, you only need to link a status to an action if it's secured. Any user with access to the case type can perform statuses that aren't linked to actions.
· Define the transition role for each status’s valid next status. You can assign valid next statuses to be reachable via system (only), or system and user.
· Define which user groups have access to the actions (i.e., statuses). In addition, these user groups should have access to the Change action.
Responsible User Applicability
Some of your cases may require a "responsible user". This is the user who has overall responsibility for the case. When you set up a case type, you define if a responsible user is required, optional or not allowed on its cases.
The following points describe how to set up the system if a responsible user is not required when a case is first created, but is later in its lifecycle:
· Indicate that a responsible user is optional on the case type
· Plug-in either an exit validation or entry validation algorithm on one of the case type's states to require a responsible user at some point in a case's lifecycle
Address To Do entries to the responsible user. If you use the base-package algorithm to create a To Do entry when a case enters a given state, you can indicate that the To Do entry should be addressed to the responsible user on the case.
Scripts and Cases
There are three ways Business Process Assistant scripts can be used to manage cases:
· You can create a BPA script to help users create a case. For example, a script can help a user create a new formal appeal.
Using a script to create a case can save a user a lot of time (and training efforts). This is because the script can automatically populate many fields on the case based on answers to questions.
Refer to Initiating Scripts for a description of how end-users initiate scripts.
· You can create a script to help users work on a case when it's in a given state. Refer to A Script That Helps A User Work A Case for more information.
· You can set up your case types to create ToDo entries to notify users when cases exist that require their attention. Users can complete many of these ToDo entries without assistance. However, you can set up the system to automatically launch a script when a user selects a ToDo entry. For example, consider a ToDo entry that highlights a formal appeal that requires investigation. You can set up the system to execute a specific script when a user selects this ToDo entry. This script might guide the user through the investigation process (and help them update the case). Refer to Executing A Script When A To Do Entry Is Selected for more information.
ToDo's and Cases
The topics in this section provide background information about how to facilitate case management with To Do entries.
Contents
Creating and Completing ToDo Entries
Launching Scripts When ToDo Entries Are Selected
Creating and Completing ToDo Entries
You can configure your case types to create and complete To Do entries when a case enters or exits a state.
Let's use the following lifecycle diagram to illustrate this point:
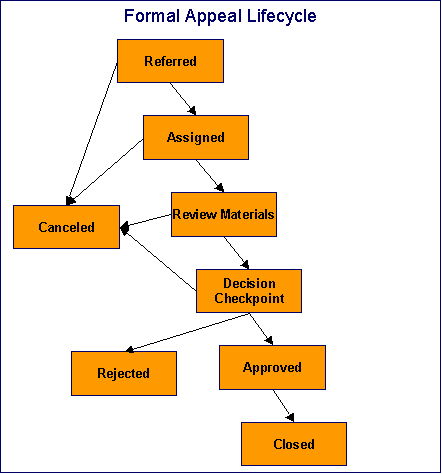
Let's assume the following:
· You want a ToDo entry created when a formal appeal is created and you want it completed when the case reaches the Canceled, Rejected or Approved states. This ToDo entry could be used by a supervisor to monitor the number of formal appeal being worked. Note, we refer to this as the "first" ToDo entry below.
· You want a different ToDo entry created when the case enters the Assign state and you want this entry automatically completed when the case leaves this state. Note, we refer to this as the "second" ToDo entry below.
· You want a different ToDo entry created when the case enters the Decision Checkpoint state and you want this entry automatically completed when the case leaves this state. Note, we refer to this as the "third" ToDo entry below.
To implement the above, you would set up the case type as follows:
· Plug-in an entry processing algorithm on the Referred status to create the first ToDo entry. Plug-in an entry processing algorithm on the Canceled, Rejected and Completed statuses to complete this entry.
· Plug-in an entry processingalgorithm on the Assigned status to create the second ToDo entry. Plug-in an exit processing algorithm onthe Assigned status to complete this entry. We elected to use an exit processing algorithm because we only have to plug it in on one status. If we'd used an entry processing algorithm, we would need to plug it in on the 2 statuses into which the Assigned status can transition.
· Plug-in an entry processingalgorithm on the Decision Checkpoint status to create the third ToDo entry. Plug-in an exit processing algorithm onthe Decision Checkpoint status to complete this entry.
Launching Scripts When ToDo Entries Are Selected
You can set up your case types to create ToDo entries to notify users when cases exist that require their attention. Users can complete many of these ToDo entries without assistance. However, you can set up the system to automatically launch a script when a user selects a ToDo entry. For example, consider a ToDo entry that highlights a formal appeal that requires investigation. You can set up the system to execute a specific script when a user selects this type of ToDo entry. This script might guide the user through the investigation process. Refer to Executing A Script When A ToDo Entry Is Selected for more information.
All ToDo Entries Are Visible
When a case is displayed on Case Maintenance, the system summarizes the number of ToDo entries associated with the case (if you've set up your ToDo types appropriately).
Examples of Case Types
The topics that follow provide an example of a case type related to a formal appeal. Use the information in this section to form an intuitive understanding of case types. After attaining this understanding, you’ll be ready to design your own case types.
Formal Appeal Case Type
Some organizations will set up a case to manage a formal appeal. The following diagram illustrates how such a case type might look:
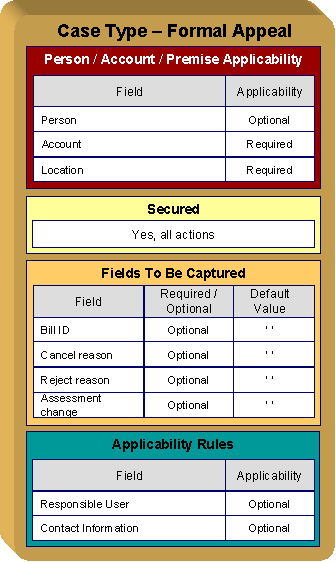
Note the following about the formal appeal case type:
· Notice that we set up the case type to require an account and a location, but person is optional. This is because multiple persons may own a property, whose assessed value is being appealed. Different tax types will need different required and optional parameters.
· We need to restrict formal appeal to specific user groups. This means we need to set up a specific application service for this case type (that has a separate "action" for each status).
· Cases of this type have 3 additional fields over their lifetime. Notice the following:
· The Bill ID characteristic is set up to be optional. This is because the assessment may or may not have been billed yet. We've assumed that sometimes a formal appeal case can be created before the tax assessment has been billed.
· Both the Cancel Reason and Reject Reason are optional. Later in this section, you'll see that we've configured the Canceled and Rejected statuses to require these fields, respectively.
· Cases of this type do not need a Responsible User when first created. Later in this section, you'll see how we've configured the Assigned status to require a Responsible User before a case can enter this state.
· Cases of this type do not need Contact Information. This was a subjective decision and depends on your organization's philosophy.
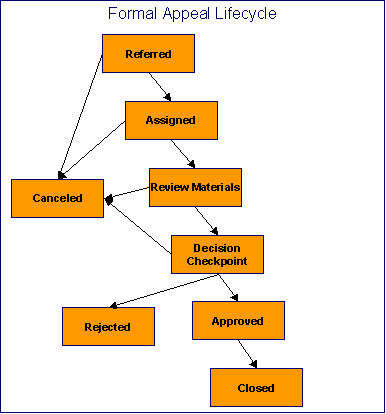
The topics that follow describe each of the statuses in a formal appeal lifecycle. We have assumed the following state transition rules:
Contents
Review Materials Formal Appeal
Decision Checkpoint Formal Appeal
Referred Formal Appeal
The following is an example of the configuration of the Referred status for formal appeal cases.
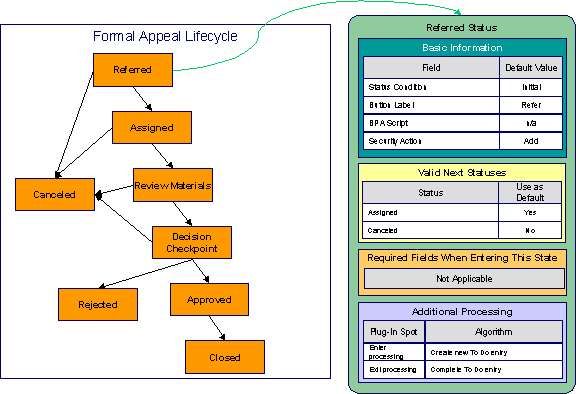
Note the following about this status:
· Referred is the initial state. The initial state is the state populated on new cases of a given type. Remember that only one status can be defined as the initial state.
· It has a button label even though it's the initial state. The above diagram doesn't allow a user to ever transition a case into this state and therefore there will never be a button with such a label. However, it's a required field just in case you change your business rules.
· We have decided not to use a BPA script to help a user work on a formal appeal when it's in this state (this is probably not the best decision as BPA scripts can be quite useful).
· We have associated the Add action with this status. This means that only users with rights to the add action for the application service defined on the case type can add cases of this type.
· Notice that Valid Next Statuses are what restricts a case in this state to be transitioned to the Canceled and Assigned states.
· Notice that the Additional Processing plug-ins create and complete a ToDo entry when a case enters and exits this state, respectively.
Assigned Formal Appeal
The following is an example of the configuration of the Assigned status for formal appeal cases.
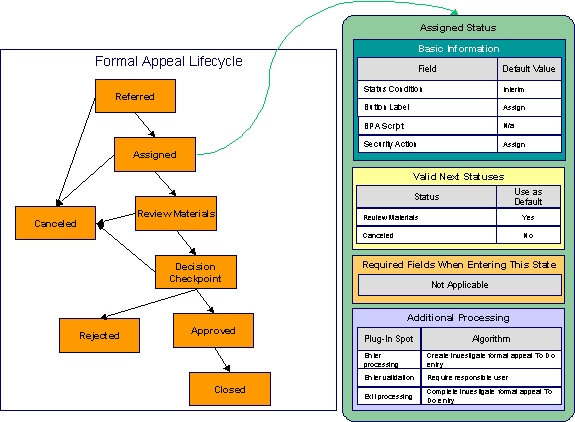
Note the following about this status:
· Assigned is an interim state (meaning that it's not an initial or final state).
· It has a button label of Assign. This is the label on the button that a user presses to move a case into this state. This button will only appear on cases that are in the Referred state as this is the only state that can transition into the Assigned state.
· We have decided not to specify a BPA script on this status. Rather, we're going to set up the ToDo type used to highlight cases in this state to automatically launch an appropriate BPA script when a user selects the ToDo entry.
· We have associated the Start Investigation action with this status. This means that only users with rights to this action for the application service defined on the case type can move a case into this state.
· Notice that Valid Next Statuses are what restricts a case in this state to be transitioned to the Review Materials and Rejected states.
· Notice that the Additional Processing plug-ins do the following:
· Create and complete a ToDo entry when a case enters and exits this state, respectively
· Require a responsible user before a case can enter this state
Review Materials Formal Appeal
The following is an example of the configuration of the Review Materials status for formal appeal cases.
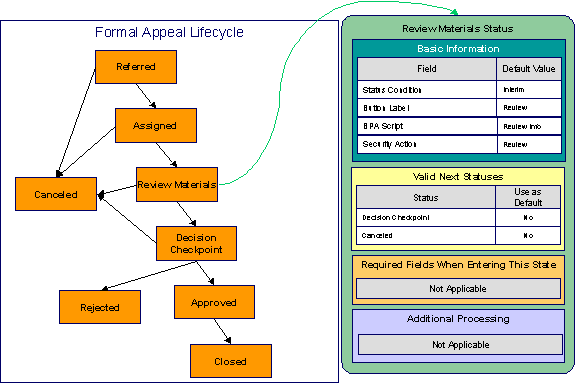
Note the following about this status:
· Review Materials is an interim state (meaning that it's not an initial or final state).
· It has a button label of Review. This is the label on the button that a user presses to move a case into this state. This button will only appear on cases that are in the Assigned state as this is the only state that can transition into the Review Materials state.
· We have decided to specify a BPA script on this status to help users find information about the property to help in reviewing the case.
· We have associated the Review action with this status. This means that only users with rights to this action for the application service defined on the case type can move a case into this state.
· Notice that Valid Next Statuses are what restricts a case in this state to be transitioned to the Decision Checkpoint and Canceled states.
Decision Checkpoint Formal Appeal
The following is an example of the configuration of the Decision Checkpoint status for formal appeal cases.
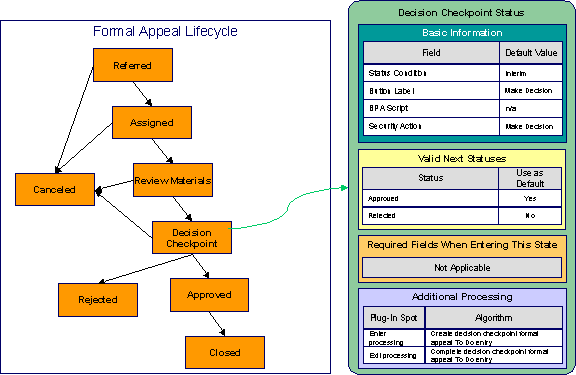
Note the following about this status:
· Decision Checkpoint is an interim state (meaning that it's not an initial or final state).
· It has a button label of Make Decision. This is the label on the button that a user presses to move a case into this state. This button will only appear on cases that are in the Review Materials state as this is the only state that can transition into the Decision Checkpoint state.
· We have decided not to specify a BPA script on this status. Rather, we're going to set up the ToDo type used to highlight cases in this state to automatically launch an appropriate BPA script when a user selects the ToDo entry.
· We have associated the Make Decision action with this status. This means that only users with rights to this action for the application service defined on the case type can move a case into this state.
· Notice that Valid Next Statuses are what restricts a case in this state to be transitioned to the Approved and Rejected states.
· Notice that the Additional Processing plug-ins create and complete a ToDo entry when a case enters and exits this state, respectively.
Approved Formal Appeal
The following is an example of the configuration of the Approved status for formal appeal cases.
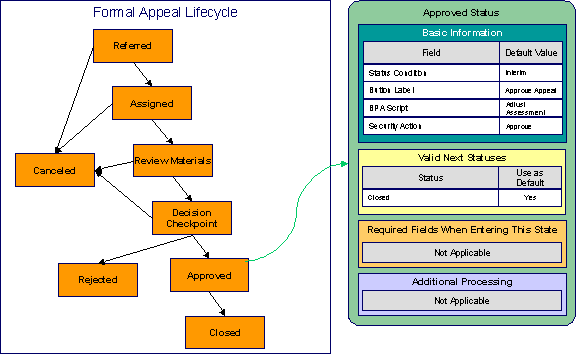
Note the following about this status:
· Approved is an interim state (meaning that it's not an initial or final state).
· It has a button label of Approve Appeal. This is the label on the button that a user presses to move a case into this state. This button will only appear on cases that are in the Decision Checkpoint state as this is the only state that can transition into the Approved state.
· We have referenced a BPA script that can assist a user in the steps required to adjust an assessment.
· We have associated the Approve action with this status. This means that only users with rights to this action for the application service defined on the case type can move a case into this state.
· Notice that Valid Next Statuses are what restricts a case in this state to be transitioned to the Closed and Rejected states.
Closed Formal Appeal
The following is an example of the configuration of the Closed status for formal appeal cases.

Note the following about this status:
· Closed is a final state (meaning that no further action is necessary).
· It has a button label of Close. This is the label on the button that a user presses to move a case into this state. This button will only appear on cases that are in the Approved state as this is the only state that can transition into the Closed state.
· We have not referenced a BPA script because this is a final state (and no additional user action is necessary).
· We have associated the Close action with this status. This means that only users with rights to this action for the application service defined on the case type can move a case into this state.
· Notice that there are no Valid Next Statuses (because this is a final state). If you wanted to allow a Closed case to be reopened, you would need to define the state into which a Closed case could be transitioned.
· Notice that the Assessment Change must be specified on the case before it can be moved into this state. This would be the difference to the taxpayer's balance after the assessment adjustment took place.
Rejected Formal Appeal
The following is an example of the configuration of the Rejected status for formal appeal cases.
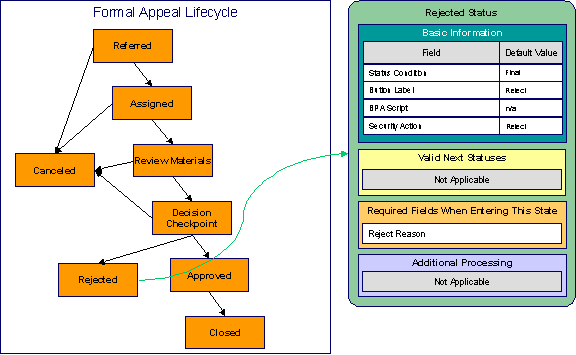
Note the following about this status:
· Rejected is a final state (meaning that no further action is necessary).
· It has a button label of Reject. This is the label on the button that a user presses to move a case into this state. This button will appear on cases that are in the Decision Checkpoint state.
· We have not referenced a BPA script because this is a final state (and no additional user action is necessary).
· We have associated the Reject action with this status. This means that only users with rights to this action for the application service defined on the case type can move a case into this state.
· Notice that there are no Valid Next Statuses (because this is a final state). If you wanted to allow a Rejected case to be reopened, you would need to define the state into which a Rejected case could be transitioned.
· Notice that a Reject Reason must be specified on the case before it can be moved into this state.
Canceled Formal Appeal
The following is an example of the configuration of the Canceled status for formal appeal cases.
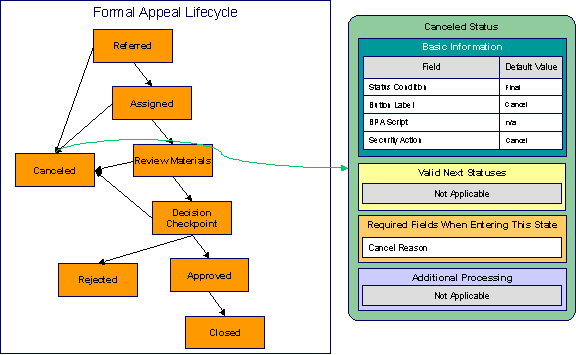
Note the following about this status:
· Canceled is a final state (meaning that no further action is necessary).
· It has a button label of Cancel. This is the label on the button that a user presses to move a case into this state. This button will appear on cases that are in the Referred, Assigned, Review Materials and Decision Checkpoint states.
· We have not referenced a BPA script because this is a final state (and no additional user action is necessary).
· We have associated the Cancel action with this status. This means that only users with rights to this action for the application service defined on the case type can move a case into this state.
· Notice that there are no Valid Next Statuses (because this is a final state). If you wanted to allow a Canceled case to be reopened, you would need to define the state into which a Canceled case could be transitioned.
· Notice that a Cancel Reason must be specified on the case before it can be moved into this state.
The topics in this section describe how to set up the system to enable case management.
Warning! The following topics assume you thoroughly understand the concepts described under The Big Picture Of Cases.
Contents
Setting Up Application Services
Setting Up Characteristic Types
Installation Options
Contents
Case Info May Be Formatted By An Algorithm
Alert Info Is Controlled By An Installation Algorithm
Case Info May Be Formatted By An Algorithm
An algorithm may be plugged in on the installation record to format the standard case information that appears throughout the system. Refer to CSIN-DFLT for an example of this algorithm.
This algorithm may be further overridden by a "Case information" plug-in on the Case Type. Refer to C1-CT-INFO for an example of this algorithm.
Alert Info Is Controlled By An Installation Algorithm
An algorithm that is plugged in on the installation record is responsible for formatting the alerts that highlight if the person / account / location in context has open cases. Refer to CCAL-CASE for an example of this algorithm.
Setting Up Application Services
As described under Access Rights, you can prevent unauthorized users from accessing cases. The following points describe how to implement this type of security:
· Create an application service for each case type that needs to be secured
· Create an action on the application service for each status you need to secure
· Link the valid user groups to the application service and define which actions they can perform
· Define the application service on the case type
· Define the related action for each status on the case type / status
Setting Up Scripts
As described under Scripts and Cases, BPA scripts can facilitate the creation and working of cases. Refer to the Defining Script Options for instructions describing how to set up scripts.
Setting Up ToDo Types
As described under ToDo's and Cases, ToDo entries can be used to highlight cases that require user attention.
The following points provide a high-level description of how to create (and complete) ToDo entries for a case type:
· Create a ToDo type for each different type of ToDo entry used during a case's lifecycle
· On the ToDo type, think carefully about the roles whose users can work on the entries
· Also consider if you would like a BPA script launched when a user selects the entry
· Specify the ToDo type on the appropriate entry processing or exit processing algorithm
· If you want the system to automatically complete ToDo entries, specify the ToDo type on the appropriate entry processing or exit processing algorithm
Please be aware that the case maintenance transaction highlights the number of open and being worked ToDo entries linked to the case being displayed on the page. However, the system can only do this if the ToDo entries reference a foreign-key characteristic whose foreign key references the case table. If you use the CSEN-TD algorithm to create ToDo entries when a case enters a given state, this algorithm will do this for you if:
· You have set up a foreign-key characteristic type whose foreign key references the case table
· In addition, the characteristic type must reference a characteristic entity of ToDo Entry
Setting Up Characteristic Types
As described under Additional Information, some of your cases may require additional information (in the form of characteristics). If this is true, you must set up the characteristic types before setting up the case types.
Refer to Setting Up ToDo Types for instructions regarding a characteristic type that must be set up in order for the system to know the ToDo entries that are associated with a case.
If you use the CSEN-CC algorithm to create customer contacts when a case enters a given state, you should set up a foreign-key characteristic type as follows:
· Its foreign key must reference the case table
· In addition, the characteristic type must reference a characteristic entity of Customer Contact
Setting Up Case Types
The case type maintenance transaction is used to maintain your case types. The topics in this section describe how to use this transaction.
Refer to The Big Picture Of Cases for more information about how a case type encapsulates the business rules that govern a case.
Contents
Case Type - Case Characteristics
Case Type - Main
Use this page to define basic information about a case type.
Open the case type page by selecting Case Type from the admin menu.
Recommendation. Before using this transaction, we strongly recommend that you review the Examples of Case Types.
Main Information
Enter a unique Case Type code and Description for the case type.
Use Long Description to provide a more detailed explanation of the purpose of the case type.
Person Usage controls the applicability of a person on cases of this type. Select Required if a person must be defined on this type of case. Select Optional if a person can optionally be defined on this type of case. Select Not Allowed if a person is not allowed on this type of case.
Account Usage controls the applicability of an account on cases of this type. Select Required if an account must be defined on this type of case. Select Optional if an account can optionally be defined on this type of case. Select Not Allowed if an account is not allowed on this type of case.
Location Usage controls the applicability of a location on cases of this type. Select Required if a location must be defined on this type of case. Select Optional if a location can optionally be defined on this type of case. Select Not Allowed if a location is not allowed on this type of case.
If you need to restrict access to cases of this type to specific user groups, reference the appropriate Application Service. Refer to Setting Up Application Services for the details of how to secure access to your cases.
If you are configuring a case type to handle the processing of data defined via a Business Object, associating the case type with a business object serves to link the properties of the business object (e.g. BO options) with cases of that type. Refer to Business Objects for further information. In addition, refer to Automatic Transition Rules for information on the role of BO options in case auto-transition errors.
Responsible User Usage controls the applicability of a responsible user on cases of this type. Select Required if a responsible user must be defined on this type of case. Select Optional if a responsible user can optionally be defined on this type of case. Select Not Allowed if a responsible user is not allowed on this type of case. Refer to Responsible User Applicability for more information.
Contact Information Fields
There are three contact information fields: Contact Person & Method Usage, Contact Instructions Usage, and Callback Phone Usage. These fields are used to determine whether or not each type of contact information must be entered on case records with this case type. Select Required if the contact information must be entered, select Optional if the user can choose whether or not to include the contact information on this type of case, or select Not Allowed if the contact information cannot be entered on this type of case.
Algorithms
The Algorithms grid contains algorithms that control functions for cases of this type. You must define the following for each algorithm:
· Specify the System Event with which the algorithm is associated (see the table that follows for a description of all possible events).
· Specify the Sequence Number and Algorithm for each system event. You can set the Sequence Number to 10 unless you have a System Event that has multiple Algorithms. In this case, you need to tell the system the Sequence in which they should execute.
The following table describes each System Event.
|
System Event |
Optional / Required |
Description |
|
Case Information |
Optional |
We use the term “Case information” to describe the basic information that appears throughout the system to describe a case. The data that appears in “case information” is constructed using this algorithm. Plug an algorithm into this spot to override the "Case information" algorithm on installation options or the system default “Case information” if no such algorithm is defined on installation options. Click here to see the algorithm types available for this system event. |
Case Type Tree
The tree summarizes the case type's lifecycle. You can use the hyperlinks to transfer you to the Lifecycle tab with the corresponding status displayed.
Case Type - Case Characteristics
To define characteristics that can be defined for cases of this type, open Admin Menu, Case Type and navigate to the Case Characteristics tab.
Description of Page
Use Sequence to control the order in which characteristics are defaulted. Turn on the Required switch if the Characteristic Type must be defined on cases of this type. Turn on the Default switch to default the Characteristic Type when cases of this type are created. Enter a Characteristic Value to use as the default for a given Characteristic Type when the Default box is checked. Refer to Required Fields Before A Case Enters A State for a description of how you can make option characteristics required at later stages in a case's lifecycle.
Case Type - Lifecycle
Case types that involve multiple users and multiple potential outcomes have complex lifecycles. Before you can design a case type's lifecycle, it's important that you thoroughly understand the concepts described under Lifecycle and Status-Specific Business Rules. After thoroughly understanding these concepts, we recommend you perform the following design steps:
· Draw a "state transition diagram" as illustrated above under Lifecycle. Keep in mind that if your state transition diagram is complex, your cases will be complex. While some cases warrant complexity, you should always ask yourself if there aren't better ways to achieve the desired results if your first effort results in complexity.
· Determine which characteristics (if any) are required during each stage of a case's lifecycle
· Determine when ToDo entries (if any) should be created (and completed) during a case's lifecycle
· Determine additional validation (if any) that should be executed before a case enters and exits each state
· Determine additional processing (if any) that should transpire when a case enters or exits each state
· Determine if scripts are warranted to help users work the cases and, if so, design the scripts for each applicable state
When the above tasks are complete, you will be ready to set up a case type's lifecycle.
Open the Lifecycle page by selecting Case Type from the admin menu then the Lifecycle tab.
Note. You can navigate to a status by clicking on the respective node in the tree on the Main tab. You can also use the hyperlinks in the Next Statuses grid to display a specific status in the accordion.
Main Information
The Status accordion contains an entry for every status in the case type's lifecycle.
Use Status to define the unique identifier of the status. This is NOT the status's description, it is simply the unique identifier used by the system.
Use Description to define the label that appears on the lifecycle accordion as well as the status displayed on the case.
Use Script to reference a BPA script that can assist a user work on a case while it's in this status. Refer to A Script That Helps A User Work Through A Case for the details.
Use Access Mode to define the action associated with this status. This field is disabled if an application service is not specified on the Main page. Refer to Access Rights for the details of how to use this field to restrict which users can transition a case into this state.
Use Batch to specify a batch control that will auto-transition the case. Any case in a status configured with a batch control will be transitioned when the batch job runs (rather than when CASETRAN is executed). For this purpose, batch process C1-CSTRS (Case Scheduled Transition) is supplied with base package, which will execute all Exit Status logic for the current status, and Enter Status logic for the destination status. You may choose to create a batch process with your own transition logic.
Note. If you wish to defer transitioning a case in a particular status until the batch process on your case type status is executed, you should not populate an Auto-Transition algorithm on that status. Otherwise, CASETRAN will transition the case according to your Auto-Transition logic.
Use Comment to describe the status. This is for your internal documentation requirements.
Use Sequence to define the relative order of this status in the tree on the Main page.
Use Status Condition to define if this status is an Initial, Interim or Final state. Refer to One Initial State and Multiple Final States for more information about how this field is used.
Use Transitory State to indicate whether a case should ever exist in this state. Only Initial or Interim states can have a transitory state value of No.
The Alert Flag is used to indicate whether or not an alert should be displayed for taxpayers with cases in the state. (The alert is shown via the base package Installation – Alert algorithm.)
Algorithms
The Algorithms grid contains algorithms that control important functions for cases of this type. You must define the following for each algorithm:
· Specify the System Event with which the algorithm is associated (see the table that follows for a description of all possible events).
· Specify the Sequence Number and Algorithm for each system event. You can set the Sequence Number to 10 unless you have a System Event that has multiple Algorithms. In this case, you need to tell the system the Sequence in which they should execute.
The following table describes each System Event (note, all system event's are optional and you can define an unlimited number of algorithms for each event).
|
System Event |
Description |
|
Auto Transition |
This algorithm is executed to determine if a case that's in this state should be transitioned into another state. Refer to Automatic Transition Rules for the details. Click here to see the algorithm types available for this system event. |
|
Enter Processing |
This algorithm holds additional processing that is executed when a case is transitioned into this state. You can also specify state transition logic within Enter Processing routines. Refer to Additional Processing When Entering A State for the details. Click here to see the algorithm types available for this system event. |
|
Enter Validation |
This algorithm holds validation logic that executes before a case can enter a given state. Refer to Validation Before A Case Enters A State for the details. Click here to see the algorithm types available for this system event. |
|
Exit Processing |
This algorithm holds additional processing that is executed when a case is transitioned out of this state. Refer to Additional Processing When Exiting A State for the details. Click here to see the algorithm types available for this system event. |
|
Exit Validation |
This algorithm holds validation logic that executes before a case can by transitioned out of a given state. Refer to Validation Before A Case Exits A State for the details. Click here to see the algorithm types available for this system event. |
|
Script Launching |
This algorithm sets the script launching option for the script associated with a given state, if any. Refer to Script Launching Option for the details. Click here to see the algorithm types available for this system event. |
Next Statuses
Use the Next Statuses grid to define the statuses a user can transition a case into while it's in this state. Refer to Valid States versus State Transition Rules for more information. Please note the following about this grid:
· Use Action Label to indicate the verbiage to display on the action button used to transition to this status.
· Sequence controls the order of the buttons that appear on Case - Main. Refer to Buttons Are Used To Transition A Case Into A State for more information.
· Use as Default controls which button (if any) is the default button.
· Transition Condition may be configured to identify a common transition path for cases of this type in the current state. This transition condition may then be referenced across multiple case types. You’ll need to add values to Look Up table field TR_COND_FLG that fit the typical transitions for your case types (e.g. Ok, Error, etc.).
By assigning the transition condition value to a given “next status”, you can design your Enter State transition or Auto-Transition logic to utilize those flag values without specifying a status particular to a given case type. Thus, similar logic may be used across a range of case types to transition a case into, for example, the next Ok state for the case’s current status.
· Transition Role controls whether only the System or both System and User have the ability to transition a case into a given “next status”.
· You can use the status description hyperlink to open the Status accordion to the respective status.
· When you initially set up a case type, none of the statuses will reside on the database and therefore you can't use the search to define a "next status". We recommend working as follows to facilitate the definition of this information:
· Leave the Next Statuses grid blank when you initially define a case type's statuses
· After all statuses have been saved on the database, update each status to define its Next Statuses (this way, you can use the search to select the status).
Required Characteristics
Use the Required Characteristics grid to define characteristics that are required when a case enters this state. Only Optional characteristics defined on the main page appear in this grid. Refer to Required Fields Before A Case Enters A State for more information.