Taxpayer Information
We use the term taxpayer information to reference the demographic, geographic, and financial objects that form the core of your system. In this section, we describe how to maintain these objects.
Contents
Understanding the Account Model
Navigating The Account Model Using Control Central
Additional Location Management Tools
The Big Picture Of Customer Contacts
The “Account Model” consists of four objects that form the core of the system: Person, Account, Location, and Obligation. These objects hold demographic, geographic, and financial information about your taxpayers.
You must intuitively understand the concepts embodied in the ”Account Model” before you can perform the business processes in the system. In this section, we provide an overview of these objects. In later sections, we describe how you maintain this information.
Contents
Sample Account Model For An Individual Taxpayer
How To Set Up Taxpayer Hierarchies
Persons
A person exists for every individual or business with which your company has contact. Besides taxpayers, persons exist for contractors, accountants at corporate taxpayers, third party guarantors, collection agencies, etc.
On a person is maintained demographic information like Name, Mailing Address, Phone Numbers, Email Address, etc.
Most persons are linked to at least one account because, without an account, the person cannot have financial interactions with the tax authority.
Refer to Maintaining Persons for more information about persons.
Accounts
Accounts are the entities for which financial interactions happen. These can include, returns, bills, and payments. You must create at least one account for every taxpayer. The account contains information that controls how returns, bills, and payments are created and handled.
Every account must reference at least one person because the person contains the taxpayer's demographic information (e.g., names, phone numbers, forms of ID). We refer to this individual as the “main” person linked to the account. In addition to the “main” person, an account may reference other types of persons, e.g., the billing contact, power of attorney, accountant, etc.
Most accounts are linked to at least one tax role because the tax role captures information related to a specific tax type that is applicable to the account.
Most accounts are linked to at least one obligation because, without an obligation, there is no ability to assess a taxpayer. An account without an obligation may exist; you just won't be able to do much in the system with such an account.
Refer to Maintaining Accounts for more information about accounts.
Tax Roles
Tax Roles represent the ongoing obligations of a given tax type within an account at a given point in time. It may be also be thought of as the reason a taxpayer must interact with the tax authority, or one of the taxpayer’s relationships with the tax authority.
Tax roles include the dates that the tax is effective. If you consider a business, some tax types are required for the entire time a company is in business, such as corporate income tax. Other tax types may only be in effect if the company is engaging in certain activities, which may change over time.
The tax role often governs the filing calendar that dictates the filing periods for which the taxpayer is obliged to file. For every filing period that the taxpayer is expected to file a return for this tax type, an appropriate obligation must be defined for this account and tax role.
Refer to Maintaining Tax Roles for more information.
Obligations
Think of an obligation as a contract between the tax authority and the taxpayer. For example, a corporate entity has certain contractual responsibilities between themselves and the tax authority. These responsibilities are tracked through the obligation. Some tax authorities refer to an obligation as a filing period or tax period. Every account should have at least one obligation (otherwise, the account has no financial obligations with your tax authority). There is no limit to the number of obligations that may be linked to an account.
Every tax role should have at least one obligation. Note that obligations are not required to have a tax role. Configuration on the obligation type's tax type controls whether a tax role is required.
Refer to Maintaining Obligations for more information.
Locations
A location is created for every real property location. On a location is maintained geographic information like:
· The address.
· Characteristics that determine tax jurisdictions.
· Descriptions of unusual situations associated with a property.
· The list goes on…
Refer to Maintaining Locations for more information about locations.
Putting It All Together
When a new taxpayer registers, you create both person and account objects for the new taxpayer.
A business with a single location uses the same “Account Model” objects as an individual income taxpayer. If the business expands and opens at new locations, you simply link new obligations to the existing account. You don't have to redefine person or account information.
A person and an account are needed for every taxpayer.
Sample Account Model For An Individual Taxpayer
The following illustration shows a simple residential taxpayer's “account model” objects.
How To Set Up Taxpayer Hierarchies
Consider the following taxpayer hierarchy:
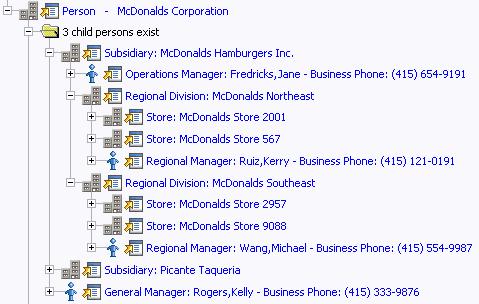
The above hierarchy shows a parent company (McDonalds Corporation) with two subsidiaries and one general manager. Each subsidiary, in turn, has subsidiaries and these subsidiaries can have their own subsidiaries …
You must set up a person for every individual and business in a hierarchy. After the basic demographic information is defined, you define each person's children using the Person to Person page.
A script can be used to set up a hierarchy. The demonstration database contains a script that guides users through the process of setting up a hierarchy. Please speak to your implementation staff if you'd like to import this script for use in your implementation.
After a hierarchy is set up, the system displays its members in the Person Tree Zone (this is a zone on the Taxpayer Information Portal). In addition, if the persons in a hierarchy have accounts, summary information about these accounts is displayed in the Account Summary Zone.
While hierarchies would typically be set up to define parent companies and subsidiaries, you can use this functionality for many other purposes. For example, a taxpayer relationship manager could set up a hierarchy containing their "important" taxpayers. To do this, they'd need to create a "dummy" person for the parent and then link the "important" taxpayers to it. After this hierarchy is set up, the manager could see a summary of these taxpayers in the Account Summary Zone whenever they display the "dummy" person.
Control Central is the name given to the functionality that helps you:
· Find a person.
· Find an account.
· Find a location.
· View information about a person / account / location.
· View alerts and messages about a person / account / location.
· Navigate to pages that contain information related to a person / account / location.
Contents
Control Central - Account Information
Control Central - Taxpayer Information
Control Central - Account Tree
Control Central - Location Tree
Control Central - Bill/Payment Tree
How To Add A New Taxpayer From Control Central
Control Central - Main
Open Control Central, Main to find a taxpayer and/or a location.
Automatic transfer to Account Information tab. You are automatically transferred to Control Central - Account Information when an account / location is selected on this page.
The contents of this section describe how to use this page.
Search Facilities
The top of Control Central is where you enter the criteria used to find a person, account or location.
Multiple search criteria. You can search for a taxpayer using a combination of Name, Address, City, and Postal Code. When multiple fields are populated, the system searches for taxpayers that match all such criteria. For example, if you enter a Name of Smith, and a Postal code of 94114; only taxpayers named Smith with service in postal area 94114 will be displayed.
The following table describes each of the different search methods.
|
Search Method |
Description |
|
Name |
Use this field to search for a person or account using a person's name. The person may be the main taxpayer on the account or a third party related to the account. You can enter all or part of the person's name. The name search is not case sensitive. If you need to add a new taxpayer, use either of the following options: - Click the + button. Clicking this button opens the Person - Main page where you can add a new person. Refer to How To Add A New Taxpayer From Control Central for more information about how to add a new taxpayer (i.e., Person and Account) from this page. |
|
Address |
Use this field to search for a location or account using the first line of a service address. You can enter all or part of the first line of the address. For example, if you're looking for 324 Hawthorne Lane, you can enter 324 Haw rather than the entire address. The address search is not case sensitive. |
|
City |
Use this field to search for a location or account using a city name associated with a service address. You can enter all or part of the city name. For example, if you're looking for someone in San Francisco; you can enter San Fra, San F, San Francisco, etc. The city search is not case sensitive. We strongly recommend qualifying a City search with some other information (e.g., Name) otherwise the resultant list can be too large to deal with. |
|
Postal |
Use this field to search for a location or account using a postal code associated with a service address. You can enter all or part of the postal code. For example, if you're looking for someone in 94114; you can enter “94114”, “9411”, etc. We strongly recommend qualifying a Postal search with some other information (e.g., Name) otherwise the resultant list will be too large to deal with. |
|
Account ID |
Use this field to search for an account using an account number. After entering this information, click the search button adjacent to the Account ID entry field (or press Enter) to search for an account. The Account ID cannot be combined with other search fields. You can enter all or part of the account ID. For example, if you're looking for account 1929119291; you can enter “1929119291”, “192911”, etc. If you need to add a new account for an existing person, click the + button. Clicking this button opens the Account - Main page on which a new account can be added. |
|
Phone Format/Number |
Use this field to search for an account using one of the telephone numbers linked to one of the persons linked to the account. The person may be the main taxpayer on the account or a third party related to the account. You may enter the phone number in the format indicated or you can enter the information as a contiguous string of numbers and the system will format this for you. Wild card searches are not supported. However, you can enter the first few digits of the phone number and the system will look for all accounts with these digits. After entering this information, click the search button (or press Enter) to search for an account linked to a person with this telephone number. The system displays every account with the input telephone number in the search results. |
|
Person ID Type/Value |
Use these fields to search for a person or account using one of the ID's linked to one of the persons linked to the account. You must enter both an identifier type and number. You may enter the person's ID in the format dictated by the identifier type (if any). Please note that if the ID Number should be formatted (e.g., dashes in an American social security number), you do not have to enter the dashes. Rather, you can enter the information as a contiguous value and the system will format this for you. Wild card searches are not supported. However, you can enter the first few digits of the ID number and the system will look for all persons and accounts with these digits. After entering this information, click the search button (or press Enter) to search for a person / account linked to a person with this ID. The system displays every person with the input ID in the search results. |
|
Geo ID Type/Value |
Use these fields to search for a location using one of the geographic values linked to the location. You must enter both a geographic type and value. Wild card searches are not supported. However, you can enter the first few digits of the geographic value and the system will look for all locations with these digits. After entering this information, click the search button (or press Enter) to search for a location with this ID. The system displays every location with the input ID in the search results. |
Automatic transfer to Account Information tab. If your search criteria result in a single taxpayer being retrieved, you are automatically transferred to Control Central - Account Information with that taxpayer's information displayed.
Search Options
The Show All Locations search option controls whether you see all of an account's locations in the search results. If turned on, every location linked to an account is shown in the search results. If turned off, only one location is shown per account (and this location is selected at random).
This switch pertains to the following search methods:
· Search by name (and all address constituents are left blank)
· Search account ID
· Search by person phone number
· Search by person identifier
This switch does NOT pertain to the following search methods as these are location-oriented, not account-oriented:
· Search by name when any address constituent is entered
· Search by address constituent (when name is blank)
· Search by geographic identifier
The benefit of turning this switch off is that an account will be immediately selected when you enter unique account-oriented search criteria. For example, if you specify an Account ID and press enter, the system automatically selects the account; you don't have to wait for the search results to be populated with the multitude of locations linked to the account (and then select one of the rows). Please note, an alert highlights if the selected account has other locations.
Default note. The first time you open this page, this switch defaults from your user preferences. When you return to this page, the last value of this switch is defaulted.
Wild Cards
The control central searches against Name, Address, and City support wild cards. The wild card character is % and represents any number or character. The system always appends a % for you when you use these search methods. Examples will help clarify this functionality:
· If you enter a B, the system searches for B% (and will find all objects that begin with B).
· If you enter B%N, the system searches for B%N%. It will find anything that
· Starts with a B, and
· has zero or more other characters followed by an N.
· If you enter %B the system searches for %B%. It will find anything with a B in it, no matter what it starts and ends with.
Certain wildcard searches can result in lengthy response times. If you use the wildcard character to prefix your search criteria (e.g., %San Fran), lengthy response times can result. Why? Because the system will have to look at EVERY taxpayer in the system before it can return the results.
Search Results
The search results at the bottom of the page contain persons, accounts, and locations that match your search criteria. The information displayed in this area differs depending on the type of search you perform.
The first X matches are returned. The number of taxpayers that are returned is limited by the system's memory buffers. If you do not find the account you are looking for in the set of results, refine your search criteria.
Automatic selection if only one match. You don't have to select the desired person / account / location if there is one and only one object that matches your search criteria; the system automatically selects it and transfers you to Control Central - Account Information.
Use Tab and Enter to select an account. You don't have to use the mouse to select an account when multiple matches are returned. Instead, the system highlights the first row in the search results. If this is the taxpayer you want, press enter to select it. If not, press tab until you've highlighted the desired taxpayer (and then press enter to select it).
Use next and previous buttons to step through a list of taxpayers. When you select an account from the search results, you are automatically transferred to Control Central - Account Information. If you want to look at a different account that appeared in the search results, you do NOT have to return to the Main tab. Rather, you can click the next in list and previous in list buttons to scroll up and down through the search results (note that there are accelerator keys for each of these buttons so you don't have to use the mouse to take advantage of this feature).
Control Central - Account Information
Once Control Central - Main has populated an account, you are brought to this page to see an overview of the account.
Global context. Selecting an account on control central causes the global context information to be refreshed. Various zones available on this page use the value in the global context to display relevant data for the appropriate account, person and location.
User configurable. Refer to Each User Can Customize Which Zones Appear for information about how to configure which zones appear. The image of the page below contains a limited number of the possible zones.
Description of Page
Navigation hint. The Go To Control Central option on the account context menu navigates to this tab page.
A mouse with a roller is useful. This page can extend vertically past the normal desktop boundary. You will find that a mouse with a “roller” will facilitate navigating through the page.
The contents of this section describe the zones that are available on this portal page.
Contents
Account Financial History Zone
Account Activity History Zone
The Account Activity History Zone is a grid that summarizes a variety of account-related events (in reverse chronological order). Pushing the button adjacent to the information transfers you to an appropriate page. The following table lists the type of information that may appear in this zone and the page to which you will be transferred if you push the adjacent button.
|
Activity Label |
What Is Displayed |
Drill Down Transfers You To |
|
Overdue Event. One row is displayed for every Pending overdue event linked to the account. |
The overdue event's standard information string (this is dynamic as it's constructed by an algorithm) |
Overdue Process - Events |
|
Overdue Process. One row is displayed for every Inactive overdue process linked to the account. Inactive processes are displayed (as opposed to active) because active overdue processes have pending events and pending events are shown separately. |
The overdue process's standard information string (this is dynamic as it's constructed by an algorithm) |
Overdue Process - Main |
|
Customer Contact. One row is displayed for every customer contact associated with the main taxpayer linked to the account. |
The main name of the person associated with the customer contact, the customer contact's class and type, and the customer contact's date |
Customer Contact - Main |
|
Compliance Rating History. One row is displayed for every compliance rating transaction that affects the account's compliance rating |
The effect on the account's compliance rating, the end date, creation date and the process that created the transaction. |
Account - Collections |
|
Case. One row is displayed for every case associated with the account. |
The case's standard information. |
Case - Main |
Warning! The first 25 rows are displayed when this zone is initially built. If more rows exist, a Get All button appears. If you click this button, the system retrieves a maximum of 750 rows.
Account Financial History Zone
The Account Financial History Zone lists an account's financial events in reverse chronological order. You can use this grid to both view high-level information about these events and to transfer to the respective page in which an object is maintained.
Approximately a year and half is shown. This zone shows all financial transactions within 20 months of the latest financial transaction. This limitation exists to prevent this zone from becoming unmanageably long.
The following columns are displayed in the grid:
Effective Date This is the date the event starts aging. This column will be blank if the FT has not started aging yet.
Financial Transaction Type This column indicates the type of financial event: Bill, Payment, Bill Cancellation, Pay Cancellation, Adjustment and Adjustment (Cancel). If the event is related to an adjustment, the adjustment type's description is displayed instead of “Adjustment”.
Current Amount This column shows the financial event's effect on the account's current balance.
Current Balance This column shows the account's current balance after the financial event.
Payoff Amount This column shows the financial event's effect on the account's payoff balance. Payoff Amount will be dimmed if it is the same as its Current Amount.
Payoff Balance This column shows the account’s payoff balance after the financial event. Payoff Balance will be dimmed if it is the same as its Current Balance.
If you need to see more information about a specific financial transaction, press the go to button to transfer to the respective page in which the information is maintained.
For information about current and payoff balance, refer to Current Amount versus Payoff Amount.
Warning! The first 25 rows are displayed when this zone is initially built. If more rows exist, a Get All button appears. If you click this button, the system retrieves a maximum of 750 rows.
Alert Zone
The Alert Zone is a grid that contains messages highlighting a variety of situations. Clicking on the hyperlink transfers you to an appropriate page. The following table lists the various alerts that may appear and the page to which you will be transferred if click on the hyperlink. The table lists the alerts in alphabetical order, but it includes a column indicating the order in which the alert will appear.
You can create additional alert conditions. The following table contains those alerts supported in the base package. It is possible to highlight additional conditions by plugging-in the appropriate algorithm(s) on the installation record. Refer to Count Customer Contacts of a Given Type and Count Pay Plans with a Given Status for examples of such algorithms.
Account alerts are implementation-specific. On Account - Alerts, a user can define account-specific alerts that should be displayed whenever the account is selected. The Alert Types control table contains the possible alert messages.
|
Alert Text |
Order |
Description |
Drill Down Transfers You To |
|
Account alerts |
4 |
Appears for each user-defined alert associated with an account. |
Account - Alert |
|
Account has Multiple Locations |
12 |
Appears when the account has Obligations that are linked to different locations |
Control Central - Account Tree |
|
Auto-Pay Active: auto pay method description |
13 |
Appears when the account has an automatic payment option effective on the current date. The auto pay method description (i.e. Direct Debit or Payment Advice) appears only if payment advice functionality is enabled. Refer to Payment Advices for more information on payment advice functionality. |
Account - Auto Pay |
|
Collection Referral Active |
5 |
Appears when the account has active collection agency referrals. |
Collection Agency Referral |
|
Comment Exists On Account |
3 |
Appears when a freeform comment has been entered for the account (on Account - Main) |
Account |
|
Compliance rating: NNNN |
6b |
Appears when the account's compliance rating falls below the compliance rating threshold on the installation table. Refer to How are compliance rating transactions created for information describing how a taxpayer's compliance rating is affected by various system and user events. |
Account - Collections |
|
Installation dynamic alerts |
16 |
You can install plug-in algorithms on the installation record that will create alerts (if given situations exist). Refer to Count Customer Contacts of a Given Type and Highlight Active Overdue Processes for examples of such algorithms |
Varies by plug-in |
|
Last Contact: days old - user name who added the contact |
1 |
Appears when the person has a customer contact. The "days old" presents how old the contact is (based on the contact's date). The word Today is shown if the last contact was on the current date. The word Yesterday is shown if the last contact was on the current date - 1 day. If neither is applicable, the number of days old is shown. |
Customer Contact |
|
Location has n Child Location (s) |
17 |
Appears when the location is defined as the parent location for one or more locations. Refer to Define Location Hierarchy for more information. |
Location Management |
|
Location is linked to Parent Location |
16 |
Appears when the location defines a parent location. Refer to Define Location Hierarchy for more information. |
Location |
|
Multiple Financially Resp |
14a |
Appears when the account has more than one financially responsible person linked to it |
Control Central - Account Tree |
|
Obligation type alert message |
7 |
Appears when the taxpayer has an obligation with an obligation type that has been marked with an alert message (refer to Obligation Type - Details) Note that if the account in control central has more than one obligation, pressing the drill down button will also launch the obligation search dialog. |
Obligation |
|
Obligation type description and status of a pay plan |
8 |
Appears for every pending start, pending stop, and active pay plan that is linked to the account. |
Pay Plan |
|
n Open Contact(s) for Person |
2 |
Appears if there are open customer contacts associated with the person. Refer to Customer Contacts Can Be Used As Case Files for more information. |
Customer Contact |
|
Person is linked to Multiple Accounts |
10 |
Appears when the person has multiple accounts. A person’s accounts are maintained on the Account - Person page. |
Control Central |
|
n Persons on Account |
14c |
Appears when the account has multiple persons linked to it. An account’s persons are maintained on the Account - Person page. |
Account - Person |
|
Reactivated Obligations Exist |
9 |
Appears when any of the account’s obligations exist in the state of reactivated (i.e., a financial transaction has been generated after the obligation was closed). |
Obligation |
|
Seasonal Address Exists |
15b |
Appears if the account has a seasonal address and there is no seasonal address active on the current date. |
Person - Correspondence Info |
|
Seasonal Address Currently Effective (MM/DD - MM/DD) |
15a |
Appears if the account has an active seasonal address that is effective on the current date. The date range that the seasonal address is effective is included in the alert. |
Person - Correspondence Info |
|
Third Party Guarantor |
14b |
Appears when the account has a third party guarantor. An account’s third party guarantors are maintained on the Account - Person page. |
Control Central - Account Tree |
Bill Graph Zone
The Bill Graph Zone illustrates the ending balance and new charges on each of the taxpayer’s historical bills.
Approximately a year and half is shown. This zone shows all bills within 20 months of the latest bill. This limitation exists to prevent this zone from becoming unmanageably wide.
For balance forward accounts, both ending balances and current charges are shown in the graph. For open-item accounts, only the current charges are shown in the graph.
The following points describe unique features of this zone:
· If you leave the mouse pointer stationary on a bar, summary information about the bill will be displayed.
· If you click on a bar, you will be transferred to the bill page with the respective bill displayed.
Context Zone
The Context Zone contains basic information about the Person / Account / Location on which you are working.
Person This part of the context area contains the person’s standard information. Note, this information is formatted by a plug-in algorithm on the installation record. Refer to the base package’s person information algorithm for an example. If you prefer different formatting logic, your system administrator should configure the system appropriately
Account ID This part of the context area contains the unique identifier of the account and the name of its main taxpayer.
Adjacent to the account ID appears a “check digit”. This is for information purposes only and is not needed to operate the system. Refer to the Description of Page section under Account - Main for a description of how “check digit” is calculated.
Below Account ID, the account’s Current Balance and Payoff Balance are displayed. Payoff Balance will be hidden when it’s the same as the Current Balance. Refer to Current Amountversus Payoff Amount for more information.
Location If the account has an obligation linked to a characteristic location, the location address is displayed. Note, the address information is formatted by a plug-in algorithm on the installation record. Refer to the base package’s location format algorithm for an example. If you prefer a different format, your system administrator should configure the system appropriately
Credit Allocation Detail Zone
The Credit Allocation Detail zone shows the results of dynamic credit allocation of an account or one of its obligations. It also allows a user to bring P&I up to date and to forecast P&I to the current date or in the future.
The default is to show the credit allocation detail for all obligations on the account that support dynamic credit allocation.
An obligation that supports dynamic credit allocation must reference a Determine Detailed Balance algorithm.
· Use the Obligation dropdown and click Display Allocation to restrict the information for a specific obligation.
· Use the Assessment dropdown and click Display Allocation to restrict the information for a specific assessment for the obligation. An option of No Assessment Grouping is shown in the assessment dropdown if there are any debit financial transactions that are not related to a specific assessment.
Click Forecast P&I to forecast P&I up to the Forecast Date for the display level selected. The date must be on or after the current date and is only applicable for the Forecast P&I button. The date is ignored and reset if the Display Allocation or Update P&I buttons are clicked.
Click Update P&I to bring P&I up to date to the current date for the selected level. The button is not available if the user has drilled down to an assessment because P&I is calculated for the whole obligation.
A message above the grid provides information about the data displayed in the grid. It indicates the Id of the level selected for display (account, obligation or assessment).
· If the data displayed is the allocation details or the result after updating P&I, the message indicates the "Calculated through" date; the last date that penalty and interest was calculated. If the display is for the account and the obligations have different Calculate Through dates, the message indicates this.
· If the data displayed is forecasted P&I, the message indicates the date to which the data was forecasted.
The grid displays the following rows:
· A row for each debt category for which the account / obligation has financial transaction posted.
· A row for Unapplied Credits displays if the overall balance is a credit
· A row for the Total displays with the total of each column
The grid displays the following columns:
· Amount Assessed indicates the original amount of each debt category. This is a sum of the amount of each financial transaction that qualifies for the row.
· Amount Collected indicates the total amount payments that have been allocated to one of the debt category rows.
· Amount Waived indicates the total amount of any waivers that have been applied to one of the debt category rows. This should only appear for a "penalty" or "interest" type of debt category.
· Amount Written Off indicates the total amount of any amount written off. Written off amounts are identified by looking at credit adjustments where the adjustment category indicates that it is a write off.
· Other Credit indicates the amount of any other type of credit that has been "applied" to this debt category.
· Total is a total for the amounts in the row.
All the amount fields are hypertext. Clicking on the amount fields will cause a list of all financial transactions that contribute to that amount to appear.
Compliance Information Zone
The Compliance Information Zone is a grid that contains a variety of compliance-oriented events. Pushing the button adjacent to the information transfers you to an appropriate page. The following table lists the type of information that may appear in this zone and the page to which you will be transferred if you push the adjacent button.
|
Activity Label |
What Is Displayed |
Drill Down Transfers You To |
|
Overdue Process. One row is displayed for every Active overdue process linked to the account. |
The overdue process’s standard information string (this is dynamic as it's constructed by an algorithm) |
Overdue Process - Main |
|
Pay Plan. One row is displayed for every Active pay plan linked to the account. |
The pay plan standard information string (this is dynamic as it's constructed by an algorithm) |
Pay Plan - Main |
Warning! The first 25 rows are displayed when this zone is initially built. If more rows exist, a Get All button appears. If you click this button, the system retrieves a maximum of 750 rows.
Taxpayer Information Zone
The Taxpayer Information Zone is a grid that contains information about the current person and account. Pushing the button adjacent to the information transfers you to an appropriate page. The following table lists the type of information that may appear in this zone and the page to which you will be transferred if you push the adjacent button.
Note. Rows are suppressed if the related data is blank for the person / account.
|
Label |
What Is Displayed |
Drill Down Transfers You To |
|
Account ID |
The account’s unique identifier (i.e., account ID) is displayed |
An account context menu has been provided (allowing you to drill to a variety of account-oriented pages) |
|
Primary Taxpayer |
The main taxpayer's name. Note, the person's name is formatted by a plug-in algorithm on the installation record. Refer to the base package's name format algorithm for an example. If you prefer different formatting logic, your system administrator should configure the system appropriately |
A person context menu has been provided (allowing you to drill to a variety of person-oriented pages) |
|
Set Up Date |
The account's setup date |
Account - Main |
|
Division |
The account's division |
Account - Main |
|
Account Type |
The account's account type |
Account - Main |
|
Bill Cycle |
The account's bill cycle |
Account - Main |
|
Current Compliance Rating |
The account's current compliance rating |
Account - Collections |
|
Next Compliance Review Date |
The next date on which the account's debt will be reviewed by the account debt monitor. |
Account - Collections |
|
A separate row is displayed for each characteristic linked to the account. Each row’s label is the characteristic type’s description. |
The characteristic’s value |
Account - Characteristic |
|
Auto Pay Source Code |
The account’s auto pay source |
Account - Auto Pay |
|
A separate row is displayed for each miscellaneous person linked to the account. Each row’s label is the person relationship type’s description. |
The main name of the miscellaneous person |
A person context menu has been provided (allowing you to drill to a variety of person-oriented pages) |
|
A separate row is displayed for each characteristic linked to the person. Each row’s label is the characteristic type’s description. |
The characteristic’s value |
Person - Characteristic |
|
A separate row is displayed for each telephone number linked to the person. Each row’s label is the phone type’s description. |
The telephone number |
Person - Main |
|
A separate row is displayed for each identifier linked to the person. Each row’s label is the ID type’s description. |
The person identifier value |
Person - Main |
|
Email Address |
The person’s email address |
Person - Miscellaneous |
Warning! This zone does not support data masking. If your implementation masks any of the information that appears on this zone, you must disable it and implement a zone that will mask your data appropriately. The demonstration system provides a sample zone that your implementation can import and then customize if necessary; this zone's code is CI_CIMAP. To disable the base package zone simply deny access to its associated application service. You should only grant access to your new Taxpayer Information zone.
Financial Information Zone
The Financial Information Zone is a grid that contains financial information related to the account. Clicking the hyperlink transfers you to the appropriate page. The following table lists the type of information that appears in this zone and the page to which you are transferred if you click the adjacent icon.
Note. Rows are suppressed if the related data is blank for the person / account.
|
Label |
What Is Displayed |
Drill Down Transfers You To |
|
Current Balance |
The account's current balance. |
Not applicable |
|
Payoff Balance |
The account's payoff balance. It will only be displayed if the amount differs from the current balance. |
Not applicable |
|
Last Bill |
The date and amount of the account’s last bill along with its due date. |
Bill - Main |
|
Last Payment |
The date and amount of the account’s last payment. |
Payment Event - Main |
|
Previous Bill |
The date and amount of the bill prior to the last bill for the account. |
Bill - Main |
|
Next Bill Date |
The next date on which a bill is scheduled to be produced for the account (based on the account’s bill cycle’s schedule) |
Not applicable |
|
Pending Bill Exists |
The date of the pending bill. This row only appears if there is a pending bill associated with the account |
Bill - Main |
|
Freezable Bill Segments |
If freezable bill segments exist, this row contains the number of segments and their total amount. |
Bill Segment - Main |
|
Incomplete Adjustments |
If incomplete adjustments exist, this row contains the number of adjustments and their total amount. |
Adjustment - Main |
|
Freezable Adjustments |
If freezable adjustments exist, this row contains the number of adjustments and their total amount. |
Adjustment - Main |
|
Payment(s) Pending Upload |
Appears when the account has a pending payment staging record (i.e., the account has an external payment that has not been uploaded into the system). To prevent payments from being created and frozen before the actual payment is received, external payments are not uploaded into the system until their accounting date is reached. Note that the amount displayed represents the amount tendered for the account, but does not reflect how the payment may be distributed (i.e., the payment may be distributed to other accounts). For information about payment staging records, refer to Interfacing Payments from External Sources. |
Payment Upload Staging |
|
Incomplete Payment(s) |
Appears when the account has payments that are incomplete. This row contains the number of payments and their total amount. Note, incomplete automatic payments that are pending distribution are not included in this alert as they are highlighted on the Auto Pay will be distributed on described below. |
Payment - Main |
|
Payment(s) with Errors |
Appears when the account has payments that are in error. This row contains the number of payments and their total amount. |
Payment - Main |
|
Freezable Payments) |
If freezable payments, this row contains the number of payments and their total amount. |
Payment Event - Main |
|
Auto Pay will be created on |
This row shows the date that the next auto pay will be created. This alert will appear after a bill is completed for an account on auto pay. Refer to How And When Are Automatic Payments Created? for more information. |
Bill - Main |
|
Auto Pay will be distributed on |
This row shows the date that the next auto pay will be distributed. This alert will appear after a bill is completed for an account on auto pay and the automatic payment has been created/extracted. Refer to How And When Are Automatic Payments Created? for more information. |
Payment Event - Main |
Location Information Zone
The Location Information Zone is a grid that contains information about the current location. Pushing the button adjacent to the information transfers you to an appropriate page. The following table lists the type of information that may appear in this zone and the page to which you will be transferred if you push the adjacent button.
Note. Rows are suppressed if the related data is blank for the location.
|
Label |
What Is Displayed |
Drill Down Transfers You To |
|
Location Information |
The location’s address. Note, the address information is formatted by a plug-in algorithm on the installation record. Refer to the base package’s location format algorithm for an example. If you prefer a different format, your system administrator should configure the system appropriately |
A location context menu has been provided (allowing you to drill to a variety of location-oriented pages) |
|
Division |
The location’s division |
Location - Main |
|
A separate row is displayed for each characteristic linked to the location. The label in each row is the respective characteristic type’s description. |
The characteristic’s value |
Location - Characteristic |
Timeline Zone - Account Info
Timeline zones show when significant events have occurred in the past and when significant events will occur in the future. For example, a timeline can show when payments and bills have been received for a taxpayer. The following is an example of a timeline zone:
Sample Timeline Zone
The topics in this section describe the rich functionality available in timeline zones.
Contents
Timelines Zones Are Configured By Your Implementation Team
The Anatomy Of A Timeline Zone
An Event's Color And Icon Can Convey Information About The Event
An Event's Hover-Text Can Contain Additional Information
Clicking On An Event Shows More Information In The Detail Area
Timelines Zones Are Configured By Your Implementation Team
Your implementation team controls the number and type of timeline zones you see on this page. Refer to Configuring Timeline Zones for how to add and change timeline zones.
The Anatomy Of A Timeline Zone
The following illustration highlights the various elements in a timeline zone. These elements are described in the remaining topics.
You Can Move Through Time
You can click the controls at the top of a timeline zone to change the date-range of the zone's information:
The following points describe how to use these controls:
· To reposition the timeline to a specific date, selected the desired month and year and click the search button.
· To go back one year, click the double-left arrow.
· To go back one month, click the single-left arrow.
· To go to today, click the red line (between the arrows).
· To go forward one month, click the single-right arrow.
· To go forward one year, click the double-right arrow.
Timelines Can Have Many Lines
A timeline zone has one or more "lines" that show when significant events have occurred. For example, you can set up a timeline zone that has two lines: one that shows when payments have been received from a taxpayer, and another that shows when bills have been sent to the taxpayer. Your implementation team controls the number and type of lines by configuring the timeline zone accordingly.
Each Line Shows Events
Each line on a timeline may contain zero or more events where each event shows the date when the event occurs. For example, the bill line in a timeline has a separate event for every bill sent to a taxpayer. Each line's description contains the number of events on the line.
Warning! If a line has more events than can fit onto a timeline, the line will show the first "chunk" of events and a message will appear in the "more info area" explaining that some events have been truncated. If this happens and the truncated events are in a latter period, you can reposition the timeline's base period to show the truncated events.
An Event's Color And Icon Can Convey Information About The Event
Your implementation team can configure the timeline so different types of events have different visual representations. For example, a timeline that shows when meter reads have occurred can use different colors and/or icons to visually differentiate between estimated and non-estimated meter reads.
An Event's Hover-Text Can Contain Additional Information
If you hover the mouse over an event, hover text appears. Each type of event can have different hover text. For example, the hover text for a case shows significant dates in the case's lifecycle (e.g., when it was created, and when it was closed). Whereas the hover text for a meter read shows each register reading.
Clicking On An Event Shows More Information In The Detail Area
When you click on an event, additional information appears in the zone's detail area (at the bottom of the zone). The following information may appear:
· The event's common "information string" appears. For example, if you click on a field activity event, the field activity's information string appears. This information is hyperlinked to allow for easy access to the transaction on which the object is maintained.
· Additional information may appear. For example, if you click on a bill that has been canceled and rebilled after it was initially sent to the taxpayer, information about the net result of the changes appears.
· BPA scripts that can be executed to perform business processes on the object. For example, if you click on a bill event, BPA scripts may appear that can guide you through initiating a bill dispute or canceling the bill. Note, BPA scripts are prefixed with the "wizard's hat" icon.
Control Central - Taxpayer Information
Once Control Central - Main has a person context, you can navigate to this page to view an overview of the related persons, customer contacts, accounts, locations, and obligations linked to the account.
User configurable. Refer to Each User Can Customize Which Zones Appear for information about how to configure which zones appear.
Description of Page
Navigation hint. The Go To Control Central option on the person context menu navigates to this tab page.
A mouse with a roller is useful. This page can extend vertically past the normal desktop boundary. You will find that a mouse with a “roller” will facilitate navigating through the page.
The contents of this section describe the zones that are available on this portal page.
Credit Allocation Detail Zone - Taxpayer Info
Person Tree Zone
The tree in this zone shows a great deal of information including:
· All accounts linked to the person in context.
· Customer contacts linked to this person.
· The hierarchy of parents and children linked this person.
· All aliases linked to this person.
You can use this tree to both view high-level information about these objects and to transfer to the respective page in which an object is maintained.
Active Account Summary Zone
The Active Account Zone lists all accounts related to the person in context. In addition, accounts linked to this person's children also appear in this zone, and if a child has children, the grandchildren's accounts are included. In fact, the system will look for accounts up to five levels deep (meaning that the great, great grandchildren's accounts will be included in this zone).
Only accounts linked to child persons with a financial relationship are shown. When you set up a taxpayer hierarchy, you can define both subsidiaries and "key contacts" (i.e., individuals that you contact at a company). As described above, this zone will include accounts related to these subsidiaries and key contacts. However, you might not want to include the personal accounts related to the key contacts in this zone. You can control which accounts appear in this zone when you set up a hierarchy. You do this by turning on the Financial Relationship switch for those persons whose accounts should be included.
The following columns are displayed in the grid:
Account Info This column contains the standard account information.
Current Balance This column contains the account's current balance.
Last Billed Info This column contains information about the last completed bill sent to the account.
Last Contact Info This column contains information about the last customer contact associated with the account's main taxpayer.
Credit Allocation Detail Zone - Taxpayer Info
The Credit Allocation Detail zone on the taxpayer portal shows the results of dynamic credit allocation of a person or one of its accounts, obligations or assessments. It also allows a user to bring P&I up to date and to forecast P&I to the current date or in the future.
The default is to show the credit allocation detail for all obligations that support dynamic credit allocation for all accounts where the person in context is the main taxpayer for the account.
Refer to Credit Allocation Detail Zone for information about the remainder of this zone.
Timeline Zone - Taxpayer Info
Your implementation may have configured this page to show one or more timeline zones. Refer Timeline Zone - Account Info for a description of how to use these zones.
Control Central - Account Tree
Once Control Central - Main has an account context, you can navigate to the Account Tree to see an overview of the persons, locations, and obligations linked to the account.
Description of Page
This page is dedicated to a tree that shows the various objects linked to an account. You can use this tree to both view high-level information about these objects and to transfer to the respective page in which an object is maintained.
Control Central - Location Tree
Once Control Central - Main has a location context, you can navigate to the Location Tree to see an overview of the accounts and obligations linked to the location.
Description of Page
This page is dedicated to a tree that shows the various objects linked to a location. You can use this tree to both view high level information about these objects and to transfer to the respective page in which an object is maintained.
Control Central - Bill/Payment Tree
Once Control Central - Main has an account context, you can navigate to the Bill/Payment Tree to see an overview of the financial transactions linked to the account.
Description of Page
This page is dedicated to a tree that shows the account's bills and payments. You can use this tree to both view high-level information about these objects and to transfer to the respective page in which an object is maintained.
For balance-forward accounts, bill nodes contain the balance presented on the respective bill, and pay nodes contain the amount of the respective payment. However, for open-item accounts, the tree behaves differently:
· The amount on bill nodes is equal to the sum of the current charges, adjustments and corrections on the bill.
· Each bill or payment will contain an indication if all of its financial transactions are fully matched. If not, the node will become red to highlight that unmatched financial transactions exist.
· If a bill or payment node is expanded, a summary of the match status of its financial transactions is shown.
How To Add A New Taxpayer From Control Central
There are two ways to add a new taxpayer from control central:
· Invoking the Person page from the menu bar.
· Adding a person from Control Central. You navigate as follows:
· You start from Control Central - Main. On this page, you determine if the taxpayer already exists in the system. If so, select it and you’re done. If not, proceed to step 2.
· Click the + button adjacent to the Person button to transfer to Person - Main Information page (with the name you entered already defaulted). Use the Person pages to record all relevant information about the new taxpayer. When finished, proceed to step 3.
When the person exists, you can add account(s) for it by invoking the Account page from the menu bar or from the Person context menu.
The Dashboard is a portal that always appears on the Oracle Enterprise Taxation Management desktop. Its zones contain tools and data that are useful regardless of the object being displayed.
User configurable. Refer to Each User Can Customize Which Zones Appear for information about a user can configure which zones appear.
Global context. The system automatically refreshes the values saved in global context with information about the object that appears in Object Display Area. Various zones available in the dashboard portal have been designed to display data related to a person id, account id or location id, which are populated by the base global context algorithm C1-GLBL-CTXT.
The contents of this section describe the zones that are available on this portal.
Other zones exist. The zones described below are unique to Oracle Enterprise Taxation Management. Please see Core Dashboard Zones for a description of other zones that can appear on the dashboard.
Contents
Financial Information Dashboard Zone
Current Context Zone
The Current Context Zone contains basic information about the taxpayer on which you are working.
A maximum of three rows may appear:
· The first row contains a person context menu and the person’s name. You can click on the person’s name to transfer to the Person - Main page. Note, the person’s name is formatted by a plug-in algorithm on the installation record. Refer to the base package’s name format algorithm for an example. If you prefer different formatting logic, your system administrator should configure the system appropriately.
· The second row contains an account context menu and the account’s:
· ID and check digit
· The primary name of the main taxpayer
· Taxpayer class
· The last row contains a location context menu and the location’s address and location type. Note, the address information is formatted by a plug-in algorithm on the installation record. Refer to the base package’s location format algorithm for an example. If you prefer a different format, your system administrator should configure the system appropriately.
Customer Contact Zone
The Customer Contact Zone has three purposes:
· It shows the age of the Last customer contact associated with the person displayed in the Current Context zone. The word Today is shown if the last contact was on the current date. The word Yesterday is shown if the last contact was on the current date - 1 day. If neither is applicable, the number of days old is shown.
· It shows the name of the person who added this contact.
· It greatly simplifies the addition of a new customer contact. To add a new contact, simply select the Type of customer contact, enter a brief Comment, and press the Add Contact button.
After the contact is added, the date / time of the new contact will be displayed in the Last area. You can use the Go To button to drill into the newly added contact where you can setup reminders or indicate the contact should remain open until future resolution.
Financial Information Dashboard Zone
The Financial Zone that appears on the dashboard contains the same information that is described in the Financial Information Zone on the account information portal.
Alert Dashboard Zone
The Alert Zone that appears on the dashboard contains the same information that is described in the Alert Zone on the account information portal.
As described in Understanding The “Account Model”, the “Account Model” objects are those that form the core of your business processes. In this section, we describe the pages that maintain these objects.
Contents
Using The Account / Person Replicator
On the person page, you define demographic information about your taxpayers and every other individual or business with which your company has contact. The topics in this section describe the person page.
For more information about how most persons are added, refer to How To Add A New Taxpayer From Control Central. For more information about how a person is required to set up a taxpayer, refer to Taxpayer Overview.
Contents
Person - Correspondence Information
Person - Main Information
The Main page contains core person information like names, telephone numbers, and forms of identification. Open this page using Taxpayer Information, Person, Main.
Description of Page
Person Information contains basic information about the person. These values only appear after the person exists on the database. The ID is a system-assigned random number that stays with a person for the life of the system.
Formatting is performed by a plug-in. The format of Person Information is controlled by a plug-in algorithm on the installation record. Refer to the base package’s person information algorithm for an example. If you prefer different formatting logic, your system administrator should configure the system appropriately.
The following information may be recorded about a person:
Define the Person Type for this person. The person type controls some behavior for the person. It includes a "person/business" indicator that controls the primary name validation. Your implementation's person types may also be configured to define other behavior for persons of this type such as the default primary ID type.
Person Names are used by Control Central to look for accounts and persons. In addition, a person’s primary name is the addressee on the person’s correspondence unless overridden by the Override Mailing Name (maintained on the Misc tab). The following fields display:
· Use Name Type to indicate if the name is an Alias, Alternate Representation, Doing Business As, Legal, or Primary name. Note, for new persons, a value of Primary is defaulted.
Note. The values for the name type field are customizable using the Lookup table. This field name is NAME_TYPE_FLG.
· Use Person Name to define the person’s name. Note well, the name is case sensitive.
Alternate representations of a person’s name. You would use an Alternate Representation for a person’s name when you have an alternate ways to define the person’s primary name. Alternate representations are typically used in countries that use multiple character sets (e.g., the Primary name is entered in Chinese, the Alternate Representationis entered in English). When a person has an alternate name, both the main and alternate names can be used to search for a person. The Alternate Representation Name Type only appears if you have enabled alternate names on the installation record. Refer to the description of the Alternate Representation field under Installation - Main for more information.
Validation is performed by a plug-in. The validation that is applied to Person Name (e.g., a comma separating the last and first name - Smith,Patricia) is controlled by a plug-in algorithm on the installation record. Refer to the base package’s name validation algorithm for an example. If you prefer different validation logic, your system administrator should configure the system appropriately.
Person Phone numbers are used by Control Central to look for accounts and persons. The following fields display:
· Phone Type indicates the type of phone number, e.g., Home, Mobile, Business, …
· Use Phone Number to define the telephone number. Enter the telephone number in the format described by the Phone Format.
Formatting is performed by a plug-in. The format that is applied to a Phone Number is controlled by the algorithm that is plugged in on the respective Phone Type. If you prefer a different format, your system administrator should configure this algorithm appropriately.
· Enter the Extension, if any, of the telephone number.
A Person’s ID’s have several uses:
· They are used by Control Central when you look for a taxpayer / location based on their ID.
· They are used to highlight potential duplicate persons.
· Control Central displays a person’s primary identification in the search results area to help a user identify the taxpayer when multiple taxpayers match the search criteria.
Person ID may be required or optional. The person ID usage flag on the installation record indicates whether at least one id for a person is required or optional.
The following fields are used to define a person's ID(s).
· Turn on Primary ID for the piece of ID that is the primary means of identifying the taxpayer.
· Indicate the ID Type. The ID Type defaults from the Installation Record based on the Person Type's person/business indicator.
· Enter the identification number in the adjacent fields. Please note that if the ID Number should be formatted (e.g., dashes in an American social security number), you do not have to enter the dashes. Rather, you can enter the information as a contiguous value and the system will format this for you. The format is shown in the adjacent Identifier Format column.
Formatting is performed by a plug-in. The format that is applied to an ID Number (e.g., dashes in an American social security number) is controlled by the algorithm that is plugged in on the respective ID Type. If you prefer a different format, your system administrator should configure this algorithm appropriately.
Person - Correspondence Information
This page contains information that may be used to address bills and letters. Use Taxpayer Information, Person, Correspondence Info to open this page.
Description of Page
If the person does not want their primary name (defined on the Main page) used on bills and letters, specify the desired name in Override Mailing Name 1, 2, and 3.
Specify the Override Mailing Address fields if the person wants their bills and letters sent to an address specific for this person. In addition, if the person's account doesn't already indicate that the person's mailing address should be used, you must update this person's account(s). This information resides in the Address Source field on Account - Person.
Address isn't everything. In addition to defining the person's Override Mailing Address, there may be additional tasks you must perform in order to route information to this address. Refer to the following links for more information: where are bills sent and where are letters sent.
If you enter an Override Mailing Address:
· The Country defaults from your installation options.
· The address constituents may differ depending on the Country. Refer to Defining Countries for more information on the address constituents.
· If you have set up postal defaults, the system will default the address constituents when you tab out of the postal code.
Specify the taxpayer’s Email Address if you communicate with the taxpayer via Email. In addition to defining the person's Email Address, you're correspondence routing software must support sending the information via Email. Refer to the following links for more information: where are bills sent and where are letters sent.
Define the Language in which the person prefers their bills and correspondence printed.
Default note. The person’s language defaults from Installation Options - Person.
Refer to Taxpayer Language for more information on options for supporting multiple languages for your taxpayers.
The Miscellaneous Addresses scroll to define additional addresses for the person.
· Select the Address Type. The base product supports a value of Seasonal. See below for additional detail about seasonal addresses. Your implementation may introduce additional values for this field.
Note. Define values for this field using the Lookup table. This field name is ADDR_TYPE_FLG.
· The Status of the address must be Active. You can set the status to Inactive if you want a seasonal address ignored (alternately, you can just remove the seasonal address).
· The Country defaults from your installation options. The address constituents may differ depending on the Country. Refer to Defining Countries for more information on the address constituents.
· If you have set up postal defaults, the system will default the address constituents when you tab out of the postal code.
The Seasonal address type allows your taxpayer to define one or more alternate addresses to use during predefined periods each year. For example, the taxpayer may want their correspondence sent to their vacation cottage during the summer. Please be aware of the following:
· Seasonal addresses will only be used if the taxpayer's bills and / or letters are routed via the postal service. For example, if you route bills to the taxpayer via Email, the seasonal address will never be used to route bills to the taxpayer. Refer to the following links for more information: where are bills sent and where are letters sent.
· You don't have to specify a seasonal address for every part of the year. For example, if the taxpayer wants their bills sent to their main address except during the summer, you need only enter a seasonal address for the summer.
· You can enter a seasonal address with or without an Override Mailing Address. If an Override Mailing Address is not specified, the person's correspondence will be addressed as per the instructions on the person's account(s). These instructions reside in the Address Source field on Account - Person.
· You can enter multiple seasonal addresses if the taxpayer so desires.
· The Seasonal periodis defined in the two Season fields. The first field contains the day and month when the season starts; the second field contains the day and month when the season ends. The day and month should be entered in the format defined in your display profile.
Person - Characteristics
The characteristics page contains information that describes miscellaneous information about the person. Use Taxpayer Information, Person, Characteristics to open this page.
Description of Page
Note. You can only choose characteristic types defined as permissible on the person record. Refer to Setting Up Characteristic Types & Their Values for more information.
The following fields display:
Effective Date Define the date on which the characteristic becomes effective. The effective date defaults from the Installation Record.
Characteristic Type Indicate the type of characteristic.
Characteristic Value Indicate the value of the characteristic.
Person - Persons
This page is used to define this person’s relationship with other persons. For example, if the person being maintained is a conglomerate, you can define its subsidiaries on this page. Refer to How To Set Up Taxpayer Hierarchies for more information about hierarchies.
You’re defining “child relationships”. It’s important to understand that the persons being defined on this page’s grid should be thought of as “children” of the person on the top of the page.
Children may have children. It’s possible for one of the children to have children itself (for example, if you have a situation where a subsidiary of a conglomerate itself has subsidiaries). To define a child’s children, simply display the child person on this page and then define its children.
Equal relationships. It’s possible to link persons where no hierarchy is implied by the relationship (e.g., spouses). There are two ways to do this: 1) you can nominate one spouse as the “parent” and the other as the “child” or 2) you can define the spousal relationship for both persons (i.e., you would define Robert Chopin as the husband of Jeanette Chopin, and Jeanette Chopin as the wife of Robert Chopin). If you choose the latter approach, a recursive relationship will exist.
Warning! If your organization enters multiple levels of person, we want to point out that we do not prevent recursive relationships. This means that you could set up a nonsensical situation where person 2 is a child of person 1 and person 1 is a child of person 2.
Use Taxpayer Information, Person, Persons to open this page.
Description of Page
The grid contains the “children” associated with the “parent” person who is defined at the top of the page. The following fields display:
Child Person This is the unique identifier of the “child” person. This person’s main name appears adjacent.
Child Information An informational message appears to highlight if the child person itself has children. You can click the corresponding go to button to view the child’s children.
Relationship Type Indicate the type of relationship between the parent and the child person.
Start Date Indicate the date on which this relationship began. This field defaults from the Installation Record.
End Date If the relationship expires, indicate the date the relationship stops.
Financial Relationship Turn on this switch if the child person has account(s) and information about these account(s) should be displayed when the parent person's hierarchy is displayed in the Active Account Summary Zone.
Person - Web Self Service
This page is used to define information for this person to access account information via your web self-service application.
Configuring Web Self Service. The system provides sample web self-service functionality. This functionality may be used as a basis for implementing a full web application for your organization that is integrated with other web services you offer.
Use Taxpayer Information, Person, Web Self Service to open this page.
Description of Page
The information on this page is entered by the taxpayer when registering for the web self service application.
Web User ID.
The sample web self service functionality provided by the system defines
the taxpayer’s web user ID using an entry in the person ID collection defined
on the main tab.
The Web Self Service Password chosen by this person through the web
application is stored encrypted and cannot be viewed. Taxpayers should change their password via the web application.
The Web Self Service Password Hint and Web Self Service Password Answer are defined by the taxpayer when registering and are used when the taxpayer has forgotten the password.
Note. The values for the password hint field are customizable using the Lookup table. This field name is WEB_PWD_HINT_FLG.
Web Self Service Receive Marketing Info indicates whether or not the taxpayer has chosen to receive marketing information. The possible values are Receives Marketing Info and Doesn’t Receive Marketing Info. This information may be used by your web application to optionally send marketing information to this taxpayer via email.
Maintaining Accounts
The account record contains information that controls billing and collections processing. You should only need to use this page if you need to fine-tune the information that the system has set up by default.
The topics in this section describe the pages on which account related information is maintained.
Contents
Account - Main Information
The Main page contains core account information. Open this page using Taxpayer Information, Account.
Description of Page
The primary name of the Account’s main taxpayer and the Account ID are displayed on every tab in this page. These values only appear after the account exists on the database. The Account ID is a system-assigned random number that stays with an account for life.
Formatting may be performed by a plug-in. The basic information about an account that appears at the top of this page (and on many other pages in the system) may be formatted by a plug-in algorithm on the installations record. Refer to the base package’s account information algorithm for an example. If you prefer different formatting logic, your system administrator should configure the system appropriately.
A “check digit” is displayed adjacent to the account ID. This is for information purposes only, and is not needed to operate the system. The following points describe how the check digit is calculated for an Account ID equal to 0011883422.
· Calculate the sum of the first and every alternate digit in the account id. A = 14 = 0+1+8+3+2
· Calculate the sum of the second and every alternate digit in the Account ID and multiply by 2. For example, B = 30 = (0 + 1 + 8 + 4 + 2) * 2
· Add A and B. For example, C = 44 = 14 + 30
· Count the number of digits used to calculate B that are greater than 4. For example, D = 1 since only 8 is greater than 4.
· Multiply D by 9. For example, E = 9 = 1 x 9
· Subtract E from C. For example, F = 35 = 44 - 9
· Subtract the units position of F from 10 to find the check digit. For example, check digit = 5 = 10 - 5 (5 is subtracted from 10 because F = 35 and there the units position is 5).
Technical note. The above is calculated in the common routine called CIPCACDN.
Set Up Date is the date the account was initially set up. This is purely informational.
Currency Code defines the currency in which the account’s financial transactions are expressed. All rates and payments associated with this account must be denominated in this currency.
Default note. The currency defaults from the Installation Record and may be overridden here.
Account Type plays a part in:
· The account’s default collection class and when the overdue monitor reviews an account. Refer to How Does The Overdue Monitor Work for more information about how and when an account’s debt is reviewed.
· And several other functions. Refer to and Setting Up Account Types for more information.
Default note. The account type defaults from Installation Options - Account (Person Account Type) and may be overridden at will.
Division defines the jurisdiction that governs this account. You may only select Divisions associated with the account's account type. This field is updated behind the scenes every time an obligation is activated (the system uses the division associated with the obligation’s obligation type). If you have assigned a divisionand do not want the system to change it when an obligation is activated, turn on Protect division.
Division governs many functions. An account’s division impacts its subsequent bill due dates, collections review dates, the roles assigned to To Do entries, and the calendar of workdays. Refer Setting Up Account Types for more information.
Access Group controls which users are allowed to view and update this account’s information (including bills, obligations, payments, locations, …). The system defaults this value from the user’s default access group. Refer to The Big Picture of Row Security for a complete description of how account security is implemented in the system.
The optional Account Management Group controls the roles assigned to To Do entries associated with an account. Refer to Setting Up Account Management Groups for more information.
Enter a Comment to define unusual information about the account. If this field is populated, an alert will highlight such in the Alert Zone.
Bill Cycle controls when a bill is produced for an account. The route the system takes to do this update is as follows:
If you have assigned a bill cycle and do not want the system to change the bill cycle when an obligation is activated, turn on Protect Bill Cycle.
Mailing Location ID defines the address on bills for persons who have their bill sent to the account’s mailing location. This field may be updated behind the scenes when an obligation is activated. The word “may” is used because the system will only update an account’s mailing location if there are no active obligations currently linked to the account. Refer to Account - Person Information for more information about how to define where a person has their correspondence and bills sent.
If you do not want the mailing location to change when an obligation is activated, turn on Protect Mailing Location.
If you want to stall billing until after some future date, enter the date in Bill After.
If user should review the account’s printed bills before they are sent to the taxpayer, enter the user ID of the individual who reviews the bill in Bill Print Intercept.
Account - Auto Pay
The Auto Pay page is used when an account pays their bills automatically (e.g., by direct debit or credit card). The Auto Pay page can also be used when a taxpayer chooses to receive their refunds via a direct deposit.
Refer to How And When Are Automatic Payments Createdfor more information.
Open Taxpayer Information, Account and navigate to the Auto Pay tab to maintain this information.
Description of Page
The Account Auto Pay scroll defines the bank account / credit card from which the taxpayer’s automatic payments are debited. Multiple auto-pay options may exist if the taxpayer changes auto-pay options over time. The following fields display:
· Start Date is the date on which the automatic payment information comes into affect. The system creates an automatic payment for any bill produced for this account with a due date on/after this date and on/before the End Date. If End Date is not specified, this means the automatic payment option applies indefinitely. You need only specify an End Date if the taxpayer wants to stop paying automatically.
· Auto Pay ID is the unique, system-assigned identifier of the auto-pay record. This value is assigned after the information is saved on the database and may not be modified.
· Use Auto Pay Source Code to define the source of the funds used to satisfy the automatic payment request. For example, if a taxpayer indicates that they want to use their checking account to pay their bill, you would specify the Auto Pay Source Code associated with their bank. The source’s description and external source ID (e.g., bank routing number) are displayed adjacent.
· Use Auto Pay Method to specify whether you want the system to process automatic payments as Direct Debit or Payment Advice. This field is visible only if feature configuration is set up to support payment advice functionality. Refer to Payment Advices for more information on the payment advice functionality.
· Use External Account ID to define the taxpayer’s bank account / credit card number.
· You will be required to define an Expires On date if the Auto Pay Source Code references a tender type that requires an expiration date (e.g., if the Auto Pay Source is a credit card company).
· Enter the Name of the taxpayer as it appears in the financial institution’s system. This name is routed to the financial institution.
Default note. The Name will default to the primary name of the main taxpayer linked to the account after you enter a Start Date. This defaulting is only possible for accounts that exist on the database.
· In some locales, taxpayers can define a Maximum Withdrawal Amount to limit the amount of money that is automatically debited from their account. Refer to How To Implement Maximum Withdrawal Amounts for more information.
· Use Comments to describe anything interesting / unusual about the automatic payment request.
Account - Person Information
The Account Person page contains information about the person(s) linked to the account.
Note. Both taxpayers and non- taxpayers (e.g. the accounting service that handles the bills of a commercial taxpayer) can be linked to an account.
If you need to link multiple persons to an account (e.g., because you need to send a duplicate of the account’s bill to someone other than the main taxpayer) or change information about a person on an account, open Taxpayer Information, Account and navigate to the Persons tab.
Description of Page
The Account Persons scroll contains one entry for every person linked to the account. The following fields display:
Person ID The unique identifier of the person linked to the account. The person’s name is displayed adjacent.
Primary Taxpayer Turn on this switch if the person is the main taxpayer on the account. Only one person on an account may be designated as the main taxpayer.
The significance of the main taxpayer is that its name will appear adjacent to the account ID throughout the system.
Financially Responsible Turn on this switch if the person is financially responsible for the account’s debt.
This switch is on and gray if the person is the Main Taxpayer because the main taxpayer is always financially responsible. If multiple persons are linked to the account, you use this switch to indicate which ones are financially responsible versus those that are linked for other purposes.
Third Party Guarantor Turn on this switch if the person is a 3rd party guarantor of the account’s debt. This switch is off and gray if the person is the Primary Taxpayer.
Relationship Type Define the relationship between the person and the account. Refer to Setting Up Account Relationship Codes for information about setting up relationship types.
Web Access Indicate whether or not a person linked to this account is Allowed or Not Allowed to view details of this account via your web self service application.
Default note. This flag is defaulted to Allowed.
Prefix/Suffix and Pfx/Sfx Name Use these fields if you need to append additional information to a taxpayer’s name when correspondence or bills are sent to this person. For example, if the account has declared bankruptcy you might attach “Debtor In Possession” to the person’s name. Use Prefix/Suffix to indicate if the Pfx/Sfx Name should be appended to the front or the back of the taxpayer’s name.
Receives Copy of Bill Turn on this switch if the person receives a copy of the account’s bills. Turning off this switch grays the remaining fields. This switch is on and gray if the person is the Primary Taxpayer because the main taxpayer always receives a copy of the bill.
Refer to The Source Of Bill Routing Information for more information about how the remaining information is used to format the address of a bill.
Bill Route Type Indicate how the bill is sent to the taxpayer. This field’s value defaults from the Installation Record. If the Bill Route Type you select indicates that bills are routed via Fax, the person’s fax number is displayed adjacent (the system knows which of a person’s phone numbers is a fax number by the phone type). If the Bill Route Type you select indicates that bills are routed via Email, the person’s Email address is displayed adjacent. If the Bill Route Type you select indicates that bills are routed via the Postal service, you must choose an appropriate Address Source to define which address should be used. Refer to Setting Up Bill Route Types for more information about bill route types.
Bill Format Indicate if the taxpayer should receive a Detailed or a Summary bill.
Note. The values for this field are customizable using the Lookup table. The values need to match the formats supported by your bill print software. This field name is BILL_FORMAT_FLG.
Number of Bill Copies Indicate how many copies of the bill the person receives.
Taxpayer PO ID Indicate the purchase order ID the taxpayer wants printed on their copy of the bill.
Receives Notification Turn on this switch if the person receives letters (i.e., notifications) initiated by overdue events. These events will send letters to the main taxpayer and any other person linked to the account that Receives Notifications. This switch is on and gray if the person is the Main Taxpayer because the main taxpayer always receives notifications. Refer to Printing Letters for more information about how letters are produced by the system.
Address Source If the Bill Route Type you selected indicates that bills are routed via the postal service, you must choose the appropriate Address Source.
Choose Mailing Location on Account if bills should be sent to the address associated with the Mailing Location on the first page. This address is displayed adjacent.
Choose Person if bills should be sent to the person’s mailing address. This address is displayed adjacent.
Choose Account Override if bills should be sent to an override address specified below. Typically, you would only choose this option if the person has multiple accounts and each account’s bills should be sent to a different address. If you choose this option, the bottom of this page will become populated with fields that should be used to specify this override address.
Override address constituents If you selected an Address Source of Account Override, you must enter the address to which bills will be sent in the address constituents. The number and type of address constituents is based on the Country. These fields will be invisible for other Address Sources.
Note, the Country defaults from Installation Options - System. The City, County and State default based on the Country and Postal Code if a Postal Default exists for the postal code.
Account - Bill Messages
The Account Message page contains information about the message(s) to appear on an account’s bills. Both one-time and permanent messages may be defined. This information is used when the system assembles messages to appear on an account’s bill. Refer to The Source of Bill Messages for more information about bill messages.
Open Taxpayer Information, Account and navigate to the Bill Messages tab to access this page.
Description of Page
The following fields are displayed:
Bill Message The message code and description of the message that appears on the taxpayer’s bill.
Bill Message Type Use Temporary to indicate the message should only be linked to the next bill produced for the account. Use Permanent if the message should appear on every bill. Note, a value of Temporary defaults.
Account - Collections
The collections page contains the compliance rating transactions that impact an account’s compliance rating. To view or modify these transactions, open Taxpayer Information, Account and navigate to the Collections tab.
Description of Page
Collection Class controls how the account’s debt is compared against collection criteria to determine if an overdue process should be started. Refer to How Does The Overdue Monitor Work for more information about how and when an account’s debt is reviewed.
Default note. The Collection Class defaults from the account’s Account Type when the account is first added. It may be overridden at will.
If you need to prevent an account from being reviewed by the overdue monitor, use Postpone Compliance Review Until to define the future date when these processes can again review the account’s debt.
Last Compliance Review Date is the date when the account’s debt was last reviewed by the overdue monitor (C1-ADMOV).
The account’s Current Compliance Rating is displayed. For an explanation of how this number is derived, see How is an account’s compliance rating calculated?.
The Compliance Rating History scroll contains one entry for each compliance rating history record associated with the account. The following fields display:
Start Date This is the first date the compliance rating transaction affects the account’s compliance rating.
End Date This is the last date the compliance rating transaction affects the account’s compliance rating.
The Created On message is formatted using an algorithm on the Installation Options.
Affect Compliance Rating By This is the effect of the compliance rating transaction on the account’s compliance score. This should be a negative number because the lower the score the worse the compliance rating.
An account’s compliance rating is equal to the start compliance rating amount defined on the installation record plus the sum of compliance rating demerits that are currently in effect. When an account’s compliance rating is less than the compliance rating threshold defined on the installation record, the account’s compliance rating is displayed as an alert in the Alert Zone.
Comments Enter comments to clarify the reason(s) for the creation of the transaction.
Contents
How are compliance rating transactions created?
How is compliance rating calculated?
What impact does compliance rating have in the system?
How are compliance rating transactions created?
Compliance rating transactions may be created as follows:
· If a payment tender is canceled with a cancellation reason that indicates the cancellation was due to non-sufficient funds, a compliance rating transaction is created. The number of compliance rating is defined on the payment cancellation reason code.
· A user may create compliance rating transactions at their discretion.
· Algorithms may add compliance rating transactions. The system provides a sample overdue event algorithm that adds compliance rating transactions. Refer to C1-OE-CR-RT for more information.
Created By Flag. The compliance rating transaction includes a Created By flag that is customizable using the Lookup table. This field name is CR_RAT_CRE_BY_FLG. If your implementation uses algorithms to create compliance rating history transactions, you may consider adding appropriate values to the Created By flag. Also note that the Created By flag includes the value Other, which may be used by your implementation specific algorithms if you do not want to add a new custom value.
How is compliance rating calculated?
An account’s compliance rating is calculated by summing the Affect on Compliance Rating from compliance rating transactions effective on the current date. This value is added to the perfect compliance rating defined on the installation record. The result is the taxpayer’s current compliance rating.
What impact does compliance rating have in the system?
The following points describe the impact of an account’s compliance rating:
· An account’s current compliance rating is displayed in the Control Central Alert area when it’s less than the threshold compliance rating defined on the installation record.
· An account’s compliance rating may affect how the account’s debt is collected. We used the word “may” because an account’s compliance rating will only affect collection criteria if you set up your overdue processes to do this.
Account - Characteristics
The characteristics page contains information that describes miscellaneous information about the account. Use Taxpayer Information, Account and navigate to the Characteristics tab to open this page.
Description of Page
Note. You can only choose characteristic types defined as permissible on the account record. Refer to Setting Up Characteristic Types & Their Values for more information.
The following fields display:
Effective Date Indicate the date on which the characteristic value becomes effective. Note, the effective date defaults to the account’s setup date (defined on the Main page).
Characteristic Type Indicate the type of characteristic.
Characteristic Value Indicate the value of the characteristic.
Account - Alerts
The alerts page contains information that describes various alerts assigned to the account. Use Taxpayer Information, Account and navigate to the Alerts tab to open this page.
Alerts assigned to an account appear in the Alert Zone. They are used to bring important information to the attention of any user who looks at the account. Up to 60 alerts can display in the Alert Zone.
Description of Page
The following fields display:
Alert Type Indicate the type of alert to show on Control Central.
Start Date Indicate the date on which the alert starts showing in Control Central. The current date defaults.
End Date Indicate the date on which the alert stops showing in Control Central. You can leave this field blank if the alert should be effective indefinitely. The date defaults to the Start Date plus the Alert Type’s alert period.
Using The Account / Person Replicator
There are two different ways to use this transaction:
· You can make many copies of a given Person / Account combination. This may be required if your company works with 3rd party agencies who enroll taxpayers on its behalf. In this situation, the 3rd party agency may receive blocks of pre-allocated account numbers to be used when they enroll a taxpayer. When a taxpayer signs up, the person information can be updated with information about the newly enrolled taxpayer.
Perform the following steps if you need to create many copies of a given person and account:
· Add a new person and account if you don’t already have a taxpayer to serve as your “template”.
· Use the account / person replicator to create copies of the person and the account as described below (and make sure to use the Replicate Acct and Person option).
· You can create many Accounts for a single Person. This may be required if you have a taxpayer who wants many separate accounts rather than a single consolidated account.
Perform the following steps if you need to create many copies of a given account for a specific person:
· Select the account that serves as the template account for the person. Note, this account must be linked to the person who wants the many accounts.
· Use the account / person replicator to create copies of the account as described below (and make sure to use the Replicate Account Only option).
Use Taxpayer Information, Account/Person Replicator to open this page.
Description of Page
Choose the Account that serves as the template account.
Recommendation. Carefully verify that the template account you have chosen is correct before you save the replicated accounts. After you save the replicated accounts, any corrections could prove time consuming.
At the top of the page, indicate the Number of accounts and persons to Replicate.
Indicate the Main Person Name Base, which will be used as the main person name for all the new persons to be created. This field will be protected if you choose a Replicate Type of Replicate Account Only (as no persons are created).
Use Replicate Type to define if you want to create multiple copies of an account for a given person or if you want to create many new person / account combinations. See the description that appears above for more information about this field.
After entering the above, click the Replicate button to generate your new accounts and persons. The grid displays informational messages describing what will happen when you click save. For example, it will verify how many accounts will be created, the person whose record will be copied, the name that will be used on all the new persons, etc..
If everything looks clean, click save.
Contents
Information Replicated for New Persons
Information Replicated for New Accounts
Information Replicated for New Persons
Except for the main name, which you indicate in the Main Person Name field, all information for the main person linked to the account will be copied to the new persons.
Warning! This copy includes the person’s identification number. This will result in multiple persons with the same identification number. You should ensure that the identification number for your template person is a temporary number. When you sign up your actual taxpayer, be sure to update the identification number to a valid number for the person.
Information Replicated for New Accounts
Although most information for an account will be copied, not all information will be. The following points describe the information that is NOT copied on newly replicated accounts:
· Mailing location will be set to blank
· Setup Date is set to the current date
· Compliance Review Date and Postpone Compliance Review Until Date will be set to blank
· Auto Pay information will not be copied
· Compliance Rating History will not be copied
Note that all miscellaneous persons linked to the account (i.e., those who are not flagged as Main Taxpayers) will be linked to the new accounts. With this functionality, for example, you can create a person for a third party enroller and link this enroller to the template account. This enroller will then be linked to all the new accounts.
Maintaining Tax Roles
Use the Tax Role transaction to view and maintain tax roles. Navigate using Main Menu, Taxpayer Information, Tax Role.
Contents
Tax Role Query
Use the query portal to search for an existing tax role. Once a tax role is selected, you are brought to the maintenance portal to view and maintain the selected record.
Tax Role Portal
This portal appears when a tax role has been selected from the Tax Role Query portal.
The topics in this section describe the base-package zones that appear on this portal.
Contents
Tax Role Actions
This is a standard actions zone.
Tax Role
The Tax Role zone contains display-only information about the tax role.
Please see the zone's help text for information about this zone's fields.
Related Obligations
This zone lists obligation currently linked to the broadcast tax role.
Tax Role Log
This is a standard log zone.
Maintaining Obligations
The topics in this section describe the pages on which obligation related information is maintained.
Warning! Take special care when adding a new obligation to specify the appropriate division and obligation type as it will affect how the taxpayer how overdue debt is collected, how penalty and interest is calculated and much more. After the obligation is activated, you may not change its obligation type.
Contents
Obligation - Chars, Qty & Rec. Charges
Obligation - Main Information
The Main page contains basic obligation information. Open Taxpayer Information, Obligation to maintain this information.
Description of Page
Obligation Info and Obligation ID are displayed on every page. These values only appear after the obligation exists on the database. The ID is a system assigned random number that stays with an obligation for life. The Obligation Info is a concatenation of important details about the obligation and its account.
Formatting may be performed by a plug-in. The contents of Obligation Info may be formatted by a plug-in algorithm on Obligation Type. Refer to the base package’s C1-SAT-INFO for an example. If such an algorithm is not plugged-in on the obligation type, the system looks for a corresponding algorithm on the installation record. Refer to the base package’s C1-SAI-INFO for an example. If you prefer different formatting logic, your system administrator should configure the system appropriately.
Obligation Status defines the state of the obligation. The system typically changes the state of an obligation behind-the-scenes. If you can’t wait for the system, use one of the adjacent buttons:
· Click the Activate button to activate a Pending Start obligation.
· Click the Cancel button to cancel a Pending Start or Active, Pending Stop or Stopped obligation.
· Click the Stop button to stop a Pending Stop obligation.
· Click the Close button to close a Stopped or Reactivated obligation.
Enter the Account ID that is financially responsible for the obligation. If you change an obligation’s Account ID, you are effectively transferring this obligation (and its debt) to the new account.
Indicate the Division and Obligation type. These fields are very important as they control numerous aspects of the obligation’s behavior. These fields are gray when the status is not Pending Start.
For more information about what the obligation type controls, refer to Setting Up Obligation Types.
If the account is populated and the obligation type's tax type indicates a tax role is required, enter the Tax Role for this obligation.
If the obligation type indicates that a filing period required, define the Filing Period for the obligation.
The Start Date defines when the financial relationship begins. The End Date defines when the financial relationship terminates. If the end date is blank, the obligation has not yet been terminated.
Enter an Override Filing Due Date if the taxpayer has requested an extension to the filing due date for this obligation's filing period.
Enter an Override Payment Due Date if the taxpayer has requested an extension to the payment due date for this obligation's filing period.
Use Maximum Bill Threshold if you want the system to generate a bill error when a bill segment is produced in batch that exceeds a given value. These bill errors will appear on the standard billing queries and To Do lists. If, after reviewing the high value bill segment, a user truly intends to send the bill out, they should regenerate the bill. Refer to How To Correct A Bill Segment That’s In Error for more information.
Default note. The value of Maximum Bill Threshold defaults from the obligation’s obligation type.
If you’ve set up the system to use start options, you can have the system default many fields by copying the terms from a start option when service is started. The Start Option field contains the last start option whose field values were copied to the Obligation. If you need to change an Obligation’s terms by applying a different start option, you can. Refer to Changing A Start Option for a description of how to do this.
The Char Location ID is a unique identifier for the location, or physical address. For obligation types such as property tax, certain characteristics of the location will be needed in order to properly assess the obligation amount. Other obligation types such as sales tax will require a valid location for which to send correspondence to.
Your conversion process will fill in Old Account ID for obligations that were converted from your legacy system. The payment upload process uses this field to locate the accounts for payments that reference a legacy account number.
If the Obligation requires a total amount to bill, the amount is displayed. The label that appears for this field is defined on the Obligation type (on the Billing tab). We recommend that the system be set up so that this label is very specific.
The Pay Plan Autopay flag determines if the pay plan scheduled payments are excluded from automatic payment or included by automatic payment. If the account is not set up for automatic payment for the period that covers the pay plan, this flag cannot be set. This field is only visible if the obligation has a special role of Pay Plan.
The Recommendation Rule displays the description of the pay plan recommendation rule used for this obligation. This field is only visible if the obligation has a special role of Pay Plan.
This bottom of this page contains a tree that shows the various objects linked to the obligation. You can use this tree to both view high-level information about these objects and to transfer to the respective page in which an object is maintained.
The topics that follow describe miscellaneous features on this page.
Changing A Start Option
If the obligation is in the active or pending stop states and if the obligation type uses start options, a button appears on obligation - Main called Apply New Start Option.
Click on the button to bring up the Apply New Start Option Confirmation popup. The fields in this dialog allow you to define a Start Option whose terms should be copied to the obligation as of a given effective date (Apply Start Option on). Because most terms on an obligation are effective-dated, it’s important that you understand the following ramifications of applying a start option (note, we use the word “terms” to generically reference any of the fields that can be defaulted from a start option):
· Terms are reused if Start Option contains the same value as defined in the obligation. For example,
· If the Start Option references the same rate as defined in the obligation, a new rate record will NOT be created.
· If the Start Option references a contract rider that’s currently defined in the obligation, a new rider will NOT be created.
· Terms that support explicit expiration (i.e., those with an end date) are expired if they are not referenced on the new Start Option. For example, if the obligation has a rider that is not referenced on the new Start Option, it will be expired.
· Terms that support implicit expiration (i.e., those without an end date) are left unchanged if they are not referenced on the new Start Option. For example, an obligation characteristic that isn’t referenced on the new Start Option will NOT be modified when a new start option is applied.
Only start options related to the obligation’s obligation type can be used. It should be noted that only start options related to the obligation’s obligation type can be specified. If the obligation is active, you may not change its obligation type.
When you click OK, a warning window will appear that summarizes the changes that will be made to the obligation. After confirming what will be changed, click OK to change the obligation’s terms. The Start Option that is shown on the Main tab will now reflect the start option whose terms were just applied.
Obligation - Rate Info
The rate info page contains the obligation’s rate and information needed by the rate to calculate the obligation’s bill segments. This information is only displayed if the obligation’s obligation type allows a rate. Generally speaking, rates are utilized by bill based taxes. These include real property taxes in which certain rates are needed for calculations of bill amounts. The local authority that create how and what property is assessed and billed usually supply these rates.
Open Taxpayer Information, Obligation and navigate to the Rate Info tab to access this page.
Description of Page
The Rate grid controls the rate used to calculate the obligation’s bill segments. Multiple rows will only exist if the obligation’s Rate changes over time.
· An obligation’s Rate is populated by the system. The obligation type’s default rate is populated on the obligation.
Billing selects a single rate from the Rate grid when it calculates a bill segment for the obligation. If multiple rates are defined in this grid, the rate is selected based on the obligation’s obligation type’s Rate Selection Date. The following fields display:
· Effective Date is the date the rate becomes effective. The obligation’s start date defaults.
· Rate Schedule defines the rate used to calculate the obligation’s bill segments. Note, you can only choose rates defined as permissible on the obligation’s obligation type; the permissible rates are shown in the adjacent tree.
The Contract Rider grid contains the contract riders that are in effect for the obligation. This information is defaulted when service is started using a start option (using the contract rider information defined on the start option). You should only have to access this section if you need to fine-tune what the system defaults.
Billing uses this information when it calculates a bill segment for the obligation if:
· The rate used to calculate the bill segment contains a rate component that references a rate factor.
· The referenced rate factor requires a contract rider to levy the associated charge.
If a Contract Rider does not exist or is not effective, the charge associated with the rate component is not applied to the taxpayer’s bill.
To modify a contract rider linked to the obligation, simply move to a field and change its value. To remove a contract rider, click the - button. To add a new contract rider, click the + button and fill in the information for each field. The following fields display:
· Use Start Date to define the date on which the contract rider becomes effective. The obligation’s start date defaults.
· Use End Date to define the date on which the contract rider expires. This field need only be specified if the contract rider expires on an explicit date.
· Use Rate Factor to define the type of rider. You may only reference Rate Factors designated as being applicable for contract riders. Note, the Rate Factors linked to the rate that are marked with contract rider applicability are shown in the adjacent tree under the Contract Rider node.
For more information about contract riders, refer to Defining General Rate Factor Information.
The Contract Values grid contains the contract values that are in effect for the obligation. This information is defaulted when service is started using the contract value information defined on the start option used to start service (if any). You should only have to access this page if you need to fine-tune what the system defaults.
Billing uses this information when it calculates a bill segment for the obligation if:
· The rate used to calculate the bill segment contains a rate component that references a rate factor.
· The referenced rate factor uses a contract value to define the amount charged.
The following fields display:
· Use Start Date to define the date on which the contract value becomes effective. The obligation’s start date defaults.
· Use End Date to define the date on which the contract value expires. This field need only be specified if the value rider expires on an explicit date.
· Use Rate Factor to define the type of value. You may only reference Rate Factors designated as allowing values in contract terms. Note, the Rate Factors linked to the rate that are marked as allowing values in contract terms are shown in the adjacent tree under the Contract Value node.
· Use Value to define contract value.
For more information about contract values, refer to Defining General Rate Factor Information.
The Tax Exemptions section contains the taxes from which the obligation is all or partially exempt.
Billing uses this information when it calculates a bill segment for the obligation if:
· The rate used to calculate the bill segment contains a rate component that references a rate factor.
· The referenced rate factor can have tax exemptions that limit the amount of the charge.
If the rate factor doesn’t have a tax exemption or there are none that are effective during the bill period, the tax is levied in full. If the obligation is exempt, the appropriate charge associated with the tax is calculated. We strongly recommend using the “%T” substitution character in the Description on Bill on tax-exemptible rate components so that an appropriate tax exemption message appears on the taxpayer’s bill.
For more information about tax exemptions, refer to Defining General Rate Factor Information.
The following fields display:
· Use Start Date to define the date on which the tax exemption becomes effective.
· Use End Date to define the date on which the tax exemption expires.
· Use Rate Factor to define the tax from which the obligation is exempt. You may only reference rate factors designated as being tax exemptible. Note, the Rate Factors linked to the rate that are marked as tax exemptible are shown in the adjacent tree under the Tax Exemption node.
· Use Percent Exempt to define the taxpayer tax exemption percent (e.g., 90 means the taxpayer is 90% exempt and will only pay 10% of the normal tax rate).
· Use Tax Exempt Type to specify the type of exemption.
· Use Tax Certification if the taxpayer has a tax exemption certificate.
Rate Information Tree
The tree shows the obligation’s permissible rates and the related types of contract riders, contract values and tax exemptions that are possible given these rates.
· The Permissible Rates node displays all the rate schedules associated with the obligation’s obligation type.
· The Effective Rate Schedule node indicates the rate schedule currently effective.
· The Contract Rider node displays the rate factors linked to the obligation’s rate(s) that may have contract riders defined for them. If you expand a node, you can see the individual rate component(s) on which the rate factor is specified. If the obligation has a value defined for the contract rider that is currently in effect, it is also shown.
· The Contract Value node displays all the rate factors linked to the obligation’s rate(s) that may have contract values defined for them. If you expand a node, you can see the individual rate component(s) on which the rate factor is specified. If the obligation has a contract value defined that is currently in effect, it is also shown.
· The Tax Exemption node displays all the rate factors linked to the obligation’s rate(s) that may have tax exemptions defined for them. If you expand a node, you can see the individual rate component(s) on which the rate factor is specified. If the obligation has a tax exemption defined for the rate factor that is currently in effect, it is also shown.
Obligation - Chars, Qty & Rec. Charges
This page contains the Characteristics, Contract Quantities and Recurring Charges that are in effect for the obligation.
Use Taxpayer Information, Obligation and navigate to the Chars, Qty & Rec. Charges tab to open this page.
Description of Page
The Characteristics grid contains information that describes miscellaneous information about the obligation. This information is defaulted when obligation is created using the characteristics defined on the start option used to start an obligation (if any). You should only have to access this section if you need to fine-tune what the system defaults.
Note. You can only choose characteristic types defined as permissible on the obligation record. Refer to Setting Up Characteristic Types & Their Values for more information.
The following fields display:
Effective Date Indicate the date on which the characteristic value becomes effective. The obligation’s start date defaults.
Characteristic Type Indicate the type of characteristic.
Characteristic Value Indicate the value of the characteristic.
The Contract Quantity grid contains the contract quantities that are in effect for the obligation. This information is defaulted when service is started using the contract quantities defined on the start option used to start service (if any). You should only have to access this section if you need to fine-tune what the system defaults.
Billing may use this information when it calculates a bill segment for the obligation if the rate has RQ (rate quantity) rules.
The following fields appear:
Effective Date The date this quantity becomes effective. The obligation’s start date defaults.
Contract Quantity Type The type of contract quantity.
Contract Quantity The contract quantity.
The Recurring Charge section contains effective-dated information that defines the recurring charge amount used to calculate the obligation’s bill segments. This information is only displayed if the obligation’s obligation type allows a recurring charge amount.
To modify a recurring charge, simply move to a field and change its value. To change the recurring charge amount effective on a given date, click the + button to insert a row, then fill in the information for each field. The following fields display:
Effective Date The date the charge becomes effective. The obligation’s start date defaults.
Recurring charge changes during a bill period. Only one recurring charge will be used on any bill segment. The system selects the recurring charge value effective on the end date of the bill segment.
Recurring Charge Amount The recurring charge amount. Recurring charges might include certain administration fees for living or working in a specific tax district (e.g. a special charge for certain school district for each bill sent out)
Obligation - Miscellaneous
The miscellaneous page contains information that describes miscellaneous information about the obligation. Use Taxpayer Information, Obligation, Misc to open this page.
Description of Page
Select the Industry code associated with the taxpayer. Some examples of these codes are NAICS and SIC which are used to classify businesses in North America.
Enter a Business Activity associated with the taxpayer. This can be used to further define what types of activities are served by this contract.
The bill message grid contains information about the message(s) to appear on an obligation’s bill segments. Both one-time and permanent messages may be defined. This information is used when the system assembles messages to appear on an account’s bill (as part of bill completion). Refer to The Source Of Bill Messages for more information. The following fields are displayed:
· For Bill Message Code, select a message code to appear on the taxpayer’s bill.
· For Bill Message Type, use Temporary to indicate the message should only be linked to the next bill produced for the account. Use Permanent if the message should appear on every bill. Note, a value of Temporary defaults.
· The terms and conditions (T&C) grid contains the Obligation’s T&C’s. This information is defaulted when service is started using a start option (using the T&C information defined on the start option). You should only need to change this information if you need to fine-tune the defaults. Typically T&C is not used frequently with tax authorities. They will probably only be used for certain bill based taxes where very specific items like fees need to be taken into account. The following fields display:
· Use Start Date to define the date on which the T&C becomes effective. The Obligation’s start date defaults.
· Use End Date to define the date on which the T&C expires. This field need only be specified if the T&C expires on an explicit date.
· Use Terms and Conditions to define the type of T&C.
Maintaining Locations
The location record contains geographic information about your service addresses.
The following methods list the various ways in which locations can be created:
· A location can be added via the location replicator.
· A location can be added using this transaction.
The topics in this section describe the location maintenance transaction.
Contents
Location - Main Information
The Location page contains basic location information. Open Taxpayer Information, Location and navigate to the Main tab to maintain this information.
Description of Page
Basic information about the Location and the location’s unique identifier (i.e., the Location ID) are displayed on every page. These values only appear after the location exists on the database. The ID is a system assigned random number that stays with a location for life.
Formatting is performed by a plug-in. The basic information about a location that appears at the top of this page (and on many other pages in the system) is controlled by a plug-in algorithm on the installation record. Refer to the base package’s location format algorithm for an example. If you prefer a different format, your system administrator should configure the system appropriately.
Enter a Location Type to categorize the type of location.
The address’s constituent fields vary based on the Country. Please refer to the Country page for more information.
Default note. A location’s state, city, county, division, characteristics, and geographic data default from your postal default information. If you change the location's postal code, the system will default geographic values based on the new postal code.
Use Division to define the jurisdiction in which the location is located. This defaults based on the Country and the Postal Code, but can be overridden here.
Indicate whether the address is a valid Mailing Address. Locations that are valid mailing addresses may be specified as the mailing location on an account. Refer to Account - Person Information for more information.
You may reference a Parent Location to include this location in a location hierarchy.
At the bottom of this page is a tree that shows the various objects linked to the location. You can use this tree to both view high-level information about these objects and to transfer to the respective page in which an object is maintained.
Location - Characteristics
The Characteristics page contains information that controls taxation and other rate options that differ based on geography. Use Taxpayer Information, Location and navigate to the Characteristics tab to open this page.
Description of Page
The assessed value of a location and the total obligation amount are controlled by the location’s characteristic values (e.g., the taxing city defines the city tax percent applied to the location’s value or certain renovations made to the location affect the appraised value). Refer to An Illustration Of A Rate Factor And Its Characteristics for more information.
Note. You can only choose characteristic types defined as permissible on the location record. Refer to Setting Up Characteristic Types & Their Values for more information.
The following fields display:
Effective Date Indicate the effective date of the characteristic type and value. The effective date defaults from the Installation Record when you are adding a new location. The effective date defaults to the current date when you are changing an existing location.
Characteristic Type Indicate the type of characteristic.
Characteristic Value Indicate the value of the characteristic.
Default note. A location’s characteristics default from your postal default information. Refer to Setting Up Location & Service Point Postal Defaults for more information. If you change the location's postal code, the system will default geographic values based on the new postal code.
Location - Geographic Data
The Geographic Data page contains information that defines where the location is located. Use Taxpayer Information, Location and navigate to the Geographic Data tab to open this page.
Description of Page
Enter the Time Zone in which the location is located. This value defaults from your postal defaults. The geographic information is used by Control Central to look for locations. The following fields display:
Geographic Type Indicate the type of geographic data.
Geographic Value Specify the coordinate value. If the entered value must be in a specific format, a description of the required format is displayed adjacent. For example, if you see the format 99A 99A 99 9, you must enter 2 numbers, followed by a letter, followed by a space, followed by 2 numbers, followed by a letter, followed by a space, followed by 2 numbers, followed by a space, followed by a single number.
Formatting is performed by a plug-in. The format that is applied to a Geographic Value is controlled by the algorithm that is plugged in on the respective Geographic Type. If you prefer a different format, your system administrator should configure this algorithm appropriately. Note, algorithms of this type will NOT convert the input value into the relevant format (i.e., you must enter the information in the exact format dictated by the algorithm).
Default note. A location’s geographic data defaults from your postal default information. Refer to Setting Up Location Postal Defaults for more information. If you change the location's postal code, the system will default geographic values based on the new postal code.
Location - Alternate Address
This tab only appears if you have enabled alternate addresses on the installation record. Refer to the description of the Alternate Representation field under Installation - Main for more information.
This page is used when you have an alternate way to define a location’s address. This is typically used in countries that use multiple character sets (e.g., the Main address is entered in Chinese, the Alternate Address is entered in English). When a location has an alternate address, both the main and alternate addresses can be used to search for a location.
Open Taxpayer Information, Location and navigate to the Alternate Address tab to maintain this information.
Description of Page
The remaining fields on the page are used to define the location’s alternate address.
The address’s constituent fields vary based on the Country. Country is always protected on this page because a location’s alternate address must be located in the same country as its main address. Please refer to the Country page for more information about address constituents.
Default note. An alternate address’s state, city and county default from your postal default information. Refer to Setting Up Location Postal Defaults for more information.
The Swap Main / Alt Address button becomes enabled when you’ve entered an Alternate Address. When clicked, the contents of the address on the Main tab are swapped with the Alternate Address.
Contents
Using The Location Replicator
You use the location replicator to create many copies of a location.
Perform the following steps to replicate a location:
· Add a location.
· Use the location replicator to create copies of the location.
The topics in this section describe how to use the location replicator.
Warning! The system warns you if you attempt to create. However, this is just a warning as you may want to generate similar locations and then update them with, for example, a unique apartment number on Location - Main Information.
Contents
Location Replicator - Location
Location Replicator - Main
Use Taxpayer Information, Location Replicator to open this page.
Description of Page
Choose the Location that serves as the template location.
Recommendation. Carefully verify the template location using the other pages in this page before you save the replicated locations. After you save the replicated locations, any corrections could prove time consuming.
The two sections at the top of the page determine the number of replica locations to be created and the address information that will be set up for each location. The left section is used to define how the system will create the part of the address that is different for each replica location. The right section defines the parts of the address that will be the same for each replica location.
In the left section:
Use the Replicate option to control how the position of the replicated number in the first address line:
· Choose Street Number if the replicated number should prefix the Base value in the first address line of the location. For example, if you have a Start # of 1020 and a Base value of Main St and you choose the Street Number option, the first replicated location will be 1020 Main St.
· Choose Apartment Number if the replicated number should suffix the Base value in the first address line of the location. For example, if you have a Start # of 1020 and a Base value of 101 Main St, Apt. and you choose the Apartment Number option, the first replicated location will be 101 Main St, Apt. 1020.
Indicate the Number Of Locations you wish to create.
Use Base to define the information that will appear at the end of the first address line on each of the replicated locations. Use Start # to define the number assigned to the first copy of the location. Use Increment to define the value to increment successive numbers by. The first and last address lines to be created by the replicator are displayed below.
For example, if the first address you want to create is 101 Derby St, and the last address is 199 Derby and you want to do the odd numbered side of the street, you’d enter the following parameters:
Number of Locations would be 50
Address Suffix would be Derby St
Start From would be 101
Increment by would be 2
The right section displays the rest of the address information that will be copied onto each replicated location. This information is defaulted from the template location that you selected. The Address 1 field is not shown because you define the information to be entered there in the previous section, as explained above. The remaining fields, however, may be edited if so desired.
After entering the parameters, click the Replicate button to generate your new locations. You can use the sections at the bottom of the page to view the locations that will be created when you click save. The left section will show how Address Line 1 will look on the first 10 locations. If you are creating more than 10 locations, the right section will show how Address Line 1 will look on the last 10 locations. If everything looks clean, click save.
Location Replicator - Location
The Location page is a display only page provided to let you confirm that the location you selected on the add dialog is the one to be used as the template by the replicator. Use Taxpayer Information, Location Replicator, Location to open this page.
Description of Page
This is a display only page that displays key information about the location being replicated.
Location Management
The location management functionality facilitates the following:
· Grouping locations together under a single parent location
· Quick & efficient setup and maintenance of apartment complexes and high-rises
· And more…
The topics in this section describe location management functionality.
Define Location Hierarchy
Location management allows you to define location hierarchy. For example, you could also have the notion of
· A building
· Multiple floors
· Multiple apartments per floor
To define this hierarchy you must create a location for each level in the hierarchy and for each "child" location, indicate its appropriate parent location. Once you have set up your location hierarchies, you may view the hierarchies on trees on the location page and on the control central location tree.
In addition, the system provides the following alerts:
· When viewing a parent location, an alert indicates how many child locations exist
· When viewing a child location, an alert indicates that it is linked to a parent location.
Manage Groups of Locations
The powerful search criteria on the location management page allows you to view different groups of locations based on any combination of parent location address information and general geographic type information. You may also define search criteria such "locations linked to any parent location" or "locations not linked to any parent location". For example, you could display all locations in a given latitude / longitude that are not linked to any parent location.
Once your search results display the desired list of locations, you could do a mass update to assign or remove the parent location.
Location Management Page
This page allows you to display a list of locations using a combination of search criteria. In addition, you can perform actions on one or more of the resulting locations, including:
· Assigning a parent location to one or more locations
· Removing the link to a parent location from one or more locations
Open this page using Taxpayer Information, Location Management.
Description of Page
The top half of the page is where you enter the criteria used to search for locations.
Multiple search criteria may be specified. You can search for locations using a combination of search criteria.
At least one positive criterion is required. You may not define your search criteria to only use filter values that start with "Not Linked…". At lease one "positive" filter value is required.
The following table describes each of the different search methods.
|
Search Method |
Description |
|
Parent Location Filter |
Use this filter to narrow down your search based on parent location. Enter one of the following values: Not Applicable Linked To This Parent Location - for this option, you must enter a Location ID for the parent location Not Linked To This Parent Location - for this option, you must enter a Location ID for the parent location Linked To Any Parent Location Not Linked To Any Parent Location. A filter value of Not Applicable defaults. |
|
Location Filter |
Use this filter to narrow down your search based on account. Enter one of the following values: Located At This Address - for this option, you must enter address constituents Located At This Geographic Type / Value - for this option, you must enter a Geo Type and Value Not Applicable Show This Specific Location - for this option, you must enter a Location ID A filter value of Not Applicable defaults. |
The Select All / Clear All buttons are used to select locations if you plan on issuing any of the mass update actions at the bottom of the page. Refer to the description of the “mass update” actions below for more information.
50 locations at a time. Clicking Select All selects the first 50 locations in the grid. If more than 50 locations exist, you must select them in batches.
The grid that follows contains the locations that match your search criteria. The following information appears in the grid:
· Select box. Use this checkbox to select locations for mass update actions.
· The Location Information column shows information about each location. Click the hyperlink to transfer to the Location page where you can update information about the location in question.
· The Parent Location Information column displays information about the location's parent location, if one exists.
This transaction has sophisticated logic that can be used to perform “mass updates” to the locations that appear in the grid using the buttons at the bottom of the page. The buttons are enabled if you select at least one row from the location grid. The following points describe these mass update actions:
The Assign Parent Location button is used to assign a parent location to one or more locations. When clicked, the Assign Parent Location window opens. Specify the Parent Location ID and click Assign.
The Remove Parent Location button is used to remove the parent location from one or more locations. When clicked, the parent location ID of all selected locations is reset.
Bill print groups allow you to categorize an account’s obligations into groups for bill print purposes.
Bill print groups are optional. Typically, only accounts with many obligations will use bill print groups because the standard bill print priority is sufficient for accounts with a limited number of obligations. Refer to Obligation Type - Billing for more information about the standard bill print priority.
Let’s use an example to clarify the bill print group concept. Consider a local government’s account. This account would have many obligations (some for the police department, others for the court system, others for the department of public works, etc.).
If you don’t create a bill print group for this taxpayer, their bill segments will be printed in the order dictated by each segment’s obligation’s obligation type’s bill print priority. If you create a bill print group for this taxpayer, you can define the taxpayer’s desired categories (e.g., police, courts, DPW, etc.) and then link each of the account’s obligations to the appropriate category.
Nomenclature. We refer to the categories under a bill print group as “subgroups”. A bill print group can have an unlimited number of subgroups. When you create a subgroup, you define its relative bill print priority and the associated verbiage to print on the bill (assuming you print information about the subgroup on the bill).
We’d like to highlight the following characteristics of bill print groups:
· A bill print group is associated with a specific account. If multiple taxpayers have the exact categorization preferences, you will have to set up multiple bill print groups.
· Over time, a taxpayer could have many bill print groups. This would happen if a taxpayer’s bill categorization preferences change over time. We’d like to stress that while an account can have multiple bill print groups, only one will be used by the bill print process (the one effective on the bill date).
· Bill print groups only affect printed bills. Bill print groups do not affect the order in which obligations appear on the bill maintenance transaction.
· If new obligations are added after a bill print group is set up for an account, they will not be linked to a subgroup. If you neglect to link the new obligations to one of the bill print group’s subgroups they will be printed under the “default” subgroup (every bill print group must have one default subgroup to cater for this situation).
Important! While the system supports the definition of bill print groups and the categorization of an account’s obligations into the various subgroups, the base package’s bill print extract does NOT take advantage of this information.
The topics in this section describe how to set up a bill print group and how to link an account’s obligations to its subgroups.
Contents
Bill Print Group - Obligation Sub Group
Bill Print Group - Main
Open Taxpayer Information, Bill Print Group to maintain an account’s bill print group and subgroups. After defining this information, transfer to the Obligation Sub Group tab to link the account’s obligations to the subgroups.
Description of Page
The Bill Print Group ID is displayed on every page. This value only appears after the bill print group exists on the database. The ID is a system-assigned random number that stays with a bill print group for life.
Enter the Account ID associated with the bill print group.
Use Effective Date to define when the bill print group is effective for the account. This date is important as it allows a taxpayer to change their preferences over time. For example, if the taxpayer wants to change the number of subgroups on a given date, you would simply add a new bill print group effective on this date and then define the new subgroups (and link each obligation to one of the subgroups).
Use Status to define if the bill print group is Active or Inactive. You would only use the Inactive value if the bill print group is no longer needed (as there is no delete action on this transaction).
Enter a brief Description of the bill print group.
Use Comments to describe anything special about the bill print group.
The grid contains the bill print group’s subgroups. The following information should be defined for each subgroup:
· Bill Print Sub Group. This is the unique identifier of the bill print subgroup.
· Sub Group Bill Print Priority. This is the relative print priority of the subgroup in respect of the other subgroups.
· Use as Default. Turn on this switch for the default sub group. A bill print group must have one and only one default subgroup. The default group is used by the bill print process if it detects an obligation that is not linked to a subgroup (it links this obligation to the default subgroup).
· Sub Group Description. This is a brief description of the subgroup.
· Description on Bill. This is the verbiage that will print on the bill (assuming you print something on your bills for the subgroup).
After defining the bill print group’s subgroups, navigate to the Obligation Sub Group tab to link the account’s obligations to the subgroups.
Bill Print Group - Obligation Sub Group
This page is used to link the account’s obligations to one of the bill print group’s subgroups.
Open Taxpayer Information, Bill Print Group and navigate to the Obligation Sub Group page to maintain this information.
Description of Page
The Bill Print Group’s ID, Account ID and Effective Date are displayed at the top of the page.
The filters control the obligations that appear in the Obligations in Bill Print Group grid. The following points describe the various options:
· Use the Obligation Filter to define the types of obligations that appear in the grid. The following options are available:
· All. Use this option if you do not wish to restrict obligations based on obligation attributes.
· Bill Print Sub Group. Use this option to restrict obligations to those that are linked to a given Bill Print Sub Group.
· Obligation type. Use this option to restrict obligations to those linked to a given Division and Obligation Type.
· Use Status Filter to restrict the obligations based on their status. The following options are available:
· All. This option shows all obligations regardless of status.
Don’t forget to click the search button after changing the filters.
The Obligations in Bill Print Group contains an entry for every non-cancelled obligation linked to the account that is linked to one of the bill print group’s subgroups. The following information appears in the grid:
· Use Bill Print Sub Group to define the subgroup associated with the obligation.
· Use Sequence when there is more than one obligation in the subgroup. The sequence controls the order in which the obligation's financial information appears on the bill.
· The Obligation Information column provides a brief description of the obligation.
· The Obligation column contains the unique identifier of the obligation.
· The Location Information column contains the characteristic location associated with the bill segment’s obligation.
The next set of filters control the obligations that appear in the Obligations Not in Bill Print Group grid. The following points describe the various options:
· Use the Obligation Filter to define the types of obligations that appear in the grid. The following options are available:
· All. Use this option if you do not wish to restrict obligations based on obligation attributes.
· Obligation type. Use this option to restrict obligations to those linked to a given Division and Obligation Type.
· Use Status Filter to restrict the obligations based on their status. The following options are available:
· All. This option shows all obligations regardless of status.
Don’t forget to click the search button after changing the filters.
The Obligations Not in Bill Print Group contains an entry for every non-cancelled obligation linked to the account that is NOT linked to one of the bill print group’s subgroups. The following information appears in the grid:
· Use Bill Print Sub Group to define the subgroup associated with the obligation.
· Use Sequence when there is more than one obligation in the subgroup. The sequence controls the order in which the obligation's financial information appears on the bill.
· The Obligation Information column provides a brief description of the obligation.
· The Obligation column contains the unique identifier of the obligation.
· The Location Information column contains the characteristic location associated with the bill segment’s obligation.
Customer contacts are used to record when and why a taxpayer contacted your company. This information is used for both audit and statistical purposes. The topics in this section provide details about how customer contacts are created and used in the system.
Contents
Customer Contacts Are Associated With Persons, NOT Accounts
How Customer Contacts Are Created
Customer Contacts Are Used To Trigger Letters
A Customer Contact May Trigger Reminders
Customer Contacts Can Be Used As Case Files
Customer Contacts Are Associated With Persons, NOT Accounts
Customer contacts are associated with a Person, not with an Account. To associate a customer contact record with an account, you must select a person related to that account. Unless you have specific reasons to do otherwise, the main taxpayer is usually your best choice.
How Customer Contacts Are Created
You can add a Customer Contact at any time using either of the following methods:
· Use the customer contact maintenance page.
· Use the Customer Contact Zone on the dashboard.
In addition to manually adding customer contacts, your implementation team can set up plug-in algorithms that create customer contacts when certain events transpire. For example, you can plug-in an algorithm on the Case Type object that creates a customer contact whenever a case enters a particular status. Because the number and type of plug-ins can be customized for your implementation, we cannot provide a concise list of all such algorithms.
In addition to the above, a variety of events can trigger the creation of a customer contact. Refer to Customer Contacts Are Used To Trigger Letters for the details.
Customer Contacts Are Used To Trigger Letters
In order to send a letter to a taxpayer, a customer contact must be created for the taxpayer. These types of customer contacts reference a customer contact type that, in turn, references a letter template. The letter template controls the type of information that is merged into the “form letter” and how the letter is physically produced. Refer to Printing Letters for more information about letter templates and how letters are physically produced.
Customer contacts that trigger letters can be produced by any of the method described under How Customer Contacts Are Created. While a user can create this type of customer contact (e.g., if a taxpayer requests a form to sign-up for automatic payment), the primary sources of customer contacts that trigger letters are via system events and algorithms. Your implementation team can introduce plug-in algorithms to create a customer contact when certain events take place. If the created customer contact references a letter template, a letter will be triggered. Because the number and type of plug-ins can be customized for your implementation, we cannot provide a concise list of all such algorithms.
A Customer Contact May Trigger Reminders
If you want the system to remind you (via a To Do entry) about a taxpayer-related issue, you can set up a “reminder” on a customer contact. To do this, follow these steps:
· Determine if you need a new customer contact or if you can reuse one that already exists. If you need a new customer contact, use any of the “online methods” described under How Customer Contacts Are Created.
· Add an entry to the customer contact’s log. This log entry should be set up as follows:
· If the To Do entry should be addressed to a specific user, choose a Reminder type of Send to User and enter the user’s User ID.
· If the To Do entry should be addressed to a group of users, choose a Reminder type of Send to Role and enter the user group’s To Do Role.
· Use Trigger Date to define the latest date on which the To Do entry should be created. The reason we indicated this should be the latest date is because the background process that’s responsible for creating these To Do entries has a parameter called “lead time”. This parameter is used to define the number of days before the Trigger Date that the To Do entry should be created. Note, the batch control ID of TD-CCCB is used to refer to this background process.
A To Do entry will then be created on a future date.
Customer Contacts Can Be Used As Case Files
If a taxpayer calls with a complaint (e.g., they suspect their bill is too high), you can start a “case file” for the complaint by creating a customer contact. This customer contact should be marked as “open”.
Alerts. Customer contacts that are marked as being open cause an alert to appear when the taxpayer is displayed on control central.
Over time, as you work on the case, you can add entries to the customer contact’s log to describe your progress.
You can use the customer contact’s reminder functionality to remind you to check out the case on a future date (or dates).
When the case is resolved, you simply turn off the customer contact’s open indicator and add an appropriate entry to the log describing the resolution.
Maintaining Customer Contacts
Customer contacts are used to record when and why a customer contacted your company. This information is used for both audit and statistical purposes. The topics in this section describe how to maintain customer contacts. Refer to The Big Picture Of Customer Contacts for background information about customer contacts.
Contents
Customer Contact - Characteristics
Customer Contact - Main
Open Taxpayer Information, Customer Contact to maintain a customer contact.
The dashboard. A zone exists in the dashboard that can be used to easily create new customer contacts.
Description of Page
Enter the Person ID of the person associated with the customer contact.
Turn on the Open switch if the event that necessitated the contact hasn’t been resolved. For example, if a taxpayer calls with a high bill complaint and you can’t resolve it immediately, you would turn on the Open switch and enter an appropriate entry in the Log. Refer to Customer Contacts Can Be Used As Case Files for more information.
Enter the Contact Date and Contact Time.
Default note. The current date and time are defaulted.
The User ID of the user who created the contact is displayed adjacent to Contact Date / Time.
Every customer contact has a Contact Type that classifies the record for reporting purposes. Every contact type, in turn, references a Contact Class. The class categorizes customer contacts into larger groupings for reporting purposes.
Adding a customer contact may cause a letter to be generated. You can set up a customer contact type to generate a form letter whenever a customer contact of this type is added. In fact, this is the only way to generate a letter in the system. Refer to Customer Contacts Are Used To Trigger Letters for more information.
Use Comments to describe the contact.
If a letter template is associated with the customer contact type / class:
· Letter Information describes the status of the letter (i.e., whether it has been printed or not).
· If the letter has been printed and you want to reprint, please turn on the reprint switch (this will cause the letter to be reprinted the next time the respective letter print background process executes).
· If your implementation team has plugged-in an Online Letter Image algorithm on Installation Options - Algorithms, the Display Letter button appears. When clicked, the image of the letter is rendered in a PDF and displayed in an Adobe reader. Refer to Technical Implementation Of Online Letter Production for a technical description of how letter images are produced.
The grid that follows contains a diary of past (and future) events related to the customer contact. Refer to A Customer Contact May Trigger Reminders and Customer Contacts Can Be Used As Case Files for more information about when you would use this log.
There are two ways to add a row to the log:
· You can click the + button to add a new row.
· You can navigate to the Log tab and insert a new row into the scroll.
Regardless of the method used to add a log entry, the following information appears on a log entry:
· Create Date / Time is the date and time when the log entry was created.
· Created by identifies the user that created the log entry.
· Use Comments to describe the reason for the log entry. If you have lengthy comments, we recommend navigating to the Log tab (by clicking the adjacent Go To button) as there is a larger input field on this page.
· The remaining fields are only used if you want the system to remind you about this customer contact on a future date. If you enter these fields, the system will create a To Do entry to remind you about the customer contact.
· If the To Do entry should be addressed to a specific user, choose a Reminder type of Send to User and enter the user’s User ID.
· If the To Do entry should be addressed to a group of users, choose a Reminder type of Send to Role and enter the user group’s To Do Role.
· Use Trigger Date to define the latest date on which the To Do entry should be created. The reason we indicated this should be the latest date is because the background process that’s responsible for creating these To Do entries has a parameter called “lead time”. This parameter is used to define the number of days before the Trigger Date that the To Do entry should be created. Note, the batch control ID of TD-CCCB is used to refer to this background process.
Multiple reminders. You can set up multiple reminders on a customer contact. For example, you can indicate that you want to be reminded every Monday for the next 4 weeks to check on the issue that caused a given customer contact to arise. You’d do this be entering 4 log entries where each as the desired Trigger Date.
Customer Contact - Log
The log contains a diary of past (and future) events related to the customer contact. Open Taxpayer Information, Customer Contact and navigate to the Log tab to maintain a customer contact’s log. Note, you can also maintain this information on the Main tab.
Refer to A Customer Contact May Trigger Reminders and Customer Contacts Can Be Used As Case Files for more information about when you would use this log.
Description of Page
Date / Time is a display-only field that contains the date and time when the log entry was created.
Log ID is the system-assigned, unique identifier of the log entry.
Created by is a display-only field that contains the ID and name of the user who created the log entry.
Use Comments to describe the reason for the log entry.
The remaining fields are only used if you want the system to remind you about this customer contact on a future date. If you enter these fields, the system will create a To Do entry to remind you about the customer contact.
· If the To Do entry should be addressed to a specific user, choose a Reminder type of Send to User and enter the user’s ID in Send To.
· If the To Do entry should be addressed to a group of users, choose a Reminder type of Send to Role and enter the user group’s To Do Role in Send To.
· Use Trigger Date to define the latest date on which the To Do entry should be created. The reason we indicated this should be the latest date is because the background process that’s responsible for creating these To Do entries has a parameter called “lead time”. This parameter is used to define the number of days before the Trigger Date that the To Do entry should be created. Note, the batch control ID of TD-CCCB is used to refer to this background process.
Customer Contact - Characteristics
Open Taxpayer Information, Customer Contact and navigate to the Characteristic tab to maintain a customer contact’s characteristics.
Note. We do not anticipate a great deal of use for characteristics on customer contacts. The primary purpose of catering for characteristics on this object is to allow a customer contact that triggers a letter to be able to extract information from any object in the system. For example, if you have an algorithm / background process that wants to generate a letter in respect of a given location, you could create a customer contact and reference the location as a characteristic value. Then, when the information is extracted for the letter, the extract algorithm could extract fields from the location to merge onto the letter.
Description of Page
Note. You can only choose characteristic types defined as permissible on a customer contact. Refer to Setting Up Characteristic Types & Their Values for more information about characteristic types. In addition, the characteristic type must also be defined as valid for the customer contact’s type. Refer to Setting Up Customer Contact Types for more information about customer contact type.
The following fields display:
Characteristic Type Indicate the type of characteristic.
Characteristic Value Indicate the value of the characteristic.
As described under Customer Contacts Are Used To Trigger Letters, you must create a customer contact whenever you want to send a letter to a taxpayer. The contents of this section describe the technical implementation of letter production.
Contents
Letter Templates Control The Information Merged Onto Letters
Technical Implementation Of Online Letter Images
Technical Implementation Of Batch Letter Production
Reproducing The Letter Print Flat File
How To Reprint A Specific Letter
Letter Templates Control The Information Merged Onto Letters
Customer contacts that trigger letters reference a customer contact type that, in turn, references a letter template. The letter template controls the following:
· It contains an algorithm that is responsible for extracting the information merged onto your letters. Specifically, algorithms of this type create the “flat file records” that are passed to your letter print software. Algorithms of this type are called under the following scenarios:
· The background process that builds the flat file that’s passed to your letter print software calls these algorithms to construct the “flat file records” for each letter.
· If your letter print software has the ability to construct a real-time image of a letter (in a PDF), you can plug-in an Online Letter Image algorithm on the Installation Record. This type of algorithm will call the letter’s letter template’s extract algorithm to extract the information that is merged onto the letter. Refer to Technical Implementation Of Online Letter Image for the details.
· It contains the ID of the background process that builds the flat file that’s passed to your letter print software. The base package example of this process (known by the batch control ID of LTRPRT) simply calls each customer contact’s letter template’s extract algorithm to format the information placed onto the flat file.
Technical Implementation Of Online Letter Images
Users can view an image of any letter that is sent to a taxpayer if you set up the following:
· Plug-in an Online Letter Image construction algorithm on the Installation Record. Refer to ONLD-LT for an example of such an algorithm. Note, if your letter print software is not capable of producing a PDF containing an image of a letter, users will not be able to view images of letters.
· Plug-in the appropriate extract algorithm on each letter template. Algorithms of this type format the records that contain the taxpayer information that is passed to your printing software.
When you plug-in these algorithms, a button appears on Customer Contact - Main for customer contacts whose customer contact type references a letter template. When a user clicks this button, the following takes place:
· The installation record’s Online Letter Image construction algorithm is executed.
· This algorithm calls the customer contact’s letter template’s extract algorithm. This algorithm constructs the information that’s merged onto the letter and returns it to the Online Letter Image algorithm. This algorithm, in turn, passes it to your letter print software.
· Your letter print software renders an image of the letter in a PDF and returns it to the Online Letter Image algorithm.
· And finally, the Online Letter Image algorithm displays the PDF in a separate Adobe session.
Technical Implementation Of Batch Letter Production
The batch process that extracts letter information (known by the batch control ID of LTRPRT) reads all customer contact records in a given run number that are marked with its batch control ID. For each customer contact, it creates numerous records on a flat file. These records contain the taxpayer information that is merged onto your letters.
The information that is placed on each record is controlled by the customer contact’s letter template’s extraction algorithm. Refer to Letter Templates Control The Information On Letters for more information.
The records on the flat file can be constructed in either a fixed-position or field-delimited format. The format that’s used is controlled by a parameter supplied to the LTRPRT background process.
Print / routing methods. If you require different print formats, you must create new letter extract algorithms and plug them in on your letter template.
Reproducing The Letter Print Flat File
You can reproduce the flat file containing the information sent to your printing software at any time. Simply request the respective extract batch process and specify the run number associated with the historic run.
How To Reprint A Specific Letter
If you need to reprint a specific letter, navigate to Customer Contact - Main and turn on the Reprint switch (and save the customer contact). Alternatively, if your implementation has enabled the online creation of letter images, you can also click the Display Letter button on this page and then print the resultant PDF on your local printer.