Billing
In this section, we describe how to manage your taxpayer’s bills.
Contents
Financial Transactions On A Bill
Billing is one method used to establish tax assessments for bill-based tax types. Examples of these tax types include real property and vehicle taxes. Many obligation types will not use billing functionality.
Refer to Defining Obligation Types for a description of the different obligation types.
The billing process is used when the tax authority has the information required to calculate and assess tax for a taxpayer, in contrast to tax types where the taxpayer must file a tax return.
Overdue processing is used to govern collections processing, including the sending of collections letters to taxpayers with past due obligations.
Refer to Overdue Financial Obligations for more information on overdue processing.
The topics in this section provide background information about a variety of billing topics.
Contents
An Illustration Of A Simple Bill
A High Level Overview Of The Bill Creation Process
Cancel / Rebill Incorrect Bill Segments
How Rates Affect The Information On Bill Segments
Bill Frequency - Bill Cycle vs Bill Segment Duration
Prorating Charges When a Rate is Applied
Billing Financial Transaction Considerations
The Source Of Bill Routing Information
A Bill May Affect More Than Just Taxpayer Balances
Using Billable Charges for Pass Through / Convergent Billing
Idiosyncratic Manual Bill Cancellation
An Illustration Of A Simple Bill
The following diagram illustrates a simple bill:
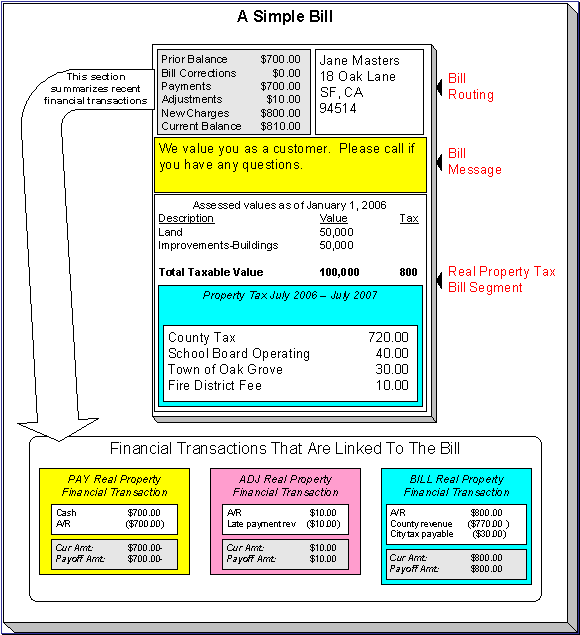
The following concepts are illustrated above:
A bill is produced for an account A bill is produced for an account. Over time, an account receives many bills.
A bill summarizes financial transactions A bill contains information about the various financial transactions that have taken place since the last bill was produced (i.e., payments, adjustments, and bill corrections). The above illustration shows a bill with financial transactions for new charges, a payment, and an adjustment.
A bill is routed to persons A copy of the bill is sent to every person linked to the account who requires a copy of the bill.
A bill contains messages A bill may contain messages.
A bill typically contains bill segmentsA bill typically contains one bill segment for every active billable obligation linked to its account.
A bill segment contains calculation details A bill segment contains information showing how the segment was calculated and how it should be printed on the taxpayer’s bill.
A High Level Overview Of The Bill Creation Process
When the system is asked to produce a bill for an account, it attempts to create one or more bill segments for every non-cancelled / non-closed billable obligation linked to the account. Whether or not an obligation contributes bill segment(s) to a bill is a complicated subject as the system supports a wide variety of bill segment creation methods.
The system determines the bill segment creation method to use from the bill segment type on the obligation's obligation type.
Some bill segment creation methods may apply the obligation's rate to a specific number / amount in order to calculate how much the taxpayer owes. The details of the calculations are captured in the bill calculation lines. For more information, refer to How Rates Affect The Information On Bill Segments for the details. Refer to Effective Dates & Proration for information about how the system prorates changes to rates and prices during a bill period.
If errors are detected during the bill segment creation process, the bill segment is saved with its error. The system then proceeds to the account’s next obligation. This way, a user can see all problematic bill segments so they can be corrected en masse. Refer to Bill Errors for information about how to deal with bill errors.
When every segment on a bill is error free, the bill is ready to be completed. When a bill is completed, the system:
· Creates a bill routing for each person linked to the account who requires a copy of the bill. The routing information controls the format of the printed bill and how the bill is sent to the person. Refer to The Source Of Bill Routing Information for the details.
· Links all bill messages to the bill. A bill message can come from a variety of sources. Refer to The Source Of Bill Messages for the details.
· If the Freeze At Bill Completion installation option has been turned on:
· All freezable bill segments will be frozen.
· All freezable adjustments whose adjustment type indicates Freeze At Bill Completion will be frozen.
· Sweeps recent financial transactions that have been created since the last bill was completed.
· There are several other functions that happen at completion time. Refer to the description of the Complete button under Bill Lifecycle for the details.
And that’s it; the bill can now be sent to the taxpayer.
The remaining topics in this section provide more information about the creation and completion of bills.
Batch and real-time bill creation. Anything the batch bill process does for whole sets of accounts, you can do to a specific account on-line / real time. Refer to How To Create A Bill For All Obligations Linked To An Account for information about how to create a bill on-line / real time. Refer to Batch Billing for more information about the batch bill creation process.
Bill Errors
The topics in this section describe errors that are detected when the system creates a bill.
Contents
Bill Segment Errors
If you consider the huge number of variables involved in the creation of a bill segment, it probably won’t surprise you to learn that occasionally, some bill segments are in error.
Errors tend to be caused by missing or inconsistent data. Some examples of classic errors:
· Missing master data. For example, if a bill is supposed to be routed to the account’s mailing address and the account doesn’t have such an address, an error is generated.
· Missing rate data. For example, if a rate contains a taxpayer specific charge and there is no value defined on the taxpayer’s obligation, an error is generated.
The system saves bill segments that are in error just as it saves bill segments that are error-free. This is done because bill segments are nothing more than a snapshot of the data that was used to calculate the charges. By saving the snapshot, you can see the information the system used when it detected the error and therefore more effectively fix the cause of the error. The standard way to fix an error is to:
· Look at the bill segment to determine the cause of the error.
· Correct the cause of the error.
· Regenerate the bill segment. Regeneration simply deletes the offending segment and recreates a new segment using the corrected information.
For every bill segment in error, a record is written to the Bill Segment Exception table.
Refer to How To Correct A Bill Segment That’s In Error for instructions describing how to correct a bill segment.
It’s obvious but worth stressing that a bill may contain some segments that are perfect and others that are in error. Once all segments that are in error are corrected, the bill can be completed (and sent to the taxpayer).
If the bill segment in error was created as part of the batch bill process, the system attempts to fix the offending segment(s) when cyclical billing runs again by regenerating it. Therefore, if the cause of the error is fixed during the day, the system will automatically regenerate the bill segment when batch billing next runs; you don’t have to manually correct each bill. And once a bill is error-free, it will be completed and sent to the taxpayer.
Refer to Batch Billing for more information.
Bill Completion Errors
In addition to errors on bill segments, there may also be errors detected when the system attempts to complete a bill. For example, if the system cannot find a mailing address, the bill will be in error (as opposed to one of its bill segments).
Errors tend to be caused by missing or inconsistent data. Some examples of classic errors:
· Missing mailing address. For example, if the system cannot find an address to which the bill can be routed, it generates an error.
· Bill segments are in error. If a bill contains bill segments that are in error, it cannot be completed and an error is generated.
The system saves bills that are in error just as it saves bills that are error-free. This is done because bills are nothing more than a snapshot of the data that was used to calculate the charges. By saving the snapshot, you can see the information the system used when it detected the error and therefore more effectively fix the cause of the error. The standard way to fix an error is to:
· Look at the bill to determine the cause of the error.
· Correct the cause of the error.
· Recomplete the bill.
For every bill in error, a record is written to the Bill Exception table.
Refer to How To Correct A Bill That’s In Error for more information.
If the bill completion error was created as part of the batch bill process, the system attempts to recomplete the bill at the next cyclical billing run. Therefore, if the cause of the error is fixed during the day, the system will automatically complete the bill when batch billing next runs; you don’t have to manually complete each bill.
Refer to Batch Billing for more information.
Cancel / Rebill Incorrect Bill Segments
Sometimes the error on a bill segment is not detected by the system. Such errors occur when the data used to calculate the bill is valid, but wrong. For example, the sales tax percent was entered incorrectly on a rate factor.
There is no way the system can detect such problems and therefore the system freezes the bill segment and routes the bill to the taxpayer. To correct such a bill segment, you must cancel the offending segment and create a new segment (after correcting the cause of the problem). We refer to this process as cancel / rebill.
Refer to How To Cancel / Rebill A Bill Segment for more information about how to cancel / rebill a frozen bill segment.
You must use the cancel / rebill process to correct problems on frozen bill segments. This is because a frozen bill segment can be thought of as having been posted to your general ledger (even if the GL interface hasn’t run). And once a financial transaction is posted to the general ledger, it can only be removed via a reversal. Contrast this to bill segments that are in error – they can be deleted because they were never posted to the general ledger.
Refer to Bill Segment Lifecycle for more information about the differences between bill segments that are frozen and those that are in error.
Bill segments are canceled / rebilled. It’s important to stress that bill segments are canceled and rebilled (as opposed to bills). If every bill segment on a bill is incorrect, you must cancel / rebill each individual bill segment.
Note. Using the cancel or cancel/rebill functionality will cause the cancel and rebill details to be swept on to the taxpayer’s next bill.
How Rates Affect The Information On Bill Segments
After a billable quantity has been compiled, the system applies the obligation’s rate to the quantity to determine how much to charge the taxpayer. We refer to this process as “rate application”. Refer to Rates for detailed information about rates.
Not all obligations use a rate! The obligation’s obligation type defines whether or not the obligation needs a rate. The bill calculation algorithm plugged-in on the bill segment type that's referenced on the obligation's obligation type controls whether or not the system calls the obligation's rate to calculate charges. Refer to Defining Bill Segment Types for a description of the various bill segment creation algorithms that are supported in the system.
Your proration choices impact what appears on a bill. A rate contains a variety of effective-dated information (e.g., the prices are effective-dated, the structure of the rate is effective-dated, etc.). If this effective-dated information changes during a bill period, the system may need to prorate the charges. For example, if the sales tax percentage changes mid-period, the system can prorate the tax change (e.g., 20 days at 6% and 11 days at 6.25%). When you setup a rate, you define exactly how the system handles changes that occur during a bill segment. For example, you can tell the system that sales tax changes should not be prorated. Rather, it should use the value effective at the start / end of the bill period (note, you have several other options). We mention this because your choices have a large impact on how a rate affects the information on bill segments. Refer to Effective Dates & Proration for more information.
Rate application is a very sophisticated process as it can affect every aspect of a bill segment. The following points describe how rate application works at a high-level:
· The calculation details that were amassed earlier are passed into rate application.
· Next, the rate schedule’s rate quantity rules (if any) are executed. Rate quantity rules are used to calculate rate quantities (RQ) referenced in the rate that cannot be derived from the calculation details. For example, if you have a rate that has a charge based on the number of days in the bill period, a rate quantity rule would be necessary to calculate the number of days in the bill period.
· The system determines which of the rate’s rate versions should be processed. Note, a flag on the rate schedule allows you to control what happens if multiple rate versions are detected during the bill period. A bill segment “calculation detail” is created for each such rate version. Each calculation detail contains the results of executing the rate version’s rate components (where a separate bill line is created for each rate component). Each bill line contains:
· An audit of what was priced.
· How the printed bill line should look (if the bill lines is printed).
· How the amount of the bill line should be booked in the general ledger.
Note. There are many plug-in spots available on a rate component. These plug-ins can manipulate virtually every aspect of the bill segment. This means if you require functionality that isn’t support by the base package rate components, you can build additional rate component plug-ins to do whatever you need.
· After every rate version is processed, rate application returns the calculation details to the process that called it. This point is important as it means that rate application executes in memory (i.e., it does NOT insert the calculation details on the database, rather, it returns them to whatever process called rate application). Because rate application executes in memory, it can be used to perform billing calculations in many parts of the system. For example:
· Billing uses rate application to calculate the charges that are eventually saved on the bill’s bill segments.
· The Rate Check transaction calls rate application when you want to check a rate real-time. When you use this transaction, you enter the quantities that are passed into rate application and then rate application shows you the calculation details that result.
Refer to Rates for more information about how rates are constructed.
Bill Frequency - Bill Cycle vs Bill Segment Duration
An account’s bill cycle defines when the system attempts to create bill segments for the account’s billable obligations. The word “attempt” is stressed because an obligation may not have a bill segment on every bill created for its account.
Some examples will help make the point:
· An account may be on a monthly bill cycle (meaning we attempt to create a bill every month for the account) but contain only biannual obligations. However, this is not sensible. Why? Because the system would attempt to create a bill every month for the account’s obligations, but only twice during the year would it succeed (because the obligations have a biannual duration).
· An account may be on a biweekly bill cycle (meaning we attempt to create a bill every 2 weeks for the account) and contain a mixture of biweekly, monthly, and quarterly obligations. In this scenario, every two weeks the system would create a bill that contains at least one bill segment (for the biweekly obligation). However, 12 times a year, the bill will contain an additional bill segment for the monthly obligation. And 4 times a year, the bill will contain one more bill segment (for a total of 3) for the quarterly obligation.
In sum, the account’s bill cycle controls when the system attempts to create a bill for the account’s obligations. Whether an obligation contributes a bill segment to the bill is a complicated subject. The topics in this section describe how the system knows it’s time to create a bill segment for an obligation.
Important! An account’s bill cycle should attempt to create bill segments at least as often as the shortest obligation duration. For example, if an account has both monthly and quarterly obligations, the account should be placed on a monthly bill cycle. Refer to How Does An Account Get Its Bill Cycle? for more information.
Contents
Ways To Control The Start Date Of A Bill Segment
Ways To Control The End Date Of A Bill Segment
Preventing Short Bill Segments
Ways To Control The Start Date Of A Bill Segment
Bill segments produced for an obligation have two time periods:
· The bill segment period. The bill segment period defines the entire period of time covered by a bill segment’s charges.
· The billable period. The billable period defines the period of time used to calculate the number of days for daily charges.
The billable period almost always starts one day after the bill segment period. The billable period always ends on the bill segment’s end date. For example, a bill segment period that spans 5-Jan-2002 through 6-Feb-2002 will almost always have a corresponding billable period of 6-Jan-2002 through 6-Feb-2002. The reason that the start dates don’t match is because a bill segment’s start date equals the end date of the prior bill segment (i.e., the start date was already counted in the previous bill segment’s period and we don’t want to count it twice).
Ways To Control The End Date Of A Bill Segment
The following points describe the different methods that can be used to define the end date on an obligation’s bill segments:
· Bill Period Schedule. Obligations may have the end date of their bill segments defined on the user-maintained bill period calendar. This option is used when bill segments must fall on strict calendar boundaries (e.g., quarterly bills that end on the last day of the quarter).
· Anniversary. In addition to the Bill Period Calendar method, obligations may have their bill segment end date based on the obligation start date. For example, if an obligation started on the 16th of some month, the ongoing bill segments will start on roughly the 16th of each month.
· ASAP. For obligations that use neither the Bill Period Calendar nor Anniversary methods, the system assumes the end date of a bill segment is the current date.
· Billable Charge. For non-metered obligations that exist to levy billable charges, the start AND end dates are defined on the billable charge information that is entered by a user or interfaced from an external system.
The topics in this section discuss each of the above methods.
Contents
Using The Bill Period Schedule Method
Using The Bill Period Schedule Method
The bill period schedule method causes the bill segment end date to be calculated using a bill period schedule. The bill period’s schedule defines when bill segments are produced and their respective end dates. This method is used when the bill segment needs to fall on strict calendar boundaries (e.g., quarterly bills that end on the last day of the quarter).
The obligation’s obligation type indicates if the obligation uses this method. If so, the obligation type also specifies the bill period whose schedule defines the end dates.
Future and Past End Dates. It’s important to be aware that a bill period schedule can be used to generate end dates that are in the future or in the past.
Using The Anniversary Method
The anniversary date method causes the bill segment end date to be calculated based on the first day of service. For example, if an obligation started on the 16th of some month, the ongoing bill segments will start on roughly the 16th of each month. When using this method, you also define the applicable billing frequency (i.e., monthly, bi-monthly, quarterly, etc.).
The following table contains the bill periods for an obligation’s starting on 23-Feb-99 that uses a monthly frequency.
|
Start Date |
End Date |
Billing Days |
|
23-Feb-99 |
25-Mar-99 |
30 |
|
25-Mar-99 |
25-Apr-99 |
31 |
|
25-Apr-99 |
25-May-99 |
30 |
|
25-May-99 |
25-Jun-99 |
31 |
|
25-Jun-99 |
25-Jul-99 |
30 |
|
25-Jul-99 |
25-Aug-99 |
31 |
|
25-Aug-99 |
24-Sep-99 |
30 |
|
24-Sep-99 |
24-Oct-99 |
30 |
|
24-Oct-99 |
24-Nov-99 |
31 |
|
24-Nov-99 |
24-Dec-99 |
30 |
|
24-Dec-99 |
24-Jan-00 |
31 |
|
24-Jan-00 |
23-Feb-00 |
30 |
|
23-Feb-00 |
25-Mar-00 |
31 |
Future and Past End Dates. It’s important to be aware that anniversary billing can generate end dates that are in the future or in the past. The future-option generates the next anniversary date after the current date. The past-option generates the anniversary date that immediately precedes the current date.
The obligation’s obligation type indicates if the obligation uses this method. If so, the obligation type also specifies the billing frequency that determines the amount of time between bill segments.
For more information about the obligation type attributes that control this method, refer to Setting Up Obligation Types.
Using Billable Charges
Bill segments for billable charge obligations have both their start and end dates defined on the respective billable charge.
For more information about billing billable charges, refer to How To Create An Ad-hoc Bill. For more information about creating a billable charge, refer to Maintaining Billable Charges. For more information about interfacing a billable charge from an external system, refer to Uploading Billable Charges.
The obligation type indicates if the obligation uses this method.
For more information about the obligation type attributes that control this method, refer to Setting Up Obligation Types.
Preventing Short Bill Segments
Every billable obligation type contains an attribute defining the minimum number of days on a bill segment. Whenever the system attempts to create a bill segment other than the final bill segment, it checks if the number of days is at least as great as the minimum. If not, the bill segment will not be created as part of this bill run. Rather, the system waits until the number of days in the bill segment is at least as large as the minimum. This is true for all methods of bill duration calculation.
Prorating Charges When a Rate is Applied
It is possible for some of the prices that appear on a bill segment to change during the course of the bill period.
Refer to Effective Dates & Proration for more information about how charges are prorated during rate application.
Batch Billing
If your implementation uses cyclical billing, most bills will be created by the batch bill process (known by the batch control ID of BILLING) and require no human intervention before they can be finalized and sent to a taxpayer. The others will be created by users on-line / real time. This section discusses several important concepts associated with batch billing.
Contents
Window Billing And The Bill Cycle Schedule
Confirming A Batch Of Bills Before Completing Them
Canceling A Batch Of Bills After They're Complete
Reopening A Batch Of Bills After They're Complete
Fixing Errors Detected In Batch Billing
Window Billing And The Bill Cycle Schedule
Refer to The Cyclical Billing Process & Window Billing for more information about how an account’s bill cycle dictates when a taxpayer is billed.
Confirming A Batch Of Bills Before Completing Them
If you’re implementing new rates or if something unusual is being introduced that affects billing and your implementation is using the cyclical billing process, you may want to turn off the bill cycle schedule’s Freeze and Complete switch. If this switch is off, the system creates bills, it just doesn’t freeze and complete them. You can then review the entire batch of bills to make sure they’re clean.
· If you find the bills are wrong, correct the source of the error and rerun the bill cycle. The system will remove all incomplete bills and then reproduce them using the corrected information in the system.
· If you find the bills are correct, turn the Freeze and Complete switch on and rerun the cycle. The system will remove all incomplete bills and then reproduce them. Assuming nothing changed, the bill amounts will be the same.
Refer to Setting Up Bill Cycles for more information.
Canceling A Batch Of Bills After They're Complete
If you need to cancel an entire batch of bills because they were created using faulty data (e.g., the wrong tax rate was defined in the rate), you can. A background process called MASSCNCL exists for this purpose.
This background process will cancel all the frozen bill segments for the latest run of a given bill cycle’s schedule. Optionally, you can cancel bills for a given bill date within the bill cycle’s schedule. The cancel reason used on the bill segment is the one marked as the bill cancel reason for mass cancel. Refer to Setting Up Bill (Segment) Cancellation Reasons for more information.
When the cycle is billed again, new bill segments will be created, and the original bill segments and the cancellations will automatically be hidden from the taxpayers.
Reopening A Batch Of Bills After They're Complete
If you need to reopen an entire batch of bills because they were completed prematurely, for instance if appraisal data did not get updated before billing ran, you can. A background process called MASSROBL exists for this purpose.
This background process will reopen all the bills for a given bill date for the latest run of a given bill cycle’s schedule.
Fixing Errors Detected In Batch Billing
If an “error” bill segment is created by the batch billing process, the system attempts to fix the offending segment at the next cyclical billing run by regenerating it using the information that exists at that time. Therefore, if the cause of the error is fixed during the day, the system will automatically regenerate the bill segment when batch billing next runs; you don’t have to manually correct each bill. And, once a bill is error-free, it will be completed and sent to the taxpayer.
Important! Automatic regeneration only works during the account’s bill window. If an “error” bill segment is not successfully regenerated on the last night of the account’s bill cycle, it will remain in error until the next time the account’s cycle runs (unless a user corrects it real time). At that time, the system will generate another bill error indicating the prior bill segment is in error (and then there’ll be two bill segments in error).
Completing Pending Bills
If you need to complete pending bills created by the batch billing process, you can. A background process called C1-BLCMP, exists for this purpose.
This background process will complete all pending bills on a given bill date for a given bill cycle’s schedule. This process does not delete and regenerate freezable bill segments linked to pending bills.
Refer to Bill Errors for more information.
Billing Financial Transaction Considerations
The topics in this section provide information about the financial impact of a bill segment.
Contents
Billing - Current Balance versus Payoff Balance
The Source Of GL Accounts On A Bill Segment's Financial Transaction
Billing - Current Balance versus Payoff Balance
A bill segment’s financial transaction affects an obligation’s payoff balance and/or current balance. In this section, we describe these two balances.
Warning! If you do not understand the difference between payoff balance and current balance, refer to Current Amount versus Payoff Amount.
Contents
When Current Balance Equals Payoff Balance
When Current Balance Differs From Payoff Balance
Bill Segment Type Controls Which Balance(s) Are Affected
When Current Balance Equals Payoff Balance
For most obligations, payoff balance and current balance are always the same (or in colloquial speech – the amount the taxpayer thinks they owe equals what they really owe). Let’s run through a typical example. The values in the payoff balance and current balance columns reflect the amount due after the financial transaction has been applied (i.e., the running balance):
|
Date
|
Financial Transaction
|
Payoff Balance |
Current Balance |
|
1-Jan-99 |
Bill: $125 |
125 |
125 |
|
15-Jan-99 |
Payment: $150 |
-25 |
-25 |
|
2-Feb-99 |
Bill: $175 |
150 |
150 |
|
14-Feb-99 |
Payment: $150 |
0 |
0 |
|
3-Mar-99 |
Bill: $200 |
200 |
200 |
|
15-Mar-99 |
Payment: $150 |
50 |
50 |
|
2-Apr-99 |
Bill: $225 |
275 |
275 |
As you can see, payoff balance and current balance are always in sync.
When Current Balance Differs From Payoff Balance
For some obligations, payoff balance and current balance differ (or in colloquial speech ‑ the amount the taxpayer thinks they owe differs from what they would owe if they wanted to pay off their account).
Note. The base product does not currently support billable obligations types where the current balance would differ from payoff balance as described above.
Bill Segment Type Controls Which Balance(s) Are Affected
Every bill segment references a bill segment type (the bill segment type comes from its obligation’s obligation type). The bill segment type controls how payoff balance and current balance are affected by the bill segment amount. It also controls the algorithm used by the system to calculate the bill segment’s bill lines.
Refer to Defining Bill Segment Types for more information about how bill segment type affects how a bill segment is produced and how its financial transaction is generated.
The Source Of GL Accounts On A Bill Segment's Financial Transaction
A bill segment’s financial transaction also contains the double-sided accounting entry that defines how the bill segment affects the general ledger.
Refer to The Source Of GL Accounts On Financial Transactions for a description of where the system extracts the distribution codes used to construct the GL accounts.
The Source Of Bill Routing Information
When a bill is completed, the system creates a bill routing for each person linked to the account who receives a copy of the bill. The bill routing record contains the information that controls how, where and to whom a bill is sent.
The following points describe how this works:
· Each person who receives a copy of an account’s bill is listed on the account’s person information.
· A bill routing is created for each such person when the bill is completed.
· The information that appears on the bill routing record is controlled by the bill route type specified on the respective account / person information:
· If the bill route type indicates the person’s bills are routed via fax, the “address line 1” address constituent is populated with the person’s fax number. The system knows which of a person’s phone numbers is a fax number by the phone type. If the person has multiple fax numbers, one is selected at random.
· If the bill route type indicates the person’s bills are routed via email, the “address line 1” address constituent is populated with the person’s Email address.
· If the bill route type indicates the person’s bills are routed via the postal service, the address constituents are populated with the address specified on the account / person's bill address source. Note, if the person has a seasonal address effective on the business date, the seasonal address will be used regardless of the value of bill address source.
Refer to Printing Bills and How To Reprint A Bill (For The Original Recipients or For Someone New) for more information. Refer to Account – Person Information for information regarding how to control who receives a copy of a bill, where the bill is sent, and how the bill is formatted.
Bill Messages
The topics in this section describe how messages are linked to a bill and bill segment.
Contents
Substituting Field Values Into A Message
The Source Of Bill Messages
When a bill is completed, the system sweeps bill messages from the following sources onto the bill.
Bill or Bill Segment Messages. Bill messages will be linked either to the bill or to one of its bill segments depending on the source of the bill message code. In other words, messages associated with an obligation (directly or indirectly) will be linked to the bill segment; messages associated with an account (directly or indirectly) will be linked to the bill.
· All permanent and temporary bill messages linked to an account are linked to the bill when it is completed. Refer to Account – Bill Messages for more information. Note well that all temporary bill messages are removed from the account when they are swept onto a bill (a temporary message is swept onto the next bill produced for the account).
· The system checks if the bill’s account’s account type has bill messages. If so, it links all such messages that are effective on the bill date to the bill when it is completed. Refer to Setting Up Account Type Bill Messages.
· All permanent and temporary bill messages linked to obligations that contributed bill segments to the bill are linked to their respective bill segment when the bill is completed. Refer to Obligation – Miscellaneous for more information. Note well that all temporary bill messages are removed from the obligation when they are swept onto a bill segment (a temporary message is swept onto the next bill segment produced for the obligation).
· The system checks if each bill segment’s rate has bill messages. If so, it links all such messages that are effective on the bill segment’s start date to the bill segment when the bill is completed. Refer to Rate Schedule – Bill Messages.
In addition, a user may manually add an ad hoc message to a bill.
And finally, you can develop your own background processes and algorithms that add bill messages to accounts, obligations, bills and/or bill segments. Refer to Substituting Field Values Into A Bill Message for examples.
Substituting Field Values Into A Message
Many bill messages contain static text (i.e., the message is the same on every bill). However, the system supports messages whose contents are dynamic. For example, consider the bill message Your 2007 taxes were reduced due to your homestead deduction of $6,000. This message contains two substitution values (the year and the amount) as is therefore considered dynamic.
Dynamic messages can be implemented as follows:
· Create a bill message code whose Message on Bill contains substitution values. For example, the bill message code to produce the message illustrated above would contain the following Message on Bill - Your %1 taxes were reduced due to your %2 of %3.
· Use either of the following methods to link the message code and its substitution parameters to the bill:
· Create a background process or algorithm to insert a permanent or temporary bill message on the appropriate accounts. Then, when an account’s bill is next completed, the system will sweep the message (and its substitution parameters onto the bill).
In addition to inserting the appropriate bill message code, your background process / algorithm must also insert the appropriate substitution values. The name of the table in which account messages are inserted is CI_ACCT_MSG. The name of the table in which a message’s substitution values are inserted is CI_ACCT_MSG_PRM (you will insert one row for each substitution field).
· Rather than adding the dynamic message to account (and then letting the bill completion logic transfer the account message to the bill), you could construct a bill completion algorithm that adds the message code and substitution values on the bill (during bill completion). The name of the table in which bill messages are inserted is CI_BILL_MSGS. The name of the table in which a message’s substitution values are substituted is CI_BILL_MSG_PRM (you will insert one row for each substitution field).
A Bill May Affect More Than Just Taxpayer Balances
The topics in this section provide information about obscure things that may happen when a bill is created, frozen, or canceled.
FT Freeze Repercussions
Refer to Obscure Things That Can Happen for more information about things that can happen when an FT is frozen (and FT’s get frozen during billing).
Using Billable Charges for Pass Through / Convergent Billing
The term “pass through” billing is used to describe the practice of receiving charges calculated by third parties and presenting them on the taxpayer's bill along with your own charges. “Pass through” billing is implemented in the system using Billable Charges.
The following points provide information to help you decide the most appropriate way to implement “pass through” billing given your specific requirements:
· Taxpayers with pass through charges will need a separate obligation to hold the pass through charges. We refer to this type of obligation as a “billable charge” obligation.
Note. An Obligation’s obligation type controls whether an obligation can have billable charges linked to it. Specifically, the obligation type must have a “special role” of Billable Charge.
· A billable charge obligation holds the billable charges until the taxpayer is next billed. At that time, a separate bill segment will be created for each unbilled billable charge linked to the billable charge obligation.
· While it is not required, we recommend creating a separate billable charge obligation for each type of pass through charge.
· You can interface billable charges using the Billable Charge Interface. The interfaced charges can consist of any of the following:
· Pre-calculated bill lines that will be presented “as is” to the taxpayer.
· Rate quantities that are used by the system to calculate the charges on behalf of the third party.
· The bill lines on a billable charge can fit into any of the following categories:
· Memo-only (i.e., don’t affect the general ledger). A bill line that is memo-only contains information that is purely informational.
· Show on the taxpayer bill. It is possible to create bill lines that affect the general ledger, but are not shown on the taxpayer’s bill. This is an unusual practice, but it happens.
· Summary / detail. Each bill line has an indication of whether it is a summary or detail line. This only impacts bill presentation.
Note. The above indicators can be defaulted onto a billable charge line by using Billable Charge Line Types when you interface the lines into the system.
· Characteristics (i.e., user-defined fields) can be associated with billable charge lines. You might populate this information if you are interfaced information that may be useful during bill presentation or for reporting purposes.
· If rate quantities are specified on a billable charge, they are saved on the bill segment created when the billable charge is billed.
· Cancel / rebill for billable charges is quite different than for normal bill segments. A billable charge bill segment can be cancelled, and this will reverse the financial effects of the billable charge. But without new information from the source, there is no way to rebill the taxpayer. Therefore, if the original charges were incorrect, the source system would send both a reversal of the charges and a newly revised set of information. These could be passed as two separate billable charges or they could be combined on a single billable charge.
· For most other functionality, the billable charge obligation supports the same functionality as normal obligations. This includes payment distribution, collections, current & payoff balances, etc.
For more information about billing billable charges, refer to How To Create An Ad-hoc Bill. For more information about creating a billable charge, refer to Maintaining Billable Charges. For more information about interfacing a billable charge from an external system, refer to Uploading Billable Charges.
Printing Bills
The contents of this section describe the technical implementation of both an online and batch bill production.
Contents
Bill Routings Are Created For Each Recipient Of A Bill
Bill Route Types Control The Information Merged Onto Bills
Technical Implementation Of Online Bill Images
Technical Implementation Of Printing Bills In Batch
Reproducing The Bill Print Flat File
How To Reprint A Specific Bill
Bill Routings Are Created For Each Recipient Of A Bill
Refer to The Source Of Bill Routing Information for a description of how the system constructs the information used to route a bill to one or more recipients.
Bill Route Types Control The Information Merged Onto Bills
Every bill routing record references a Bill Route Type. The bill route type controls the following:
· It contains an algorithm that is responsible for extracting the information merged onto your bills. Algorithms of this type are called under the following scenarios:
· The background process that interacts with your bill print software calls these algorithms.
· If your bill print software has the ability to construct a real-time image of a bill, you can plug-in an Online Bill Display algorithm on the Installation Record. This type of algorithm will call the extract algorithm for an appropriate bill route type to extract the information that is merged onto the bill. Refer to Technical Implementation Of Online Bill Image for the details.
· It contains the ID of the background process responsible for interacting with your bill print software in batch.
Technical Implementation Of Online Bill Images
Users can view an image of any bill that is sent to a taxpayer on Bill - Main if you set up the following:
· Plug-in an Online Bill Display construction algorithm on the Installation Record.
· Plug-in the appropriate bill extract algorithm on each Bill Route Type.
The system provides algorithms that interact with bill print software that renders an image of the bill in a PDF. The following points describe what takes place when clicking Display Bill when these sample algorithms are used.
· The sample Online Bill Display algorithm ONLN-BL-DSP is executed.
· This algorithm calls the bill extract algorithm for an appropriate bill route type (as determined by the algorithm). The sample bill extract algorithm BLEX-EX constructs the information that appears on the bill and returns it to the Online Bill Display algorithm. This algorithm, in turn, passes it to your bill print software.
· Your bill print software renders an image of the bill in a PDF and returns it to the Online Bill Display algorithm.
· And finally, the system displays the PDF in a separate browser session. Note that the client must have Adobe Acrobat Reader installed to view PDF files.
Technical Implementation Of Printing Bills In Batch
The batch process that extracts bill information reads all bill routing records in a given run number that are marked with its batch control ID
The base package example of this process (known by the batch control ID of POSTROUT) simply calls the extract algorithm on the routing record's route type to format the information placed onto the flat file. Refer to Bill Route Types Control The Information On Bills for more information.
If your software doesn't support online bill images. The algorithm that formats bill extract records that's plugged in on bill route type serves two purposes: 1) it interacts with the online bill display algorithm plugged into to the installation record to support online images of a bill, and 2) it interacts with the background process to support printing your bills in batch. If your bill print software does not support the rendering of bill images real time, there is no need to create an extract algorithm. Rather, you should simply develop your own download process that works with your bill print software to print bills in batch (and then specify this batch process on your bill route type).
Reproducing The Bill Print Flat File
You can reproduce the flat file at any time. Simply request the download process and specify the run number associated with the historic run.
How To Reprint A Specific Bill
Refer to How To Reprint A Bill (For The Original Recipients or For Someone New) for instructions describing how to reprint a specific bill.
Who Gets A Copy Of A Bill?
A copy of a bill is sent to every individual / business specified in the bill’s routing details.
There are two ways in which a bill routing detail can be created:
· When a bill is completed, the system creates a routing detail for every person linked to the account that wants to receive a copy of the bill (as specified on Account – Person Information). Refer to The Source Of Bill Routing Information for more information.
· After a bill is completed, you may insert a bill routing record. Refer to How To Reprint A Bill (For The Original Recipients or For Someone New) for more information.
Final Bills and Bill Print
If a bill is produced for an account where all of the account's obligations are stopped, closed or cancelled; the bill is flagged as being the final bill on the flat file produced by the postal routing process.
If a bill is considered to be a final bill and the amount owing for the entire account is less than the final bill threshold amount on the installation record, the bill will be skipped (i.e., it won't appear on the flat file produced by the postal routing process). Note, this logic also suppresses bills from being produced when a payment is received AFTER the final bill and the account's balance falls beneath the installation record's final bill threshold amount. Refer to Installation Options - Billing for more information.
Idiosyncratic Manual Bill Cancellation
If a bill's account is associated with an account type that has a Cancel Bill algorithm, the system invokes this algorithm before the bill is displayed to determine if the bill is "cancellable". If the algorithm indicates the bill is cancellable, a button appears on Bill - Main. When clicked, the Cancel Bill algorithm is invoked again to cancel the bill. This functionality is meant to support unique cancellation needs required by some implementations; the sample base-package algorithm is empty.
A bill is used to communicate changes in a taxpayer’s financial obligations to the taxpayer. The topics in this section describe how to maintain bills.
It’s important to be aware that there are very few fields that are directly modifiable by a user. To modify most fields on a bill, you have to change source information (e.g., obligation, rate) and then regenerate the bill. For example, if you want to change a bill’s amount, you must cancel or add bill segments; you cannot change the bill’s amount by modifying the bill amount field. Refer to How To for step-by-step instructions that explain how to perform common bill maintenance functions.
Contents
Bill Lifecycle
The following diagram shows the possible lifecycle of a bill.
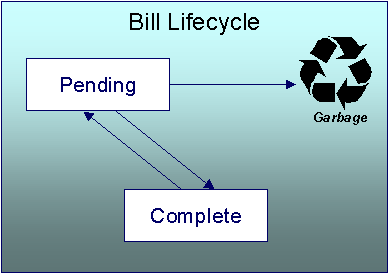
Warning! This explanation only makes sense in the context of the page used to maintain bills. Refer to Bill – Main Information for the details.
A bill is initially saved in the Pending state. You may create one or more bill segments for the account's obligations at this point. Refer to How To for information about generating bill segments for the bill.
A bill becomes Complete when it is ready to be sent to the taxpayer. Completing a bill triggers many things to occur. Refer to the section below for information about what happens when a bill is completed.
When you complete a bill, several things may happen:
· Pre-completion algorithms associated with the account’s account type are executed.
· The bill’s due date is calculated. This is equal to the bill date plus the number of days defined on the account’s account type. If the resultant date is not a workday, the due date is set to the next workday. Note, this due date can be overridden if an override algorithm exists on the account’s account type.
· The bill’s routing information is set up using Account – Person Information.
· If the Freeze At Bill Completion installation option has been turned on, freezable bill segments and adjustments linked to the account are frozen. Note, only freezable adjustments whose adjustment type indicates Freeze At Bill Completion will be frozen at this time.
· Post completion algorithms associated with the account’s obligations’ obligation types are executed. The system executes these algorithms first in the order of the billing processing sequence on each obligation’s obligation type then in the order of the algorithm’s sequence.
· Bill completion algorithms associated with the account’s account type are executed.
· Bill messages are amalgamated from various sources and linked to the bill. Refer to The Source Of Bill Messages for more information.
· Other financial transactions that have been frozen since the last bill and are marked to show on bill are linked to the new bill
· For open-item account types adjustments and corrections are linked
· For all other situations, payments, adjustments and corrections are linked
· All financial transactions that don’t already have a user-defined aging date will be dated with the current date. In other words, they start aging from the date the bill is completed.
· If the account’s account type indicates the account is an open-item taxpayer, a match event is created. The bill’s FTs and the automatic payment’s FTs are linked to it. Refer to Payments and Match Events for more information about match events.
· If the account pays, the bill is stamped with the date when the automatic payment is to be created. Refer to The System Background Processes for more information about APAYCRET, the background process that creates the automatic payment and APAYDSFR, the background process that distributes and freezes the automatic payment.
· If the account’s account type indicates the account is an open-item taxpayer, the system will create a match event if the new charges are offset by other financial transactions. Refer to Payments and Match Events for more information about match events.
· The bill’s status becomes Complete.
· Post bill completion algorithms associated with the account’s account type are executed.
If the system cannot complete the bill (for whatever reason), the bill remains Pending and an error message is shown on the main bill page. After correcting the cause of the problem, attempt to complete the bill again.
A complete bill may be changed back to pending using the Reopen button on Bill – Main Information. You would reopen a bill when
· Add more bill segments to a completed bill. Refer to the How To section for information about linking bill segments for a bill.
· Fine-tune the payments, adjustments, and corrections that were linked to a completed bill. Refer to the How To section for detailed instructions.
When you’re happy with the bill, you can complete it again.
Cannot reopen historical bills. You may only reopen an account’s most recent bill because recompleting the bill causes the ending-balance to change, and we don’t want this to happen to historical bills.
Automatic payments. If an automatic payment was created when the bill was completed and it has already been interfaced to the financial institution, you cannot reopen the bill. If the automatic payment exists, but it has not yet been interfaced, the system will automatically cancel the payment when you reopen the bill.
You may delete a Pending bill from the database. You may not delete a pending bill if: a) there are frozen bill segments linked to the bill, or b) if financial transactions were linked to the bill (and this can only happen if the bill had been previously completed).
In addition to removing the bill, the system will also remove unfrozen bill segments linked to the bill.
Bill - Main Information
Open Financial, Bill, Main to maintain core bill information.
The follow discussion simply describes the fields on this page. Refer to How To for a description of how to perform common bill maintenance functions.
Bill Info contains a concatenation of important information about the bill (e.g., the bill date, its status, due date, ending balance, etc.).
Bill ID is the system-assigned unique identifier of the bill.
Account ID identifies the taxpayer who is responsible for the bill. The name of the main taxpayer on the account appears adjacent.
Bill Status is the bill’s status. Refer to Bill Lifecycle for the potential values and how to handle a bill when it exists in a given state. Adjacent to the bill status is the Display Bill button, which will display an online image of the bill when clicked. Refer to How To Display A Bill On-line for more information.
Note. You can only use the Display Bill button if your system has been configured to display an on-line image; otherwise, a message indicating that the service is not available will appear. This option can only be configured by your technical staff.
Due Date is the date on which the bill is due. A bill’s due date is calculated as follows:
· Add the due days specified on the account’s account type to the bill date.
· The resulting date is the due date unless it’s not a workday. In this case, the due date is set to the next workday (workdays are defined in the installation options tables).
· If the account’s account type has an override due date calculation algorithm, the due date may be overridden. Refer to Setting Up Account Types for more information.
Bill Date is the business date that was used when the bill was completed.
Create Date/Time is the date and time on which the bill was originally created.
Completion Date/Time is the date and time on which the bill was completed.
If the taxpayer pays automatically and the automatic payment has not yet been created, a brief message appears highlighting the date and amount of the future automatic payment. In addition, a button appears called Stop Autopay, that, when clicked, causes the associated automatic payment to stop. You might click this button if the taxpayer indicates that they will send in a payment. After you click the Stop Autopay button, a message appears highlighting the stoppage. Refer to How And When Are Automatic Payments Created for more information about how to setup the system to defer the creation of automatic payments until the future automatic payment extract date.
In the Message area, a brief error message appears if there’s a problem with the bill. The message area is suppressed if there are no problems with the bill.
Click the magnifying button to view the long explanation. The long explanation will provide information about the cause of the error (and how to fix it).
Bill Summary summarizes the financial impact of the bill. The information that appears differs depending on whether the account is a balance-forward or open-item account. If the account is a balance-forward taxpayer, the following information appears:
· Previous Period’s Balance is the balance from the account’s last bill.
· Total Payments is the total amount of frozen or canceled payment segment financial transactions linked to this bill. Frozen payment segments appear as negative numbers (decreasing the amount owed by the taxpayer), while canceled payment segments appear as positive numbers (increasing the amount owed). You can drill down on this balance to view the financial transactions that contribute to this total. Refer to How To Remove Unwanted Payments From A Completed Bill for a description of how to perform common maintenance functions.
· Total Adjustments is the total amount of frozen or canceled adjustment financial transactions linked to this bill. You can drill down on the balance to view the financial transactions that contribute to this total. Refer to How To Remove Unwanted Adjustments From A Completed Bill for a description of how to perform common maintenance functions.
· Total Bill Corrections is the total amount of canceled and / or rebilled bill segment financial transactions linked to this bill. You can drill down on the balance to view the financial transactions that contribute to this total.
· Total Current Billing Charges is the total amount of frozen bill segment financial transactions linked to this bill. You can drill down on the balance to view the financial transactions that contribute to this total.
· Ending Balance For This Period is the sum of the five amounts above. It is the amount owed by the taxpayer as of the end of the bill period.
If the account is an open-item taxpayer, the following information appears under Bill Summary:
· New Charges is the total amount of frozen bill segment financial transactions linked to this bill. You can drill down on this value to view the financial transactions that contribute to this total.
· Adjustments is the total amount of frozen or canceled adjustment financial transactions linked to this bill. You can drill down on this value to view the financial transactions that contribute to this total. Refer to How To Remove Unwanted Adjustments From A Completed Bill for a description of how to perform common maintenance functions.
· Corrections is the total amount of canceled and / or rebilled bill segment financial transactions linked to this bill. You can drill down on this value to view the financial transactions that contribute to this total.
· Total is the sum of the above amounts. You can drill down on this value to view the financial transactions that contribute to this total.
If the account is an open-item taxpayer, the following information appears under Match Summary (note, this section is not displayed for balance-forward accounts):
· X Balanced Item(s) contains the count and total amount of financial transactions linked to this bill that are linked to balanced match events.
· X Unbalanced Item(s) contains the count and total amount of financial transactions linked to this bill that are linked to unbalanced match events.
· X Disputed Item(s) contains the count and total amount of financial transactions linked to this bill that are linked to disputed match events.
· X Unmatched Item(s) contains the count and total amount of financial transactions linked to this bill that are not linked to any match event.
Total Changes After Completion only appears if bill segments that appeared on the original bill have been subsequently canceled or rebilled. The amount displayed is the net effect of all cancels and rebills. Note, you can use the Remarks column in the bill segments grid (to the right) to see which bill segments have been cancelled / rebilled.
If 25 or fewer bill segments are linked to this bill, the grid in the lower right portion of the page contains one row for every bill segment linked to the bill.
The following points describe each column:
· The Bill Segment column contains a concatenation of each bill segment’s division, obligation type, status and bill period. The division and obligation type come from the bill segment’s obligation.
· The Current Amount column contains the bill segment’s effect on the obligation’s current balance.
· The Status column shows the bill segment’s status. Refer to Bill Segment Lifecycle for the possible values.
· The Remarks highlight special situations. The following remarks may appear:
· Rebill after completion appears if the bill segment is a rebill that was created after the bill was sent to the taxpayer. The financial impact of this bill segment appears as a “bill correction” on the next bill produced for the taxpayer.
· Rebill prior completion appears if the bill segment is a rebill that was created before the bill was sent to the taxpayer.
· Canceled after completion appears if the bill segment was canceled after the bill was sent to the taxpayer. The financial impact of this bill segment appears as a “bill correction” on the next bill produced for the taxpayer.
· Canceled prior completion appears if the bill segment was canceled before the bill was sent to the taxpayer.
· If the bill segment’s status is Error, this column also contains the error message.
If more than 25 bill segments are linked to this bill, the grid in the lower right portion of the page contains a summary of the various bill segments linked to the bill:
The following points describe each column:
· The Status column shows the bill segment’s status. Refer to Bill Segment Lifecycle for the possible values. Click on the hyperlink to transfer to the Bill Segments tab where the associated bill segments can be viewed.
· The Total Bill Segments column contains the number of bill segments linked to the bill with this Status.
· The Total Amount column contains the sum of the current amount of these bill segments.
At the bottom of the scroll is shown the Total Generated Charge. This represents the total amount of the bill segments. This amount may differ from the Total Current Billing Charges when:
· The bill is not Complete. A bill segment’s financial effect is not shown on the bill until the bill is completed.
· A bill segment has been canceled / rebilled since the bill was completed.
The topics that follow describe each of the actions that appear in the Bill Segment Action and Bill Action areas. Refer to How To for a description of typical business processes that use these buttons.
Contents
Generate
The Generate button causes a bill segment to be created for each billable obligation linked to the account. The system generates bill segments in the order of the billing processing sequence on each obligation’s obligation type.
This button is enabled when you are in add mode (i.e., you are not displaying an existing bill) and you have selected an Account ID.
When clicked, the Generate window opens.
You must specify the following parameters in the Generate window to generate the bill segments:
· Cut-off Date is the last possible day of the bill segment’s bill period. The current date defaults when the window opens. Refer to Ways To Control The End Date Of A Bill Segment for more information.
· Accounting Date is used to define the financial period to which the new bill segment’s financial transaction will be booked. The current date defaults when the window opens.
After specifying the parameters, click Calculate to create a new bill and new bill segments for the account. You see a summary of the bill segments in the lower right portion of the page.
Freeze
Clicking Freeze causes all freezable bill segments to become frozen. Refer to Bill Segment Lifecycle for more information about freezing.
This button is enabled if:
· the Freeze At Will Bill Segment Freeze Option on the installation option has been selected AND
· freezable bill segments exist AND
· there are no error, incomplete or pending cancel bill segments.
Freezing a day or more after generation. If, during freezing, bill segments in closed accounting periods are detected, a pop-up appears in which you can specify a new accounting date; this date is updated onto the offending bill segments. This only happens if the accounting period closes before you freeze the bill segments (the accounting date is stamped on a bill segment when it’s generated).
If, after freezing, you’re ready to send the bill to the taxpayer click Complete to finalize the bill.
If problems are detected after freezing. A bill segment may not be changed after it is frozen. All subsequent changes must occur by canceling the frozen bill segment and creating a new bill segment. Refer to How To Cancel A Bill Segment and How To Cancel / Rebill A Bill Segment for more information.
Cancel Frozen
Clicking Cancel Frozen causes all frozen bill segments to become canceled. Refer to Bill Segment Lifecycle for more information about cancellation. This button is disabled if the bill is written off.
Pending cancels are not affected. Clicking Cancel Frozen does not affect bill segments that are pending cancel. To make a pending cancel bill segment canceled, transfer to Bill Segment – Main and click Cancel.
If you need to cancel a specific bill segment, either transfer to the next tab and cancel the bill segment in question or follow the instructions under How To Cancel A Bill Segment.
This button is enabled if frozen bill segments are linked to the bill.
You must specify the following parameters in order to cancel the frozen bill segments:
· Cancel Reason defines why you are performing the cancellation.
· Accounting Date defines the financial period to which the canceled bill segments’ financial transactions are booked. The current date defaults when the window opens.
After specifying the parameters, click Calculate to cancel the frozen bill segments.
There is no Undo. Unlike cancellations performed on Bill Segment – Main, there is no Undo action. This transaction moves the pending cancel bill segments to the cancel state immediately; whereas the bill segment transaction lets you examine the cancellation before you commit it. If you cancelled bill segments by mistake, you must generate and freeze new bill segments.
If the bill is pending, the cancellation causes the bill segments to be suppressed on the version of the bill sent to the taxpayer (but they remain in the database for audit and financial reporting purposes).
If the bill is complete and you do not Reopen the bill, the financial impact of the canceled bill segments appears on the next bill created for the account (under Bill Corrections).
If the bill is complete you may be able to Reopen the bill and then Complete it. By doing this, you can suppress a frozen bill segment on a previously completed bill. This means that if you catch a problem after completion you don’t necessarily have to show the problem to the taxpayer. Rather, cancel the problem, reopen and then recomplete the bill (when you recomplete the bill the system marks the bill segment to be suppressed on the version sent to the taxpayer because its cancellation appears on the same bill as the original charges).
Freeze / Complete
The Freeze / Complete button performs a variety of functions:
· all freezable bill segments (including rebills) become frozen
· all pending cancel bill segments become canceled
· all freezable adjustments whose adjustment type indicates Freeze At Bill Completion become frozen
· the bill is finalized and marked for transmission to the taxpayer
Refer to Bill Lifecycle for information about what happens during bill completion. Refer to Bill Segment Lifecycle for more information about freezing.
This button is enabled if:
· the Freeze At Bill Completion Bill Segment Freeze Option on the installation option has been selected AND
· the bill is pending AND
· there are no bill segments or there are bill segments and all are freezable, pending cancel, frozen or canceled AND
· there are no error or incomplete bill segments.
If the User May Override Bill Date option has been enabled on the Installation Record, you may override the Bill Date prior to completion. Otherwise, the Bill Date is the current date and cannot be changed. The current date defaults when the window opens.
Freezing a day or more after generation. If, during freezing, bill segments in closed accounting periods are detected, a pop-up appears in which you can specify a new accounting date; this date is updated onto the offending bill segments. This will only happen if the accounting period closes before you freeze the bill segments (the accounting date is stamped on a bill segment when it’s initially generated).
After specifying the parameter, click Calculate to freeze and complete the bill.
Complete
The Complete button causes a bill to be finalized and marked for transmission to the taxpayer. Refer to Bill Lifecycle for information about what happens during bill completion.
This button is enabled if:
· the Freeze At Will Bill Segment Freeze Option on the installation option has been selected AND
· the bill is pending AND
· there are no bill segments or there are bill segments and all are frozen or canceled.
If the User May Override Bill Date option has been enabled on the Installation Record, you may override the Bill Date prior to completion. Otherwise, the Bill Date is the current date and cannot be changed. The current date defaults when the window opens.
After specifying the above parameters, click Calculate to complete the bill.
Delete
The Delete button deletes a bill and its bill segments.
This button is enabled if:
· the bill is pending AND
· all bill segments are incomplete, freezable or in error.
Reopen
The Reopen button causes a bill to be reopened. Refer to Bill Lifecycle for information about why you would reopen a bill.
This button is enabled if:
· the bill is complete AND
· the bill is not written off AND
· this is the most recent bill produced for the account AND
· reopening hasn’t been prohibited for the bill. Refer to Bill Lifecycle for information about conditions that can prevent a bill from reopening.
After reopening a bill, it returns to the pending state and you can make changes to the account’s financial transactions (e.g., add payments, adjustments, and bill segments). After which, you click Complete or Freeze / Complete to finalize the bill. Only one of these buttons is shown – the specific one depends on how your organization has set the Bill Segment Freeze Option on the installation record.
Cancel Bill
Refer to Idiosyncratic Manual Bill Cancellation for a description of when the Cancel Bill button appears and what happens if the button is clicked.
Bill - Bill Segments
You can use this page to view all or selected bill segments linked to a bill. In addition, you can also perform certain maintenance functions on this page (see the details below).
Open Financial, Bill, Bill Segments to view this information.
Note. If the bill has more than 25 bill segments and you don’t use the hyperlinks in the bill segment grid on the Main tab to drill over to this information, the search criteria are intentionally left blank in order to avoid retrieving all bill segments (with the resultant slow response times). You must therefore use the Obligation Filter and the Status Filter to define the type of bill segments that should be retrieved. See the Description of page below for more information about this page’s search criteria.
The Description of page that appears below simply describes the fields on this page. Refer to How To for a description of how to perform common maintenance functions.
Description of page
Bill Info contains a concatenation of important information about the bill (e.g., the bill date, its status, due date, ending balance, etc.).
Bill ID is the system-assigned unique identifier of the bill.
Note. If the bill has more than 25 bill segments and you don’t use the hyperlinks in the bill segment grid on the Main tab to drill over to this page, the Filters are intentionally left blank in order to avoid retrieving all bill segments (with the resultant slow response times). You must therefore use the Obligation Filter and the Status Filter to define the type of bill segments that should be retrieved.
The area beneath Bill Info provides you with options that control which bill segments appear in the grid. The following points describe the various options:
· Use the Obligation Filter to define the types of obligations whose bill segments appear in the grid. The following options are available:
· All. Use this option if you do not wish to restrict bill segments based on obligation attributes.
· Obligation Type. Use this option to restrict bill segments to those whose obligations are linked to a given division and obligation type.
· Use Status Filter to restrict the bill segments based on their status. The following options are available:
· All. This option shows all bill segments regardless of status.
· Refer to Bill Segment Lifecycle for the various status values.
Don’t forget to click the search button after changing the filters.
The Select All / Clear All buttons are used to select bill segments if you plan on issuing any of the mass update actions at the bottom of the page. These buttons are enabled if either of the following conditions is true:
· All bill segments that appear in the grid are in the Error, Freezable and/or Incomplete states.
· All bill segments that appear in the grid are in the Frozen state
Refer to the description of the “mass update” actions below for more information.
100 bill segments at a time. Clicking Select All selects the first 100 bill segments in the grid. If more than 100 bill segments exist, you must select them in batches.
The grid that follows contains the bill segments that match your search criteria. The following information appears in the grid:
· Select box. See the mass update description immediately above for conditions under which this checkbox can be used to select bill segments for mass update actions.
· The Bill Segment column contains a concatenation of the bill segment’s division, obligation type, status and bill period. The division and obligation type come from the bill segment’s obligation. Click the hyperlink to transfer to Bill Segment – Main Information. On this page you can perform maintenance functions (e.g., cancel/rebill, delete, cancel, etc., depending on the segment’s status) on the bill segment in question.
· The Current Amount column contains the bill segment’s effect on the obligation’s current balance.
· The Status shows the bill segment’s status. Refer to Bill Segment Lifecycle for the possible values.
· The Remarks column highlights special circumstances associated with the bill segment.
· Rebill after completion appears if the bill segment is a rebill that was created after the bill was sent to the taxpayer. The financial impact of this bill segment appears as a “bill correction” on the next bill produced for the taxpayer.
· Rebill prior completion appears if the bill segment is a rebill that was created before the bill was sent to the taxpayer.
· Canceled after completion appears if the bill segment was canceled after the bill was sent to the taxpayer. The financial impact of this bill segment appears as a “bill correction” on the next bill produced for the taxpayer.
· Canceled prior completion appears if the bill segment was canceled before the bill was sent to the taxpayer.
· If the bill segment’s status is Error, this column also contains the error message.
· Rate Quantity and UOM columns are not used.
· The Bill Segment ID is the system-assigned unique identifier of the bill segment.
This transaction has sophisticated logic that can be used to perform “mass updates” to the bill segments that appear in the grid (using the buttons at the bottom of the page). The following points describe these mass update actions:
Contents
Generate (Bill - Bill Segments)
Cancel/Rebill/Freeze (Bill - Bill Segments)
Generate (Bill - Bill Segments)
The Generate button is used to delete and recreate one or more bill segments. This button is enabled if you select at least one row from the bill segments grid that’s in the Error, Freezable and/or Incomplete state.
Note that you can only select a bill segment for regeneration if ALL bill segments in the grid are in the Error, Freezable and/or Incomplete states. Note, you can use the Status Filter to restrict the type of bill segments in the grid.
You must specify the following parameters in order to regenerate a new bill:
· Accounting Date defines the financial period to which the new bill segments’ financial transactions will be booked. The current date defaults when the window opens.
· Choose Use Cut off Date as Billing Option.
After specifying the parameters, click Calculate to regenerate the selected bill segments. A summary of what the system does is presented next.
Freeze (Bill - Bill Segments)
The Freeze button is used to freeze one or more bill segments. This button is enabled if you select at least one row from the bill segments grid that’s in the Freezable state AND the installation option indicates users are allowed to “freeze at will”.
Note that you can only select a bill segment for freezing if ALL bill segments in the grid are in the Freezable state. Note, you can use the Status Filter to restrict the type of bill segments in the grid.
Accounting Date is used to define the financial period to which the frozen bill segments’ financial transactions are booked. The current date defaults when the window opens.
After specifying the above parameters, click Freeze to freeze the selected bill segments. A summary of what the system does is presented next.
Delete (Bill - Bill Segments)
The Delete button is used to delete one or more bill segments. This button is enabled if you select at least one row from the bill segments grid that’s in the Error, Freezable and/or Incomplete state.
Note that you can only select a bill segment for deletion if ALL bill segments in the grid are in the Error, Freezable and/or Incomplete states. Note, you can use the Status Filter to restrict the type of bill segments in the grid.
If the system is successful in deleting the selected bill segment(s), a confirmation window summarizes what the system just did (i.e., it shows the number of bill segments that were deleted).
Cancel/Rebill/Freeze (Bill - Bill Segments)
If problems are detected with a frozen bill segment, it should be canceled and a new bill segment should be created. We refer to this process as cancel / rebill. Refer to Cancel / Rebill Incorrect Bill Segments for more information.
Before you cancel / rebill, you’ll probably need to fix the cause of the problem. The following table describes common problems and how to fix them.
|
Problem |
How To Fix It |
|
The wrong rate was used |
Go to Obligation – Rate Info and correct the rate. |
|
The wrong tax exemption amount was calculated |
Go to Obligation – Rate Info and correct the tax exemption information. |
Multi-Cancel/Rebill Saves Time. If the cause of the problem impacts many bill segments related to an obligation, you should use the Multi Cancel Rebill transaction as it allows you to cancel / rebill an unlimited number of bill segments at once.
The Cancel/Rebill/Freeze button is used to cancel, rebill and freeze one or more bill segments. This button is enabled if you select at least one row from the bill segments grid that’s in the Frozen state AND the bill is not written off.
Note that you can only select a bill segment for cancel/rebill/freeze if ALL bill segments in the grid are in the Frozen state. Note, you can use the Status Filter to restrict the type of bill segments in the grid.
· Cancel Reason defines why the bill segment(s) are being canceled.
· Accounting Date defines the financial period to which the canceled and new bill segments’ financial transactions are booked. The current date defaults when the window opens.
· Choose Use Cut off Date as Billing Option.
· If you prefer to have the system use the details used on the original bill segments, check Use Old RQ.
Warning! If the cause of the rebill is an incorrect rate and the new rate requires rate quantities that were not calculated when the bill was originally calculated, do not turn on Use Old RQ. Why? Because you want the system to derive new rate quantities during the rebill process.
After specifying the parameters, click Calculate to cancel, rebill and freeze the selected bill segments.
Errors. Bill segment errors may occur when you cancel / rebill the bill segments. For example, if you change the obligation’s rate to a rate that is no longer effective on the bill segment period, a bill segment error is generated. If this occurs, you must go to Bill Segment – Main for the pending cancel bill segment and use the Undo action to remove the offending bill segment (and restore the original segment to the Frozen state). Alternatively, you can drill down on the Error bill segment and use the Regenerate action after correcting the cause of the problem.
There is no Undo. Unlike cancel / rebills performed on Bill Segment – Main, there is no Undo action. This is because this transaction freezes the newly created bill segments after it cancel/rebills; whereas the bill segment transaction lets you examine the new bill segment before you freeze it. If you made a mistake, simply correct the cause of the mistake and then cancel / rebill again. The erroneous financial transactions are automatically suppressed on the next bill produced for the taxpayer.
A confirmation window summarizes what the system just did (i.e., it shows the number of bill segments that were deleted / generated).
Cancel (Bill - Bill Segments)
The Cancel button is used to cancel one or more bill segments. This button is enabled if you select at least one row from the bill segments grid that’s in the Frozen state AND the bill is not written off.
Note that you can only select a bill segment for cancellation if ALL bill segments in the grid are in the Frozen state. Note, you can use the Status Filter to restrict the type of bill segments in the grid.
· Cancel Reason defines why the bill segment(s) are being canceled.
· Accounting Date is used to define the financial period to which the canceled bill segments’ financial transactions are booked. The current date defaults when the window opens.
After specifying the above parameters, click Calculate to cancel the selected bill segments.
There is no Undo. Unlike cancellations performed on Bill Segment – Main, there is no Undo action. This transaction moves the pending cancel bill segments to the cancel state immediately; whereas the bill segment transaction lets you examine the cancellation before you commit it. If you cancelled bill segments by mistake, you must generate and freeze new bill segments.
Bill - Bill Routings
This page is used to view the recipients of a bill. Refer to Printing Bills for a discussion of how this information is used to produce bill images.
This page is also used to request a new copy of a bill. Refer to How To Reprint A Bill (For The Original Recipients or For Someone New) for a description of how to do this.
No routing information until completion. A bill has no routing details until it is completed. At completion time, the system creates a routing detail for every person linked to the account that receives a copy of its bills. Refer to The Source Of Bill Routing Information for more information about how this information is constructed.
Use Financial, Bill, Bill Routings to open this page.
Description of Page
Bill Info contains a concatenation of important information about the bill (e.g., the bill date, its status, due date, ending balance).
Bill ID is the system-assigned unique identifier of the bill.
The Bill Routing Information scroll contains an entry for each recipient of the bill. This information is disabled after the bill has been routed to the recipient. The remainder of this discussion describes the fields that can be defined for each recipient of the bill.
Person ID identifies the person who was originally associated with the routing record. You may change the Person ID to any person in the system as this information is only used to default the recipient's name and address information, below.
The Bill Routing Parameters area contains information explaining how and when the bill is routed to the recipient. This information is gray when the rill routing information has been extracted or if a bill is reopened:
· Bill Route Type is the method used to transmit the bill to the taxpayer. If the Person ID is linked to the account, the bill route type defaults from the person's Account – Person Information.
· Sequence is the system-assigned identifier assigned to this bill routing.
· Batch Control is the identifier of the batch of bills in which the recipient’s copy was downloaded. The batch process is defined on the Bill Route Type.
· Extract Date/Time is the date and time the bill was downloaded. This information only appears after the download has commenced.
· Format indicates if the taxpayer should receive a Detailed or a Summary bill. If the Person ID is linked to the account, this information defaults from Account – Person Information.
· Reprint is checked if a user created this routing. This switch is populated by the system and is always protected.
· Turn on Do Not Extract if the bill should not be routed to the individual for whatever reason.
· Copies indicates the number of copies of the bill the person receives. If the Person ID is linked to the account, this information defaults from Account – Person Information.
· PO ID is the purchase order Id the taxpayer wants printed on their copy of the bill. If the Person ID is linked to the account, this information defaults from Account – Person Information.
· Intercept is the user ID of the individual who wants to review the bill before it is sent to the taxpayer. This field is only populated when the account has a Bill Print Intercept specified. Intercept information is defined on Account – Main Information.
The Mailing Address Information area contains the recipient’s name and address.
· If the recipient has an override mailing name, Name1, Name2 and Name3 contain the person’s override mailing name. Otherwise, Name1 contains the recipient’s primary name (this name might also include a prefix or suffix if the related Account – Person relationship has these fields defined).
· The remaining fields are the recipient’s address. Refer to The Source Of Bill Routing Information for information about how the system constructs the recipient’s address. Note:
· If the recipient’s address is a mailing address (as opposed to fax or email), the Country associated with the address controls the fields that appear in the address. Refer to Defining Countries for more information on the address constituents.
· If a user manually adds a routing record, the mailing address information defaults from the information on the current routing record.
· If a user specifies a Person ID that is linked to the bill's account, the Bill Route Type defined on the Account – Person record is defaulted.
· If a user specifies a Person ID that is not linked to the bill's account, the Bill Route Type on the installation record is defaulted. Note, if the bill route indicates the bill is routed via the postal service, the system will only be able to default the person's address if the person has an override mailing address on their correspondence information.
· If the user changes the Bill Route Type after the initial default, the system populates the address information as described under The Source Of Bill Routing Information.
Bill - Bill Messages
The Messages page is a grid containing one row for every message that appears on the bill. Open Financial, Bill, Bill Messages to view this information.
No messages until completion. A bill has no messages until it is completed (unless you insert them manually). At completion time, the system assembles messages from the various message sources. Refer to The Source Of Bill Messages for information about these sources.
The bill segment(s) may also have messages. Be aware that only account-oriented messages are linked to a bill. There may also be obligation-oriented messages linked to the bill’s bill segments. Refer to Bill - Bill Messages for information about the page on which obligation-oriented messages are displayed. Refer to The Source Of Bill Messages for information about the various message sources and whether each is linked to a bill or a bill segment.
Bill messages may contain dynamic information. Refer to Substituting Field Values Into A Bill Message for more information.
The Description of Page section that appears below simply describes the fields on this page. Refer to How To Add Ad Hoc Messages To A Bill for a description of how to perform common maintenance functions.
Description of Page
Bill Info contains a concatenation of important information about the bill (e.g., the bill date, its status, due date, ending balance).
Bill ID is the system-assigned unique identifier of the bill.
The following columns are displayed in the grid:
· Bill Message is the code that identifies the bill message.
· Message On Bill is the message associated with the code.
· Priority is the bill messages priority (on the printed bill).
· Insert Code defines if the bill message causes an insert in the envelope.
Bill - Characteristics
The Characteristics page is a grid containing one row for each characteristic linked to the bill. Bill characteristics are purely informational.
Note. You can only choose characteristic types defined as permissible on a bill record. Refer to Setting Up Characteristic Types and Their Values for more information.
Description of Page
The following fields display on the grid:
· Characteristic Type must bea type of characteristic defined as permissible on a bill record.
· Characteristic Value indicates the value of the characteristic if the characteristic type is pre-defined or foreign key reference.
How To
The topics in this section describe how to perform common bill maintenance functions.
Contents
How To Create A Bill For All Obligations Linked To An Account
How To Create A Bill For A Specific Obligation
How To Create a Bill with no Bill Segments
How To Correct A Bill Segment That's In Error
How To Correct A Bill That's In Error
How To Cancel / Rebill A Bill Segment
How To Remove Unwanted Adjustments (or Payments) From A Completed Bill
How To Add An Adjustment (or Payment) To A Completed Bill
How To Reprint A Bill (For The Original Recipients or For Someone New)
How To Add Ad Hoc Messages To A Bill
How To Remove A Completed Bill
How To Create A Bill For All Obligations Linked To An Account
99.9% of all bills are created by the batch bill process and require no human intervention before they are finalized and sent to a taxpayer. The other 0.1% are created by users on-line / real time. This section explains how to create the 0.1%.
The following points describe how to use this page to create a new bill:
· Navigate to the Bill – Main Information page:
· If you have already selected the taxpayer (say on Control Central), select Go To Bill + option on the account context menu. This will transfer you to this page with the respective account populated.
· If you haven’t selected the account, use the main menu to navigate to this page (Main Menu, Financial, Bill, +) and then select the Account ID using the adjacent search button.
· Click the Generate button to create a new bill.
· You will see a summary of the bill segments in the lower right portion of the page. If there are errors, refer to How To Correct A Bill Segment That’s In Error. If there are no errors, the Bill Segment Freeze Option on the installation option controls the next step:
· If this option is set to Freeze At Bill Completion, click the Freeze / Complete button.
· If this option is set to Freeze At Will, click the Freeze button and, if everything looks clean, click the Complete button.
How To Create A Bill For A Specific Obligation
Most bills contain a bill segment for every billable obligation linked to the account. If you want to produce a bill that contains bill segments for a subset of obligations (e.g., you want to create an ad-hoc bill for an account’s billable charge obligation), follow these steps:
· Navigate to the Bill – Main Information page:
· If you have already selected the taxpayer (say on Control Central), select Go To Bill + option on the account context menu. This will transfer you to this page with the respective account populated.
· If you haven’t selected the account, use the main menu to navigate to this page (Main Menu, Financial, Bill, +) and then select the Account ID using the adjacent search button.
· Click the save button to create a bill without bill segments for the account.
· Select Go To Bill Segment + option on the Bill’s context menu to transfer to Bill Segment - Main.
· Select the Obligation ID of the obligation for which you want to create a bill segment.
· Click the Generate button to generate a bill segment.
· If an error exists, refer to How To Correct A Bill Segment That's In Error.
· If there are no errors, the Bill Segment Freeze Option on the installation option controls the next step:
· If this option is set to Freeze At Bill Completion, return to Bill – Main (using the bill context menu) and click the Freeze / Complete button.
· If this option is set to Freeze At Will, click the Freeze button and, if everything looks clean, return to Bill – Main and click the Complete button.
How To Create a Bill with no Bill Segments
You may wish to generate a bill that contains no bill segments. For example, perhaps your taxpayer is billed quarterly but pays monthly. During the months where no charges are calculated, you may choose to send a "bill" that does not show new charges, but includes the payments received. To produce a bill with no bill segments, follow these steps:
· Navigate to the Bill – Main Information page:
· If you have already selected the taxpayer (say on Control Central), select Go To Bill + option on the account context menu. This will transfer you to this page with the respective account populated.
· If you haven’t selected the account, use the main menu to navigate to this page (Main Menu, Financial, Bill, +) and then select the Account ID using the adjacent search button.
· Click the save button to create a bill without bill segments for the account.
· At this point either the Complete or Freeze / Complete button (based on the value of Bill Segment Freeze Option on installation options) becomes enabled. Click the applicable button for your installation to complete the bill. At this point, all the steps described for completing a bill in Bill Lifecycle are performed, including sweeping onto the bill any payments received since the last bill was generated.
How To Create An Ad-hoc Bill
The following points describe the steps necessary to create and bill an ad-hoc bill:
· If the taxpayer to be invoiced doesn’t already have an appropriate billable charge obligation, create one.
· Use Maintaining Billable Charges to add a billable charge for the obligation. The billable charge contains the invoice lines and amounts.
· If you created a new billable charge obligation in step 1, you must activate it before billing can bill it. To do this, transfer to Obligation – Main Information and click the activate button.
Refer to How To Create A Bill For A Specific Obligation for instructions describing how to create a bill with a bill segment for the billable charge obligation.
How To Correct A Bill Segment That's In Error
A bill segment will exist in the Error state if a problem was encountered during the generation of a bill segment. To fix an error bill segment you must correct the cause of the error and then regenerate the bill segment. Refer to Bill Segment Errors for background information.
Error segments created during batch billing. If the error bill segment was created as part of the cyclical batch bill process, the system attempts to fix the offending segment(s) each night during the account’s bill window by regenerating it. Therefore, if the cause of the error is fixed during the day, the system will automatically regenerate the bill segment when batch billing next runs; you don’t have to manually correct each bill. And once a bill is error-free, it will be completed and sent to the taxpayer. Refer to Batch Billingfor more information.
Correcting the cause of a bill segment error can be difficult or trivial; we hope that the error messages (along with their long descriptions) provide a good description of how to resolve the issue.
After you have corrected the cause of the error, you should regenerate the bill segment. There are two ways to do this:
· You can use the Generateaction on Bill – Bill Segment to regenerate one or more bill segments. We recommend using this method if the cause of the error affected many bill segments because you can regenerate many bill segments at a time on this page. Also, be aware that this transaction shows the estimated value of error bill segments so you can gauge whether to invest a lot of time in correcting the problem. For example, if the bill segment’s estimated value is $10,000, it’s probably worth correcting the problem before sending the bill out. However, if the bill segment’s value is small, you may decide to simply delete the error bill segment and send the bill without it (the system will attempt to create a bill for the deleted period the next time the account is billed).
· You can use the Generate action on Bill Segment - Main to regenerate an individual bill segment. We’d recommend using this method if the problem is bill segment-specific and you need to examine the information that is snapshot on the bill segment to resolve the error.
Drilling Into Bill Segment Errors. When you use the bill segments in error To Do list to work through errors, you will be transferred to Bill Segment - Main with the bill segment displayed.
After all errors have been resolved on a bill, return to Bill – Main. The Bill Segment Freeze Option on the installation option controls the next step:
· If this option is set to Freeze At Bill Completion, click the Freeze / Complete button.
· If this option is set to Freeze At Will, click the Freeze button and, if everything looks clean, click the Complete button.
How To Correct A Bill That's In Error
Besides errors on bill segments, there may also be errors detected when the system attempts to complete a bill. For example, if the system cannot find a mailing address, the bill will be in error (as opposed to one of its bill segments). Refer to Bill Errors for background information.
To correct such an error:
· Navigate to Bill – Main.
· Look at the bill’s error message. Push the view button to view the long explanation that will provide suggestions as to the cause of the error (and how to fix it). Transfer to the appropriate page to fix the problem.
· After fixing the cause of the error, return to Bill – Main. The Bill Segment Freeze Option on the installation option controls the next step:
· If this option is set to Freeze At Bill Completion, click the Freeze / Complete button.
· If this option is set to Freeze At Will, click the Freeze button and, if everything looks clean, click the Complete button.
How To Cancel A Bill Segment
If a bill segment was frozen and it should never have been created in the first place, the bill segment must be canceled. There are several ways to do this:
· You can use the Cancel Frozen action on Bill – Main to cancel all frozen bill segments linked to the bill. We recommend using this method if you need to cancel everything on a bill.
· You can use the Cancel action on Bill – Bill Segments to cancel selected bill segments. We recommend using this method if you need to cancel multiple bill segments.
· You can use the Cancel action on Bill Segment - Main to cancel an individual bill segment. We’d recommend using this method if you need to examine the information on the bill segment before canceling it.
If the related bill is pending, the cancellation will cause the bill segment to be suppressed on the version of the bill sent to the taxpayer (but it remains in the database for audit and financial reporting purposes).
If the related bill is complete and you do not Reopen the bill, the financial impact of the canceled bill segment(s) will appear on the next bill created for the account (under Bill Corrections).
If the related bill is complete you may be able to Reopen the bill and then Complete it. By doing this, you can suppress a frozen bill segment on a previously completed bill. This means that if you catch a problem after completion you don’t necessarily have to show the problem to the taxpayer. Rather, cancel the problem, reopen and then recomplete the bill (when you recomplete the bill the system will mark the bill segment to be suppressed on the version sent to the taxpayer because its cancellation appears on the same bill as the original charges).
How To Cancel / Rebill A Bill Segment
If a bill segment was frozen but it contains incorrect information, it should be canceled and a new bill segment should be created. We refer to this process as cancel / rebill. Refer to Cancel / Rebill Incorrect Bill Segments for more information.
Before you cancel / rebill, you must correct the cause of the problem. The following table describes common problems and where to go to fix them.
|
Problem |
How To Fix It |
|
The wrong rate was used |
Go to Obligation – Rate Info and correct the rate. |
|
The wrong tax exemption amount was calculated |
Go to Obligation – Rate Info and correct the tax exemption information. |
After correcting the cause of the problem, you’re ready to cancel and rebill the offending bill segment(s). There are several ways to do this:
· You can use the Cancel / Rebill / Freeze action on Bill – Bill Segments to cancel, rebill and freeze selected bill segments. We recommend using this method if you need to cancel / rebill multiple bill segments due to a pervasive problem.
· You can use the Rebill action on Bill Segment - Main to cancel and rebill an individual bill segment. We’d recommend using this method if you need to examine the information on the bill segment before and after canceling it. If you use this method, you must also use the Freeze action to freeze the newly created bill segment.
· If the cause of the problem impacts many bill segments related to an obligation, you should use the Multi Cancel Rebill transaction as it allows you to cancel / rebill an unlimited number of bill segments at once.
If the related bill is pending, the cancellation will cause the erroneous bill segment to be suppressed on the version of the bill sent to the taxpayer (but it remains in the database for audit and financial reporting purposes).
If the related bill is complete and you do not Reopen the bill, the financial impact of the canceled bill segment(s) and their rebill bill segment(s) will appear on the next bill created for the account (under Bill Corrections).
If the related bill is complete you may be able to Reopen the bill and then Complete it. By doing this, you can suppress an erroneous frozen bill segment on a previously completed bill. This means that if you catch a problem after completion you don’t necessarily have to show the problem to the taxpayer. Rather, cancel / rebill the problem, reopen and then recomplete the bill (when you recomplete the bill the system will mark the bill segment to be suppressed on the version sent to the taxpayer because its cancellation appears on the same bill as the original charges).
How To Remove Unwanted Adjustments (or Payments) From A Completed Bill
If the system (or a user) has created adjustments that have been swept onto a recently completed bill but you don’t want them to appear on the bill perform the following steps:
· Cancel the adjustment (Adjustments – Main Information).
· Navigate to the Bill - Main page.
· Click the Reopen button to reopen the previously completed bill.
· Click the Complete button to recomplete the bill. When the bill is recompleted, the system will see that an adjustment that was swept onto the bill when it was originally completed has been canceled and it will mark the adjustment for suppression on the printed bill.
You can remove unwanted payments using an analogous approach – Cancel the payment, Reopen the bill, Complete the bill.
Cannot reopen historical bills. You may only reopen an account’s most recent bill because recompleting the bill causes the ending-balance to change, and we don’t want this to happen to historical bills.
How To Add An Adjustment (or Payment) To A Completed Bill
If you want to add an adjustment to a completed bill perform the following steps:
· Add and freeze the adjustment (Adjustments – Main Information).
· Navigate to the Bill - Main page.
· Click the Reopen button to reopen the previously completed bill.
· Click the Complete button to recomplete the bill. When the bill is recompleted, the system will sweep the recently created financial transactions onto itself.
You can add a payment to a bill using an analogous approach – Add the payment, Reopen the bill, Complete the bill.
Cannot reopen historical bills. You may only reopen an account’s most recent bill because recompleting the bill causes the ending-balance to change, and we don’t want this to happen to historical bills.
How To Reprint A Bill (For The Original Recipients or For Someone New)
A copy of a bill is sent to every individual / business specified in the bill’s routing details. The system creates the routing details when a bill is completed. Refer to The Source Of Bill Routing Information for more information about how this information is compiled during bill completion.
If you want to reprint a bill OR if you want to send a bill to someone other than the original recipient(s):
· Navigate to the Bill - Main page.
· Transfer to the Bill - Bill Routings tab.
· Insert a new row (click the + button). Note well, you can only insert information on a bill that is Complete.
· Specify the name and address to which the bill should be sent. If you want to send the bill to someone other than the original recipient, simply specify the individual’s name and address. If the recipient is a person in the system, you can select their person ID and let the system default this information for you.
· Save the bill.
If a bill is Complete but the print process hasn’t yet executed, you don’t have to insert a new routing row. Rather, you can simply change the name and address on the original routing details.
How To Add Ad Hoc Messages To A Bill
If you want to add a message to a completed bill:
· Navigate to the Bill - Main page.
· Transfer to the Bill - Bill Messages tab.
· Insert a new row (click the + button). Note, you can only insert a message on the most recent bill that is Complete.
· Specify the desired message code.
· Save the bill.
· Reprint the bill as per How To Reprint A Bill (For The Original Recipients or For Someone New).
Refer to The Source Of Bill Messagesfor more information about the messages the system automatically links to a bill when the bill is completed.
How To Remove A Completed Bill
You can’t physically remove a completed bill from the system. However, you can remove all financial transactions from the bill (and therefore end up with a zero value bill). You can also suppress the bill from being printed. To do this, perform the following steps:
· If the bill has bill segments, cancel each bill segment. Refer to How To Cancel A Bill Segment for instructions describing how to do this.
· If the bill has payment amounts or adjustment amounts that were entered incorrectly, navigate to the payment and/or adjustment pages and cancel the payments / adjustments.
· Navigate to the Bill - Main page.
· Click the Reopen button to reopen the previously completed bill.
· Transfer to the Bill - Bill Routings tab. Turn on the Do Not Print switch for every routing entry.
· Click the Complete button to recomplete the bill. When the bill is recompleted, the system will sweep the canceled segments onto it and the net effect should be zero current charges.
Cannot reopen historical bills. You may only reopen an account’s most recent bill because recompleting the bill causes the ending balance to change, and we don’t want this to happen to historical bills.
If the bill has payment amounts or adjustment amounts that are valid, but you don’t want them to appear on this bill, navigate to the Bill, Financial Details page. Drill over to each respective financial transaction by clicking the drill down button. Clicking this button transfers you to Financial Transaction - Main. On this page, clear out the value of the Bill ID. Clearing out the Bill ID unlinks the financial transaction from the bill. When the system next completes a bill for the account, it will find the unbilled financial transaction and link it to the bill.
How To Display A Bill On-line
To display a bill on-line, you must first have installed software to render the bill in a format suitable for displaying. You must also configure the system to invoke this software; otherwise, you will get a message indicating that the service is not available. This option can only be configured by your technical staff.
To view a bill on-line, click the Display Bill button.
Open Financial Query, Financial Transactions On A Bill to view the financial transactions on a bill.
Note. You can also open this page using the go to buttons that prefix the financial transaction summaries on Bill - Main.
Description of page
Bill Id is the system-assigned unique identifier of the bill.
Account ID is the bill’s account.
The area beneath Account ID provides you with options that control which financial transactions appear in the grid. The following points describe the various options:
· Use the Obligation Filter to define the types of obligations whose financial transactions appear in the grid. The following options are available:
· All. Use this option if you do not wish to restrict financial transactions based on obligation attributes.
· Obligation ID. Use this option to restrict financial transactions to those of a specific obligation.
· Obligation Type. Use this option to restrict financial transactions to those whose obligations are linked to a given division and obligation type.
· Use FT Type Filter to restrict the type of financial transactions that appear in the grid. The following options are available:
· Adjustments. This option shows all financial transactions associated with adjustments.
· All. This option shows all financial transactions.
· Corrections. This option shows all financial transactions associated with corrections (i.e., cancel / rebills that have occurred after the bill was completed).
· Current Charges. This option shows all financial transactions associated with bill segments (that aren’t Corrections).
· Payments. This option shows all financial transactions associated with payments.
Don’t forget to click the search button after changing the filters or after selecting a new Bill ID.
The grid that follows contains the financial transactions that match your search criteria. The following information is displayed:
· FT Type displays the type of financial transaction except for adjustments. For adjustments, the adjustment type’s description is shown. Click on the hyperlink to transfer to Financial Transaction - Main. On this page, you can change certain aspects of the FT in question. Refer to How To Remove Unwanted Adjustments (or Payments) From A Completed Bill for a description of how to perform common maintenance functions.
· Accounting Date is the date the system uses to determine the financial transaction's accounting period in your general ledger.
· Current Amount contains the financial transaction's effect on the obligation’s current balance.
· Payoff Amount contains the financial transaction's effect on the obligation’s payoff balance. The Payoff Amount will be dim if it equals the Current Amount.
· Show on Bill indicates if information about the financial transaction appears on the taxpayer’s bill.
· Obligation Information contains a summary of the respective obligation.
· Financial Transaction ID is the system-assigned unique identifier of the financial transaction.
At the bottom of the page is a summary of the financial transactions that match the search criteria.
A bill typically contains one bill segment for every active billable obligation linked to its account. A bill segment contains information showing how the segment was calculated and how it should be printed on the taxpayer’s bill.
The actions taken to create a bill segment are dependent on the obligation’s obligation type.
It’s important to be aware that there are very few fields that are directly modifiable by a user. To modify most fields on a bill segment, you have to change source information (e.g., obligation, rate) and then regenerate the bill segment. For example, if you want to change the rate used to calculate a bill segment, you must change the rate history on the respective obligation and then cancel / rebill the bill segment. Refer to How To for step-by-step instructions that explain how to perform common bill segment maintenance functions.
Contents
Bill Segment - Main Information
Bill Segment - Financial Details
Bill Segment - Bill Segment Messages
Bill Segment Lifecycle
The following diagram shows the possible lifecycle of a bill segment.
Warning! This diagram only makes sense in the context of the page used to maintain bill segments. Refer to Bill Segment – Main Information for the details.
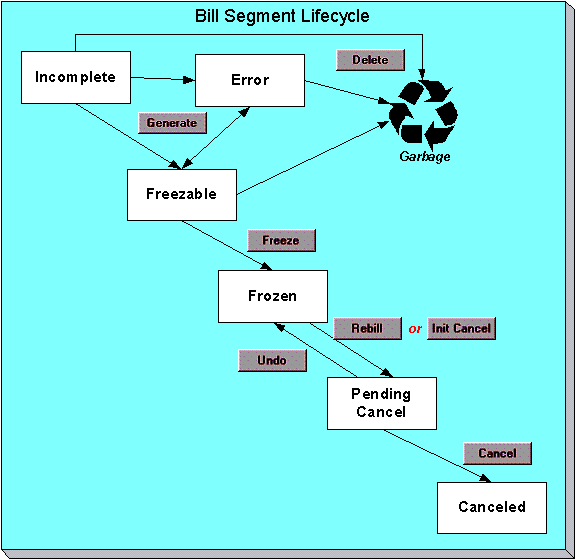
Bill segments are initially created in the Incomplete state. Bill segments in this state don’t have bill lines or a financial transaction; they are simply a stub awaiting generation.
Click Generate to generate the bill segment’s bill lines and its financial transaction.
· If the system cannot generate the bill segment (for any number of reasons), the bill segment is moved to the Error state. You may regenerate the bill segment after correcting the source of the error (by clicking Generate). You may also delete such a bill segment.
· If the system successfully generates a bill segment, the bill segment becomes Freezable. If the bill segment is incorrect, correct the cause of the problem (e.g., fix the meter read, change the obligation’s rate) and regenerate the bill segment (by clicking Generate).
Click the delete button to physically remove an Incomplete, Error or Freezable bill segment from the database.
Click Freeze to freeze a bill segment and its financial transaction. After doing this, the bill segment’s state becomes Frozen and the bill segment may now appear on a taxpayer’s bill. Also note, when a bill segment is frozen, its financial details will be interfaced to the general ledger the next time the GL interface executes.
You may not change a bill segment once it is frozen. However, you have two options if you want to change a frozen bill segment’s financial impact:
· If you need to remove the financial effects of a bill segment, click Init Cancel. Clicking this button causes a new financial transaction to be generated and linked to the bill segment. This financial transaction reverses the financial effects of the original bill segment. The bill segment becomes Pending Cancel after the system successfully generates this financial transaction. At this point, you have two options:
· Click Cancel to freeze the cancellation. Clicking this button causes the bill segment to move to the Canceled state. Once canceled, the bill segment cannot be uncanceled or changed.
· Click Undo to return the pending cancellation to the Frozen state.
· Click Rebill if you need to recalculate the bill segment because something has changed since it was originally created (e.g., the obligation’s rate was changed, a new read was entered). Clicking this button causes the following events to take place:
· The original bill segment is moved to the Pending Cancel state.
· A new bill segment is created in the Freezable (or Error) state.
At this point, you have two options.
· Click Freeze to make the new bill segment Frozen and make the original bill segment Canceled.
Multi-Cancel/Rebill Saves Time. If you need to rebill many bill segments related to an obligation (e.g., because many bill segments were created using the wrong rate), you should use the Multi Cancel Rebill transaction as it allows you to cancel / rebill an unlimited number of bill segments at once.
Click Undo to delete the new bill segment and return the original bill segment to the Frozen state.
Bill Segment - Main Information
The Description of Page section that appears below simply describes the fields on this page. Refer to How To for a description of how to perform common bill maintenance functions.
The Main page contains core bill segment information. Open Financial, Bill Segment, Main to view this information.
Note. Most bill segments are created by a background process. Refer to A High Level Overview Of The Bill Creation Process for information describing how the system creates a bill segment.
Description of Page
Bill Seg Info is a concatenation of the bill segment’s division, obligation type, status, bill period and amount. Bill Segment ID is the system-assigned unique identifier of the bill segment.
Account ID references the bill segment’s account.
Current Amount is the bill segment’s effect on the obligation’s current balance. Payoff Amount is only shown if it differs from current amount. Refer to Billing – Current Balance versus Payoff Balance for more information.
Bill ID is the system-assigned unique identifier of the bill on which the bill segment appears. A concatenation of its bill date, status, due date and amount is displayed.
Obligation ID contains information about the bill segment’s obligation. A concatenation of the obligation’s division, obligation type, start option (if any), status and start date is displayed.
Period is the start and end dates of the bill segment.
Bill Cycle displays the bill cycle and window start date of the bill segment’s bill. This information is only populated on bills when they are generated on-schedule by the batch billing background process. Bills generated manually, i.e. off-schedule, do not have this information.
Status is the bill segment’s status. Refer to Bill Segment Lifecycle for the potential values and how to handle a bill segment when it exists in a given state.
The Closing switch is not used.
If the RQ Override switch is on, a user has overridden the rate quantities.
Location is the address of the main location associated with the obligation (as defined on the obligation’s characteristic location).
Create Dt/Tm is the date and time on which the bill segment was created or regenerated.
In the Message area, a brief error message appears if there’s a problem with the bill segment. The message area is suppressed if there are no problems with the bill.
Push the magnifying glass button to view the long explanation. The long explanation will provide information about the cause of the error (and how to fix it).
If the bill segment is a rebill of a canceled bill segment, a reference to the original bill segment is displayed. Click the adjacent go to button to transfer to the bill segment that was canceled.
If the bill segment was canceled and rebilled by another segment, a reference to the new bill segment is displayed. Click the adjacent go to button to transfer to the new bill segment that superseded the canceled segment.
The topics that follow describe each of the actions on that appear in the Bill Segment Actions area. Refer to How To for a description of typical business processes that use these buttons.
Mass update actions. This page allows you to work on individual bill segments. If you want to update many bill segments linked to a bill at once, try using the mass update actions available on Bill -Bill Segments.
Contents
Generate (Bill Segment)
Click the Generate button to create a new a bill segment.
This button is enabled when either of the following conditions is true:
· You are in add mode (i.e., you are not displaying an existing bill segment) and you have selected an Account ID, Bill ID and Obligation ID.
· You are displaying a bill segment that is Incomplete, Error, or Freezable. Refer to Bill Segment Lifecycle for more information about these status values.
You must specify the following parameters in order to generate a new bill segment:
· Cut-off Date is the last possible day of the bill segment’s bill period. The current date defaults when the window opens. Refer to Ways To Control The End Date Of A Bill Segment for more information.
· Accounting Date is used to define the financial period to which the new bill segment’s financial transaction will be booked. The current date defaults when the window opens.
After specifying the above parameters, click the Calculate button to create a new bill segment for the bill.
If an error exists, refer to How To Correct A Bill Segment That's In Error.
If there are no errors, the Bill Segment Freeze Option on the installation option controls the next step:
· If this option is set to Freeze At Bill Completion, return to Bill – Main (using the bill context menu) and click the Freeze / Complete button.
· If this option is set to Freeze At Will, click the Freeze button and, if everything looks clean, return to Bill – Main and click the Complete button.
Delete (Bill Segment)
The Delete button deletes a bill segment.
This button is enabled if you are displaying a bill segment that is Incomplete, Error, or Freezable. Refer to Bill Segment Lifecycle for more information about these status values.
Freeze (Bill Segment)
Clicking the Freeze button causes a freezable bill segment to become frozen. Refer to Bill Segment Lifecycle for more information about freezing.
This button is enabled if:
· the Freeze At Will Bill Segment Freeze Option on the installation option has been selected AND
· the bill segment is freezable.
Freezing a day or more after generation. If the bill segment is linked to a closed accounting period, a pop-up appears in which you can specify a new accounting date. This will only happen if the accounting period closes before you freeze the bill segment (the accounting date is stamped on a bill segment when it’s initially generated).
If problems are detected after freezing. A bill segment may not be changed after it is frozen. All subsequent changes must occur by canceling the frozen bill segment and creating a new bill segment. Refer to How To Cancel A Bill Segment and How To Cancel / Rebill A Bill Segment for more information.
Rebill (Bill Segment)
If problems are detected with a frozen bill segment, it should be canceled and a new bill segment should be created. We refer to this process as cancel / rebill. Refer to Cancel / Rebill Incorrect Bill Segments for more information.
Before you cancel / rebill, you’ll probably need to fix the cause of the problem. The following table describes common problems and where to go to fix them.
|
Problem |
How To Fix It |
|
The wrong rate was used |
Go to Obligation – Rate Info and correct the rate. |
|
The wrong tax exemption amount was calculated |
Go to Obligation – Rate Info and correct the tax exemption information. |
Multi-Cancel/Rebill Saves Time. If the cause of the problem impacts many bill segments related to an obligation, you should use the Multi Cancel Rebill transaction as it allows you to cancel / rebill an unlimited number of bill segments at once.
The Rebill button causes an existing bill segment to be canceled, and a new bill segment to be created.
This button is enabled when you display a Frozen bill segment AND the bill segment's bill is not written off. Refer to Bill Segment Lifecycle for more information about these status values.
You must specify the following parameters in order to cancel and rebill a new bill segment:
· Cancel Reason defines why the bill segment is being canceled.
· Cutoff Date is the last day of the new bill segment. The cutoff date on the bill segment defaults when the window opens.
· Accounting Date is used to define the financial period to which the canceled and new bill segments’ financial transactions will be booked. The current date defaults when the window opens.
· Choose Use Cut off Date as Billing Option.
· Turn on Use Old RQ for Regen if you want the system to use the details on the original bill segment when it calculates the new bill segment.
Click the Calculate button to cancel the original bill segment and create a new bill segment.
At this point, there are now two bill segments - the original bill segment is in the state of Pending Cancel, the new bill segment is in the Freezable (or Error) state. If you want to back out, click the go to button to return to the original bill segment and then click Undo (this will delete the new bill segment and return the original bill segment to the Frozen state). If the new bill segment looks correct, click Freeze to move the original bill segment to the Canceled state and the new bill segment to the Frozen state.
Init Cancel (Bill Segment)
The Init Cancel button causes the first step of the bill segment cancellation process to be executed. You’d click this button if a frozen bill segment should never have been created (i.e., you want to remove the financial impact of a bill segment from a taxpayer’s balance).
This button is enabled when you display a Frozen bill segment AND the bill segment's bill is not written off. Refer to Bill Segment Lifecycle for more information about these status values.
You must specify the following parameters in order to cancel and rebill a new bill segment:
· Cancel Reason defines why the bill segment is being canceled.
· Accounting Date is used to define the financial period to which the canceled bill segment’s financial transactions will be booked. The current date defaults when the window opens.
Click the Calculate button to cancel the original bill segment.
At this point, the bill segment is in the state of Pending Cancel. If you want to back out, click Undo; the bill segment will be returned to the Frozen state. Click Cancel to move the bill segment to the Canceled state.
Undo (Bill Segment)
The Undo button returns a Pending Cancel bill segment to the Frozen state. If a Pending Cancel bill segment was created during a Cancel / Rebill, the newly created Freezable bill segment is also deleted.
This button is enabled when you display a Pending Cancel bill segment. Refer to Bill Segment Lifecycle for more information about this status.
Cancel (Bill Segment)
Clicking the Cancel button causes a Pending Cancel bill segment to become Canceled. Refer to Bill Segment Lifecycle for more information about cancellation.
This button is enabled if a Pending Cancel bill segment is displayed AND the bill segment's bill is not written off.
You must specify the following parameters in order to cancel the frozen bill segments:
· Cancel Reason defines why you are performing the cancellation.
· Accounting Date defines the financial period to which the canceled bill segments’ financial transactions will be booked. The current date defaults when the window opens.
After specifying the above parameters, click the Calculate button to cancel the frozen bill segments.
If the related bill is pending, the cancellation will cause the bill segment to be suppressed on the version of the bill sent to the taxpayer (but it remains in the database for audit and financial reporting purposes).
If the related bill is complete and you do not Reopen the bill, the financial impact of the canceled bill segment will appear on the next bill created for the account (under Bill Corrections).
If the related bill is complete you may be able to Reopen the bill and then Complete it. By doing this, you can suppress a frozen bill segment on a previously completed bill. This means that if you catch a problem after completion you don’t necessarily have to show the problem to the taxpayer. Rather, cancel the problem, reopen and then recomplete the bill (when you recomplete the bill the system will mark the bill segment to be suppressed on the version sent to the taxpayer because its cancellation appears on the same bill as the original charges).
Bill Segment - RQ Details
The Description of Page section that appears below simply describes the fields on this page.
The RQ Details page contains information about the rate quantities (RQ) that will be priced by the obligation’s rate. In addition to showing RQ details, this page shows any Calculation / Audit Read Details that are linked to the bill segment. Open Financial, Bill Segment, RQ Details to view this information.
Description of Page
Bill Seg Info is a concatenation of the bill segment’s division, obligation type, status, bill period and amount. Bill Segment ID is the system-assigned unique identifier of the bill segment.
The Rate Quantity details grid is a snapshot of the rate quantities amassed from:
· The RQ rules defined on the obligation’s rate. Refer to Defining Measured Quantity Manipulation Rulesfor more information about how RQ rules can introduce additional rate quantities.
· Billable charges that supply rate quantities.
One row exists for every unique combination of unit of measure (UOM), time-of-use (TOU) code, and rate quantity identifier (RQI) associated with the obligation.
This information may be overridden on a bill segment in the Error or Freezable state. Insert one row in the rate quantity grid (click the + button) for each UOM/TOU/RQI you need to add. You may also change amounts that were populated by the system when it initially generated the bill by simply overwriting the information.
Warning! The proper way to fix the RQ details on a bill segment is to correct the cause of the error. Overriding the RQ details on a bill segment is a last resort that should only be used when you can’t fix the cause of the problem. Refer to How To Cancel / Rebill A Bill Segment for ways to fix common problems.
The following information is displayed in the grid:
· Unit of Measure is the unit of measure of the rate quantity.
· Time of Use is the time-of-use of the rate quantity.
· RQI is the rate quantity identifier of the rate quantity.
· Initial Rate Quantity is the initial quantity amassed by the system before application of the rate’s RQ rules.
· Billable Rate Quantity is the quantity that will be priced by the obligation’s rate. This amount differs from the initial quantity when the rate’s RQ rules manipulate the value.
The Calculation/Audit Read Details section contains Calculation / Audit Read Details. This section only appears if the obligation has a special role of Billable Charge.
The following information may be defined for each calculation / audit read:
· Final Unit of Measure is the final unit of measure of the calculation / audit read.
· Final Time of Use is the final time-of-use code of the calculation / audit read.
· Final RQI is the final rate quantity identifier of the calculation / audit read.
· Start Date/Time is the date and time of the calculation / audit read.
· End Date/Time is the date and time of the calculation / audit read.
· Final Quantity is the quantity of the calculation / audit read. This would typically contain the amount that was billed during the Start Date/Time through the End Date/Time for the Final Unit of Measure, Final Time of Use and Final RQI.
· Unit of Measure is the initial unit of measure of the calculation / audit read (if any).
· Time of Use is the initial time-of-use code of the calculation / audit read.
· RQI is the initial rate quantity identifier of the calculation / audit read.
· Start Quantity is the “start” quantity (if any). This value would typically only be displayed if the calculation / audit read is subtractive (i.e., you must subtract the end quantity from the start quantity to determine billable quantity).
· End Quantity is the “end” quantity (if any). This value would typically only be displayed if the calculation / audit read is subtractive (i.e., you must subtract the end quantity from the start quantity to determine billable quantity).
· Quantity is the resulting measured quantity (if any). This value would typically only be displayed if the calculation / audit read is subtractive (i.e., you must subtract the end quantity from the start quantity to determine billable quantity). It should contain the difference between the Start Quantity and the End Quantity.
· Constant is the constant of the measuring device that was multiplied by the Quantity to derive the calculation / audit read’s Final Quantity.
· How To Use is a code that indicates if the “calculation / audit” read was considered to be additive, subtractive, peak or check.
· Use Percent is the percentage of the total quantity that was billed.
· Meas Peak Qty indicates if the unit of measure is one that measures a peak amount.
· Multiplier is the ratio of the Final Quantity and the Quantity. This value only appears if a non-zero value exists in both of these fields.
· Sequence is the sequence number (if any).
This information may be overridden on a bill segment in the Error or Freezable state. Insert one row in the calculation / audit details grid (click the + button) for each entry you need to add. You may also information populated by the system when it initially generated the bill by simply overwriting the information.
Warning! The proper way to fix the calculation/audit details on a bill segment is to correct the cause of the error. Overriding the calculation/audit details on a bill segment is a last resort that should only be used when you can’t fix the cause of the problem.
Refer to Calculation / Audit Read Details for more information about this section.
Bill Segment - Calc Lines
The Description of Page section below simply describes the fields on this page. Refer to How To Cancel / Rebill A Bill Segment for instructions describing how to regenerate this information if the bill segment is incorrect.
The Calc Lines page contains information about the bill calculation lines produced when the system generates the bill segment. These lines are the source of the details printed on the taxpayer’s bill. Open Financial, Bill Segment, Calc Lines to view this information.
Most obligations use a rate to calculate the information that appears on this page. Refer to How Rates Affect The Information On Bill Segments for more information.
Description of Page
Bill Seg Info is a concatenation of the bill segment’s division, obligation type, status, bill period and amount. Bill Segment ID is the system-assigned unique identifier of the bill segment.
The Bill Segment Header (Bill Seg Hdr) scroll contains one entry for every version of the rate that was used to calculate the bill segment’s lines. Because most bill segments use a single rate version, you typically only see one entry in the scroll.
The following information is displayed above the bill calculation line grid.
· Sequence will be 1 unless multiple versions of the rate were in effect during the bill period. If there was more than one effective rate version, there will be a separate set of calc lines for each version applied. The lines that apply to the first part of the bill period would have a Sequence of 1, the lines for the next part of the bill period would have a Sequence of 2 and so on.
· Start Date – End Date is the portion of the bill segment period that the calculation details apply.
· Amount is the sum of the bill calculation lines in the grid.
· Desc on Bill is summary information about the calculation details that will be printed on the taxpayer’s bill.
· Rate Version is the ID of the rate version and its effective date. This information only appears if a rate was used to calculate the charges.
The calculation lines grid is a snapshot of how the system calculated the bill segment amount. One row exists for every calculation involved in this process. This information is for audit purposes only and may not be modified. The following information is displayed in the grid:
· A drill down button appears in the Calc Line Char column if the bill calculation line has characteristics. The Char column only appears if at least one of the calculation lines has a characteristic.
· Sequence is the system-assigned unique identifier of the calculation detail row.
· Description on Bill is the information about the bill line that appears on the taxpayer’s bill.
· Calculated Amount is the calculated amount associated with the bill line.
· The Print switch controls whether information about this line will print on the taxpayer’s bill.
· The Appears in Summary switch defines if this line’s amount also appears on a summary line. This switch plays a part at bill print time – those lines that appear in a summary print in the left dollar column, those that don’t appear in a summary print in the right dollar column.
The system automatically populates this switch as follows:
· Bill segments created by applying a rate have this switch turned on if the corresponding rate component is summarized on a summary rate component.
· Bill segments created from billable charges use the value of this switch as defined on the billable charge. Refer to Maintaining Billable Charges for more information.
· Unit of Measure (UOM) is the unit of measure of the rate quantity priced on the calculation line.
· Time of Use (TOU) is the time-of-use code of the rate quantity priced on the calculation line.
· RQI is the rate quantity identifier of the rate quantity priced on the calculation line.
· Billable Rate Quantity is the quantity priced on the calculation line. This quantity will be different from the measured quantity is there are RQ rules in effect.
· Base Amount is used by calculation lines (e.g. taxes) that are cross-referenced to other calculation lines and whose value(s), therefore, depend on the amounts calculated by those other lines. The Base Amount shows the total amount derived from the cross-referenced line(s) that the current line then used to calculate its billed amount.
· Rate Component Sequence refers to the sequence number of the rate component on the applicable rate version that was used to calculate the line.
· Measures Peak Qty is checked if the UOM priced on the calculation line is used to measure a peak quantity.
· Exempt Amount is the amount of the calculated charge that the taxpayer doesn’t have to pay because they are tax exempt.
· Distribution Code is the distribution code associated with the calculation line. This distribution code is used to build the general ledger details on the bill segment’s financial transaction.
· Description describes the characteristic value that was used when the line’s amount was calculated. This information is only displayed if the line was calculated using a rate factor (because only rate factors use characteristic values). Refer to An Illustration Of A Rate Factor And Its Characteristics for more information.
Bill Segment - Financial Details
The Description of Page section that appears below simply describes the fields on this page. Refer to How To Cancel / Rebill A Bill Segment for instructions describing how to regenerate this information if it is incorrect.
The Financial Details page contains information about the financial effects of the bill segment. Open Financial, Bill Segment, Financial Details to view this information.
Note. Refer to The Source Of GL Accounts On A Bill Segment’s Financial Transaction for how the system compiles this information.
Description of Page
Bill Seg Info is a concatenation of the bill segment’s division, obligation type, status, bill period and amount. Bill Segment ID is the system-assigned unique identifier of the bill segment.
The Bill Segment FT scroll contains one entry for every financial transaction (FT) associated with the bill segment. All bill segments have an FT that shows the impact of the bill segment on the general ledger. A bill segment may have an additional FT (for a maximum of two) if it is cancelled. The second FT shows the impact of the cancellation on the general ledger.
The following financial transaction information is displayed above the general ledger distribution grid.
· FT Type displays the type of financial transaction (FT).
· Show on bill indicates if information about the FT appears on the taxpayer’s bill.
· FT ID is the system-assigned unique identifier of the FT. Click the go to button to transfer to the Financial Transaction - Main page. On this page you can change certain aspects of the FT in question. Refer to How To Remove Unwanted Adjustments (or Payments) From A Completed Bill for a description of how to perform common maintenance functions.
· The posted by information that appears adjacent to the FT ID shows the date on which the FT was frozen and the user ID of the user who performed the operation.
· The “Linked to bill on” message appears when the financial transaction is linked to a bill. A FT is linked to a bill the next time a bill is completed for the account. Therefore, if a user cancels a bill segment, the FT associated with the cancellation will not be linked to a bill until the next bill is completed (although the financial effect of the cancellation takes place immediately). Click the adjacent go to button to transfer to the bill on which the FT appears.
· Current Amount contains the FT’s effect on the obligation’s current balance.
· Payoff Amount contains the FT’s effect on the obligation’s payoff balance. This field is only visible when the payoff amount differs from the current amount.
· Accounting Date is the date the system uses to determine the FT’s accounting period in your general ledger.
· Effective Date is the date the FT starts aging.
The journal details grid is a snapshot of the distribution codes used to generate the GL accounts that are affected by the FT. This information is for audit purposes only and may not be modified. The following information is displayed in the grid:
· Sequence is the system-assigned unique identifier of the distribution line.
· Distribution Code is the distribution code used to generate the GL account affected by the distribution line. Drill over to the FT if you need to see the actual GL account.
· Amount is the amount debited / credited (credits are shown as negative values).
· Statistics Code and Statistics Amount are only specified when a statistical quantity is associated with the distribution line.
· Description describes the characteristic value that was used when the line’s amount was calculated. This information is only displayed if the distribution line was derived from bill calculation lines that were calculated using a rate factor (because only rate factor’s use characteristic values). Refer to An Illustration Of A Rate Factor And Its Characteristics for more information.
· If you keep the default installation option where fund accounting is practiced, the description of the Fund associated with this distribution code is displayed.
Bill Segment - Bill Segment Messages
The Messages page is a grid containing one row for every message that appears on the bill segment. Open Financial, Bill Segment, Bill Segment Messages to view this information.
No messages until completion. A bill segment has no messages until it is completed (unless you insert them manually). At completion time, the system assembles messages from the various message sources. Refer to The Source Of Bill Messages for information about these sources.
The bill may also have messages. Be aware that only obligation-oriented messages are linked to a bill segment. There may also be account-oriented messages linked to the bill. Refer to Bill - Bill Messages for information about the page on which account-oriented messages are displayed. Refer to The Source Of Bill Messages for information about the various message sources and whether each is linked to a bill or a bill segment.
Description of Page
Bill Seg Info is a concatenation of the bill segment’s division, obligation type, status, bill period and amount. Bill Segment ID is the system-assigned unique identifier of the bill segment.
The following columns are displayed in the grid:
· Msg Code is the code that identifies the bill message.
· Message On Bill is the message associated with the code.
· Priority is the bill messages priority (on the printed bill).
· Insert Code defines if the bill message causes an insert in the envelope.
The Multi-Cancel/Rebill transaction is used to cancel / rebill (and freeze) one or more bill segments linked to an obligation.
Note. You would typically use this transaction when something has been wrong for an extended period of time. For example, if the taxpayer was assigned the wrong rate from the beginning, you would correct the taxpayer’s rate using Obligation – Rate Info and then use this transaction to cancel / rebill the taxpayer’s historical bill segments.
The following topics describe how to use this transaction.
Contents
Multi Cancel/Rebill - Main
The main page is used to select the bill segments to be cancel/rebilled and to initiate the cancel/rebill request. Open Financial, Multi-Cancel/Rebill to use this transaction.
Description of Page
This page contains all non-cancelled bill segments associated with a given Obligation ID. The obligation’s Obligation Info, Account ID (and name), characteristic Location (and address), Current Balance and Payoff Balance are displayed at the top of page.
When the page first opens, the grid is populated with ALL non-cancelled bill segments displayed in reverse chronology order. All frozen bill segments are pre-selected for cancel/rebill processing. The following information appears in the grid:
· Selected Switch. If this switch is turned on, the bill segment will be cancel / rebilled when the Cancel/Rebill/Freeze button is clicked. You can use the mouse to toggle the value of this switch on a specific bill segment. Alternatively, you can click the Select All button or Unselect All button to toggle the switch for all frozen bill segments. The checkbox is disabled if the bill segment's bill is written off. Note: the total number of selected bill segments is shown above the grid for confirmation purposes.
· Start Date. This is the first day of the bill segment.
· End Date. This is the last day of the bill segment.
· Create Date/Time. This is the day/time the bill segment was created.
· Amount. This is the payoff amount of the bill segment.
· Original Amount. This column only contains a value if the bill segment is a rebill of another bill segment. In this situation, one of the following values will be displayed:
· If the amount of the new bill segment differs from the amount of the original bill segment, the amount of the original bill segment will be displayed.
· If the amount of the new bill segment equals the amount of the original bill segment, the word No change will be displayed.
· Bill Segment Information. This is the standard bill segment summary information.
Sorting By Values In The Grid. Just like all grids in the system, you can click on a column heading to resort the grid by the value of the respective column. This might be useful to sort the bill segments in Amount order.
After selecting the bill segments to be cancel/rebilled, click the Cancel/Rebill/Freeze button.
Please specify the following information and then click Calculate to cancel the selected bill segment and create new bill segments:
· Cancel Reason defines why the bill segment(s) are being canceled.
· Accounting Date is used to define the financial period to which the canceled and new bill segments’ financial transactions will be booked.
· Choose Use Cut off Date as Billing Option.
· If you’d prefer to have the system use the details snapshot on the original bill segments, turn on Use Old RQ.
Warning! If the cause of the rebill is an incorrect rate and the new rate requires rate quantities that were not calculated when the bill was originally calculated, do not turn on Use Old RQ. Why? Because you want the system to derive new rate quantities during the rebill process.
Default note. The Accounting Date is defaulted to the current date and the Use Old RQ switch is turned on.
After specifying the above information, the system cancel / rebills each segment in chronological order (i.e., earlier segments will be cancel / rebilled before later segments). The new amount of each bill segment is shown in the Original Amount column. You can navigate to the Graph page to graphically view the financial ramifications of the cancel/rebills.
Errors. It’s possible that bill segment errors will occur when you cancel / rebill the bill segments. For example, if you change the obligation’s rate to a rate that is no longer effective on the bill segment period, a bill segment error will be generated. If this occurs, you must go to Bill Segment – Main for the pending cancel bill segment and use the Undo action to remove the offending bill segment (and restore the original segment to the Frozen state). Alternatively, you can drill down on the Error bill segment and use the Regenerate action after correcting the cause of the problem.
There is no Undo. Unlike cancel / rebills performed on Bill Segment – Main, there is no Undo action. This is because the multi-cancel/rebill transaction freezes the newly created bill segments after it cancel/rebills; whereas the bill segment transaction lets you examine the new bill segment before you freeze it. If you made a mistake, simply correct the cause of the mistake and then cancel / rebill again. The erroneous financial transactions will be automatically suppressed on the next bill produced for the taxpayer.
Multi Cancel/Rebill - Graph
This page contains a graph that shows the rebilled and original payoff amounts for an obligation’s non-cancelled bill segments. Open Financial, Multi Cancel/Rebill and navigate to the Graph page to view this information.
Description of Page
This page contains a graph that shows the payoff amounts for an obligation’s non-cancelled bill segments (represented by the blue bars in the graph). If a bill segment is a rebill of another bill segment, the payoff amount of the original bill segment is displayed on a red-colored bar adjacent to the respective blue bar.
Click a bar. You can click on a bar to drill down to a bill segment.
Open Financial Query, Obligation Billing History to view a history of all bill segments produced for an obligation.
Description of Page
The Account ID is displayed with the account’s name adjacent.
The Obligation Information shows a summary of information about the obligation. The Obligation ID is the unique identifier of this obligation.
One row is displayed for every bill segment ever produced for the selected obligation.
The following information is displayed for each bill segment:
· The Start Date and End Date of the bill segment.
· The number of Days in the bill segment period.
· The Status of the bill segment
· The Current and Payoff Amounts of the bill segment.
· The UOM (Unit of Measure) of the rate quantity designated as the “graph UOM” for the obligation’s obligation type.
· The total amount of the service Billable Rate Quantity that was billed.
· The Average Daily Rate Quantity is the Billable Rate Quantity divided by the numbers of days of service.
If you need to see more detailed information about the bill segment, click the go to button to transfer to the bill segment page.
If errors are detected during the billing process, it may cause a record to be written to the bill exception table with a message indicating the nature of the severe error.
To view the messages associated with the exception records, schedule the TD-BIERR background process. This process generates a To Do entry for every record in the bill exception table.
Refer to How to Correct a Bill That's In Error for instructions describing how to correct a bill.
If errors are detected during the billing process, it may cause a record to be written to the bill segment exception table with a message indicating the nature of the severe error.
To view the messages associated with the exception records, schedule the TD-BSERR background process. This process generates a To Do entry for every record in the bill segment exception table.
Refer to How To Correct A Bill Segment That’s In Error for instructions describing how to correct a bill segment.
You create a billable charge whenever a taxpayer should be charged for a service that occurs outside the normal course of business. For example, if a taxpayer requires a review of their property assessment, you may charge them an administration fee.
Billable charges can be uploaded from an external system. Refer to Uploading Billable Charges and Using Billable Charges For Pass Through Billing for more information.
A billable charge must refer to an obligation. This obligation behaves just like any other obligation:
· Bill segments are created for the obligation. Whenever billing is performed for an account with billable charge obligations, the system creates a bill segment for each billable charge. This means that if an obligation has many unbilled billable charges, it will have many bill segments.
· Payments are distributed to the obligation. Payments made by an account are distributed to its billable charge obligations just like any other obligation.
· Overdue debt is monitored. The collections process monitors billable charge obligations for overdue debt and responds accordingly when overdue debt is detected.
· This obligation must reference an obligation type that has a Special Role Flag of Billable Charge. If such an obligation does not already exist for the account, one must be created before you can levy a billable charge. See “For more information” at the end of this section for links to other sections that will help you with this process.
Billable charge templates exist to minimize the effort required to create a billable charge for a taxpayer. A billable charge template contains the standard bill lines, amounts and distribution codes used to charge for a one-off charge.
A user may override the information on the template when the billable charge is created.
Templates aren’t required. A billable charge can be created without a template for a truly unexpected charge. If you don’t use a template, you’ll have to enter the bill information manually.
Refer to Setting Up Billable Charge Templates for more information.
Adding taxes and other calculation lines to a billable charge. Refer to Billable Charge – RQ Details for information about how to have the system calculate tax lines and append them to the billable charge.
Contents
Billable Charge - Line Characteristics
Billable Charge - Calculation Details
Billable Charge - Main
Open Financial, Billable Charge to add or update a billable charge.
Description of Page
The Billable Charge ID is system generated. The Account ID of the account responsible for the charge is displayed at the top.
Use Obligation ID to define the ID of the billable charge obligation that will hold the billable charge’s debt. The Account ID for the obligation is displayed for information purposes.
Use Start Date and End Date to define the charge’s bill period.
Installment billable charges. You can create many future dated billable charges to implement unusual installment plans. For example, if you want to bill a taxpayer $250 today, $150 next month, and $1000 three months from now; you could create three billable charges with a date that reflects the earliest bill date. When a bill is produced for the account, the system will create a bill segment for every billable charge whose start date is on or before the current date.
If you want to create the billable charges from an existing template, enter the ID of the Billable Charge Template from which the billable charge information defaults. If your obligation type indicates a billable charge template, that value will be defaulted.
Use Description on Bill to define the verbiage that should print on the taxpayer’s bill above the line item details.
Billable Charge Status defines the state of the billable charges. Possible values are Billable and Canceled. Click the Cancel button to cancel a billable charge.
Bill Segment ID is the ID of the bill segment on which the billable charge’s charge details appear. This information is only populated AFTER the billable charge has been swept onto a bill.
The Total Bill Amount displays the sum of all billable charge lines except those that are Memo Only. The Total Line Amount displays the sum of all billable charge lines except those that Appear In Summary.
The information in the grid defines the line item details associated with the billable charge. Click the drill down button to navigate to the line characteristics. The following fields are required for each line:
Sequence Sequence controls the order in which the line items appear on the bill segment.
Description on Bill Specify the verbiage to print on the bill for the line item.
Charge Amount Specify the amount to charge for the line item.
Show on Bill Turn this switch on if the line item should appear on the taxpayer’s printed bill. It would be very unusual for this switch to be off.
Appears in Summary Turn this switch on when the amount associated with this line also appears in a summary line. This switch plays a part at bill print time - those lines that appear in a summary print in the left dollar column, those that don’t appear in a summary print in the right dollar column. Also note, those lines that appear in a summary line are not included in the total amount associated with the billable charge.
Memo Only, No GL Turn this switch on if the billable charge line does not contribute to the total amount due (e.g., this switch would be on for “information only” lines).
Distribution Code Specify the distribution code that identifies the GL account associated with this line item. The description of the code appears adjacent.
For more information about billing billable charges, refer to How To Create An Ad-hoc Bill. For more information about billable charge templates, refer to Setting Up Billable Charge Templates.
Billable Charge - Line Characteristics
Characteristics may be associated with billable charge lines. Typically, this is done to categorize billable charge lines for reporting purposes.
Open Financial, Billable Charge, Line Characteristics to maintain characteristics that are associated with billable charge.
Description of Page
The Billable Charge Line scroll defines the billable charge line to which you wish to assign characteristic values. The following fields display:
Characteristic Type The type of characteristic.
Characteristics Value The value of the characteristic.
Note. You can only choose characteristic types defined as permissible on a billable charge line. Refer to Setting Up Characteristic Types & Their Values for more information.
Billable Charge - RQ Details
Optionally, you may specify rate quantities associated with a billable charge. These are most commonly used when you want the system to calculate charges in addition to the billable charge lines (e.g., adding tax to the billable charge lines).
The obligation must specify a rate. If you want the system to calculate additional charges based on the rate quantities defined on this page, the related billable charge obligation must reference a rate. This rate must have rate components that calculate charges based on the rate quantities specified on this page. When the obligation is next billed, the system will sweep on the billable charges and then call the rate and pass it the rate quantities defined on this page. The rate will calculate the additional charges and these will be appended to the bill segment.
Open Financial, Billable Charge, RQ Details to maintain a billable charges rate quantities.
Description of Page
The following fields display:
Sequence Specify the sequence number of the RQ.
Unit of Measure Select the unit of measure of this RQ. One or more of Unit of Measure, Time of Use, or Rate Quantity Identifier must be selected.
Time of Use Select the time of use period.
Rate Quantity Identifier Select the RQ identifier.
Rate Quantity Specify the number of units of this rate quantity.
Billable Charge - Calculation Details
Optionally, you may specify calculation details associated with a billable charge. These are most commonly used when you need to print the details that were used to calculate the bill lines that appear on the main tab.
Open Financial, Billable Charge, Calculation Details to maintain a billable charge's rate quantities.
Description of Page
The grid is a snapshot of the details that were billed using the bill lines shown on the main tab. One row exists for every calculation detail that should be swept onto the related bill segment when the system creates a bill segment for this billable charge. The following information is displayed in the grid:
· Final Unit of Measure is the final unit of measure of the calculation / audit read.
· Final Time of Use is the final time-of-use code of the calculation / audit read.
· Final RQI is the final rate quantity identifier of the calculation / audit read.
· Final Quantity is the quantity of the calculation / audit read. This would typically contain the amount that was billed during the Start Date/Time through the End Date/Time for the Final Unit of Measure, Final Time of Use and Final RQI.
· Sequence is the sequence number (if any).
· Unit of Measure is the initial unit of measure of the calculation / audit read (if any).
· Time of Use is the initial time-of-use code of the calculation / audit read.
· RQI is the initial rate quantity identifier of the calculation / audit read.
· Start Quantity is the “start” quantity (if any). This value would typically only be displayed if the calculation / audit read is subtractive (i.e., you must subtract the end quantity from the start quantity to determine billable quantity).
· End Quantity is the “end” quantity (if any). This value would typically only be displayed if the calculation / audit read is subtractive (i.e., you must subtract the end quantity from the start quantity to determine billable quantity).
· Quantity is the resulting measured quantity (if any). This value would typically only be displayed if the calculation / audit read is subtractive (i.e., you must subtract the end quantity from the start quantity to determine billable quantity). It should contain the difference between the Start Quantity and the End Quantity.
· Constant is the constant of the measuring device that was multiplied by the Quantity to derive the calculation / audit read’s Final Quantity.
· How To Use is a code that indicates if the “calculation / audit” read is considered to be additive, subtractive, peak or check.
· Use Percent is the percentage of the total quantity that was billed.
· Measures Peak Qty indicates if the unit of measure is one that measures a peak amount.
· Start Date/Time is the date and time of the calculation / audit read.
· End Date/Time is the date and time of the calculation / audit read.
· Multiplier is the ratio of the Final Quantity and the Quantity. This value only appears if a non-zero value exists in both of these fields.
Note. The multiplier is calculated by dividing the Final Quantity by the Quantity (if the Quantity is 0, then the result is 0). This is not stored on the database. There is a chance that the value is not precise due to round-off.
This section describes how the system uploads billable charges from an external source. This mechanism is used when you need to "pass through" charges that have been calculated by a third party but appear on your bill.
Contents
Billable Charge Upload Background Processes
BCUP-PRG - Purge Billable Charge Upload Objects
Billable Charge Upload Staging
Billable Charge Upload Exception
Billable Charge Upload Background Processes
The following diagram illustrates the processes involved in the uploading of billable charges into the system.
The topics in this section describe how these processes work.
Contents
Process X - Populate BC Upload Staging
BCU1 - Validate & Populate Billable Charge Upload Staging
Process X - Populate BC Upload Staging
Process X refers to the mechanism used by your organization to populate the various staging tables (shown in the yellow section of the following ERD).

The topics in this section describe each of these tables.
Contents
Billable Charge Upload Staging Layout
Billable Charge Line Upload Staging Layout
Billable Charge Line Characteristic Upload Staging Layout
Billable Charge Rate Quantity Upload Staging Layout
Billable Charge Calculation Details Upload Staging Layout
Billable Charge Upload Staging Layout
You must create an upload staging record for each billable charge. The name of this table is CI_BCHG_UP. The following table describes each column on this table.
|
Column Name |
Length |
Req’d |
Data Type |
Comments |
|
BCHG_UP_ID |
30 |
Y |
Char |
This is the unique identifier of the record. This value does NOT have to be a random number, but it does need to be unique. If your process that inserts records on this table is capable of calling a COBOL routine, call CIPCKEYG and it will supply a 12 digit random number for you. |
|
BCHG_UP_STAT_FLG |
2 |
Y |
Char |
This must be set to P for Pending. |
|
NT_XID_CD |
30 |
N |
Char |
Leave this column blank. |
|
SA_EXT_REF_ID |
36 |
N |
Varchar2 |
Leave this column blank. |
|
BCHG_EXT_REF_ID |
50 |
N |
Varchar2 |
This is the identifier of the billable charge in the sender’s system. |
|
CRE_DTTM |
26 |
N |
Date/Time |
The date and time the upload staging row was inserted (this can be used for audit purposes). |
|
START_DT |
10 |
Y |
Date |
The start date of the period encompassed by the billable charge. |
|
END_DT |
10 |
Y |
Date |
The end date of the billable charge period. |
|
DESCR_ON_BILL |
80 |
Y |
Varchar2 |
This is the description that should prefix the charges on the printed bill. |
|
SA_ID |
10 |
See note |
Char |
This must correspond with an obligation ID of a billable charge obligation. |
|
BILLABLE_CHG_ID |
12 |
N |
Char |
Leave this column blank. It will be assigned by the system when it creates a billable charge record. |
Billable Charge Line Upload Staging Layout
You must create a billable charge line upload record for each line to be uploaded. The name of this table is CI_BCHG_LINE_UP. The following table describes each column on this table.
Defaulting from Billable Charge Upload Line Type (BCHG_UP_XTYP). Please pay special attention to the Comments column below as many fields, if left blank, will default from each record’s billable charge upload line type (BCHG_UP_XTYP).
|
Column Name |
Length |
Req’d |
Data Type |
Comments |
|
BCHG_UP_ID |
30 |
Y |
Char |
This is the foreign key to the billable charge upload staging record. |
|
LINE_SEQ |
3 |
Y |
N |
This is the unique line number of the billable charge line. This value must be unique within the billable charge. |
|
DESCR_ON_BILL |
80 |
Y |
Varchar2 |
This is the description that will be printed on the bill for the line. |
|
CHARGE_AMT |
13.2 |
N |
N |
This is the amount associated with the billable charge line. |
|
BCHG_LINE_XID |
20 |
N |
Varchar2 |
This is the unique identifier of the billable charge line in the sender’s system. |
|
BCHG_UP_XTYPE |
30 |
N |
Char |
This is the type of billable charge line. This is a foreign key reference to the billable charge line type control table. This control table is used to populate the remaining fields (if they are blank). If this field is blank, the remaining fields must be specified as they cannot be defaulted from the billable charge line type control table. Refer to Bill Charge Line Type for more information. |
|
CURRENCY_CD |
3 |
See note |
Char |
This is a foreign key reference to the currency code of the billable charge line. This field must be specified if CHARGE_AMT is non-zero. |
|
SHOW_ON_BILL_SW |
1 |
See note |
Char |
This should be Y if the line should appear on the taxpayer’s printed bill. This should be N if the line should not appear on the taxpayer’s printed bill. If left blank, this value will be populated from the line’s BCHG_UP_XTYPE. |
|
APP_IN_SUMM_SW |
1 |
See note |
Char |
This should be Y if the line appears in a summary line. This should be N if the line does not appear in a summary line. This switch plays a part at bill print time – those lines that appear in a summary print in the left dollar column, those that don’t appear in a summary print in the right dollar column. If left blank, this value will be populated from the line’s BCHG_UP_XTYPE. |
|
MEMO_SW |
1 |
See note |
Char |
This should be Y if the line does NOT affect the general ledger. This should be N if the line affects the general ledger. If left blank, this value will be populated from the line’s BCHG_UP_XTYPE. |
|
DST_ID |
10 |
See note |
Char |
If the line affects the general ledger, the set ID (the previous field) and the distribution code of the GL account must be specified. If left blank, this value will be populated from the line’s BCHG_UP_XTYPE. |
Billable Charge Line Characteristic Upload Staging Layout
If you want to upload characteristics on your billable charge lines, you must create a billable charge line characteristic upload record for each characteristic on each line. The name of this table is CI_B_LN_UP_CHAR. The following table describes each column on this table.
|
Column Name |
Length |
Req’d |
Data Type |
Comments |
|
BCHG_UP_ID |
30 |
Y |
Char |
This is the foreign key to the billable charge upload staging record. |
|
LINE_SEQ |
3 |
Y |
N |
This is the foreign key to the billable charge line upload staging record |
|
CHAR_TYPE_CD |
8 |
Y |
Char |
This is the unique identifier of the billable charge line characteristics. This value must be unique within the billable charge line characteristics. |
|
CHAR_VAL |
16 |
N |
Char |
A characteristic value must be supplied if the ad hoc switch on characteristic type is N. Otherwise, it is not allowed. |
|
ADHOC_CHAR_VAL |
30 |
N |
Varchar2 |
An ad hoc characteristic value must be supplied if the ad hoc switch on characteristic type is Y. Otherwise, it is not allowed. |
Billable Charge Rate Quantity Upload Staging Layout
You must create a billable charge rate quantity upload record for each rate quantity to be uploaded. The name of this table is CI_BCHG_UP_SQ. The following table describes each column on this table. Refer to “pass through” charges for more information about how this type of information is used.
|
Column Name |
Length |
Req’d |
Data Type |
Comments |
|
BCHG_UP_ID |
30 |
Y |
Char |
This is the foreign key to the billable charge upload staging record. |
|
SEQ_NUM |
3 |
Y |
N |
Sequence of the rate quantity within the Billable Charge Upload |
|
UOM_CD |
4 |
N |
Char |
The unit of measure of the Billable Charge Upload RQ row. If specified, it must reference a valid value on CI_UOM. Note, at least one of the following fields should be specified: SQI_CD, TOU_CD, UOM_CD. |
|
TOU_CD |
8 |
N |
Char |
The time of use of the Billable Charge Upload RQ row. If specified, it must reference a valid value on CI_TOU. Note, at least one of the following fields should be specified: SQI_CD, TOU_CD, UOM_CD. |
|
SQI_CD |
8 |
N |
Char |
The rate quantity identifier of the Billable Charge Upload RQ row. If specified, it must reference a valid value on CI_SQI. Note, at least one of the following fields should be specified: SQI_CD, TOU_CD, UOM_CD. |
|
SVC_QTY |
12.6 |
N |
N |
Quantity of the rate used for the UOM / TOU / RQI combination |
Billable Charge Calculation Details Upload Staging Layout
You must create a billable charge read details upload record for each calculation detail to be uploaded. The name of this table is CI_BCHG_UP_READ. The following table describes each column on this table. Refer to “pass through” charges for more information about how this type of information is used.
|
Column Name |
Length |
Req’d |
Data Type |
Comments |
|
BCHG_UP_ID |
30 |
Y |
Char |
This is the foreign key to the billable charge upload staging record. |
|
SP_ID |
10 |
Y |
Char |
Leave this column blank. It is not used. |
|
SEQNO |
5 |
Y |
Number |
This should be a value greater than zero. |
|
END_READ_DTTM |
26 |
Y |
DateTime |
This is the date and time of the end quantity |
|
END_REG_READ_ID |
12 |
N |
Char |
Leave this column blank. It is not used. |
|
END_REG_READING |
9.6 |
Y |
Number |
This is the end quantity. |
|
FINAL_REG_QTY |
12.6 |
Y |
Number |
This is the final quantity |
|
FINAL_SQI |
8 |
N |
Char |
The rate quantity identifier of the FINAL_REG_QTY. If specified, it must reference a valid value on CI_SQI. Note, at least one of the following fields should be specified: FINAL_SQI, FINAL_UOM_CD. |
|
FINAL_TOU_CD |
8 |
N |
Char |
The time-of-use code of the FINAL_REG_QTY. If specified, it must reference a valid value on CI_TOU. |
|
FINAL_UOM_CD |
4 |
N |
Char |
The unit of measure of the FINAL_REG_QTY. If specified, it must reference a valid value on CI_UOM. Note, at least one of the following fields should be specified: FINAL_SQI, FINAL_UOM_CD. |
|
HOW_TO_USE_FLG |
2 |
Y |
Char |
See the field description in the data dictionary for the valid values (CI_BCHG_UP_READ). |
|
MSR_PEAK_QTY_SW |
1 |
Y |
Char |
Y or N |
|
MSR_QTY |
12.6 |
Y |
Number |
Quantity. This is the difference between end quantity and start quantity. |
|
REG_CONST |
6.6 |
Y |
Number |
This is the constant value used to adjust the quantity. Set this to a value of 1 if it is not known. |
|
SQI_CD |
8 |
N |
|
The rate quantity identifier of end quantity and start quantity. If specified, it must reference a valid value on CI_SQI. Note, at least one of the following fields should be specified: SQI_CD, TOU_CD, UOM_CD. |
|
START_READ_DTTM |
26 |
Y |
DateTime |
This is the date and time of the start quantity. |
|
START_REG_READ_ID |
12 |
Y |
Char |
Leave this column blank. It is not used. |
|
START_REG_READING |
9.6 |
Y |
Number |
This is the start quantity |
|
TOU_CD |
8 |
N |
Char |
The time-of-use code of end quantity and start quantity. If specified, it must reference a valid value on CI_TOU. |
|
UOM_CD |
4 |
Y |
Char |
The unit of measure of end quantity and start quantity. |
|
USAGE_FLG |
2 |
Y |
Char |
Leave this column blank. It is not used. |
|
USE_PCT |
3 |
Y |
Number |
This is the percentage of the quantity that was billed (this will typically be 100). |
BCU1 - Validate & Populate Billable Charge Upload Staging
This process populates various fields (e.g., the GL distribution code, memo only switch) on the billable charge upload line records from the billable charge line type specified on each respective record.
Any validation / population errors detected during this process are written to the BC Upload Exception table. You can fix errors using BC Upload Staging page (don’t forget to change the record’s status back to Pending).
BCU2 - Create Billable Charge
This process creates a billable charge and billable charge lines (shown in the yellow section of the following ERD) for all BC upload records in the Pending state.
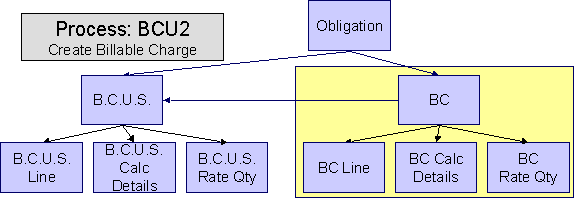
If the billable charge’s obligation is Closed, it will Reactivate it so that the billable charges will be swept onto the next bill produced for the account.
Note. This process will override the values of the various switches referenced on bill charge upload staging line if the respective obligation’s obligation type has an override value for the line’s billable charge line type. Refer to Obligation Type – Billable Charge Overrides for more information.
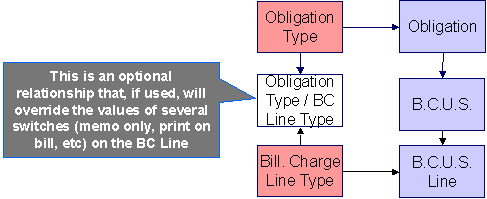
Any errors detected during this process are written to the Billable Charge Upload Exception table. You can fix errors using BC Upload Staging page (don’t forget to change the record’s status back to Pending).
BCUP-PRG - Purge Billable Charge Upload Objects
Completed billable charge upload staging objects should be periodically purged from the system by executing the BCUP-PRG background process. This background process allows you to purge all Completed billable charge upload staging objects older than a given number of days.
We want to stress that there is no system constraint as to the number of Completed billable charge upload objects that may exist. You can retain these objects for as long as you desire. However we recommend that you periodically purge Completed billable charge upload objects as they exist only to satisfy auditing and reporting needs.
Billable Charge Upload Staging
The Billable charge Upload Staging page has three purposes:
· You can view historical billable charge upload records.
· You can correct billable charge upload records that are in error.
· You can add new billable charge upload records. These will be uploaded by the billable charge upload process (although it’s probably easier to just add the billable charges using the Maintaining Billable Charges page).
The topics in the section describe how to maintain this information.
Contents
Billable Charge Upload - Lines
Billable Charge Upload - RQ Details
Billable Charge Upload - Calculation Details
Billable Charge Upload - Main
Open this page using Financial, Billable Charge Upload Staging, Main.
Description of Page
Refer to Billable Charge Upload Staging for more information about these fields.
Correcting Errors. If a Billable Charge Upload record’s status is Error, you should correct the problem and then change its status back to Pending. The next time the billable charge upload process runs, it will revalidate the record and, if valid, it will create a billable charge record.
Billable Charge Upload - Lines
Open this page using Financial, Billable Charge Upload Staging, Lines.
Description of Page
Refer to Billable Charge Line Upload Staging for more information about these fields.
Billable Charge Upload - RQ Details
Open this page using Financial, Billable Charge Upload Staging, RQ Details.
Description of Page
Refer to Billable Charge Rate Quantity Upload Staging for more information about these fields.
Billable Charge Upload - Calculation Details
Optionally, you may specify calculation details associated with a billable charge. These are most commonly used when you need to print the details that were used to calculate the bill lines that appear on the main tab.
Open Financial, Billable Charge, Calculation Details to maintain a billable charge's rate quantities.
Description of Page
Refer to Billable Charge Calculation Details Upload Staging for more information about these fields.
Billable Charge Upload Exception
If errors are detected during the billable charge upload process, a record is written to the billable charge upload exception table with a message indicating the nature of the severe error.
To view the messages associated with the exception records, schedule the TD-BCUPL background process. This process generates a To Do entry for every record in the billable charge upload exception table.
You can fix this error using the Billable Charge Upload Staging page and change the status of the record from Error to Pending. When the billable charge upload process next runs, it attempts to upload this record again.