Payments
In this section, we describe how to manage your taxpayer’s payments.
Contents
Financial Transactions On A Payment
Interfacing Payments From External Sources
A payment reduces how much an account owes. The topics in this section provide background information about a variety of payment topics.
Contents
A Payment Event Has Payments And Tenders
Multiple Tenders Used To Pay For Multiple Accounts
An Overview Of The Payment Event Creation & Allocation Process
Payments and Penalty and Interest
Payment Date and Effective Date for Payment Events
Distributing A Payment Amongst An Account's Obligations
Canceling A Tender Versus Canceling A Payment
Tender Management and Workstation Cashiering
Payment Financial Transaction Considerations
A Payment May Affect More Than Just Taxpayer Balances
Issuing A Payment Advice Instead Of Creating An Automatic Payment
A Payment Event Has Payments And Tenders
The explanation in The Financial Big Picture provides an accurate, but incomplete view of payments. The missing pieces concern payment events and tenders. The following diagram illustrates the difference between a payment event, its payment(s) and its tender(s).
The following concepts are illustrated above:
A payment event defines the event A payment event is required whenever any form of payment is received. The payment event defines the payment date and effective date (and that’s all).
A payment event has tender(s) A tender exists for every form of tender remitted as part of the payment event. A payment event must have at least one tender otherwise nothing was remitted. A payment event may have many tenders when multiple payment methods are associated with an event (e.g., paying with cash, a check, and a credit card).
A payment is allocated to account(s) The total amount of tenders under a payment event is distributed to one or more accounts.
A payment is distributed to obligations The system allocates an account’s payment amount amongst its obligations. The system creates a payment segment for each obligation that receives a portion of the payment.
Payor and payee are frequently the same The account remitting the tender (the payor) is frequently the same as the account to which the funds are allocated (the payee). The next illustration provides an example when this is not the case.
Multiple Tenders Used To Pay For Multiple Accounts
The following diagram illustrates a payment event with multiple tenders where the payor of the tender is not the same as the account(s) receiving the payment.
A payment event may have many tenders A single payment event may have many tenders. While the above example shows both tenders being paid by the same account, each tender may reference a different account.
Many accounts may be paid under 1 event The total amount of tenders under a payment event are distributed to one or more accounts.
Payor may differ from payee The account(s) remitting the tender may differ from the account(s) whose debt is relieved.
An Overview Of The Payment Event Creation & Allocation Process
When a payment event occurs, the system stores a tender for each form of remittance (e.g., cash, check, charge). It then allocates the sum of the tenders to one or more accounts.
By default, the system allocates the sum of the tenders to the account that remits the tenders. You may override this default and specify any number of accounts and their respective payment allocation amount. This is useful, for example, when a social service agency pays for many accounts. If applicable, you may also configure the system to use your own payment event distribution rule(s).
Refer to Distributing A Payment Event for more information.
The system distributes a payment amongst an account’s obligations based on the age of each obligation’s debt AND distribution priority. The system creates a payment segment for each obligation that receives part of the payment.
Refer to Distributing A Payment Amongst An Account’s Obligations for more information.
You may manually redistribute the payment amount amongst the account’s obligations before you commit the distribution. When the distribution is acceptable, you freeze the payment. Freezing a payment causes the system to create a financial transaction for each related payment segment. It is the financial transaction(s) that causes the obligations’ payoff and current balances to be reduced. The financial transaction also contains the journal details that debit “cash" and credit some other GL account.
And that’s it. The remaining topics in this section provide more information about the creation and allocation of payment events.
Batch and real-time payment event creation / allocation. There is only one payment event creation / allocation routine and therefore anything the batch payment process does for whole batches of payments, you can do to a payment on-line.
Payments and Penalty and Interest
If your organizations levy penalty and interest (P&I) charges for unpaid tax assessments, creating or canceling payments should recalculate penalty and interest.
The recalculation occurs when a payment is frozen or canceled assuming that the correct algorithm has been plugged in to the account's account type.
Payment Date and Effective Date for Payment Events
This section discusses the payment and effective dates used in payment events.
By default, the payment and effective dates are equal but the algorithm used to create the payment may calculate the dates differently based on business rules.
A payment event records a payment date and an effective date. The payment date should be the date that the payment was considered "received". This could be the system date or it could be a postmark date. The effective date is used to populate the effective date of the payment segment's financial transactions and is the date that the payment should affect penalty and interest.
The following examples illustrate when the effective date may differ from the payment date:
· Consider the following collections scenario. A collections notice is sent to a taxpayer with penalty and interest forecasted to a future date (for example, the 30th). If the payment is received (postmarked) on the 20th, this date is used as the payment date. However, your organization's business rules may dictate that for P&I purposes, the payment should be considered effective on the 30th (the date noted in the collection notice). In this case the distribution algorithm that directs this payment to a collection notice should set the payment effective date to the 30th. This ensures that penalty and interest will be calculated according to what was forecast.
· Consider an obligation whose filing period due date is April 15th, where the payment grace days on the obligation type is 3. If the taxpayer files and pays on April 17th, the payment distribution algorithm determines that this is within the grace days and sets the effective date to the 15th. In this case the payment date would still be the 17th.
Changing effective date. A BPA script Change Payment Effective Date is provided as an option on the payment event context menu. The script prompts you for a new effective date. It updates the payment event and its related FT and then causes penalty and interest to be recalculated.
Distributing A Payment Event
Warning! This section deals with the concept distributing a payment amount into payment(s). It does not discuss the distribution of a single payment into segments. For more information about payment distribution, refer to Distributing A Payment Amongst An Account’s Obligations.
The base-package, by default, creates a single payment for a payment event. Some business practices require potentially many payments to be created when payment events are added.
A few examples of when multiple payments may be necessary are:
· A payment amount needs to be distributed towards different distribution types:
· $50 in interest
· $60 in collection charges
· $70 in taxes
Each of the above distributions is realized as a separate payment identified by its own match type (i.e., there'll be one match type called Interest, another called Collection Charges, etc.).
In this example, the debt of a single obligation may be relieved by each of these payments.
· In a similar way, you may want to create a separate payment for an overpayment to differentiate it from regular payments (using yet another match type).
· In the case of a social service agency that pays for many accounts, a single payment event may be distributed amongst multiple accounts.
The method by which a payment amount is distributed to create payment(s) is contained in Create Payment algorithms plugged in on a distribution rule.
There is yet another aspect to having control over how payment events are created. The default method of creating payment events assumes knowledge of account IDs (of the payor and the payee) when making a payment. In cases where payments are made by and towards business entities other than accounts, knowledge of their corresponding account IDs may not be available at payment time. Consider the following examples:
· A payment is made for a taxpayer. The payment is applied to all of the taxpayer's accounts.
· A payment is made for a specific filing period.
· A court-ordered payment is made for a case. The payment is directed toward the assessments linked to the case, where assessments may cross tax roles, filing periods, etc
· A payment is made for a collections notice. The payment is directed toward specific assessments linked to the notice.
· A payment is made for a pay plan. The payment is applied to the specific obligations that are covered by the pay plan.
The method by which the tender account is determined by means of an alternate identifier is contained in Determine Tender Account algorithm plugged in on a distribution rule.
Refer to Making Payments Using Distribution Rules for information on how to configure your system to use this distribution method.
Distributing A Payment Amongst An Account's Obligations
Warning! This section deals with the concept of distributing a payment amongst an account’s obligations. It does not discuss how the sum of a payment event’s tenders is balanced out by payment allocations. For more information about payment event balance, refer to Unbalanced Payment Events.
A payment must be distributed to one or more obligations for its financial impact to be realized. When a payment satisfies an account’s entire debt, you don’t have to worry about how the system distributes the payment. The concept of payment distribution is only relevant when a partial or excess payment is distributed.
The first important point to understand is that the method of distributing a payment amongst an account’s obligations is contained in an algorithm that’s plugged in on to account type. This means that you can have different distribution algorithms for different account types.
Manual overrides. Most of the time, you’ll let the payment distribution algorithm distribute the payment amongst an account’s obligations. However, you may manually distribute a payment when a taxpayer directs a payment to specific obligation(s).
The following explanation describes one of the base package payment distribution algorithms (refer to Payment Distribution – Pay Priority and Debt Age for information about this algorithm). This algorithm distributes a payment based on:
· The age of each obligation’s debt.
· The payment distribution priority of each obligation’s obligation type.
The following diagram helps illustrate how the distribution algorithm works.
Important! There are other payment distribution algorithms in the base package. Click here to see the available algorithm types.
The above example shows three columns, one for each obligation linked to a hypothetical account. Notice that two of the obligations have the same distribution priority, the third has a lower priority. The numbers in the cells indicate the order in which the system distributes a partial payment.
Debt terminology. Before we can discuss the distribution algorithm, you must understand the terminology we use to categorize debt. Delinquent debt is associated with financial transactions that appear on overdue bills. Non-Delinquent debt is associated with financial transactions that appear on current bills. New Debits debt is associated with financial transactions that do not yet appear on a completed bill.
The following points describe the algorithm used to distribute the partial payment:
· The system pays off delinquent debt of the highest priority obligations first. In the above example, where multiple obligations have the same distribution priority, the system does NOT payoff one obligation before it starts on the next (which one would it pick?). Rather, it distributes the payment amongst the obligations based on the age of the respective debt on each obligation. In the above example, this is represented by steps 1 through 6 (notice how the distribution jumps between Obligation #1 and Obligation #2).
· After all delinquent debt has been relieved from the highest priority obligation(s), the system pays off the next priority until all delinquent debt is relieved. In the above example, this is represented by steps 7 through 9.
· The system next pays off non-delinquent debt using each obligation’s respective distribution priority. Note well, the payment distribution algorithm doesn’t associate an age with non-delinquent debt and therefore the distribution is based purely on the obligations’ respective distribution priority. In the above example, this is represented by steps 10 through 12.
· After all non-delinquent debt is relieved, the system next pays off “new debit” debt based on the obligations’ respective distribution priority. In the above example, this is represented by steps 13 through 15.
· Refer to Overpayment for a description of what happens if money still exists after the above distribution is complete.
Payment segments and financial transactions. A payment segment exists for each obligation that receives a portion of a payment. Linked to each payment segment is a financial transaction. It is the financial transaction that causes the obligation’s debt to be relieved and the general ledger to be impacted.
Refer to Payment Exception for more information about how the system handles errors detected during the payment distribution process.
Overriding the distribution algorithm for uploaded payments. The standard distribution algorithm is used for payments that are Interfaced From An External System unless you specify a MATCH_VALUE and MATCH_FLG on the Payment Staging row associated with the uploaded payment. These fields are used in conjunction to indicate that the distribution of the payment should be restricted in some way (i.e., the standard payment distribution algorithm should not be used). MATCH_FLG indicates how the payment should be distributed (e.g., only distribute to a specific obligation), MATCH_VALUE contains the ID of the restriction (e.g., the obligation ID).
Open item customers. For an open-item taxpayer, you MUST override the standard distribution algorithm because the payment is distributed as per the open items that it is relieving. Refer to Payments And Match Events for more information.
Overpayment
Overpayment refers to the situation where money is left over after a payment has been distributed to all eligible obligations, and all debt is relieved. Refer to Overpayment Obligations for a description on how to configure the system to handle your overpayment requirements.
Canceling A Tender Versus Canceling A Payment
A payment event has tender(s) and payment(s). You can cancel a tender when it’s not valid, e.g., when a check bounces. You can cancel a payment when the account should not have received the payment (e.g., a misdistribution or a canceled tender).
When you cancel a tender, the system automatically cancels ALL frozen payments. We do this because if the tender is canceled, there are no funds to distribute to accounts (unless there are other non-canceled tenders under the event). However, when you cancel a payment, the system does NOT cancel the tender(s) because we assume that, if the tenders were incorrect, you would have canceled them rather than the payment.
NSF Cancellations
When a tender is canceled, a cancellation reason must be supplied. If the cancellation reason indicates a NSF (non sufficient funds) charge should be levied, the system invokes the NSF charge algorithm specified on the tender’s account’s account type. Algorithms of this type will typically create an adjustment or billable charge to levy the NSF charge.
Besides calling this algorithm, an NSF cancellation may affect the tendering account's compliance rating. The cancellation reason indicates the extent to which the account’s ratings are affected.
Transferring A Payment
If the account on an event’s tender and payment are wrong, you can use the Transfer button on the Payment Event page to transfer the payment to another account.
If the account on the payment is wrong – but the tender is correct, you can use the Transfer button on the Payment page to transfer the payment only to another account.
Unbalanced Payment Events
The system, by default, distributes the sum of a payment event’s tenders to the account that remits the tender with a single payment. After distribution the sum of the tenders equals the sum of the payments when the event is first created. We refer to such an event as being balanced.
However, it is possible for an event’s tender amount to not equal the sum of the payment allocations (i.e., the event becomes unbalanced). How? Well, there are several ways this can happen:
· While the system DEFAULTS the payment amount to be the tender amount, you can override the payment amount and therefore make a previously balanced event unbalanced.
· While the system DEFAULTS the payment account to be the tender account, you can add additional accounts / amounts and therefore make a previously balanced event unbalanced.
· When you cancel a tender (e.g., because a check bounces), the system cancels ALL payments linked to the tender's payment event. If the payment event has multiple tenders, this will cause the event to become unbalanced. To correct this situation, you must add payment allocations to equal the amount of non-canceled tenders.
· If you cancel a payment and forget to add another payment for the same amount, the event becomes unbalanced. To correct this situation, you must add another payment (or cancel the tender).
· You may delete a tender from an event while its tender control is open. If you delete a tender and don’t do anything about the related payments, the event becomes unbalanced.
· You may add a tender to an event at any time. If you don’t allocate the tender amount to an account, the event becomes unbalanced.
Refer to Payment Event Exceptions for more information about how the system reminds you about unbalanced payment events.
Tender Management and Workstation Cashiering
When you add a tender, you must identify its Tender Source. For example,
· A specific cash drawer ID is the source of tenders remitted to a cashier.
· The notional lockbox ID is the source of tenders interfaced from a lockbox.
· The remittance processor is the source of tenders interfaced from a remittance processor.
For more information, refer to Setting Up Tender Sources.
A tender source’s tenders must be balanced against an expected total before they can be deposited at a bank. This periodic balancing requires all tenders to exist in respect of a Tender Control. Over time, a tender source may have many tender controls (one per balancing event).
An example of a cashier’s cash drawer will help clarify the tender control concept:
· When a cashier starts in the morning, s/he starts with a fresh cash drawer (i.e., one without tenders). Whenever a drawer starts afresh, a new Tender Control must be created because you balance the contents of a drawer.
· A cash drawer typically contains funds to make change. These funds are the tender control’s Opening Balance.
Default note. A tender control’s starting balance defaults from its tender source.
· During the day, taxpayers remit tenders to the cashier. Every tender put into the drawer is associated with the drawer’s tender control created at the start of the day.
· A tender control’s balance increases during the day as tenders are recorded. A cashier can view the balance at any time.
· The cashier can turn in funds to the head cashier during the day. Each turn in event can be recorded in the system. Note well, if the amount of funds in a tender control exceeds the maximum balance defined on the tender control’s tender source, a warning is issued to the cashier to remind him/her to turn in funds.
· At some point, the contents of the drawer must be balanced against the total tenders linked to the tender control. When balancing starts, no additional tenders may be put into the tender control. If the cashier receives additional tenders after balancing starts, a new tender control must be created (and the above process starts afresh).
· During the balancing process, some modifications may be made to the tenders associated with the tender control, but no additional tenders may be added. When the tender control is balanced, neither it nor its tenders may be modified.
For more information, refer to Managing Your Cash Drawers.
While the above explanation is true, it isn’t complete. In addition to the requirement that a tender must reference a tender control, the tender control must refer to a Deposit Control. Deposit controls give you administrative control over all of the tender controls whose contents will be deposited en masse. The following concepts will help explain the power of deposit controls:
· As explained above, when a cash drawer is started afresh, a new tender control must be created. The tender control “holds” all new tenders received by the cashier.
· Similarly, when a tender control is created, it must reference a deposit control. During the day, a deposit control’s tender controls are constantly changing. You can view the total impact of a deposit control’s tender controls at any time.
· At some point, you will want to deposit the tenders received during the day. To do this, you must indicate how much will be deposited at the bank. This deposit amount must equal the sum of the tender controls linked to the cash drawer. When this deposit balancing starts, no additional tender controls may be associated with the deposit control.
· When the deposit total equals the sum of the tender controls, the deposit control becomes balanced and no changes may be made to it, its tender controls, or its tender controls’ tenders.
For more information, refer to Managing Your Cash Drawers.
Background processes use the same concepts. Tenders that are interfaced from external sources (e.g., lockboxes and remittance processors) make use of the concepts describe above. For example, tenders interfaced from a remittance processor are linked to a tender control and this tender control is linked to a deposit control. The main difference is that the background processes require no human intervention; the system automatically creates tender and deposit controls and sets their states to balanced when the interface concludes successfully.
The ACH activation process also creates tender and deposit controls. Refer to Activating Automatic Payments for more information.
The topics in this section elaborate on the tender management concepts described above.
Contents
Managing Payments Interfaced From External Sources
Managing Your Cash Drawers
Warning! This section assumes you are familiar with the concepts described in The Lifecycle Of A Deposit Control and The Lifecycle Of A Tender Control.
There are many ways to handle the daily management of tenders received via cash drawers. It really depends on how your organization works. To help you understand the potential of the system, we’ll continue the example started above.
Assume that the cash drawers in your western office are balanced and deposited independently from those in your eastern office. We’ll assume that both offices follow the same daily routine:
· Load fresh drawers first thing in the morning. Each drawer contains a starting balance of $150.00. Note: the drawer’s tender control’s starting balance defaults from its tender source.
· At 10 am, the cashier turns in funds to the chief cashier and continues to receive additional tenders.
· At 12 noon, each drawer is pulled and balanced by a supervisor.
· By 12:30 pm, the tender controls are balanced.
· At 4 pm, the cashiering stations are closed. Each drawer is pulled and balanced by a supervisor.
· By 4:30 pm, the tender controls are balanced.
· At 5 pm, the deposit control is balanced and funds are ready to be deposited at the bank.
Given this, the following diagram illustrates the deposit controls and tender controls used by each office on a given day.
The following concepts are illustrated above:
· An Open deposit control must exist before you can create a tender control. And an Open tender control must exist before you can create a tender. From a business process standpoint, this means:
· A supervisor would create a deposit control at the start of the day (8 am in the above illustration).
· Each cashier would create a tender control when they start a drawer and reference the deposit control created by the supervisor.
· During the day, the cashier can turn-in moneys to the chief cashier. These turn-in events are recorded in the system as they play a part in the ultimate balancing of the drawer. Refer to Turn Ins for more information.
· At some point, the contents of a drawer can be pulled and balanced. If additional tenders can be received in a drawer, a new tender control must be created for the drawer. Refer to Balancing By Tender Type for more information.
· At the end of the day, the supervisor checks to make certain that all tender controls linked to the deposit control are Balanced. After this has been done, the supervisor indicates the deposit amount on the deposit control and changes it to Balanced. Notice that in the above illustration each deposit control references four tender controls.
· Typically, a cash drawer has one tender control Open at any point in time (meaning that the tenders being received are being linked to a specific tender control). However, this is not a hard rule. If you want, you may have multiple tender controls Open at any point for a specific cash drawer (for example, if multiple cashiers can work the same drawer during the day but take their drawer with them).
· Typically, a specific cashier puts tenders into a specific tender control. However, this is not a hard rule. On a tender control, you can define if it’s limited to a specific operator OR if any operator can link tenders to it.
· When you’re ready to balance a drawer, you change the tender control to Balancing in Progress. This prevents new tenders from being added to the tender control. If the cashier can continue to receive tenders, s/he must create another tender control. In the above example, all drawers are balanced at 12 noon by a supervisor while the cashier continues to take payments.
· When the tender control is balanced, you change its state to Balanced. This prevents any changes to the tender control or its tenders.
· All tender controls exist in respect of a deposit control (in fact, the deposit control must be created before the tender control). This way, a supervisor can check the state of the related drawers throughout the day. Notice that the state transition of a deposit control is identical to that of the tender control (refer to The Lifecycle Of A Deposit Control and The Lifecycle Of A Tender Control). There is only a temporal difference. Notice that the deposit control stays open throughout the day while any number of tender controls are being opened and balanced.
Multiple deposits in a day. While the above example illustrates a single deposit per office per day, it is quite possible to have multiple deposit controls on any given day.
Turns ins. The above example did not illustrate the fact that a cashier can turn-in moneys during the day without having to balance the drawer. Refer to Turn Ins for more information.
Turn Ins
A cashier may optionally turn-in funds received into a cash drawer to a head cashier. The turn-in process requires two steps:
· Each time a cashier turns-in funds, they add a turn-in event on the Tender Control – Turn Ins page. Note that a separate turn-in event is required for each type of tender that’s turned in. This is because the balancing of a tender control is performed for each tender type and therefore the system must know how much of each tender type has been removed from the drawer.
Turn in warning. If the amount of cash-like funds in a tender control exceeds the maximum balance defined on the tender control’s tender source, a warning is issued to the cashier to remind him/her to turn in funds.
· The head cashier (the person responsible for the deposit control associated with the various tender controls) approves the turn in using the Deposit Control – Turn Ins page.
All turn-ins must be approved for balancing to complete. A tender control cannot be balanced until the head cashier has approved all turn-in events.
Balancing By Tender Type
It should be noted that when it’s time to balance a tender control, the cashier must enter the amount of each tender type that is in the drawer in order to balance it. For example, assume the following takes place:
· A drawer is opened with a starting balance of $150.50 (tender type is Cash).
· During the day, the cashier receives $5,000 in Cash, and $1,000 in Checks.
· During the day, the cashier turns in $750 or the Checks and $4,000 of Cash.
At the end of the day, the following operator would have to enter the balances shown in the Ending Balance column.
|
Tender Type
|
Starting Balance |
Tenders Received |
Turn Ins
|
Ending Balance
|
|
Cash |
$150.50 |
$5,000 |
$4,000 |
$1150.50 |
|
Check |
- |
$1,000 |
$750 |
$250 |
Time saver. The system assists in the balancing effort by amalgamating the amount of tenders by tender type when the tender control’s status is changed from Open to Balancing In Progress. The cashier just needs to enter the Ending Balance. The system can then compare the cashier’s Ending Balance against the Expected Ending Balance. When these values are equal for all tender types, the tender control’s status can become Balanced.
Cash Back
When a payment is added, the user defines the following:
· The amount of debt to be relieved (i.e., the payment amount)
· The amount remitted (i.e., the tender amount)
· The form of the remittance (i.e., the tender type)
The payment amount typically equals the tender amount unless cash will be returned to the taxpayer. For example, if a taxpayer remits $100, but only wants to pay off $25 of debt, the tender amount will be $100 and the payment amount will be $25. The system will only allow a user to remit more than the payment amount if the tender type indicates "cash back" is allowed. For example, you may not allow cash to be returned if a check is remitted, but you may allow it to be returned if cash is remitted.
If cash back is allowed for the tender type, the system displays the amount of cash to be returned on the Payment Event. In addition, because the system enforces balancing the cash drawer by tender type, the system adjusts the payment event's tendered information as follows:
· When there is cash back, the payment event will have two tenders - one will be for the amount and type entered by the user, the other will be a negative amount with a tender type of cash (note, this tender type is retrieved from the Starting Balance Tender Type on the installation record). For example, if a taxpayer remits $100 in traveler's checks, but only wants to pay off $25 of debt, there will be two tenders: one for the $100 travelers check and the other for the -$25 of cash.
Multiple tenders and payment cancellation. If multiple tenders were created because of "cash back" processing, both tenders must be cancelled if the payment event needs to be cancelled.
When modifying an unfrozen payment on the Payment Event, if the payment becomes unbalanced, a button is displayed allowing the user to Recalculate Cash Back. If the user clicks this button, the system reassesses the cash back tender as follows:
· If there is now cash back, a new tender is created for the credit amount
· If the cash back amount has changed, the tender for the cash back is adjusted to the new amount
· If there is no longer cash back due, the tender for the cash back is removed.
Managing Payments Interfaced From External Sources
Just like a payment recorded on-line via a cash drawer, a payment interfaced from an external source (e.g., lock box or remittance processor) must reference a tender control and the tender controls, in turn, must reference a deposit control. The only real differences between these two types of payments are highlighted below:
· Whilst an operator must create and balance the tender and deposit controls for real-time payments, the system creates the tender and deposit controls associated with interfaced payments.
· It’s impossible for an invalid account to be referenced on a payment recorded real-time. However, it is quite possible for an interfaced payment to reference an unknown account. If an invalid account is referenced on an interfaced payment (using no distribution rules), the system links it to the suspense obligation referenced on the tender source control table.
Refer to Interfacing Payments From External Sources for more information.
Exceptions
The topics in this section describe exceptions that are detected when the system allocates a payment.
Contents
Resolving Exceptions Automatically
Payment Exceptions
When the system attempts to distribute a payment, there are a small number of situations where it can’t do its job. Some examples of classic errors:
· No obligation to hold a credit. For example, if an account overpays their debt and the account doesn’t have a single obligation that is allowed to hold a credit, a payment error is generated.
The system saves payments that are in error just as it saves payments that are error-free. This is done because payments are nothing more than a snapshot of the data that was used to distribute the payment. By saving the snapshot, you can see the information the system used when it detected the error and therefore more effectively correct it.
Every payment in error is written to the Payment Exception table. A To Do background process creates To Do entries for records in this table.
Payment Event Exceptions
It is possible for a payment event’s tenders to not equal its payments. Such events are classified as unbalanced. Refer to Unbalanced Payment Events for how this can happen.
For each unbalanced payment event, a record is written to the Payment Event Exception table. A To Do background process creates To Do entries for records in this table.
Resolving Exceptions Automatically
Some payment errors occur because master data was not fully set up prior to receiving a payment for the account. For these cases, the system will periodically check to see whether the master data problem has been resolved by attempting to distribute and freeze the payment in error.
A background process, Resolve Payments in Error – PY-RPE, exists for this purpose. This background process works as follows:
· It looks for payments in error where the error was caused by the lack of active obligations linked to the payment’s account.
· For each such payment, it attempts to re-distribute the payment. If obligations have been created in the meantime, this payment will distribute and freeze successfully.
Payment Financial Transaction Considerations
A payment segment exists for each obligation that receives a portion of a payment. Linked to every frozen payment segment is a financial transaction. This financial transaction affects an obligation’s payoff balance and/or current balance. It also contains the journal details that debt cash and credit some other account.
The topics in this section provide information about the financial impact of a payment segment.
Refer to The Financial Big Picture for more information about a payment’s place in the financial big picture.
Contents
Payment - Current Balance versus Payoff Balance
The Source Of GL Accounts On A Payment Financial Transaction
Payment - Current Balance versus Payoff Balance
Warning! If you do not understand the difference between payoff balance and current balance, refer to Current Amount versus Payoff Amount.
A payment segment financial transaction almost always affects payoff balance and current balance by the same amount (think of it like this - when a taxpayer pays, the amount they think they owe goes down by the amount they really owe). The only exception is a payment segment for a charitable contribution. These payment segments only affect current balance because the taxpayer was never assessed for the contribution in the first place.
Refer to Setting Up Payment Segment Types for more information about how payment segment type affects how a payment segment is produced and how its financial transaction is generated.
The Source Of GL Accounts On A Payment Financial Transaction
A payment segment’s financial transaction also contains the double-sided accounting entry that defines how the payment segment affects the general ledger.
Refer to The Source Of GL Accounts On Financial Transactions for a description of where the system extracts the distribution codes used to construct the GL accounts.
A Payment May Affect More Than Just Taxpayer Balances
The topics in this section provide information about obscure things that may happen when a payment is distributed and frozen.
Contents
Open Item Accounting and Match Events
Open Item Accounting and Match Events
Refer to Payments and Match Events for more information about how payments can create match events for open-item accounts.
FT Freeze Repercussions
Refer to Obscure Things That Can Happen for more information about things that can happen when an FT is frozen (and FT’s get frozen when a payment is frozen).
Automatic Payments
This section discusses how to set up and manage taxpayers who pay their bills automatically (via direct debit or credit card debits)
Contents
How To Set Up A Taxpayer To Pay Automatically
How And When Are Automatic Payments Created?
How To Implement Maximum Withdrawal Limits
How Are Automatic Payments Cancelled?
Match Events Are Created For Open-Item Customers When An Automatic Payment Is Created
Pay Plans and Automatic Payment
Downloading Automatic Payments and Interfacing Them To The GL
How To Set Up A Taxpayer To Pay Automatically
If a taxpayer wants to pay automatically, transfer to Account – Auto Pay and define the source of the funds and the taxpayer’s account or credit card number.
What Are Automatic Payments?
An automatic payment is just like any other payment (refer to A Payment Event Has Payments And Tenders for more information about payments in general). However, automatic payments have one special trait – they cause funds to be transferred into your company’s bank account. Refer to Downloading Automatic Payments and Interfacing Them To The GL for how this transference happens.
How And When Are Automatic Payments Created?
Automatic payments can be created in several ways:
· The system creates automatic payments for bills linked to accounts with an active auto pay option.
· At bill completion time, the bill is stamped with the automatic payment’s extract date and amount. The date is the automatic payment source’s extraction date (refer to Automatic Payment Dates for more information on how this date is calculated).
· The automatic payment background process (APAYCRET) creates the automatic payment on the extract date stamped on the bill.
An algorithm is used to create automatic payments. The logic used to create automatic payments is plugged in on the Installation Record. The base package includes two sample algorithms. APAY-CREATE creates each auto pay as one payment event with one tender and one payment. Use APAY-CREATE if you use standard payment distribution. C1-APAY-CRDR creates automatic payments using distribution rules. Use C1-APAY-CRDR if you use distribution rules.
· The automatic payment is NOT distributed and frozen when the automatic payment is initially created. A separate background process (APAYDSFR / C1-APYDF) distributes and freezes the automatic payment on the automatic payment GL distribution date (refer to Automatic Payment Dates for more information on how this date is calculated). This means that the taxpayer’s balance increases when the bill is completed and is only reduced when the automatic payment is marked for interface to the general ledger.
APAYDSFR uses standard payment distribution. This process assumes the automatic payment was created as: one payment event, one payment. Use this to distribute / freeze payments created by APAY-CREATE.
C1-APYDF uses distribution rules. This process assumes that the automatic payment was created using distribution rules. Use this to distribute / freeze payments created by C1-APAY-CRDR.
· Note that it is possible for automatic payments to be distributed and frozen after being extracted and interfaced to a financial institution. Please refer to Downloading Automatic Payments and Interfacing Them To The GL and The Nightly Processes.
An algorithm plugged in on the Installation Record calculates the payment amount whether the automatic payment is created at bill completion time or on the extract date. Please refer to APAM-DFLT for more information about how the algorithm that is supplied with the base package calculates this amount.
With balance forward accounting, automatic payments are not just for new charges. The base package algorithm includes prior balances when it creates a taxpayer’s first automatic payment. For example, if a taxpayer has an existing balance of $100 and then signs up for automatic payment, their next bill will cause an automatic payment of $100 plus any new charges to be created (assuming the $100 remains unpaid at the time the next bill is completed). Refer to Open Item Versus Balance Forward Accounting for information about balance forward accounting.
· If a taxpayer with an account that is set up for automatic payment has a pay plan that is not excluded from automatic payment, a background process (C1-PAYPA) creates an automatic payment on the scheduled payment dates. Please note, the automatic payment is NOT distributed and frozen when the automatic payment is initially created. Rather, a separate background process (APAYDSFR / C1-APYDF) distributes and freezes the automatic payment on the automatic payment GL distribution date (refer to Automatic Payment Dates for more information on how this date is calculated). Refer to The Big Picture of Pay Plans for more information about pay plans.
· A user can create an automatic payment by simply adding a payment tender with a tender type that indicates it is for automatic payment purposes. This would be a rather unusual thing to do, but you might do this if you want to immediately debit a taxpayer’s bank account after a large adjustment is added to the system (e.g., if they suddenly owe you a lot of money and you don’t want to wait until the next bill to collect it). Automatic payments created by this method must be distributed and frozen before they can be extracted.
Auto pay creation algorithm is not invoked for manually created automatic payments. Please note that this algorithm is not called when a user manually creates an automatic payment (by adding a payment tender with a tender type that indicates that it is for automatic payment purposes).
When an automatic payment is first created, it gets marked with a distribution date. The distribution date is the date on which the automatic payment’s FT’s GL details can be interfaced to the general ledger (via the standard GL interface). The distribution date is determined as follows:
· Every automatic payment references an auto-pay source.
· Every auto-pay source references an auto-pay route type.
· Every auto-pay route type contains an algorithm that is responsible for calculating the GL Distribution (Posting) date. On the GL distribution date, the automatic payment will be interfaced to the general ledger.
Automatic Payment Dates
As described in the previous section, an algorithm (that’s plugged in on Auto Pay Route Types) controls the date on which the automatic payment is interfaced to your general ledger. We refer to this date as the GL distribution date.
This algorithm also populates the following dates:
· The payment date that is stored on the payment.
· The date on which the automatic payment is interfaced to the financial institution.
The algorithm that is supplied with the base package provides many parameters that allow you to dictate how these dates are calculated. Please refer to APAY-DTCALC for the details.
How To Implement Maximum Withdrawal Limits
In some locales, taxpayers can define a “maximum withdrawal amount” to limit the amount of money that is automatically debited from their bank account. For example, a low-income taxpayer may want to prevent direct debits of more than $50 from being applied to their checking account.
You define a taxpayer’s maximum withdrawal amount when you setup their automatic payment information on Account – Auto Pay.
The following points describe how the system implements maximum withdrawal limits:
· When a bill is completed for a taxpayer who pays automatically the system calls the automatic payment creation algorithm that’s plugged in on the Installation Record. The base-package autopay creation algorithm checks if the amount of the automatic payment exceeds the taxpayer’s maximum withdrawal amount. If so, the autopay creation algorithm calls the automatic payment over limit algorithm that’s plugged in on the account’s account type. Algorithms of this type have the ability to reduce the amount of the autopay or to prevent the autopay from being created. Refer to APOL-RA for an example plug-in.
· When a user manually creates an automatic payment (by adding a tender with a tender type that indicates that it is for automatic payment purposes), the system issues a warning message when the tender amount exceeds the account’s maximum withdrawal amount.
Pay plans. Please note that automatic payments that are created as a result of pay plans are not subject to maximum withdrawal limits. This is because both of these options required taxpayer approval and therefore the taxpayer should be able to plan accordingly. Refer to How And When Are Automatic Payments Created for more information.
How Are Automatic Payments Cancelled?
There are two ways to cancel an automatic payment:
· The system will cancel an automatic payment behind-the-scenes if the related bill (if any) is reopened BEFORE the automatic payment is interfaced to the financial institution. When you recomplete the bill, the system will create a new automatic payment that reflects the new amount due (and the canceled automatic payment will net out the original automatic payment).
An operator can cancel an automatic payment (refer to How To Cancel A Tender) at any time. You would do this if the financial institution rejected the automatic payment.
Match Events Are Created For Open-Item Customers When An Automatic Payment Is Created
The system creates a match event when a bill is completed for open-item customers that pay automatically (i.e., direct debit taxpayers). The match event groups together the bill’s new charges against the automatic payment’s payment segments.
If the bill is subsequently re-opened, the match event will be cancelled when the automatic payment is cancelled.
Refer to Open Item Accounting for more information.
Pay Plans and Automatic Payment
If a taxpayer wants to pay their pay plan scheduled payments automatically, the account must be set up for automatic payment (as described under How To Set Up A Taxpayer To Pay Automatically). In addition, the pay plan must indicate that automatic payment is being used.
When this is done, a background process referred to as C1-PAYPA creates automatic payments on the scheduled payment date by calling the automatic payment creation algorithm plugged in on the installation record.
Downloading Automatic Payments and Interfacing Them To The GL
The following diagram illustrates the background processes that interface automatic payment out of the system:
These processes are described in the following topics.
Contents
ACTVTAPY - Activating Automatic Payments
APAYACH - Download Automatic Payments To The ACH (automated clearing house)
BALAPY - Creating Automatic Payment Tender Controls
ACTVTAPY - Activating Automatic Payments
When an automatic payment is first created, it gets marked with an extract date. The extract date is the date the automatic payment will be downloaded to the respective financial institution. The extract date is determined as follows:
· Every automatic payment references an auto-pay source.
· Every auto-pay source references an auto-pay route type.
· Every auto-pay route type contains an algorithm that calculates this date.
On the extract date, the automatic payment is “activated”. The automatic payment is activated is marked for download the next time its download process runs. An automatic payment’s download process is defined on its auto-pay source’s route type.
APAYACH - Download Automatic Payments To The ACH (automated clearing house)
This process reads all auto pay download staging records marked with a given batch control ID & run number and creates the flat file that’s passed to the ACH. Refer to ACH Record Layouts for the details of the record layouts.
You can rerun this process. You can reproduce the flat file at any time. Simply request this job and specify the run number associated with the historic run.
If you require a different flat file format, you must create additional versions of this program. Refer to Setting Up Automatic Payment Extracts for instructions describing how to add another process.
BALAPY - Creating Automatic Payment Tender Controls
This process creates a new tender control (with an associated deposit control) for each unique batch control and run number encountered in the extracted automatic payments (where its payment tender is not yet linked to a tender control). The payment tender of each of these automatic payments is then linked to the corresponding tender control. This process also balances the open tender control records afterwards.
ACH Record Layouts
The topics in this section describe the layout of the records created by APAYACH – Download Automatic Payments To The ACH (automated clearing house).
Contents
File Header Record
The ACH extract flat file must have one record of this type and it must be the first logical record on file.
|
Field Name |
Format |
Source/Value/Description |
|
RECORD-TYPE |
A1 |
“1” |
|
PRIORITY-CD |
A2 |
“01” |
|
RESERVED-01 |
A1 |
Spaces |
|
IMMEDIATE-DESTINATION |
A9 |
CI_BANK_ACCOUNT.DFI_ID_NUM |
|
COMPANY-ID |
A10 |
CI_BANK_ACCOUNT.ACCOUNT_NBR |
|
FILE-CRE-DT |
A6 |
YYMMDD. Current date |
|
FILE-CRE-TM |
A4 |
HHMM. Current time |
|
FILE-ID-MODIFIER |
A1 |
“A” |
|
RECORD-SIZE-CONST |
N3 |
“094” The “FILLER” at the end of all but the Entry Detail Record serves to bring the total length of each record up to this constant. |
|
BLOCKING-FACTOR |
N2 |
“10” |
|
FORMAT-CD |
A1 |
“1” |
|
ORIG-FIN-INST-NAME |
A23 |
CI_BANK_L.DESCR |
|
COMPANY-NAME |
A23 |
CI_BANK_ACCOUNT_L.DESCR |
|
REFERENCE-CD |
A8 |
Spaces |
Company Batch Header Record
The ACH extract flat file must have one record of this type and it must be the second logical record on file.
|
Field Name |
Format |
Source/Value/Description |
|
RECORD-TYPE |
A1 |
“5” |
|
SERVICE-CLASS-CD |
A3 |
“200” |
|
COMPANY-NAME |
A16 |
CI_BANK_ACCOUNT_L.DESCR |
|
COMPANY-DISCRETIONARY |
A20 |
Spaces |
|
COMPANY-ID |
A10 |
CI_BANK_ACCOUNT.ACCOUNT_NBR |
|
STD-ENTRY-CLASS |
A3 |
“PPD” |
|
CO-ENTRY-DESCR |
A10 |
“PAYMENT” |
|
COMPANY-DESCR-DT |
A6 |
Business process date |
|
EFF-ENTRY-DT |
A6 |
Business process date |
|
RESERVED-01 |
A3 |
Spaces |
|
ORIGINATOR-STAT-CD |
A1 |
“1” |
|
ORIGIN-DFI-ID |
A8 |
CI_BANK_ACCOUNT.DFI_ID_NUM |
|
BATCH-NBR |
N7 |
The batch number of this batch within the file. |
Entry Detail Record
The ACH extract flat file must have one record of this type for every direct debit record.
|
Field Name |
Format |
Source/Value/Description |
|
RECORD-TYPE |
A1 |
“6” |
|
TRANSACTION-CD |
A2 |
If the amount is a debit, this is set to CI_TENDER_TYPE.EXT_TYPE_FLG. If the amount is a credit, this is set based on the external type flag as follows: · If the value is Checking Withdrawal (27), this is set to 22 (Checking Deposit) · If the value is Savings Withdrawal (37), this is set to 32 (Savings Deposit) · If the value is Credit Card Withdrawal (47), this is set to 42 (Credit Card Deposit) |
|
TRANSIT-RTG-NBR |
A9 |
CI_APAY_SRC.EXT_SOURCE_ID |
|
DFI-ACCT-NBR |
A17 |
CI_APAY_CLR_STG.EXT_ACCT_ID |
|
AMOUNT |
N8.2 |
CI_PAY_TNDR.TENDER_AMT |
|
INDIVIDUAL-ID |
A15 |
CI_PAY_TNDR.PAYOR_ACCT_ID |
|
INDIVIDUAL-NAME |
A22 |
CI_APAY_CLR_STG.ENTITY_NAME |
|
DISCRETIONARY-DATA |
A2 |
Spaces |
|
ADDENDA-REC-IND |
A1 |
“0” |
|
TRACE-NBR |
N15 |
“000000000000000” |
External Account ID. The EXT_ACCT_ID field supports up to 50 characters. If the value entered in the field is longer than that supported by the record layout (17 characters), the value will be truncated.
Company Batch Control Record
The ACH extract flat file must have one record of this type and it must follow the Entry Detail records.
|
Field Name |
Format |
Source/Value/Description |
|
RECORD-TYPE |
A1 |
“8” |
|
SERVICE-CLASS-CD |
A3 |
“200” |
|
ENTRY-ADDENDA-CNT |
N6 |
The total number of entry detail records in this batch. |
|
ENTRY-HASH |
N10 |
The product of the first 8 digits of the external source id of the autopay source, multiplied by the number of entry detail records in the batch. |
|
TOTAL-DR-DOLLAR-AMT |
N10.2 |
Total tender amounts of the entry detail records. |
|
TOTAL-CR-DOLLAR-AMT |
N10.2 |
Zero. |
|
COMPANY-ID |
A10 |
CI_BANK_ACCOUNT.ACCOUNT_NBR |
|
RESERVED-01 |
A19 |
Spaces |
|
RESERVED-02 |
A6 |
Spaces |
|
ORIGIN-DFI-ID |
A8 |
CI_BANK_ACCOUNT.DFI_ID_NUM |
|
BATCH-NBR |
N7 |
The batch number of this batch within the file. |
File Control Record
The ACH extract flat file must have one record of this type and it must be the last logical record on file.
|
Field Name |
Format |
Source/Value/Description |
|
RECORD-TYPE |
A1 |
“9” |
|
BATCH-CNT |
N6 |
The number of batches in this file. |
|
BLOCK-CNT |
N6 |
Calculation of the total number of records in the file / 10.0 + 0.9 |
|
ENTRY-ADDENDA-CNT |
N8 |
The total number of entry detail records in this file. |
|
ENTRY-HASH |
N10 |
The sum of the entry hash values on all the batch control records in this file. |
|
TOTAL-DR-DOLLAR-AMT |
N10.2 |
Sum of the total debit entry dollar amounts of all the batches in this file. |
|
TOTAL-CR-DOLLAR-AMT |
N10.2 |
Sum of the total credit entry dollar amounts of all the batches in this file. |
|
RESERVED-01 |
A39 |
Spaces |
Issuing A Payment Advice Instead Of Creating An Automatic Payment
If the system is configured to send the taxpayer a payment advice (instead of initiating an electronic funds transfer) when a bill is completed, the automatic payment records – i.e. payment event, payment, tender and auto pay clearinghouse staging – are not created. Refer to Payment Advices for more information.
Contents
How To Set Up A Taxpayer To Receive Payment Advices
Payment Advice Option Is For Bill-Related Automatic Payments Only
How To Set Up A Taxpayer To Receive Payment Advices
Use Account – Auto Pay to capture the taxpayer’s bank details and indicate an auto pay method of Payment Advice.
Payment Advice Option Is For Bill-Related Automatic Payments Only
Payment advices can be printed for auto pays that result from completed bills.
An auto pay for a pay plan scheduled payment will not be created if the account’s effective auto pay option is set to Payment Advice. The Pay Plan Pay Plan Auto Pay (C1-PAYPA) batch process will log an error in this case.
Manually created automatic payments (i.e. auto pays created via payment event UI) are always processed as direct debit.
A payment event is used to record when moneys are remitted and how the moneys are allocated amongst accounts. The topics in this section describe how to maintain payment events.
The system creates most payment events behind-the-scenes. Most payment events are created by the system when it uploads payments and when it creates automatic payments. You should only have to access the payment event transaction if you need to correct a payment event or add a payment event real-time. For information about how the system creates payment events, refer to The Big Picture of Payments.
Contents
Payment Event - Main Information
Payment Lifecycles
The topics in this section describe the lifecycle of the various payment objects.
Contents
Payment Event Lifecycle
The following diagram shows the possible lifecycle of a payment event.
Warning! This diagram only makes sense in the context of the page used to maintain payment events. Refer to Payment Event - Main Information for the details.
The system, by default, distributes the sum of a payment event’s tenders to the account that remits the tenders. After distribution the sum of the tenders equals the sum of the payments (remember, the term payment is used to refer to an allocation of some/all of a payment event’s tenders to an account’s debt) when the event is first created. We refer to such an event as being Balanced.
It is possible via any of the methods described in Unbalanced Payment Events to make a balanced payment event Unbalanced.
Click ![]() to physically remove
a balanced or unbalanced payment event from the database. You may not delete a
payment event if: a) there are frozen or canceled payments linked to the event,
or b) if there are canceled tenders linked to the event, or c) if a tender
linked to the event is part of a balanced tender control. When the payment event is deleted, the
system also deletes its tenders, payments, and payment segments.
to physically remove
a balanced or unbalanced payment event from the database. You may not delete a
payment event if: a) there are frozen or canceled payments linked to the event,
or b) if there are canceled tenders linked to the event, or c) if a tender
linked to the event is part of a balanced tender control. When the payment event is deleted, the
system also deletes its tenders, payments, and payment segments.
Tender Lifecycle
The following diagram shows the possible lifecycle of a payment event.
Warning! This diagram only makes sense in the context of the page used to maintain tenders. Refer to Payment Event - Tenders for the details.
A tender is initially saved in the Valid state. It is possible via any of the methods described in Unbalanced Payment Events to make a balanced payment event Unbalanced.
If a tender is invalid, click ![]() to cancel the tender
AND ALL PAYMENTS LINKED TO THE EVENT.
to cancel the tender
AND ALL PAYMENTS LINKED TO THE EVENT.
Click the delete button to physically remove a tender from the database. You may not delete a tender if it is part of a balanced tender control.
Payment Lifecycle
The following diagram shows the possible lifecycle of a payment.
Warning! This diagram only makes sense in the context of the page used to maintain a payment. Refer to Payment - Main for the details.
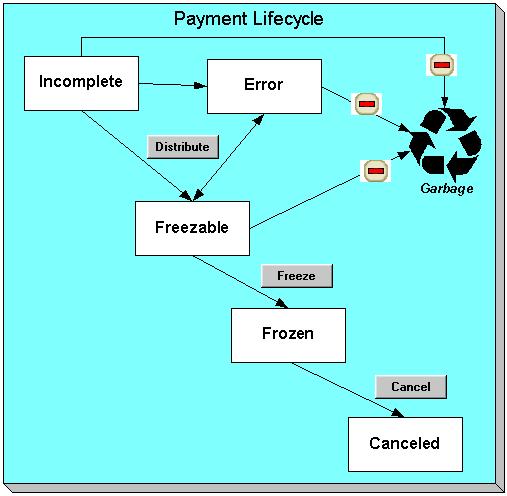
Payments are initially created in the Incomplete state. Payments in this state don’t have payment segments or financial transactions; they are simply a stub awaiting distribution.
Click ![]() to distribute a
payment amongst an account’s obligations.
to distribute a
payment amongst an account’s obligations.
· If the system cannot distribute the payment (for whatever reason), the payment is moved to the Error state. You may delete such a payment.
· If the system successfully distributes a payment, the payment becomes Freezable.
Click the - button to physically remove an Incomplete, Error or Freezable payment from the database.
Click ![]() to freeze a payment
and its financial transaction. Freezing
the payment causes the following to occur:
to freeze a payment
and its financial transaction. Freezing
the payment causes the following to occur:
· The system executes any payment freeze algorithms linked to the account’s account type and to the obligation’s obligation type.
· The payment’s state becomes Frozen and the payment may now appear on a taxpayer’s bill.
You may not change a payment once it is frozen. However, you may reverse the payment’s
financial effect by clicking ![]() button. Clicking this button will cause the
following to occur:
button. Clicking this button will cause the
following to occur:
· A new financial transaction is generated and linked to the payment. This financial transaction reverses the financial effects of the original payment.
· The system executes any payment cancellation algorithms linked to the account’s account type.
· If the payment has a related adjustment, this adjustment is also cancelled.
· The payment becomes Canceled.
Payment Event - Add Dialog
The Payment Event transaction features an unusual dialog that simplifies the addition of new payment events. This page appears if you open the Financial, Payment Event page in add mode from either the Account context menu or from the main menu (it also appears if you click the clear button when on the Payment Event page).
Note. If you have opted to always use the payment event distribution rules method as your default method, the Payment Event QuickAdd (Single Payment Event) page appears instead.
Description of Page
The Payor Account ID is the account that remitted the payment. We assume this account is both the tendering account and the account whose debt is being relieved by the payment. If this assumption is not correct, choose a Distribute Action of Do Not Distribute and then change the tendering or paying account when the Payment Event page appears (after you click OK).
Default note. If you have navigated to this page from account context menu, the Payor Account ID and Payment Amount are defaulted to this account.
The Payment Amount is the amount of the taxpayer’s debt to be relieved by the payment. Note, this amount is defaulted using an algorithm plugged in on the Installation Record. Please refer to APAM-DFLT for more information about how the algorithm that is supplied with the base package calculates this amount.
The payment tenders grid allows you to enter multiple tender types and amounts. Click + to add a new tender. For each tender specify the following fields:
· The Amount Tendered is the amount of moneys remitted for the tender type.
· Tender Type describes what was remitted (e.g., cash, check, …). Tender Type defaults from the Quick Add Tender Type that is defined on the installation record.
· If a check was tendered, use Check Number to specify the identity of the check.
Cash back causes an additional tender to be created. If cash should be returned to the taxpayer (because the taxpayer overpaid and the tender type’s cash back allowed switch is true and the tender type is not “like cash”), a negative tender for the cash back amount is created for the payment event. Refer to Cash Back for a description of how the system can recommend Cash Back amount if the taxpayer tendered more than they are paying.
Match Type and Match Value are used if either of the following conditions is true:
· This Payor Account belongs to an open item account type. In this situation, specify a Match Type to define how the payment should be matched to the taxpayer’s open-items and use Match Value to define the open-items covered by the payment. For example, if this payment is in respect of a bill, specify a match type of “bill id” and a match value of the bill id being paid.
Shortcut. If you enter a Match Type of “bill id” and leave the Match Value blank, the system assumes the taxpayer wants to pay the latest bill.
· The taxpayer wants to restrict the distribution of the payment to a specific obligation. In this situation, specify a Match Type of “obligation ID” and a Match Value of the respective obligation ID.
The Payment Date defaults to the current date.
If the Payor Account ID's account type is designated as non-tax agency payor (i.e., the person making the payment isn't a taxpayer), the following information appears in the above window:
Non Tax Agency Name is the name of the person remitting the payment.
Reference Number is the reference number of the item being paid (e.g., the property tax reference number).
Non Tax Agency Comments are used to describe anything unusual about the non tax agency payment.
Use Distribute Action to describe what you’d like to have happen when you click the OK button:
· Choose Distribute and Freeze if OK if this is a simple payment that should require no manual intervention. By “simple payment” we mean:
· The account is both the tendering account and the account whose debt is being relieved by the payment
· The payment date is the current date
· The payment should be distributed amongst the account’s obligations using standard distribution logic
If this option is selected, the system distributes the Payment Amount amongst the account’s obligations. If the distribution is successful, the system automatically freezes the payment. If the distribution is not successful, the payment will be in the Error or Incomplete state. When the Payment Event page appears, you can view the error and then correct it. After the cause of the error is corrected, you must distribute and freeze the payment manually (this can be done on several pages including Payment Event - Main and Payment - Main).
· Choose Manual Distribution if you need to manually distribute the payment amongst the account’s obligations. If this option is selected, the system creates a payment event, a tender and a payment and then transfers you to the Payment - Manual Distribution page where you can define the amount to be allocated to each of the account’s obligations. After you’ve distributed the payment, don’t forget to freeze it.
· Choose Do Not Distribute if you want to process the payment event manually (e.g., if you need to define multiple accounts whose debt is relieved by the payment). If this option is selected, the Payment Event – Main page opens with the information you entered defaulted accordingly. You can make any changes you want and then distribute and freeze the payment. Refer to How To Add A New Payment Event for more information.
Payment Event - Main Information
The Main page contains core payment event information. Open this page using Financial, Payment Event.
The Description of Page section that appears below simply describes the fields on this page. Refer to How To for a description of how to perform common payment event maintenance functions.
Description of Page
Pay Event Info contains a concatenation of the payment date, amount, and the name of the main taxpayer on the account that remits the tender. If multiple tenders exist, the taxpayer’s name is not displayed. If the payment event is associated with a single distribution detail, the rule name and the description of the rule value are displayed as well. If multiple distribution details exist, Multiple Distribution Details Exist is displayed instead. Pay Event Info is only displayed after the payment event has been added to the database.
Payment Event ID is the system-assigned unique identifier of the payment event.
The area under Pay Event Info provides warnings about the payment event. Possible warnings are Unfrozen Payments and The Payment Event is Unbalanced. A warning is also issued to the cashier to remind him/her to turn in funds – see Turn Ins.
If multiple distribution details are linked to the payment event, the distribution rule, value and amount for each distribution detail is displayed.
Payment Date is the business date associated with the payment event.
Warning! If you change the payment date and this event’s tender(s) are automatic payments, the extract date (i.e., the date the automatic payment is sent to the financial institution) will be changed to equal the payment date. Refer to Automatic Payments for more information.
Effective Date is populated by the algorithm that creates the payment and is used to populate the FT effective date. For example, an income tax return that the taxpayer files on April 1st that is due on April 15th has an effective date of April 15th.
Changing effective date. Refer to Payment Date and Effective Date for Payment Events for information about changing the effective date of a distributed payment event.
Payment(s) contains the total number and value of payments linked to the event.
Tender(s) contains the total number and value of tenders linked to the event.
Amount Tendered contains the amount that was tendered by the taxpayer.
The system displays a Cash Back Amount if the taxpayer tenders more than they are paying (refer to Cash Back for details).
If the payment event becomes unbalanced, a Recalculate Cash Back button appears. If this button is clicked, the system creates, deletes or recalculates the cash back tender. Refer to Cash Back for details.
While most payment events contain a single payment, the system allows many payments to exist under a payment event (when the payment event’s tender(s) are distributed amongst multiple accounts). If a payment event has a large number of payments, you can use the Account Filter to limit the payments that appear in the Payments grid. The following options are available:
· Account. Use this option if you only want to see the payment linked to an Account ID.
· All. Use this option to view all payments linked to the payment event.
· Person Name. Use this option to restrict payments linked to accounts whose main taxpayer has a primary name that matches Person Name.
The Payments grid contains the payment(s) linked to the payment event. The following points describe the attributes in this scroll; refer to How To for instructions describing how to perform common maintenance activities.
· If the payment is created via distribution details, the Distribution Sequence associated with this payment is displayed.
· Account ID references the payment’s account. The name of the account’s main taxpayer is displayed adjacent.
· Payment Amount is the amount of the account’s debt relieved by the payment. The adjacent context menu allows you to drill down to the details of the payment (this is where you can see the payment’s payment segments and where you can override the distribution of the payment).
· Payment Status is the payment’s status. If the payment’s status is Error, the error message is displayed adjacent. Refer to Payment Lifecycle for the potential values and how to handle a payment when it exists in a given state.
· Match Type and Match Value should only be used if either of the following conditions is true:
· This Account ID belongs to an open item account type. In this situation, specify a Match Type to define how the payment should be matched to the taxpayer’s open-items and use Match Value to define the open-items covered by the payment. For example, if this payment is in respect of a bill, specify a match type of “bill id” and a match value of the bill id being paid.
· The taxpayer wants to restrict the distribution of the payment to a specific obligation. In this situation, specify a Match Type of “obligation ID” and a Match Value of the respective obligation ID.
· The remaining columns are only used if the payment is linked to an Account ID that belongs to an account type that is used for non-CIS payments. Refer to Setting Up Account Types for more information. If such an account exists, the following fields must be defined.
· Non Tax Agency Name is the name of the person remitting the payment.
· Reference Number is the reference number of the item being paid (e.g., the property tax reference number).
· Non Tax Agency Comments are used to describe anything unusual about the non tax agency payment.
Note, you can also define a comment for a non tax agency payment. To define a comment, use the context menu adjacent to Payment Amount to drill to Payment - Main.
· Payment ID is the unique, system-assigned identifier of the payment. This value only appears after the payment has been added to the database.
Refer to Payment Actions and Payment Event Actions for information about the action buttons on this page. Refer to How To for a description of typical business processes that use these buttons.
Payment Event - Tenders
The Tenders page contains a scroll showing one row for every tender associated with the payment event. Open this page using Financial, Payment Event, Tenders.
The Description of Page section that appears below simply describes the fields on this page. Refer to How To for instructions describing how to perform common maintenance functions.
Description of Page
Pay Event Info contains a concatenation of the payment date, amount, and the name of the main taxpayer on the account that remits the tender. If multiple tenders exist, the taxpayer’s name is not displayed. If the payment event is associated with a single distribution detail, the rule name and the description of the rule value are displayed as well. If multiple distribution details exist, Multiple Distribution Details Exist is displayed instead. Pay Event Info is only displayed after the payment event has been added to the database.
Payment Event ID is the system-assigned unique identifier of the payment event.
Payment Date is the business date associated with the payment event.
Payment(s) contains the total number and value of payments linked to the event.
Tender(s) contains the total number and value of tenders linked to the event.
Amount Tendered contains the amount that was tendered by the taxpayer.
The system displays a Cash Back Amount if the taxpayer tenders more than they are paying (refer to Cash Back for details).
If the payment event becomes unbalanced, a Recalculate Cash Back button appears. If this button is clicked, the system creates, deletes or recalculates the cash back tender. Refer to Cash Back for details.
The Tenders scroll controls the display of the tenders linked to the payment event. The following simply describes the fields in this scroll; refer to How To for instructions describing how to perform common tender maintenance activities.
· Payor Account ID references the tendering account. The name of the account’s main taxpayer is displayed adjacent.
Warning! If you change the Payor Account ID and the tender has an associated automatic payment request, the automatic payment request will be removed. A new automatic payment request will be created for the new Payor Account ID. Refer to Automatic Payments for more information.
· Tender Amount is the amount of the tender.
· If a check was used, the Check Number contains the identity of the check.
· Pay Tender ID is the system-assigned unique identifier of the tender. This value appears after the tender has been added to the database.
· Tender Type describes what was remitted (e.g., cash, check). If the Tender Type is associated with an automatic payment, the page displays a section that includes information about how and when the automatic payment was interfaced to the payment source.
· Tender Status is the tender’s status. Refer to Tender Lifecycle for the potential values and how to handle a tender when it exists in a given state.
· If the Tender Type is associated with an automatic payment, the system attempts to default automatic payment information from the account’s auto-pay option if the tender type is the same as the tender type on the account’s auto-pay source and if the auto pay option is effective on the payment date. If the system is unable to default information, you must specify the source of the funds and the taxpayer’s account number / credit card number at the financial institution. You can override automatic payment information as long as the automatic payment has not been sent to the financial institution or cancelled.
· Auto Pay Source Code is the financial institution / credit card company that receives the automatic payment request.
· Scheduled Extract Date is the date the automatic payment request was sent / is scheduled to be sent to the financial institution. This information is display-only.
· External Account ID is the taxpayer’s account number at the financial institution.
· Expires On is only needed if the Tender Type indicates that an expiration date is necessary (e.g., for a credit card payment).
· Name is the taxpayer’s name in the financial institution’s system.
· Bill ID is the ID of the bill whose completion caused the creation of the automatic payment. This information only appears if the automatic payment was created as a result of a bill. This information is display-only.
· If the payment was uploaded, the following fields MAY contain information (if they were populated in the interface file):
· MICR ID is the value of the magnetic ink character recognition (MICR) line on the payment.
· Taxpayer ID is the taxpayer’s account ID that appeared on the interfaced payment.
· Ext. Reference ID is the unique identifier of the payment upload interface record.
· Name is the taxpayer’s name on the interfaced payment record.
· In the Tender Control area, the Tender Control ID is the identity of the remittance processor batch or cash drawer bundle in which the tender was remitted. Refer to Tender Management and Workstation Cashiering for more information about tender controls.
Displayed adjacent to Tender Control is the date, tender source, and status of the tender control.
Every new tender must reference an open tender control. The system will attempt to default an appropriate tender control as follows:
· If the user has at least one open, user-specific Tender Control, the system will default one, at random.
· If the user has no open, user-specific Tender Controls; the system will default an open, “all users” tender control if it can find one whose tender source indicates it’s used for online cashiering. If multiple exist, one will be selected at random.
Turn off Included in Tender Ctl Balance if the tender should not be included in the tender amount in the tender control’s tender balance. You would turn this switch off if you canceled a tender because it was mistakenly applied to the wrong account (or the amount was wrong). This switch is only enabled if:
· The tender control isn’t balanced.
· The tender is canceled.
Deposit Control contains a concatenation of the tender control’s deposit control’s creation date, tender source type, and status. Refer to Tender Management and Workstation Cashiering for more information about deposit controls.
· The Tender Action area contains a button that you use to cancel a tender. Refer to Tender Actions for information about this button. Refer to How To Cancel A Tender for more information.
The Characteristics collection contains information that describes miscellaneous information about the tender. The following fields display:
Characteristic Type Indicate the type of characteristic.
Sequence Controls the order in which characteristics of the same type are displayed.
Characteristic Value Indicate the value of the characteristic.
Payment Event Action Codes
The topics that follow describe each of the actions that appear on the payment event pages.
Contents
Payment Actions
The topics that follow describe payment-oriented actions. Refer to How To for a description of several business processes that use these buttons.
Contents
Distribute (Payments)
Clicking the Distribute button distributes all Incomplete, Error, or Freezable payments linked to the event. Refer to Distribute (A Payment) for information of how a single payment is distributed.
This button is enabled if at least one payment is Incomplete, Error, or Freezable.
Redistribute (Payments)
Clicking the Redistribute button redistributes all Incomplete, Error, or Freezable payments linked to the event. Refer to Redistribute (A Payment) for information of how a single payment is redistributed.
This button is enabled if at least one payment is Incomplete, Error, or Freezable.
This button is enabled under the following conditions:
· The document cm_POSPrint.js must be present on the web server and the variable defined in that document must be set to true. This is to indicate that point of sale (POS) printers are in use. Refer to the installation guide for more information about setting up receipt printers.
· The payment event must have at least one payment that is frozen AND no payments that are in Incomplete, Error or Freezable
Refer to How To Print Receipts And Endorsements for more information.
Freeze (Payments)
Clicking the Freeze button causes all Freezable payments linked to the event to become frozen. Refer to Freeze (A Payment) for information of how a single payment is frozen.
This button is enabled if at least one payment is Freezable.
If problems are detected after freezing. A payment may not be changed after it is frozen. All subsequent changes must occur by canceling the frozen payment and creating a new one. You can cancel and redistribute a payment on the next tab. Refer to Canceling A Tender Versus Canceling a Payment for more information.
Payment Event Actions
The topics that follow describe payment event-oriented actions. Refer to How To for a description of typical business processes that use these buttons.
Contents
Transfer
If the payment event was created using distribution rule(s), any transfer of its payments should also be done using the distribution rules method. Hence, a different dialog opens when you click Transfer based on whether the payment event is associated with at least one distribution detail or not.
Contents
Transfer (No Distribution Details Exist)
Transfer (Distribution Details Exist)
Transfer (No Distribution Details Exist)
The Transfer button is enabled if:
· There is a single non-cancelled tender linked to the event AND
· There is a single frozen payment linked to the event AND
· The account on the tender is the same as the account on the payment.
You must specify the following parameters in order to transfer a payment:
· Account ID is the account to which the payment event should be transferred.
· Cancel Reason defines why you are performing the transfer.
· Match Type and Match Value are defaulted based on their values for the payment event that you are transferring. If necessary, modify the values appropriately for the account to which you are transferring the payment event. Match Type and Match Value are used for an account that belongs to an open item account type or to restrict the distribution of the payment to a specific obligation. Refer to Payment Event - Main for more information.
· Turn on Freeze Payment if the transferred payment should be frozen automatically. You may want to leave this turned off if you want to examine the payment distribution before freezing the payment.
· Non Tax Agency Name, Reference Number, and Non Tax Agency Comments appear if the Account ID belongs to an account type that is used for non tax agency payments. Refer to Setting Up Account Types for more information.
Clicking OK causes the following to take place:
· The account on the tender is changed to reflect the transfer to account.
· The original payment and its segments are cancelled.
· A new payment is added for the transfer to account. The payment characteristics associated with the original payment are copied to the new payment.
· The new payment is distributed.
· If so designated, the new payment is frozen.
Transfer (Distribution Details Exist)
The Transfer button is enabled if:
· There is a single payor AND
· All existing payees before the transfer are the same as the payor AND
· There is at least a single non-cancelled tender linked to the event
You must specify the following parameters in order to transfer payment(s):
· Distribution Rule is the account to which the payment event should be transferred.
· Rule Value is the value associated with the payment and expected by the distribution rule.
· Amount is the payment amount.
· Cancel Reason defines why you are performing the transfer.
Clicking OK causes the following to take place:
· The payment(s) associated with the original account are canceled.
· The new set of distribution details are processes, creating new payment(s) for the transfer to account. The payment characteristics associated with the original payment are copied to the new payment.
· If all new payments are for the same payee account (and the payee is different than the current payor) the account on the tender is changed to reflect the transfer to account.
· Original distribution details (only those with a non-zero amount) are deleted and replaced by the new set of details on the payment event.
Distribution rule entries can have a zero amount. Refer to Rule Value Can Capture Additional Information for more information about how to use distribution details to capture additional payment related information.
Determine Tender Account. This dialog does not call the Determine Tender Account algorithm defined on distribution rule as this action does not rebuild the payment tender collection.
Refer to Rule Value Can Capture Additional Information for more information about how to use distribution details to capture additional payment related information.
Delete A Payment Event
The Delete button deletes a payment event and its tenders and payments.
This button is enabled if there are no frozen or canceled payments and no canceled tenders.
Tender Actions
The topics that follow describe tender-oriented actions. Refer to How To for a description of several business processes that use these buttons.
Cancel A Tender
Clicking Cancel causes the following to take place:
· All payments associated with the tender’s payment event are canceled.
· The tender becomes canceled.
· If the cancellation reason indicates the cancellation is due to non-sufficient funds, other actions may occur. Refer to NSF Cancellations for more information.
The Cancel button is enabled if the tender is not canceled
You must specify the following parameters in order to cancel a tender:
· Select a Cancel Reason to describe why the tender is being canceled.
· The system also needs to know which Bank Account To Charge the cancellation against. The system will default the Bank Code and Bank Account from the original bank information used when the tender was deposited. You can override them here.
When you click the OK button, the system cancels the tender and ALL payments linked to the event.
When non-canceled tenders are still linked to the event. If there are multiple tenders linked to the payment event, you must either add new payment(s) that equal the sum of the event's non-canceled tenders or cancel the remaining tenders.
Cancellation after cash back. If a taxpayer tenders a check for $100, but only owes $80, the system will recommend returning $20 in cash to the taxpayer (assuming the tender type for checks allows overpayment). If the tender type for checks is not “like cash”, a second tender is created for -$20 (the first tender is for $100). If the check subsequently bounces, both tenders must be cancelled.
The Payment Event QuickAdd page is used to quickly add, distribute and freeze one or more payment events using distribution rules. Open this page using Financial, Payment Event QuickAdd.
Description of Page
Specify the Tender Control ID in which the tenders will be recorded. Every new tender must reference an open tender control. The system will attempt to default an appropriate tender control as follows:
· If the user has at least one open, user-specific Tender Control whose tender source has a tender source type of online cashiering or ad hoc, the system will default one, at random.
· If the user has no open, user-specific Tender Controls; the system will default an open, “all users” tender control if it can find one whose type is online cashiering or ad hoc. If multiple exist, one will be selected at random.
Specify the Payment Date. The current date defaults. Note that you can modify the payment effective date on the Payment Event page. See Payment Event - Main for more information.
Use Number of Payment Events to indicate whether you intend to add a single payment event or multiple payment events.
Choose the multiple payment events option if you intend to add "simple" payment events. By "simple" we mean:
· A single account is both the payor account and the account whose debt is being relieved by the payment.
· The payment tender is not an auto-pay tender.
For all other cases choose the single payment event dialogue as it is designed to handle more complex payment event configurations such as when:
· The payor account is different than the payee account.
· Multiple payors cover payments for one or more payees.
· The payment tender is an auto-pay tender.
Once you have made your selection the page is adjusted to support the corresponding dialog.
Contents
Multiple Payment Events Dialog
Multiple Payment Events Dialog
This is the default dialog setup when navigating from Financial, Payment Event QuickAdd.
Description of Page
Using the multiple payment events option, each row in the payment detail grid typically represents a unique distribution detail. However, more than one row in the grid can belong to a single payment event. All distribution details for identical tender account will be grouped under a single pay event.
The following columns appear in the Payments grid:
· Select a Distribution Rule by which the payment detail is to be processed. If you have set up a default distribution rule, it is defaulted in the first row.
· Specify the Rule Value associated with the payment and expected by the distribution rule.
· Use Tender Amount to define the amount of the payment.
· Use Tender Type to define the form or remittance (e.g., cash, check, etc.). Note that the Tender Type defaults from the installation record.
Automatic Payments. The multiple payment events dialog does not support automatic payments. Switch to the single payment event dialog to enter automatic payments.
· Use Check Number if a check is remitted.
· MICR ID is the value of the magnetic ink character recognition (MICR) line on the payment.
· You may use Customer ID to record additional taxpayer information.
· You may use External Reference ID to record external information associated with the payment tender.
· You may use Name to record additional payment tender information.
· Payor Account ID is the tender account as determined by the Determine Tender Account algorithm defined on the distribution rule. This information is only populated after the distribution detail has been processed.
After specifying the various payment distribution details in the grid, click Create. The system attempts to create payment event(s) as follows:
· As mentioned earlier, all distribution details for identical tender accounts are grouped under a single pay event. The first step in identifying common tenders is to determine the tender account. To do that the system calls the Determine Tender Account algorithm defined on the distribution rule.
· A payment event is created for each unique tender account.
· All rows having all attributes of the tender identical except for the amount are grouped together where each group represents a single tender.
· A single payment tender is created for each unique tender and linked to the payment event.
· The total payment amount for each distinct group of distribution details (for the payment event) having the same rule and value is summarized. For each distinct group, the system calls the Create Payment algorithm defined on the distribution rule providing it with the rule value and total payment amount. It is the responsibility of this algorithm to create the payments for this payment event.
· Add the distinct payment event distribution detail and its total amount beneath the payment event.
· If the tender control's tender source type indicates that this is a cashiering station and your implementation is configured for printing at a cashier station, the Print Dialog appears.
The Payment Event ID column appears in the grid after the distribution details have been processed. It shows the payment event ID created for the distribution detail record and a short description as to the status of the payment(s) created for the payment event. You can use this field to navigate to the payment event.
After you've added a group of payment events, you should press the clear button (or Alt-C), to ready the page for the next group of payment event details.
Single Payment Event Dialog
If you have opted to always use the payment event distribution rules method as your default method, this is the default dialog setup you would see when you navigate to the Payment Event page in Add mode.
Adding a single payment event at a time, allows for more complex payment event information to be captured.
Enter one row in the Tenders grid for every unique tender associated with the payment event.
· Payor Account ID references the tendering account. The name of the account’s main taxpayer is displayed adjacent.
Warning! If you change the Payor Account ID and the tender has an associated automatic payment request, the automatic payment request will be removed. A new automatic payment request will be created for the new Payor Account ID. Refer to Automatic Payments for more information.
· Tender Amount is the amount of the tender.
· Use Tender Type to define the form or remittance (e.g., cash, check, etc.). Note, the Tender Type defaults from the installation record.
· Use Check Number if a check is remitted.
· MICR ID is the value of the magnetic ink character recognition (MICR) line on the payment.
· You may use Customer ID to record additional taxpayer information.
· You may use External Reference ID to record external information associated with the payment tender.
· You may use Name to record additional payment tender information.
· If the Tender Type is associated with an automatic payment, the page displays a section that includes information about how and when the automatic payment was interfaced to the payment source.
· If the Tender Type is associated with an automatic payment, the system attempts to default automatic payment information from the account’s auto-pay option if the tender type is the same as the tender type on the account’s auto-pay source and if the auto pay option is effective on the payment date. If the system is unable to default information, you must specify the source of the funds and the taxpayer’s account number / credit card number at the financial institution.
· Auto Pay Source Code is the financial institution / credit card company that receives the automatic payment request.
· External Account ID is the taxpayer’s account number at the financial institution.
· Expires On is only needed if the Tender Type indicates that an expiration date is necessary (e.g., for a credit card payment).
· Name is the taxpayer’s name in the financial institution’s system.
The following columns appear in the Payments grid:
· Select a Distribution Rule by which the payment detail is to be processed. If you have set up a default distribution rule, it is defaulted in the first row.
· Specify the Rule Value associated with the payment and expected by the distribution rule.
· Use Amount to define the amount of the payment.
After specifying the various payment distribution details in the grid, click Create.
Go To Payment Event. If you wish to be transferred to the payment event page once processing is complete, remember to check the Go To Payment Event check box before you click Create. This field does not appear when this page is used as the default Payment Event - Add Dialog and you are automatically transferred to the payment event page once the payment event is created.
After distribution details have been processed, a short description of the payment event that has been created is displayed to the right of the Go To Payment Event field. The description provides information as to the status of the payment(s) created for the payment event. You can use this field to navigate to the payment event.
The system attempts to create the payment event as follows:
· Validate that the sum of the tenders equals the sum of the payments.
· Create the payment event with a separate payment tender for each row in the Tenders grid.
· Summarize the total payment amount for each distinct group of distribution details having the same rule and value. For each distinct group, call the Create Payment algorithm defined on the distribution rule providing it with the rule value and total payment amount. It is the responsibility of this algorithm to create the payments for the payment event.
· Add the distinct payment event distribution detail summary beneath the payment event.
· If the tender control's tender source type indicates that this is a cashiering station and your implementation is configured for printing at a cashier station, the Print Dialog appears.
Determine Tender Account. Having an explicit collection of tenders eliminate the need to determine the tender account. Therefore this dialog does not call the Determine Tender Account algorithm.
The Payment QuickAdd page is used to quickly add, distribute and freeze payment events for up to fifteen accounts. Open this page using Financial, Payment QuickAdd.
Description of Page
Specify the Tender Control ID in which the tenders will be recorded. Every new tender must reference an open tender control. The system will attempt to default an appropriate tender control as follows:
· If the user has at least one open, user-specific Tender Control whose type is online cashiering or ad hoc, the system will default one, at random.
· If the user has no open, user-specific Tender Controls; the system will default an open, “all users” tender control if it can find one whose tender source has a tender source type of online cashiering or ad hoc. If multiple exist, one will be selected at random.
Specify the Payment Date. The current date defaults. Note that you can modify the payment effective date on the Payment Event page. See Payment Event - Main for more information.
Enter one row in the grid for every payment event to be added. The following information is entered for each payment event:
· Use Account ID to define the taxpayer who tendered the payment. It’s important to note that this transaction assumes that the tendering account is the same as the account whose balance is relieved by the payment. Refer to How To Allocate The Tender Amount To Multiple Accounts if you need to distribute the payment to an account (or accounts) other than the tendering account.
· Use Payment Amount to define the amount of the payment.
· Use Tender Type to define the form or remittance (e.g., cash, check, etc.). Note, the Tender Type defaults from the installation record.
· Use Check Number if a check is remitted.
· Match Type and Match Value are only used if either of the following conditions is true:
· This Account ID belongs to an open item account type. In this situation, specify a Match Type to define how the payment should be matched to the taxpayer’s open-items and use Match Value to define the open-items covered by the payment. For example, if this payment is in respect of a bill, specify a match type of “bill id” and a match value of the bill id being paid.
Shortcut. If you enter a Match Type of “bill id” and leave the Match Value blank, we assume the taxpayer wants to pay the latest bill.
· The taxpayer wants to restrict the distribution of the payment to a specific obligation. In this situation, specify a Match Type of “obligation ID” and a Match Value of the respective obligation ID.
After specifying the various accounts and amounts in the grid, click the Distribute and Freeze button. When you click this button, the system attempts to create a payment event for each row in the grid. Four potential outcomes are possible for each row:
· If the data you entered for a payment event isn't complete (e.g., you don't specify a valid account or amount):
· No payment event is created.
· A Message describing the problem is displayed.
· All fields on the row remain modifiable.
You should correct each such line and then press the Distribute and Freeze button.
· If the data you entered is complete, but the system issues a warning for any reason:
· No payment event is created.
· A Message containing the warning is displayed.
· All fields on the row remain modifiable.
You must clear the line and add a payment using the Payment Event transaction (note, if you use the Account context menu to transfer to the Payment Event page in add mode, you won't have to retype the Account ID when you add the payment event).
· If the data you entered is complete, but the system is not successful in distributing the payment:
· The system creates a payment event, a payment and a tender.
· A Message describing the problem is displayed.
· The payment's Status is displayed
· All fields on the row are disabled.
You must press the adjacent go to button to drill to the payment event where the error can be corrected.
· If the data you entered is complete and the system is successful in distributing the payment:
· The system creates a payment event, a payment, and a tender.
· The system distributes the payment amongst the account's obligations and then freezes the payment.
· The payment's Status is displayed.
· All fields on the row are disabled.
· If the tender control's tender source type indicates that this is a cashiering station and your implementation is configured for printing at a cashier station, the Print Dialog appears.
· You can press the adjacent go to button to view a payment event.
Separate Commits. This page is unusual in that each payment event is committed to the database independently. For example, if you enter seven payment events and one is invalid, six payment events will be added to the database when you press Distribute and Freeze. When the page is redisplayed, the rows containing the valid payments are protected and an indication of their validity is displayed. The row containing the invalid payment remains unprotected. You can correct the erroneous payment and then press the Distribute and Freeze button again.
After you've added a group of payments, you should press the clear button (or Alt-C), to ready the page for the next group of payment events.
Payments and payment segments are automatically created by the system when payment events are created. You should only need to access this transaction as follows:
· To view a payment’s payment segments (i.e., to view how a payment was distributed amongst its account’s obligations).
· To override the distribution of a payment amongst its account’s obligations. Refer to Distributing A Payment Amongst An Account's Obligations for information describing how payments are typically distributed.
The topics in this section describe how to maintain a payment.
Contents
Payment - Main
This page contains basic information about a payment. Open this page using Financial, Payment, Main.
Most payments are maintained using the Payment Event page. The transaction described below is typically only used to view a payment’s payment segments and to manually distribute a payment amongst an account’s obligations.
The Description of Page section that appears below simply describes the fields on this page. Refer to How To for instructions on how to perform common maintenance functions.
Description of Page
Payment Info contains a concatenation of the payment date, amount, status, and the name of the main taxpayer on the account.
Payment ID is the system-assigned unique identifier of the payment.
Payment Event ID is the system-assigned unique identifier of the payment event. The adjacent info contains a concatenation of the payment date, amount, and the name of the main taxpayer on the account that remits the event’s tender. If multiple tenders exist, the taxpayer’s name is not displayed. A warning may also be displayed. The possible warnings are Unfrozen Payments and The Payment Event is unbalanced.
Payment(s) contains the total number and value of payments linked to the payment event.
Tender(s) contains the total number and value of tenders linked to the payment event.
Account ID is the account whose debt is reduced by the payment. The name of the account’s main taxpayer is displayed adjacent. This field is gray after the payment is frozen.
Payment Amount is the amount of the payment. This field is gray after the payment is frozen.
Payment Status is the payment’s status. Refer to Payment Lifecycle for the potential values and how to handle a payment when it exists in a given state. If the payment is in Error, the error message is displayed adjacent. If the payment is canceled, the Cancel Reason is displayed adjacent.
Match Type and Match Value will only be used if either of the following conditions is true:
· This Account ID belongs to an open item account type. In this situation, specify a Match Type to define how the payment should be matched to the taxpayer’s open-items and use Match Value to define the open-items covered by the payment. For example, if this payment is in respect of a bill, specify a match type of “bill id” and a match value of the bill id being paid.
· The taxpayer wants to restrict the distribution of the payment to a specific obligation. In this situation, specify a Match Type of “obligation ID” and a Match Value of the respective obligation ID.
Match Type and Match Value are gray after the payment is frozen.
If the payment is linked to an Account ID that belongs to a account type that is used for non tax agency payments, the following fields appear (note, these fields are gray after the payment is frozen):
· Name is the name of the person remitting the payment.
· Reference Number is the reference number of the item being paid (e.g., the property tax reference number).
· Comments are used to describe anything unusual about the non tax agency payment.
The contents of the Payment Segments section depends on the number of payment segments linked to the payment. If more than 25 payment segments exist, a message appears that allows you to navigate to Payment - Payment Segments where you can view the payment segments (this tab page has special functionality that allows you to define which payment segments should be displayed). If 25 or fewer payment segments exist, the grid contains information about each payment segment:
· Location is the address of the obligation’s main premise.
· Click the go to button to transfer to view the financial transaction related to the payment segment. This is only available after the payment has been frozen.
· Obligation Information contains basic information about the obligation.
· Distributed Amt is the amount of the obligation’s debt relieved by the payment.
The following information appears at the bottom of the page:
· Payment Amount is the amount of the payment.
· Distributed Amount is the sum of the payment segments linked to the payment.
· The Difference between the Payment Amount and the Distributed Amount appears if it is non-zero.
· Billed Amount is the amount of the bill preceding the payment date.
· Delinquent Amount is the amount of the taxpayer’s debt that was due on / before the prior bill’s due date.
· Current Balance is the account’s current balance.
Refer to Payment Action Codes for information about the action buttons on this page.
Payment - Pay Segments
You can use this page to view all or selected payment segments linked to a payment.
Open Financial, Payment, Payment Segments to view this information.
Most payments are maintained using the Payment Event page. The transaction described below is typically only used to view a payment’s payment segments.
Note. If the payment has more than 25 payment segments, the search criteria are intentionally left blank in order to avoid retrieving all payment segments (with the resultant slow response times). You must therefore use the Obligation Filter to define the type of payment segments that should be retrieved. See the Description of page below for more information about this page’s search criteria.
Description of page
Payment Info contains a concatenation of important information about the payment.
Payment ID is the system-assigned unique identifier of the payment.
Payment Event ID is the system-assigned unique identifier of the payment event. The adjacent info contains a concatenation of the payment date, amount, and the name of the main taxpayer on the account that remits the event’s tender. If multiple tenders exist, the taxpayer’s name is not displayed. A warning may also be displayed. The possible warnings are Unfrozen Payments and The Payment Event is unbalanced.
Payment(s) contains the total number and value of payments linked to the payment event.
Tender(s) contains the total number and value of tenders linked to the payment event.
Note. If the payment has more than 25 payment segments, the search criteria are intentionally left blank in order to avoid retrieving all payment segments (with the resultant slow response times). You must therefore use the obligation Filter to define the type of payment segments that should be retrieved.
Use the Obligation Filter to define the types of obligations whose payment segments appear in the grid. The following options are available:
· All. Use this option if you do not wish to restrict payment segments based on obligation attributes.
· Obligation Type. Use this option to restrict payment segments to those whose obligations are linked to a given Division and Obligation Type.
Don’t forget to click the search button after changing the Obligation Filter.
The grid that follows contains the payment segments that match your search criteria. The following information appears in the grid:
· The Location column contains the characteristic location associated with the payment segment’s obligation. Refer to Maintaining Locations for more information about this location.
· Click the go to button to transfer to view the financial transaction related to the payment segment. This is only available after the payment has been frozen.
· Obligation Information contains summary information about the obligation.
· Distributed Amt is the amount of the obligation’s debt relieved by the distribution.
· Adjustment ID is displayed if there is an adjustment associated with the payment.
The following information appears at the bottom of the page:
· Payment Amount is the amount of the payment.
· Distributed Amount is the sum of the payment segments linked to the payment.
· The Difference between the Payment Amount and the Distributed Amount appears if it is non-zero.
· Billed Amount is the amount of the bill preceding the payment date.
· Delinquent Amount is the amount of the taxpayer’s debt that was due on / before the prior bill’s due date.
· Current Balance is the account’s current balance.
Payment - Manual Distribution
You can use this page to view obligations linked to the payment’s account and to manually distribute a payment amongst specific obligations.
Open this page using Financial, Payment, Manual Distribution.
Most payments are maintained using the Payment Event page. The transaction described below is typically only used to view a payment’s payment segments and to manually distribute a payment amongst an account’s obligations.
Note. If the payment’s account has more than 25 obligations, the search criteria are intentionally left blank in order to avoid retrieving all obligations (with the resultant slow response times). You must therefore use the Obligation Filter to define the type of obligations that should be retrieved. See the Description of page below for more information about this page’s search criteria.
Description of page
Payment Info contains a concatenation of important information about the payment.
Payment ID is the system-assigned unique identifier of the payment.
Note. If the payment’s account has more than 25 obligations, the search criteria are intentionally left blank in order to avoid retrieving all obligations (with the resultant slow response times). You must therefore use the obligation Filter to define the type of obligations that should be retrieved.
Use the Obligation Filter to define the types of obligations that appear in the grid. The following options are available:
· All. Use this option if you want to view all obligations.
· Obligation Type. Use this option to restrict obligations to those linked to a given Division and Obligation Type.
Don’t forget to click the search button after changing the Obligation Filter.
The grid that follows contains the obligations that match your search criteria. The following information appears in the grid:
· Location contains the characteristic location associated with the obligation.
· Obligation Information contains summary information about the obligation.
· Distributed Amt is the amount of the obligation’s debt relieved by the payment. This field is gray after the payment is frozen.
· Billed Amt is the amount that was billed for the obligation on the bill preceding the payment date.
· Delinquent Amt is the amount of debt associated with financial transactions that appear on overdue bills.
· Current Balance is the amount currently owing for this obligation.
If the account being paid is an open item account, then an alternate grid is displayed. The alternate grid is designed to break down payable balances by individual bill and obligation. Both unpaid bill balances and new charges are displayed. After distribution, a separate match event will be created for each bill paid or partially paid.
The open item manual distribution grid will have the following columns:
· Bill Date
· Shows bill date if the row contains an account’s unpaid bill.
· Shows ‘New Charges’ if the row contains an account’s unbilled new charges.
· Shows ‘Payment Segment’ for the following conditions:
· Row is a pay segment of a cancelled payment.
· Row is a pay segment of an overpayment to the highest priority obligation or an excess credit obligation.
· Row is a pay segment of a balance forward payment distribution.
· Location Information contains the characteristic location associated with the obligation.
· Obligation Information contains summary information about the obligation.
· Distributed Amount
· You can enter an amount to distribute if the payment is non-frozen and non-cancelled, otherwise, this field is protected.
· Billed Amount
· The amount that was billed for the obligation on the row’s bill. If the row does not represent a bill amount then this will be zero.
· Unpaid Amount
· This is determined by the “determine open-item bill amount” algorithm as defined on the installation option.
· This column will contain zero if:
· The row is linked to an open non-disputed match event with other bills’ FTs on it. In this case, it is not possible to determine the bill amount.
· The row is linked to an open disputed match event.
For either grid, the following information appears at the bottom of the page:
· Payment Amount is the amount of the payment.
· Distributed Amount is the sum of the payment segments linked to the payment.
· The Difference between the Payment Amount and the Distributed Amount appears if it is non-zero.
· Billed Amount is the amount of the bill preceding the payment date.
· Delinquent Amount is the amount of the taxpayer’s debt that was due on / before the prior bill’s due date.
· Current Balance is the account’s current balance.
Payment - Characteristics
To update payment characteristics, open Financial, Payment and navigate to the Characteristics tab.
Description of Page
The Characteristics collection contains information that describes miscellaneous information about the payment. The following fields display:
Characteristic Type Indicate the type of characteristic.
Sequence Controls the order in which characteristics of the same type are displayed.
Characteristic Value Indicate the value of the characteristic.
Payment Action Codes
The topics that follow describe each of the actions that appear on the payment pages.
Contents
Distribute (A Payment)
Clicking the Distribute button causes a payment to be distributed amongst the account’s obligations. Refer to Distributing A Payment Amongst An Account's obligations for a description of how this is achieved.
This button is enabled if a payment is Incomplete, Error, or Freezable. Refer to Payment Lifecycle for more information about these status values.
If the payment is distributed appropriately, click the Freeze button to freeze the payment and its payment segments.
Redistribute (A Payment)
Clicking the Redistribute button causes a payment to be redistributed amongst the account’s obligations. Refer to Distributing A Payment Amongst An Account's Obligations for a description of how this is achieved.
This button is enabled if a payment is Incomplete, Error, or Freezable. Refer to Payment Lifecycle for more information about these status values.
If the payment is distributed appropriately, click the Freeze button to freeze the payment and its payment segments.
Note. This button is only available on the Payment - Main and Payment - Manual Distribution pages.
Freeze (A Payment)
Clicking the Freeze button causes a payment and its payment segments to become frozen. Refer to Payment Lifecycle for more information about freezing.
This button is enabled if the payment is Freezable.
If problems are detected after freezing. A payment may not be changed after it is frozen. All subsequent changes must occur by canceling the frozen payment and creating a new one.
Cancel (A Payment)
Clicking the Cancel button causes the payment and its payment segments to be canceled. Canceling a payment (as opposed to canceling a tender) is typically only done if the original distribution was frozen and it’s incorrect.
This button is enabled if the payment is Frozen. Refer to Payment Lifecycle for more information about these status values.
Transfer (A Payment)
The Transfer button is enabled if the payment is Frozen. Refer to Payment Lifecycle for more information about these status values.
If the payment being transferred was created using payment event distribution rule(s), the payment transfer should also be done using the distribution rules method. Hence, a different dialog opens when you click Transfer based on whether the payment's payment event is associated with at least one distribution detail or not.
Contents
Transfer Payment (No Distribution Details Exist)
Transfer Payment (Distribution Details Exist)
Transfer Payment (No Distribution Details Exist)
Payment transfer causes the payment and its payment segments to be canceled and a new payment to be created. Transferring a payment is typically only done if the original distribution was targeted at the wrong account but all tender information for the pay event is correct. Unlike the payment event transfer, transferring a single payment does not affect the pay event’s tender information.
You must specify the following parameters in order to transfer a payment:
· Account ID is the account to which the payment should be transferred.
· Cancel Reason defines why you are performing the transfer.
· Match Type and Match Value are defaulted based on their values for the payment event that you are transferring. If necessary, modify the values appropriately for the account to which you are transferring the payment event. Match Type and Match Value are used for an account that belongs to an open item account type or to restrict the distribution of the payment to a specific obligation. Refer to Payment Event - Main for more information.
· Turn on Freeze Payment if the transferred payment should be frozen automatically. You may want to leave this turned off if you want to examine the payment distribution before freezing the payment.
· Non Tax Agency Name, Reference Number, and Non Tax Agency Comments appear if the Account ID belongs to an account type that is used for non tax agency payments. Refer to Setting Up Account Types for more information.
Clicking OK causes the following to take place:
· The original payment and its segments are cancelled.
· A new payment is added for the transfer to account. The payment characteristics associated with the original payment are copied to the new payment.
· The payment is distributed amongst the new account’s obligations.
· If so designated, the new payment is frozen.
Transfer Payment (Distribution Details Exist)
Payment transfer causes the payment to be canceled and new payment(s) to be created using new payment event distribution rule(s). Transferring a payment is typically done when a payment event has multiple payments and one or more payments have been assigned to the wrong obligation. Each of the incorrectly directed payments can be transferred to the correct obligation(s) using this dialog.
Total Amount is the total payment amount to transfer from.
You must specify the following parameters in order to transfer a payment:
· Distribution Rule is the obligation to which the payment should be transferred.
· Rule Value is the value associated with the payment and expected by the distribution rule.
· Amount is the payment amount.
· Cancel Reason defines why you are performing the transfer.
Clicking OK causes the following to take place:
· The payment associated with the original account is canceled.
· The new set of distribution details is processed, creating new payment(s) for the transfer-to obligation(s). The payment characteristics associated with the original payment are copied to the new payment.
· The new set of distribution details is added to the payment event. The original distribution details are kept.
Distribution rule entries can have a zero amount. Refer to Rule Value Can Capture Additional Information for more information about how to use distribution details to capture additional payment related information.
Determine Tender Account. This dialog does not call the Determine Tender Account algorithm defined on distribution rule as this action does not rebuild the payment tender collection.
Delete (A Payment)
The Delete button deletes a payment. This button is enabled if the payment is Incomplete, Error, or Freezable.
The topics in this section describe how to perform common payment maintenance functions.
Contents
How To Add A New Payment Event
How To Allocate The Tender Amount To Multiple Accounts
How To Print Receipts And Endorsements
How To Transfer A Payment From One Account To Another
How To Distribute A Payment To A Specific obligation
How To Get An Unbalanced Tender Control In Balance (Fixing Over/Under)
How To Add A New Payment Event
There are several ways to add a new event:
· You can use Payment QuickAdd to quickly add one or more payment events. You’d use this approach to add simple payments where no manual intervention is required. By “simple payment” we mean:
· The account is both the tendering account and the account whose debt is being relieved by the payment
· The payment date is the current date
· The payment should be distributed amongst the account’s obligations using standard distribution logic
· If applicable to your business practice, you can use Payment Event QuickAdd to quickly add one or more payment events using distribution rules.
· You can use Payment Event Maintenance to add a payment event. You would use this approach if multiple forms of payment are remitted (e.g., cash and a check) or if there are multiple payors and/or payees linked to the payment event.
Note. By default the system opens the Payment Event - Add Dialog when you navigate to this page in add mode. If you have opted to always use the payment event distribution rules method as your default method, the Payment Event QuickAdd (Single Payment Event) page appears instead. Refer to these pages for more information.
How To Cash A Check
If you allow taxpayers to cash checks, you’ll have a payment event with two tenders:
· The first tender contains information about the check.
· The second tender contains information about the cash refund (the tender amount is a negative amount equal to the amount of the check).
The interesting aspect of this payment event is that it has no payments because the sum of the tenders is zero.
We start this explanation in the middle of How To Add A New Payment Event.
In the Payment Event Add dialog, be sure to select Do Not Distribute before clicking OK.
· On the Main page, click – to remove the payment (cashing a check is a payment event with no payments).
· Transfer to the Payment Event, Tenders page.
· Insert a row in the tender scroll (click the + button) for the cash refund tender. In this row enter a tender type of “cash” and a tender amount of negative the check amount.
· Save the event (note there is nothing to distribute or freeze).
How To Allocate The Tender Amount To Multiple Accounts
When you add a payment event, the system automatically creates a single payment for the account that remitted the funds. If someone is remitting funds for someone other than themselves, you must change/add payments. This section describes how to do this.
Note. This section assumes you chose to add the payment event using the Payment Event - Add Dialog. Refer to How To Add A New Payment Event for the complete list of options.
In the Payment Event - Add Dialog, be sure to select Do Not Distribute before clicking OK.
Once on the payment event page, go to the Tenders tab and do the following:
· If the remitting account shouldn’t have received any part of the payment, Remove it by clicking the - button. Alternatively, you can just change the account id to reflect the recipient.
· If multiple accounts receive the remitted funds, Insert one row in the payment scroll (click the + button) for each additional account.
· When the payment event is balanced, Save it. Then Distribute and Freeze the payment(s). Refer to Payment Event Actions for more information on these action buttons.
How To Print Receipts And Endorsements
The system can be configured to allow you to endorse checks and print receipts using special cashiering station printers. This section describes the print options available.
Note. These options are only available if they have been installed in your system. Installing these options are a delivery and installation issue and are not within the domain of this document.
The print functions are available from the Payment Event, Payment QuickAdd and Payment Event QuickAdd transactions. Refer to those sections for more information.
Description of Page
Use the Endorse button to endorse checks using the cashier station printer. This is only enabled if one of the tender types indicates a check. If there were multiple checks, use the scroll buttons to select them. Feed the appropriate check in the printer and an endorsement message is printed on the back.
Use the Receipt button to print a receipt using the cashier station printer. Choose a Short or Long option. Use the Duplicate button to print a duplicate receipt – this prints the receipt with a “duplicate” label.
Use the Stub button to print special information in bill stub format (account, name, amount). Feed a slip of paper into the printer and the special stub information will be printed.
When you are finished, click Done; click Cancel to exit at any time.
The various text strings that are printed on the receipt and the endorsement are defined on Installation Options - Messages.
How To Cancel A Tender
If a tender is no longer valid (e.g., a check bounces), the tender must be canceled.
Warning! This process only makes sense in the context of the page used to maintain tenders. Refer to Payment Event - Tenders for the details.
You navigate through the pages as follows:
1. Open the payment event - tenders page for the tender in question. Proceed to step 2.
2. Click
![]() . Proceed to step 3.
. Proceed to step 3.
3. Before the system cancels the tender, you must specify the cancel reason.
Select a Cancel Reason to describe why the tender is being canceled. The system also needs to know which Bank Account To Charge the cancellation against. The system will default the Bank Code and Bank Account from the original bank information used when the tender was deposited. You can override them here.
When you click the OK button, the system cancels the tender and ALL payments linked to the event.
If the cancellation reason you supply is indicated as being “non-sufficient funds”, the system will generate an adjustment to levy a NSF charge. Refer to Obligation Type - Main Information for more information.
When non-canceled tenders are still linked to the event. If there are multiple tenders linked to the payment event, you must either add new payment(s) that equal the sum of the event's non-canceled tenders or cancel the remaining tenders.
Cancellation after cash back. If a taxpayer tenders a check for $100, but only owes $80, the system will recommend returning $20 in cash to the taxpayer (assuming the tender type for checks allows overpayment). If the tender type for checks is not “like cash”, a second tender is created for -$20 (the first tender is for $100). If the check subsequently bounces, both tenders must be cancelled.
How To Transfer A Payment From One Account To Another
If you need to transfer a payment amount from one account to another, you can use the Transfer button either on the payment event page or the payment page.
Refer to Transferring A Payment for a description of when to use each option.
How To Distribute A Payment To A Specific obligation
When you click Distribute, the system uses the payment distribution algorithm defined on the account’s account type to allocate the payment amongst the account’s obligations. In this section, we describe how to override this distribution (e.g., when you need to allocate a payment to specific obligation(s)).
We start this explanation in the middle of How To Add A New Payment Event.
In the Payment Event Add dialog, be sure to select Do Not Distribute before clicking OK.
· Save the payment event (this also saves the payment and tender information).
· Use the Payment Amount context menu to transfer to the Manual Distribution page.
· Fill in the desired Distributed Amt for each obligation and save the payment.
· Click Freeze to freeze the payment when the amount distributed is equal to the payment amount.
How To Get An Unbalanced Tender Control In Balance (Fixing Over/Under)
In order to balance a tender control that is out-of-balance, you must create a tender for an account associated with your company.
The over / under account. Your organization must set up a company-use account with an obligation whose obligation type references the over/under distribution code. This account should be linked to the person ID associated with company usage.
· If you have more money in the drawer than you have tenders, then you’re “over”. In this situation, you need to record a payment for the “over” amount. This will cause cash to be debited by the over amount, and the expense account associated with the account’s obligation to be credited.
· If you have less money in the drawer than you have tenders, then you’re “under”. In this situation, you need to record a negative payment for the “under” amount. This will cause cash to be credited by the over amount, and the expense account associated with the account’s obligation to be debited.
Important! You must determine the over/under amount for each tender type and then enter the respective over/under tender for the company-use account. For example, if you have more cash but fewer checks then you must enter two tenders for the company-use account (but you can do this on the same event). Check out the following table for an example:
|
Tender Type |
Starting Balance |
Tenders Received |
Turn Ins |
Actual Ending Balance (Entered by Cashier) |
Expected Ending Balance |
Over/Under Amount |
|
Cash |
$150.50 |
$5,000 |
$4,000 |
$1151 |
$1150.50 |
Over $0.50 |
|
Check |
- |
$1,000 |
$750 |
$249 |
$250 |
Under $1 |
In this example, you’d have to create two tenders for the company-use account:
· Tender type: Cash, Tender amount: +$0.50
· Tender type: Check, Tender amount: -$1.00
The sum of the tenders is -$0.50 and this is the amount that will be distributed to the company-use account’s obligation (debit over/under expense, credit cash).
You must reopen the tender control. Before you can add an over/under tender to a tender control, you must reopen the tender control (tenders may only be added to open tender controls).
Open Financial Query, Financial Transactions On A Payment to view the financial transactions on a payment.
Note. You can also open this page using the go to buttons that prefix the financial transaction summaries on Payment - Main.
Description of page
Payment Id is the system-assigned unique identifier of the payment.
Account ID is the payment's account.
The area beneath Account ID provides you with options that control which financial transactions appear in the grid. The following points describe the various options:
· Use the Obligation Filter to define the types of obligations whose financial transactions appear in the grid. The following options are available:
· All. Use this option if you do not wish to restrict financial transactions based on obligation attributes.
· Obligation ID. Use this option to restrict financial transactions to those of a specific obligation.
· Obligation Type. Use this option to restrict financial transactions to those whose obligations are linked to a given Division and Obligation Type.
· Use Match Event Status Filter to restrict the financial transactions based on the status of their match event. This filter only appears if the payment's account is an open-item taxpayer. The following options are available:
· All. This option shows all financial transactions.
· Balanced. This option shows all financial transactions whose match event is balanced.
· Disputed. This option shows all financial transactions whose match event is disputed.
· Unbalanced. This option shows all financial transactions whose match event is unbalanced.
· Unmatched. This option shows all financial transactions that are not linked to a match event.
Don’t forget to click the search button after changing the filters or after selecting a new Payment Id.
The grid that follows contains the financial transactions that match your search criteria. The following information is displayed:
· Match Event Status shows the status of the financial transaction's match event. This column only appears if the account is an open-item taxpayer.
· FT Type displays the type of financial transaction. Click on the hyperlink to transfer to Financial Transaction - Main. On this page, you can change certain aspects of the FT in question.
· Accounting Date is the date the system uses to determine the financial transaction's accounting period in your general ledger.
· Current Amount contains the financial transaction's effect on the obligation’s current balance.
· Payoff Amount contains the financial transaction's effect on the obligation’s payoff balance. The Payoff Amount will be dim if it equals the Current Amount.
· Show on Bill indicates if information about the financial transaction appears on the taxpayer’s bill.
· Obligation Information contains a summary of the respective obligation.
· Financial Transaction ID is the system-assigned unique identifier of the financial transaction.
At the bottom of the page is a summary of the financial transactions that match the search criteria.
The payment history page shows all payments that have been distributed to an account’s obligations. Open this page using Financial Query, Account Payment History.
Description of Page
One row is displayed for every payment that has been distributed to an account’s obligations. The payment date, amount, payment status and the tender source associated with the tender’s tender control are displayed for each payment.
Note. Tender Source typically contains the description of the cash drawer in which the payment was made or the remittance processor that processed the payment. Tender Source will be blank for automatic payments until they are interfaced to the financial institution. Refer to Downloading Automatic Payments for more information about interfacing automatic payments.
If you need to see more detailed information about the payment, click the Go To button to transfer to the payment event page.
This page allows you to look for payments and/or tenders using a combination of search criteria. Open this page using Financial Query, Payment / Tender Search.
Description of Page
The top half of the page is where you enter the criteria used to search for payments and tenders.
Multiple search criteria may be specified. You can search for payments and tenders using a combination of search criteria. For example, if you enter both a Payment Account name of Brandon and a Payment Amount between 150 and 170; only those payments for taxpayers named Brandon whose amount is between 150 and 170 will be displayed.
Warning! Try to be as specific as possible when entering search criteria. Why? Because entering open-ended search criteria may have a severe impact on response times. For example, if you know the payments you're looking for have a payment date sometime in January 2003 and the taxpayer's name is Brazil,John, then enter both of these criteria. If you also know the payment amount is between 150 and 170, enter these values too.
The following table describes each of the different search methods.
|
Search Method |
Description |
|
Search for |
Use this field to define if you're searching for Payments, Tenders or both Payments and Tenders. The value entered in this field controls which of the remaining search methods are enabled. |
|
Distribution Rule |
Use this field if you're searching for a tender or a payment and know the distribution rule and value used to created it. Note. This section appears only if you have configured your system to allow the payment event distribution rules method to be used. |
|
Payment Account |
Use this field if you're searching for a payment and know the account ID or the name of any person linked to the account whose debt is relieved by the payment. - If you know the payment's account ID, first choose Account in the adjacent dropdown and then and enter the account's ID. You must enter all of the account ID. - If you know the name of any person linked to the account, first choose Person Name in the adjacent dropdown and then enter the person's name. You can enter all or part of the person’s name (the more you enter, the faster the search will be). The name search is not case sensitive. A search method of Person Name defaults. If you leave the person name or ID blank, the system ignores this search method. These fields are protected if you've selected a Search for of Tender. |
|
Payment Amount |
Use this field if you're searching for a payment and know its amount. - If you know the exact amount, first choose Equal To in the adjacent dropdown and then enter the amount. - If you know the payment amount is between a given range of values, first choose Between and then enter the range of values. A search method of Between defaults. If you leave the amount(s) blank, the system ignores this search method. These fields are protected if you've selected a Search for of Tender. |
|
Payor Account |
Use this field if you're searching for a tender and know the account ID or the name of any person linked to the tendering account. - If you know the tender's account ID, first choose Account in the adjacent dropdown and then and enter the account's ID. You must enter all of the account ID. - If you know the name of any person linked to the tendering account, first choose Person Name in the adjacent dropdown and then enter the person's name. You can enter all or part of the person’s name (the more you enter, the faster the search will be). The name search is not case sensitive. A search method of Person Name defaults. If you leave the person name or ID blank, the system ignores this search method. These fields are protected if you've selected a Search for of Payment. |
|
Tender Amount |
Use this field if you're searching for a tender and know its amount. - If you know the exact amount, first choose Equal To in the adjacent dropdown and then enter the amount. - If you know the tender amount is between a given range of values, first choose Between and then enter the range of values. A search method of Between defaults. If you leave the amount(s) blank, the system ignores this search method. These fields are protected if you've selected a Search for of Payment. |
|
Tender Source |
If you're searching for a tender and you know the source of the tender (e.g., the lockbox, cashier, etc.), enter the tender source code. A search method of Equal To defaults. If you leave the tender source blank, the system ignores this search method. These fields are protected if you've selected a Search for of Payment. |
|
MICR ID |
Use this field if you're searching for a tender and know its MICR (magnetic ink character recognition) ID. - If you know the entire MICR ID, first choose Equal To in the adjacent dropdown and then and enter the entire MICR ID. - If you know the first X characters of the MICR ID, first choose Like in the adjacent dropdown and then and enter the entire MICR ID. A search method of Like defaults. If you leave the MICR ID blank, the system ignores this search method. These fields are protected if you've selected a Search for of Payment. |
|
Payment Date |
Use this field if you're searching for a tender or a payment and know its date. - If you know the exact date, first choose Equal To in the adjacent dropdown and then enter the date. - If you know the date is between a given range of values, first choose Between and then enter the date range. A search method of Between defaults. If you leave the date(s) blank, the system ignores this search method. |
The system shows the total number of payments / tenders that satisfy your search results immediately below the grid.
The first group of payments / tenders is displayed in the grid at the bottom of the page. Different columns appear in the grid depending on the value of Search for.
· If you use a Search for of Payment, only payment-oriented columns appear in the grid.
· If you use a Search for of Tender, only tender-oriented columns appear in the grid.
· If you use a Search for of Payment and Tender, both payment-oriented and tender-oriented columns appear in the grid.
Warning! If you use the Payment and Tender search method, and the resultant tenders / payments are linked to payment events that have multiple payments or tenders, multiple rows may be displayed for the payment event's tenders and payments. For example, if a tender with multiple payments is selected, a separate row will be displayed for every payment that matches your payment search criteria. If you don't specify any payment search criteria, a row will be displayed for every payment linked to the tender.
Payment Date This contains the date of the payment event associated with the payment / tender. This column appears regardless of the value of Search for.
Payment Account Info This contains a concatenation of important information about the account whose debt was relieved by the payment. This column does not appear if you use a Search for of Tender.
Payment Amount This contains the amount of the payment. This column does not appear if you use a Search for of Tender.
Payment Status This contains the status of the payment. Refer to Payment Lifecycle for more information. This column does not appear if you use a Search for of Tender.
Payment ID This contains the unique identifier of the payment. This column does not appear if you use a Search for of Tender.
Payor Account Info This contains a concatenation of important information about the account who tendered the payment. This column does not appear if you use a Search for of Payment.
Tender Amount This contains the amount of the tender. This column does not appear if you use a Search for of Payment.
Tender Control ID This contains the related tender control. This column does not appear if you use a Search for of Payment.
MICR ID This contains the MICR (magnetic ink character recognition) ID of the tender. This column does not appear if you use a Search for of Payment.
Tender Status This contains the status of the tender. Refer to Tender Lifecycle for more information. This column does not appear if you use a Search for of Payment.
Pay Tender ID This contains the unique identifier of the tender. This column does not appear if you use a Search for of Payment.
Pay Event ID This contains the unique identifier of the payment event.
Unbalanced payment events cause a record to be written to the payment event exception table with a message indicating the nature of the error.
To view the messages associated with the exception records, schedule the TD-UNBAL background process. This process generates a To Do entry for every record in the payment event exception table.
Refer to Unbalanced Payment Events for instructions describing how to correct an unbalanced payment event.
When the system is unable to distribute a payment, a record to be written to the payment exception table with a message indicating the nature of the error.
To view the messages associated with the exception records, schedule the TD-PYERR background process. This process generates a To Do entry for every record in the payment exception table.
After correcting the cause of the error, drill into the Payment and attempt to redistribute it.
Deposit controls exist to give you administrative control over your cash drawers (and all other tender sources) and the subsequent deposit of funds at banks.
Refer to Tender Management and Workstation Cashieringfor background information.
The system creates most deposit controls behind-the-scenes. Most deposit controls are created by the system when it processes tenders from your remittance processor and lock boxes. You should only have to access the deposit control pages if you record payments in cash drawers. For information about how the system creates deposit controls, refer to Managing Payments Interfaced From External Sources. Also note that the automatic payment activation process also creates tender and deposit controls. Refer to Activating Automatic Payments for more information.
Contents
The Lifecycle Of A Deposit Control
Deposit Control - Tender Control
Deposit Control - Tender Deposit
The Lifecycle Of A Deposit Control
The following diagram shows the possible lifecycle of a deposit control.

Open A deposit control is initially created in the Open state. While in this state, you may add new deposits to it, change the deposit amount on its deposits, and transfer tender controls into and out of it.
Balancing In Progress You change a deposit control’s status to Balancing In Progress when you’re ready to balance its contents. While in this state, you can change the deposit amount on its deposits and transfer tender controls out of it. If you need to add new deposits to it or transfer tender controls into it you must return it to the Open state.
Balanced You change a deposit control’s status to Balanced when the sum of its tender controls is consistent with the total of its deposits. While in this state, you cannot modify its deposits or its tender controls. If you need to make modifications, you must return it to the Open or Balancing In Progress state.
Background processes and state transition. When payments are interfaced from external sources, the system automatically creates a deposit control and links a tender control to it. When all payments have been successfully loaded, the system changes the state of the respective deposit control to Balanced.
Deposit Control - Main
The Main page contains core deposit control information. Open this page using Financial, Deposit Control and then navigate to the Main tab.
Description of Page
Deposit Control contains a concatenation of the deposit control’s creation date, tender source type, and status.
Deposit Control ID is the system-assigned, unique identifier of the deposit control.
User is the person who created the deposit control.
Create Date/Time is the date and time the deposit control was created.
Tender Source Type is the type of tender control that has been linked to the deposit control. Valid values are: Ad hoc, Auto Pay, Online Cashiering and Lockbox. The system uses this information to prevent tender controls from different sources from being included under the same deposit control. In other words, you can’t mix automatic payment, cashiering and lockbox tenders under the same deposit control.
Currency Code is the currency in which the deposit control’s tenders are denominated.
Default note. The currency code defaults from the installation record.
The summary information that follows contains a summary of the starting balance and the tenders that are linked to the tender control.
· Starting Balance is the sum of the starting balances from all tender controls linked to the deposit control.
· Total Tenders Amount is the sum of tenders from all tender controls linked to the deposit control.
· Total Tender Controls is the number and amount of tender controls linked to the deposit control.
· Total Tender Deposits is the number and amount of tender deposits linked to the deposit control.
· Expected Ending Balance is the Total Tender Control minus Total Tender Deposits.
· Ending Balance is the actual amount of money in the tender control. This amount must equal the Expected Ending Balance before the tender control can be marked as Balanced.
· Outstanding Over/Under is Ending Balance minus Expected Ending Balance.
Deposit Control Status shows the status of the deposit control. Valid values are Open, Balanced, and Balancing In Progress.
For more information, refer to The Lifecycle Of A Deposit Control.
The Balanced User ID and Balanced Date/Time are populated when the status is changed to Balanced.
Use Comments to describing anything unusual about the deposit control.
Deposit Control - Tender Control
The Tender Control page contains a row for every tender control linked to the deposit control. Open this page using Financial, Deposit Control, Tender Control.
Description of Page
Deposit Control contains a concatenation of the deposit control’s creation date, tender source type, and status.
Deposit Control ID is the system-assigned, unique identifier of the deposit control.
The grid that follows contains a row for every tender control linked to the deposit control. No information about the tender controls may be modified on this page. To view or modify tender control information, click the Go To button.
Deposit Control - Tender Deposit
The Tender Deposit tab page contains a row for every tender deposit linked to the deposit control. Open this page using Financial, Deposit Control and navigate to the Tender Deposit tab.
Description of Page
Deposit Control contains a concatenation of the deposit control’s creation date, tender source type, and status.
Deposit Control ID is the system-assigned, unique identifier of the deposit control.
The Tender Deposit scroll that follows contains one row for every financial institution into which the tenders will be deposited. To insert a new row, click the + button and fill in the following fields:
· Tender Deposit ID is maintained by the system. When a deposit is being created, there is no ID number displayed. Once a deposit is entered and saved, the system generates an ID and displays it here.
· Deposit Amount contains the amount to be deposited at the bank. Currency Code is the currency in which the deposit is denominated.
· Reference ID contains the ID of the deposit (if any).
· Use Bank Code and Bank Account to define where the tenders will be deposited.
Deposit Control - Turn Ins
The Turn Ins page contains a row for every turn-in event linked to the deposit control. Open this page using Financial, Deposit Control and navigate to the Turn Ins tab.
Refer to Turn Insfor background information.
Description of Page
Deposit Control contains a concatenation of the deposit control’s creation date, tender source type, and status.
Deposit Control ID is the system-assigned, unique identifier of the deposit control.
The turn-ins grid contains one row for every turn-in event associated with the deposit control. A turn-in event is created when moneys originally deposited in respect of a tender control are turned in to the tender control’s deposit control. Turn-in events are created and maintained on the Tender Control – Turn Ins page. Refer to Turn Ins for background information. The following information is displayed in the grid:
· Turn In Status defines if it is a new turn in Awaiting approval or has been Approved by the operator who is responsible for the Deposit Control. Once the turn-in is Approved, this field becomes display-only.
· Tender Type is the type of tender that has been turned in. This is a display-only field.
· Turn In Amount is the amount of the Tender Type that has been turned in. This is a display-only field.
· Receipt Number is the ID of the receipt given to the person who turn-in the funds. This is a display-only field.
· Create Date/Time contains when the turn-in event was created. This is a display-only field.
Tender controls exist to give you administrative control over your cash drawers (and all other tender sources).
Refer to Managing Your Cash Drawers for more information.
The system creates most tender controls behind-the-scenes. Most tender controls are created by the system when it processes tenders from the remittance processors and lock boxes. You should only have to access the tender control pages if you record payments in cash drawers. For information about how the system creates tender controls, refer to Managing Payments Interfaced From External Sources. Also note that the automatic payment activation process also creates tender and deposit controls. Refer to Activating Automatic Payments for more information.
Contents
The Lifecycle Of A Tender Control
Tender Control - Characteristics
The Lifecycle Of A Tender Control
The following diagram shows the possible lifecycle of a tender control.
Open A tender control is initially created in the Open state. While in this state, you may add new tenders to it, change the tender amount on its tenders, and transfer tenders into and out of it.
Balancing In Progress You change a tender control’s status to Balancing In Progress when you’re ready to balance its contents. While in this state, you can change the tender amount on its tenders and transfer tenders out of it. If you need to add new tenders to it or transfer tenders into it, you must return it to the Open state.
Balanced You change a tender control’s status to Balanced when the sum of its tenders is consistent with the ending balance in the drawer. While in this state, you cannot modify it or its tenders. If you need to make modifications, you must return it to the Open or Balancing In Progress state.
If the tender control is part of a Balanced deposit control, you may not change its status.
Background processes and state transition. When payments are interfaced from external sources, the system automatically creates a tender control and links tenders to it (one for each payment interfaced). When all payments have been successfully loaded, the system changes the state of the respective tender control to Balanced.
Tender Control - Main
The Main page contains core tender control information. This page is used to balance the tender control.
Open this page using Financial, Tender Control.
Searching For Tender Controls. When you use the Creation Date to search for tender controls, the system returns tender controls that are created on or before the date you specify. If the number of records returned exceeds the search limit (i.e. 300 records), only the records that do not exceed search limit are displayed. Therefore, you may need to specify an earlier creation date to find the record you are looking for. If you do not specify a creation date and search based on other criteria, the system uses the most recent date.
Refer to Managing Your Cash Drawers, Turn Ins and Balancing By Tender Type for more information.
Description of Page
Tender Control contains a concatenation of the tender control’s creation date, tender source, and status.
Tender Control ID is the system-assigned, unique identifier of the tender control.
Tender Source is the source of the tenders (e.g., cash drawer 22, lockbox 1 at Bank of America).
Deposit Control ID is the system-assigned, unique identifier of the deposit control that the tender control is part of. The deposit control’s Currency Code is displayed below.
For more information about deposit controls and tender controls, refer to Managing Your Cash Drawers.
Turn on All Users if any user may insert tenders into this tender control. Turn this switch off and specify the appropriate User ID if only a single user may insert tenders into this tender control.
Create Date/Time is the date and time the tender control was created.
The Starting Balance of the tender control is defaulted from the tender source. This may be overridden while the Tender Control Status is Open or Balancing in Progress.
The Tender Control Status shows the status of the tender control. The Balanced User ID and Balanced Date/Time are populated when the status is changed to Balanced.
For more information, refer to The Lifecycle Of A Tender Control.
The Balance button is enabled when the Tender Control Status is Balancing in Progress. When this button is clicked, the system checks the following:
· All Turn-Ins have been Approved.
· The sum of all Ending Balances equals the sum of all Expected Ending Balances.
If the above conditions are true, the status of the tender control is changed to Balanced and all modifiable fields become protected.
The tenders grid contains a summary of the tenders linked to the tender control. One row is displayed for each tender type. Each row contains the number of tenders of this type and their total amount. In order to Balance the tender control, you must enter an appropriate Ending Balance for each Tender Type. Refer to Balancing By Tender Type for more information. The following information appears in the grid:
· Tender Type represents the type of tender (e.g., cash, credit card). This is a display-only field.
· Number of Tenders contains the total number of tenders of this type in the tender control. This is a display-only field and is calculated by the system by accumulating the tenders linked to the tender control.
· Tender Total Amount contains the total amount of tenders of this type in the tender control. This is a display-only field and is calculated by the system by accumulating the tenders linked to the tender control. Navigate to the Tenders page to see the individual tenders.
· Turn In Amount contains the total amount of turn-ins of this type. This is a display-only field and is calculated by the system by accumulating the turn-ins linked to the tender control. Navigate to the Turn Ins pages to see the individual turn ins.
· Starting Balance contains the starting balance of this type of turn in. This field is only populated on the row defined as the Starting Balance tender type on the Installation Record. This is a display-only field and is equal to the tender control’s Starting Balance.
· Expected Ending Bal is the Starting Balance plus Tender Total Amount minus Turn In Amount for this type of tender.
· Ending Bal is the actual amount of money of this tender type. The cashier must enter this field in order to balance the tender control. This field is protected unless the Status of the tender control is Balancing In Progress. This amount must equal the Expected Ending Balance before the tender control can be marked as Balanced. Refer to How To Get An Unbalanced Tender Control In Balance (Fixing Over/Under) for more information.
· Outstanding Over/Under is the difference between Expected Ending Bal and Ending Bal. This is a display-only field.
The summary information beneath the tender type grid contains a summary of the tenders that are linked to the tender control.
· Total Tender Amount is the total amount of all tenders linked to the tender control.
· Ending Balance is the actual amount of money in the tender control (as defined in the above grid).
· Expected Ending Balance is the expected amount of money in the tender control (as defined in the above grid).
· Outstanding Over/Under is Ending Balance minus Expected Ending Balance. If this amount is zero, the field is not displayed.
If the tender controls were created for a background process, such as the automatic payment extract, the following information is displayed:
· Batch Code is the batch code for which the tender control was created. This field only appears if it contains a value.
· Batch Number is the batch number for which the tender control was created. This field only appears if it contains a value.
Use Comments to describe anything unusual about the tender control (e.g., to explain why a large over/under amount was created).
Tender Control - Tenders
The Tenders page contains a row for every tender linked to the tender control. Open this page using Financial, Tender Control, Tenders.
Description of Page
Tender Control contains a concatenation of the tender control’s creation date, tender source, and status.
Tender Control ID is the system-assigned, unique identifier of the tender control.
This grid at the top of the page contains a row for every tender linked to the tender control. When first displayed, the grid is ordered by the Create Date/Time column. No information about the tenders may be modified. To view or modify tender information, click the Go To button.
The grid at the bottom of the page contains a summary by tender type of all tenders linked to the tender control.
Tender Control - Turn Ins
Every time you turn in funds to the deposit control that is associated with your tender control, you create a turn-in event using this page. Open this page using Financial, Tender Control and navigate to the Turn Ins tab.
Refer to Managing Your Cash Drawers and Turn Ins for more information.
Description of Page
Tender Control contains a concatenation of the tender control’s creation date, tender source, and status.
Tender Control ID is the system-assigned, unique identifier of the tender control.
The turn-ins grid contains one row for every turn-in event associated with the tender control. A turn-in event is created when moneys are physically transferred to the deposit control associated with the tender control. Turn-in events are approved on the Deposit Control – Turn Ins page. The following information is displayed in the grid:
· Turn In Status defines if the turn-in is Awaiting approval or has been Approved by the operator who is responsible for the Deposit Control. When a turn-in is first created, its status is Awaiting approval and the following fields should be defined. Once the turn-in is Approved by the user responsible for the deposit control associated with the tender control, all of the following fields become display-only and the turn-in event cannot be deleted.
· Tender Type is the type of tender that has been turned in. This field may only be modified when the Turn In Status is Awaiting approval.
· Turn In Amount is the amount of the Tender Type that has been turned in. This field may only be modified when the Turn In Status is Awaiting approval.
· Receipt Number is the ID of the receipt given to the person who turn-in the funds. This field may only be modified when the Turn In Status is Awaiting approval.
· Create Date/Time contains when the turn-in event was created. This is a display-only field.
Tender Control - Exceptions
This page contains an entry for every exception (i.e., error) associated with the tender control’s payments and payment events. Open this page using Financial, Tender Control and navigate to the Exceptions tab.
Refer to Exceptions for more information.
Description of Page
This page contains an entry for every exception (i.e., error) associated with the tender control’s payments and payment events.
Tender Control - Characteristics
To update tender control characteristics, open Financial, Tender Control and navigate to the Characteristics tab.
Note: If your tender control is balanced, you cannot update tender control characteristics.
Description of Page
The Characteristics collection contains information that describes miscellaneous information about the tender control. The following fields display:
Characteristic Type Indicate the type of characteristic.
Sequence Controls the order in which characteristics of the same type are displayed.
Characteristic Value Indicate the value of the characteristic.
Most payments are NOT added by an operator using the Payment Event page. Rather, they are interfaced from an external source (e.g., a lock box or a remittance processor).
The base-package provides two interfaces to upload payments, each based on a different method of creating payment events.
Refer to Distributing A Payment Event for more information about how payment event distribution is handled in the system.
The topics in this section describe how these payment interfaces work.
Contents
Interfacing Payments Using Distribution Rules
Interfacing Payments
The topics in this section describe how the payment interface using the system default method of creating payment events works.
Contents
Populating The Payment Upload Staging Records
PYUP-PRG - Purge Payment Upload Objects
Maintaining Deposit Control Staging
Populating The Payment Upload Staging Records
The following diagram illustrates the processes involved in the uploading of payment into the system.
The topics in this section describe each background process referenced above.
Contents
Process X - Populate Payment Upload Staging
Process PUPL - Upload Payments
Process X - Populate Payment Upload Staging
Process X refers to the mechanism used by your organization to populate the various staging tables (shown in the orange section of the following ERD).
The topics in this section describe each of these tables.
Contents
You must create a deposit control staging record for each batch of payments to be uploaded into the system. The name of this table is CI_DEP_CTL_ST. The following table describes each column on this table.
|
Column Name |
Length |
Req’d |
Data Type |
Comments |
|
EXT_SOURCE_ID |
30 |
Y |
A/N |
This must correspond with an external source ID on one of the defined tender sources. Refer to Setting Up Tender Sources for more information. |
|
EXT_TRANSMIT_ID |
30 |
Y |
A/N |
This is the unique identifier of the transmission from the external source. This must be a unique value for each transmission from the source. |
|
DEP_CTL_STG_ST_FLG |
2 |
Y |
A/N |
This must be set to 20 (20 is the lookup value that corresponds with the Pending state) |
|
DEP_CTL_ID |
10 |
N |
N |
Leave this column blank. It will be assigned by the system when it creates a deposit control record. |
|
TRANSMIT_DTTM |
15 |
Y |
DateTime |
Date and time that the file was transmitted. |
|
CURRENCY_CD |
3 |
Y |
A/N |
This must be a valid currency code (this would be USD for United States dollars). |
|
TOT_TNDR_CTL_AMT |
13.2 |
Y |
N |
This column must equal the sum of the payment amounts on the tender control staging records associated with this deposit control staging. |
|
TOT_TNDR_CTL_CNT |
10 |
Y |
N |
This column must equal the number of tender control staging records associated with this deposit control staging. |
|
LAST_UPDATE_INST |
10 |
N |
N |
This field is populated during the upload. It is the process scheduler instance ID of the process performing the upload. |
You must create one or more Tender Control Staging for this deposit control staging record.
You must create at least one tender control staging record for each batch of payments to be uploaded into the system. The name of this table is CI_TNDR_CTL_ST. The following table describes each column on this table.
|
Column Name |
Length |
Req’d |
Data Type |
Comments |
|
EXT_SOURCE_ID |
30 |
Y |
A/N |
This must correspond with the external source ID on the parent deposit control staging record. |
|
EXT_TRANSMIT_ID |
30 |
Y |
A/N |
This must correspond with the external transmission ID on the parent deposit control staging record. |
|
EXT_BATCH_ID |
30 |
Y |
A/N |
This is the unique identifier of the batch of payments in respect of the external transmission ID. |
|
TNDR_CTL_STG_ST_FLG |
2 |
Y |
A/N |
This must be set to 20 (20 is the translate value that corresponds with the Pending state) |
|
TNDR_CTL_ID |
10 |
N |
N |
Leave this column blank. It will be assigned by the system when it creates a tender control record. |
|
TOT_TNDR_AMT |
13.2 |
Y |
N |
This column must equal the sum of the payment amounts on the payment tender staging records associated with this tender control staging. |
|
TOT_TNDR_CNT |
10 |
Y |
N |
This column must equal the number of payment tender staging records associated with this tender control staging. |
You must create one or more Payment Tender Staging records for this tender control staging record.
You must create at least one payment tender staging record for each payment associated with the tender control staging record. The name of this table is CI_PAY_TNDR_ST. The following table describes each column on this table.
|
Column Name |
Length |
Req’d |
Data Type |
Comments |
|
EXT_SOURCE_ID |
30 |
Y |
A/N |
This must correspond with the external source ID on the parent deposit control staging record. |
|
EXT_TRANSMIT_ID |
30 |
Y |
A/N |
This must correspond with the external transmission ID on the parent tender control staging record. |
|
EXT_BATCH_ID |
30 |
Y |
A/N |
This must correspond with the external batch ID on the parent tender control staging record. |
|
EXT_REFERENCE_ID |
30 |
Y |
A/N |
This is the unique identifier of the payment in respect of the external batch ID. |
|
PAY_TND_STG_ST_FLG |
2 |
Y |
A/N |
This must be set to 10 (10 is the translate value that corresponds with the Pending state) |
|
PAY_TENDER_ID |
12 |
N |
N |
Leave this column blank. It will be assigned by the system when it creates a tender record. |
|
TENDER_AMT |
13.2 |
Y |
N |
The amount tendered (i.e., the payment amount). |
|
ACCOUNTING_DT |
10 |
Y |
Date |
This is the date that should be used for accounting purposes. This should correspond with an open accounting period. |
|
TENDER_TYPE_CD |
4 |
Y |
A/N |
This must correspond with the prime key of one of your tender types. Refer to Setting Up Tender Types for more information. |
|
CUST_ID |
15 |
Y |
A/N |
This is the account ID or old account number of the taxpayer tendering the payment. If the system cannot find an account ID or old account number that matches this value, the account ID of the tender source’s suspense obligation will be used on the corresponding tender and payment. |
|
MICR_ID |
30 |
N |
A/N |
This is the MICR ID associated with the payment. |
|
NAME1 |
40 |
N |
A/N |
This is the taxpayer name on the payment. |
|
CHECK_NBR |
10 |
N |
A/N |
This is the check number on the payment. |
You need only populate rows on this table if any of the following conditions apply:
· If you need to distribute a payment tender to an account other than that defined with the CUST_ID on the payment tender staging record, you must create a payment staging record. You may distribute a tender to multiple accounts by creating multiple payment staging records. Note, if you want to distribute the payment tender to the same account, you do NOT need a payment staging record.
· If you want to restrict a payment to a specific obligation, you must insert a row on this table to indicate the specific the obligation in question. You do this by populating MATCH_TYPE_CD with a value that indicates that you are paying for a specific obligation and MATCH_VALUE with the unique ID of the obligation.
· If you practice open-item accounting, you must insert a row on this table for each to indicate the open-item to which the payment should be matched. Note, because open-item taxpayer typically match payments to bills, you would populate MATCH_TYPE_CD with a value to indicate that you are matching by bill ID and MATCH_VALUE with the unique ID of the bill.
The name of this table is CI_PAY_ST. The following table describes each column on this table.
|
Column Name |
Length |
Req’d |
Data Type |
Comments |
|
EXT_SOURCE_ID |
30 |
Y |
A/N |
This must correspond with the external source ID on the parent payment tender staging record. |
|
EXT_TRANSMIT_ID |
30 |
Y |
A/N |
This must correspond with the external transmission ID on the parent payment tender staging record. |
|
EXT_BATCH_ID |
30 |
Y |
A/N |
This must correspond with the external batch ID on the parent payment tender staging record. |
|
EXT_REFERENCE_ID |
30 |
Y |
A/N |
This must correspond with the external reference ID on the parent payment tender staging record. |
|
CUST_ID |
15 |
Y |
A/N |
This is the account ID or old account number of the taxpayer to which the payment should be distributed. If the system cannot find an account ID or old account number that matches this value, the account ID of the payor is used on the corresponding payment. If the payor’s account ID is invalid, the tender source’s suspense obligation is used. |
|
PAY_AMT |
13.2 |
Y |
N |
The amount tendered (i.e., the payment amount). |
|
MATCH_TYPE_CD |
8 |
N |
A/N |
See the description of the MATCH_VALUE field below. Refer to Payments And Match Events for more information about the significance of this field. |
|
MATCH_VALUE |
30 |
N |
A/N |
MATCH_VALUE and MATCH_TYPE_CD are used in conjunction to indicate that the distribution of the payment should be restricted in some way (i.e., the standard payment distribution algorithm should not be used). MATCH_TYPE_CD indicates how the payment should be distributed (e.g., only distribute to a specific obligation), MATCH_VALUE contains the ID of the restriction (e.g., the obligation ID). If MATCH_TYPE_CD is specified, it must reference a valid Match Type. |
Process PUPL - Upload Payments
The batch process identified by the batch process ID PUPL refers to the background process that loads the contents of the various payment staging records into the various payment event tables. The tables that are populated by this process are shown in the left orange section of the following ERD (the right orange section are the staging tables populated by the process described above)
The topics in this section describe how these tables are populated.
Contents
Phase 1 - Create Deposit Control
Phase 2 - Create Tender Control
Phase 3 - Create Payment Events, Tenders, Payments and Payment Segments
Phase 1 - Create Deposit Control
The following points describe, at a high level, the first phase of the payment upload process:
· PUPL checks that the record counts and money totals of tender control stagings add up to the expected amount on deposit control staging. If not,
· PUPL sets the status of the deposit control staging to be Error. None of the tender controls within the deposit control will be processed until everything adds up. You can fix these on the Deposit Control Staging page.
· When PUPL runs next, it will recheck the totals on deposit control stagings that are in Error or Pending
· If the record and dollar amounts are clean,
· PUPL creates the corresponding deposit control
· PUPL sets the status of the deposit control staging to be In Progress
Phase 2 - Create Tender Control
The following points describe, at a high level, the second phase of the payment upload process:
· PUPL checks that record counts and money totals of payment tender staging(s) adds up to expected amount on tender control staging. If not,
· PUPL sets the status of the tender control staging to be Error. None of the tender controls within the deposit control will be processed until everything adds up for ALL tender controls. You can fix these on the Tender Control Staging page.
Note that the Deposit Control Staging record is not updated – its status is unchanged. Neither is the Pay Tender Staging record updated – its status also remains unchanged. Only the Tender Control Staging record is updated to be in Error.
· When PUPL runs next, it will recheck the totals of tender control stagings that are in Error or Pending.
· If the record and dollar amounts are clean,
· PUPL creates the corresponding tender control.
· PUPL sets the status of the tender control staging to be In Progress.
Phase 3 - Create Payment Events, Tenders, Payments and Payment Segments
At this point, all deposit control stagings and tender control stagings are in the state of In Progress. Next, PUPL starts the upload of payment tender staging and payment advice staging. The following points describe, at a high level, this phase of the payment upload process:
· If the payment tender staging record has a future accounting date, the processing for the record is skipped. This prevents uploaded payments from being created and subsequently frozen until their accounting date is reached. (Some external sources may provide advance notification of payments to be made in the future.) A skipped staging record remains in the Pending state until its accounting date is reached.
· PUPL checks money totals of payment advices (if any) adds up to expected amount on payment tender staging.
· If not, PUPL sets the payment tender staging’s status to Error.
· Any errors are written to the Payment Upload Exception table. You can fix these errors on the Payment Upload Staging page and change the record’s status back to Pending.
· When PUPL runs next, it will recheck the totals of the payment tender staging
· If payment tender staging record is clean:
· PUPL creates a corresponding payment event, tender, and payment.
· If the account on payment tender staging is wrong, the account on the corresponding tender will be the tender source’s suspense obligation’s account. Refer to Setting Up Tender Sources for more information. Refer to How To Transfer A Payment From One Account To Another for how to transfer to payment to the correct account.
· If the account on payment advice is wrong, the account on the corresponding payment will be the account on the payment tender.
· PUPL distributes the payment(s) amongst the account’s obligations, and payment segments are created. Note, the payment could be in error if there are no obligation’s for the account (as well as other reasons). Payments in error are written to the Payment Exceptions table.
· PUPL changes the payment tender staging’s status to Complete.
· If all payment tender stagings are Complete:
· PUPL changes the tender control staging’s status to Complete.
· PUPL changes the deposit control staging’s status to Complete.
· If there are payment tender staging that are not Complete
· The status of the tender control staging will still be In progress.
· The status of the deposit control staging will still be In progress.
· PUPL will attempt to upload the offending payment tender staging records when it next runs.
PYUP-PRG - Purge Payment Upload Objects
Completed payment upload staging objects should be periodically purged from the system by executing the PYUP-PRG background process. This background process allows you to purge all Completed payment upload staging objects older than a given number of days.
We want to stress that there is no system constraint as to the number of Completed payment upload objects that may exist. You can retain these objects for as long as you desire. However we recommend that you periodically purge Completed payment upload objects as they exist only to satisfy auditing and reporting needs.
Maintaining Deposit Control Staging
The Deposit Control Staging page has three purposes:
· You can view historical deposit and tender control staging records associated with uploaded payments.
· You can correct deposit and tender control records that are in error.
· You can add deposit and tender control records to be uploaded by the payment upload background process.
The topics in this section describe this page.
Contents
Deposit Control Staging - Main
Deposit Control Staging - Tender Control Staging
Deposit Control Staging - Main
This page shows the details of a deposit control staging record.
Refer to Populating The Payment Upload Staging Records for more information about this record.
Open this page using Financial, Deposit Control Staging.
Description of Page
External Source ID corresponds with an external source ID on one of the your tender sources. This should be the unique ID of the source of the interfaced payments. Refer to Setting Up Tender Sources for more information.
External Transmit ID is the unique identifier of the transmission of payments from the external source. This must be a unique value for each transmission from the source.
Status shows the state of the deposit control staging records. Potential values are: Incomplete, Pending, In Progress, Partial Load, Complete, Error.
Deposit Control ID is the system-assigned, unique identifier of the related deposit control. This value is populated after the system creates a deposit control for the upload staging record.
Transmission Date/Time are when the information was interfaced into the system.
Total Tender Controls must equal the number of tender control staging records associated with this deposit control staging.
Total Tender Control Amount must equal the sum of the payment amounts on the tender control staging records associated with this deposit control staging. The Currency Code related to the amount is adjacent.
Deposit Control Staging - Tender Control Staging
This page shows the details of a tender control staging record.
Refer to Populating The Payment Upload Staging Records for more information about this record.
Open this page using Financial, Deposit Control Staging, Tender Control Staging.
Description of Page
External Source ID is the external source ID on the parent deposit control staging record.
External Transmit ID is the external transmission ID on the parent deposit control staging record.
The grid that follows contains a row for every tender control staging record linked to the deposit control staging record. The following information is displayed.
External Batch ID This is the unique identifier of the batch of payments in respect of the external transmission ID.
Status This is the state of the tender control staging records. Potential values are: Pending, In Progress, Complete, Error.
Tender Control ID This is the system-assigned, unique identifier of the related tender control. This value is populated after the system creates a tender control for the upload staging record.
Total Tenders Amount This is the sum of the payment amounts on the payment staging records associated with this tender control staging.
Total Number Of Tenders This is the number payment tender staging records associated with this tender control staging.
Payment Upload Staging
The Payment Upload Staging page has three purposes:
· You can view historical payment tender and payment advice staging records associated with uploaded payments.
· You can correct payment tender records that are in error.
· You can add new payment tender and payment advice staging records to be uploaded by the payment upload process.
The topics in this section describe this page.
Contents
Payment Upload Staging - Tender Detail
Payment Upload Staging - Payment Advice
Payment Upload Staging - Tender Detail
This page shows the details of a payment tender staging record.
Refer to Populating The Payment Upload Staging Records for more information about this record.
Open this page using Financial, Payment Upload Staging, Tender Detail.
Description of Page
External Source ID this is the external source ID on the parent tender control staging record.
External Transmission ID is the external transmission ID on the parent tender control staging record.
External Batch ID is the external batch ID on the parent tender control staging record.
Ext. Reference ID is the external source’s unique identifier of the payment tender.
Customer ID is the account ID or old account number of the taxpayer tendering the payment. If the system cannot find an account ID or old account number that matches this value, the account ID of the tender source’s suspense obligation will be used on the corresponding tender and payment.
The Tender Amount is the amount tendered (i.e., the payment amount).
Tender Type defines the type of tender. Refer to Setting Up Tender Types for more information.
MICR ID is the MICR ID associated with the tender.
Check Number is the check number on the payment.
Name is the taxpayer’s name (as it appeared on the uploaded tender).
Accounting Date is the date that should be used for accounting purposes.
Pay Tender Staging Status shows the state of the tender control staging records. Potential values are: Pending, Complete, Error.
Payment Event ID is the system-assigned, unique identifier of the related payment event. This value is populated after the system creates a payment event for the upload staging record.
Payment Upload Staging - Payment Advice
If a tender was distributed to taxpayers other than that defined on the Tender Detail page, the taxpayers that the tender was distributed to are defined on this page. This page will not contain information if the tender is distributed to the tender detail’s taxpayer.
Refer to Populating The Payment Upload Staging Records for more information about this record.
Open this page using Financial, Payment Upload Staging, Payment Advice.
Description of Page
External Source ID this is the external source ID on the parent tender control staging record.
External Transmission ID is the external transmission ID on the parent tender control staging record.
External Batch ID is the external batch ID on the parent tender control staging record.
External Reference ID is the external reference ID of the payment tender.
The grid that follows is only populated if the tender is distributed to taxpayer(s) other than the tendering taxpayer. The following information is displayed.
Customer ID This is the account ID or the old account number of the taxpayer to which the payment should be distributed.
Customer Info If the Customer ID is an account ID that exists in the system, the name of the primary person and the account type of the account are displayed here.
Payment Amount This is the amount of the tender to be distributed to the taxpayer.
Match Type and Match Value These fields are only used if the distribution of the payment should be restricted in some way (i.e., the standard payment distribution algorithm should not be used). Match Type indicates how the payment should be distributed (e.g., only distribute to a specific obligation), Match Value indicates the ID of the restriction (e.g., the obligation ID). Valid values of Match Type are obligation.
Payment Upload Exception
If errors are detected during the payment upload process, a record is written to the payment upload exception table with a message indicating the nature of the severe error.
To view the messages associated with the exception records, schedule the TD-PYUPL background process. This process generates a To Do entry for every record in the payment upload exception table.
You can fix this error using the Payment Upload Staging page and change the status of the record from Error to Pending. When the payment upload process next runs, it attempts to upload this record again.
Interfacing Payments Using Distribution Rules
The topics in this section describe how the payment interface using distribution rules works.
Contents
Populating The Payment Event Upload Staging Records
Populating The Payment Event Upload Staging Records
The following diagram illustrates the processes involved in the uploading of payment event distribution details into the system.
The topics in this section describe each background process referenced above.
Contents
Process X - Populate Payment Event Upload Staging
Data Setup Examples of Payment Distribution Details
The Lifecycle of a Payment Event Upload Staging Record
ToDo Entries Instead of Exception Records
Process C1-PEPL1 - Upload Payments (Step 1)
Process C1-PEPL2 - Upload Payments (Step 2)
Process C1-PEPL3 - Upload Payments (Step 3)
Process X - Populate Payment Event Upload Staging
Process X refers to the mechanism used by your organization to populate the payment event upload staging table.
Payment Event Upload Staging Table
You must create a payment event upload staging record for each payment distribution detail to be uploaded into the system. The name of this table is CI_PEVT_DTL_ST. The following table describes each column on this table.
|
Column Name |
Length |
Req’d |
Data Type |
Comments |
|
EXT_SOURCE_ID |
30 |
Y |
A/N |
This must correspond with an external source ID on one of the defined tender sources. Refer to Setting Up Tender Sources for more information. |
|
EXT_TRANSMIT_ID |
30 |
Y |
A/N |
This is the unique identifier of the transmission from the external source. This must be a unique value for each transmission from the source. |
|
PEVT_DTL_SEQ |
12 |
Y |
N |
Unique identifier of the detail record within the transmission. The C1-PEPL1 process uses this field to organize the parallel threads. |
|
PEVT_STG_ST_FLG |
4 |
Y |
A/N |
This must be set to 10 (10 is the lookup value that corresponds with the Incomplete state) |
|
DST_RULE_CD |
12 |
Y |
A/N |
This must be a valid distribution rule. The distribution rule contains the set of algorithms designed to process the staging detail. |
|
DST_RULE_VALUE |
254 |
Y |
A/N |
This must be a valid value for the characteristic type defined on the distribution rule. |
|
CURRENCY_CD |
3 |
Y |
A/N |
This must be a valid currency code (this would be USD for United States dollars). |
|
TENDER_AMT |
13.2 |
Y |
N |
The amount tendered (i.e., the payment amount). |
|
ACCOUNTING_DT |
10 |
Y |
Date |
This is the payment date that should be used for accounting purposes. This should correspond with an open accounting period. |
|
TENDER_TYPE_CD |
4 |
Y |
A/N |
This must be a valid tender type. Refer to Setting Up Tender Types for more information. |
|
CHECK_NBR |
10 |
N |
A/N |
This is the check number on the payment. |
|
MICR_ID |
30 |
N |
A/N |
This is the MICR ID associated with the payment tender. |
|
CUST_ID |
15 |
N |
A/N |
This field may be used to record taxpayer information. |
|
NAME1 |
30 |
N |
A/N |
This field may be used to capture additional payment tender information. |
|
EXT_REFERENCE_ID |
30 |
N |
A/N |
This field may be used to capture external information associated with the payment tender. |
|
MATCH_TYPE_CD |
8 |
N |
A/N |
See the description of the MATCH_VALUE field below. Refer to Payments And Match Events for more information about the significance of this field. |
|
MATCH_VALUE |
30 |
N |
A/N |
MATCH_VALUE and MATCH_TYPE_CD are used in conjunction to indicate that the distribution of the payment should be restricted in some way (i.e., the standard payment distribution algorithm should not be used). MATCH_TYPE_CD indicates how the payment should be distributed (e.g., only distribute to a specific obligation), MATCH_VALUE contains the ID of the restriction (e.g., the obligation ID). If MATCH_TYPE_CD is specified, it must reference a valid Match Type. |
|
TNDR_CTL_ID |
10 |
N |
A/N |
Leave this column blank. It will be assigned by the system when it creates a tender control record. |
|
ACCT_ID |
10 |
N |
A/N |
This is the tender account. If left blank, the C1-PEPL1 process will populate this field by calling the Determine Tender Account algorithm defined on the distribution rule. Note that this Account ID is not necessarily unique as multiple staging details can reference the same tender account. |
|
PAY_EVENT_ID |
12 |
N |
A/N |
Leave this column blank. It will be assigned by the system when it creates a payment event record. |
|
PEVT_PROCESS_ID |
10 |
N |
A/N |
If left blank, the C1-PEPL1 process will set this field equal to the Tender Account ID. This field is used for grouping staging records and for organizing parallel threads (in the C1-PEPL2 process). Therefore, it is strongly encouraged that it bears a relationship to the tender account ID. |
|
APAY_SRC_CD |
12 |
N |
A/N |
This must be a valid auto-pay source code. |
|
EXT_ACCT_ID |
50 |
N |
A/N |
This is the taxpayer’s account number at the financial institution |
|
EXPIRE_DT |
10 |
N |
Date |
This field is only needed if the Tender Type indicates that an expiration date is necessary (e.g., for a credit card payment) |
|
ENTITY_NAME |
64 |
N |
A/N |
This is the taxpayer’s name in the financial institution’s system |
Data Setup Examples of Payment Distribution Details
Typically, each staging record will represent a single payment event – with a corresponding payment tender and payment. However, it is possible to specify complex relationships within a set of staging records. For example, it will be straightforward to define a set of staging records that represent a single tender but multiple payments (to model the single payment tender of a welfare agency which covers payments for multiple accounts). Similarly, it is equally possible to define a set of staging records that represent a single payment but multiple tenders (although not a common requirement).
Each staging record can represent:
· Zero or one new payment events. Typically, each detail staging record will represent a single payment event. However, it is possible to define multiple records for a single payment event. All details for a single payment event are identified by a common value on the staging record: Pay Event Process ID.
Pay Event Process ID. This field is used for grouping staging records and for organizing parallel threads (in the C1-PEPL2 process). Therefore, it is strongly encouraged that it bears a relationship to the tender account ID.
· A partial or one new payment tenders. Typically, each detail staging record will represent a single payment tender. However, it is possible to define multiple staging records for a single pay tender. All details for a single tender are identified by a common payment event ID as well as common tender information (tender type, tender account ID, check number, external reference, etc.).
· A partial or many new payments. Typically, each detail staging record will represent a set of one or many new payments. However, it is possible to define multiple staging records for a single payment. All details for a single payment are identified by a common payment event ID as well as common distribution rule and characteristic value information.
The sections below provide examples of a few of these complex payment event configurations. Note that these examples assume the same distribution rule is referenced in all staging records.
Contents
Staging Entry Example 1: One Payment Event, Two Tenders, Two Payments
Staging Entry Example 2: One Payment Event, One Tender, Two Payments
Staging Entry Example 3: One Payment Event, Two Tenders, One Payment
Staging Entry Example 1: One Payment Event, Two Tenders, Two Payments
|
Seq. |
Pay Event Process ID |
Tender Account ID |
Tender Ref. |
Date |
Rule Value |
Amount |
Tender Type |
Check No |
|
1 |
1234567890 |
1234567890 |
112A |
1/1/2006 |
113-54-8978 |
30.00 |
Check |
101 |
|
2 |
1234567890 |
1234567890 |
112B |
1/1/2006 |
575-40-3030 |
40.00 |
Check |
102 |
Staging Entry Example 2: One Payment Event, One Tender, Two Payments
|
Seq. |
Pay Event Process ID |
Tender Account ID |
Tender Ref. |
Date |
Rule Value |
Amount |
Tender Type |
Check No |
|
1 |
1234567890 |
1234567890 |
112A |
1/1/2006 |
113-54-8978 |
30.00 |
Check |
101 |
|
2 |
1234567890 |
1234567890 |
112A |
1/1/2006 |
575-40-3030 |
40.00 |
Check |
101 |
Staging Entry Example 3: One Payment Event, Two Tenders, One Payment
|
Seq. |
Pay Event Process ID |
Tender Account ID |
Tender Ref. |
Date |
Rule Value |
Amount |
Tender Type |
Check No |
|
1 |
1234567890 |
1234567890 |
112A |
1/1/2006 |
575-40-3030 |
30.00 |
Check |
101 |
|
2 |
1234567890 |
7878787870 |
888Q |
1/1/2006 |
575-40-3030 |
40.00 |
Check |
9872 |
The Lifecycle of a Payment Event Upload Staging Record
The following diagram shows the possible lifecycle of a payment event upload staging record.
· Incomplete. A payment event staging record is initially created in incomplete state. The C1-PEPL1 process sets it to pending once it links it to a tender control and determines its tender account.
· Pending. The C1-PEPL2 process sets a pending record to complete once all processing logic is executed and a payment event is linked to it.
· Complete. When processing of the staging record is complete the record is in the complete state. This is a final state.
· Error. A payment event staging record may be set to Error from Incomplete or Pending states by the C1-PEPL1 and C1-PEPL2 processes respectively.
Refer to ToDo Entries Instead of Exceptions for more information on how ToDo entries are used to capture processing errors.
ToDo Entries Instead of Exception Records
Instead of creating an exception record for staging records in the Error state the C1-PEPL1 and C1-PEPL2 background processes create To Do entries and link them to the offending staging records.
Each process determines the To Do type to use for reporting errors by looking for the To Do Type defined with this process as its creation process.
Process C1-PEPL1 - Upload Payments (Step 1)
The batch process C1-PEPL1 refers to the first of three background processes that load the contents of the payment event upload staging records into the various payment tables.
The responsibility of this process is to transition the status of the staging records from Incomplete to Pending. The status of a staging record must remain Incomplete until:
· It is linked to a tender control. This process creates new deposit and tender control records, and then updates the payment event upload staging records with the corresponding Tender Control ID.
· The Tender Account ID field is populated. The Determine Tender Account algorithm defined on the distribution rule is called and the returned account ID is posted on the staging record.
· The Pay Event Process ID field is populated. If left blank this field is set equal to the Tender Account ID.
The following diagram and the sections below describe at a high level the processing phases of the C1-PEPL1 background process.
Contents
Phase 1 - Create Tender Control
Phase 2 - Determine Tender Account
Phase 1 - Create Tender Control
Note. This step cannot be bounded by thread range but must execute across the entire population of staging details. Therefore this step in the process is designed so that all parallel threads attempt to execute it at the same time but only one thread succeeds to avoid creating duplicate tender controls.
This step creates all tender controls required by the upload records as follows:
· For each distinct tender source transmissions represented within the incomplete set of upload staging details a deposit control, a deposit tender and a tender control are created in an open state. Note that a deposit tender record is only created if the tender amount is not zero.
· If an error occurs at this stage
· A designated staging record for the transmission group (one is picked at random) is set to Error and a ToDo entry is created and linked to it to capture the error message that applies for the whole transmission group. Other records in the group remain incomplete.
· The process stops.
Group Error. This technique allows for an easier recovery from a setup error that may affect a large volume of records in a single transmission. Capturing the error only on a single designated record requires only this record to be set back to Incomplete once the setup issue is corrected. It is important to note that the transmission group is not processes if at least one of the records in the group is in Error status.
· Once a transmission group of records is fully processed, a ToDo cleanup processing takes place to complete ToDo entries previously raised for its designated staging record.
Refer to ToDo Entries Instead of Exceptions for more information on how ToDo entries are used to capture processing errors.
Phase 2 - Determine Tender Account
After all tender controls have been created the second step attempts to transition all incomplete records to the pending state.
Each incomplete staging record is processed as follows:
· If not yet associated with a tender control ID, the process looks for an Open tender control that matches the batch code, batch number and external source ID and links it to the staging record. An error is raised if a matching tender control is not found.
· Execute the Determine Tender Account algorithm defined on the distribution rule and populate the record with the returned account ID. Note that the algorithm is called even when the tender account is populated to provide for a potential override of the initial value when necessary. An error is raised if a tender account may not be determined.
· If not already populated, the Pay Event Process ID is set equal to the Tender Account ID. The C1-PEPL2 process uses this field to organize the parallel threads and to group multiple staging details into a single payment event.
· The staging record is moved to pending state.
· If any errors occur set the record to Error and create a To Do entry for the error message.
· If no error occurred, a ToDo cleanup processing takes place to complete ToDo entries previously raised for the staging record.
Refer to ToDo Entries Instead of Exceptions for more information on how ToDo entries are used to capture processing errors.
Note. This step is designed to support execution in parallel threads based upon the sequence number portion of the staging table prime key.
Process C1-PEPL2 - Upload Payments (Step 2)
The batch process C1-PEPL2 refers to the second of three background processes that load the contents of the payment event upload staging records into the various payment tables.
The responsibility of the C1-PEPL2 process is to create payment events, payment tenders and payments and transition the corresponding staging records from Pending to Complete.
The following diagram and the section below describe at a high level the processing phases of the C1-PEPL2 background process.
Each distinct group of pending staging records associated with the same external source ID, external transmit ID, accounting date, and pay event process ID is processed as follows:
· A payment event is created for the group and stamped on each of its records.
· A payment tender is created for each distinct set of staging records having the same tender account, tender type and other tender information fields, except for the tender amount.
· The Create Payment algorithm is then called for each distinct group of staging records having the same tender account, distribution rule and rule value providing it with the total amount for the group.
· The staging record is moved to pending state.
· If any error occurs a designated staging record for the payment event group (one is picked at random) is set to Error and a To Do entry is created and linked to it to capture the error message that applies for the whole group. Other records in the group remain incomplete.
Group Error. This technique allows for an easier recovery from an error that affects all staging records for a single payment event. Capturing the error only on a single designated record requires only this record to be set back to pending once the issue is corrected. It is important to note that the whole set of records is not processes if at least one of the records in the group is in Error status.
· If no error occurred, a To Do cleanup processing takes place to complete To Do entries previously raised for the designated staging record.
Refer to ToDo Entries Instead of Exceptions for more information on how To Do entries are used to capture processing errors.
Note. This process is designed to support execution in parallel threads based upon the payment event process ID field.
Process C1-PEPL3 - Upload Payments (Step 3)
The batch process C1-PEPL3 refers to the last of three background processes that load the contents of the payment event upload staging records into the various payment tables.
The responsibility of the C1-PEPL3 process is to update the status of the related deposit and tender controls from open to balanced.
Each distinct tender control for which all associated staging records are in complete status is processed as follows:
· The tender control is set to balanced.
· The deposit control is set to balanced.
Note. This process is designed to support execution in parallel threads based upon the Tender Control ID field.
Payment Event Upload Staging
The Payment Event Upload Staging page has three purposes:
· You can view historical payment event upload staging records associated with uploaded payments.
· You can correct payment event upload staging records that are in error.
· You can add new payment event upload staging records to be uploaded by the payment event upload processes.
The topics in this section describe this page.
Payment Event Upload Staging - Main
This page shows the details of a payment event upload staging record.
Refer to Populating The Payment Event Upload Staging Records for more information about this record.
Open this page using Financial, Payment Event Upload Staging, Main.
Description of Page
External Source ID corresponds with an external source ID on one of the your tender sources. This should be the unique ID of the source of the interfaced payments. Refer to Setting Up Tender Sources for more information.
External Transmit ID is the unique identifier of the transmission of payments from the external source. This must be a unique value for each transmission from the source.
Sequence is the identifier of the record within the transmission. The C1-PEPL1 process uses this field to organize the parallel threads.
Accounting Date is the payment date that should be used for accounting purposes.
Distribution Rule is the rule by which the payment detail is to be processed. A default distribution rule is displayed if you have set one.
Rule Value is a value associated with the payment and expected by the distribution rule.
Match Type and Match Value are only used if the distribution of the payment should be restricted in some way (i.e., the standard payment distribution algorithm should not be used). Match Type indicates how the payment should be distributed (e.g., only distribute to a specific obligation), Match Value indicates the ID of the restriction (e.g., the obligation ID).
Payor Account ID is the tender account. If not populated the C1-PEPL1 process populates this field by calling the Determine Tender Account algorithm defined on the distribution rule.
Tender Amount is the amount tendered (i.e., the payment amount).
Currency Code is the currency of the tendered amount. This should be the same as currency defined on the tender source.
Tender Type defines the form or remittance (e.g., cash, check, etc.). Note that the Tender Type defaults from the installation record.
Check Number is the check number on the payment.
MICR ID is the value of the magnetic ink character recognition (MICR) line on the payment.
External Reference ID may be used to record external information associated with the payment tender.
Customer ID may be used to record additional taxpayer information.
Name may be used to record additional payment tender information.
Tender Control ID is the tender control associated with the payment. This field is should typically be left for the C1-PEPL1 process to populate.
If the Tender Type is associated with an automatic payment, the following section appears:
The system attempts to default automatic payment information from the account’s auto-pay option if the tender type is the same as the tender type on the account’s auto-pay source and if the auto pay option is effective on the payment date. If the system is unable to default information, you must specify the source of the funds and the taxpayer’s account number / credit card number at the financial institution.
· Auto Pay Source Code is the financial institution / credit card company that receives the automatic payment request.
· External Account ID is the taxpayer’s account number at the financial institution.
· Expires On is only needed if the Tender Type indicates that an expiration date is necessary (e.g., for a credit card payment).
· Name is the taxpayer’s name in the financial institution’s system.
Pay Event Process ID is used to group multiple staging records into a single payment event. If not populated, the C1-PEPL1 process sets this field equal to the Payor Account ID.
Pay Event Staging Status shows the state of the staging record. Refer to The Lifecycle of a Payment Event Upload Staging for a state transition overview.
Payment Event ID is the system-assigned, unique identifier of the related payment event. The C1-PEPL2 process populates this field when it creates a payment event for the upload staging record. You can use this field to navigate to the payment event page.
If a staging record is in Error state then the error message associated with the corresponding To Do entry is displayed.