Adjustments
In this section, we describe when and how to adjust an obligation’s balance.
Contents
The Big Picture Of Adjustments
How and When To Use An Adjustment
Interfacing Adjustments From External Sources
The topics in this section provide background information about a variety of adjustment issues.
We strongly recommend familiarizing yourself with the topics described in The Financial Big Picture to fully appreciate the place of an adjustment in the system’s financial architecture. In particular, refer to Setting Up Adjustment Types and Setting Up Adjustment Type Profiles.
Contents
Adjustments - Current Balance versus Payoff Balance
Adjustments and Penalty and Interest
Adjustment Type Controls Everything
An Adjustment May Affect More Than Just Taxpayer Balances
Adjustments - Current Balance versus Payoff Balance
Adjusting how much a taxpayer owes involves changing an obligation’s payoff balance and/or current balance by creating an adjustment. In this section we describe these two balances.
Warning! If you do not understand the difference between payoff balance and current balance, refer to Current Amount versus Payoff Amount.
Contents
When Current Balance Equals Payoff Balance
When Current Balance Differs From Payoff Balance
When Current Balance Equals Payoff Balance
For most obligations, payoff balance and current balance are always the same (or in colloquial speech - the amount the taxpayer thinks they owe equals what they really owe). In this situation, an adjustment is easy: both payoff balance and current balance are adjusted by the same value.
Let’s run through a typical example. The values in the payoff balance and current balance columns reflect the amount due after the financial transaction has been applied (i.e., the running balance):
|
Date |
Financial Transaction |
Payoff Balance |
Current Balance |
|
1-Jan-99 |
Bill: $125 |
125 |
125 |
|
15-Jan-99 |
Payment: $150 |
-25 |
-25 |
|
2-Feb-99 |
Bill: $175 |
150 |
150 |
|
14-Feb-99 |
Payment: $150 |
0 |
0 |
|
3-Mar-99 |
Bill: $200 |
200 |
200 |
|
15-Mar-99 |
Payment: $150 |
50 |
50 |
|
2-Apr-99 |
Bill: $225 |
275 |
275 |
|
|
|
|
|
As you can see, payoff balance and current balance are always in sync.
When Current Balance Differs From Payoff Balance
For some obligations, payoff balance and current balance differ (or in colloquial speech ‑ the amount the taxpayer thinks they owe differs from what they would owe if they wanted to payoff their account).
The next table shows several examples for tax processing where the current balance differs from the payoff balance.
|
Obligation Type |
Payoff Balance |
Current Balance |
|
Taxpayer submits a return submitted prior to the due date |
The payoff balance includes the full debt minus any payments. |
Until the debt is due, the current amount reflects that no debt is due (credit balance results from any payment). |
|
Real property |
Includes the full outstanding debt amount for the obligation period. |
Includes only the debt due at the current time. |
|
Taxpayers with a payment agreement |
Includes the full outstanding debt amount. |
References the current payment portion due. |
Adjustment Type And Balances
When you create an adjustment, you must define its adjustment type. The adjustment type controls how payoff balance and current balance are affected by the adjustment amount.
You can only pick adjustment types that make sense for the obligation.
The various types of adjustments that may be linked to an obligation are controlled by the adjustment profiles defined on the obligation’s obligation type.
Refer to Adjustment Type Controls Everything for more information.
Canceling Adjustments
You may cancel any frozen adjustment. Canceling the adjustment creates another financial transaction that reverses the financial effects of the original adjustment. The impact of the cancellation appears on the taxpayer’s next bill. You may view both the original financial transaction and its cancellation on the Adjustment page.
Transfer Adjustments
A convenient mechanism exists to transfer moneys between two obligations. The net effect of such a request is the creation of two adjustments, each of which is linked to the other. Both adjustments are created together, frozen together, and posted to the GL together. This is useful because you can’t create one side of the transfer and without the other. Refer to How To Create A Transfer Adjustment for more information.
Inter or Intra Account. It’s important to be aware that the transfer can be inter or intra account (i.e., the accounts on the two adjustments may be different).
Adjustments and Penalty and Interest
If your organization calculates penalty and interest (P&I) on outstanding debt, creating adjustments will typically impact the penalty and interest calculations. Most such adjustments are created as part of another business process, such as posting a tax form, where bringing P&I up to date is part of the business process.
For various reasons, the base product does not provide functionality to bring P&I up to date when an adjustment is created manually via the adjustment page. If your organization requires the ability to create a manual adjustment and bring P&I up to date, a special business process should be designed to orchestrate this.
Refer to Adjustments and Updating P&I for more information.
Adjustment Amount
An adjustment’s amount may be positive, negative or zero:
· A positive amount causes the taxpayer’s balance(s) to increase.
· A negative amount causes the taxpayer’s balance(s) to decrease.
· A zero amount will not affect the taxpayer’s balance(s). A zero amount is odd, but necessary when you need to use an adjustment to correct the GL distribution. Refer to How To Use An Adjustment To Change Amounts Booked In Your GL for more information.
When creating a manual adjustment, the adjustment amount may default based on configuration on the adjustment type. When an amount is defaulted, it may be overridden by a user.
Some adjustment types may also be configured to take the base amount and calculate additional charges once the user clicks Generate.
Adjustment Type Controls Everything
When you create an adjustment, you must define its adjustment type. The adjustment type contains the business rules that govern how its adjustments are managed by the system. Refer to Adjustment Types Define Business Rules for more information.
Adjustment Approval
If a user creates an adjustment and the related adjustment type is configured to require approval, the initiating user must submit the adjustment for approval. When an adjustment is submitted for approval, the system determines the necessary approval levels and notifies the first approver. The system freezes the adjustment when last approver approves the adjustment (if the adjustment's adjustment type allows it to be frozen prior to the completion of the next bill).
Refer to The Big Picture of Adjustment Approvals for more information.
An Adjustment May Affect More Than Just Taxpayer Balances
When an adjustment is frozen or cancelled, a taxpayer’s current and payoff balances are affected. However, several other objects may be affected when such events occur. Refer to Obscure Things That Can Happen for more information.
An adjustment is used to change the amount of debt stored on an obligation. The topics in this section describe the pages on which adjustments are maintained.
For more information about adjustments, refer to The Big Picture Of Adjustments.
Contents
The Lifecycle Of An Adjustment
Adjustments - Main Information
Adjustments - Transfer Adjustment
Financial - Adjustment Calculation Line Characteristics
The Lifecycle Of An Adjustment
The following diagram shows the possible lifecycle of an adjustment.
Warning! This diagram only makes sense in the context of the page used to maintain Adjustments. Refer to Adjustments - Main Information for the details.
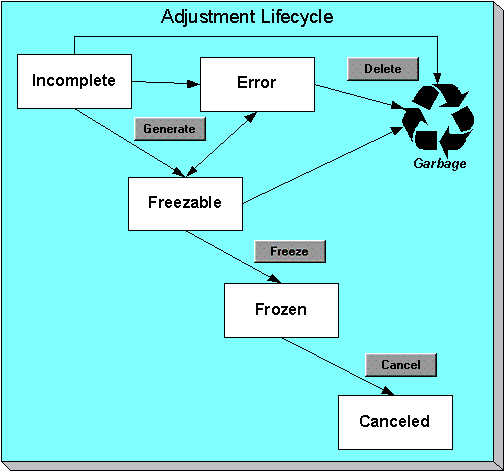
Adjustments are initially created in the Incomplete state. Adjustments in this state don’t have a financial transaction. This means, you can change the adjustment type and amount at will.
Click Generate to generate a financial transaction for the adjustment. The financial transaction contains the adjustment’s effect on the general ledger and on the taxpayer’s payoff and current balances. If the adjustment amount is calculated the algorithm on the adjustment type’s Generate Adjustment event controls how the adjustment's amount and calculation details are generated. If the adjustment is calculated, you must specify the calculation date, to use for calculations that are effective dated.
After generating the financial transaction, the adjustment becomes Freezable. While in this state, you may change the obligation, adjustment type and amount at will. However, if you change this information, you will have to regenerate the financial transaction (by clicking the Generate button).
In the very rare situation when the system cannot generate the financial transaction because of inconsistent setup data, the adjustment is moved to the Error state. You may regenerate the financial transaction after correcting the source of the error. You may also delete such an adjustment.
Click the delete button to physically remove an Incomplete, Error or Freezable adjustment from the database.
Click Freeze to freeze the adjustment and its financial transaction. After doing this, the adjustment’s state becomes Frozen. While in this state, you cannot change the adjustment’s type or amount, but you may change:
· When the adjustment starts aging.
· Whether the adjustment appears on a taxpayer’s bill.
· The accounting date used to derive the general ledger accounting period(s) to which the financial transaction is booked.
Adjustments may require approval. If the adjustment type referenced on the adjustment has an approval profile, the Freeze button is replaced with a Submit for Approval button. If an adjustment is currently being approved, all action buttons are disabled because the adjustment must be either approved or rejected using the Adjustments - Approval page. Refer to The Big Picture of Adjustment Approvals for more information.
If you need to remove the financial effects of an adjustment, click Cancel. Canceling an adjustment causes the generation of another financial transaction. This new financial transaction reverses the financial impact of the original adjustment.
Adjustments - Main Information
The Description of Page section that appears below simply describes the fields on this page. Refer to How and When To Use An Adjustment for instructions describing how to perform common maintenance functions.
The Main page contains core adjustment information. Open this page using Financial, Adjustment.
Description of Page
Adjustment Info contains a concatenation of important information about the adjustment.
Adjustment ID is the system-assigned, unique identifier of the adjustment.
Account ID is the account to which the adjustment is linked. The name of the main person on the account appears next to the account ID.
Use Obligation ID to define the obligation whose value needs to be adjusted. Basic information about the obligation appears adjacent.
Location is a display-only field that shows the location associated with the obligation, if any.
Indicate the Adjustment Type. This field is very important as it controls numerous aspects of the adjustment’s impact on the taxpayer’s balance and your general ledger. This field is gray after the adjustment is frozen.
You can only choose certain adjustment types. The obligation’s obligation type has a collection of valid adjustment profiles. You may only reference adjustment types that are listed in one of the adjustment type profiles linked to the obligation type.
Enter the Amount of the adjustment. If the adjustment type is a generated adjustment, the Calculated Amount and Calculation Date are displayed. The values of the calculated amount and calculation date are displayed after the adjustment is generated. The calculated amount shows the result of the generate adjustment algorithm. The calculation date is specified when you click Generate for a generated adjustment type. It is used by the generate adjustment algorithm for any calculations that are effective dated (e.g., rate version or rate factor value).
Default note. The adjustment amount defaults based on the adjustment type. When you change the adjustment type, the amount changes accordingly. You may change the adjustment amount after it is defaulted.
You may not change an adjustment’s Adjustment Status directly. Rather, you use the buttons in the Adjustment Actions area. Refer to The Lifecycle Of An Adjustment for the details.
If the status is Canceled, the Cancel Reason is displayed.
The Adjustment Date defines the date of the adjustment.
For adjustments that cover a period of time, the Through Date identifies the end of the adjustment period. For example, if penalty is calculated for a given month, the Adjustment Date and the Through Date are set to the start and end of the month, respectively.
Use the Comments to describe anything unusual about the adjustment.
If the adjustment is subject to approval, a message indicating such appears. Clicking this message navigates the user to the Approvals tab. Refer to The Big Picture of Adjustment Approvals for more information.
The financial transaction (FT) grid contains the financial transactions associated with the adjustment. It only contains information after the adjustment is frozen. If the adjustment is canceled, a second row appears showing the details of the cancellation FT.
· Financial Transaction ID is the system-assigned unique identifier of the FT. Click the go to button to transfer to the financial transaction. On this page you can change certain aspects of the FT in question.
· Effective Date is the date the FT starts aging.
· Accounting Date is the date the system uses to determine the FT’s accounting period in your general ledger.
· Current Amount contains the FT’s effect on the obligation’s current balance.
· Payoff Amount contains the FT’s effect on the obligation’s payoff balance.
· Bill ID is the bill on which the FT appears (if it has been swept onto a bill). Click the adjacent go to button to transfer to the bill on which the FT appears. Note: an FT is linked to a bill the next time a bill is completed for the obligation’s account.
· Group FT ID is the identifier of the main tax liability assessment's FT. Refer to Group Financial Transactions for more information.
The Calculation Lines grid contains the details of the calculations associated with a calculated adjustment. It only appears if the rate that calculated the adjustment amount created at least one calculation line. One row exists for every calculation involved in the process. This information is for audit purposes only and cannot be modified.
The following information is displayed in the grid:
· If at least one of the calculation lines has characteristics, Calc Line Char displays go to buttons, allowing you to go to characteristics that are linked to a specific adjustment calculation line. This column is only displayed if at least one of the calculation lines has characteristics.
· Sequence is the system-assigned unique identifier of the calculation detail row.
· Description on Bill is the information about the calculation line that appears on the taxpayer’s bill.
· Calculated Amount is the calculated amount associated with the calculation line.
· The Print switch controls whether information about this line will print on the taxpayer’s bill.
· The Appears in Summary switch defines if this line’s amount also appears on a summary line. This switch plays a part at bill print time if this adjustment is included in a bill to the taxpayer. Those lines that appear in a summary print in the left dollar column, those that don’t appear in a summary print in the right dollar column.
Calculation lines created by applying a rate have this switch turned on if the corresponding rate component is summarized on a summary rate component.
· Unit of Measure (UOM) is the unit of measure of the rate quantity priced on the calculation line.
· Time of Use (TOU) is the time-of-use code of the rate quantity priced on the calculation line.
· RQI is the rate quantity identifier of the rate quantity priced on the calculation line.
· Billable Rate Quantity is the rate quantity priced on the calculation line. This quantity differs from the measured consumption if there are RQ rules or register rules in effect.
· Base Amount is used by calculation lines (e.g. taxes) that are cross-referenced to other calculation lines and whose value(s), therefore, depend on the amounts calculated by those other lines. The Base Amount shows the total amount derived from the cross-referenced line(s) that the current line then used to calculate its billed amount.
· Rate Component Sequence refers to the sequence number of the rate component on the applicable rate version that was used to calculate the line.
· Measures Peak Qtyis checked if the UOM priced on the calculation line is used to measure a peak quantity.
· Exempt Amount is the amount of the calculated charge that the taxpayer doesn’t have to pay because they are tax exempt.
· Distribution Code is the distribution code associated with the calculation line. This distribution code is used to build the general ledger details on the bill segment’s financial transaction.
· Description describes the characteristic value that was used when the line’s amount was calculated. This information is only displayed if the line was calculated using a rate factor (because only rate factors use characteristic values). Refer to An Illustration Of A Rate Factor And Its Characteristics for more information.
For more information, refer to Generated Adjustments.
The Adjustment Actions area contains buttons that you use to commit and cancel the adjustment’s financial impact. The adjustment’s status controls the button you can see and select. Refer to The Lifecycle Of An Adjustment for the details.
Cancel may not be enabled. The cancel button is not enabled if the adjustment is linked to a bill that is written off.
Canceling An Accounts Payable (A/P) Adjustment. If you need to cancel an A/P adjustment (i.e. an adjustment of an adjustment type that has an A/P request type) that has already been extracted by A/P, refer to How To Cancel An A/P Adjustment After It’s Been Selected By A/P.
Adjustments - Characteristics
You use this page to link additional information to the adjustment. Open using Financial, Adjustment, Characteristics.
Description of Page
The characteristics collection contains information that describes miscellaneous information about the adjustment.
Characteristic Types. You can only choose characteristic types defined on the adjustment's adjustment type.
The following fields display:
Characteristic Type Indicate the type of characteristic.
Characteristic Value Indicate the value of the characteristic.
Default Note. An adjustment’s characteristics default from the adjustment type.
Adjustments - Transfer Adjustment
The Description of Page section that appears below simply describes the fields on this page. Refer to How and When To Use An Adjustment for instructions describing how to perform common maintenance functions.
The Transfer Adjustment is used to define the reciprocal adjustment associated with a transfer adjustment (there are always two adjustments associated with a transfer). Open using Financial, Adjustment, Transfer Adjustment.
Description of Page
Adjustment Info contains a concatenation of the adjustment amount, adjustment type and status.
Adjustment ID is the system-assigned, unique identifier of the adjustment.
Account ID is the account to which the adjustment is linked. The name of the main person on the account appears next to the account ID.
Use Obligation ID to define the transfer to obligation. Basic information about the obligation appears adjacent.
Location is a display-only field that shows the location that associated with the obligation, if any.
The Adjustment Type and adjustment Amount from the first page are displayed. If you need to change either value, return to the first page.
Adjustment Status shows the status of the transfer to adjustment. If you need to change the adjustment’s status, use the action buttons.
Use the Comments to describe anything unusual about the adjustment.
Transfer Adj ID is the system-assigned, unique identifier of the adjustment.
The Creation Date defines the date on which the adjustment was created.
The financial transaction grid contains the financial transactions associated with the adjustment. It only contains information after the adjustment is frozen. If the adjustment is canceled, a second row appears showing the details of the cancellation FT.
· Financial Transaction ID is the system-assigned unique identifier of the FT. Click the go to button to transfer to the financial transaction. On this page you can change certain aspects of the FT in question.
· Effective Date is the date the FT starts aging.
· Accounting Date is the date the system uses to determine the FT’s accounting period in your general ledger.
· Current Amount contains the FT’s effect on the obligation’s current balance.
· Payoff Amount contains the FT’s effect on the obligation’s payoff balance.
· Bill ID is the bill on which the FT appears (if it has been swept onto a bill). Click the adjacent go to button to transfer to the bill on which the FT appears. Note: an FT is linked to a bill the next time a bill is completed for the account.
· Group FT ID is the identifier of the main tax liability assessment's FT. Refer to Group Financial Transactions for more information.
Adjustments - A/P Request
The Description of Page that appears below simply describes the fields on this page. Refer to How and When To Use An Adjustment for instructions describing how to perform common maintenance functions.
The A/P Request page contains information about adjustments used to refund money via an A/P check request. This page is only relevant if:
· The adjustment’s adjustment type references an A/P Request Type (i.e., it will be interfaced to your accounts payable system which will cut the check), AND
· The adjustment is frozen.
Open this page using Financial, Adjustment, A/P Request.
Description of Page
Adjustment Info contains a concatenation of important information about the adjustment.
Adjustment ID is the system-assigned, unique identifier of the adjustment.
Account ID is the account to which the adjustment is linked.
Adjustment type controls A/P check requests. The A/P Request information is populated when an adjustment used to refund money via an A/P check request is frozen. Whether or not an adjustment is interfaced to A/P is controlled by the adjustment’s adjustment type. The adjustment type’s A/P Request Type controls the payment date and the bank.
Name is the name printed on the check. This name is derived from the account's main person:
· If this person has an override mailing name, the first line of the override mailing name is used.
· If this person does not have an override mailing name, the person's primary name is used.
Payment Selection Status is the status of the check request. The values are:
· Not Selected for Payment before it’s selected by A/P for payment
· Requested for Payment after it’s selected by A/P
· Paid after it’s paid by A/P
· Canceled if it’s been canceled in A/P
· Hold if it's been held in A/P
Scheduled to Pay is the date on which the check is scheduled to be cut. This is equal to the adjustment date plus the Due Days on the adjustment type’s A/P request type.
The following fields are provided in order to support a two-way interface with an A/P system. The delivered system does not have processes which update these fields.
· Payment Date is the date on which the check was cut in A/P. This field is only populated after A/P cuts the check.
· Paid Amount is the amount of the check. This field is only populated after A/P cuts the check.
· A/P Request ID is the system-assigned, unique identifier of the A/P check request.
· Payment Number is the system-assigned number of the payment in A/P (this number typically appears on the printed check). This field is only populated after A/P cuts the check.
The address information in the bottom frame is the address to which the check is mailed. This is the billing address of the main taxpayer linked to the account. After the adjustment is frozen, this information is automatically populated based on the address information for the account. This information is modifiable until the status is Paid.
Adjustments - Approval
This page only appears after an adjustment has started the approval process. Open this page using Financial, Adjustment, Approval.
Refer to The Big Picture of Adjustment Approvals for more information about the approval process.
The topics in this section describe the base-package zones that appear on the Approval Profile portal.
Contents
Adjustment Information
The Adjustment Information zone contains display-only information about the adjustment.
Approval Request
The Approval Request zone shows the current and future approvers of an adjustment. This zone only appears if the adjustment is in the approval process.
If the current user has approval authority, the following functions are available:
· Click the Approve button to approve the adjustment.
· Click the Reject button to reject the adjustment.
Approval Request Log
The Approval Request Log zone contains the history of the adjustment's approval.
Financial - Adjustment Calculation Line Characteristics
This page displays the characteristics that are linked to a specific adjustment calculation line. The information on this page is for audit purposes only and cannot be changed.
Open this page by clicking on the characteristics go to button on the calculation lines grid of the Adjustments - Main page.
Description of Page
Accountis the account to which the adjustment is linked. The name of the main person on the account appears next to the account ID.
The Obligation is the obligation whose value needs to be adjusted. Basic information about the obligation appears adjacent.
Location shows the location that is associated with the obligation, if any.
The Adjustment Info displays information to identify the adjustment, including amount, type, and status.
Adjustment ID displays the identification of the adjustment, and Calc Line displays the calculation line with which the characteristics are associated.
The Description on Bill displays the description of the calculation line that appears on the taxpayer’s bill.
The characteristics grid displays the Characteristic Types and the Characteristic Values associated with the calculation line.
For more information about characteristics, refer to Setting Up Characteristic Types and Their Values.
The topics in this section describe how to perform common adjustment maintenance functions.
Contents
How To Create A Transfer Adjustment
How To Create A Generated Adjustment
How To Cancel An A/P Adjustment After It Has Been Selected By A/P
How To Apply Ad Hoc Fees To An Obligation
How To Use An Adjustment To Change The GL Distribution
How To Create A Transfer Adjustment
The following steps describe how to create a transfer adjustment on the Adjustment page.
Note. You cannot use an adjustment type with a calculated amount for transfer adjustments.
Warning! This process only makes sense in the context of the page used to maintain Adjustments. Refer to Adjustments - Main Information for the details.
To create a transfer adjustment:
· Specify the “transfer from” account and obligation on the Adjustment - Main page.
· Specify the adjustment type and the amount and transfer to the Transfer Adjustment page.
· Specify the “transfer to” obligation and click Generate.
· In the resulting dialog box
· Specify an Accounting Date and Adjustment Date. You may also specify the Effective Date.
· Indicate the Debt Category to use on the debit side of the transfer or leave it blank to have it default from the adjustment type.
· Indicate the Debt Category Priority for the credit side of the transfer if this adjustment should override the default debt category priority from the obligation type.
· Check FT Header to indicate if the adjustment FT will be used as the assessment header, otherwise you may specify a Group FT ID if the Adjustment should be associated with a specific assessment.
· Click Calculate.
· After generating, click Freeze to freeze the adjustments’ financial transactions.
How To Create A Generated Adjustment
The following steps describe how to create a generated adjustment on the Adjustment page.
Warning! This process only makes sense in the context of the page used to maintain Adjustments. Refer to Adjustments - Main Information for the details.
To create a calculated adjustment:
· Open Financial, Adjustment, Main and specify the Obligation to which the adjustment will be applied.
· Specify the Adjustment Type that calculates the amount, and enter a base Amount.
· Click Generate. The Generate dialog box opens.
· In the resulting dialog box
· Specify an Accounting Date, Adjustment Date and Calculation Date. You may also specify the Effective Date.
· If the adjustment is for a debit amount, indicate the Debt Category, or leave it blank to have it default from the adjustment type.
· If the adjustment is for a credit amount indicate the Debt Category Priority if this adjustment should override the default debt category priority from the obligation type.
· Check FT Header to indicate if the adjustment FT will be used as the assessment header, otherwise you may specify a Group FT ID if the Adjustment should be associated with a specific assessment.
· Click Calculate.
· Click Freeze to freeze the calculated transactions.
The Calculation Date that you supply is used by the generate adjustment algorithm for any calculations that are effective dated (e.g., rate version or rate factor value).
How To Cancel An A/P Adjustment After It Has Been Selected By A/P
Adjustments that are interfaced to A/P (because A/P needs to cut a refund check) sometimes need to be canceled. You may cancel an A/P adjustment in the system while its A/P request is Not Selected. If the A/P request is Requested for Payment or Paid you must first cancel the payment in A/P. Canceling the payment in A/P changes the A/P request to Canceled. At this point, you can cancel the adjustment.
How To Apply Ad Hoc Fees To An Obligation
If you need to apply a fee (e.g., NSF charge) to an obligation, issue an adjustment using the appropriate adjustment type. The adjustment amount should be a positive number so that the taxpayer’s balance increases.
How To Change The Age Of Debt
If an obligation’s debt is older (or younger) than what it should be (for whatever reason), you should do the following.
· Use the Transfer Adjustment process to re-age the debt. The 'transfer from' and 'transfer to' obligations will be the same. The adjustment amount should be a negative number. Refer to How To Create A Transfer Adjustment for more information.
· After creating the transfer adjustment, drill into the transfer to adjustment and populate the effective date with the day on which the debt should start aging (e.g., if the debt should be 7 days old, the effective date should be the current date minus 7 days).
How To Use An Adjustment To Change The GL Distribution
Assume you have a frozen bill segment that affected an incorrect GL distribution code. You have two ways to correct such a situation:
· You could correct the cause of the incorrect distribution code (probably incorrect GL information on a rate component) and cancel / rebill the bill segment. Refer to Cancel / Rebill for more information about this method.
· You could create an adjustment that does not impact the taxpayer’s balance but does have a GL entry. This GL entry would reverse the effect of the original distribution code and have an offsetting entry to the correct distribution code. The following points explain how to do this:
· Choose an adjustment type that only impacts the GL (i.e., the adjustment’s adjustment type has an FT algorithm that doesn’t impact the taxpayer’s current or payoff balance, it only impacts the GL).
· Enter an adjustment amount of zero.
· Generate the adjustment.
· Drill into the adjustment’s financial transaction and enter two (or more) GL distribution rows that reflect the redistribution of the amounts.
· Return to the adjustment and freeze it.
Adjusting statistical amounts. You can use the above approach to change the statistical amount that is interfaced to the general ledger. The statistical amount is simply another column on the financial transaction’s GL distribution rows.
Interfacing Adjustments From External Sources
The topics in this section describe how adjustments are uploaded from an external source.
Contents
Maintaining Adjustment Staging Control
Maintaining Adjustment Upload Staging
Interfacing Adjustments
The following diagram illustrates the processes involved in the uploading of adjustments into the system.
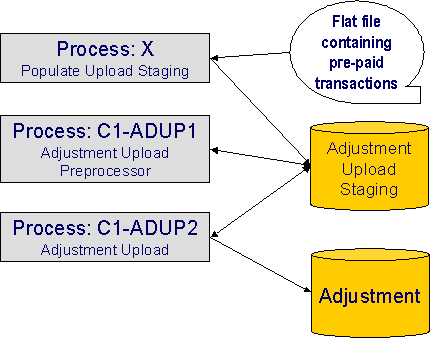
The topics in this section describe how these processes work.
Contents
Process X - Populate Adjustment Upload Records
Process C1-ADUP1 - Preprocess Adjustment Uploads
Process C1-ADUP2 - Upload Adjustments
Process X - Populate Adjustment Upload Records
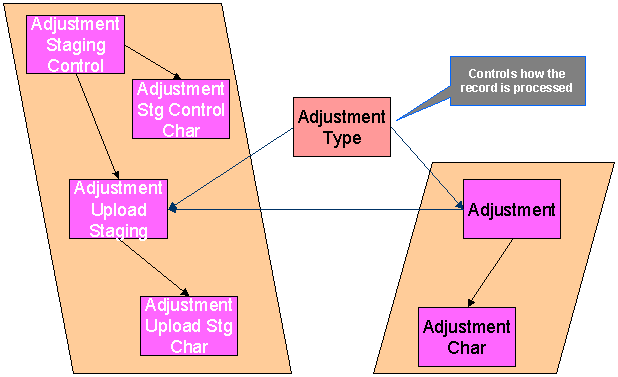
Process X refers to the mechanism used by your organization to populate the various staging tables (shown in the orange section of the following ERD).

The topics in this section describe each of these tables.
Contents
Adjustment Staging Control Characteristic
Adjustment Characteristic Upload Staging
The Lifecycle of an Adjustment Staging Control Record
The Lifecycle of an Adjustment Upload Staging Record
Adjustment Staging Control
You must create an adjustment staging control record for each batch of adjustments to be uploaded into the system. The name of this table is CI_ADJ_STG_CTL. The following describes each column on this table.
|
Column Name |
Length |
Req’d |
Data Type |
Comments |
|
ADJ_STG_CTL_ID |
12 |
Y |
N |
This is the unique identifier of the adjustment staging control record. This key is a sequential number so you can use a database function to assign the value when populating the table. |
|
CRE_DTTM |
15 |
Y |
DateTime |
This is the date / time on which the adjustment staging control record was created. This must be populated with the current date / time. |
|
ADJ_STG_CTL_STATUS_FLG |
4 |
Y |
A/N |
This must be set to P for Pending. |
|
ADJ_STG_UP_REC_CNT |
10 |
Y |
N |
This is the total number of adjustment upload staging records that are linked to this adjustment staging control. |
|
TOT_ADJ_AMT |
13.2 |
Y |
N |
This column must equal the sum of adjustment amounts on the adjustment upload staging records that are linked to this adjustment staging control. |
|
CURRENCY_CD |
3 |
Y |
A/N |
This must be a valid currency code in the system. Refer to Defining Currency Codes for more information. |
|
MESSAGE_CATEGORY |
5 |
N |
N |
Leave this blank. The adjustment upload preprocessor populates this when an error occurs during upload. |
|
MESSAGE_NBR |
5 |
N |
N |
Leave this blank. The adjustment upload preprocessor populates this when an error occurs during upload. |
Adjustment Staging Control Characteristic
You must create an adjustment staging control characteristic record for each characteristic that you would like to link to the adjustment staging control. The name of this table is CI_ADJ_STG_CTL_CHAR. The following describes each column on this table.
|
Column Name |
Length |
Req’d |
Data Type |
Comments |
|
ADJ_STG_CTL_ID |
12 |
Y |
N |
This must correspond with the prime key of the related CI_ADJ_STG_CTL record. |
|
CHAR_TYPE_CD |
8 |
Y |
A/N |
This must correspond with a characteristic type that is defined as valid for adjustment staging control. Refer to Setting Up Characteristic Types & Their Values for more information. |
|
SEQ_NUM |
3 |
Y |
N |
This should be set to 10 unless you have multiple values for a given adjustment staging control and characteristic type. |
|
CHAR_VAL |
16 |
N |
A/N |
Populate this field if your characteristic type is predefined. |
|
ADHOC_CHAR_VAL |
254 |
N |
A/N |
Populate this field if your characteristic type is ad-hoc or file location. |
|
CHAR_VAL_FK1 - CHAR_VAL_FK5 |
50 each |
N |
A/N |
Populate these fields if your characteristic type is foreign key reference. Up to five columns of 50 bytes each are provided to accommodate compound keys. |
Adjustment Upload Staging
You must create an adjustment upload staging record for each adjustment you want to upload. The name of this table is CI_ADJ_STG_UP. The following describes each column on this table.
|
Column Name |
Length |
Req’d |
Data Type |
Comments |
|
ADJ_STG_UP_ID |
12 |
Y |
N |
This is the unique identifier of the adjustment upload staging record. This key is a sequential number so you can use a database function to assign the value when populating the table. |
|
ADJ_STG_CTL_ID |
12 |
Y |
N |
The ID of the adjustment staging control that is linked to this adjustment upload staging record. |
|
ADJ_TYPE_CD |
8 |
Y |
A/N |
This must correspond to the prime key of one of your adjustment types. Refer to Setting up Adjustment Types for more information. |
|
ADJ_STG_UP_STATUS_FLG |
4 |
Y |
A/N |
This must be set to P for Pending. |
|
CREATE_DT |
10 |
Y |
Date |
The date when the adjustment occurred. |
|
ADJ_AMT |
13.2 |
Y |
N |
The amount of the adjustment. |
|
ADJ_SUSPENSE_FLG |
4 |
Y |
N |
This must be set to NSUS for Not In Suspense. |
|
SA_ID |
10 |
N |
A/N |
This must correspond to a valid obligation in the system. If you leave this blank and opt to let the system find the obligation during adjustment upload preprocessing, a Determine Obligation algorithm must be plugged in on the associated adjustment type. This plug-in is meant to derive the obligation ID based on supplied miscellaneous information – e.g. information supplied via adjustment characteristic upload staging. |
|
ADJ_ID |
10 |
N |
A/N |
Leave this blank. The adjustment upload process populates this. |
|
SUSPENSE_ADJ_ID |
10 |
N |
A/N |
Leave this blank. The adjustment upload process populates this. |
|
MESSAGE_CATEGORY |
5 |
N |
N |
Leave this blank. The adjustment upload background processes populate this when an error occurs during upload. |
|
MESSAGE_NBR |
5 |
N |
N |
Leave this blank. The adjustment upload background processes populate this when an error occurs during upload. |
Adjustment Characteristic Upload Staging
You must create an adjustment characteristic upload staging record for each characteristic that you would like to link to the adjustment upload staging. The name of this table is CI_ADJ_STG_UP_CHAR. The following describes each column on this table.
|
Column Name |
Length |
Req’d |
Data Type |
Comments |
|
ADJ_STG_UP_ID |
12 |
Y |
N |
This must correspond with the prime key of the related CI_ADJ_STG_UP record. |
|
CHAR_TYPE_CD |
8 |
Y |
A/N |
This must correspond with a characteristic type that is defined as valid for adjustment Refer to Setting Up Characteristic Types & Their Values for more information. |
|
SEQ_NUM |
3 |
Y |
N |
This should be set to 10 unless you have multiple values for a given adjustment upload staging and characteristic type. |
|
CHAR_VAL |
16 |
N |
A/N |
Populate this field if your characteristic type is predefined. |
|
ADHOC_CHAR_VAL |
254 |
N |
A/N |
Populate this field if your characteristic type is ad-hoc or file location. |
|
CHAR_VAL_FK1 - CHAR_VAL_FK5 |
50 each |
N |
A/N |
Populate these fields if your characteristic type is foreign key reference. Up to five columns of 50 bytes each are provided to accommodate compound keys. |
The Lifecycle of an Adjustment Staging Control Record
The following diagram shows the possible lifecycle of an adjustment staging control record.
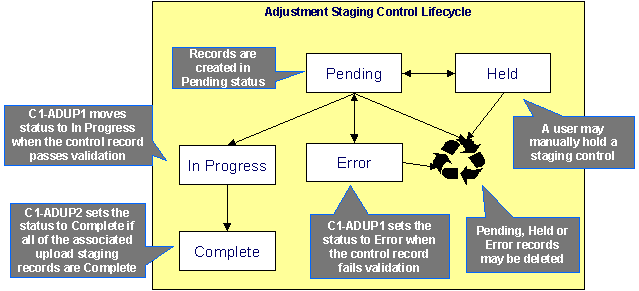
· Pending. An adjustment staging control record is created in this state. The C1-ADUP1 process selects pending adjustment staging control records for validation.
· In Progress. The C1-ADUP1 process sets a pending record to in progress when the totals on the adjustment staging control are successfully validated against the totals from the associated adjustment upload staging records.
· Complete. The C1-ADUP2 process sets the adjustment staging control’s status to complete when all adjustment upload staging records linked to the adjustment staging control are complete.
· Error. The C1-ADUP1 process sets a pending record to error if the adjustment staging control fails validation. The status may be set back to pending after the error is fixed.
· Held. The held status is available for situations where you want to prevent or delay the upload of a batch of adjustment staging records. The status may be set back to pending when the batch of records is ready for upload.
· Pending, error and held records may be deleted.
The Lifecycle of an Adjustment Upload Staging Record
The following diagram shows the possible lifecycle of an adjustment upload staging record.
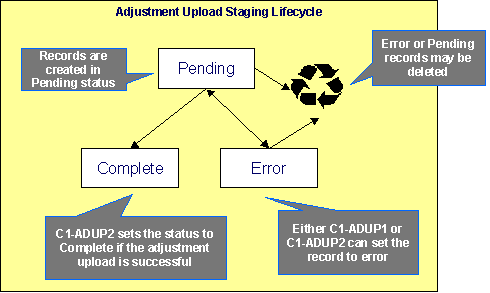
· Pending. Adjustment upload records are created in this state. The C1-ADUP2 process selects pending adjustment upload records and creates adjustments for each of them.
· Complete. The C1-ADUP2 process sets a pending record to complete if an adjustment is successfully created.
· Error. Either C1-ADUP1 or C1-ADUP2 process sets pending record to error when it encounters an error during the upload process. The status may be set back to pending after the error is fixed.
· Pending and error records may be deleted.
Process C1-ADUP1 - Preprocess Adjustment Uploads
The batch process identified by batch process ID C1-ADUP1 refers to the background process that validates adjustment staging control records and populates obligation IDs on adjustment upload staging records that do not specify an obligation ID.

Contents
Phase 1 - Validate Adjustment Staging Controls
Phase 2 - Populate Obligation ID
Phase 1 - Validate Adjustment Staging Controls
The following points describe, at a high level, the first phase of the adjustment upload pre-process:
· For each Pending adjustment staging control,
· Check that the record count on the adjustment staging control record equals the number of adjustment upload staging records that are linked to the adjustment staging control.
· Check that the total adjustment amount on the adjustment staging control record equals the sum of the adjustment amounts from the adjustment upload staging records that are linked to the adjustment staging control.
· If the adjustment staging control passes validation, set its status to In Progress. Otherwise, set the status to Error. Create a To Do entry using the inputs To Do type and To Do role (if supplied) for adjustment staging control errors. (Complete any outstanding To Do entries for the adjustment staging control before creating a new To Do entry.)
· If no errors occur, perform To Do cleanup by completing any outstanding To Do entries that were previously created for the adjustment staging control.
Note. You can fix errors by going to the To Do entry and drilling into the adjustment staging control page. Don’t forget to change the adjustment staging control’s status back to Pending after fixing the error.
Phase 2 - Populate Obligation ID
The following points describe, at a high level, the second phase of the adjustment upload pre-process:
· For each Pending adjustment upload staging that is linked to an In Progress adjustment staging control AND does not have the obligation ID,
· Execute the Determine Obligation algorithm that is plugged in on the adjustment type.
· If the algorithm returns a valid obligation ID, stamp that obligation ID onto the adjustment upload staging. If the algorithm also returns an indication that the adjustment is to be put into suspense, set the suspense flag on the adjustment upload staging to In Suspense. Refer to Suspense Adjustments for more information on how suspense adjustments are handled.
· If the algorithm returns an error, set the adjustment upload staging record’s status to Error. Create a To Do entry using the inputs To Do type and To Do role (if supplied) for adjustment upload staging errors. (Complete any outstanding To Do entries for the adjustment upload staging before creating a new To Do entry.)
· If no errors occur, perform To Do cleanup by completing any outstanding To Do entries that were previously created for the adjustment upload staging.
Note. You can fix errors by going to the To Do entry and drilling into the adjustment upload staging page. Don’t forget to change the adjustment upload staging’s status back to Pending after fixing the error.
Process C1-ADUP2 - Upload Adjustments
The batch process identified by batch process ID C1-ADUP2 refers to the background process that creates adjustments for all adjustment upload staging records that are stamped with an obligation ID.
The following diagram and section describe, at a high level, the processing done in the C1-ADUP2 background process.
· For each Pending adjustment upload staging that has an obligation ID,
· Add a frozen adjustment using the amount, creation date and adjustment type on the staging record.
Note. If the type of adjustment being uploaded is one that is calculated, the algorithm that’s plugged in on the adjustment type will calculate the adjustment amount and generate associated calculation lines (if applicable). See Calculated Adjustments for more information.
· If adjustment creation is successful, update the adjustment ID on the staging record and set the staging record’s status to Complete.
· If adjustment creation results in an error, set the staging record’s status to Error. Create a To Do entry using the To Do type on which this batch process (C1-ADUP2) is defined as creation process. (Complete any outstanding To Do entries for the adjustment upload staging before creating a new To Do entry.)
· If no errors occur, perform To Do cleanup by completing any outstanding To Do entries that were previously created for the adjustment upload staging.
Suspense Adjustments
Contents
What Are Suspense Adjustments?
How Are Suspense Adjustments Resolved?
What Are Suspense Adjustments?
When the adjustment upload preprocessor is unable to identify a valid obligation ID, it can post the adjustment to a suspense obligation. This is similar to how a payment is posted to a suspense account when a valid account ID could not be identified during payment upload.
Putting adjustments in suspense is optional. Therefore, this logic sits in a plug-in spot. If suspense adjustments are applicable to you, you must plug in your suspense logic in a Determine obligation algorithm on Adjustment Type.
How Are Suspense Adjustments Resolved?
A background process can be run periodically to automatically resolve suspense adjustments. Since rules for resolving suspense may vary, this logic sits in a plug-in spot. You must plug in your resolve logic in a Resolve Suspense algorithm on Adjustment Type.
Process C1-ADURS - Resolve Suspense Adjustments
The batch process identified by batch process ID C1-ADURS refers to the background process that resolves suspense adjustments.
For each adjustment upload staging that is In Suspense, execute the Resolve Suspense algorithm that is plugged in on the adjustment type.
Maintaining Adjustment Staging Control
Use this page to add, view or modify an adjustment staging control record. Open this page using Financial, Adjustment Staging Control.
Description of Page
Adjustment Staging Control ID is the unique identifier of the adjustment staging control record.
Create Date/Time is when the adjustment staging control was created. This field is protected after the record is saved.
Number of Staging Records is the number of adjustment upload staging records that are linked to this adjustment staging control record.
Total Adjustment Amount is the total of adjustment amounts from the adjustment upload staging records that are linked to this adjustment staging control record.
Enter the Currency for the total adjustment amount on the adjustment staging control. This is also the currency of the adjustment amounts on the associated adjustment upload staging records.
Status shows the state of the adjustment staging control. Possible values are: Pending, In Progress, Complete, Error, and Held.
A Hold button appears adjacent to the status description if Status is Pending. Click this button to set the status to Held. The adjustment upload process will ignore staging controls in this state.
A Pend button appears adjacent to the status description if Status is either Held or Error. Click this button to set the status to Pending. An error message box also appears below the status descriptionif Status is Error.
Use the Characteristics collection to capture miscellaneous information about an adjustment staging control.
Characteristic Type The type of characteristic.
Characteristics Value The value of the characteristic.
Note. You can only choose characteristic types defined as permissible on an adjustment staging control. Refer to Setting Up Characteristic Types & Their Values for more information.
Maintaining Adjustment Upload Staging
Use this page to add, view or modify an adjustment upload staging record. Open this page using Financial, Adjustment Upload Staging.
Description of Page
Adjustment Upload ID is the unique identifier of the adjustment upload staging record.
Adjustment Staging Control ID is the identifier of the adjustment staging control to which the adjustment upload staging is linked.
Indicate the Adjustment Type. This field is very important as it controls numerous aspects of the adjustment’s impact on the taxpayer’s balance and your general ledger.
You can only choose certain adjustment types. The obligation’s obligation type has a collection of valid adjustment profiles. You may only reference adjustment types that are listed in one of the adjustment type profiles linked to the obligation type.
Enter an Adjustment Amount.
Creation Date is the date when the adjustment occurred. This will be the creation date on the uploaded adjustment. This field is protected after the record is saved.
Obligation indicates the obligation to which the adjustment was posted. If the adjustment is in suspense, the label shows Suspense Obligation instead.
Adjustment is a reference to the adjustment that got created from the upload.
Status shows the state of the adjustment upload staging. Possible values are: Pending, Complete, and Error.
If Status is Error, a Pend button appears adjacent to the status description. In addition, an error message box displays below the status description.
If the adjustment is in suspense, a message appears to indicate the condition and the Suspense Adjustment is shown. A different message appears when the suspense is resolved.
Use the Characteristics collection to keep miscellaneous information about an adjustment upload staging.
Characteristic Type The type of characteristic.
Characteristics Value The value of the characteristic.
Default Note. An adjustment upload staging’s characteristics default from the adjustment type.