Rates
Rates may be used to do any number of calculations for a taxpayer, such as assessments for filing based tax types, real property taxes, complicated penalty and interest rules or interest calculations for overpayments.
The rate controls:
· How charges are calculated.
· How the charges appear aesthetically on the taxpayer’s bills, for billed obligation types.
· How the general ledger is affected by the charges.
In this section, we explain how to set up your organization’s rates.
Refer to How Rates Affect The Information On A Bill for how billing uses the information in a rate to calculate a bill segment.
Not all obligations reference a rate. It’s important to understand that the system may not determine the applicable rate for a calculation solely from the obligation. For example, the rate used to calculate an assessment may be referenced on the tax form type. Whether or not an obligation uses a rate and the list of rates that can be specified on an obligation are controlled by the obligation’s obligation type.
Contents
All Rates Share A Common Structure
Control Tables That Must Be Set Up Before Creating A Rate Schedule
How To Add A New Rate Quantity Rule Algorithm
All rates share a common structure as illustrated in the following sample rate:
This rate is constructed using the following components:
· Every rate has a single rate schedule that contains information about the rate that doesn’t change over time. For example, the rate’s description.
· A rate’s effective-dated calculation algorithms are stored in a rate version. Every rate schedule has at least one rate version. Multiple rate versions exist when something about the algorithms changes and it’s important to keep the prior version in order to recalculate historical bills. The rate shown above has 2 rate versions; one effective on 1-March-1997, the other effective on 1-April-1998.
· A rate version’s calculation algorithms are stored in rate components. Every rate version will have at least one rate component. The number of rate components linked to a rate version is dependent on the complexity of the calculation rules. We have seen very simple calculation rules that need only a single rate component; we have seen others that require over 150 rate components. You will find the construction of rate components to be the most challenging task of the setup process.
· Rate factors are used to specify the amount to charge when the amount is the same for many rates. Notice that both of the above rate versions reference the prevailing “state tax” rate factor rather than specifying the specific tax percent. This allows the tax rate to be maintained in one place.
Rate factors have many uses. Rate factors have many uses in addition to specifying tax rates. Refer to An Overview Of Rate Factors for all the details.
The remainder of this chapter discusses the intricacies of setting up the rates and rate factors.
The following points describe steps you’ll follow to set up a rate.
· Create a rate schedule for the rate. Refer to Setting Up A Rate Schedule for more information.
· Set up a rate version to establish the earliest effective date of the rate. Refer to Defining Rate Versions for more information. We recommend that you set the status of the rate version to In Progress while you’re working on the rate.
· Set up rate components to define the rate version’s calculation rules. Refer to Defining Rate Components and Rate Version Merge for more information.
· After all rate components have been setup, return to Rate Version - Main and change the rate version’s status to Validated. At this point, you can use Rate Check to test the rate version.
· After you have checked the rate, return to the Rate Version - Main and change the status to Finished. This allows the rate to be used by billing.
· Define the various obligation types that can use the rate. You do this by referencing the rate on Obligation Type – Rate.
Control Tables That Must Be Set Up Before Creating A Rate Schedule
This section describes tables that must be set up before you can add a new rate schedule.
Contents
Setting Up Rate Quantity (RQ) Rules
Defining Rate Quantity (RQ) Identifiers
Setting Up Unit Of Measure Codes
Defining Frequency Codes
When you create a rate schedule, you must enter a code defining the frequency in which the charges are expressed, e.g., monthly, quarterly, biannual, etc. To set up frequency codes, open Admin Menu, Frequency.
Description of Page
Enter a unique Frequency ID and Description for each frequency.
Before entering the remaining fields, you must analyze the 'proration provisions' in your rates. For example, consider a rate used to calculate a tax exemption that is typically granted for bi-annual periods. Assume this rate’s amount will not be prorated when the taxpayer qualifies for the exemption between 20 and 160 days. This rate requires a frequency that indicates:
· 2 Periods / Year (because it’s a bi-annual rate).
· Offset for Minimum Days equal to 160.
· Offset for Maximum Days equal to -20.
When the system creates a bill using a rate with this frequency, it compares the number of days that the taxpayer qualified for the exemption to the minimum and maximum number of days inferred by the rate’s frequency. In the example above, the minimum number of days would be 20 (365 days / 2 period per year - 160 offset for minimum days). The maximum number of days would be 163 (365 days / 2 periods per year + (-20) offset for maximum days). Therefore, if a taxpayer qualifies for the exemption for less than 20 days or more than 163 days, the exemption's value is prorated. In this case, prorating the exemption will give the taxpayer some of the benefit while not prorating will either give the taxpayer no exemption or the full exemption value.
Overriding the system’s standard proration logic. If the standard proration logic does not satisfy your requirements, you may plug in an override proration algorithm to calculate the proration factors as required by your implementation. For example, we have encountered companies who treat a year as having 360 days rather than 365 days. Such a company would need to develop an override proration algorithm and plug it on the Installation record.
Where Used
Every Rate Schedule must have a frequency. Refer to Rate Schedule – Main for more information.
Setting Up Rate Quantity (RQ) Rules
To set up Rate Quantity (RQ) rules, choose Admin Menu, Rate Quantity Rule.
Description of Page
Enter a unique RQ Rule ID and a Description for the RQ rule.
Enter a Long Description that describes, in detail, what the rule does.
Indicate the UOM, TOU and RQI to be output by the rule.
Note: Unit of Measure (UOM) and Time of Use (TOU) do not normally apply to tax-based calculations and will typically be left blank.
Every rate quantity supplied to a rate has two quantities – the quantity as it was initially captured, and the quantity that rate calculation will use. Most of the time, these two amounts will be the same. They will only differ when another RQ Rule has executed and caused the billable quantity to change (an RQ Rule NEVER changes initially captured quantities). Because these two amounts may differ, an RQ Rule needs to know if it should use the quantity as initially captured OR if it should use the quantity that rate calculation will use. You use the RQ Quantity to Use field to indicate such. Valid values are Use Initial Quantity and Use Billable Quantity.
Indicate whether the system should Create Billing Error if the RQ Rule is not able to execute successfully. For most RQ Rules you would turn this option on. However, if the rule is linked to a rate where the rule is only applicable to a subset of the taxpayer base using the rate, you may not want a billing error to be issued if the rule cannot execute.
Use RQ Rule Processing to indicate if the RQ rule is Always executed by rate application, even if the billable details on the original bill segment are to be used when the system recalculates a bill segment (refer to Rebill (Bill Segment)). If the RQ rule should not be executed when the billable details on the original bill segment are used, indicate that the RQ rule should only be executed on the Initial RQ Calculation. RQ rules that create a characteristic type / value (in the characteristic collection) used by one or more rate factors referenced in a rate component should typically be always executed. Refer to Base Package RQ Rules for examples of RQ rules that create a characteristic type / value.
Select the RQ Algorithm Type that controls how the system manipulates the quantity supplied to the rate. Define the Parameters to be used by the RQ algorithm.
Base Package RQ Rules
The system provides a number of base package RQ rule algorithms. Click here to see algorithm types available for this entity.
Note. If the base package algorithms are not sufficient for your rating requirements, you must write a new RQ rule algorithm. Refer to How To Add A New RQ Rule for how to do this.
For more information about defining algorithm types, refer to Setting Up Algorithm Types.
Where Used
A Rate Schedule may have zero or more RQ Rules. Refer to Rate Schedule - RQ Rules for more information.
Defining Rate Quantity (RQ) Identifiers
Warning! RQIs exist to support calculations performed by rate components. This means that you must design your rate components before you can design your rate quantity identifiers. We strongly recommend that you design “on paper” how every rate’s rate component looks before you attempt to set up your RQIs.
Note. If you create an RQI, you must also have a corresponding RQ Rule to calculate the amount of the RQI to be charged by the rate. If not, it is impossible for the system to generate a bill line for the RQI because there will be no quantity associated with the RQI.
To define rate quantity identifiers, open Admin Menu, Rate Quantity Identifier.
Description of Page
Enter a unique Rate Qty. Identifier and Description for every RQI.
Enter the appropriate number of Decimal Positions for each RQI. The rate application process uses this information to round the calculated rate quantity prior to applying appropriate rate components.
Where Used
An RQ Rule may use an RQ Identifier to describe what it generates. Refer to Setting Up Rate Quantity (RQ) Rules for more information.
A Rate Quantity Rate Component may use an RQ Identifier to describe what it is charging. In this situation, the rate must contain an RQ Rule that generates a quantity for this RQI; otherwise there will be a charge without a rate quantity. Refer to Rate Component – Main Information for more information.
Setting Up Unit Of Measure Codes
Many rates contain prices in respect of some number of something. We use three distinct codes to identify the “thing” being priced in a rate. Unit of measure (UOM) is one code provided to help identify something being priced in a rate.
To define unit of measure codes, open Admin Menu, Unit of Measure.
Description of Page
The following fields display for each unit of measure:
UOM The unique identifier of the unit of measure.
Description The full description of the UOM.
Tax Type The type of rate associated with this UOM. Refer to Setting Up Tax Types for more information.
Decimal Positions The number of decimal positions that appear on bill lines.
Where Used
Follow this link to open the data dictionary where you can view the tables that reference CI_UOM.
Setting Up Time-Of-Use Codes
Many rates contain prices in respect of some number of something. We use three distinct codes to identify the “thing” being priced in a rate. Time of Use (TOU) is one code provided to help identify something being priced in a rate.
To define time-of-use codes, open Admin Menu, Time of Use.
Description of Page
Enter a unique Time of Use code and Description for every time of use code.
Where Used
Follow this link to open the data dictionary where you can view the tables that reference CI_TOU.
A rate schedule is setup for every rate used in calcualtions. Rate schedules are defined using the pages described in this section.
A rate schedule isn’t complete without rate versions and rate components. Refer to All Rates Share A Common Structure for information about how you must also create rate versions and rate components for every rate schedule.
Contents
Rate Schedule - Main
You start the rate definition process by selecting Main Menu, Rates, Rate Schedule. On this window you enter general information about the rate.
Description of Page
Enter a unique Rate Schedule ID to identify the rate. The value that you supply will typically correspond with the identity of the rate in your rate book.
Enter a Description for the rate schedule.
Select the Tax Type that describes the type of tax associated with this rate. When you maintain an existing rate schedule, this field will be gray if the rate is referenced on at least one obligation type. See Setting Up Tax Types for more information.
Select a Frequency to define the time period in which the rate’s charges are expressed. See Defining Frequency Codes for more information.
Select a Currency Code to define the currency in which the rate’s charges are expressed. See Defining Currency Codes for more information.
Currency note. All rate factors that are referenced on the rate’s rate components must be denominated in the same currency as defined on the rate schedule. This is because rate factors are used when the charge is “soft” and all charges in a rate, be they hard or soft, must be in the same currency. Also note – all rates referenced on an account’s obligations must be denominated in the same currency as defined on the account.
Turn on Allow RVs Proration if a change in the Rate Version during a bill period should be prorated. If changes should not be prorated, indicate the RV Selection Date to use when the system determines which rate version to use; available options are:
|
Accounting Date |
The rate version effective on the bill’s accounting date will be used. |
|
Bill End Date |
The rate version effective on the bill’s end date will be used. |
|
Bill Start Date |
The rate version effective on the bill’s start date will be used. |
Rate Schedule Tree
The right half of this page is dedicated to a tree that shows the rate schedule’s RQ Rules and Rate Versions. You can use this tree to view high-level information about these objects. You may also transfer to a given rate version by selecting that rate version.
Note. The duplicate action in the action button bar enables you to copy another rate schedule and optionally, its rate versions. Refer to Duplicate Button in the system wide standards document for more information.
Rate Schedule - RQ Rules
When a rate schedule has RQ Rules, the system executes each rule’s algorithm before it calculates the charges embodied in the rate’s rate components. Open Rates, Rate Schedule and navigate to the RQ Rule to link RQ Rules to a rate.
For more information, refer to Setting Up Rate Quantity (RQ) Rules.
Note. The Rate Schedule Merge page enables you to build the RQ rule collection for your rate schedule by copying collections from existing rate schedules.
Description of Page
Enter a Rate Quantity Rule for every type of rate quantity manipulation required by the rate. The Sequence number is important when you have multiple rules linked to the rate, as it defines the order in which the rules will be executed.
Where Used
Billing uses this information to create additional rate quantities at billing time.
Rate Schedule - Bill Messages
When a rate schedule has bill messages, the system will sweep these messages onto bills that use the rate.
For more information about bill messages, refer to The Source Of Bill Messages.
Note. The Rate Schedule Merge page enables you to build the bill message collection for your rate schedule by copying collections from existing rate schedules.
Select Main Menu, Rates, Rate Schedule and navigate to the Bill Messages to link bill messages to a rate.
Description of Page
Use the Bill Messages collection to define Bill Message codes that should appear on bills that use a given rate schedule. For each message, also specify the Start Date and End Date when such a message should appear on the bill (leave End Date blank if the message should appear indefinitely).
Where Used
The system snaps bill messages on a bill during bill completion. Refer to The Source Of Bill Messages for more information.
Use this page to modify an existing rate schedule by copying information from other rate schedules. This page may be used to copy records from the RQ rule, and bill message collections from one or more existing rate schedules to another. Some examples of when this page may be used are as follows:
· You wish to create a new rate schedule, which is similar to an existing rate schedule. Rather than copying all the information from the existing rate schedule and then removing the inapplicable components, this page may be used to selectively copy only the information applicable to the new rate schedule.
· Perhaps you have a tax calculation that contains many optional components. Rather than building a generic rate schedule used by many tax form types, and using other logic to determine which options are applicable to which tax form, you may choose to build a custom rate schedule for each form type, using only the components applicable to that tax form. In this scenario, you may choose to create special ‘mini’ rate schedules, one for each of the various calculation options. Then, you could use the rate schedule merge page to select the components applicable for the new custom rate schedule.
· Perhaps you are adding several new bill messages, which are applicable to multiple existing rate schedules. Once you have added the new messages to one rate schedule, you may find it easier to update the subsequent rate schedules by using the rate merge page to copy the messages across.
Note. The target rate schedule must exist prior to using this page. If you are creating a new rate, you must first go to the Rate Schedule page to add the new rate schedule and then navigate to the merge page to copy collection information.
Duplicate versus Merge. The Rate Schedule page has Duplication capability. You would duplicate a rate schedule if you want to a) create a new rate schedule AND b) populate it with all the information from an existing rate schedule. You would use the rate schedule merge page if you want to build a rate schedule using pieces of one or more rate schedules.
Open Main Menu, Rates, Rate Schedule Merge to open this page.
Description of Page
Select the Original Rate Schedule that is the target for merging the rate schedule collection information.
Select the Merge From Rate Schedule that is your template rate schedule to copy the collections from.
Note. You may only copy information from one Merge From rate schedule at a time. If you wish to copy information from more than one rate schedule, select the first Merge From rate schedule, copy the desired records, Save, then select the next Merge From rate schedule.
The left portion of the page will display any existing records in the collections for the original rate schedule. The right portion of the page will display the existing records in the collections for the Merge From rate schedule.
You may use the Copy All button to copy all the records in all the collections from the Merge From rate to the Original rate. If you do not choose to copy all, you may copy records individually as described below.
The left portion of the RQ Rule collection initially displays existing RQ rule records linked to the original rate schedule. In the Merge Type, you will see the word Original, for any of these records. The Sequence number and RQ Rule description are displayed. In the right portion of the collection, the existing records in the merge from rate are displayed initially.
The left portion of the Bill Messages collection initially displays existing bill messages linked to the original rate schedule. In the Merge Type, you will see the word Original, for any of these records. The description of each Bill Message is displayed. In the right portion of the collection, the existing records in the merge from rate are displayed initially.
The topics, which follow, describe how to perform common maintenance tasks:
Contents
Removing A Row
If you wish to remove a record linked to the Original rate schedule, press the “-“ button to the left of the record.
Adding A New Row
You may move any of the records from the Merge From rate to the original rate by selecting the left arrow adjacent to the desired row. Once a record is moved it will disappear from the Merge From information and appear in the Original information with the word Merge in the Merge Type column.
Removing An Uncommitted Row
If you have copied a row across by mistake, you may remove it by clicking on the right arrow adjacent to the appropriate record.
Moving Rows Up and Down
The RQ Rule grids contain sequence numbers that indicate the order in which the rules should be executed. You may modify the execution order using the up and down arrows.
Refer to Editable Grid in the system wide standards documentation for more information about adding records to a collection by selecting from a list and repositioning rows within a grid.
This section describes rate factors and how they are used to levy the many charges referenced in a rate.
Warning! Most rate factors exist to support calculations performed by rate components. This means that you must design your rate components before you can design your rate factors. We strongly recommend that you design “on paper” how every rate’s rate components looks before you attempt to set up rate factors.
Contents
The Structure Of A Rate Factor
An Illustration Of A Rate Factor And Its Characteristics
Deriving / Passing In Characteristic Values
An Overview Of Rate factors
The primary reason why rate components exist is to define how to calculate values to determine tax obligations. When you create rate components, the following factors indicate how these values should be calculated or determined:
· Specify the value directly in the rate component.
· Tell the rate component to use the value defined in a rate factor.
· Tell the rate component to use the value calculated by a “for calculation purposes only” rate component.
· Tell the rate component to call an algorithm to calculate the value.
The remainder of this section describes the rate factor approach. The other methods are discussed in Designing Rate Components.
Rate factors are frequently used to specify a tax rate. For example, you could specify the current tax rate (say 6%) directly in every rate’s rate components OR you could indicate every rate should levy the current state tax rate and have the system look up the applicable rate when it calculates bills. The latter approach involves using a rate factor to indicate that the amount to charge should be retrieved from someplace other than the rate component when a bill is calculated.
You can use rate factors to define any of the following types of charges:
· A flat amount. This would typically be used to define fixed charges such as fees.
· An amount for a given unit of measure.
· A percentage. This would typically be used for tax rates and exemption percents.
As a rule of thumb, you would use a rate factor (rather than specify the value in the rate component) when any of the following situations exist:
· The same charge exists in many rates. For example, if there are 3 rates that all contain the same fixed charge, it would make sense to use a rate factor to levy this charge rather than specify the same value on 3 rate components.
· The amount being charged is dependent on some physical characteristic of the taxpayer’s location.
· The amount being charged is dictated by some external organization and therefore can change independently from the rate. For example, city tax percentages are set by city taxing authorities and can be changed at any time (and you don’t want to change the rate when these charges change).
· The amount being charged varies depending on WHERE the taxpayer lives.
· A charge is only levied for a subset of taxpayers for defined periods of time.
· The charge differs per taxpayer.
Warning! As you can deduce, rate factors are extremely flexible. While the flexibility makes for a very powerful rating engine, it also presents you a dizzying array of options. We have discovered that to take advantage of the flexibility, you need to gain an overall understanding of the taxation provisions in ALL of your rates. Only then can you make logical and pragmatic decisions in respect of the number and type of rate factors.
The Structure Of A Rate Factor
All rate factors share a common structure as illustrated below:
The above example shows a standard rate factor made up of the following tables:
· A rate factor contains descriptive information and attributes that control how the rate factor may be used in the system.
· All rate factors have the capability of having different values depending on some characteristic of the location. For example, a rate factor used to levy a city tax would have a different tax rate depending on the city in which the taxpayer resides. A rate factor characteristic must exist for every city with a tax (cities without a tax will not be linked to the city tax rate factor). At billing time, if the system cannot find a rate factor characteristic that corresponds with the taxpayer’s city of residence, the charge will be skipped.
· And finally, each rate factor characteristic may have many rate factor values over time. To continue with our city tax example, each city with a tax can have different tax rates over time. There are different ways in which a rate factor’s values may be defined:
· For rate factors whose values are applicable to many taxpayers where only one value is effective on a given date, e.g., a city tax, the values are defined using rate factor values. Refer to Defining Rate Factor Values for more information.
· For rate factors whose values are applicable to many taxpayers where more than one value is effective on a given date.
· For rate factors whose value differs per taxpayer, the value is defined in the taxpayer’s obligation. Refer to Obligation – Contract Value for more information about rate factors in contract terms.
An Illustration Of A Rate Factor And Its Characteristics
The following picture illustrates how a rate factor and its characteristics are used to retrieve the relevant city tax at billing time:
The following points describe the above:
· At billing time, the billing engine sends a request to a rate to calculate the appropriate city tax based on the known real property tax calculated for the county.
· The rate calculates charges without rate factors until it encounters the rate component used to levy city tax. This rate component references a rate factor. This means the rate must get the tax rate(s) in effect during the billing period from this rate factor.
· The city tax rate factor contains an attribute defining that the location’s taxing city characteristic controls the rate factor value. The rate factor therefore extracts the taxing city from the location.
Deriving characteristic values. Rather than have the system extract the characteristic value from an entity, you can setup the system to derive the characteristic value when the rate is calculated. For example, if all of your taxpayers are located in a single city, you may not want to maintain the taxing city on every location. To do this, you could setup the rate to “hard code” a taxing city of say Sterling. This is an advanced topic, but it may prove useful for your implementation. Refer to Deriving / Passing In Characteristic Values for the details.
· The location returns the taxing city and the rate factor extracts the tax rate(s) in effect during the bill period and returns them to the rate.
· The rate applies the tax percents and returns the charges to billing.
Some rate factors don’t need a characteristic. There are rate factors whose value does not differ based on a characteristic. For example, a rate factor that does not need a characteristic is a fee assessed for returned checks. These are typically flat fees that do not vary when applied. However, because of the relational design of the system, every rate factor value must reference both a rate factor and a characteristic value. Therefore, if you have rate factors whose value is not related to a characteristic, you must specify a characteristic type on the rate factor with a characteristic value that is exactly the same as the characteristic type.
For more information about setting up characteristics, see Setting Up Characteristic Types & Their Values.
Deriving / Passing In Characteristic Values
Warning! This is an advanced, technical concept.
In An Illustration Of A Rate Factor And Its Characteristics, we described how the system retrieves a characteristic value from a location when a rate factor is encountered that uses a location characteristic. This is a very common technique and is easy to understand. However, there are situations when an entity in Oracle Enterprise Taxation Management doesn’t contain the appropriate characteristic value and therefore other techniques must be used. These techniques may not apply to your implementation, but they’re worth understanding to help you form an intuitive understanding of rate application:
· Assume you have a charge that is based on the account’s account type and the obligation’s revenue class. This type of charge’s characteristic value is not extractable from a single entity. Rather, the system must construct the characteristic value real-time by concatenating information from the account and obligation being billed. In this situation, you can use an RQ rule to derive this characteristic type and value. This RQ rule would create a characteristic type and value real time by concatenating the account’s account type and the obligation’s revenue class. This characteristic type and value only exists in memory while rate application executes. This is an example of the system deriving a characteristic value as opposed to it being passed in or retrieved from another object in the system.
When you setup a rate factor to use a characteristic whose value is derived or passed in, you need to define its characteristic source as Characteristics Collection. This source tells the system to extract the characteristic value from memory rather than extracting it from an object within the system.
Note. The various plug-in spots on a rate component have access to the Characteristics Collection. You might find this useful if you have a rate component that needs to calculate characteristic values for subsequent rate components.
Defining Rate Factors
You create a rate factor for every type of charge whose value is not specified directly in a rate component.
You use two windows to set up a rate factor. On the first, you define general information describing how the rate factor is used in the system. On the second, you define every characteristic value for which the rate factor has a value.
Contents
Defining General Rate Factor Information
Setting Up Rate Factor Characteristics
Defining General Rate Factor Information
You begin to define a rate factor by selecting Main Menu, Rates, Rate Factor.
Description of Page
Enter a unique Rate Factor code and a Description for the rate factor.
Rate Factor Type is set to Regular, to indicate that this rate factor’s values are specified on Rate Factor Value – Main or on Obligation – Contract Values.
Enter a Currency Code to define the currency in which the rate factor’s charges are denominated. This field will be gray if the rate factor is referenced on a rate component.
Note. Rate factors referenced on a rate component must be denominated in the same currency as is the rate.
Select the Value Type to define the kind of value maintained by this rate factor. The Value Type options are:
|
Charge |
The value maintained in this rate factor is a fixed amount (e.g., a flat charge). |
|
Percentage |
The value maintained in this rate factor is a percentage. |
|
Unit Rate |
The value maintained in the rate factor is a charge per rate quantity. |
This field will be gray if the rate factor is already referenced on a rate component or if the rate factor already has values.
Turn on Error If No Value if the system should create a billing error when a rate factor value doesn’t exist for the characteristic value linked to the taxpayer. Confused? To clarify this, you need to be aware that there are different types of rate factors:
· Those that should have a value for every taxpayer whose rate references the rate factor. A rate factor used to levy the relevant state tax is a good example (assuming every state has a tax). For this type of rate factor, if the system cannot find a rate factor value for the taxing state, it must generate a billing error because data is missing from the system. You would turn on Error if No Value for this type of rate factor.
· Those that only have a value when the taxpayer has a characteristic value that levies a charge. A rate factor used to levy the relevant city tax is a good example (because not all cities levy taxes). For this type of rate factor, if the system cannot find a rate factor value for the city in which the taxpayer lives, the rate component will be skipped and no billing error will be generated. You would turn off Error if No Value for this type of rate factor.
Rate factors used to levy taxes may or may not be eligible for tax exemptions; it’s up to the respective taxing authority. Taxpayers who are eligible for the tax exemption will have their tax obligation reduced (or nullified) at billing time. For rate factors that are eligible for tax exemptions, turn on Tax Exemption. If an obligation is fully or partially exempt for the taxes defined by a given rate factor, the rate factor and the exemption information for the taxpayer must be indicated on the obligation page. This field will be gray if the rate factor is referenced as being tax exempt in an obligation.
Tax Exemptions limited to Apply To Rate Components. Although rate factors marked as eligible for tax exemptions may be referenced on several different types of rate components, only Apply To rate components include the logic to check for tax exemption eligibility.
For more information about how to make a taxpayer tax exempt, refer to Obligation – Tax Exemptions.
Some types of rate factors do not have the same value for all taxpayers. Rather, their value may be unique for every taxpayer or it may be unique for some taxpayers and common for others. For example, rates may be defined for groups of taxpayers based on special incentive programs such as low-income groups or charitable organizations. Those taxpayers that do not qualify for these programs will use a general rate factor. For rate factor types where a taxpayer may have their own unique price, turn on Value In Contract Term. For any obligation that has a unique value for a given rate factor, the rate factor and the obligation’s value must be indicated on the obligation page. When applying the rate for a rate factor of this type, the system will first check for the existence of a contract value for the obligation and if one is not found, it will use the value on the rate factor. This field will be gray if a contract term referencing this rate factor exists. Time of Use rate factors may follow this same logic. Taxpayers may override their time of use values by using a contract term.
Note. The Error if No Value switch also affects what happens if there is no contract term for the rate factor. If the error switch is on, a billing error will be generated. If the error switch is off, no billing error will be generated and the rate component will be skipped.
For more information about how to specify a rate factor value in a taxpayer’s contract, refer to Obligation – Rate Info.
Contract riders are used when the charge associated with the rate factor is only applicable to some taxpayers for some period of time. Turn on Contract Rider Applicability if the rate factor’s applicability is contingent on the existence of a contract rider. This field will be gray if a contract rider referencing this rate factor exists on an obligation.
For more information about how to establish a contract rider for a taxpayer, refer to Obligation – Contract Riders.
The proration information tells the system how to handle changes to rate factor values and their optional contract riders that may occur during a taxpayer’s bill period. Turn on Allow Proration if changes to the rate factor’s value and/or contract riders should be prorated. If changes should not be prorated, indicate the Rate Selection Date to use when the system retrieves rate factor values or determines if contract riders are applicable; available options are:
|
Accounting Date |
The rate factor value effective on the bill segment’s accounting date will be used. |
|
Bill End Date |
The rate factor value effective on the end date will be used. |
|
Bill Start Date |
The rate factor value effective on the bill segment’s start date will be used. |
Rate Factor Tree
The right half of this page is dedicated to a tree that shows the rate factors characteristics and their respective values. You can use this tree to both view high-level information about these objects and to transfer to the respective page in which an object is maintained by using the available Go To buttons.
Where Used
Many types of Rate Components may use a Rate Factor to define the amount being charged. Refer to Rate Component – Main Information for more information.
An obligation references Rate Factors as follows:
· When an obligation’s Apply To rate component references tax exemptible rate factors AND the taxpayer is tax exempt, the obligation will define the rate factors from which the taxpayer is exempt. Refer to Obligation – Tax Exemptions for more information.
· When an obligation’s rate references rate factors whose charges are taxpayer-specific (i.e., specified on a contract term), the obligation will contain charges for these rate factors. Refer to Obligation – Contract Values for more information.
· When an obligation’s rate references rate factors that are contingent on contract riders, the obligation will define the rider period (if any) for these rate factors. Refer to Obligation – Contract Riders for more information.
Setting Up Rate Factor Characteristics
After defining general information about a rate factor, open Main Menu, Rates, Rate Factor and navigate to the Rate Factor Characteristic tab to define characteristic values for which a charge is applicable. For example, a rate factor used to levy the applicable city tax would require the definition of every city that levies a tax.
Note. If all values for a rate factor are specified in contract terms, you do not need to set up Rate Factor Characteristics.
Description of Page
Enter a Characteristic Type to indicate the type of characteristic that controls how the rate factor’s value is defined. This field will be gray if Rate Factor Characteristics are specified in the following grid.
The Characteristic Source defines where the system retrieves the characteristic value at billing time. The Characteristic Source options are:
|
Account |
The characteristic type's value will be retrieved from the obligation's account. |
|
Asset |
This option is not supported in this release. |
|
Characteristic Collection |
Refer to Deriving / Passing In Characteristic Values for an explanation of this value. |
|
Main Person |
The characteristic type’s value will be retrieved from the main person linked to the obligation’s account. |
|
N/A |
The characteristic type’s value is the same for all customers using the rate. If this option is used, you must still choose a Characteristic Type. This Characteristic Type should have a single Characteristic Value. The ID of the characteristic value must be identical to the ID of the characteristic type. |
|
Obligation |
The characteristic type’s value will be retrieved from the obligation. |
|
Location |
The characteristic type’s value will be retrieved from the obligation’s characteristic location. |
For more information about characteristics, see Setting Up Characteristic Types & Their Values and An Illustration Of A Rate Factor And Its Characteristics.
Use the add and remove buttons to define the Characteristic Values that are relevant for the rate factor’s Characteristic Type. For example, if the rate factor is used to levy a city tax, you would define the city’s that have a city tax in the above collection.
Use the External ID if the values for this characteristic are interfaced to the system from an external source and you want to record an identifier for the source.
Note. If the rate factor’s value is the same for all taxpayers, you still must link a “dummy” characteristic value to the rate factor. In other words, you’ll have to create a characteristic type called “n/a” and define for it a characteristic value of “n/a”. Then, on the rate factor, you reference the “n/a” characteristic type and on the above window, you indicate a characteristic value of “n/a”.
Defining Rate Factor Values
After the rate factor and its characteristic values are defined, you define the charge / percent and GL distribution associated with each rate factor characteristic. The topics in this section describe the pages used to set up this information.
Contents
Rate Factor Value - GL Distribution
Rate Factor Value - Main
After the rate factor and its characteristic values are defined, select Main Menu, Rates, Rate Factor Values to define the charge / percent applicable to each rate factor characteristic.
Description of Page
Enter the Effective Date and respective Value for the rate factor and characteristic value. The first date should be the earliest date on which the rate factor’s charges are effective. Subsequent effective dates and values are required whenever the value changes.
Default note. A Value of 0 will be defaulted.
Rate Factor Value - GL Distribution
Select Main Menu, Rates, Rate Factor Value and navigate to the GL Distribution tab to define the GL account affected by the rate factor characteristic.
Important! If you do not specify this information for a rate factor characteristic, the distribution code defined on the rate component that references the rate factor will be used.
Description of Page
If the rate factor characteristic’s charges are booked to a different GL account depending on the characteristic value, specify the appropriate Distribution Code for each Revenue Class.
Optional information. Specifying distribution codes on a rate factor is optional. You would only do this if the GL distribution code differs based on the characteristic value (e.g., the city tax payable GL account differs depending on the city). If you do not enter the above information, the distribution code specified in the rate component that references the rate factor will be used.
After defining general information about a rate on Rate Schedule Maintenance, you must link to it a rate version. The rate version defines the effective date of the calculation rules defined in its rate components. A rate schedule will have multiple rate versions if its calculation rules (i.e., its rate components) change over time.
A switch on the rate schedules controls what happens if multiple rate versions are effective during a bill period. When the system creates a bill segment for an obligation, it checks if multiple rate versions are in effect during the bill period. If so, it uses the rate schedule’s Allow RVs Proration switch and RV Selection Date flag to determine if it should prorate the various rate versions or if it should pick one of the rate versions effective during the bill period.
After a rate version exists, you add rate components to it using Rate Component Maintenance and/or Rate Version Merge. After you have added all necessary rate components, don’t forget to return to Rate Version - Main and change the state of the rate version to Finished (otherwise, it cannot be used by billing).
The topics in this section describe how to setup a rate version.
Contents
Rate Version - Bill Print Info
Lifecycle of a Rate Version
The following diagram shows the possible lifecycle of a rate version (you’ll notice that you can change a rate version from any state to any state).
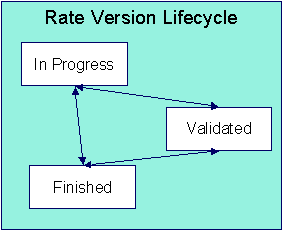
A rate version is in the In Progress state while you build its rate components. While a rate version is in this state, the system does not perform cross validation between rate components as they are added / changed / deleted using Rate Component Maintenance and/or Rate Version Merge. However, the system will perform inter-field validation applicable to each type of rate component. Rate versions in this state may not be used by Rate Check, nor will they be used up by the billing process.
You transition a rate version to the Validated state when you’re ready to check it using Rate Check, but you don’t want billing to use it to calculate charges. When a rate version is transitioned to this state, the system performs cross validation between its rate components. If any validation errors are found, an error message is displayed and the status remains In Progress. If all validation checks are passed, the rate version status will become Validated. We’d like to stress that rate versions in this state may be used by Rate Check, but will not be used by billing.
You transition a rate version to the Finished state when it can be used by billing to calculate charges. All of the cross validation between rate components will be performed when transitioning to this state.
Finished and Validated states also affect rate component maintenance. If a rate version is Finished or Validated, the system performs internal consistency checks every time a rate component is added, changed or deleted using Rate Component Maintenance and/or Rate Version Merge. If you don’t want these checks to be performed while you’re working on a rate version’s rate components, change its state to In Progress.
Rate Version - Main
Use Main Menu, Rates, Rate Version to maintain a rate version.
Description of Page
Rate Version contains basic information about the rate version. This information only appears after the rate version has been added to the database.
Rate Schedule defines the rate to which the rate version is linked. Effective Date defines the date on which the rate version’s rate components become effective. These fields are the unique identifier of the rate version. Both fields become protected after the rate version is added to the database.
Multiple rate versions may be prorated. When the system creates a bill segment for an obligation, it checks if multiple rate versions are in effect during the bill period. If so, it uses the rate schedule’s Allow RVs Proration switch and RV Selection Date flag to determine if it should prorate the various rate versions or if it should pick one of the rate versions effective during the bill period.
The Rate Version Status indicates the current state of the rate version. Refer to Lifecycle of a Rate Versionfor more information.
Warning! Billing ignores rate versions that are not in the Finished status. This means that if you create a new rate version and forget to finish it, billing will use the prior rate version when it calculates the taxpayers’ bills.
Specify the description of the rate version in Description on Bill. This description is saved on bill calculation details created using this rate version. The following table illustrates the substitution variable(s) that may be used to substitute variables into the description during billing:
|
Substitution Character |
What It Does
|
|
%D |
Replaces the substitution character with message 10101 from message category 4. This message is maintained in the standard message table. We recommend this message be set to “(prorated for %1 of %2 days)” where %1 will be substituted with the number of days of prorated consumption charged on the bill line and %2 will be the “normal” days associated with the rate’s charges. This message will only be substituted when the rate version is prorated. |
The following is an example of the content of common Description on Bills along with how the line would look on the bill:
|
Description on Bill |
How It Looks On A Bill |
|
Interest %D |
Interest (prorated for 10 of 30 days) |
The tree that follows contains a summary of the rate version’s rate components. You can use this tree to both view high-level information about these objects and to transfer to the respective page on which an object is maintained.
Note. The duplicate action in the action button bar enables you to duplicate a rate version and its rate components. Refer to Duplicate Button in the system wide standards document for more information.
Rate Version - Bill Print Info
This page allows you to maintain the bill print information for all of the rate version’s rate components. Note, you can also maintain this information for individual rate components on Rate Component – Main.
Description of Page
The grid contains an entry for each rate component linked to the rate version. The following information is displayed in the grid:
Sequence uniquely identifies the rate component. It also controls the order in which the rate component is processed when the rate version is processed by billing.
Description is the rate component’s description.
Description on Bill is the verbiage that appears on the bill line generated for this rate component. You can dynamically substitute variables into this description (e.g., charge and quantity) when billing calculates the rate component’s charges. Refer to How To Use Description on Bill for a discussion of the various substitution variables.
Turn on the Print switch if you want the bill line to appear on the taxpayer’s bill.
Some bill lines don’t print. You may wonder why we give you the ability to not print a bill line. The reason is because ALL bill lines are shown on Bill Segment – Calculation Details. However, only those lines marked as Print are presented to the taxpayer. This way, if you want to suppress some calculation details, you can, but still show the details to your own employees.
The Print If Zero switch is only enabled if the Print switch is turned on. It allows you to indicate if a bill line should print when the bill line’s value is zero:
· Turn this switch on if the bill line should print when the calculated value is zero.
· Turn this switch off if the bill line should not print when the calculated value is zero.
How To Use Description on Bill
Enter the verbiage to appear on the bill segment in the Description On Bill. Turn on Print if the verbiage should appear on the printed bill.
Suppressing calculation details on the printed bill. Only rate components used to calculate intermediate values are typically suppressed on a bill. For these types of rate components, we recommend using Description on Bill to show users how the line was calculated, but turn off the Print switch. This way, users will see the calculation details on the Bill Segment – Calc Lines window, but the taxpayer won’t see it on the bill.
Many lines that appear on a bill do not contain static verbiage. Rather, the printed lines contain information from the calculation process. For example, the bill line for state tax would typically contain the tax percent.
You control exactly what is substituted in the bill line by entering one or more of the following substitution variables in the Description on Bill field:
|
Substitution Character |
What It Does
|
|
%A |
Replaces the substitution character with the amount of the bill line. Please be aware of the following: · If the rate component isn’t designated as being “for calculation purposes only” (FCPO), all trailing zeroes up to the decimal position of the rate’s currency will be removed. If the rate component is designated as being “for calculation purposes only” (FCPO), the number of decimal places as defined in the rate component’s precision will be shown. · All leading zeroes will be removed unless the value is between 1 and -1 in which case a leading 0 will appear before the decimal place. · The Symbol on the Currency control table will prefix the value. · The position of the negative sign and currency symbol is dependent on the display profile of the user who generated the bill. |
|
%D |
Replaces the substitution character with message 10101 from message category 4. This message is maintained in the standard message table. We recommend this message be set to “(prorated for %1 of %2 days)” where %1 will be substituted with the number of days of prorated consumption charged on the bill line and %2 will be the “normal” days associated with the rate’s charges. This message will only be substituted when the rate component is prorated. Note, neither %1 nor %2 are required. Either this character OR %F should be used when you desire to substitute the charge / percent into the bill line. If the charge is proratable, %D should be using in conjunction with %R to print an appropriate message when the charges are prorated. |
|
%F |
Replaces the substitution character with message 10102 from message category 4. This message is maintained in the standard message table. We recommend this message be set to “(prorated by %1)” where %1 will be substituted with the factor used to prorate the charge. This message will only be substituted when the rate component is prorated. Note, %1 is not required. If the charge is proratable, %F should be used in conjunction with %I to print an appropriate message when the charges are prorated. |
|
%I |
Replaces the substitution character with the value specified in the rate component / rate factor. If the value is a percent, · all leading and trailing zeroes will be suppressed, · and a “%” will be suffixed to the resultant value. If the value is not a percent, · all trailing zeroes up to the decimal position of the rate’s currency will be removed, · and all leading zeroes will be removed unless the value is between 1 and -1 in which case a leading 0 will appear before the decimal place, · and note that the position of the negative sign and currency symbol is dependent on the display profile of the user who generated the bill. Either this character OR %R should be used when you desire to substitute the charge / percent into the bill line. Using %I will cause the value as specified in the rate component to be substituted regardless of whether the charges are prorated. If the charge is proratable, %I should be used in conjunction with %F to print an appropriate message when the charges are prorated. |
|
%Q |
Replaces the substitution character with the rate quantity being billed. Leading zeroes are suppressed. The decimal places shown are specified in a field on the Unit Of Measure control table. |
|
%R |
Replaces the substitution character with the value specified in the rate component / rate factor. Either this character OR %I should be used when you desire to substitute the charge / percent into the bill line. Using %R causes the prorated charge / percent to be printed in the bill line (%I causes the charge / percent as specified in the rate to be printed during proration situations). If the charge is proratable, %R should be used in conjunction with %D to print an appropriate message when the charges are prorated. |
|
%S |
Replaces the substitution character with the summed amount. All trailing zeroes up to the decimal position of the rate’s currency will be removed. All leading zeroes will be removed unless the value is between 1 and -1 in which case a leading 0 will appear before the decimal place. The Symbol on the Currency control table will prefix the value. If the value is negative, a “-“ will prefix the value. This character should only be used with Minimum, Apply To, and Summary rate components. |
|
%T |
Replaces the substitution character with message 10103 from message category 4. This message is maintained in the standard message table. We recommend this message be set to “(%1% exempt)” where %1 will be substituted with the tax exemption percent as specified in the obligation. This message will only be substituted when the rate component’s rate factor is eligible for tax exemptions AND the taxpayer is exempt from the tax. Note, %1 is not required. |
|
Lines that don’t print |
If the bill line is not printed (as defined by the Print switch), message 10104 from message category 4 will be appended to the bill line. This message is maintained in the standard message table. We recommend this message be “NOT SEEN BY TAXPAYER!” This message appears in the bill line that appears in the billing windows but does not appear on the taxpayer’s bill. |
The following are examples of the content of common Description on Bills along with how the line would look on the taxpayer’s bill:
|
Description on Bill On Rate Component |
How It Looks On A Bill
|
|
County Tax at %R of %I: %A |
County Tax at 1.0% of $70,160: $701.60 |
|
%O: %I %D |
Homestead Exemption: $150.24 (prorated for 100 of 183 days) |
|
First %Q of Income %R |
First $45,000 of Income at 10% |
|
State sales tax %R %T |
State sales tax 6.25% (50% exempt) |
|
Minimum charge of %I %F |
Minimum charge of $10.00 (prorated by .3333) |
|
Subtotal of %S |
Subtotal of $1,123.23 |
The prorated references will only appear if the rate component’s charges are prorated due to a short or long bill period.
Rate components are the fundamental building blocks of your rate calculation algorithms. All of the other rate and rate factor set up tasks are done in preparation of the creation of these records. This means that you must design your rate components before you can design rate factors, RQ rules, RQ identifiers, eligibility rules. We strongly recommend that you design “on paper” how every rate component looks on every rate schedule before you attempt to set up any of the rate control tables.
All of the calculation details and financial information that appear on a bill segment are derived using information on rate components. If you want to see the results of what rate components do, refer to Bill Segment – Calc Lines.
Warning! There are innumerable ways to design rate components for a given rate. Some designs will result in easy long-term maintenance; others will result in maintenance headaches. In this section, we provide information to help you understand the ramifications of the various options. Before you set up your production rate components, we encourage you to gain intuitive understanding of these options by using the system to prototype the alternatives.
The topics in this section provide background information that will facilitate the construction of your rate components.
Contents
Rate Component Design Methodology
The Big Picture Of Rate Component Eligibility Rules
Rate Component Design Methodology
Designing rate components is an iterative process. Over time, you will develop intuitive skills that will allow you to avoid some iterations. However, when you’re starting out, we recommend you follow these steps to design your rate components:
· Obtain copies of existing bills that use the rate in question. If the rate is new, then write up EXACTLY how the information should appear on the taxpayers' printed bills. If the rate has optional charges (e.g., city taxes that are added if applicable or senior citizen discounts), make sure your examples encompass every possible scenario.
· Next, look at the bill lines and ask yourself what are the variables that cause each line’s charges to be calculated the way they are. Consider the following examples:
· "County Tax at 1.0% of $70,160: $701.60". This charge is based on the tax rate and the base amount for the calculation. The variables involved are the tax rate, the base amount and the resulting tax amount.
· "Homestead Exemption: $150.24 (prorated for 100 of 183 days)". This line may appear on the bill if the taxpayer qualifies for this particular type of exemption. The variables involved are the exemption type, amount and proration (if applicable).
· “Minimum monthly charge of $100.00”. This is a charge that only appears if the total of the prior lines is less than $100.00. The variables involved in this line are a little complicated because they must be calculated at billing time by adding up several other lines and comparing them to the minimum charge amount. This means the variables are the total of prior lines and the minimum charge amount.
· “1.25% County Surcharge”. This charge is similar to the minimum charge in that it is calculated by adding up one or more prior lines and applying a percentage to the sum. This means the variables are the total of prior lines plus the tax percentage.
· After you’ve determined all of the potential bill lines you can start designing your rate components. Typically you create one rate component for every line that can appear on the taxpayer’s bill. When you create a rate component, you will categorize it as one of the following types:
|
Flat Charge |
This type of rate component is used to create bill lines that levy fixed charges and fees that aren’t based on the taxpayer's income, asset value or other assessable amounts. The monthly charge shown above would be levied using this type of rate component. |
|
Rate Quantity |
This type of rate component is used to create bill lines that levy charges based on some type of input quantity. |
|
Apply To |
This type of rate component is used to create bill lines that levy charges based on the amount calculated on other bill lines. |
|
Summary |
This type of rate component is used to create a “subtotal” on the bill. It exists purely for aesthetic purposes. |
|
Minimum Charge |
This type of rate component is used to create bill lines that levy charges only when the sum of previously calculated lines is less than the minimum charge amount. The minimum monthly charge shown above would be levied using this type of rate component. Note that if the values being compared are negative values, the comparison is NOT done on the absolute values, but rather on the actual values. For example, imagine you have a minimum discount of $ -2.00 and previous rate components have calculated a discount of $ -1.00. You want a rate component to create a bill line for $ -1.00 to apply a further discount. A minimum charge rate component will not work in this case because -1 is considered more than -2. For this business scenario you should use a maximum charge rate component. |
|
Maximum Charge |
This type of rate component is used to create bill lines that levy charges only when the sum of previously calculated lines is more than the maximum charge amount. Note that if the values being compared are negative values, the comparison is NOT done on the absolute values, but rather on the actual values. For example, imagine you have a maximum discount of $ -2.00 and previous rate components have calculated a discount of $ -3.00. You want a rate component to create a bill line for $1.00 to reduce the discount. A maximum charge rate component will not work in this case because -3 is considered less than -2. For this business scenario you should use a minimum charge rate component. |
|
Exact Charge |
This type of rate component is used to force a bill to add up to a given amount (regardless of how much the bill would be based on earlier rate components). |
|
Calculation Algorithm |
This type of rate component enables you to produce bill calculation lines based on logic in an algorithm that you supply. Use this rate component when none of the other rate component functions will provide you with the logic you require. |
· For each rate component, determine if the taxpayer must meet some form of eligibility criteria before the rate component is applied. For example, you may have a rate component that is calculated if a taxpayer is a senior citizen. This rate component may have eligibility criteria that requires the person to have a given characteristic value before the rate component is applied. Refer to The Big Picture of Rate Component Eligibility for more information.
· For each type of rate component (except summary), determine how you’ll define its unit rate / percent / flat amount. You have four choices:
· Specify the value directly in the rate component.
· Tell the rate component to use the value defined in a rate factor.
· Tell the rate component to use the value calculated by a “for calculation purposes only” rate component.
· Tell the rate component to call an algorithm. The algorithm will return the value.
The following tables provide guidance in respect of which of the methods to use:
|
Specify value in the rate component |
You’d specify the value in the rate component when the value in the rate is specific to that rate and is applied to all taxpayers regardless. For example, if you see a provision in the rate to add a trash fee of $45, you'd specify 45.00 directly in the rate. |
|
Use a rate factor to define the value |
The following paragraphs describe when you’d use a rate factor to define a unit rate / percent / flat amount. The same charge exists in many rates. The amount being charged varies depending on where the taxpayer lives. If you have a rate where the charge differs depending on where the taxpayer lives, you should use a rate factor to levy this type of charge. A charge (or discount) is only levied for a subset of taxpayers for defined periods of time. The charge differs per taxpayer. |
|
Use a "for calculation purposes only" rate component |
This is complicated to explain and is not used very often, but it is very powerful and handles some very complicated algorithms. It works like this – you calculate the charge / percent / flat charge on another rate component (marked as "for calculation purposes only" so it won’t affect the bill amount), and then reference it on the "real" rate component. |
|
Call an algorithm |
This is complicated to explain and is not used very often, but it is very powerful and handles some very complicated examples. It works like this – you call an algorithm and it calculates the charge / percent / charge. We supply an example of one such algorithm in the base package. If your rates require additional algorithms, you will have to develop additional algorithms. Refer to How to set up rate quantity rate components under Rate Component – Main Information for more information about this type of algorithm. |
· After you’ve categorized the bill lines into the various types and know how the price is defined, you determine how each line’s charges are reflected in your general ledger. You will need to work with your accounting department as they will tell you the exact revenue, expense, and liability accounts that will be affected by the charges.
· Finally, read the provisions of your rate (the legal wording) and make sure you haven’t left out something. This may involve having to discuss confusing provisions with your legal department.
At this point, you’re ready to start entering your rate components.
Rate Component Rounding
The topics in this section describe how to control how each rate component’s final value is rounded.
Contents
Rounding Precision Is Defined On A Rate Component
Rounding Method Is Defined On A Rate Component
Rounding And FCPO Rate Components
Interim Rounding For Apply To Rate Components
Rounding Precision Is Defined On A Rate Component
A rate schedule references a currency code. A rate’s currency code defines its maximum number of decimal places. These decimal places, in turn, control the smallest unit to which most rate components can be rounded (i.e., the rate component’s precision). For example,
· If a rate’s currency has 2 decimal places, the smallest rounding precision that most of its rate components can have is 0.01. In other words, the smallest unit to which most dollar-based rate components can be rounded is to the cent. Note, whether you round up / down / to the nearest is discussed below.
· If a rate’s currency has no decimal places, the smallest rounding precision that most of its rate components can have is 1.00.
The system supports the notion of a rate component having a greater rounding precision than its currency. For example, a rate’s currency may support 2 decimal places, but you can setup rate components to have a rounding precision of 0.05.
The reason that we underlined the word most in the previous paragraphs is that these rules do not apply to “for calculation purposes only” (FCPO) rate components. FCPO rate components don’t contribute real amounts to a bill (they exist to calculate intermediate results that are used by later rate components) and therefore they can support a rounding precision of up to 0.00001 (5 decimal places).
Rounding Method Is Defined On A Rate Component
When you setup a rate component you must define the rounding method. You are given the following choices:
· Always round up. This rounding method rounds a rate component up to the nearest value (as controlled by the rate component’s precision). For example, if a rate component’s precision is 0.01 and a value of 0.011 is calculated, the rate component’s final value would be rounded up to 0.02.
· Always round down. This rounding method rounds a rate component down to the nearest value (as controlled by the rate component’s precision). For example, if a rate component’s precision is 0.01 and a value of 0.019 is calculated, the rate component’s final value would be rounded down to 0.01.
· Round to the nearest value. This rounding method rounds a rate component to the nearest value (as controlled by the rate component’s precision). For example, if a rate component’s precision is 0.01 and a value of 0.019 is calculated, the rate component’s final value would be rounded up to 0.02. Whereas, if a value of 0.012 is calculated, the rate component’s final value would be rounded down to 0.01.
Rounding And FCPO Rate Components
As described above, for calculation purpose only (FCPO) rate components don’t contribute real amounts to a bill. FCPO rate components exist to calculate intermediate results that are used by later rate components. We therefore allow FCPO rate components to have a rounding precision greater than the rate’s currency code to a maximum of 0.00001 (5 decimal places).
Please be aware of the following:
· As described under How To Use Description on Bill, you can indicate that the final amount of a bill line should be substituted into the bill line’s description by using the %A substitution variable in the rate component’s Description On Bill. If you do this for an FCPO rate component, the system will show the number of decimal places as dictated by the FCPO’s precision.
· While rate application calculates bill lines, the system maintains each rate component’s value in memory. For FCPO rate components, this means that precisions greater than .01 are available during rate application. For example, you could indicate an FCPO rate component has a precision of .0001 and the resultant value will be maintained in memory and is available to other rate components while rate application executes.
When rate application completes, the FCPO’s value will be either saved in the bill line’s amount or discarded as per the value of the rate component’s FCPO retention rule. If you indicate that the FCPO amount should be retained on the bill line and its precision is greater than 2 decimal places, the FCPO amount will be rounded to two decimal places before it’s saved on the database. Keep in mind that this could result in an inconsistency if you used the %A substitution variable in the rate component’s Description On Bill as the value substituted into the bill line will have a greater precision.
Interim Rounding For Apply To Rate Components
The calculations for Apply To rate components involve several steps with interim values stored along the way. For every interim value that is stored, rounding rules are applied. The following steps describe the interim rounding rules:
· If the value type is not Unit Rate, the amounts for all the "cross-reference" rate components are added together and stored in the database as the Base Amount. The base amount is stored with a precision of .01 and it is rounded to the nearest value based on the currency's precision.
· The rate component calculates its charge and keeps the result in a temporary field with a precision of .00001.
· The remaining steps depend on whether or not a tax exemption is applicable
· If NO tax exemptions are applicable, the temporary field is rounded based on the rate component's rounding rules to produce the final amount.
· If there are tax exemptions, the temporary field is rounded to the nearest .01 decimal precision prior to applying the tax exemptions. When the tax exemption is applied, the result is rounded according to the currency precision and stored as the Exempt Amount. The system calculates the final amount by subtracting the exempt amount from the rounded temporary amount and then applying the rate component's rounding rules.
Rounding At The End
The following is an example of a simple bill segment with three bill lines.

The first two bill lines are calculated using simple rate components that have a precision of .01. The last bill line is special, it rounds the bill up to the next highest 0.05 (this is an example from a country that doesn’t have cents, their smallest coin is 0.05). The following would be necessary to calculate the last bill line:
· The rate component would be an exact charge rate component
· Its value (i.e., the exact charge) would be calculated using a value calculation algorithm that sums the first two rate components and rounds them up to the nearest .05. Refer to RCVL-RNDXRF for a value calculation algorithm that can perform this function.
An alternative approach is to do the following:
· Use a summary rate component to calculate the exact charge. This rate component would require the following characteristics:
· FCPO
· Non printing
· Rounding type would be round up
· Precision would be 0.05
· Reference the summary rate component as the exact charge rate component’s value
The Big Picture Of Rate Component Eligibility Rules
You can use eligibility rules to define the criteria when a rate component should be applied (or skipped). For example,
· For example, you may have a rate component that is calculated if a taxpayer is a senior citizen. This rate component may have eligibility criteria that require the person to have a given characteristic type and value (this assumes you use a person characteristic to capture the taxpayer's date of birth) before the rate component is applied.
· You may have a rate component that calculates a surcharge if the taxpayer uses 25% more than they used in the same period in prior year.
Eligibility rules are optional. If you put eligibility rules on a rate component, the rate component will be skipped or applied as per the instructions in the rules. If you don’t put eligibility rules on a rate component, the rate component will be executed (i.e., rate components are eligible by default).
The topics in this section describe eligibility rules.
Contents
A Rate Component Is Eligible By Default
Criteria Groups versus Eligibility Criteria
Examples Of Rate Component Eligibility Rules
A Rate Component Is Eligible By Default
If you don’t want to setup eligibility rules, you don’t have to. If you don’t specify eligibility rules on a rate component, it’s eligible (i.e., it’s going to be processed by rate application).
Criteria Groups versus Eligibility Criteria
Before we provide examples of eligibility criteria, we need to explain two concepts: Criteria Groups and Eligibility Criteria. A rate component’s criteria groups control whether rate application executes a rate component. At a high level, it works like this:
· A criteria group has one or more eligibility criteria. A group’s criteria control whether the group is considered True or False.
· When you create a group, you define what should happen if the group is True or False. You have the following choices:
· The rate component should be applied
· The rate component should be skipped
· The next group should be checked
We’ll use the following example to help illustrate these points. Assume a rate component is only eligible if:
· The taxpayer is a low income taxpayer and has no overdue obligations.
· OR, the taxpayer isn’t a low income taxpayer and has no more than one overdue obligation.
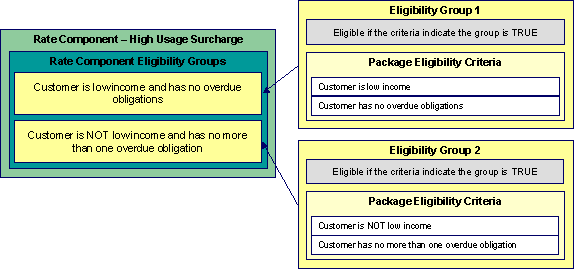
This rate component requires two eligibility groups because it has two distinct conditions:
· IF (Taxpayer is low income AND the taxpayer has no overdue obligations)
· IF (Taxpayer is NOT low income AND the taxpayer has no more than one overdue obligation)
If either condition is true, then the rate component is eligible.
You’d need to setup the following criteria groups in order to support this requirement:
|
Group No. |
Group Description
|
If Group is True |
If Group is False |
|
1 |
Taxpayer is a low income taxpayer and has no overdue obligations |
Eligible |
Check next group |
|
2 |
Taxpayer is NOT a low income taxpayer and has no more than one overdue obligation |
Eligible |
Ineligible |
The following criteria will be required for each of the above groups:
|
Group 1: Taxpayer is a low income taxpayer and has no overdue obligations |
||||
|
Seq |
Logical Criteria |
If Eligibility Criteria is True |
If Eligibility Criteria is False |
If Insufficient Data |
|
10 |
Taxpayer is low income |
Check next condition |
Group is false |
Group is false |
|
20 |
Taxpayer has no overdue obligations |
Group is true |
Group is false |
Group is false |
|
Group 2: Taxpayer is NOT a low income taxpayer and has no more than one overdue obligation |
||||
|
Seq |
Logical Criteria |
If Eligibility Criteria is True |
If Eligibility Criteria is False |
If Insufficient Data |
|
10 |
Taxpayer is NOT low income |
Check next condition |
Group is false |
Group is false |
|
20 |
Taxpayer has no more than one overdue obligation |
Group is true |
Group is false |
Group is false |
The next section describes how you’d setup the specific logical criteria in each of the groups.
Defining Logical Criteria
When you setup an eligibility criterion, you must define two things:
· The field to be compared
· The comparison method
You have the following choices in respect of identifying the field to be compared:
· You can retrieve a characteristic value linked to any of the following:
· The obligation being billed
· The obligation’s account
· The main person linked to the obligation’s account
· The characteristic location linked to the obligation
· The obligation's asset (not supported in this release)
· In addition, you can also use a characteristic value that is derived while the rate is being calculated (characteristic values can be created by RQ rules and many other rate component algorithms)
· You can retrieve the value of a given rate quantity
· You can retrieve the final value of an earlier rate component
· You can execute an algorithm to retrieve a field value from someplace else in the system. This is a very powerful feature, but it’s not terribly intuitive. We’ll present a few examples later in this section to illustrate the power of this approach.
You have the following choices in respect of identifying the comparison method:
· You can choose an operator (e.g., >, <, =, BETWEEN, IN, etc.) and a comparison value.
· You can execute an algorithm that performs the comparison (and returns True, False or INSUFFICIENT DATA). This is also a very powerful feature, but it’s not terribly intuitive. We’ll present a few examples later in this section to illustrate the power of this approach.
The Examples Of Rate Component Eligibility Rules provide examples to help you understand this design.
Examples Of Rate Component Eligibility Rules
The topics in this section provide examples about how to setup rate component eligibility rules.
Contents
A Rate Component With A Time Span Comparison
A Rate Component With Tax Type Comparison
A Rate Component With A Time Span Comparison
A rate component that is only eligible for senior citizens has the following eligibility rule:
· Birth date equates to that of a senior citizen
This rule requires only one eligibility group on the rate component. It would look as follows:
|
Group No. |
Group Description
|
If Group is True
|
If Group is False
|
|
1 |
Taxpayer Is A Senior Citizen |
Apply rate component |
Skip rate component |
The following criterion is required for this group:
|
Group 1: Residential, Calif, Senior |
|||||
|
Seq
|
Field to Compare
|
Comparison Method
|
If True
|
If False
|
If Insufficient Data |
|
10 |
Main person characteristic: Date of Birth |
Algorithm: True if senior |
Group is true |
Group is false |
Group is false |
The criterion contains a time span comparison. Time span comparisons are used to compare a date to something. In our example, we have to determine the age of the taxpayer based on their birth date. If the resultant age is > 65, they are considered to be a senior citizen. To pull this off, you can take advantage of a comparison algorithm supplied with the base rate component as described below.
· Field to Compare. The person characteristic in which the taxpayer’s birth date is held is selected.
· Comparison Method. We chose a comparison algorithm that returns a value of True if the related field value (the taxpayer’s date of birth) is greater than 65 years (refer to RECC-TIMESPN for an example of this type of algorithm).
You’ll notice that if a value of True is returned by the True if senior algorithm, the group is true (and we’ve setup the group to indicate a true group means the rate component is eligible).
The time span algorithm can be used to compare days, weeks, months, etc. Refer to RECC-TIMESPN for more information about this algorithm.
A Rate Component With Tax Type Comparison
Imagine a rate component that is only eligible if the current taxpayer has two tax types. This rate component would need the following eligibility rules:
· Taxpayer has real property taxes, and
· Taxpayer has personal property taxes.
These rules require only one eligibility group on the rate component. It would looks as follows:
|
Group No. |
Group Description
|
If Group is True |
If Group is False |
|
1 |
Has real property AND personal property taxes |
Apply rate component |
Skip rate component |
The following criteria will be required for this group:
|
Group 1: Has real property AND personal property taxes |
|||||
|
Seq |
Field to Compare |
Comparison Method |
If True |
If False |
If Insufficient Data |
|
10 |
Algorithm: check if taxpayer has real property taxes |
= True |
Check next condition |
Group is false |
Group is false |
|
20 |
Algorithm: check if taxpayer has personal property taxes |
= True |
Group is true |
Group is false |
Group is false |
Both criteria are similar – they call an algorithm that performs a logical comparison. These algorithms are a bit counter intuitive (but understanding them will provide you with another way to implement complex eligibility criteria):
Both criterion works as follows:
· Field to Compare. We chose a “field to compare” algorithm that checks if the current account has obligations that belong to a given set of tax types. It returns a value of True if the taxpayer has an active obligation that matches one of the tax types in the algorithm. In our example, the “check if taxpayer has real property taxes” algorithm returns a value of True if the taxpayer has at least one active obligation whose obligation type references the real property tax type. The “check if taxpayer has property taxes” algorithm is almost identical, only the tax type differs. Refer to RECF-SRVTY and RECF-AUTOPAY for examples of this type of algorithm.
· Comparison Method. We simply compare the value returned by the algorithm to True and indicate the appropriate response.
Bottom line. The “field to compare” algorithm isn’t actually returning a specific field’s value. Rather, it’s returning a value of True or False. This value is, in turn, compared by the “comparison method” and the group is set to true, false or check next accordingly.
We strongly recommend that you familiarize yourself with the information under Designing Rate Components before using this transaction.
Rate components control exactly how your bill calculation lines are calculated. Every rate component exist in respect of a given rate version. This is because the rate version defines the date on which all of its rate components become effective.
Copying, delete and moving rate components. You can use the rate component maintenance transaction to duplicate, delete and move rate components. However, you may find these functions are easier to do using the Rate Version Merge transaction as this transaction can copy en masse and it also updates the relevant cross reference information if you move or delete a rate component.
The topics in this section describe how to maintain a rate component.
Don’t forget to finish the rate version. After you have added all necessary rate components to a rate version, don’t forget to return to Rate Version - Main and change the state of the rate version to Finished (otherwise, it cannot be used by billing).
Contents
Rate Component - Main Information
Rate Component - Cross Reference
Rate Component - GL Distribution
Rate Component - Characteristics
Rate Component - Main Information
Core information about a rate component is defined using Main Menu, Rates, Rate Component.
Description of Page
Rate Component contains a concatenation of basic information about the rate component. This information only appears after the rate component has been added to the database. The adjacent up and down arrows cause the rate component immediately before or after this rate component to be displayed.
Rate Version defines the rate version to which the rate component is linked. Sequence defines the relative position of this rate component in respect of the other rate components. The position is important because it defines the order in which the system calculates the charges AND the order in which the calculated charges appear on bills. Rate Version and Sequence form the unique identifier of the rate component. Both fields become protected after the rate component is added to the database.
Re-sequencing rate components. You must use the Rate Version Merge transaction to reposition a rate component. If you use the up / down arrows on the Rate Version Merge, the system will change the rate component’s Sequence and change all rate components that reference the old Sequence accordingly.
Leave gaps in the sequence numbers. Make sure you leave space between sequence numbers so that you can add new rate components between existing ones in the future. If you run out of space between rate components, you can use the Rate Version Merge transaction to re-sequence a rate version’s rate components.
Eligibility criteria are highlighted. If the rate component has eligibility criteria, an indication of such appears.
Select the Rate Component Type that corresponds with the rate component. The screen will display the appropriate fields, which correspond with the categories of rate components described in Designing Rate Components. This field will be gray when the rate component is referenced on other rate components.
Warning! The Rate Component Type affects what you can enter on other parts of the window. The remainder of this section is devoted to those fields that can be entered regardless of RC Type. The subtopics that follow describe those fields whose entry is contingent on the RC Type.
Use Description to describe what the rate component does.
Rounding Type and Precision control how the system rounds the rate component’s calculated value. Refer to Rate Component Rounding for a complete description.
Default note. Rounding Type defaults to Nearest and Precision defaults to a value consistent with the decimal positions defined on the rate schedule’s currency code.
Turn on For Calculation Purposes Only (FCPO) if this rate component exists purely to calculate the percent / flat rate / unit rate used by another rate component. When this switch is on, the system does not include the calculated amount in the bill total.
When this switch is on:
· You must define what is calculated in Result Type; permissible values are Unit Rate, Charge, Step Multiplier and Percentage.
· Use Create a Bill Line to define if a bill line should be created for the rate component (if you don’t need to show the results to the taxpayer or a user, there is no need to create a bill line).
· If a bill line is being created, use the FCPO Retention Rule to define if the FCPO amount should be set to zero on the bill line or whether the bill line’s amount should be set equal to the FCPO amount.
For each rate component, you will need to select the Value Type and Value Source. Valid values for the Value Type are Charge, Percentage and Unit Rate. More information to help determine which value type to choose is described in the How To sections below. Based on the Value Source entered, the remainder of this row will change.
If the Value Source is Rate Factor, then a prompt to indicate the Rate Factor will appear.
If the Value Source is Other Rate Component, then a prompt to indicate the RC Sequence will appear.
If the Value Source is Value, then a prompt to indicate the Value directly on the rate component will appear.
If the Value Source is Value Algorithm, then a prompt to indicate the Value Algorithm will appear.
If you plan to use this method, you must set up this algorithm in the system. This can be done with the following options:
· Create a new algorithm (refer to Setting Up Algorithms).
· On this algorithm, reference an Algorithm Type that calculates a rate component’s value. Click here to see the algorithm types available for this plug-in spot.
For more information about which method to use, refer to Designing Rate Components.
If the charges associated with the rate component are only levied during a specific season, you must turn on the Seasonal options.
When Seasonal is turned on, you use Prorate Method to define how the system should prorate a seasonal charge when a bill segment’s start and end dates are not entirely within the seasonal period (defined in Season). The following options are available:
· Accounting Date Dependent. This option will not prorate the charge calculated by this rate component. Rather, it will only calculate the charge if the accounting date associated with the bill segment is within the seasonal period.
· Bill End Date. This option will not prorate the charge calculated by this rate component. Rather, it will only calculate the charge if the bill segment end date is within the seasonal period.
· Bill Start Date. This option will not prorate the charge calculated by this rate component. Rather, it will only calculate the charge if the bill segment start date is within the seasonal period.
· Prorate. This option will prorate the charge calculated by this rate component based on the number of days in the adjacent season that is included in the bill period. For example, if a bill period is from 15-April through 15-May and the seasonal period is from 1-May through 31-October, the system will assume 15 / 30 of the charge should be levied.
· Prorate seasonal RQ. This option is only pertinent if you have:
· Seasonal rate quantity (RQ) charges, AND
· You have a bill that crosses seasonal boundaries, AND
· You have multiple rate versions effective across the bill period.
If this option is used, the system will prorate the charge calculated by a RQ rate component based on the number of days in the adjacent season that is included in the rate version’s calculation period.
Note. The Seasonal period is defined in the two adjacent fields. The first field contains the day and month when the season starts; the second field contains the day and month when the season ends. The day and month should be entered in the format defined in your display profile.
Override Seasonal Proration. If the seasonal functionality provided with the system does not work for your organization, you may override the logic using the Override Seasonal Proration plug-in spot on the installation record. For example, perhaps the seasonal period is determined dynamically based on the scheduled meter read date of the bill cycle. Or perhaps a seasonal rate component should not be prorated and the date used to determine whether the rate component is applicable is not in the list provided by the system.
Description On Bill, Print, and Print If Zero all control if the rate component contributes a line to the taxpayer’s bill. These fields can also be modified on Rate Version - Bill Print Info. You might find it easier to setup these fields on the rate version transaction as you can copy and paste descriptions between rate components. Refer to Rate Version - Bill Print Info for a description of these fields.
The other fields on this page are dependent on the type of rate component. See the “how to” subtopics below for more information.
How To
Contents
How To Set Up Flat Charge Rate Components
How To Set Up Rate Quantity Rate Components
How To Set Up Apply To Rate Components
How To Set Up Maximum Charge Rate Components
How To Set Up Minimum Charge Rate Components
How To Set Up Exact Charge Rate Components
How To Set Up Summary Rate Components
How To Set Up Calculation Algorithm Rate Components
How To Set Up Flat Charge Rate Components
There are no special additional fields on this page available for setting up a Flat rate component. The following information will help you determine how to set up your Flat rate components.
The Value Type in this case would be Charge. This field will be gray when the rate component is referenced on another rate component.
Refer to Rate Component - Main Information for information about defining the Value Source.
Enter the verbiage to appear on the taxpayer’s bill in Description On Bill and turn on the Print switch. Refer to How To Use Description on Bill for more information about these fields.
Move to the GL Distribution window to define how to book moneys associated with this rate component in the general ledger.
How To Set Up Rate Quantity Rate Components
When setting up an RQ rate component, additional fields become available for you to define.
The following information will help you to set up your RQ rate components.
Select a Value Type of Unit Rate if the type of charge is an amount per some unit/quantity. In the rare situation where the amount of the charge is flat for the first X units, use the Value Type of Charge. This field will be gray when the rate component is referenced on another rate component.
Refer to Rate Component - Main Information for information about defining the Value Source.
The amount that you specified using the rate factor / value field wasa rate per some unit of some thing. This thing must be identified using the Unit Of Measure, Time Of Use, and Rate Qty. Identifier fields.
Turn on Measures Peak Qty if you do not want this rate component to prorate.
Default note. The value of Measures Peak Qty is defaulted from the UOM table (if a UOM is specified).
Turn on GL Statistical Quantity if GL journal lines generated for this rate component should also contain the rate quantity amount as a statistical quantity. You would use this option if you keep track of both dollar amounts and consumption units in your general ledger.
Warning! When a bill segment is created, the system stores the statistical quantity on the journal line associated with the rate component’s distribution code. If you book multiple UOM’s to the same distribution code, you should only turn on GL Statistical Qty on one of the rate components. Otherwise, you will commingle different UOM’s on a journal line’s statistical quantity.
If the charge is only applicable to a quantity within some tier, indicate that the rate component is Stepped. When this option is turned on, you must indicate the Step Low Value and Step High Value that the charge is applicable to. When multiple tiers exist, the high value of the first tier is the low value of the second tier (and so on).
If the step boundaries are dynamic (i.e., they are calculated based on something that’s only known at billing time), you can change the step boundaries using either of the following methods:
· Use Step RC Sequence to indicate the sequence number of the rate component whose value will be multiplied by the step’s boundaries to calculate the step boundaries to use at billing time.
· Use Step Algorithm to indicate that an algorithm will be called to manipulate the step boundaries (note, this algorithm can manipulate the low and/or high boundaries). If you plan to use this method, you must set up this algorithm in the system. To do this:
· Create a new algorithm (refer to Setting Up Algorithms).
· On this algorithm, reference an Algorithm Type that manipulates a rate component’s step boundaries. Click here to see the algorithm types available for this plug-in spot.
Warning! If you dynamically calculate step boundaries and the resultant high AND low values become zero, this signals the system that the rate component should be skipped (i.e., no bill line will be produced for the rate component).
Turn on Error if No Value if a bill error should be generated if the UOM / TOU / RQI specified on the rate component was not supplied at billing time.
Enter the verbiage to appear on the taxpayer’s bill in Description On Bill and turn on the Print switch. Refer to How To Use Description on Bill for more information about these fields.
Move to the GL Distribution window to define how to book moneys associated with this rate component in the general ledger.
How To Set Up Apply To Rate Components
There are no special additional fields on this page available for setting up an Apply To rate component. The following information will help you determine how to set up your Apply To rate components.
Select a Value Type of Percent if the type of charge is a percent of the dollar value of previously calculated rate components. If the amount being charged is an amount per some unit of quantity or measure, select the Value Type of Unit Rate. This field will be gray when the rate component references other rate components.
Refer to Rate Component - Main Information for information about defining the Value Source.
Enter the verbiage to appear on the taxpayer’s bill in Description On Bill and turn on the Print switch. Refer to How To Use Description on Bill for more information about these fields.
Move to the Cross Reference window to define the rate components to which the charge will be applied.
Move to the GL Distribution window to define how to book moneys associated with this rate component in the general ledger.
How To Set Up Maximum Charge Rate Components
There are no special additional fields on this page available for setting up a Maximum rate component. The following information will help you determine how to set up your Maximum rate components.
Select a Value Type of Charge.
Refer to Rate Component - Main Information for information about defining the Value Source.
Enter the verbiage to appear on the taxpayer’s bill in Description On Bill and turn on the Print switch. Refer to How To Use Description on Bill for more information about these fields.
Move to the Cross Reference page to define the rate components against which the maximum charge will be applied.
Move to the GL Distribution page to define how any additional revenue associated with the maximum charge should be booked in the general ledger.
How To Set Up Minimum Charge Rate Components
There are no special additional fields on this page available for setting up a Minimum rate component. The following information will help you determine how to set up your Minimum rate components.
Select a Value Type of Charge.
Refer to Rate Component - Main Information for information about defining the Value Source.
Enter the verbiage to appear on the taxpayer’s bill in Description On Bill and turn on the Print switch. Refer to How To Use Description on Bill for more information about these fields.
Move to the Cross Reference window to define the rate components against which the minimum charge will be applied.
Move to the GL Distribution window to define how any additional revenue associated with the minimum charge should be booked in the general ledger.
How To Set Up Exact Charge Rate Components
There are no special additional fields on this page available for setting up an Exact Charge rate component. The following information will help you determine how to set up your Exact Charge rate components.
Select a Value Type of Charge.
Refer to Rate Component - Main Information for information about defining the Value Source.
Enter the verbiage to appear on the taxpayer’s bill in Description On Bill and turn on the Print switch. Refer to How To Use Description on Bill for more information about these fields.
Move to the Cross Reference window to define the rate components against which the exact charge will be applied.
Move to the GL Distribution window to define how any additional revenue associated with the minimum charge should be booked in the general ledger.
How To Set Up Summary Rate Components
Summary rate components use no other fields on this page other than those defined above.
Enter the verbiage to appear on the taxpayer’s bill in Description On Bill and turn on the Print switch. Refer to How To Use Description on Bill for more information about these fields.
Move to the Cross Reference window to define the rate components to summarize on this rate component.
How To Set Up Calculation Algorithm Rate Components
Calculation Algorithm rate components are used when none of the other rate components will provide you with the functionality you need.
First, you must select a Calc Algorithm. This calculation algorithm will have the responsibility of producing your bill lines. All rate component options become available when you use this rate component type, based on the assumption that it is generally capable of doing anything you might require.
If you plan to use this method, you must set up this algorithm in the system. This can be done with the following options:
· Create a new algorithm (refer to Setting Up Algorithms).
· On this algorithm, reference an Algorithm Type that calculates a rate component. Click here to see the algorithm types available for this plug-in spot.
Note. The calculation algorithm’s main purpose is to create bill calculation lines. However, the algorithm may populate other information for the bill, for example, it may add to the RQ or it may overwrite the description on bill.
If you wish to provide your users with the ability to audit the bill lines created by a rate component of this type, you may indicate an Audit Algorithm.
All the other fields on the page are optional fields available to you for use by your calculation algorithm.
Turn on Error if No Value if a bill error should be generated if the UOM / TOU / RQI specified on the rate component was not supplied at billing time.
Turn on the Derive RQ switch when your calculation algorithm will be creating entries in the RQ array for the UOM / TOU / RQI defined on your rate component. In this case, the system will not attempt to locate an entry in the RQ collection matching the rate component’s UOM / TOU / RQI before calling your calculation algorithm.
Enter the verbiage to appear on the taxpayer’s bill in Description On Bill and turn on the Print switch. Refer to How To Use Description on Bill for more information about these fields.
Move to the GL Distribution window to define how any additional revenue associated with the minimum charge should be booked in the general ledger.
Rate Component - Cross Reference
Minimum charge, maximum charge, exact charge, apply-to, and summary rate components reference other rate components. For these types of rate components, open Main Menu, Rates, Rate Component and navigate to the Cross Reference tab define the other rate components to which it refers.
Description of Page
Rate Component contains a concatenation of basic information about the rate component. This information only appears after the rate component has been added to the database. The adjacent up and down arrows cause the rate component immediately before or after this rate component to be displayed.
Use the Apply this Rate Component to collection to specify the other rate component(s) on the Rate Version to which the rate component in question should refer. The list of rate components available for reference is displayed on the right. Use the left arrow to move the desired rate components into the grid. If a rate component appears in the 'apply to' list in error, use the left arrow to remove the rate component.
Refer to Editable Grid in the system wide standards documentation for more information about adding records to a collection by selecting from a list.
Note. An apply to rate component that has a charge type of unit rate can only reference RQ and calculation rate components. Apply to rate components with a charge type of percentage, along with summary, minimum charge, maximum charge and exact charge rate components can reference all types of rate components including summary.
The This RC is referenced by collection indicates what other rate components reference the rate component in question.
Rate Component - GL Distribution
Open Main Menu, Rates, Rate Component and navigate to the GL Distribution tab to define each rate component’s effect on the general ledger. GL distribution information is required for all rate components except for FCPO and summary rate components.
Description of Page
Rate Component contains a concatenation of basic information about the rate component. This information only appears after the rate component has been added to the database. The adjacent up and down arrows cause the rate component immediately before or after this rate component to be displayed.
If the rate component’s charges should be booked to a single GL account regardless of the obligation’s obligation type’s Revenue Class, enter a Distribution Code. If the rate component’s charges are booked to a different GL account depending on the obligation’s Revenue Class, turn on Use Revenue Class and insert the appropriate Revenue Class and Distribution Code for each that uses the rate.
Rate Component - Characteristics
Your algorithms and reports may need additional rate component fields that aren't supported in the base-package. If so, you can set up a rate component characteristic for each such field.
Snapshotting characteristics on bill calculation lines. The system will automatically copy a rate component's characteristics onto the resultant bill lines for those characteristic types that are usable on bill lines.
Open Main Menu, Rates, Rate Component and navigate to the Characteristics tab to define characteristic values for your rate component.
Description of Page
For each characteristic in the collection, indicate the appropriate Characteristic Type and Characteristic Value.
Note. You can only choose characteristic types defined as permissible on the rate schedule record. Refer to Setting Up Characteristic Types & Their Values for more information.
Rate Component - Eligibility
This page is used to define the conditions under which a rate component will be applied. If you don’t specify any Eligibility Criteria Groups, the system assumes the rate component should be applied (i.e., a rate component is eligible by default).
Refer to The Big Picture Of Rate Component Eligibility for more information.
Open this page using Main Menu, Rates, Rate Component and navigate to the Eligibility tab.
Description of Page
Rate Component contains a concatenation of basic information about the rate component. This information only appears after the rate component has been added to the database. The adjacent up and down arrows cause the rate component immediately before or after this rate component to be displayed.
Warning! The following information is not intuitive; we strongly recommend that you follow the guidelines under The Big Picture Of Rate Component Eligibility before attempting to enter this information.
The Eligibility Criteria Group scroll contains one entry for each group of eligibility criteria. The following fields may be defined for each group:
· Use Sort Sequence to control the relative order in which the group is executed when the system determines if the rate component should be applied (smaller numbers are executed before larger numbers).
· Use Description and Long Description to describe the criteria group.
· Use If Group is True to define what should happen if the eligibility criteria (defined in the following grid) return a value of True.
· Choose Apply Rate Component if this rate component should be executed.
· Choose Check Next Group if the next criteria group should be checked.
· Choose Skip Rate Component if this rate component should NOT be executed.
· Use If Group is False to define what should happen if the eligibility criteria (defined in the following grid) return a value of False.
· Choose Apply Rate Component if this rate component should be executed.
· Choose Check Next Group if the next criteria group should be checked.
· Choose Skip Rate Component if this rate component should NOT be executed.
The grid that follows contains the rate component’s eligibility criteria. Think of each row as an “if statement” that can result in the related eligibility group being True or False. For example, you might have a row that indicates the taxpayer is eligible for the rate component if the taxpayer’s birth date equates to that of a senior citizen. The following bullets provide a brief description of each field on an eligibility criterion. Please refer to Defining Logical Criteria for several examples of how this information can be used.
· Use Sequence to control the order in which the criteria are checked.
· Use Criteria Field to define the field to compare:
· Choose Characteristic if you want to compare a characteristic value that resides on any of the following to a given value (use the adjacent fields to define the object on which the characteristic resides and the characteristic type):
· The obligation being billed
· The obligation’s account
· The main person linked to the obligation’s account
· The characteristic location linked to the obligation
· The obligation's asset (not supported in this release)
· In addition, you can also use a characteristic value that is derived while the rate is being calculated (characteristic values can be created by RQ rules and many other rate component algorithms)
· Choose Rate Component Value if you want to compare the final value of an earlier rate component to a given value. Push the adjacent search button to select the rate component’s sequence number.
· Choose Rate Quantity if you want to compare the final value of a rate quantity to a given value. Push the adjacent search button to select the rate quantity’s UOM / TOU / RQI.
· Choose Algorithm if you want to compare anything other than the above options. Push the adjacent search button to select the algorithm that is responsible for retrieving the comparison value.
· Use Criteria Comparison to define the method of comparison:
· Choose Algorithm if you want an algorithm to perform the comparison and return a value of True, False or Insufficient Data.
· Choose any other option if you want to compare the Criteria Field using a logical operator. The following options are available:
· Use >, <, =, >=, <=, <> (not equal) to compare the Criteria Field using standard logical operators. Enter the comparison value in the adjacent field.
· Use IN to compare the Criteria Field to a list of values. Each value is separated by a comma. For example, if a field value must equal 1, 3 or 9, you would enter a comparison value of 1,3,9.
· Use BETWEEN to compare the Criteria Field to a range of values. For example, if a field value must be between 1 and 9, you would enter a comparison value of 1,9. Note, the comparison is inclusive of the low and high values.
· The next three fields control whether the related logical criteria cause the eligibility group to be considered True or False:
· Use If True to control what happens if the related logical criterion returns a value of True. You have the options of Group is true, Group is false, or Check next condition. If you indicate Group is true or Group is false, then the rate component will be Skipped or Applied based on the values defined above in If Group is False and If Group is True.
· Use If False to control what happens if the related logical criterion returns a value of False. You have the options of Group is true, Group is false, or Check next condition. If you indicate Group is true or Group is false, then the rate component will be Skipped or Applied based on the values defined above in If Group is False and If Group is True.
· Use If INSUFFICIENT DATA to control what happens if the related logical criterion returns a value of “Insufficient Data”. You have the options of Group is true, Group is false, or Check next condition. If you indicate Group is true or Group is false, then the rate component will be Skipped or Applied based on the values defined above in If Group is False and If Group is True.
The following point summarize the many diverse functions available on this transaction:
· A rate version’s rate components have unique sequence numbers. This number controls the order in which a rate component is processed. If you need to insert a rate component and there’s no space between existing sequence numbers, you can use this transaction to renumber the rate version’s rate components.
· You can use this transaction to move a rate component to a different position within a rate version. When a rate version is moved, all references to the rate component are changed to reflect the new sequence number.
· You can use this transaction to delete a rate component. When a rate component is deleted, all references to the rate component are deleted.
· You can use this transaction to copy rate components from other rate versions. For example,
· You may want to create a rate version that is similar to an existing rate version. Rather than copying all the information from the existing rate version and then removing the inapplicable components, this page may be used to selectively copy specific rate components from the existing rate version to the new rate version.
· You may have taxpayer-specific rates that are very similar, but still unique. You can use this transaction to build a taxpayer-specific rate. In this scenario, you may choose to create special ‘mini’ rate versions, one for each of the various options. Then, you could use the rate version merge page to select the components applicable for the new custom rate version.
The target rate version must exist prior to using this page. If you are creating a new rate, you must first create the Rate Schedule and Rate Version and then navigate to the merge page to copy rate component information.
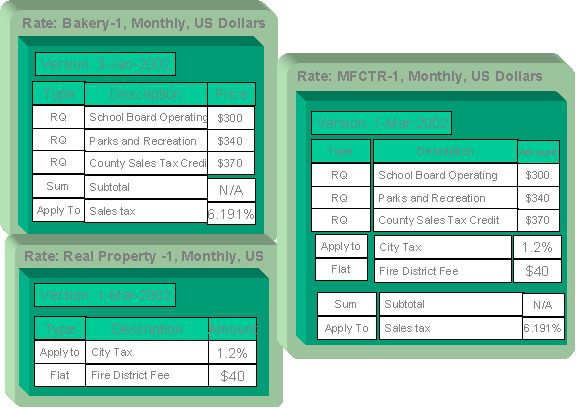
Duplicate versus Merge. The Rate Version page itself has duplication capability. You would duplicate a rate version if you want to a) create a new rate version AND b) populate it with all the rate components from an existing rate version. The Rate Component Maintenance transaction also allows you to duplicate a rate component within a rate version.
Open Main Menu, Rates, Rate Version Merge to open this page.
Description of Page
Select the Original Rate Version, which is the target for merging the rate component information.
Finished rate versions are protected. Only rate versions that are In Progress or Validated may be used as the target rate version in the merge functionality. If any changes are made to a Validated rate version on this page, the system will move the status back to In Progress. If a rate version with a status of Finished is selected, it will be displayed, but you will be unable to copy any information to it (and its description will appear in red). If you need to make changes to a Finished rate version, navigate to Rate Version – Main and change the rate version’s status to In Progress. Refer to Lifecycle of a Rate Version for more information.
Select the Merge From Rate Version, which is your template rate version to copy the rate components from.
Note. You may only copy components from one Merge From rate version at a time. If you want to copy components from more than one rate version, select the first Merge From rate version, copy the desired records, Save, and then select the next Merge From rate version.
The left portion of the page displays any existing rate components for the Original Rate Version. The right portion of the page displays the existing rate components for the Merge From Rate Version.
You can use the Copy All button to copy all the rate components from the Merge From rate to the Original rate. If you use Copy All, please be aware that the rate components are added to the end of the Original rate version.
Each time you save the changes, the system renumbers the Original rate version using the Start From Sequence Number and Increment By.
The left portion of the page initially displays existing rate component records linked to the original rate version. In the Merge Type, you will see the word Original, for any of these records. The Sequence, RC Type and Description for each rate component are displayed. In the right portion of the page, the existing records in the merge from rate version are displayed initially.
The topics that follow describe how to perform common maintenance tasks:
Contents
Removing An Uncommitted Row From A Rate
Moving Positional Rows Up and Down
Rate Component Cross Reference Information
Resequencing Rate Components
If there are no gaps between two rate components and you need to resequence the rate components:
· Make a change to the Start From Sequence Number or Increment By (so that the Save button becomes enabled).
· Click the Save button.
Removing A Row From A Grid
If you wish to remove a record linked to the Original rate version, press the “-“ button to the left of the record.
Adding A New Row To A Rate
You may move any of the rate components from the Merge From rate version to the original rate version by selecting the left arrow adjacent to the desired row. Once a record is moved it will disappear from the Merge From information and appear in the Original information with the word Merge in the Merge Type column.
Removing An Uncommitted Row From A Rate
If you have copied a row across by mistake, you may remove it by clicking on the right arrow adjacent to the appropriate record.
Moving Positional Rows Up and Down
A rate component's sequence number controls the order in which the rate component should be applied. You may modify the order execution using the up and down arrows.
The sequences need to be renumbered in order to ensure the correct order. The fields Start from Sequence Number and Increment By are used to define the sequence number to assign to the first rate component and the subsequent values to assign to subsequent rate components.
Refer to Editable Grid in the system wide standards documentation for more information about adding records to a collection by selecting from a list and repositioning rows within a grid.
Rate Component Cross Reference Information
All information related to a rate component, including general ledger information, characteristics and eligibility rules, will be copied.
Special logic exists for merged rate components that reference other rate components. This includes the cross reference collection and the eligibility criteria.
If any rate component refers to another rate component in the eligibility criteria, the sequence number of the eligibility criteria is also adjusted accordingly.
Note. You will be warned by the system when you copy a rate component that has cross-references to other rate components that are not being copied.
The Rate Check page allows you to test your rates under various scenarios. The topics in this section describe how to use this transaction.
Contents
Rate Check Results - Calc Lines
Rate Check Results - RQ Details
Rate Check Results - Calculation Details
Rate Check Results - Characteristics
Rate Check - Main
Open Main Menu, Rates, Rate Check to enter the parameters required to check a rate.
Description of Page
Easiest way to use rate check. The easiest way to populate the above parameters is to select an existing bill segment on Bill Segment – Calc Lines and then use the rate schedule context menu to navigate to this transaction. When you do this, the system populates the above fields from the values on the bill segment. After these fields are populated, you can override the defaulted values to check various scenarios.
Indicate the Rate Schedule that you want to test. The version(s) used will be those in effect during the start and end dates. Only validated and finished rate versions will be used.
Default note. If Rate Schedule is blank and you enter an Obligation ID, the obligation’s current rate will be defaulted.
While using an Obligation ID is not strictly required to check a rate, we strongly recommend finding a representative obligation to check a rate. Why? Because charges in a rate may be affected by values in an obligation. For example, consider the following types of rate components that use obligation-specific values:
· Rate components with rate factors that are subject to the presence of contract riders. In fact, if a rate factor requires a contract rider and you do not specify an Obligation ID, rate check assumes that the rider is applicable.
· Rate components with rate factors that are subject to tax exemptions.
· Rate components with rate factors with taxpayer-specific charges.
· Rate components with rate quantity (RQ) rules that use characteristics on obligation, account or the obligation’s characteristic location.
· Rate components with RQ rules that use contract quantities.
In other words, if you don’t specify an Obligation ID, you will not be able to check rates with the above characteristics.
Enter a Bill Seg ID if you want to test the rate with actual quantities for a given bill segment. This is useful if you want to compare the actual bill segment results with the results of the same calculation values under a different rate schedule. If you indicate a Bill Seg ID, rate check’s Obligation ID will be populated with the bill segment’s obligation ID (and Obligation ID will be protected).
Overriding quantities. If you enter a Bill Seg ID, the bill segment’s quantities will be defaulted into the array that follows. You may override the quantities in this array to test various scenarios.
You must indicate a Revenue Class. This is needed for applying the appropriate GL distribution code for rate components where the GL account is based on the taxpayer’s revenue class.
Enter the Start Date and End Date that you are testing. If a Bill Seg ID is entered, the start and end dates are taken from the bill segment’s period, but can be overwritten.
Indicate the Accounting Date. If a Bill Seg ID is entered, the accounting date on the bill segment is used but can be overwritten.
Enter the quantities that you want to test in the quantity collection. For every UOM/TOD/RQI combination, enter a quantity.
The collection of Characteristic Types and Characteristic Values is used to apply the appropriate rate factor values. If these values are entered, these values will be used to apply the appropriate rate factors (even if you have specified an obligation from which characteristics can be derived). If these values are blank AND there is no obligation ID, then you will receive an error from the rate application indicating which values are needed.
Indicate the Bill Language to use for the resulting bill calc line descriptions.
When you have entered everything, click on the Check Rate button. This will cause your rate to be applied to the parameters entered above. If the system is successful, you will be transferred to the Calc Lines page on which the resulting calculation details can be viewed.
Rate Check Results - Calc Lines
After you have pressed the Check Rate button on the Main page, you will be transferred to the Calc Lines tab to view the lines that have been calculated by your rate.
Description of Page
The Rate Schedule and its description, the Revenue Class and its description and the Bill Period are displayed at the top.
More than one Rate Version may have been effective for the Rate Schedule during this bill period. If so, multiple collections of calculation lines will be produced. Use the Bill Seg Hdr scroll to view each collection of calculation lines.
For each Bill Seg Hdr, the following information will be displayed above the calculation line grid.
Sequence This identifies which Bill Seg Hdr is being displayed.
Start Date, End Date This is the period, within the bill period, that the rate version, which produced these lines, was effective.
Amount This is the total amount calculated by this group of calculation lines.
Desc on Bill The description on bill for the rate version that produced these lines.
Rate Version The rate version that was used to produce these lines.
The grid, which displays the bill calculation lines for this rate version, shows one row exists for every calculation involved in this process. This information is very similar to what is displayed on the bill calculation lines page for a bill segment. The following information is displayed in the grid:
· Sequence is the system-assigned unique identifier of the calculation detail row.
· Description on Bill is the information about the bill line that appears on the taxpayer’s bill.
· Calculated Amount is the calculated amount associated with the bill line.
· Calculated Value is the same value as the Calculated Amount except that it displays 5 decimals.
· The Print switch controls whether information about this line will print on the taxpayer’s bill.
· The Appears in Summary switch defines if this line’s amount also appears on a summary line. This switch is turned on if the corresponding rate component is summarized on a summary rate component.
· UOM is the unit of measure of the rate quantity on the calculation line.
· TOU is the time-of-use code of the rate quantity on the calculation line.
· RQI is the rate quantity identifier of the rate quantity on the calculation line.
· Billable Rate Quantity is the rate quantity on the calculation line.
· Base Amount is used by calculation lines (e.g. taxes) that are cross-referenced to other calculation lines and whose value(s), therefore, depend on the amounts calculated by those other lines. The Base Amount shows the total amount derived from the cross-referenced line(s) that the current line then used to calculate its billed amount.
· Sequence refers to the sequence number of the rate component on the applicable rate version that was used to calculate the line.
· Meas Peak Qty is checked if the UOM on the calculation line is used to measure a peak quantity.
· Exempt Amount is the amount of the calculated charge that the taxpayer doesn’t have to pay because they are tax exempt. This will only be calculated if you have provided an obligation ID on the main page.
· Distribution Code is the distribution code associated with the calculation line. This distribution code is used to build the general ledger details on the bill segment’s financial transaction.
Rate Check Results - RQ Details
After you have pressed the Check Rate button on the Main page, you can navigate to the RQ Details tab to view the rate quantities that supplied to (or derived by) you rate. Please be aware that a rate can derive rate quantities if there are rate quantity rules rate components.
Description of Page
The Rate Schedule and its description, the Revenue Class and its description and the Bill Period are displayed at the top.
The RQ details grid is a snapshot of the rate quantities amassed from:
· The quantities input on the main page OR the quantities taken from the rate quantity collection for the bill segment, if it was input on the main page.
· The RQ rules defined on the input rate.
The following information is displayed in the grid:
· UOM is the unit of measure of the rate quantity.
· TOU is the time-of-use code of the rate quantity.
· RQI is the rate quantity identifier of the rate quantity.
· Initial Rate Quantity is the initial quantity amassed by the system before application of the rate’s RQ rules.
· Billable Rate Quantity is the rate quantity that will be used by the obligation’s rate.
Rate Check Results - Calculation Details
After you have pressed the Check Rate button on the Main page, you can navigate to the Register Read tab to view the final quantities (Final UOM, Final TOU and Final RQI) that were derived by your rate.
Description of Page
The Rate Schedule and its description, the Revenue Class and its description and the Bill Period are displayed at the top.
This page displays measured quantities from one of two places:
· From the values input on the main page of Rate Check
· From the quantities collection for the bill segment indicated on the main page of Rate Check
The following information is displayed in the grid:
· UOM is the unit of measure of the quantity.
· TOU is the time-of-use code of the quantity.
· RQI is the rate quantity identifier of the quantity.
· Quantity is the initial quantity amassed by the system before application of the rate’s register rules.
· Final UOM is the unit of measure of the resultant billing quantity.
· Final TOU is the time-of-use code of the resultant billing quantity.
· Final RQI is the rate quantity identifier of the resultant billing quantity.
· Final Quantity is the resultant billing quantity.
Rate Check Results - Characteristics
After you have pressed the Check Rate button on the Main page, you can navigate to the Characteristics tab to view the final characteristics collection as manipulated by your rate’s plug-ins.
Description of Page
The Rate Schedule and its description, the Revenue Class and its description and the Bill Period are displayed at the top.
The collection of Characteristic Types and Characteristic Values reflects any changes made to the initial characteristics collection (input on the main tab page) after applying the rate.
In this section, we describe how proration applies to different types of rate components. Proration implies assessing charges proportionately.
The term "proration" describes two different issues:
· Prorating a charge whose value changes during a bill period. For example, if a tax rate changes during a bill period and you've indicated that such changes should be prorated, the system prorates the tax change (e.g., 20 days at 5% and 10 days at 6%).
· Prorating charges when the time period being billed is not in sync with the time period in which the charges were defined in the rate. For example, if a rate contains a flat monthly charge and the bill period spans two months, the flat charge must be prorated.
This is a complicated topic as it's possible for many proration issues to exist on a single bill. For example, on a single bill:
· The rate structure can change several times during the bill period (i.e., multiple rate versions are effective).
· The taxing authority changes the tax rate.
· The taxpayer's tax exemption changes.
· The taxpayer-specific charge can change.
Contents
Rate Component Value Proration
Types of Proration
The following section describes the types of proration performed by applying a rate.
For more information on how prorated charges are presented on the printed bill, refer to How To Use Description On Bill.
Contents
Rate Calculation Period Proration
An Obligation Rate Changes Are Not Prorated
Rate Calculation Period Proration
There can be multiple versions of a given rate over time. Each version has an effective date. When the system detects that a rate schedule has multiple versions of a rate in effect during a bill period, it may or may not prorate the charges. You control exactly how the system handles this situation using the rate schedule’s proration parameters.
If multiple rate versions are effective during the period and the rate schedule is configured to prorate the rate versions, a given bill segment will contain a set of bill calculation lines for each rate version. You should consider quite carefully how to handle this situation on your printed bills as rate version proration can confuse a taxpayer.
Refer to Defining Rate Versions for more information about rate versions.
Rate Factor Proration
A rate contains rate components. When you create rate components, you have two ways to indicate how much to charge:
· You can specify the value directly in a rate component.
· You can have the rate component use a rate factor that contains the value.
Rate factors are effective-dated (i.e., their values may change over time). When the system detects that a rate component’s rate factor has multiple values in effect during a period, it may or may not prorate the charges. You control exactly how the system handles this situation using the rate factor’s proration parameters.
Refer to Defining Rate Factors and Rate Factor Value Proration for more information.
Contents
Tax Exemption Proration
Rate factors may or may not be eligible for tax exemptions; it’s up to the respective taxing authority. Taxpayers who are eligible for tax exemptions will have their tax obligation reduced (or nullified) at billing time.
Whether or not a taxpayer is tax exempt for a given rate factor (and the percent exempt) is defined on the obligation’s tax exemption page. The exemption is effective-dated (i.e., it may change over time). If a taxpayer’s eligibility for the exemption changes during a period, the system may or may not prorate the charges. You control exactly how the system handles this situation using the rate factor’s proration parameters.
Contract Value Proration
The system allows for types of rate factors that do not have the same value for all taxpayers.
For rate factors whose value is taxpayer-specific, the value is defined on the obligation’s contract value page. The contract value is effective-dated (i.e., it may change over time). If a taxpayer’s contract value changes during a bill period, the system may or may not prorate the changes. You control exactly how the system handles this situation using the rate factor’s proration parameters.
Contract Rider Proration
Contract riders are used when the charge associated with a rate factor is only applicable to some taxpayers for some period of time.
A taxpayer’s contract rider applicability period is defined on the obligation’s contract rider page. A rider’s applicability may change during a taxpayer’s bill period. You control exactly what the system does when a rider’s applicability changes during a bill period using the rate factor’s proration parameters.
An Obligation Rate Changes Are Not Prorated
An obligation’s rate is effective-dated (i.e., it may change over time). When the system calculates an obligation’s bill segment when multiple rates are effective during the bill period, it will use a single rate from the obligation’s rate history. The system chooses the rate as per the obligation’s obligation type’s rate selection date.
Refer to Obligation Type - Rate for more information.
Proration Factors
The purpose of rate components is to generate bill calculation lines. When rate application builds bill calculation lines, it may also prorate the charges.
There are multiple types of proration performed by rate application. Rate quantities, step boundaries, rate values, and rate factor values may all be prorated as part of applying a rate.
We need to establish some terms in order to understand the calculations.
Contents
Normal Days
As mentioned previously, the rate schedule references a frequency that specifies the number of times per year that obligations referencing the rate are expected to bill. The following formula dictates a rate frequency’s normal days: 365 days / number of periods per year.
Example:
· For a monthly frequency (12 periods per year), 365 / 12 = 30 days.
· For a quarterly frequency (4 periods per year), 365 / 4 = 91 days.
Refer to Defining Frequency Codes for more information.
Calculation Period Factor
The calculation period is the date range where a rate version is effective during the billable period. For each rate version that is effective during the billable period, a bill segment calculation period is created. A set of bill calculation lines is created for each calculation period.
A calculation period factor is determined for each calculation period. The calculation period factor is the ratio of calculation period days to normal days. If the billable period factor is 1 (not applicable), then the calculation period factor is the ratio of calculation period days to consumption period days.
RF Value Period Factor
The rate factor value period is the date range where a proratable rate factor value is effective during the calculation period.
When a rate factor value changes during the calculation period, the results is that multiple bill calculation lines are generated for the same rate component.
The ratio of the number of days within the calculation period that a distinct value is effective to the number of days in the calculation period determines the RF value period factor. When the rate factor is set up not to prorate, the RF value period factor is 1 (not applicable).
Example:
If the state tax rate changes from 6% to 6.5% on April 16 and the calculation period is April 1 to April 30, there are two rate factor value periods.
· Rate factor value period April 1 to April 15, RF value period factor = 15 days / 30 days = 0.5.
· Rate factor value period April 16 to April 30, RF value period factor = 15 days / 30 days = 0.5.
Refer to Defining Rate Factors for more information on specifying whether the rate factor allows proration.
Overriding Proration Factors
If the system logic for determining proration factors does not satisfy your requirements, you may plug in an override proration algorithm to calculate the proration factors as required by your implementation. The override proration algorithm must be specified on the Installation record.
The system is delivered with an algorithm type that sets the proration factors to 1 (not applicable) when a predefined characteristic is specified on a rate component. Refer to OVPF-NOPROR for more information.
Rate Quantity Proration
Contents
Step Proration
If a rate component’s charges are based on stepped charges then the step boundaries are also prorated (as long as the rate component is not marked as measures peak). Step boundaries are multiplied by the calculation period factor to determine the adjusted steps boundaries.
Step Multipliers
If the rate component specifies that the steps be multiplied by the result value of another rate component, step proration is not performed. It is assumed that the result value from the referenced rate component has already been prorated, as the referenced step rate component is subject to Rate Component Value Proration.
Rate Component Value Proration
Except for summary type rate components (which are not prorated at all), a value is specified on the rate component. The value may be a unit rate, percentage or charge. The value may be specified directly on the rate component, derived from a rate factor, derived from another rate component or calculated by an algorithm.
Regardless of where the rate component value comes from, it will be multiplied by the calculation period factor when determining the charge on a bill calculation line. Exceptions to this rule are:
· Unit rate values where the rate component’s measures peak attribute is not checked.
· Percentage values.
· Rate component values derived from another rate component.
Even though the rate component values are not prorated for unit rate and percentage value types, if these rate values change during the calculation period due to a rate factor value change, rate factor value proration still applies.
Values derived from another rate component are not subject to rate value proration, as rate component value proration was already performed on the referenced rate component. Again, if the rate factor value changed on the referenced rate component, rate factor value proration still applies.
For more information on rate factor value proration, refer to Rate Factor Value Proration.
Rate Factor Value Proration
Rate factor value proration behaves the same way any time a rate factor value changes within a calculation period. This could be due to a change in a tax rate, a contract rider becoming effective, a tax exemption expiring, etc.
Multiple bill calculation lines are generated for a given rate component when a proratable rate factor value changes during the calculation period.
Example:
If the state tax rate changes from 6% to 6.5% on April 16, and the calculation period is April 1 to April 30.
· The first RF value factor period April 1 to April 15, so RF value period factor is 0.5.
· The value used in the first bill calculation line for state tax is 6% x 0.5 = 3%.
· The second rate factor value period is April 16 to April 30, so the RF value period factor is 0.5.
· The value used in the second bill calculation line for state tax is 6.5% x 0.5 = 3.25%.
How To Add A New Rate Quantity Rule Algorithm
Technical Information Below! This section is meant for technicians only!
If the RQ rule algorithms that are supplied with the base package are not sufficient for your rating requirements, you will have to write a new RQ rule algorithm. This section describes how to do this. After you have followed the steps outlined below, you can then set up the control tables necessary to invoke this algorithm as described under Setting Up Rate Quantity Rules.
Follow the following steps to define a new rate quantity (RQ) rule:
· Assign a two-character identifier to the RQ rule. This identifier should begin with an X or Y. For example, you could give your first RQ rule the identifier X1, the second X2, etc.
· Create an algorithm type for your new RQ rule. This algorithm type exists to define the types of parameters supplied to your RQ rule. Refer to Base Package RQ Rules for examples. This algorithm type must be identified by the two-digit identifier allocated above.
While RQ rules require an algorithm type, they do NOT require an algorithm. Why? Because you set up an RQ rule to define the values of the parameters passed to your program (and therefore you don’t need an algorithm as algorithms exist to define the values of the parameters passed to a program).
· Go to Look Up Options and add a new lookup value for the field SQ_RULE_FLG. This should have a Field Value equal to the two-digit identifier allocated above.
· Write your new program.