9 Problem Management
Problem management in Enterprise Manager Ops Center consists of several components that are designed to work together to simplify managing problems for a large number of assets. The components include monitoring rules, suggested actions, and methods for automating problem identification and resolution.
Monitoring includes a standard set of monitoring rules, consisting of an asset's attribute and the threshold value for that attribute. When monitoring is enabled, it generates alerts, which connect to both the problem management and notification features.
How Alerts and Problems Work
Each time an asset's attribute that is being monitored does not meet its monitoring rule, a new alert is generated and is reported as a problem in the Message Center. If a value for an attribute exceeds its monitoring rule and then later meets the rule, the alert is cleared automatically. If the attribute does not meet the rule in the next monitoring period, a new alert is generated.
A problem reported in the Message Center is not cleared automatically in response to a change in the attribute's value. To remove a problem from the Message Center, you must close the problem or take no action on it for seven (7) days. See Closing a Problem for more information about manually closing a problem.
If an attribute's value is moving in and out of its monitoring rule's parameters, alerts are generated and cleared continuously. However, a new problem is only generated if the original problem is closed. If a problem is not yet closed, the new alerts are aggregated into the existing problem.
Problems with no activity for seven (7) days are closed automatically and do not appear in the Message Center or in the Asset view. If any action istaken on a problem, such as adding an annotation, the counter is reset.
When a problem is closed, its status changes to Closed, the problem is deleted from the list of active problems, and the problem is no longer displayed in the UI. You can retrieve information about a closed problem for 60 days by using the public API. After 60 days, closed problems are permanently deleted. To edit the time limit, you must edit the value in the public API. You can disable the time limit by setting the value for the number of days to 0.
Note:
If the monitoring condition is still true after the problem is closed, a new alert is raised and a new problem is created.Problem Severity Badges
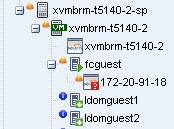
When an asset has a problem, the severity badge appears next to the asset icon in the Asset hierarchy. If it is the highest severity problem in the membership of a group, the severity badge also appears next to the parent assets. In Figure 9-1, the OS for xvmbrm-t5140-2 has a critical problem. The critical problem badge also appears on the system and service processor. Any group that this OS is a member of, such as All Assets and Operating Systems, also display the badge.
If the problem is the only critical problem, the badge is removed when the problem is acknowledged, marked repaired, or closed. If open problems are still present, the next highest severity badge is displayed. For example, if both a Critical and a Warning problem is detected and the Critical problem is acknowledged, the Critical badge is replaced with the Warning badge because that is now the highest level unacknowledged problem.
See the Enterprise Manager Ops Center Advanced User's Guide for more information about creating and maintaining monitoring rules, profiles, plans, and the problems knowledge base.
Methods of Problem Management
Enterprise Manager Ops Center uses an help desk approach to managing problems. The following are the key tools available for taking action on a problem:
-
Message Center – View the status of problems and assign problems.
-
Annotations – Add notes and change status. Use annotation options to provide recommended actions or fixes, or add custom scripts to provide an automated response to a problem.
-
Operational Plans – Deploy a shell script against a specific asset, or asset sub-type to automate problem resolution.
-
Problems Knowledge Base – Collect comments and suggested actions for known issues for future use.
If you want to receive e-mail or pager notification each time a problem is reported in the Message Center, you can create notification rules to send a message advising you of a new critical or warning problem.
The Message Center contains a detailed list of unassigned problems, problems assigned to you, and problems assigned to other users.
You can manage problems from either the Message Center or from the Asset view. You can view and add comments and annotations, take action on a problem, and closeproblems.
-
The Message Center provides a list of all problems. Select a problem to see its details and activity.
-
From the Asset tree in the Navigation pane, select the asset and then click the Problems tab to see a list of problems for that asset.
Any user that has the Manage or Admin role for the asset can take action on the problem. The user to which the problem is assigned must also have the Manage or Admin role. If the icon is not active, the user does not have the appropriate role.
See User and Role Management for more information about user roles and authorizations
Viewing Unresolved Problems
You can display a history of unresolved problems for a specific asset, for a user, or unassigned problems. Problems fall into one of the following severity levels:
-
Critical
-
Warning
-
Informational, or Info
-
Select the view:
To view unresolved problems for a specific asset, click the asset in the Navigation pane, then click the Problems tab in the center pane.
To view unresolved problems from the Message Center, click one of the following:
-
Unassigned Problems
-
My Problems
-
Problems Assigned to Others
The number of unresolved problems for an asset appears in a bar chart and in a summary by severity. All Unresolved problems appear in a table.
-
-
(Optional) To view details of a problem, hover or click the problem in the Unresolved Problems table.
-
(Optional) To view the alerts that make up the problem, click the problem in the Unresolved Problems table, then click the Alerts icon in the center pane.
Viewing Problem Details
A problem consists of one or more alerts. You can view problem details, including the individual alerts that are part of the problem. The following problem details are available:
-
How long the problem has been open, or the duration
-
When the problem was assigned
-
The number of suggested actions for the problem
-
Who is assigned to the problem
-
Which resource is affected, or the cause
-
A description of the problem
-
Select Assets in the Navigation pane.
-
Select an asset that has a problem badge next to the icon. The Dashboard page is displayed with the status of the asset.
-
Click the Problems tab.
-
Hover over the problem to display the problem details.
-
To display the alerts that are associated with the problem, click the Alerts sub-tab or click the Alerts icon in the center pane. The alerts that make up the problem are displayed, including the current and highest alert status, and the alert history.
Assigning a Problem
You can assign a problem to a user who has Manage or Admin role for the asset.
Assigning a problem might affect the asset's Problem severity badge. If a problem was previously acknowledged or marked as being repaired, its severity was not propagated up to antecedent assets in the navigation pane. After assigning a problem (to a user or to no one), the severity is propagated up again to antecedent assets in the navigation pane.
-
To display a problem from the Message Center, click Message Center, then click Unassigned Problems in the navigation pane.
To display a problem from the asset view, click the asset in the Navigation pane, then click the Problems tab.
-
Select one or more problems in the center pane, then click the Assign Problem(s) icon.
-
Select a user name from the Assign To list, which is the list of users who have either the Manage or Admin role for the asset. To move an assigned problem back to the Unassigned Problems queue, select No One from the list.
-
(Optional) Add a note in the text field.
-
Click Assign Problems.
Acknowledging Problems
Acknowledging a problem indicates that you are investigating the issue. You can acknowledge a problem if you have the Admin or Manage role for the asset on which the problem is identified.
When an asset has a problem, a severity badge appears next to the asset in the Asset hierarchy. If it is the highest severity problem in the membership, it also appears next to the parent assets. In Figure 9-3, the OS for xvmbrm-t5140-2 has a critical problem. The critical problem badge also appears on the system and service processor. Any group that this OS is a member of, such as All Assets and Operating Systems, also display the badge.
Figure 9-3 Critcal Problem Badge on Asset and Parent Assets
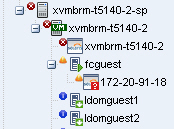
Description of "Figure 9-3 Critcal Problem Badge on Asset and Parent Assets"
If the problem was previously in an Unassigned state or was assigned to someone else, the severity was taken into account in the computation of the highest severity to propagate up to antecedent assets in the navigation pane. When you acknowledge a problem, it is moved into your queue in the Message Center and the severity is no longer propagated up to antecedent assets in the navigation pane.
When you acknowledge the Critical problem, the badge is replaced with the Warning badge because that is now the highest level unacknowledged problem.
Figure 9-4 Effect of Acknowledging a Critical Problem
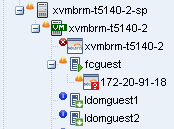
Description of "Figure 9-4 Effect of Acknowledging a Critical Problem"
-
From the Message Center, click Message Center, then click one of the following:
-
Unassigned Problems
-
My Problems
-
Problems Assigned to Others
OR
From the asset view, click the asset in the Assets section of the Navigation pane, then click the Problems tab.
-
-
Select one or more problems, then click the Acknowledge Problems(s) icon in the center pane.
Adding an Annotation
Annotations are defined by the asset type. The annotation can be a comment, a suggested action, or you can refer to an operational profile. Any user can add an annotation to a Problem. To add an entry to the Problems Knowledge Base requires Enterprise Manager Ops Center Admin permissions
See Adding An Annotation To The Problems KB for information about annotating the Problems Knowledge Base.
-
From the Message Center, click Message Center, then click one of the following:
-
Unassigned Problems
-
My Problems
-
Problems Assigned to Others
OR
From the asset view, click the asset in the Assets section of the Navigation pane, then click the Problems tab.
-
-
Select the problem, then click the Add Annotations icon in the center pane.
-
Select one of the following types from the Annotation Type from the drop-down list:
-
Comment – Text only option that is designed to be used to add a note or editorial comment.
-
Suggested Action – Text required and a script is optional.
-
-
Select an operational plan from the drop-down list of operational profiles defined for the type of asset on which this Problem is open.
-
The Synopsis field is completed based on the annotation type. Edit the synopsis, as needed. There is no character limit in the UI, but the API allows for 80 characters.
Note:
If you enter more than 80 characters, the synopsis is truncated to the first 80 characters when viewed in the annotation. -
Type a description or instructions in the Note field. There is no character limit.
-
To add the annotation to the Problems Knowledge Base and include the annotation for every problem of this type and severity, click the check box.
Note:
You must have the Enterprise Manager Ops Center Admin role to complete this operation. -
Click Save and Execute or click Save.
Displaying Annotations
Annotations are automated operations with associated scripts, suggested fixes or actions, or text-only comments. You can associate annotations with a problem instance or an asset type. The Problems Knowledge Base contains your annotations, by asset type, and stores the information on the Enterprise Controller. This annotation can be viewed by browsing the Problems Knowledge Base.
Example 9-1 Example of Using Annotations
The CPU usage on a Sun Fire x4150 host is exceeded and a problem is generated. The problem is assigned to Lee. Lee is concerned because these systems are often used to host Oracle Solaris Zones. Lee adds the following comment to the problem: "This asset is not powerful enough and cannot cope with the load". Lee also wants to associate an annotation with the Global Zone asset type to recommend checking for processes that are consuming excessive CPU usage on the Global Zone. Lee adds the following annotation to the asset type: "Run the 'prstat 1 1' command to check which processes are taking CPU." The annotation is saved in the Problems Knowledge Base and is displayed the next time CPU usage is exceeded on a global zone asset type.
To Display Annotations for a Problem
-
From the Message Center, click Message Center, then click one of the following:
-
Unassigned Problems
-
My Problems
-
Problems Assigned to Others
OR
From the asset view, click the asset in the Assets section of the Navigation pane, then click the Problems tab.
-
-
Click the problem in the center pane.
-
Click the View Annotations icon.
To Display Annotations for an Asset Type Using the Problems Knowledge Base
-
Click Plan Management.
-
Expand Problems Knowledge Base in the Navigation pane, then select the asset type. The Annotations associated with the asset type are displayed in the center pane.
Viewing Comments
A comment is a type of annotation. You can add informational comments and notes to an issue while you are working on a resolution, when you mark a problem as fixed, or when you close a problem. You can also use annotations to build a Problems Knowledge Base that contains a mixture of comments, suggested actions, and automated actions. To add a comment, see Adding an Annotation.
-
From the Message Center, click Message Center, then click one of the following:
-
Unassigned Problems
-
My Problems
-
Problems Assigned to Others
OR
From the asset view, click the asset in the Assets section of the Navigation pane, then click the Problems tab.
-
-
Click the problem in the center pane, then click the View Comments icon.
Taking Action on a Problem
If you have the Manage or Administration role for an asset that has an Open Problem, you can correct some problems by using a script or command. In these situations, you might want to associate an automated action with some known issues. For other problems, you might want to review the issue before deciding on the appropriate action.
The problem management functionality provides varying levels of control. You can build the Problems Knowledge Base with Annotations that contain a combination of automated actions, suggested actions, and comments. You can execute one or more of the suggested actions associated with the Problem or use an operational plan to correct the problem. If an action is not available in a suggested action or Operational Profile, you can execute a command or a custom script that is stored on the managed asset or on the Enterprise Controller.
See Adding an Annotation for information on adding a suggested action to a Problem.
See Problems Knowledge Base to add a suggested action or automated action in the Problems Knowledge Base. See Operational Plans for information about creating an operational profile.
-
From the Message Center, click one of the following:
-
Unassigned Problems
-
My Problems
-
Problems Assigned to Others
OR
From the asset view, click the asset in the Assets section of the Navigation pane, then click the Problems tab.
-
-
Select the problem.
-
Click the Take Action(s) on a Problem icon in the center pane.
-
Select the action that you want to perform:
-
If the Problems Knowledge Base has provided a suggested action for the problem, select Execute the Selected Suggested Action option and then select the action from the table.
-
If an operational plan has a suggested action, select the Execute an Operational Plan option, then select the plan from the drop-down list.
-
To run a script or command that is not part of a suggested action or operational plan, select the Execute a Command or Script File option.
-
To execute a command, type the command in the field.
-
To browse for a script, click Browse and then select the script from the File Chooser popup.
-
-
-
Select where to run the script, on the managed asset where the problem is open, or on the Enterprise Controller.
-
Define the time out period for the action, in minutes, hours, or days.
-
(Optional) Add a note describing the action taken.
-
Click Execute Selected Action.
Using Maintenance Mode
Maintenance mode is designed to disable assets from generating problems temporarily. This mode is useful when you plan to power off a hardware asset or reconfigure a system manually, and you do not want problems to appear in the user interface.
Note:
Alerts are still generated when the asset is maintenance mode. View alerts by selecting the Alerts tab, which is a subtab of the Problems tab.When an asset is placed in maintenance mode, the severity badge of unassigned and assigned problems affecting the asset and its children is not propagated up the asset membership hierarchy in the navigation pane.
When the maintenance operations are completed, use the Remove From Maintenance action to begin monitoring the asset. When the asset is removed from maintenance mode, the severity badge appears in the asset membership hierarchy in the navigation pane.
-
To remove an asset from monitoring, highlight the asset in the Navigation pane, then click Place in Maintenance in the Actions pane.
-
To begin monitoring the asset, highlight the asset in the Navigation pane, then click Remove From Maintenance in the Actions pane.
Marking a Problem Repaired
The software cannot determine if a problem is repaired. However, you can open a known problem and manually add a note with the repair details and mark the problem as repaired. You must have the Manage or Admin role for the asset to perform this task.
If the problem was previously in an Unassigned state or Assigned to someone, the severity was taken into account in the computation of the highest severity to propagate up to antecedent assets in the navigation pane. After marking this problem as repaired, its severity badge will not be displayed in assets list in the navigation pane.
-
From the Message Center, click Message Center, then click one of the following:
-
Unassigned Problems
-
My Problems
-
Problems Assigned to Others
OR
From the asset view, click the asset in the Assets section of the Navigation pane, then click the Problems tab.
-
-
Select one or more problems, then click the Mark Problem(s) as Repaired icon in the center pane.
-
(Optional) Select the problem, then add a Note.
-
Click Tag Problems as Being Repaired.
Closing a Problem
Closing a problem changes the state to Closed, removes the problem from the list of active problems, and no longer displays it in the UI. You can retrieve information about a closed problem for 60 days by using the public API. After 60 days closed problems are permanently deleted.
To edit the time limit, you must edit the value in the public API. You can also disable the feature by setting the value for the number of days to 0.
Note:
Problems with no activity for seven (7) days are closed automatically by Ops Center, and do not appear in the UI. You can edit this value in the public API.After the problem is closed, its severity badge is not displayed in the asset hierarchy.
-
From the Message Center, click Message Center, then click one of the following:
-
Unassigned Problems
-
My Problems
-
Problems Assigned to Others
OR
From the asset view, click the asset in the Assets section of the Navigation pane, then click the Problems tab.
-
-
Select one or more problems, then click the Close Problem(s) icon in the center pane.
-
(Optional) Select the problem, then add a Note.
-
(Optional) To temporarily disable the monitoring rule that identified the problem, click the Action check box, then define when the monitors will be enabled.
-
Click Close Problems.