5 Images and Local Content
When Enterprise Manager Ops Center provisions or updates its assets, it uses images and other software that has been created or provided for those specific assets. The images and software are uploaded from a CD/DVD or from a local directory or downloaded from an Oracle or vendor site and stored in a software library.
Images
You create images within Enterprise Manager Ops Center or obtain them from a location external to Enterprise Manager Ops Center and then import or upload them into Enterprise Manager Ops Center. Enterprise Manager Ops Center manages the following categories of images:
-
Firmware image - In Enterprise Manager Ops Center, a firmware image consists of the hardware's firmware and the instructions for its use such as its platform and its software dependencies. These images are stored in the Software Libraries. The following firmware types are supported:
-
Server Service Processor firmware
-
Chassis firmware
-
Storage Component firmware to update firmware on RAID Controllers, Expanders and Disks The maximum size of a firmware image is 20 MB.
-
-
OS image – An OS image contains an entire operating system. A subset of OS images are branded images, which install an operating system that is optimized for a specific purpose and can also install applications. For example, a branded image for Oracle Solaris 9 can be installed in a nonglobal zone of a system running Oracle Solaris 10. The maximum size of an OS image is 2 GB. These images are stored in the Software Libraries.
-
ISO image – The image, also called a disk image, contains uncompressed directories and files of any type. This is the image that resides on removable media. It can be an application or data or both. These images are stored in the Software Libraries. The maximum size of an ISO image that you can transfer using browser operations is 2 GB. If the image is larger than 2 GB, move the file manually to the Enterprise Controller's system and then import it.
-
guest metadata – The image contains the all configuration information for a virtual host's guest, its operating system, and the applications used by a virtual host's guest. In Enterprise Manager Ops Center, the guests are either guest domains or nonglobal zones, depending on the type of virtual host. These images are stored in the Storage Libraries. ISO images and guest metadata maintain virtual hosts and guests.
Firmware images provision hardware assets and are grouped as packages, patches, or updates. They are created by their manufacturers and must be downloaded from vendor web sites or uploaded from their media. A firmware image is a copy of the vendor's firmware file and metadata for the firmware, such as the platform it is used on and any software dependencies.
OS images provision both hardware servers and virtual hosts with an operating system. In addition to being grouped as packages, patches, or updates, OS images are also grouped into baselines. You import OS images from existing ISO files. OS images for virtual hosts are provided as ISO files that you import in the same manner as Oracle Solaris or Linux OS images.
To provision firmware or an OS, use a deployment plan to direct Enterprise Manager Ops Center to retrieve the images from the appropriate software library and install them on the targeted assets. The steps of a deployment plan are profiles. Each time you import an image, a profile is also created with the same name. You can use the default profile in deployment plans but, as a good practice, rename a copy of this profile for use in deployment plans and leave the original profile with its original name in the library.
Uploading ISO Images
To use an image for provisioning, the image must be included in one of the Enterprise Manager Ops Center's software libraries. You can upload an image or import an image, depending on where the image resides.
-
If the image resides on the Enterprise Controller's system, import the image. See Importing Images.
-
If the image does not reside on the Enterprise Controller's system, use the following procedure to upload the image.
In both cases, you are moving the image from a location external to Enterprise Manager Ops Center's management into one of its libraries.
-
The OS image must be in a file in the ISO format. In previous versions of Enterprise Manager Ops Center, an image could be converted to an ISO file during the upload procedure. In the current version, you must verify that the image you want to upload is an ISO file. If image is not in an ISO file, create the file. For example, on an Oracle Solaris system, use the following command collects all OS component files on the auto-mounted file system into an ISO file.
# mkisofs -o <name_of_OS.iso> -J -R /cdrom/<name_of_OS>
-
The Enterprise Manager Ops Center software loads one ISO file per operation. If an ISO file spans more than one CD, combine the content on one DVD.
-
The size of the ISO file containing the image must not exceed 2 GB to upload an image from the system running the browser to the system running the Enterprise Controller. If the file is larger than 2 GB, copy the file manually to a file system on the Enterprise Controller's system and then use the procedure in Importing Images.
-
Verify that the image and directory has the correct permissions for uploading.
-
Verify that the size of the image does not exceed 2 GB.
-
Expand Libraries from the Navigation pane.
-
In Software Libraries or Storage Libraries, select the library in which you want to store the image.
-
Click Upload ISO Image in the Actions pane.
-
Enter the name of the file in the Source of ISO File field or click Browse to select the image.
-
Enter the name and description of the image.
-
Click Upload Image. The progress of the upload to the Enterprise Controller is displayed. After uploading, the image is copied to the software library.
Importing Images
To use an image for provisioning, the image must be included in one of the Enterprise Manager Ops Center's software libraries. You can upload an image or import an image, depending on where the image resides.
-
If the image does not reside on the Enterprise Controller's system, upload the image. See either Uploading ISO Images or Uploading Firmware Images.
-
If the image resides on the Enterprise Controller's system, use the following procedure to import the image.
In both cases, you are moving the image from a location external to Enterprise Manager Ops Center's management into one of its libraries.
-
OS images cannot be imported from ISO files made from Oracle Solaris installation CDs.
-
When importing a SUSE Linux Enterprise Server (SLES) 9 SP3 OS distribution from ISO files, you must perform the import procedure twice, and specify the same OS image name each time. Import the SLES 9 distribution first, and then import the SLES 9 Update 3 distribution.
-
Verify the location of the image you want to import. To import the image, it must reside in one of these locations:
-
A
blobsdirectory, for example, if the NFS mountpoint isserver1/nfs_share/lib1, the image must be inserver1/nfs_share/lib1/blobsand if the EC Local Library is in/var/opt/ec-01-OSlib, the image must be in /var/opt/ec-01-OSlib/blobs. -
A directory that the Enterprise Controller can access on either the NFS server or the Enterprise Controller.
-
-
Verify that the size of the image does not exceed 2 GB. If the file is greater than 2 GB, move the file manually to the system that is running the Enterprise Controller and then use the procedure in Uploading ISO Images.
-
Expand Libraries in the Navigation pane.
-
Click Software Libraries or Storage Libraries to expand.
-
Click the library.
-
Click Import Image in the Actions pane.
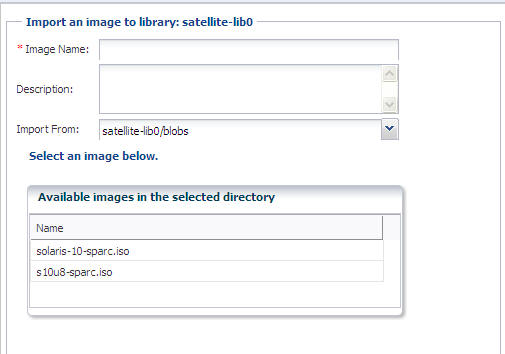
The Import an Image window is displayed.
-
Enter a name for the image and a description. Image names must be unique, can consist of up to 100 characters, and can include numbers, letters, and some special symbols. The following special symbols are prohibited: comma, asterisk, single quote, double quote, parenthesis, question mark, equal sign, and newline.
-
Specify the location of the image. All of the images in the location are displayed.
-
Select the image you want to import.
-
Click Import Image to copy the image to the library.
Moving an Image
You can move an image from one library to another library.
-
To move the image of a virtual host, shut down all of its guests.
-
Verify that the destination library has enough free space for the image.
-
Expand Libraries in the Navigation pane.
-
Click Software Libraries or Storage Libraries to expand.
-
Click the library. The Summary tab shows the images in the library, in a separate table for each type. The table also shows the image's size and the date it was last modified.
-
Select the image.
-
Click the Move Image icon.
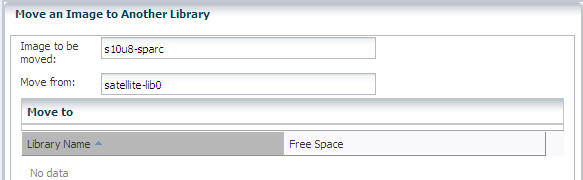
The Move an Image to Another Library window is displayed with the library and image you selected. The Move To table lists all the NAS storage libraries.
Figure 5-2 Move an Image to Another Library Window
Description of "Figure 5-2 Move an Image to Another Library Window"
-
Click the library to which you want to move the image, that is, the destination library.
-
Click Move Image. The image is moved from the original library to the destination library.
Viewing Image Details
The library's Summary page lists all the images in that library by type:
-
Operating system ISO image
-
Logical domain
-
Non-global zone
-
Service Processor firmware
-
Component firmware for storage devices
-
Expand Libraries in the Navigation pane.
-
Click Software Libraries or Storage Libraries to expand.
-
Click the library. The Summary tab shows the images in the library, in a separate table for each type. The table also shows the image's size and the date it was last modified.
-
Select the image.
-
Click the View Image Details icon. For an ISO image, the Image Name and Description are displayed. Click the Edit icon to change them. For an LDom guest or zone guest (non-global zone), the Summary page for the virtual asset is displayed. This is the same display you see when you choose the logical domain or zone from Assets in the Navigation pane. For disk firmware, the compressed files containing the images are displayed:
-
Click one of the compressed files to see the packages.
-
Click a package to see the image's metadata.
-

Editing Image Details
You can change the image name and description of an ISO image. For guests and non-global zones, you can change the name, description, tags, allocated memory, and its physical media.
-
Expand Libraries in the Navigation pane.
-
Click Software Libraries or Storage Libraries to expand.
-
Click the library. The Summary tab shows the images in the library, according to type of image.
-
Select the image.
-
Click the Edit Image Details icon. For an ISO image, you can change the Image Name and Description. For guests and non-global zones, the Summary page is displayed. You can change the following fields:
-
Name
-
Description
-
Tags
-
Allocated Memory
-
CD/DVD
-
-
Click Submit to create the job.
Deleting Images
When you delete the image for a virtual host, its corresponding guests are also deleted.
You cannot delete an OS image that is used by an OS profile.
-
Expand Libraries in the Navigation pane.
-
Click Software Libraries or Storage Libraries to expand.
-
Click the library. The Summary tab shows the images in the library, in a separate table for each type. The table also shows the image's size and the date it was last modified.
-
Select the image.
-
Click the Delete Image Details icon to delete the image.
-
Click OK to confirm the delete action.
Determining Metadata for a Firmware Image
When you import a firmware image, you might be required to provide metadata to complete the image file. You can usually find the information in the image's README file. You must provide the firmware type, the systems that the firmware supports, the version of the firmware, and any other firmware images that this firmware image depends on.
The following is an example of a README file for ALOM-CMT firmware, where a single binary is deployed to the Service Processor.
-
To determine the type and version of the firmware update:
Latest Sun System Firmware(6.1.2): ---------------------------------- System Firmware 6.1.2 Sun Fire[TM] T2000 2006/01/20 18:19 ALOM-CMT v1.1.2 Jan 20 2006 18:06:10 VBSC 1.1.1 Jan 20 2006 17:56:19 Reset V1.0.0 Hypervisor 1.1.0 2005/12/15 11:10 OBP 4.20.0 2005/12/15 16:48 Sun Fire[TM] T2000 POST 4.20.0 2005/12/15 17:19 -
To determine the models supported:
This README is intended for users who wish to
upgrade the firmware in their Sun Fire T2000.
-
To determine if the system needs to be powered off before updating the firmware:
a)To update the Sun System Firmware, the system must be powered off (i.e. in standby mode).
From this README file, you can identify the following metadata :
-
Available platforms - Sun Fire T2000
-
Type - VBSC
-
Version - 1.1.1
-
Require power off - Yes
For this example, the VBSC firmware subcomponent/type with version 1.1.1 was used. You can use any of the other types such as ALOM-CMT:1.1.2 or OBP:4.20.0. However, you must ensure that the version specified is always the firmware subcomponent/type.
Uploading Firmware Images
Firmware images are platform-specific and rely on metadata to provision and update managed assets. They reside in one of the Software or Storage Libraries.
-
Put the firmware images or packages on the local file system or an NFS-mounted file system that is accessible to the Enterprise Controller.
-
Uncompress any compressed files to see the firmware image and its associated README file.
-
Verify that the size of the image does not exceed 20 MB.
-
Open the README file to identify information that you use to create the image's metadata. See Determining Metadata for a Firmware Image for instructions and an example.
-
Expand Libraries in the Navigation pane.
-
Click Software Libraries or Storage Libraries to expand.
-
Click the library.
-
Click Upload Firmware in the Actions pane.
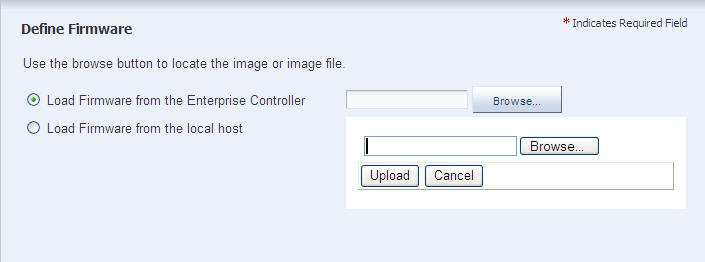
The Upload Firmware window is displayed.
-
Choose the location of the firmware image and then click the Browse button to navigate to its location.
-
Select the firmware image and click the Select File button. If you are loading the firmware image from a location on the Enterprise Controller, the image is uploaded now.
-
If you are loading the firmware image from the local host, click the Upload button.
-
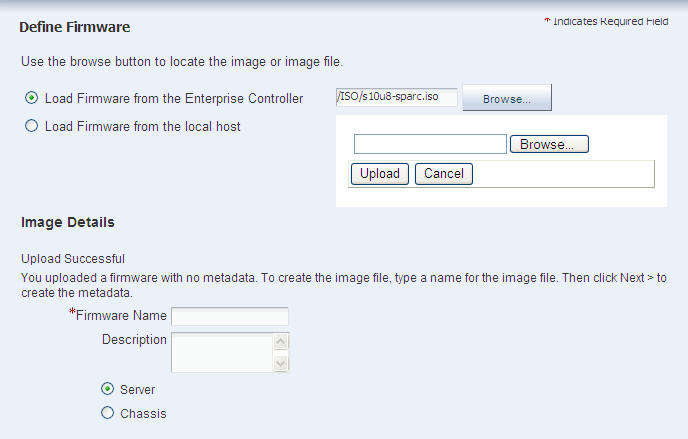
If you chose to upload an image file, that is, a file that contains an image and its metadata, Ops Center displays the message "Upload successful. You uploaded a firmware image with metadata." Click Next to see the Summary page.
-
If you chose to upload an image, you now provide the metadata to create the image file.
The Upload Firmware window displays additional fields.
-
Type a name and description for the image file and specify the type of firmware image. Then click Next.
-
-
Select the platforms for the firmware image. From the list of available platforms, choose at least one platform and then click the Add button. When the list of Supported Platforms is complete, click Next.
-
Specify the type and version of the firmware image. The version must match the version number of the firmware image file. For example, if you create a firmware image for the image file FFXCP1080.tar.gz, enter 1080 as the version.
-
If this image depends on other firmware images, select those firmware images from the list.
-
If this firmware's README file states that the server must be shut down before updating the Service Processor, select Power Off. If you are not certain about this requirement, select Power Off. When a firmware image has the Power Off attribute, you must stop the OS and shut down the server before you attempt to provision firmware.
-
Review the details in the Summary page and click Finish.
Downloading OS Images
Profiles that provision an OS use OS images. You must ensure that the required images are in the software library used by the profile, If not, download them from the Knowledge Base.
When Enterprise Manager Ops Center is in Disconnected mode, you cannot download OS images from the Knowledge Base. Because your local copy of the Knowledge Base does not include these images, you must obtain the images using an alternate method:
-
Change to Connected mode temporarily, if this is allowed at your site, to download the images.
-
Obtain the images from a system that is allowed to have Internet access and can download the images.
-
Upload the images from CD/DVD.
-
Expand Libraries in the Navigation pane.
-
Click Software Libraries or Storage Libraries to expand.
-
Click the library.
-
Click Download OS Image in the Actions pane.
The Download OS Image wizard is displayed.
-
Select the OS image that you want to download.
-
If a license is associated with the OS image , complete the following actions:
-
Click View License to display the associated license.
-
Click Accept License and Download to start the download process. The job for the download operation is submitted.
-
Loading OS Images From CD or DVD
To obtain OS images from physical media, use the Bulk Upload Packages and Patches action with the following conditions:
-
The OS image must be in a file in the ISO format. In previous versions of Enterprise Manager Ops Center, an OS image could be converted to an ISO file during the upload procedure. In the current version, you must verify that the CD or DVD contains an ISO file of the OS image. If image is not in an ISO file, create the file. For example, on an Oracle Solaris system, the following command collects all the OS component files on the auto-mounted file system into an ISO file.
# mkisofs -o <name_of_OS.iso> -J -R /cdrom/<name_of_OS>
If you have access to the CD/DVD drive of the Enterprise Controller's system, you can use the same command to create the ISO file on the system. The following example creates the ISO file in the directory myimages. In this case, you do not need to use the Bulk Upload Packages and Patches action. Instead, use the procedure in Importing Images.
# mkisofs -o /<myimages>/<name_of_OS.iso> -J -R /cdrom/<name_of_OS>
-
The Enterprise Manager Ops Center software loads one ISO file per operation. If an ISO file spans more than one CD, combine the content on one DVD.
-
The size of the ISO file containing the OS image must not exceed 2 GB to upload an image from the system running the browser to the system running the Enterprise Controller. If the file is larger than 2 GB, copy the file manually to a file system on the Enterprise Controller's system and then use the procedure in Importing Images.
-
Load the CD or DVD into the system drive and verify that the OS image on the physical medium is in ISO format, usually indicated by the file extension iso.
-
Verify that the file size does not exceed 2 GB and can fit onto one CD or DVD.
To Load an OS Image From CD or DVD
-
Load the CD or DVD into the drive of the Enterprise Controller's system.
-
Expand Libraries in the Navigation pane.
-
Click Local Content in the Solaris/Linux OS Updates library.
-
Click Bulk Upload Packages and Patches in the Actions pane.
The Upload Patches, Packages, and RPMS window is displayed.
Figure 5-6 Upload Patches, Packages, and RPMs
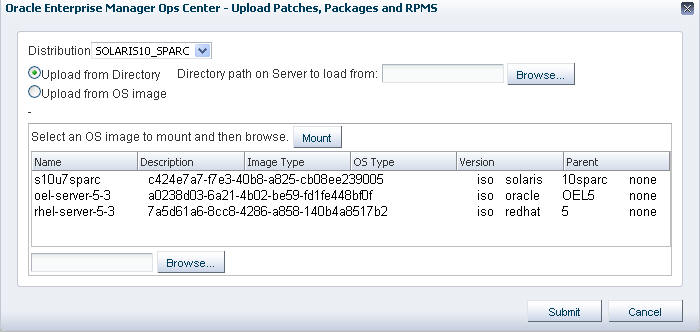
Description of "Figure 5-6 Upload Patches, Packages, and RPMs "
-
Click Distribution to select the distribution that applies to these files.
-
Select Upload from Directory.
-
Specify the path to the OS image or directory on the CD/DVD or click Browse to locate and select it. If you specify a directory, all files in the directory and its subdirectories are uploaded. If you specify an OS image, you must mount the OS image and select the files.
-
Click one of the OS images and click Mount.
-
Click Browse to locate and select the files.
-
-
Click Submit to upload the files. The Upload Job is submitted. To use the OS images, you must import them. See Importing Images.
Local Content
In addition to packages and updates, the Updates library also stores and gives access to site-specific configuration files, and scripts. Other local content your site requires can be data files, executable files, or binary files. For example, you might develop a script to test servers before running a provisioning job.
Files in Local Content section of the Updates Library have no connection to the Knowledge Base. You upload files to the Updates library into one of the categories and then manage their life cycle. You can create subcategories under any parent category to organize the uploaded files.
In addition to the operating system and firmware images, Enterprise Manager Ops Center can be directed to use other software to manage assets. This software is site-specific and consists of configuration files and scripts that are used in deployment plans and profiles to complete an action. The content can also be files that must be included in the deployment.
See Update Profiles and Policies for more information about the Updates Library.
Viewing Component Details
You can view details about a component such as distribution, version, release, group, size URL, when the file was added or edited the file, and any summary and description information, host, RPM, and vendor.
-
Expand Libraries in the Navigation pane.
-
Click Local Content in the Solaris/Linux OS Updates library. The center pane displays the standard categories of local content: Configuration files, Local packages, Macros, Pre-actions, Post-actions, and Probes.
-
Expand a category to see view its components. For the local packages category, the content is organized further by the name of the server that discovered the package, for example Agent<hostname>auto register, so you must also expand this subcategory.
-
Double-click the component to view information about it. Details about the component are displayed, with tabs to organize the information such as General, Incident, Dependencies, Installed, and Rules.
-
To dismiss the component details, click Close.
Uploading a Local Configuration File
A configuration file is a text file, binary file, or non-RPM application that contains the settings and values for an asset type. A profile or deployment plan then uses the configuration file on all of the assets defined for it.
To Upload a Local Configuration File
-
Expand Libraries in the Navigation pane.
-
Click Local Content in the Solaris/Linux OS Updates library.
-
Click Upload Local Configuration File in the Actions pane.
The Upload Local Configuration File window is displayed.
Figure 5-7 Upload Local Configuration File
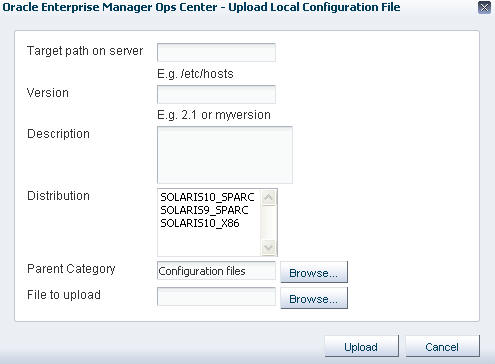
Description of "Figure 5-7 Upload Local Configuration File"
-
In Target path on server, type the full path to the configuration file.
-
In Version, type a character string to identify this version of the file. The string is appended to the file name when it is displayed in a Components list.
-
Type a brief description of the file.
-
Select the Distribution to which this file is applied. You can choose multiple distributions.
-
In Parent, accept the Configuration Files category or click Browse to locate a subcategory.
-
Click Browse to locate and select the configuration file.
-
Click Upload. The file is uploaded to the selected distributions.
Uploading a Local Software Package
You can upload software in the following formats:
-
pkg
-
rpm (for Linux RPMs)
-
Package data stream and package directories
-
tar
-
zip
-
gzip
-
compress
If the file is in compressed format, the file is uncompressed after it is uploaded.
Verify that all extracted files are of one of the supported types.
To Upload a Local Software Package
-
Expand Libraries in the Navigation pane.
-
Click Local Content in the Solaris/Linux OS Updates library.
-
Click Upload Local Software Packages in the Actions pane.
-
Select Yes if the package is a security fix for a previous version of the software. Otherwise, select No.
-
Click the name of the distribution to which you want to add this package.
-
In Parent, click Local PKGs or click Browse to locate a subcategory.
-
In Files, click Add to see the list of files. Select at least one software package.
-
Click Upload. The software package is uploaded and listed under the Local Content.
Uploading a Local Action
An action is a script, binary file, or executable file that makes changes to a host. The following actions are available:
-
Pre-Actions – Script that runs on a managed host before job tasks are carried out.
-
Post-Actions – Script that runs on a managed host after job tasks are completed.
-
Probes – Script that runs on a managed host to verify that a job task can be performed.
-
Macros – Script that outputs a single line. This output replaces a macro sign in a local configuration file. The macro value is used to customize a configuration file for its host machine. The macro actions can be leveraged to deploy a single configuration file across multiple hosts by customizing the configuration file for different environments.
-
Expand Libraries in the Navigation pane.
-
Click Local Content in the Solaris/Linux OS Updates library.
-
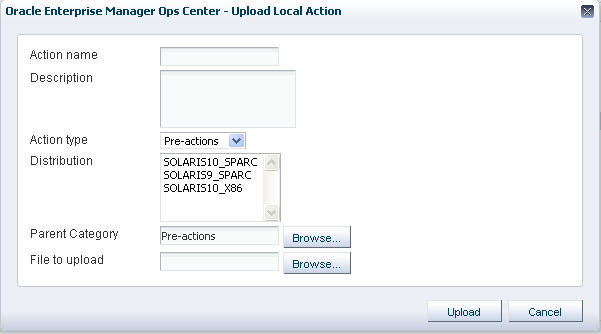
Click Upload Local Action in the Actions pane.
The Upload Local Action window is displayed.
-
Type a name for the action.
-
Enter text to describe the purpose of the action.
-
Select the type of action.
-
Click the name of the distribution that uses the action. The Parent field shows the category, based on the type of Action.
-
Click Browse to locate and select the file.
-
Click Upload. The file is uploaded.
Editing a Local Component File
You can edit the contents of a local component file. For example, if you uploaded a system file that contained IP addresses and determined that there was an incorrect IP address in the file, you can edit the file to correct the IP address. You can also use this procedure to replace the file with one that you have already corrected.
-
Expand Libraries in the Navigation pane.
-
Click Local Content in the Solaris/Linux OS Updates library.
-
Click Edit Local Component File in the Actions pane.
-
To specify the file, type its name or click the Browse button to navigate to the file. If the file is not found, click Distribution to select the correct distribution. Only files in the the selected distribution are displayed.
-
Select either Edit existing file or Replace existing file.
-
If you choose to edit the file, make changes to the file and click Save.
-
If you choose to replace the file, browse for the replacement file and click Upload.
-
Deleting a Local Component
You can remove your site's local content but you cannot remove the default categories.
Note:
Deleting content does not require confirmation and cannot be undone. Verify you are deleting the correct local component.To Delete a Local Component File
-
Expand Libraries in the Navigation pane.
-
Click Local Content in the Solaris/Linux OS Updates library.
-
Click Delete Local Component in the Actions pane.
-
Expand the category to display the component you want to delete. To change the distribution that is displayed, click Distribution.
-
Select the component or a subcategory to delete.
-
Click Delete.
To remove a subcategory and its components, do not attempt to remove each component and then remove the subcategory. When there are no components in a subcategory, the subcategory creates a placeholder component, which you cannot delete. Repeat the procedure and select the subcategory itself to delete. The placeholder component is also removed.
Adding a Local Category
Your site's local content is organized into the following default categories: local RPMs or PKGs, configuration files, macros, pre-actions, post-actions, and probes. You can create subcategories to further organize your local content. The type of local content allowed in a subcategory depends on its parent category.
-
Expand Libraries in the Navigation pane.
-
Click Local Content in the Solaris/Linux OS Updates library.
-
Click Add Local Category in the Actions pane.
-
Enter a name for the new subcategory.
-
Enter a brief description for the new subcategory such as its purpose.
-
Click Distribution to assign to the subcategory.
-
Click Parent to select one of the default categories for the subcategory.
-
Click Apply. The new subcategory is created under the selected default category. You can now upload software packages and files into the new subcategory.
You cannot edit or delete one of the default categories. However, you can edit and delete a subcategory and you can delete the content in the subcategory. See Deleting a Local Component.
Uploading Local Software in Bulk
You can upload multiple files or an entire directory in one operation. For example, you can upload the contents of a DVD or you can specify a directory. All components in the directory and subdirectories are uploaded.
The files must be in the following formats:
-
pkg
-
rpm (for Linux RPMs)
-
Package data stream and package directories
-
tar
-
zip
-
gzip
-
compress
If files are compressed, the software extracts the files after it uploads them.
-
Verify that the files have the supported file types.
-
Verify that the file size does not exceed 2 GB. If the file is larger than 2 GB, copy the file manually to a file system on the Enterprise Controller's system.
-
If you are uploading from removable media, insert the media.
To Upload Local Software in Bulk
-
Expand Libraries in the Navigation pane.
-
Click Local Content in the Solaris/Linux OS Updates library.
-
Click Bulk Upload Packages and Patches in the Actions pane.
The Upload Packages, Patches, and RPMS window is displayed
-
Click Distribution to select the distribution that applies to these files.
-
Select either Upload from OS Image or Upload from Directory.
-
Specify the path to the OS image or directory or click Browse to locate and select it. If you specify a directory, all files in the directory and its subdirectories are uploaded. If you specify an OS image, you must mount the OS image and select the files.
-
Click one of the OS images and click Mount.
-
Click Browse to locate and select the files.
-
-
Click Submit. The upload job is created.
To view the status of the upload job, select Bulk Upload Results .
To view the certified packages that have been uploaded, click Update Components in the Navigation pane. To view non-certified packages that have been uploaded, click Local Content in the Navigation pane.
Viewing Bulk Upload Results
You can view a detailed history of all the local components that were uploaded in bulk.
-
Click Libraries in the Navigation pane.
-
Click Solaris/Linux Updates Library.
-
Click Bulk Upload Results in the Actions pane. The uploaded components list displays the name, description, status, and date for each component.
-
Select a component and click View Results. The details of the uploaded components are displayed.
Backing Up Images and Local Content
The satadm command that backs up the Enterprise Controller does not include the Storage or Software Libraries. You must back up the images manually.
To Back Up Images and Local Content
-
Move the archive to another server, file-share facility, or a location outside of the /var/opt/sun directory, according to your site's disaster recovery plan.
-
If it is necessary to rebuild the Enterprise Controller, restore the Enterprise Controller and then restore the
/var/opt/sun/xvm/images/oshierarchy.
Uploading Software in Disconnected Mode
In Disconnected mode, all content required for provisioning and updating an OS or firmware must be uploaded manually in addition to any local content. If any required content is missing, Enterprise Manager Ops Center reports an error similar to "Not installable by current KB"
-
Use the Bulk Upload Packages and Patches action, as described in Loading OS Images From CD or DVD, to move images files and other content from physical media to Enterprise Manager Ops Center's libraries.
To view the Oracle Solaris-certified packages that have been uploaded, click Update Components in the Navigation pane. To view non-certified packages that have been uploaded, click Local Content in the Navigation pane.