3 Running Exachk for Exalogic: Basic Usage
This chapter contains the following sections:
3.1 Usage Recommendations
For optimum performance of the Exachk tool, Oracle recommends that you complete the following steps:
-
Exachk is a minimal impact tool, but Oracle recommends that you run Exachk when the load on the system is low. The runtime duration of Exachk depends on the number of nodes to be checked, CPU load, network latency, and so on.
-
Do not run any scripts in the Exachk directory unless specifically documented.
-
To avoid problems while running the tool from terminal sessions on a workstation or laptop, connect to the Exalogic machine and run Exachk by using VNC, so that if a network interruption occurs, Exachk continues to run.
-
Run Exachk as the
rootuser.Whenever the tool requires
rootuser privileges, it displays a message like the following:7 of the included audit checks require root privileged data collection. If sudo is not configured or the root password is not available, audit checks which require root privileged data collection can be skipped. 1. Enter 1 if you will enter root password for each host when prompted (once for each node of the cluster) 2. Enter 2 if you have sudo configured for oracle user to execute /tmp/root_exachk.sh script 3. Enter 3 to skip the root privileged collections 4. Enter 4 to exit and work with the SA to configure sudo or arrange for root access and run tool later Please indicate your selection from one of the above options:-
If you select
1, the tool prompts you to enter therootpassword for each node. Enter therootpassword once for each node.If you select
2, and if you havesudoconfigured on your system, the tool performs the root privileged collection by using thesudocredentials.If you select
3, the tool skips all of the root privileged collections and audit checks. Those checks must be performed manually.
3.2 Performing Health Checks for the Exalogic Infrastructure
This section describes how to use Exachk to perform health checks for the Exalogic infrastructure. This section contains the following topics:
3.2.1 Prerequisites for Performing Health Checks for the Exalogic Infrastructure
The term infrastructure is used here to indicate the compute nodes, switches, storage appliance, and, additionally, the Exalogic Control stack in the case of a machine in a virtual configuration.
Before running Exachk for the Exalogic infrastructure components, ensure that the following prerequisites are fulfilled:
-
Ensure that Exachk has been installed as described in Chapter 2.
-
Before running Exachk for the first time, make a note of the short names of the storage nodes and switches:
el01sn01,el01sw-ib01, and so on. Exachk will prompt you for these names at the start of the health-check process. This is a one-time prompt. Exachk stores the names you provide, and uses the stored names for subsequent runs.
3.2.2 Running Exachk for Physical Racks
To perform health checks for all the infrastructure components in an Exalogic machine in a physical (Linux or Solaris) configuration, complete the following steps:
-
SSH, as
root, to the compute node on which you installed Exachk -
Go to the directory in which you installed Exachk.
# cd /u01/common/general/exachk
-
Run the following command:
# ./exachk
When running Exachk for the first time, the tool detects the size of the Exalogic rack and prompts for the host name or IP address of the switch and storage node. For information about overriding the IP addresses and host names set during the first run, see Section 4.4.
For more information about all the options that you can use with the exachk command, see Section 4.2.
For information about the results of a health check performed by using Exachk, see Chapter 5.
3.2.3 Running Exachk for Virtual Racks
To perform health checks for all the infrastructure components in an Exalogic machine in a virtual configuration, complete the following steps:
-
SSH, as
root, to the vServer that hosts the Enterprise Controller. -
Go to the directory in which you installed Exachk.
# cd /u01/common/general/exachk
-
Run the following command:
# ./exachk
Exachk automatically discovers the IP addresses or host names of all the components in the machine, and starts performing the health checks. For information about overriding the autodiscovered IP addresses and host names, see Section 4.4.
For more information about all the options that you can use with the exachk command, see Section 4.2.
For information about the results of a health check performed by using Exachk, see Chapter 5.
Note:
For an Exalogic machine running EECS 2.0.4 (virtual), if traffic from theeth-admin network cannot be routed to the EoIB-external-mgmt network, when you run Exachk from the Enterprise Controller vServer, health checks will not be performed for the switches and storage heads. On such racks, to perform health checks on all the components, complete the following steps:
-
Perform health checks for the Exalogic Control components:
a. SSH, as
root, to the Enterprise Controller vServer.b. Go to the directory in which you installed Exachk.
# cd /u01/common/general/exachk
c. Run the following command:
# ./exachk -profile control_VM
Note that Exachk reports that all the checks on the compute nodes passed, but this command does not perform any health checks on the compute nodes, the storage appliance, and the switches.
-
Perform health checks for the physical components: compute nodes, storage appliance, and switches:
a. SSH, as
root, to the compute node on which you installed Exachk.b. Ensure that passwordless SSH to the Oracle VM Manager CLI shell is enabled, as described in "Verifying and Enabling Passwordless SSH to the Oracle VM Manager CLI" in Section 4.2, "Exachk Command Options."
c. Go to the directory in which you installed Exachk.
# cd /u01/common/general/exachk
c. Run the following command:
# ./exachk -profile el_extensive
3.2.4 Running Exachk for Hybrid Racks
To perform health checks for all the infrastructure components in an Exalogic machine in a hybrid configuration (that is, a machine on which half the nodes are running Oracle VM Server and the other half are on Oracle Linux), complete the following steps:
-
SSH, as
root, to the vServer that hosts the Enterprise Controller component of the Exalogic Control stack. -
Go to the directory in which you installed Exachk.
# cd /u01/common/general/exachk
-
Run the following command:
./exachk -hybrid -phy physical_node_1[,physical_node_2,...]
In this command,
physical_node_1,physical_node_2, and so on are theeth-adminIP addresses of the compute nodes running Oracle Linux.Note:
The-phyphysical_node_1[,physical_node_2,...]must be specified only the first time you run Exachk with the-hybridoption. Exachk stores the host names in theexachk_exalogic.conffile. For subsequent runs, you can run Exachk without specifying the-phyoption. Exachk uses the host names stored inexachk_exalogic.conf.
For more information about all the options that you can use with the exachk command, see Section 4.2.
For information about the results of a health check performed by using Exachk, see Chapter 5.
3.3 Performing Health Checks for Guest vServers
This section describes how to use Exachk to perform health checks for guest vServers.
This section contains the following sections:
-
Section 3.3.2, "Additional Prerequisites for STIG-hardened vServers."
-
Section 3.3.3, "Running Exachk for vServers that are not STIG-hardened."
3.3.1 Prerequisites
This section describes the prerequisites that must be completed before running Exachk for all guest vServers.
-
Exachk must be installed as described in Chapter 2.
-
The IaaS CLI and API must be installed on the vServer that hosts the Enterprise Controller. Note that the IaaS CLI and API are pre-installed on the Enterprise Controller vServer in EECS 2.0.4.
To verify this prerequisite, check whether the
/opt/oracle/iaas/cliand/opt/oracle/iaas/apidirectories exist on the vServer. If the directories exist, then the IaaS CLI and API are installed.To install the IaaS CLI and API, complete the following steps:
-
Go to
https://edelivery.oracle.com.Sign in by using your Oracle account.
-
Read and accept the Oracle Software Delivery Cloud Trial License Agreement and the Export Restrictions
Click Continue.
-
In the Select a Product Pack field, select Oracle Fusion Middleware.
In the Platform field, select Linux x86-64.
Click Go.
-
In the results displayed, select Oracle Exalogic Elastic Cloud Software 11g Media Pack, and click Continue.
-
Look for Oracle Exalogic <version> IaaS Client for Exalogic Linux x86-64 (64 bit), and download the appropriate version—2.0.4.0.0, 2.0.6.0.0, or 2.0.6.0.1—depending on the EECS release installed on the Exalogic machine.
-
Unzip the downloaded file. It contains two RPMs.
-
Install both the RPMs by running the following command in the directory in which you unzipped the RPMs:
rpm -i *.rpm
-
3.3.2 Additional Prerequisites for STIG-hardened vServers
You can harden guest vServers using the STIGfix tool. The STIGfix tool is packaged as a part of the Exalogic Lifecycle Toolkit. You can download the toolkit installer and tar bundle from the My Oracle Support document ID 1586312.1. The My Oracle Support document also contains instructions for installing the toolkit.
To run Exachk on STIG-hardened vServers, you must perform the following prerequisites:
-
Run Exachk on STIG-hardened vServers separately from other guest vServers.
-
The vServer that hosts the Enterprise Controller and the STIG-hardened guest vServers should have the same user with sudo privileges. You can create these users by doing the following:
Create the account on the vServer hosting Enterprise Controller as follows:
-
Log in to the vServer hosting Enterprise Controller as the
rootuser. -
Run the following scripts to create the account
ELAdmin:# useradd -d /home/ELAdmin -s /bin/bash -m ELAdmin # echo "ELAdmin:<password>"|chpasswd # echo "PATH=$PATH.:/usr/kerberos/sbin:/usr/kerberos/bin:/usr/local/sbin:/usr/local/bin:/sbin:/bin:/usr/sbin:/usr/bin:/root/bin" >>/home/ELAdmin/.bashrc # usermod -a -G oinstall ELAdminReplace
<password>with a password of your choice. -
Run the
visudocommand. -
Under
## Allows people in group wheel to run all commands, add the following line:%ELAdmin ALL=(ALL) ALL
-
Under
## Same thing without a password, add the following line:%ELAdmin ALL=(ALL) NOPASSWD: ALL
-
Save the file.
Create the
ELAdminaccount, which you created on the Enterprise Controller, on the guest vServer that is STIG-hardened as follows:-
Log in to the vServer that is STIG-hardened.
-
Switch to the
rootuser by running the following command:su root
-
Run the following scripts to create the account
ELAdmin:# useradd -d /home/ELAdmin -s /bin/bash -m ELAdmin # echo "ELAdmin:<password>"|chpasswd # echo "PATH=$PATH.:/usr/kerberos/sbin:/usr/kerberos/bin:/usr/local/sbin:/usr/local/bin:/sbin:/bin:/usr/sbin:/usr/bin:/root/bin" >>/home/ELAdmin/.bashrcReplace
<password>with a password of your choice. -
Run the
visudocommand. -
Under
## Allows people in group wheel to run all commands, add the following line:%ELAdmin ALL=(ALL) ALL
-
Under
## Same thing without a password, add the following line:%ELAdmin ALL=(ALL) NOPASSWD: ALL
-
Save the file.
-
3.3.3 Running Exachk for vServers that are not STIG-hardened
To perform health checks for all the guest vServers, which are not STIG-hardened, in a vDC on an Exalogic machine, complete the following steps:
-
SSH, as
root, to the vServer that hosts the Enterprise Controller. -
Go to the directory in which you installed Exachk.
# cd /u01/common/general/exachk
-
Discover the IP addresses of all the guest vServers, by running the following script:
# ./generate_guests_list.sh
Note:
If the IaaS CLI and API are not installed on the vServer, the following error message is displayed:IaaS API is not installed. Please consult with user guide for more information on IaaS API installation.
If this error occurs, install the IaaS CLI and API, as described in Section 3.3.1, "Prerequisites" and then perform this procedure from step 1.
-
When prompted, enter the
rootpassword.Note:
At times, particularly right after installing the IaaS CLI and API, when you enter therootpassword, thegenerate_guests_list.shscript may hang.If this error occurs, complete the following steps:
-
Set the
IAAS_HOMEandJAVA_HOMEenvironment variables, by running the following commands:# export IAAS_HOME="/opt/oracle/iaas/cli" # export JAVA_HOME="/usr/java/latest/"
-
Run the following command:
# /opt/oracle/iaas/cli/bin/akm-describe-accounts --base-url https://localhost/ --user root
-
At the prompt to accept the trust certificate, enter
yes. -
Run
generate_guests_list.shagain.
The script generates a set of
.outfiles, one for eachCloud User. The files are namedguest_vm_ip_user.out, whereuseris aCloud User. Each.outfile contains the IP addresses of the guest vServers created by aCloud User. -
-
Run Exachk with the
-vmguestoption, and specify one or moreguest_vm_ip_user.outfiles as arguments, depending on the users for which you want to perform health checks for guest vServers:# ./exachk -vmguest guest_vm_ip_user-1.out[,guest_vm_ip_user-1.out,...]
For more information about all the options that you can use with the exachk command, see Section 4.2.
For information about the results of a health check performed by using Exachk, see Chapter 5.
3.3.4 Running Exachk for STIG-hardened vServers
Run Exachk for STIG-hardened vServers by doing the following:
-
Log in as
rooton the vServer that hosts the Enterprise Controller. -
Switch to the
ELAdminuser by running the following command:su - ELAdmin
Note:
When running Exachk on STIG-hardened vServers, Oracle recommends using only theELAdminuser which you created in Section 3.3.2, "Additional Prerequisites for STIG-hardened vServers." -
Create the
guest_vm_ip_user.outmanually. Theguest_vm_ip_user.outhas the following format:ip_address_of_stig_hardened_guest_vserver1 ip_address_of_stig_hardened_guest_vserver2 ip_address_of_stig_hardened_guest_vserver3
-
Run Exachk with the
-vmguestoption, and specify one or moreguest_vm_ip_user.outfiles as arguments, depending on the users for which you want to perform health checks for guest vServers:# ./exachk -vmguest guest_vm_ip_user-1.out[,guest_vm_ip_user-1.out,...]
For more information about all the options that you can use with the exachk command, see Section 4.2.
For information about the results of a health check performed by using Exachk, see Chapter 5.
3.4 About the Exachk Health-Check Process
When Exachk starts, you will see the following sequence of events:
-
At the start of the health-check process, Exachk prompts you for the names of the storage nodes and switches. At the prompt, enter the names or IP addresses of the storage nodes and switches. This is a one time process. Exachk remembers these values, and uses them for the consequent health-checks. See Figure 3-1.
Figure 3-1 Sample Message: Exachk Prompts for Names of Storage Nodes and Switches
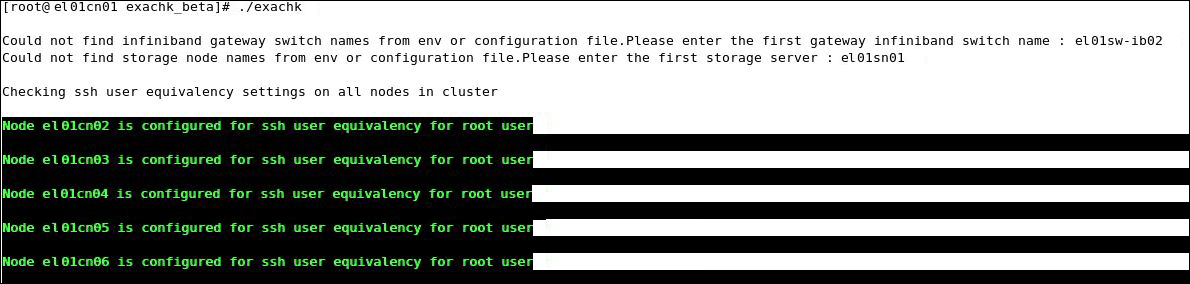
Description of "Figure 3-1 Sample Message: Exachk Prompts for Names of Storage Nodes and Switches"
Note:
Enter the hostnames or IP addresses for the nodes, in the sequence in which they are arranged on the machine. -
The health-check tool checks the SSH user-equivalency settings on all of the nodes in the cluster.
Exachk is a non-intrusive health-check tool. Therefore, it does not change anything in the environment. The tool verifies the SSH user equivalency settings, assuming that it is configured on all of the compute nodes on the system:
-
If the tool determines that the user equivalence is not established on the nodes, it provides you an option to set the SSH user equivalency either temporarily or permanently.
-
If you choose to set SSH user equivalence temporarily, Exachk does this for the duration of the health check, but after the completion of the health check, it returns the system to the state in which it found SSH user equivalence originally.
When Exachk prompts you, specify your preference, and enter the password for the nodes for which you are prompted. The default preference,
1, allows you to enter therootpassword once, for all of the nodes, on each host of the Exalogic machine. See Figure 3-2.Figure 3-2 Sample Message: Exachk Prompt for Setting SSH User Equivalence
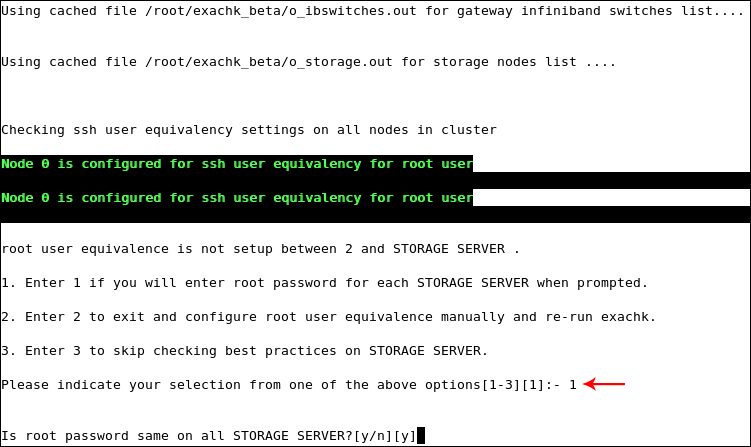
Description of "Figure 3-2 Sample Message: Exachk Prompt for Setting SSH User Equivalence"
On confirming the option and entering the credentials to proceed, Exachk creates a number of output files—log files and collection files—for collecting the data required for the health check. See Figure 3-3.
Figure 3-3 Sample Collections: Exachk Data Collection
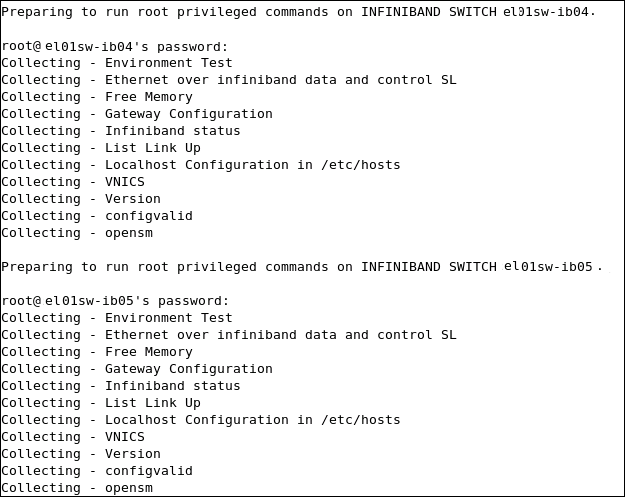
Description of "Figure 3-3 Sample Collections: Exachk Data Collection"
-
-
Exachk checks the status of the components of the Exalogic stack: compute nodes, storage nodes, and InfiniBand switches. Depending upon the status of each component, the tool runs the appropriate collections and audit checks. See Figure 3-4.
Figure 3-4 Sample Message: Collection and Audit Checks
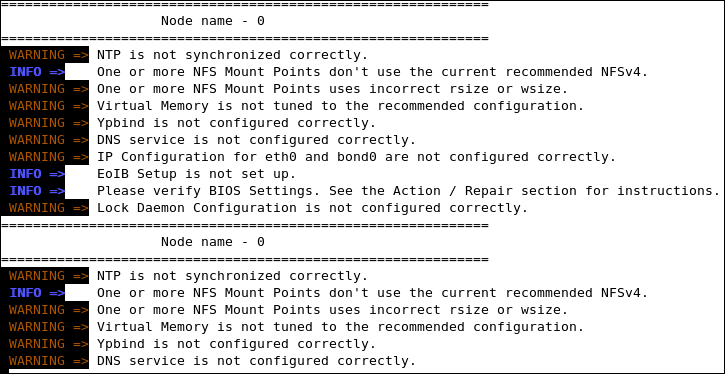
Description of "Figure 3-4 Sample Message: Collection and Audit Checks"
-
Exachk runs in the background, monitoring the progress of the command execution. If, for any reason, one of the commands times out, Exachk either skips or terminates that command, so that the process can continue. Exachk notes such cases in the log files. For information about command timeouts, see Section 4.1.1.
If Exachk stops running for any reason, it cannot resume or restart automatically. You must start Exachk afresh. However, before running Exachk again, complete the following steps:
-
Verify whether the previous Exachk process has been terminated, by running the following command:
# ps -ef | grep exachk
If the Exachk process is still running, terminate it by running the following command:
# kill pidIn this command
pidis the process ID of the Exachk process that you want to terminate. -
Verify whether
/tmp/.exachk/, the temporary directory generated by Exachk during the previous run, has been deleted. If the directory still exists, delete it.
-
-
When Exachk completes the health check, it produces an HTML report and a zip file.
For information about the output of Exachk, see Chapter 5.