Release 12.1
Part Number E12954-04
Contents
Previous
Next
| Oracle XML Gateway User's Guide Release 12.1 Part Number E12954-04 | Contents | Previous | Next |
Web services are Web-based applications that provide a standard means of interoperating between different software applications, running on a variety of platforms or frameworks. Web services have an interface described in a machine-processable format called WSDL (Web Services Description Language). Other systems interact with the Web service in a manner prescribed by its description using SOAP (Simple Object Access Protocol) messages, typically conveyed using HTTP with an XML serialization in conjunction with other Web-related standards.
Service-Oriented Architecture for Enabling XML Gateway Web Services
By leveraging the concept of service-oriented architecture (SOA) in Oracle E-Business Suite, XML Gateway inbound messages can be service enabled.
Note: Outbound XML Gateway messages are first enqueued to the ECX_OUTBOUND queue. They are used through subscription model by first dequeuing the messages to retrieve outbound data and then invoking appropriate outbound XML Gateway maps to exchange messages with any trading partner that conforms to Oracle E-Business Suite Web service client. Hence, all the XML Gateway Web services discussed here are for inbound services.
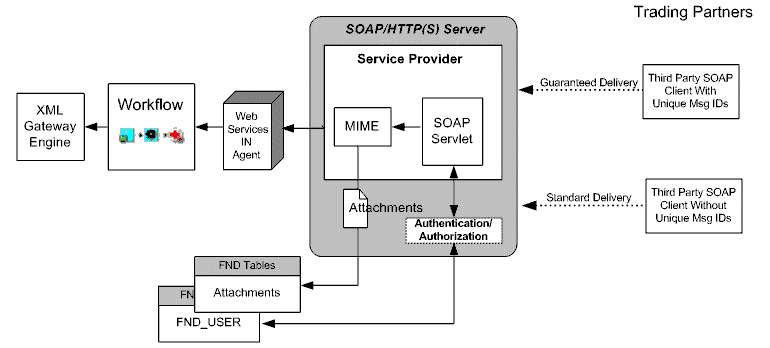
The common service-oriented architecture used in enabling Web services is illustrated in the following diagram:
Service-Oriented Architecture
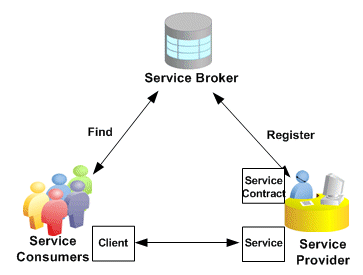
A service provider is the primary engine underlying the Web services. It describes its Web services using WSDL and actually provides or implements the business functionality of various types. The WSDL definition is published to a service broker.
A service broker describes the service's location and contract. It is responsible for ensuring the service information is available to any potential service requestor, consumer, or called Web service client.
A service consumer or Web service client issues one or more queries to the service broker to locate a service and determine how to communicate with that service.
WSDL and SOAP are the communication vehicles facilitating the services. Part of the WSDL provided by a service provider is passed to the service consumer in specifying what the requests and responses are for the service provider. The service consumer sends SOAP messages as service requests to the service provider. The service provider then provides the expected SOAP responses back to the service consumer to complete the requests.
In Oracle XML Gateway, WSDL description is used to inform trading partners how to communicate with Oracle E-Business Suite. Inbound Web services must conform to this WSDL. Outbound message maps are first dequeued from the ECX_OUTBOUND queue to retrieve outbound data and then invoke appropriate outbound maps to exchange messages with any trading partner that conforms to Oracle E-Business Suite Web service client.
Any transaction supported by Oracle XML Gateway can be sent or received as a document style Web service using the Simple Object Access Protocol (SOAP).
Following are the components and features implemented for Web services in Oracle E-Business Suite.
One of the major components for publishing a Web service is the WSDL. It enables your trading partner to call your Web service without any further details. Partners can use any third party Web service tools to call your service.
Typically, schema structure is defined as part of the WSDL. For generic XML Gateway services through Web Service Provider, the schema structure type is defined as "anyType". This allows the Oracle E-Business Suite to accept XML documents containing any XML structure. For strongly-typed XML Gateway services through SOA Provider, each service contains a complete definition of its input and output message content in XML schema included in the WSDL definition. XML Gateway knows the data structure to expect based on the transaction type based on the DTD defined in the map for the message enabled for the trading partner.
The Oracle E-Business Suite publishes the WSDL to a URL for your customers to access.
SOAP is a protocol specification for exchanging structured information in the implementation of Web services in computer networks.
The current release of Oracle E-Business Suite supports document style Web services.
Delivery is guaranteed for messages exchanged between trading partners that both recognize unique message IDs. The Oracle E-Business Suite leverages the AQ message ID. This ID is guaranteed to be the same across any database system in the world.
The message IDs are maintained in a repository on the receiving side. Before receiving any message, it interrogates the repository for the ID. If the message has not been received, the Web service provider receives and commits. If the message has already been received, it ignores the message and sends a successful response.
The sending side reviews the response. If it is successful, it does not retry. If it is a failure, it retries based on two parameters: Number of attempts and time-to-live for a transaction. Once both are exhausted, the message is marked as undeliverable. If implemented, a sent to the Workflow.
The SOAP servlet receives inbound transactions. It is responsible for the following:
Authentication
The system-level User ID and Password are validated against the Oracle E-Business Suite application user.
Authorization
The trading partner information is validated against the trading partner tables.
Message extraction
The message is enqueued and any attachments are placed in the attachments table.
All incoming and outgoing messages are uniquely identified by a message ID. Attachments related to the message are stored in the FND tables. For incoming Web services, the attachments are extracted by the SOAP servlet and only references are passed on as part of the message.
Web service security (WS-Security) is a specification to enable applications to conduct secure SOAP message exchanges. It proposes a standard set of SOAP extensions that can be used when building secure Web services to implement message content integrity and confidentiality. It also provides support for multiple security tokens, the details of which are defined in the associated profile documents.
When a SOAP request message is received through a service provider, the SOAP message is passed for authentication. The authentication on the SOAP message is based on the wsse:security Web Security headers.
A SOAP header should include the following wsse:security section:
<wsse:Security xmlns:wsse="http://docs.oasis-open.org/wss/2004/01/oasis-200401-wsswssecurity-secext-1.0.xsd>
   <wsse:UsernameToken>
     <wsse:Username>username</wsse:Username>
     <wsse:Password>password</wsse:Password>
     </wsse:UsernameToken>
   </wsse:Security>
A typical WS-Security header in the SOAP message from Oracle E-Business Suite can be as follows:
<xml version="1.0" encoding="UTF-8">
<env:Envelope xmlns:env="http://schemas.xmlsoap.org/soap/envelope/" xmlns:xsd="http://www.w3.org/2001/XMLSchema"
xmlns:xsi="http://www.w3.org/2001/XMLSchema-instance">
 <env:Header>

	<wsse:Security xmlns:wsse="http://docs.oasis-open.org/wss/2004/01/oasis-200401-wsswssecurity-secext-1.0.xsd>
	 <wsse:UsernameToken>
     <wsse:Username>username</wsse:Username>
     <wsse:Password Type="http://docs.oasis-open.org/wss/2004/01/oasis-200401-wss-username-token-profile-1.0#PasswordText">password</wsse:Password>
     </wsse:UsernameToken>
  </wsse:Security>
 </env:Header>

 <env:Body>
...
 </env:Body>
</evn:Envelope>
In the UsernameToken based security mechanism, the username/password is sent in the SOAP header. The SOA Provider authenticates the user based on this information.
Username is a clear text; password is the most sensitive part of the UsernameToken profile. In this security model, the supported password type is plain text password (or PasswordText).
The username/password in SOAP Header of a SOAP message will be passed for Web service authentication. The username/password discussed here in wsse:security is associated with the User created in Oracle E-Business Suite.
Note: The username/password information in XMLGateway_Header is the username/password associated with trading partner setup.
For more information about setting up a trading partner, see Trading Partner Setup.
Oracle XML Gateway provides a set of services that can be easily integrated with Oracle E-Business Suite to support XML messaging.
XML Gateway messages can be displayed through Oracle Integration Repository, an centralized repository that contains numerous interface endpoints exposed by applications within the Oracle E-Business Suite.
Based on the SOA architecture described earlier, XML messages residing on the Oracle Integration Repository (serves as a service broker) can be service enabled through a service provider and then in the form of WSDL description to inform trading partners how to communicate with Oracle E-Business Suite.
Enabling XML Gateway Services
It is important to know that XML Gateway messages can be exposed as Web services through the following service providers:
SOA Provider
From Oracle E-Business Suite Release 12.1 onwards, an enhanced service provider called SOA Provider is used to enable XML Gateway services. Instead of a generic WSDL description for all XML Gateway services in the releases earlier than 12.1, now a WSDL definition is generated each time for a strongly-typed XML Gateway service.
To differentiate the services available through Web Service Provider, XML Gateway header parameters are defined in SOAHeader part of a SOAP request.
Web Service Provider
Prior to Oracle E-Business Suite Release 12.1, XML Gateway services are available through Web Service Provider. A generic WSDL description representing all XML Gateway services is used. Mandatory XML Gateway header parameters for inbound transactions are defined in XMLGateway_Header part of a SOAP request.
How to enable XML Gateway services through Web Service Provider and SOA Provider is described respectively in the following sections:
Enabling Strongly-Typed XML Gateway Services through SOA Provider
Accessing Generic XML Gateway Services through Web Service Provider
From Oracle E-Business Suite Release 12.1 onwards, XML Gateway messages (along with other integration interfaces) within Oracle E-Business Suite are displayed through Oracle Integration Repository where they can be exposed to all users.
Note: Oracle Integration Repository is one of essential components within Oracle E-Business Suite Integrated SOA Gateway. Building on the principle of service-oriented architecture technology, Oracle E-Business Suite Integrated SOA Gateway provides the service enablement capability through SOA Provider from Oracle E-Business Suite 12.1 onwards, and supports XML Gateway services enabled through Web Service Provider in Oracle E-Business Suite Release 12.0.
XML Gateway Service through SOA Provider
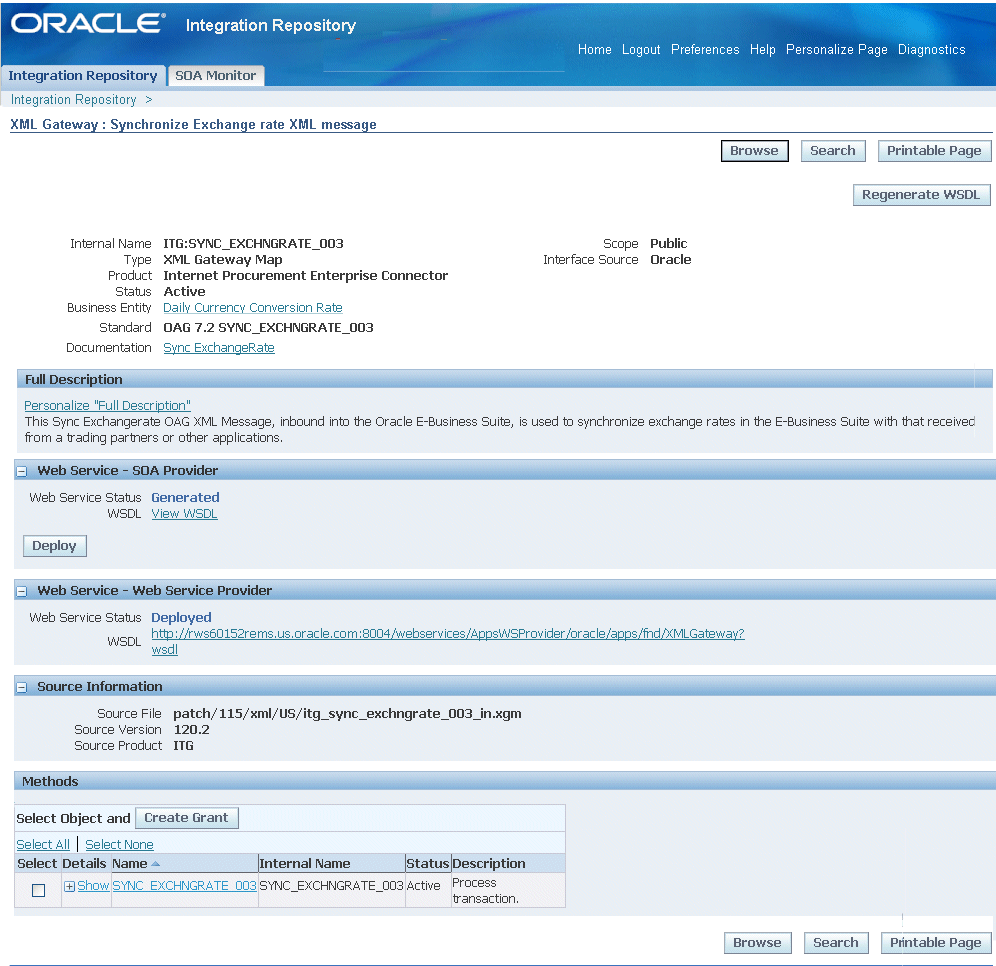
Web Service - SOA Provider region
For strongly-typed XML Gateway services enabled through SOA Provider, the Web Service - SOA Provider region is available in the interface details page if a selected XML Gateway map has a Web service generated.
To support the XML Gateway Map service enablement through Web Service Provider in Oracle E-Business Suite Release 12.0 and to differentiate it from the SOA Provider, a profile option FND: XML Gateway Map Service Provider is used allowing you to select an appropriate service provider in enabling services for XML Gateway Map interface type. Based on the selected profile value, the interface details page displays an appropriate Web Service region or more than one region if the service is available.
For more information about this profile option, see Setup Steps for Invoking XML Gateway Web Services.
To enable XML Gateway services, you must log on to Oracle E-Business Suite with the username who has the Integration Repository Administrator role.
Note: Oracle E-Business Suite Integrated SOA Gateway allows users with different user roles (System Integration Analyst, System Integration Developer, and Integration Repository Administrator) to access the Integration Repository user interfaces and perform different tasks. Only users who have the Integration Repository Administrator role can perform administrative tasks including generating and deploying Web services as well as creating security grants.
Select the Integrated SOA Gateway responsibility from the Navigator. Click the Integration Repository link to access the Integration Repository where you can find XML Gateway interfaces.
To enable a Web service for an XML Gateway interface, you must first locate the interface that you want to enable. This step can be achieved through the following ways:
Navigate to the interface from the Integration Repository browser window
Select 'Interface Type' from the View By drop-down list. Select 'XML Gateway Map' folder to expand the navigation tree and see a list of the available XML Gateway interfaces.
Locate the interface through a search
Click Search to open the main search window. Enter appropriate search criteria to locate an desired XML Gateway map.
Once you locate the desired interface from the tree or a search result, click the interface name link to open the interface details page. Only users with the administrator role can find the Generate WSDL button available in the interface details page for a selected XML Gateway map. Clicking the Generate WSDL button allows you to generate a Web service.
Once the service has been successfully generated, the Web Service - SOA Provider region will be populated automatically. You can find the View WSDL link is available along with the Web Service Status - Generated' status.
Click Deploy to deploy the generated service from Oracle Integration Repository to Oracle Application Server.
Recording Deployed WSDL URL
To use and invoke the deployed Web services, you must record the deployed Web service WSDL URL for the inbound message map by clicking the View WSDL link. This opens a new window where you can record the deployed WSDL URL and use it while invoking a service.
For detailed instruction on how to generate and deploy a Web service, see:
Generating Web Services, Oracle E-Business Suite Integrated SOA Gateway Implementation Guide
Deploying, Undeploying, and Redeploying Web Services, Oracle E-Business Suite Integrated SOA Gateway Implementation Guide
XML Gateway Service through SOA Provider
Use the following steps to enable XML Gateway services:
Log on to Oracle E-Business Suite with the username who has the Integration Repository Administrator role.
Select the Integrated SOA Gateway responsibility.
Select the Integration Repository link to access the Integration Repository.
From the Integration Repository browser window, select 'Interface Type' from the View By drop-down list.
Select 'XML Gateway Map' folder to expand the navigation tree and see a list of the available XML Gateway interfaces.
Alternatively, you can locate an XML Gateway message directly by performing a search.
Click Search to open the main search window. Enter appropriate search criteria to locate an desired XML Gateway map.
Click your desired XML Gateway map link either from the navigation tree or from the search result. This opens the interface details page for your selected XML Gateway map.
Click Generate WSDL to generate Web service for a selected XML Gateway map. Once the service has been successfully generated, the Web Service - SOA Provider region will be populated automatically.
You can find the View WSDL link is available along with the Web Service Status - Generated' status.
Click Deploy to deploy the generated service.
Click the View WSDL link to open and view the deployed WSDL description.
For XML Gateway services enabled through SOA Provider, all XML Gateway header parameters for inbound transactions are defined in SOAHeader part of a SOAP request.
The following code snippet shows the SOAHeader part of a SOAP request for an XML Gateway inbound message through SOA Provider:
<soapenv: Envelope xmlns:ecx="http://xmlns.oracle.com/apps/ecx/soaprovider/xmlgateway/ecx__cbodi/"
xmlns:soapenv="http://schemas.xmlsoap.org/soap/envelope/"
xmlns:sys="http://xmlns.oracle.com/xdb/SYSTEM">
  <soapenv:Header>
	 <wsse:Security soapenv:mustUnderstand="1"
     xmlns:wsse="http://docs.oasis-open.org/wss/2004/01/oasis-200401-wss-wssecurity-secext-1.0.xsd">
     	<wsse:UsernameToken wsu:Id="UsernameToken-10586449"
      xmlns:wsu="http://docs.oasis-open.org/wss/2004/01/oasis-200401-wss-wssecurity-utility-1.0.xsd">
  			<wsse:Username>SYSADMIN</wsse:Username>
         <wsse:Password Type="http://docs.oasis-open.org/wss/2004/01/oasis-200401-wss-username-token-profile-1.0#PasswordText">SYSADMIN</wsse:Password>
		</wsse:UsernameToken>
    </wsse:Security>
    <ecx:SOAHeader>
     <sys:ECXMSG>
     		<MESSAGE_TYPE></MESSAGE_TYPE>
     		<MESSAGE_STANDARD></MESSAGE_STANDARD>
     		<TRANSACTION_TYPE></TRANSACTION_TYPE>
     		<TRANSACTION_SUBTYPE></TRANSACTION_SUBTYPE>
     		<DOCUMENT_NUMBER></DOCUMENT_NUMBER>
			<PARTYID></PARTYID>
    		<PARTY_SITE_ID></PARTY_SITE_ID>
			<PARTY_TYPE></PARTY_TYPE>
			<PROTOCOL_TYPE></PROTOCOL_TYPE>
			<PROTOCOL_ADDRESS></PROTOCOL_ADDRESS>
			<USERNAME></USERNAME>
			<PASSWORD></PASSWORD>
			<ATTRIBUTE1></ATTRIBUTE1>
			<ATTRIBUTE2></ATTRIBUTE2>
			<ATTRIBUTE3></ATTRIBUTE3>
			<ATTRIBUTE4></ATTRIBUTE4>
			<ATTRIBUTE5></ATTRIBUTE5>
		</sys:ECXMSG>
   </ecx:SOAHeader>
 </soapenv:Header>
For the description of each XML Gateway message parameter in the SOAHeader part of a SOAP request, see XML Gateway Envelope.
Please note that the Username and Password in <wsse:Security> is Oracle E-Business Suite username/password (or the username/password created through the Users window in defining an application user).
The Username and Password in <ecx:SOAHeader> is the username and password associated with trading partner setup.
For more information about setting up a trading partner, see Trading Partner Setup.
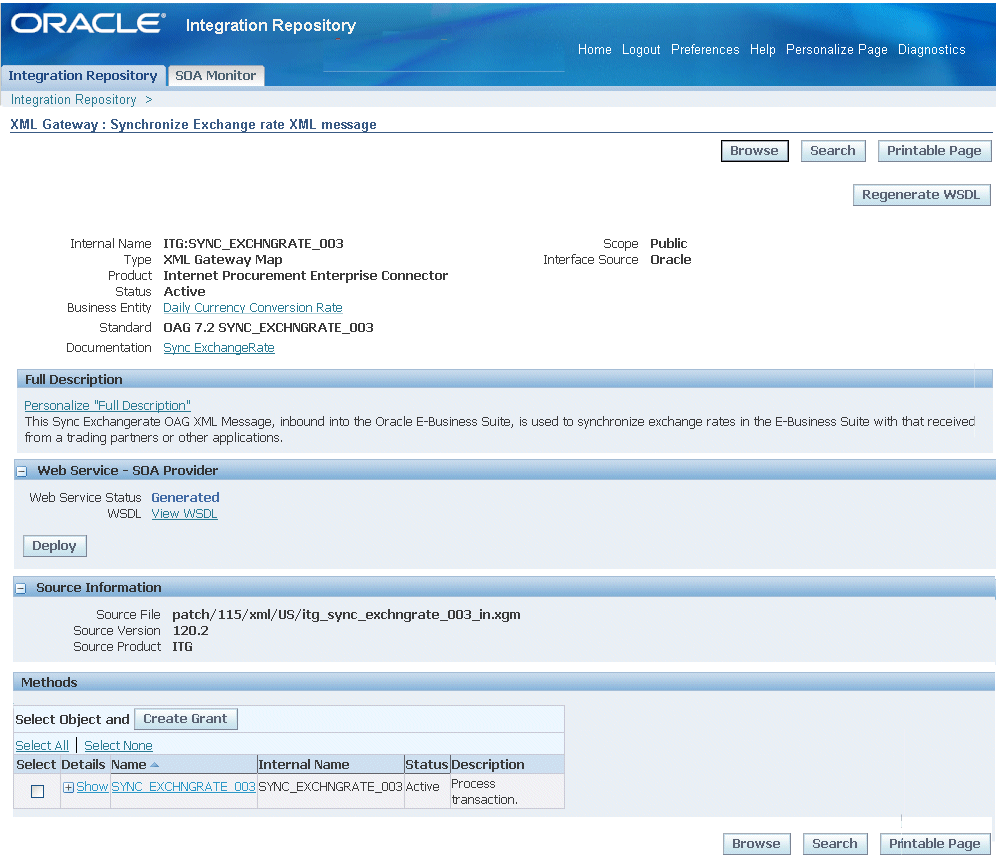
In Oracle E-Business Suite Release 12.0, XML Gateway messages were service enabled and deployed by default through Web Service Provider. You can find a deployed XML Gateway service with a standard XML Gateway WSDL URL from Oracle Integration Repository.
http://<IPAddress>:<port>/webservices/AppsWSProvider/oracle/apps/fnd/XMLGateway?wsdl
XML Gateway Map information page
Web Service - Web Service Provider region
For XML Gateway services enabled through Web Service Provider in Oracle E-Busines Suite Release 12.0, you will find the Web Service - Web Service Provider region available in the interface details page if a selected XML Gateway map has a Web service generated.
Note: For XML Gateway services enabled from Oracle E-Business Suite Release 12.1 onwards, SOA Provider is used for enabling XML Gateway services. To support backward compatibility for the services enabled through Web Service Provider, a profile option FND: XML Gateway Map Service Provider is used allowing appropriate Web Service region(s) to be displayed in the interface details page if the Web service is available.
For more information about service enablement through SOA Provider, see Enabling Strongly-Typed XML Gateway Services through SOA Provider.
A standard XML Gateway WSDL URL (http://<IPAddress>:<port>/webservices/AppsWSProvider/oracle/apps/fnd/XMLGateway?wsdl) with the 'Web Service Status - Deployed' status appears in the Web Service - Web Service Provider region.
To locate a deployed XML Gateway service for an inbound transaction:
Log on to Oracle E-Business Suite with the Integrated SOA Gateway responsibility.
Select the Integration Repository link to access the Integration Repository.
From the Integration Repository browser window, select 'Interface Type' from the View By drop-down list.
Select 'XML Gateway Map' folder to expand the navigation tree and see a list of the available XML Gateway interfaces.
Alternatively, you can locate an XML Gateway message directly by performing a search.
Click Search to open the main search window. Enter appropriate search criteria to locate an desired XML Gateway map.
Click your desired XML Gateway map link either from the navigation tree or from the search result.
This opens the interface details page for your selected XML Gateway map.
If this message map is service enabled through Web Service Provider, you should find a standard XML Gateway WSDL URL displayed in the Web Service - Web Service Provider region with the 'Web Service Status - Deployed' status.
Click the WSDL URL link to open and view the WSDL description.
You can also access the generic WSDL for your inbound transactions through the following steps:
Log on to Oracle E-Business Suite with the Workflow Administrator Web Applications responsibility or the Workflow Administrator Web (New) responsibility.
Select Web Services WSDL > Generic XML Gateway WSDL to open the generic WSDL description page.
Generic XML Gateway WSDL Page

For XML Gateway services enabled through Web Service Provider, all mandatory XML Gateway header parameters for inbound transactions are defined in XMLGateway_Header part of a SOAP request.
The following code snippet shows the XMLGateway_Header part of a SOAP request through Web Service Provider:
<soap:Envelope>
  <soap:Header>
...
   <ns1:XMLGateway_Header
      xmlns:ns1="http://xmlns.oracle.com/apps/fnd/XMLGateway
      soapenv:mustUnderstand="0">
     <ns1:MESSAGE_TYPE>XML</ns1:MESSAGE_TYPE>
     <ns1:MESSAGE_STANDARD>OAG</ns1:MESSAGE_STANDARD>
     <ns1:TRANSACTION_TYPE>PO</ns1:TRANSACTION_TYPE>
     <ns1:TRANSACTION_SUBTYPE>PROCESS</ns1:TRANSACTION_SUBTYPE>
     <ns1:DOCUMENT_NUMBER>123</ns1:DOCUMENT_NUMBER>
     <ns1:PARTY_SITE_ID>4444</ns1:PARTY_SITE_ID>
   </ns1:XMLGateway_Header>
 </soap:Header>
...
</soap:Envelope>
The following table describes the XML Gateway header information in XMLGateway_Header part of a SOAP request:
| Parameter Name | Description |
|---|---|
| MESSAGE_TYPE | Payload message format. This defaults to XML. Oracle XML Gateway currently supports only XML. |
| MESSAGE_STANDARD | Message format standard as displayed in the Define Transactions form and entered in the Define XML Standards form. This defaults to OAG. The message standard entered for an inbound XML document must be the same as the message standard in the trading partner setup. |
| TRANSACTION_TYPE | External Transaction Type for the business document from the Trading Partner table. The transaction type for an inbound XML document must be the same as the transaction type defined in the Trading Partner form. |
| TRANSACTION_SUBTYPE | External Transaction Subtype for the business document from the Trading Partner table. The transaction subtype for an inbound XML document must be the same as the transaction subtype defined in the Trading Partner form. |
| DOCUMENT_NUMBER | The document identifier used to identify the transaction, such as a purchase order or invoice number. This parameter is not used by the XML Gateway, but it may be passed on inbound messages. |
| PARTY_SITE_ID | The party site identifier for an inbound XML document must be the same as the Source Trading Partner location defined in the Trading Partner form. |
This section describes the process flow of an inbound Web service in Oracle E-Business Suite.
Requests are authorized against the Application Object Library user tables (fnd_user). After authorization, the body (XML data), header (trading partner information), and attachments are extracted from the request. Attachments are loaded to the FND attachment tables. XML messages are prepared as designated events before being enqueued to the SOAP agent (Web Services IN Agent). The agent listeners pick up the message for further processing. For any errors in the service provider (Web Service Provider and SOA Provider), a notification is sent to the Trading Partner and/or System Administrator.
Inbound Agent Listeners monitor these agents for events. The XML message is embedded in the event, and will execute the appropriate business subscription. An event will be raised for XML Gateway.
To enable Web service transactions, the following setup tasks are required:
No special trading partner setup is required to enable an inbound XML message as a Document-style Web service.
For information about setting up a trading partner, see Trading Partner Setup.
To support the XML Gateway service through Web Service Provider in Oracle E-Business Suite Release 12.0 and to differentiate the service enablement through SOA Provider, XML Gateway uses the FND: XML Gateway Map Service Provider profile option to control the display of an appropriate Web Service region or more than one region if the service is available.
The available profile values are explained as follows:
WSP (Web Service Provider)
This displays the Web Service - Web Service Provider region if Web services are available.
SOAP (SOA Provider)
This is the default profile value which displays the Web Service - SOA Provider region if Web services are available.
Note: The default profile value is set to 'SOAP'. However, if you do not start from this release and your system has Web Service Provider based service integration for enabling generic XML Gateway services, set the profile option to 'Both' (Web Service Provider and SOA Provider) instead. This allows the Web Service - Web Service Provider region and the Web Service - SOA Provider region can both be displayed simultaneously in the interface details page if Web services are available. Otherwise, Web Service Provider will be disabled and any invocations of generic XML Gateway Web services will return a fault message.
Both
This displays both the Web Service - Web Service Provider region and Web Service - SOA Provider region in the interface details page if Web services are available.
The following agents must be enabled and the seeded agent listener service components must be running:
| Agent Name | Listener Name |
|---|---|
| WF_WS_JMS_IN | Web Services IN Agent |
| WF_WS_JMS_OUT | Web Services OUT Agent |
Use the Workflow Administrator: Agents window to enable the agents if necessary (the agents are enabled by default). The same window can be used to disable an agent.
Use Oracle Applications Manager to schedule and manage agent listener service components. For more information, refer to the Oracle Applications Manager online help.
The agent listener components are seeded with a manual startup mode and therefore must be manually started.
For inbound transactions service enabled through SOA Provider
From Oracle E-Business Suite Release 12.1 onwards, XML Gateway messages within Oracle E-Business Suite are displayed through Oracle Integration Repository where they can be exposed as Web services through SOA Provider.
Users with the integration repository administrator role can log on to Oracle E-Business Suite with the Integrated SOA Gateway responsibility and have the privileges of generating a Web service for a selected XML Gateway interface.
Steps to enable XML Gateway Web services and get the WSDL URL, see: Enabling Strongly-Typed XML Gateway Services through SOA Provider.
How to invoke XML Gateway Web services through a BPEL process, see Example of Using an XML Gateway Inbound Service.
For inbound transactions service enabled through Web Service Provider
The WSDL is published at the following URL:
http://<IPAddress>:<port>/webservices/AppsWSProvider/oracle/apps/fnd/XMLGateway?wsdl
You can also access the WSDL by selecting Generic XML Gateway WSDL from the Workflow Administrator Web Applications responsibility or the Workflow Administrator Web (New) responsibility.
See: Accessing Generic XML Gateway Services through Web Service Provider.
For inbound Web services, SSL is handled by the Apache Server which does not require additional settings.
Web services can then be exposed to customers through service provider and invoked through any of the Web service clients or orchestration tool including Oracle JDeveloper, Apache Axis, .NET Web Service Client, Oracle BPEL Process Manager, and Oracle Enterprise Service Bus (ESB).
To better understand how to use XML Gateway Web services, this section describes how to leverage SOA component within Oracle E-Business Suite to invoke an inbound XML Gateway service through BPEL PM. The detailed design-time and run-time tasks in creating and deploying a BPEL process are discussed in this chapter.
For the example described in the following sections, we use Oracle JDeveloper 10.1.3.3.0 as a design-time tool to create the BPEL process and use Oracle SOA Suite BPEL server 10.1.3.3.0 for the process deployment.
BPEL Process Scenario
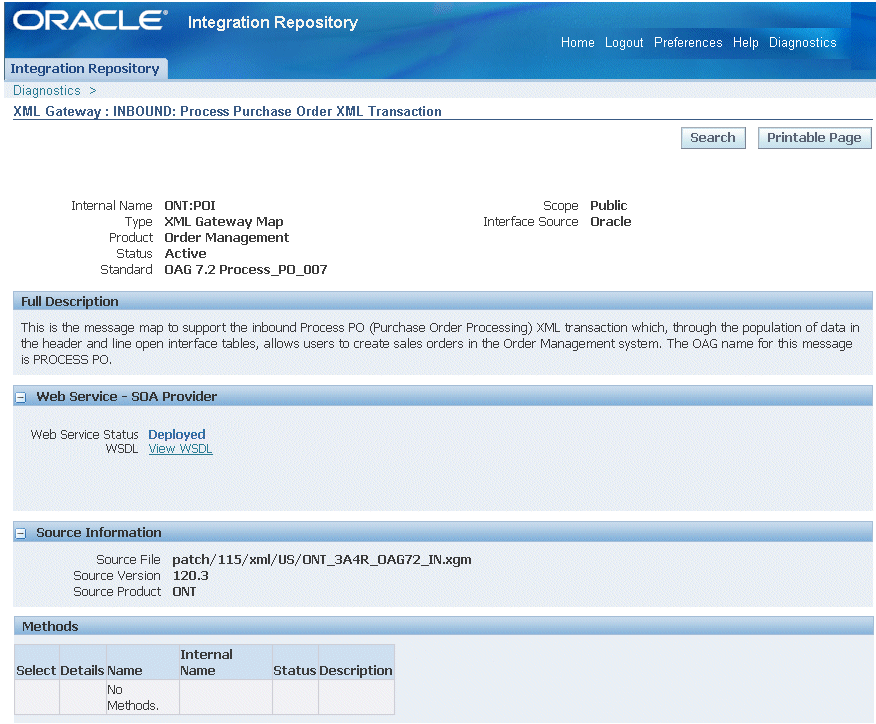
Take the XML Gateway Inbound Process PO XML Transaction as an example to explain the BPEL process creation. In this example, the XML Gateway inbound message map is exposed as a Web service through PROCESS_PO_007 inbound map. It allows sales order data including header and line items to be inserted into Order Management system while an associated purchase order is created.
When a purchase order is sent by a trading partner, the purchase order data is used as input to the BPEL process along with ECX Header properties such as MESSAGE_TYPE, MESSAGE_STANDARD, TRANSACTION_TYPE, TRANSACTION_SUBTYPE, PARTY_SITE_ID, and DOCUMENT_NUMBER. The BPEL process then pushes this purchase order in ECX_INBOUND queue. Agent Listeners running on ECX_INBOUND would enable further processing by the Execution Engine. Oracle XML Gateway picks this XML message, does trading partner validation, and inserts order data to Order Management Application.
If the BPEL process is successfully executed after deployment, you should get the same order information inserted into the Order Management table once a purchase order is created.
Prerequisites to Configure a BPEL Process Using an XML Gateway Inbound Service
Before performing the design-time tasks for XML Gateway Inbound services, you need to ensure the following tasks are in place:
An integration repository administrator needs to successfully deploy the XML Gateway inbound message map to the application server.
An integration developer needs to locate and record the deployed WSDL URL for the inbound message map exposed as a Web service.
XML Gateway header variables need to be populated for XML transaction.
Agent listeners need to be up and running.
Deploying XML Gateway Inbound WSDL URL
An integration repository administrator must first create a Web service for the selected XML Gateway inbound map, and then deploy the service from Oracle Integration Repository to the application server.
For example, the administrator must perform the following steps before letting the integration developers use the deployed WSDL in creating a BPEL process:
To generate a Web service, locate the interface definition first (such as an XML Gateway inbound interface INBOUND:Process Purchase Order XML Transaction (ONT:POI)) and click Generate WSDL in the interface details page.
Once the service is successfully generated, the Web Service - SOA Provider region appears in the interface details page.
For detailed instruction on how to generate a Web service, see Enabling Strongly-Typed XML Gateway Services through SOA Provider.
To deploy a generated Web service, click Deploy in the Web Service - SOA Provider region of the interface details page to deploy the service.
Once the service is successfully deployed, a confirmation message appears on top of the interface details page.
Searching and Recording WSDL URL
An integration developer also needs to log on to the system to locate and record the deployed Web service WSDL URL for the inbound message map.
This WSDL information will be used later in creating a partner link for the inbound map exposed as a Web service during the BPEL process creation at design time.
Confirming and Recording a Deployed WSDL URL
Populating XML Gateway Header Variables
You need to populate certain variables in the BPEL PM in order to provide context information for Oracle E-Business Suite. The MESSAGE_TYPE, MESSAGE_STANDARD, TRANSACTION_TYPE, TRANSACTION_SUBTYPE, DOCUMENT_NUMBER and PARTY_SITE_ID are the mandatory header variables that you need to populate for the XML transaction to complete successfully.
Refer to Adding an Assign activity for more information.
Ensuring Agent Listeners Are Up and Running
You also need to ensure that listeners on the ECX_INBOUND, ECX_TRANSACTION queues are up and running. Use the following steps to configure these listeners in Oracle E-Business Suite:
Log in to Oracle E-Business Suite with the Workflow Administrator responsibility.
Select the Workflow Administrator Web Applications link from the Navigator.
Click the Workflow Manager link under Oracle Applications Manager.
Click the status icon next to Agent Listeners.
Configure and schedule the ECX Inbound Agent Listener and the ECX Transaction Agent Listener. Select the listener, and select Start from the Actions box. Click Go if they are not up and running.
BPEL Process Creation Flow
After deploying the BPEL process, you should get the same order information inserted into the Order Management table once a purchase order is created.
Based on the XML Gateway Inbound Process PO XML Transaction business scenario, the following design-time tasks are discussed in this chapter:
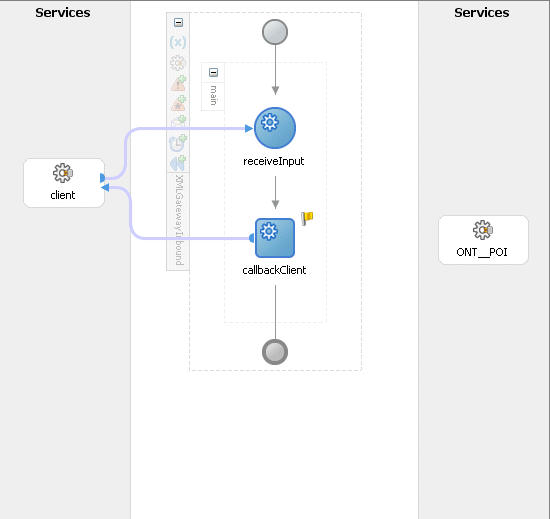
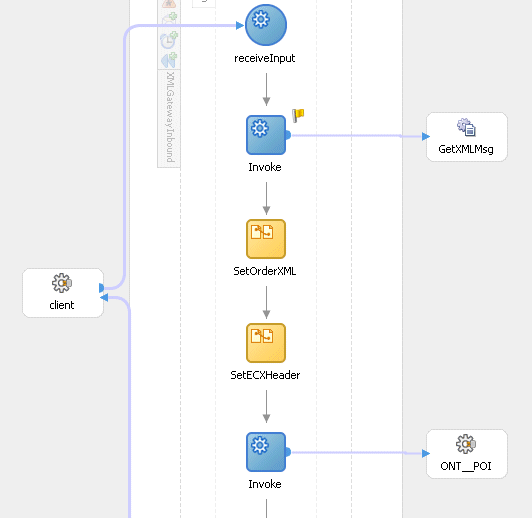
Use this step to create a new BPEL project called XMLGatewayInbound.bpelusing an Synchronous BPEL Process template. This automatically creates two dummy activities - Receive and Reply - to receive input from a trading partner and to reply output of the BPEL process back to the request application.
Use this step to create a partner link to allow the inbound message to be inserted to the Oracle E-Business Suite.
Add a Partner Link for File Adapter
Use this step to add a partner link for File Adapter in order to pick up an XML file received from the trading partner to get the XML message.
Use this step to add two Invoke activities in order to:
To get the XML message details that is received from the Receive activity.
To enqueue the purchase order information to the ECX_INBOUND queue.
Use this step to create two Assign activities in order to:
To pass XML message obtained from the first Invoke activity to the second Invoke activity.
To pass ECX header variables to the second Invoke activity.
For general information and basic concept of a BPEL process, see Oracle BPEL Process Manager Developer's Guide for details.
Use this step to create a new BPEL project that will contain various BPEL process activities.
To create a new BPEL project:
Open JDeveloper BPEL Designer.
From the File menu, select New. The New Gallery dialog box appears.
Select All Items from the Filter By box. This produces a list of available categories.
Expand the General node and then select Projects.
Select BPEL Process Project from the Items group.
Click OK. The BPEL Process Project dialog box appears.
Entering BPEL Project Information
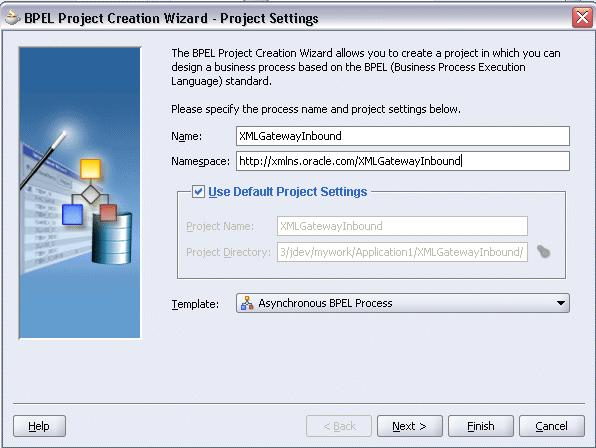
In the Name field, enter a descriptive name such as XMLGatewayInbound.
From the Template list, select Asynchronous BPEL Process and then select Use Default Project Settings.
Use the default input and output schema elements in the Input/Output Elements dialog box.
Click Finish.
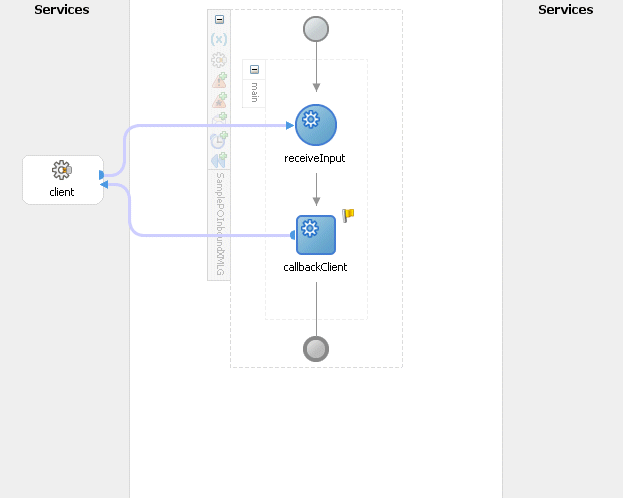
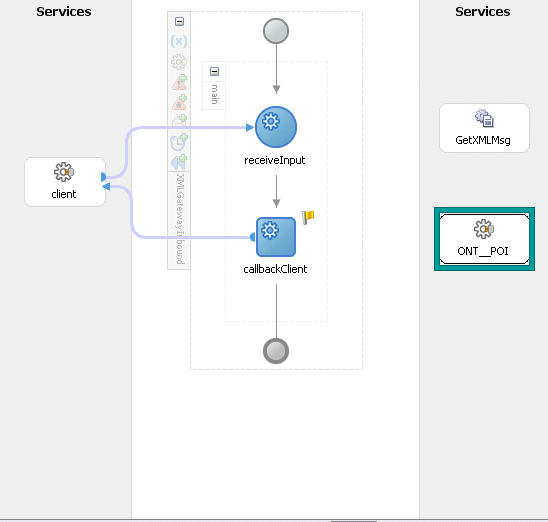
A new asynchronous BPEL process is created with the Receive and Callback activities. The required source files including bpel.xml, using the name you specified (for example, XMLGInbound.bpel) are also generated.
New BPEL Process Diagram
Use this step to create a Partner Link called ONT_POI to insert sales order data to Oracle E-Business Suite.
To create a partner link to insert sales data to Oracle E-Business Suite:
In JDeveloper BPEL Designer, drag and drop the PartnerLink service from the Component Palette into the Partner Link border area of the process diagram. The Service Name dialog box appears.
Copy the WSDL URL corresponding to the XML Gateway inbound map INBOUND:Process Purchase Order XML Transaction (ONT:POI) that you recorded earlier in the WSDL File field.
A Partner Link Type message dialog box appears asking whether you want the system to create a new WSDL file that will by default create partner link types for you.
Click Yes to have the Partner Name value populated automatically. The name is defaulted to ONT_POI.
Select Partner Role and My Role fields from the drop-down lists.
Create Partner Link
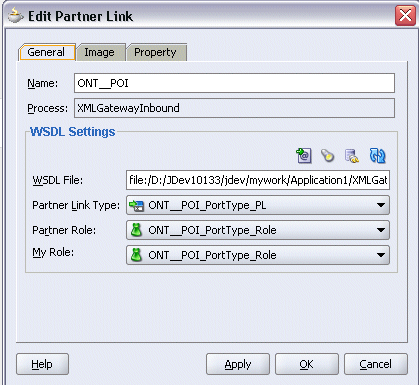
Click Apply.
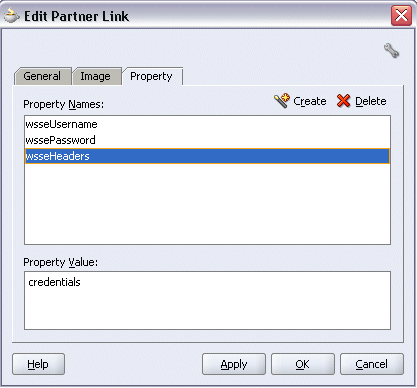
Select the Property tab and click the Create Property icon to select the following properties from the property name drop-down list in order to pass the security header along with the SOAP request:
wsseUsername
Specify the username to be passed in the Property Value box.
wssePassword
Specify the corresponding password for the username to be passed in the Property Value box.
wsseHeaders
Enter credentials as the property value.
Click Apply to save the selected property values.
Adding Properties
Click OK to complete the partner link configuration. The partner link is created with the required WSDL settings, and is represented in the BPEL project by a new icon in the border area of the process diagram.
Adding the Partner Link
Use this step to configure a BPEL process by adding a partner link for File Adapter to get the XML Message.
To add the Partner Link for File Adapter to get the XML Message:
In JDeveloper BPEL Designer, drag and drop the File Adapter service from the Adapter Service section of the Component Palette into the Partner Link area of the process diagram. The Adapter Configuration wizard welcome page appears.
Click Next. The Service Name dialog box appears.
Enter a name for the file adapter service, such as GetXMLMsg. You can add an optional description of the service.
Click Next and the Operation dialog box appears.
Specifying the Operation
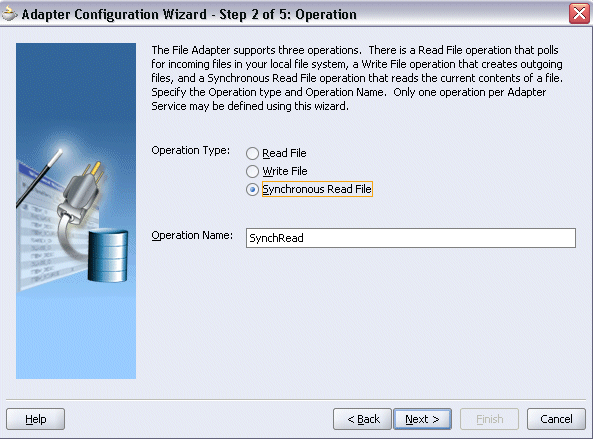
Specify the operation type, for example Synchronous Read File. This automatically populates the Operation Name field.
Click Next to access the File Directories dialog box.
Configuring the Input File
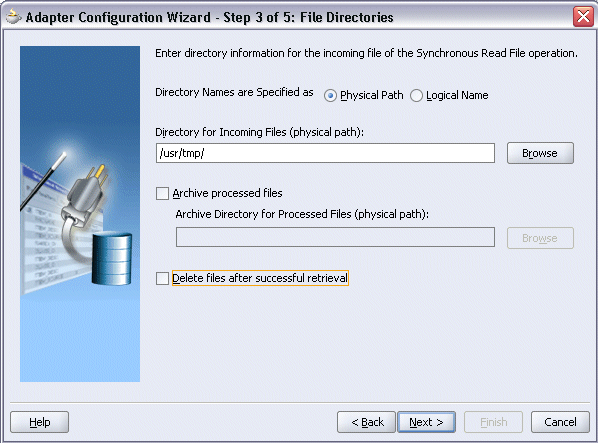
Select Physical Path radio button and enter the physical path for incoming file directory information. For example, enter /usr/tmp/.
Note: To be able to locate the file from the physical directory you specified here, you must first place the input payload file (such as order_data_xmlg.xml) to the specified directory.
Alternatively, click Browse to locate the incoming file directory information.
Uncheck the Delete files after successful retrieval check box. Click Next.
Enter the name of the file for the synchronous read file operation. For example, enter order_data_xmlg.xml. Click Next. The Messages dialog box appears.
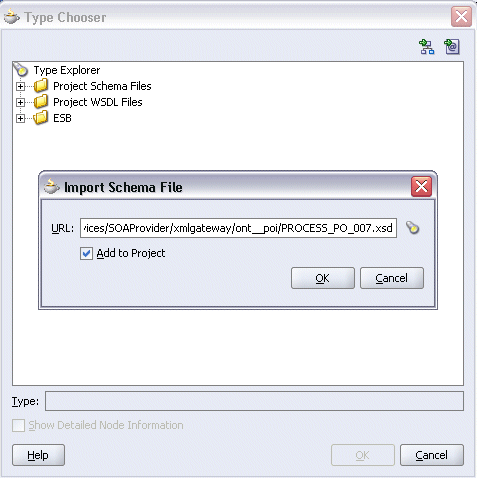
Select Browse to open the Type Chooser.
Click Import Schema Files button on the top right corner of the Type Chooser window. This opens the Import Schema File pop-up window.
Enter the schema location for the service. Such as http://<myhost>:<port>/webservices/SOAProvider/xmlgateway/ont__poi/PROCESS_PO_007.xsd.
Schema location for your service can be found from the service WSDL URL (for example, http://<myhost>:<port>/webservices/SOAProvider/xmlgateway/ont__poi/?wsdl).
Importing Project Schema
Select the Add to Project check box and click OK.
Click OK to the Import Project Schema message prompt.
Importing Project Schema Message Prompt
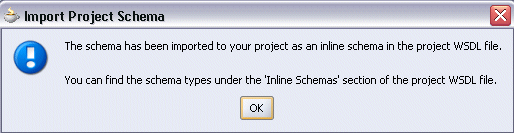
The Imported Schemas folder is automatically added to the Type Chooser window.
Expand the Imported Schemas folder and select PROCESS_PO_007.xsd > PROCESS_PO_007. Click OK.
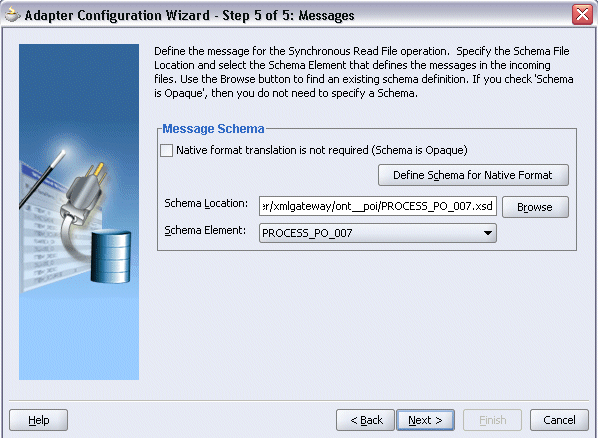
The selected xsd is displayed as Schema Location, and PROCESS_PO_007 is selected as Schema Element.
Click OK to populate the selected values in the Messages dialog box.
Populating Selected Message Schema and Element
Click Next and then Finish. The wizard generates the WSDL file corresponding to the partner link. The main Create Partner Link dialog box appears, specifying the new WSDL file GetXMLMsg.wsdl.
Click Apply and then OK to complete the configuration and create the partner link with the required WSDL settings for the File Adapter Service.
The GetXMLMsg Partner Link appears in the BPEL process diagram.
Adding the Partner Link for File Adapter
This step is to configure three Invoke activities:
To get the XML message details that is received from the Receive activity by invoking the GetXMLMsg partner link in an XML file.
To enqueue the purchase order information to the ECX_INBOUND queue by invoking ONT_POI partner link in an XML file.
To add the first Invoke activity for a partner link to get XML message:
In JDeveloper BPEL Designer, drag and drop the first Invoke activity from the Component Palette into the Activity box of the process diagram, between the Receive and Callback activities.
Link the Invoke activity to the GetXMLMsg service. The Edit Invoke dialog box appears.
Enter a name for the Invoke activity and then click the Create icon next to the Input Variable field to create a new variable. The Create Variable dialog box appears.
Select Global Variable and then enter a name for the variable. You can also accept the default name. Click OK.
Enter a name for the Invoke activity and click the Create icon next to the Output Variable field to create a new variable. The Create Variable dialog box appears.
Select Global Variable, and enter a name for the variable. You can also accept the default name. Click OK.
Editing Invoke Activity
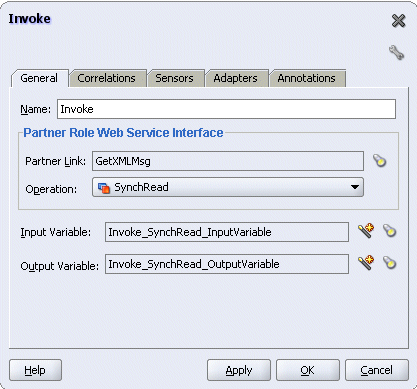
Click Apply and then OK in the Edit Invoke dialog box to finish configuring the Invoke activity.
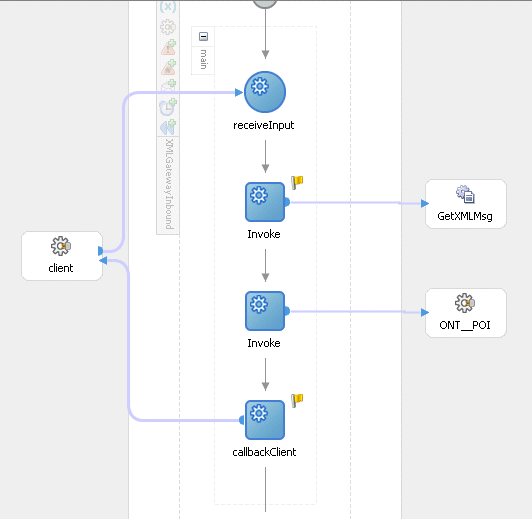
The first Invoke activity appears in the process diagram.
To add the second Invoke activity for a partner link to enqueue PO information:
In JDeveloper BPEL Designer, drag and drop the second Invoke activity from the Component Palette into the Activity box of the process diagram, between the first Invoke and Callback activities.
Link the Invoke activity to the ONT_POI service. The Edit Invoke dialog box appears.
Enter a name for the Invoke activity and then click the Create icon next to the Input Variable field to create a new variable. The Create Variable dialog box appears.
Select Global Variable and then enter a name for the variable. You can also accept the default name. Click OK.
Editing Invoke Activity

Click Apply and then OK in the Edit Invoke dialog box to finish configuring the Invoke activity.
The process diagram appears.
Adding Invoke Activities
This step is to configure two Assign activities:
To pass XML message as an input to the Invoke activity for enqueuing message.
To pass XML Gateway header variables as input variables to the Invoke activity in order to provide context information for Oracle E-Business Suite.
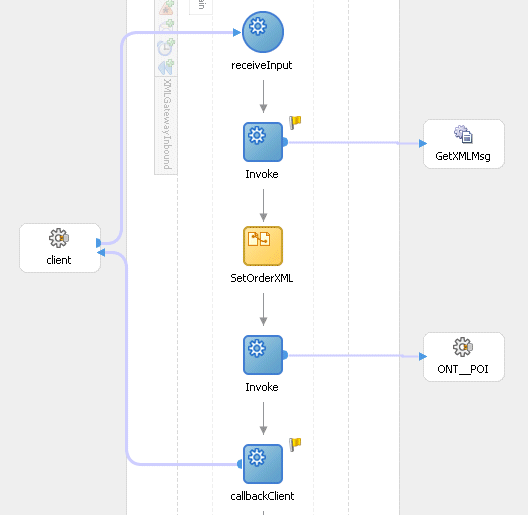
To add the first Assign activity to pass XML message as input to the Invoke activity:
In JDeveloper BPEL Designer, drag and drop the Assign activity from the Component Palette into the Activity box of the process diagram, between the two Invoke activities.
Adding an Assign Activity
Double-click the Assign activity to access the Edit Assign dialog box.
Click the General tab to enter the name for the Assign activity, such as 'SetOrderXML'.
On the Copy Operation tab, click Create and then select Copy Operation from the menu. The Create Copy Operation window appears.
Enter the following information:
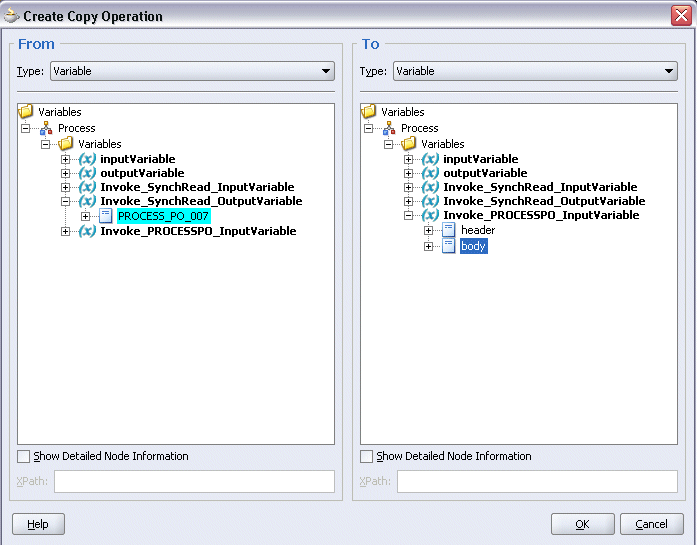
In the From navigation tree, select type Variable. Navigate to Variable > Process > Variables > Invoke_SynchRead_OutputVariable and select Process_PO_007.
In the To navigation tree, select type Variable. Navigate to Variable > Process > Variables > Invoke_PROCESSPO_InputVariable and select body.
Assigning Parameters
Click OK. The Edit Assign dialog box appears.
Click Apply and then OK to complete the configuration of the Assign activity.
To add the second Assign activity to pass XML Gateway header variables to the Invoke activity:
Add the second Assign activity by dragging and dropping the Assign activity from the Component Palette into the Activity box of the process diagram, between the SetOrderXML Assign activity and the second Invoke activity.
Adding Assign Activity
Repeat Step 2 to Step 4 described in creating the first Assign activity to add the second Assign activity called 'SetECXHeader'.
On the Copy Operation tab, click Create and then select Copy Operation from the menu. The Create Copy Operation window appears.
Enter the first pair of parameters:
In the From navigation tree, select type Expression and then enter 'XML' in the Expression box.
In the To navigation tree, select type Variable. Navigate to Variable > Process > Variables > Invoke_PROCESSPO_InputVariable > header > ns1:SOAHeader > ns3:ECXMSG and select MESSAGE_TYPE.
The XPath field should contain your selected entry.
Assigning XML Gateway Header Parameter Value
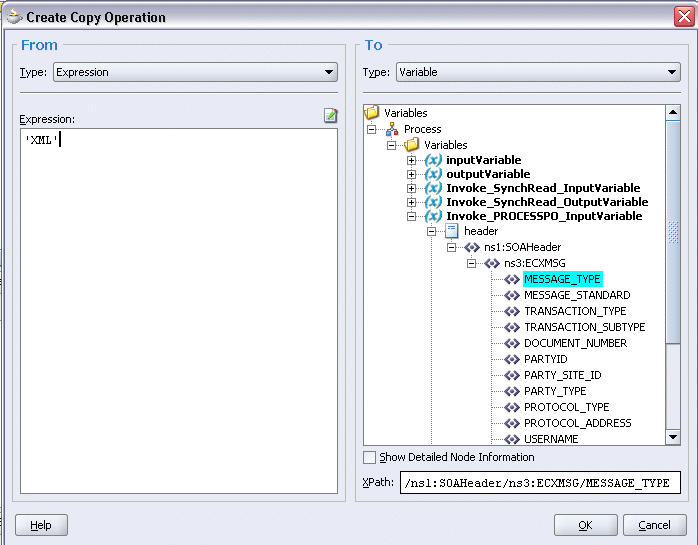
Click OK.
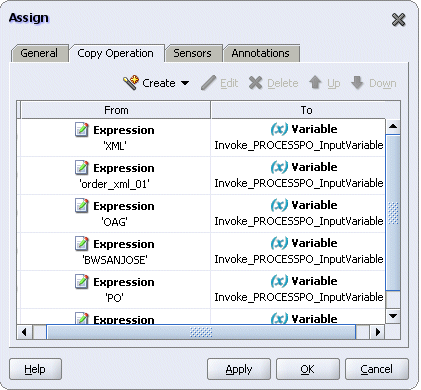
Use the same mechanism described in step 3 and 4 to enter the following additional parameters:
MESSAGE_STANDARD: 'OAG'
TRANSACTION_TYPE: 'PO'
TRANSACTION_SUBTYPE: 'PROCESS'
DOCUMENT_NUMBER: 'order_xml_01'
PARTY_SIDE_ID: 'BWSANJOSE'
Assigning XML Gateway Header Parameters
Click Apply and OK to complete the configuration of the Assign activity.
After creating a BPEL process using the WSDL URL generated from the XML Gateway inbound message map interface definition, you can deploy it to a BPEL server if needed. To ensure that this process is modified or orchestrated appropriately, you can also manually test the BPEL process by initiating the business process contained in the BPEL process to test the interface integration.
Prerequisites
Before deploying the BPEL process using Oracle JDeveloper, you must ensure that you have established the connectivity between the deign-time environment and the run-time servers including the application server and the integration server.
How to configure the necessary server connection, see Configuring Server Connection, Oracle E-Business Suite Integrated SOA Gateway Developer's Guide.
To validate your BPEL process, perform the following run-time tasks:
Once you deploy the process to a BPEL server, it becomes available so that you can run the process manually to test it for validation.
After deploying a BPEL process, you can manage the process from the BPEL console to validate the interface integration contained in your BPEL process.
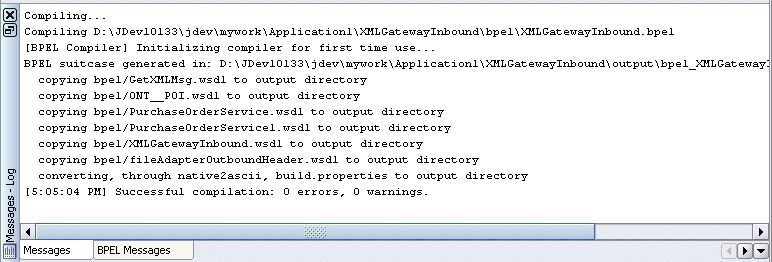
You must deploy the BPEL process (XMLGatewayInbound.bpel) that you created earlier before you can run it. The BPEL process is first compiled and then deployed to the BPEL server.
Note: Before deploying the BPEL Process for XML Gateway Inbound service, you should:
Load the order_data_xmlg.xml file into the specified directory '/usr/tmp/' folder of SOA Suite server (or D:\HOL in case of SOA Server in Windows machine).
Edit the input file order_data_xmlg.xml by entering values for <REFERENCEID> and <POID> such as 'order_xml_01'.
To deploy the BPEL process:
In the Applications Navigator of JDeveloper BPEL Designer, select the XMLGInbound project.
Right-click the project and click Make action from the menu.
Look for any compilation error messages in Message Log.
Messages Window
Right-click the project and select Deploy > Integration Server Connection name > Deploy to Default Domain action from the menu.
For example, you can select Deploy > BPELServerConn > Deploy to Default Domain to deploy the process if you have the BPEL Process Manager setup appropriately.
Look for ‘Build successful’ message in Apache Ant – Log to ensure that the BPEL project is compiled and successfully deployed.
Once the BPEL process is deployed, it can be seen in the BPEL console. You can manage and monitor the process from the BPEL console. You can also test the process and the integration interface by manually initiating the process.
To test the BPEL process:
Log into Oracle Application Server 10g BPEL Console ( http://<soaSuiteServerHostName>:<port>/BPELConsole). The BPEL Console login page appears.
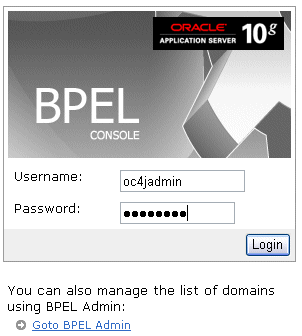
Enter the username and password and click Login.
The Oracle Enterprise Manager 10g BPEL Control appears.
In the BPEL Console, confirm that XMLGInbound has been deployed.
Click the XMLGInbound link to open the Initiate tab
Click Post XML Message to initiate the process.
Verifying Records in Oracle E-Business Suite
Once the BPEL process is successfully initiated and completed, you can validate it through the relevant module in Oracle E-Business Suite.
To validate it in Oracle Transaction Monitor:
You can validate it from the Transaction Monitor. The Transaction Monitor is a tool for monitoring the status of inbound and outbound transactions originating from and going into Oracle E-Business Suite that have been processed by the XML Gateway and delivered or received by the Oracle Transport Agent. It shows a complete history and audit trail of these documents.
Log on to Oracle E-Business Suite with the Workflow Administrator Web Applications responsibility.
Select the Transaction Monitor link to open the search window to search for the order.
Searching from the Transaction Monitor
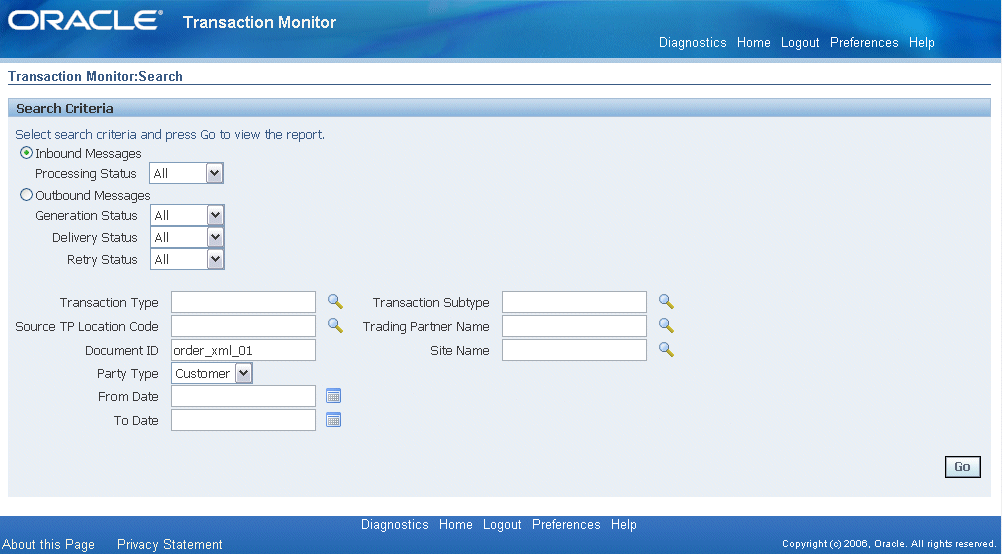
Clear From Date and To Date fields and enter 'order_xml_01' in the Document ID field.
Select Customer as the Party Type. Click Go to execute the search.
This retrieves XML inbound transaction 'order_xml_01' in the Inbound Search Results region.
Confirm that the transaction 'order_xml_01' has status 'SUCCESS'.
To validate it in Oracle Order Management:
Log on to the Forms-based Oracle E-Business Suite with the Order Management, Super User responsibility.
Select Order Returns > Sales Order. Sales Order Forms would open up.
Search for an order by entering the order number in the Customer PO field (such as 'order_xml_01'). This would bring up the details of newly created order.
Sales Orders
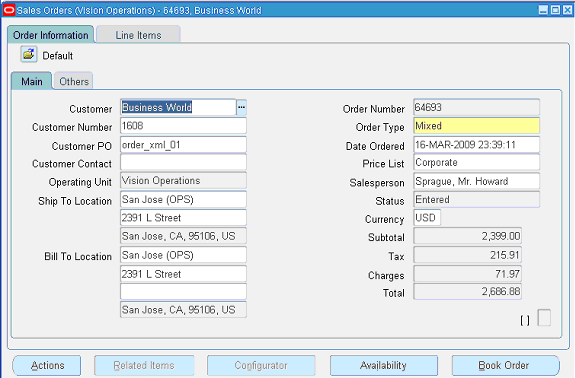
You can also select the Items tab for item details.
The following information shows the sample payload in the order_data_xmlg.xml file:
<?xml version="1.0">
  <PROCESS_PO_007> <!--xmlns="http://TargetNamespace.com/ServiceName"-->
    <CNTROLAREA>
        <BSR>
 				<VERB>PROCESS</VERB>
          	<NOUN>PO</NOUN>
				<REVISION>007</REVISION>
			</BSR>
		 <SENDER>
				<LOGICALID/>
				<COMPONENT>BPEL</COMPONENT>
				<TASK>POISSUE</TASK>
				<REFERENCEID>refid</REFERENCEID>
				<CONFIRMATION>2</CONFIRMATION>
				<LANGUAGE>ENG</LANGUAGE>
				<CODEPAGE>US7ASCII</CODEPAGE>
				<AUTHID>APPS</AUTHID>
		 </SENDER>
			<DATETIME qualifier="CREATION">
				<YEAR>2002</YEAR>
				<MONTH>10</MONTH>
				<DAY>09</DAY>
				<HOUR>16</HOUR>
				<MINUTE>45</MINUTE>
				<SECOND>47</SECOND>
				<SUBSECOND>356</SUBSECOND>
				<TIMEZONE>-0800</TIMEZONE>
			</DATETIME>
 	</CNTROLAREA>
		<DATAAREA>
			<PROCESS_PO>
				<POORDERHDR>
					<DATETIME qualifier="DOCUMENT">
						<YEAR>2002</YEAR>
						<MONTH>10</MONTH>
						<DAY>09</DAY>
						<HOUR>16</HOUR>
						<MINUTE>40</MINUTE>
						<SECOND>34</SECOND>
						<SUBSECOND>000</SUBSECOND>
						<TIMEZONE>+0100</TIMEZONE>
 				</DATETIME>
					<OPERAMT qualifier="EXTENDED" type="T">
						<VALUE>107.86</VALUE>
						<NUMOFDEC>6</NUMOFDEC>
						<SIGN>+</SIGN>
						<CURRENCY>USD</CURRENCY>
						<UOMVALUE>1</UOMVALUE>
						<UOMNUMDEC>0</UOMNUMDEC>
						<UOM>Ea</UOM>
			</OPERAMT>
				<POID>refid</POID>
				<POTYPE>Mixed</POTYPE>
				<CONTRACTS/>
				<DESCRIPTN/>
				<NOTES index="1"/>
				<USERAREA/>
				<PARTNER>
						<NAME index="1"/>
						<ONETIME>0</ONETIME>
						<PARTNRID/>
						<PARTNRTYPE>SoldTo</PARTNRTYPE>
						<PARTNRIDX>BWSANJOSE</PARTNRIDX>
				</PARTNER>
	</POORDERHDR>
		<POORDERLIN>
			<QUANTITY qualifier="ORDERED">
						<VALUE>1</VALUE>
						<NUMOFDEC>0</NUMOFDEC>
						<SIGN>+</SIGN>
						<UOM>Ea</UOM>
		</QUANTITY>
			<OPERAMT qualifier="UNIT" type="T">
						<VALUE>107.86</VALUE>
						<NUMOFDEC>6</NUMOFDEC>
						<SIGN>+</SIGN>
						<CURRENCY>USD</CURRENCY>
						<UOMVALUE>1</UOMVALUE>
						<UOMNUMDEC>0</UOMNUMDEC>
						<UOM>Ea</UOM>
		</OPERAMT>
			<POLINENUM>1</POLINENUM>
			<ITEMRV/>
			<NOTES index="1"/>
			<ITEM>LAP-DLX</ITEM>
			<POLINESCHD>
						<DATETIME qualifier="NEEDDELV">
								<YEAR>2002</YEAR>
								<MONTH>10</MONTH>
								<DAY>09</DAY>
								<HOUR>00</HOUR>
								<MINUTE>00</MINUTE>
								<SECOND>00</SECOND>
								<SUBSECOND>000</SUBSECOND>
								<TIMEZONE>+0100</TIMEZONE>
			</DATETIME>
						<QUANTITY qualifier="ORDERED">
								<VALUE>1</VALUE>
								<NUMOFDEC>0</NUMOFDEC>
								<SIGN>+</SIGN>
								<UOM>Ea</UOM>
			</QUANTITY>
						<PSCLINENUM>1</PSCLINENUM>
						<USERAREA/>
			</POLINESCHD>
		 </POORDERLIN>
	  </PROCESS_PO>
  </DATAAREA>
</PROCESS_PO_007>Oracle Diagnostics provides a mechanism that makes Oracle E-Business Suite more supportable and robust by providing predefined tests to check for key setup requirements. Oracle XML Gateway provides several Web services tests through Oracle Diagnostics that you can use to check the setup and review debugging information.
You can access Oracle Diagnostics through different user interfaces, including Oracle Applications Manager and other administrative consoles. For more information, see the Oracle Diagnostics Framework User's Guide.
The Web services tests are available in Oracle Diagnostics under the Application Object Library application.
This test checks whether Application Server and Namespace enable parser are present in the classpath. If either is not present, the report will state that it is not present.
![]()
Copyright © 2001, 2010, Oracle and/or its affiliates. All rights reserved.