Oracle Demantra Dashboard
This chapter covers the following topics:
- Introduction to the Dashboard
- Reviewing Metrics
- Reviewing the Planning Hierarchy
- Editing Retailer Information
- Opening Worksheets
- Managing Tasks
- Creating and Sending a Task
- Personalizing the Dashboard
- Configuring Your Default Layout
- Configuring My Tasks
- Configuring My Worksheets
Introduction to the Dashboard
This chapter introduces the Oracle dashboard: Collaborator Workbench.
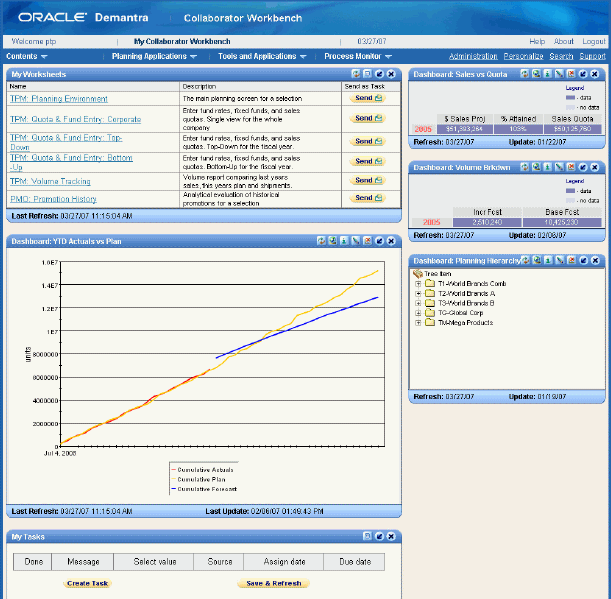
Oracle's Collaborator Workbench is a starting point for PTP. This dashboard is designed for use by sales managers. You log into the application and immediately have access to a number of key performance indicators (KPIs). You can also jump directly to TPMO worksheets, which are working environments that support specific business processes; these are described in the following chapters.
To log into the dashboard
-
In Windows, click Start and click Programs.
-
Click Demantra > Demantra Spectrum release > Collaborator Workbench.
-
In the Log On dialog box, enter your user name and password.
-
Click Login.
-
If the toolbar includes a link labeled Click here to install Java Web Start, click that link.
-
When you are prompted to install JRE, do so. Choose the Typical installation and accept all the default values, unless otherwise advised by your system administrators.
After you install this software, Collaborator Workbench comes up, displaying your personal page.
At this point, Oracle Demantra might display a dialog box that asks if you want to trust the signed application distributed by Oracle.
Note: In some cases, you do not see this dialog box until you click a worksheet name.
-
Click Yes (or Always) or Start.
Reviewing Metrics
Collaborator Workbench displays summary panes that display critical information and which you can customize to your needs. Initially, it displays the following summary panes.
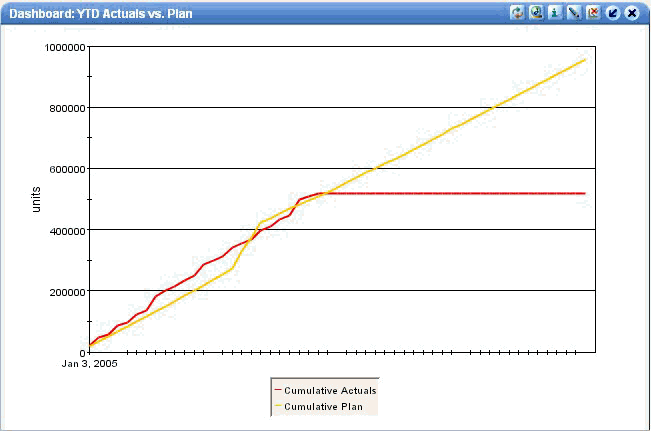
Actuals versus Plan
This summary pane is a graph that shows cumulative actual volume and planned volume.
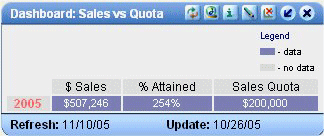
Sales versus Quota
This summary pane shows current sales compared to the sales quota.
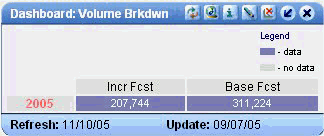
Volume Breakdown
This summary pane displays a table that shows the breakdown of volume into base volume and incremental volume.
Reviewing the Planning Hierarchy
The Planning Hierarchy is an expandable, treelike view that you can use to navigate the planning hierarchy.
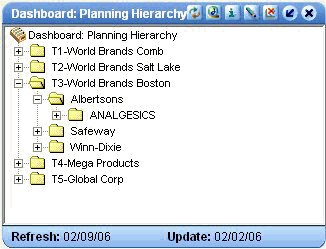
Expand the hierarchy as needed.
You can right-click for more options.
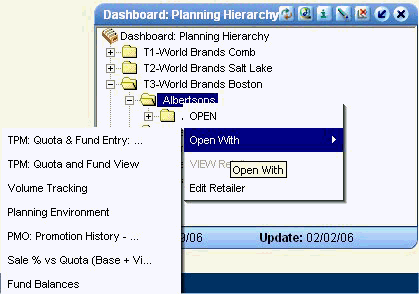
In particular, you can open worksheets that are filtered to the selected retailer (for example). In the case of retailers, you can also view or edit properties of the retailer such as minimum event margin.
Editing Retailer Information
PTP stores basic retailer details so that when you create a promotion, it is automatically specified appropriately for that particular retailer. PTP provides default settings that you can use for any retailer.
Setting a Retailer Profile to the Default
To set a retailer profile to the default settings
-
In the Planning Hierarchy, expand the tree display to the retailer level.
-
Right-click the retailer and click Edit Retailer.
PTP displays the Edit Retailer screen.
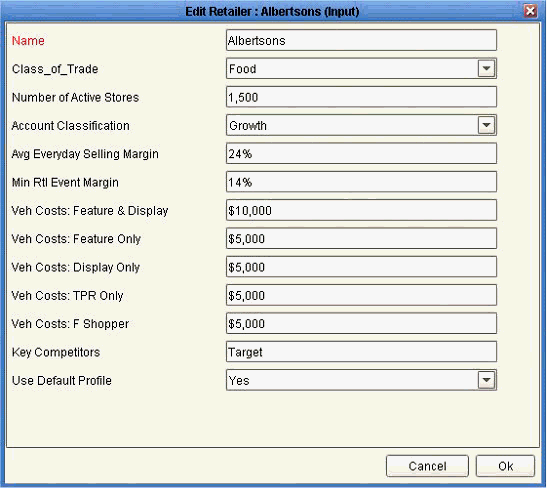
-
Change Use Default Profile to Yes.
Caution: Do this only if you are certain that you want to change all settings for this retailer.
-
Click OK.
-
Log into the Workflow Manager and run the CopyRetailerDefaults workflow; see Administration - Running Required Workflows.
This workflow checks for any retailers that have been set to use the default profile, and it copies the default details to those retailers.
Editing a Retailer Profile
To edit a retailer profile
-
In the Planning Hierarchy, expand the tree display to the retailer level.
-
Right-click the retailer and click Edit Retailer.
PTP displays the Edit Retailer screen, as shown in the previous procedure.
-
Set Use Default Profile to No.
Caution: If you do not set Use Default Profile to No, your changes will be reset to the default.
-
Enter values for the other attributes as follows:
Name Name of the retailer. Class_of_Trade Dropdown list with the following choices: -
Food
-
Drug
-
Mass
-
C-Store
-
Military
Number of Active Stores Number of active stores that this retailer operates. Account Classification Dropdown list with the following choices: -
Growth
-
Holding
-
Declining
Avg Everyday Selling Margin Average selling margin, disregarding promotions. Min Rtl Event Margin Minimum margin that this retailer must make on an event. Promotion Optimization considers only events that provide at least this much margin. Veh Costs: Feature & Display Default cost for an event of type F&D for this retailer. Veh Costs: Feature Only Default cost for an event of type Feature for this retailer. Veh Costs: Display Only Default cost for an event of type Display for this retailer. Veh Costs: TPR Only Default cost for an event of type TPR for this retailer. Veh Costs: F Shopper Default cost for an event of type F. Shopper for this retailer. Key Competitors A text field where you can list the key competitors of this retailer. -
-
Click OK.
Opening Worksheets
Each worksheet is a working environment designed for specific PTP and TPO business processes.
To open worksheets using Collaborator Workbench, click My Worksheets, or right-click Planning Hierarchy, or right click an open worksheet.
See also Oracle Demantra Users Guide.
To open a worksheet
-
To open an unfiltered worksheet, click a worksheet listed in My Worksheets.
-
To open a worksheet that is filtered to a specific context, right-click a promotion, scenario, retailer, or territory, click Open With, and then click the worksheet name. You can do this within the Planning Hierarchy or within an open worksheet.
When you open a worksheet this way, it is filtered to show just the object from which you launched it. Notice that the name of the object is added to the beginning of the worksheet title.
Note: When you first open a worksheet, Oracle Demantra might display a dialog box that asks if you want to trust the signed application distributed by Oracle.
Click Yes (or Always) or Start.
See
Managing Tasks
My Tasks lists all tasks that are assigned to you and that you have not yet addressed. For example, if you are a manager, you will receive promotions that require approval.
Note: If a due date is shown in red text, that means the response period has nearly ended and the task is going to time out fairly soon.
To view all assigned tasks
If you have many open tasks, the My Tasks module does not necessarily display all of them. To check for additional tasks:
Click the More link in the bottom right corner of My Tasks.
My Tasks fills the wide pane and shows all current tasks.
To mark a task as done
Before you mark a task as done, make sure that you have reviewed all the relevant information and that you have addressed any concerns or issues. Then do the following:
-
First:
-
Select the appropriate response from the dropdown list in the Select value column. The check box next to the task is automatically selected.
-
If there is no dropdown list, just select the check box to the left of the task.
-
-
Click the Save & Refresh link at the bottom of the task list.
The task is removed from My Tasks and the updated task list is shown.
Caution: If you go to another page or log off without clicking Save & Refresh, then your changes will be lost.
Creating and Sending a Task
To create and send a task
-
Start by doing one of the following:
-
Within My Worksheets, click Send on the worksheet that you want to send.
-
Within My Tasks, click Create Task.
The Send Task to User dialog box appears.
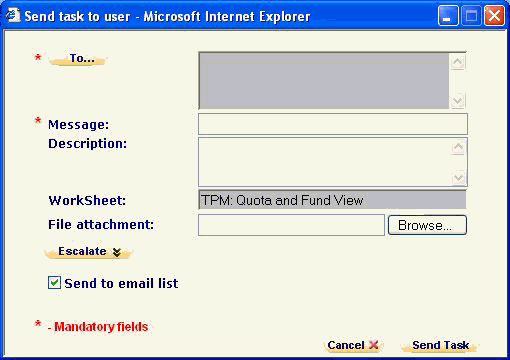
-
-
Click To..... and select the users or groups to receive the task.
-
In the Message field, type a short text message.
This will be the task message that the recipient sees. The worksheet that you are sending will be added automatically as a link from the Message text.
-
In the Description field, type a short description.
This description will be displayed below the task message in the recipient's My Tasks module.
-
To link the task subject line to a Web page, enter the full path to the file in URL field.
Note: You must enter the full URL, including server name and directory hierarchy. The http:// part will be added automatically if omitted.
-
To attach a file to the task, enter the path to the file in the File Attachment field or use the Browse button to find it.
-
To ensure that this task is completed by a specific time, click Escalate and then provide the following information:
Due Date Date and time by which this task must be completed Alert Time Date and time at which an alert will be displayed To Additional email addresses -
To send an email notification to the recipient of the task, select the Send email list check box. (Depending on how your system has been configured, this option may not be available.)
-
Click Send Task.
When the recipient next logs in (or refreshes My Tasks), he or she will see the new task.
Personalizing the Dashboard
You can personalize Collaborator Workbench in several different ways:
To add new summary panes, see Creating or Editing a Worksheet or Content Pane.
Configuring Your Default Layout
The Collaborator Workbench page includes a wide pane and a narrow pane, and each pane has a possible set of modules that it can display. You choose the modules and their display order, top to bottom.
To personalize your default layout
-
Click the Personalize link.
The Personalize - Modules page appears. This page contains two lists: one for items that can be displayed in the wide pane and one for items that can be displayed in the narrow pane.
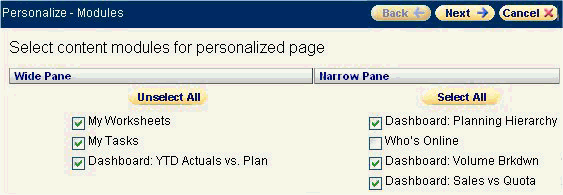
These lists include the following:
-
My Tasks and My Worksheets, which can be displayed only in the wide pane.
-
Who's Online, which can be displayed only in the narrow pane.
-
Worksheets that have been defined as content and to which you have access.
-
-
In each list, use the check boxes to select or clear the modules that you want to see.
-
Click Next.
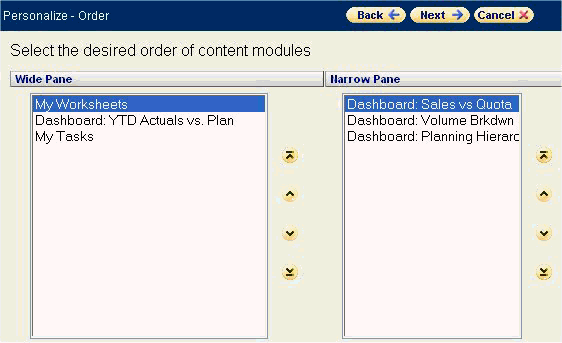
The Personalize - Order page appears. Like the previous page, this page has one list for the wide pane and one for the narrow pane.
-
Select a module and then click the up or down buttons to change its position in the list.
The order here is the order in which these modules are shown in Collaborator Workbench.
-
Click Next.
The next page summarizes your choices. You can return to the previous pages to make further alterations.
-
Click Finish to save your changes. Or click Back to go back to the previous pages.
Configuring My Tasks
To configure My Tasks
-
If Collaborator Workbench is not currently displaying My Tasks, then display it as described in "Configuring Your Default Layout".
-
In My Tasks module, click the personalize button in the upper right corner of the pane.
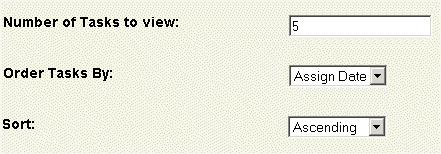
Collaborator Workbench displays a page like the following:
-
In the Number of Tasks to View field, type the maximum number of tasks that you want to see in My Tasks.
-
From the Order Tasks by list, select the field that you want to list the tasks by.
-
From the Sort dropdown menu, select the sorting order that you want for the tasks. Task fields can be listed in either ascending or descending order.
-
Click Finish.
My Collaborator Workbench refreshes with My Tasks in the new configuration.
Configuring My Worksheets
To configure My Worksheets
-
If Collaborator Workbench is not currently displaying My Worksheets, then display it as described in "Configuring Your Default Layout".
-
In My Worksheets module, click the personalize button in the upper right corner.
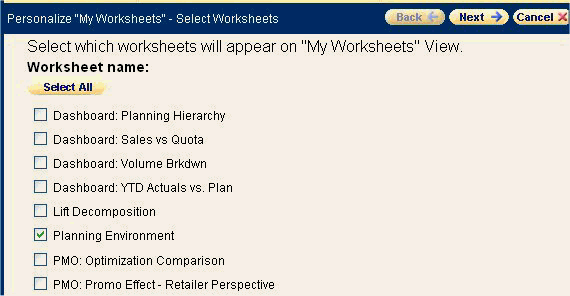
Collaborator Workbench displays a list of all available worksheets. This includes all worksheets you own and all public worksheets.
-
Select the check box next to worksheet that you want to display.
-
Click Next.
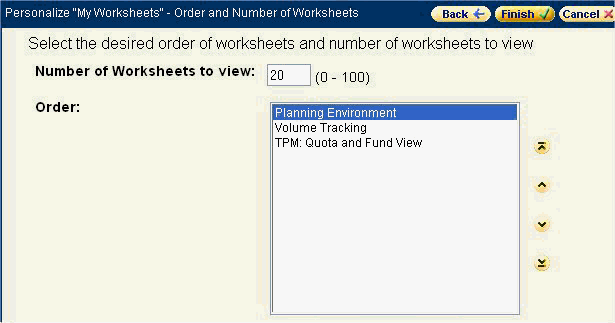
Collaborator Workbench displays a new page where you specify how many worksheets to display and the display order for the worksheets you have selected.
-
In the Number of Worksheets to View field, type the maximum number of worksheets that you want to see in My Worksheets.
-
In the Order list, click a worksheet and then click the up or down arrows to specify the display order of that worksheet. Repeat as necessary.
-
Click Finish to save your changes.