Creating and Using Custom Integration Interfaces
Overview
To support custom integration interfaces, Oracle E-Business Suite Integrated SOA Gateway provides a mechanism allowing these custom interfaces to be displayed through the Oracle Integration Repository browser along with Oracle packaged interfaces. This enables Oracle Integration Repository a single source of truth in centrally displaying all integration interfaces regardless of custom or Oracle packaged ones within the entire Oracle E-Business Suite.
Custom interface definitions can be created for various interface types including custom interface definitions for XML Gateway Map, Business Event, PL/SQL, Concurrent Program, Business Service Object, Java APIs, Java Bean Services, Application Module Services, and Composite Service for BPEL type.
Note: Please note that custom interface types of EDI, Open Interface Tables, and Open Interface Views are not supported in this release.
Oracle Integration Repository currently does not support the creation of custom Product Family and custom Business Entity.
Depending on your business needs, integration developers can create custom integration interfaces first, and then annotate the custom interfaces based on the Integration Repository annotation standards. Once these custom interfaces are annotated, appropriate validation on the annotated custom interfaces is required before they are uploaded to the Integration Repository by an integration repository administrator.
For custom integration interfaces of interface types
If a custom interface created for a supported interface type has been uploaded to Oracle Integration Repository, to use this custom interface, an integration repository administrator should first create necessary security grants, and then generate and deploy the Web service WSDL file to the application server if the custom interface type can be service enabled. Thus, the deployed service can be exposed to customers through a service provider and invoked through any of the Web service clients or orchestration tools.
For custom composite service - BPEL type
If a custom interface is needed for a composite service - BPEL type, the integration developer will first create a composite service by orchestrating discrete native services into a meaningful process flow using BPEL. Based on the annotation standards specifically for composite service, the developer will then annotate the composite service, and create and unzip the JAR file of the BPEL project. Like custom interfaces of other interface types, appropriate validation on the BPEL project JAR file is required to ensure its compliance with the annotation standards before it is uploaded to the Integration Repository.
To have a better understanding of how to create custom interfaces as well as how to use custom interfaces as Web services, the following topics are discussed in this chapter:
Creating Custom Integration Interfaces
The following topics are discussed in this section:
Creating Custom Integration Interfaces of Interface Types
Custom interface definitions can be created and annotated for almost all interface types. After appropriate validation, these custom interfaces will be uploaded to Oracle Integration Repository and embedded into the interface categories where they belong.
Note: Custom interface types of EDI, Open Interface Tables, and Open Interface Views are not supported in this release.
Oracle Integration Repository currently does not support the creation of custom Product Family and custom Business Entity.
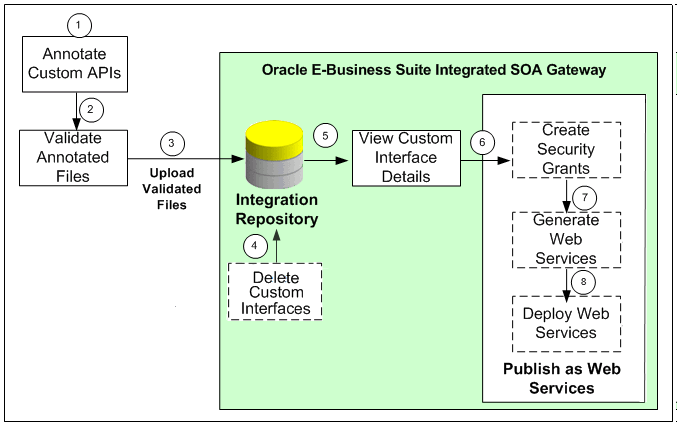
Enabling Custom Integration Interfaces
The custom interface design and service enablement process flow can be illustrated in the following diagram:
Note: Not all integration interface definitions can be service enabled. Oracle Integration Repository supports service enablement only for the following interface types:
-
PL/SQL
-
XML Gateway Map (inbound)
-
Concurrent Program
-
Business Service Object (Service Beans)
-
Java Bean Services
-
Application Module Services
Note that the Business Event and XML Gateway Map (outbound) interface types are supported through subscription model.
Custom Integration Interfaces Development Process Flow
-
Users who have the System Integration Developer role can annotate custom integration interface definition based on the Integration Repository annotation standards for the supported interface types.
-
Users who have the Integration Repository Administrator role can validate the annotated custom interface definitions against the annotation standards. This validation is performed by executing the Integration Repository Parser (IREP Parser), a design-time tool, to read the annotated files and then generate an Integration Repository loader file (iLDT ) if no error occurred.
For information on how to generate and upload the iLDT files, see Generating and Uploading iLDT Files.
-
Users who have the Integration Repository Administrator role can upload the generated iLDT file to Oracle Integration Repository.
See: Uploading ILDT Files to Integration Repository, Oracle E-Business Suite Integrated SOA Gateway Implementation Guide.
-
(Optional) Users who have the Integration Repository Administrator role can delete the custom interfaces if needed.
Before starting to use a custom integration interface from the Integration Repository, users who have the Integration Repository Administrator role can delete the custom interface if it is not yet generated or deployed as a web service. The administrators can first locate the custom interface from the Integration Repository user interface, and then click Delete Interface in the Overview tab of the custom interface details page.
If a custom interface has been deployed, it must be undeployed first before it can be deleted. That is, its web service status must be either 'Generated' for a custom SOAP service or 'Not Deployed' for a custom REST service. See: Deleting Custom Integration Interfaces, Oracle E-Business Suite Integrated SOA Gateway Implementation Guide.
-
All users can view the uploaded custom interfaces from the Integration Repository user interface.
-
(Optional) Users who have the Integration Repository Administrator role then create necessary security grants for the custom integration interfaces if needed.
This is achieved by first locating the custom interface from the Integration Repository, and then selecting methods contained in the selected custom interface before clicking Create Grant. The Create Grants page is displayed where the administrators can grant the selected method access permissions to a user, user group, or all users. See: Creating Security Grants, Oracle E-Business Suite Integrated SOA Gateway Implementation Guide.
-
(Optional) Users who have the Integration Repository Administrator role can generate SOAP services if the custom interfaces can be service enabled.
This is achieved by first locating the custom interface, and then specifying the interaction pattern either at the interface level or the method level before clicking Generate (or Generate WSDL) in the selected custom interface details page. See: Generating Custom SOAP Web Services, Oracle E-Business Suite Integrated SOA Gateway Implementation Guide.
-
(Optional) Users who have the Integration Repository Administrator role can deploy the web services from Oracle Integration Repository to the application server.
To deploy generated SOAP services, the administrators must first select one authentication type (Username Token or SAML Token) for each selected service and then click Deploy in the selected interface details page. This deploys the generated service to the application server. See: Deploying and Undeploying Custom SOAP Web Services, Oracle E-Business Suite Integrated SOA Gateway Implementation Guide.
If the custom interfaces can be exposed as REST services, the administrators must enter a unique service alias for each selected custom interface before deploying the service. If the selected interface is an interface type of Java Bean Services, Application Module Services, or Business Service Object, the administrators need to specify HTTP methods for the service operations contained in the selected interface.
Note: Although Open Interface Tables and Open Interface Views can be exposed as REST services, custom Open Interfaces are not supported in this release.
See: Deploying Custom REST Web Services, Oracle E-Business Suite Integrated SOA Gateway Implementation Guide.
Custom Integration Interface Annotation Example
The key essence of successfully creating custom integration interfaces relies on properly explanation of the new interface feature or definition. Once a custom interface definition of a specific interface type is created, an integration developer must properly annotate the custom file based on the Integration Repository annotation standards so that the interface file of a specific interface type can be displayed with appropriate description from the browser interface.
For example, the integration developer can create a Supplier Ship and Debit Request custom interface using PL/SQL API. This custom PL/SQL API package specification file (zz_sdrequest_s.pls) can be as follows:
set verify off
whenever sqlerror exit failure rollback;
WHENEVER OSERROR EXIT FAILURE ROLLBACK;

create or replace package ZZ_SDREQUEST as
/* $Header: zz_sdrequest_s.pls $ */

-- Custom procedure to create single supplier ship and debit request

procedure ZZ_CREATE_SDREQUEST (
CP_API_VERSION_NUMBER  IN    NUMBER,
CP_INIT_MSG_LIST  IN    VARCHAR2 := FND_API.G_FALSE,
CP_COMMIT  IN    VARCHAR2 := FND_API.G_FALSE,
CP_VALIDATION_LEVEL  IN    NUMBER := FND_API.G_VALID_LEVEL_FULL,
CX_RETURN_STATUS  OUT    VARCHAR2,
CX_MSG_COUNT  OUT    NUMBER,
CX_MSG_DATA  OUT    VARCHAR2,
CP_SDR_HDR_REC  IN    OZF_SD_REQUEST_PUB.SDR_HDR_REC_TYPE,
CP_SDR_LINES_REC  IN    OZF_SD_REQUEST_PUB.SDR_lines_rec_type,
CP_SDR_CUST_REC  IN    OZF_SD_REQUEST_PUB.SDR_cust_rec_type,
CP_SDR_BILLTO_REC  IN    OZF_SD_REQUEST_PUB.SDR_cust_rec_type,
CX_REQUEST_HEADER_ID  OUT    NUMBER
)
;
end ZZ_SDREQUEST;

/
commit;
exit;
Based on the PL/SQL API annotation standards, the integration developer must annotate the Supplier Ship and Debit Request custom package specification file by adding the annotation information specifically in the following places:
-
Annotate the PL/SQL API package specification
-
Annotate the PL/SQL procedure
The annotations for the procedure should be placed between the definition and '
;'.
Please note that you only need to annotate the custom package specification file, but not the package body file.
How to annotate custom interfaces for the interface types supported by Oracle Integration Repository, see Integration Repository Annotation Standards.
set verify off
whenever sqlerror exit failure rollback;
WHENEVER OSERROR EXIT FAILURE ROLLBACK;

create or replace package ZZ_SDREQUEST as
/* $Header: zz_sdrequest_s.pls $ */
/*#
* This custom PL/SQL package can be used to create supplier ship and debit request for single product.
* @rep:scope public
* @rep:product OZF
* @rep:displayname Single ship and debit request
* @rep:category BUSINESS_ENTITY OZF_SSD_REQUEST
*/

-- Custom procedure to create single supplier ship and debit request

procedure ZZ_CREATE_SDREQUEST (
CP_API_VERSION_NUMBER  IN    NUMBER,
CP_INIT_MSG_LIST  IN    VARCHAR2 := FND_API.G_FALSE,
CP_COMMIT  IN    VARCHAR2 := FND_API.G_FALSE,
CP_VALIDATION_LEVEL  IN    NUMBER := FND_API.G_VALID_LEVEL_FULL,
CX_RETURN_STATUS  OUT    VARCHAR2,
CX_MSG_COUNT  OUT    NUMBER,
CX_MSG_DATA  OUT    VARCHAR2,
CP_SDR_HDR_REC  IN    OZF_SD_REQUEST_PUB.SDR_HDR_REC_TYPE,
CP_SDR_LINES_REC  IN    OZF_SD_REQUEST_PUB.SDR_lines_rec_type,
CP_SDR_CUST_REC  IN    OZF_SD_REQUEST_PUB.SDR_cust_rec_type,
CP_SDR_BILLTO_REC  IN    OZF_SD_REQUEST_PUB.SDR_cust_rec_type,
CX_REQUEST_HEADER_ID  OUT    NUMBER
)
/*#
* Use this procedure to create single supplier ship and debit request
* @param CP_API_VERSION_NUMBER Version of the custom API
* @param CP_INIT_MSG_LIST Flag to initialize the message stack
* @param CP_COMMIT Indicates Flag to commit within the program
* @param CP_VALIDATION_LEVEL Indicates the level of the validation
* @param CX_RETURN_STATUS Indicates the status of the program
* @param CX_MSG_COUNT Provides the number of the messages returned by the program
* @param CX_MSG_DATA Returns messages by the program
* @param CP_SDR_HDR_REC Contains details of the new Ship Debit Request to be created
* @param CP_SDR_LINES_REC Contains the product line information for the new Ship Debit Request
* @param CP_SDR_CUST_REC Contains the Customer information for the new Ship Debit Request
* @param CP_SDR_BILLTO_REC Contains the Bill-to information for the new Ship Debit Request
* @param CX_REQUEST_HEADER_ID Returns the id of the new Ship Debit Request created
* @rep:displayname Create ship and debit request
* @rep:category BUSINESS_ENTITY OZF_SSD_REQUEST
* @rep:scope public
* @rep:lifecycle active
*/
;
end ZZ_SDREQUEST;

/
commit;
exit;
Generating and Uploading iLDT Files
Once annotated custom integration interface definitions are created, these annotated source files need to be validated against the annotation standards before they can be uploaded to Oracle Integration Repository. This validation is performed by executing the Integration Repository Parser (IREP Parser), a design time tool, to read the annotated files and then generate an Integration Repository loader file (iLDT ) if no error occurred.
Note: Please note that Integration Repository Parser does not support the integration interfaces registered under custom applications.
It is currently tested and certified for Linux, Unix, Oracle Solaris on SPARC, HP-UX Itanium, HP-UX PA-RISC, IBM AIX on Power Systems and Windows.
Once an iLDT file is generated, an integration repository administrator can upload the generated file to Oracle Integration Repository where the custom interfaces can be exposed to all users.
How to set up the Integration Repository Parser, and use it to generate and upload the iLDT file, refer to:
-
Setting Up and Using Integration Repository Parser, Oracle E-Business Suite Integrated SOA Gateway Implementation Guide
-
Generating ILDT Files, Oracle E-Business Suite Integrated SOA Gateway Implementation Guide
-
Uploading ILDT Files to Integration Repository, Oracle E-Business Suite Integrated SOA Gateway Implementation Guide
Viewing Custom Interfaces and Performing Administrative Tasks
Searching and Viewing Custom Interfaces
Once annotated custom interface definitions are uploaded successfully, they are merged into the interface types they belong to and displayed together with Oracle interfaces from the Integration Repository browser window. To easily distinguish annotated custom interface definitions from Oracle interfaces, the Interface Source "Custom" is used to categorize those custom integration interfaces in contrast to Interface Source "Oracle" for Oracle interfaces.
To search for custom integration interfaces, you can use either one of the following ways:
-
From the Interface List page, select 'Custom' from the Interface Source drop-down list along with a value for the Scope field to restrict the custom integration interfaces display.
-
From the Search page, click Show More Search Options to select 'Custom' from the Interface Source drop-down list along with any interface type, product family, or scope if needed as the search criteria.
After executing the search, all matched custom integration interfaces will be displayed. For more information on how to search and view custom integration interfaces, see Searching Custom Integration Interfaces, Oracle E-Business Suite Integrated SOA Gateway Implementation Guide and Viewing Custom Integration Interfaces, Oracle E-Business Suite Integrated SOA Gateway Implementation Guide.
Performing Administrative Tasks
Once custom integration interfaces are uploaded and displayed from the Integration Repository browser interface types, all the administrative tasks are the same for the native integration interfaces. These administrative tasks including creating security grants for newly created custom interfaces if needed, generating Web services, and deploying Web services. See Administering Custom Integration Interfaces and Services, Oracle E-Business Suite Integrated SOA Gateway Implementation Guide.
How to use custom integration interfaces as Web services to perform necessary transactions for your business needs, see a custom interface example described in the Using Custom Integration Interfaces as Web Services.
Creating Custom Integration Interfaces of Composite Services
Integration developers can create new composite services by orchestrating discrete Web services into meaningful business processes using BPEL language. With appropriate annotation specifically for the composite services and validation against the annotation standards, the validated JAR files of the composite service BPEL projects can be uploaded to the Integration Repository.
Creating Custom Composite Services
The following diagram illustrates the custom integration interface design flow for composite service - BPEL type:

-
A system integration developer orchestrates a composite service using a Web service composition language BPEL.
-
The integration developer annotates the composite service based on the Integration Repository annotation standards specifically for the composite service interface type.
-
The integration developer creates a JAR file of the composite service BPEL project.
-
The integration repository administrator unzips the JAR file first and then validates the annotated custom interface definitions against the annotation standards specifically for composite services. This validation is performed by executing the Integration Repository Parser to read the annotated files and then generate an Integration Repository loader file (iLDT) if no error occurs.
-
An integration repository administrator uploads the generated iLDT file to Oracle Integration Repository through backend processing.
See: Generating and Uploading iLDT Files.
After the upload, you can search and view the uploaded custom interface from the Integration Repository user interface for verification.
Once custom integration interface definitions are uploaded and displayed from the Integration Repository browser, integration repository administrators and the integration developers can download the composite services for modification if needed. For information on how to download composite services, see Viewing and Downloading Custom Composite Services.
Custom Composite Service Annotation Example
As mentioned earlier that the key essence of successfully creating custom integration interfaces relies on properly explanation of the new interface feature or definition. Once a custom interface definition of a specific interface type is created, an integration developer must properly annotate the custom source file based on the Integration Repository annotation standards so that the interface file of a specific interface type can be displayed with appropriate description from the browser interface.
For example, a create invoice composite service - BPEL project is created. To annotate the composite service *.bpel file, you open the *.bpel file in text editor and place the annotation within the comments section in the beginning of the file as highlighted below:
//////////////////////////////////////////////////////////////
Oracle JDeveloper BPEL Designer

  Created: Tue Oct 30 17:10:13 IST 2007
  Author:  <username>
  Purpose: Synchronous BPEL Process
 /*#
  * This is a bpel file for creating invoice.
  * @rep:scope public
  * @rep:displayname Create Invoice
  * @rep:lifecycle active
  * @rep:product PO
  * @rep:compatibility S
  * @rep:interface oracle.apps.po.CreateInvoice
  * @rep:category BUSINESS_ENTITY INVOICE
  */

//////////////////////////////////////////////////////////////

-->
<process name="CreateInvoice">
                        targetNamespace="http://xmlns.oracle.com/CreateInvoice"
                xmlns="http://schemas.xmlsoap.org/ws/2003/03/business-process/"
                        xmlns:bpws="http://schemas.xmlsoap.org/ws/2003/03/business-process/"
         xmlns:xp20="http://www.oracle.com/XSL/Transform/java/oracle.tip.pc.services.functions.Xpath20"
         xmlns:ns4="http://xmlns.oracle.com/pcbpel/adapter/file/ReadPayload/"
         xmlns:ldap="http://schemas.oracle.com/xpath/extension/ldap"
         xmlns:xsd="http://www.w3.org/2001/XMLSchema"
         xmlns:ns5="http://xmlns.oracle.com/bpel/workflow/xpath"
         xmlns:client="http://xmlns.oracle.com/CreateInvoice"
         xmlns:ns6="http://xmlns.oracle.com/bpel/services/IdentityService/xpath"
         xmlns:ora="http://schemas.oracle.com/xpath/extension"
         xmlns:ns1="http://xmlns.oracle.com/soaprovider/plsql/AR_INVOICE_API_PUB_2108/CREATE_SINGLE_INVOICE_1037895/"
         xmlns:ns3="http://xmlns.oracle.com/soaprovider/plsql/AR_INVOICE_API_PUB_2108/APPS/BPEL_CREATE_SINGLE_INVOICE_1037895/AR_INVOICE_API_PUB-24CREATE_INV/"
         xmlns:ns2="http://xmlns.oracle.com/pcbpel/adapter/appscontext/"
         xmlns:bpelx="http://schemas.oracle.com/bpel/extension"
                        xmlns:orcl="http://www.oracle.com/XSL/Transform/java/oracle.tip.pc.services.functions.ExtFunc">

  <!--
/////////////////////////////////////////////////////////////////////
PARTNERLINKS
      List of services participating in this BPEL process
/////////////////////////////////////////////////////////////////////
-->
<partnerLinks>
        <!--
                The 'client' role represents the requester of this service. It is
      used for callback. The location and correlation information associated
      with the client role are automatically set using WS-Addressing.
    -->
    <partnerLink name="client" partnerLinkType="client:CreateInvoice"
                 myRole="CreateInvoiceProvider"/>
    <partnerLink name="CREATE_SINGLE_INVOICE_1037895"
                 partnerRole="CREATE_SINGLE_INVOICE_1037895_ptt_Role"
                 partnerLinkType="ns1:CREATE_SINGLE_INVOICE_1037895_ptt_PL"/>
    <parnterLink name="ReadPayload" partnerRole="SynchRead_role"
                 partnerLinkType="ns4:SynchRead_plt"/>
</partnerLinks>
<!--
/////////////////////////////////////////////////////////////////////
VARIABLES
      List of messages and XML documents used within this BPEL process
/////////////////////////////////////////////////////////////////////
-->
<variables>
<!--Reference to the message passed as input during initiation-->
         <variable name="inputVariable"
              messageType="client:CreateInvoiceRequestMessage"/>
<!--Reference to the message that will be returned to the requester-->
    <variable name="outputVariable"
              messageType="client:CreateInvoiceResponseMessage"/>
    <variable name="Invoke_1_CREATE_SINGLE_INVOICE_1037895_InputVariable"
              messageType="ns1:Request"/>
    <variable name="Invoke_1_CREATE_SINGLE_INVOICE_1037895_OutputVariable"
              messageType="ns1:Response"/>
    <variable name="Invoke_2_SynchRead_InputVariable"
              messageType="ns4:Empty_msg"/>
    <variable name="Invoke_2_SynchRead_OutputVariable"
              messageType="ns4:InputParameters_msg"/>
</variables>
<!--
/////////////////////////////////////////////////////////////////////
ORCHESTRATION LOGIC
     Set of activities coordinating the flow of messages across the
     services integrated within this business process
/////////////////////////////////////////////////////////////////////
-->
<sequence name="main">
    <!--Receive input from requestor. (Note: This maps to operation defined in CreateInvoice.wsdl)-->
         <receive name="receiveInput" partnerLink="client"
             portType="client:CreateInvoice" operation="process"
             variable="inputVariable" createInstance="yes"/>
    <!--Generate reply to synchronous request-->
    <assign name="SetHeader">
      <copy>
        <from expression="''operations'">
        <to variable="Invoke_1_CREATE_SINGLE_INVOICE_1037895_InputVariable"
            part="header"
            query="/ns1:SOAHeader/ns2:ProcedureHeaderType/ns2:Username"/>
      </copy>
      <copy>
        <from expression="''Receivables, Vision Operations (USA)'">
        <to variable="Invoke_1_CREATE_SINGLE_INVOICE_1037895_InputVariable"
            part="header"
            query="/ns1:SOAHeader/ns2:ProcedureHeaderType/ns2:Responsibility"/>
      </copy>
      <copy>
        <from expression="''204'">
        <to variable="Invoke_1_CREATE_SINGLE_INVOICE_1037895_InputVariable"
            part="header"
            query="/ns1:SOAHeader/ns2:ProcedureHeaderType/ns2:ORG_ID"/>
      </copy>
      <copy>
        <from expression="''Receivables, Vision Operations (USA)'">
        <to variable="Invoke_1_CREATE_SINGLE_INVOICE_1037895_InputVariable"
            part="header"
            query="/ns1:SOAHeader/ns1:SecurityHeader/ns1:ResponsibilityName"/>
      </copy>
   </assign>
   <invoke name="InvokeReadPayload" partnerLink="ReadPayload"
            portType="ns4:SynchRead_ptt" operation="SynchRead"
            inputVariable="Invoke_2_SynchRead_InputVariable"
            outputVariable="Invoke_2_SynchRead_OutputVariable"/>
   <assign name="SetPayload">
      <copy>
        <from variable="Invoke_2_SynchRead_OutputVariable"
              part="InputParameters" query="/ns3:InputParameters"/>
        Invoke_1_CREATE_SINGLE_INVOICE_1037895_InputVariable"
        part="body" query="/ns1:SOARequest/ns3:InputParameters"/>
      </copy>
   </assign>
   <assign name="SetDate">
      <copy>
        <from expression="xp20:current-date()">
        <to to variable="Invoke_1_CREATE_SINGLE_INVOICE_1037895_InputVariable"
            part="body"
            query="/ns1:SOARequest/ns3:InputParameters/ns3:P_TRX_HEADER_TBL/ns3:P_TRX_HEADER_TBL_ITEM/ns3:TRX_DATE"/>
      </copy>
   </assign>
   <invoke name="Invoke_1" partnerLink="CREATE_SINGLE_INVOICE_1037895"
            portType="ns1:CREATE_SINGLE_INVOICE_1037895_ptt"
            operation="CREATE_SINGLE_INVOICE_1037895"
            inputVariable="Invoke_1_CREATE_SINGLE_INVOICE_1037895_InputVariable"
            outputVariable="Invoke_1_CREATE_SINGLE_INVOICE_1037895_OutputVariable"/>
   <assign name="AssignResult">
      <copy>
        <from variable="Invoke_1_CREATE_SINGLE_INVOICE_1037895_OutputVariable"
              part="body"
              query="/ns1:SOAResponse/ns3:OutputParameters/ns3:X_MSG_DATA"/>
        <to variable="outputVariable" part="payload"
            query="/client:CreateInvoiceProcessResponse/client:result"/>
      </copy>
   </assign>
   <reply name="replyOutput" partnerLink="client"
           portType="client:CreateInvoice" operation="process"
           variable="outputVariable"/>
 </sequence>
</process>
For more information on how to annotate composite service BPEL type, see Composite Service - BPEL Annotations.
Generating and Uploading iLDT Files
Once annotated custom composite services are created, these annotated source files need to be validated against the annotation standards specifically for composite service - BPEL type before they can be uploaded to Oracle Integration Repository. This validation is performed by executing the Integration Repository Parser (IREP Parser), a design time tool, to read the annotated files and then generate an Integration Repository loader file (iLDT ) if no error occurred.
Note: Please note that Integration Repository Parser does not support the integration interfaces registered under custom applications.
It is currently tested and certified for Linux, Unix, Oracle Solaris on SPARC, HP-UX Itanium, HP-UX PA-RISC, IBM AIX on Power Systems and Windows.
Once an iLDT file is generated, an integration repository administrator can upload the generated file to Oracle Integration Repository where the custom interfaces can be exposed to all users.
How to set up the Integration Repository Parser, and use it to generate and upload the iLDT file, see:
-
Setting Up and Using Integration Repository Parser, Oracle E-Business Suite Integrated SOA Gateway Implementation Guide
-
Generating ILDT Files, Oracle E-Business Suite Integrated SOA Gateway Implementation Guide
-
Uploading ILDT Files to Integration Repository, Oracle E-Business Suite Integrated SOA Gateway Implementation Guide
Viewing and Downloading Custom Composite Services
Once annotated custom composite service definitions are uploaded successfully, they are merged into the Composite Service BPEL type and displayed together with Oracle interfaces from the Integration Repository browser window. To easily distinguish annotated custom composite services from Oracle interfaces, the Interface Source "Custom" is used to categorize those custom interfaces in contrast to Interface Source "Oracle" for Oracle interfaces.
To search for custom composite services, from the Search page, click Show More Search Options to expand the search criteria. Select 'Custom' from the Interface Source drop-down list along with 'Composite Service' interface type, product family, or scope if needed as the search criteria.
After executing the search, all matched custom composite services will be displayed.
Downloading Custom Composite Services
Similar to downloading native packaged composite services, the integration repository administrators and the integration developers can click Download Service in the composite service interface details page to download the relevant custom composite files aggregated in a .JAR file to your local directory.
For more information on how to search and download custom composite services, see Downloading Composite Services, Oracle E-Business Suite Integrated SOA Gateway Implementation Guide.
Creating Custom Business Events Using Workflow XML Loader
Oracle E-Business Suite Integrated SOA Gateway allows you to create custom business events in the Business Event System and then download the events that you have created, annotate the event source codes, validate the files, and then upload the files back to the event system using Workflow XML Loader.
The Workflow XML Loader is a command line utility that lets you upload and download XML definitions for Business Event System objects between a database and a flat file. When you download Business Event System object definitions from a database, Oracle Workflow saves the definitions as an XML file. When you upload object definitions to a database, Oracle Workflow loads the definitions from the source XML file into the Business Event System tables in the database, creating new definitions or updating existing definitions as necessary.
XML files uploaded or downloaded by the Workflow XML Loader should have the extension .wfx to identify them as Workflow object XML definitions.
Use the following steps to create custom business events:
Step 1: Locating and Downloading Business Events
After creating custom business events in the Oracle Workflow Business Event System, first locate them and then download them using Workflow XML Loader.
Business Events Page
To download XML definitions for Business Event System objects between a database and a flat file, run the Workflow XML Loader by running Java against oracle.apps.fnd.wf.WFXload with the following command syntax:
jre oracle.apps.fnd.wf.WFXload -d{e} <user> <password> <connect string> <protocol> <language> <xml file> <object> {<key>} {<OWNER_TAG>} {<owner>}
For example, you can download either a single event or a group of events:
-
Use the following command to download a single business event, such as
wfdemoe.wfx. In the filename, first two or three chars refers to the product and the last character 'e' refers to Event.java oracle.apps.fnd.wf.WFXLoad -d apps_read_only password hostdb:xxxxx:sidxxx thin US wfdemoe.wfx EVENTS abc.apps.wf.bes.demo.event
-
Use the following command to download a group of business events with wildcard:
java oracle.apps.fnd.wf.WFXLoad -d apps_read_only password hostdb:xxxxx:sidxxx thin US wfdemoe.wfx EVENTS abc.apps.wf.bes.%
After successfully downloading the event XML definitions, open the .wfx file in any text editor. You will find the content of a wfdemoe.wfx file, for example, containing one event shown as follows:
<?xml version = '1.0' encoding = 'UTF-8'?>
...

<oracle.apps.wf.event.all.sync><ExternalElement>
<OraTranslatibility>
<XlatElement Name="WF_EVENTS">
<XladID>
<Key>NAME</Key>
</XladID>
<XlatElement Name="DISPLAY_EVENTS" MaxLen="80" Expansion="50"/>
<XladID>
<Key Type="CONSTANT">DISPLAY_EVENTS</Key>
</XladID>
<XlatElement Name="DESCRIPTION" MaxLen="2000" Expansion="50"/>
<XladID>
<Key Type="CONSTANT">DESCRIPTION</Key>
</XladID>
</XlatElement>
</OraTranslatibility>
</ExternalElement>
<WF_TABLE_DATA>
  <WF_EVENTS>
        <VERSION>1.0</VERSION>
                <GUID>#NEW</GUID>
                <NAME>abc.apps.wf.demo.event</NAME>
                <TYPE>EVENT</TYPE>
                <STATUS>ENABLED</STATUS>
                <GENERATE_FUNCTION/>
                <OWNER_MAME>Oracle Workflow</OWNER_MAME>
                <OWNER_TAG>FMD</OWNER_TAG>
                <CUSTOMIZATION_LEVEL>U</CUSTOMIZATION_LEVEL>
                <LICENSED_FLAG>Y</LICENSED_FLAG>
                <JAVA_GENERATE_FUNC/>
                <DISPLAY_NAME>Demo Business Event</DISPLAY_NAME>
                <DESCRIPTION>Business event created for annotation demo.</DESCRIPTION>
                <IREP_ANNOTATION>
/*#
* Business event created for annotation demo.
*
* @rep:scope public
* @rep:displayname Demo Business Event
* @rep:product FND
* @rep:category BUSINESS_ENTITY
*/
</IREP_ANNOTATION>
                </WF_EVENTS>
</WF_TABLE_DATA>
</oracle.apps.wf.event.all.sync>
The Workflow XML Loader automatically creates a template for integration repository annotation as highlighted in bold between <IREP_ANNOTATION> and </IREP_ANNOTATION>. This is where appropriate annotations need to be placed or modified for a business event based on the business event annotation standards.
To download business events XML definitions:
-
Log on to Oracle Workflow page with the Workflow Administrator Web Applications responsibility. Select the Business Events link from the Navigator to open the Events page.
-
Enter search criteria in the Search region to locate your business events.
-
Change your directory to the same environment where your application is running.
For example, if your application is running on
seed100, then change your directory toseed100where your business events exist./slot/ems3404/appmgr/apps/apps_st/appl . ./APPSseed100.env
-
Download the events from the database using
oracle.apps.fnd.wf.WFXloadwith the following syntax:jre oracle.apps.fnd.wf.WFXload -d{e} <user> <password> <connect string> <protocol> <language> <xml file> <object> {<key>} {<OWNER_TAG>} {<owner>} -
Open the
.wfxfile in any text editor and notice that one business event has been placed there.
Step 2: Annotating an XML Definition
After successfully downloading the XML definition file from a database, you should open the .wfx file containing one business event in any text editor and modify the annotation appropriately based on Integration Repository business event annotation standards.
The appropriate annotation includes:
-
Enter meaningful description.
-
Enter conditions under which the business event is raised.
-
Enter UI action that invokes the business event if applicable.
-
Verify scope. By default, the Workflow XML Loader annotates scope as 'public'.
-
Verify display name. By default, the Workflow XML Loader uses the same display name as that mentioned in business event definition.
-
Verify product. By default, the Workflow XML Loader uses Owner Tag as the Application Short Name.
Make sure that the Owner Tag corresponds to Application Short Name in FND_APPLICATION. Owner Name typically corresponds to Application Name but if your product is part of a larger application, you may enter an appropriate name in Owner Name.
-
Enter BUSINESS_ENTITY code that your respective business event belongs to.
-
Enter additional annotation properties if needed.
Please note that the IREP properties should not be blank. For example, the Workflow XML Loader only adds the template for Business Entity as rep:category BUSINESS_ENTITY, but you should add an appropriate business entity to which the event belongs. Similarly, other @rep properties cannot be left blank either.
The following is a sample business event annotation for Oracle Workflow:
* Business Event created to demonstrate using WFXLoad to annotate Business Events.
*
* @rep:scope internal
* @rep:displayname Demo Business Event
* @rep:product OWF
* @rep:lifecycle active
* @rep:category BUSINESS_ENTITY WF_EVENT
*/
Important: If you decide not to annotate or publish the event in Oracle Integration Repository, you should remove the annotation only but leave the following tags unchanged. Presence of these tags is an indication that the event was reviewed for annotation.
<IREP_ANNOTATION/>
or
<IREP_ANNOTATION></IREP_ANNOTATION>
If the Loader sees these empty tags, it interprets that the business event was reviewed for annotation and it does not need to be published to the Integration Repository. Next time, when the user downloads these events, the Loader will insert empty IREP_ANNOTATION tags as shown in the following example.
However, if you remove the entire IREP_ANNOTATION tags for the business event and upload it, then on subsequent download the Loader will insert partially filled annotation template for the business event.
<WF_TABLE_DATA>
  <WF_EVENTS>
        <VERSION>1.0</VERSION>
                <GUID>#NEW</GUID>
                <NAME>oracle.apps.wf.demo.event.noannotate</NAME>
                <TYPE>EVENT</TYPE>
                <STATUS>ENABLED</STATUS>
                <GENERATE_FUNCTION/>
                <OWNER_MAME>Oracle Workflow</OWNER_MAME>
                <OWNER_TAG>FMD</OWNER_TAG>
                <CUSTOMIZATION_LEVEL>U</CUSTOMIZATION_LEVEL>
                <LICENSED_FLAG>Y</LICENSED_FLAG>
                <JAVA_GENERATE_FUNC/>
                <DISPLAY_NAME>Demo Business Event with no annotation</DISPLAY_NAME>
                <DESCRIPTION>Business second event created for annotation demo.</DESCRIPTION>
                <IREP_ANNOTATION>/*#
* Business event created for annotation demo.
*
* @rep:scope public
* @rep:displayname Demo Business Event
* @rep:product FND
* @rep:category BUSINESS_ENTITY
*/
</IREP_ANNOTATION>
  </WF_EVENTS>
</WF_TABLE_DATA>
For more information on Integration Repository Business Event Annotation Standards, see Business Event Annotations.
Step 3: Validating the Annotated Source File Using Integration Repository Parser
Integration Repository Parser is a standalone design time tool. It can be executed to validate the annotated custom interface definitions against the annotation standards and to generate an iLDT file if no error occurs.
After annotating the XML definition for a business event, execute the standalone Integration Repository Parser (IREP Parser) using the following command syntax to validate whether the annotation in .wfx file is valid:
Command Syntax:
$IAS_ORACLE_HOME/perl/bin/perl $FND_TOP/bin/irep_parser.pl -g -v -username=<a fnd username> <product>:<relative path from product top>:<fileName>:<version>=<Complete File Path, if not in currect directory>
For example:
$IAS_ORACLE_HOME/perl/bin/perl $FND_TOP/bin/irep_parser.pl -g -v -username=sysadmin owf:patch/115/xml/US:wfdemoe.wfx:12.0=./wfdemoe.wfx
While executing the parser, pay attention to any error messages on the console. Typically these errors would be due to incorrect annotation or some syntax errors in the annotated file. Ensure that the annotations are correct and the file has proper syntax.
If no error occurs in the annotated interface file, an iLDT (*.ildt) file would be generated. An integration repository administrator needs to upload the generated iLDT file to the Integration Repository where the custom business events can be exposed to all users. See Step 5: Uploading iLDT Files to Integration Repository.
Integration Repository Parser (irep_parser.pl)
The irep_parser is a design time tool. It reads interface annotation documentation in program source files and validates it according to its file type. If the -generate flag is supplied (and other conditions met), then it will generate iLDT files. Any validation errors will be reported, usually along with file name and line number, like the result of grep -n.
Additionally, it can handle almost all types of application source files. While validating the annotated files against the annotation standards of supported interface types, if files that do not match will be ignored.
The parser will return an exit value of 0 if no errors occurred during processing. Otherwise, it will return a count of the number of files that had errors. Files with incomplete information for generation (class resolution) are considered errors only if the -generate flag is used.
However, before executing the Integration Repository Parser, you need to install perl modules and apply necessary patches. For setup information, see Setting Up and Using Integration Repository Parser, Oracle E-Business Suite Integrated SOA Gateway Implementation Guide.
For information on the Integration Repository Parser (irep_parser.pl) usage details including supported file types and options, files specifications, and environment, see Integration Repository Parser (irep_parser.pl) Usage Details, Oracle E-Business Suite Integrated SOA Gateway Implementation Guide.
Step 4: Uploading Annotated File Back to a Database
After validating the annotated source file .wfx, upload the file back to the database where you downloaded it earlier so that the annotated file can be stored in the appropriate tables in business event system for future references.
Note: To view custom business events through the Integration Repository browser window, an integration repository administrator needs to upload the generated iLDT files to the Integration Repository. For information on uploading iLDT files, see Step 5: Uploading iLDT Files to Integration Repository.
The Workflow XML Loader lets you upload business event system XML definitions in either normal upload mode (-u) or force upload mode (-uf):
-
Normal upload mode (
-u): If you created an event with a customization level of Core or Limit, the Workflow XML Loader will be able to update IREP_ANNOTATION into the Business Event SystemWF_EVENTStable in the database. This normal mode will not make any updates to events or subscriptions with a customization level of User.Use the following command to upload the annotated
.wfxfile back to a database:java oracle.apps.fnd.wf.WFXLoad -u apps_read_only password hostdb:xxxxx:sidxxx thin US wfdemoe.wfx -
Force upload mode (
-uf): The Workflow XML Loader loads the object definitions from the source XML file into the Business Event System tables in the database and overwrites any existing definitions, even for events or subscriptions with a customization level of User.Therefore, if you created an event with a customization level of User, use the following force upload option to make sure the IREP_ANNOTATION can be uploaded back into the database.
java oracle.apps.fnd.wf.WFXLoad -uf apps_read_only password hostdb:xxxxx:sidxxx thin US wfdemoe.wfx
For more information on how to use Workflow XML Loader, see Using the Workflow XML Loader, Oracle Workflow Administrator's Guide.
Step 5: Uploading ILDT Files to Integration Repository
After the validation using the Integration Repository Parser, an iLDT file will be generated if no error occurs during the iLDT generation. In order for users to view the custom business events through the Integration Repository, an integration repository administrator needs to manually upload the generated iLDT file to the Integration Repository using FNDLOAD command.
$FND_TOP/bin/FNDLOAD <db_connect> 0 Y UPLOAD $fnd/patch/115/import/wfirep.lct <ildt file>
For example, FND_TOP/bin/FNDLOAD apps @instance_name 0 Y UPLOAD $FND_TOP/patch/115/import/wfirep.lct SOAIS_pls.ildt
ORACLE Password: password
For detailed information on how to upload the iLDT files, see Uploading ILDT Files to Integration Repository, Oracle E-Business Suite Integrated SOA Gateway Implementation Guide.
Viewing Custom Interfaces and Performing Administrative Tasks
Searching and Viewing Custom Interfaces
Annotated custom interface definitions, once they are uploaded successfully, are merged into the interface types they belong to and displayed together with Oracle interfaces from the Integration Repository browser window. To easily distinguish annotated custom interface definitions from Oracle interfaces, the Interface Source "Custom" is used to categorize those custom integration interfaces in contrast to Interface Source "Oracle" for Oracle interfaces.
To search for custom integration interfaces, you can use either one of the following ways:
-
From the Interface List page, select 'Custom' from the Interface Source drop-down list along with a value for the Scope field to restrict the custom integration interfaces display.
-
From the Search page, click Show More Search Options to select 'Custom' from the Interface Source drop-down list along with any interface type (such as 'Business Event'), product family, or scope if needed as the search criteria.
After executing the search, all matched custom integration interfaces will be displayed. For more information on how to search and view custom integration interfaces, see Searching Custom Integration Interfaces, Oracle E-Business Suite Integrated SOA Gateway Implementation Guide and Viewing Custom Integration Interfaces, Oracle E-Business Suite Integrated SOA Gateway Implementation Guide.
Performing Administrative Tasks
Once custom business events are uploaded and displayed from the Integration Repository browser interface types, all the administrative tasks are the same for the native interfaces. These administrative tasks including creating security grants for newly created custom events if needed, and subscribing to custom business events. See Administering Custom Integration Interfaces and Services, Oracle E-Business Suite Integrated SOA Gateway Implementation Guide.
How to use custom integration interfaces as Web services to perform necessary transactions for your business needs, see a custom interface example described in the Using Custom Integration Interfaces as Web Services.
Using Custom Integration Interfaces as Web Services
Overview
With appropriate annotation and validation, a custom integration interface can be created or built around a business entity for the interface type that Oracle Integration Repository supports. If the interface type that the custom interface belongs to can be service enabled, you can use the custom interface as a Web service to update or retrieve data from Oracle E-Business Suite or perform other business transactions over the Web.
For example, an integration developer can create a new or customized interface for Supplier Ship and Debit Request business entity using a PL/SQL API. Once the interface is uploaded to Oracle Integration Repository, it will be displayed under the PL/SQL API interface type from the Integration Repository browser. To differentiate the custom interfaces from Oracle native packaged ones, all custom integration interfaces have Interface Source 'Custom' in contrast to Oracle interfaces with Interface Source 'Oracle' when you view them from the repository.
To better understand how to use deployed custom interfaces as Web services in fulfilling your business needs, detailed design-time and run-time tasks in creating and deploying a BPEL process are discussed in this section. For the example described in the following sections, we use Oracle JDeveloper 10.1.3.3.0 as a design-time tool to create the BPEL process and use Oracle SOA Suite BPEL server 10.1.3.3.0 for the process deployment.
Using Custom Interface WSDL in Creating a BPEL Process at Design Time
Take a custom PL/SQL API ZZ_SDREQUEST as an example to explain the BPEL process creation.
When the request of creating a supplier ship and debit request is received, the request information including payload and request number will be read and passed to create a supplier ship and debit request. Once the supplier ship and debit request for a product is created, the request number will then be returned to the requestor.
After deploying the BPEL process, you should find a supplier ship and debit request is created in the Oracle E-Business Suite. The request number should be the same as the payload input value.
Prerequisites to Create a BPEL Process Using a Custom Web Service
Before performing design-time tasks for concurrent programs, ensure the following tasks are in place:
-
An integration repository administrator needs to locate the custom interface and then create security grants so that the right person can access the interface.
-
An integration repository administrator needs to successfully deploy the generated custom Web service to the application server.
-
An integration developer needs to locate and record the deployed WSDL URL for the custom interface exposed as a Web service.
Creating Security Grants on the Custom Interface
To be able to verify and use this custom interface, the administrator will first locate the custom interface (with 'Custom' interface source) from the repository, and then create security grants for the custom interface so that users with appropriate privileges can execute the interface and access the application for secured transactions.
For example, the administrator can grant the custom API access privilege to a user who has Oracle Trade Management responsibility. After the execution of this custom API, the authorized user can log in to Oracle Trade Management and verify the supplier and debit request creation details.
How to create security grants, see Creating Grants, Oracle E-Business Suite Integrated SOA Gateway Implementation Guide.
Deploying the WSDL URL for the Custom Interface
An integration repository administrator must perform the following steps before letting integration developers use the deployed WSDL in creating a BPEL process:
-
To generate a Web service, locate the interface definition first (such as a custom PL/SQL interface
ZZ_SDREQUEST) and click Generate in the SOAP Web Service tab of the interface details page.For detailed instruction on how to generate a Web service, see Generating SOAP Web Services, Oracle E-Business Suite Integrated SOA Gateway Implementation Guide.
-
To deploy a generated Web service, select one authentication type and click Deploy in the SOAP Web Service tab to deploy the service.
Once the service is successfully deployed, the selected authentication type will be displayed along with 'Deployed' Web Service Status. For more information on securing Web services with authentication type, see Managing Web Service Security, Oracle E-Business Suite Integrated SOA Gateway Implementation Guide.
For detailed instruction on how to deploy a Web service, see Deploying, Undeploying, and Redeploying SOAP Web Services, Oracle E-Business Suite Integrated SOA Gateway Implementation Guide.
Searching and Recording WSDL URL
Apart from the required tasks performed by the administrators, an integration developer also needs to log on to the system to locate and record the deployed Web service WSDL URL for the custom interface that needs to be orchestrated into a meaningful business process in Oracle JDeveloper using BPEL language.
This WSDL information will be used later in creating a partner link for the custom interface exposed as a Web service during the BPEL process creation at design time.
For information on how to search for an interface and review the interface details, see Searching and Viewing Integration Interfaces.
BPEL Process Creation Flow
Based on the supplier and debit request creation scenario, the following design-time tasks are discussed in this chapter:
-
Use this step to create a new BPEL project called
ZZ_CreateSingle_ShipDebitRequest.bpelusing an Synchronous BPEL Process template. This automatically creates two dummy activities - Receive and Reply - to receive input from a third party application and to reply output of the BPEL process back to the request application. -
Use this step to create an invoice in Oracle E-Business Suite by using the Single Ship and Debit Request custom API
ZZ_SDREQUESTexposed as Web service. -
Add a Partner Link for File Adapter
Use this step to synchronous read input data details passed from the first Assign activity to create supplier ship and debit request.
-
Use this step to configure two Invoke activities in order to:
-
Point to the File Adapter to synchronous read input data details that is passed from the first Assign activity.
-
Point to the
ZZ_SDREQUESTpartner link to initiate the supplier ship and debit request creation with payload and request number details received from the Assign activities.
-
-
Use this step to configure Assign activities in order to pass application context header variables, payload information and request number to appropriate Invoke activities to facilitate the single supplier ship and debit request creation. At the end, pass the request number to the request application through the dummy Reply activity.
For general information and basic concept of a BPEL process, see Understanding BPEL Business Processes and the Oracle BPEL Process Manager Developer's Guide for details.
Creating a New BPEL Project
Use this step to create a new BPEL project that will contain various BPEL process activities.
To create a new BPEL project:
-
Open JDeveloper BPEL Designer.
-
From the File menu, select New. The New Gallery dialog box appears.
-
Select All Items from the Filter By box. This produces a list of available categories.
-
Expand the General node and select Projects.
-
Select BPEL Process Project from the Items group.
-
Click OK. The BPEL Process Project dialog box appears.
BPEL Project Creation Wizard - Project Settings Dialog

-
In the Name field, enter a descriptive name such as
ZZ_CreateSingle_ShipDebitRequest. -
From the Template list, select Synchronous BPEL Process and then select Use Default Project Settings.
-
Use the default input and output schema elements in the Input/Output Elements dialog box.
-
Click Finish.
A new synchronous BPEL process is created with the Receive and Reply activities. The required source files including bpel.xml, using the name you specified (for example,
ZZ_CreateSingle_ShipDebitRequest.bpel) are also generated.
Creating a Partner Link for the Web Service
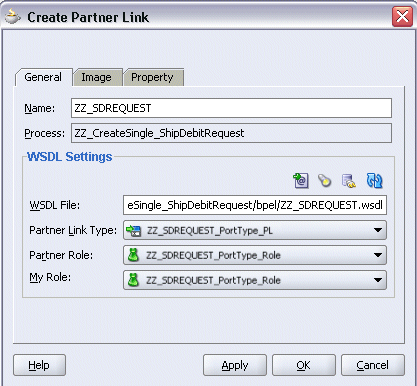
Use this step to create a Partner Link called ZZ_CreateSD_Request.
To create a partner link for Single Ship and Debit Request Web service:
-
In JDeveloper BPEL Designer, drag and drop the PartnerLink service from the Component Palette into the Partner Link border area of the process diagram. The Service Name dialog box appears.
-
Copy the WSDL URL corresponding to the custom service,
ZZ_SDREQUEST, that you recorded earlier in the WSDL File field. -
A Partner Link Type message dialog box appears asking whether you want the system to create a new WSDL file that will by default create partner link types for you.
Click Yes to have the Partner Name value populated automatically.
The partner link is created with the required WSDL settings, and is represented in the BPEL project by a new icon in the border area of the process diagram.
BPEL Process Diagram with Partner Link

-
You can optionally change the default partner link name by double-clicking the icon to open the Edit Partner Link window if you like.
Select the Partner Role value from the drop-down list.
Click Apply.
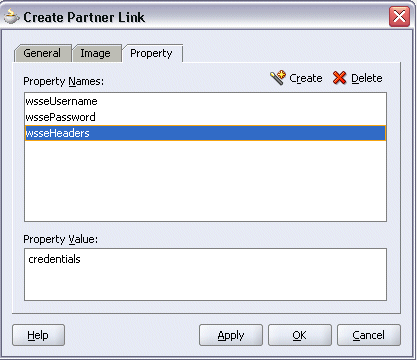
Create Partner Link Dialog
-
Select the Property tab and click the Create Property icon to select the following properties from the property name drop-down list in order to pass the security header along with the SOAP request:
-
wsseUsername
Specify the username such as
trademgrto be passed in the Property Value box. -
wssePassword
Specify the corresponding password for the username to be passed in the Property Value box.
-
wsseHeaders
Enter
credentialsas the property value.
Click Apply to save the selected property values.
Create Partner Link: Property Tab
-
-
Click OK to complete the partner link configuration.
Adding a Partner Link for File Adapter
Use this step to configure a BPEL process to read input payload.
To add a Partner Link for File Adapter to Read Payload:
-
In JDeveloper BPEL Designer, drag and drop the File Adapter service from the Adapter Service section of the Component Palette into the Partner Link area of the process diagram. The Adapter Configuration Wizard welcome page appears.
-
Click Next. The Service Name dialog box appears.
-
Enter a name for the file adapter service such as
Read_Payload. You can add an optional description of the service. -
Click Next. The Operation dialog box appears.
Operation Dialog
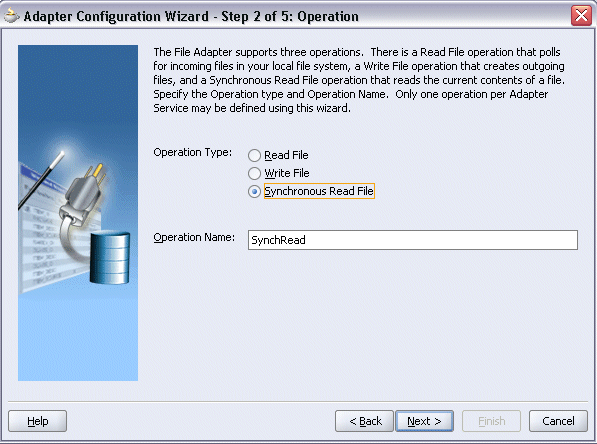
-
Specify the operation type, for example Synchronous Read File. This automatically populates the Operation Name field.
Click Next to access the File Directories dialog box.
File Directories Dialog
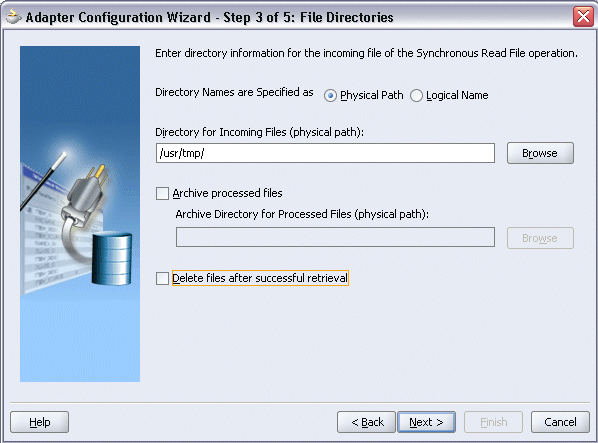
-
Select the Physical Path radio button and enter the physical path for incoming file directory information. For example, enter
/usr/tmp/.Note: To be able to locate the file from the physical directory you specified here, you must first place the input payload file (such as
Inputzzsdrequest.xml) to the specified directory.Alternatively, click Browse to locate the incoming file directory information.
Uncheck the Delete Files after successful retrieval check box. Click Next to open the File Name dialog box.
-
Enter the name of the file for the synchronous read file operation. For example, enter
Inputzzsdrequest.xml. Click Next. The Messages dialog box appears. -
Select Browse in the Schema Location field to open the Type Chooser dialog.
Click Import Schema File... icon on the top right corner of the Type Chooser dialog.
-
Enter the schema location for the custom service, such as
http://<host>:<port>/webservices/SOAProvider/plsql/zz_sdrequest/APPS_XX_BPEL_ZZ_CREATE_SDREQUEST_RE_ZZ_SDREQUEST_ZZ_CREATE_SDREQU.xsd.The schema location for your custom service can be found from the custom service WSDL (for example,
http://<host>:<port>/webservices/SOAProvider/plsql/zz_sdrequest/?wsdl).Select the 'Add to Project' check box and click OK.
-
Click OK to import schema prompt. The imported schema section will be added to the Type Choose dialog.
Type Chooser Dialog
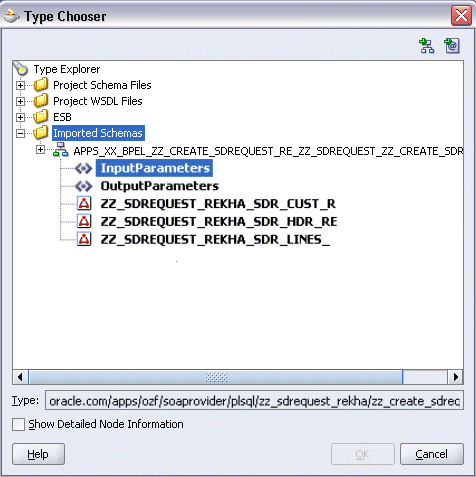
-
Browse the imported schema by selecting Imported Schemas > APPS_XX_BPEL_ZZ_CREATE_SDREQUEST_RE_ZZ_SDREQUEST_ZZ_CREATE_SDREQU.xsd > InputParameters.
Click OK. The selected .xsd is displayed as Schema Location, and
InputParametersis displayed as Schema Element. -
Click Next and then Finish. The wizard generates the WSDL file corresponding to the partner link. The main Create Partner Link dialog box appears, specifying the new WSDL file
Read_Payload.wsdl.Create Partner Link Dialog
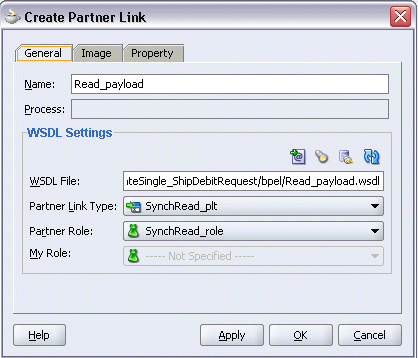
Click Apply and OK to complete the configuration and create the partner link with the required WSDL settings for the File Adapter Service.
The
Read_PayloadPartner Link appears in the BPEL process diagram:
Adding Invoke Activities
This step is to configure two Invoke activities:
-
Read supplier ship and debit request creation details that is passed from the first Assign activity using
Read_Payloadpartner link for File Adapter. -
Send the payload and request number details received from the Assign activities to create a single supplier ship and debit request by using the
ZZ_SDREQUESTpartner link.
To add an Invoke activity for Read_Payload Partner Link:
-
In JDeveloper BPEL Designer, drag and drop the Invoke activity from the Component Palette into the Activity box of the process diagram, between the Receive and Reply activities.
-
Link the Invoke activity to the
Read_Payloadservice. The Invoke activity will send request data to the partner link. The Edit Invoke dialog box appears.Edit Invoke Dialog
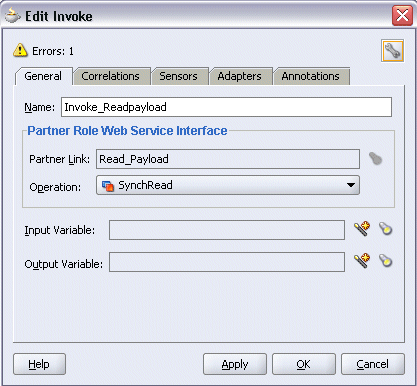
-
Enter a name for the Invoke activity such as 'Invoke_Readpayload', and then click the Create icon next to the Input Variable field to create a new variable. The Create Variable dialog box appears.
-
Enter a name for the variable such as 'Invoke_Readpayload_InputVariable' and select Global Variable. Click OK in the Create Variable dialog box.
Enter a name for the output variable such as 'Invoke_Readpayload_OutputVariable' and select Global Variable. Click OK in the Create Variable dialog box.
Click Apply and OK in the Edit Invoke dialog box to finish configuring the Invoke activity.
The Invoke activity appears in the process diagram.
To add an Invoke activity for ZZ_SDREQUEST Partner Link:
-
In JDeveloper BPEL Designer, drag and drop the Invoke activity from the Component Palette into the Activity box of the process diagram, after the Invoke and Reply activities.
-
Link the Invoke activity to the
ZZ_SDREQUESTservice. The Invoke activity will send the request number to the partner link. The Edit Invoke dialog box appears. -
Enter a name for the Invoke activity such as 'Invoke_zzsdrequest'.
Select the Operation as ZZ_CREATE_SDREQUEST.
-
Click the Create icon next to the Input Variable field to create a new variable such as 'Invoke_zzsdrequest_InputVariable'. Select Global Variable and click OK in the Create Variable dialog box.
-
Click the Create icon next to the Output Variable field to create a new variable such as 'Invoke_zzsdrequest_OutVariable'. Select Global Variable and click OK in the Create Variable dialog box. Click Apply and OK in the Edit Invoke dialog box to complete the Invoke activity creation.
The Invoke activity appears in the process diagram.
Adding Assign Activities
This step is to configure four Assign activities:
-
To set the applications context information obtained from the dummy Receive activity, that will be used in passing variables for SOAHeader elements of the SOAP request.
Note: You need to populate certain variables in the BPEL process for SOAHeader elements to pass values that may be required to set applications context during service execution. These SOAHeader elements are
Responsibility, RespApplication, SecurityGroup, NLSLanguage, andOrg_Id. -
To pass the payload information to the
Invoke_zzsdrequestInvoke activity. -
To pass the supplier ship and debit request number information to the
Invoke_zzsdrequestInvoke activity. -
To pass the supplier ship and debit request number information back to the dummy Reply activity as an output.
To add the first Assign activity to pass applications context details to the Invoke_Readpayload Invoke activity:
-
In JDeveloper BPEL Designer, drag and drop the Assign activity from the Component Palette into the Activity box of the process diagram, between the Receive activity and the first Invoke activity.
BPEL Process Dialog with Assign Activity

-
Double-click the Assign activity to access the Edit Assign dialog box.
-
Click the General tab to enter the name for the Assign activity, such as 'SetHeader'.
-
On the Copy Operation tab, click Create and then select Copy Operation from the menu. The Create Copy Operation window appears.
-
Enter the first pair of parameters:
-
In the From navigation tree, select type Expression and then enter '204' in the Expression box.
-
In the To navigation tree, select type Variable. Navigate to Variable > Process > Variables > Invoke_zzsdrequest_InputVariable >header> ns5:SOAHeader and select ns5:ORG_ID. The XPath field should contain your selected entry.
-
Click OK.
-
-
Enter the second pair of parameters by selecting Copy Operation from the Create drop-down list with the following values:
-
In the From navigation tree, select type Expression and then enter 'TRADE_MANAGEMENT_USER' in the Expression box.
-
In the To navigation tree, select type Variable. Navigate to Variable > Process > Variables > Invoke_zzsdrequest_InputVariable >header > ns5:SOAHeader and select ns5:Responsibility. The XPath field should contain your selected entry.
-
Click OK.
-
-
Enter the third pair of parameters by selecting Copy Operation from the Create drop-down list with the following values:
-
In the From navigation tree, select type Expression and then enter 'OZF' in the Expression box.
-
In the To navigation tree, select type Variable. Navigate to Variable > Process > Variables > Invoke_zzsdrequest_InputVariable >header > ns5:SOAHeader and select ns5:RespApplication. The XPath field should contain your selected entry.
-
Click OK.
-
-
Enter the fourth pair of parameters by selecting Copy Operation from the Create drop-down list with the following values:
-
In the From navigation tree, select type Expression and then enter 'STANDARD' in the Expression box.
-
In the To navigation tree, select type Variable. Navigate to Variable > Process > Variables > Invoke_zzsdrequest_InputVariable >header > ns5:SOAHeader and select ns5:SecurityGroup. The XPath field should contain your selected entry.
-
Click OK.
-
-
Enter the fifth pair of parameters by selecting Copy Operation from the Create drop-down list with the following values:
-
In the From navigation tree, select type Expression and then enter 'AMERICAN' in the Expression box.
-
In the To navigation tree, select type Variable. Navigate to Variable > Process > Variables > Invoke_zzsdrequest_InputVariable >header > ns5:SOAHeader and select ns5:NLSLanguage. The XPath field should contain your selected entry.
-
Click OK.
-
-
The Edit Assign dialog box appears.
-
Click OK to complete the configuration of the Assign activity.
To enter the second Assign activity to pass payload information to the Invoke_zzsdrequest Invoke activity:
-
Add the second Assign activity by dragging and dropping the Assign activity from the Component Palette into the Activity box of the process diagram, between two Invoke activities.
-
Repeat Step 2 to Step 4 described in creating the first Assign activity to add the second Assign activity called 'SetPayload'.
-
Enter the following information:
-
In the From navigation tree, navigate to Variable > Process > Variables > Invoke_ReadPayload_OutVariable > ZZ_CreateSingle_ShipDebitRequestProcessRequest.
-
In the To navigation tree, select type Variable. Navigate to Variable > Process > Variables > Invoke_zzsdrequest_InputVariable > Body.
Create Copy Operation Dialog
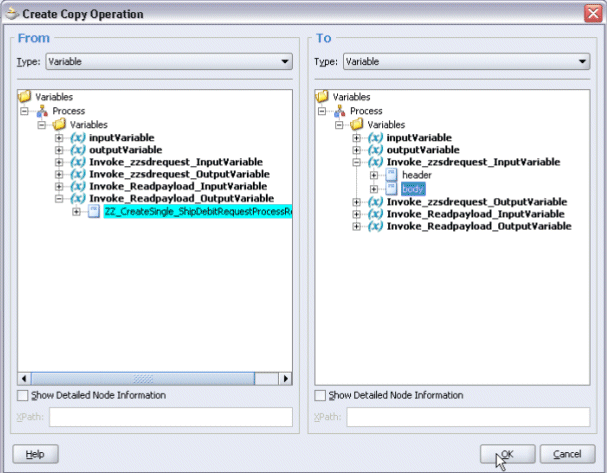
Click OK in the Create Copy Operation window.
-
-
Click OK to complete the configuration of the Assign activity.
To enter the third Assign activity to pass the supplier ship and debit request number to the Invoke_zzsdrequest Invoke activity:
-
Add the third Assign activity by dragging and dropping the Assign activity from the Component Palette into the Activity box of the process diagram, between the second Assign activity and the
Invoke_zzsdrequestInvoke activity. -
Repeat Step 2 to Step 4 described in creating the first Assign activity to add the third Assign activity called 'SetRequestNumber'.
-
Enter the following information:
-
In the From navigation tree, navigate to Variable > Process > Variables > inputVariable > Payload > client:ZZ_CreateSingle_ShipDebitRequestProcessRequest > client:input. The XPath field should contain your selected entry.
-
In the To navigation tree, select type Variable. Navigate to Variable > Process > Variables > Invoke_zzsdrequest_InputVariable > Body > ns3:InputParameters >ns3:CP_SDR_HDR_REC > ns3:REQUEST_NUMBER and select ns3: TRX_NUMBER. The XPath field should contain your selected entry.
Create Copy Operation Dialog
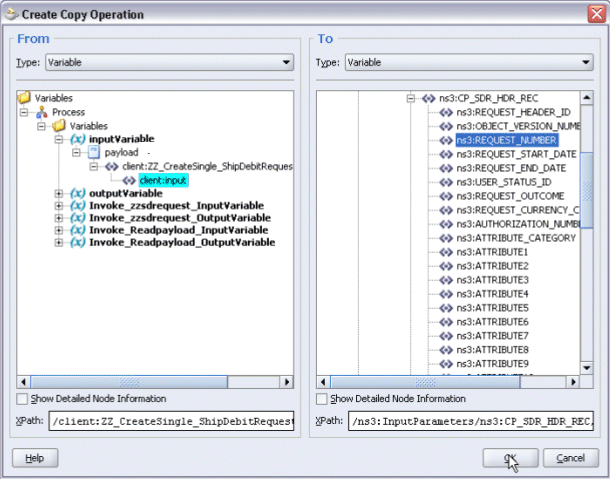
-
Click OK in the Create Copy Operation window.
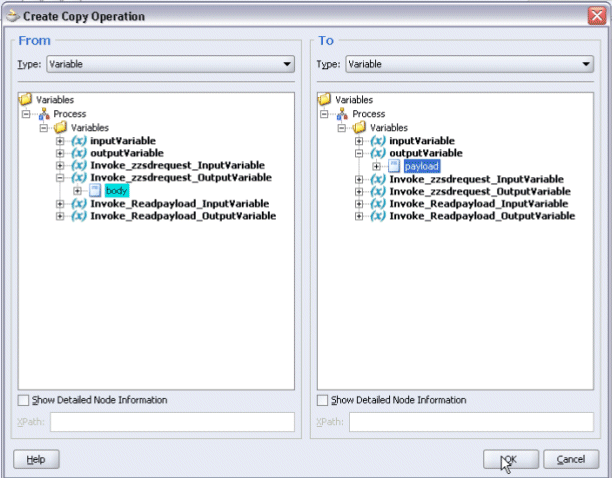
-
-
Click OK in the Assign window to complete the configuration of the Assign activity.
To add the fourth Assign activity to reply back supplier ship and debit request number:
-
Add the third Assign activity by dragging and dropping the Assign activity from the Component Palette into the Activity box of the process diagram, between the
Invoke_zzsdrequestInvoke and the Reply activities. -
Repeat Step 2 to Step 4 described in creating the first Assign activity to add the fourth Assign activity called 'SetRequestNumber'.
-
Enter the following information:
-
In the From navigation tree, select type Variable. Navigate to Variable > Process > Variables > Invoke_zzsdrequest_OutputVariable > Body.
-
In the To navigation tree, select type Variable. Navigate to Variable > Process > Variables > outputVariable > payload.
Create Copy Operation Dialog
-
-
Click OK in the Create Copy Operation window.
-
Click OK in the Assign window to complete the configuration of the Assign activity.
Deploying and Testing the BPEL Process at Run Time
After creating a BPEL process using the WSDL URL generated from a custom PL/SQL interface definition, you can deploy it to a BPEL server if needed. To ensure that this process is modified or orchestrated appropriately, you can also manually test the BPEL process by initiating the business process contained in the BPEL process to test the interface integration.
Prerequisites
Before deploying the BPEL process using Oracle JDeveloper, you must ensure that you have established the connectivity between the deign-time environment and the run-time servers including the application server and the integration server.
How to configure the necessary server connection, see Configuring Server Connection.
To validate your BPEL process, perform the following run-time tasks:
-
Once you deploy the process to a BPEL server, it becomes available so that you can run the process manually to test it for validation.
-
After deploying a BPEL process, you can manage the process from the BPEL console to manually initiate the business process and test the interface integration contained in your BPEL process.
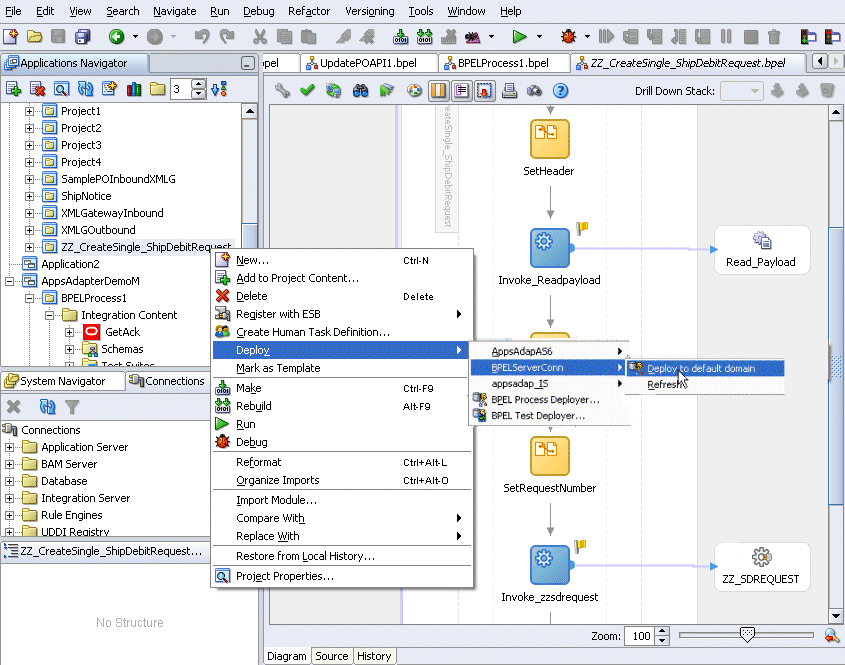
Deploying the BPEL Process
You must deploy the Create Single Supplier Ship and Debit Request BPEL process (ZZ_CreateSingle_ShipDebitRequest.bpel) that you created earlier before you can run it.
To deploy the BPEL process:
-
In the Applications Navigator of JDeveloper BPEL Designer, select the ZZ_CreateSingle_ShipDebitRequest project.
-
Right-click the project and select Make action from the menu to ensure the successful server connections.
You can look for any compilation error messages in Messages Log.
-
Right-click the project and select Deploy action from the menu. Click on IntegrationServerConnection name and enter your BPEL Process Manager information.
For example, you can select Deploy > BPELServerConn > Deploy to Default Domain to deploy the process if you have the BPEL Process Manager set up appropriately.
Oracle JDeveloper for Deploying the BPEL Process
-
The Password Prompt dialog box appears.
Enter the password for the default domain in the Domain Password field and click OK.
The BPEL project is compiled and successfully deployed.
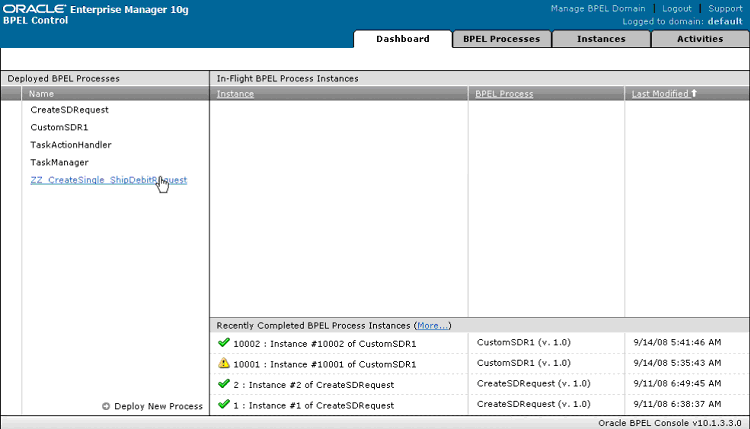
Testing the BPEL Process
To validate whether the BPEL process that you created works or not, you need to manually initiate the process after it has been successfully deployed to the BPEL server. Therefore, the validation starts with the BPEL console to ensure that you can find the deployed BPEL process listed in the console. Then, you can log on to Oracle E-Business Suite to validate that the supplier ship and debit request is successfully created with the request number you specified.
To test the BPEL process:
-
Log in to Oracle Application Server 10g BPEL Console (
http://<soaSuiteServerHostName>:<port>/BPELConsole). The BPEL Console login page appears. -
Enter the username and password and click Login.
The Oracle Enterprise Manager 10g BPEL Control appears.
-
In the BPEL Console, confirm that ZZ_CreateSingle_ShipDebitRequest has been deployed.
Oracle Enterprise Manager BPEL Control Console with Deployed BPEL Processes
-
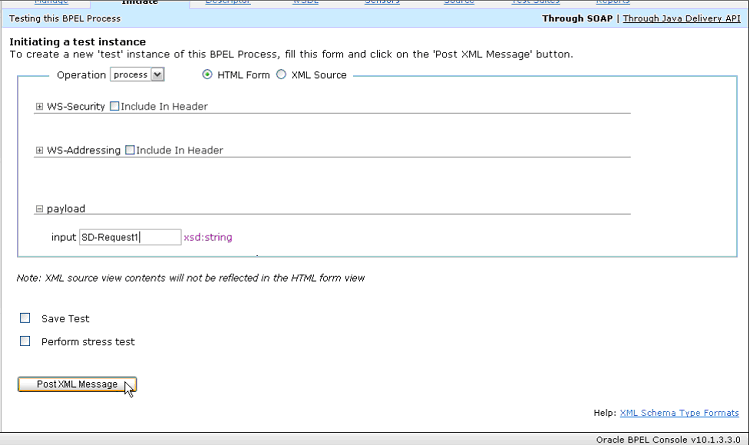
Click the ZZ_CreateSingle_ShipDebitRequest link to open the Initiate tab.
-
Enter Payload input field, such as 'SD-Request1' and click Post XML Message to initiate the process.
Note: The Request Number entered here should be unique each time that you initiate the process because this number will be used as the Supplier Ship and Debit number across users in Oracle Trade Management.
BPEL Control Console: Initiate Tab to Enter Payload Information
-
You can verify SOAP Response in BPEL Console.
BPEL Control Console: Initiate Tab to Verify SOAP Response
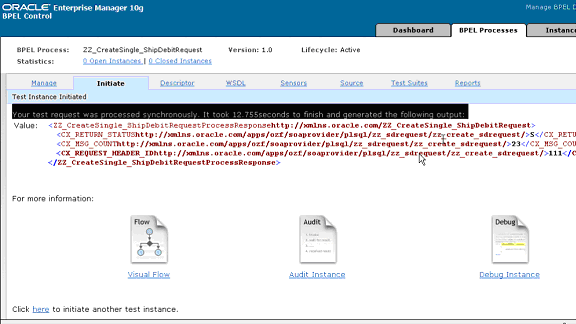
Look for 'S' in CX_RETURN_STATUS for success. If 'E' is displayed instead, then it means error has occurred while processing the service. Look for detailed exception message in SOA Monitor.
-
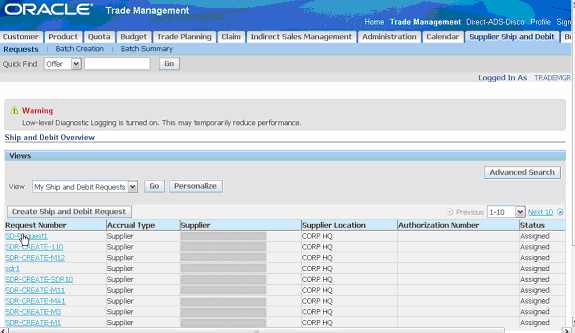
Log in to Oracle E-Business Suite as a user who has the Oracle Trade Management User responsibility. Select the Oracle Trade Management User responsibility from the navigator. Select the 'Supplier Ship and Debit' link to open the Ship and Debit Overview window.
-
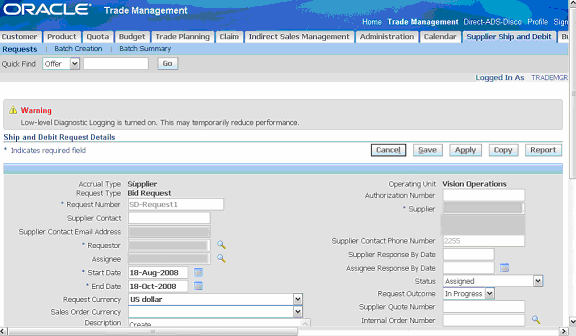
Verify if the request number 'SD-Request1' that you entered in Step 5 appears in the list.
Ship and Debit Overview Window
-
Click the request number 'SD-Request' link to open the Ship and Debit Request Details window. You can verify the request details.
Ship and Debit Request Details Window