Using Oracle Advanced Scheduler
This chapter documents procedures for using Oracle Advanced Scheduler functionality to schedule service tasks.
This chapter covers the following topics:
- Scheduling with Oracle Advanced Scheduler
- Accessing the Schedule Task Window
- Using the Schedule Task Window
- Using Advanced Scheduler in the Dispatch Center
- Using Additional Features of the Advanced Scheduler
- Third Party Scheduling and Management
Scheduling with Oracle Advanced Scheduler
Advanced Scheduler enables a field service operation to make complex task scheduling decisions manually or automatically. In both cases, Advanced Scheduler considers a host of applicable criteria and returns plan options that meet the needs of the company based upon the criteria used.
A key difference between manual scheduling and automated scheduling, either through the use of the Advanced Scheduler Autonomous Scheduling functionality or through the use of the Auto Schedule functionality in the Dispatch Center, is that with manual scheduling the dispatcher is given several plan options to choose from for scheduling purposes, while automatic scheduling always schedules the plan option with the lowest cost value to the task.
To enable Autonomous Scheduling, you set some profile options and run a concurrent program. See Setting Up the Autonomous Scheduler in the Oracle Field Service Implementation Guide.
For more details on manual scheduling with Advanced Scheduler, see the following topics:
Accessing the Schedule Task Window
You will use the Schedule Task window to schedule tasks interactively based upon the criteria chosen by a dispatcher, customer service representative, or a call center agent.
There are two Oracle applications modules that provide access to the Schedule Task window:
-
Field Service Dispatch Center (Field Service)
-
Service Request (Tele Service)
To access the Schedule Task window from the Dispatch Center, select a task in the Tasks List table. Right-click on the task and select Schedule from the menu options. The Schedule menu option is available when the task carries a status that can be scheduled.
To access the Schedule Task window from the Tasks tab of the Service Request window, click the Scheduler icon located next to the Assignee field for the task. The task must be of type Field Service and it must also carry a status that can be scheduled.
Using the Schedule Task Window
The Schedule Task window consists of a region that displays the Task Details of the task you want to schedule, and two tabs:
When the dispatcher searches for plan options for a task, based on the scheduler parameter settings, plan options are retrieved for the eligible resources. Modifying the search criteria in the Preferences tab can refine results.
Preferences Tab
The Preferences tab is where you specify the scheduling criteria you want Advanced Scheduler to use when retrieving schedule options. The logic that Scheduler uses when considering third party resources is different from that which it uses when retrieving plan options for internal resources. For information on scheduling third party resources, see Third Party Scheduling and Management. There are several sub regions within the tab:
-
Assistance Level
-
Resourcest
-
Time Zone
-
Routing Mode
-
Overrule
-
Spares
The Assistance Level enables you to select the scheduling mode. The options are: Intelligent, Window to Promise, and Assisted. This table describes these options:
| Assistance Option | Description |
|---|---|
| Assisted | Use the Assisted option to find the best plan option for the eligible resources based on a predefined set of criteria. When no qualified resource is shown, adjust the criteria and search again. This provides the dispatcher the ability to override scheduling parameters as well as the flexibility needed to quickly schedule the task to an available qualified technician. When considering third party resources, Scheduler only applies the constraints of planned window, calendar availability, and spares availability. In this case the scheduled window is the same as the planned window. |
| Intelligent | The Intelligent option provides relative cost and travel time information to schedule cost effective trips based on predefined business rules and constraints. This mode of scheduling is useful when geo-spatial data is being used for scheduling. |
| Window to Promise | The Window to Promise option displays time buckets (time slots) during which an available service technician can visit the customer site and start working on the task. Schedule options appear with costs related to the particular time frame requested by the customer. When considering third party resources, Scheduler assumes that these resources have unlimited capacity. In this case the planned and scheduled windows are identical to the selected Window-to-Promise window. |
In the Resources region, you can select which criteria you want Advanced Scheduler to consider when searching for scheduling options. These criteria can be included in the search:
-
Territory Qualifiers. Any combination of the following dynamic attributes is available:
-
Area Code
-
City
-
Country
-
Customer Name
-
Customer Name Range
-
Postal Code
-
Request Severity
-
Request Status
-
Request Type
-
Request Urgency
-
State
-
Task Priority
-
Task Status
-
Task Type
-
VIP Customers
-
-
Contracts
-
Installed Base
-
Skills
-
Resource Type
-
Resource Suggestion
-
Resource Preference
-
Consider Stand By Resources
Advanced Scheduler prioritizes its scheduling process based upon the chosen criteria.
Finding Technicians
In cases where a dispatcher selects more than one of the criteria in the Resources region, Advanced Scheduler returns either all the resources found, or just those that fit all the criteria. This table describes how Advanced Scheduler filters options when using a single criterion or multiple resource criteria:
| Selected Criteria | Scheduler Results |
|---|---|
| Territory Qualifiers | Returns resources that satisfy the Territories requirement. |
| Contracts | Returns resources that satisfy the Contracts requirement. |
| Installed Base (IB) | Returns resources that satisfy the Installed Base requirement. |
| IB + Contracts | Returns all resources that are identified in IB and Contracts depending on the profile JTFAM: Resource Search Order. If the profile value is set to Both Contracts and Install Base then preferred resources from both IB and Contracts are retrieved. If the profile value is set to Contracts Preferred Resource then preferred resources from Contracts alone are retrieved. If the profile value is set to Install Base Preferred Resource then preferred resources from IB alone are retrieved. |
| IB + Territory Qualifiers | Returns only those resources that satisfy both the IB and the Territory requirement. |
| Contracts + Territory Qualifiers | Returns only those resources that satisfy both the Contracts and the Territory requirement. |
| IB + Contracts + Territory Qualifiers | This returns all resources that are identified in either IB or Contracts AND who also satisfy the Territory requirement. Returns all resources that are identified in IB and Contracts depending on profile JTFAM: Resource Search Order AND also satisfy the Territory requirement. |
| Consider Stand By Resources | Returns resources with stand by shifts. |
Qualifying Technicians
If the Skills check box is selected, then in each of the above scenarios, after the relevant resources are identified, additional skills filtering is done to determine which of the initially identified resources also fill the skills requirement. In other words, the Skills requirement is only applied after a set of resources has been identified based on the other criteria. Advanced Scheduler picks technicians with skill levels at or above the requirement.
Additional Overriding Criteria
In the Resources region of the Preferences tab, you can add a specific Resource Type and Resource Name that you want the Scheduler to consider. Additionally, you can specify whether you want the scheduler to consider stand by resources. However, your selection of resource preference overrides these.
In the Overrule region, you can modify the Planned Start and Planned End dates. If Access Hours are to be considered, the Access Hours check box is selected. When considering third party resources, Scheduler ignores access hours and other task constraints such as trip availability, customer confirmation, trip availability, cost, and window-to-promise.
In the Routing Mode region, the Route Based check box displays whether or not street routing is to be factored into scheduling. The Router Mode parameter controls the functioning of this check box. You can override the check box option based on the Router Mode parameter value. This value governs which data is used by Advanced Scheduler during the search for schedulable options. Again, for third party resources, Scheduler ignores this.
The Spares region displays the following options by default and you can override the current state of the check boxes:
-
Parts Mandatory: The check box is enabled only if the to-be-scheduled task has parts requirement defined and the Assistance Level option is either ‘Intelligent’ or ‘Window To Promise’ Mode. The check box is selected by default if you have set the Spares Mandatory parameter to Yes. The check box is unchecked if the Spares Mandatory parameter value is set to No. If parts are not mandatory, then the Warehouses check box is disabled.
-
You can indicate the stocking location search preference using these check boxes:
-
Technician Trunk Stock - The check box is enabled only if the to-be-scheduled task has parts requirement defined and the Assistance Level option is either ‘Intelligent’ or ‘Window To Promise’ mode. The check box is selected by default if you have set the Spares Source parameter to Technician Trunk Stock or Trunk and Warehouses values.
-
Warehouses - The check box is enabled only if the to-be-scheduled task has parts requirement defined and the Assistance Level option is either ‘Intelligent’ or ‘Window To Promise’ mode. The check box is selected by default if you have set the Spares Source parameter to Warehouses or Trunk and Warehouses values. If parts are not mandatory, then the Warehouses check box is disabled.
-
For details on Advanced Scheduler's integration with Spares Management, see Scheduling Based on Parts Availability.
Advice Tab
In the Advice tab, the plan options that Advanced Scheduler identifies after its search are displayed in a table format. The plans consist of the Cost value, Resource name, resource source, start and end times available for the task, along with other optional information such as Travel Time, Spares Date, Spares Cost, and Shift Type that indicates whether the shift is regular or stand by. To view the information in a Gantt chart click the Gantt button.
For resources other than third party resources, the plan options are displayed and sorted based upon their cost effectiveness in accordance to the criteria selected for the search. If a Customer Confirmation is required, the Customer Confirmation Received check box is enabled. Also, in the Schedule with Status field, you can choose the task status that you want to associate with the task you are scheduling.
The dispatcher or third party administrator can interactively receive and record customer confirmation by selecting the Customer Confirmation Received check box before clicking the Schedule button.
For resources other than third party resources, you can also change the Results display section by selecting one of the following options in the Display Selection sub region:
-
All
-
For Each Day-Lowest Cost
-
For Each Resource-Lowest Cost
-
Single Resource
Once Scheduler has returned plan options, the dispatcher can schedule the task assignment by selecting the preferred plan option and clicking the Schedule button. At that point, Advanced Scheduler schedules the technician for the task and changes the task status accordingly.
Using Advanced Scheduler in the Dispatch Center
See the following procedures for performing Advanced Scheduler functions from the Field Service Dispatch Center:
-
Scheduling Using the Intelligent Option, Oracle Field Service User Guide
-
Scheduling Using the Window to Promise Option, Oracle Field Service User Guide
-
Scheduling Using the Assisted Option, Oracle Field Service User Guide
-
Scheduling Tasks Automatically, Oracle Field Service User Guide
-
Working with Tasks Rejected by Autonomous Scheduler, Oracle Field Service User Guide
-
Overview: Invalid Addresses, Oracle Field Service User Guide
-
Submitting the Find Invalid Addresses Concurrent Program, Oracle Field Service User Guide
-
Correcting and Validating Addresses, Oracle Field Service User Guide
-
-
Overview: Rescheduling Tasks, Oracle Field Service User Guide
-
Rescheduling a Scheduled Task from the Plan Board, Oracle Field Service User Guide
-
Rescheduling a Scheduled Task from the Gantt View, Oracle Field Service User Guide
-
Using Drag and Drop to Reschedule Tasks, Oracle Field Service User Guide
-
Rescheduling a Scheduled Task from the Tasks View, Oracle Field Service User Guide
-
Rescheduling Tasks Longer than a Shift, Oracle Field Service User Guide
-
Rescheduling, Unscheduling, or Canceling a Trip with Actuals, Oracle Field Service User Guide
-
-
Recalculating a Trip, Oracle Field Service User Guide
-
Recalculating all Trips, Oracle Field Service User Guide
-
Optimizing One or More Trips from the Dispatch Center, Oracle Field Service User Guide
-
Optimizing Technician Trips, Oracle Field Service User Guide
Using Additional Features of the Advanced Scheduler
The Advanced Scheduler provides additional scheduling features for you to use when scheduling tasks to internal resources. For more information on scheduling to third party resources, see Third Party Scheduling and Management.
Working With Tasks Durations Longer Than a Standard Shift
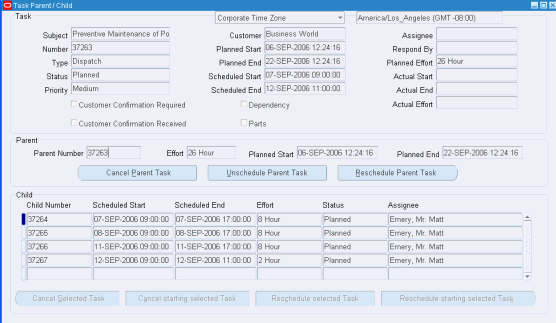
The Parent/Child tab of the Dispatch Center Task Details view displays the parent and child relationship of a set of tasks. When the effort of the task is longer than a regular work shift, Oracle Advanced Scheduler splits that task, called the "Parent" task, into multiple "Child" tasks, to accommodate and execute within the regular work shift of a technician.
For example, a parent task effort is 12 hours. The parent task propagates two child tasks, one for an eight hour task, and another for a four hour task.
Note: In the Task List table of the Dispatch Center Task Details view, task numbers appearing in italics indicate tasks having related parent or child tasks.
To manage parent or child tasks, dispatchers can invoke the Task Parent/Child window by right-clicking the task, and then selecting Parent/Child from the right-click menu options. The task you selected information appears at the top of this window. This could be a parent or child task. Parent task information appears in the middle of the window and Child task information appears in a table at the bottom of the window. Buttons enable the dispatcher to:
-
Cancel the parent task
-
Unschedule the parent task
-
Reschedule the parent task
-
Cancel a selected child task in the sequence
-
Cancel a selected child task and all subsequent child tasks
-
Reschedule a selected child task in the sequence
-
Reschedule a selected child task and all subsequent child tasks
Advanced Scheduler initially schedules Parent tasks to a single technician available for the entire effort of the task to be performed. Later if the technician falls sick or is unavailable for some reason, the child tasks can be rescheduled to another qualified technician. A single child task can be rescheduled to a qualified technician using the Reschedule selected Task button. All of the child tasks starting from the second in sequence of the child tasks hierarchy for a Parent task can be rescheduled to a qualified technician using the Reschedule starting selected Task button.
To either cancel or reschedule the original parent task, or all or some of the child tasks, see Rescheduling Tasks Longer Than a Shift, Oracle Field Service User Guide.
To configure Advanced Scheduler to handle tasks longer than a standard shift, see Setting Up Tasks Longer Than a Standard Shift in the Oracle Field Service Implementation Guide.
Working With Customer Confirmations
Since planned work-related tasks, like tasks for inspections and preventive maintenance typically disrupt business operations and involve equipment or site down time, customers may require confirmation of scheduled visits prior to the technicians arrival.
The confirmation requirement is typically defined in the Service Contract for the preventive maintenance programs and related activities. Tasks for such preventive maintenance activities are created automatically with the requirement. You can also define the confirmation requirement constraint for a task in the Task tab of the Service Request window or in the Field Service Dispatch Center window. See Marking a Task to Indicate Customer Confirmation Requirement in the Oracle Field Service Implementation Guide..
The Autonomous Scheduler engine can schedule tasks that require customer confirmation but the tasks cannot be assigned (released to the technician), or "committed" to the technicians without first recording the confirmation receipt. The Auto Commit concurrent program skips tasks having confirmation requirements. Dispatchers can query tasks having the confirmation requirement, and interactively record receipt of the confirmation before scheduling and committing the task to a specific technician.
Dispatchers can cancel and reconfirm the technicians visits. To monitor the efficiency of customer service and the organizations commitment to the confirmation process, the Dispatch Center keeps track of the number of reschedules and reconfirmations initiated by the service organization. Those initiated by the customer are not counted.
To record receipt of confirmation or to manage the confirmation process from the Dispatch Center, use the following procedure:
Confirmation Process
-
Navigate to the Field Service Dispatch Center.
The Field Service Dispatch Center window appears.
-
Use the task query functionality to load tasks having the customer confirmation attribute set.
-
Select a task and click the Customer Confirmation Required button or right mouse click on the task and select Customer Confirmation from the menu options.
The Customer Confirmation window appears. The field next to Customer Confirmation label is set to Required. The Set to Received button is enabled.
-
To record receipt of the customer confirmation, the dispatcher clicks the Set to Received button.
The Customer Confirmation field changes from Required to Confirmed. The Dispatcher can now proceed with interactively committing the task to a technician.
The Dispatch Center button will also update. It will change from Customer Confirmation Required to Customer Confirmation Received.
See Choosing a Scheduler Option, Oracle Field Service User Guide.
-
(Optional) To initiate a reconfirmation process, the dispatcher can navigate back to the Customer Confirmation window and set the customer requirement again using the Set to Required button.
At that point, you can also remove the requirement by clicking the Set to No button.
Scheduling With Access or After Hours Requirements
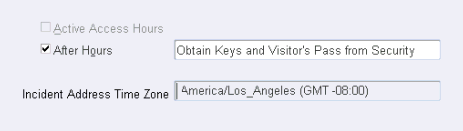
Some customers restrict access to their site to times when work on a task would not intrude on normal business operations. Oracle Field Service enables you to define Access Hours, which are periods when a technician can arrive and start working. When Access Hours constraints are activated, Oracle Advanced Scheduler automatically considers them when identifying schedule options. Alternatively, you can define After Hours requirements. After Hours requirements are treated as special instructions for field visits, and are entered as free format text. When an After Hours requirement is invoked, the task must be scheduled interactively. The dispatcher can view and schedule After Hours tasks by making a query in the Task List table of the Dispatcher Center for those tasks carrying the After Hours attribute.
Advanced Scheduler handles these constraints differently. Definition of Access Hours constraints and After Hours requirements are mutually exclusive.
The Dispatch Center Plan Board view and Gantt chart indicate which tasks have active Access Hours constraints or After Hours requirements.
See Setting Up Access Hours and After Hours Constraints in the Oracle Field Service Implementation Guide.
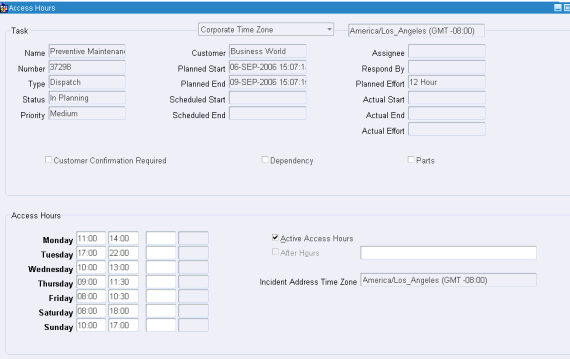
Access Hours
Field Service Advanced Scheduler can schedule Field Service tasks within Access Hours constraints.
An Access Hours constraint can be set up for a customer, customer site, or location, and can be set up for different time slots (ranges) that apply to different days of the week. Service requests and tasks created for preventive maintenance honor the Access Hours constraint definition. Preventive maintenance tasks are created automatically with this constraint. In Break-Fix scenarios, an Access Hours/After Hours constraint can be entered manually against a specific task in the Field Service Dispatch Center window. This can be done by right-clicking a task in the Task List table and then selecting Access Hours from the menu options. Access Hours entered against such tasks are honored by Advanced Scheduler.
Note: If you manually update the access hours for a scheduled task in working status, you must reschedule the task for the update to take effect. For more information see Overview: Rescheduling Tasks in the Field Service User Guide.
After Hours
After hours information can be set up to apply to a customer, customer site, or customer site location. Optionally, after hours information can be specified for a specific task in situations where the information is unique to a task and customer combination. Autonomous Scheduler does not schedule tasks that have active After Hours constraints. Using the Field Service Dispatch Center window, the dispatcher queries tasks possessing the after hours attribute, and schedules those tasks interactively.
Defining Task Access Hours or After Hours Constraints for a Specific Task
Use this procedure to create access hours and after hours for a particular task.
Creating Access Hours and After Hours Constraints
Steps
-
Navigate to the Access Hours window from the Dispatch Center.
The Access Hours window appears. Task details display for the selected task. Boxes appear in rows representing each day of the week. There are four boxes in each row. These boxes enable you to define up to two access hour time slots per day.
Setting Up Access Hours
-
To create Access Hours, select the Active Access Hours check box.
This disables the After Hours check box. The two actions are mutually exclusive.
-
Fill in the access hours that are available for scheduling service tasks. For example, Monday 17:00-21:00.
Hours must be entered in military time.
-
Save your work.
Although you can change Access Hours, even if the task status is 'Planned' or 'Assigned', you cannot remove Access Hours once the task status changes to 'Working' or 'Completed'. You can also update the access hours after work has started on a scheduled task.
Setting Up After Hours
-
To define After Hours requirements, select the After Hours check box.
This disables the Active Access Hours check box.
-
In the text box to the right of the check box, enter instructions regarding the after hours scheduling that you want the dispatcher to consider.
-
Save your work.
Scheduling Tasks With Dependencies
Dispatchers can use the Field Service Dispatch Center window to create task dependencies. See Creating Task Dependencies, Oracle Field Service User Guide.
The Autonomous Scheduler concurrent program or the Auto Schedule feature in the Dispatch Center will not consider these task dependencies (ignores the dependencies between tasks) and schedules these tasks treating them as any other normal field service tasks. The dispatcher will use the Dispatch Center window to query and schedule these tasks interactively, duly honoring the dependencies.
Making Trip Adjustments
When tasks are scheduled manually, the corresponding travel times are not calculated in an optimized way. Hence an optimized schedule of a trip is not achieved. To achieve a better sequence in scheduling and optimizing the route of a technicians trip, you can perform a recalculation of the trip or an optimization of the trip.
Recalculating Trips
This functionality is available in the Dispatch Center. This functionality calls Advanced Scheduler to sequence the trip in a regular fashion based on the scheduled start times of the task.
For more information see Recalculating a Trip, Oracle Field Service User Guide.
Optimizing Trips (Interactive)
To arrange a trip in a better sequence, based on the travel distance, time and other cost factors, optimize trip calls Advance Scheduler to rearrange the tasks within a trip in a fashion such that the least cost is achieved for performing the tasks in the trip.
For more information see Optimizing One or More Trips From the Dispatch Center, Oracle Field Service User Guide.
Optimizing Technician Schedules Across Trips
Scheduling tasks to field service technicians optimally is always a challenge for dispatchers and managers of service organizations. This becomes increasingly complex due to other factors such as, operational costs, constraints on tasks, skill requirements, and technician availability. Service organizations also want to reduce the technicians commute costs directly associated with the technicians travel times and distances and also the overhead costs incurred for performing the tasks in the field.
Sub-optimal technician schedules (trips) can occur for several reasons. Most of the time, dispatching and scheduling functions are handled on an on-demand basis, as dispatchers schedule jobs as they are logged, without any insight into future jobs that are yet to be logged. Such periodic scheduling activities, including manual scheduling, often lead to sub-optimal trips for technicians such as, technicians traveling long distances, multiple technicians traveling to the same or near by geographical locations, or multiple technicians visiting the same customer site.
Advanced Scheduler provides the Optimization Across Trips functionality to address the issues leading to sub-optimal schedules. Using this functionality you can geographically cluster tasks before you optimally schedule them to technicians. This functionality handles more complex scheduling scenarios and compliments the optimize trip functionality which you can perform interactively to optimize a trip for a technician across a single day through the Dispatch Center. For information on optimizing a technicians schedule for a trip (one day), see Optimizing One or More Trips from the Dispatch Center, Oracle Field Service User Guide.
Geographical Proximity Based Sorting of Tasks
The sorting of the tasks before they are actually scheduled assists with creating the most optimal schedules for the technicians.
When you have a set of tasks with latitude and longitude information, the question becomes how does one model two-dimensional geography into a one-dimensional task list with the tasks perfectly ordered by proximity.
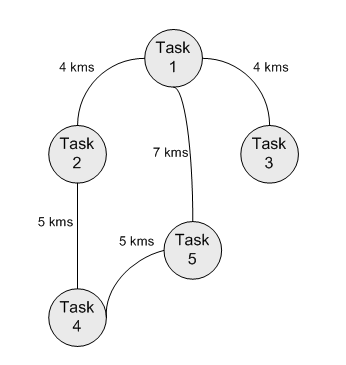
In this illustration, there are two possible paths from task #1. One can either say that task #2 is closer to task #1 or say task #3 is closer to task #1. If we choose task #2, it is obvious that the next closest task is #4 and then task #5. Thus task #3 ends up being the last task in the list. Despite, task #3 being closer to task #1, since we chose another closer task #2, we are deviating from #3 and thus the original intent of sorting closer tasks together is lost. Task #3 might end up getting scheduled to another technician. The issue here is that we are trying to convert a two-dimensional space into a one-dimensional list. It is not whether task #3 should be immediately next to task #1. It is whether task #3 is as close to task #1 in the list when compared to other tasks. Similarly, task #5 could be considered to be closer to task #1. It could very well be after task #4. It is a complex process to convert a two-dimensional space into a one-dimensional list, and because of the complexity we might have a few exceptions in the final list.
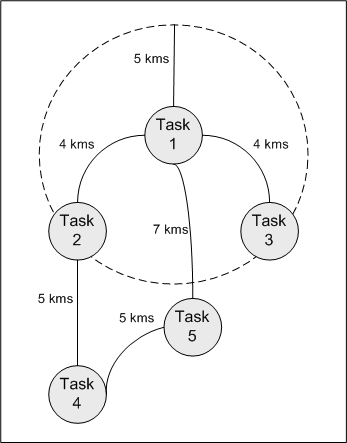
To minimize these exceptions and to ensure that the tasks that are separated by some configurable distance are still together in the final list, you will set the Max Distance in a Group (in kms) parameter. Using this parameter, you can decide the limiting distance such that the scheduling algorithm results in a better sorting of tasks
Alternatively, this distance can also be thought of to be the radius of the circle around each task (reference illustration) so that the algorithm considers the others tasks within that circle together to be processed as a single group. Suppose we set the profile option to be 5 (kilometers), then the geo-clustering algorithm will end up creating the final sorted list as 1, 2, 3, 4, and 5 rather than 1, 2, 4, 5, and 3.
Autonomous Scheduler Program with Geographical Sorting
The Autonomous Scheduler concurrent program is used to schedule a multitude of tasks to technicians. The Autonomous Scheduler program has information about the tasks that have been scheduled and are part of the technicians' trips. It also has information about the tasks currently on hand and being scheduled. The Autonomous Scheduler processes each and every task based on the status, planned start and end times, and date and time of creation. Though the Autonomous Scheduler has information about the location of tasks in the pipeline to be scheduled, priority is given to the creation and planned dates of the tasks for scheduling. This intended behavior of the Autonomous Scheduler might sometimes create sub-optimal schedules and trips for technicians. Plus, the dispatchers have the ability to interactively assign jobs and make adjustments to technicians schedules which further lowers the possibility of generating optimal technician schedules.
Due to this functionality, several technicians may have to:
-
Travel farther distances than required (spending more time on the road).
-
Travel to the same location or close proximity to locations traveled by other technicians.
-
Travel to the same customer site or location on different days.
The Autonomous Scheduler utilizes the geographical proximity based sorting of tasks based on geo-spatial attributes (latitude and longitude) of a tasks address. This is the first step in determining when and to whom the task has to be scheduled. Scheduling tasks that are closer in proximity, to eligible technicians cannot always be accomplished, as the Autonomous Scheduler is bound by other constraints such as, the available capacity of the technicians, overtime allowed, shift definition, current location of the technician, technicians home address, and so on.
These examples illustrate the sorting process:
Scheduling Without Sorting Tasks by Geo-Spatial Attributes (Latitude and Longitude)
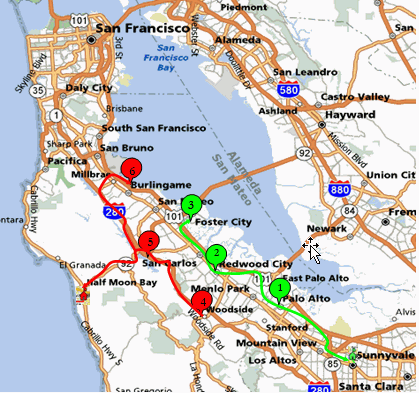
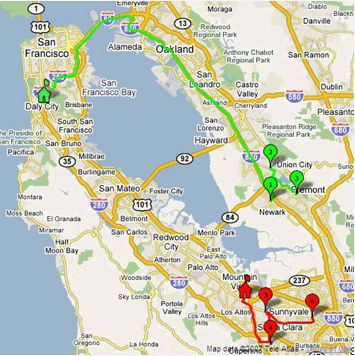
This diagram illustrates the trips of two technicians marked by the circles (green and red) with their home icons displayed. Tasks 1, 2 and 3 are scheduled to one technician and tasks 4, 5, and 6 are scheduled to another technician. Six tasks labeled as number 1 through 6 are retrieved and sorted using the query. From the task addresses (location) you can see that the tasks marked as 2 and 4 are in close proximity to each other. Similarly, tasks marked as 3 and 5 are in close proximity to each other.
Assuming that the tasks were fetched in the order of 1, 2, 3, 4, 5 and 6, and prior to the algorithm improvements, the scheduler engine would assign tasks to a technician whose trip has a task closer to the task being processed. In other words, if the technician (in green) was assigned task 1, subsequent tasks would also be assigned to that technician, as the tasks would be closer to this technician than the technician in red. For simplicity, let us assume that a technician can perform only three tasks in a day. So the trip of the technician in green gets filled with tasks 1, 2, and 3. So the remaining three tasks are placed in the trip of another technician as shown in red. This ends up in generating a sub-optimal schedule for the technicians. The core-scheduling engine does leverage travel time and distance and its associated costs during its search for the optimal technician and trip. The sub-optimal schedule (trips) occurs due to the manner in which the background engine used to sort and handle the to-be processed task list. The tasks are sorted without considering the location proximity of the tasks and because of that the core-scheduling engine has no visibility into the tasks that are yet to processed, the cheaper technician for a task is assigned to other tasks thereby completely utilizing the technician availability. This highlights the importance that is played by the order of processing and sorting of the task list in the generation of the final schedule.
Scheduling After Sorting Tasks by Geo-Spatial Attributes (Latitude and Longitude)
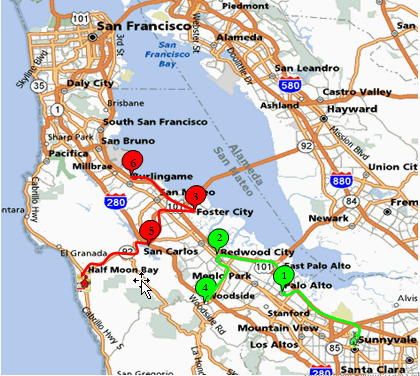
With the Optimization Across Trips functionality, the core Scheduler engine orders the tasks in the list not only based on the existing task sort criteria but also on the geographical location (based on the geo-spatial attributes, namely latitude and longitude) of the task. This improved sorting logic ensures that the closer location tasks are processed one after another by the core engine and the engine might schedule these tasks to the same technician, given the availability and qualification of the technician to perform the tasks.
The postal code or the name of the city does provide location information for a task. They do not represent the proximity of one task to another. More sophisticated algorithms are required to compute geographical proximity of the tasks from the address without compromising on performance. Hence, the Scheduler engine utilizes the latitude and longitude information of the task address to sort the tasks for processing. Autonomous Scheduler now employs this sophisticated algorithm during its initial sorting of tasks when determining better optimized schedules.
Using the same example as given before, yet this time leveraging the algorithm improvements, the Autonomous Scheduler would assign tasks as depicted in this illustration. Tasks 1, 2, and 4 are scheduled to one technician (green) and tasks 5, 3, and 6 are scheduled to another technician (red). This time task proximity is taken into consideration.
The scenarios mentioned before, leading to the generation of sub-optimal trips by the Autonomous Scheduler cannot be totally avoided. To minimize the impacts of sub-optimal schedules there is a need to further fine tune and optimize the schedules and trips generated by the Autonomous Scheduler.
Understanding the Optimization Across Trips Functionality
Both the Autonomous Scheduler and Optimization Across Trips concurrent programs use the Optimization Across Trips functionality. This functionality contains several processes and algorithms that are used by both of the programs.
Plus, before you can use the Optimization Across Trips functionality you need to set up the following parameters:
-
Max Distance in a Group (in kms)
-
Force Optimizer to Group
-
Optimizer Minimum Success Percentage
-
Use Default Values for Invalid Addresses
-
Consider Standby Shifts
For more information on these parameters, see Parameters used for Optimization Across Trips.
Process Flow
A high-level business process flow for this functionality would include these steps:
-
Several tasks are created for your customers.
These customers are located in several different locations.
-
The Autonomous Scheduler program is executed to schedule technicians to perform these tasks. This program performs these steps:
-
Tasks are sorted by proximity and are clustered geographical.
-
Processes are used to determine the most cost effective technicians to perform the sorted tasks.
-
Tasks are optimally scheduled to technicians.
At this point in time, several technicians trips are complete for a period of time (day or week).
-
-
More tasks are created for your customers.
-
The Autonomous Scheduler program is executed to schedule technicians to these tasks.
-
The dispatcher reschedules a task or manually schedules a task using the Field Service Dispatch Center.
Due to the nature of how scheduling is performed you may now have sub-optimal technician schedules.
-
The Optimization Across Trips program is executed to fine tune the technicians schedules. This program performs these steps:
-
Tasks are sorted by proximity and are clustered geographical.
-
Schedules are optimized across trips.
-
Tasks are rescheduled to create more efficient and cost effective trips.
-
Optimization Across Trips Program
To fine tune and optimize the trips generated by the Autonomous Scheduler, the Advanced Scheduler application provides the Optimization Across Trips (multiple trip) concurrent program. Using the Optimization Across Trips program, tasks within a selected date range are shuffled among the trips of selected technicians or among all the technicians within a territory. Tasks are shuffled and realigned in such a way that more efficient and cost effective trips are created when compared to the previous sub-optimal schedules. This program recognizes the availability of technicians in stand by shifts and honors other restrictions while optimizing the trips.
Optimization of a single trip or across trips comes into the picture only after tasks are scheduled into the trips of the technicians. If scheduling is done even after optimizing, either manually or through Autonomous Scheduler, the corresponding trips of the technicians might end up again having sub-optimal schedules. The Optimization Across Trips program is more effective, if the program is run after the trips of the technicians are scheduled with tasks and the scheduling action is frozen for the dates. After optimal trips are generated for the technicians, their trips can be committed and tasks can be released for execution.
Even with the constraints based scheduling algorithm leveraged by the Autonomous Scheduler, the scheduling results can always be further improved upon with another run of the optimization process. In other words, time is the only constraint to getting a perfectly optimized schedule. In the process of optimization tasks are initially clustered for better scheduling.
These examples illustrate the difference between not performing virtual clustering of tasks and when performing virtual clustering of tasks.
Before Virtual Clustering of Tasks
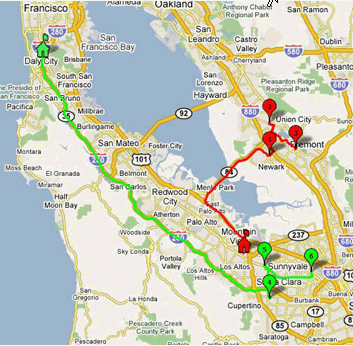
Using this illustration, let us assume that we have a set of six tasks labeled from 1 through 6. Tasks 1, 2 and 3 are scheduled to one technician (red) and tasks 4, 5, and 6 are scheduled to another technician (green). Further, let us assume that the final sorted task list is Task #1, Task #2, Task #3, Task #4, Task #5, and Task #6. In comparing the technicians schedules, one of the technicians (in red) is closer to Task #1 and thus will travel all the way to that region ignoring the tasks in their region.
As you can see from this illustration, despite sorting the tasks appropriately, Autonomous Scheduler may still offer a schedule that may not be completely optimal. With the existing configurable constraints, Scheduler may find eligible technicians and still assign Task #1 to the cheapest among the two technicians.
Autonomous Scheduler stamps the schedule for every task before it processes the next task. This enables the Dispatcher to view the updates on the task and subsequently inform the customer about the scheduled times for the task and the expected availability of the technician on site.
After Virtual Clustering of Tasks
With the assumption that the parts are available and that the skill requirements are met, it is expected that all the tasks at a given customer location preferably be scheduled to a single technician. Similarly, one expects that the tasks within a certain geographic boundary be scheduled to the same technician. You will determine this boundary or spread that is suitable for your implementation.
Some implementations may prefer that tasks at a given location be assigned to a single technician and may not bother with whether that same technician also gets tasks in closer proximity. Other implementations may prefer that tasks separated by a travel distance of say 10 Kilometers is acceptable and should be handled by a single technician. Using the Max Distance in a Group (in kms) parameter, you will define the acceptable travel distance preference. Depending on this profile setting and the task effort, it may be possible to schedule the entire group of tasks to a single technician. At other times, the total effort of the tasks in the group might be so large that the technician may not have the required availability to perform all the tasks. In such cases, the scheduling algorithm ensures that the group is broken down into smaller groups such that the total travel time within these smaller groups is minimal. The scheduling algorithm also ensures that the same location tasks are retained together, as practical.
After clustering the tasks in proximity to each other, the tasks would be re scheduled between the two technicians in the fashion displayed in the illustration.
The Optimization Across Trips program will not optimize tasks that have these attributes:
-
After Hours.
-
Task Dependencies.
-
Customer Confirmation when set to Received.
-
Parent/Child Tasks.
Parameters Used for Optimization Across Trips
The Optimization Across Trips functionality (processes and algorithms) uses several parameters for it’s processing.
A few of the parameters are used by the Optimization Across Trips algorithms which are shared by the Autonomous Scheduler and the Optimization Across Trips concurrent programs and a few of the parameters are used just by the Optimization Across Trips concurrent program.
Max Distance in a Group (in kms)
When optimizing across trips, you will want to sort the tasks by proximity before you actually schedule the tasks to technicians. Sorting of the tasks by proximity will assist with creating more optimal schedules for technicians.
Using the Max Distance in a Group (in kms) parameter you can control the distance between tasks that are grouped (clustered) together.
For more information on how this parameter is used, see Geographical Proximity Based Sorting of Tasks.
Force Optimizer to Group
When optimizing across trips, the grouping and assignment of tasks to a single technician may result in an increase to the total cost of the trip. A group of tasks, if optimally scheduled to a technician might lead to overtime. At times, it may be preferable for a technician to work overtime either to finish the tasks at the same location or tasks close by rather than visiting the same region again on another day or alternatively, to dispatch a different technician altogether.
Using the Force Optimizer to Group parameter, you can define whether the tasks will be grouped or not when optimizing across trips. If you want to group and schedule the tasks at the same location to a single technician within a trip, then set the parameter value to Yes.
Use Default Values for Invalid Addresses
During the Optimization Across Trips process, if a task has been submitted for optimization but it has an invalid address and the Autonomous Scheduler is not able to geo-code the geometry, then the task will be auto rejected. This will occur if the Use Default Values for Invalid Addresses parameter is set to No. Otherwise, the task will be processed successfully.
Plus, if one of the technicians trips included for optimization has an invalid address then that technicians trip is ignored and other technicians trips are considered for optimization.
Optimizer Minimum Success Percentage
Unlike the Autonomous Scheduler, the Optimization Across Trips concurrent program commits the processed transactions only at the end of its operation upon successful processing. The number of tasks submitted for optimizing (several technician trips across different dates) might range from a few to a large number of tasks. It is likely that a few tasks from the pool of all the selected tasks for optimization might not find an optimal schedule option. You will define the criteria for the successful run of the optimization process using the Optimizer Minimum Success Percentage parameter. The Optimize Across Trips program decides whether to commit or abort its operation by the value set for this parameter. If the percentage of tasks optimized (based on the number of tasks submitted for optimization) is greater than or equal to the parameter value the optimizer will commit the operation. Otherwise, it will abort as soon as the threshold (set by the parameter value) is exceeded. This parameter is used for each run of the Optimization Across Trips program.
Consider Standby Shifts
The Optimization Across Trips concurrent program recognizes the availability of technicians in stand by shifts and honor other restrictions while optimizing the trips. This program considers the value that you have set for the Consider Technicians in Stand By Shifts parameter. You can select the following values:
-
Never - Never consider stand by shifts.
-
Always - Always consider stand by shifts even if regular shift plan options are found.
-
Day by Day - Consider stand by shifts only when there is no regular shift plan option on a day.
-
Regular and then Stand By (Default) - Consider standby shifts only when there is no regular shift plan option in the entire planned period.
Running the Optimization Across Trips Concurrent Program
They are a few methods that can be used to initiate the Optimization Across Trips concurrent program. Two of the methods are from the Field Service Dispatch Center and the other method is by directly initiating the concurrent program.
Use one of these procedures to optimize technician schedules across trips:
Running the Optimization Across Trips Program
To Interactively Optimize Trips for All Technicians Using the Plan Board
For information on this procedure, see Optimizing One or More Trips From the Dispatch Center, Oracle Field Service User Guide.
To Interactively Optimize Trips for All Technicians Using the Schedule Management Page
For information on this procedure, see Optimizing Technician Trips, Oracle Field Service User Guide.
To Optimize Trips for All Technicians by Directly Initiating the Concurrent Program
-
Navigate to the Optimize Across Trips window.
The Parameters window appears.
-
Enter the Start Date and End Date.
The program will process the trips for technicians during this time frame.
-
(Optional) Select a Territory Name.
To process all territories do not select a territory name.
The program will process the trips for technicians that are associated with this territory.
-
Click OK.
The Optimize Across Trips window appears displaying the parameters selected.
-
Click Submit.
The Optimize Across Trips program is initiated. A Decision box appears displaying the request number and asking if you want to Submit another request?
-
Click No.
-
Navigate to the Requests page (View > Requests).
The Find Request page appears.
-
Select the All My Requests option or select the Specific Request option and enter the Request ID number for the program and then click Find.
-
Locate the specific request ID and click View Output.
The output file appears displaying the results of that specific concurrent program run.
The output file contains several sections. The Header section displays the start time for the program and the action.
The Footer section displays the completion status, completion message, and completion time.
The Important Information relevant to the Program run section displays the technicians and territories and profile options used during the program run.
The Tasks Auto-Rejected during Optimization Process section displays the task numbers and the reason why the tasks were auto rejected during the optimization process.
The Trips skipped during Optimization Process section displays the trips and the reason why they were skipped during the optimization process.
The Optimizer Completion Status section displays the number of trips used for optimization, the total number of tasks considered for optimization, and the cost benefit achieved through optimization of tasks across trips.
Third Party Scheduling and Management
This section explains the logic that Scheduler uses when scheduling third party resources. Additionally, it describes the tasks that third party administrators must perform to ensure completion of these scheduled tasks.
This section covers the following topics.
For information on how to set up third party resources, see the Oracle Field Service Implementation Guide.
Specifying Resource Preference
When scheduling tasks from the Dispatch Center, the dispatcher selects the scheduling mode and enters various selection criteria that Scheduler uses to filter eligible resources for each task. If one of these selection criteria is the resource preference of Prefer Third Party Resources, then Scheduler ignores many of the other selection criteria specified. See below to understand how Scheduler schedules third party resources..
Understanding Scheduling Considerations
If you selected the Scheduler parameter value for Resource Preference as Ignore Third Party Organizations, Scheduler only considers internal resources for scheduling. If you set the parameter value to Prefer Internal Resources, Scheduler searches first for eligible internal resources and only if none are found, does it move on to consider third party resources. Similarly, if you set the parameter value to Prefer Third Party Resources, Scheduler first finds eligible third party resources and only if none are found, does it move on to consider available internal resources.
When scheduling third party resources, Scheduler considers only the following constraints:
-
Planned Window of the Task – its overlap with technician’s calendar availability
-
Calendar Availability – resource availability
-
Spares Availability – if this is mandatory for the task in hand, then the eligible resource must have this spares part
-
Skill Level Match – of the resource with that required for the task
It does not consider the other task constraints of customer access hours, customer confirmation, trip availability, routing mode, and cost. Once eligible resources are found, Scheduler updates the Schedule dates to that of the Planned dates. If you are using the Window-to-Promise method of scheduling, Scheduler treats third party resources as having unlimited capacity and updates the schedule dates to that of the planned dates and the selected window-to-promise dates.
Note that because it is assumed that third party resources have unlimited capacity to perform tasks, you cannot generate trips for third party resources. Neither can you optimize trips. In fact, as soon any eligible third party resource is found, the dispatcher can use the right click menu option to directly commit the task to this resource.
Managing Third Party Tasks
After the task is committed, the third party administrator uses the Third Party Administrator Portal to manually reschedule the task to any one of the available technicians in his third party organization. From this portal, the third party administrator can manage the other task constraints such as customer access hours and customer confirmation.
Note that because third party service providers have no associated address, routing constraints and all map displays, geocoding capabilities, and GPS considerations are ignored for third party resources.
After the task is complete, the third party technician uses the Field Service Technician Portal to enter debrief. The administrator uses the Third Party Administrator Portal to review debrief and billing and make debrief corrections if necessary. The dispatcher, who originally scheduled the task, is then responsible for any billing corrections before submitting charges and closing the task and the associated service request.