Using Oracle Mobile Field Service Store and Forward - Laptop Technicians Dashboard
This chapter describes how to use the Field Service Technician Dashboard in the Mobile Field Service Store and Forward - Laptop application. Plus it describes how to launch the application and synchronize with the enterprise system after the application is installed.
This chapter covers the following topics:
- Introduction
- Launching and Synchronizing Oracle Mobile Field Service Store and Forward - Laptop
- Understanding the Field Service Technician Dashboard
- Using Simple Search and Advanced Search
- Assigning Unassigned Tasks to Technicians
- Viewing and Opening Tasks
- Performing Debrief
- Setting Counters and Counter Properties
- Creating and Viewing Notes
- Ordering Parts for a Specific Task
- Ordering Parts for Trunk Stock
- Viewing Parts Order Details
- Transferring Parts Between Sub-Inventories
- Viewing the Technicians Calendar
- Creating a Personal Task
- Creating Service Requests
- Viewing Customer Information
- Viewing Install Base Information
- Viewing and Sending Messages
- Viewing Contract Information
- Viewing Service History
- Viewing and Changing Service Request Information
- Understanding Task Creation
- Creating a Task Based on an Existing Task
- Creating a Task Based on an Existing Service Request
- Viewing a Service Request Attachment
- Uploading Attachments
- Logging Out
Introduction
The Mobile Field Service Store and Forward - Laptop application enables field service technicians to have access to information necessary for them to perform work at customer sites.
Technicians view their daily schedules of tasks, and perform many other functions, such as ordering parts, creating follow-up tasks, creating service requests, and accessing the Knowledge Base for potential solutions to common customer issues.
User Interface
The Mobile Field Service Store and Forward - Laptop application provides a consistent user experience through a common look and feel with the Field Service Technician Portal, and through similar interaction behaviors.
User interface enhancements provide standards to ensure that when a user is searching for an asset in a financial application, or searching for a campaign in a marketing application, the search behaviors should not only look the same, but also function and interact the same. Not only should they look the same but they should also be able to specify the types of common interactions.
Multiple Responsibilities
Regardless of the responsibility associated with the user, the user can gain access to the Mobile Field Service Store and Forward - Laptop application. The user's responsibilities do not need to be a seeded responsibility, but they do need to be a responsibility tied to the field service application.
When a single user is mapped to multiple responsibilities, and all those responsibilities are granted rights to access the Mobile Field Service Store and Forward - Laptop application, then the user gains access to the Mobile Field Service Store and Forward - Laptop application through the oldest responsibility through which the user gained access.
Multiple responsibilities features can be applied to fulfill the following needs:
-
Assign a different transition task status to different responsibilities.
The Task Status and Transition Rule are assigned to a specific responsibility. The business requirement of applying different rules for different field service users can be accomplished by creating new responsibilities and new rules, and then attaching them to each other.
-
Customized menus
The business requirement of restricting some functions provided in the Field Service Store and Forward - Laptop menu, can be accomplished by creating a custom responsibility with certain restricted functions excluded.
Multiple User Laptop Groups
The Multiple User Laptop Group functionality will enable multiple mobile users of the Mobile Field Service Store and Forward - Laptop application to share a single laptop device. Using a single laptop device saves on hardware cost and enables flexible deployments (groups and single users can share the same laptop) when implementing the application.
You can enable this functionality by setting the profile option CSM: Data Routed to Group Owner to Yes and creating the multiple user laptop group.
For information on setting up multiple user laptop groups, see Creating and Managing Mobile Users, Oracle Mobile Field Service Implementation Guide.
Open Service Request Against Any Product or Customer
This functionality will enable technicians to create service requests against any customer or asset/product they are responsible for using the Oracle Mobile Field Service Store and Forward - Laptop application. Previously, technicians were only able to create a service request against those customers and assets/products that had been downloaded to their mobile device.
To use this functionality, a system administrator will assign customers to the individual technicians or they will assign customers to the field service group owner if you are using a multiple user laptop group. In addition, if you are using multiple user laptop groups you have the option to associate other groups to your multiple user laptop group. Relating these groups together gives the administrator of the group the ability to assign and reassign work within the related groups.
For more information on assigning customers to technicians, see Assigning Customers to Mobile Field Service Technicians, Oracle Mobile Field Service Implementation Guide.
File Based Synchronization
This functionality provides technicians and administrators with the ability to perform file based synchronization using the Oracle Mobile Field Service Store and Forward - Laptop application. Technicians and administrators are able to save the data to be synchronized to an external device such as, a CD or flash drive. This functionality is very useful when the technicians are working in remote locations where network connections are not readily available.
For more information on file based synchronization, see Launching and Synchronizing Oracle Mobile Field Service Store and Forward - Laptop and Setting Up File-Based Synchronization.
Launching and Synchronizing Oracle Mobile Field Service Store and Forward - Laptop
To use the Mobile Field Service Store and Forward - Laptop application technicians and administrators will launch the application and then they will perform a synchronization with the enterprise system to ensure that they have the most current information and that their most current information from the laptop application is sent to the enterprise system. The synchronization process can be a system process or it can be a file-based process depending on how the application is configured.
For information on setting up file-based synchronization in the Mobile Field Service Store and Forward - Laptop application, see Setting Up File-Based Synchronization
Complete the following steps to launch and synchronize Oracle Mobile Field Service Store and Forward - Laptop after the installation. Administrators and members of a multiple user laptop group can synchronize the data for the whole group. To install the application, see Installing Oracle Mobile Field Service Store and Forward - Laptop, Oracle Mobile Field Service Implementation Guide.
Prerequisites
- If you are performing file-based synchronization than the Mobile Field Service Store and Forward - Laptop application must be configured for this option.
Steps
Launch Web-to-Go and the Mobile Field Service Store and Forward - Laptop Application
-
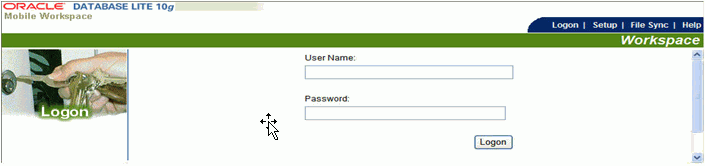
Select Start > Programs > Oracle Database Lite 10g > Oracle Web-to-go
The Oracle Web-to-go icon appears in the system tray. The system tray is located in the Windows task bar, usually at the bottom of the screen. The system tray contains the clock and miniature icons for easy access to system functions such as printer, modem, and volume control.
-
Double click the Oracle Web-to-go icon in the system tray.
The Oracle Database Lite 10g login page appears.
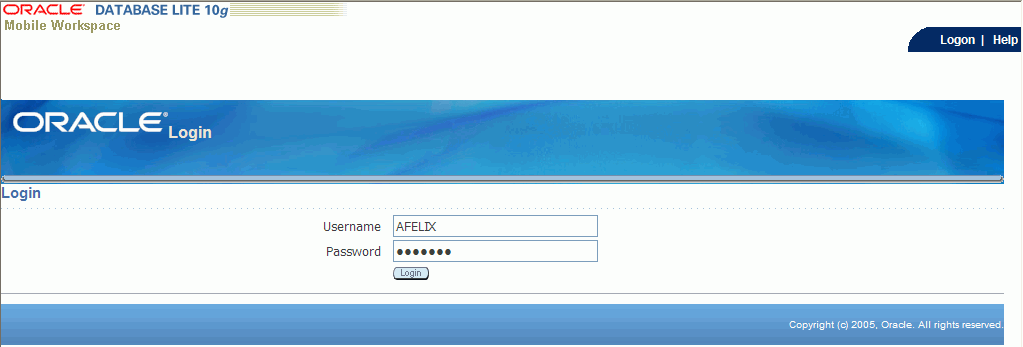
-
Enter your user name and password in the appropriate fields and then click Login.
The Field Service Technician Dashboard appears. For a description of this page, see Understanding the Field Service Technician Dashboard.
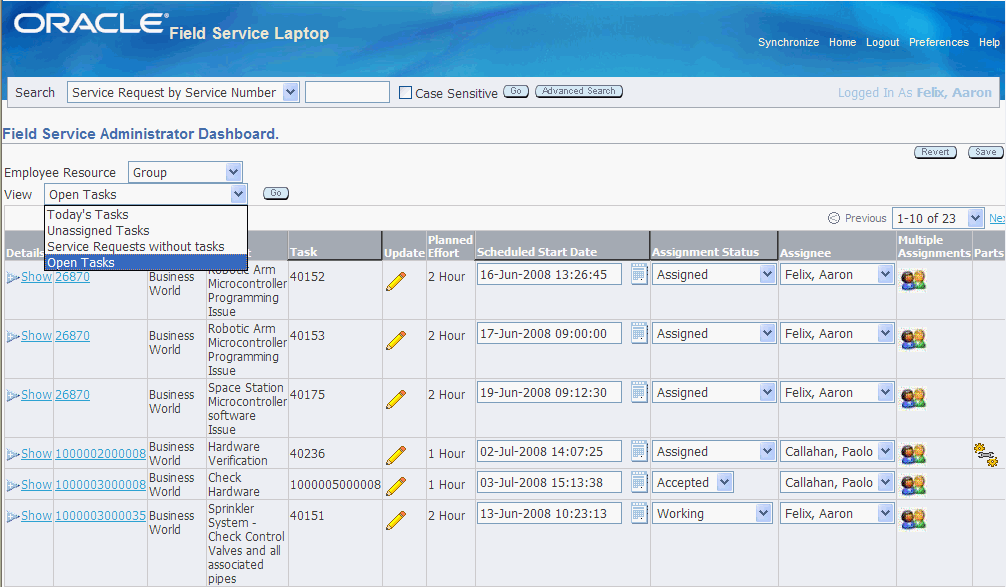
Field Service Technician Dashboard Page (1 of 2)
Field Service Technician Dashboard Page (2 of 2)
Synchronize with the Enterprise System
To receive new data that has been assigned to you, such as new tasks and service requests, you will need to synchronize with the enterprise system. Likewise, to send the changes that you make, such as creating debrief lines and updating task statuses, will need to be synchronized with the enterprise system.
-
Establish an internet connection for your laptop computer.
-
Click the Synchronize link located in the upper right corner of the page.
The laptop computer will synchronize the information with the enterprise system.
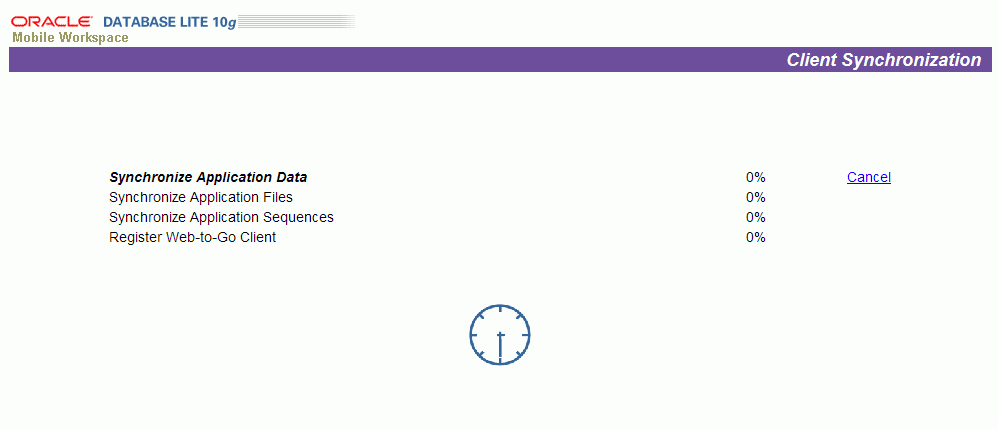
Caution: Synchronizing data can take a few minutes; therefore, do not abort this process. If the synchronization process fails, contact your system administrator.
(Alternative Method) Synchronize with the Enterprise System (File-Based)
-
Click the File Sync link located in the upper right corner of the page.
Note: The Synchronization link changes to the File Sync link when the laptop application is configured for file-based synchronization.
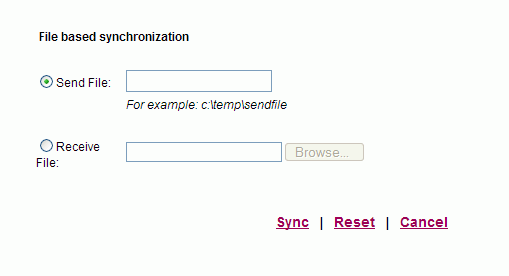
The File based synchronization page appears.
-
To upload information to the enterprise system, select the Send File option and enter the file name and location for where the system should create the file containing the data to be uploaded.
-
Click the Sync link.
The system creates the file in the location specified. You will receive a message stating that the synchronization succeeded and the file was created successfully.
-
Click the OK link.
-
To complete the upload process, navigate to the Mobile Server page.
-
Select the File Sync tab.
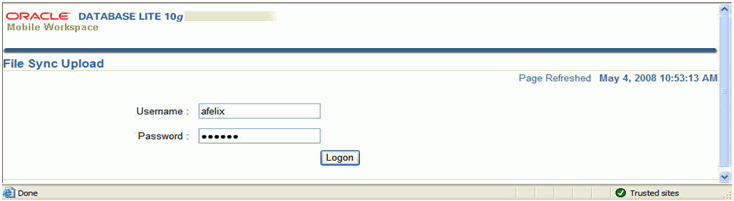
The File Sync Upload page appears.
-
Login using your Username and Password.
-
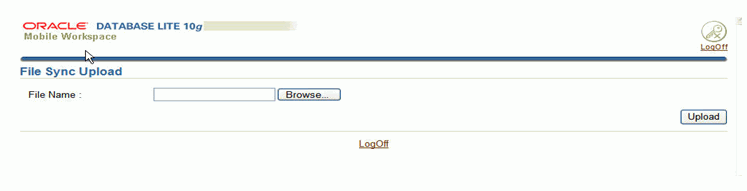
Browse for the file name containing the data to be uploaded in the File Name field and click Upload.
The synchronization process is initiated. Upon completion, if there is data to be downloaded from the Enterprise system to the Laptop application a link will appear on the File Sync Upload page.
-
To download the information from the Enterprise system to the Laptop click the link on the File Sync Upload page.
-
Enter a file name and location for where the system should create the file containing the data to be downloaded.
-
Navigate to the Field Service Technician Dashboard.
-
Click the File Sync link located in the upper right hand portion of the page.
-
To download information from the Enterprise system, select the Receive file option and browse for the file name of the file containing the data to be downloaded.
-
Click the Sync link.
You will receive a message stating that the synchronization succeeded.
-
Click the OK link.
Understanding the Field Service Technician Dashboard
The Oracle Mobile Field Service Store and Forward - Laptop Field Service Technician Dashboard serves as the point of entry for a field service technician.
Important: The Field Service Technician Dashboard provides a similar look and feel, and functions in the same way as does the Field Service Technician Portal, which is documented in the Oracle Field Service User Guide.
The Dashboard is divided into these components:
-
Main View
-
Search Area
-
Quick Links
-
Messaging
Main View
The Dashboard appears displaying the designated default main view of tasks assigned to the technician. The view defines which columns of information appear in the summary table, the column sequence, and the criteria for tasks to appear in the rows of the table.
-
Today's Tasks
-
Unassigned Tasks
-
Service Request without tasks
-
Open Tasks
Field Service Technician Dashboard Page (1 of 2)
Field Service Technician Dashboard Page (2 of 2)
Custom Views
The technician can select a different view, personalize a seeded or existing custom view, create a new custom view, or designate a different default view.
To access another view, select the different view from the View drop-down menu, and then click Go.
To personalize a seeded or existing custom view, create a custom view, or designate a different view as the default view, see Customizing Dashboard Views, Oracle Mobile Field Service Implementation Guide.
For more information about custom views, see Understanding Dashboard Customized Views, Oracle Mobile Field Service Implementation Guide.
Dashboard Summary Table Functions
Field service technicians can perform multiple functions from the Dashboard summary table:
-
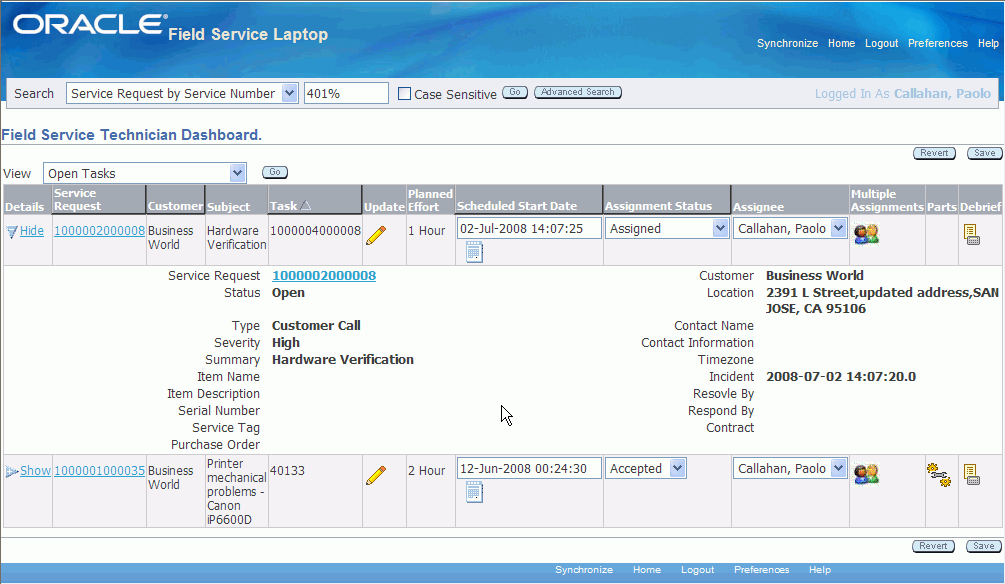
To view service request detailed information, click the Details Show link.
Field Service Technician Dashboard - Service Request Details
-
To access Item Instance details, click the Details Show link, and then from the expanded Details region, click the Item Name link.
Item Instance page
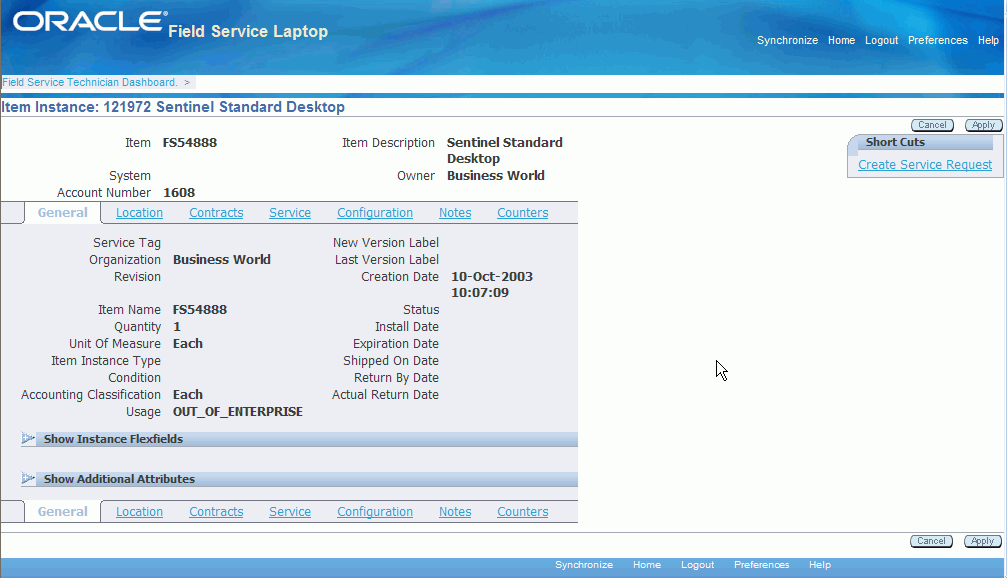
-
Using Item Instance details:
-
Access Location details by clicking the Location link.
-
Access Contract details by clicking the Contracts link.
-
Access Service history details by clicking the Service link.
-
Access Configuration details by clicking the Configuration link.
-
Access Notes details by clicking the Notes link.
-
Access Counter details by clicking the Counters link.
-
-
To access service request details, drill down to the Update Service Request page by clicking the Service Request number link.
-
To view customer and product information, click the Service Request number link.
-
To access task detailed information, click the Update icon in the row for the task.
-
To change task assignment status, in the row for the task, select another status from the drop down menu in the Assignment Status column.
-
To assign a task, technician will select them self as the resource using the Assignee field.
-
To assign a task, technician will click the Multiple Assignments icon and assign them self as the resource.
-
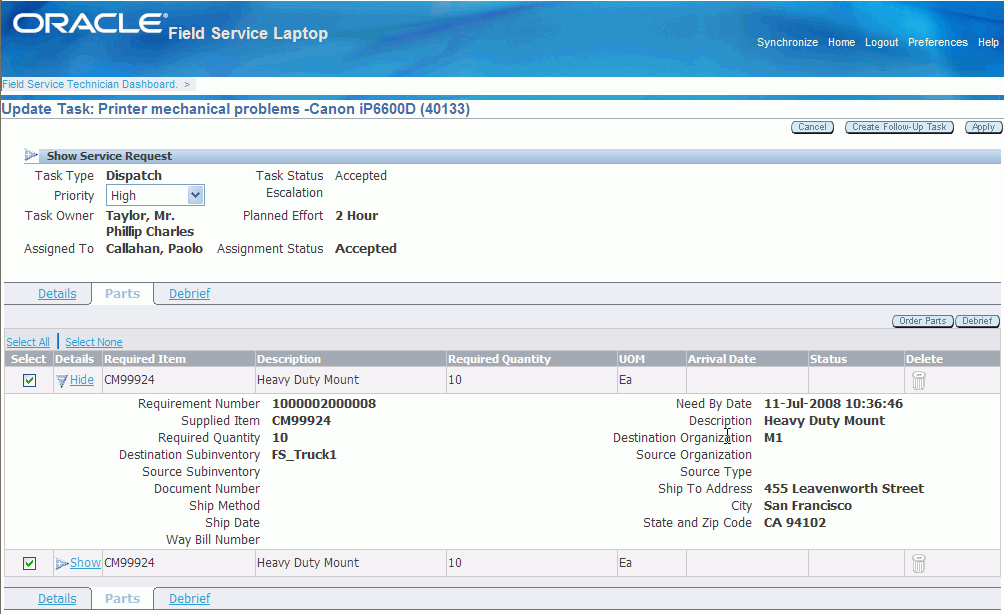
To access service part details, click the Parts icon in the row for the task.
Note: The Parts icon is enabled on the Dashboard only if there are parts associated to the task.
See Viewing Parts Order Details.
Update Task - Parts page
-
To report labor, material, and expense, click the debrief icon in the row for the task.
See Performing Debrief.
Search Area
The search area is used to retrieve a subset of tasks, based on search criteria that you specify. The technician can search based on the following search criteria using the basic search functionality:
-
Service Request by Service Number
-
Service Request by Service Tag
-
Service Request by Customer Name
-
Service Request by Item Name
-
Service Request by Item Description
-
Service Request by Serial Number
-
Task by Task Number
-
Task by Customer Name
-
Customer by Customer Name
-
Item Ordered by Item Name
-
Item Ordered by Customer Name
-
Inventory by Item Name
-
Inventory by Subinventory
-
Installed Base by Service Tag
-
Installed Base by Item Name
-
Installed Base by Serial Number
-
Installed Base by Status
Using the advanced search functionality, the technician can search based on combinations of conditions and search parameters.
See Using Search and Advanced Search.
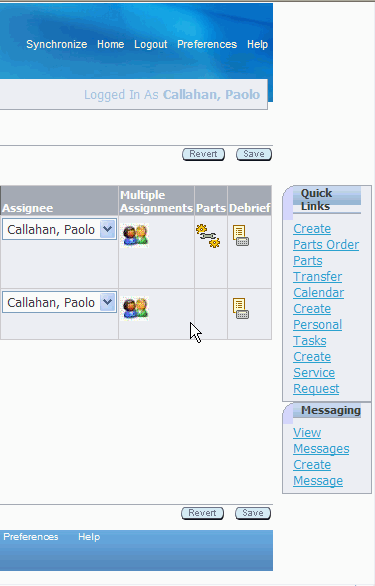
Quick Links
Quick links are provided for these operations:
-
Create Parts Order.
See Ordering Parts for a Specific Task and Ordering Parts for Trunk Stock.
-
Parts Transfer.
-
Calendar.
-
Create Personal Tasks.
-
Create Service Request.
Messaging
From the Messaging region you can select to:
-
View Messages.
-
Create Messages.
See Viewing and Sending Messages.
Using Simple Search and Advanced Search
The Field Service Technician Dashboard provides technicians with the ability to perform a simple search or advanced search when searching for task-related information. With a simple search, technicians select a criterion in the Search field and then enter a full or partial value in the Search Criteria field and then click Go. This action will quickly retrieve the search criteria information. The Search field provides for the following types of searches:
-
Service Request by Service Number
-
Service Request by Service Tag
-
Service Request by Customer Name
-
Service Request by Item Name
-
Service Request by Item Description
-
Service Request by Serial Number
-
Task by Task Number
-
Task by Customer Name
-
Customer by Customer Name
-
Item Ordered by Item Name
-
Item Ordered by Customer Name
-
Inventory by Item Name
-
Inventory by Subinventory
-
Installed Base by Service Tag
-
Installed Base by Item Name
-
Installed Base by Serial Number
-
Installed Base by Status
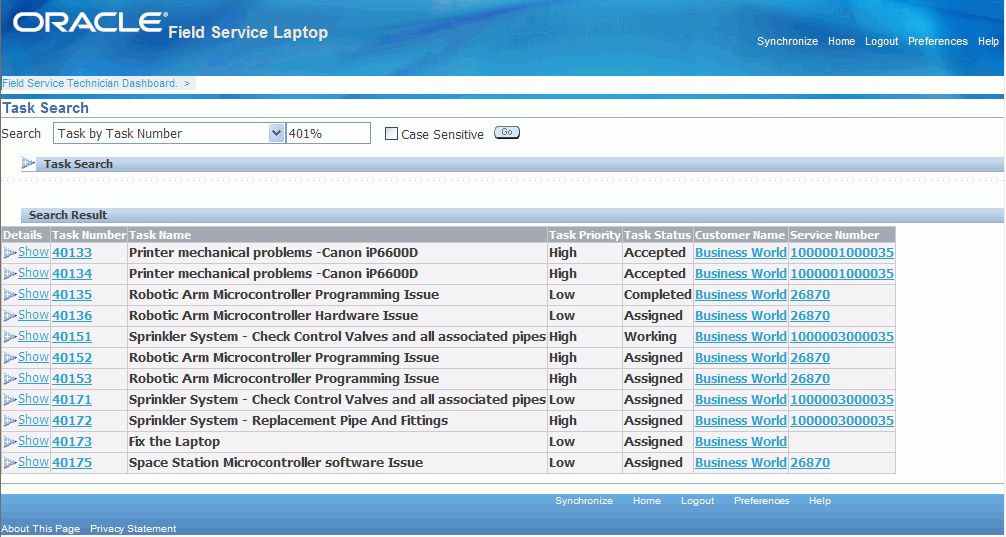
Advanced Search functionality is also available by clicking the Advanced Search button. When you click the Advanced Search button, the advanced search page appears where technicians can enter more detailed search criteria. The fields that appear in the advanced search page and the title of the advanced search page depend on the criterion that was selected in the Search field. For example, if you select Task by Task Number in the Search field and click the Advanced Search button, the Search Task page appears displaying advanced task-related search fields. If you select Service Request by Service Number in the Search field and click the Advanced Search button, the Service Request Search page appears displaying advanced service request-related fields.
Use this procedure to perform a simple or advanced search:
Steps
Simple Search
-
Navigate to the Field Service Technician Dashboard.
-
From the Search field drop down list select the type of information on which you want to search the task-related information, such as "Task by Task Number".
-
Enter the data value that you want the search to match such as, the task number in the field next to the Search field.
-
Click Go.
The Search Result table populates with results that match the search criteria.
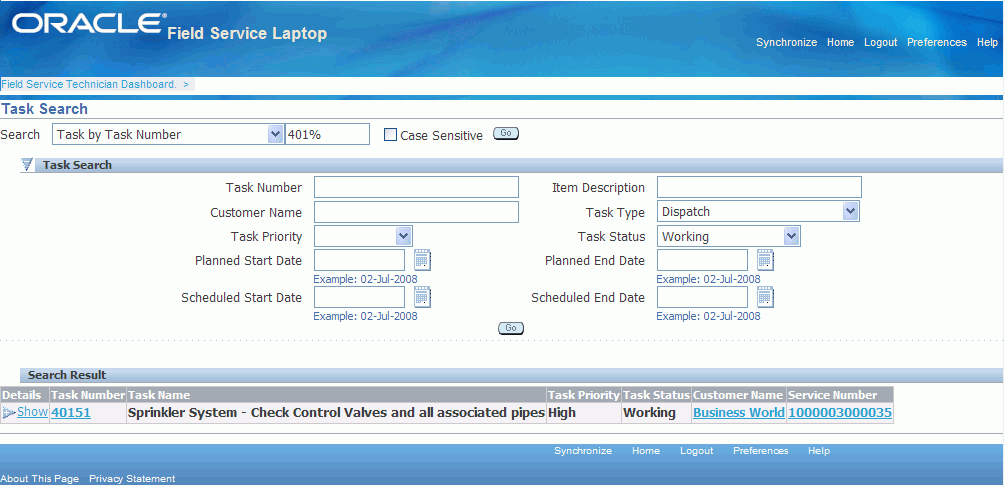
Advanced Search
The Technician has the ability to perform an Advanced Search to narrow the search criteria down even further than that found using the simple search.
-
Click Advanced Search.
The advanced search page appears that is relevant to the search criteria. For example, if you select Task by Task Number the Task Search page appears. If you select Service Request by Service Number the Service Request Search page appears.
The search criteria fields that appear are different depending on the type of search you are performing. If you are searching for service requests than service request related field will appear for selection. If you are searching for installed base information than installed based related fields will appear.
-
Specify the additional search criteria and click Go.
The Search Results table populates with the data that matches the search criteria.
Assigning Unassigned Tasks to Technicians
Using the Field Service Technician Dashboard technicians can assign themselves to tasks that are unassigned.
Use this procedure to assign technicians to unassigned tasks:
Prerequisites
- A task must exist that has not been assigned to a technician.
To Assign a Technician to an Unassigned Task
-
Navigate to the Field Service Technician Dashboard.
The Dashboard appears.
-
Select Unassigned Tasks in the View field.
All of the unassigned tasks appear in the summary table.
-
In the unassigned task row, select the Scheduled Start Date for the task.
-
Select an Assignment Status for the task.
-
Select the technician you want to assign the task to using the Assignee field.
Note: Technicians can only assign tasks to themselves.
-
Click Save.
The task is assigned to the technician.
Alternative Method - To Assign a Technician to an Unassigned Task
-
Navigate to the Field Service Technician Dashboard.
The Dashboard appears.
-
Select Unassigned Tasks in the View field.
All of the unassigned tasks appear in the summary table.
-
In the unassigned task row, click the Multiple Assignments icon.
The Update Task - Details page appears.
-
In the Owner and Assignee(s) section, click the Add Assignee button.
The technicians Resource Name, Resource Type, and Status appear by default from the technician who is doing the assignment.
Note: Technicians can only assign tasks to themselves.
-
Click Apply.
The task is assigned to the technician.
Viewing and Opening Tasks
Task can be viewed and opened using any of the following methods:
-
Using the Field Service Technician Dashboard. See Understanding the Field Service Technician Dashboard.
-
Using the Technician's Calendar. For more information, see Viewing the Technicians Calendar.
-
Using the search results of task-related information. See Using Simple Search and Advanced Search.
From the Field Service Technician Dashboard, you can learn which customers you are scheduled to visit, what tasks you will perform at each site, and retrieve additional information about the listed tasks.
To view and open a task, complete the following steps:
Steps
-
Launch the Field Service Technician Dashboard.
The information for the default view appears.
-
To change the view, select a view from the View drop-down list located in the header region of the Field Service Technician Dashboard, and then click Go.
The information for the selected view appears in the summary table.
-
Service Request column - View the service request number.
-
Customer column - View the Customer name.
-
Subject column - View the description for the service request.
-
Task column - View the task number of the desired task.
-
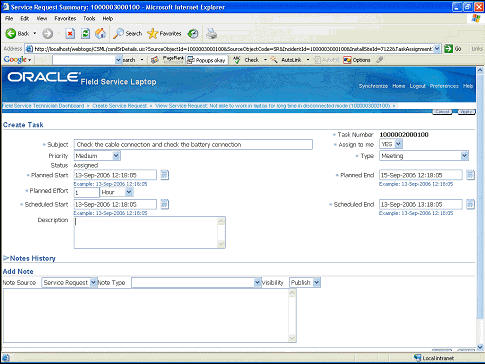
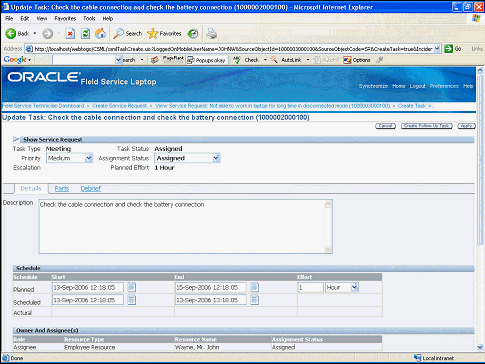
Update column - Click the Update Task icon to access the Update Task - Details page.
-
Planned Effort - View the planned duration for the task.
-
Scheduled Start Date column - View when the task is scheduled to start.
-
Assignment Status column - View and specify the current task status.
-
Assignee column - View the resource assigned to the task.
-
Multiple Assignments column - Click the Multiple Assignments icon to assign multiple resources to a task.
-
Parts column - Click the Parts icon to view the parts order requirements.
-
Debrief column - Click the Debrief icon to perform debrief on a task.
-
-
To view task-related details, click the Update Task icon for the respective task.
-
To view the service request, item instance, and customer details, click the Show/Hide link in the Details column.
-
To specify the current task assignment status, access the Assignment Status drop-down list for the desired task, and then make the appropriate selection. Click Save to save the status to the local database on your laptop computer.
For example, select a status from the following table:
Typically, the status for a task progresses in the following order:
-
Upon initial download to the laptop computer, a task has a status of "Assigned".
-
Once you review your schedule for the current day, change the status of "Assigned" tasks to "Accepted".
-
Before you start working on an "Accepted" task, change its status to "Working".
-
When you have successfully completed a "Working" task, change its status to "Completed".
-
Performing Debrief
Field service technicians use the Debrief module to view their task assignment details, accept or reject assignments, update task statuses, capture travel related information, and report on material, labor time, and expenses for their individual task assignments. Data gathered is used for generating customer invoices, updating the installed base, and maintaining the service vehicle trunk stock.
Debrief procedures for the Mobile Field Service Store and Forward - Laptop application are the same as the debrief procedures from the Field Service Technician Portal. See the Debriefing Work Completion chapter in the Oracle Field Service User Guide.
Setting Counters and Counter Properties
You can log a service request for a customer product that contains a counter. A counter helps a field service technician determine how much work was done before a customer product was serviced. For example, a copier having a number-of-copies counter.
There can be multiple customer product counters, each with multiple readings. From these multiple readings, you can learn the service history of the customer product.
You can also create new readings for a customer product counter. You can reset a reading as well as make miscellaneous readings. A miscellaneous reading can be a value used for testing a customer product. For example, a technician who is fixing a copier may make ten test copies after completing the service. The copy counter value increases by ten, but the technician does not want the customer to pay for the test copies. Therefore, the field service technician can state a miscellaneous reading of ten.
Finally, you can enter counter properties. Counter properties describe something about the customer product counter.
Use this procedure to enter a counter reading and to set the counter properties:
Steps
-
Determine the desired customer product for which you want to enter a counter reading and set the counter properties.
-
Select the task associated to the customer product and click the Update Task icon.
The Update Task page appears.
-
Select the Debrief tab
-
Alternatively, from the Field Service Technician Dashboard, click the Debrief icon.
-
Expand the Counters section.
-
Enter the new reading value in the Value field.
-
Provide the new reading comments in the Comments field.
-
To save the new value, click Apply.
-
Complete the Date and Reading fields.
Note: The Date and Reading fields are mandatory. The date is the date that you take the reading, and the reading is the counter value that to want to record.
-
Complete or change any other fields as desired.
-
To make miscellaneous readings, select from the Misc. Reading Type drop-down list, and then complete the Misc. Reading field.
-
To reset the counter, complete the Reset Reading field.
-
Complete the property field for the customer product.
-
Click Apply.
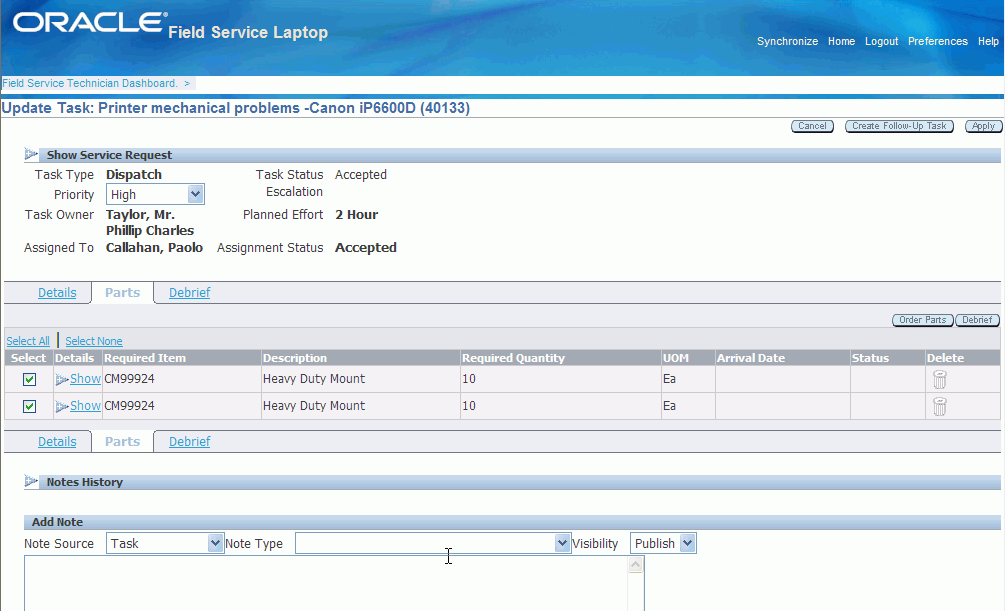
Creating and Viewing Notes
You can create and view notes for the following:
-
Customer
-
Customer Product
-
Service Request
-
Task
For example, you may make a note that a power supply needs to be replaced by a refurbished one.
A note includes the following:
-
Note text
-
Date entered
-
Note type
-
Visibility
Use this procedure to create and view a note:
Steps
-
Open the appropriate page:
-
To create and view a service request note, from the Field Service Technician Dashboard, click the Service Request link against the service request.
-
To create and view a task note, from the Field Service Technician Dashboard, click the Update Task icon against the task.
-
To create and view a customer note, from Field Service Technician Dashboard, click the Update Task icon against the Customer.
-
To create and view a customer product note, click the Show link against the service request for the customer product, and then click the Item Name link against the item. This action opens the Item Instance page. Select the Notes tab.
-
-
To view existing notes, expand the Notes History section.
All the existing notes display.
-
Click the Show link to view note details.
-
To add a new note:
-
Select the Note Source from the drop-down list in the Add Notes section.
-
Select the note Type from the drop-down list.
-
Select the Visibility from the drop-down list.
-
Enter the text for the note in the Note text box.
-
-
Click Apply
Ordering Parts for a Specific Task
Using the Mobile Field Service Store and Forward - Laptop, the Field Service technician has the ability to order parts for a specific task. The parts ordering functionality results in creating one of the following:
-
Purchase Requisition
-
Internal Order
To order a part specific to a task, the user clicks the Update Task icon from the Dashboard, selects the Parts tab, and then clicks the Order Parts button.
Use this procedure to order a part specific to a task:
Prerequisites
- The desired part must be defined as "orderable".
- The desired part must already exist, either in the vehicle or at some other location. This prerequisite is applicable only when Spares Management is being used. See the Oracle Mobile Field Service Implementation Guide.
Steps
-
Navigate to the Field Service Technician Dashboard.
The Dashboard appears.
-
From the Dashboard, click the Update Task icon against the task for which parts need to be ordered.
The Update Task page appears displaying the Details tab.
-
Select the Parts tab.
The Update Task - Parts page appears displaying the existing parts requirements if any exist.
-
Click Order Parts.
The Create Parts Order page appears.
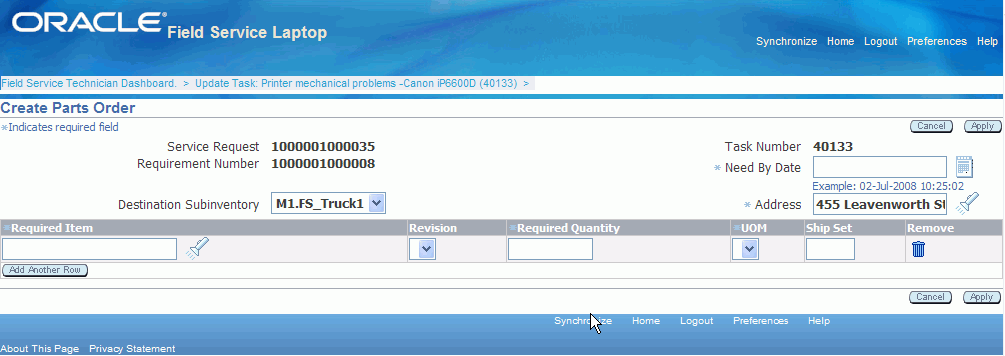
-
Provide the Need By Date.
-
Select a destination sub inventory. The technicians default Usable sub inventory appears by default.
-
Select an address. The technicians primary address appears by default.
-
Enter the Required Item for the parts order or search for it in the available lookup table.
After you select the item, the UOM appears for the item.
-
Provide item revision details if required.
-
Enter the Required Quantity.
-
(Optional) Enter the Ship Set value.
A ship set is a group of order lines, linked by a common number. Set this value to specify that the full quantity of certain items must be shipped together.
-
Click Apply.
Note: The Need By Date, Address, Required Item, Required Quantity, and UOM are mandatory fields.
-
To remove the row added in the parts requirement before creating the order, click the Remove icon in the Remove column.
-
To delete a requirement after a parts requirements has been created:
-
Click the Update Task icon against the specific task.
-
Select the Parts tab.
-
Click the Select check box to select the row that needs to be deleted.
-
Click the Delete icon in the Delete column.
Important: Parts requirements can be deleted only before synchronization. After synchronization with the Enterprise system, parts requirements cannot be deleted from Mobile Field Service Store and Forward - Laptop.
-
Ordering Parts for Trunk Stock
Based on the sourcing rules and availability of parts within the technicians trunk stock, the parts ordering functionality results in creating one of the following:
-
Purchase Requisition
-
Internal Order
Note: The process for creating a parts order for the technician trunk stock is similar to the process for creating a parts order for a specific task. Both processes use the same Create Parts Order page.
Use this procedure to create a parts order for trunk stock sub-inventory:
Prerequisites
- The desired part must be defined as "orderable".
- The desired part must already exist, either in the vehicle or at some other location. This prerequisite is applicable only when Spares Management is being used. See the Oracle Mobile Field Service Implementation Guide.
Steps
-
Navigate to the Field Service Technician Dashboard.
The Dashboard appears.
-
From the Quick Links section, click the Create Parts Order link.
The Create Parts Order page appears. A temporary parts Requirement Number is automatically created for the order. This parts Requirement Number is saved when you click Apply to complete the transaction.
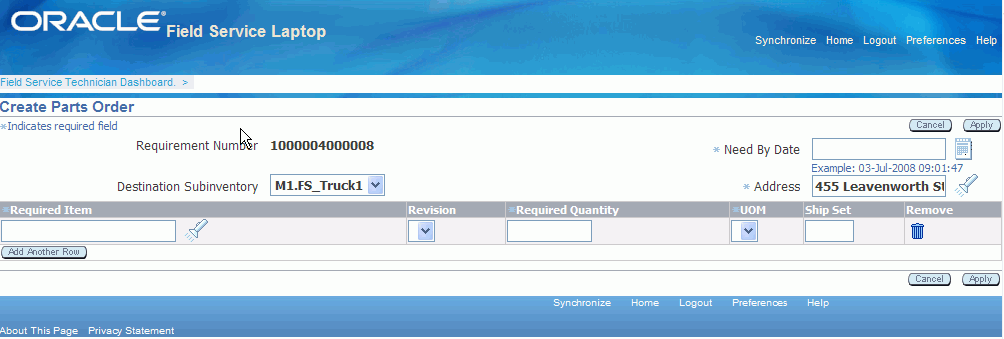
-
Select a Need By Date for the parts order.
-
Confirm the Destination sub-inventory is correct. If it is not correct, select the correct sub-inventory from the list of values.
-
Verify the Address.
-
Enter the Required Item for the parts order or search for it in the available lookup table.
After you select the item, the UOM for the item appears.
-
Provide item revision details if required.
-
Enter the Required Quantity.
Note: The Need By Date, Address, Required Item, Required Quantity, and UOM are mandatory fields.
-
(Optional) Enter the Ship Set value.
A ship set is a group of order lines, linked by a common number. Set this value to specify that the full quantity of certain items must be shipped together.
-
Click Apply to complete the transaction.
This action validates and saves the Parts Requirement number created in step 1, creates the order number, and generates a parts order confirmation.
Viewing Parts Order Details
Once a part is ordered, you can view the details regarding this part.
Use this procedure to view part order details:
Prerequisites
- A part must be ordered.
Steps
-
Navigate to the Field Service Technician Dashboard.
The Dashboard appears.
-
Navigate to the Update Task - Parts page.
-
Click the Parts icon in the Summary Table for the task for which parts were ordered.
-
Click the Update Task icon in the Summary Table for the task for which the parts were ordered > Select the Parts tab in the Update Task page.
-
-
Click the Show link to view the details of the parts order.
The technician is able to view the parts order created only for a specific task.
Additionally, you can view part order details using the Item Ordered by Item Name search criteria.
Transferring Parts Between Sub-Inventories
Using the Parts Transfer Quick Link from the Dashboard, the technician can transfer parts between their sub-inventories.
Steps
To Transfer Parts
-
Navigate to the Field Service Technician Dashboard.
The Dashboard appears.
-
Click the Parts Transfer link in the Quick Links section.
The Transfer Parts window appears.
-
Click Add Another Row.
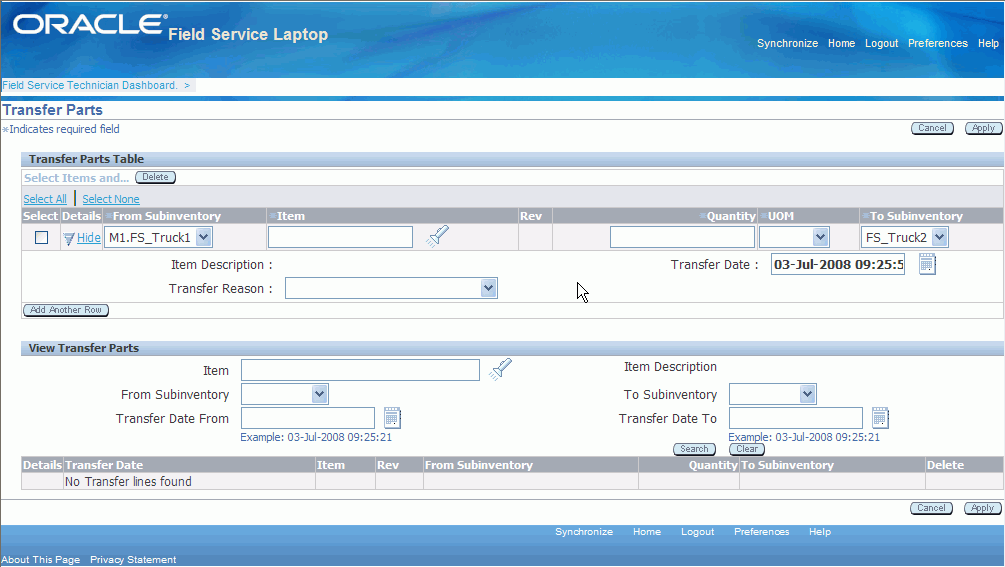
-
In the From Subinventory field, select the source sub-inventory from the drop-down list.
-
In the Item field, select the item you want to transfer.
The Item UOM appears in the UOM field.
-
In the Quantity field, enter the quantity you want to transfer.
-
In the UOM field, provide the unit of measure for the quantity you want to transfer.
-
In the To Subinventory field, select the destination sub-inventory from the drop-down list.
-
In the Transfer Reason field, select a reason from the drop-down list.
-
Complete the control attributes for the item based on the item selected.
For example, enter Serial Number and Lot Number, in their respective fields.
-
In the Transfer Date field, provide the transfer date. The system date appears by default in the Transfer Date field. The technician can enter a future transfer date, but not a past date.
-
Click Apply.
To Exit Without Transferring the Part
-
In the Select column, in the new row added for the parts transfer, select the check box.
-
In the Transfer Parts table header, click Delete.
To View Parts Transfer Details
-
Click the Transfer Parts link in the Quick Links section of the Field Service Technician Dashboard.
The Transfer Parts page appears.
-
Enter search criteria details in the View Transfer Parts section and click Search.
The transfer part details display that match the search criteria.
-
To view details of the parts transfer, click the Show link.
To Delete a Parts Transfer
-
Click the Transfer Parts link in the Quick Links section of the Field Service Technician Dashboard.
The Transfer Parts page appears.
-
Search for the specific part transfer in the View Transfer Parts section.
-
In the Delete column, click the Delete icon for the specific part transfer.
Viewing the Technicians Calendar
The Oracle Field Service Technician Dashboard provides a quick link to the Technicians Calendar. The technician has the ability to view the calendar in daily, weekly or monthly mode and can also drill down to task details from the calendar.
Use this procedure to view the calendar:
Steps
To Open the Calendar
-
Navigate to the Field Service Technician Dashboard.
The Dashboard appears.
-
From the Dashboard Quick Links section, click Calendar.
The technicians calendar appears in the daily view for the current date (by default).
To Navigate the Calendar
-
To view the previous or next day, click the Previous Day or Next Day buttons.
Note: The system date appears by default for the Calendar date. You can enter the date directly into the View date field. If you enter the date with the incorrect format, a warning message appears.
-
To view the calendar in Weekly or Monthly format, select the Weekly or Monthly tab.
Depending on the tab you select, the weekly or monthly calendar format appears to display the current week or month.
-
On the Weekly tab, to view the previous or next week, click the Previous Week or Next Week buttons.
-
On the Monthly tab, to view the previous or next month, click the Previous Month or Next Month buttons.

-
To view the calendar for a specific day, select the Calendar from the Daily, Weekly, or Monthly tab.
-
Select a date using the View field.
Depending on which tab was open at the time the calendar was selected, the technicians calendar displays the day, week, or month for the date selected in the View field.
To View Task Details
-
To view task details click the corresponding Task link that appears on the calendar.
-
If you are in the Daily View, the tasks for the selected date appear in the Calendar page.
-
If you are in the Weekly View, the tasks for the week of the selected date appear in the Calendar page.
-
If you are in the Monthly View, the tasks for the month of the selected date appear in the Calendar page.
The Update Task page appears displaying the task information.
-
-
To return to the calendar, click the Calendar link at the top left of the page.
To Close the Calendar
-
Click the Field Service Technician Dashboard link at the top left corner of the page.
Creating a Personal Task
A personal task is a notice to the dispatcher that a technician will not be available for a particular period. A personal task is not dispatchable or tied to a service request, therefore making it different from a task that is loaded onto the laptop computer. For example, if a technician needs to go to the dentist next week, they can create a personal task stating that they will be unavailable to perform service tasks for a certain period. By knowing the availability, the dispatcher can schedule the technicians tasks more effectively.
Use this procedure to create a personal task:
Steps
-
Navigate to the Field Service Technician Dashboard.
The Dashboard appears.
-
Click the Personal Tasks link the Quick Links section.
The Create Personal Task page appears.
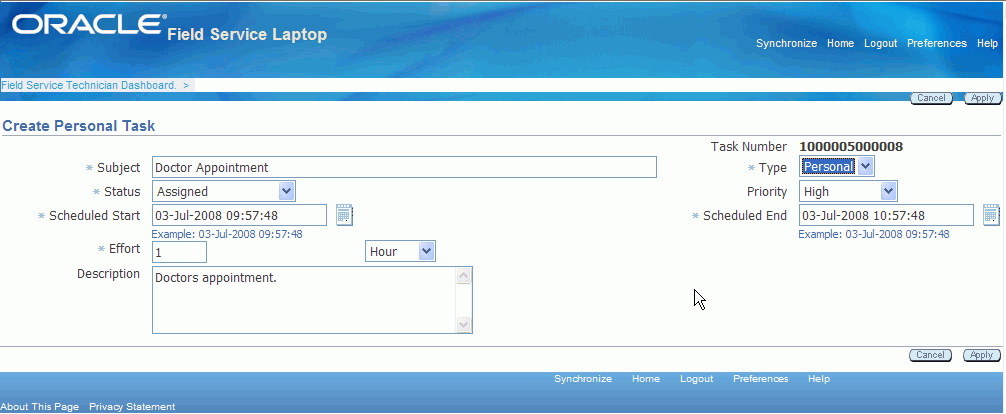
-
Enter the Subject field.
-
Select Personal in the Task Type field.
-
Select a Status for the personal task.
-
(Optional) Select a Priority for the personal task.
-
Enter the Scheduled Start and End Date for the personal task.
-
In the Effort field, enter the duration of the Personal Task.
Note: The Subject, Type, Status, Scheduled Start, Scheduled End, and Effort fields are mandatory.
-
Click Apply.
Oracle Mobile Field Service Store and Forward - Laptop creates a personal task and then returns you to the Field Service Technician Dashboard.
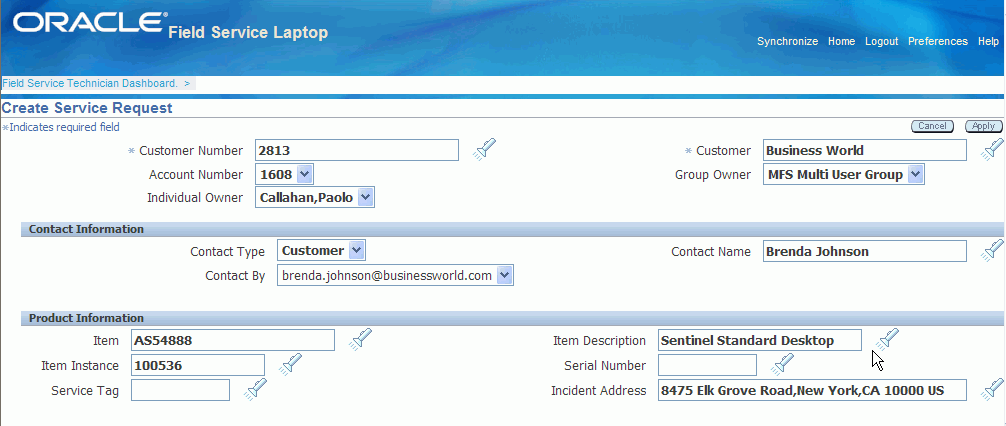
Creating Service Requests
Field service technicians can create a new service request from the Field Service Technician Dashboard using the Create Service Request quick link. Technicians can create service requests against any customer or asset/product that they are responsible for. When setting up technicians you assign the customers they are responsible for using the Assign Customers page.
For more information on assigning customers to technicians, see Assigning Customers to Mobile Field Service Technicians, Oracle Mobile Field Service Implementation Guide.
The Create Service Request page includes regions for contact information, product information, problem description, and service information.
For more information about logging a service request, see the Oracle TeleService User Guide.
Use this procedure to create a service request:
To Create a Service Request
-
From the Field Service Technician Dashboard, click the Create Service Request link in the Quick Links section.
The Create Service Request page appears.
Create Service Request Page (1 of 2)
Create Service Request Page (2 of 2)

Enter Customer Information
-
Select either a Customer Number or the Customer name.
After you select a customer, the Account Number appears by default from the selected customer. The Group Owner and Individual Owner appear by default from the technician that is creating the service request.
Group owner only applies if the technician is a member of a multiple user laptop group.
Note: If you set up the profile option CSM: Data Routed to Group Owner to Yes and completed all the setup required for a multiple user laptop group, then you will be able to view all those customers that are attached to the multiple user laptop group.
-
(Optional) Change the Group Owner if applicable.
Note: A member of a multiple user laptop group can create a service request for another group owner, if their group is related to another group.
-
(Optional) Change the Individual Owner if applicable.
Note: A member of a multiple user laptop group can create a service request for any other member in the group by selecting the member in the Individual Owner field.
Enter Contact Information
The Contact Information region provides the following fields:
-
Contact Type
-
Contact Name
-
Contact By
-
Select a contact type. Options are: Employee or Customer.
-
Select the Contact Name.
Enter Product Information
-
To log Product Information, select values for the applicable fields in the following list:
-
Item
-
Item Description
-
Item Instance
-
Serial number
-
Service Tag
-
Incident Address
-
Enter the Problem Description
-
In the Problem Description section, enter a Summary for the service request.
Enter Issues
-
In the Issues section, select a Request Type from the list of values. For example, Field Service.
-
Select a Status, such as Open, or Working.
-
Select the Internal Severity level of the service request.
-
(Optional) Provide information such as Problem Type, Incident Date, Customer's Urgency, and PO Number.
Enter a Resolution
-
Select a Resolution Type from the list of values.
-
Enter the resolution in the Resolution Summary field.
Add Note
Using the Add Note section you have the option to enter notes.
-
Select a Note Source from the list of values. Sources are Customer or Service Request.
-
Select the Type of note from the list of values.
-
Select the note Visibility from the list of values. Options are: Publish, Public, or Private.
-
Enter note text in the Note text box.
Create Service Request
-
To create the service request, click Apply.
The Service Request is created. The Create Service Request page title changes to the Update Service Request page. The Service Request number that was created displays in the title of the page.
(Optional) Create a Task
Creating a task at this time is optional. You can always come back at a later date and add the task.
Using the Service Requests with no tasks seeded view on the Field Service Technician Dashboard page you can easily locate the service requests that do not have associated tasks.
-
Click the Create Task button.
The Create Task page appears.
-
Create the task.
For more information on creating a task, see Creating a Task Based on an Existing Service Request.
Viewing Customer Information
Before visiting a customer site, the technician may need address and customer information. Customer information is available from the Field Service Technician Dashboard.
Note: The technician has the ability to view customer information only when there is a task for the customer assigned to the technician.
Customer information such as, name, country, and location can be displayed as columns in the selected view. Additionally, to view customer information, technicians can click the Show link in the Details column.
Viewing Install Base Information
Oracle Mobile Field Service Store and Forward - Laptop enables you to view the location and product details for a customer product. You are also able to view the configuration of the customer product and any additional attributes. Finally, you are able to view and add customer product notes.
Use this procedure to view Installed Base information.
Steps
-
Navigate to the Field Service Technician Dashboard.
The Dashboard appears.
-
Click the Show link in the Details column.
-
Click the Item Name link.
The Installed Base Item Instance page appears displaying the General tab.
Note: The Item Name field will have the link only when an item instance is associated to the item, and the service request is created for that item and item instance combination.
-
To view the location details of the item instance, select the Location tab.
-
To view item configuration details, select the Configuration tab.
Viewing and Sending Messages
Oracle Mobile Field Service Store and Forward - Laptop enables you to send and receive messages from other people within your organization. This messaging function facilitates communication among field service employees. It can be set up to send messages among all Field Service users, or among the members of one team.
You can use the New Message page to send messages. You can use this functionality to ask for support or additional information from other field service employees.
Technicians can send notification messages to the other resources from the Field Service Technician Dashboard by selecting the Create Message link from the Messaging section. The selection of the resource in the notification depends on the value of the profile option 'CSM: Notifications Scope'. The possible values for this profile are:
-
All field Service Users: The technician can select any resource defined in the application.
-
Representatives in the same Resource Group: The technician can select only resources that share the same resource group.
After you synchronize with the enterprise system, you can verify if you have received any messages.
Use this procedure to view messages that you have received and to delete messages that you have read:
To View Received and Sent Messages
-
Navigate to the Field Service Technician Dashboard.
The Dashboard appears.
-
Click the View Messages link in the Messaging section.
The Notification Summary page appears.
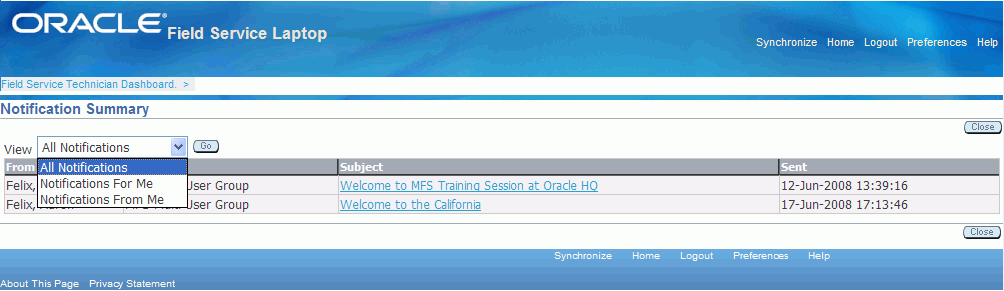
-
From the View drop-down menu, select the category of messages that you want to retrieve. The options are:
-
All Notifications
-
Notifications For Me
-
Notifications From Me
-
-
To read a message, click the message subject link in the Subject column.
The Notification Details page appears displaying the complete message.
To Write and Send New Messages
When you need information from one of the other members of the field service organization, you can ask for it by sending a message.
Use this procedure to write and send messages to other people in the field service organization:
-
Navigate to the Field Service Technician Dashboard.
The Dashboard appears.
-
Click the Create Message link in the Messaging section.
The New Message page appears.

-
(Optional) Determine whether you want to send the message to everyone in the group. If you do, select Yes in the Send to Whole Group field.
Note: This field applies only if you are using multiple user laptop group functionality.
The To field becomes unavailable.
-
If you do not want to send the message to the whole group, select the recipient from the To field drop-down list.
-
Complete the Subject and Message.
-
Click Submit.
Note: Upon synchronization, the new message written by the technician is delivered to the recipient. Similarly, new messages for the technician become available for the technician to view from the view messages link.
Viewing Contract Information
Before starting a task, a field service technician should review details about the customer and task. Such details include contract information. The field service technician uses this information to determine the following:
-
Customer entitlements
-
Contract coverage
Oracle Mobile Field Service Store and Forward - Laptop displays contractual information in a table format that you can reference for transaction billing types.
Use this procedure to view contractual information:
To View Contractual Dates
-
Navigate to the Field Service Technician Dashboard.
The Dashboard appears.
-
Select the service request for which you want to view contractual information and click the associated Service Request link in the summary table.
The Update Service Request page appears. The contract information appears in the Contractual Dates section of the page.
To View Contract Details
-
Navigate to the Field Service Technician Dashboard.
The Dashboard appears.
-
Click the Show link in the Details column associated with a service request and task.
-
Click the Item Name link.
The Item Instance page appears for the item.
-
Select the Contracts tab.
The Item Instance - Contracts page displays the Contract Line Details view.
-
The contract number appears in the Contract Number field.
-
The type of service covered by the contract appears in the Service Name field.
-
The Service description code appears in the Service Description field.
-
-
Click the Show link against the contract number to view the business process and entitlement database details for the contract number.
For example, an Extended Notebook PC Service Program covers eight transaction billing types, each with a maximum amount of $100,000. The percent covered by the service organization varies from transaction billing type. In one instance, a loaner notebook computer is provided under a Loaner transaction billing type with 10% coverage, so the service organization would only be responsible for 10% of the cost. In another instance, an Estimate Repair transaction billing type with 100% coverage could apply.
Viewing Service History
To best serve the customer, field service technicians should review the customers service history prior to making a customer visit. Technicians can request service history for either a customer or a customer product. Only tasks and service requests that are closed or completed appear in the service history.
The amount of service history gathered for a customer is determined in customer setup. Here, the administrator determines how many service requests are used to create the service history. For example, the last three service requests may be compiled to create the service history.
Service history includes the following:
-
Customer and contact details.
-
Product details (item or installed base).
-
Service request and task assignment details.
-
Reported labor, material, and expense for each customer visit.
-
Field service technicians who previously visited the customer.
Use this procedure to view service history:
Steps
-
Navigate to the Field Service Technician Dashboard.
The Dashboard appears.
-
Click the Show link in the Details column against the service request for which you want to view service history.
-
Click the Item Name link.
The Item Instance page appears.
-
Select the Service tab.
The service history appears.
Additionally, you can use the Service Request by Item Name Search criteria to view the service history.
Viewing and Changing Service Request Information
The service request contains practical information, including the problem and likely resolution.
Use this procedure to view service request information:
To View Service Request Information
-
Navigate to the Field Service Technician Dashboard.
The Dashboard appears.
-
Identify the task information related to the service request.
-
Click the Show link in the Details column associated with a service request and task, and then click the Service Request number link.
The Update Service Request page appears.
To View Service Request Information (Alternative Method)
-
Navigate to the Field Service Technician Dashboard.
The Dashboard appears.
-
Click the Update Task icon in the task row.
The Update Task page appears.
-
On the Update task page, expand the Show Service Request section.
-
Click the service request Number link.
The Update Service Request page appears
To View Service Request Information (Alternative Method)
-
Navigate to the Field Service Technician Dashboard.
The Dashboard appears.
-
Click the Service Request Number link.
The Update Service Request page appears.
To Change Service Request Information
-
Navigate to the Field Service Technician Dashboard.
The Dashboard appears.
-
Identify the task information related to the service request.
-
Click the Update Task icon in the task row.
The Update task page appears.
-
On the Update task page, expand the Show Service Request section.
Under the Show Service Request section you can change or enter the following information:
-
Item Name
-
Item Description
-
Item Instance
-
Serial Number of the item
-
Service Tag
-
Problem and Problem Summary
-
Resolution and Resolution Summary
-
Understanding Task Creation
There may be times when you need to create a new or additional task for a service request. For example, if you cannot complete a task or need support from a fellow field service technician, then you should create an additional task.
There are two ways you can create a task:
-
Based on an existing task that serves as a template.
-
Based on an existing service request, where you have to complete all the desired fields.
Creating a Task Based on an Existing Task
- A service request must exist.
- A task must exist.
Steps
-
From the Fields Service Technician Dashboard, click the Update Task icon against the task for which a new follow-up task needs to be created.
The Update Task page appears.
-
Click the Create Follow-Up Task button located in the top right corner.
The Create Follow-up Task page appears. The fields in this page populate based on the respective field values in the existing task.
-
Update the field values as required.
-
(Optional) Technicians have the ability to assign the follow-up task to themselves by selecting Yes in the 'Assign to me' field.
-
To create the follow-up task, click Apply.
After the creation and assignment of the follow-up task to the technician, the follow-up task appears in the Field Service Technician Dashboard.
Creating a Task Based on an Existing Service Request
The existing service request could:
-
Already be downloaded from the enterprise.
-
Be newly created in the Mobile Field Service Laptop application.
Prerequisites
- A service request must exist.
Steps
To Create a Task for a Service Request Downloaded From the Enterprise
-
Launch the existing Service Request page from the Field Service Technician Dashboard or from the Update Task page. See Viewing and Changing Service Request Information.
-
Click Create Task.
The Create Task page appears. The fields in this page populate based on the data for the existing task for the same service request.
-
Update or modify the fields as required.
-
(Optional) Technicians have the ability to assign the follow-up task to themselves by selecting Yes in the 'Assign to me' field.
-
Click Apply.
The new task is created for the service request. After the creation and assignment of the follow-up task to the technician, the follow-up task appears in the Field Service Technician Dashboard.
To Create a Task for a New Service Request
You can create tasks for a newly created service request.
-
Click Create Task.
The Create Task page appears.
-
Complete the Description text box.
The system date and time appears by default in the Planned Start and Scheduled Start fields. The Planned End time is populated based on the value set for the profile option, ‘CSFW: Planned Task Window’. The Scheduled End date and time are populated based on the effort value set for the task type.
-
Update or modify the fields as required.
-
(Optional) Technicians have the ability to assign the follow-up task to themselves by selecting Yes in the 'Assign to me' field.
-
To create the task click Apply.
The Update Task <Description> page appears.
After the creation and assignment of the task to the technician the follow-up task appears in the Field Service Technician Dashboard.
-
To upload an attachment, see Uploading Attachments.
-
To verify the service request and task, go to the Dashboard. The newly created Service Request and Task is available in the summary table of the Dashboard.
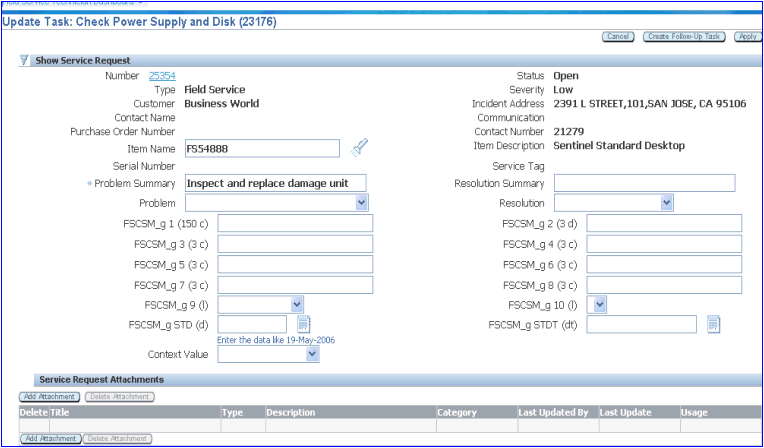
Viewing a Service Request Attachment
From the update task page you can open and view any attachment associated with a service request. The attachment can vary in type such as, a .pdf, .doc, .xls, and .gif.
Use this procedure to view a service request attachment:
Steps
-
Navigate to the Update task page.
-
Expand the Show Service Request section.
The existing service request attachments display in the Service Request Attachments section of the page.
-
Click the File Name link located under the Service Request Attachments.
The Attachment page appears.
Uploading Attachments
Field Service technicians can upload service request attachments from their mobile devices. Technicians can add attachments to tasks and service requests. Uploaded data can be viewed in the enterprise system after synchronization.
This feature assists technicians in capturing additional information related to task execution such as, diagnostic reports, images, photos, drawings and so on, that can be accessed at a later date.
Supported Attachment Types
-
Short Text Attachment
-
Add text up to 4000 characters.
-
Size is not limited by profile value.
-
-
Web Page Attachment
-
Link a URL up to 4000 characters.
-
Size is not limited by profile value.
-
-
File Attachment
-
Multiple files types are supported such as, .jpeg, .bmp, and .doc.
-
Attachment size is limited by the CSM: Maximum Attachment profile value. The profile value represents the size of the attachment in megabytes (MB) for each task or service request per synchronization.
-
If the profile value is not set, the system determines the value as zero. The technician cannot upload or download file attachments.
-
If the attachment size is greater than the value set in the profile, then the application will generate an error message. The technician cannot upload the attachment.
-
-
Steps
Use this procedure to create and upload attachments.
-
Navigate Field Service Technician Dashboard > Update Task icon > Expand Show Service Request section.
The Update Task page appears.
-
Click Add Attachment.
The Attachment Summary page appears.
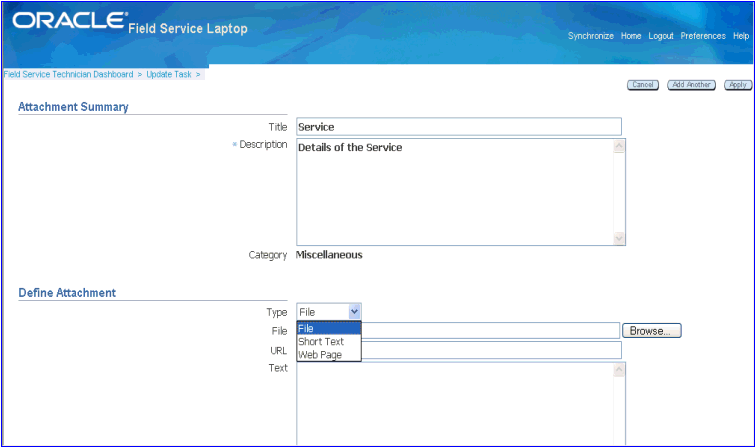
-
Complete the Title and Description fields.
-
If the attachment is a file, browse to and select the file.
-
If the attachment is a URL, enter the URL address. The limit is 4000 characters.
-
If the attachment is text, enter text up to 4000 characters.
-
Click Apply.
-
To save the attachment and proceed with another attachment, click Add Another.
-
To cancel the attachment, click Cancel.
-
To delete the attachments added, navigate:
Field Service Technician Dashboard > Update Task icon > Expand Show Service Request section
-
Select the attachment that should be deleted by checking the check box in the select column, and then click the Delete Attachment button located in the header.
Note: Attachments can be deleted only before synchronization.
Logging Out
When you have finished working in the Oracle Mobile Field Service Store and Forward - Laptop application, you will want to log out of the application.
Use this procedure to log out of Oracle Mobile Field Service Store and Forward - Laptop:
Prerequisites
- Save all data and be ready to exit the application.
- Perform a synchronization with the Enterprise system.
Steps
-
Click the Logout link in the upper right corner of any page.
Oracle Mobile Field Service Store and Forward - Laptop checks that all data has been correctly saved and then closes. The application returns to the login page.