Using Oracle Mobile Field Service Store and Forward - Laptop Administrators Dashboard
This chapter describes how to use the Field Service Administrator Dashboard in the Mobile Field Service Store and Forward - Laptop application. Plus it describes how to launch the application and synchronize with the enterprise system after the application is installed.
This chapter covers the following topics:
- Introduction
- Launching and Synchronizing Oracle Mobile Field Service Store and Forward - Laptop
- Understanding the Field Service Administrator Dashboard
- Activating and Disabling Members of a Multiple User Laptop Group
- Creating Service Requests
- Assigning Unassigned Tasks
- Assigning Multiple Resources to a Task
- Reassigning Tasks
- Viewing and Sending Messages
- Setting Up File-Based Synchronization
Introduction
The Field Service Administrator Dashboard is the entry point for administrators or managers to perform multiple functions on behalf of their reporting field technicians.
The Field Service Administrator Dashboard is only available to administrators and owners of a multiple user laptop group. You need to define a multiple user laptop group with one member having the Field Service Group Owner responsibility and one or more members having the Field Service Group Administrator responsibility before you can access the Field Service Administrator Dashboard. Resources with the Field Service Group Member responsibility will use the Field Service Technician Dashboard to perform their daily job functions.
For information on creating a multiple user laptop group, see Creating and Managing Mobile Users, Oracle Mobile Field Service Implementation Guide.
The Field Service Administrator Dashboard is similar to the Field Service Technician Dashboard. The functionality of the Dashboards is basically the same, except that the Field Service Administrator Dashboard is from the perspective of a team lead or manager whereas the Field Service Technician Dashboard is used by individual technicians.
The differences between the Field Service Administrator Dashboard and Field Service Technician Dashboard will be described in this chapter. For information on the Field Service Technician Dashboard, see Understanding the Field Service Technician Dashboard.
Launching and Synchronizing Oracle Mobile Field Service Store and Forward - Laptop
To use the Mobile Field Service Store and Forward - Laptop application technicians and administrators will launch the application and then they will perform a synchronization with the enterprise system to ensure that they have the most current information and that their most current information from the laptop application is sent to the enterprise system. The synchronization process can be a system process or it can be a file-based process depending on how the application is configured.
For information on setting up file-based synchronization in the Mobile Field Service Store and Forward - Laptop application, see Setting Up File-Based Synchronization
Complete the following steps to launch and synchronize Oracle Mobile Field Service Store and Forward - Laptop after the installation. Administrators and members of a multiple user laptop group can synchronize the data for the whole group.
The Field Service Group Owner of a multiple user laptop group will install the application for the group on a single laptop device. To install the application, see Installing Oracle Mobile Field Service Store and Forward - Laptop, Oracle Mobile Field Service Implementation Guide.
Prerequisites
- If you are performing file-based synchronization than the Mobile Field Service Store and Forward - Laptop application must be configured for this option.
Steps
Launch Web-to-Go and the Mobile Field Service Store and Forward - Laptop Application
-
Select Start > Programs > Oracle Database Lite 10g > Oracle Web-to-go
The Oracle Web-to-go icon appears in the system tray. The system tray is located in the Windows task bar, usually at the bottom of the screen. The system tray contains the clock and miniature icons for easy access to system functions such as printer, modem, and volume control.
-
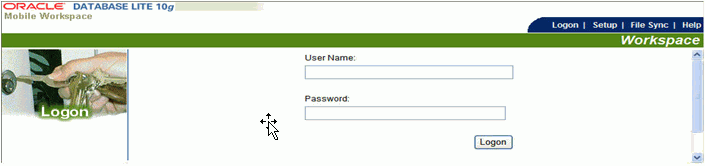
Double click the Oracle Web-to-go icon in the system tray.
The Laptop client login page appears.
-
Enter the user name and password in the appropriate fields and then click Login.
Note: This user must have either the Field Service Group Owner or Field Service Group Administrator responsibilities.
The Field Service Administrator Dashboard appears. For a description of this page, see Understanding the Field Service Administrator Dashboard.
Synchronize with the Enterprise System
To receive new data that has been assigned to technicians, such as new tasks and service requests, administrators will need to synchronize with the enterprise system. Likewise, to send the changes that administrators make, such as creating debrief lines and updating task statuses, will need to be synchronized with the enterprise system.
-
Establish an internet connection for your laptop computer.
-
Click the Synchronize link located in the upper right corner of the page.
The laptop computer will synchronize the information with the enterprise system.
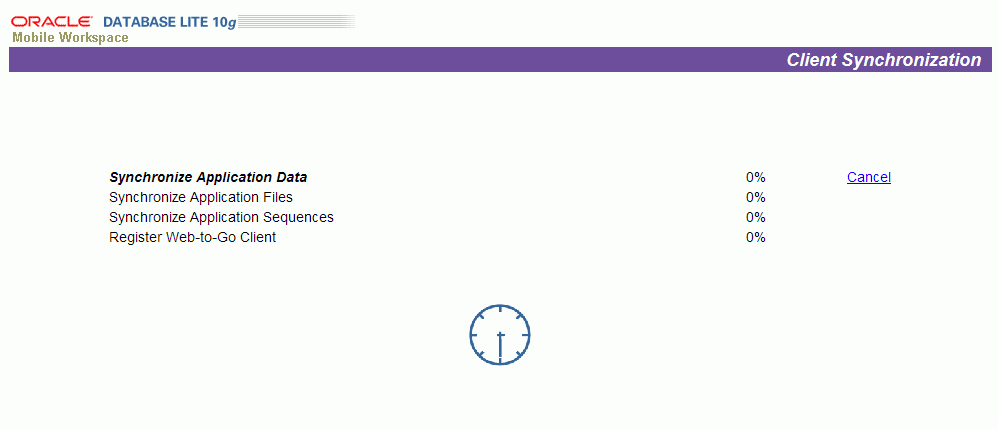
Caution: Synchronizing data can take a few minutes; therefore, do not abort this process. If the synchronization process fails, contact your system administrator.
(Alternative Method) Synchronize with the Enterprise System (File-Based)
-
Click the File Sync link located in the upper right corner of the page.
Note: The Synchronization link changes to the File Sync link when the laptop application is configured for file-based synchronization.
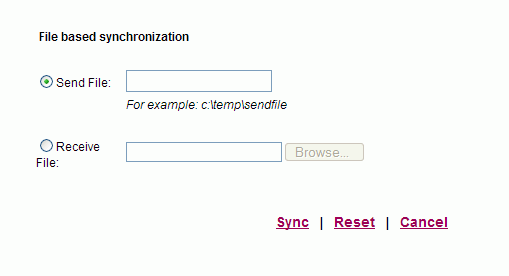
The File based synchronization page appears.
-
To upload information to the enterprise system, select the Send File option and enter the file name and location for where the system should create the file containing the data to be uploaded.
-
Click the Sync link.
The system creates the file in the location specified. You will receive a message stating that the synchronization succeeded and the file was created successfully.
-
Click the OK link.
-
To complete the upload process, navigate to the Mobile Server page.
-
Select the File Sync tab.
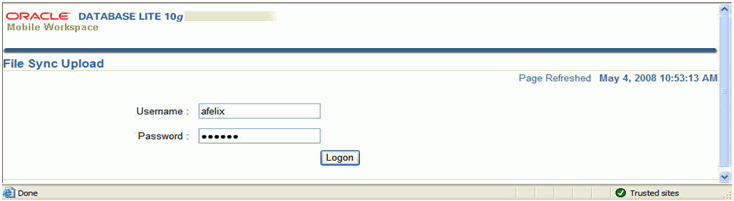
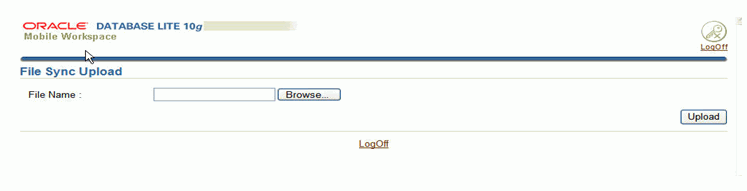
The File Sync Upload page appears.
-
Login using your Username and Password.
-
Browse for the file name containing the data to be uploaded in the File Name field and click Upload.
The synchronization process is initiated. Upon completion, if there is data to be downloaded from the Enterprise system to the Laptop application a link will appear on the File Sync Upload page.
-
To download the information from the Enterprise system to the Laptop click the link on the File Sync Upload page.
-
Enter a file name and location for where the system should create the file containing the data to be downloaded.
-
Navigate to the Field Service Administrator Dashboard.
-
Click the File Sync link located in the upper right hand portion of the page.
-
To download information from the Enterprise system, select the Receive file option and browse for the file name of the file containing the data to be downloaded.
-
Click the Sync link.
You will receive a message stating that the synchronization succeeded.
-
Click the OK link.
Understanding the Field Service Administrator Dashboard
The Oracle Mobile Field Service Store and Forward - Laptop Field Service Administrator Dashboard serves as the point of entry for a field service administrator, manager, or team lead.
Important: The Field Service Administrator Dashboard provides a similar look and feel, and functions in the same way as does the Field Service Technician Dashboard.
The Dashboard is divided into these components:
-
Main View
-
Search Area
-
Quick Links
-
Messaging
-
Configuration
Main View
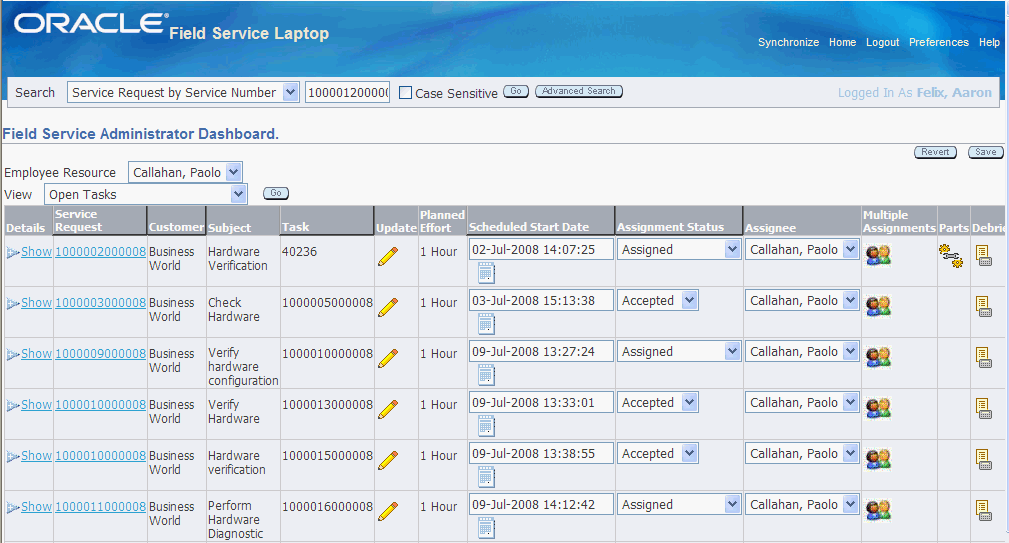
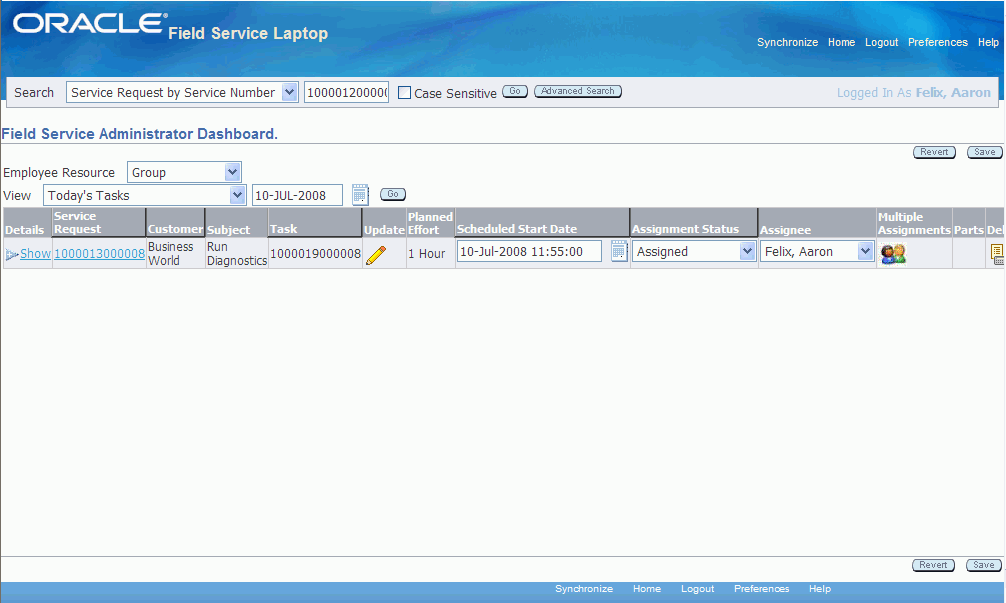
The Dashboard appears displaying the designated default main view of tasks assigned to all the technicians that the administrator is responsible for. The view defines which columns of information appear in the summary table, the column sequence, and the criteria for tasks to appear in the rows of the table. Oracle provides these seeded views to use with the Dashboard:
-
Today's Tasks
-
Unassigned Tasks
-
Service Request without tasks
-
Open Tasks
In addition, in the Field Service Administrator Dashboard there is the Employee Resource field above the View field. This field enables administrators to view all the information for the group or for each individual member of the group. An administrator will select the type of view they want to use using the View field and then they will specify whether they want to see this view information for the entire group or for individual members of the group. The summary table appears displaying the information that matches these criteria.
Field Service Administrator Dashboard
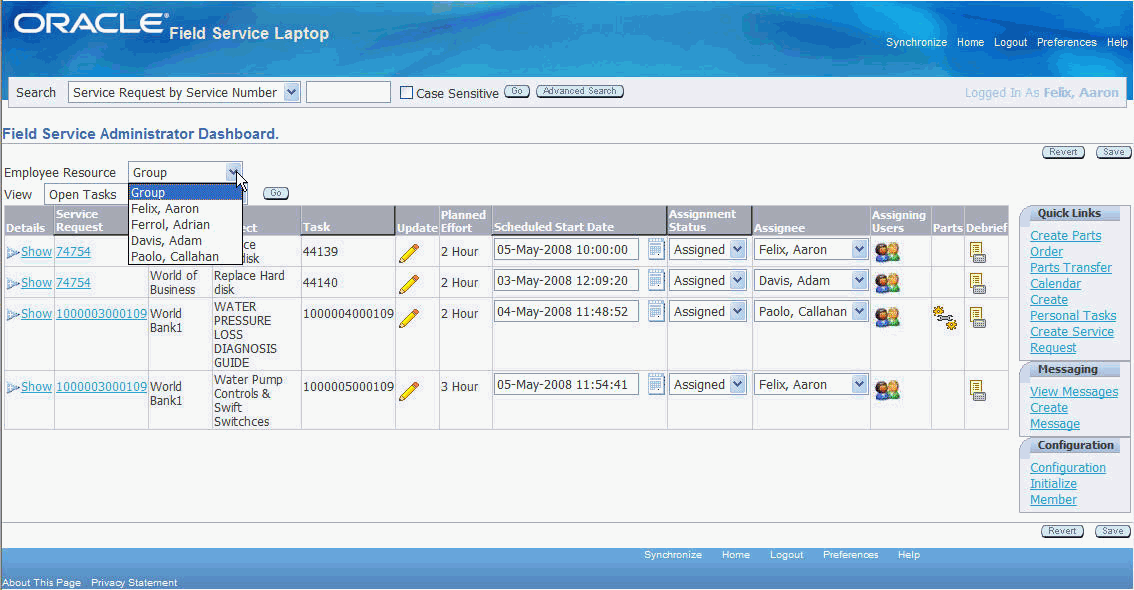
Custom Views
The administrator can select a different view, personalize a seeded or existing custom view, create a new custom view, or designate a different default view.
To access another view, select the different view from the View drop-down menu, and then click Go.
To personalize a seeded or existing custom view, create a custom view, or designate a different view as the default view, see Customizing Dashboard Views, Oracle Mobile Field Service Implementation Guide.
For more information about custom views, see Understanding Dashboard Customized Views, Oracle Mobile Field Service Implementation Guide.
Dashboard Summary Table Functions
Field service administrators can perform multiple functions from the Dashboard summary table:
-
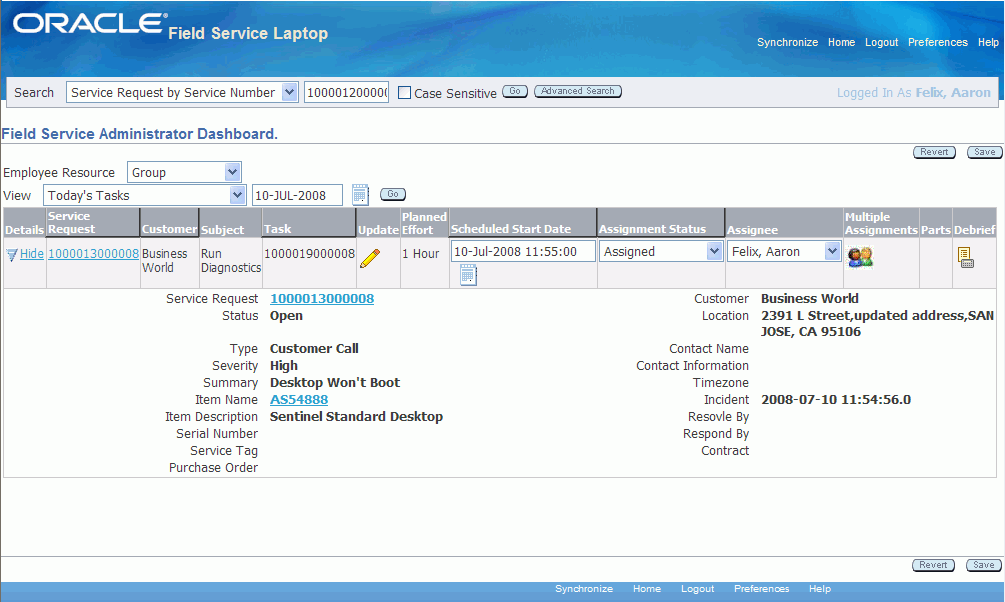
To view service request detailed information, click the Details Show link.
Field Service Administrator Dashboard - Service Request Details
-
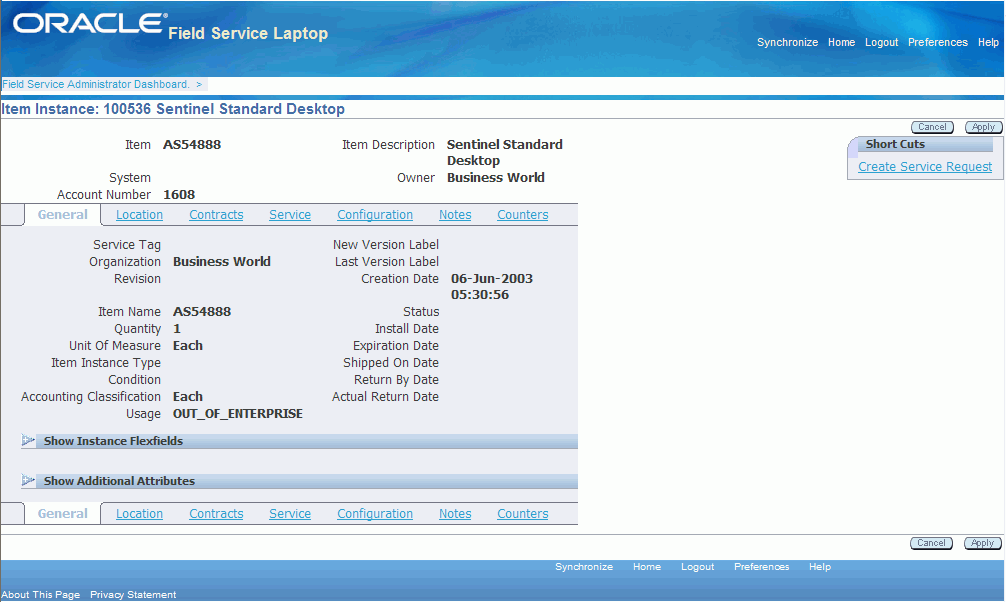
To access Item Instance details, click the Details Show link, and then from the expanded Details region, click the Item Name link.
Item Instance page
-
Using Item Instance details:
-
Access Location details by clicking the Location link.
-
Access Contract details by clicking the Contracts link.
-
Access Service history details by clicking the Service link.
-
Access Configuration details by clicking the Configuration link.
-
Access Notes details by clicking the Notes link.
-
Access Counter details by clicking the Counters link.
-
-
To access service request details, drill down to the Update Service Request page by clicking the Service Request number link.
-
To view customer and product information, click the Service Request number link.
-
To access task detailed information, click the Update icon in the row for the task.
-
To change task assignment status, in the row for the task, select another status from the drop down menu in the Assignment Status column.
-
To assign or reassign a task, select another resource using the Assignee field.
-
To assign or reassign multiple resources to a task, click the Multiple Assignments icon.
-
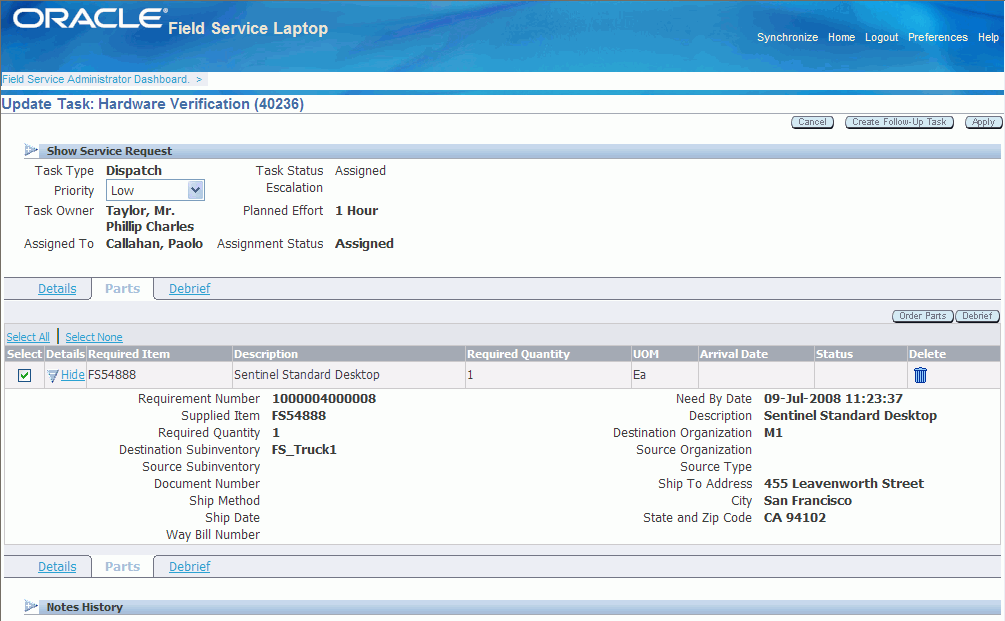
To access service part details, click the Parts icon in the row for the task.
See Viewing Parts Order Details.
Note: The Parts icon is enabled on the Dashboard only if there are parts associated to the task.
Update Task - Parts page
-
To report labor, material, and expense, click the debrief icon in the row for the task.
See Performing Debrief.
Search Area
The search area is used to retrieve a subset of tasks, based on search criteria that you specify. The administrator can search based on the following search criteria using the basic search functionality:
-
Service Request by Service Number
-
Service Request by Service Tag
-
Service Request by Customer Name
-
Service Request by Item Name
-
Service Request by Item Description
-
Service Request by Serial Number
-
Task by Task Number
-
Task by Customer Name
-
Customer by Customer Name
-
Item Ordered by Item Name
-
Item Ordered by Customer Name
-
Inventory by Item Name
-
Inventory by Subinventory
-
Installed Base by Service Tag
-
Installed Base by Item Name
-
Installed Base by Serial Number
-
Installed Base by Status
Using the advanced search functionality, the administrator can search based on combinations of conditions and search parameters.
See Using Search and Advanced Search.
Quick Links
Quick links are provided for these operations:
-
Create Parts Order.
See Ordering Parts for a Specific Task and Ordering Parts for Trunk Stock.
-
Parts Transfer.
-
Calendar.
-
Create Personal Tasks.
-
Create Service Request.
Messaging
From the Messaging region you can select to:
-
View Messages.
-
Create Messages.
See Viewing and Sending Messages.
Configuration
Using the configuration section of the page, the owner of a multiple user laptop group can initialize the members of the group to use the laptop device. Plus, they can also disable members of the group.
Plus, administrators can enable file based synchronization for the multiple user laptop group.
For information on activating and disabling members, see Activating and Disabling Members of a Multiple User Laptop Group.
For information on setting up file-based synchronization, see Setting Up File-Based Synchronization.
Activating and Disabling Members of a Multiple User Laptop Group
Using the Members page within the Field Service Administrator Dashboard, the owner of the multiple user laptop group can activate the members of the group enabling them to use the single laptop device. They also can disable the members as well if the members no longer need access to the laptop device.
The Field Service group owner will activate the administrators and members (technicians) within the group to use the laptop device.
For information on creating a multiple user laptop group, see Creating and Managing Mobile Users., Oracle Mobile Field Service Implementation Guide
Use this procedure to activate a member or disable a member of the multiple user laptop group:
Prerequisites
- A multiple user laptop group has been defined.
- Multiple users have been created with the required roles and assigned to the multiple user laptop group.
To Activate Members of the Group
-
Navigate to the Field Service Administrator Dashboard as the owner of the multiple user laptop group.
-
Click Initialize Member link in the Configuration section.
The Members page appears displaying all of the members of the group.
-
Select the Initialize check box next to the administrator and member resources and enter their Password.
Note: This password is the same one they would use to access the Enterprise system.
-
Click the Save link.
A message appears stating that the selected operation was successful.
-
Click the OK link.
The Members page reappears.
The administrator and member (technician) resources has been activated to use the single laptop device. After the activation the administrators can now access the Field Service Administrator Dashboard and the members can access the Field Service Technician Dashboard in the Oracle Mobile Field Service Store and Forward - Laptop application.
-
Click the Field Service Administrator Dashboard link to go the Dashboard main page.
To Disable Members of a Group
-
Navigate to the Field Service Administrator Dashboard as the owner of the multiple user laptop group.
-
Click Initialize Member link in the Configuration section.
The Members page appears displaying all of the members of the group and the date and time they were initialized in the Initialize Time field.
-
Select the Disabled check box next to the member that you want to disable.
-
Click the Save link.
-
Click the OK link.
The member is now disabled. They will not be able to use the single laptop device to access the Mobile Field Service Store and Forward - Laptop application.
Creating Service Requests
Field service administrators can create a new service request from the Field Service Administrator Dashboard using the Create Service Request quick link. Administrators can create service requests against any customer or asset/product for the technicians that they are responsible for. When setting up technicians you assign the customers they are responsible for using the Assign Customers page.
For more information on assigning customers to technicians, see Assigning Customers to Mobile Field Service Technicians, Oracle Mobile Field Service Implementation Guide.
The Create Service Request page includes regions for contact information, product information, problem description, and service information.
For more information about logging a service request, see the Oracle TeleService User Guide.
Use this procedure to create a service request:
To Create a Service Request
-
From the Field Service Administrator Dashboard, click the Create Service Request link in the Quick Links section.
The Create Service Request page appears.
Create Service Request Page (1 of 2)
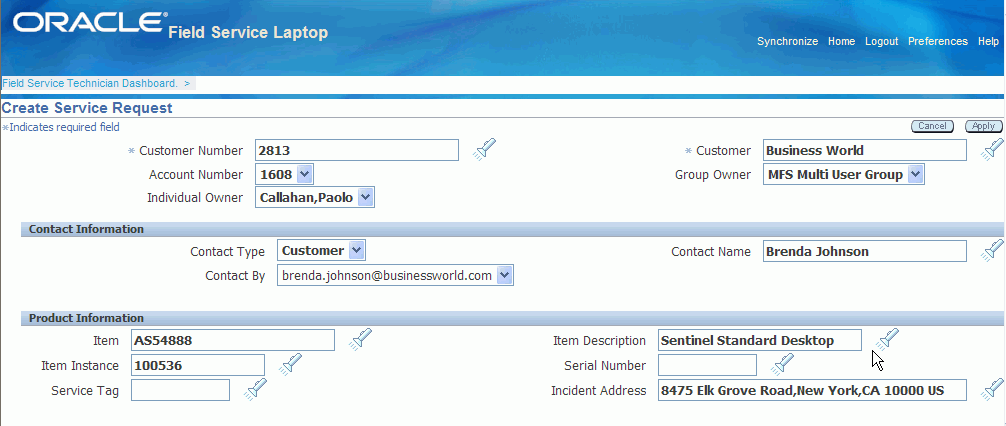
Create Service Request Page (2 of 2)

Enter Customer Information
-
Select either a Customer Number or the Customer name.
After you select a customer, the Account Number appears by default from the selected customer. The Group Owner and Individual Owner appear by default from the administrator that is creating the service request.
-
(Optional) Change the Group Owner if applicable.
Note: An administrator of a multiple user laptop group can create a service request and assign it to a different group if there are no skills, parts, or resource availability in the current group.
-
(Optional) Change the Individual Owner if applicable.
Note: An administrator of a multiple user laptop group can create a service request for any other member in the group by selecting the member in the Individual Owner field.
Enter Contact Information
The Contact Information region provides the following fields:
-
Contact Type
-
Contact Name
-
Contact By
-
Select a contact type. Options are: Employee or Customer.
-
Select the Contact Name.
Enter Product Information
-
To log Product Information, select values for the applicable fields in the following list:
-
Item
-
Item Description
-
Item Instance
-
Serial number
-
Service Tag
-
Incident Address
-
Enter the Problem Description
-
In the Problem Description section, enter a Summary for the service request.
Enter Issues
-
In the Issues section, select a Request Type from the list of values. For example, Field Service.
-
Select a Status, such as Open, or Working.
-
Select the Internal Severity level of the service request.
-
(Optional) Provide information such as Problem Type, Incident Date, Customer's Urgency, and PO Number.
Enter a Resolution
-
Select a Resolution Type from the list of values.
-
Enter the resolution in the Resolution Summary field.
Add Note
Using the Add Note section you have the option to enter notes.
-
Select a Note Source from the list of values. Sources are Customer or Service Request.
-
Select the Type of note from the list of values.
-
Select the note Visibility from the list of values. Options are: Publish, Public, or Private.
-
Enter note text in the Note text box.
Create Service Request
-
To create the service request, click Apply.
The Service Request is created. The Create Service Request page title changes to the Update Service Request page. The Service Request number that was created displays in the title of the page.
(Optional) Create a Task
Creating a task at this time is optional. You can always come back at a later date and add the task.
Using the Service Requests with no tasks seeded view on the Field Service Technician Dashboard page you can easily locate the service requests that do not have associated tasks.
-
Click the Create Task button.
The Create Task page appears.
-
Create the task.
For more information on creating a task, see Creating a Task Based on an Existing Service Request.
Assigning Unassigned Tasks
Using the Field Service Administrator Dashboard administrators can assign tasks that have not been assigned. They can assign a task to any member within the multiple user laptop group.
Use this procedure to assign an unassigned task:
Prerequisites
- A service request and task have been created but they have not been assigned to a technician.
To Assign Unassigned Tasks
-
Navigate to the Field Service Administrator Dashboard.
The Dashboard appears.
-
Select Unassigned Tasks in the View field and click Go.
All of the unassigned tasks appear in the summary table.
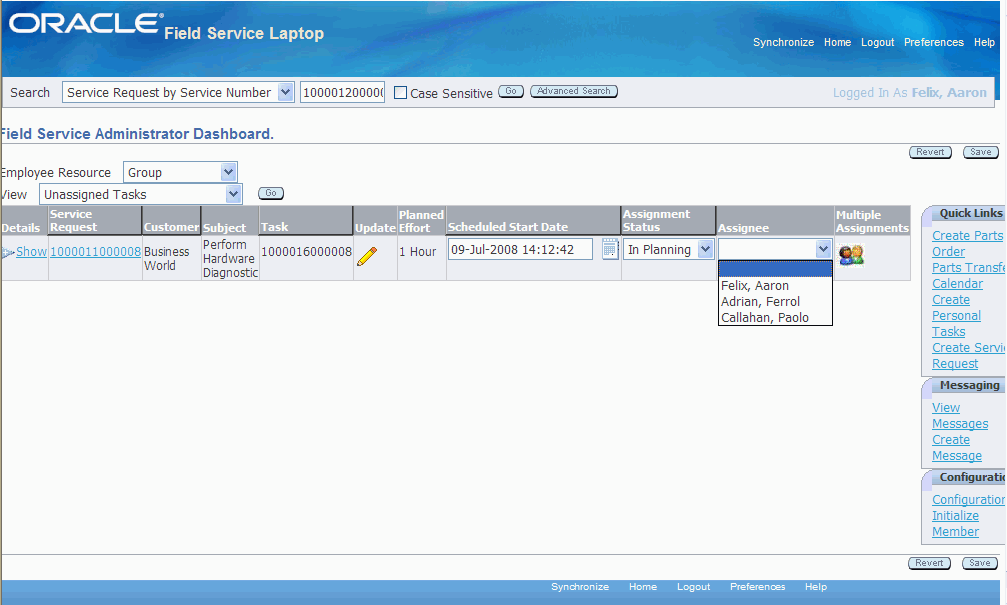
-
For the unassigned task that you want to assign, select the Assignee.
-
Click Save.
The task is assigned to the technician. The Assignment Status for the task changes from In Planning to Assigned.
Assigning Multiple Resources to a Task
Using the Field Service Administrator Dashboard, administrators can assign multiple resources to a task.
Use this procedure to assign multiple resources to a task:
Prerequisites
- A service request and task have already been created.
To Assign Multiple Resources to a Task
-
Navigate to the Field Service Administrator Dashboard.
The Dashboard page appears.
-
Click the Multiple Assignments icon for a task.
Update Task - Details page (1 of 2)
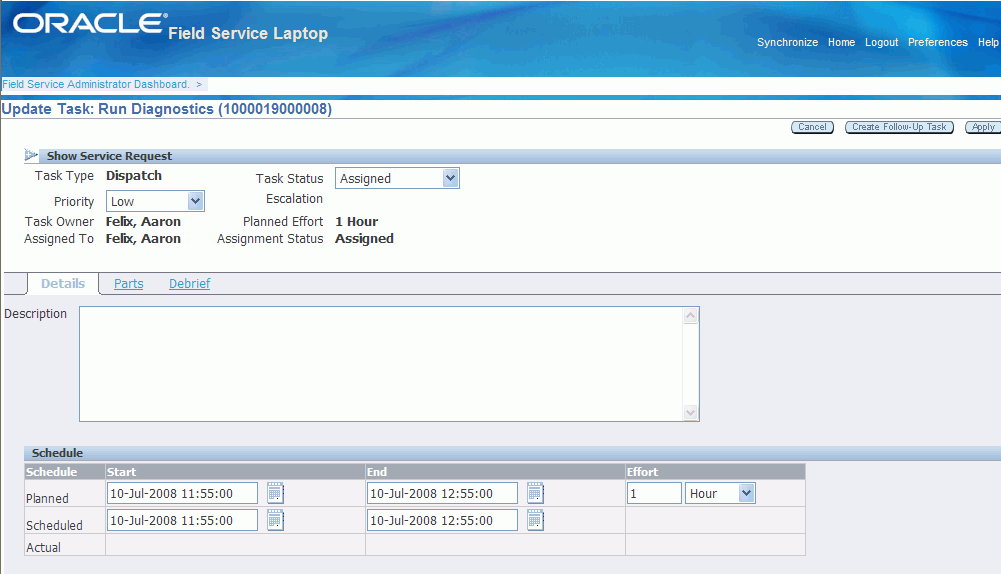
Update Task - Details page (2 of 2)
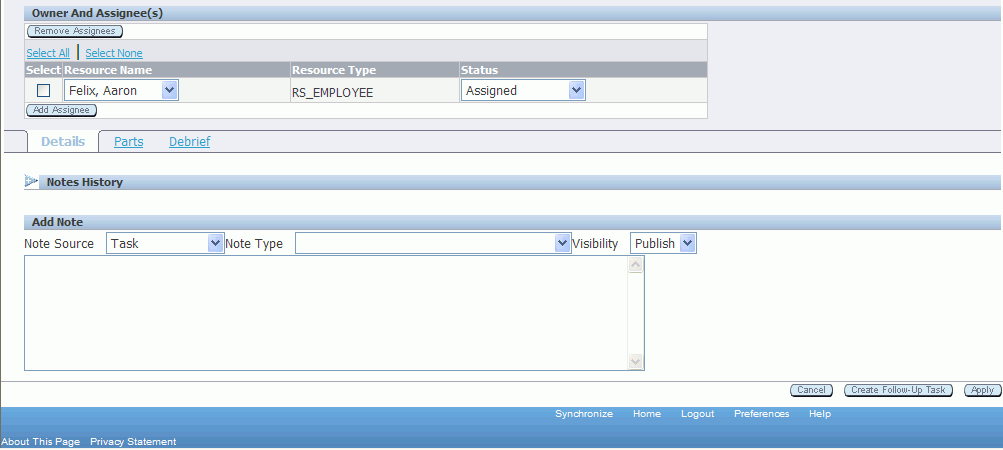
The Update Task - Details page appears. Any resources that are currently assigned to the task appear in the Owner and Assignee(s) section of the page.
-
Click the Add Assignee button under the Owner and Assignee(s) section of the page.
-
Select a Resource Name and their Status for the task.
Note: An administrator can assign any members in their multiple user laptop group to a task.
-
Repeat steps 3 and 4 for each resource you want to add to the task.

-
Click Apply.
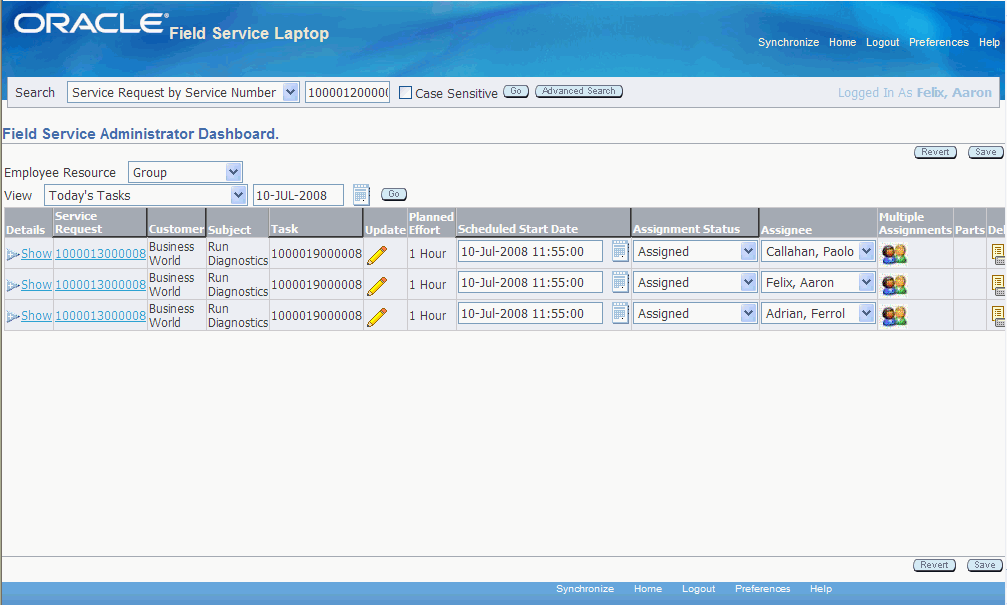
The resources are assigned to the task. In the Field Service Administrator Dashboard summary table that task will be listed multiple times. One time for each resource assigned to the task. For example, if three resources have been assigned to Task A. Task A will appear in the summary table three times displaying each resource as the Assignee.
To Delete an Assigned Resource
-
Navigate to the Field Service Administrator Dashboard.
The Dashboard page appears.
-
Click the Multiple Assignments icon for a task.
The Update Task - Details page appears. Any resources that are currently assigned to the task appear in the Owner and Assignee(s) section of the page.
-
Select the resource you want to remove and click the Remove Assignees button.
-
Click Apply.
The resource is no longer assigned to the task.
Reassigning Tasks
Using the Field Service Administrator Dashboard, administrators can reassign tasks to other resources.
Use this procedure to reassign a task to another resource:
To Reassign a Task
-
Navigate to the Field Service Administrator Dashboard.
The Dashboard appears.
-
For the task you want to reassign, select another assignee using the Assignee field.
-
Click Save.
The task is reassigned to the new resource.
(Alternative Method) To Reassign a Task
-
Navigate to the Field Service Administrator Dashboard.
The Dashboard appears.
-
For the task you want to reassign, click the Multiple Assignments icon.
In the Owner and Assignee(s) section of the page, the resource who is currently assigned to the task appears.
-
Select another resource using the Resource Name list of values.
-
Click Apply.
The task is reassigned to the new resource.
Viewing and Sending Messages
Oracle Mobile Field Service Store and Forward - Laptop enables you to send and receive messages from other people within your organization. This messaging function facilitates communication among field service employees. It can be set up to send messages among all Field Service users, or among the members of one group
Administrators can use the New Message page to send messages. They can use this functionality to send vital information to the members of their group.
Administrators can send notification messages to the other resources from the Field Service Administrator Dashboard by selecting the Create Message link from the Messaging section. The selection of the resource in the notification depends on the value of the profile option 'CSM: Notifications Scope'. The possible values for this profile are:
-
All field Service Users: The administrator can select any resource defined in the application.
-
Representatives in the same Resource Group: The administrator can select only resources that share the same resource group.
After you synchronize with the enterprise system, you can verify if you have received any messages.
Use this procedure to view messages that you have received and to delete messages that you have read:
To View Received and Sent Messages
-
Navigate to the Field Service Administrator Dashboard.
The Dashboard appears.
-
Click the View Messages link in the Messaging section.
The Notification Summary page appears.
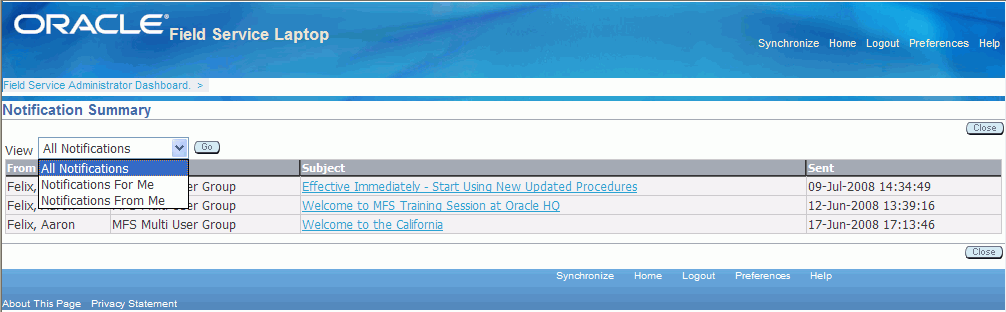
-
From the View drop-down menu, select the category of messages that you want to retrieve. The options are:
-
All Notifications
-
Notifications For Me
-
Notifications From Me
-
-
To read a message, click the message subject link in the Subject column.
The Notification Details page appears displaying the complete message.
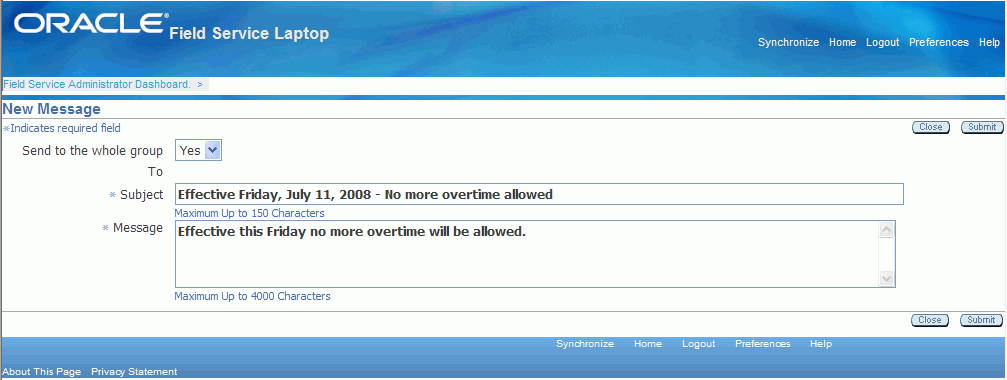
To Write and Send New Messages
When administrators need information from one of the other members of the field service organization or they would like to send information to the members of the group, they can do this by sending a message.
Use this procedure to write and send messages to other people in the field service organization:
-
Navigate to the Field Service Administrator Dashboard.
The Dashboard appears.
-
Click the Create Message link in the Messaging section.
The New Message page appears.
-
(Optional) Determine whether you want to send the message to everyone in the group. If you do, select Yes in the Send to Whole Group field.
The To field becomes unavailable.
-
If you do not want to send the message to the whole group, select the recipient from the To field drop-down list.
-
Complete the Subject and Message.
-
Click Submit.
Note: Upon synchronization, the new message written by the administrator is delivered to the recipient. Similarly, new messages for the administrator become available for the administrator to view from the view messages link.
Setting Up File-Based Synchronization
Using the Mobile Field Service Store and Forward - Laptop application technicians and administrators have the option to perform a file based synchronization. The owner of the multiple user laptop group configures this option and then the technicians and administrators can perform a file based synchronization.
File based synchronization enables technicians or administrators to plug in their own external device such as, a CD or flash drive and upload or download data when there is no network connectivity.
When performing the upload synchronization from the Mobile Field Service Store and Forward - Laptop application to the enterprise the administrator or technician can specify the file name and location where the file is to be stored using the File Sync option in the application. After the synchronization file is uploaded to the portable media, the administrator is able to use the file to initiate the synchronization from the mobile server located at the office.
When performing the download synchronization from the enterprise to the Mobile Field Service Store and Forward - Laptop application the administrator or technician is able to download the file to the external media (CD or flash drive) from the mobile server located at the office. The administrator or technician is able to download the file using the File Sync option present in the laptop device located in the field.
For information on performing a file based synchronization, see Launching and Synchronizing Oracle Mobile Field Service Store and Forward - Laptop.
To Set Up File Based Synchronization
-
Navigate to the Field Service Administrator Dashboard.
The Dashboard appears.
-
Click the Configuration link in the Configuration section of the page.
The Configure your Workspace page appears.
-
Select the Enable file based sync? check box.
-
Click the Save link and then OK.
The Synchronization link in the Dashboard changes to File Sync.