Basic Configuration Tasks
Oracle E-Business Suite Setup Steps
Proper setup is required before a number of Oracle E-Business Suite features will operate correctly. The following steps are carried out automatically during or after installation:
-
Run Rapid Install
-
Test Web listener virtual directories
-
Test Oracle HTTP Server configuration
-
Create DBC files
-
Test Java Servlet setup
-
Set Web Server profile options
The above is not an inclusive list of the installation and post-installation tasks that may be needed on a particular system.
Rapid Install is the installation program. Refer to Oracle E-Business Suite Installation Guide: Using Rapid Install for detailed information on running Rapid Install.
Configuring the Login Page for Oracle E-Business Suite
Oracle E-Business Suite uses a configurable login page, which can be tailored to suit the needs of different organizations.
Oracle E-Business Suite Login page
Users log in to Oracle E-Business Suite using a client web browser. From the Oracle E-Business Suite Login page, users access the Oracle E-Business Suite Home Page, which provides a single point of access to HTML-based applications, forms-based applications, and Business Intelligence applications. Users access the Oracle E-Business Suite Login page from the following URL:
http://<server:port>/OA_HTML/AppsLogin
For example,
http://oraapps1.oracle.com:8000/OA_HTML/AppsLogin
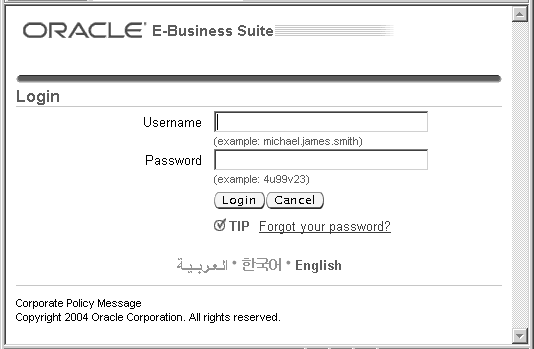
From this URL, you will be redirected to the central login page, "AppsLocalLogin.jsp".
Central Login Page
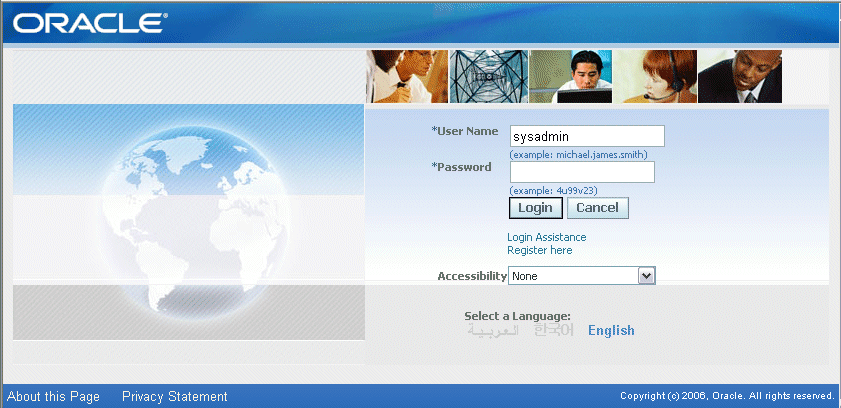
The following features are displayed in the default login page: Username field, Password field, Login button, and the Language Picker (if more than one language is installed).
The following user interface features can be turned on or off through the Local Login Mask profile option:
-
Hints for username/password
-
* Register URL - this link allows the user to perform self-service registration in User Management
-
* Forgot Password URL - allows the user to have a password reset
-
Language Picker
-
Corporate Policy message
* Oracle User Management must be installed for "Register URL" and "Forgot Password URL" to be enabled.
The ICX login page (http://server:port/OA_HTML/US/ICXINDEX.htm) redirects the user to the central login page, "AppsLocalLogin.jsp". If, in a previous release, you customized the ICX login page previously with a custom logo, you should make a copy of the new ICX login page and replace the existing image with your custom image in the copied file. The location for the company logo is $OA_MEDIA/FNDSSOCORP.gif. Ensure that the image is appropriately size. Also, you should change the text of the message 'FND_ORACLE_LOGO' in Message Dictionary to the appropriate text. The following login URL is supported, but no new features are being added to it:
http://server:port/OA_HTML/jtflogin.jsp
If the Oracle E-Business Suite instance is Single Sign-On enabled, the servlet directs the user to the Single Sign-On login page.
Passwords
Note that in previous releases of Oracle E-Business Suite, user passwords were treated as case insensitive. Now, Oracle E-Business Suite user passwords can optionally be treated as case sensitive, depending on the mode you choose. Case-sensitivity in passwords is controlled by the profile option Password Case Option.
Language
The current browser language, if it exists in the applications database also, is used for the login page. The user can choose a different language on the login page (if the Language Picker is enabled) and refresh the page to have it appear in that language.
If the current browser language does not exist in the Oracle E-Business Suite installation, the language set in the site-level setting of the ICX_LANGUAGE profile option is used to render the login page.
A user can override the value of the ICX_LANGUAGE profile option for a given session only.
Oracle Applications Manager
Oracle Applications Manager uses this central login page as well to authenticate users.
Customizing the Oracle E-Business Suite Login page
Customized Login Page
User interface features can be turned on or off using the profile option Local Login Mask (FND_SSO_LOCAL_LOGIN_MASK):
For the Login page to show one of more of these optional attributes, just add the numeric values of all desired attributes and set the value of the profile option to that value.
-
Username Hint = 01
-
Password Hint = 02
-
Cancel Button = 04
-
Forgot Password URL = 08
-
Register URL = 16
-
Language Picker = 32
-
Corporate Policy Message = 64
For example to show the Password Hint and the Forgot Password URL only, set the Local Login Mask profile option to 10 (02+08). To show just the Language Picker, set the value to 32, which is also the default value for the profile option.
The values for the Username Hint, Password Hint, Forgot Password URL text, Register URL text, and the Corporate Policy Message, as well as the Copyright text, are stored in Message Dictionary. You can update these messages using the Messages form or HTML page.
The table below lists the message names and their default values.
| Message Name | Default value |
|---|---|
| FND_SSO_HINT_USERNAME | (example: michael.james.smith) |
| FND_SSO_HINT_PASSWORD | (example: 4u99v23) |
| FND_SSO_FORGOT_PASSWORD | Forgot your password? |
| FND_SSO_REGISTER_HERE | Register here |
| FND_SSO_SARBANES_OXLEY_TEXT | Corporate Policy Message |
| FND_SSO_COPYRIGHT_TEXT | Copyright (c) 2006, Oracle. All rights reserved. |
Personalizing the Oracle E-Business Suite Home Page
The Oracle E-Business Home Page can be personalized to display the Worklist and to display the Applications Navigator in "Tree" or "Flat" mode. By default, the Applications Navigator is shown in Flat mode.
Refer to the Oracle Application Framework Personalization Guide for more information on personalizing Oracle Application Framework pages. Ensure that you have the relevant profile options set appropriately.
Follow these steps to use the Tree mode:
-
Log in to Oracle E-Business Suite with the system administrator responsibility.
-
From the Oracle E-Business Suite Home page, select Personalize Page.
-
Select Apply in the "Choose Personalization Context" page.
-
Under "Personalization Structure", expand the following nodes: 'Table Layout: (topTableLayoutContainer)' > 'Row Layout: (tableLayoutRow)' > 'Cell Format: (worklistResponsibilityLeftCell)' > 'Table Layout: Home Contenttable'.
-
Under the node 'Table Layout: Home Contenttable' > Row Layout: (responsibilityRow), click the Personalize icon.
-
Change the value for the 'Rendered' property for the column 'Function: Applications Home Page' to 'false'. Select Apply.
-
Click on the Personalize icon for 'Table Layout: Home Contenttable' > 'Row Layout: (appsNavTreeRow)'.
-
Change the value for the 'Rendered' property for the column 'Function: Applications Home Page' to 'true'. Select Apply.
-
Select Return to Application.
Administering Oracle HTTP Server
Oracle HTTP Server Powered by Apache provides the communication services within Oracle Application Server. This facilitates deployment of HTML-based applications within a multi-tiered computing environment.
Oracle HTTP Server
All incoming client requests to Oracle Internet Application Server (AS) are handled by the Communication Services component of AS. The Oracle HTTP Server, powered by Apache Web Server technology accepts and processes these requests. The Apache technology adopted by Oracle HTTP Server provides an extremely stable, scalable, and extensible platform on which to deploy web-based applications. The modular design of the Apache server allows for extension of the capabilities of the Oracle HTTP Server. In addition to the standard Apache modules (often referred to as modules, or simply mods), a number of Oracle specific modules are provided along with an extension to the functionality of several standard modules.
These modules include:
-
mod_ssl - This module provides secure listener communications using an Oracle provided encryption mechanism using 128-bit Secure Sockets Layer (SSL). The mod_ossl module replaces mod_ssl. In contrast to the OpenSSL module, mod_ossl is based on the Oracle implementation of SSL, which supports SSL version 3 and uses the Oracle Wallet Manager for Certificate Management. The Apache HTTP Server SSL configuration file, ssl.conf, is located in $INST_TOP/ora/10.1.3/Apache/Apache/conf directory.
-
mod_oc4j - This module routes all servlet requests to the Apache OC4J servlet engine embedded within Oracle HTTP Server. Servlets can be shared across multiple zones.
-
mod_perl - This module forwards Perl requests to the Perl Interpreter. The Perl Interpreter is embedded within the Oracle HTTP Server, removing the necessity to spawn an external interpreter as well as providing a caching mechanism such that modules and scripts need only be loaded or compiled once. Oracle E-Business Suite does not currently utilize mod_perl.
The Oracle HTTP Server is powered by a standard version of Apache. A number of books have been published describing the operation of the Apache server. To further add to your knowledge of the Apache server, you may wish to consult one of these.
Note: Refer to the Oracle HTTP Server documentation for a more detailed description of the operation and configuration of the Oracle HTTP Server. The information in this section is supplementary to that provided in the Oracle HTTP Server books.
Oracle E-Business Suite Installation Guide: Using Rapid Install should be consulted for additional information on directory structures and file locations referred to in this guide.
Apache Configuration Files
Apache is configured through directives contained in one or more configuration files. The directives necessary for operating Apache within the Oracle environment will be entered into the configuration files during the install process. It should not be necessary to modify these files unless the system is being re-configured.
Warning: An invalid directive entered into a configuration file will prevent Apache from starting. An incorrect definition provided to a directive may cause Apache to behave in an unintended fashion.
Location
The Apache configuration files are installed as part of the Oracle E-Business Suite Rapid Install process. On UNIX, for example, the files will be placed in $INST_TOP/ora/10.1.3/Apache/Apache/conf.
Secure Sockets Layer Configuration
Secure Sockets Layer (SSL) allows the Apache listener to encrypt HTML pages and transmit them on the network using the HTTPS protocol for secure transmissions.
SSL uses an encrypting method called public key cryptography, where the server provides the client with a public key for encrypting information. The server's private key is required to decrypt this information. The client uses the public key to encrypt and send information to the server, including its own key which identifies it to the server.
In order for the Oracle HTTP Server, powered by Apache, to function in secure mode it is also necessary to utilize certificates which validate the server's identity. These certificates are used to ensure that the owner of a public key is who they say they are. Typically you will want to use a private key with an officially signed certificate, validated by a Certificate Authority (CA). The CA validates the company details, sets expiration dates on the certificates and may place policies on what information is contained within the certificate. A number of CAs exist, and include such authorities as Verisign, RSA, and GTE CyberTrust.
To obtain a CA approved certificate it is necessary to generate a certificate request, which includes details of the organization applying as well as the public key to be distributed, this is then sent to the CA, validated and returned. Authorities may also require proof of ownership of the company applying for the certificate, as well as proof of ownership of the domain name specified in the certificate request.
It is possible to generate a self-signed certificate that can be used to test SSL operation. Most browsers are configured to accept certificates from a number of recognized authorities. Receiving a certificate from an organization other than one of these will generate a warning, and the user will be prompted to accept or reject this certificate. A self-signed certificate will generate this warning.
Creating a self-signed certificate
The SSL module provides two utilities - Oracle Wallet Manager, and the Oracle Wallet Manager Command Line Interface (orapki) - that can be used to create a self-signed certificate for testing purposes.
Warning: Self-signed certificates are inherently insecure, and should not be used in a environment where security is required.
In order to generate a self-signed certificate, perform the steps below using the Oracle Wallet Manager Command Line Interface:
Temporary SSL Environment Setup
Follow these steps for the temporary SSL environment setup.
-
Source your environment
-
Log on to the application (middle) tier, as the OS user who owns the application tier files.
-
Source your <APPL_TOP>/<SID_hostname>.env file to set your APPL_TOP variables.
-
Navigate to the $INST_TOP/ora/10.1.3 and source the <SID_hostname>.env file to set your 10.1.3 ORACLE_HOME variables. When working with wallets and certificates, you must use the 10.1.3 executables.
-
-
Create a Wallet
-
Verify the location of the Web SSL directory:
grep s_web_ssl_directory $CONTEXT_FILE
-
Navigate to this directory, which will have Apache and opmn subdirectories
-
Change to the Apache subdirectory
-
Backup any existing wallets (demo certificates are included in Release 12)
-
Create your new wallet:
orapki wallet create -wallet . -auto_login -pwd <password>
"-wallet ." (note the ".") tells orapki that you want to create the wallet in the current directory. You can also specify the full path to any directory where you wish to create a wallet.
" -auto_login" tells orapki that you want to create cwallet.sso which is an obfuscated copy of ewallet.p12. With auto login enabled, processes submitted by the OS user who created the wallet will not need to supply the password to access the wallet.
-
You should now see two wallet files in your directory: cwallet.sso and ewallet.p12.
-
-
Add your self-signed certificate to the wallet.
-
Enter the following command all on one line, substituting the appropriate parameters for your instance:
orapki wallet add -wallet . -dn "CN=server.us.oracle.com,OU=Unit,O=Org,L=Orlando,ST=Florida,C=US" -keysize 1024 -self_signed -validity 3650 -pwd welcome1
-
Your wallet is now ready for use in environments where security is not required (as mentioned in the warning note above, self-certification is by definition not secure).
-
Configure Apache for SSL Connections using AutoConfig
Ensure that the following parameters are correctly set in your Oracle E-Business Suite applications context file:
| Variable | Non-SSL Value | SSL Value |
|---|---|---|
| s_url_protocol | http | https |
| s_local_url_protocol | http | https |
| s_webentryurlprotocol | http | https |
| s_active_webport | Same as s_webport | Same as s_webssl_port |
| s_help_web_agent | URL constructed with http protocol and s_webport | URL constructed with http protocol and s_webport (same as non-SSL) |
| s_login_page | URL constructed with http protocol and s_webport | URL constructed with https protocol and s_webssl_port |
Run AutoConfig, either through the Oracle Applications Manager interface, or by using the adautocfg.sh script in the application tier $ADMIN_SCRIPTS_HOME directory.
Note: For more details, see My Oracle Support Knowledge Document 387859.1, Using AutoConfig to Manage System Configurations with Oracle E-Business Suite Release 12.
Test Startup of Apache and Oracle E-Business Suite Sign-On
Restart the application tier Apache services using the adapcctl.sh script in the $ADMIN_SCRIPTS_HOME directory. Ensure that Apache can startup successfully, and that you successfully get an SSL connection to the default Apache banner screen using https:/<host.domain>:<SSL_port>, where <host.domain> is the fully qualified name of the machine running Apache, and <SSL_port> is the SSL port number defined in ssl.conf.
Once you have signed on to Oracle E-Business Suite, select a responsibility and process that will launch a Forms-based application. For example, System Administrator responsibility and the Define User process.
Note: For further details of using SSL, see My Oracle Support Knowledge Document 376700.1, Enabling SSL with Oracle Application Server 10g and E-Business Suite Release 12, and Knowledge Document 376694.1, Using the Oracle Wallet Manager Command Line Interface with Oracle E-Business Suite Release 12.
AdminAppServer Utility
Important: The following details are provided for reference only. You should not need to carry out manual maintenance on dbc files, as they are managed by AutoConfig, which runs AdminAppServer automatically. See "Using AutoConfig to Manage System Configurations with Oracle E-Business Suite Release 12", Knowledge Document 387859.1, on My Oracle Support.
Because Release 12 is deployed in a multi-tier configuration, the security model includes authentication of application servers to the database servers they access. When this layer of security is activated, the application server passes server IDs (similar to passwords) to the database server. If the database server recognizes the server ID, it grants access to the database. The server IDs are created using a Java script called AdminAppServer.
The application server security system is by default not activated; if it you must activate it after installation, if required. The application servers are not assigned server IDs and the database servers do not check for server IDs.
Using the AdminAppServer Utility
The Java script AdminAppServer is used to create .dbc files and to enable or disable application server security.
Prior to running AdminAppServer you must ensure that:
-
JDBC classes are in the CLASSPATH and LD_LIBRARY_PATH
-
$JAVA_TOP is in the classpath
For UNIX platforms, the script is run as:
java oracle.apps.fnd.security.AdminAppServer [parameters]
For Windows platforms, the script is run as:
jre -classpath %CLASSPATH% \
        oracle.apps.fnd.security.AdminAppServer [parameters]
The first parameter must be the connection string followed by the command string, for example:
apps/apps@dbname ADD
The following commands are supported:
-
ADD - create a new .dbc file
-
UPDATE - update an existing .dbc file
-
DELETE - delete an existing .dbc file
-
STATUS - check the serverID status for a database
-
AUTHENTICATION - toggle authentication mode
Additional parameters depend on the operation. These include:
-
DBC - The .dbc file to modified, or used to connect to the database. Used with UPDATE, DELETE, STATUS, AND AUTHENTICATION.
-
SECURE_PATH - Used with ADD. This parameter specifies in which directory the .dbc file should be created, and defaults to the current directory if not provided. This parameter should always point to $FND_TOP/secure.
-
DB_HOST - Required. The host machine of database.
-
DB_PORT - Required. The port of database. The default is 1521.
-
DB_NAME - For thin drivers. The database SID.
-
APPS_JDBC_DRIVER_TYPE - THICK or THIN. This parameter must be set to THIN.
-
GUEST_USER_PWD - Any valid applications user. This parameter defaults to the value of GUEST_USER_PWD profile if not provided. If passed with no arguments to an UPDATE call, it will refresh with the value from database.
-
GWYUID - For thick drivers.
-
FNDNAM - For thick drivers.
-
TWO_TASK - For thick drivers. Name of database.
-
WALLET_PWD - Used with the TCF Socket Server in SSL mode.
-
SERVER_ADDRESS - Used with authentication.
-
SERVER_DESCRIPTION - Used with authentication.
-
FND_MAX_JDBC_CONNECTIONS - The maximum number of open connections in the JDBC connection cache. This number is dependent on the amount of memory available, number of processes specified in the init.ora file of the database and the per-processor file descriptor limit.
-
FND_IN_USE_CONNECTION_TIMEOUT - The maximum number of seconds a connection can be in use. In order to avoid connections being locked up for too long, the connection cache uses this parameter to forcibly close connections that have been locked for longer than this specified limit. If this parameter is unspecified, connections in use will not be cleaned up. This should be set to a number larger than the time taken to complete the largest transaction.
-
FND_UNUSED_CONNECTION_TIMEOUT - The maximum number of seconds an unused connection can remain in the cache. The connection cache will close and remove from the cache any connection that has been idle for longer than this specified limit.
Important: The following parameters are required: APPS_JDBC_DRIVER_TYPE (must be set to THIN), DB_HOST, and DB_PORT.
Administering .dbc Files
The .dbc file is contained on the web/applications server and holds information used by the database for authentication. The web/application server passes the information from the .dbc file, as well as login information, to the database server to authenticate the user. The authentication process is handled by the standard applications security feature.
The .dbc files required by the application server security system are not part of the delivered product and must be created after installation.
The Java utility AdminAppServer is used to create the .dbc files.
Prior to running AdminAppServer you must ensure that:
-
JDBC classes are in the CLASSPATH and LD_LIBRARY_PATH
-
$JAVA_TOP is in the classpath
Creating a .dbc file
Use the AdminAppServer utility to create a .dbc file for the application server to access the database server. In addition to creating the .dbc file this utility registers the application server with the database for the Applications Server Security feature.
To access additional database servers from the same application server, you must rerun the AdminAppServer utility for each additional database. You must run the AdminAppServer utility each time you create a .dbc file, and each .dbc file only allows access to one database.
To create a .dbc file for an application server:
-
You must set the username/password value for the GUEST_USER_PWD parameter. Create a valid username ("guest" for example) in Oracle E-Business Suite. Then use the username/password combination as the value for GUEST_USER_PWD. The syntax is illustrated in the following example:
GUEST_USER_PWD=guest/guest
Oracle recommends that you do not assign any responsibilities for this user.
-
From the command line, enter the appropriate command for your platform:
For UNIX platforms:
java oracle.apps.fnd.security.AdminAppServer apps/apps@dbname \
        ADD DB_HOST=database_host_name DB_PORT=database_port \
        DB_NAME=database_sid \
        [env_name=env_value] SECURE_PATH=$FND_TOP/secure
For Windows platforms:
jre -classpath %CLASSPATH% \
        oracle.apps.fnd.security.AdminAppServer apps/apps@dbname \
        ADD DB_HOST=database_host_name DB_PORT=database_port \
        DB_NAME=database_sid \
        [env_name=env_value] SECURE_PATH=$FND_TOP/secure
GWYUID, FNDNAM, and GUEST_USER_PWD will be defaulted if not provided explicitly. dbc files should be located in $FND_TOP/secure, so SECURE_PATH should always be set to that, or this should be run directly out of of the $FND_TOP/secure area.
Updating a .dbc file (or Server ID)
When updating the .dbc file you can change as many parameters as you want, including the server ID, but you must enter at least one. Settings that you do not update retain their value.
To update a .dbc file or server ID:
Enter from the command line:
UNIX
java oracle.apps.fnd.security.AdminAppServer apps/apps@dbname \ UPDATE DBC=$FND_TOP/secure/file.dbc APPL_SERVER_ID \ [env_name=env_value]
Windows
jre -classpath %CLASSPATH% \ oracle.apps.fnd.security.AdminAppServer apps/apps@dbname \ UPDATE DBC=$FND_TOP/secure/file.dbc APPL_SERVER_ID \ [env_name=env_value]
If APPL_SERVER_ID is not passed, AdminAppServer will attempt to synchronize the current server ID value in the .dbc file and the database, generating a new one if neither contains a value at all. Passing in APPL_SERVER_ID by itself will force a brand new application server ID to be created always, overwriting any existing one.
Deleting a .dbc file
To delete a .dbc file, enter on the command line:
UNIX
java oracle.apps.fnd.security.AdminAppServer apps/apps@dbname \ DELETE DBC=$FND_TOP/secure/file.dbc
Windows
jre -classpath %CLASSPATH% \ oracle.apps.fnd.security.AdminAppServer apps/apps@dbname \ DELETE DBC=$FND_TOP/secure/file.dbc
This deletes the .dbc file and disallows access to the indicated database if Server Security is active.
Troubleshooting
The following are possible problems you may encounter and suggested solutions.
-
Database connection failed.
Check to see if your JDBC environment is correct. See: AdminAppServer Utility.
-
File I/O error while adding the server.
Check to see if the path you supplied as SECURE_PATH exists and that you have write permissions on it.
-
Unable to read environment file.
A value for SECURE_PATH may not have been specified. If a value is not specified, the AdminAppServer utility assumes you are running from JAVA_TOP and looks for the file $JAVA_TOP/oracle/apps/env.html to find the value of FND_TOP. Retry the command specifying the value of SECURE_PATH.
-
Database error: Unique constraint violated.
There can be only one entry for each application server per database. If you do not specify the value for SERVER_ADDRESS, the AdminAppServer utility will default the IP address of the machine from which you are running the command. To resolve this issue, run the STATUS command of AdminAppServer to ensure you are not trying to create a duplicate entry. Delete the old entry if you want to replace it. Retry, supplying the correct value for SERVER_ADDRESS.
Administering Server Security
Oracle E-Business Suite is deployed in a multi-tier configuration with one database server and many possible middle-tier application servers. The application servers include Apache JSP/Servlet, Forms, Discoverer and also some client programs such as Application Desktop Integrator. Any program which makes a SQL*Net connection to the Oracle E-Business Suite database needs to be trusted at some level. Oracle E-Business Suite uses the Server Security feature to ensure that such SQL*Net connections are coming from trusted machines and/or trusted programs.
The Server Security feature of Oracle Application Object Library supports authentication of application server machines and code modules in order to access the database. When Server Security is activated, application servers are required to supply server IDs (like passwords) and/or code IDs to access a database server. Server IDs identify the machine from which the connection is originating. Code IDs identify the module and patch level from which the connection is originating. Code IDs are included in applications code by development. The database server can be set to allow access only from specific machines and/or by code at a desired patch level.
The application server security feature is not initially activated. You should activate it by using the commands described in this section.
Application Server Security can be in one of three states:
-
OFF - Server security is not checked. Any application server machine can access the database. Code IDs are also not checked. Use this option on test systems or if you have full control over the software on all machines which can physically access your database.
-
ON - Some level of trust is required to access the database. Either the application server must be registered with the database or the code must pass a module and version ID known to be trusted. Use this option only if you wish to maintain compatibility with application servers that you cannot yet patch to the code level required for best security.
-
SECURE - Full trust is required for access to the database. Only registered application server machines may connect to the database, and only trusted code modules may connect to the database. This is the default setting for Release 12.
Server Security Status
You can check the Server Security status for a particular database using the STATUS command in the AdminAppServer utility, and providing the dbc file corresponding to that database. The STATUS command will display whether server security is turned on and whether the server ID in the dbc file is currently valid.
To check the Server Security status for a database:
On UNIX:
java oracle.apps.fnd.security.AdminAppServer apps/apps \
     STATUS DBC=<dbc file path>
On Windows:
jre –classpath %CLASSPATH% \
     oracle.apps.fnd.security.AdminAppServer apps/apps \
     STATUS DBC=<dbc file path>
Important: Check the Server Security status of your databases before you activate server security and ensure that all desired application servers have been registered.
Adding, Updating, or Deleting Server IDs
Application servers can be registered as trusted machines with a database server. This works by generating a large random ID number and storing that in both the application server and the database. When the application server attempts to connect to the database it will supply its server ID and the database will verify that it matches a trusted machine. The server ID is stored as a parameter in the DBC file for each application server. It can also be defined as an environment variable. The AdminAppServer utility is used to generate server IDs and then register them with a database server.
To add a server ID
Server ID values are generated by the AdminAppServer utility, and therefore cannot be supplied on the command line. They will be added to the database automatically when the AdminAppServer is used to create a dbc file.
On UNIX:
java oracle.apps.fnd.security.AdminAppServer apps/apps \
ADD [SECURE_PATH=$FND_TOP/secure] \
DB_HOST=<database host> \
DB_PORT=<database port> \
DB_NAME=<database sid>
On Windows:
jre –classpath %CLASSPATH \
oracle.apps.fnd.security.AdminAppServer apps/apps \
ADD [SECURE_PATH=$FND_TOP/secure] \
DB_HOST=<database host> \
DB_PORT=<database port> \
DB_NAME=<database sid>
To update a server ID
You can update an application server's server ID at any time. From the command line enter:
On UNIX:
java oracle.apps.fnd.security.AdminAppServer apps/apps \
UPDATE DBC= <dbc file path> APPL_SERVER_ID
On Windows:
jre –classpath %CLASSPATH% \
oracle.apps.fnd.security.AdminAppServer apps/apps \
UPDATE DBC=
By providing the APPL_SERVER_ID argument, you will force a new server ID to be generated and added to your DBC file. If the APPL_SERVER_ID argument is not provided, AdminAppServer will take care of syncing up the server ID's of your dbc file and your database automatically, if required.
To delete a server ID
Server IDs can be deleted. This must be done using the AdminAppServer utility as follows:
On UNIX:
java oracle.apps.fnd.security.AdminAppServer apps/apps \
DELETE DBC= <dbc file path> APPL_SERVER_ID
On Windows:
jre –classpath %CLASSPATH% \
oracle.apps.fnd.security.AdminAppServer apps/apps \
DELETE DBC=
Activating Server Security
You can turn the server security feature to OFF, ON, or SECURE mode using the AdminAppServer utility. When you turn off server security, you will not change or delete your server IDs. You can re-enable server security without having to recreate server IDs for existing registered application servers.
On UNIX:
To activate basic server security on UNIX, enter on the command line:
 java oracle.apps.fnd.security.AdminAppServer apps/apps \
    AUTHENTICATION ON DBC=<dbc file path>
To activate full server security (SECURE mode) on UNIX, enter:
 java oracle.apps.fnd.security.AdminAppServer apps/apps \
    AUTHENTICATION SECURE DBC=<dbc file path>
To deactivate server security on UNIX, enter:
 java oracle.apps.fnd.security.AdminAppServer apps/apps \
    AUTHENTICATION OFF DBC=<dbc file path>
On Windows:
jre -classpath %CLASSPATH% \
 oracle.apps.fnd.security.AdminAppServer apps/apps \
 AUTHENTICATION ON DBC=<dbc file path>
To activate full server security (SECURE mode), from the command line, enter:
jre -classpath %CLASSPATH% \
    oracle.apps.fnd.security.AdminAppServer apps/apps \
    AUTHENTICATION SECURE DBC=<dbc file path>
To deactivate server security, from the command line, enter:
 jre -classpath %CLASSPATH% \
    oracle.apps.fnd.security.AdminAppServer apps/apps \
    AUTHENTICATION OFF DBC=<dbc file path>
Restricting Access to Responsibilities Based on User's Web Server
Oracle E-Business Suite has the capability to restrict access to a responsibility based upon the Web server from which the user logs in. This capability is provided by tagging Web servers with a "server trust level."
The server trust level indicates the level of trust associated with the Web server. Currently, three trust levels are supported: 1) administrative, 2) normal, and 3) external. Web servers marked as "administrative" are typically those used exclusively by system administrators. These servers are considered secure and may contain highly sensitive information. Servers marked as "normal" are those used by employees within a company's firewall. Users logging in from normal servers have access to only a limited set of responsibilities. Lastly, servers marked as "external" are those used by customers or employees outside of a company's firewall. These servers have access to an even smaller set of responsibilities.
Setting the Server Trust Level for a Server
To assign a trust level to a Web server, set the Node Trust Level profile option. The Node Trust Level profile option uses the Server profile hierarchy type, meaning that the value of the profile depends on the particular middle-tier server accessing the profile. This profile option can be set to either 1, 2, or 3, with the following meanings.
-
1 - Administrative
-
2 - Normal
-
3 - External
To avoid having to set the Node Trust Level profile option for every Web server, you may wish to set it to a default level of trust at the site level, such as level 1. If no value is set for the Node Trust Level profile option for a Web server, the Web server is assumed to have a trust level of 1 (Administrative).
Restricting Access to a Responsibility
To restrict access to a responsibility, set the security-based Responsibility Trust Level (internal name APPL_SERVER_TRUST_LEVEL) profile option value for that responsibility to be the number 1, 2, or 3. Setting this profile value ensures that only Web servers with the same or greater privileged trust level may access that responsibility.
Like the Node Trust Level profile option, the default value for the Responsibility Trust Level is 1.
When fetching the list of valid responsibilities for a user, Oracle E-Business Suite checks to find only responsibilities with a Responsibility Trust Level value greater than or equal to the Web server's Node Trust Level. In this way, a responsibility with Responsibility Trust Level set to 1 would only be available if the Web server has the Node Trust Level set to 1 as well. A responsibility with Responsibility Trust Level set to 2 would only be available if the Web server has Node Trust Level set to either 1 or 2.
Oracle Application Object Library AOL/J Setup Test Suite
The AOL/J Setup Test Suite consists of Java Server Pages (JSPs) and can be used to diagnose AOL/J setup issues. These JSPs exercise various features of AOL/J and provide feedback on the results. The test suite is accessed from the URL:
http://<host_name>:<port_number>/OA_HTML/jsp/fnd/aoljtest.jsp
where host_name and port_number correspond to the host name and port number of your instance's Apache listener. The host name and port number values are normally found in the APPS_SERVLET_AGENT profile option.
When you access the test suite, you will be asked to provide login information for your instance:
-
Applications Schema Name
-
Applications Schema Password
-
TWO_TASK
-
Host Name
-
Port Number
The following is a list of functions and tests you can run with your instance.
-
Connection Test
-
Locate DBC File
-
Verify DBC Settings
-
AOL/J Connection Test
-
-
Virtual Directory settings
-
APPS_WEB_AGENT
-
Virtual Directory Settings
-
FND_WEB.PING
-
Custom Authentication
-
GFM (Generic File Manager)
-
-
APPS_SERVLET_AGENT
-
Virtual Directory Settings
-
Servlet Ping
-
Jsp Ping
-
-
APPS_FRAMEWORK_AGENT
-
Virtual Directory Settings
-
Servlet Ping
-
Jsp Ping
-
Cabo Setup Tests
-
X Server Accessibility
-
OA Framework System Info
-
Versions for Loaded Classes
-
-
HELP_WEB_AGENT
-
TCF
-
Test Connection
-
-
Tool Launcher Profile Settings
-
ICX_FORMS_LAUNCHER
-
ICX_REPORT_LAUNCHER
-
ICX_DISCOVERER_LAUNCHER
-
-
Application Login
-
Login Page
-
Show Responsibilities
-
Show Session Properties
-
An optional and recommended alternative to AOL/J is the Oracle Universal Connection Pool (UCP ) for JDBC.
Note: For further details, refer to My Oracle Support Knowledge Document 1077727.1, Using Universal Connection Pool (UCP) in Oracle E-Business Suite Release 12.1.3.
Using Oracle Application Framework
Oracle Application Framework is an Oracle E-Business Suite development and deployment platform. It is a 100% Java and XML, middle-tier application framework and services for the rapid development and deployment of HTML based applications.
For information on Oracle Application Framework, see My Oracle Support Knowledge Document 1087332.1, Oracle Application Framework Release Notes, Release 12.1.3.
The following user interface features are enabled by default but can be disabled via the profile options listed in the table below.
Note: See the Oracle E-Business Suite User's Guide for additional information on these features.
| Feature | Profile Option | Profile Option Values | Default Value on Site Level |
|---|---|---|---|
| Configurable Homepage | FND: Disable Configurable Home Page | True, False | False |
| Slideout Menu for Navigator and Favorites | FND: Disable Navigator and Favorites Rich Menu | True, False | False |
| Inline Attachments | FND: Disable Inline Attachments | True, False | False |
| Look-ahead LOV | FND: Disable Look Ahead LOV | True, False | False |
Note: The profile Enable Configurable Homepage (FND_CONFIG_HOMEPAGE_ENABLED) is retained for backward compatibility with Release 12.1.2.
Note: To disable the feature, the profile values should be set as follows:
-
FND Slideout Menu (FND_SLIDEOUT_MENU) = 'Disabled'
-
FND: Disable Navigator and Favorites Rich Menu (FND_DISABLE_NAVIGATOR_AND_FAVORITES_RICH_MENU) = 'TRUE'
The profile FND Slideout Menu is retained for backward compatibility on Release 12.1.2.
Note: Inline Attachments can only be enabled if the accessibility mode is set to None using the profile option Self Service Accessibility Features. Inline Attachments are disabled if accessibility is set to "Screen Reader Optimized" mode or "Standard Accessibility" mode. See the Oracle E-Business Suite User's Guide for more information on accessibility.
AutoConfig and Oracle Applications Manager
Oracle Applications Manager (OAM) provides access to the AutoConfig configuration management tool via the AutoConfig tab in the Site Manager screen. Previous configuration settings can easily be compared with the current settings, allowing changed settings to be identified and rolled back as necessary. The configuration editor also helps you add custom variables to the context files, to allow AutoConfig and AutoPatch to preserve your system configuration customizations.
For more information on AutoConfig, see: "Using AutoConfig to Manage System Configurations with Oracle E-Business Suite Release 12", Knowledge Document 387859.1, on My Oracle Support.
For more information on Oracle Applications Manager, see: Introduction to Oracle Applications Manager.
From the Oracle Applications Manager Site Map, AutoConfig is on the Administration tab under the System Configuration heading. Click on the AutoConfig link to go to the tool's home page.
From the AutoConfig home page, you can view details of a context file by clicking Show. For example, you can see Version, Path, Creation Date. Last Updated By, Status (for example, Write succeeded), and Comments.
You can select a context file and choose Edit Parameters. This is the only supported way to modify parameters that AutoConfig maintains: if you edit any context files manually, they will be overwritten the next time AutoConfig is run.
Under Edit Parameters, choosing the Local tab will open a screen that shows environment-related details, including local host machine name, virtual hostname (used to connect), local domain name, and platform type.
You can select a context file and click on Show History, to see details of any previous configurations.
The Custom tab under Edit Parameters allows you to add a new context variable (not maintained by AutoConfig) to the context file. This is the only supported way to add customizations.
Related Topics