Defining Alerts
This chapter tells you how to define alerts in Oracle Alert.
It includes a summary of major alert features and an explanation of the steps you complete to define both periodic and event alerts.
This chapter covers the following topics:
- Overview of Alerts
- Creating a Periodic Alert
- Creating an Event Alert
- Specifying Alert Details
- Creating Alert Actions
- Creating an Action Set for an Alert
- Deleting an Alert
- Transferring Alert Definitions
Overview of Alerts
You can create alerts that are as simple or as complex as you need them to be, and you can tailor your alerts in a variety of ways so they perform the kind of exception reporting your organization needs. There are two types of alerts: event and periodic. Both types are defined by a SQL Select statement that you specify.
You can create event alerts that monitor your applications for the exception conditions you specify. You can create periodic alerts that check your database for predefined conditions according to the schedule you determine.
Major Features
Verify SQL
You can verify that your alert's SQL Select statement runs correctly, and returns the data you specify. You can do this verification directly in Oracle Alert immediately after you enter your Select statement - you don't have to suspend your Oracle Alert session or navigate to SQL*Plus.
Specify Installations
You can specify which Application installations you want your alert to run against, so you can control which Application installations your alert checks in a database with multiple Application installations.
Information Routing
With Oracle Alert, you can include a file created by another application as part of an alert message. You can also define an alert that distributes an electronic copy of a report, log file, or any other ASCII file.
Dynamic Message Distributions
Oracle Alert lets you define a message distribution list without knowing ahead of time who the actual individuals on the list will be. Oracle Alert can retrieve the appropriate electronic mail IDs from your application tables, and send the message automatically.
Duplicate Suppression
Oracle Alert can automatically determine which action to perform based on whether it locates the same exceptions during a sequence of alert checks. You can have Oracle Alert perform a different action during each alert check that finds the same database exception.
Customizable Inputs by Action Set
You can further customize your alerts by specifying parameters for each set of actions you define. These parameters, or inputs, provide you with extra flexibility in creating your alerts because you can assign specific values to them. For example, if a vendor delivery is overdue, Oracle Alert can notify the purchasing agent when it is two days late and the purchasing manager when it is seven days late. The number of days late is the input; two and seven are distinct input values you assign for each type of recipient.
Distribution Lists
Oracle Alert lets you create an electronic distribution list that you can use on many messages. At any time, you can add or remove names from your lists, or you can make copies of your lists and use the copies to create new lists.
Standard Message Address Formats
Oracle Alert lets you address messages using easily recognizable symbols: to, cc, bcc, just as you would use when writing a memo or sending electronic mail.
Printed Alert Messages
Oracle Alert lets you send messages to people who do not use electronic mail. You can direct a message to a printer with the recipient's name on the burst page.
Electronic Mail Integration
Oracle Alert leverages the Workflow Notification Mailer to send and receive alert e-mail messages. The notification mailer uses the Simple Mail Transfer Protocol (SMTP) for outbound messages and the Internet Message Access Protocol (IMAP) for inbound messages.
Related Topics
Transferring Alert Definitions
Creating a Periodic Alert
To create a periodic alert, you perform the following tasks in the order listed:
-
Define your periodic alert and specify its frequency
-
Create action sets containing the actions you want your alert to perform
This section focuses on the first task of defining a periodic alert and its frequency and divides the task into smaller sub-tasks.
Before you define a periodic alert, make sure you do the following:
-
Configure the Workflow Notification Mailer to send and receive e-mail messages according to your alert requirements. See: Setup Steps.
-
Specify Oracle Alert options to configure how Oracle Alert checks alerts and handles alert messages. See: Specifying Oracle Alert Options.
To define a periodic alert
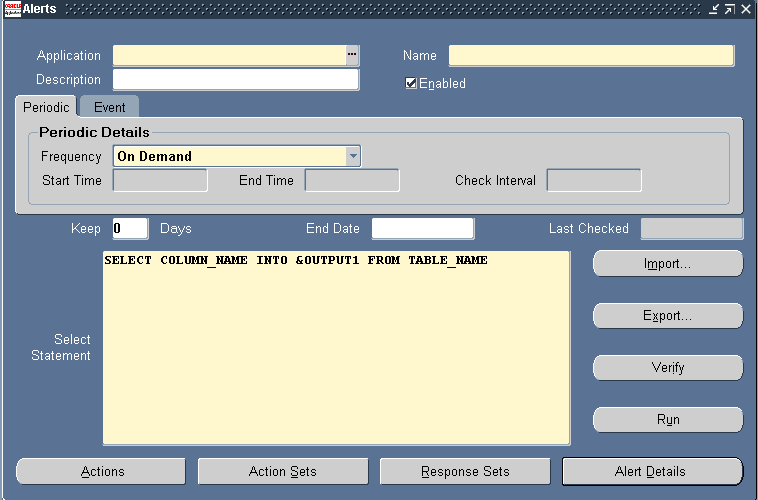
The Alerts Window
-
Navigate to the Alerts form.
-
Enter the name of the application that owns the alert in the Application field. This application must reside in the same Oracle database as Oracle Alert.
-
Name the alert (up to 50 characters), and give it a meaningful description (up to 240 characters). See: Oracle Alert Naming Conventions.
Enter a name for the alert that is unique within the application. Use an initial character other than a pound sign (#), a colon (:), or a percentage sign (%).
To set the frequency for a periodic alert
-
Select a frequency for your periodic alert. You can choose from nine frequency options:
-
On Demand-If you choose this frequency, Oracle Alert checks your periodic alert only when you specify. You do not have to fill in any other field in the Periodic Details block. You check on demand alerts by using the Request Periodic Alert Check window.
-
On Day of the Month-If you choose this frequency, Oracle Alert checks your alert on a monthly basis on the day number you enter in the Day field. If you want your alert checked on the last day of the month, enter the number 31. Oracle Alert checks the alert on the 28th, 29th, 30th, or 31st, whichever is the actual last day of the month.
-
On Day of the Week-If you choose this frequency, Oracle Alert checks your alert on the day of the week you enter in the Day field.
-
Every N Calendar Days-If you choose this frequency, enter a value in the Days field. Oracle Alert considers every day a calendar day, and does not skip holidays.
-
Every Day-Choosing this frequency is the same as choosing Every N Calendar Days and entering a value of 1 in the Days field.
-
Every Other Day-Choosing this frequency is the same as choosing Every N Calendar Days and entering a value of 2 in the Days field.
-
Every N Business Days-If you choose this frequency, enter a value in the Days field. Oracle Alert lets you choose your business days, but does not skip any holidays. A value of 1 indicates that Oracle Alert should check the alert every business day, and a value of 2 indicates that Oracle Alert should check the alert every other business day. If you enter 3 in the Days field, Oracle Alert checks your periodic alert every three business days. For example, if you enable your alert on a Monday, Oracle Alert checks the alert first on that Monday, then on Thursday, then on the following Tuesday, then the following Friday, and so on.
-
Every Business Day-Choosing this frequency is the same as choosing Every N Business Days and entering a value of 1 in the Days field.
-
Every Other Business Day-Choosing this frequency is the same as choosing Every N Business Days and entering a value of 2 in the Days field.
You can also check all periodic alerts at any time, regardless of the frequency you assign them, using the Request Periodic Alert Check window. See: Checking a Periodic Alert.
-
-
Depending on the frequency you choose in the previous step, the Start Time and End Time fields become enabled. Enter 24-hour clock time values in these fields to specify when to start and end the periodic alert.
-
You may also specify the number of times within a 24-hour period that Oracle Alert checks your alert. Enter 24-hour clock time values in the Start Time, End Time and Check Interval fields.
For example, suppose you want Oracle Alert to check your alert every 2 and a half hours between the hours of 9:00 A.M. and 7:00 P.M. Enter 09:00:00 in the Start Time field, 19:00:00 in the End Time field, and 02:30:00 in the Check Interval field.
If you want Oracle Alert to check your alert just once a day, enter 00:00:00 in the Start Time field and leave End Time blank.
-
Specify a value in the Keep _ Days field to indicate the number of days of exceptions, actions, and response actions history you want to keep for this alert. See: Overview of Oracle Alert History
-
Specify a value in the End Date field if you want to disable your alert by a certain date. Note that you can enter a date in this field only if the alert is enabled.
In the Last Checked field, Oracle Alert displays the last date that this exception condition was checked, if it has been checked.
To enter a SQL Select statement for your periodic alert
Enter a SQL Select statement that retrieves all the data your alert needs to perform the actions you plan to define.
Your periodic alert Select statement must include an INTO clause that contains one output for each column selected by your Select statement. Identify any inputs with a colon before the name, for example, :INPUT_NAME. Identify any outputs with an ampersand (&) before the name, for example, &OUTPUT_NAME. Do not use set operators in your Select statement.
Tip: If you want to use an input value in an action for this alert, select the input into an output. Then you can use the output when you define actions for this alert.
When selecting number columns, Oracle Alert uses the number formats defined in your database. Optionally, you can format your number outputs as real numbers by specifying a SQL*Plus format mask in your Select statement. For each number output, simply add a pound sign (#) and format mask to your output name. For example, if you select purchase price into the output &PRICE, add "#9999.99" after &PRICE for Oracle Alert to display the value to two decimal places. Your number output looks like: &PRICE#9999.99.
Here is an example of a periodic alert Select statement that looks for users who have not changed their passwords within the number of days specified by the value in :THRESHOLD_DAYS.:
SELECT      user_name,
                        password_date,
                        :THRESHOLD_DAYS
INTO            &USER,
                        &LASTDATE,
                        &NUMDAYS
FROM            fnd_user
WHERE   sysdate = NVL(password_date,
                        sysdate) + :THRESHOLD_DAYS
ORDER BY        user_name
Note: Although Oracle Alert does not support PL/SQL statements as the alert SQL statement definition, you can create a PL/SQL packaged function that contains PL/SQL logic and enter a SQL Select statement that calls that packaged function. For example, you can enter a SQL Select statement that looks like:
SELECT package1.function1(:INPUT1, column1)
INTO &OUTPUT1
FROM table1
In this example, package1 is the name of the PL/SQL package and function1 is the name of user-defined PL/SQL function stored in the package.
To ensure that your PL/SQL function is callable from a SQL statement, verify that the packaged function meets the requirements listed in your PL/SQL Release 2.1 and Oracle Precompilers Release 1.6 Addendum.
Important: The SQL Select statement must be less than 32K.
-
Rather than typing in your Select statement, you may also import a SQL Select statement from a file in your operating system. Choose Import... and specify the location and name of the file that contains the SQL Select statement you want to import into your alert definition.
Important: The file you import must be less than 32K.
-
You can verify the accuracy and effectiveness of your Select statement. Choose Verify to parse your Select statement and display the result in a Note window.
-
Choose Run to execute the Select statement in one of your application's Oracle IDs, and display the number of rows returned in a Note window.
-
Once you are satisfied with the SQL statement, save your work.
-
Navigate to the Alert Details window to complete the definition of your periodic alert. See: Specifying Alert Details.
Related Topics
How Oracle Alert Checks Alerts
Transferring Alert Definitions
Creating an Action Set for an Alert
Creating an Event Alert
To create an event alert, you perform the following tasks in the order listed:
-
Define the database events that will trigger your alert
-
Create action sets containing the actions you want your alert to perform
This section focuses on the first task of defining the database events that trigger your event alert and divides the task into smaller sub-tasks.
Before you define an event alert, make sure you do the following:
-
Configure the Workflow Notification Mailer to send and receive e-mail messages according to your alert requirements. See: Setup Steps.
-
Specify Oracle Alert options to configure how Oracle Alert checks alerts and handles alert messages. See: Specifying Oracle Alert Options.
To define an event alert
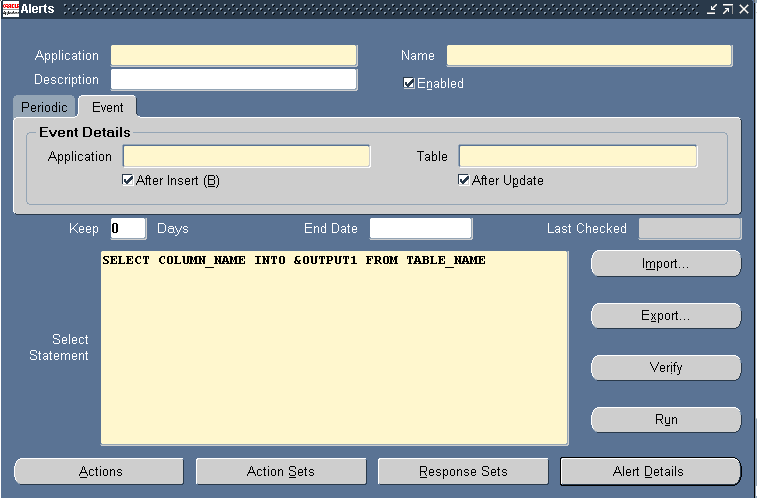
The Alert Window: Event Tab
-
Navigate to the Alerts form.
-
In the Application field, use the list of values to choose the name of the application that owns the alert. This application must reside in the same Oracle database as Oracle Alert.
-
Name the alert (up to 50 characters), and give it a meaningful description (up to 240 characters). See: Oracle Alert Naming Conventions.
Enter a name for the alert that is unique within the application. Use an initial character other than a pound sign (#), a colon (:), or a percentage sign (%).
To specify an event table
-
Specify the name of the application and the database table that you want Oracle Alert to monitor.
Although the application you enter here need not be the same application that owns the alert, both applications must reside in the same Oracle database and the application that owns the alert has to have Select privileges on the tables listed in the alert Select statement.
Important: You cannot use a view as the event table for your alert.
Important: Do not define an event alert on the table FND_CONCURRENT_REQUESTS. Oracle Alert submits a concurrent request to the concurrent manager when an event alert is triggered by an insert or update to an event table. For concurrent processing to occur, every submitted concurrent request automatically gets inserted as a row in the FND_CONCURRENT_REQUESTS table. If you define an event alert on this table, you create a situation where the event alert will cause an exception to occur recursively. See: How Oracle Alert Checks Alerts.
-
Check After Insert and/or After Update if you want to run your event alert when an application user inserts and/or updates a row in the database table.
-
Specify a value in the Keep _ Days field to indicate the number of days of exceptions, actions, and response actions history you want to keep for this alert. See: Overview of Oracle Alert History.
-
Specify a value in the End Date field if you want to disable your alert by a certain date. Note that you can enter a date in this field only if the alert is enabled.
In the Last Checked field, Oracle Alert displays the last date that this exception condition was checked, if it has been checked.
To enter a SQL Select statement for your event alert
-
Enter a SQL Select statement in the Select Statement field that retrieves all the data your alert needs to perform the actions you plan to define.
Important: The SQL Select statement must be less than 32K.
-
Your event alert Select statement must include an INTO clause that contains one output for each column selected by your Select statement.
Identify any inputs with a colon before the name, for example, :INPUT_NAME. Identify any outputs with an ampersand (&) before the name, for example, &OUTPUT_NAME. Do not use set operators in your Select statement.
Tip: If you want to use an input value in an action for this alert, select the input into an output. Then you can use the output when you define actions for this alert.
When selecting number columns, Oracle Alert uses the number formats defined in your database. Optionally, you can format your number outputs as real numbers by specifying a SQL*Plus format mask in your Select statement. For each number output, simply add a pound sign (#) and format mask to your output name. For example, if you select purchase price into the output &PRICE, add "#9999.99" after &PRICE for Oracle Alert to display the value to two decimal places. Your number output looks like: &PRICE#9999.99.
-
Your event alert Select statement must also include a join from the table where the event transaction occurs to an implicit input we call :ROWID. Oracle Alert supplies the values for implicit inputs. Oracle Alert uses :ROWID to pinpoint the inserted or updated record in the table that caused the event.
Important: You must include :ROWID in your event alert's Select statement Where clause, or Oracle Alert will not be able to locate the row where the event transaction occurred.
Oracle Alert also automatically supplies the values for the implicit inputs :MAILID and :ORG_ID when triggering an event alert.
The value for :MAILID is the electronic mail address of the application user who triggered the event. This value comes from the EMAIL_ADDRESS profile option. If you want to send an alert message to that user, or use that user's email username in an action, simply select :MAILID into an output.
Note: To use the EMAIL_ADDRESS profile option value as the :MAILID value, you must create and set the EMAIL_ADDRESS profile option and perform some additional setup steps. If the EMAIL_ADDRESS profile option has not been created, or if its value is null, Oracle Alert uses the operating system user ID or the Application username of the user who triggered the event, depending on the value set for the Default User Mail Account option in the Oracle Alert Options form. See: Setting Up the :MAILID Implicit Input.
The value for :ORG_ID is the ID of the operating unit that the user is running against upon triggering the event alert. If your SQL statement selects from a multiorg partitioned view, Oracle Alert automatically sets the correct operating unit context to retrieve the data and you need not use :ORG_ID in the SQL statement. You can, however, use :ORG_ID in your SQL statement to select from a table that is partitioned by operating units, that is, a table that has an ORG_ID column.
Oracle Alert does not require that you use :MAILID or :ORG_ID in your Select statement.
Important: The inputs :MAILID, :ORG_ID and :ROWID are reserved terms that you should not use for anything other than their intended purposes.
Here is an example of an event alert Select statement that reports the creation of new users:
SELECT user_name,
                          :MAILID
INTO            &NEWUSER,
                           &USER
FROM            fnd_user
WHERE   rowid = :ROWID
Note: Although Oracle Alert does not support PL/SQL statements as the alert SQL statement definition, you can create a PL/SQL packaged function that contains PL/SQL logic and enter a SQL Select statement that calls that packaged function. For example, you can enter a SQL Select statement that looks like:
SELECT package1.function1(:INPUT1, column1)
INTO &OUTPUT1
FROM table1
In this example, package1 is the name of the PL/SQL package andfunction1 is the name of user-defined PL/SQL function stored in the package.
To ensure that your PL/SQL function is callable from a SQL statement, verify that the packaged function meets the requirements listed in your PL/SQL Release 2.1 and Oracle Precompilers Release 1.6 Addendum.
-
Rather than typing in your Select statement, you may also import a SQL Select statement from a file in your operating system. Choose Import... and specify the location and name of the file that contains the SQL Select statement you want to import into your alert definition.
Important: The file you import must be less than 32K.
-
You can verify the accuracy and effectiveness of your Select statement. Choose Verify to parse your Select statement and display the result in a Note window.
-
Choose Run to execute the Select statement in one of your application's Oracle IDs, and display the number of rows returned in a Note window.
-
Once you are satisfied with the SQL statement, save your work.
-
Navigate to the Alert Details window to complete the definition of your event alert. See: Specifying Alert Details.
Related Topics
Creating an Action Set for an Alert
Transferring Alert Definitions
Specifying Alert Details
Once you define an event or periodic alert in the Alerts window, you need to display to the Alert Details window to complete the alert definition. The Alert Details window includes information such as which Application installations you want the alert to run against, what default values you want your inputs variables to use, and what additional characteristics you want your output variables to have.
To specify the alert details for an event or periodic alert
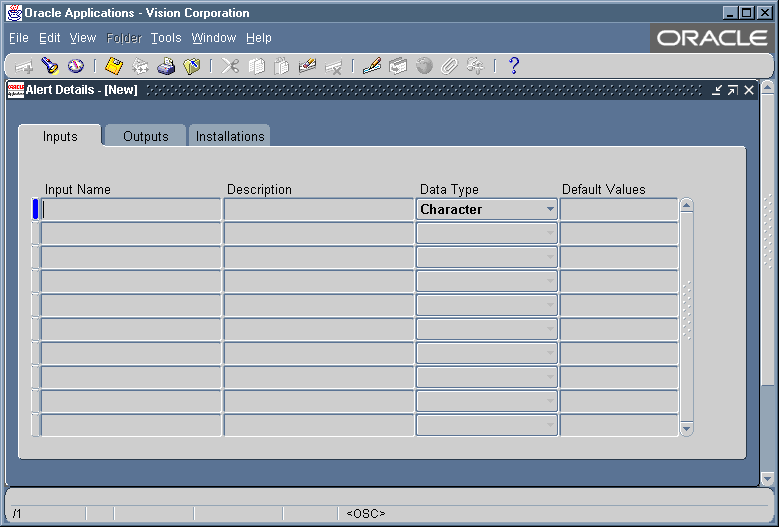
The Alert Details Window: Inputs Tab
-
With your alert definition displayed in the Alerts form, choose Alert Details. The Alert Details window that appears contains three tabbed regions: Installations, Inputs, and Outputs.
-
In the Inputs tabbed region, Oracle Alert automatically displays the inputs used in your Select statement, unless they are the implicit inputs: :ROWID, :MAILID, :ORG_ID and :DATE_LAST_CHECKED. The values of the implicit inputs are as follows:
-
ROWID-Contains the ID number of the row where the insert or update that triggers an event alert occurs.
-
MAILID-Contains the email username of the person who enters an insert or update that triggers an event alert.
-
ORG_ID-Contains the organization ID that is selected when the alert runs.
-
DATE_LAST_CHECKED-Contains the date and time that the alert was most recently checked.
-
-
You can optionally add a description for each input, but you must specify the data type (either character, number, or date) for the input, because Oracle Alert uses the data type to validate the default values for inputs you enter in the Default Values field and in the Action Set Inputs tabbed region of the Action Sets block.
-
Enter a default value for your input. You can enter up to 240 characters. This value automatically becomes the default value for your input in each action set you define.
For example, if you have an input APPLICATION_NAME, and you give it the default value "Oracle General Ledger," Oracle General Ledger will also be the value for the input in each action set you define, unless you change it in the action set to another value like "Oracle Payables."
Note: When you change an input value in an action set, you simply change the value for that action set. The new value does not get propagated as a new default value for other occurrences of that input.
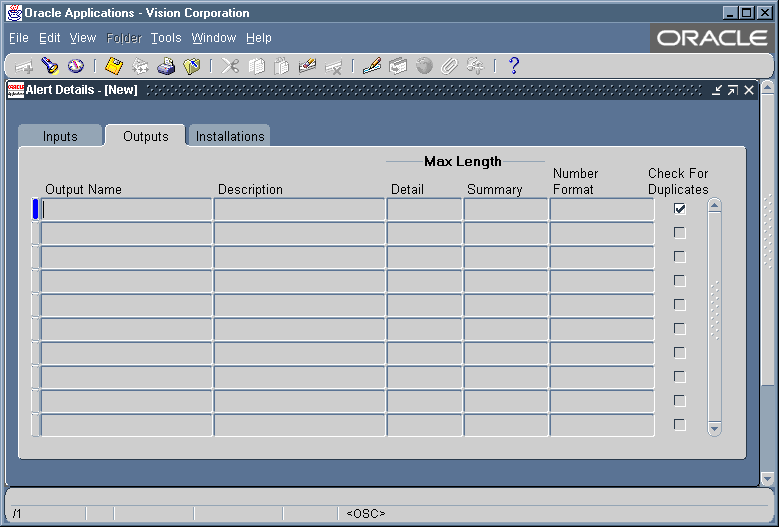
The Alert Details Window: Outputs Tab
-
In the Outputs tabbed region, Oracle Alert automatically displays the outputs used in your alert Select statement without the ampersand (&) and any numbering format. You can add meaningful descriptions for the outputs.
-
You can specify the maximum number of output characters you want to display in your detail or summary message actions. See: Formatting Summary Message Actions.
-
If your output value is numeric, enter the SQL*Plus format mask in the Number Format field.
-
You can also check the Check for Duplicates check box to customize the combination of outputs you want to verify as a possible duplicate exception each time the alert is checked. A duplicate exception is an exception that existed in your database during previous alert checks. You can define Oracle Alert to perform certain actions based on the presence of these duplicate exceptions.
Note: You must save history for your alert to use duplicate checking. See: Overview of Oracle Alert History.
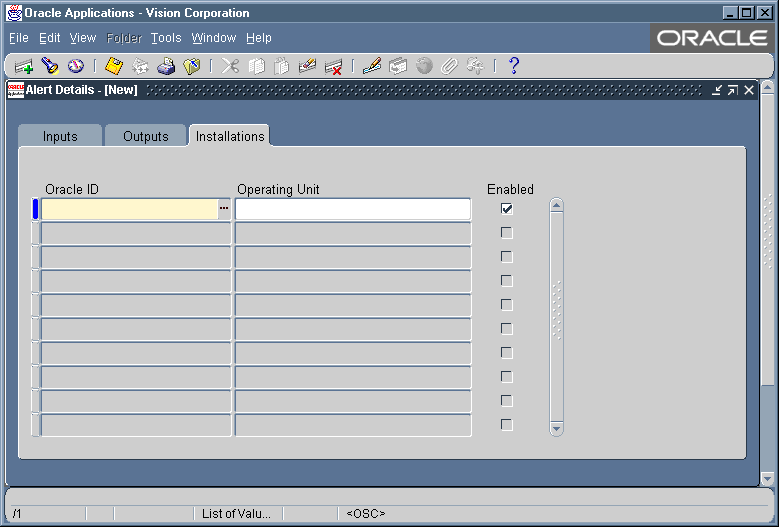
The Alert Details Window: Installation Tab
-
In the Installations tabbed region, specify an Oracle ID if you want Oracle Alert to check your alert against that specific Oracle ID. You can select only those Oracle IDs that are associated with the application that owns your alert.
If you do not specify an Oracle ID in this region, Oracle Alert checks your alert against all installations in your database of the application that owns your alert.
-
If you have multiple organizations defined in your application schema, you must perform the following steps:
-
Specify the organization you want the alert to run against in the Operating Unit field.
-
If you do not specify an operating unit for a multiorg schema, then:
-
your event alert will run for the operating unit from which the event alert is triggered, as specified in the MO: Operating Unit profile option.
-
your periodic alert assumes a non-multiorg schema and simply runs for the Oracle Alert Manager's operating unit.
-
-
If you want your alert to run against several operating units of the multiorg schema, you must enter them individually in the Installations tabbed region. Delete any records in this region that do not have a valid Oracle ID and operating unit.
-
-
Check whether you have the MO: Security Profile profile option defined:
-
If it is set, then you must set the MO: Default Operating Unit profile value to a valid organization that you want the alert to run against in the Operating Unit field.
-
If it is not set, then the MO: Operating Unit profile option should be set to a valid organization that you want the alert to run against in the Operating Unit field.
Please note that the MO: Security Profile profile option is to designate which set of operating units the event alert can be triggered. The MO: Default Operating Unit is to designate which operating unit will default the event alert to be triggered. If the MO: Security Profile profile option is set, then you must specify the default operating unit for the event alert to be triggered in the MO: Default Operating Unit profile.
-
-
-
Check the Enabled field if you want your alert to run against the specified Oracle ID.
-
Save your changes and close the window.
Once you finish specifying the details for your alert definition, you need to create the actions for your alert. .
Related Topics
Creating an Action Set for an Alert
Creating Alert Actions
After you define your alert you need to create the actions you want your alert to perform. There are four types of actions you can create:
-
message actions
-
concurrent program actions
-
operating script actions
-
SQL statement script actions
To create an action for an alert
-
Display the alert that you want to create an action for in the Alerts form.
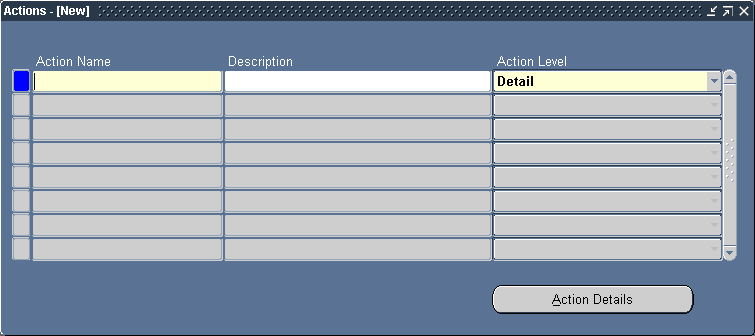
The Actions Window
-
Choose Actions to display the Actions window.
-
Enter a name (up to 80 characters) and description (up to 240 characters) for your alert action. See: Oracle Alert Naming Conventions.
-
Select a level for your action: Detail, Summary, or No Exception.
During an alert check, a detail action performs once for each individual exception found, a summary action performs once for all exceptions found, and a no exception action performs when no exceptions are found.
-
Choose Action Details to display the Action Details window.
-
Select the type of action you want to create in the Action Type field: Message, Concurrent Program, Operating System Script, or SQL Script.
Depending upon the action level and type you choose, different fields appear in the Action Details window.
-
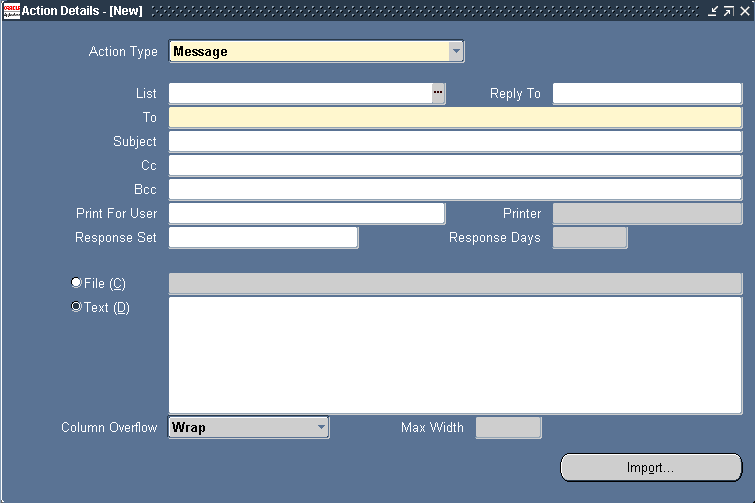
Choose Message in the Action Type field of the Action Details window if you want the alert to send a message as its action.
Define Message Actions
-
Specify the electronic mail IDs of the recipients you want to send your message to in the To field. You can also enter the IDs of recipients to whom you want to send "carbon" (Cc) and "blind" (Bcc) copies of your alert message. If you list more than one recipient in any of these recipient fields, separate each recipient by a space, or a comma, or a combination of the two. You can enter as many recipients as you want, up to 240 characters.
-
You can also enter in the List field, a distribution list that you define in the Distribution Lists window. See: Defining a Distribution List.
If you enter a distribution list name, Oracle Alert displays all electronic mail IDs on the list in the To field, and does not let you change any values in the To, Cc, Bcc, Print For, or Printer fields.
-
In the Reply To field, you can optionally specify the address that should receive the reply to the alert message. This address must be either the reply-to address for the Workflow Notification Mailer, the e-mail address for a human in charge of response processing, or the address for a custom processing agent external to the notification mailer. If you leave this field blank, the Workflow Notification Mailer uses the value of its own Reply-to Address configuration parameter instead.
-
You can also have Oracle Alert print your message to the printer you specify in the Printer field. Enter in the Print For User field, the names, or alert outputs or response variables that represent the names of the recipients for whom you want to print a copy of the message. Separate the names by commas and do not use blank spaces within a name.
Oracle Alert prints the message preceded by a banner page with the name as it appears in the Print For User field. You can enter as many names as you want, up to 240 characters.
-
In the Subject field, enter a brief statement that describes the message's subject matter. You can enter up to 240 characters.
-
You can also enter alert outputs or response variables in any of the alert detail fields. Oracle Alert automatically substitutes the associated output value when checking the alert or the associated response variable value when reading the response. By entering an output or response variable rather than a mail ID in a recipient field, you can make use of dynamic distribution. See: Defining a Response Processing Alert.
For example, if you define an alert that reminds users to change expired passwords, you can define an alert output called &USER to hold the user's electronic mail ID. Enter &USER in the To: field to have Oracle Alert send a message to each user whose password has expired.
-
For a detail message action, you can either send the contents of a file as the message, or write the text of your message in Oracle Alert. If you want to write your message in Oracle Alert, choose the Text option and enter the text in the Text field. (You can also click on the Import button and import the contents of a file into the Text field.) You can include any outputs in the message text.
If you want to send the contents of a file, choose the File option and enter the file name (including the full path), or the output from the alert Select statement that represents the file name and location, in the File field. You may use any outputs to construct the file name.
Note: If this message action has a response set associated with it, you must define the text of the message within Oracle Alert.
-
For detail message actions, Oracle Alert distributes one message for each exception found during an alert check. Place outputs wherever you need to in the message text, to format your message as you like. When Oracle Alert sends the message it substitutes the output variables with the exception values found during the alert check.
-
If this action is a response action, identify your response variables with an ampersand before the name, for example, &VARIABLE_NAME. Oracle Alert reads the value for a response variable from the response message. If the response message does not include the response variable, Oracle Alert uses the default value from your response variable definition.
-
For a no exception message action, Oracle Alert distributes a message when no exceptions are found for an alert check. Do not use outputs to define your no exception message and recipients.
Note: If you decide to change the Action Level of your action after entering message text in the Text field, you must delete the message text yourself. Oracle Alert does not automatically delete the text for you.
Important: For detail or no exception message actions, the message text that you specify for an event alert must be less than 32000 characters. This includes a limitation for the number of operating units that can be defined in the Installation tab. The message file that you specify must be less than 32K.
For information about defining operating units in the Installation tab, see Specifying Alert Details.
-
For summary message actions, complete your action details by following the instructions listed in the next section.
-
Save your changes.
-
When you are done defining actions, close the Actions and Action Details window and choose Action Sets to define the action set(s) for your alert definition. See: Creating an Action Set for an Alert.
To complete the action details for a summary message
-
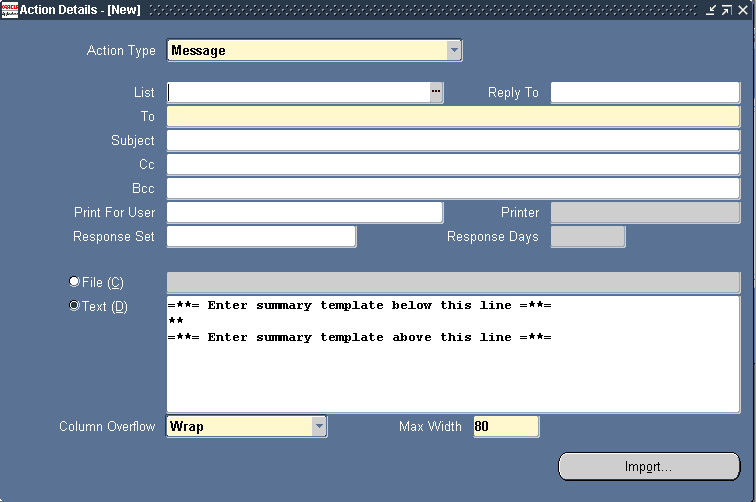
Choose the Text option. A Summary Message Template appears in the text field.
Complete the Action Details for a Summary Message
-
You can place outputs anywhere in the three parts of the summary message body: above the summary template in the opening text, within the Summary Message Template, and after the summary template in the closing text.
-
Enter the opening text of your summary message at the top of the window above the summary template. Use this area to enter any introductory text that you want to precede the columns in your message and to lay out your column headings.
Tip: You can use any output values in the opening text of your summary message. Use outputs like current date (if you want to display the date that the exception was found) in the introductory text of the message to avoid repeating the date as a separate column in the summary.
-
Leave the summary template lines exactly as you find them. Move the cursor between the two template lines and enter your outputs in this space, lined up below your column headings. Do not use spaces 1 and 2 within the summary template lines, as specified by the two asterisks (**); Oracle Alert reserves these to mark duplicate exceptions. You have up to 178 spaces across in which to lay out your outputs, and you can vary this value by specifying a number of characters in theMax Width field. (Oracle Alert defaults to the value of the Maximum Summary Message Width option defined in the Oracle Alert Options form.)
The number of characters your message displays for each output depends on the number of characters you allot for each output in the Max Length field in the Outputs tabbed region of the Alert Details window. The ampersand (&) of the output defines the left margin of an output's column area. Oracle Alert defines the right margin of an output's column area as two spaces to the left of the next column. Oracle Alert left-justifies any character or date outputs within that output's column area. For number outputs, Oracle Alert right-justifies the data within the column area. If the output in the rightmost column is defined as a number, Oracle Alert right-justifies the data in a column 15 characters wide. If the numeric data is wider than the column width allotted, Oracle Alert displays '###' in the message. See: Formatting Summary Message Actions.
-
If you want to use multiple lines per exception, position your outputs on as many lines as you need, in the positions you want. If you want a blank line between each set of exceptions, leave a blank line between your outputs and the lower summary template line.
-
Enter the closing text below the summary message template. You can use any outputs in your closing text.
If you define a Message Action Header and/or a Message Action Footer in the Oracle Alert Options form, this generic text attaches to the top (before any message-specific text begins) and bottom (after any message-specific text ends) of your message text, respectively. If you define a header and footer, Oracle Alert adds it to every message constructed, including messages for which Oracle Alert is expecting a response. See: Defining Boilerplate Message Text.
-
Choose Wrap or Truncate in the Column Overflow field to indicate whether Oracle Alert should wrap column values that exceed the space allotted to them or truncate them. If you choose Wrap, Oracle Alert uses as many lines as necessary to display the output value. If you choose Truncate, Oracle Alert truncates a column at the start of the next column, or at the page width (right margin), if it is the last column. See: Formatting Summary Message Actions.
-
Enter the width of your message in the Max Width field. The default value is defined by the Maximum Summary Message Width option listed in the Other Options tabbed region of the Oracle Alert Options form. You cannot define a message wider than this maximum, but you can define a narrower message. Oracle Alert uses this value to determine the location of the right margin in the summary message.
-
Oracle Alert distributes one summary message for each unique combination of critical output values found during an alert check. Outputs that you place outside the Summary Message Template are considered critical outputs. Within the message, Oracle Alert summarizes all the exceptions found during an alert check for those outputs located within the Summary Message Template.
-
If this action is a response action, identify your response variables with an ampersand before the name, for example, &VARIABLE_NAME. Oracle Alert reads the value for a response variable from the response message. If the response message does not include the response variable, Oracle Alert uses the default value from your response variable definition.
Note: If you decide to change the Action Level of your action after entering message text in the Text field, you must delete the message text yourself. Oracle Alert does not automatically delete the text for you.
Important: For a summary message actions, the message text that you enter for an event alert must be less than 32000 characters. This includes a limitation for the number of operating units that can be defined in the Installation tab. The message file that you specify must be less than 32K.
For information about defining operating units in the Installation tab, see Specifying Alert Details.
-
Save your changes.
-
When you are done defining actions, close the Actions and Action Details window and navigate to the Action Sets window to define action sets for your alert definition. See: Creating an Action Set for an Alert.
To define concurrent program actions
-
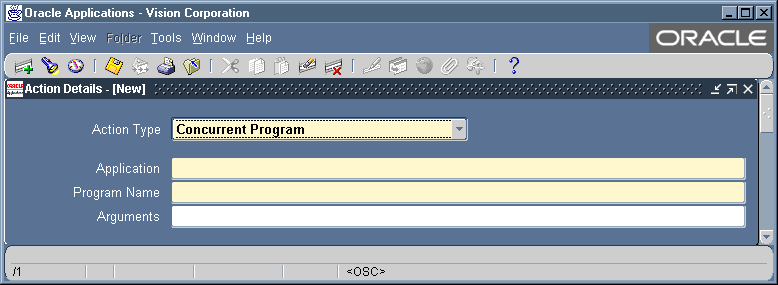
Choose Concurrent Program in the Action Type field of the Action Details window.
Define Concurrent Program Actions
-
Enter the name of the application that owns the concurrent program you want to define as an action.
-
Enter the name of the concurrent program.
-
Enter any arguments for the concurrent program in the Arguments field, each separated by a space.
You can use output variables from the alert SQL statement or response variables to dynamically pass arguments to your concurrent program. If your concurrent program action uses arguments that select character or date data, place double quotes around your argument so that Oracle Alert can correctly pass the data.
-
If this action is a response action, identify your response variables with an ampersand before the name, for example, &VARIABLE_NAME. Oracle Alert reads the value for a response variable from the message response and reads the value of an alert output from the original alert message, then substitutes the value when sending the message. If the response message does not include the response variable, Oracle Alert uses the default value from your response variable definition.
-
For detail concurrent program actions, Oracle Alert submits the concurrent program request once for each exception found during an alert check.
-
For summary concurrent program actions, Oracle Alert submits the concurrent program request once for each unique combination of critical output values. Outputs used as arguments are considered critical outputs.
-
For no exception concurrent program actions, Oracle Alert submits the concurrent program request if it finds no exceptions during an alert check. Do not use outputs when defining your no exception concurrent program actions.
-
Save your changes.
-
When you are done defining actions, close the Actions and Action Details window and navigate to the Action Sets window to define action sets for your alert definition. See: Creating an Action Set for an Alert.
To define operating system script actions
-
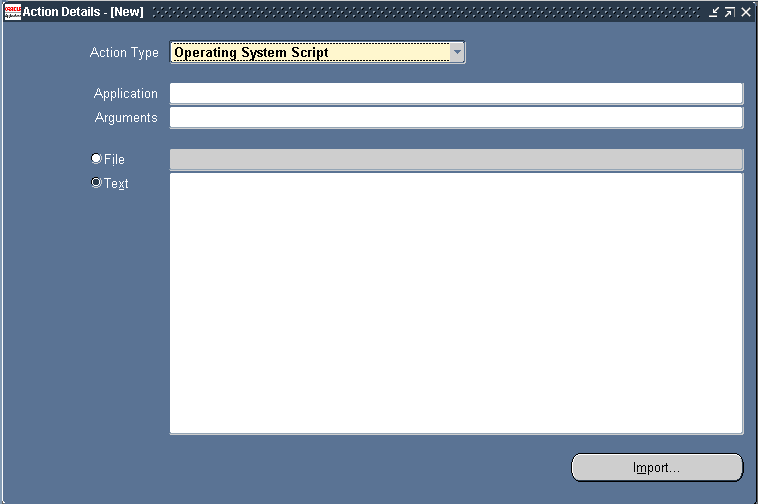
Choose Operating System Script in the Action Type field of the Action Details window.
Define Operating System Script Actions
-
If the operating system script you want to execute is in a file located in an Application's base path bin directory, specify that Application name in the Application field.
-
Enter any arguments you want to pass to the operating script in the Arguments field, each separated by a space.
You can use output variables from the alert SQL statement or response variables to dynamically pass arguments to your operating system script. If your operating system script action uses arguments that select character or date data, place single quotes around your argument so that Oracle Alert can correctly pass the data.
-
Choose File if the operating system script resides in a file.
-
If the operating system script is in a file, and you do not specify a value in the Application field, as specified above, then enter the full path of the operating system script, or the output from the alert SQL statement that represents the file name and location in the File field.
Note: Oracle Alert cannot substitute values into output variables located in an operating system script file.
Note: The operating script file must be less than 32K.
-
If you want to enter the script in Oracle Alert, check Text and type the script in the Text field. (You can also click on the Import button and import the contents of a file into the Text field.) For an event alert, the script must be less than 32000 characters. This includes a limitation for the number of operating units that can be defined in the Installation tab. For information about defining operating units in the Installation tab, see Specifying Alert Details.
Identify your alert outputs with an ampersand before the name, for example, &OUTPUT_NAME.
-
If this action is a response action, identify your response variables with an ampersand before the name, for example, &VARIABLE_NAME. Oracle Alert reads the value for a response variable from the message response and reads the value of an alert output from the original alert message, then substitutes the value when sending the message. If the response message does not include the response variable, Oracle Alert uses the default value from your response variable definition.
-
For detail operating system script actions, Oracle Alert performs the operating system script once for each exception found during an alert check.
-
For summary operating script actions, Oracle Alert performs the operating system script once for each unique combination of critical output values returned by the alert Select statement. If the operating system script is found in a file, the outputs used as the file name and arguments are considered critical outputs. If the operating system script is found in the Text field, all outputs in the operating system script are considered critical outputs.
-
For no exception operating system script actions, Oracle Alert performs the operating system script if it finds no exceptions during an alert check. Do not use outputs when defining your no exception operating system script actions.
Important: When performing an operating system action, Oracle Alert executes the commands with the privileges of the operating system user that started the Concurrent Manager.
-
Save your changes.
-
When you are done defining actions, close the Actions and Action Details window and navigate to the Action Sets window to define action sets for your alert definition. See: Creating an Action Set for an Alert.
To define SQL statement script actions
-
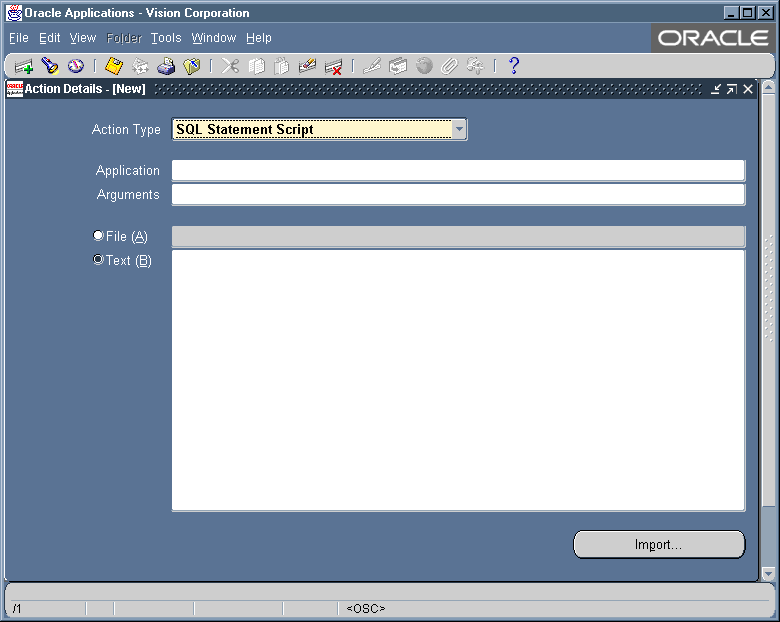
Choose SQL Statement Script in the Action Type field of the Action Details window.
Define SQL Statement Script Actions
-
If the SQL statement script you want to execute is in a file located in an Application's base path sql directory, specify that Application name in the Application field.
-
Enter any arguments you want to pass to the SQL statement script in the Arguments field, each separated by a space.
You can use output variables from the alert SQL statement or response variables to dynamically pass arguments to your SQL statement script.
-
Choose File if the SQL statement script resides in a file.
-
If the SQL statement script is in a file, and you do not specify a value in the Application field, as indicated in above, then enter the full path of the SQL statement script, or the output from the alert SQL statement that represents the file name and location in the File field.
Note: You can use PL/SQL for your SQL statement script action.
Important: The SQL script file must be less than 32K.
-
If you want to enter the script in Oracle Alert, check Text and type the SQL script in the Text field. (You can also click on the Import button and import the contents of a file into the Text field.)
Identify your alert outputs with an ampersand before the name, for example, &OUTPUT_NAME. If your SQL statement script action uses outputs that select character or date data, place single quotes around your output so that Oracle Alert can correctly pass the data. If a single quote lies within your character string, Oracle Alert adds a second single quote. For example, if your character string is resume', Oracle Alert displays this data as resume''. Follow SQL format conventions in the text of your SQL statement action, and place a semicolon (;) or a forward slash (/) at the end of each SQL statement.
Important: The SQL script you enter for an event alert must have less than 32000 character. This includes a limitation for the number of operating units that can be defined in the Installation tab. For information about defining operating units in the Installation tab, see Specifying Alert Details.
-
If this action is a response action, identify your response variables with an ampersand before the name, for example, &VARIABLE_NAME. Oracle Alert reads the value for a response variable from the message response and reads the value of an alert output from the original alert message, then substitutes the value when sending the message. If the response message does not include the response variable, Oracle Alert uses the default value from your response variable definition.
-
For detail SQL statement script actions, Oracle Alert performs the SQL statement script once for each exception found during an alert check.
-
For summary SQL statement script actions, Oracle Alert performs the SQL statement script once for each unique combination of critical output values returned by the alert Select statement. If the SQL statement script is found in a file, the outputs used as the file name and arguments are considered critical outputs. If the SQL statement script is found in the Text field, all outputs used in the SQL statement are considered critical outputs. See: Formatting Summary Message Actions.
-
For no exception SQL statement script actions, Oracle Alert performs the SQL statement script if it finds no exceptions during an alert check. Do not use outputs when defining your no exception SQL statement script actions.
-
Save your changes.
-
When you are done defining actions, close the Actions and Action Details window and navigate to the Action Sets window to define action sets for your alert definition. See: Creating an Action Set for an Alert.
Select the action you wish to delete in the Actions window of the Alerts form.
-
Choose from the Edit menu, Delete Record.
You can delete an action if there is no history for the action and the action is not an enabled member of an action set, response set, or action group (such as an escalation or threshold group).
-
If the action is an enabled member of an action group, action set, or response set, an error message followed by a References window appears.
Delete an Action
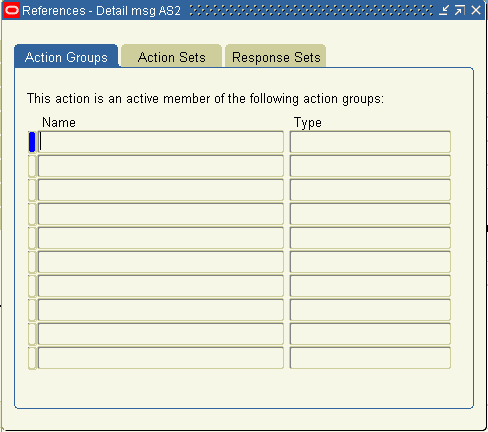
You can also choose References from the Tools menu in the Actions window at any time to display the References window.
-
The References window shows you where the action is referenced. Choose the Action Groups, Action Sets, or Response Sets tab to display the list of action groups, action sets, or response sets that reference this action.
You must navigate to the appropriate window and disable or remove the action from those action groups, action sets, or response sets that reference the action before you can delete the action.
-
Once you delete your action, save your changes.
Related Topics
Defining a Response Processing Alert
Creating an Action Set for an Alert
Once you create your alert actions, you must include them in an enabled action set for Oracle Alert to perform during an alert check. An action set can include an unlimited number of actions and any combination of actions and action groups (such as escalation or threshold groups). You can define as many action sets as you want for each alert. Oracle Alert executes the alert Select statement once for each action set you define. During each action set check, Oracle Alert executes each action set member in the sequence you specify.
To create an action set for an alert
-
Display the alert that you want to create an action set for in the Alerts form.
-
Choose Action Sets.
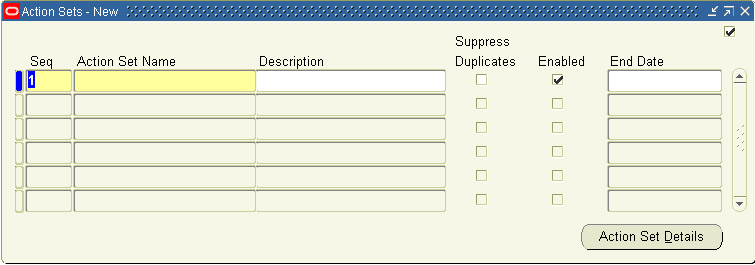
The Action Sets Window
-
In the Action Sets window that appears, enter a sequence number in the Seq field and name your action set (up to 30 characters). See: Oracle Alert Naming Conventions.
The sequence number lets you order the execution of action sets during an alert check. The sequence number automatically defaults to the next available number. You can accept or change the default.
-
Give the action set a meaningful description (up to 240 characters).
-
Check Suppress Duplicates if you want Oracle Alert to suppress the actions in this action set if the exception found is a duplicate that occurred during the last alert check. Note that you first have to save history to use this function.
If you check Suppress Duplicates and the action set includes a summary message action, Oracle Alert marks with an asterisk (*) any duplicate exceptions included in the summary message.
If you check Suppress Duplicates and the action set includes an escalation group whose members are detail actions, Oracle Alert performs the detail action that corresponds to the appropriate escalation level. Once Oracle Alert performs the action that corresponds to the highest escalation level, it ceases performing actions within that escalation group. If you uncheck Suppress Duplicates, then once Oracle Alert performs the action that corresponds to the highest escalation level, it continues to perform that same action during each alert check. See: Overview of Oracle Alert History.
Note: Use the Check for Duplicates check box in the Outputs tabbed regions of the Alert Details and Action Sets windows to tell Oracle Alert which outputs to consider when checking for duplicates.
-
Enable the action set.
-
Enter a value in End Date if you want to disable the action set by a certain date.
-
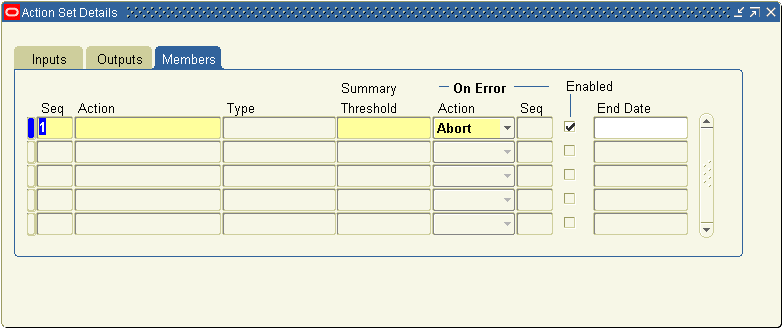
To add the actions, escalation groups, and/or threshold groups to your current action set, choose Action Set Details. In the Action Set Details window, display the Members tabbed region.
The Action Set Details Window - Members Tab
-
Assign each action set member a sequence number so that you can specify the order in which the members are performed.
Oracle Alert defaults the next available sequence number, but you can change the number if, for example, you want to re-sequence the actions in the action set. You can assign any sequence numbers you want, keeping in mind that Oracle Alert performs the actions so that two members with the same sequence number are performed in a random order.
-
Display the list of predefined actions, escalation groups, or threshold groups in the Action field to choose the members you want to include in the action set.
When you add a member to your action set, Oracle Alert automatically displays in the Type field, whether the member is an action, escalation group, or threshold group, and what its action type is (message, concurrent request, operating script, or SQL statement script). Oracle Alert also indicates whether the member is enabled.
-
You can also assign additional actions for Oracle Alert to take if a particular action in an action set fails.
If an action fails, you can choose to have Oracle Alert abort the action set, continue processing other action set members, or process another action set.
If you select Set: in the On Error Action field, Oracle Alert leaves the current action set and performs the action set whose sequence number you specify in the Seq field when an error occurs. If you select Member:, Oracle Alert performs the action set member whose sequence number you specify in the Seq field.
-
Enter a value in End Date to disable the action set member by a certain date.
-
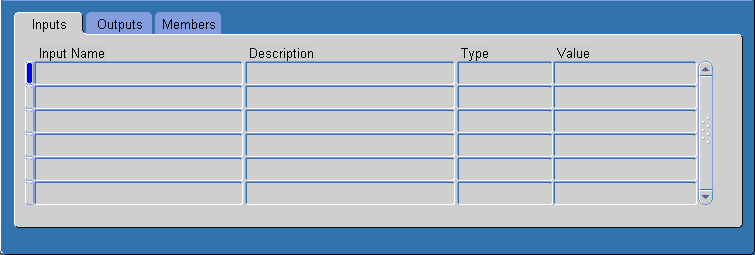
Display the Inputs tabbed region.
The Action Set Details Window - Inputs Tab
-
The input values you assign at the alert level become the default values for each action set. You can change the default input values for a particular action set by using the Inputs tabbed region.
Note: When you change an input value in an action set, you simply change the value in that action set. The new value does not get propagated as a new default value for other occurrences of that input.
-
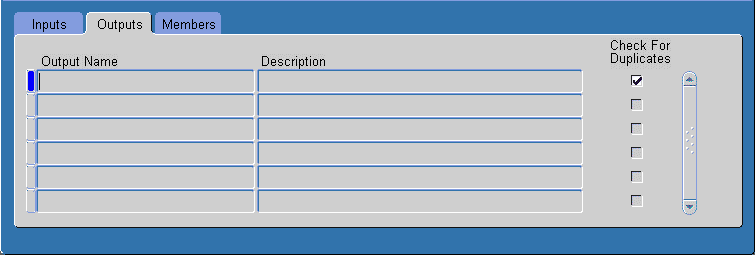
Display the Outputs tabbed region.
The Action Set Details Window - Outputs Tab
-
You can customize the type of duplicate output you want Oracle Alert to check for at the action set level by checking the Check for Duplicates check box. Indicate, as you did in the Outputs tabbed region of the Alert Details window, the outputs you want Oracle Alert to consider when checking for duplicates.
For example, an alert showing overdue password changes might include three outputs: User Name, Date Password Changed, and Current Date. If you want Oracle Alert to consider only User Name and Date Password Changed when checking for duplicates, you uncheck the Check for Duplicates check box for the Current Date output. Since the value of Current Date will always be different each time the alert is checked, an exception would never be considered a duplicate if Current Date is included in the duplicate configuration.
Note: The duplicate check configuration you define at the action set level overrides the duplicate configuration you define at the alert level.
-
Save your work. Your alert is ready for use.
-
Select the action set you wish to delete in the Action Sets window of the Alerts form.
-
Choose from the Edit menu, Delete Record.
You can delete an action set if there is no history saved for the action set.
-
Save your work.
Related Topics
Overview of Oracle Alert History
Deleting an Alert
-
Query the Alerts form for the alert you wish to delete.
-
Choose from the Edit menu, Delete Record.
You can delete an alert only if there is no history, no enabled action sets, and no outstanding responses for the alert. If you delete an alert that has actions or response sets defined but no enabled action sets, Oracle Alert deletes the alert, as well as the associated actions and response sets.
-
Save your work.
Related Topics
Overview of Oracle Alert History
Defining a Response Processing Alert
Transferring Alert Definitions
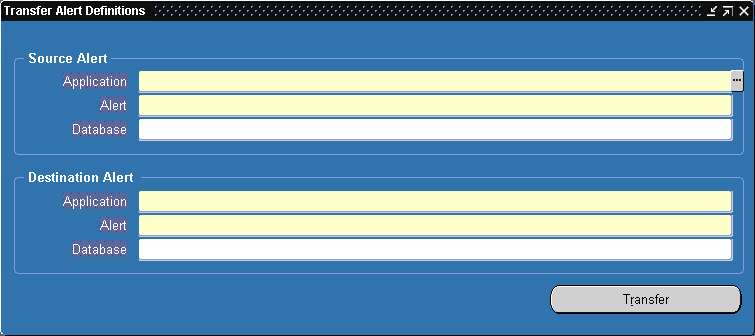
You can use the Transfer Alert Definitions window to transfer an alert definition to another database, or make a copy of an existing alert.
To transfer or copy an alert definition
-
Choose from the Tools menu of the Alerts form, Transfer Alert.
The Transfer Alert Definitions Window
-
In the Source Alert region of the Transfer Alert Definition window, enter:
-
the name of the application that owns the alert you want to transfer
-
the name of the alert you want to transfer
-
the username and password of the database where the alert you want to transfer resides
Also include any necessary SQL*Net syntax to indicate where your database resides. You may use SQL*Net V1 or SQL*Net V2 syntax. In the Database field, enter the username, password, and SQL*Net syntax in the following format:
username/password@SQL*Net_syntax
Here is an example of SQL*Net V1 syntax to specify the database location:
sysadmin/friday@T:testing:db2
Here is an example of SQL*Net V2 syntax to specify the database location:
sysadmin/friday@db2
-
-
Similarly, in the Destination Alert region, enter:
-
the name of the application you want to transfer the alert to
-
the name you want to assign to the new alert
-
the database where you want the new alert to reside
-
-
Choose Transfer to complete the alert transfer.
Related Topics