Setting Up
This chapter covers the following topics:
- Setting Up Oracle e-Commerce Gateway
- Oracle e-Commerce Gateway Profile Options
- Setting Profile Options
Setting Up Oracle e-Commerce Gateway
This section briefly describes Oracle e-Commerce Gateway setup steps. For the complete discussion, refer to Setting Up, Oracle e-Commerce Gateway Implementation Manual.
Note: Oracle e-Commerce Gateway relies on several base Oracle E-Business Suite. Please refer to the setup and open interfaces documentation for those products. See: Setting Up, Oracle e-Commerce Gateway Implementation Manual.
Step 1. Set Profile Options
Profile options must be set up for basic e-Commerce Gateway functions. See: Oracle e-Commerce Gateway Profile Options.
Step 2. Define Data File Directories
To use e-Commerce Gateway, you must first create directories where data files, for both inbound and outbound transactions, are stored. You must then specify these in the INIT.ORA file and in the e-Commerce Gateway profile options. See: Defining Data File Directories, Oracle e-Commerce Gateway Implementation Manual.
Step 3. Define Trading Partner Data
First, define a trading partner group and associate the group with an operating unit that is linked to your responsibility as well as associate all trading partner location (address) entities to this group. Assign the trading partner to an address entity in Oracle E-Business Suite such as a customer, supplier, or bank branch address. The trading partner assignment and entry of the trading partner detail data establishes the link between the trading partner as defined in Oracle E-Business Suite and its identification in your trading partner's application or EDI translator application. See: Overview of Trading Partners, Oracle e-Commerce Gateway Implementation Manual, and Defining Trading Partner Data.
Step 4. Define Code Conversions
The Oracle e-Commerce Gateway code conversion function provides a method by which trading partner and standard codes can be converted to Oracle E-Business Suite application codes and vice versa. See: Overview of Code Conversion, Oracle e-Commerce Gateway Implementation Manual.
-
Define code conversion categories to specify a subset of codes within the code conversion table. See: Defining Code Conversion Categories.
-
For each data element in a transaction that requires code conversion by e-Commerce Gateway, assign one code conversion category. See: Assigning Categories.
-
Enter the actual code conversion values from the internal codes to external codes into the code conversion table. The internal codes are defined in the Oracle E-Business Suite. The external codes are the associated values required by the trading partner or chosen EDI standard.
Step 5. Customize Interface Data File Formats
Oracle delivers a standard predefined data file format containing all the data that may be required to support a particular EDI transaction. You may customize this data file to meet specific business needs. See: Overview of Data File Structure, Oracle e-Commerce Gateway Implementation Manual and Changing the Interface Data File Record Layout.
Step 6. Transactions
Once data file directories, trading partner information, code conversions, and optional customizations of interface data file formats have been performed, use Oracle E-Business Suite Standard Request Submission to run extract programs for outbound transactions and import programs for inbound transactions.
Note: For more information, see:
Setting Up, Oracle e-Commerce Gateway Implementation Manual
Profile Options, Oracle e-Commerce Gateway Implementation Manual
Oracle e-Commerce Gateway Profile Options
There are three system level profile options you must set. These affect all e-Commerce Gateway transactions:
-
Outbound directory.
-
Inbound directory.
-
Allow Split Words in Attachment.
There are other transaction level profile options.
-
Enable / disable each transaction.
-
Address derivation precedence.
-
Attachment segment size.
-
Enabling header-level attachments.
-
Enabling line-level attachments.
-
Enabling inventory line attachments.
-
Enabling master item attachments.
Note: There may be more profile options in other Oracle E-Business Suite products that affect e-Commerce Gateway. These products include: Purchasing, Inventory, Order Entry / Shipping, Payables, Receivables, Supplier Scheduling, and Planning.
System Level Profile Options
This section lists system level profile options used in Oracle e-Commerce Gateway. Please note that each profile option is classified with a profile category. For more profile category information, see Oracle E-Business Suite System Administrator's Guide - Maintenance.
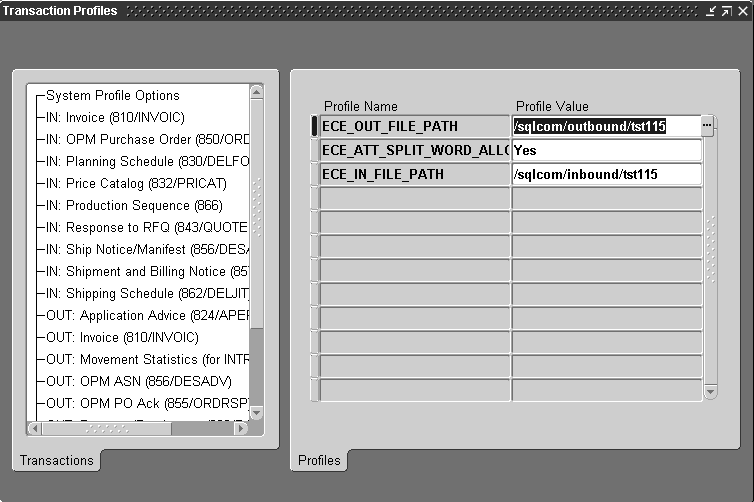
ECE_IN_FILE_PATH (ECE: Inbound File Path), Deployment profile category
Indicate the directory where inbound interface data files are expected. This value must match the actual directory on disk and that designated in the INIT.ORA file.
ECE_OUT_FILE_PATH (ECE: Outbound File Path), Deployment profile category
Indicate the directory where outbound interface data files are written. This value must match the actual directory on disk and that designated in the INIT.ORA file.
Note: For the e-Commerce Gateway, you must create inbound and outbound directories on your server, and then specify them in the INIT.ORA file and in the “ECE: Inbound directory” and “ECE: Outbound file path” profile options, respectively. See: Defining Data File Directories, Oracle e-Commerce Gateway Implementation Manual.
ECE_ATT_SPLIT_WORD_ALLOWED (ECE: Split Word Allowed), Functional profile category
An attachment is usually plain text used as a note.
If you allow words to be split in an attachment, a new line begins within a word. If you do not allow words to be split, the new line is created after a space or a punctuation mark, not within a word. Thus, if you do not allow words to be split, some segment sizes fall below the attachment segment size, and vice versa.
New lines are created once the current line reaches the attachment segment size. For further information, refer to attachment segment size profile options for individual transactions.
Transaction Level Profile Options
Each transaction has a common set of profile options. For purposes of brevity, each type is documented below. For complete documentation, see: Oracle e-Commerce Gateway Profile Options, Oracle e-Commerce Gateway Implementation Manual.
Each of the profile options below lists the variable <transaction_code>. For a listing of the transaction codes used below, see: EDI Transaction Support.
ECE_<transaction_code>_ENABLED, Functional profile category
Indicates whether the transaction is enabled at the site level. The default is Yes.
ECE_<inbound_transaction_code>_ADDRESS_PRECEDENCE, Functional profile category
Applies to inbound transactions only. Determines the precedence by which trading partner addresses are derived.
When inbound EDI transactions are imported into Oracle E-Business Suite, the unique business site address must be established before the transaction can be processed. Each trading partner must have a unique address.
A trading partner is a site, such as a plant, a warehouse, a bank branch, or some other business unit. A trading partner is not necessarily a company; one company can have several sites.
The correct address can be obtained from three categories of components. They have unique address ids, location code/translator codes, location names, and physical addresses. These addresses are verified and validated as transactions are processed.
When you set this profile option using the Transaction Profiles window, you must select from the following values:
-
LOC (Default)- Address components and/or location code combination
The address is derived from the combination of location code and address components. If there is only one value provided, either location code or address components, the address will be derived based on the provided value. If both location code and address components are provided, then it will be based on the combination of both.
Note: If no address is found for both location code and address components or if the populated address components and location code do not match, then a message "Unable to derive ship to address" will appear.
If both location code and physical address are provided, then it will derive address through location code and compare it with that derived through physical address.
-
LTC - Location code/translator code combination
A trading partner must be set up first so that the address can be derived.
-
LPA - Location code/physical address/party details combination
The correct address is derived through the combination of location code, customer name, customer number, and address components. If there is only a partial set of values provided, the address will be derived based on the provided values.
Note: This feature is available only for address type "CUSTOMER".
You must set up each inbound transaction to derive the correct address.
The following profile options apply only to the Purchase Order Outbound (POO) and Purchase Order Change Request Outbound (POCO) transactions:
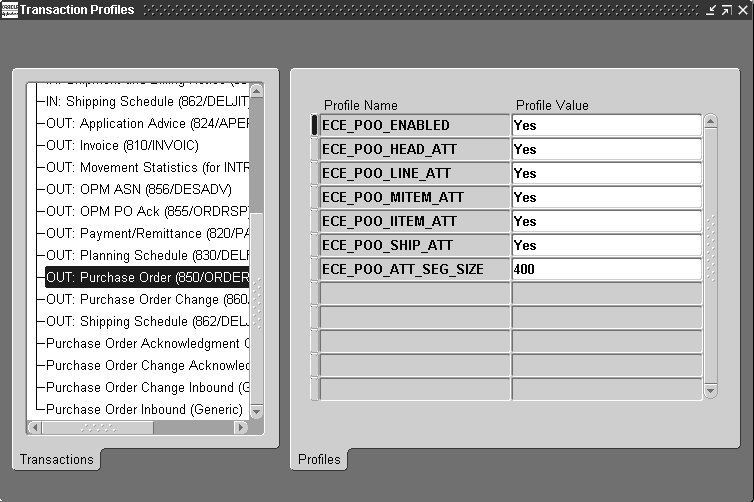
ECE_<transaction_code>_HEAD_ATT, Functional profile category
Enables the header attachment for the transaction. The default is No.
ECE_<transaction_code>_LINE_ATT, Functional profile category
Enables the line attachment for the transaction. The default is No.
ECE_<transaction_code>_MITEM_ATT, Functional profile category
Enables the master item attachment for the transaction. The default is No.
ECE_<transaction_code>_IITEM_ATT, Functional profile category
Enables the inventory item attachment for the transaction. The default is No.
ECE_<transaction_code>_SHIP_ATT, Functional profile category
Enables the shipment attachment for the transaction. The default is No.
ECE_<transaction_code>_ATT_SEG_SIZE, Functional profile category
Sets the attachment segment size for the transaction. Attachments can be split into segments to accommodate their insertion into the interface data file. The segment size is expressed in bytes. The default is 400.
Note: For more information, see:
Profile Options, Oracle e-Commerce Gateway Implementation Manual
Setting Profile Options
To set system-level profile options:
-
Navigate to the Transaction Profiles window.

-
Enter the outbound directory where your outbound interface data files will be stored. For example, /sqlcom/outbound.
-
Enter the inbound directory where your inbound interface data files will be stored. For example, /sqlcom/inbound.
-
Indicate whether to allow words to be split when the segment size is reached.
To set profile options by transaction:
-
Navigate to the Transaction Profiles window.

-
Select the transaction for which you want to set profile options.
See: EDI Transaction Support, Oracle e-Commerce Gateway Implementation Manual.
-
Indicate whether the transaction should be enabled or disabled.
-
For inbound transactions only, select the address precedence code. Refer to the profile option description for the meaning of each address precedence codes. See Oracle e-Commerce Gateway Profile Options.
-
For the Purchase Order Outbound (POO) and Purchase Order Change Request Outbound (POCO) transactions only, enter the attachment segment size, the number (in bytes) of each line in your attachments. The default it 400; the valid range is from 1 to 400. Once an attachment line reaches the segment size, it is split to create a new line.
-
For the POO and POCO transactions only, set up the following profile options:
-
Enable or disable the header attachment.
-
Enable or disable the line attachment.
-
Enable or disable the Inventory item attachment.
-
Enable or disable the master item attachment.
-
Enable or disable the shipment attachment.
-
-
Repeat these steps above for each transaction you use.
Note: For additional information, see:
Oracle e-Commerce Gateway Profile Options
Setting Your Personal User Profile, Oracle E-Business Suite User's Guide
Common User Profile Options, Oracle E-Business Suite User's Guide
Profile Options in Oracle Application Object Library, Oracle AE-Business Suite System Administrator's Guide - Maintenance