MES Administrator
This chapter describes the features of the MES Administrator role, including parameter descriptions.
This chapter covers the following topics:
MES Administrator
The MES Workstation is configured with parameters controlling behavior at the organization or department level, and actions at the user level based on roles. When you access the Workstation Parameters page, definition for each parameter is specified for—or inherited from—the site, role, organization, or department. Parameters are used for the display of information, security, and actions. Based on user roles and level, predefined security and preferences control the types of functions and information accessed. Parameters related to actions can be configured as buttons or choice lists.
Manufacturing Execution Workstation Parameters
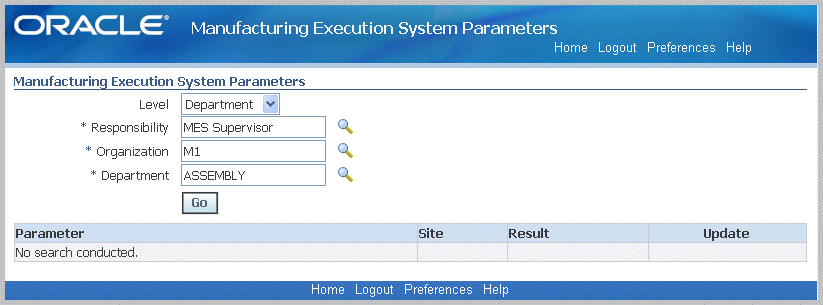
To view or update Manufacturing Execution Workstation parameters
-
Navigate to the Manufacturing Execution Workstation Parameters page.
-
Select a parameter level.
Your choices are Site, Role, Organization, or Department.
Depending on the level selected, other level specific values are required. For example:
-
Site: No other related fields
-
Role: Responsibility, that is, MES Operator or MES Supervisor
-
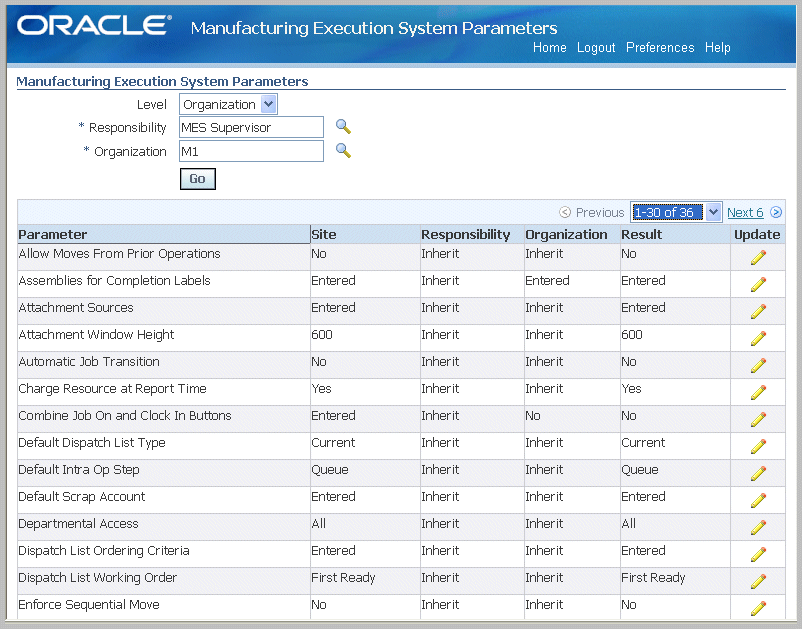
Organization: Role and Organization fields
-
Department: Role, Organization, and Department fields
-
-
Select Go to display the Workstation Parameters page.
The page displays a table format view of the list of parameters, and the values at the level you selected. There are several display options:
-
Parameters using only one value from a list of values, display the selected value—or Inherited if they are derived from the higher level.
-
Parameters using multiple values from a list of values display Entered—or Inherited if they are derived from the higher level.
-
-
Select the Update icon to display the individual parameter page.
-
You can view or change information on the parameter detail page. If you update the information, select Apply to save your work Otherwise, select Cancel to display the table view format.
The following table describes the MES Workstation parameters.
| Parameter | Description |
|---|---|
| Allow Moves From Prior Operations | Enables flexibility in move transactions by providing a list of values at the From operation. |
| Assemblies for Completion Labels | Specifies which assemblies have labels automatically printed at the time of completion. |
| Attachment Sources | Defines the source and the order of documents displayed in the Attachments region. |
| Attachment Window Height | Sets the view size of attachments on the Work Content and Attachment pages. The width is always full screen. Choices are 100, 400, 600, or 800 pixels. |
| Automatic Job Transition | Controls the presentation of jobs on the Work Content page. Choices are:
|
| Charge Resource at Report Time | Indicates if resource transactions are created from reported times— through clock actions. Choices are Yes or No. |
| Combine Job On and Clock In Buttons | Enables you to combine the actions of Job On and Clock In, and Job Off and Clock Out time entry. The combination is used for environments where only one employee is working on a job. Choices are:
Note: This parameter is disabled if the Time Entry Mode parameter is set to Disable. |
| Default Dispatch List Type | Determines the type of dispatch list to display when the workstation is initialized. Choices are
|
| Default Intra Op Step | Specifies the default To intraoperation step for move transactions. Choices are Queue, Run, or To Move. |
| Default Scrap Account | Used when the organization requires a scrap account. |
| Departmental Access | Determines which records display in the Department list of values of the Startup page. Choices are:
|
| Dispatch List Ordering Criteria | Specifies the fields and order displayed on the dispatch list. |
| Dispatch List Working Order | Specifies the order for working on jobs as shown on the dispatch list. Choices are Any Order or First Ready. |
| Enforce Sequential Move | Sets flag for sequential moves for assemblies. If set to:
Sequential moves are applicable to both serialized and non-serialized jobs. |
| Global Actions | Specifies which global actions display in the MES Workstation and the MES Supervisor Workbench. |
| Include Complete Quantity in Dispatch List | Include or exclude job operations in the current and scheduled dispatch lists that have quantities in the To Move operation step. Choices are Yes or No. |
| Include Job Status | Specifies status of jobs displayed in dispatch lists and the Supervisor home page. |
| Job Operation Actions | Specifies actions available for job transactions. You can create the action in a list of values or button display. |
| Job Selection Mode | Sets your preference for job search display when initializing the workstation. Your choices are:
|
| Job Traveler Template Setup | Provides the ability to associate a template to a job traveler at the item, category, or organization level. |
| Labor Performance Metrics | Configures the labor performance metrics definitions displayed in the Labor Performance views on Supervisor Dashboard. |
| Move Option | On the Move Assembly page, this parameter enables you to combine a move transaction with scrap or reject transactions. Choices are Move, Move and Scrap, or Move and Reject. |
| Operator Skills Validation | Used to define and configure operator skills validation at Clock In and for move transactions for organizations. |
| Production to Plan KPI | Used to configure the key performance indicators displaying on the Supervisor Dashboard. These indicators are used to monitor progress on the shop floor. |
| Ready Status Criteria | Specifies when a released job is ready for work on the shop floor. Choices are No Exceptions, No Shop Floor Status Assigned, and Quantity in Queue or Run. |
| Reason Codes for Exception Types | Used to associate reason codes with the different exception types. |
| Require Badge Number for Move Transaction | Requires the employee to enter his badge number when reporting moves and completions. This parameter is not applicable for single users. Choices are Yes or No. |
| Resources for Capacity Shortages | Defines which resources to consider when calculating potential capacity shortages. |
| Retain Badge Number | Controls whether to retain the badge number on the dispatch list when entered by the employee. The badge number appears until cleared. Your choices are Yes or No. |
| Search Job/Serial Operation Actions | Specifies list of actions available on the Search Jobs and Search Serial Numbers pages. |
| Single User Mode | Specifies if only one operator is working on a job operation through a single login. Choices are Yes or No, if set to:
|
| Standard Operations for Move Labels | Defines the operations where labels are automatically printed when a move transaction is performed. |
| Supervisor Dashboard View | Controls which performance indicators display on the Supervisor Dashboard. |
| Time Entry Mode | Controls shift and clock functionality for time and labor reporting. |
| Work Content Actions | Specifies the list of actions available on the Work Content page. |
| Work Content Layout | Specifies how page and tab regions are displayed in the Work Content page. |
| Work Orders and Component Shortage Setup | Defines which components are considered in the shortage calculation displayed in the Shopfloor Progress region of the Supervisor Dashboard. |
Allow Moves From Prior Operations
Enables flexibility in move transactions by providing a list of values at the From operation to support out-of-order operation completion reporting. You can select any operation up to the current operation. If there is no quantity in the current operation, the From operation defaults to the previous operation, if the quantity is not split in multiple operations.
Values are Yes or No.
Note: Express Move transactions are not supported when the value is set to Yes.

Assemblies for Completion Labels
Specifies which assemblies have labels automatically printed when the completion transaction is recorded. This parameter is set only at the organization level. Label printing can be defined for either the assembly item or category type. If choosing:
-
Assembly level, select the assembly in the Item field
-
Category level, select both the Category Set and Category values
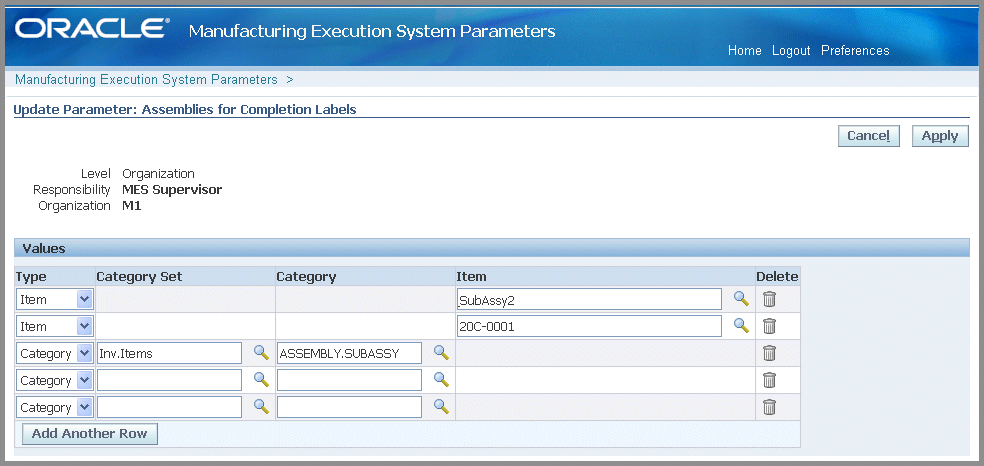
See:
Defining Categories, Oracle Inventory User's Guide
Defining Category Sets, Oracle Inventory User's Guide
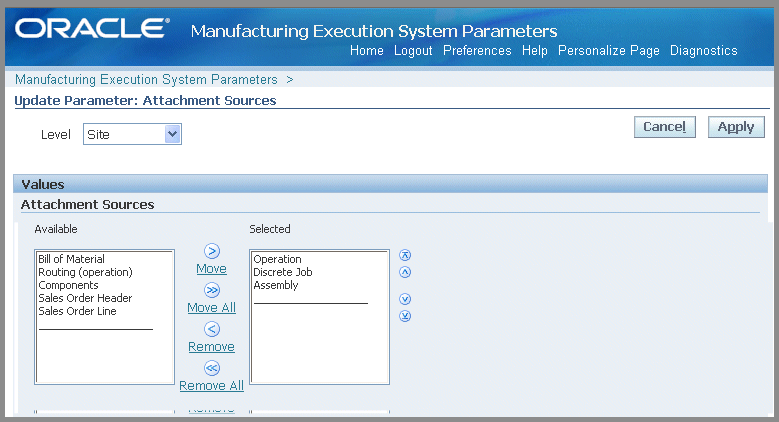
Attachment Sources
The workstation provides the ability to display attached instructions and documents pertaining to your production. This can include procedures, diagrams, and assembly instructions—viewable from the Work Content page. The attachment displays in a frame, the size can be changed in the Workstation parameter Attachment Window Height. If more than one attachment exists, documents appear in a sequential format. You can specify the order of display in the table when you setup the attachment.
Instructions and documents are attached to entities in their specific product application. For example, an instruction for operations are attached in the Operation window in Oracle Bills of Material.
To setup attachments for viewing in the MES Workstation
-
In specific product applications, attach the instructions and documents.
You can attach instructions to the following entities for display in the MES Workstation:
-
Assembly
-
Bill of Material
-
Components
-
Discrete Job
-
Operation
-
Routing (operation)
-
Sales Order Header
-
Sales Order Line
-
-
Set the frame for viewing in the workstation parameter Attachment Window Height.
-
In the Attachment Sources boxes, select where to display the instructions and attachments.
Select attachment source from the Available box—and move to the Selected box. The order listed in the Selected box, is the order displayed on the page. Use the Arrow tool to change the order. This enables you to prioritize the attachments.
-
Choose Apply to save your work.
Default Intra Op Step
This parameter is used to specify the default To intraoperation step for move transactions. Each step has a value. You can choose one of the following:
-
Queue
-
Run
-
To Move
Note: Values of Reject and Scrap are not available as default move transactions.
The default logic for Intraoperation steps in the MES Workstation progresses in the following way:
-
When the default step is greater than the From operation step, the To operation is used as the From operation default.
For example, for Operation 10 Queue moves, if the default step is set to Run—the To operation is defaulted to Operation 10, and the To step default is Run.
-
When the default step is less than or equal to the From step, the To operation is defaulted to the next count point operation.
For example, for Operation 10 Queue moves, if the default step is set to Queue—the To operation is defaulted to Operation 20, and the To step default is Queue.
-
When the From operation is the last operation in the routing, and the default step is less than or equal to the From step—the To step default is To Move.
For example, for Operation 20 Queue moves, if this is the last operation and the default step is set to Queue—the To operation is defaulted to Operation 20, and To step default is To Move.
-
When moving from To Move of the last operation—the To step is defaulted but not the To operation, because there are a number of possibilities for the backward moves.
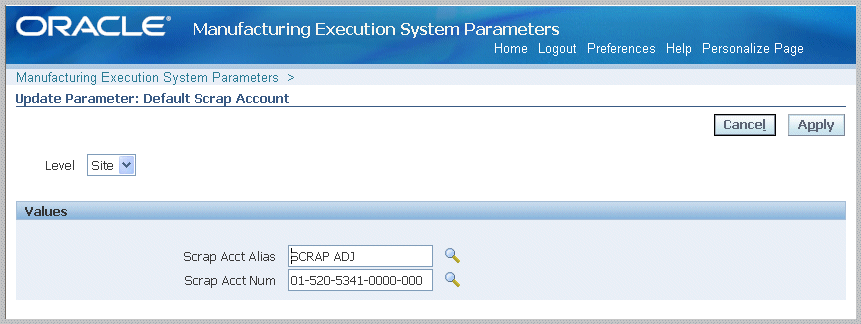
Default Scrap Account
This parameter is used when the organization requires a scrap account, and there is a value in the Quantity to Scrap field for move transactions. Select a value in the Scrap Account field. Or select an alias value in the Scrap Account Alias field, the account number appears in the Scrap Account field.
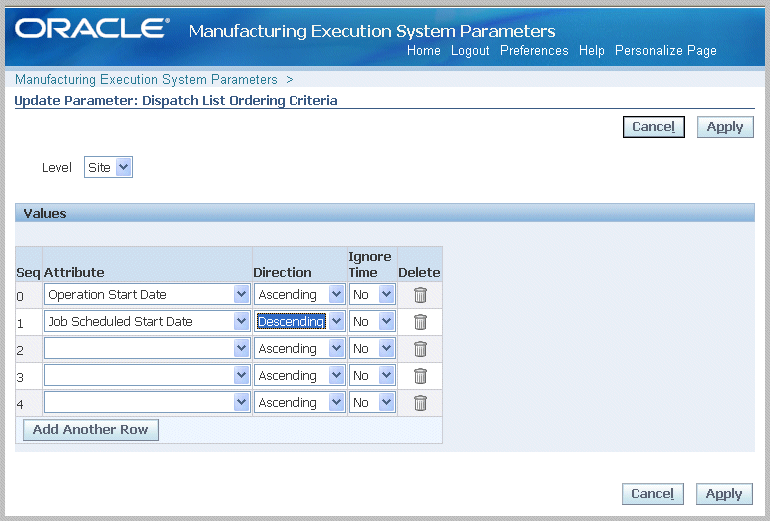
Dispatch List Ordering Criteria
The Dispatch List Ordering Criteria page determines the order in which job operations are shown on the dispatch list on the workstation. Fields are specified in ascending or descending order, and you can set an Ignore Time flag. In the Values region, select ordering criteria including:
-
Sequence Attribute
You can choose from the following values:
-
Assembly
-
Build Sequence
-
Custom Order Attribute 1
-
Custom Order Attribute 2
-
Job Due Date
-
Job Scheduled Completion Date
-
Job Scheduled Start Date
-
Line
-
Operation Completion Date
-
Operation Start Date
-
Schedule Group
Note: You can use the sequence attributes—Custom Order Attribute 1 and Custom Order Attribute 2—to order your dispatch list using customized values. See: Ready Status
-
-
Direction
Specify how you want sequence attributes ordered on the page. Select Ascending, in order of lowest to highest choice, or Descending, in order of highest to lowest choice.
-
Ignore Time
This flag is used if you do not want to display the time component of date and time values. When set to Yes, only the date displays, and not the time value.
Global Actions
You can restrict access to the actions in the global list in the MES Workstation and MES Supervisor Workbench based on site, role, organization and department. These actions include:
-
Launch Component Shortage Calculation
-
Launch First Pass Yield Calculation
-
Launch Labor Performance Calculation
-
Launch Production to Plan Calculation
-
Launch Resource Workbench
-
Launch Job Workbench
-
Launch Parts Per Million Defects Calculation
-
Print Discrete Job Routing
-
Report My Time
-
Report Resource Usages
-
Search Jobs
-
Search Serial Numbers
-
View Performance Metrics
Select Global Actions from the Available box—and move to the Selected box. The order listed in the Selected box, is the order displayed on the page. Use the Arrow tool to change the order they appear in the pop-list. See Global Actions
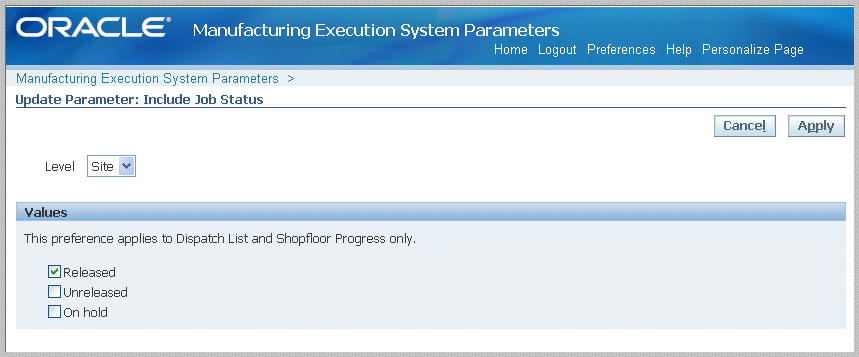
Include Job Status
This parameter specifies job statuses displayed in dispatch lists, and in the Shop Floor Progress region on the Supervisor home page. Choices are Released, Unreleased, and On Hold.
Job Operation Actions
This parameter is used to list the actions available for job transactions. You have the option to specify if the listed actions are viewed on the page as buttons in the Button Actions region, or as a drop-down list of values in the Choice List Actions region. For the Choice List Actions, the order actions are listed in the Selected box, determines your order on the page.
Select categories from the Available box—and move to the Selected box. Actions are displayed only in one mode on a page, that is, a button or drop-down list. Choose Apply to save your work.
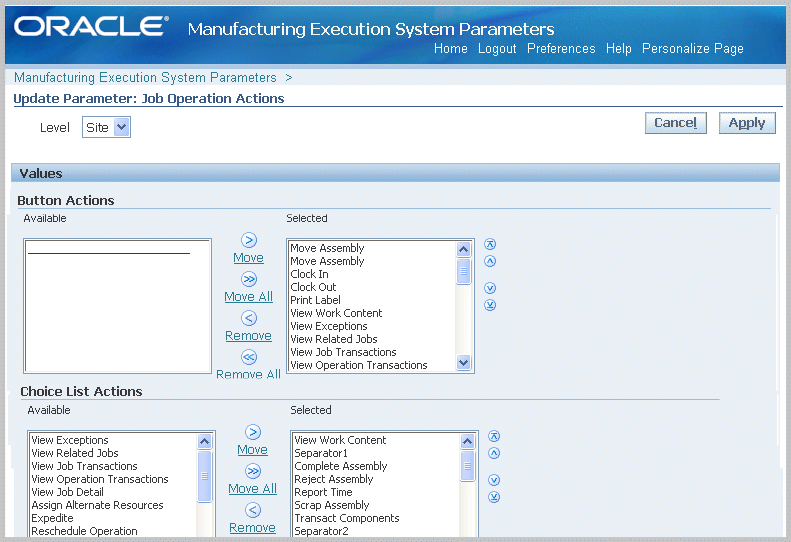
The available Job Operation Actions include: Assign Alternate Resources, Clock In, Clock Out, Complete Assembly, Expedite, Job On, Job Off, Move Assembly, Move and Complete, Print Label, Reject Assembly, Report Exception, Report Time, Reschedule Operation, Return Assembly, Return and Move, Return From Scrap, Return From Reject, Separator1, Separator2, Separator3, Scrap Assembly, Transact Components, View Exceptions, View Job Detail, View Job Transactions, Undo Clock In, Undo Expedite, Update Note, View Operation Transactions, View Related Jobs, View and Print Job Traveler, and View Work Content.
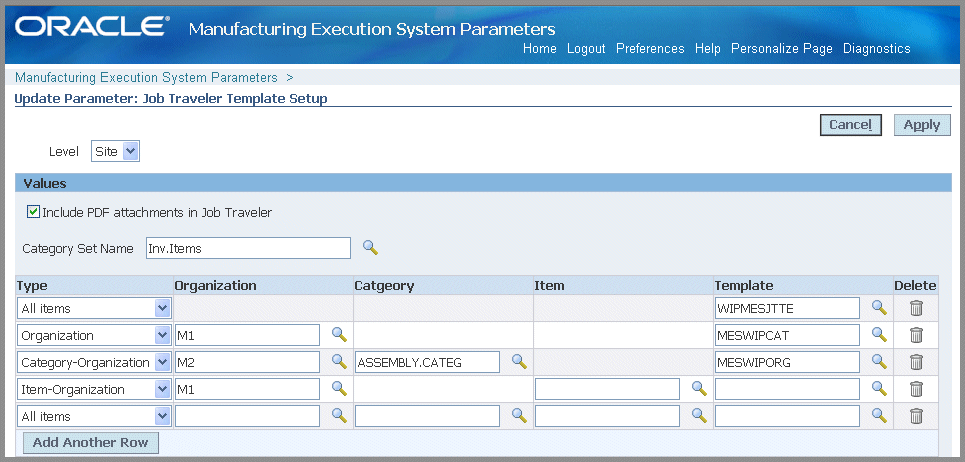
Job Traveler Template Setup
The Job Traveler Template Setup parameter provides the ability to associate a template to a job traveler. You can view and print a job traveler from the Dispatch List, Search Jobs, Work Content, and Shopfloor Progress pages. This parameter enables you to configure a template for job travelers at several different levels including item, category, or organization level—and also enables you to include separate PDF files as appendices to the traveler document. It is set at the site level only.
To setup a job traveler template
-
Navigate to the Job Traveler Template Setup page.
-
Enable the Include PDF attachments in Job Traveler if you want to include separate PDF document file attachments.
These documents are printed at the end of the traveler as appendices.
-
Select a value in the Category Set Name field to create a template for a category set.
Categories and category sets are used to group items for reporting. See: Defining Categories, Oracle Inventory User's Guide, and Defining Category Sets, Oracle Inventory User's Guide
Note: Oracle recommends that you do not enable the feature, Allow Multiple Item Categories, for the category sets you assign to the template. The job traveler feature requires one item category per job traveler template record.
-
In the Type field, select the level or hierarchy of levels you want to configure for your template:
-
All Items: Associate the template to all items across all your site's organizations. If you choose this option—the Organization, Category, and Item fields are disabled.
-
Organization: Associate the template across the organization. Select an organization, the Category and Item fields are disabled.
-
Category-Organization: Associate the template across the organization for a particular category. Select an organization and category. The Item field is disabled.
-
Item-Organization: Associate the template across the organization for a specific item. Select values in the Organization and Item fields.
-
-
In the Template field, select a template record.
A default template is provided, WIPMESJTTE. You can attach custom templates created using Oracle XML Publisher.
-
Select Apply to save your work.
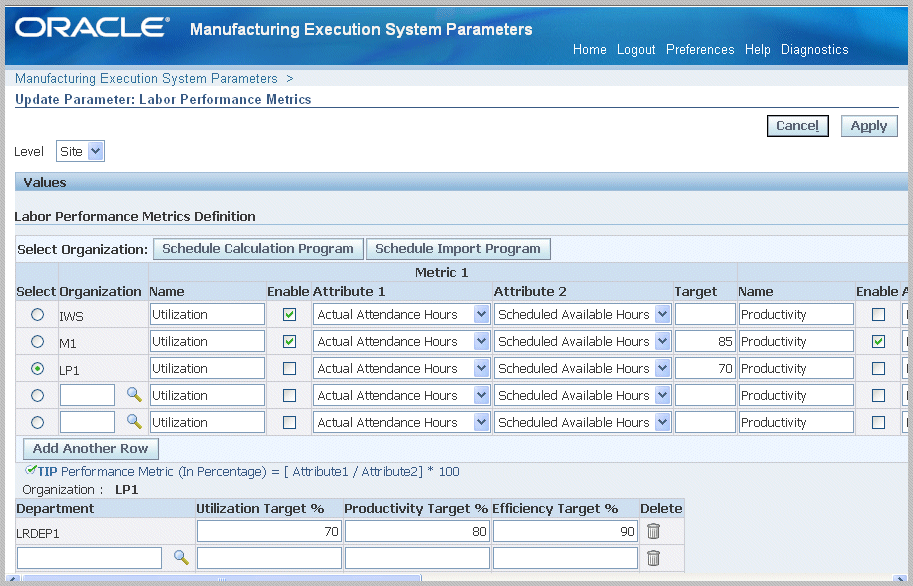
Labor Performance Metrics
This parameter defines the labor performance metrics displayed in the Labor Performance views on Supervisor Dashboard. These views include the Labor Performance chart, Labor Performance View, and Labor Performance Summary. This parameter is set at the site level only.
To define your labor performance metrics values
-
Navigate to the update Labor Performance Metrics page.
-
In the Labor Performance Metrics region, select a value in the Organization field. You can create one record per organization.
-
For each organization enter values for Metrics 1 - 3.
-
Name—This name displays on the Labor Performance chart. Three labor performance metrics are system provided, and comprises the following calculations:
-
Efficiency—Earned Hours / Direct Labor Hours
-
Productivity—Direct Labor Hours / Actual Attendance Hours
-
Utilization—Actual Attendance Hours / Scheduled Available Hours
You can customize the metric name to meet your site's specifications. For example, you can rename the a specific metric to something more specific to your site.
-
-
Attribute 1, Attribute 2—Choices are Actual Attendance Hours, Direct Labor Hours, Earned Hours, and Scheduled Available Hours.
-
Target—Enter a percentage value for the goal of this metric.
-
-
You have the option to define metrics, but choose not to use them in the calculations. Check the Enable box for the metrics you want defined in your calculation.
Note: Metrics must be enabled to be considered in the calculation program.
-
You can also set a target for the metrics at department level. Specify the target for each department.
If no value is entered here, the calculation program uses the organization level value.
If you have customized the name of the metric, that customization displays here.
-
Select Apply to save your work.
-
Select an organization row, and choose Schedule Calculation Program to launch the Labor Performance Metrics concurrent request program. The Schedule Request: Schedule page appears where you can select runtime details for this request. The program considers the parameter values to calculate values for each organization. This information is displayed on the Labor Performance chart. You can also access the concurrent request through the Global Actions box.
-
Select Schedule Import Program to use time and attendance data from another system.
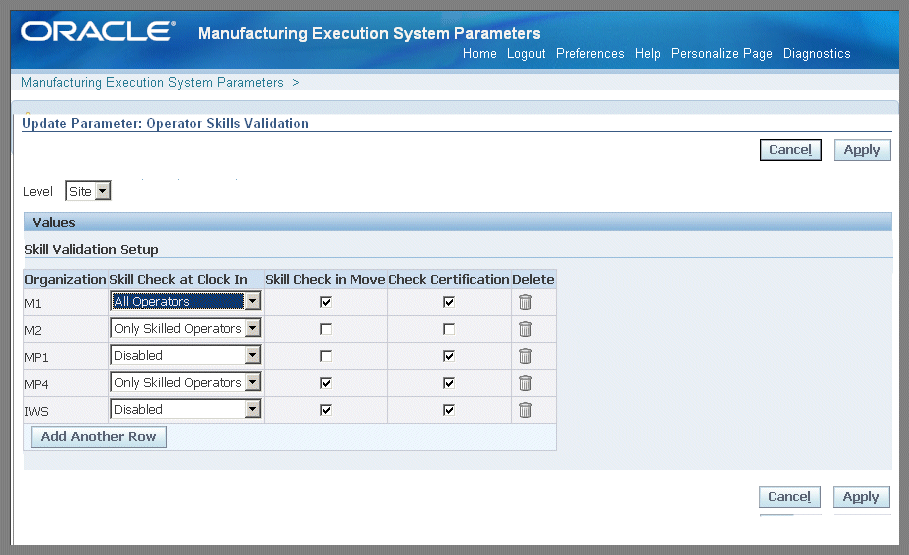
Operator Skills Validation
The Operator Skills Validation parameter defines and configures organizations to check for the skill requirements during Clock In and move transactions. Use this parameter to specify the organizations that require competencies and qualifications are confirmed before enabling move transactions. This feature is setup in several Oracle Applications, see: Labor Skills Validation Setup
To enable operator skills validation at the organization level
-
Navigate to the Operator Skills Validation parameter.
Note: This parameter is set at the Site level.
-
Select appropriate organizations in the Organization field.
-
In the Skill Check In at Clock In field, set the type of employee confirmation needed during operation Clock In. Your choices are:
-
All Operators
All operators (resources) are permitted to Clock In to the job operation—both skilled and unskilled. This enables all resource transactions to be reported for the operation. However, at least one skilled resource is required for job transactions at Clock In for the job operation.
-
Only Skilled Operators
Only skilled operators can Clock In to the job operation. The Clock In transaction will fail if the operator does not meet the skill requirements.
-
Disabled
Skills validation is not required at Clock In for this organization.
-
-
Enable or disable the Skill Check in Move check box. This specifies if the skill check is required for move transactions.
If this value is enabled, the operator performing the move transaction is required to have all the specified competencies at the appropriate skill levels, qualifications, and certifications to perform the job operation. If the move is across multiple operations, the skill check is effective for each performed operation where the skill check is enabled.
-
Enable or disable the Check Certification check box. This specifies if certification is required for move transactions.
-
Select Apply to save your work.
Labor Skills Validation Setup
Labor skills validation is used to certify the qualifications and required competencies for operators performing assigned manufacturing activities. This helps you meet International Organization for Standardization (ISO) 9000 standards, preventing potential errors during job transactions. Regulatory requirements for specific industries may mandate companies to execute and document employee competencies.
The setup for labor skills validation is integrated with other Oracle applications including Human Resources Management Systems, Bills of Material, Work in Process, and E-Records.
-
Human Resources Management Systems
-
Setup required competencies including certifications and skill levels.
-
Setup qualifications.
-
Associate competencies and qualifications to employees.
For procedures on setting up Human Resources Management Systems functionality, see:
-
Competencies Overview, Oracle HRMS Workforce Sourcing, Deployment, and Talent Management Guide
-
Competency Requirements, Oracle HRMS Workforce Sourcing, Deployment, and Talent Management Guide
-
Defining Competencies, Oracle HRMS Workforce Sourcing, Deployment, and Talent Management Guide
-
Creating a Competency Profile, Oracle HRMS Workforce Sourcing, Deployment, and Talent Management Guide
-
Qualification Types, Oracle HRMS Workforce Sourcing, Deployment, and Talent Management Guide
-
-
Bills of Material
-
Define competencies for standard operations.
-
Define competencies for routing operations.
For procedures on setting up Bills of Material functionality, see:
-
Creating a Standard Operation, Oracle Bills of Material User's Guide
-
Creating a Routing, Oracle Bills of Material User's Guide
-
-
Work in Process
Define competencies for the operations on jobs, see: Adding and Updating Operations, Oracle Work in Process User's Guide.
-
E-Records
Setup e-records for capturing the competencies validated during move transactions, , see:
-
Evidence Store, Oracle E-Records Implementation Guide
-
Implementing E-Records, Oracle E-Records Implementation Guide
-
-
MES for Discrete Manufacturing
Configure Operator Skills Validation parameter.
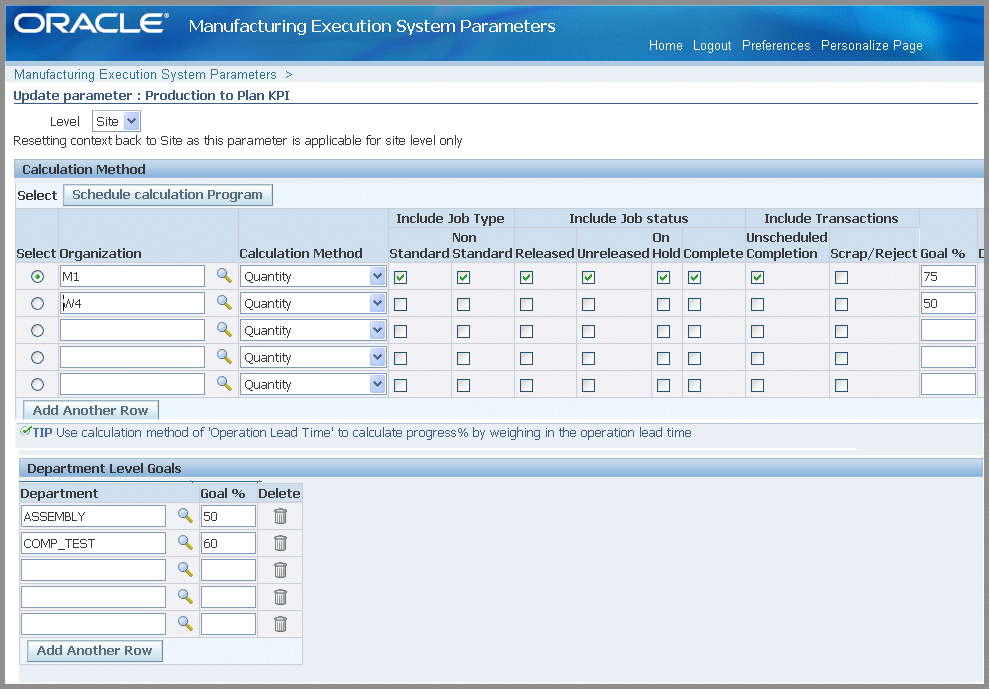
Production to Plan KPI
This parameter defines the key performance indicators on the Production to Plan graph on the Supervisor Dashboard. Supervisors use this graph to review shop floor progress and then take appropriate actions. The parameter is set at the site level only.
The page displays a table containing values used for the scheduling calculation method per organization record. You select a specific organization and launch the Production to Plan Calculation concurrent request.
To set Production to Plan key performance indicators
-
Navigate to the Production to Plan KPI parameter page.
-
Select an Organization. You can create only one record per organization.
-
Select a calculation method, your choices are:
-
Quantity
If this method is selected, then the calculation for both planned and production is only based on quantity. The calculation is:
Calculation = [(Actual production quantity) / (Planned quantity)] * 100
The progress percent calculated for each job operation is then summed up, and the average is calculated at the department or organization level.
-
Operation Lead Time
If this method is selected, then quantity for production and plan is adjusted with operation lead time factored in. The calculation is:
Progress % = [{Sum (Actual production quantity * Operation Lead Time)} / {Sum (Planned quantity * Operation Lead Time)}] * 100
The progress percent calculated for each job operation is then summed up, and the average is calculated at the department or organization level.
-
-
In the Include Job Type field, your choices in the calculation are standard and non-standard jobs.
If both standard and non-standard are unchecked, then jobs are not considered for calculation.
-
In the Include Job Status field, your choices in the calculation are Released, Unreleased, On Hold, and Complete.
If no status is selected, then jobs are not considered for calculation.
-
In the Include Transactions field, your choices in the calculation are Unscheduled Completion and Scrap/Reject.
Transactions on job operations which are not performed on the scheduled day and shift are considered as unscheduled completions. Scheduled day and shift is calculated based on the job operation completion time.
-
Enter a Goal % at the organization level for the production to plan. This value is user-defined.
-
In the Department Level Goals region, you can specify the objective of the percentage of parts completed for each department. Select a Department and enter a value in the Goal % field at the department level.
If no value is entered here, the calculation program uses the organization level value.
-
Select Apply to save your work.
-
Select an organization row, and choose Schedule Calculation Program to launch the Production to Plan Calculation concurrent request program.
The Schedule Request: Schedule page appears where you can select runtime details for this request. The program considers the parameter values to calculate values for each job operation rolled up to the department and organization. This information is displayed on the Production to Plan graph.
You can also access the concurrent request through the Global Actions box.
See: Production to Plan
Ready Status Criteria
This parameter specifies the criteria used to indicate if a released job is ready for work on the shop floor. When a job meets the conditions for work, the Ready check mark is automatically updated on the Dispatch List and Work Content page. Criteria includes:
-
No Exceptions
-
No Shop Floor Status Assigned
-
Quantity in Queue or Run
Information on ready status details displays in the Status region of the Work Content page if set in the parameter Work Content Layout
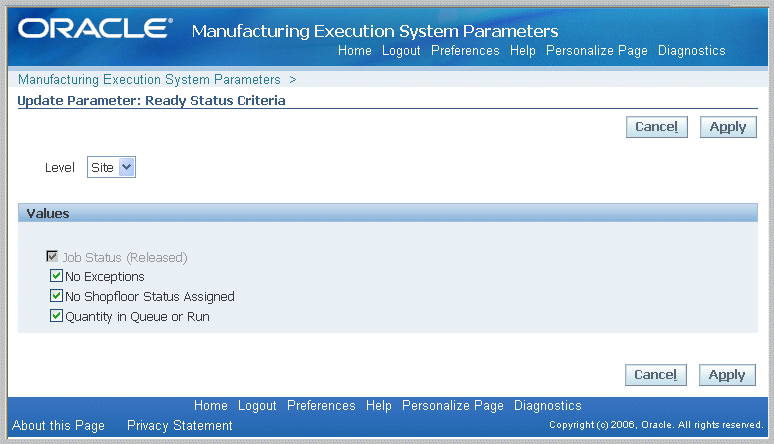
You can tailor the ready status calculation to meet your site's requirements using custom programming instructions to control job operation readiness. The Ready Status client extension is used to set your own criteria to determine if work can be performed on the job operation. See: Overview of MES Client Extensions
Reason Codes for Exception Types
You can create relationships between reason codes and exception types. This information displays on the Exceptions, Add Exceptions to Impacted Jobs, and Closed Exceptions pages.
Note: Reason codes are defined in the Work in Process Lookup, WIP_EXCEPTION_REASON_CODES.
Select reason codes from the Available box—and move to the Selected box. Select Apply to save your work

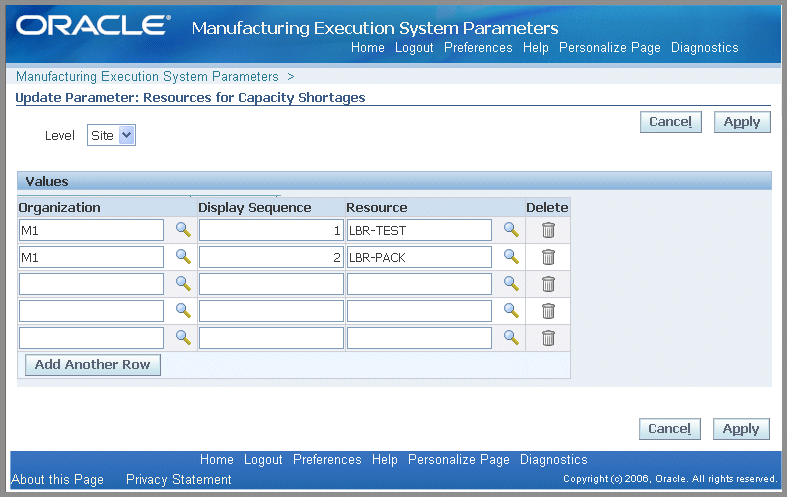
Resources for Capacity Shortages
This parameter is used to specify resources considered in capacity shortage calculations.
Select the organization, enter a value in the Display Sequence field, and select a resource.
Note: The lower the numerical value of the Display sequence rating, the higher the level in priority. Use positive numbers in this field.
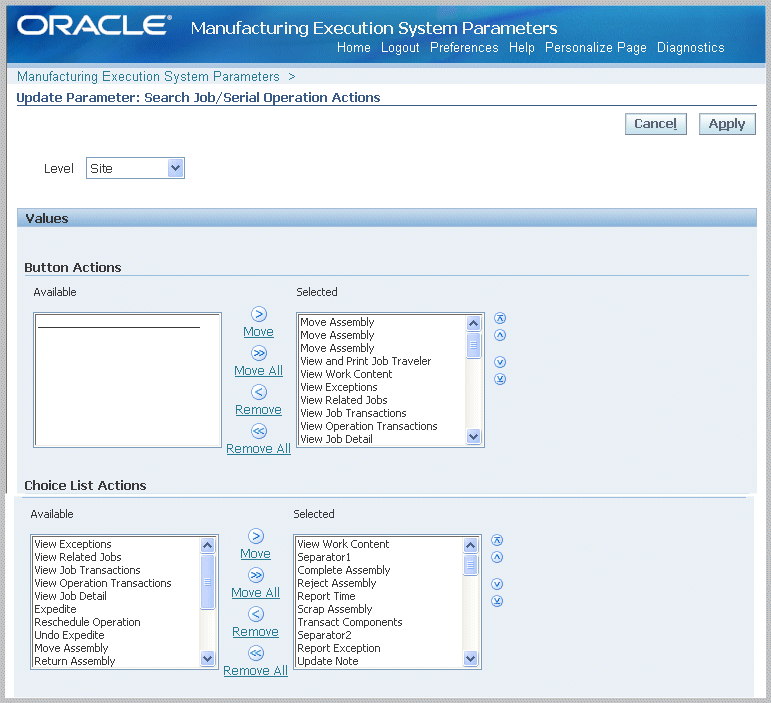
Search Job/Serial Operation Actions
This parameter is used to list the actions available on the Search Jobs and Search Serial Numbers pages. You have the option to specify if the listed actions are viewed on the page as buttons in the Button Actions region, or as a drop-down list of values in the Choice List Actions region. For the Choice List Actions, the order actions are listed in the Selected box determines your order of preference on the page.
Select categories from the Available box—and move to the Selected box. Actions are displayed only in one mode on a page, that is, a button or drop-down list. Choose Apply to save your work.
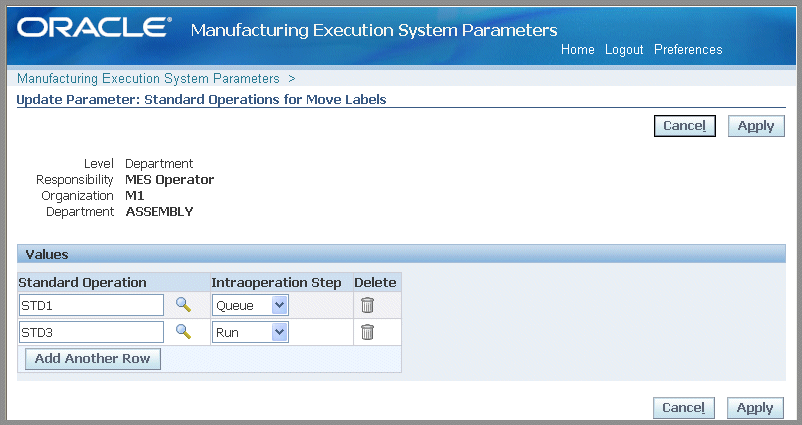
Standard Operations for Move Labels
This parameter defines the operations where labels are automatically printed when a move transaction is performed. This parameter is set only at the department level.
To set standard operations for move labels
-
Navigate to the Standard Operations for Move Labels parameter.
-
In the Standard Operations field, select a valid standard operation code.
-
Select a value in the Interoperation Step field.
Your choices are the steps enabled for your organization in the Work in Process Parameters file and can include Queue, Run, To Move, Reject, and Scrap.
-
Select Apply to save your work.
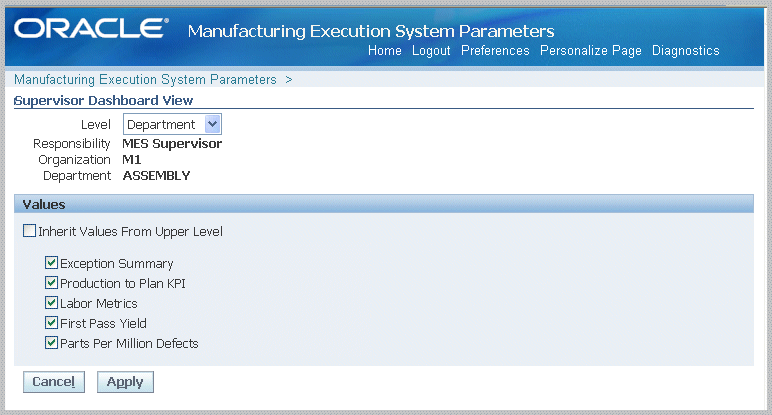
Supervisor Dashboard View
This parameter sets the display on the Supervisor Dashboard for performance indicators. Enable the appropriate check boxes for the following views to display:
-
Exceptions Summary
-
Production to Plan KPI
-
Labor Metrics
-
First Pass Yield
-
Parts Per Million Defects
See: Dashboard
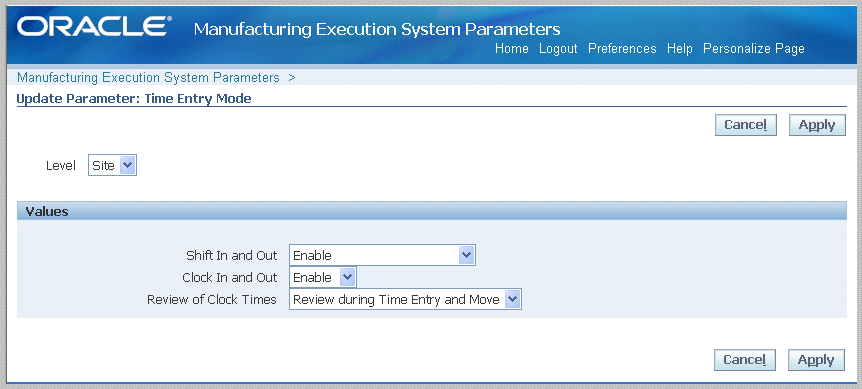
Time Entry Mode
This parameter is used to distinguish between the time entry records entered through the Startup page, Dispatch List, and transaction pages. It enables the shift and clock button displays used in time and attendance calculations, and labor reporting.
Choices for Shift In and Shift Out configuration are:
-
Disable—Shift In and Shift Out do not display
-
Enable—Shift In and Shift Out display on both the Dispatch List and Startup page
-
Enable Only In Dispatch List
-
Enable Only In Startup Page
Choices for Clock In and Clock Out configuration are Enable or Disable. If enabled, the choices for when the resource is charged are:
-
No Review—charged automatically
-
Review during Time Entry—charged at time entry
-
Review during Time Entry and Move—charged during move transaction
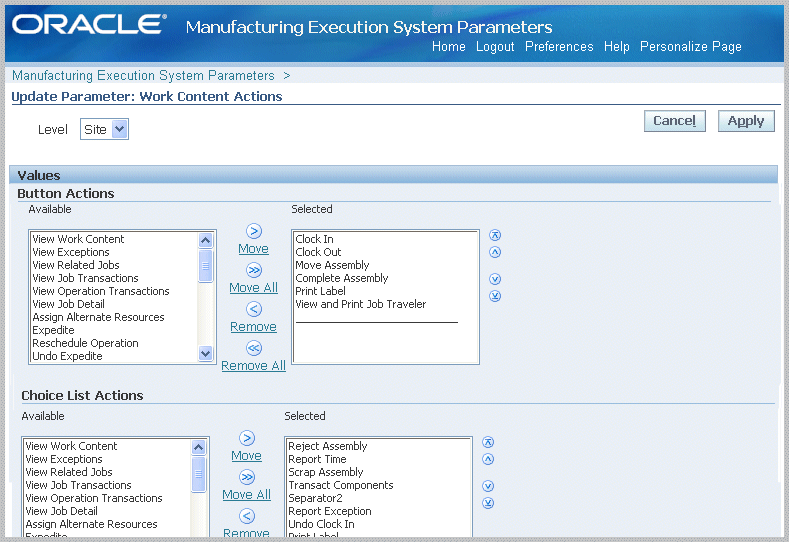
Work Content Actions
This parameter is used to list the actions available on the Work Content page. You have the option to specify if the listed actions are viewed on the page as buttons in the Button Actions region, or as a drop-down list of values in the Choice List Actions region. For the Choice List Actions, the order actions are listed in the Selected box determines your order of preference on the page.
The available Work Content Actions include: Assign Alternate Resources, Clock In, Clock Out, Complete Assembly, Dispatch Instances, Expedite, Job On, Job Off, Move Assembly, Move and Complete, Print Label, Reject Assembly, Report Exception, Report Time, Reschedule Operation, Return Assembly, Return and Move, Return From Scrap, Return From Reject, Separator1, Separator2, Separator3, Scrap Assembly, Transact Components, View Exceptions, View Job Detail, View Job Transactions, Undo Clock In, Undo Expedite, Update Note, View Operation Transactions, View Related Jobs, View and Print Job Traveler, and View Work Content.
Select categories from the Available box—and move to the Selected box. You have the option to display actions as buttons, on a drop-down list, or both modes. Choose Apply to save your work.
See: Viewing Work Content
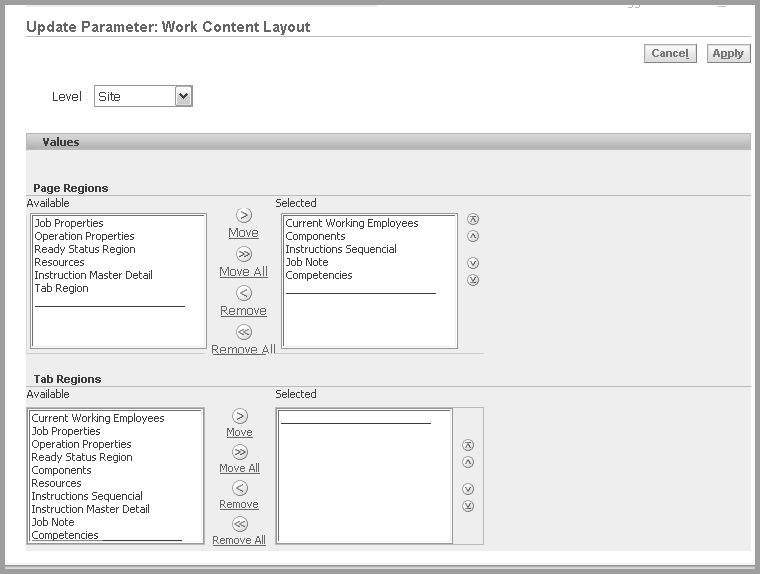
Work Content Layout
The Work Content Layout parameter is used to determine how to display page regions and tab regions on the Work Content page. Work Content Layout includes the following:
-
Competencies
-
Components
-
Current Working Employees
-
Instruction Master Detail
-
Sequential Instructions
-
Job Note
-
Job Properties
-
Operation Properties
-
Ready Status Region
-
Resources
Select categories from the Available box—and move to the Selected box. You have the option to display actions as buttons, on a drop-down list, or both modes. For the Choice List Actions, the order actions are listed in the Selected box determines your order of preference on the page. Choose Apply to save your work.
See: Viewing Work Content
Work Orders and Component Shortage Setup
This parameter is used to define components in the shortage calculation, as viewed in the Shopfloor Progress region of the Supervisor Dashboard. Component information is displayed in the Work Orders and Component Shortages tabbed regions. You can view information for a particular shift, and then navigate to the impacted jobs to make decisions such as releasing a job or putting a job on hold. This parameter is set at the site level only. See: Monitoring Shop Floor Progress
To define material and component values for inclusion in the shortage calculation program
-
Navigate to the Work Orders and Component Shortage Setup parameter.
-
If you want to use category sets in your shortage calculation, select a value in the Category Set Name field.
Category sets are used to assign items to category classifications that can be used in calculations for shortages. See: Defining Category Sets, Oracle Inventory User's Guide

-
In the Calculation Mode table, select scheduling calculation criteria in the following fields:
-
Organization: Calculation program allows only one record per organization.
-
Component Shortage Calculation Level: You can calculate on one of two levels—an entire organization, or a subinventory within an organization.
-
Valid Job Status: Choices are Released, Unreleased, On Hold. Job status is not considered for calculation if these boxes are unchecked.
-
Include Expected Receipts: This field is enabled only if the Component Shortage Calculation Level is set at the organization level. Supply sources for expected receipts can include purchase orders, jobs, schedules, inter-organization transfers, and purchase order receipts.
-
Supply Cut Off Time: This field is enabled and mandatory only when the Include Expected Receipts field is enabled. Enter values for the Hour and Minute cut off time. Expected receipt quantities are considered potential supply for job operations that have a start time after the supply cutoff time.
-
-
In the Critical Components and Categories region, you can choose to calculate component shortages for specific components or categories that are critical to each organization's production. Select the level you want in your calculation in the Type field. Choices are Item, Category, or All.
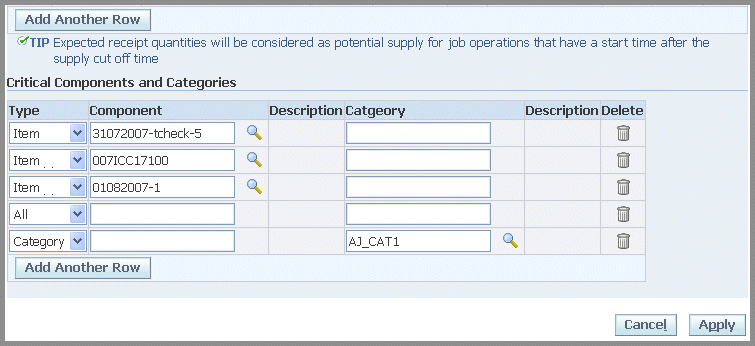
For the various types selected, if you select:
-
Item type—select a value in the Component field
-
Category type—select a value in the Category field
-
All—all items and categories in the organization are considered critical
-
-
Select Apply to save your work.
-
Select an organization row, and choose Schedule Calculation Program to launch the Component Shortage Calculation concurrent request program.
The Schedule Request: Schedule page appears where you can select runtime details for this request. The program considers the parameter values to calculate values for each job operation rolled up to the department and organization. This information is displayed in the Work Orders and Component Shortages tabbed regions of the Supervisor Dashboard.
The calculation program allocates components to job operations in the order of the operation start date. If this is not the desired sequence, a client extension is provided to reorder operations in your desired sequence and calculate components in the specified order. See: Component Shortage Calculation
You can also access the concurrent request through the Global Actions box and drop-down list.