MES Supervisor Workbench
This chapter describes the features of the MES Supervisor Workbench, including the ability to monitor shop floor progress on the Dashboard and to avoid potential problems through actions taken on the Supervisor Workstation.
This chapter covers the following topics:
- Overview of the MES Supervisor Workbench
- Dashboard
- Monitoring Shop Floor Progress
- Viewing and Resolving Exceptions
- Assigning Alternate Resources
- Rescheduling Operations
- Changing Shopfloor Statuses
- Job Operations and the Dispatch List
- Expedite and Undo Expedite
Overview of the MES Supervisor Workbench
The MES Supervisor Workbench is the starting point for supervisors to view shop floor progress and potential problems. This includes shop floor status, performance, and exceptions to shop floor work flow. The MES Supervisor responsibility includes two tabbed regions: the Dashboard and the Supervisor Workstation. The program opens in the Dashboard view and displays graphs and links to detailed information on exceptions, performance, and labor. The Supervisor Workstation tab displays the dispatch list. From both of these tabs you can navigate to global actions for more information.
The details displayed in the Supervisor Workbench are determined by the specifics of the login information. You can view the entire organization; or specify a particular department, resource, employee, or machine.
MES Supervisor Workbench Startup
The Startup page is used to enter specific parameters for organization, department; and resource. You can set different login and workbench initialization modes. For example, you can:
-
Save startup parameters from a prior login to reduce navigation for repeated parameter combinations.
-
Set different job search pages.
-
Configure organization, department, and resource access.
See: Workstation Startup and Initialization Modes
To access the MES Supervisor Workbench
-
Navigate to Startup page and select the specifics for a particular organization, department, resource, employee, or machine.
The Organization field is required; select values in the other fields depending on how much detailed information you want to view.
-
Select Start to display the Dashboard page.
From here you can view performance indicators, shop floor progress, or select the Supervisor Workstation tab to navigate to transaction pages.
-
Select a task from the Actions box to access available global actions. Choose Go to navigate to the appropriate page.
Available global actions are specified in the Global Actions parameter. These views and tasks include other workbenches and reports. See: Global Actions
-
Select the MES Workstation tabbed region to display the dispatch list. See: Viewing Dispatch Lists
Dashboard
The Dashboard displays performance graphs, links to detailed information, and a Shopfloor Progress region. The graphs on the Dashboard are configured using several parameters including:
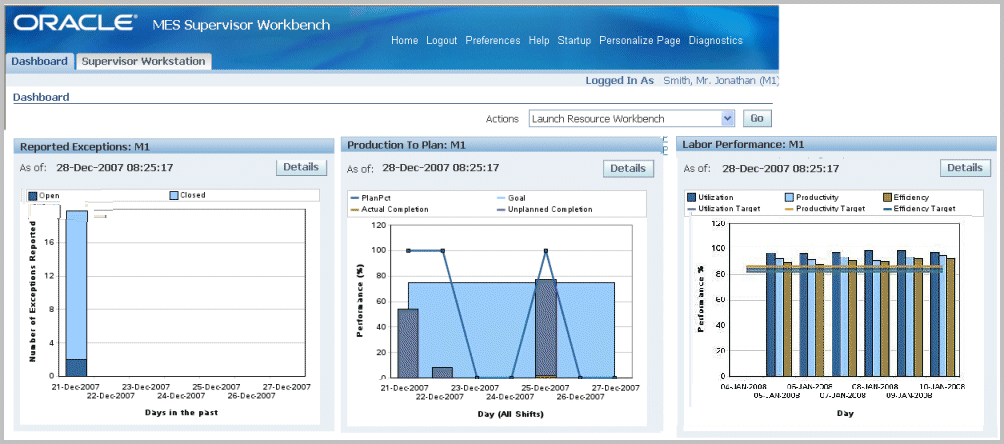
The Dashboard includes:
-
The Exceptions Summary graph displays a summary of open and closed exceptions on jobs, grouped by type. Select Details to view a table of specific records and to access the Exceptions page.
-
This graph displays the progress at the organization and department levels for the actual versus the planned production. Select Details to display both summary and detailed views.
-
Labor reporting captures both attendance and actual time spend on production for employees. These times are used for generating the labor performance views. You set targets for utilization, productivity, and efficiency at the organization and department level. Select Details to display both summary and detailed views.
-
First Pass Yield (FPY) is defined as the ratio of usable, specification conforming output from a process to its input, achieved without rework or reprocessing. The data is calculated from the move transactions performed. Select Details to display both summary and detailed views.
-
Parts Per Million Defects View
Parts per million defects refers to the defective parts per million on completed work orders. This view provides a large scale view of your manufacturing operations and is calculated from job with statuses of Completed, Complete-No Charges, and Closed. Select Details to display both summary and detailed views.
-
Monitoring Shop Floor Progress
The Shopfloor Progress region displays tabbed regions displaying information for Capacity Shortages, Current State, Work Orders, Component Shortages, and Operator Availability.
Important: Data displayed in the graphs on the dashboard are based on time calculated in the server time zone, and not the client time zone.
Reported Exceptions View
Exceptions are reported for situations preventing work on job operations and may include material shortages, labor balancing problems, machine downtime, and quality problems. The Reported Exceptions graph displays the number of both open and closed exception records for a seven day time frame. When you select Details, the Exceptions Summary view displays the Open Exceptions Summary table and a link for viewing details of closed exceptions.
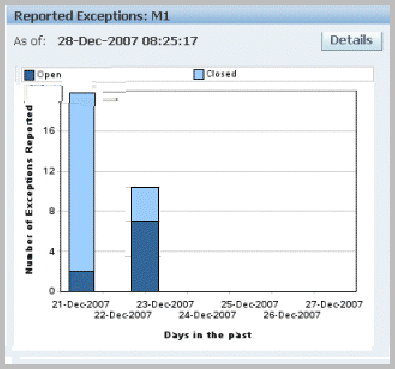
The Open Exceptions Summary table lists exception types, and the number reported for each type. When you select the links, the Exception page displays for that reported incident. This view also enables you to navigate to the other dashboard performance tables and graphs. You can view all closed exceptions by selecting Closed Exceptions.
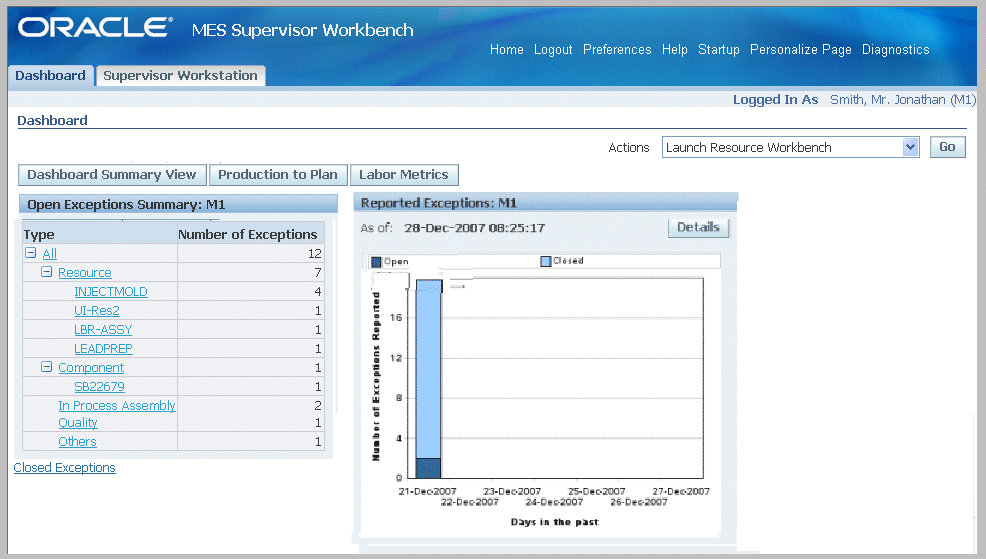
Open Exceptions Summary Table
The Open Exceptions Summary table displays a summary of open exceptions on jobs of statuses released, unreleased, and hold. The results are grouped by exception type, and ordered by number of exceptions reported. You can access the Exceptions page by selecting a specific record.
Reported Exceptions Graph
The Reported Exceptions region displays the number of open and closed exception records in a color coded graphical view. It is presented in a rolling seven day time frame.
See: Viewing and Resolving Exceptions, and Viewing Closed Exceptions
Production to Plan View
The Production to Plan graph displays progress for actual production in comparison to planned production. Planned quantity is the scheduled quantity for a job operation with a scheduled end time. Actual production quantity is the number of good units completed at a job operation. This view gives supervisors the capability to monitor production and synchronize it with demand. The key performance indicators are calculated for organization and department levels. The Production to Plan KPI parameter is one of the key performance indicators on the Dashboard. See: Production to Plan KPI.
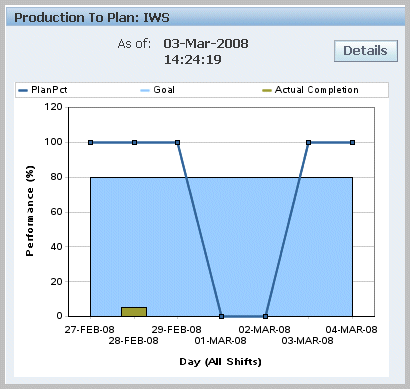
The progress percent is defined in the Production to Plan KPI parameter and can be calculated on either quantity or operation lead time. The calculated values at each job operation is then summed up, and the average is calculated at the department or organization level:
-
Quantity = [(Actual production quantity) / (Planned quantity)] * 100
-
Operation lead time = [{Sum (Actual production quantity * Operation Lead Time)} / {Sum (Planned quantity * Operation Lead Time)}] * 100
Data is used from the WIP_OPERATIONS table for planned jobs; and from the WIP_MOVE_TRANSACTIONS table for actual completion. Depending on how the parameter is set, the program also considers other factors such as job types, job statuses, scrap, reject, and unplanned completions. When the concurrent program is generated, information from these two sources, at the shift level, is calculated for the 7 day period to display in the chart for each day.
You can navigate to the Production to Plan Summary and Production to Plan Details tables by selecting Details. This view also enables you to navigate to the other Dashboard performance tables and graphs. You can set your display for:
-
Department—a particular department or all departments. This is available if you logged in without specifying the department.
-
Period Type—week or day
-
View by—a particular shift, all shifts, or a particular date (based on Period Type)
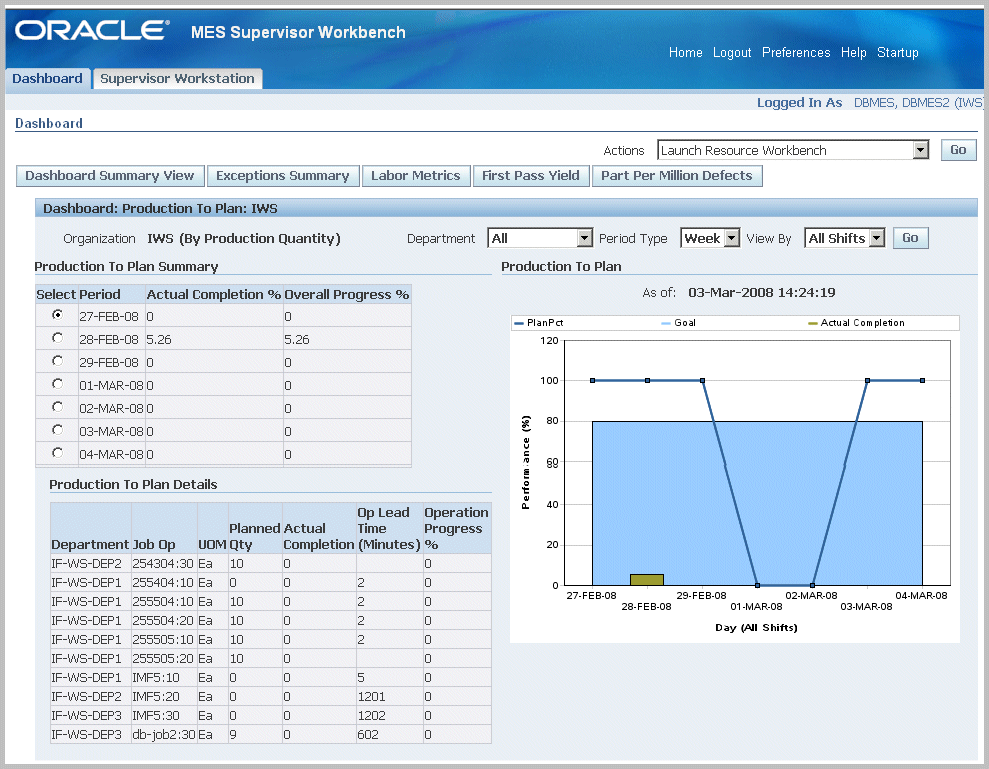
The Production to Plan Summary table displays the period, actual completion percent, unscheduled completion percent, scrap percent, reject percent, and overall progress percent of your production—based on your setup of the Production to Plan KPI parameter setup for the organization.
Select a record to display the details of that record in the Production to Plan Details table. This view displays the department, job operation, unit of measure, planned quantity, actual completion, operation lead time, and operation progress percent.
Labor Performance View
The Labor Performance graph provides visibility in managing shop floor resources—using values set in the Labor Performance Metrics parameter, and calculated in the Labor Performance Metrics concurrent request. Labor Performance metrics are displayed in different time buckets for views by organization, department, resource, or employee. Aggregated data for all employees, at every shift for the previous seven days, is populated into the graph. Time is captured using shift, clock, and job information.
The Labor Performance graph displays the performance metrics and the target goals for efficiency, productivity, and utilization for a seven day time frame.
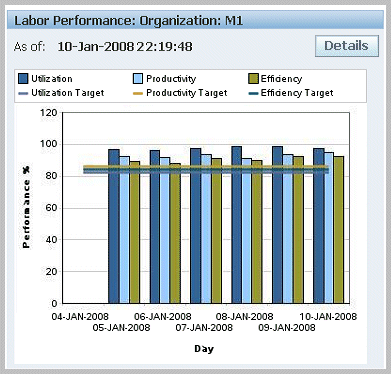
Labor performance reporting uses the following in its calculations:
-
Calculates are only for person type resources; the calculation is based on actual times and not on resource transactions.
-
Labor metrics are calculated for non-24 hours resources (person type resources do not work 24 hours).
-
Shop floor labor resources are tracked using employee badge numbers and resource instances.
-
Data attributes are configured per organization using the parameter, Labor Performance Metrics
-
Four labor performance data elements are tracked including actual attendance, direct labor, scheduled available, and earned hours.
-
Values are used from the WIP_LABOR_PERFORMANCE_RATES table, Bill of Material department resource setups, and the Bill of Material Workday Calendar shifts.
-
Labor metrics are calculated only for resources that are attached to specific shifts.
-
Shift In and Shift Out enables the recording of actual attendance hours entered. You can enable or disable employee time and labor reporting in the parameter, Time Entry Mode
-
Actual attendance hours is not computed for the current shift until the shift ends.
-
For overlapping shifts, actual hours are credited to the shift with the earliest start date.
-
-
Clock In flags the job operation as started, and records the start time for resource usage calculation. See: Clock In and Clock Out
-
Actual Attendance Hours—the number of hours an employee reports for work in a given period of time. For example, if an employee reports to work at 8:00 am and leaves at 5:00 pm; the total number of actual attendance hours is 9 hours.
-
Scheduled Available Hours—the number of hours an employee is scheduled to be available for work in a given period of time (excluding holidays, sick days, and vacation).
-
Direct Labor Hours—the total number of hours an employee reports on job operations in a given period of time.
-
Earned Hours—the total number of hours designated to produce a specific quantity of units, according to the standard routing definition. For example, if an employee reports 10 units completed in a certain operation and the standard usage rate defined on the routing is 1 hour per unit; then the employee earned 10 hours.
Note: Earned hours are not be calculated for lot based resources as they cannot be attributed to a particular unit of an assembly level.
Note: Direct labor hours are used for earned hours in reporting for an employee who does not have a standard usage rate.
Using Third Party Time and Attendance Systems
MES for Discrete Manufacturing can be integrated with third party time and attendance systems to collect actual time. The WIP_TIME_ENTRY_INTERFACE table is used to enter records for Direct Labor Hours and Actual Attendance Hours. The Import Actual Times concurrent program moves the records from this table and imports them into the MES system. The Labor Performance Metrics Calculation is then generated to view labor metrics with the imported data. See: Integration with Time and Attendance Systems
Labor Performance View and Labor Performance Summary
In the Labor Performance Graph, select Details to navigate to both the Labor Performance View and Labor Performance Summary tables. This view also enables you to navigate to the other Dashboard performance tables and graphs. The detail of the information displayed, and the selection of specific criteria, depends on the level of your login values entered in the startup page. You can set your display for:
-
Department—a particular department or all departments. This is available if you logged in without specifying the department.
-
Resource—a particular resource or all resources. This is available if you logged in without specifying the resource.
-
Employee—a particular employee or all employee. This is available if you logged in without specifying the employee.
-
Metrics—all metrics or you can specify efficiency, productivity, or utilization.
-
Period Type—week or day.
-
View By—a particular shift or all shifts
Select Go to display the results of your search.
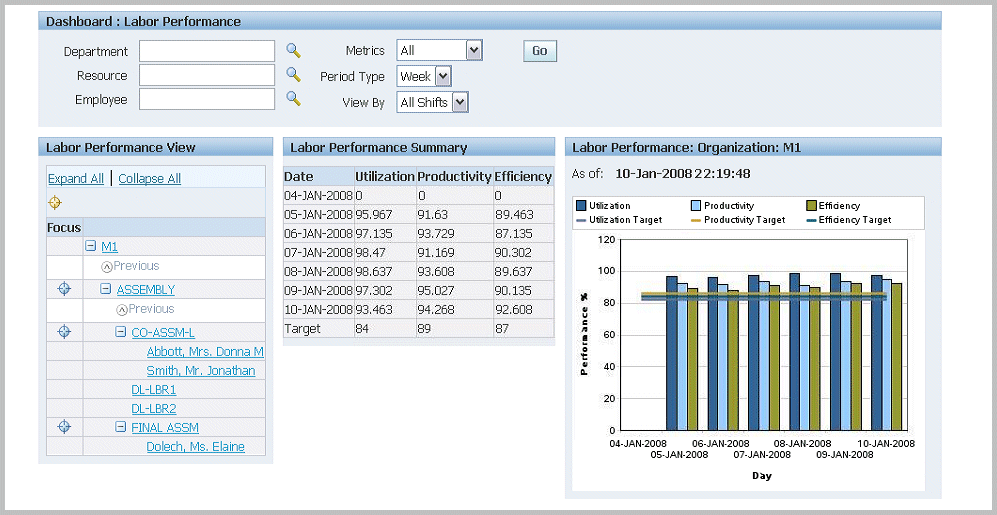
-
Labor Performance View: The detail level of your search criteria is displayed in this view. You can expand or collapse the nodes for specified departments resources, and employees to review different levels of information. When you select one of the links on the node, the Labor Performance Summary table and graph are refreshed with the detail level of this information.
-
Labor Performance Summary Table: The detail level of your search criteria is displayed in this view. The table displays the labor performance metrics and targets for each metric based on the Labor Reporting parameters. It displays the period (day or week) and shift set in the search criteria.
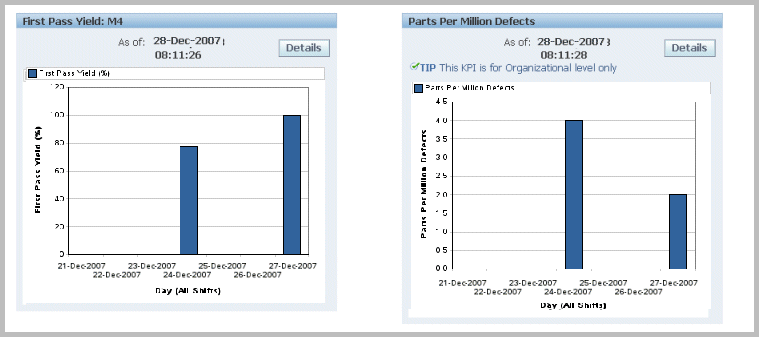
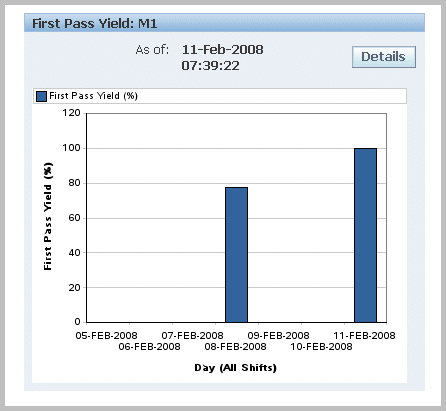
First Pass Yield View
The First Pass Yield graph displays the ratio of usable parts to the material used for its processing—achieved without rework or reprocessing. This metric provides supervisors a view of manufacturing operations at the macro level for decision making. The view is enabled using the Supervisor Dashboard View parameter, and generated through the First Pass Yield Calculation program accessed in the global actions. See: Supervisor Dashboard View
The First Pass Yield concurrent program uses the following considerations in its calculation:
-
Only operations performed are considered.
-
Net scrap or reject quantities are the final quantities moved to the Scrap or Reject intraoperation step—not the sum of quantities moved in and out of these steps.
-
Partially completed assembles not meeting quality requirements are considered moved to the Scrap or Reject intraoperation.
-
Reject transactions are reversed by moving parts out of the Reject step.
-
-
Either or both the Count Point and Autocharge fields on job operations must be enabled. See: Count Point and Autocharge Fields, Oracle Bills of Material User's Guide
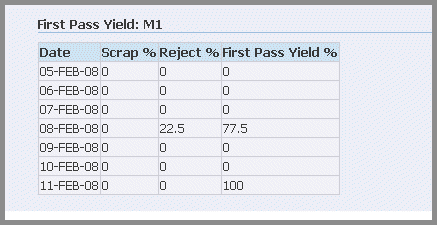
The first pass yield percentages displaying on the chart are for the previous seven days from the current date.
Select Details to view First Pass Yield Summary and Details. This view also enables you to navigate to the other Dashboard performance tables and graphs. The data displayed in the summary and detail regions depends on your display parameters. You can set your display for:
-
Department—a particular department or all departments. This is available if you logged in without specifying the department.
-
Period Type—week or day
-
View by—a particular shift, all shifts, or a particular date (based on Period Type)
In the First Pass Yield Summary Region, select view and date values to filter your display for the Scrap Percent, Reject Percent, First Pass Yield Percent values.
-
Select View—by Department or Assembly. This is available if you logged in without specifying the department.
If you select Assembly, Assembly name and Assembly Description display. If you select Department, Department Code and Department Name display.
-
Select Date—a particular date or all dates in the previous seven day period.
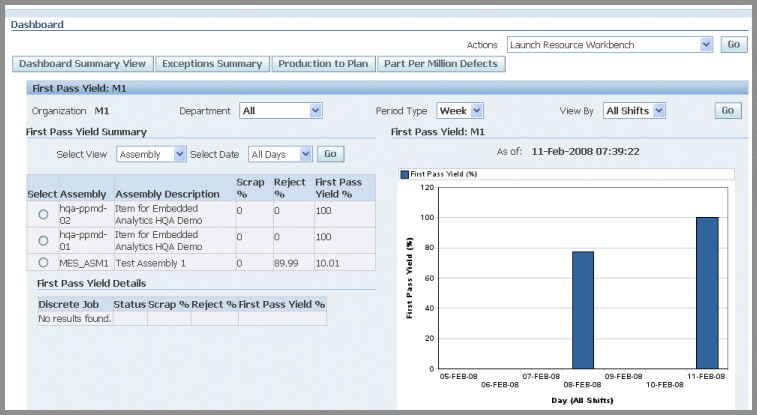
Select a record to display the First Pass Yield Details for a particular assembly or department for the date parameters specified.
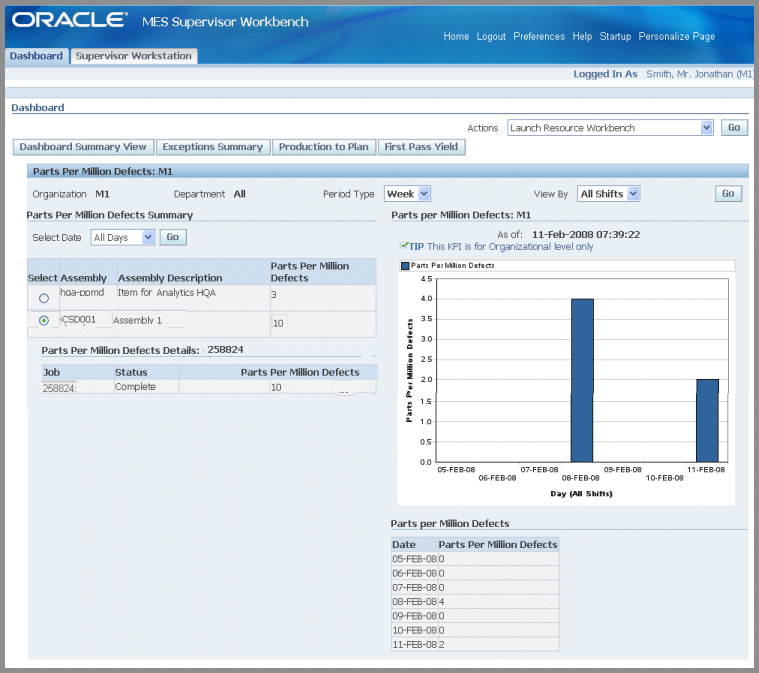
Parts Per Million Defects View
The Parts Per Million Defects graph displays the ratio of defective parts per million on completed work orders. This view is calculated from job with statuses of Completed, Complete-No Charges, and Closed. The view is enabled using the Supervisor Dashboard View parameter, and generated through the Parts Per Million Defects Calculation program, accessed in the global actions. See: Supervisor Dashboard View
The parts per million defects percentages displaying on the chart are for the previous seven days from the As Of date field value.
The Parts Per Million Defects concurrent program uses the following considerations in its calculation:
-
The program gathers quantity completed and quantity scrapped data from the WIP_DISCRETE_JOBS table, and populates data into WIP_WS_PPM_DEFECTS table.
-
Parts Per Million Defect is always calculated at organization level.

Select Details to view Parts Per Million Defects Summary and Details charts, and a table of the listing the records in a seven date range. This view also enables you to navigate to the other Dashboard performance tables and graphs. The data displayed in the summary and detail regions depends on your display parameters. You can set your display for:
-
Organization
-
Period Type—week or day
-
View by—a particular shift, all shifts, or a particular date (based on Period Type)
In the Parts Per Million Defects Summary Region, select shift or date values to filter your display for the Assembly and Parts Per Million Defects values. If you select date, you can see a particular date or all dates in the previous seven day period.
Select a record to display the Parts Per Million Defects Details for a particular assembly or department for the date parameters specified.
Monitoring Shop Floor Progress
The Shopfloor Progress region displays tabbed regions for the status of jobs, machines, and people on the shop floor. This includes:
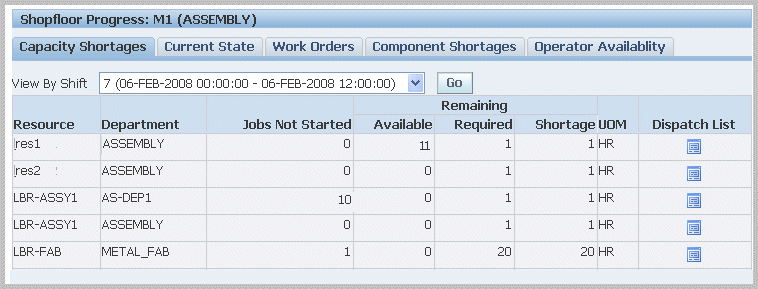
Capacity Shortages
The Capacity Shortages tabbed region displays potential capacity shortages for bottleneck resources. The jobs appearing are those whose projected completion time exceeds the shift or scheduled time.
You can set your display to a particular shift by selecting a time slot in the View By Shift box, and selecting Go. The other fields in this view include Jobs Not Started, Remaining quantities (for Available, Required, Shortage), and Unit of Measure. The resources considered when calculating capacity shortages are set in the parameter, Resources for Capacity Shortages
This view enables you to select a resource record, and navigate to the Dispatch List page to view other jobs using this resource. You can then monitor those jobs and perform transactions.
Note: Resource shortages do not change the ready status of a job operation. A particular job may have shortages, but the job can display as ready on the Dispatch List and Work Content pages. The Ready Status function is designed to enable the supervisor to determine if a job is ready for work. However, you can customize how you want job readiness calculated using a client extension. See:Viewing Dispatch Lists
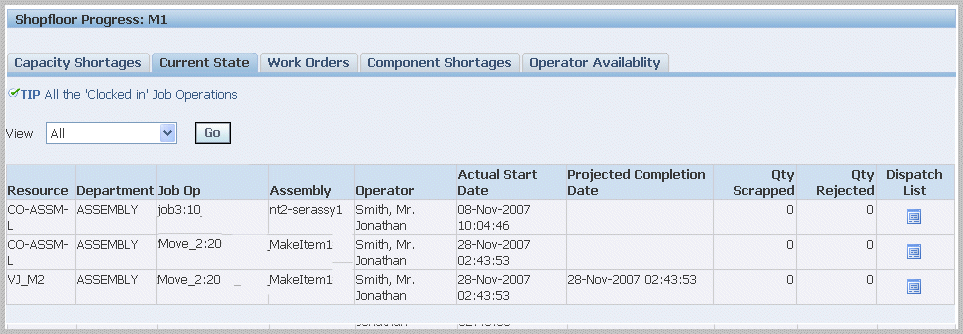
Current State
The Current State tabbed region displays a real time view of all the clocked in job operations. It provides a status of current jobs, and machines and operators. The other fields in this view include Job Operation, Assembly Operator, Actual Start Date, Projected Completion Date, Quantity Scrapped, and Quantity Rejected.
You can filter the list of records by specifying a resource view in the View box, and selecting Go. Choices are:
-
All—all resources for the job operations fitting the criteria in your login parameters
-
Assembly—select a specific assembly for job operations fitting the criteria in your login parameters
-
Department—select a specific department for job operations fitting the criteria in your login parameters
-
Labor—select a specific labor resource for job operations fitting the criteria in your login parameters
-
Machine—select a specific machine resource for job operations fitting the criteria in your login parameters
-
With Scrap/Reject—all job operations with scrap or reject fitting the criteria in your login parameters
You can select a resource record, and navigate to the Dispatch List page to view other jobs using this resource. This enables you to monitor those jobs and perform transactions.
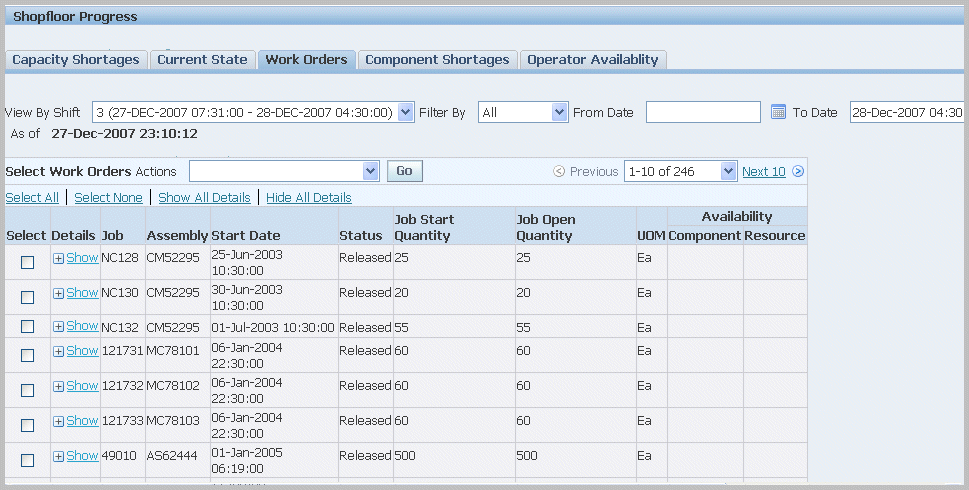
Work Orders
The Work Orders tabbed region provides a job centric view of component and resource shortages. It lists all the jobs fitting the criteria in your Startup page parameters. The other fields in this view include Assembly, Start Date, Status, Job Quantities (Start and Open), and Component and Resource Availability. You can:
-
Set your display to a particular shift by selecting a time slot in the View By Shift box, and selecting Go.
-
Filter the list of records by specifying a job status type in the Filter By box. Choices are All, Unreleased, Released, and On Hold
-
Select a date range for work order records in the From and To Date fields. Select Go to display the results for your search.
-
Perform actions for one or multiple records listed. These actions include:
-
Put Jobs on Hold
-
Release Jobs
-
Unrelease Jobs
-
View and Print Job Travelers
-
Print Labels
-
-
Print job travelers and labels for multiple jobs in a batch. Select multiple jobs scheduled in a shift:
-
Select View Job Traveler to print job travelers; the traveler document for each job is created and merged into a consolidated traveler document.
-
Select Print Labels to print configured labels for the individual jobs.
-
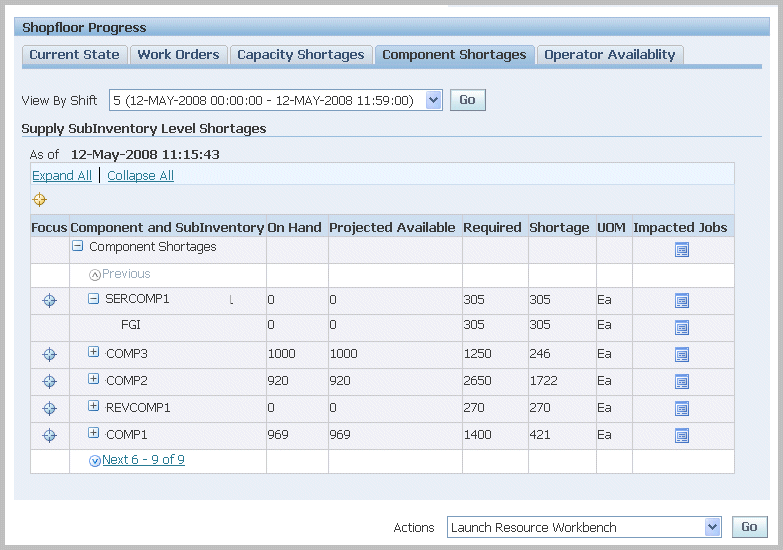
Component Shortages
The Component Shortages tabbed region provides a component centric view of shortages. It lists shortages, for the records fitting the criteria in your Startup page parameters, according to the values calculated by the Component Shortage Calculation concurrent request. The shortage calculation parameters are set in the parameter Work Orders and Component Shortage Setup
This parameter enables you to set your shortage calculation by defining:
-
Category sets
-
Calculation Modes using either level of organization or subinventory
-
Job Status
-
Expected Receipt
-
Supply Cut Off Time
-
Components and categories critical to the organization
Note: Component shortages do not change the ready status of a job operation. A particular job may have shortages, but the job can display as ready on the Dispatch List and Work Content pages. The Ready Status function is designed to enable the supervisor to determine if a job is ready for work. However, you can customize how you want job readiness calculated using a client extension. See:Viewing Dispatch Lists
Note: The calculation program allocates components to job operations in the order of the operation start date. If this is not the desired sequence, a client extension is provided to reorder operations in your desired sequence and calculate components in the specified order. See: Component Shortage Calculation
The information displayed is generated from the Component Shortage Calculation concurrent request program. You can:
-
Set your display to a particular shift by selecting a time slot in the View By Shift box, and selecting Go.
-
View shortages in a table view with the following information:
-
Component and Subinventory
-
Quantities—On Hand, Projected Available, Required, Shortage
-
-
Select the Focus icon to separate a record n this list to view.
-
Select a component record and navigate to the Impacted Jobs page to view all the other jobs using this component. See: Viewing Impacted Jobs
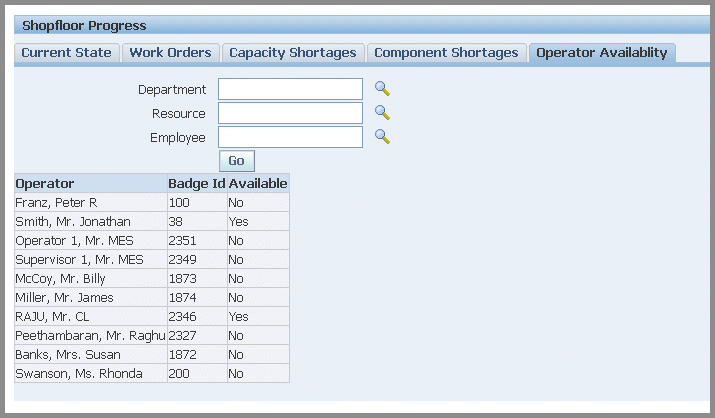
Operator Availability
The Operator Availability tabbed region provides of view of labor availability based on employees who have reported their attendance either through MES for Discrete or another time and attendance system integrated with MES. This aids supervisors in managing shop floor work. This list is dependent on the level of the login information. For example, if the supervisor logs in specifying Department, the list displays employees attached as resource instances to the department. You can:
-
Filter the list by selecting values in the Department, Resource, and Employee fields—and select Go to display the results of your search.
-
Or just select Go to display all records.
-
Operators are listed by name, Badge Identification, and Available status.
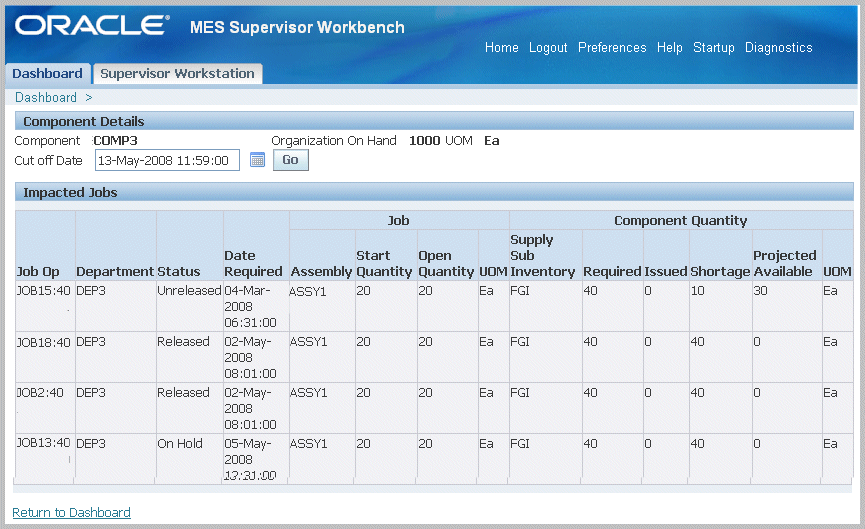
Viewing Impacted Jobs
You navigate to this page from the Impacted Jobs icon on the Component Shortages tabbed region on the Dashboard page. For the component selected, this page displays information for all job operations affected by the shortage.
The field values include Department, Status, Assembly, Job Open and Start Quantity, Component Quantity (Requested, Issued, Shortage, Projected Available):
-
Use the Cut Off Date field to change the calculated shortage values by date. Shift end time is used as the end time value in the calculation.
-
If the shortage calculation is based on Component Shortage Calculation Level: of Subinventory, the shortages displayed are based on the specific subinventory. See: Work Orders and Component Shortage Setup
Viewing and Resolving Exceptions
Exceptions are reported and displayed for situations preventing work on job operations. They can include material shortages, labor balancing problems, machine downtime, and quality problems. When an exception is reported, the job is not available for production. A workflow is invoked and notifications are sent to the appropriate recipients. When notified about exceptions, you can view other job operations affected and take action. See: Reporting Exceptions
The same exception can be created for any or all of the impacted jobs. Various resolutions are available including changing an operation status, rescheduling a job, assigning alternate resources, or accessing the Scheduling and Resource Workbenches to resolve problems. Exception types are in the following categories:
-
Resource
-
Component
-
In Process Assembly
-
Quality
-
Other
Additionally, you can define a custom type using the Oracle Applications Lookup functionality. Exceptions display in summary and graphical view on the Dashboard page. See: Reported Exceptions View
Viewing an Exception Record
The Exception page appears when you select an exception record. This page can be accessed from:
-
Exception Summary Region of the Supervisor Dashboard: Display and content is dependant on the exception type selected. If All is selected, all open exceptions display on the page:
-
Dispatch List: Displays only exceptions reported against that particular job operation.
-
Work Content page: Displays only exceptions reported against that particular job operation.
The page is divided between a summary and a detail region. The summary region displays assembly, operator, dates, number of exceptions, and other values according to the exception type. Actions are available according to the exception type.
To view and resolve exceptions to production work
-
Navigate to the Exceptions page.
The exception type displays in a region on the page. If you have selected All from the Supervisor Home page, all of the exception types display in separate regions on the page.
-
Select Add Exceptions to Impacted Jobs to add exceptions to other jobs affected by this production problem.
Note: This option is not available for In Process Assembly type exceptions.
-
If this is a resource or component type exception, you can select Launch the Resource Workbench, or Launch the Job Workbench for rescheduling.
See: Using the Job Workbench, Oracle Work in Process User's Guide, and Using the Resource Workbench, Oracle Work in Process User's Guide
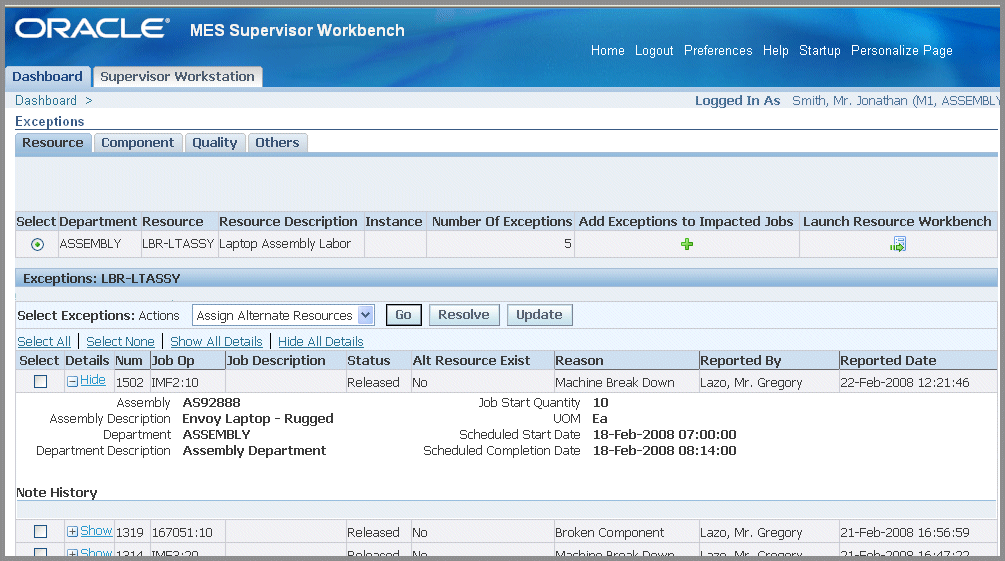
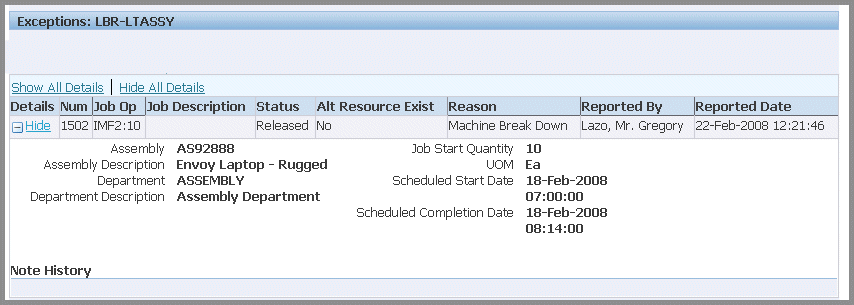
-
In the detail region of the page, you can select Show for a particular record to display details including assembly and description, department and description, quantity, and scheduled start and completion dates. There is a region for Note History for descriptive information added in the Update Exceptions note page.
-
You can choose a record and select an action to resolve the production problem.
For example, for the following exception types, you can:
-
Resource: Assign Alternate Resources, Assign Shopfloor Statuses, Put Jobs on Hold, Reschedule Jobs
-
Component: Assign Shopfloor Statuses, Put Jobs on Hold, Reschedule Jobs
-
In Process Assembly: Reschedule Jobs
-
Quality, Other, and User Defined: Assign Alternate Resources, Assign Shopfloor Statuses, Put Jobs on Hold, Reschedule Jobs
-
-
If this exception has been corrected, select Resolve to close this record, and delete it from this page.
If you access the Exception page from either the Dispatch List or Work Content page, this action is not available.
-
You have the option to add informational text by selecting Update. This displays the Update Exceptions page. See: Updating Exception Notes
If you access the Exception page from either the Dispatch List or Work Content page, this action is not available.
Adding Exceptions to Impacted Jobs and Updating Exceptions
You use the Add Exceptions to Impacted Jobs page to enter exceptions to other job operations affected by the exception. You use the Update Exception page to add and update notes about the exception.
You can add descriptive note text to your exception records, and update these records. The text appears in the details of the Exception page in the Note History region.
To add exceptions to impacted jobs
-
Select an exception from the Supervisor Dashboard, and navigate to the Add Exceptions to Impacted Jobs page.
-
In the Search region, select a Cutoff Date value, and select Go to display the applicable jobs and job operations display in the Impacted Jobs region.
-
You have the option to change the reason for the impacted jobs in the Reason field—both for individual or multiple job operations.
-
For individual records, select the appropriate reason in the Reason field for the job operations.
-
For multiple records, choose the record in the Select Jobs field, and select a reason in the Set Reason field. Select Go.
-
-
Select Apply to save your work.
To update exception note information
-
Navigate to the Update Exception page.
-
Optionally, you can select a value in the Reason field for this exception.
-
Enter text in the Note region.
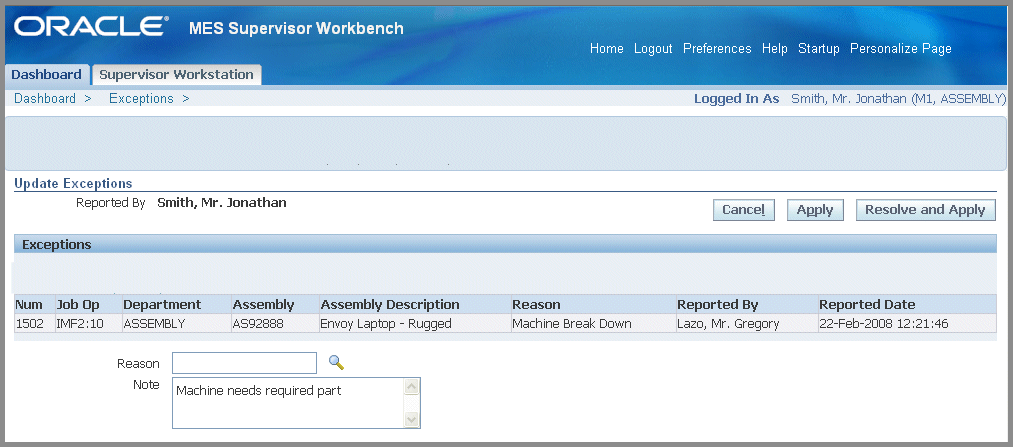
-
Select Apply to save your work. Or select Resolve and Apply to save your work and close this exception record.
You can view closed exception records by accessing the Closed Exceptions page in the Supervisor Dashboard view.
To view closed exception records
-
Navigate to the Closed Exceptions page.
-
In the View Closed Exceptions search region, you can filter your search using the following criteria:
-
Exception Number
-
Department
-
Exception Type
-
Dates, From and To
-
-
Additionally, you have more search options in the More Closed Exceptions Options region. You can filter your search using values in the Reported By, Assembly, and Job fields.
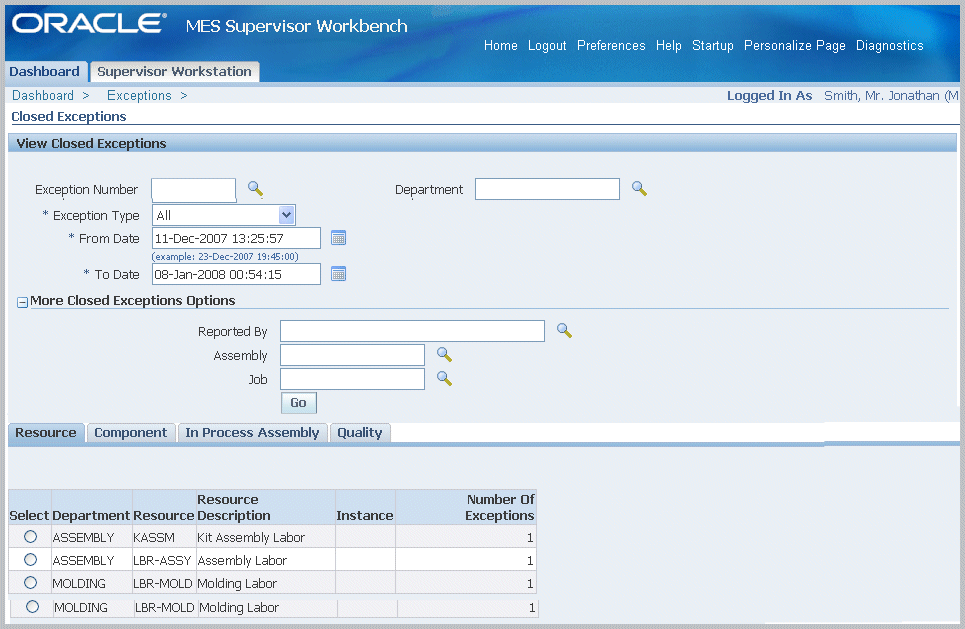
-
Select Go to display the results of your search.
Results display in tabbed regions according to the available closed exception type records. The tabbed regions display applicable information for each exception type.
-
Select a record to display the Exceptions detail region for individual exceptions. Applicable information is displayed depending on the exception type.
Related Topics
WIP Exception Notification Workflow
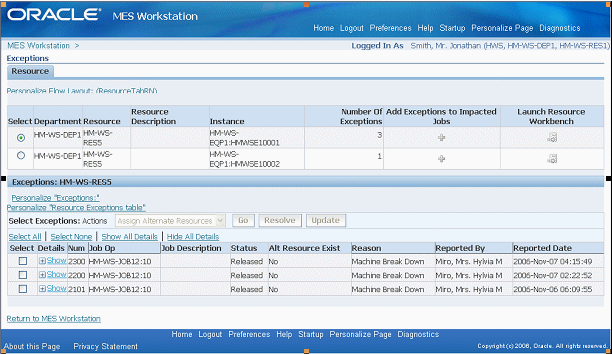
Assigning Alternate Resources
You can use alternate resources to resolve production problems on the shop floor. Resources can be substituted in groups, enabling a switch from the current resource group to an alternate resource group. If several resources are available, they display in a drop-down box.
To assign alternate resources
-
Navigate to the Assign Alternate Resources page.
The page displays job number and description, assembly number and description, operation number and description.
The Resource table displays information about the available resources. The Required Amount and Available Amount indicates the resource load.
-
Select the resource you want to assign in the Resource box.
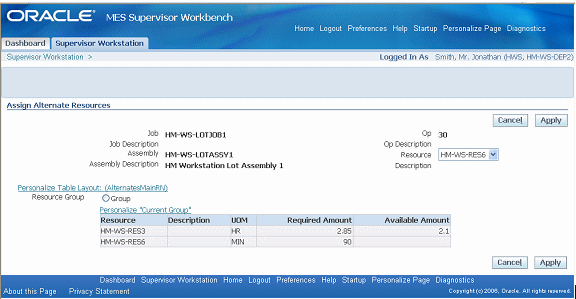
-
Enable the Group radio button if this is a resource group.
-
Select Apply to save your work.
Rescheduling Operations
You can reschedule operations to resolve exceptions in bottleneck job operations. You have the option to change scheduling direction, and start dates. Material and resource requirement dates are also updated.
To reschedule an operation
-
Navigate to the Reschedule Operation page.
Information displays in fields for Job, Job Description, Operation Sequence, Operation Description, and Actual Start and Completion Dates.
-
Select a direction in the Scheduling Direction field, choices are:
-
Forward: Scheduling begins at the start date and calculates a production end date.
-
Backward: Scheduling begins at the production end date and calculates a production start date.
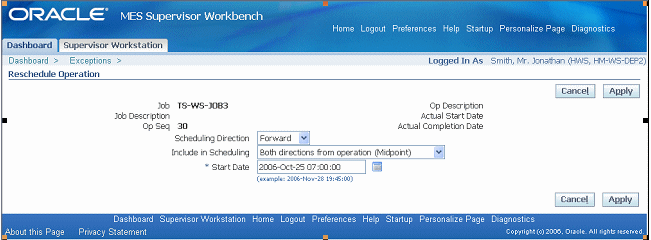
-
-
Select a value in the Include in Scheduling field, used to set the automatic scheduling option. Choices are:
-
Backward from operation (Midpoint Backward): Moves only the selected and prior operations, keeping them in sequence, when a time slot is located to move this specified operation. Next operations are not rescheduled.
-
Both directions from operation (Midpoint): Reschedules all prior and next operations when a time slot is found for the operation. Prior operations are backward scheduled. Next operations are forward scheduled.
-
Forward from operation (Midpoint Forward): Moves only the selected and next operations, keeping them in sequence, when a time slot is located to move this specified operation. Prior operations are not rescheduled.
-
Operation Only: Only the operation that is selected is scheduled. Prior and next operations are not rescheduled.
-
-
Select a value in the Start Date field to begin the rescheduling process.
-
Select Apply to save your work.
Related Topics
Discrete Rescheduling, Oracle Work in Process User's Guide
Rescheduling Discrete Jobs, Oracle Work in Process User's Guide
Changing Shopfloor Statuses
You may need to change the status of a job operation because exception problems. When you display the Assign Shopfloor Statuses page, existing exceptions display in a table view list. This page enables you to change the status of a specific interoperation step. The job progresses through the routing until it reaches that step
To change the status of the job operation
-
Navigate to the Assign Shopfloor Statuses page.
Exceptions display in a table view, the number of records in the list is dependent on your selection from the Exceptions page.
-
In the Job Op field, select the interoperation step for the status change.
-
In the Status field, select the new status for this interoperation step.
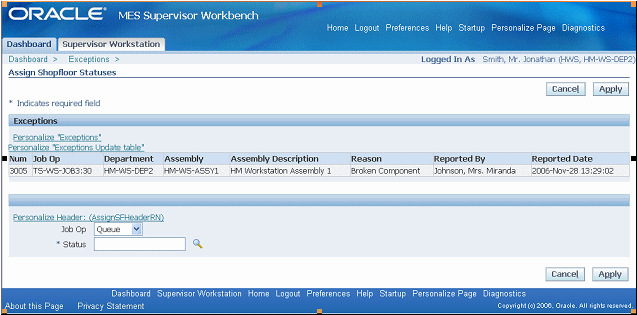
-
Select Apply to save your work.
Job Operations and the Dispatch List
Reordering Job Operations on the Dispatch List
You have the ability to change the order and rearrange job operations on the dispatch list. This action enables you to group job operations together on the dispatch list. Reordering may be performed for more efficient display and processing of job operations with similar setups, components, or for expediting.
Note: To adjust to the changes and dynamic nature of the shop floor, the supervisor might need to re-order the dispatch list. Because the Dispatch list is a supervisor or scheduler function, Oracle recommends that you limit access to this action.
To reorder job operations on the dispatch list
-
Navigate to the Reorder Dispatch List page.
Job operations from your dispatch list display in a table view; all operations are shown as in your dispatch list, including any filtering performed on the list. The fields appearing on the page are set in the parameter, Dispatch List Ordering Criteria
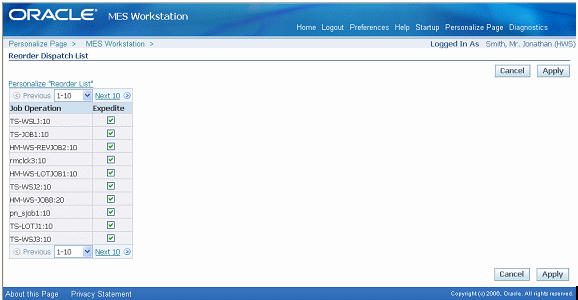
The ordering is performed first by Expedite column changes, then by the attributes. Changing the values of the attributes creates the reordering.
-
Select the job operations you want to expedite by enabling the Expedite check box.
-
Select values in the attribute fields according to your preference for reordering the list.
-
Select Apply to save your work.
The dispatch list refreshes with your changes.
Expedite and Undo Expedite
Any job operation can be moved to top priority on the dispatch list. Scheduled operation start and end times are not changed—the operation is moved on the display to make it prominent. The Ready column displays an arrow icon indicating the operation is expedited. Since expediting is performed at the job level, all operations are affected—and moved and marked on the dispatch list.