Managing Searches
This chapter covers the following topics:
- Overview
- Item Instance and System Search Overview
- Performing Simple Searches
- Performing Advanced Searches
- Creating and Personalizing Views
- Using Views
Overview
When searching for item instances or systems, (which are constructs used for grouping item instances) you can perform simple or advanced searches, and then save your searches, with all the search parameters you entered, for reuse.
For both item instances and systems, the methods for searching and saving searches are similar. In both cases, the saved searches are known as views.
Note: In this chapter, the terms “saved search” and "view" are used interchangeably.
Item instance views can only be used in item instance searches; system views can only be used for system searches.
Item Instance and System Search Overview
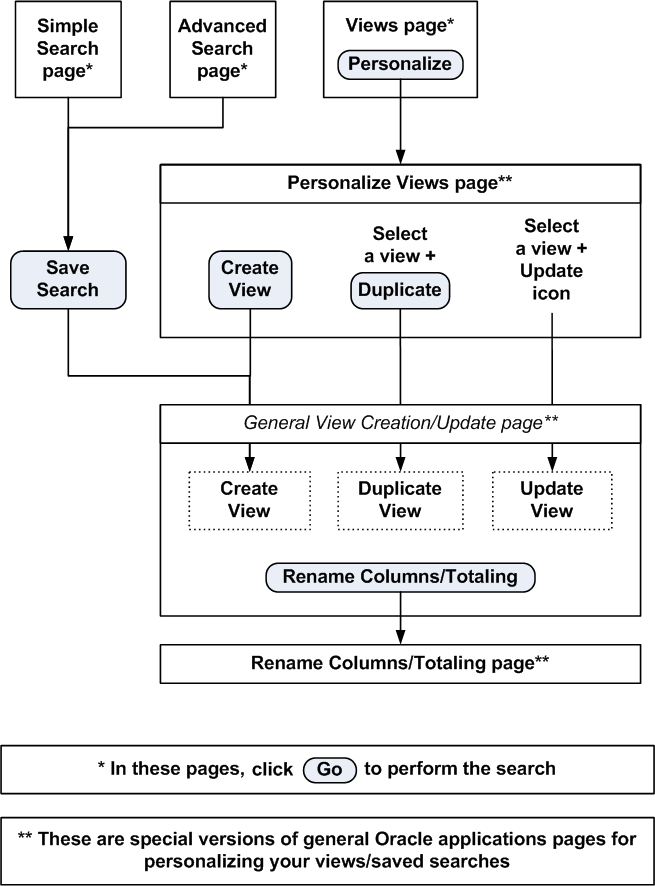
The diagram shows an overview of the features available when you search for item instances or systems.

Both the initial Item Instance page and the initial System page appear as a Simple Search search page with two regions:
-
Search region
-
Results region
You can search for item instances or systems using three search pages: Simple Search, Advanced Search, or Views. You can switch between the search pages by clicking the appropriate Simple Search, Advanced Search, or Views button.
A view is a saved search. For simple or advanced searches that will be useful to repeat in the future, save them as views, and reuse them as needed.
Each of the search pages contains a Go button, which performs the actual search.
The basic search process is as follows:
-
Select the search page that you want to use.
-
Prepare to perform the search as follows:
-
For simple searches, enter the search parameters.
-
For advanced searches, optionally add in extra search parameters from an extensive list, then enter your search parameters.
-
To use views, invoke a previously saved search or view.
-
-
Click Go to perform the search.
-
The results appear in the results region.
For details of the operations to perform on the results, see the chapters Managing Item Instances in Oracle Install Base and Managing Systems.
This section consists of the following topics:
Performing Simple Searches
The Simple Search page enables you to use a standard set of the most common search parameters.
Notes
-
For each search column, you can enter complete or partial values.
-
For item instances searches, by checking the Show Expired Item Instances check box, you can specify that you want the search to look for expired as well as active instances.
-
Click Go to perform the search.
The results appear in the results region of the page.
For details of formulating more extensive searches, see Performing Advanced Searches.
Saving Your Search
Whether you perform the search or not, you can click Save Search to save your search as a view, so that you can reuse it later. For details, see Creating and Personalizing Views
Performing Advanced Searches
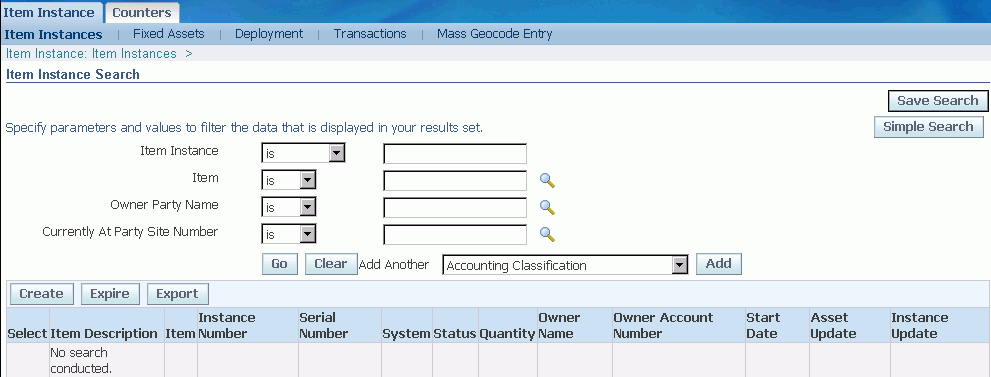
The Advanced Search page enables you to search using a more extensive set of search parameters than is available for simple searches.

Adding Extra Search Parameters
The Advanced Search page contains a set of standard search parameters. You can select further columns from an extensive list to act as extra search parameters, as follows:
-
Click in the Add Another field, and select a column name from the list.
-
Click Add.
The page redisplays with your selected column name, and untitled condition operator and value fields beside it.
Repeat these steps for as many columns as you wish to add to the page as search parameters.
Entering Search Conditions and Performing the Search
-
For each search parameter that you want to search on, formulate a condition, with a condition operator and a value, as follows:
-
Select a condition operator.
The condition operators "is" and "is not" are available for all columns. In addition, for some key fields, you can select "contains", "starts with", or "ends with".
-
Select or enter a value to complete the condition.
-
-
Click Go to perform the search.
The results appear in the results region of the page.
Saving Your Search
Whether you perform the search or not, you can click Save Search to save your search as a view, so that you can reuse it later. For details, see Creating and Personalizing Views.
Creating and Personalizing Views
Generally, you create a view when you decide to save the search parameters for a simple or advanced search for reuse. You can also create a view from scratch, with no previously entered search parameters.
The general view creation/update page is used to create a new view, duplicate a view, or update a view.
Prerequisites
When creating a view:
-
In the Simple Search or Advanced Search page, you clicked Saved Search, or, in the Views page, you clicked Personalize, then Create View.
When duplicating a view:
-
In the Personalize Views page, you selected a view, then clicked Duplicate.
When updating a view:
-
In the Personalize Views page, you selected a view, then clicked the Update icon.
Entering View Information
The general view creation and update page is an Oracle Applications Framework page, which enables you to customize your item instance or system searches and the layout of the search results as follows:
General Properties

-
Name the view, if you are creating or duplicating a view. When updating a view, you can change the view name.
-
Optionally alter the default value, 10, for the number of rows to display in the results region.
-
If you want the current view to be used as the default view each time you log on, check Set as Default.
Column Properties

-
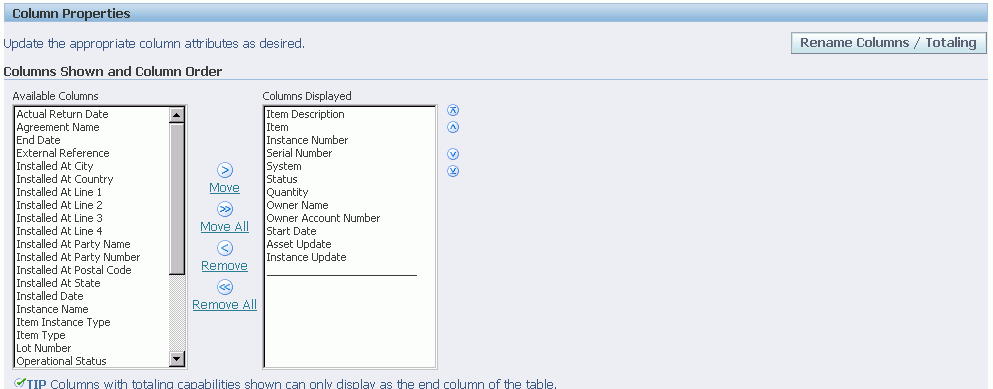
Select the columns which you want to appear in the search results. The values in the Columns Displayed list show the default selection of columns.
Use the Move and Remove links and arrows to move selected columns between the Available Columns list and the Columns Displayed list.
Use the Up and Down arrows to arrange the sequence of the columns in the Columns Displayed list. The columns as arranged from top to bottom will be displayed from left to right in your search results.
-
If you want to customize the headings for a selected column, or if you want to have totaling on numeric columns, click Rename Columns/Totaling and perform those customizations in the page that appears. Note that you can only select totaling for the end columns of the list.
Sort Settings

-
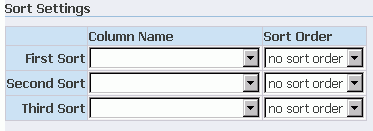
You can select whether you want the results sorted or not. If you decide to have sorted results, you can choose up to three columns to sort by.
Search Query to Filter Data in your Table

-
If you came to this page from a simple or advanced search page, this region is where the simple or advanced search parameters appear.
-
You can alter the entries here, and add further search parameters. For each additional search parameter, select a column name from the Add Another list of values, and click Add.
-
For item instance views, you can also indicate whether you want the view to show all item instances, expired and active, or just the active item instances.
Saving the View and Optionally Performing the Search
After entering all the view information, click either Apply or Apply and View Results. The latter option applies the changes, then performs the saved search and displays the results of the search.
Using Views
Use this procedure to invoke a previously saved search.
Notes
-
In the Views page, select a View, and click Go.
The results appear in the results region of the page.