Working with Systems
This chapter covers the following topics:
- Overview
- Managing Systems
- Searching for Systems
- Creating Systems
- Viewing and Updating Systems
- Viewing System Details
- Updating System Details
- Working with System Configurations
- Viewing All or Active Item Instances in a System
Overview
A system is a construct in Oracle Install Base that customers can use to group their items. A customer is considered to be an owner party with an account.
-
For example, a headquarters can have many buildings, and each building can have many floors. Headquarters can be a system, each building can be a system, and each floor can be a system.
There can be a hierarchy in system structure.
-
For example, headquarters can be parent of all the buildings, and each building can be a parent of all the floors in the building.
Item instances can be grouped under systems. Each item instance can belong to one system only.
-
For example, headquarters can own a number of networks, each building can own many servers, and each floor can own many PCs and printers.
Creating Parent-Child Relationships Between Systems
Both when you create and update a system, you can set up a parent-child relationship, by entering a parent name for the current system. Each relationship becomes part of configuration hierarchy for the system. The parent system must be a system with the same or related party and account.
You can subsequently view the system configuration hierarchy by clicking the View Configuration icon from a systems search page.
Adding Item Instances to a System
You add item instances to a system when you edit item instance details, by specifying a system for the item instance. An item instance can belong to only one system.
Cascading System Changes to Item Instances
When you update a system, you have the option to cascade some of the system changes to the item instances that belong to the system.
See Also
Managing Systems
This section consists of the following topics:
See Also
Searching for Systems
You can search for systems in several ways.
For details of system search options and processes, see Item Instance and System Search Overview.

Processing the Search Results
From the search results, you can perform the following operations:
See Also
Creating Systems
You can create a system only for an external party (customer) with an account number. System type is mandatory. You can assign a parent system only with the same owner and account.
Installation, billing, shipping, and contact details appear after you select the owner and account.

Creating Parent-Child Relationships Between Systems
In the Create System page, you can set up a parent-child relationship between systems, by entering a parent name for the current system. Each relationship becomes part of configuration hierarchy for the system.
The list of values available for parent system is restricted to systems with the same or related party and party accounts.
See Also
Viewing and Updating Systems
This section consists of the following topics:
Viewing System Details
For each system in the search results area, you can view its details, by clicking the System name link.
The System details page appears. From this page, you can view details of the system. Most of the fields are associated with the owner and the account.
See Also
Updating System Details
To start the process of updating the system from the results area, click its Update icon. The System details page appears, and you can update many of the system attributes.
In the Systems Details page you can view and edit system details such as installation location, shipping and billing location, and contacts. You can optionally cascade these changes to the item instances that belong to the system.
You can also create or change a parent system for the current system.
Creating Parent-Child Relationships Between Systems
In the Systems Details page, you can set up a parent-child relationship between systems, by entering a parent name for the current system. Each relationship becomes part of the configuration hierarchy for the system.
The list of values available for parent system is restricted to systems with the same or related party and party accounts.
Changing Party and Account Details
To transfer a system, you can change the party name and associated account number. Click the check box Cascade Ownership if you want to cascade the party and account changes to all child systems of the current system.
See Also
Working with System Configurations
In the Systems Configurations page you can see a graphical representation of a system, and all the parent-child relationships associated with the system.
Layout and Usage of the System Configuration Page
The System Configuration page displays the systems in a configuration hierarchy.
In this section, the following terminology applies:
-
The term "parent" denotes a system in a configuration level above the currently- described system
-
The term "child" denotes a system in a configuration level below the currently- described system.
How the Hierarchy Appears in the System Configuration page
The function of the tabular grid in the main part of the page is to display the current system and its child systems. Initially, only the child systems that are one level below the current system are shown.
You can expand or collapse parts or all of the configuration hierarchy in the grid.
Above the grid is an untitled "parent line", that displays all the parent systems, if any, above the current system in the configuration. The parent systems appear as a sequence of links.
For example, if the configuration consists of a 5-level hierarchy of systems A>B>C>D>E, and the current system is C, the System Configuration page initially displays the following:
-
The "parent line" displays the system links A>B.
-
The grid displays C and D, with an Expand arrowhead icon (+) beside D to enable you to view its lower level systems.
Systems in the grid that have children appear with either an Expand (+) or a Collapse (-) arrowhead icon to enable you to view or hide the children.
The entries for systems in the grid, other than the top entry, that have child systems, appear with a Focus icon.
Expanding and Collapsing the Hierarchy
Within the grid, you can click the Expand (+) or Collapse (-) arrowhead icon on a system to enable you to view or hide the children.
Click Expand All to show all the systems from the current top entry downwards.
Click Collapse All to reduce the grid to the current top entry only.
Focusing
The object of focusing is to rearrange the hierarchy by moving a system to the top of the grid.
You can focus on any system of the configuration hierarchy:
-
For a system in the grid, click the Focus icon for that system.
-
For a system in the parent line, click the link of the system that you want to focus on.
The "parent line" automatically adjusts to display the systems above the new top entry.
See Also
Viewing All or Active Item Instances in a System
Depending on which icon you clicked in the System search results, you can see either all, or just the active item instances in a system.
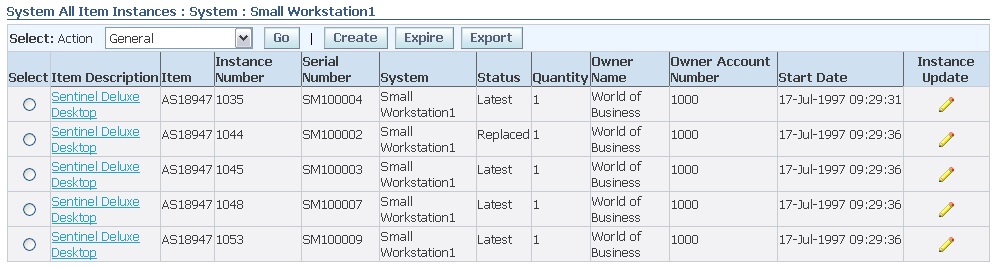
From the list, you can update, expire, and export existing item instances, or create new ones.