Implementing Roles and Role Based Security
This chapter covers the following topics:
- Overview of Roles and Role Based Security
- Administering Roles
- Administering People, Groups, and Companies
- Implementing Role Based Security
- Implementing Change Management Role Based Security
- Creating Custom Privileges
Overview of Roles and Role Based Security
Role-based data security enables users to secure individual data objects and user-defined attribute groups. Your ability to view, edit and perform certain actions on an object or attribute group is determined by your role on it. Users with the privilege to add people can assign users to object roles. You can assign roles for the following objects:
-
Catalog
-
Catalog Category
-
Change
-
Group
-
Item
-
Item Catalog Category
Roles
A role is a collection of privileges. Roles are a convenient way to group privileges into a bundle that can later on be assigned to users, groups, or companies. For example, a user with the Design Engineer role on an item is granted the privilege to View Item, Edit Item, Add/Delete Item Attachments and more. However, the Design Engineer is not granted the privilege to Promote Item/Item Revision Lifecycle Phase.
You can assign roles to a person, group, company, or all users. To simplify item security maintenance, you can assign item roles at the catalog category, catalog, organization, item catalog category, or item level. You can specify default roles for all items in an organization. For example, you can assign the Item Reviewer role to the Engineering group so that all engineers can search for and view all items in the item catalog. For each item catalog category, you can specify which people can create items by assigning them the Catalog Category User role. For example, you can assign just the New Product Introduction engineers the Catalog Category User on the item catalog categories for which they are responsible for maintaining. Next, you can assign default role assignments to people by organization for all items in the item catalog category. For example, you can assign your Motherboard engineers a Design Engineer role for the Motherboard item catalog category. You can assign the buyer for Motherboards a Buyer role. At the item level, you can assign direct roles to enable access to specific items. For example, you can assign the role of Supplier Engineer to suppliers with whom you are collaborating on specific items.
Privileges
A privilege defines a user's access to an object. For example, a user's ability to view an item and edit it is determined by his or her privileges on that item. You can define additional privileges to secure user-defined attribute groups. See: To implement attribute group security.
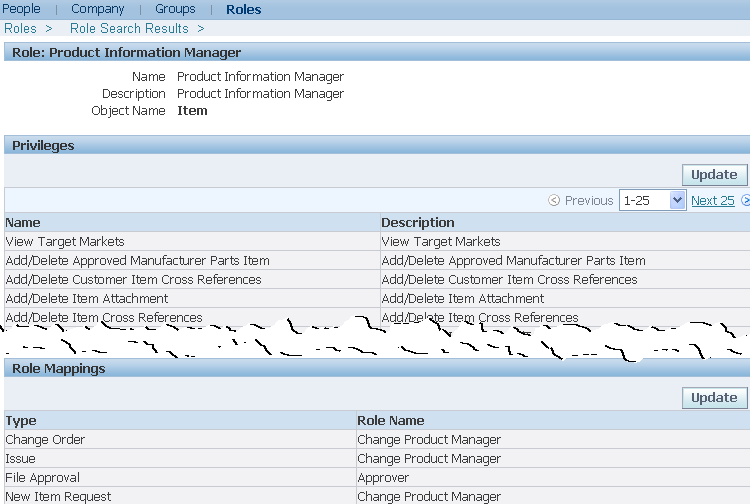
Example of an Item Role
To implement roles and role-based security, perform the following tasks:
Administering Roles
You can create roles for the following objects:
-
Catalog
A catalog role assigned to a user determines which actions that user can perform on items in a catalog.
-
Catalog Category
A catalog category role assigned to a user determines which actions that user can perform on items in a catalog category.
-
Change
The change role assigned to a user for a change object (for example, issue, change request, change order) determines which actions that user can perform on the change object. For example, a user with an Approver role on a change request is granted the View Basic Change Information and Edit/Delete Change privileges.
-
Group
A group role assigned to a user for a group determines which actions that user can perform on the group.
-
Item
The item role assigned to a user for an item determines which actions that user can perform on the item. You can also inherit item privileges assigned at the catalog, catalog category, and item catalog category levels. For example, a user with the seeded Catalog Category User role on the Motherboard catalog category is granted the “Create Item of this Catalog Category” privilege, which enables him or her to create Motherboard items.
-
Item Catalog Category
The item catalog category role assigned to a user determines which actions that user can perform on items in a specific item catalog category.
Additional Information: In order to administer roles, a system administrator must grant you a role at the Oracle Applications user level. This role is granted by default in seeded responsibilities that include the Role submenu. The Role submenu, which includes the Roles link, is available from the Development Manager and Development Engineer responsibilities, as well as others.
If you cannot access the Roles link from your responsibility or if you cannot view, create, or update roles, then contact your system administrator. For more information, see:
-
Creating and Updating Roles, Oracle E-Business Suite System Administrator's Guide - Security.
-
Excluding functions in the Menu Exclusions tab,Responsibilities Window, Oracle E-Business Suite System Administrator's Guide - Security.
To view roles
You can view roles to examine the privileges that are associated with them.
-
Click the Roles link in the Application tree menu.
-
On the Roles page, enter the role name and click Go. If you know the specific object that the role is associated with, select it.
-
On the Roles Search Results page, click the name link of the role for which you were searching.
-
On the Role Detail page, you can view all the privileges associated with the role. You can also view the role mappings, which identify item roles and their corresponding change object roles.
To create a role
-
From the applications tree menu, click Roles.
-
On the Roles page, click Create Role.
-
On the Create Role page, select the object for which you are creating a role and click Next.
-
Provide a name and description for the new role. Select the object privileges you want to associate with this new role and click Apply. Be aware that selecting the Edit privilege does not implicitly grant the view privilege. So, if you want someone to be able to edit an item, they must be able to view it first. Every role must have at least one privilege associated with it.
Note: Click Save and Map Roles if you wish to map an item role to a change object role.
To update a role
-
In the applications tree menu, click Roles.
-
On the Roles page, enter the role name and click Go. If you know the specific object that the role is associated with, select it.
-
On the Role Search Results page, click the name link of the role for which you were searching.
-
On the Role: (Role Name) page, click Update in the Privileges region.
-
On the Update Role: (Role Name) page, you can edit the role name, description, or select/unselect the privileges associated with it.
-
Click Apply.
To update role mappings
-
On the Role: (Role Name) page, click Update in the Role Mappings region.
-
On the Role Mappings page, you can select a different role name or no role name for each change object.
-
Click Apply.
To delete a role
On the Role Search Results page, select the role you want to delete and click Delete.
Note: Once a role has been granted it cannot be deleted.
Related Topics
Overview of Roles and Role Based Security
Administering People, Groups, and Companies
Implementing Role Based Security
Implementing Change Management Role Based Security
Administering People, Groups, and Companies
You can assign a person, group, company, or all users a role on a particular object, such as the Product Catalog (a catalog object) or a mobile phone (an item object). Groups are useful for managing role assignments for items, catalogs, and change management. Groups are also useful in change management approval routings, where one or all people in a group must approve a change, or all people in a group should be notified of a change.
You can create groups of people that include internal users, suppliers and customers. A group consists of one or more members. You can create groups of people for different teams or departments that serve similar business functions. The person that creates the group is by default a member and the Group Administrator. Each member in a group is assigned a group role that determines which privileges are granted to the member of that group. There are three privileges a group role may grant a member: View Group Header, View Group Members, and Manage Group. For example, you can create a Supplier group made up of all your suppliers; however, you do not want any of the members to see who else is in the group. In this case, each of the members would be assigned the Group Reviewer role, which only allows them to see the group header information, but not the other members. In another scenario, you may wish to create an Engineering group where you want members to be aware of who else is in the group. In this case, you can grant each member the View Group Members role. Only a person or group with the Group Administrator role can also manage the group. The Manage Group privilege enables a user to add/delete members and change their roles.
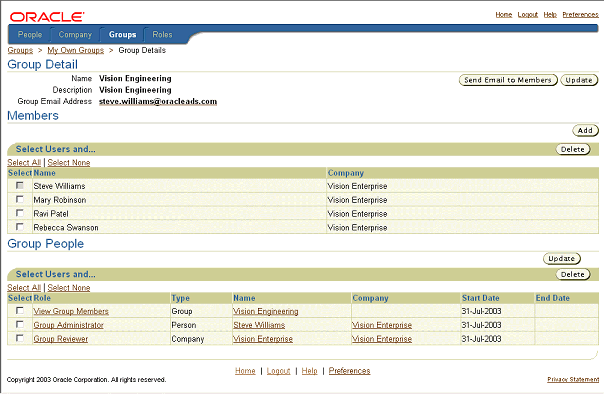
Group details
You can add three types of people to a group or assign them to a role on an object directly. The Type attribute on the People Search and Person: (Person Name) pages corresponds to the three basic types of people in the system:
-
Internal
When you create a user using the E-Business Suite Define User form, you define an employee in the People field. This person, now identified by the username entered, is classified as Internal in the system. You can search for and view details about this person.
-
Customer
When you create a user using the E-Business Suite Define User form, you define a customer in the Customer field. This person, now identified by the username entered, is classified as a Customer in the system. You can search for and view details about this person.
-
Vendor
When you create a user using the E-Business Suite Define User form, you define a supplier in Supplier field. This person, now identified by the username entered, is classified as a Vendor in the system. You can search for and view details about this person.
Customer and Vendor are external people.
Important: You may have defined people, such as contractors and temporary employees, in Oracle HRMS. You may also have defined people as customers in Oracle Customer Online. These people are not recognized as valid people in the system despite the fact that they are in HRMS and Customer Online. You cannot search for or view details about these people.
-
In the Applications tree menu, click People, Groups and Companies.
-
Click the People tab.
-
On the People page, enter the name of the person for whom you are searching in the Search field.
You can search by first name, last name or user name. You can enter a partial name and search on this. For example, enter "wil". A list of all people with a name beginning with "wil" is returned.
-
Click Go.
The name you entered is returned in the People Search Results region. If the name you entered is not listed in the People Search Results, check the spelling of the name and try searching again. If you are unable to locate the name, the person is not registered in E-Business Suite, or is not valid in the system. Try registering the person in the E-Business Suite first, or make sure the person is valid in the system.
Groups are communities of people you can define in order to collaborate. You can represent all your teams as groups in the system and give your group access to the system's objects. You can send an e-mail to everyone in a group with a click of a button. To view and create a group, you must have the following list of privileges, such as in the seeded Group Administrator role:
-
View Group Header
-
View Group Members
-
Manage Group
-
In the Applications tree menu, click People, Groups and Companies.
-
Click the Groups tab.
-
On the Groups page, click Create Group.
-
On the Create Group page, provide the following:
Group
Provide a name that identifies the group.
Description
Provide a brief description of the group.
Group Email Address
Specify the group mailing list, if you have one, as your group's Email address.
-
Click Apply to save the group, or click Add Another Row to create another group.
After clicking Apply, the Group Details page appears.
-
On the Group Details page, you can perform the following actions:
-
Click Update in the Group Detail region to edit group information.
-
Click Add to add additional members to the group.
-
If you wish to delete a member, select that group member and click Delete.
-
Click Update in the Group People region to assign a group object role to a specific person, group or company.
The system automatically assigns the following seeded roles:
-
Group Administrator to the person who created the group
-
View Group Members to all members of the group
-
Group Reviewer to any member of the group creator's company
Tip: Assign the Group Administrator role to an additional person as a backup.
-
-
To add/remove members to a group
-
In the Applications tree menu, click People, Groups and Companies.
-
Click the Groups tab.
-
On the Groups page, click My Own Groups.
-
Select a group and click Edit Membership.
-
On the Group Detail page, click Add, and select one or more persons from the list of values.
-
To remove members, select each member to delete and click Delete.
-
In the Applications tree menu, click People, Groups and Companies.
-
Click the Groups tab.
-
On the Groups page, enter the full or partial name of the group. Click Go.
-
To locate all groups in which you are a member, click My Group Memberships.
-
To locate all groups that you own, click My Own Groups.
-
-
If the group name you entered is not listed in the Group Search Results, check the spelling of the name and try searching again. If you are unable to locate the group, it has not yet been created. Create the group using the "Create Group" link on the Groups page.
-
On the Group Search Results page, select a group and click Request Membership to join a group. The owner is sent an Email notification and can add you as a member of that group.
-
Click a group name to see all the members of a group (only if you are the owner or a member of that group or have the View Group Members privilege assigned to you).
-
In the Applications tree menu, click the "People, Groups and Companies" link.
-
Click the Groups tab.
-
On the Groups page, click the "My Own Groups" link to locate all groups that you own.
See "To create a group:" above for more details about updating groups.
-
In the Applications tree menu, click the "People, Groups and Companies" link.
-
Click the Companies tab.
-
On the Companies page, enter the name of the company for which you are searching, or enter a letter from the alphabet. If you only know part of the name of the company for which you are searching, enter that name. For example, if you are searching for a company named "AAA Supplier," type "AAA" in the search field. You will then see a list of all companies with "AAA" in their name.
-
Click Go. The name you entered is displayed in the Company Search Results field. If the company name you entered is not listed in the Company Search Results, check the spelling of the name and try searching again. If you are unable to locate the company, it is likely not registered in E-Business Suite. Try registering the customer company using Oracle Customer Online or Oracle Order Management. Try registering the Vendor/Supplier Company using Oracle Purchasing.
Related Topics
Overview of Roles and Role Based Security
Implementing Role Based Security
Implementing Change Management Role Based Security
Implementing Role Based Security
To implement role based security on a particular object, attach a role to the object and a person, group, company, or all users to the role on the object. For example, for each item catalog category, you can specify which people can create items by assigning them the Catalog Category User role on the item catalog category.
To implement role based security on a user-defined attribute group, assign people to an item role containing custom privileges for the attribute group.
Prerequisites
- Create roles. See: Administering Roles
- Optionally, create groups. See: Administering People, Groups, and Companies
To assign people to a catalog
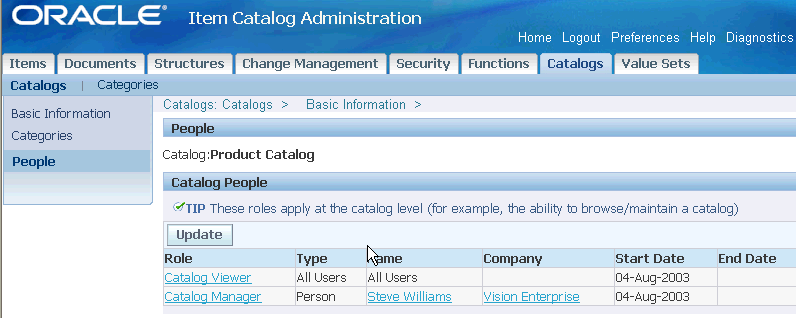
Depending on their assigned role, people can assign items to a catalog or view the catalog hierarchy. You can assign either of the following seeded roles to people in a catalog:
Catalog Manager
The Catalog Manager role enables users to view the catalog hierarchy and also enables them to assign items to this catalog.
Catalog Viewer
The Catalog Viewer role enables users to view the catalog hierarchy, but they cannot assign items to it.
Assigning Catalog Roles
-
On the Search: Item Catalog Categories page, click the Catalogs tab.
-
On the Search: Catalogs page, select the catalog to which you wish to assign people.
-
On the Basic Information page for the catalog, click the "People" link.
-
On the People page, click Update. After the page refreshes, click Add Another Row.
-
After the Update People page refreshes, select a role, the type of people to use the role, and the name of the company, group, or person given the role on the catalog. Specify a start date and, optionally, an end date.
-
Click Apply.
To delete people from a catalog
-
In the Update People page, select a row and click Remove.
-
Click Apply.
To assign people to a catalog category
Note: There are no seeded roles for the catalog category object. You must create a role for the catalog category before you can assign people.
-
On the Search: Item Catalog Categories page, click the Catalogs tab.
-
On the Search: Catalogs page, select the catalog containing the category to which you wish to assign people.
-
On the catalog's Basic Information page, click the Categories link on the left side of the page.
The Categories page displays the valid categories for the selected catalog.
-
Click on the name link of the valid category to which you wish to assign people.
-
On the Category Details page, click the People link.
-
On the People page, under the Category People heading, click Update. After the page refreshes, click Add Another Row.
-
After the Category People page refreshes, select a role, the type of people to use the role, and the name of the company, group, or person given the role on the catalog. Specify a start date and, optionally, an end date.
-
Click Apply.
To delete people from a catalog category
-
In the Category People page, select a row and click Remove.
-
Click Apply.
To grant group roles to people
You can grant a person, group or company a specific role for a group. You must have the Manage Groups privilege for the group in order to grant others a role on the group.
-
In the Applications tree menu, click People, Groups and Companies.
-
Click the Groups tab.
-
On the Groups page, click My Own Groups or search for a group for which you have the Manage Groups privilege.
-
Click on a group name.
-
In the Group Details page, under the Group People heading, click Update.
-
In the Update Group People page, click Add Another Row.
-
Select a role, the type of people to use the role, and the name of the company, group, or person given the role on the group. Specify a start date and, optionally, an end date.
-
Click Apply.
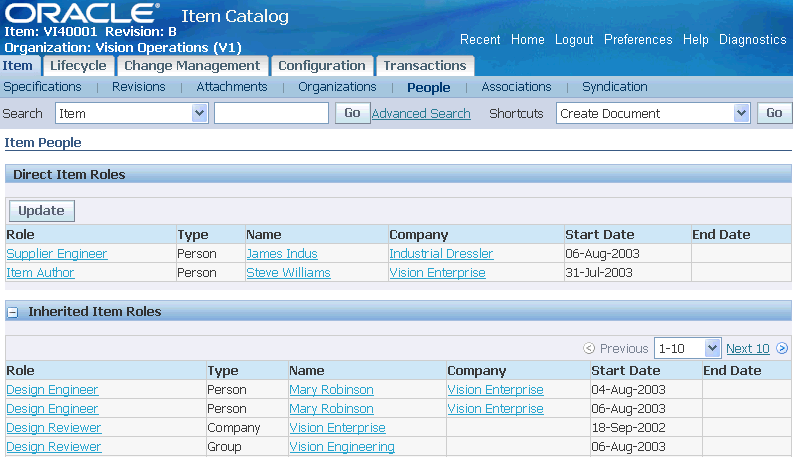
To assign people to an item
You can assign roles for certain users directly to a single item or assign roles indirectly using roles inherited from the following objects that contain the item:
-
an alternate catalog
-
an alternate catalog category
-
an item catalog category
-
an organization
Item-specific role assignments
-
In the Applications tree menu, use either the "Simple Search" or "Advanced Search" links to search for the item to which you wish to add people.
-
Click the item's link in the search results.
-
On the item's Overview page, click People.
-
On the Item People page, click Update.
Note: You can only update the People page for an item from within the master organization.
-
On the Update Item People page, click Add Another Row. Provide the following information:
Role
Specify the role of the person you are adding.
Type
Specify the type of person you are adding (All Users, Company, Person, Group).
Name
Enter the name of the company, person, or group.
Start Date
Specify the date on which the person/group gains access to the item.
End Date
Optionally, specify the date on which the person/group no longer has access to the item.
-
Click Apply.
To assign people to an item catalog category
You can grant roles to people by item catalog category for all organizations or by item catalog category in a particular organization. Item catalog categories at a lower level in the catalog hierarchy inherit roles granted to people at a higher level item catalog category. You cannot remove or edit inherited roles.
Item Catalog Category People
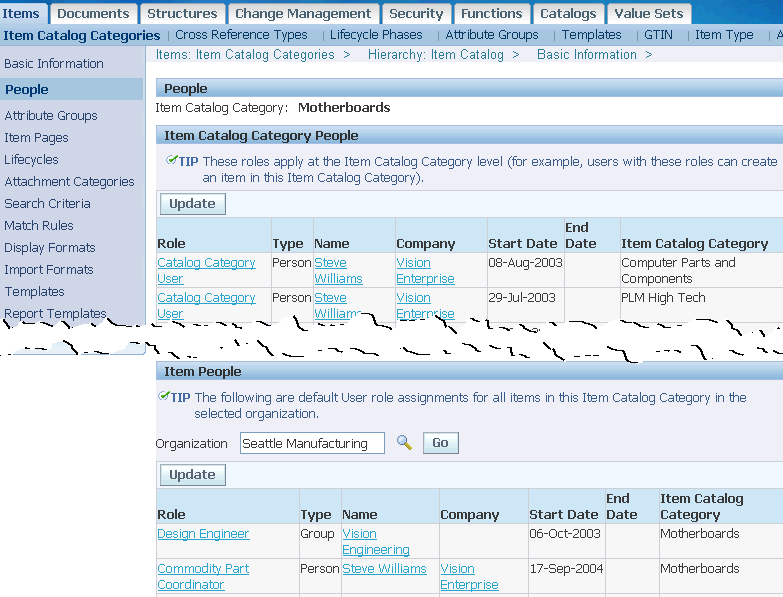
-
Navigate to the Setup Workbench. On the Item Catalog Categories page, search for and select an item catalog category.
-
On the Basic Information page, click the People link.
To assign people to an item catalog category for all organizations
-
On the People page, under the Item Catalog Category People heading, click Update.
This updates roles for the item catalog category across all organizations.
-
In the Edit People page, click Add Another Row. Provide the following information:
Role
Specify the role of the person you are adding.
Type
Specify the type of person you are adding (All Users, Company, Person, Group).
Name
Enter the name of the company, person, or group.
Start Date
Specify the date on which the person/group gains access to the item catalog category.
End Date
Optionally, specify the date on which the person/group no longer has access to the item catalog category.
-
Click Apply.
To assign people to an item catalog category for a particular organization
-
On the People page, under the Item People heading, search for and select an organization.
-
Under the Organization field, click Update.
This updates roles for the item catalog category only in the selected organization.
-
In the Edit Item People page, click Add Another Row. Provide the following information:
Role
Specify the role of the person you are adding.
Type
Specify the type of person you are adding (All Users, Company, Person, Group).
Name
Enter the name of the company, person, or group.
Start Date
Specify the date on which the person/group gains access to the item catalog category.
End Date
Optionally, specify the date on which the person/group no longer has access to the item catalog category.
-
Click Apply.
To assign people to all items in an organization
You can grant a specific role to a certain person, group, company, or all users that applies to all items in an organization. This is useful when you want to grant one person access to many items.
Note: You can grant organization-level roles if you are assigned the Item Administration function through one of your responsibilities.
If you cannot grant organization-level roles, then contact your system administrator. For more information, see:
-
Creating and Updating Roles, Oracle E-Business Suite System Administrator's Guide - Security.
-
Excluding functions in the Menu Exclusions tab, Responsibilities Window, Oracle Applications System Administrator's Guide - Security.
Organization Level Item Role Assignments
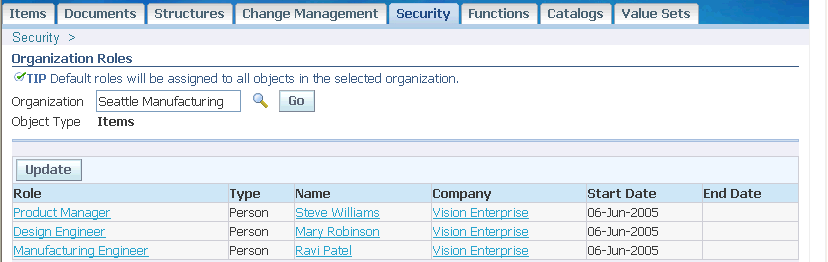
-
In the Applications tree menu, click Setup Workbench.
-
On the Item Catalog Categories page, click the Security tab.
-
On the Organization Roles page, select an Organization to which to grant a role and click Go. The table returns all people, groups and companies who have been granted roles in the selected organization.
-
Click Update.
-
On the Update Organization Roles page, click Add Another Row. A new row appears in the table. Enter the following information:
-
Role
Select a role for this grant.
-
Type
Select the type of grant: a grant to a single person, a group, a company, or all users.
-
Name
Enter the name of the person, group, or company to which you are making this grant.
-
Start Date
Select a start date from which this grant is effective.
-
End Date
Select an end date on which the grant will no longer be effective.
-
-
Click Apply.
To revoke a specific role from a person for all items in the organization
-
On the Update Organization Roles page, select the person(s) or group(s) whose role you wish to delete, and click Remove.
-
Click Apply.
To edit a role grant of a person for all items in an organization
-
On the Update Organization Roles page, select the person or group whose role you wish to edit, and provide a new start date or end date.
-
Click Apply.
To implement attribute group security
When implementing role-based item security, you can create custom privileges to control the view and edit permissions for specific item attribute groups. You can control which users can view and/or edit certain attribute groups for an item by assigning a role granting those specific privileges. By default, an item role's View Item and Edit Item privileges control whether or not you can view or edit item attributes that are not controlled specifically at the item attribute group level. In other words, when implementing item security you do not have to specify a view or edit privilege for each item attribute group.
Example: Attribute Group Security
Suppose your company is designing, along with your supplier, a new motherboard for its next generation of desktop computers. To improve design collaboration you would like to securely share item information about the motherboard—both internally between departments and externally with your suppliers and contract manufacturers. The Supplier Engineer should only be able to view specific item attribute groups such as the Technical Specifications. The Supplier Engineer should not be able to view the Market Research attributes. The Engineering Manager and Marketing Manager should be able to view and edit the Market Research attributes, while a Design Engineer should only view the Market Research attributes. There are three sets of Market Research attributes (attribute groups): Key Metrics, Target Markets, and Competitors.
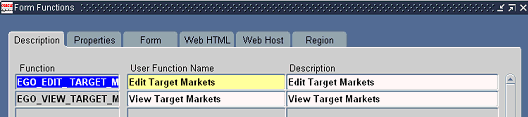
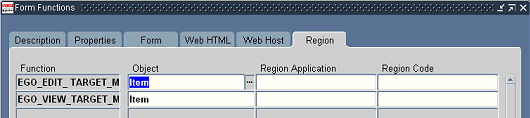
-
Select the Application Developer responsibility, navigate to the Form Functions form, and create Form Functions for each privilege that controls view and edit permissions for the Market Research attribute groups. See: Creating Custom Privileges.
Defining form functions to create user-defined item role privileges

-
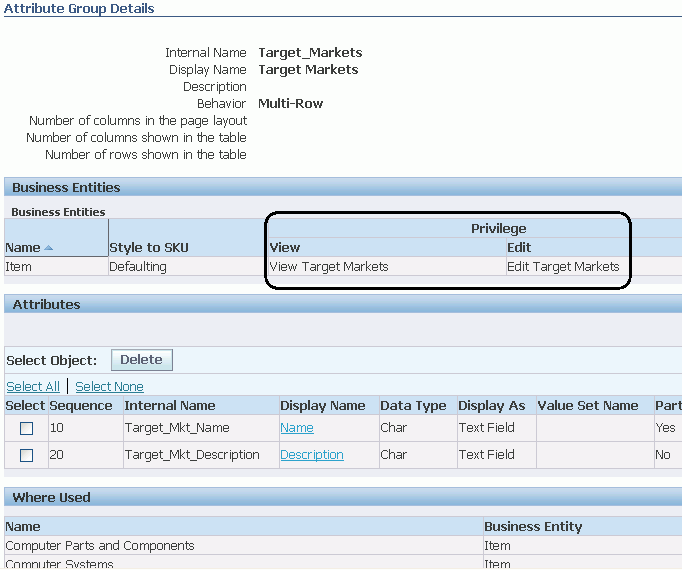
Select the Development Manager responsibility and navigate to the Setup Workbench. In the Attribute Group Details page for each Market Research-related attribute group (for example, Target Markets) specify the View Privilege (for example, View Target Markets) and Edit Privilege (for example, Edit Target Markets) in the Business Entities region.
Defining Item Attribute group with view and edit privileges
-
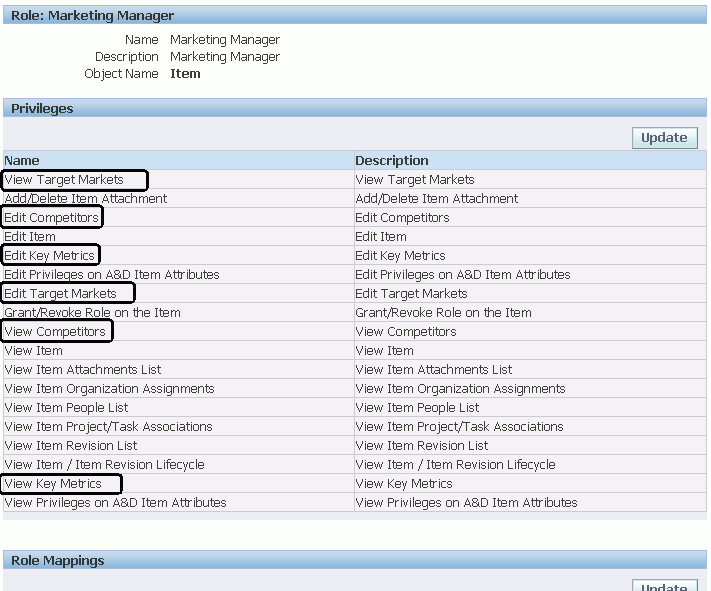
On the Item Role Detail page for the Marketing Manager and Engineering Manager roles, grant the following privileges:
-
View Target Markets
-
View Key Metrics
-
View Competitors
-
Edit Target Markets
-
Edit Key Metrics
-
Edit Competitors
-
Defining the Marketing Manager role with specific item attribute group privileges
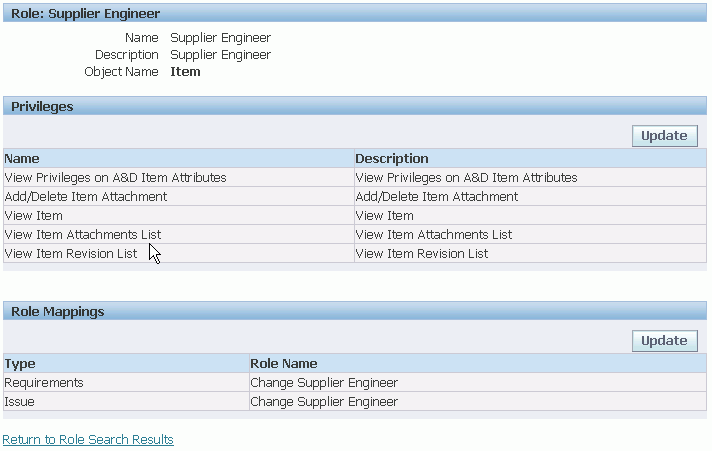
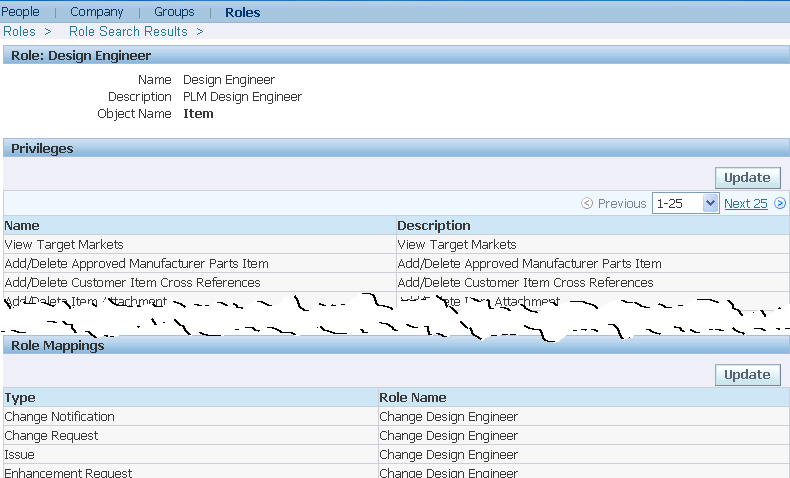
For the Design Engineer role, grant the following privileges:
-
View Target Markets
-
View Key Metrics
-
View Competitors
Do not grant any of the Market Research privileges to the Supplier Engineer role.
Defining the Supplier Engineer role with no specific item attribute group privileges
-
Related Topics
Overview of Roles and Role Based Security
Administering People, Groups, and Companies
Implementing Change Management Role Based Security
Implementing Change Management Role Based Security
You can assign change roles to a person, group, company, or all users. To simplify maintaining change management security, you can assign change roles directly to the change object or inherit them through item role mapping from the subject item of the change object. For example, you can map the Design Engineer item role to the Change Design Engineer role for issues, change requests, and change orders. So users with the Design Engineer role on the subject item of the change request header will inherit the Change Design Engineer role as well. You can also assign a default role to all internal users with the site level profile ENG: Internal User Default Role for Changes. A role that is explicitly granted to a user for a change object is a direct role assignment. Roles inherited from an item are inherited role assignments.
All seeded item roles are mapped to seeded change object roles. User-created item roles do not have to be mapped to change roles. If you do not want a seeded item role mapped to a change role, edit that item role (such as Item Author) explicitly.
The change role assigned to a user for a change object (for example, issue, change request, change order) determines which actions that user can perform on the change object. For example, a user with an Approver role on a change request is granted the View Basic Change Information and Edit/Delete Change privileges. You can also specify which user-defined attribute groups a user can view and/or edit when granted a change role.
Following are the seeded change roles:
-
Approver
-
Assignee
-
Creator
-
Requestor
-
Reviewer
To assign change roles directly to the change object
Change roles are assigned directly to the change object by the change type. When you defined your change types in Defining Header Types, you specified a workflow. Each workflow step with an Approval status requires at least one associated workflow template (see: Defining Workflow Templates). Each person, role, or group specified in the workflow template receives a role on the change object based on the approval routing activity. All Request Approval assignees get an Approver role. Request Comment and FYI assignees get a Reviewer role on the change object. You can also specify a Default Assigned To role for a person/group when you define a change type. The Assigned To person for every change object gets an Assignee role.
To inherit change roles through item role mapping
-
In the applications tree menu, click Roles.
-
On the Roles page, select the item object, enter the role name, and then click Go.
-
On the Role Search Results page, click the name link of the role for which you were searching.
-
On the Role: (Role Name) page, click Update in the Role Mappings region.
-
On the Role Mappings page, you can map each change object type to a specific change role.
-
Click Apply.
Mapping an Item Role to Change Roles
To assign a default change role to all internal users
You can assign a default role to all internal users with the site level profile option ENG: Internal User Default Role for Changes.
-
Within the System Administrator responsibility, click System.
-
In the System Profile Values window, search for and select the site level profile option ENG: Internal User Default Role for Changes.
-
In the Site field, select the default change role for the site from the list of values.
-
Save your work.
To implement attribute group security for change management
When implementing role-based change management security you can set up privileges to control the view and edit permissions for specific change management attribute groups. You can control which users can view and/or edit certain attribute groups for a change object by assigning a role granting those specific privileges. By default, a change role's View Basic Change Information and Edit/Delete Change privileges control whether you can view or edit attributes that are not controlled specifically at the attribute group level. In other words, when implementing change management security you do not have to specify a view or edit privilege for each attribute group.
Suppose your company is co-designing with your supplier a new motherboard for its next generation of desktop computers. To improve communication with your supplier on design changes to the motherboard, you would like to securely share change request information externally with your suppliers and contract manufacturers. The Supplier Engineer should only be able to view specific attribute groups.
-
Select the Application Developer responsibility, navigate to the Form Functions form, and create Form Functions for each privilege that controls view and edit permissions for the attribute groups. Specify “Change” or “Change Line” in the Object field for each Form Function.
-
Select the Development Manager responsibility and navigate to the Setup Workbench. On the Attribute Group Details page for each attribute group, specify the View Privilege and Edit Privilege in the Business Entities region.
-
On the Change Role Detail page, grant the privileges that you defined as Form Functions in the previous steps.
Related Topics
Overview of Roles and Role Based Security
Administering People, Groups, and Companies
Implementing Role Based Security
Creating Custom Privileges
The system includes a number of seeded privileges. However, you have the option to create custom privileges to meet the needs of your business.
To create a custom privilege
-
Log into Oracle Forms using the System Administrator responsibility.
-
In the Application menu, select Function.
-
In the Form Functions window, provide the following information:
Function
Enter a unique function name. You may use this name when calling your function programmatically.
User Function Name
Enter a unique name that describes your function. You see this name when assigning functions to roles.
Description
Provide a description of the function.
-
Click the Region tab, and select the Object for which you are creating this privilege.
-
Click Save.
Related Topics
Overview of Roles and Role Based Security
Administering People, Groups, and Companies