Setting Up Change Categories and Types
This chapter covers the following topics:
- Overview of Change Categories and Types
- Building and Optimizing the Change Management Text Index
- Defining Change Categories
- Creating Priority Codes
- Creating Reason Codes
- Creating Classification Codes
- Creating Statuses
- Defining Workflow Templates
- Customizing Change Management Workflows
- Creating Task Templates
- Defining Header/Line Type Attributes and Attribute Groups
- Defining Header Types
- Defining Line Types
- Associating Change Type Attributes
- Associating Change Line Type Attributes
- Implementing User Defined Functions for Change Type Attribute
- Defining Change Category Search Criteria
- Defining Change Category Display Formats
- Defining Change Category Reports
- Subscribing to a Change Management Business Event
Overview of Change Categories and Types
Important: The seeded Change Management categories of Idea and Issue are available only to customers who have licensed Product Lifecycle Management, and they are not available to licensees of Product Information Management.
You must perform the following tasks to define Change categories and their associated types.
| Task | Required? |
| Defining Change Categories | |
| Defining Change Types | Yes |
| Defining Line Types | |
| Defining Change Type Attribute Groups | |
| Defining Change Line Attribute Groups | |
| Setting Up Change Attribute Group Security | |
| Implementing User-Defined Functions for Change Type Attributes | |
| Associating Change Type Attributes | |
| Customizing Change Management Workflows | |
| Defining Approval Routing Templates | Yes |
| Creating User-Defined Priority Codes | Yes |
| Creating User-Defined Reason Codes | |
| Creating User-Defined Statuses | |
| Defining Change Category Criteria Templates | |
| Defining Change Category Results Formats | |
| Defining Change Reports |
Building and Optimizing the Change Management Text Index
To take advantage of the Oracle Text search features such as keyword search, stemming search, and fuzzy search— run the concurrent program Item Catalog Text Index Build. Any user with the Development Manager responsibility can submit this concurrent program from the Submit Request window. Select the concurrent request parameter Action=CREATE when submitting the request.
As item data changes over time due to ongoing item insert, delete, or update operations, the query response time may gradually decrease. Optimizing the change Management Text index using the Optimize Item Catalog Text Index concurrent program removes old data and minimizes index fragmentation, and therefore can improve query response time.
The Change Management Text Index should be optimized:
-
After the import of many items
-
After deleting or updating many items
-
On a regular basis (you should optimize the text index at regular intervals, for example, twice a week.)
-
When you notice slow performance for item simple search
Note: This program optimizes at most 16,000 items per single run. To continue optimizing more items, re-run the program.
To optimize the Change Management Text Index
-
In the Applications tree menu, click the "View Concurrent Requests" forms link.
-
In the Find Requests form, click Submit a New Request.
-
In the Submit a New Request form, select Single Request and click OK.
-
In the Submit Request form, select Optimize Change Management Text Index from the Name list of values.
-
In the Parameters form, provide the Program parameter values: FAST
This optimization method compacts fragmented rows. However, old data remaining from deleted rows is not removed. FULL This method both compacts rows and removes old data (for example, performs garbage collection).
Maximum Optimization
Time Specify the maximum optimization time, in minutes, for FULL optimize. If you do not enter a value, the program runs until the entire index is optimized. If you specify a maximum time, the program performs as much work as allowed by the imposed time limit. The optimization picks up and continues the next time the program is run. When you specify 0 for maximum time, Oracle performs minimal optimization.
-
Click Submit.
Defining Change Categories
You can use change categories to define and manage changes required by your enterprise. In addition to the seeded change categories (ideas, issues, change requests, change notifications, change orders) you can create change categories specific to your business needs. For example, you can create the change category Enhancement Requests to track your customers' product enhancement requests. You cannot delete seeded change categories; however, you can disable them.
You can configure each change category to have revised items or request lines based on the business purpose of the category. For example, a Change Order can have revised items as they allow a change order to implement item related changes. Request lines enable you to request changes or specify tasks related to an item and assign it to a person or group. You can associate criteria templates and result formats to a change category for frequently executed search criteria.
Important: The seeded Change Management categories of Idea and Issue are available only to customers who have licensed Product Lifecycle Management, and they are not available to licensees of Product Information Management.
The system provides five base change categories that can be used to create other categories:
-
Ideas - To capture suggestions, innovations, improvements etc. from customers and internal users.
-
Issues - to track, manage and resolve various product/process related issues.
-
Change Request - to request changes and get approval for requested changes.
-
Change Order - to implement requested changes and revise items.
-
Change Notification - to distribute documents and files to multiple recipients.
Other change categories provided by the system include:
-
File Review - to allow for an informal process of review and feedback on attachments.
-
File Approval - to allow for a formal process of review and approval of attachments.
-
New Item Request (NIR) - to provide a formal process of definition and approval of a new item.
You can create your own change categories to manage a variety of issue and change management business processes relevant to your company.
You can specify a form function to control who can view and create change category objects. The form function must be added to the change management security menu (EGO_CHGMGMT_USER_SECURITY), which in turn is referenced by a user responsibility (such as Development Manager or Development Engineer). You can also enable (in the Item Catalog workbench) a tab to show all instances of a change category for the item in context.
You can specify a form function to control who can view and create change category objects. The form function must be added to the change management security menu (EGO_CHGMGMT_USER_SECURITY), which in turn is referenced by a user responsibility (such as Development Manager or Development Engineer). You can also enable (in the Item Catalog workbench) a tab to show all instances of a change category for the item in context.
New change category Enhancement Requests enabled in the Item Catalog
Enabling Change Category Function Security and the Item Change Category Tab
To enable the change category function and the item change category tab:
-
Create the Form Function for the Item Enhancement Request tab.
Description Tab
Function
EGO_ITEM_ENH_REQ
User Function Name
EGO User Item Enh Request tab
Description
EGO User Item Enh Request tab
Properties Tab
Type
SSWA JSP FUNCTION
Maintenance Mode Support
None
Context Dependence
Responsibility
Web HTML Tab
HTML Call OA.jsp?page=/oracle/apps/ego/item/eu/webui/EGOITEMCHANGEMGMTLISTPGL&akRegionApplicationId=431&addBreadCrumb=RP&OAHP=EGO_USER_WORKBENCH_HOMEPAGE&OASF=EGO_ITEM_ENH_REQ&changeMgmtTypeCode=ENHANCEMENT_REQUEST
Important: Boldfaced characters represent the form function and internal name of the change category, respectively.
-
Create the Form Function for Enhancement Request security. The function name must be 'ENG_CREATE_' (for example, ENG_CREATE_ENHANCEMENT_REQUEST):
Description Tab
Function
ENG_CREATE_ENHANCEMENT_REQUEST
User Function Name
Engineering Create Enhancement Request
Properties Tab
Type
SSWA JSP FUNCTION
Maintenance Mode Support
None
Context Dependence
Responsibility
Web HTML Tab
HTML Call
OA.jsp?page=/oracle/apps/eng/changemgmt/webui/SelectChgTypePG& changeMgmtTypeCode=ENHANCEMENT_REQUEST
Additional Information: Boldfaced characters represent the internal name of the change category.
Create form functions for change category security and item change category tab
-
Add the Create Enhancement Request function to the change management navigation menu (see the menu EGO_CHANGE_MGMT_MENU).
Prompt
Create Enhancement Request
Function
Engineering Create Enhancement Request
Add function to change management menu
-
Add the Enhancement Request security function to the change management security menu (see the menu EGO_CHGMGMT_USER_SECURITY).
Function
Engineering Create Enhancement Request
Add function to change management security menu
-
Add the Item Enhancement Request function to the item change management tab menu (query the menu EGO_USER_CHANGE_MANAGEMENT_TAB)
Prompt
Enhancement Requests
Function
EGO User Item Enh Request tab
Important: You must enter a prompt when adding a function to a change management menu such as EGO_USER_CHANGE_MANAGEMENT_TAB.
-
Add the new change category for Enhancement Requests by duplicating an existing Change Category. In example shown in the new Enhancement Request Change Category is being defined by duplicating the Issue category:
Internal Name
ENHANCEMENT_REQUEST
Name
Enhancement Request
Description
Enhancement Request
Plural Name
Enhancement Requests
Sort Seq
9
Start Date
defaults to sysdate
Number Generation
Sequence Generated
Prefix
ER-
Next Available Number
0001
Add new change category by duplicating an existing change category
Additional Information: Oracle recommends that you stop and then start the Jserv and Apache listener middle tier ports after completing these setup tasks.
To create a new change category
-
On the Categories page in the Setup Workbench, select any change category and click Duplicate.
Note: Creating new categories by duplicating existing categories enables your enterprise to better control the general change categories in use. It also makes it easier to introduce new categories that are similar to the basic issue, change request and change order categories. Note, however, that duplication is not allowed for the following change categories:
-
File Review
-
File Approval
-
New Item Request (NIR)
-
-
On the Duplicate Category page, change the data in the fields as necessary to create your new category.
Important: When duplicating a change category, all information from the Basic Information section is copied. For new change categories based on existing change order categories, the following seeded line types are copied:
-
Item AML changes
-
Item attachment changes
-
Item attribute changes
Note the following fields:
-
Plural Name
Enter alphanumeric text to specify the plural of the name that appears in the user interface.
-
Sort Sequence
Enter a number to specify the tab sequence in which the categories will appear in the user interface.
-
Autonumbering
If you select the Number Generation method Override at Type Level, then autonumbering must be specified at the Type level, and therefore does not inherit the numbering schema used for the parent change category.
-
-
Click Apply to complete creation of the new change category.
If, after creating a new change category you wish for the new category to be displayed as a tab in the item workbench, you must create a form function passing the change category name as a parameter, then assign the form function to the appropriate Menu in the user interface, and finally assign the Menu to a Responsibility, which in turn is granted to a user. For more information, see the Oracle Product Information Management Implementation Guide. For more information on Menus and Responsibilities, see the Oracle E-Business Suite Developer's Guide.
All new change categories created will be available to the user for search and reporting under the general Change Management Menu.
If you wish to have this category be available separately to the user, you must create separate form functions for simple search, advanced search, create, and reports, assign the form functions to a menu, and finally assign the menu to a responsibility.
After creating a new change category, you can configure the Header Types, Line Types and Reports. For more details see:
Creating Priority Codes
Change priorities enable you to define the degree of urgency of change requests, change orders, and issues in a way that accommodates your business processes. You can create priority codes to capture different priorities (such as High, Medium or Low).
Priority codes are applicable to all change categories and their types.
You cannot delete seeded priority codes; however, you can disable the seeded priority codes and define new ones specific to your use. You can disable a priority on a given date by specifying a date in the Inactive On field.
To create a change priority
-
On the Search: Item Catalog Categories page in the Setup Workbench, click the Change Management tab.
-
On the Categories page, click the Codes tab.
-
On the Priorities page, click Add Another Row.
-
In the new row, enter the following:
Priority
Enter alphanumeric text to specify the name of the priority.
Priority Sequence
Enter a number between 0 and 9. Use 0 to denote the highest priority and 9 the lowest. Priority sequence is used to determine the sort sequence.
Description
Enter a description for the priority.
Note: You can delete a change priority as long as it has not yet been used--once in use, a priority cannot be deleted.
Creating Reason Codes
Use change reasons to categorize and identify causes for changes. The system uses reasons for reference only.
Reason codes enable you to track the reason for which the issue/change has been created. Create reason codes to capture reasons for the issue/change (such as Quality Improvement, Design Improvement, Cost Reduction, Test Failure and Non Conformance).
Reason codes are applicable to all change categories and their types.
You cannot delete seeded reason codes; however, you can disable the seeded reason codes and define new ones specific to your use. You can disable a reason on a given date by specifying a date in the Inactive On field.
To create a change reason
-
On the Search: Item Catalog Categories page in the Setup Workbench, click the Change Management tab.
-
On the Categories page, click the Codes tab.
-
On the Priorities page, click the Reasons link.
-
On the Reasons page, click Add Another Row. In the new row, enter the following:
Reason
Enter alphanumeric text to describe a unique reason for initiating a change. For example, you could define a reason named OBSOLETE to indicate an obsolete part, or WAIVER to indicate a component change on a bill of material.
Description
Enter a description of the reason.
Note: You can delete a change reason as long as it has not yet been used--once in use, a reason cannot be deleted.
Creating Classification Codes
Classifications provide a mechanism for companies to automate the categorization of change orders, and to also indicate to users exactly how the change order will impact their production. Oracle provides two types of classifications:
Derived
Derived classification codes are derived from a user-defined function. For example, a division of a company, Vision Operations, needs to automate the process whereby a change order is assigned a particular classification code. To create an automated classification process, Vision has created a set of attributes that, when filled in by users, classifies change orders into a particular classification or workflow routing. The user-supplied attributes are mapped to user-defined functions. The function takes the data supplied in the attributes and derives a valid classification code. Derived classification codes appear to users as read-only data. For details about user-defined attributes and functions see Defining Header/Line Type Attributes and Attribute Groups, and Defining User-Defined Functions. For details about setting up user-defined functions for change type attributes, see the example: Implement User-Defined Functions for Change Type Attributes.
Valid
Valid classification codes are selected by the user from a list of values. Valid values are specified in the change header type. Note: Classifications are available only to change categories whose base category is Change Order.
Note: Classifications are available only to change categories whose base category is Change Order.
To create classifications
-
On the Search: Item Catalog Categories page in the Setup Workbench, click the Change Management tab.
-
On the Categories page, click the Codes tab.
-
On the Priorities page, click the Classifications link.
-
On the Classifications page, click Add Another Row.
-
In the new row, provide the name of the Classification Code and a Description.
Note: You can delete a classification code as long as it has not yet been used. Once in use, a classification code cannot be deleted.
Creating Statuses
Statuses enable you to manage an issue/change through its lifecycle. You define statuses to indicate various states of an issue/change (for example, Open, On Hold, Complete and Cancelled).
Statuses are applicable to all change categories and their types
You cannot delete or disable seeded statuses; however, you can define new statuses specific to your business processes. You can disable user-defined statuses on a given date by specifying a date in the Inactive On field.
Change categories are managed through their statuses and an approval workflow. Each status can have one workflow associated with it, and that workflow is automatically launched when changes enter into the status.
Note: You can change the name of any status, even those provided by the system. If a status is already in use you cannot delete it. Also, you cannot delete any of the system provided status.
To create a status
-
On the Search: Item Catalog Categories page in the Setup Workbench, click the Change Management tab.
-
On the Categories page, click the Workflow tab.
-
On the Statuses page, click Add Another Row.
-
In the new row, enter the following:
-
Status
Provide a name for the new status.
-
Status Type
Select the type that applies to the status:
-
Open
When a change order has a status of Open, users can update it. However, when the workflow is running and Update Allowed is not selected, users cannot update it. Note that Update Allowed specifies that even if a workflow is running, the change object can still be updated. Otherwise, if a workflow is running, it cannot be updated , except for the posting of comments.
-
Scheduled
Once in use, the change cannot be updated. Scheduled change orders are picked up and implemented by auto-implement manager (when auto-implement is set up).
-
Released
Cannot be updated.
-
Approval
A workflow is mandatory for this status. Once the Approval is granted, the status cannot be updated. You can associate a workflow template containing an approval request step for Approval status types only.
-
Implemented
For each change header type, only one status can use Implemented. Implemented change orders cannot be reopened and canceled. Implemented must always be the final status.
Note: Once in use, you cannot delete or update Status Types (except for the Display Name).
-
-
Description
Enter a description of the status.
-
Inactive On
Optionally, enter a date on which the status becomes inactive. As of this date, you can no longer assign the status.
-
Defining Workflow Templates
Workflow templates enable you to predefine a business approval process. Change categories such as issues, change requests and change orders can only be approved via the successful completion of an approval routing. Workflows are supported at change header and line levels. You can create and maintain header and line workflow templates for each change type using workflow templates listed in the Setup Workbench under the Change Management Workflow tab.
Creation of a new Workflow Template
Workflow templates enable you to define a workflow for a change object; you can use workflows for a variety of purposes, some of which include informational messages (FYI), request for comment, or approval requests. Create workflow templates for change header and line level usage separately and associate them at the change header and change line level, respectively.
Workflow templates are made up of steps--each step describes a workflow process and specifies the assignees. For example, you can create steps to request approval, request comment, or send an FYI notification.
While creating a workflow template its Type needs to be specified.
Important: Once a workflow template is created of a particular type, its type cannot be changed.
Currently the following workflow template types are supported:
Approval
The Approval workflow template type is valid only for workflows with status type Approval.
Definition
The Definition workflow template type is used primarily for workflows in New Item Requests with status type Open.
Definition and Approval
The Definition and Approval workflow template type is used primarily for New Item Requests of status type Approval.
Generic
The Generic workflow template type is used for all other status types.
Certain workflow types can be associated with specific statuses. Following are the associations between status type and workflow types:
| Status Type | Valid Workflow Type |
| Approval/Review | Approval |
| Others | Generic |
| Status Type | Valid Workflow Type |
| Open | Definition |
| Approval/Review, Definition and Approval, or Approval | Approval |
| Others | Generic |
Workflow templates are basically made up of approval steps; each approval step describes a workflow process and specifies the assignees. For example, you can create steps to request approval, request comment, or send an FYI notification.
You can use any of the following seeded workflow processes in a workflow template:
Request Approval
The Request Approval workflow enables you to request approvals from a person or group.
FYI
The FYI workflow enables you to send an FYI notification to a person or group.
Request Comment
The Request Comment workflow enables you to request comments from a person or group.
Definition
The Definition workflow is primarily used in the New Item Request Process and allows for the association of item attribute groups in the New Item Request process so that they can be defined by the step assignee.
Definition and Approval
The Definition and Approval workflow is similar to the Definition workflow but also requires an approval by the step assignee. For more details, see: Defining New Item Request Workflows.
You should plan and document the approval processes needed for specific types of changes in your enterprise. Pre-planning of these processes enable you to define workflow templates that adhere to your business processes.
You can manage parallel and serial approvals by assigning multiple people or groups to a routing step, or by assigning individual people or a group to each routing step. You can assign a specific role, person, or group to a routing step. Item roles need to be mapped to the change roles assigned on an approval routing step to ensure a person or group is assigned when the change is created (see Implementing Change Management Role Based Security for details on mapping item roles to change roles).
To create a header workflow template
In the Applications tree menu, click the Setup Workbench link.
-
On the Search: Item Catalog Categories page, click the Change Management tab.
-
On the Categories page, click the Workflow tab.
-
On the Workflow Templates page, select Header Templates and click Create.
-
5a)
On the Create Header Workflow Template page, note the following fields:
Start Date
Defaults to the current date. Start date is the date from which the workflow template is available.
End Date
The date upon which this workflow template is no longer unavailable.
Type
Identifies the type of workflow template that you are creating. Available workflow template types are:
-
Approval
The Approval workflow template type is valid only for workflows with status type Approval.
-
Definition
The Definition workflow template type is used primarily for workflows in New Item Requests with status type Open.
-
Definition and Approval
The Definition and Approval workflow template type is used primarily for New Item Requests of status type Approval.
-
Generic
The Generic workflow template type is used for all other status types.
Certain workflow types can be associated with specific statuses. The following table shows the association between the header status type and the workflow type for all change categories:
Following are the associations between status types and workflow types for the change category New Item Request:
Header Workflow Types and their Usage in Change Categories and Statuses Change Category/ Workflow Type Definition Definition and Approval Approval Generic Notification NIR Available for Open Status Available for Approval Status Available for Approval Status Available for all Statuses - Idea - - Available for Approval Status Available for all Statuses - Issue - - Available for Approval Status Available for all Statuses - Change Request - - Available for Approval Status Available for all Statuses - Change Notification - - Available for Approval Status Available for all Statuses - Change Order - -- Available for Approval Status Available for all Statuses - File Review - - - Use in All Statuses - File Approval - - Available for Approval Status Available for all Statuses - -
-
Click Add Step.
-
On the Add Step page, provide the following information:
Step
Enter the number of the step. This determines the order in which the steps are executed.
Workflow Process
Select the workflow process that describes this step. After selecting a workflow process, click Go. Selecting FYI changes the fields that follow; only the Instructions field appears. You can create custom workflow processes using Oracle Workflow Builder.
Important: Users receive a role based on the workflow process that is chosen here. If Request Comment is selected, the person from whom you are requesting the comment receives the Change Reviewer role. If Request Approval is selected, the person from whom you are requesting the approval receives the Change Approver role. If FYI is selected, the person to whom you are sending the FYI receives the Change Reviewer role. These roles are assigned in addition to any other roles these users may already have on the change object. The administrator can edit the privileges for these roles.
Assignee
Following are the choices for Assignee:
-
User Entered
You must select a particular user who is restricted to the Roles or Groups specified in the Assignees list.
-
Derived
The assignee is derived based on user's roles. Hence, the list of available assignees (in the Assignees section) will all have the same role.
Response Required
Following are the rule choices for responses:
-
All Assignees
All assignees must respond (or approve).
-
One Assignee
Only one of the assignees must respond (or approve).
-
Mandatory Assignees
When you add assignees, you specify that they are Optional or Mandatory. You must always have at least one Mandatory responder/approver.
Days to Respond
Enter the number of days--from the time this step is executed--in which you will need a response. Note that this is not the amount of time that transpires from the time the approval routing is submitted, but that it is the number of days from the time this particular step begins.
Instructions
Optionally, enter instructions for the assignees to follow in their responses.
Assignees
You can add assignees based on roles, membership in groups, or by selecting a specific person.
Note: When you select role, you are selecting either a change management or item role. If you assign someone by item role, then all users with this role on the item become Reviewers. If you assign someone by change management role, then all users with this role on the change become Approvers.
-
-
Click Apply to save this step.
-
On the Update Workflow Template page, verify that all steps required for the template have been added, and then click Apply.
To create a line workflow template
Create line workflow templates using the same steps described in To create a header workflow template.
-
Workflows are not associated to a particular status for change lines.
-
Approval workflows are not supported at the line level.
The following workflow types are supported at the line level:
-
Notification
The notification workflow template type is available at the line level only. The workflow process associated to this type enables users to track assignees responses and manage the change line.
-
Generic
Use the generic workflow template type for change lines across all categories that support lines.
The following table shows the associations between change lines and workflow types for all change categories:
| Change Category/ Workflow Type | Definition | Definition and Approval | Approval | Generic | Notification |
| NIR | - | - | - | - | - |
| Idea | - | - | - | Available | Available |
| Issue | - | - | - | Available | Available |
| - | - | - | Available | Available | |
| - | - | - | Available | Available | |
| - | - | - | - | - | |
| - | - | - | - | - | |
| - | - | - | - | - |
Customizing Change Management Workflows
Oracle supports the extension of workflows. Extensions include using existing seeded processes to build new workflow processes and modifying parameters of an activity without changing process logic (for example, adding custom logic in an Abort Approval Routing subprocess).
If the Change Management seeded workflows do not meet your business processing needs, you can customize or extend the seeded Change Management Workflow processes by creating your own processes, modifying the seeded ones, adding a new activity to a seeded process, and/or modifying custom hook PL/SQL procedures.
Suggestions for Customizing Workflows
-
If you decide to create a new workflow process for Priority Change rather than modifying the seeded workflow, you must write your own custom logic to start your custom workflow in the custom hook called in Start Workflow.
-
If you add a new workflow process in the Change Approval Routing Step (ENGCSTEP), then the process will be enabled as an Approval Routing Step Workflow in the Approval Routing pages. The workflow process is automatically called from the Approval Routing workflow.
-
The activity will be shared by more than one object's process, so create the activity in the ENG: Standard (ENGWFSTD) item type. Otherwise, create the activity in the appropriate object's item type.
-
Instead of modifying workflow notifications, you should create new messages. Oracle Workflow Builder does not maintain version information for objects such as item types, item type attributes, messages, and lookup types. For these objects, the latest definition always applies, so you must consider whether a change to any of these objects is backward compatible. If the modification affects existing processes, you should create a new object rather than edit the existing object.
Important: Oracle provides support only for its seeded activities, processes, and the types of extensions described in this guide. Oracle does not provide support for your custom activities and processes.
Creating Task Templates
Task templates define the various tasks that must be completed for a change order. You can create task templates only for categories whose base change category is Change Order. After creating task templates, you can use them to define the organization policies for change order header types.
Creation of a Task Template
The task templates are created for specific Organizations. Hence multiple task templates could be associated with a change order type. Depending on the organization in which the change order is created, the task templates defined for that organization associated with the change order become applicable.
If a task is specified as Mandatory it means that the task must be completed before the change order can proceed to the next status. After creating task templates, you can use them to define the organization policies for change order header types. This has been detailed in the section Defining Header Types.
To create a task template
-
On the Categories page in the Setup Workbench, click the Task Templates tab.
-
On the Task Templates page, click Create.
-
On the Create Task Template page, provide data in the required fields and click Add Another Row in the Change Tasks table to specify the tasks associated with the change order header type. Note the following fields:
-
Sequence
Determines the order in which the tasks will appear on the page.
-
Task
The name of the task.
-
Assignee Type
Specify whether you wish to assign the task to a person or group.
-
Assignee
The person (or group) to whom the task is assigned.
-
Mandatory
Specifies that the task must be completed before the change order can proceed to the next status.
-
Defining Header/Line Type Attributes and Attribute Groups
Defining attributes and attributes groups enables you to capture additional information related to issues, change requests, and change orders. You can create user-defined attributes with validation logic and associate them to change types as a collection of attributes within an attribute group.
Attributes are defined by their names and values, and are saved within attribute groups. You can associate attribute groups to a change header type or change line type. You must define separate attribute groups for header types and line types. You can reuse the same attribute group across different change categories and their change types. Users enter the values for the attributes on the pages that you create for each change type. You can also define how attributes are displayed for your change objects to improve usability.
You can index attributes to speed up search performance. For numeric or date data types, a B-tree index enables users to search on a range of values or use relational operators such as “less than” and “greater than,” among others. For text attributes, Oracle Text index allows flexible key word searching.
Prior to creating user-defined attributes, do the following:
-
Group related attributes within the same attribute group. The following table shows some examples of attribute groupings:
| Attribute Group | Attributes | Data Type |
| Customer Priorities | Customer | Char |
| Priority | Char | |
| Date | Standard Date | |
| Review | Char | |
| Implementation Cost | Manufacturing | Number |
| Engineering | Number | |
| Supplier Charges etc | Number |
-
Create an object role (change) with custom privileges to define attribute group security (if necessary). You can secure the attribute group by setting Edit/View privileges. Later on, only users with certain roles can view or edit those attributes.
-
Determine the data type of the attributes (for example, number, char, date).
Important: You cannot edit the data type after you save the attribute.
-
Set up the Unit of Measure Classes (for example, Currency) and Units of Measure (for example, US Dollars).
-
Establish the validation rules for each attribute and create the corresponding value sets. For more details, see Defining Value Sets for User-Defined Attributes.
-
Decide how you want the attribute group to be displayed:
-
Single row Displays a Text field with a value.
-
Multi-row Displays multiple values (rows) for the same attributes (column) in a table.
Important: Define which attributes or combination of attributes will maintain uniqueness of records in cases where the attribute group is displayed as multi-row.
-
The figure below shows how the display options are set for the different attributes. The figure on Defining Change Attribute Types shows the results of these display option settings. For example, you can see that the attribute Customer is set to display as a text field, and indeed it does. Note that the attribute Customer uses the value set Customer, which is really a table that is displayed as a list of values (LOV) text field. Also notice that the attribute Customer is maintained as part of a unique key. You can add to/edit the unique key as long as doing so does not destroy the uniqueness (creating duplicates) of existing records.
Also note in the figure below that Enabled parameter is set to No for the Company Name attribute, indicating that this attribute will not be displayed on the change page. You can always disable attributes; however, you cannot delete attributes if the attribute group has already been associated with a change type.
Defining change attributes and attribute groups
Defining change type attributes (setting attribute values)
Related Topics
Defining Item Attributes and Attribute Group, Oracle Product Lifecycle Management User's Guide or Oracle Product Information Management Distribution Librarian User's Guide
Defining Header Types
Change types provide enterprises a way to accommodate business processes and classify types of changes within a change category. For example, you can define different issue types such as Quality Issue, Product Issue, and Performance Issue to capture the various types of issues in your enterprise.
You can configure a change type to have the following:
-
Auto Tracking Numbers
Choose from the following auto numbering schema options:
-
user entered
-
sequence generated
-
function generated
For sequence generated schema, you can specify a prefix and a next available number of a sequence. For example, configure an Engineering Design Change type with a prefix of DSGN.
-
-
Default Assigned To Role
Specify an item role (such as Design Engineer) as the default assignment role for a specific person or a group. For example, if Design Engineer is selected, then the person or group who has the Design Engineer role on the subject item for which the change is created is assigned to the change. Note that the change is only assigned to one person or group, thereby ensuring that it is assigned only to the person or group for which it was intended. If more than one person must have the specified role, it is recommended that you create a group and place all users with the same role into the group, and then give that group the default assignment. If more than one person has the Design Engineer role, then the change would be randomly assigned to one of those users.
-
Attribute Groups/Pages
Associate attribute groups that have been defined for headers to a change type. These attribute groups enable you to capture additional information regarding the type of change being created, or business process-specific attributes required to process the change. You can create pages for a change type and then organize the attribute groups associated with the change type in a logical manner.
-
Setting up valid codes
Specify the valid codes for Priority, Reason and Classifications for the Change type. (Classification codes are only available change types based on the Change Order category.) This allows you to limit the available values for a user to only the selected values for each of these codes. The creation of these values for the different codes was detailed earlier in this chapter.
-
Configuring Primary Attribute groups and sections
Depending on your business process, you can elect to enable only certain primary attributes and sections for a change type. For example, for a Supplier Requested Issue, you can disable the People section, as you may not want the Supplier to have visibility on who has what role in your organization.
-
Workflow
Define the various statuses for the change type under the workflow tab. You can specify the valid statuses for promotion and demotion as well as associate one or more workflows with each status. For an Approval status, only an Approval type workflow can be selected. Also, if desired, you can enable Digital Signatures for the Approval. If a workflow is associated with an Approval status, you also have the option to allow updates, auto-promote and auto-demote.
-
Allow Updates - enables the cancellation of change lines during the Approval process.
-
Auto Promote - automatic promotion to the selected status upon the successful completion of the workflow.
-
Auto Demote - automatic demotion to the selected status upon the rejection of a workflow.
You can associate multiple workflows to a change status and specify one of them as a default. Use any one of the associated workflows at run time.
-
-
Organizational Policies and Task Templates for Change Orders
For change orders only, you can specify task templates and propagation rules by organization. You can group a set of change tasks (defined in a task template) to be performed during or between certain statuses of the change type's workflow. You can also specify whether or not all or some of these tasks are mandatory.
Associating Task Templates per organization
-
Propagation Rules for Change Orders
Besides associating Task templates for each organization, you can specify the Propagation rules for propagating change orders of this type to other organizations. A propagation rule enables you to specify an organizational hierarchy to propagate the change order, including all associated revised items and tasks. The propagation rule can be executed automatically when the change order enters a specific status. You can choose to auto-propagate the change by specifying the status to propagate in. Additionally, you can also choose to immediately schedule the propagated changes.
Note: This option is available only if the change type supports the Scheduled status.
Defining Propagation Rules
To create a change header type
-
On the Categories page in the Setup workbench, select a change category and then click the Header Types tab.
-
If you already know of a similar header type, select it and click Duplicate. Otherwise, click Create.
-
On the Create <Change Category Name>Type page, note the following fields:
-
Number Generation
Select a number generation method.
Note: To enable autonumbering, you must enter both a prefix and next available number.
-
Sequence Generated
If the change header type numbering method is sequence generated, then all change headers will be automatically generated based on the sequence generation rules specified here. You can specify a prefix, starting number, and increment.
-
User Entered
If you specify user entered, then the user is required to manually enter a number for new headers of this change header type.
Note: The User Entered number generation method is not supported for the New Item Request change category.
-
Function Generated
Enables you to associate user-defined functions based on change type attributes. These functions will automatically create change numbers in the sequenced defined in the function.
-
Inherit From Parent
If the change header type numbering method is inherited from parent, then the change header type number generation method will be the same as that defined for the parent change category.
Note: Inherit From Parent only appears as a Number Generation selection choice for the change header type when the associated change category's (the parent) Number Generation is set to Override at Type Level.
Note: When importing new item requests using a spreadsheet, the associated change header type must have Sequence Generated or Function Generated autonumbering. User Entered autonumbering results in an import error.
-
-
Subject
You can specify that the subject of the change header type is an item, item revision, item and component, or document revision. The subject may then be restricted by item catalog category, item status, or item type. For example, you can set up an issue header type named Production Motherboard Issue where the subject of the issue is restricted to items in the Motherboard item catalog category with a status of Production.
Similarly, you can restrict the subject document revision by document category, document status, document lifecycle phase.
Note: Unlike other change categories, the Change Order category does not support document revision as a subject.
-
Assignee Type
You can set up the change header type to assign change objects by Person, Group, or Item Role. A user may have more than one role for an because you can assign item roles at the organization, item catalog category, and item level. If you choose to assign change objects by item role, then you need to choose an Assignee Type that specifies the level in which to look up the assignee by item role:
-
Group
The change header is assigned to members of the group that is specified.
-
Item Role at Catalog Category Level
The change header is assigned to users who have a role on the subject item that is inherited from the item catalog category.
-
Item Role at Item Level
The change header is assigned to users who have a role on the subject item.
-
Item Role at Organization Level
The change header is assigned to users who have a role on the subject item that is inherited within the organization.
-
Person
The change header is assigned to the person specified.
-
-
After creating and saving the basic information for the change header type, you can complete the configuration setup as described in the following tasks.
To associate attribute groups with a change header type
-
On the Basic Information page of the header type to which you wish to associate attributes groups, click Attribute Groups.
-
Click Add Attribute Groups.
-
Search for and select the attribute groups you wish to associate and click Apply.
To associate pages with a change header type
Use the Pages link to add attribute groups specified for a type to pages within the user interface. For example, you may have created and associated the attribute groups Cost Information and Inventory Impact for a particular change header type. Now you wish to make them available via the user interface. Using Pages, you can set up a new page, for example, Related Information, on which to view and update the interface for the attributes Cost Information and Inventory Impact.
-
On the Basic Information page of the header type to which you wish to associate attributes groups, click Pages.
-
On the Pages page, click Create Page.
-
Enter the basic information in the required fields. Note that the number entered in Sequence determines the order in which the page links appear on the change object's detail page.
-
Click Add Another Row in the Attribute Groups section. Enter the Sequence number to specify the order in which the attribute groups will appear on the page.
To associate codes with a change header type
You can specify valid priority and reason codes applicable to a change header type.
-
On the Basic Information page of the header type to which you wish to associate attributes groups, click Codes.
-
On the Codes page, select the valid priorities and reasons code for the header type.
To configure a change header type
You can configure the change header type to specify what sections and primary attributes are enabled for the type.
-
On the Basic Information page of the header type click Configuration.
-
On the Configuration page, select the sections and primary attributes to enable for the change header type.
To associate workflows with a change header type
You can associate multiple workflows to each status and set one of them as default. The system automatically uses the default workflow when you creates a change of that type. However, you can choose to select any of the associated workflows when creating the change.
Note: If a mandatory workflow step is unassigned in an approval workflow, the workflow does not launch until all mandatory steps have valid assignees. If a workflow is associated to the first status (Open) on a change and a mandatory step in the workflow is unassigned, the change can only be saved as a draft. The change can move to the Open status after the step is assigned.
When you create a status you specify a status type. These status types determine some of the operational characteristics of the change header during its workflow:
-
Open
When a change header has a status of Open, users can update the change object. However, there are two exceptions:
-
If the workflow is running and Update Allowed is not selected, you cannot update the change object.
-
If an Open status follows an Approval status within a workflow, you cannot update the change object. You cannot update a change object once it has gone through an approval process.
-
-
Scheduled
Users cannot update the change object (unless reopened). Scheduled change objects are picked up and implemented by the auto-implement manager. Change headers must be Scheduled before they can enter the Implemented status.
-
Released
Ready to be scheduled or implemented. Cannot be updated (unless the change is reopened).
-
Approval
A workflow is mandatory for this status. Once the Approval is granted, the change object cannot be updated. You can associate a workflow template containing an approval request step for Approval status types only.
-
Implemented
The changes specified in the change object take effect. Implemented change objects cannot be reopened and canceled. Once implemented, no further changes can be made. For each change header type, only one status can use Implemented. Implemented must always be the final status.
Certain workflow types can be associated with the statuses defined here. Following are the associations between status type and workflow type for non-new item requests:
| Status Type | Valid Workflow Type |
| Approval | Approval |
| Others | Generic |
Following are the associations between status types and workflow types for new item requests:
| Status Type | Valid Workflow Type |
| Open | Definition |
| Approval | Definition & Approval, or Approval |
| Others | Generic |
-
On the Basic Information page of the header type, click Workflow to define the workflow for the change header type.
-
On the Workflow page, click Add Another Row in the Statuses section.
-
Specify a number that indicates the order in which the statuses are executed, and select a status. Click Apply.
-
After creating a workflow for a change header type, you can click the Update Properties icon to specify for each status the valid promotion and demotion statuses and assign one or more workflows. For workflows that contain an Approval status, you must assign a workflow template that contains at least one Request Approval step. You can also select the following for each Appproval workflow:
-
Allow Updates
Selecting this option enables the user to cancel a change line during the Approval status.
-
Auto Promote
Selecting this option and specifying a valid promotion status enables the system to automatically promote the change to this status after successful completion of the Approval status.
-
Auto Demote
Selecting this option and specifying a valid demotion status enables the system to automatically demote the change to this status after failing the Approval process.
-
To specify organization policies for change headers
You can specify organization policies for change orders only.
You can specify organization policies for change header types such that task templates and propagation rules are applied to every change order created in a specific organization. The changes specified in a change order may need to be propagated to several other organizations in your company. A business may therefore be comprised of hierarchically related organizations for which you need to propagate these change orders. For example, you may have an organization, Vision Operations, which has two manufacturing organizations in the VisionMfg hierarchy named Seattle Manufacturing and Chicago Manufacturing. You initially create change orders in the Vision Operations organization. Once the change orders reach a certain status in the workflow (for example, Scheduled), the change orders can be propagated (for example, copied to the destination organization with the Status initially set to Open) to the two manufacturing organizations in the hierarchy. You can set up the organization policy such that a change order is automatically propagated downward to the other organizations in the hierarchy whenever the change order reaches a particular status. However, the changes only propagate to the organizations within the hierarchy to which the user entering the change order has access. For example, if another user who only has security access to the Vision Operations and Seattle Manufacturing organizations enters change orders under this organization policy, the change orders only propagate to Vision Operations and Seattle Manufacturing and not to Chicago Manufacturing.
Task templates identify the specific tasks that must be performed before a status is considered complete. For details, see Creating Task Templates.
-
On the Basic Information page of the change order header type to which you wish to create organization policies, click Organization Policies.
-
On the Organization Policies page, select the organization to which the organization policy will be applied.
-
Click the Task Template tab, and then click Add Another Row to specify the task template you wish to use. Note that you can assign more than one task template. You can specify the status in which to start the task and the status in which to complete the task.
-
Click the Propagation Rules tab. Before specifying the organization hierarchy for propagation, you have the option of selecting a particular status that, when entered, will automatically propagate the change order to a default organization hierarchy. To do so, select Auto Propagate and specify the Status for Propagation. If you wish to manually propagate change orders, do not select Auto Propagate.
-
In the Organization Hierarchy for Propagation table, click Add Another Row, then select the Organization Hierarchy to which the change order will be propagated. While you can add more than one organization hierarchy to the propagation rules, the change order can only be propagated to one. Also, you can select one organization hierarchy as the default to which all change orders are propagated.
Note: Both an organization and the task templates/propagation rules must be specified before you click Apply. If you select an organization only and click Apply no organization policy has been defined, thus nothing is saved.
Defining Line Types
Change orders employ tasks and revised items to capture their various elements or "to do's." Change orders do not support ad-hoc line types. Issues, Change Notifications, Ideas, and Change Requests, however, use change lines, which serve a similar role. NIR and File Approval and File Review do not support line types. Change lines capture all the details required for a change.
Change line types enable you to capture specific changes to an item or tasks related to a change. For example, you can define different line types to capture item related changes (such as Item Attribute changes, Component redesign changes, Attachment changes and Part Obsolescence).
Change Line Types

Creation of a Line type is similar to that of the Change Header type. Each Line type could have a default assignee as well as an associated Subject.
Defining a Change Line Type
You can associate workflows at the line level. Generic and Notification workflow types are supported for lines—approval workflows are not supported for lines. You have the option to associate multiple workflows to a line type, with one of the workflows set as the default.
-
On the Categories page in the Setup Workbench, select any change category that supports line types, and click the Line Types tab.
-
If you already know of a similar line type, select it and click Duplicate. Otherwise, click Create.
-
On the Create <Change Category Name> Line Type page, note the following fields:
-
Subject
You can specify an item, item revision, or document revision upon which the line type shall be based. You can restrict the subject item further by item catalog category, lifecycle phase, or item type. For example, you can create an issue line type to restrict the subject to all items in a particular catalog category whose value you specify. So when users file issues, they will select from a list of values. If you do not restrict the subject, then all items will be available for the line type.
Similarly, you can restrict the subject document revision by document category, document status, and document lifecycle phase.
Note: Unlike other change categories, the Change Order category does not support document revision as a subject.
-
Assignee Type
Typically users have different roles at different levels within an enterprise. To ensure users are assigned the correct role on line types, you can choose from the following Assignee Types:
-
Group
The change line type is assigned to members of the group that is specified.
-
Item Role at Catalog Category Level
The change line type is assigned to users who have a role on the subject item that is inherited from the item catalog category.
-
Item Role at Item Level
The change line type is assigned to users who have a role on the subject item.
-
Item Role at Organization Level
The change line type is assigned to users who have a role on the subject item that is inherited within the organization.
-
Person
The change line type is assigned to the person specified.
-
-
After the change line type is created, you can associate attribute groups and pages with it.
To associate pages with a change line type
Use the Pages link to add attribute groups specified for a change line type to pages within the user interface. For example, you may have created and specified the attribute groups Cost Information and Inventory Impact for a particular change line type. Now you wish to make them available via the user interface. Using Pages, you can set up a new page, for example, Related Information, on which to make available the interface for the attributes Cost Information and Inventory Impact.
-
On the Basic Information page of the change line to which you wish to associate attributes groups, click Pages.
-
On the Pages page, click Create Page.
-
Enter the basic information in the required fields. Note that the number entered in Sequence determines the order in which the page links appear on the change line's detail page.
-
Click Add Another Row in the Attribute Groups section. Enter the Sequence number to specify the order in which the attribute groups will appear on the page.
Note: You cannot associate pages with the following change order line types:
-
AML changes
-
Attribute changes
-
Attachment changes
-
To associate workflows with a change line type
You can associate multiple workflow templates to a change line type, setting one of them as the default workflow.
Note: Only Generic and Notification workflow types are supported for change line types. The Approval workflow type is not supported.
-
On the Basic Information page of the change line to which you wish to associate workflows, click Update.
-
On the Update Change Request Line Type page, find the Workflows section of the page. Click Add Another Row.
-
Search for and select a workflow template.
-
Optionally, with the workflow template selected, click Set as Default to select this template as the default workflow for the change line type.
-
Click Apply.
Associating Change Type Attributes
After creating the attributes, values, value sets, and attribute groups, associate the attribute group to a change type or a line type. You can define pages to display the associated attribute groups.
Note: You can reuse the same attribute group across change types belonging to different change categories.
To associate attribute groups with a change type
-
Add the attribute group to the Attribute Groups list for that change type (change order or issue).
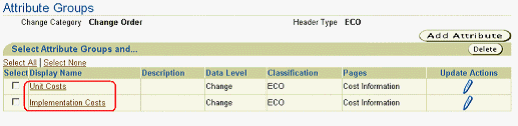
For example, the change category Change Order has the change type ECO. The following figure shows that the attribute groups Implementation Cost and Unit Cost are associated with the header type ECO.
Associate change type attribute
-
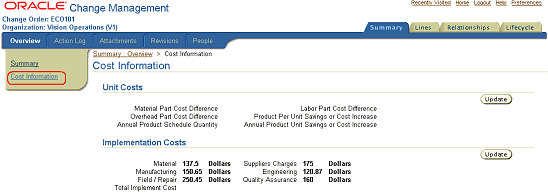
Define change pages for the associated attribute groups. You can locate one or more attribute groups on a page, or create separate pages for each attribute group. The following figure shows the change order type ECO has two pages: Classification and Impact Analysis. The figure "Create pages for attributes" shows an example of how two attribute groups are rendered on a single page for a change order.
Create pages for attributes

Change page for attributes on change order overview page
Associating Change Line Type Attributes
You can configure a line type to have Attribute Groups/Pages. You can associate attribute groups that have been defined for lines to a change type. These attribute groups enable you to capture additional information regarding the type of change being created, or business process-specific attributes that are required to process the change. You can create pages for a line type, and then organize the attribute groups associated with the line type in a logical manner.
Attribute Groups for a Change Line Type

To associate attribute groups with a change line type
-
On the Basic Information page of the change line to which you wish to associate attributes groups, click Attribute Groups.
-
Click Add Attribute Groups.
-
Search for and select the attribute groups you wish to associate and click Apply.
Note: You cannot associate attribute groups with the following change order line types:
-
AML changes
-
Attribute changes
-
Attachment changes
-
Implementing User Defined Functions for Change Type Attribute
You can define your own custom logic by adding user-defined functions and actions to existing change pages. In such cases you do not need to customize the entire page.
You can register user-defined functions for executing customer-specific business rules and calculations. These functions can be written in Java or PL/SQL. URL functions can also pass the values of certain parameters to the URL string and redirect users to a secure page. For each function, you need to register the list of parameters, their data types, and how they get their values by specifying parameter types.
Actions are trigger points for functions and can be displayed as buttons or links. You can determine the conditional visibility of the button/links and also prompt the user based on his or her input.
Example: Implement User-Defined Functions for Change Type Attributes
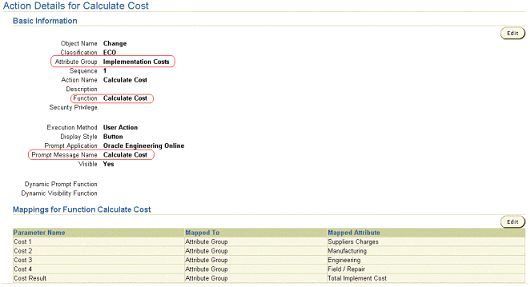
The following example shows how you would calculate Total Cost by using the attribute group Implementation Cost.
| Sequence | Attribute Group: Implement Cost |
Attribute Group: Implement Cost |
Attribute Group: Implement Cost | PL/SQL Function: Calculate Cost | PL/SQL Function: Calculate Cost | PL/SQL Function: Calculate Cost |
| Sequence | Attribute Name | Data Type | Mapping Attribute & Parameters | Parameter Name | Data Type | Parameter Type |
| 1 | Suppliers Charges | Number | --a` ---a` ---a` | Cost 1 | Number | Input |
| 2 | Manufacturing | Number | --a` ---a` ---a` | Cost 2 | Number | Input |
| 3 | Engineering | Number | --a` ---a` ---a` | Cost 3 | Number | Input |
| 4 | Field/Repair | Number | --a` ---a` ---a` | Cost 4 | Number | Input |
| 5 | Total Implement Cost | Number | --a` ---a` ---a` | Cost Result | Number | Return Value |
First, register the PL/SQL function “Calculate Cost” (based on the PL/SQL procedure that resides in the PL/SQL package) with all required parameters.
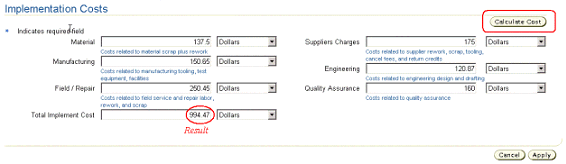
Then navigate to the “ECO” change order type and add the action to the attribute group “Implement Cost” by clicking Update Action. The action executes the function on the change pages. After creating the action, map the function parameters to the corresponding attributes.
The mapping section on the Action Detail page provides the mapping information for function parameters. You can also map parameters of functions to the object's primary key value (for example, CHANGE_ID for change objects).
When setting up an action
-
Specify a role-based privilege to secure the action.
-
Add the Dynamic Visibility Function (written in Java only) to your action if there is a certain condition that needs to be satisfied before users can view the action button or link. For example, if one or all of the fields are empty, then the user cannot see the button/link to execute the action.
-
Add the Dynamic Prompt Function (written in Java only) to your action if the label for the button/link needs to be changed depending on a certain condition. For example, it the Total Implement Cost attribute is empty, then the button label is Apply, otherwise the button label is Apply Changes.
Important: Dynamic Prompt and Dynamic Visibility function parameters must be mapped to the corresponding attributes as well.
Associate action with attribute group to execute a function
Change type attribute page displays action button
Related Topics
Implementing User-Defined Functions for Items, Oracle Product Lifecycle Management User's Guide or Oracle Product Information Management Distribution Librarian User's Guide
Defining Change Category Search Criteria
Criteria templates offer you a way to save frequently used search criteria—essentially, acting as a saved list of specific attributes and attribute values. Criteria templates that you—the administrator—create are available to all users, and serve to expedite searches for issues, ideas, change requests and change orders, thereby saving users the time it would take to specify search criteria and execute frequent change management searches.
Of course, users also have the option of creating criteria templates for their own private use. In fact, when both a user and administrator define a default criteria template for a particular change category, the user-defined criteria template takes precedence.
Because criteria templates contain user-defined attributes, you must always define them in the context of a change category. You can define as many criteria templates as you wish, and you can also denote the most commonly used as the default criteria template. For example, you may define criteria templates to quickly find Open Change Requests, My Issues, or Scheduled Change Orders.
For instructions on how to create and maintain search criteria for change objects, see: Managing Search Criteria.
Accessing Administrative Level Search Criteria and Display Formats
Related Topics
Searching for Ideas, Issues, and Changes, Oracle Product Information Management User's Guide
Defining Change Category Display Formats
Display formats enable you to predefine search results views for each change category. You can use these views to look at different sets of attributes of the change objects (for example, issues, change requests, change orders) that are returned by a search. Both administrators and users can create display formats. Administrator-created display formats are available to all users. User-created display formats are available only to the users who created them. You can define as many display formats as you wish, and you can also denote the most commonly used as the default display format.
You can include any primary, operational, or user-defined attributes in your display format definitions. You can include display sections in your display formats that provide links directly to the section from your search results. This enables you to display links in your search results to any user-defined change type page (such as Cost Information) or any of the standard display sections: Lines, Attachments, Action Log, Approval, Approval History, Dependencies, Revisions, and People.
For more information on how to create and maintain a change category display format, see: Managing Display Formats.
Change request search results using a user-created display format
Related Topics
Searching for Ideas, Issues, and Changes, Oracle Product Information Management User's Guide
Defining Change Category Search Criteria
Defining Change Category Reports
Change management reports are basically search criteria and display formats that you can save, browse, email, or print. You can create reports for any change management category. You can also browse a report sequentially or using a summary view. Browsing a report sequentially enables you to step through each change object in a report. A summary view displays the report in tabular column format. You can send a report to other users including registered suppliers and customers.
An Admin can create a report for the most common or frequent searches that users of the system would be performing. This would be based on the business process being implemented. These Admin defined reports would save an ordinary user the time of selecting a change category, search criteria and display format, and repeating the same search over and over again. You can give reports meaningful names as well. For example, a search for all open high priority issues may yield dozens of issues, each identified by issue name and number. You can name the report for these search results " High Priority Open Issues Report" as shown in the figure below.
Report security is consistent with search security: you can only access change object on which you have the required role. Also, administrator-created reports are available to all users, although only the administrator can edit these reports.
High Priority Issue Report
To create a report
-
In the Setup Workbench, on the Categories page, click the Reports tab. When the page refreshes, click Create Report.
-
When the Create Report page refreshes, provide the following:
Name
Provide a name for the Report.
Description
Optionally, provide a description of the Report.
Criteria
Select the criteria to be used in the search. You can use an existing search criteria template (if one exists for the change category selected), or add criteria here by clicking Add Criteria.
Format
Select a format for the report. You can use an existing display format by selecting it from the Display Format pulldown and clicking Go.
-
In the Export Format section, you can optionally select an export template and output format, such as .pdf , .rtf, .html, .xls, and .xml, in which you want to generate the report.
-
Click Apply.
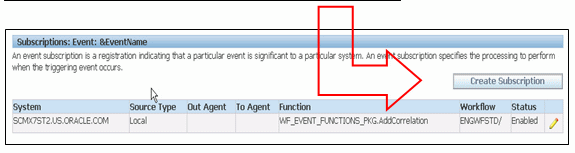
Subscribing to a Change Management Business Event
Change management business events represent an activity or task that can be extended or customized. For example, creation of items and engineering change orders (ECO's) are examples of business events.
Change Management business events enable you to extend and customize your environment. You subscribe to Change Management business events to:
-
Execute custom code on the event information
-
Send event information to a workflow process
-
Send event information to other queues or systems
Business events are represented within workflow processes by event activities. Business events can be synchronous or asynchronous. That is, when a local event occurs, the subscribing event can be executed during the same time as the transaction (synchronous), or the subscribing event can be deferred (asynchronous).
You use Oracle Workflow to set up business events.
You can subscribe to the following business events:
| Business Event | Event Type | Description |
| oracle.apps.eng.cm.changeObject.changeApprovalStatus | CM Approval Status Change | Business event for change object approval status change |
| oracle.apps.eng.cm.changeObject.changePriority | CM Priority Change | Business event for change object priority changes |
| oracle.apps.eng.cm.changeObject.changeStatus | CM Status Change | Business event for change object status changes |
| oracle.apps.eng.cm.changeObject.changeWorkflowStatus | CM Workflow Status Change | Business event for change object Workflow Status changes |
| oracle.apps.eng.cm.changeObject.create | CM Create | Business event for the creation of a change object |
| oracle.apps.eng.cm.changeObject.postComment | CM Post Comment | Business event for a posted comment on a change object |
| oracle.apps.eng.cm.changeObject.reassign | CM Reassign | Business event for the reassignment of a change object |
| oracle.apps.eng.cm.changeObject.requestComment | CM Request Comment | Business event for a comment request of a change object |
| oracle.apps.eng.cm.changeObject.submit | CM Submit | Business event for the submission of a change object |
| oracle.apps.eng.cm.changeObject.update | CM Update | Business event for the update of a change object |
| oracle.apps.eng.cm.changeOrder.changeScheduleDate | CM Schedule Date Change | Business event for change order schedule date change |
| oracle.apps.eng.cm.import.complete | CM Import Complete | Change Management Import is completed |
| oracle.apps.eng.cm.revisedItem.changeScheduleDate | CM Revised Item Schedule Date Change | Business event for revised item schedule date change |
| oracle.apps.eng.cm.revisedItem.changeStatu | CM Revised Item Status Change | Business event for revised item status changes |
To enable Change Management business events
-
Log into Oracle Applications as Workflow Administrator.
-
Select the Business Events tab.
-
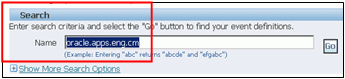
Search for the business event to which you want to subscribe.
Note: If you do not know the name of the event that you want to search for, use the following search string: Oracle.apps.eng.cm.
The search results include a list of change management business events. By default, all business events are disabled.
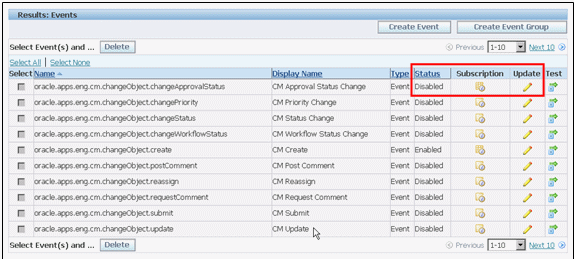
-
To enable a business event, click the Update icon, which opens a page for the selected event where you can enable the event.
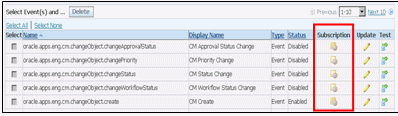
-
Click the Subscription icon to define the subscription code (also known as the Event trigger).
To review more detailed business events set up steps See: Setting Up the Business Event System, in the Oracle Workflow Administrator's Guide.