Setting Up the Item Catalog
This chapter covers the following topics:
- Overview of Item Catalogs
- Building the Item Catalog Text Index
- Defining Item Catalog Categories
- Defining Item Attachment Categories
- Adding Attachment Categories to an Item Catalog Category
- Defining Item Templates
- Managing Item Statuses
- Defining Change Policies
- Defining New Item Request Types
- Defining New Item Request Workflows
- Associating New Item Requests with an Item Catalog Category
- Defining Item Numbers and Descriptions
- Creating Pages for an Item Catalog Category
- Managing Search Criteria
- Managing Display Formats
- Defining Item Catalog Import Formats
- Assigning Systems to an Item Catalog Category
- Publishing Item Catalog Categories
- Defining Report Templates Using XML Publisher
- Defining Cross Reference Types
- Importing Item Catalog Metadata
Overview of Item Catalogs
Oracle enables you to define hierarchies of items using catalogs and catalog categories. The Item Catalog contains all of the items in the system; all other catalogs are subsets of the Item Catalog. For example, the Product Catalog contains all of the items in the Item Catalog that are sold. Oracle provides several predefined catalogs, such as the Product Catalog, Asset Catalog, and the Service Catalog. Customers can also define additional catalogs for browsing and reporting purposes. Each catalog includes a hierarchy of categories, with each catalog item assigned to a catalog category.
The following table lists all of the tasks described in this chapter. You only need to complete two of the tasks to use the item catalog; the other tasks enable you to use additional item catalog features.
| Task | Required? |
| Building the Item Catalog Text Index | Yes |
| Defining Item Catalog Categories | Yes |
| Defining Item Attachment Categories | |
| Adding Attachment Categories to an Item Catalog Category | |
| Defining Item Templates | |
| Managing Item Statuses | |
| Defining Change Policies | |
| Defining New Item Request Types | |
| Defining New Item Request Workflows | |
| Associating New Item Requests with an Item Catalog Category | |
| Defining Item Numbers and Descriptions | |
| Creating Pages for an Item Catalog Category | |
| Managing Search Criteria | |
| Managing Display Formats | |
| Defining Item Catalog Import Formats | |
| Assigning Source Systems to an Item Catalog Category | |
| Defining Report Templates Using XML Publisher | |
| Defining Cross Reference Types |
Related Topics
Using the Item Catalog chapter, Oracle Product Information Management User's Guide
Building the Item Catalog Text Index
To take advantage of the Oracle Text search features available such as keyword search, stemming search, and fuzzy search— run the concurrent program Item Catalog Text Index Build. Any user with the Development Manager responsibility can submit this concurrent program from the Submit Request window. Select the concurrent request parameter Action=CREATE when submitting the request.
Related Topics
Optimizing the Item Catalog Text Index, Oracle Product Lifecycle Management User's Guide
Defining Item Catalog Categories
The item catalog contains all items defined for your company or organization. Within the item catalog, item catalog categories provide a way to logically classify items that have similar characteristics. So, you can classify a computer monitor in an item catalog category named Computer Parts and Components. Item catalogs are hierarchical, and relationships between the various item catalog categories (such as an item's catalog category attributes) are inherited. You can define a rich hierarchical taxonomy of item catalog categories that enable you to set up item attribution, lifecycles and their change policies, security, attachment categories, results formats, criteria templates, and import formats.
When defining item catalog categories, do the following:
-
Create a list of all your items.
-
Classify the items in unique item catalog categories and sub-categories that suit your business needs.
-
Consider which category is a sub-classification within a category (for example, SRAM, DRAM could be subcategories of the item catalog category Memory).
-
List the required and optional item attributes for each item catalog category.
Following are some of the basic item catalog category terms:
-
Item Catalog Categories
Item catalog categories inherit attributes from the parent category; so consider which attributes to associate at higher levels in the item catalog category. Inheritance helps to simplify maintenance.
-
Item Lifecycles
Item lifecycles enable you to track and control the lifecycle phases of items. You can specify an item lifecycle for each item catalog category. Item lifecycles are inherited from the parent item catalog category.
-
Change Policy
Item behavior is described by defining a change policy for each lifecycle phase in a given lifecycle.
-
Security
You can control item creation, viewing and update access by assigning a role on the item catalog category to a user or group of users.
-
Attachment Categories
You can classify a file that is attached to an item using an attachment category. Attachment categories are inherited from the parent catalog category, and those most commonly used can be defined at a higher node. You can then add more specific attachment categories for the child item catalog categories.
Additional Information: Catalog Groups defined in Oracle Inventory will appear as Item Catalog Categories.
For details about seeded operational attributes, see the Oracle Inventory User's Guide.
Item catalog categories provide metadata common to all items that share the category. For example, the item catalog category "Engine" describes attributes, functions and other characteristics common to several item numbers, such as Engine M10000 and Engine M20000.
Note: Item catalog categories are hierarchically structured, with characteristics (attribute groups, functions, pages, lifecycles, criteria templates, and result formats) being inherited throughout the hierarchy.
When you create a new item catalog category that does not have a parent node (meaning it is a top node), the system associates all operational attribute groups and pages with the item catalog category. You cannot delete the attribute associations, but you can delete the pages. When you create a new item catalog category that has a parent node, all operational attributes and pages are inherited from the parent. If a page is deleted at the parent node, then it is also deleted within all its child nodes. So if you wish to display pages in a particular item catalog category, but they have been deleted at the parent node, you must explicitly add them in the child item catalog category.
For a complete listing of the operational attributes associated with new item catalog categories, see "Item Attributes Listed by Group Name" in the Oracle Inventory User Guide.
The following pages are configured for all new item catalog categories:
-
Physical Attributes
-
Sales and Order Management
-
Planning
-
Purchasing
-
Inventory
-
Manufacturing
-
Service
Creating Versions of Item Catalog Categories
You can choose to create a different version of an item catalog category (ICC) when you change a transaction attribute or structure component in the ICC if you set the profile option "Enable PIM for Telco Features" to Yes. Enabling the use of ICC versions enables the use of transaction attributes and ICC structures. Transaction attributes differ from other types of attributes such as operational or user-defined attributes because the choices of transaction attribute values for an item can change depending on the date. For more information about transaction attributes, see Defining Transaction Attributes.
ICC structures enable you to create a default structure for use by all items created within a certain item catalog category. For more information about ICC structures, see Creating an Item Catalog Category Structure.
Caution: When you enable the use of ICC versions, the system automatically creates a draft version for every new ICC created. You cannot choose to create versions for some ICCs, but not others.
Once you set the profile option "Enable PIM for Telco Features" to Yes, you must create a released version for each existing ICC. Oracle provides an upgrade API that automatically performs this task. Your database administrator can invoke the upgrade API from the back end once you enable the Telco features.
Warning: You must turn on the "Enable PIM for Telco Features" profile option before invoking the upgrade API. Do not disable the "Enable PIM for Telco Features" profile option by changing the value from 'Y' to 'N' after it has been enabled. If it is disabled and enabled again, you must invoke the upgrade API again to maintain data integrity and consistent functionality.
Upgrade API Sample Call
DECLARE
                uid NUMBER;
                rid NUMBER;
                rad NUMBER;
                sgid NUMBER;
BEGIN
SELECT
                USER_ID,RESPONSIBILITY_ID,RESPONSIBILITY_APPLICATION_ID,SECURITY_GROUP_ID
INTO
                uid, rid, rad, sgid
FROM
                FND_USER_RESP_GROUPS
WHERE
USER_ID = (SELECT USER_ID FROM FND_USER WHERE USER_NAME = 'SYSADMIN')
AND RESPONSIBILITY_ID =
(SELECT RESPONSIBILITY_ID FROM FND_RESPONSIBILITY_VL WHERE RESPONSIBILITY_KEY = 'SYSTEM_ADMINISTRATOR');
FND_GLOBAL.apps_initialize (uid, rid, rad, sgid);
ego_p4t_upgrade_pvt.upgrade_to_pim4telco(null);
END;
When creating a child ICC version, the Draft version inherits the transaction attributes and structure components defined in the latest released versions of any of its parent categories. You can then define additional attributes or structure components for the child ICC, in addition to the attributes and structure components of the parent ICC. Any new transaction attributes and structure components added to a parent ICC draft version and released in a new version appear in all child ICC draft versions unless the new parent ICC version is released with a start date in the future.
When an item is assigned to an ICC that contains transaction attributes or an ICC structure, links to the Transaction Attributes and Structure pages appear in the item's Overview page in the same way as links to other ICC pages containing operational and user-defined attributes appear. The Transaction Attributes page shows the attribute details in read-only mode, but you cannot assign an attribute value since transaction attribute values are assigned when a transaction takes place. Any items created at any given time within an ICC with versions inherits the ICC version effective during item creation.
To create an item catalog category
The following steps apply to creating an item catalog category with the profile option "Enable PIM for Telco Features" set to either Yes or No.
-
On the item Search: Item Catalog Categories page, click the Create Item Catalog Category link.
-
On the Create Item Catalog Category page, enter the following:
Catalog
Defines the category name. The number of segments (and respective labels) for item catalog category depends on how the item catalog group flexfield is defined in Oracle Inventory setup.
<Key Flexfield>
All administrators have a key flexfield available for use in the "Catalog Category" section of the Create Catalog Category page. The heading and function of this field is determined by the administrator. The key flexfield is case insensitive.
Note: Any leading or ending white spaces in the key flexfield segments are trimmed automatically.
Description
Optionally enter a brief description of the item catalog category.
Parent Item Catalog Category
Specify the immediate parent of the item catalog category being created, thereby determining the item catalog category hierarchy.
Default Template
Optionally specify an item template to use to populate the Create Item page for any item of the item catalog category being created. On the Create Item page, you can modify the template to be applied upon item creation or choose not to apply a template.
Item Creation Allowed
Select to specify that items of the item catalog category can be created (if you do not select, the category only serves the purpose of being a placeholder in the catalog hierarchy). If item creation is not allowed, the category will typically specify characteristics (attribute groups, etc.) that are inherited by its descendants.
Inactivate
Optionally specify a date on which the item catalog category will become inactive. You cannot specify an inactive date that is later than the inactive date of an item catalog category's parent, nor can you specify an inactive date that has already passed. Also, all children of a parent catalog category with an inactive date should be made inactive at the same time or earlier. Making a category inactive has the following implications:
-
You cannot create items of that item catalog category or any of its descendants.
-
You cannot use that item catalog category or any of its descendants as the parent catalog category upon creation of an item catalog category.
-
-
Click Apply.
The system returns you to the Basic Information page. From here, you can perform all remaining item catalog category setup steps described in this chapter.
This is the last step when creating an item catalog category with the profile option "Enable PIM for Telco Features" set to No. If this profile option is set to Yes, continue with the following steps.
To release an item catalog category draft version
Important: You can only perform the following steps if the profile option "Enable PIM for Telco Features" is set to Yes and from within the Setup Workbench (HTML interface). You cannot access item catalog category versions from the Forms interface.
Clicking Apply in the previous step created a locked item catalog category draft version. Only the user listed in the Locked By field can release a draft version. Add all transaction attributes and associate a structure before releasing the draft version to create a numbered version. Once you release an item catalog category, you cannot update the released version. The following information associated with the item catalog category is not included in a version. If you make any changes to the following information, the changes apply to all versions.
-
Basic information
-
People
-
Attribute groups, both operational and user-defined
-
Item pages
-
Lifecycles
-
Attachment categories
-
Search criteria
-
Display formats
-
Import formats
-
Templates
-
Report templates
-
Item creation details
Additional Information: The system chooses which numbered version of the item catalog category to use for an item based on the versions' start and end dates. Only an item catalog category with a numbered version that has a date range which encompasses the item's effective date can be assigned to an item.
-
In the Basic Information page, click Release.
To lock and unlock a draft item catalog category version
A version enabled item catalog category is automatically locked upon creation of the draft. Only the user listed in the Locked By field can update the item catalog category transaction attributes or structure or release the item catalog category to create a new version. To enable another user to update the item catalog category, unlock it. The other user can then lock it and make updates or release the item catalog category. Locking the item catalog category only locks the draft version's transaction attributes, structure, version description, and start date. You can update the item catalog category primary information, such as description and the inactivate date, regardless of the lock status. This primary information applies to all versions.
-
On the Basic Information page, if the draft is locked and you are the user who locked it, the Unlock button is visible. Click Unlock.
The Locked By field displays the name of the person who locked it. Only the person displayed in the Locked By field can unlock the draft.
-
If the draft is unlocked, the Locked By field is blank and the Lock button is visible. Click Lock.
To update an item catalog category
Before updating an item catalog category draft version, you must lock it.
To update an item catalog category with no versions, refer to Updating Item Catalog Categories, Oracle Product Information Management User's Guide.
-
To change the item catalog category primary (header) information for all item catalog category versions, in the Basic Information page, click the Update button.
-
To change the draft version's description or start date, in the Basic Information page, click the draft version's Update icon.
-
To change the draft version's transaction attributes or structure, in the Basic Information page, click the Draft link.
On the Transaction Attributes page, you can update, delete, or add transaction attributes to the item catalog category. See: Defining Transaction Attributes.
On the Structure page, you can update, add, or delete components and validate the structure. See: Creating an Item Catalog Category Structure.
To revert the draft item catalog category to an earlier version
The Revert Draft to button enables you to refresh the draft version's characteristics with a released version's characteristics.
-
Select a released version that contains the characteristics that you want the draft version to contain.
-
Click Revert Draft to.
The draft version now contains the same characteristics as the released version selected.
Related Topics
Defining Transaction Attributes
Defining Item Attributes and Attribute Groups
Creating an Item Catalog Category Structure
Defining Item Attachment Categories
Whenever users add attachments to an item, they specify an attachment category. Item attachment categories provide a way to classify attachments—this classification identifies the purpose of the attachment to the business object, and can also be used as one of the search criteria within an attachment list. If users do not specify an attachment category for an item catalog category, and none are inherited from its parent catalog category, they always have the option of using the attachment category Miscellaneous.
Additional Information: Attachment categories inherited from a parent catalog category cannot be deleted at the child catalog category level.
Attachment categories are defined by the system administrator and are available across the various applications of the E-Business Suite. Attachment categories that you define can be made available to any E-Business Suite application. Thus, attachment categories are shared across the E-Business Suite applications and this should be kept in mind when defining any new attachment categories. Rules defining the usage of attachment categories are defined independently by each application.
You can define attachment categories in the Document Categories form. Before defining a new attachment category, verify that it does not already exist. If it already exists, then you can enable it for item catalog categories.
Defining an attachment category

Adding Attachment Categories to an Item Catalog Category
Once you define an attachment category (also known as a “document category”), you can enable it for an item by associating it with an item catalog category.
All item catalog categories inherit attachment categories (in the same way they inherit item attributes) from their parent catalog category. So, before associating attachment categories with item catalog categories create a list of all attachment categories to be used in your item catalog. Consider which attachment categories are common among item catalog categories within each branch of the item catalog hierarchy. If an attachment category is applicable to all the child catalog categories, then the attachment category should be associated with the parent catalog category.
When associating Attachment categories with item catalog categories, you can specify the effectivity of this association by providing a Start Date and an End Date. If an attachment category association has an end date, that type of attachment cannot be used for the items belonging to the category beyond the specified date.
Associating an attachment category with an item catalog category
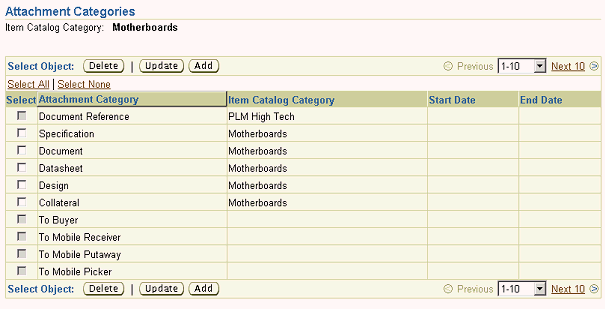
To add attachments to an item, users need to specify an attachment category. Attachment Categories sort and organize attachments that users might attach to an item or items. They provide a way to classify attachments—this classification identifies the purpose of the attachment to the business object, and can also be used as one of the search criteria within an attachment list. If users do not specify an attachment category for an item catalog category, and none are inherited from its parent catalog category, they always have the option of using the attachment category "Miscellaneous"
When moving attachment categories, only those attachments whose categories are common between the source and target catalog categories will be retained.
By adding attachment categories, you can classify all attachments that you add to specific item catalog categories.
Note: Attachment categories inherited from a parent catalog category cannot be deleted at the child catalog category level. Attachment categories can be inherited from a parent catalog category and explicitly added to the catalog category itself. Administrators should not associate the same attachment category with an item catalog category in this manner.
The following attachment categories are available for all item catalog categories:
-
Description
-
Image
-
Item Internal
-
Miscellaneous
-
To Buyer
-
To Supplier
-
To Receiver
-
To Mobile Picker
-
To Mobile Putaway
-
To Mobile Receiver
To add an attachment category to an item catalog category
-
On the Search: Item Catalog Categories page, locate the item catalog category to which you wish to attach an attachment category.
-
On the Basic Information page of the item catalog category, click the Attachment Categories link.
-
On the Attachment Categories page, click Add.
-
On the Search and Select: Attachment Categories page, select an attachment category from the list. You can also search within the list for a specific attachment category and then select it.
-
Click Apply.
Defining Item Templates
You can specify one or more item templates during the item creation process. The system applies the templates in the order listed, so later templates overwrite attribute values applied with earlier templates. An item template is a defined set of attribute values used during item creation. When you apply a template to an item, you overlay or default in the set of attribute values to the item definition. For example, every time users in a particular organization create new items, the attributes as defined and approved by the organization appear in the appropriate fields--no user guesswork is required, and much time is saved during the creation of items with a similar form, fit and function.
You can create item templates that contain either the operational attributes for an item, which are visible to all organizations, or user-defined attributes, which are specific to an item catalog category. When you explicitly associate a template with an item catalog category, it is made available for all create and update item actions in that item catalog category. Also, the values for the user-defined attributes that are specified in the template are inherited from parent to child within the particular item catalog category. After creating the item template for use with user-defined attributes, you must associate it with an item catalog category.
Benefits:
-
Default operational and user-defined attributes to speed up the process of specifying item attribute values
-
Enforce consistency of item attribute values for items belonging to different item catalog categories or item types. For example, you may have an item template for all purchased computer hard-drive assemblies.
For more details about creating item templates that use operational attributes, as well as a listing of the Oracle provided templates, see Item Templates,Oracle Inventory User's Guide.
To define an item template and specify user-defined attributes
-
Navigate to the Setup Workbench. In the Items tab, select the Templates subtab.
-
On the Search: Templates page, click Create.
-
In the Oracle Forms Find Item Templates window, click New.
-
Provide the item template name and description, and then specify the operational attributes and the default values. When finished, save the template.
-
Navigate to the item catalog category to which you wish to associate the new item template and click the Templates link.
-
On the Templates page, click Add Template.
Associate item templates with any item catalog category. Item templates are inherited down through the item catalog hierarchy
-
On the Add Templates to Item Catalog Category page, locate the new template, select it and click Apply.
-
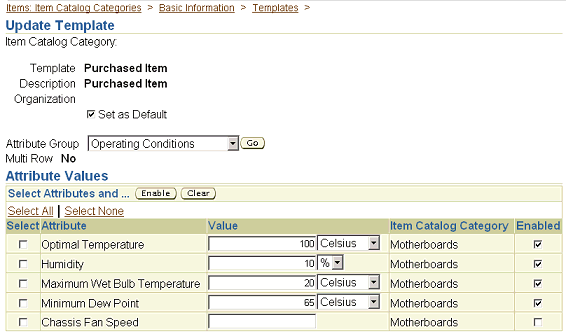
On the Templates page for the item catalog category, click the template name to which you wish to add user-defined attributes.
-
On the Update Template page, select the user-defined attributes you wish to add to the template:
-
Select an attribute group, then click Go.
-
Select the user-defined attributes to add to the template. You can also choose to set the default attribute values.
-
Click Enable.
You can also make this the default item template for all new items created in this item catalog category by selecting Set as Default.
Click Apply.
Updating item template for user-defined item category attributes
-
How to Use Item Templates
-
During the new item creation process you can specify one or more item templates or use the default if one was setup at the item catalog category level. See: Creating New Items, Oracle Product Information Management User's Guide
Caution: If applying more than one template, specify the order to apply them. The last template's attribute values override any previously applied template attribute values.
-
The operational attribute values specified in an item template are not set for 'unapproved' items (i.e. items requiring a new item request). The item template will need to be applied manually once the item is approved.
Managing Item Statuses
An item status is assigned to a lifecycle phase; in fact, each lifecycle phase can have multiple item statuses associated with it. You should create item statuses, or edit item statuses appropriately before associating them with lifecycle phases.
-
On the Search: Item Catalog Categories page, click the Lifecycle Phases tab.
-
On the Search: Lifecycle Phases page, click the Item Statuses link.
-
On the Search: Item Statuses page, click the Create Item Status link.
-
On the Create Item Status page, provide the following information:
Status
The name of the item status.
Description
The description of the item status.
Inactive Date
The date on which the item status is no longer valid and available for use.
-
Select the Value checkboxes that correspond to the attributes that you wish to associate with the item status.
-
Click Apply.
-
In the Applications tree menu, click the Setup Workbench link.
-
On the Search: Item Catalog Categories page, click the Lifecycle Phases tab.
-
On the Search: Lifecycle Phases page, click the Item Statuses link.
-
On the Search: Item Statuses page, select the item status that you wish to edit.
-
On the Item Status Details page, click Update.
-
On the Edit Item Status page, update the Description, Inactive Date, or, select an attribute you wish to apply.
-
Click Apply.
Defining Change Policies
Administrators can define and update item change policies for item catalog categories. These item change policies determine the rules for how and when an item's attributes, attachments, and associations are changed. For example, a company manufacturing an engine that has hundreds of specifications may wish to define item change policies for the different phases of development. So when the engine is in the concept or design phase, many of the attributes are allowed to change without formal approval, and the lifecycle policy is not very restrictive. When the engine progresses to the prototype phase, the company might wish to place all attributes, attachments, and associations under stricter change control, perhaps requiring a change order for all modifications. Later, when the engine is in the production phase, the company will likely want every facet of the engine's production under tight control.
Defining item change policies enables a company to:
-
Specify whether or not item changes are allowed in a particular lifecycle phase of an item lifecycle
-
Specify what types of changes (attributes, attachments, associations, structures) are allowed for an item in each lifecycle phase
-
Specify whether or not a change order is required to make particular changes to an item in a specific lifecycle phase
Note: Change policies inherited from a parent catalog category cannot be edited at the child catalog category level.
If you do not define a change policy for an item, then by default changes are allowed in all lifecycle phases.
Item change policies only take effect after the item has been Approved.
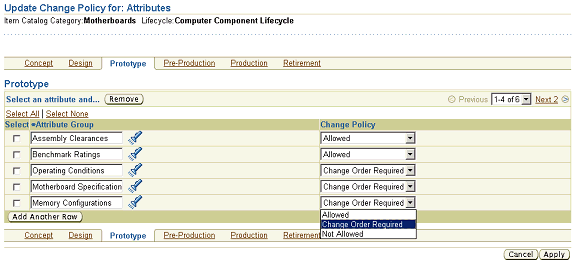
On the Update Change Policy for Attributes (Associations or Attachments) page, select the appropriate attribute group (association or attachment category) and the change policy you wish to apply for the particular phase. The valid change policies are:
-
Allowed
-
Not Allowed
-
Change Order Required
Setting lifecycle change policy
Additional Information: Before establishing a change policy for attributes or attachments, you must first associate the attribute group or attachment category with the item catalog category.
To define or update an item change policy
-
On the Search: Item Catalog Categories page, search for the item catalog category (see: Browsing Item and Alternate Catalogs , Oracle Product Information Management User's Guide) for which you would like to define an item change policy, and click its name link.
-
On the Basic Information page for the item catalog category, click the Lifecycles link.
-
On the Lifecycles page, locate the lifecycle for which you wish to define a change policy. If no lifecycles are listed, associate the lifecycle for which you wish to define item change policies.
Select the item change policy (for attributes, associations, attachments, structures) you wish to define for the selected lifecycle, and then select the lifecycle phase.
-
On the Update Change Policy for Attributes (Associations, Attachments, or Sstructures) page, select the appropriate attribute group (association or attachment category) and the change policy you wish to apply for the particular phase. The valid change policies are:
-
Allowed
-
Not Allowed
-
Change Order Required
Important: Before establishing a change policy for attributes or attachments, you must first associate the attribute group or attachment category with the item catalog category.
You can switch back and forth among the various lifecycle phases via the tabs on the Update Change Policy for Attributes (Associations or Attachments) page.
-
Related Topics
Defining Change Policies, Oracle Product Lifecycle Management Implementation Guide or Oracle Product Information Management Implementation Guide
Defining New Item Request Types
New Item request is a workflow process, which enables you to route the definition and approval of a new item. When creating a new item, various people in the organization can define various aspects of an item like operational attributes, user-defined attributes, AML etc. using a workflow process. You can also combine the definition routing and approval routing in a new item request workflow.
New Item Request is a seeded Change Management category for which you must define a Type before you can set up new item requests for an item catalog category. New Item Request Types are defined like any other change type. The topic Defining Header Types provides additional type definition details.
Once a specific NIR type is created, the administrator can assign additional information like the NIR related attributes to be associated. Examples of such attributes are Cost Impact, Implementation costs etc. These attribute groups then could be organized in different pages similar to the Associating Item Catalog Attributes.
When users create items in item catalog categories that require an item request, the New Item Request Type specified for the item catalog category determines how the request is routed for distribution and approval, and identifies the approvers for the new item. For example, the New Item Request Type determines what item request attributes and sections are available on pages; it determines the valid priorities and reasons available to users; it also determines the valid statuses for the request (for example, Open, Approval, and Closed). In essence, the new item request change type defines the process for routing the collection of item attributes and approval requests from various people who are internal (such as Engineering and Manufacturing) or external to your organization (such as Suppliers).
Prerequisites
- Define one or more workflow templates. See:
To define a new item request type
-
On the Change Management Categories page in the Setup Workbench, select the New Item Request category, then click the Types tab in the lower half of the page. When the page refreshes click Create.
Defining New Item Request Type

-
On the Create New Item Request Type page, enter information in the required fields.
The Number Generation field provides multiple methods for item number request generation, but you can only select either the Sequence Generated or Function Generated method for the new item request type. When using the sequence generated item request numbering method, all item number requests automatically generate based on the sequence generation rules specified here. Specify a prefix, starting number, and increment. For the function generated method, specify a function and select whether or not to enable key attributes.
Note: The Number Generation field on the Create New Item Request Type page applies to the number generation for new item requests, not for new items. Item number generation is defined at the item catalog category level.
You must have already defined a custom function before using the function generation method. For details, see Creating User Defined Functions.
You can set up the default Assignee for all new item requests of this Type in the Default Assigned To section.
-
After creating the New Item Request Type you can continue the setup tasks via the side navigation links on the Basic Information page.
Click the Attribute Groups link to associate attribute groups with the New Item Request type.
Click the Pages link to organize the associated attribute groups on one or more New Item Request pages.
Defining User defined Attributes for New Item Request Type
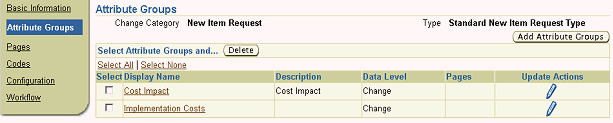
Click the Codes link to associate valid priorities and reasons for new items that are created with this request type.
Click the Configuration link to select the display sections and primary attributes that you wish to make available for this request type.
Click the Workflow link to define the statuses of the workflow. Click the Update Properties icon for a particular status to set up valid phases for promotion, demotion and the associated workflows. In the Workflows region, you can add many workflow templates, if desired. When creating a new item request using this new item request type, the user can select which workflow template to use. Select which workflow template to appear as the default during the new item request creation process.
You can then select each workflow template one at a time and specify the following:
-
Auto Promote
Indicates that when the workflow completes successfully and all required approvers have approved, the item request will automatically be promoted to the specified valid phase.
-
Auto Demote
Indicates that when the workflow completes successfully and all required approvers have approved, the item request will automatically be demoted to the specified valid phase.
-
Enable Digital Signature
Indicates that users who are expected to approve or reject the item request must enter their username and password to reauthenticate themselves.
-
Related Topics
Associating New Item Requests with an Item Catalog Category
Defining New Item Request Workflows
Creating New Item Requests, Oracle Product Information Management User's Guide
Defining New Item Request Workflows
One of the most important features of new item requests is the ability to associate one or more workflows to each status of a new item request. The administrator can add workflow steps and specify the status of the NIR in which to execute a workflow. The administrator can add multiple workflows for each status, then the user can choose from this list of workflows which one to use for the status in a particular new item request. The administrator specifies the step number, status of the NIR process in which one of the workflows will be initiated, and finally associates the workflows by choosing them from the workflow templates.
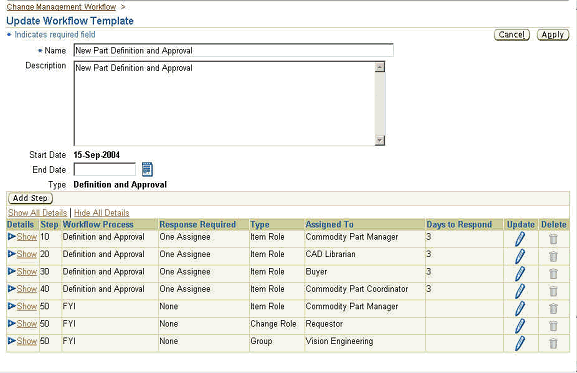
To define a workflow template to assign to a new item request, see Defining Workflow Templates. NIR workflows are typically Definition and Approval workflows. An example of a NIR workflow is outlined in the following figure.
NIR Workflow example
Once you finish associating workflow templates with the NIR type, you need to specify the category association for the NIR.
Related Topics
Associating New Item Requests with an Item Catalog Category
Associating New Item Requests with an Item Catalog Category
Important: Before associating new item requests with an item catalog category, you must set up both a workflow template and a new item request type. For details, see Defining Workflow Templates and Defining New Item Request Types.
You can define a new item approval request for all items created in a particular item catalog category. Defining a new item approval request enables an enterprise to enforce standard business processes during item creation, thereby avoiding costly mishaps, such as duplicate parts. New item approval requests enable your enterprise to have different people from various lines of business help define the many item attributes required during item creation.
You can set up a new item request for an item catalog category to request approval from several people in sequence or parallel. Each person may also be required to enter certain item attributes during the approval process.
To associate a specific new item request type with a category, you need to navigate to the item catalog category and specify the new item request type in the New Item Request page.
In the Workflow/Approval section, you can specify which attributes the people associated with a workflow step are required to enter. For example, when the new item request has a workflow status of Open, one person in the workflow may be responsible for some technical specifications associated with the new item being created; another might need to provide details about the new item's safety standards. In this case, associate the attribute groups related to technical specifications and safety standards so that the appropriate people can add the information necessary to define all aspects of the new item.
Since a NIR is a change, it has a status type. Only certain workflow types are allowed for a given NIR status type as tabulated below.
| NIR Status Type | Valid Workflow Type |
| Open | Definition |
| Approval/Review | Definition and Approval, or Approval |
| Others | Generic |
Prerequisites
To associate new item requests with an item catalog category
-
Navigate to the Setup Workbench Item Catalog Categories tab. Find and select the item catalog category to which to associate a new item request type.
-
Click the New Item Request link. In the New Item Request page, click Update.
The Update New Item Request page opens.
Associating a New Item Request with an Item Catalog Category
-
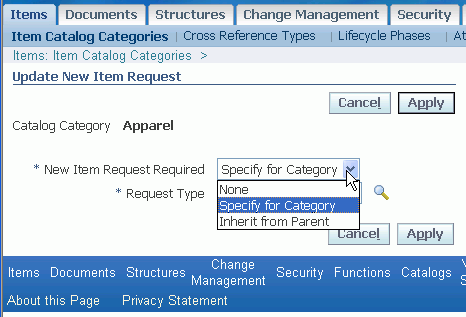
In the New Item Request Required field, specify one of the following:
-
None - no new item request is required for items created within this item catalog category.
-
Specify for Category - if you select this option, you can select a value in the Item Request Type field.
-
Inherit from Parent - use the same new item request type as the parent item catalog category.
You can change the value of the New Item Request Required field at any time. For example, if you no longer want to inherit the NIR type from the parent ICC, you can specify a new NIR type or no longer require new item requests.
Click Apply. The New Item Request page appears.
-
If the item catalog category is associated with an item request type, either through inheritance or directly, then the Workflow/Approval section appears in the New Item Request page.
If there is more than one workflow associated with an item request type, select each workflow for each status using the pull down lists in the Workflow and Workflow Status fields. For each workflow, you can choose to associate attribute groups to each workflow step only if the ICC is associated with an item request type directly. Otherwise, the attribute group definitions are inherited from the parent ICC or nonexistent.
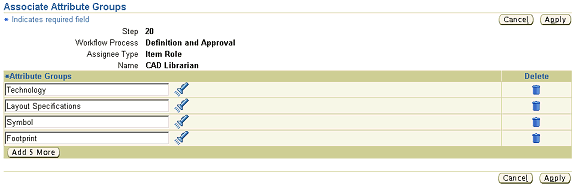
To update the attribute groups for a workflow step, click the Associate Attribute Groups icon for the workflow step.
Example of When to Associate Attribute Groups
When the new item request is in the Open workflow phase, one person in the workflow may be responsible for some technical specifications associated with the new item being created; another might need to provide details about the new item's safety standards. In this case, associate the attribute groups related to technical specifications and safety standards so that the appropriate people can add the information necessary to define all aspects of the new item.
You can set up the collection of user-defined attributes during the new item request process for any attribute group associated with the item catalog category.
Note: People associated with the workflow must also have sufficient privileges on the item for which you are creating a request. To ensure the appropriate people have sufficient privileges to view and update the attributes on the item for which they are responsible, you should confirm that they have the appropriate role at the organization or item catalog category level.
-
In the Associate Attribute Groups page, search for and select the user-defined attribute groups associated with the ICC for which you want the workflow assignees to add attribute values.
Click Apply.
Associating Item Attribute groups with Definition Steps
Related Topics
Defining New Item Request Workflows
Defining Item Numbers and Descriptions
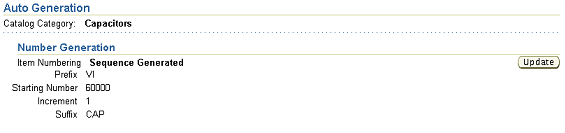
You can define new item numbers and descriptions so that they are automatically generated when users create new items. Setting up autonumber generation ensures that new items created in item catalog categories have a consistent numbering scheme. You can set up item number and description generation so that numbers/descriptions are either:
-
Sequence generated
If the item request numbering method is sequence generated, then all item number requests will be automatically generated based on the sequence generation rules specified here. You can specify a prefix, starting number, increment, and suffix.
Note: Sequence generation does not apply to Item Description generation--it is for item number generation only.
-
Function generated
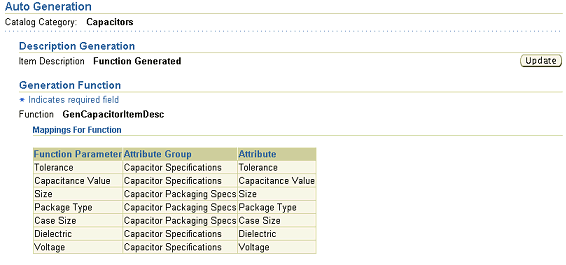
If the item request numbering/description method is function generated, then all number/descriptions for new items in the item catalog category will be automatically generated based on a custom function. When specifying that an item number/description is function generated, select the function that you want to use, and then map the function parameters to the user-defined attributes that you want included in the item number/description. When you create a new item, users will be prompted to enter the user-defined attributes used in generating the item number/description.
Note: You must have already defined a custom function before using this item number/description generation method. For details, see Creating User-Defined Functions.
-
Inherited from parent
If the item request numbering/description generation method is inherited from parent, then the item number/descriptions for the items will be generated using the same method as the parent item catalog category.
Note: All item catalog category subcategories have, by default, a number/description scheme that is inherited from parent.
-
User entered
If the item request numbering/description method is user entered, then the user is required to manually enter a number or a description for new items.
To set up automatic change number generation using user-defined functions, follow these steps:
-
Update the header type.
-
Select Function Generated from the Number Creation drop-down list.
-
Associate the function.
-
Associate the function parameters to the attributes.
To define automatic item number/description generation
-
On the Basic Information page of an item catalog category, click either the Number Generation or Description Generation link. On the Auto Generation page for the generation method you selected, click Update.
Item Number Generation
Setting up Item Number Generation
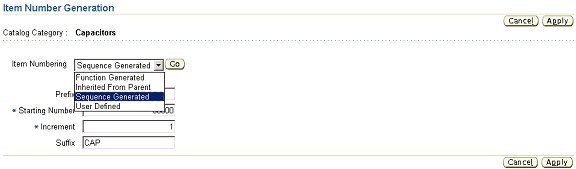
-
On either the Item Description Generation or Item Number Generation page, select the generation method you wish to use and fill in the required fields.
Description Generation Sample
Creating Pages for an Item Catalog Category
Item pages provide a mechanism to customize the user interface. The administrator can combine and sequence attribute groups into pages. There is no limit on the number of attribute groups associated with a page. However, attribute groups contained in a page must have the same association level, for example, they must all be at one of the following attribute group levels:
-
Item
-
Item Revision
-
Item Supplier
-
Item Supplier Site
-
Item Organization
-
Item Supplier Site Organization
Note: Pages inherited from a parent catalog category cannot be deleted at the child catalog category level. Pages can be inherited from a parent catalog category and explicitly added to the catalog category itself. Administrators should not associate the same pages with an item catalog category in this manner.
To create a page for an item catalog category
-
On the Search: Item Catalog Categories page, search for the item catalog category (see:Browsing Item and Alternate Catalogs , Oracle Product Information Management User's Guide) and click its corresponding name link.
-
On the Basic Information page for the item catalog category, click the Item Pages link.
-
On the Item Pages page, click Add.
-
On the Create Item Catalog Category Page page, enter the following:
Display Name
Enter the name to be displayed in the user interface.
Internal Name
Enter the internal name. The internal name cannot be updated once a page has been created.
Description
Enter a description of the catalog category page.
Sequence
Enter the sequence number. For each page associated with a catalog category, a corresponding link is displayed to the user on the Item Detail page. The sequence number determines the order for the page links on the Item Detail page.
Data Level
Select Data Level and click Go. The data level constrains applicable attribute groups. The data level cannot be updated after a page has been created.
Note: If you change the data level after you have already associated attribute groups with a page, those attribute groups will no longer be associated with the page.
-
Click Add Another Row if you wish to add an attribute group to the page being created.
-
Click Apply.
Managing Search Criteria
Search criteria templates offer a convenient way to save frequently used search criteria. Search criteria can be created either by administrators or end users. Administrator-created search criteria templates are available for all users. User-created search criteria are available only to the particular user who creates it. When a default search criteria template for a particular object is defined by a user and administrator, the user-defined search criteria template takes precedence.
You can create item search criteria and import formats for the following business entities:
-
Item
-
Item Organization
-
Item Revision
-
Item Supplier
-
Item Supplier Site
-
Item Supplier Site Organization
Because search criteria templates contain primary, operational, and user-defined attributes, they are always defined in the context of an item catalog category, structure type, or change category (depending on the object for which a criteria template is being created).
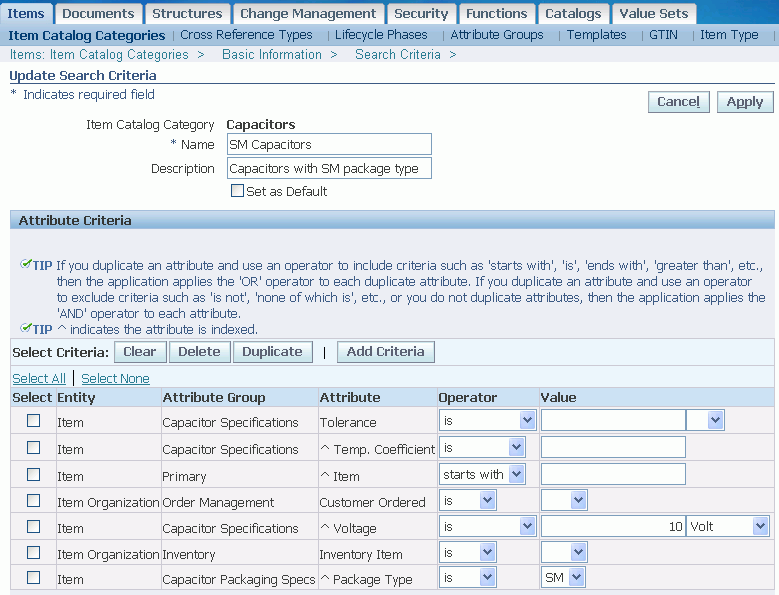
The following figure shows the Advanced Search page, where you would define a criteria template for the item catalog category Capacitors. Begin by listing the common attributes a typical user might search for when using the item catalog category Capacitors. Here, attributes like Capacitor Tolerance and Capacitor Voltage, among others, are specified. After adding attributes, you can specify operators and values to further restrict the scope of your search.
Defining Item Catalog Search Criteria
To create administrator level search criteria
-
Administrators can create search criteria from the respective item catalog category definition page for an item, the structure type definition page for a structure, or the change category list page for a change object. You can access these pages via the Setup Workbench link on the Applications page.
-
From the object's definition page (either the Basic Information page for an item catalog category or structure type or the Categories page for a change object), click the Search Criteria link.
Note: On the change management Categories page, click the Search Criteria icon in the row of the category for which you wish to create search criteria.
Note: The Packaging BOM structure type Basic Information page has no link to Search Criteria. You can check Display Formats and Import Formats from the Setup Workbench Structures tab.
-
On the Search Criteria Template page, click Create.
-
On the Create Search Criteria page, provide a name and description for the search criteria. You can set this search criteria as the default search criteria for the object by clicking Set as Default. Note that the name of the respective item catalog category, structure type, or change category already appears. You have the option of copying an existing item catalog category, structure type, or change category search criteria and combining the respective attributes with those you wish to add to this search criteria.
-
Click Add Criteria to add search criteria.
If you simply wish to locate a single attribute, enter its name and click Find. To search for attributes by business entity (for item catalog categories only) and attribute group, select the business entity, click Go, then select the attribute group and click Go again.
For change categories, search for attributes by change category.
For structures, search for attributes either by structure type (you do not need to specify a structure type because you are always in the context of a structure and structure type) or by catalog category. To search for attributes by structure type, select Component. To search for attributes by catalog category, select Item.
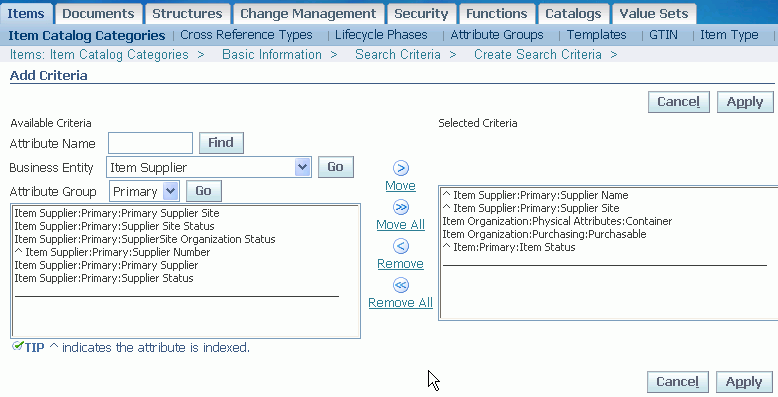
-
On the Add Criteria page, you can move search criteria back and forth from the Available Criteria list to the Selected Criteria list via the Move, Move All, Remove, and Remove All shuttles. When finished, click Continue.
-
Back on the Create Search Criteria page after adding criteria, you can specify operators and values to further refine the search criteria. For example, when searching for Capacitors, you may always want to include Capacitors with a Capacitance value that is between 5 and 30 uF (microfarads)--in this case you would add the attribute "Capacitance Value" to your search criteria, then select the operator "between," and specify a minimum value of "5" uF and a maximum value of "30" uF.
Note: For multi-row attributes with a value set, the distinction between the operators "is not" and "none of which is" is as follows:
-
is not
Returns any record containing at least one attribute value that is not the value specified. For example, suppose you have a multi-row attribute for "Color." If you specify an operator and value "is not" as "Red," then the search results will include records where there is at least one attribute value for "Color" that is not "Red."
-
none of which is
Returns any record where none of the attribute values is the value specified. For example, suppose you have a multi-row attribute for "Color." If you specify an operator and the value "none of which is" as "Red," then the search results will include records where none of the attribute values for "Color" are equal to "Red."
To clear the criteria values, select the criteria and click Clear. To delete criteria attributes, select the criteria and click Delete. To copy a criteria attribute and it's value, select the criteria and click Duplicate.
Tip: All of the operators except for "contains" are case sensitive.
-
-
Click Apply to save your search criteria definition.
To create user level search criteria
-
Navigate to the Advanced Search page for items, change objects, or structures.
For items, click on the Advanced Search link in the Applications tree menu. For change objects, click on the Issue, Idea, or Change Advanced Search link in the Applications tree menu. See Searching for Items in a Structure, Oracle Product Information Management User's Guide for instructions on how to navigate to the Advanced Search page for structures.
-
On the Advanced Search page, select an Item Catalog Category or Change Category (whichever is appropriate for your context) and click Go.
Skip this step for structures.
-
Click Personalize in the Search Criteria section.
-
Once in the Personalize Search Criteria page, follow the steps for "To create administrator level search criteria:" listed above. Begin at the step where you are in the Search Criteria Template page.
To update user level search criteria
-
Navigate to the Advanced Search page for items, change objects, or structures.
For items, click on the Advanced Search link in the Applications tree menu. For change objects, click on the Issue, Idea, or Change Advanced Search link in the Applications tree menu. See Searching for Items in a Structure, Oracle Product Information Management User's Guide for instructions on how to navigate to the Advanced Search page for structures.
-
On the Advanced Search page, select an Item Catalog Category or Change Category (whichever is appropriate for your context) and click Go.
Note: For structures, you do not have to specify a Structure Type because you are always in the context of a structure and structure type.
-
Click Personalize in the Search Criteria section.
-
On the Personalize Search Criteria page you are provided with a list of search criterion that are available for the item catalog category/structure type/change category you originally selected. You can only edit search criteria that you created. Click the update icon for the search criteria you wish to update.
-
On the Update Search Criteria page, you can update the name, description, set as default, and other attributes of the search criteria. You can also add/delete/copy/clear/modify criteria, corresponding search operators, and values.
-
Click Apply to save your search criteria definition.
Related Topics
Searching for Items, Oracle Product Information Management User's Guide
Searching for Ideas, Issues, and Changes, Oracle Product Information Management User's Guide
Defining Change Category Search Criteria
Searching for Items in a Structure, Oracle Product Information Management User's Guide
Defining Display Formats and Search Criteria for Structures
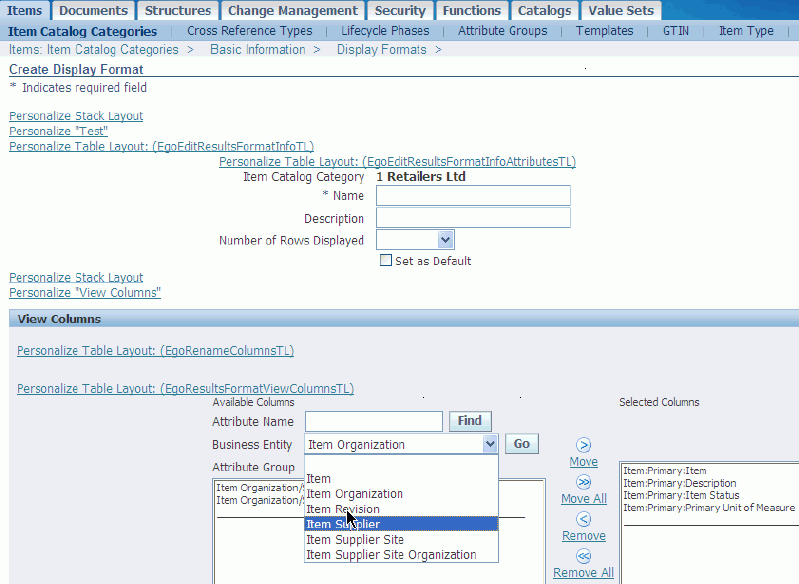
Managing Display Formats
Display Formats enable you to predefine search display views. You can use these views to look at different sets of attributes of the items, change objects, or structure components that are returned by the search. Item display formats, by default, always include the item number, item description, item catalog category, and revision level. Change display formats always include, by default, the change number. Structure display formats always include, by default, name, description, and component revision.
You can create item display formats using primary, operational, and user-defined attributes. Select user-defined attributes from attribute groups associated with any of the following business entities:
-
Item
-
Item Organization
-
Item Revision
-
Item Supplier
-
Item Supplier Site
-
Item Supplier Site Organization
Creating a Display Format
Both administrators and users can create display formats. Administrator-created display formats are available to all users. User-created display formats are available only to the users who created them.
To create an administrator level display format
-
Administrators can create display formats from the respective item catalog category definition page for an item, the structure type definition page for a structure, or the change category list page for a change object. You can access these pages via the Setup Workbench link in the Applications tree menu.
-
From the object's definition page (either the Basic Information page for an item catalog category or structure type, or the Categories page for a change object), click the Display Formats link.
Note: On the change management Categories page, click the Display Format icon in the row of the category for which you wish to create a display format.
-
On the Display Formats page, click Create.
Note: When viewing display formats for structures, the name of this page is Search Results Format.
Alternatively, you can click Copy to select an existing display format and copy its columns into a new display format. You can add additional, new columns into this copied display format, too.
-
On the Create Display Format page, provide the name and a description for the display format. Also, select the number of rows you want to display per page.
You can set this display format as the default display format for the object by clicking Set as Default. Note that the name of the respective item catalog category, structure type, or change category already appears.
In the View Columns region, specify the columns you want to display in the search results display. If you simply wish to locate a single attribute, enter its name and click Find. To search for attributes by business entity (for item catalog categories only) and attribute group, select the business entity, click Go, then select the attribute group and click Go again.
For structures, search for attributes either by structure type (you do not need to specify a structure type because you are always in the context of a structure and structure type) or by catalog category. To search for attributes by structure type, select Component. To search for attributes by catalog category, select Item. If you select Item, you must specify a catalog category.
You can move display attributes back and forth from the Available Columns list to the Selected Columns list via the Move, Move All, Remove, and Remove All shuttles.
Note that you can rename the columns that will appear in your display format by clicking Rename Columns. On the Rename Columns page, the original column names that you have already selected are listed. Enter the new column names in the New Column Name field and click Continue.
In the Sort Order section, you can select up to three columns upon which to sort the display results. You can also specify whether or not the search results in these columns be displayed in ascending or descending order. Only indexed and non-secured attributes (attributes that are not secured by a view or edit privilege) are available for sorting. Thus, you cannot sort secured attributes.
Under "Display Sections," (available only for items and change objects) you can select which sections will be displayed in your search results. Sections are displayed as a column containing an icon with a direct link to the section. For example, to include an Attachments link on your search results page, select Attachments from the Available Sections list and move it to the Selected Sections list.
-
Click Apply to save your display format definition.
Note: Set up a display format to include item multi-row attributes the same way you set it up to include single attributes. After the list of items that met your search criteria appears, click the Show link for a particular item. The Show region displays the multi-row attributes.
To update an administrator level display format
-
Administrators can update display formats from the respective item catalog category definition page, the structure type definition page, or change category list page--all of which are accessible via the Setup Workbench link in the Applications tree menu.
-
From the object's definition page (either the Basic Information page for an item catalog category or structure type, or the Categories page for a change object), click the Display Format link.
Note: On the change management Categories page, click the Display Format icon in the row of the category for which you wish to update a display format.
-
On the Display Format page, click the Update icon in the row of the display format you wish to update. You can only edit the display formats that are explicitly associated with the item catalog category, structure type, or change category originally selected.
-
On the Update Display Format page, you can update the name, description and other columns of the display format. You can also add/remove/rename columns and modify sort criteria.
-
Click Apply to save your display format definition.
To create a user level display format
-
Navigate to the Advanced Search page for items, change objects, or structures.
For items, click on the Advanced Search link in the Applications tree menu. For change objects, click on the Issue, Idea, or Change Advanced Search link in the Applications tree menu. See Searching for Items in a Structure, Oracle Product Information Management User's Guide for instructions on how to navigate to the Advanced Search page for structures.
-
On the Advanced Search page, select an Item Catalog Category or Change Category (whichever is appropriate for your context) or, alternatively, an Alternate Catalog, and click Go.
Optionally, you can limit your search further to a certain organization, revision, and, if you selected an Alternate Catalog, alternate category.
-
Click Personalize in the Display Format section.
-
On the Personalize Display Formats page, click Create or click the Copy icon for one of the existing display formats.
-
Once in the Personalize Display Formats page, follow the steps for "To create an administrator level display format:" listed above. Begin at the step where you are in the Create Display Format page.
-
Click Apply to save your display format definition.
To update a user level display format
-
Navigate to the Advanced Search page for items, change objects, or structures.
For items, click on the Advanced Search link in the Applications tree menu. For change objects, click on the Issue, Idea, or Change Advanced Search link in the Applications tree menu. See Searching for Items in a Structure, Oracle Product Information Management User's Guide for instructions on how to navigate to the Advanced Search page for structures.
-
On the Advanced Search page, select an Item Catalog Category or Change Category (whichever is appropriate for your context) or, alternatively, an Alternate Catalog, and click Go.
Optionally, you can limit your search further to a certain organization, revision, and, if you selected an Alternate Catalog, alternate category.
For structures, you do not need to specify a structure type because you are always in the context of a structure and structure type.
-
Click Personalize in the Display Format section.
-
On the Personalize Display Formats page, click the Update icon of the display format you wish to update. You can only update your user display formats that are explicitly associated with the item catalog category, alternate catalog, structure type, or change category originally selected.
-
On the Update Display Format page, you can update all of the display format fields.
-
Click Apply to save your display format definition.
Related Topics
Searching for Items, Oracle Product Information Management User's Guide
Searching for Ideas, Issues, and Changes, Oracle Product Information Management User's Guide
Defining Change Category Display Formats
Searching for Items in a Structure, Oracle Product Information Management User's Guide
Defining Display Formats and Search Criteria for Structures
Defining Item Catalog Import Formats
An import format identifies the primary and user-defined attributes (but not the operational attributes) in an item catalog category that is imported into the application using a spreadsheet. You can import operational attributes; however, to do this, you must specify an item template and item status in your import format. Both item templates and item statuses can be used to set operational attributes when importing items.
Seeded Business Entities for Importing
You can define import formats for the following business entities:
-
Item
-
Item Revision
-
Item Supplier
-
Item Supplier Site
-
Item Organization
-
Item Supplier Site Organization
An import format can also import values for a multi-row attribute group.
To import any of the above business entities from the system into an Excel spreadsheet, you must use an import format. An import format identifies the operational and user defined attributes in an item catalog category that will be imported into the spreadsheet. Consequently, when you import item business entities from an Excel spreadsheet, the items are all imported to a particular item catalog category defined in the import format. These imported item business entities inherit all the attribute groups defined for the specific item catalog category. You can also copy, update and delete import formats.
If users do not select an item catalog category when importing business entities, the default System business entity import format is available for use. If an import format has not yet been defined for an item catalog category that a user selects, then the default System business entity import format is available for use. The System business entity import format does not appear if a user selects an item catalog category that already has import formats defined. You cannot modify the System business entity import formats.
Items uploaded to the system from a spreadsheet become, by default, Engineering items. If you wish to upload a non-Engineering item, then include an available primary attribute column called "Engineering Item Flag" in your import format. When uploading the spreadsheet identify such items in this column by specifying the value "Yes" or "No" in this column. If you leave the column blank, the item once again defaults to an Engineering item.
To create an item import format
-
In the Applications tree menu, click the Setup Workbench link.
-
On the Search: Catalog Categories page, locate the item catalog category for which you wish to create the import format, and click its name link.
-
On the Basic Information page for the item catalog category, click the Import Formats link.
-
On the Import Formats page, click Create.
-
On the Create Import Format page, provide the following information:
Name
Provide the name of the import format you are creating for the item catalog category.
Description
Provide a description of the import format.
Set as Default
Select the checkbox if you wish for this import format to be the default import format for the item catalog category in which it is created.
Note: There can be only one default import format for each item catalog category.
-
In the View Columns region of the Create Import Format page, find the attribute columns to appear on the import format using the following fields:
-
Attribute Name
If you know the partial name of an attribute and the business entity it belongs to, you can use this field to find it.
For example, if you are looking for a status attribute assigned to the Item Supplier business entity, select Item Supplier in the Business Entity field and click Go. Enter %stat% in the Attribute Name field and click Find. The Item Supplier attributes containing "stat" in their names are listed below and are available for selection.
-
Business Entity
To view all attributes assigned to a business entity, select one of the following entities and click Go.
-
Item
-
Item Organization
-
Item Revision
-
Item Supplier
-
Item Supplier Site
-
Item Supplier Site Organization
-
-
Attribute Group
Select an attribute group assigned to the selected business entity, then click Go. All attributes within the attribute group are now available for selection.
-
-
Use the Move and Remove buttons to select and remove attributes from the import format.
You can select either single or multi-row attributes to include in the import format.
Tip: You can rename the columns that will appear in your import format by clicking Rename Columns. On the Rename Columns page, the original column names that you have already selected are listed. Enter the new column names in the New Column Name field and click Apply.
-
Once you have moved all of the attribute columns you want in the import format into the Selected Columns box, click Apply.
Your new import format now appears in the list of available import formats for the selected Item Catalog Category.
Note: When importing data using Excel, you can use a combination of 220 character fields, 200 numeric fields, and 50 date fields, subject to an overall 255 field limit. For example, an import format can include 220 character columns and 35 numeric columns for a total of 255 columns. If you use a display format to export and import data, the same restriction applies.
To copy an import format
-
Navigate to the Import Format page. See: To create an item import format.
-
On the Import Formats page, locate the import format you wish to copy and click its Copy icon in the Copy column.
-
On the Copy Import Format page, note that a new name is defaulted, as well as the description. You can change either, and also add or remove attributes in the Selected Columns box.
Note that you can rename the columns that will appear in your import format by clicking Rename Columns. On the Rename Columns page, the original column names that you have already selected are listed. Enter the new column names in the New Column Name field and click Continue.
If there are more columns/attributes than can be easily scrolled in the list, you can filter the list by providing the attribute group and clicking Go, or providing the attribute name and clicking Find.
Note: You can select either single or multi-row attributes to include in the import format.
-
Click Apply.
To update an import format
-
Navigate to the Import Format page. See: To create an item import format.
-
On the Import Formats page, locate the import format you wish to update and click the Update icon in the Update column.
-
On the Edit Import Format page, you can change the name, description, default setting and add or remove attributes/columns as needed.
Note that you can rename the columns that will appear in your import format by clicking Rename Columns. On the Rename Columns page, the original column names that you have already selected are listed. Enter the new column names in the New Column Name field and click Continue.
If there are more columns/attributes than can be easily scrolled in the list, you can filter the list by providing the attribute group and clicking Go, or providing the attribute name and clicking Find.
Note: You can select either single or multi-row attributes to include in the import format. Also, you cannot modify the System Item import format.
-
Click Apply.
To delete an import format
-
Navigate to the Import Format page. See: To create an item import format.
-
On the Import Formats page, locate the import format you wish to delete, select it and click Delete.
Related Topics
Defining Item Catalog Import Formats, Oracle Product Lifecycle Management Implementation Guide or Oracle Product Information Management Implementation Guide
Assigning Systems to an Item Catalog Category
You can publish value sets, item catalog categories, items, and structures to other systems that use this information. The following steps describe how to define default systems for an item catalog category. Systems defined for a parent item catalog category are inherited by the entire ICC hierarchy below the parent. If you choose to define default systems for an item catalog category, these systems are automatically selected during the publishing process when publishing item catalog categories, items, and structures.
-
From the Oracle Applications Home Page, select an appropriate responsibility, then Setup Workbench. Select the Items tab.
-
In the Item Catalog Categories page, search for and select an item catalog category.
-
In the Basic Information page, click Systems.
-
In the Systems page, select an organization in which to associate systems.
-
Click Update, then Add Another Row to add systems.
-
In the Systems field, select a system from the list.
If the system you want to select is not listed, then see Defining Source Systems.
If you want to remove a system from the item catalog category and organization, select the system, then click Remove.
-
Once you have added all of the systems for the item catalog category and organization, then click Apply.
Repeat this task for as many item catalog category, organization, and system combinations as needed.
Related Topics
Publishing Item Catalog Categories
Publishing Item Catalog Categories
You can search for and select an item catalog category and publish it to one or more systems.
Prerequisites
- Before publishing any data, you must set up Oracle Data Integrator Artifacts and Web Services for Oracle Product Information Management. For set up instructions, refer to My Oracle Support ID 888696.1. For more information about the Web Services used during publishing, see: Oracle Product Information Management Web Services Overview.
To publish an item catalog category
-
From the Oracle Applications Home Page, select an appropriate responsibility, then Setup Workbench. Select the Items tab.
-
In the Item Catalog Categories page, search for and select an item catalog category.
-
In the Basic Information page, click Publish.
-
In the ICC Publish Parameters page, enter the following:
-
Batch Name. Enter a unique name.
-
Version. Select one of the existing item catalog category versions to publish.
-
Publish Parent ICC(s). Select this box to publish any parent ICCs along with the selected ICC (item catalog category).
-
Publish Children ICC(s). Select this box to publish any children ICCs along with the selected ICC.
-
-
Click Continue.
-
In the Publish page, enter the following:
-
Workspace Name. Enter a unique workspace name.
-
Auto-Release. Choose from Default, Yes, or No.
-
Systems. Systems previously associated with the ICC are listed, but you can add additional systems or remove any existing systems.
-
-
Click Apply.
The Publish History page opens, displaying the status of the batch submitted.
Related Topics
Publishing Overview, Oracle Product Information Management User's Guide
Assigning Systems to an Item Catalog Category
Publishing Items and Structures, Oracle Product Information Management User's Guide
Viewing the Publishing History, Oracle Product Information Management User's Guide
Oracle Product Information Management Web Services Overview
Defining Report Templates Using XML Publisher
Creating a template file consists of two basic steps:
-
Design your template layout - Use the formatting features of a word processing application and save the file as RTF.
-
Mark up your template layout - Insert the XML Publisher simplified tags.
To create a template, you need to create or use any of the existing seeded data definitions and associate or assign the template file with the corresponding data definition file. For example, if you have a Change Order template file, associate it to a Change Order data definition file.
When you create a template, you need to assign it a data definition and upload the RTF. There are several seeded “Summary” templates available in the system. These cannot be updated. Initially, upload one template file for a specific language and territory combination. This file will become the Default Template File. To upload additional template files or to change the Default Template File, use the View Template page.
To create a template
-
Using the XML Publisher Administrator responsibility, navigate to the Templates page.
-
Select the Create Template button.
-
Provide the following information:
Name
Enter a user-friendly name for your template.
Code
Assign a template code using the product short name and a descriptive ending.
Application
While creating templates, select the correct application from the LOV. This application should be the same as the application of the Data definition. For Change Templates, the supported application is “Engineering”. For
Data Definition
Select the product's data definition from the LOV. Oracle Engineering (Application Short Name = ENG) and Oracle Product Information Management (Application Short Name = EGO) come seeded with many different data definitions for changes and items. For example for an Issue Report Template, select the seeded Oracle Engineering Data Definition for Issues. This will result in the Template being available for Issue Reports. Select the input template type (RTF, PDF, or XSL-FO) from the LOV.
Start Date
Enter the date from which the template will be active.
End Date
To make the template inactive, enter an end date.
Subtemplate
If this is a subtemplate, select the check box.
Additional Information: A subtemplate is referenced by other templates, but cannot run on its own.
File
Use the Browse button to upload your RTF or PDF template layout file.
Language
Select the template language from the LOV. Add more language template files to your template definition from the View Template page.
Territory
Select the language territory from the LOV.
Important: After the template definition is created, the following fields cannot be updated: Application, Code, and Type. You can update the template from the View Template page.
In the template file, you can include simplified XML tags to refer to the Item information you want XML Publisher to print while generating the report.
For further information, see:
-
Oracle XML Publisher User's Guide
-
XML Publisher Feature Listing
-
Associating Report Templates to Item Catalog Categories
Associating a Report Template with an item catalog category makes these templates available for all items in the item catalog category. Report Templates are inherited throughout the item catalog category hierarchy—child categories inherit the Report Templates from the parent category.
Additional Information: For details about how to associate Report Templates, see “Associating Report Templates to an Item Catalog Category” in Oracle Product Lifecycle Management User's Guide.
Related Topics
Generating Reports, Oracle Product Information Management User's Guide
Defining Cross Reference Types
Items can have many cross-references. Example of cross-references are, customer part number, superseding/preceding item number etc. An administrator can define their own cross-reference types based on their business need. User-defined flex-fields and value sets can be associated with each cross-reference types. Cross-reference types have effectivity dates, which controls them being active or inactive.
Defining Cross Reference Types
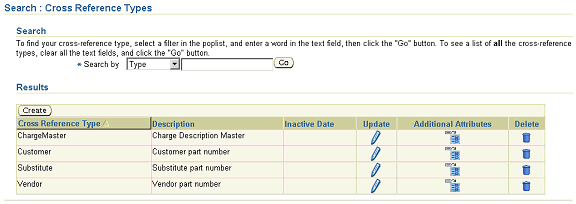
Importing Item Catalog Metadata
Use open interface tables to import the following item catalog metadata:
-
Item catalog categories (ICCs)
-
ICC definition
-
Attribute group association
See: Associating Attribute Groups with an Item Catalog Category
-
Item pages association
-
Item number and description generation methods
-
New item request association
See: Associating New Item Requests with an Item Catalog Category
-
ICC versions
-
Transaction attributes
-
-
Value sets
See: Defining Value Sets for User-Defined Attributes
-
Non-versioned value sets and its values
-
Versioned value sets and its values
-
Child value sets and its values
-
-
Attribute groups and attributes
-
Functions
See: Creating User-Defined Functions for Item Attributes
-
Function header
-
Function parameter
-
Using the concurrent program EGO Import Metadata (EGOIMDCP), you can choose to validate and import the above data from the open interface tables into the production tables collectively or one at a time by selecting one of the following parameters:
-
Import Value Sets
-
Import Attribute Groups
-
Import Item Catalog Categories
-
Batch Id (Null for All).
Selecting the Batch Id parameter imports all batch data into the production tables.
-
Delete Successfully Processed Records
Tip: When troubleshooting this import process, leave this parameter set to No.
| Table Name | Description |
|---|---|
| EGO_FLEX_VALUE_SET_INTF | This table stores intermediate information about value sets. It stores information for both value set versions and non-versioned value sets, as well as the parent-child relationship for a value set. |
| EGO_FLEX_VALUE_INTF | This table stores intermediate values for an associated value set. It also stores table and column information for a table type value set. It stores values corresponding to each version for a value set with versions. |
| EGO_FLEX_VALUE_TL_INTF | This table stores translations for value set values in each of the installed languages. |
| EGO_ATTR_GROUPS_INTERFACE | This table stores the definitions for attribute groups. |
| EGO_ATTR_GROUPS_DL_INTERFACE | This table stores the definitions for attribute group business entities (data levels). |
| EGO_ATTR_GROUP_COLS_INTF | This table stores the definitions for attributes. |
| EGO_PAGES_INTERFACE | This table stores the definitions for Item Catalog Category pages. |
| EGO_PAGE_ENTRIES_INTERFACE | This table stores the definitions for Item Catalog Category page entries. |
| EGO_FUNCTIONS_INTERFACE | This table stores the function header information. |
| EGO_FUNC_PARAMS_INTERFACE | This table stores the function parameters information. |
| MTL_ITEM_CAT_GRPS_INTERFACE | This table stores the ICC header record mimicking the base table MTL_ITEM_CATALOG_GROUPS_B. |
| EGO_ATTR_GRPS_ASSOC_INTERFACE | This table stores the Attribute Group associations with ICCs. |
| EGO_ICC_VERS_INTERFACE | This table stores version related information. It links to the Transaction Attributes interface table (EGO_TRANS_ATTRS_VERS_INTF) by ICC name/ID and version sequence number. |
| EGO_TRANS_ATTRS_VERS_INTF | This table stores information about the transaction attributes for a specific ICC version. |
| EGO_FUNC_PARAMS_MAP_INTERFACE | This table stores function parameters mapping for number generation and description generation for ICCs. |
Warning: The following columns in the open interface tables are either used by the system during record processing or are not supported at this time. Do not populate these columns with values.
| Column | Appears in Table |
|---|---|
| ASSOCIATION_ID | EGO_ATTR_GRPS_ASSOC_INTERFACE |
| DATA_LEVEL | EGO_ATTR_GRPS_ASSOC_INTERFACE |
| DATA_LEVEL_ID | EGO_ATTR_GRPS_ASSOC_INTERFACE |
| END_DATE | EGO_ICC_VERS_INTERFACE |
| VERSION_SEQ_ID | EGO_ICC_VERS_INTERFACE |
| ASSOCIATION_ID | EGO_TRANS_ATTRS_VERS_INTF
Caution: Do not populate this column if the Transaction Type = Create. You must populate this column for all other transaction types. |
| ATTR_ID | EGO_TRANS_ATTRS_VERS_INTF
Caution: Do not populate this column if the Transaction Type = Create. You must populate this column for all other transaction types. |
| CREATED_BY | Appears in all item catalog metadata open interface tables |
| CREATION_DATE | Appears in all item catalog metadata open interface tables |
| LAST_UPDATE_LOGIN | Appears in all item catalog metadata open interface tables |
| LAST_UPDATED_BY | Appears in all item catalog metadata open interface tables |
| LAST_UPDATE_DATE | Appears in all item catalog metadata open interface tables |
| REQUEST_ID | Appears in all item catalog metadata open interface tables |
| PROGRAM_APPLICATION_ID | Appears in all item catalog metadata open interface tables |
| PROGRAM_ID | Appears in all item catalog metadata open interface tables |
| PROGRAM_UPDATE_DATE | Appears in all item catalog metadata open interface tables |
| TRANSACTION_ID | Appears in all item catalog metadata open interface tables |
| START_DATE_ACTIVE | MTL_ITEM_CAT_GRPS_INTERFACE |
| END_DATE_ACTIVE | MTL_ITEM_CAT_GRPS_INTERFACE |
| SUMMARY_FLAG | MTL_ITEM_CAT_GRPS_INTERFACE |
| ITEM_DESC_ACTION_ID | MTL_ITEM_CAT_GRPS_INTERFACE |
| ITEM_NUM_ACTION_ID | MTL_ITEM_CAT_GRPS_INTERFACE |
To import item catalog metadata
-
Load the item catalog metadata open interface tables with the data you want to import. For detailed help on loading the Open Interface tables, refer to:
-
My Oracle Support (https://support.oracle.com) Document ID 730164.1.
-
the Integration Repository. See: Oracle Integration Repository User's Guide.
-
Here are some suggestions if you encounter problems while importing item catalog metadata:
-
Consider writing errors into the MTL_INTERFACE_ERRORS table.
-
Perform the following steps before logging a bug:
-
Set the profile option 'INV: Debug Trace' to Yes. This will write detailed debug messages into the concurrent program log file.
-
Turn ON the trace for the concurrent program 'EGO Import Metadata' (short name EGOIMDCP).
-
While launching the concurrent program, set the parameter 'Delete Successfully Processed Records' to 'No'.
-
-
In the bug, provide the following information:
-
Concurrent Program log file
-
Raw Trace file. If it is a performance issue, then generate the tkprof file for this raw trace file and provide both the raw trace file as well as the tkprof file.
-
Set of records from the table mtl_interface_errors for this specific request_id.
-
Set of records from the specific entity's interface table before and after launching the concurrent program.
-
List of invalid objects in EGO schema.
-