Administering Item Business Rules
This chapter covers the following topics:
- Overview of Item Business Rules
- Administering Rule Sets
- Building Rule Expressions
- Viewing Attributes Used in Rule Sets
- Including other Rule Sets
- Viewing Rule Set Dependencies
- Assigning Rule Sets to Entities
Overview of Item Business Rules
Oracle Product Information Management enables you to define and manage items and bills of material (BOMs) in multiple organizations and organization hierarchies. Item business rules define integrity constraints on the attributes of those items. You can define integrity constraints on operational as well as user-defined attributes (UDAs). A typical constraint, known as a validation expression, might check that a certain attribute is less than another. For example:
Physical_Attributes.Net_Weight <= Logistics.Shipping_Weight
In other words, the net weight of an item must be less than or equal to the shipping weight.
You can also define assignment expressions. For example, use the following expression for the "Daily Waste Percent", where the daily waste percent equals the total waste percent divided by the shelf life in days.
Inventory.Total_Waste_Percent / Inventory.Shelf_Life
In order to use item business rules, you must define:
-
Rules and rule sets. See: Administering Rule Sets
-
Validation and assignment expressions. See: Building Rule Expressions
To activate a rule set, you must assign it to a business entity. See: Assigning Rule Sets to Entities
Rules and Rule Sets
Rules encapsulate a single integrity constraint or assignment expression, for example:
-
Constraint:
Physical_Attributes.Net_Weight <= Logistics.Shipping_Weight
-
Assignment:
Inventory.Total_Waste_Percent / Inventory.Shelf_Life
Rule sets group multiple rules together. You can associate a rule set with both:
-
An attribute group or item catalog category (ICC)
-
A list of valid business entities (such as an item, item revision, item supplier, item supplier site, item organization, or item supplier site organization)
This enables the system to validate that the rules include only attributes from the associated attribute group or ICC. A rule set associated with an attribute group can only use the attributes in that group within its expressions. A rule set associated with an ICC can only use the attribute groups valid for that ICC.
Apply a rule set to each business entity separately - rule expressions cannot default from one business entity to another. For example, you cannot check an item attribute against an item organization attribute. Also, a multi-row attribute group cannot use attributes from any other attribute groups in its expressions.
You can create composite rule sets to aggregate rule sets that operate using different attribute groups and ICCs. Activate a rule set by assigning it to a business entity. The composite rule set assigned to a business entity must include all of the attribute group and ICC-specific rule sets relevant to that business entity because you can only assign one rule set to each business entity.
Validation and Assignment Expressions
Create validation and assignment expressions after defining rules and rule sets. The expressions that make up the integrity validation and assignments follow a spreadsheet-like syntax. Each attribute is referenced by its attribute group name, followed by the attribute name:
Physical_Attributes.NetWeight
In the above example, Physical_Attributes is the internal name of the attribute group, and "NetWeight" is the internal name of the attribute.
Combine attributes into more complex expressions using build-in operators and functions such as:
| Comparison Operators | == != < <= > >= in |
| Logical Operators | and or not (you can also use && and ||) |
| String Functions | compare contains endsWith match startsWith + indexOf length lowercase substring trim uppercase |
| Math Functions | + - * / sum abs amount min max round roundup rounddown |
| Date Functions | + (Date + days) - (Date - days) |
| Comparison to current Production Value Functions | changed delta percent previous |
For example, the following expression checks if the item name's 3rd letter is "A" or "E":
substring(Item_Primary.Name,2,3) == "A" or substring(Item_Primary.Name,2,3) == "E"
Example
The following integrity constraints are typical of what you might expect for an item, in this case, a computer motherboard:
Assignments
-
Lead Percent equals Total Lead Mass divided by Unit Weight
-
Sellable Date (date when item can be sold) equals 10 days after the Availability Date
Validations
-
The Minimum CPU Speed (in MHz) must be less than the Maximum CPU Speed.
-
If the Purchasable Flag equals Yes, then the List Price cannot be null.
-
Unit Height cannot change by more than 3% without requiring approval.
To implement the above rules, create the appropriate rule sets and then assign them to the item entity:
-
Create assignment rule set.
-
Create validation rule set.
-
Create composite rule set.
-
Assign composite rule set to the business entity.
Note: There is no limit to the number of rule sets that you can define for a business entity. Typically, define one rule set for each attribute group and ICC. If you create multiple rule sets for a business entity, you must create one composite rule set that contains all of these rule sets, then assign the composite rule set to the business entity. You can only assign one rule set to a business entity.
Administering Rule Sets
When you create the rule sets to address your business needs, first create the rule sets for all necessary attribute groups and item catalog categories (ICCs). Typically, assign one rule set for each attribute group and ICC. Next, determine if you can consolidate rule sets together into composite rule sets. There is no limit to the number of rule sets that you can define for a business entity, but, ideally, assign only one composite rule set to each business entity.
Generally, rule sets that perform assignments should execute before validation rule sets, since validation rule sets ensure that the results of the assignment rule sets are valid.
Computer Motherboard Rule Set Example
The following integrity constraints are typical of an item, in this case a computer motherboard:
Assignments
-
Lead Percent equals Total Lead Mass divided by Unit Weight.
-
Sellable Date (date when you can sell the item) equals 10 days after the Availability Date.
Validations
-
Minimum CPU Speed (in MHz) must be less than the Maximum CPU Speed.
-
If Purchasable Flag is set to Yes, then List Price has to be set.
-
Unit Height cannot change more than 3% without requiring approval.
To implement the above rules, create the appropriate rule sets and then assign the sets to the Item entity following these steps:
-
Create Assignment Rule Set
See steps below.
-
Create Validation Rule Set
See steps below.
-
Create Composite Rule Set
-
Assign Composite Rule Set to business entity
The procedures below refer to this example while explaining how to enter rules.
To create a new rule set
-
Navigate to the Setup Workbench. In the Items tab, click the Rules subtab.
-
In the Update Rule Set Assignment page, select Item Rules from the left side menu.
-
In the Item Rule Sets page, click Create.
-
In the Item Rules: Create Rule Set page, enter Name, Description and Internal Name for the rule set.
Caution: You cannot change the Internal Name after the rule set is created.
-
In the Composite field, select NO.
For rule sets containing rules, set the Composite field to NO. For rule sets that contain other rule sets, set the Composite field to YES.
To create a new assignment rule
The process for creating assignment and validation rules is the same up to this point. Follow the next set of steps to create assignment rules. Otherwise, skip to "To create a new validation rule:".
-
In the Type field, select Assignments.
-
Select the Item Catalog Category radio button.
-
Enter or search for and select an ICC.
-
Select all appropriate business entities for this rule set.
-
Click Continue.
This creates an empty rule set with the appropriate ICC context. All of the attribute groups within the selected ICC are available for creating assignment rules. The following steps create the actual rules.
-
Within the Item Rules: Rule List page, select the Rules tab (if not already selected).
-
Click Add Above.
You can also click Add Below. When you have more than one rule, these buttons enable you to create rules in a particular sequence.
-
In the Item Rules: Create Attribute Assignment Rule page, create an assignment rule by entering the following information:
-
Name - assignment rule name
-
Description
-
Set Value of Attribute - the name of the attribute where the computed value of the assignment rule is stored.
Note: You can use all item primary attributes as read-only values for rule evaluation at all business entity levels (for example: Item, Item Revision, Item Supplier, and so on) while creating rules. Only Item business entity level assignment rules can set the value of the following item primary attributes: Item, Description, and Status. Modifying item primary attributes only triggers Item business entity rules.
-
If Expression - enter the If part of an if/then expression, if required. If the attribute assignment rule has no requirements, then leave this field blank.
This If expression must be blank or equal True for the assignment to take place.
-
If Expressions in the Then Expression region - You can add multiple If expressions in the Then Expression region. They are nested within the previous If expression located above the Then Expression region. If there is no If expression to enter here, then leave this field blank. It defaults to true and is always selected.
Example of Nested If/Then Expressions
The following example explains how the system reads multiple nested if/then expressions entered in the Item Rules: Create Attribute Assignment Rule page.
if (main rule expression) = true if (If Expression #1 in the Then Expressions region) = true, then (Then Expression #1) else if (If Expression #2 in the Then Expressions region) = true, then (Then Expression #2) else if (If Expression #3 in the Then Expressions region) = true, then (Then Expression #3) end if -
Then Expression - enter an expression that assigns an attribute value
-
Explanation Message - Optional. Use this field to inform the user about the assignment that took place.
Additional Information: You do not need to verify that attributes do not equal null, or, in the case of division, zero. The system ignores the assignment in this case.
Computer Motherboard Rule Set Example
To define the first assignment rule for the Computer Motherboard Rule Set Example described above, the field values are entered as follows:
Create Assignment Rule: Lead Percent is Total Lead Mass divided by Unit Weight Field Name Value Name Lead_Percent Description Lead Percent is Total Lead Mass divided by Unit Weight. Set Value of Attribute Hazard.Lead_Percent If Expression Select If Expression Then Expression round((Hazard.Lead_Mass / Physical_Attributes.Unit_Weight) * 100, 2) Explanation Message Percent is Mass ($Hazard.Lead_Mass$) divided by Weight ($Physical_Attributes.Unit_Weight$). 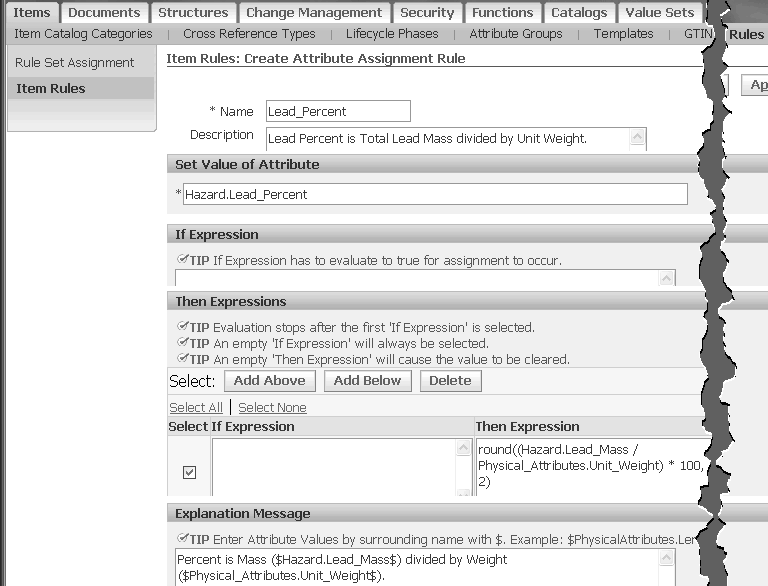
-
-
Click Validate to ensure that you typed the attribute names correctly.
Important: You must know the internal names of the attribute groups and attributes that you want to use in expressions. You cannot look up valid attribute groups and attributes from this page.
-
Click Apply.
This enters the first assignment rule into the rule set and returns you to the Rule Set: Rule List page. From this page, you can continue to add assignment rules to the rule set using the Add Above or Add Below buttons and repeating the above steps. Rules execute in the order listed within the rule set. Use the Sequence field and the Update Sequence button to change the rule order. If an attribute's expression depends on a previously calculated value, you must ensure that the previous value calculation occurs before it is needed in a later rule.
Computer Motherboard Rule Set Example
The following if/else if expression describes the second assignment rule for the Computer Motherboard Rule Set Example described above.
if (Item_Primary.Sellable_Flag == "Yes")

     if (assignedTo("VeryFastDelivery")
     then Marketing.Sellable_Date = Planning.Availability_Date + 3

     else if (assignedTo("FastDelivery")
     then Marketing.Sellable_Date = Planning.Availability_Date + 6

     else Marketing.Sellable_Date = Planning.Availability_Date + 10
The "assignedTo" function verifies that an item is assigned to a particular Alternate Catalog Category.
From the Rule Set: Rule List page, click Add Below to add this second assignment rule. The table below shows the field values to enter in the Item Rules: Create Attribute Assignment Rule page.
Create Assignment Rule: Calculate Sellable Date based on the Availability Date Field Name Value Name Sellable_Date_Calculation Description Calculate Sellable date based on the Availability Date. Set Value of Attribute Marketing.Sellable_Date If Expression Item_Primary.Sellable_Flag == "Yes" Select If Expression assignedTo("Delivery", "VeryFastDelivery") Then Expression Planning.Availability_Date + 3 Select If Expression assignedTo("Delivery", "FastDelivery") Then Expression Planning.Availability_Date + 6 Select If Expression (field value is Null) Then Expression Planning.Availability_Date + 10 Explanation Message (field value is Null)
To create a new validation rule
-
In the Item Rule Sets page, click Create.
-
In the Item Rules: Create Rule Set page, enter Name, Description and Internal Name for the rule set.
Caution: You cannot change the Internal Name after the rule set is created.
-
In the Composite field, select NO.
For rule sets containing rules, set the Composite field to NO. For rule sets that contain other rule sets, set the Composite field to YES.
-
In the Type field, select Validations.
-
Select the Item Catalog Category radio button.
-
Enter or search for and select an ICC.
-
Select all appropriate business entities for this rule set.
-
Click Continue.
This creates an empty rule set with the appropriate ICC context. All of the attribute groups within the selected ICC are available for creating validation rules. The following steps create the actual rules.
-
Within the Item Rules: Rule List page, select the Rules tab (if not already selected).
-
Click Add Above.
You can also click Add Below. When you have more than one rule, these buttons enable you to create rules in a particular sequence.
-
In the Item Rules: Create Validation Rule page, create a validation rule by entering the following information:
-
Name - validation rule name
-
Description
-
Severity - determines the action taken if the validation fails. Severity actions include:
-
Reject - You cannot save the business entity until the validation passes.
-
Needs Approval - requires a change order.
-
Warning - The Explanation Message displays, but you can still save the entity.
-
-
If Expression - enter the If part of an if/then expression, if required. If the attribute validation rule has no requirements, then leave this field blank.
-
Validation Condition - enter an expression that determines if a condition is true or false.
-
Explanation Message - Optional. Use this field to inform the user about the validation that took place.
Additional Information: You do not need to verify that attributes do not equal null, or, in the case of division, zero. The system ignores the validation in this case. If you want to explicitly test for a null value, use the "isnull" function.
Computer Motherboard Rule Set Example
To define the first validation rule for the Computer Motherboard Rule Set Example described above, the field values are entered as follows:
Create Validation Rule: Minimum CPU Speed (in MHz) must be less than the Maximum CPU Speed. Field Name Value Name Max_Min_CPU_Check Description Check that Minimum CPU Clock Speed is less than Maximum CPU Clock Speed. Severity Reject If Expression Validation Condition Motherboard_Spec.Min_CPU_Speed <= Motherboard_Spec.Max_CPU_Speed Explanation Message Minimum CPU Speed must be less than or equal to Maximum CPU Speed. 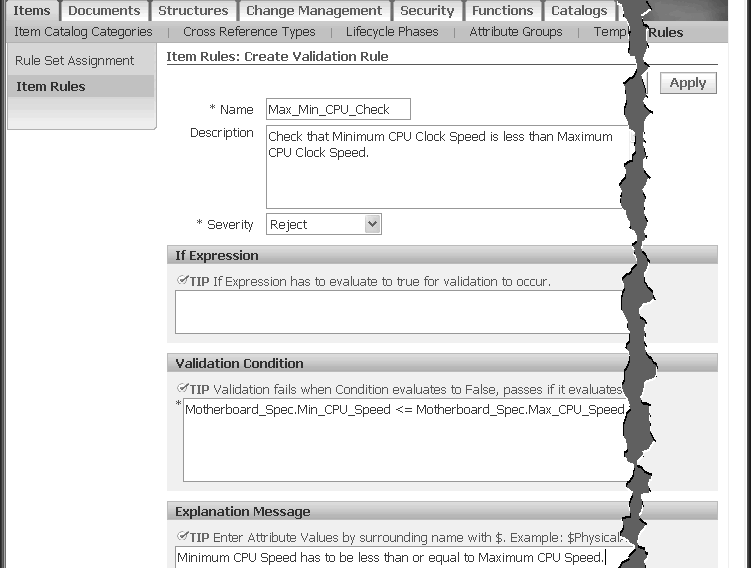
-
-
Click Validate to ensure that you typed the attribute names correctly.
Important: You must know the internal names of the attribute groups and attributes that you want to use in expressions. You cannot look up valid attribute groups and attributes from this page.
-
Click Apply.
This enters the first validation rule into the rule set and returns you to the Rule Set: Rule List page. From this page, you can continue to add validation rules to the rule set by selecting the checkbox next to the first rule, using the Add Above or Add Below buttons, and repeating the above steps. Rules execute in the order listed within the rule set. Use the Sequence field and the Update Sequence button to change the rule order. If an attribute's expression depends on a previously calculated value, you must ensure that the previous value calculation occurs before it is needed in a later rule.
Computer Motherboard Rule Set Example
From the Rule Set: Rule List page, click Add Below to add this second validation rule. The table below shows the field values to enter in the Item Rules: Create Attribute Validation Rule page.
Create Validation Rule: If the Purchasable Flag equals Yes, then the List Price cannot be null. Field Name Value Name Require_List_Price Description List Price must be set if Purchasable Flag is set to "Yes". Severity Reject If Expression Purchasing.Purchasable == "Yes" Validation Condition (!isnull(Purchasing.List_Price)) Explanation Message If Purchasable is set to Yes then List Price cannot be null. Tip: The "!" in "!isnull" is used for "not".
Now, create the third validation rule in the example:
Validation Rule: Unit Height cannot change by more than 3% without requiring approval. Name Height_Change Description Unit Height cannot change by more than 3%. Severity Needs Approval If Expression Validation Condition abs(percent(Physical_Attributes.Unit_Height)) > 3.0 Explanation Message A Unit Height change of 3% or more requires a Change Order. Note: The percent function returns the percentage change of the new value to the value in Production. This change can be positive or negative. The abs function converts it to an absolute change.
To include other rule sets within a rule set (create a composite rule set)
To delete a rule set
-
In the Item Rule Sets page, search for and select the rule sets to delete.
-
Click Delete.
To copy a rule set
-
In the Item Rule Sets page, search for and locate the rule set to copy.
-
In the row containing the rule set, click the Copy icon.
The PIM Rules: Copy Rule Set page appears.
-
Enter a unique Internal Name for the rule set.
The Name, Description, and Business Entities default from the original rule set, but you can change them.
-
Click Continue.
This takes you to the Rule Set: Rule List page. All of the rules from the original rule set are copied into this new rule set, too. You can now update the attached rules and rule set as needed.
To update a rule set
-
In the Item Rule Sets page, search for and locate the rule set to update.
-
In the row containing the rule set, click the Update icon.
The Item Rules: Rule List page appears. From here, you can update the rule set description and the attached rules, as well as add or delete rules and update the rule sequence.
Related Topics
Overview of Item Business Rules
Assigning Rule Sets to Entities
Viewing Attributes Used in Rule Sets
Building Rule Expressions
The rule administrator writes assignment and validation rules based on the components of the logical data model. This topic describes the logical data model components and the syntax used to write business rules.
You can use the following data model components when building rule expressions:
-
attributes
-
attribute groups
-
records, when using multi-row attribute groups
-
alternate catalog categories
-
business entities
-
current production values
Item Business Rule Expression Reference
Use the syntax described in this section to build rule expressions.
Constants
All values used in rule expressions consist of the following simple types:
| Type | Description |
|---|---|
| String | All strings and characters. Strings are delimited by double or single quotes. The escape character is "\”. |
| Number | All decimals, integers, and so on. Depending on the user's Oracle E-Business Suite preferences, numbers can have a "." or "," as a decimal point. If "," is used as a decimal point, then function arguments use ";" as the argument delimiter. |
| Date | Date only. Enter dates in the format specified in your Preference Option. Date constants automatically reformat if a user logs in with a different preference. You can add days to the date using numbers. For example, compute the sell date by adding 30 days to the availability date. |
| DateTime | Combination of date and time |
| Time | Time only |
Attributes and Catalogs
-
Attributes
Indicate an attribute by appending it to its attribute group (separated by a period). For example:
<Attribute Group Name>.<Attribute Name>
Use the internal name of the attribute group and attribute. The internal name must not contain any spaces.
-
Attribute Units of Measure
For attributes with a defined unit of measure (UOM), add the UOM to the end of the expression. For example:
<Attribute Group Name>.<Attribute Name>.UOM
Tip: Note that all comparisons between amounts are automatically adjusted to take into account different UOMs, so accessing the UOM is not necessary for comparison purposes.
-
Item Catalog Categories
You cannot use item catalog categories in expressions. To make a rule set specific to an item catalog category (ICC), assign it to that ICC during rule set creation. That rule set then applies to each entity with the ICC attached as a parent or as an ancestor.
-
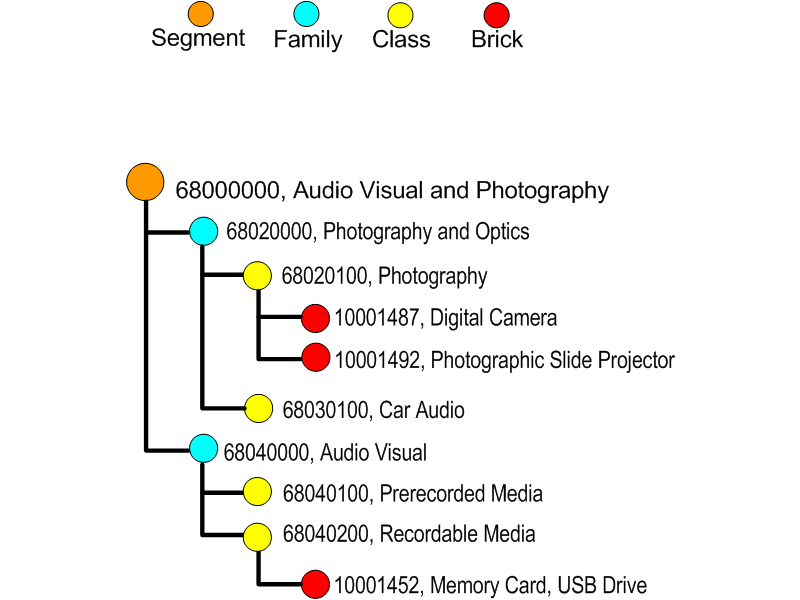
Alternate Catalogs
An administrator can define many alternate catalogs. For example, GS1, the supply chain standards organization, defines a categorization system named GPC. GPC contains four levels: Segment, Family, Class and Brick. The figure below illustrates some levels within the Audio Visual/Photography segment:
GPC Categorization System Example
You can access alternate catalog information two ways with item rules:
-
Determine if an entity is assigned to an alternate catalog or category.
-
Access the values of an alternate catalog category.
If an item is assigned to an alternate category, all of the parent categories are also searchable.
-
Item rules referring to ICCs and Alternate Catalogs can use levels to identify the level in a catalog hierarchy tree. The root of the tree equals 1 and level 0 designates the node that the entity is assigned to, no matter what level in the hierarchy that this node actually appears. The following table shows the levels of the catalog hierarchy from the above GPC Categorization System example:
| Level | Code | Description |
|---|---|---|
| 1 | 68000000 | Audio Visual/Photography |
| 2 | 68020000 | Photography/Optics |
| 3 | 68020100 | Photography |
| 4 or 0 | 10001487 | Digital Camera |
AssignedTo Function
The AssignedTo function can use levels:
Syntax
-
assignedTo(catalog)
-
assignedTo(catalog, category)
-
assignedTo(catalog, category, level)
You can use assignedTo with one, two, or three parameters:
| Parameter | Type | Explanation |
| catalog | String (constant) | Name of Alternate Catalog. Use only constant names (no expressions). If this is the only parameter provided, then determine if the item is assigned to any category in this catalog. |
| category | String (constant) | Name of Category. If no other parameter is provided, then determine if the category matches any ancestor category of the item. |
| level | Number | Determine if the category matches at a specific level. Numbers count from the root category through the branches in the hierarchy. Level 0 is always the parent node. |
assignedTo Examples
-
Determine if an item is assigned to the Spring Collection alternate catalog:
assignedTo("Spring Collection")
-
Determine if an item is assigned to a category starting with 68:
assignedTo ("GPC", "68000000")
-
Determine if Level 2 of a Geographic Categorization is Washington:
assignedTo ("Location", "Washington", 2)
The assignedTo functions work for any item-related business entity. For example, if you are checking an Item Supplier entity, then the function runs for the relevant item belonging to that Item Supplier entity.
Accessing Alternate Catalog Attributes
To write expressions that go beyond determining assignment to a category, you can access the categories and its attributes directly. If an expression referencing the alternate catalog occurs, the system loops through all of the selected categories and evaluates the expression by instantiating each one. Use the following syntax:
<Catalog Specifier>.<Category Specifier>.<Attribute Specifier>
For example:
Catalog[Retail Hierarchy].AncestorCategory.Name == "USWest"
Caution: You can use only one alternate catalog per expression.
You can use multiple ParentCategory and AncestoryCategory specifiers, as long as they all refer to the same alternate catalog. The following list provides more information about each specifier:
-
<Catalog Specifier>
The catalog is specified by the keyword "Catalog" followed by the name of the catalog in square brackets.
-
<Category Specifier>
We support 2 category specifiers, ParentCategory and AncestorCategory. ParentCategory references the immediate category(s) assigned to the item. AncestorCategory references the immediate category, its parents, its parent's parents, and so on, to the root category.
-
<Attribute Specifier>
The Attribute Specifier is the internal name of the attribute. This also retrieves the Name and Description of the attribute. Other information about the attribute is represented and stored as flexfields and is accessed using the Flexfield keyword. Examples include:
-
Catalog[Medical].AncestorCategory.Name == "Pediatrics"
-
Catalog[RMS].ParentCategory.Name == "Fashion"
-
[Electronics].ParentCategory.FlexField[HDTV] == "Yes"
-
Multi-Row Attribute Groups
Multi-row attribute group expressions can only include attributes from a single multi-row attribute group. The system only processes the modified rows of a multi-row attribute group.
Entity Flexfields
Entity flexfields do not belong to any attribute group. Access them using the FlexField keyword:
Flexfield[<Flexfield Internal Name>]
For example:
Flexfield[DiagonalLength]
Operators and Functions
The following section describes how to use operators and functions when building rule expressions.
Null Values
Any attribute can have an empty (null) value. In a typical business process, not all attribute values are entered at the same time. Multiple people enter data for an item over a period of time. For example, the Production Engineer enters an item's weight, while the Marketing Manager enters the description. To facilitate this form of processing, rules referencing attributes that have no (null) value are ignored. This means that the expression is neither true or false; expressions that evaluate to null are ignored.
Therefore, there is no need to write a validation rule with the following logic:
if (not isnull(PhysicalAttributes.Weight)) then PhysicalAttributes.Weight <= 10
The "if" part of the above rule is unnecessary. If Weight equaled null, the validation would be ignored. If you want to verify that an attribute has a non null value, use the "isnull" function. "isnull" verifies that an attribute contains a value. "isnull" is the only way to test for empty values.
Boolean Expressions
Boolean expressions return TRUE, FALSE or null. Use them in "If" expressions or in validations. Consider the following when writing Boolean expressions:
General Comparison Operators: == != < <= > >=
Use the following syntax:
expression1 == expression2
expression1 != expression2
expression1 < expression2
expression1 <= expression2
expression1 > expression2
expression1 >= expression2
expression1 in (expression2, expression3, …)
If one or both expressions are null, then the result is null. To check for null values, you must use the "isnull" function. A string comparison is case insensitive. For case sensitive comparisons, use the string "compare" function. The "in" function is equivalent to (expression1 == expression2) or (expression1 == expression3) or …(and so on).
Null Comparison: isnull
Use the following syntax:
isnull(expression)
The function "isnull" returns TRUE if its argument is a NULL value. Otherwise, it returns FALSE. This function lets you explicitly test whether a value is null. Other functions are ignored if the value of the argument is null. Use !isnull to check that an attribute is not null.
String Search: compare contains endsWith match startsWith
Use the following syntax:
compare(string1, string2)
contains(look_for_string, look_in_string)
endsWith(look_for_string, look_in_string)
match(pattern, look_in_string)
startsWith(look_for_string, look_in_string)
All string search functions are case sensitive. If you want to do a case insensitive comparison, use the "==" comparison operator. "compare" returns 0 when string1 is exactly equal to string2, -1 if string1 is lexicographically less than string2, and +1 if string1 is lexicographically greater than string2. "match" performs a regular expression search on a string. For a description of regular expression construct behavior, see Friedl, Jeffrey E. F. (2002). Mastering Regular Expressions. 2nd Edition. O'Reilly and Associates.
Logical Operators: and or not
Use the following syntax:
expression1 and expression2
expression1 or expression2
not expression1
The logical "and" function returns the following results based on whether or not expressions A and B are true:
| A | B | A and B |
|---|---|---|
| False | False | False |
| False | True | False |
| True | False | False |
| True | True | True |
| False | null | False |
| null | False* | null |
* The processor stops after it finds the first False. Therefore, there is a difference between "False and null" and "null and False".
The logical "or" function returns the following results based on whether or not expressions A and B are true:
| A | B | A or B |
|---|---|---|
| False | False | False |
| False | True | True |
| True | False | True |
| True | True | True |
| True | null | True |
| null | True* | null |
* The processor stops after it finds the first True. Therefore, there is a difference between "True and null" and "null and True".
The logical "not" function returns the following results based on whether or not expression A is true:
| A | not(A) |
|---|---|
| False | True |
| True | False |
| null | null |
Comparison to Current Production: changed delta percent previous
When using tolerance rules, you can compare the new value of an attribute to the current production value.
Use the following syntax:
changed(attribute)
changed(attributeGroup)
delta(attribute)
percent(attribute)
previous(attribute)
"changed" returns TRUE if the new value of an attribute differs from the current production value. This function also works with null values. If you specify only the Attribute Group, then the function returns TRUE if any attribute in that Attribute Group changes.
"delta" returns the difference between new and existing attributes. String comparisons are case-insensitive. For Booleans expressions, TRUE is considered greater than FALSE. The following table shows the result of different scenarios:
| Operator | Number, Date, or DateTime |
|---|---|
| new < current production | new - current production value |
| new >current production | new - current production value |
| new == current production | 0 |
| current production value does not exist | null |
| both new and current production value are null | 0 |
| either new or current production value are null (but not both) | null |
"percent" is only valid for numbers. It returns:
(delta(attribute)/"current production value")*100
"previous" accesses the actual previous value.
Number Operators
Use the following operators in numerical expressions:
Math: + - * / sum
Use the following syntax:
expression1 + expression2
expression1 - expression2
expression1 * expression2
expression1 / expression2
sum(expression1, expression2, …)
All of the above mathematical expressions return null if any argument is null and division by zero returns null. The number of decimal digits returned by division is the maximum number of digits from expression1 and expression2. Use "sum" to add up a series of values.
abs
Use the following syntax to return the absolute value of an expression.
abs(expression)
For example, the percentage weight change must be less than 10.
abs(percent(PhysicalAttributes.Weight))<=10
amount
Use the following syntax to return an amount in a given unit of measure. This ensures that comparisons or calculations occur in the desired unit of measure.
amount(expression,target UOM)
The weight must be less than or equal to 10 kg:
PhysicalAttributes.Weight<=amount(10,'kg')
min, max
Use the following syntax to return the minimum or maximum value in a series of values. You can also use this function for arrays or in query expressions.
min(expression1,expression2,…)
In the following example, the result is "2006-11-30".
max("2006-10-12","2006-11-30")
round, roundup, rounddown
Use the following syntax to round a number to the specified decimal places. "round" rounds to the nearest value. "roundup" rounds away from zero and "rounddown" rounds toward zero.
round(expression,decimals)
roundup(expression,decimals)
rounddown(expression,decimals)
| Example Expression | Result |
|---|---|
round(1.5758,2) |
1.58 |
roundup(1.5758,2) |
1.58 |
rounddown(1.5758,2) |
1.57 |
String Functions
Use the following functions with string data types.
+
Use the following syntax to concatenate two expressions and return the resulting string. This syntax also returns a valid string if the expressions consist of other data types.
expression1 + expression2
indexOf
Use this syntax to return a position of "look_for_string" in "look_in_string". The string position starts at zero. If "look_for_string" is not found, then the processor returns a value of -1. The search is case sensitive. If either expression is null, the resultant value is null.
indexOf(look_for_string, look_in_string)
length
Use this syntax to return the length of the given string. If the expression is null, then the resultant value is null.
length(expression)
lowercase
Use this syntax to return the lowercase equivalent of the given expression. If the expression is null, then the resultant value is null.
lowercase(expression)
substring
Use this syntax to return a substring of "string" starting at "start" and ending before "end". If "end" is omitted, then return to the end of the string. The string position begins at zero. If "start" is less than zero, then start at the beginning of the string. If "end" is greater than the length of the string, then return up to the end of the string. If any expression is null, then the resultant value is null.
substring(string,start)
substring(string,start,end)
trim
Use this syntax to remove all leading and trailing (but not middle) whitespace characters from a string. If the expression is null, then the resultant value is null.
trim(expression)
uppercase
Use this syntax to return the uppercase equivalent of the given expression. If the expression is null, then the resultant value is null.
uppercase(expression)
Date Functions
Use the following functions with date data types.
+ -
Use the following syntax to add or subtract a certain number of days from a date. A single number is interpreted as days. Otherwise, use the ISO 8601 format.
expression1 + expression2
expression1 - expression2
For example, Item.Logistics.LeadTime + 3 equals 3 days after the Item Lead Time.
Supported Attributes
You can access all attributes for the following business entities using the <Attribute Group Name>.<Attribute> syntax.
-
item
-
item revision
-
item organization
-
item supplier
-
item supplier site
-
item supplier site organization
You cannot access attributes for item revision business entities using rules. Attributes in the supplier, supplier site, and organization business entities do not use attribute group names; access the attributes directly using the <Business Entity>.<Attribute> syntax (for example, Supplier.Supplier_Name).
See below for more information about using the following types of attributes.
-
Rule Set Context Attributes
-
Item Primary Attributes
-
Item Supplier Attributes
-
Supplier Attributes
-
SupplierSite Attributes
-
Organization Attributes
Rule Set Context Attributes
Rule set context attributes are a special set of seeded attributes that give some context to the rule execution.
| Context Attributes | Description |
|---|---|
| Context.RuleSetVersion | Always set to "1.0" |
| Context.ExecutionDate | Date that rules are invoked. |
| Context.ExecutionDateTime | Date and time that rules are invoked. |
| Context.BatchID | Enter the Batch ID when running Import. |
| Context.BatchName | Enter the Batch Name when running Import. |
Context.ExecutionDate>="7/6/2007"
Item Primary Attributes
You can use all item primary attributes as read-only values for rule evaluation (in If/Then expressions) at all business entity levels (for example: Item, Item Revision, Item Supplier, and so on) while creating rules. Changes to an item's primary attributes only trigger Item business entity rules. The item primary attributes available for rule evaluation include:
-
Item_Primary.Name
-
Item_Primary.Description
-
Item_Primary.Status
-
Item_Primary.Primary_UOM
-
Item_Primary.Secondary_UOM
-
Item_Primary.Engineering_Item
-
Item_Primary.Approval_Status
Only Item business entity assignment rules can set the value of the following item primary attributes:
-
Name
-
Description
-
Status
You cannot change the value of any other item primary attributes using a rule.
Example
Item_Primary.Sellable_Flag == "Yes"
Item Supplier Attributes
Use the following two attributes for the item supplier, item supplier site, and item supplier site organization business entities when creating rules. The attribute group is Intersection_Primary.
-
Primary_Flag
-
Status
Item Supplier Attribute Example
Intersection_Primary.Primary_Flag
Intersection_Primary.Status=="Production"
Supplier Attributes
Use the following supplier attributes when creating rules. Access the supplier attributes using the attribute group "Supplier".
-
Supplier_Name
-
Supplier_Number
-
DUNS
-
Taxpayer_ID
-
Tax_Registration_Number
Supplier Attribute Example
Supplier.Supplier_Name == "Acme"
SupplierSite Attributes
Use the following supplier site attributes when creating rules. Access the supplier site attributes using the attribute group "SupplierSite".
-
Supplier_Site
-
Supplier_Site_ID
-
City
-
State
-
Country
Supplier Site Attribute Example
SupplierSite.State=="CA"
Organization Attributes
Use the organization attribute "Code" when creating rules. Access the organization attribute using the attribute group "Organization".
Organization Attribute Example
Organization.Code=="9289"
Execution Behavior
Rules only run during item creation, when attributes change, or when assigning an alternate catalog and the rule contains an alternate catalog reference.
Additional Information: Rules run before the item number and description generating functions, so the Item Number and Description fields do not contain values when the rules run. However, the item number and description generating functions can use attribute values assigned by rules.
Rules and Change Management
An attribute requires a change order if one of the following conditions are met:
-
an attribute's status equals "Change Order Required"
-
A validation rule (using an attribute) with severity equal to "Needs Approval" runs
If an attribute requires a change order, any related attributes must also require change orders. Related attributes include any attribute used in a validation or assignment rule that contains another attribute requiring a change order.
Related Attribute Example
If Condition: General.Shippable == "Yes"
Assignment: Logistics.PostalLength = Physical.Length + Physical.Girth
If General.Shippable, Logistics.PostalLength, Physical.Length or Physical.Girth requires a change order, then all other attributes require a change order, also.
Note: For validation rules, if any attribute requires a change order, then all updated attributes in the validation rule must be included in the same change order.
If the attributes computed in assignment rules are used in subsequent rules, then they can form a chain of dependencies. In order to ensure that the data remains consistent, the system propagates the change order requirement along the dependency chain. For example, consider the following two assignment rules:
-
Physical.Girth = Physical.Width + Physical.Depth
-
Logistics.PostalLength = Physical.Length + Physical.Girth
If "Physical.Depth" is updated and requires a change order, then the change order requirement propagates to Logistics.PostalLength. Note that the change order only propagates along updated attributes. If an attribute is not updated, then it does not require a change order (for example, Physical.Length above).
If an assignment rule assigns a value to an attribute in an attribute group with a change policy of "Not Allowed", then the application treats this item like a failed validation and rejects it. For example, consider the following assignment:
Logistics.PostalLength = Physical.Length + Physical.Girth
If the "Logistics.PostalLength" change policy is "Not Allowed" and "Physical.Length" changes, then the item is rejected.
This prevents inconsistent data from entering the database. If the system ignores the assignment rule, then the relationship between PostalLength, Length and Girth no longer holds. To avoid an error, ensure that all attributes dependent upon each other have change policies of "Not Allowed". In the above example, the "Logistics" and "Physical" attribute group change policies should be the same (see: Defining Change Policies). If setting "Physical" to "Not Allowed" is not feasible, then ensure that Length and Girth do not change by other means, because the changed entity will be rejected.
Regular Expression Syntax
Use the following syntax when building rule expressions.
| x | The character x |
| \\ | The backslash character |
| \0n | The character with octal value 0n (0 <= n <= 7) |
| \0nn | The character with octal value 0nn (0 <= n <= 7) |
| \0mnn | The character with octal value 0mnn (0 <= m <= 3, 0 <= n <= 7) |
| \xhh | The character with hexadecimal value 0xhh |
| \uhhhh | The character with hexadecimal value 0xhhhh |
| \t | The tab character ('\u0009') |
| \n | The newline (line feed) character ('\u000A') |
| \r | The carriage-return character ('\u000D') |
| \f | The form-feed character ('\u000C') |
| \a | The alert (bell) character ('\u0007') |
| \e | The escape character ('\u001B') |
| \cx | The control character corresponding to x |
| [abc] | a, b, or c (simple class) |
| [^abc] | Any character except a, b, or c (negation) |
| [a-zA-Z] | a through z or A through Z, inclusive (range) |
| [a-d[m-p]] | a through d, or m through p: [a-dm-p] (union) |
| [a-z&&[def]] | d, e, or f (intersection) |
| [a-z&&[^bc]] | a through z, except for b and c: [ad-z] (subtraction) |
| [a-z&&[^m-p]] | a through z, and not m through p: [a-lq-z](subtraction) |
| . | Any character (may or may not match line terminators) |
| \d | A digit: [0-9] |
| \D | A non-digit: [^0-9] |
| \s | A whitespace character: [ \t\n\x0B\f\r] |
| \S | A non-whitespace character: [^\s] |
| \w | A word character: [a-zA-Z_0-9] |
| \W | A non-word character: [^\w] |
| ^ | The beginning of a line |
| $ | The end of a line |
| \b | A word boundary |
| \B | A non-word boundary |
| \A | The beginning of the input |
| \G | The end of the previous match |
| \Z | The end of the input but for the final terminator, if any |
| \z | The end of the input |
| X? | X, once or not at all |
| X* | X, zero or more times |
| X+ | X, one or more times |
| X{n} | X, exactly n times |
| X{n,} | X, at least n times |
| X{n,m} | X, at least n but not more than m times |
| X?? | X, once or not at all |
| X*? | X, zero or more times |
| X+? | X, one or more times |
| X{n}? | X, exactly n times |
| X{n,}? | X, at least n times |
| X{n,m}? | X, at least n but not more than m times |
| X?+ | X, once or not at all |
| X*+ | X, zero or more times |
| X++ | X, one or more times |
| X{n}+ | X, exactly n times |
| X{n,}+ | X, at least n times |
| X{n,m}+ | X, at least n but not more than m times |
| XY | X followed by Y |
| X|Y | Either X or Y |
| (X) | X, as a capturing group |
Precedence
The precedence of character-class operators is as follows, from highest to lowest:
-
Literal escape \x
-
Grouping [...]
-
Range a-z
-
Union [a-e][i-u]
-
Intersection [a-z&&[aeiou]]
Note that a different set of metacharacters are in effect inside a character class versus outside a character class. For instance, the regular expression "." loses its special meaning inside a character class, while the expression "-" becomes a range forming metacharacter.
For a more precise description of the behavior of regular expression constructs, refer to Mastering Regular Expressions, 2nd Edition, Jeffrey E. F. Friedl, O'Reilly and Associates, 2002.
Viewing Attributes Used in Rule Sets
To view attributes used in rule sets
-
Navigate to the Setup Workbench. In the Items tab, click the Rules subtab.
-
In the Update Rule Set Assignment page, select Item Rules from the left side menu.
-
In the Item Rule Sets page, search for and select the name of a rule set.
-
In the Item Rules: Rule List page, select the Attributes tab.
You can search for the attributes included in the rule set using the following parameters:
-
Business Entity
-
Attribute Group
-
Attribute
-
Data Type
-
-
Click Go once you have entered your search parameters.
The search results display below the search parameters.
Including other Rule Sets
Since you can only assign one rule set to each business entity, create composite rule sets to bundle rule sets together. You can create a hierarchy of rule sets. For example, create a composite assignment rule set, a composite validations rule set, then a master composite mixed rule set that contains the above two rule sets. Assign the master composite mixed rule set to the business entity.
To include other rule sets within a rule set
-
Navigate to the Setup Workbench. In the Items tab, click the Rules subtab.
-
In the Update Rule Set Assignment page, select Item Rules from the left side menu.
-
In the Item Rule Sets page, click Create.
-
In the Item Rules: Create Rule Set page, enter Name, Description and Internal Name for the rule set.
Caution: You cannot change the Internal Name after the rule set is created.
-
In the Composite field, select YES.
For rule sets containing rules, set the Composite field to NO. For rule sets that contain other rule sets, set the Composite field to YES.
-
In the Type field, select the type of rules you plan to include in the composite rule set. Choose from:
-
Assignments
-
Validations
-
Mixed - select Mixed if you plan to include assignment and validation rule sets in the composite rule set.
Note: You have the option to create multiple layers of composite rule sets, some of which might only contain assignment or validation rules. Use a mixed composite rule set to include both types of rule sets together in one composite rule set.
-
-
Click Continue.
The Item Rules: Rule List page appears.
-
In the Included Rule Sets tab of the Item Rules: Rule List page, click Add Above or Add Below to add a rule set.
Note: The rule sets execute in the order listed in the Included Rule Sets tab. List validations after assignments if you want to validate some of the assignments.
-
In the Rule Set Search page, search for and select the rule sets to add to your composite rule set.
The system returns you to the Item Rules: Rule List page.
-
Enter the sequence for the rules to run. Click Apply.
To remove a rule set from a composite rule set
Select the composite rule set. In the Item Rules: Rule List page, select the rule to remove, then click Remove.
To update the rule set sequence in a composite rule set
Select the composite rule set. In the Item Rules: Rule List page, enter a new sequence number in the Sequence field for each rule set. Click Apply.
Viewing Rule Set Dependencies
From the Item Rules: Rule List page for a rule set, you can view the attributes used in the rule set, if the rule set is included in other rule sets (part of a composite rule set), and what business entities use the rule set.
To view the attributes used in a rule set
Navigate to the Item Rules: Rule List page for a rule set. In the lower region of the page, select the Attributes tab.
The search results region within the Attributes tab lists all attributes used in the rule set. Use the search parameters to filter the attributes listed in the search results.
To view which rule sets include the selected rule set
Navigate to the Item Rules: Rule List page for a rule set. In the lower region of the page, select the Rule Sets Where Included tab.
The search results region within the Rule Sets Where Included tab lists all composite rule sets that include the rule set appearing in the Item Rules: Rule List page. Use the search parameters to filter the composite rule sets listed in the search results.
To view which entities use the rule set
Once a rule set (typically a composite rule set) is assigned to an entity, you can view which entity uses the rule set.
Navigate to the Item Rules: Rule List page for a rule set. In the lower region of the page, select the Where Used tab. The search results region lists the business entity that the rule set validates.
Assigning Rule Sets to Entities
After creating rule sets, you must activate them by assigning them to the appropriate business entity. You can activate them directly by assigning the rule set to a business entity, but you can only assign one rule set to each business entity. Activate a rule set indirectly by using composite rule sets to group multiple rule sets together (see: Including other Rule Sets). You can then assign one composite rule set to a business entity. Once a rule set is activated, the rules are applied the next time a user updates the business entity data.
To assign a rule set to an entity
-
Navigate to the Setup Workbench. In the Items tab, click the Rules subtab.
-
In the Update Rule Set Assignment page, click Add Another Row.
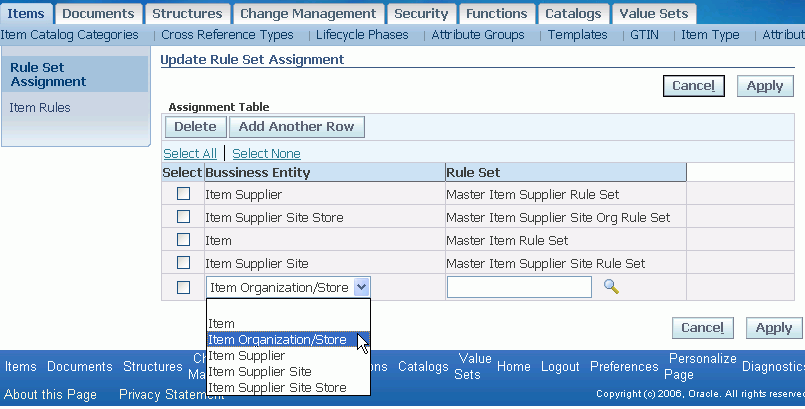
-
Select a business entity and a rule set to validate it.
-
You can only create one assignment per business entity.
-
If you need to update an assignment, select the existing assignment, click Delete, then click Apply. Finally, click Add Another Row.
-
Assign a rule set for each business entity that you want validated.
-
-
Click Apply.
Test the rules in the item specification pages by updating attribute values in the appropriate attribute groups. The rules should validate any updated values and any defined error messages should appear.