Using the Item Catalog
This chapter covers the following topics:
- Browsing the Item Catalog and Alternate Catalogs
- Updating Item Catalog Categories
- Assigning an Item to a Category
- Changing an Existing Item's Item Catalog Category
- Copying Items with Category Assignments
- Assigning Suppliers to Items
- Searching for Items
- Managing Favorite Items
- Using Recently Visited
- Creating New Items
- Creating New Item Requests
- Managing Item Imports
- EGO_ITM_USR_ATTR_INTRFC
- EGO_ITM_USR_ATTR_INTRFC Column Details
- EGO_ITEM_PEOPLE_INTF
- EGO_ITEM_PEOPLE_INTF Column Details
- Importing Items Using a Spreadsheet
- Importing Item Revisions Using a Spreadsheet
- Importing Item Categories Using a Spreadsheet
- Importing Item Organization Assignment Using a Spreadsheet
- Importing Item People Assignment Using a Spreadsheet
- Updating Existing Items
- Updating Existing Items Using a Spreadsheet
- Mass Updating Items, Categories and Associations
- Deleting Items
- Updating Multi-Row Attributes in a Spreadsheet
- Managing Item Specifications
- Managing Item Phases
- Managing AMLs
- Creating Item Revisions
- Managing Item Attachments
- Using Item Business Events
- Enabling Organization Assignments
- Managing Revision Phases
- Viewing Item Transaction Information
- Generating Reports
Browsing the Item Catalog and Alternate Catalogs
You can browse the hierarchically structured item and alternate catalogs from the application tree menu "Browse Catalog" link. You can also browse the item catalog, but not alternate catalogs, from the Setup Workbench. Expand and collapse levels in the hierarchy to view the current structure of the catalog. You can only browse catalogs for which you have the Catalog Viewer role.
To browse a catalog
-
In the Items section of the Application tree menu, click the "Browse Catalog" link.
-
In the Browse Catalog page Catalog field, select either the Item Catalog or another catalog.
-
In the Categories field, choose to view all categories for the catalog or only the active categories.
-
Click the Show/Hide link to search for item catalog categories by Name or Description. After entering the search criteria, click Go.
-
To view the items associated with the item catalog category, select the item catalog category.
All items associated with the item catalog category and its child categories are listed below.
-
Click the focus icon next to the desired item catalog category to display it at the top level.
To perform actions on an item within a catalog category
The actions you can perform on items vary depending on whether you select a category within the Item Catalog or another catalog.
From an Item Catalog category, you can select items and perform the following actions:
-
create a new item request
-
add items to a new catalog category
-
add items to an existing catalog category
-
generate a report
-
create a change order, change request, or issue
-
change the lifecycle
-
change the item catalog category
-
compare items
-
add to the Favorites list
-
export all items in the category to a spreadsheet
-
remove items from the catalog category
From any other catalog, you can select items and perform the following actions:
-
create a new item request
-
create a change order, change request, or issue
-
generate a report
-
compare items
-
add to the Favorites list
-
Complete the steps in To browse a catalog above, then select one or more items.
To export all items to a spreadsheet
-
Click Export All Items to export all items in the category to a spreadsheet.
To perform all other actions
-
In the Select Items field, select one of the following actions, then click Go.
-
Create New Item Request. See: Creating New Item Requests
Note: You can only create new item requests for items with an Approval Status of "Not Submitted For Approval" or "Rejected".
-
Add to Existing Catalog Category. See: Assigning an Item to a Category
-
Add to New Catalog Category. See: Assigning an Item to a Category
-
Generate Report. See: Generating Reports
-
Create Change Order. See: Creating Change Orders
-
Create Change Request. See: Creating Change Requests
-
Create Issue. See: Creating Issues
-
Change Lifecycle. See: Defining Change Policies, Oracle Product Information Management Implementation Guide
-
Change Item Catalog Category. See: Changing an Existing Item's Item Catalog Category
-
Compare
You can compare attributes of two or more items by selecting them and then selecting Compare from the Action menu. Each item's attributes will be listed side-by-side in a table. Select each attribute group individually.
-
Add to Favorites. See: Managing Favorite Items
-
To search or browse the item catalog from the Setup Workbench
-
In the Applications tree menu, click the "Setup Workbench" link.
On the Search: Item Catalog Categories page, click the Catalog Hierarchy link or the Catalog Hierarchy icon.
Note: You can only browse the item catalog using this method.
Tip: In the Search: Item Catalog Categories page, you can also search for item catalog categories by entering search criteria for a category name, description, or parent category.
When you enter a search string, the wildcard character "%" is appended to the input. For example, entering "mem" enters the search string "mem%", so that the "memory" catalog category could be returned in the search results. If you wish to search for entries that end with a particular string, such as "log", you can type in "%log", and all entries ending in "log" are returned. If you do not enter a search string in the text box, an error is returned.
Related Topics
Overview of Item Catalogs, Oracle Product Information Management Implementation Guide
Overview of Catalogs, Oracle Product Information Management Implementation Guide
Assigning an Item to a Category
Copying Items with Category Assignments
Updating Item Catalog Categories
It is likely that you will need to update item catalog categories at some point--you may need to change an item catalog category so that it can be used for item creation, or modify the inactive date so that the item catalog category will no longer be used. Often, users simply need to correct a mistake or reclassify the item catalog category due to shifting relationships within the item catalog category hierarchy.
To update an item catalog category
-
On the Search: Item Catalog Categories page, search for the item catalog category you want to update and click the corresponding link.
-
On the Basic Information page for the item catalog category, click Update.
-
On the Create/Edit Item Catalog Category page, enter or change the following information:
Catalog (required)
Defines the item catalog category name. The number of segments (and respective labels) for the item catalog category depends on how the item catalog group flexfield is defined in Oracle Inventory setup.
Description
Optionally enter a brief description of the item catalog category.
Parent Item Category
If at any time a parent item catalog category has been created for this item catalog category, then you cannot leave this field blank. In other words, once you have defined a parent for an item catalog category, you always have a parent item catalog category. Also, if a parent item catalog category has already been defined, then you can only choose the item catalog category's siblings, its sibling's children, or the current parent item catalog category, as a parent item catalog category.
Note: For item catalog categories with versions, once the item catalog category is released, you cannot change the parent item catalog category.
Item Creation Allowed
Select to specify that items in the item catalog category can be created (if you do not select, the item catalog category only serves the purpose of being a placeholder in the item catalog category hierarchy). If item creation is not allowed, the item catalog category will typically specify characteristics (attribute groups, etc.) that are inherited by its descendants.
Inactivate
Optionally specify a date on which the item catalog category will become inactive. You cannot specify an inactive date that is later than the inactive date of an item catalog category's parent, nor can you specify an inactive date that has already passed. Thus, all children of a parent item catalog category with an inactive date should be made inactive at the same time or earlier. Making an item catalog category inactive has the following implications:
-
You cannot create items of that item catalog category or any of its descendants.
-
You cannot use that item catalog category or any of its descendants as the parent item catalog category upon creation of an item catalog category.
Note: After you've updated an inactive date, the change propagates to all of the item catalog category's children.
-
-
Click Apply.
Related Topics
Defining Item Catalog Categories, Oracle Product Information Management Implementation Guide
Assigning an Item to a Category
When you create an item, it is automatically assigned to the default mandatory item catalog and default category of the functional area in which it is created. You can override the item catalog's default category as well as manually assign the item to an unlimited number of catalogs.
To assign an item to an existing category from the item's Classifications and Categories page
This explains how you can change an item catalog category as well as assign an item to one or more existing catalog categories.
-
In the Applications tree menu, use either the "Simple Search" or "Advanced Search" links to search for the item whose category you wish to change.
-
Click the item's link in the search results.
-
On the Overview page, select the Classification and Categories link.
-
On the Classification and Categories page, click Update. After the page refreshes, click Add Assignment.
-
Select a catalog and then a category within that catalog.
If Enforce List of Valid Categories is enabled in the catalog definition (See: Defining Catalogs, Oracle Product Information Management Implementation Guide), then you can only choose from the list of valid categories defined for that catalog. Otherwise, you can choose any category that has the same flex field structure as the catalog.
If Allow Multiple Item Category Assignments is disabled in the catalog definition (See: Defining Catalogs, Oracle Product Information Management Implementation Guide), then you can assign an item to only one category in the catalog. Otherwise, you can choose to assign the item to multiple categories in the catalog.
In a hierarchical item catalog, you can only assign items to leaf categories.
Tip: If you want to add the selected items to more than one catalog category, click Add Another Row to search for and select another catalog/category combination.
-
Click Apply.
To add items to an existing catalog category from the Browse Catalog or Search Results page
Using this method, you can select one or more items and assign them to existing catalog categories from the Browse Catalog or Search Results page.
-
Browse the item catalog or another catalog. Select the items within a catalog category that you want to add to an existing catalog category. See: Browsing the Item Catalog and Alternate Catalogs
Alternatively, search for one or more items. In the Search Results page, select the items that you want to add to an existing catalog category. See: Searching for Items
-
In the Select Items field, select the Add to Existing Catalog Category action, then click Go.
-
The Add to Existing Category page appears. In the Catalog field, search for and select a catalog.
-
In the Category field, search for and select a category.
-
If you want to add the selected items to more than one existing catalog category, then click Add Another Row.
-
If you decide not to add the items to a catalog category, you can either remove the items or remove the catalog category by selecting it, then clicking either Remove for the selected categories or Remove for the selected items.
-
Click Apply.
To add items to a new catalog category from the Browse Catalog or Search Results page
In addition to creating new catalog categories in the Setup Workbench (see: Defining Catalog Categories, Oracle Product Information Management Implementation Guide), you can create a new catalog category from the Browse Catalog and Search Results pages and add items to it in one flow of steps.
-
Browse the item catalog or another catalog. Select the items within a catalog category that you want to add to a new catalog category. See: Browsing the Item Catalog and Alternate Catalogs
Alternatively, search for one or more items. In the Search Results page, select the items that you want to add to a new catalog category. See: Searching for Items
-
In the Select Items field, select the Add to New Catalog Category action, then click Go.
-
In the Add to New Category page, Catalog field, search for and select the catalog to which you want to add a new category.
Caution: You can only select those catalogs for which you have the Manage Catalog privilege.
-
The Catalog Category field appears. Enter a unique name for the new catalog category.
Caution: If the search/list of values icon appears next to the Catalog Category field, this means that a value set is assigned to the flex structure associated with the catalog. Any new catalog category name must be a value from this value set that has not been previously used to create a catalog category.
When you use the list of values icon to search for a value within the value set, you are able to search on all values, including the values already used to create categories. If you select a value that is already assigned to a category, an error appears only after you try to create the new category.
To avoid this problem, select a catalog that uses free form category creation rather than one based on a value set.
-
Optionally, enter a description for the catalog category.
-
Optionally, enter a parent category for the new category.
The Parent Category field only appears if the catalog's Enable Hierarchy for Categories field is set to No (see: Defining Catalogs, Oracle Product Information Management Implementation Guide).
-
Optionally, in the Inactive On field, enter the date when you can no longer assign this catalog category:
-
As the default category of a new catalog
-
As a valid category of a catalog
-
To an item
-
As a valid category of an item catalog category
-
-
Optionally, you can select any items and click Remove if you no longer want to include them in the new catalog category.
-
Click Apply.
Related Topics
Overview of Item Catalogs, Oracle Product Information Management Implementation Guide
Overview of Catalogs, Oracle Product Information Management Implementation Guide
Browsing the Item Catalog and Alternate Catalogs
Copying Items with Category Assignments
Changing an Existing Item's Item Catalog Category
Warning: Before changing an item's ICC, consider the potential loss of user defined attribute data. If attribute groups associated with the existing ICC are not associated with the new ICC, then the item's attribute data for these attribute groups will be lost once the ICC changes.
See: Associating Attribute Groups with an Item Catalog Category, Oracle Product Information Management Implementation Guide
You can change an item's item catalog category (ICC) with the following exceptions:
-
You cannot change the ICC for style items that have SKU items.
-
For style items, the new ICC must have variant attribute groups.
-
You can only change the ICC of items for which you have the Edit Item and the Change Item Status privileges.
-
In one of the following pages, select the item(s) for which you want to change the item catalog category.
-
Browse Catalog page. See: Browsing the Item Catalog and Alternate Catalogs
-
Search Results page. See:Searching for Items
Alternatively, you can change the ICC from the item's Overview page.
Warning: If ICC versions are enabled, use one of the HTML interface options as described above to change an item's item catalog category rather than the Forms interface to avoid data corruption. Forms behavior has not been enhanced to support ICC versions.
-
-
Select Change Item Catalog Category from either:
-
the Select Items field in the Browse Catalog or Search Results page.
-
the Actions field in the item's Overview page.
Click Go.
-
-
In the Change Item Catalog Category page, search for and select a new ICC, then click Go.
Note: Items you selected for an ICC change do not appear in the Change Item Catalog Category page when the following conditions apply:
-
The items selected are style items with SKU items.
-
The items selected are style items and the new ICC has no variant attribute groups.
-
You do not have the Edit Item and the Change Item Status privileges for the item(s).
-
-
Optionally, you can select new values for the following fields:
-
New Lifecycle
-
New Lifecycle Phase
-
New Item Status
Any new values selected apply to all items in the list.
-
-
Optionally, select any items to remove from the list of items for which you plan to change the ICC. Click Remove.
-
Click Continue.
-
In the Change Item Catalog Category: Review Details page, for each item in the list, enter the following field values if you did not enter these field values for all items previously.
-
New Lifecycle. Optional.
-
New Lifecycle Phase. Optional.
-
New Item Status. Required.
-
-
Click Finish.
Related Topics
Browsing the Item Catalog and Alternate Catalogs
Assigning an Item to a Category
Copying Items with Category Assignments
When you assign an item to another organization, the system copies the item level catalogs, organization level default catalog, and the associated categories assigned in the item master organization. For example, if you manually assign an organization item level catalog to the item in the master organization, the system does not copy over that organization item level catalog when you assign that item to another organization.
After assigning an item to another organization, you can disable the item for one or more functional areas in the new organization. However, the system does not remove the corresponding functional area's default catalog. For example, you may have set the value of the Purchased attribute to "Yes" when you defined the item in the item master organization. When you assign this item to another organization, the system copies over the "Yes" value of the Purchased attribute, and therefore assigns the default catalog of the Purchasing functional area. In the new organization, you may decide to set the value of the Purchased attribute to "No." After you disable the item for the Purchasing functional area in the new organization, the item still retains the Purchasing default catalog. You may manually delete the Purchasing catalog in the new organization.
If you copy an object with item catalogs defined at the organization level, the system assigns the new item the default categories of the mandatory catalogs, even if the original item did not have the default categories. This occurs because the system copies the values of the item defining attributes and not the item catalogs and categories themselves.
Assigning Suppliers to Items
Assigning suppliers to items enables you to assign attributes, perform actions, and make rules that only apply to that item/supplier combination. For example, if you choose not to assign suppliers to items, you can assign attributes at:
-
the master item level - all attributes defined at this level apply to the item across all organizations and all suppliers.
-
the item organization level - all attributes defined at this level apply to the item only in this particular organization.
If you choose to assign suppliers to items, you can also assign supplier sites to items. For example, a supplier manufactures an item in two locations, San Francisco and Denver (the supplier sites). The characteristics of the item differ slightly depending on which supplier site ships to your retail store (organization). In this example, you can assign attributes at the following levels, in addition to the item and item organization levels described above:
-
item supplier - all attributes defined at this level apply to this item and supplier combination.
-
item supplier site - all attributes defined at this level apply to this item and supplier site combination.
-
item supplier site organization - all attributes defined at this level apply to this item, supplier site, and your organization combination.
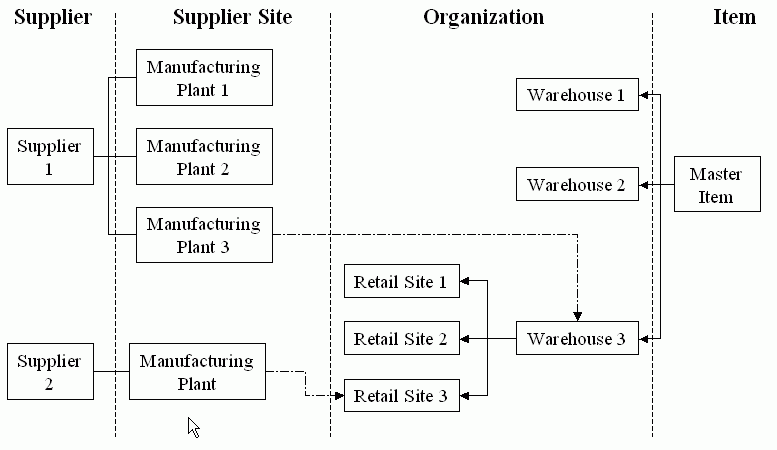
The following graphic depicts an item supplied to a company's retail stores, either directly to the store or through a warehouse. The suppliers can ship the item from more than one manufacturing plant (supplier site). In this scenario, a store either receives the item from it's warehouse or directly from a supplier. Supplier 1 ships to the warehouse, which then ships the item to the store, while supplier 2 ships the item directly to the store. The item attributes differ slightly, depending on which supplier, and even which supplier site, ships the item.
Note: Some users question how item supplier associations relate to the Approved Supplier List (ASL). The item supplier associations serve a different purpose than the Approved Supplier List. The item supplier associations can tell you which supplier and/or supplier location supply an item, but not whether the supplier is approved.
To assign a supplier and supplier site to an item
-
In the Item Overview page, select the Associations subtab. Select Supplier and Supplier Site Assignment from the left side of the page.
-
From the Supplier and Supplier Site Assignments page, click Assign.
-
In the Assign Items to Suppliers: Select Suppliers page, enter at least one of the following to identify the supplier, then click Next.
-
Supplier Name
-
Supplier Number
-
DUNS Number
-
Tax Payer ID
-
Tax Registration Number
Tip: Check the Show Supplier Sites box to narrow your search for specific suppliers and supplier sites. Checking this box enables you to enter supplier site information.
-
-
In the Assign Items to Suppliers: Review Supplier Results page, select the supplier and/or the supplier sites listed. Click Next.
This page lists the supplier and all supplier sites for the supplier.
-
In the Assign Items : Review Results page, review supplier and supplier sites selected. Click Finish.
If the supplier and supplier sites selected are incorrect, click Back to correct the error.
To assign a supplier site and organization to an item
The process of assigning a supplier site and organization to an item is similar to the process described above of assigning a supplier and supplier site to an item, but with one more step - assigning an organization to the item supplier site.
-
In the Item Overview page, select the Associations subtab. Select Supplier Site Organization Assignment from the left side of the page.
-
Assign a supplier site as described above in "To assign a supplier and supplier site to an item:".
-
In the Assign Items to SupplierSites-Org: Select Organizations page, enter an organization code, name or hierarchy. Click Next.
-
Review the organization selected and click Next again.
Click Back if you want to change the organization.
-
In the Assign Items: Review Results page, you can review the supplier, supplier site, and organization assigned to the item. Click Finish.
Click Back if you want to change the supplier, supplier site, or organization.
To view and update item supplier, item supplier site, or item supplier site organization attributes
You can view or update a single item supplier association from both the Supplier and Supplier Site Assignments page and the Supplier Site Organization Assignment page. To update all item supplier associations at once, you must import the changes using a spreadsheet.
To view and update attributes for a single item/supplier/supplier site/organization association
-
Navigate to either the Supplier and Supplier Site Assignments page or the Supplier Site Organization Assignment page.
-
In the Advanced Search region, search for and select an item/supplier/supplier site/organization intersection.
-
In the Supplier Assignment detail region, select the Attributes tab, then click Update.
-
Enter any changes to the item/supplier/supplier site/organization intersection attributes, then click Apply.
To view and update attributes for all suppliers, supplier sites, or supplier site organizations at once
-
Navigate to either the Supplier and Supplier Site Assignments page or the Supplier Site Organization Assignment page.
-
Click the appropriate button:
-
Update Supplier Attributes
-
Update Supplier Site Attributes
-
Update All Attributes (on the Supplier Site Organization Assignment page)
-
-
Select a display format to download, then click Export.
Note: The display format you select must contain attributes controlled at the appropriate level. For example, if you want to update supplier site attributes, the display format must contain attributes controlled at the supplier site level.
See Updating Existing Items Using a Spreadsheet for a detailed description of how to export, make changes, and import those changes.
To view and mass update item supplier, item supplier site, or item supplier site organization attributes
-
For item supplier and item supplier site attributes, navigate to the Supplier and Supplier Site Assignments page. For item supplier site organization attributes, navigate to the Supplier Site Organization Assignment page. Select the supplier, supplier site, and/or organization intersection for which to view or update attributes.
-
Click one of the following:
-
Update Supplier Attributes
-
Update Supplier Site Attributes
-
Update All Attributes - use for updating the item supplier site organization intersection attributes.
Tip: You can update the item supplier and item supplier site attributes from the Supplier Site Organization Assignment page. For the selected item supplier site organization, click the Supplier and Supplier Site Assignment tab. All item supplier and item supplier site intersections are listed. Click the Additional Attributes icon for a particular row, then click Update.
-
-
Select a display format that contains attributes controlled at the intersection level selected. Click Export.
-
Select the application on your desktop to use for viewing the exported document. Click Next.
-
Choose whether to open or save the exported spreadsheet document.
-
Update the attributes, then save the spreadsheet to import later.
To view and update item-supplier formal packs
-
Navigate to the Supplier and Supplier Site Assignments page, then select the Formal Packs tab.
-
To update the pack type, select the Pack Type to use with the selected supplier or supplier site, then click Create Change Order.
See: Managing the Packaging Hierarchy and Creating a SKU Packaging Hierarchy.
To view, create, and update item-supplier change orders
You can create a change order for:
-
adding or removing a supplier or specific supplier site to or from an item
-
updating item supplier, item supplier site, or item supplier site organization attributes
-
For item supplier and item supplier site assignments and attributes, navigate to the Supplier and Supplier Site Assignments page. For item supplier site organization assignments and attributes, navigate to the Supplier Site Organization Assignment page. Select the supplier, supplier site, and/or organization intersection for which to view or update attributes.
-
Click Create Change Order. See: Creating Change Orders
To inactivate an item supplier, item supplier site, or item supplier site organization association
Once you assign an item to a supplier, supplier site, or supplier site organization, you cannot delete this relationship. You can inactivate the relationship, though. In the (item/supplier/supplier site/organization) Assignment: Update Attributes page, change the Status attribute to Inactive.
Related Topics
Approved Supplier List, Oracle Purchasing User's Guide
Entering Suppliers Manually, Oracle Payables User's Guide
Adjusting Suppliers (Adding a New Supplier Site), Oracle Payables User's Guide
Finding Suppliers, Oracle Payables User's Guide
Searching for Items
You can perform searches using keywords that may be part of an item number, item catalog category, manufacturer, manufacturer part number, short description or long description. Keyword searches enable you to search using any or all keywords. You can enter additional keywords to be excluded from a search. For example, the keyword search for “SRAM” may return results that include all items that have “SRAM” in the item name, description, or an attribute value. A Wildcard search enables you to enter the percent (%) sign before and/or after a keyword. For example, a search using “mo%” may return “Monitor” and “Mouse,” but a search using “mon%” would return “Monitor.” A Fuzzy Search enables you to look for records that closely resemble or sound like your word(s), but are spelled differently. For example, a search for “telefone."
Keyword search options include:
-
Exact match
Enter search criteria for a specific word.
-
Word positioning
Search using a particular phrase such as “optical sensors relay,” or search for words near each other, such as “optical NEAR relay.”
-
Inexact match
Search for words that sound like your word to account for common spelling and typing errors.
-
Intelligent match
Search for an item by entering a word that is about something like a theme--for example searching by the word 'Car' can result in items such as Convertibles, Coupes, and Sedans without having the word car in the item name. You may also ignore the noise words such as 'the', 'of'. A default list of noise words (a stop list) is supplied for each European Language.
-
Non-alphanumeric characters
You may choose to search with '-' (or other non-alphanumeric characters) as part of the item name such as AS-18947.
-
Boolean combinations
Combine terms described above using the operators: AND, OR, and NOT.
-
Stemming search
Search for relevant items. For example, entering the word “pen” returns results that include items like pens and pencils.
The system also enables you to search for items based on item revision attribute values. For example, if the horsepower of an engine has changed from 200 hp to 220 hp between revisions A and B, searching for an item revision with the horsepower attribute value of 220, will return only revision B.
To perform a simple item search
-
On the Simple Search page, enter as many keywords as possible in the Keyword Search field. For example, entering "CRT Color Monitor" would return more relevant results than simply entering "Monitor." To specify that the search uses all the keywords entered, select Match all word(s) (AND). To specify that the search use any of the keywords entered, select Match any word(s) (OR).
-
To exclude a keyword from the search, enter it in the Without Keyword(s) field. For example, entering the keywords "Flat LCD Monitor" without the keyword "black " returns all "Flat LCD Monitors" that are not black.
-
Click Search.
-
Enter % (wildcard) before and/or after a keyword to perform a wildcard search. For example, a search for "mo%" returns Mouse and Monitor; a search for mon% returns Monitor.
-
Include "$" before the item name to perform a stemming search. This indicates that you want to search for items whose spelling is derived, or stems from the keyword. For example, a search on the keyword "$contract" could return: "contract," "contracts," "contracted," and "contracting."
-
Include "?" before the item name to perform a fuzzy search. This indicates that you want to search for items whose spelling is close to the actual item for which you are performing the search. The search engine looks for records that closely resemble the words you have entered, but that are spelled differently. The search returns results that have items with that term in either its name or description. Hence, entering the keyword "?telefone" also would return "telephone."
-
Simple Search is case-insensitive.
As mentioned above, Item simple search supports wildcard, fuzzy and stemming search. However these different types of search are supported only in certain languages. The following table summarizes the search features and the supported languages.
Language Wildcard (%) Fuzzy (?) Stemming ($) English Yes Yes Yes German Yes Yes Yes Japanese No Yes No French Yes Yes Yes Spanish Yes Yes Yes Italian Yes Yes Yes Dutch Yes Yes Yes Portuguese Yes Yes No Korean Yes No No Simplified Chinese No No No Traditional Chinese No No No Danish Yes No No Swedish Yes No No Finnish Yes No No -
Note the following tips and restrictions before conducting an advanced search:
-
Providing values for the indexed attributes improves performance during the search.
-
If no search criteria template is used, you must add your own criteria to be used for the search.
-
If no display format template is used, the following columns will be the default for your search results: Item, Item Catalog Category, Description, and Item Revision.
-
All Advanced Search operators are case-sensitive, except for the operator "contains".
-
On the Advanced Search page, select an Item Catalog Category and click Go. This determines the search criteria templates that are available to use for this particular search.
Note: You are not required to search by or select a catalog category. If you do not, the default system search criteria template appears.
You can also optionally search by Organization and Revision. To search by item revision specific attributes, select the type of Revision on which to base the search. Following are the types of revisions available:
-
All
Searches for all (past, current and future) revisions.
-
Latest
Searches for the most current effective revisions that are not yet implemented.
-
Production
Searches for the revisions that are currently implemented.
-
-
Select a search criteria, add or delete attributes and enter values to define your parametric search. You must include at least one indexed attribute in your search. You can select and preview a display format for the search results.
Note: For details about how to use search criteria and display formats to assist in your advanced search, see Managing Search Criteria, Oracle Product Information Management Implementation Guide and Managing Display Formats, Oracle Product Information Management Implementation Guide.
-
Click Search.
The Search Results page appears.
You can view the AML or Manufacturer Part Numbers for an item in the item search results page within the show/hide region.
To perform actions on items in the Search Results page
You can select items and perform the following actions:
-
create a new item request
-
add items to a new catalog category
-
add items to an existing catalog category
-
generate a report
-
create a change order, change request, or issue
-
change the lifecycle
-
change the item catalog category
-
compare items
-
add to the Favorites list
-
export all items in the category to a spreadsheet
-
Complete the steps in To perform a simple item search or To perform an advanced search above, then select one or more items.
To export all items to a spreadsheet
-
Click Export All Items to export all items in the category to a spreadsheet.
To perform all other actions
-
In the Select Items field, select one of the following actions, then click Go.
-
Create New Item Request. See: Creating New Item Requests
Note: You can only create new item requests for items with an Approval Status of "Not Submitted For Approval" or "Rejected".
-
Add to Existing Catalog Category. See: Assigning an Item to a Category
-
Add to New Catalog Category. See: Assigning an Item to a Category
-
Generate Report. See: Generating Reports
-
Create Change Order. See: Creating Change Orders
-
Create Change Request. See: Creating Change Requests
-
Create Issue. See: Creating Issues
-
Change Lifecycle. See: Defining Change Policies, Oracle Product Information Management Implementation Guide
-
Change Item Catalog Category. See: Changing an Existing Item's Item Catalog Category
-
Compare
You can compare attributes of two or more items by selecting them and then selecting Compare from the Action menu. Each item's attributes will be listed side-by-side in a table. Select each attribute group individually.
-
Add to Favorites. See: Managing Favorite Items
-
Managing Favorite Items
The Favorite Items list provides you a mechanism for creating and managing lists of your favorite or bookmarked items. You can add items to your Favorite Item list from the Search Results page, or while browsing--there are a number of contexts from which the Favorite Items link is available. The following steps describe just one of these contexts.
To add an item to your favorite items list
-
Navigate to the Favorite Items page by clicking the Favorite Items link in the Items section of the Applications tree menu. You can also get there by navigating to any item Search or Browse page and clicking the Favorite Items tab.
-
On the Favorite Items page, click Add Favorite Item.
-
On the Advanced Search page, search for item you wish to add to your favorites list.
-
On the Search Results page, select the items you wish to add and select Add to Favorites in the Action menu and click Go. A message acknowledging the successful addition of the item to your favorites list appears at the top of the page.
To manage your favorite items list
-
Navigate to the Favorite Items page by clicking the Favorite Items link in the Items section of the Applications tree menu. You can also get there by navigating to any item Search or Browse page and clicking the Favorite Items tab.
-
On the Favorite Items page, click Add Favorite Item to add a new item to the list. To remove an item from your Favorite Items list, select the item and then choose Remove from the Action menu and click Go.
-
You can Export to Excel the attributes for your favorite item by selecting it and clicking Export to Excel.
-
You can compare attributes of your favorite items by selecting them and then selecting Compare from the Action menu. Each item's attributes will be listed side-by-side in a table.
-
You can change the lifecycle of an item by selecting it and then selecting Change Lifecycle from the Action menu.
-
You can change an item's catalog category by selecting it and then selecting Change Catalog Category from the Action menu.
-
Using Recently Visited
Clicking the Recently Visited global button (global buttons appear on all pages in the system's user interface) enables you to view a list of pages that you visited before the current page. This eases navigation throughout the user interface, as the use of your browser's Back button is not supported. The Recently Visited list provides links up to the last 20 pages visited in your current session, in order of most to least recently visited.
Creating New Items
-
Products and services you sell
-
Resources that you maintain
-
Components that make up your products and services
Each item that you create in the catalog has several standard operational attributes that determine the behavior of the item with respect to various functions such as Purchasing, and Inventory Management. In addition to these operational attributes, the item has several user-defined attributes defined by its item catalog category. These user-defined attributes can capture item specifications and other information relevant to the product definition.
You can choose from multiple methods to create a new item:
-
Create Item page
-
Item Open Interface table (see: Managing Item Imports)
-
Microsoft Office Excel spreadsheet (see: Importing Items Using a Spreadsheet)
-
Import Workbench (see: Overview of Inbound Product Data Synchronization and Data Quality Management).
-
Product Workbench (see: Creating Items)
If the item catalog category specified when creating the item requires an item request approval, proceed to Creating New Item Requests after you create the item.
To create a new item
-
From the menu, select either Create Engineering Items or Create Production Items.
Note: The only difference between these two menu choices is whether or not the Engineering Item box is pre-selected.
-
On the Create Item page, enter values in the following fields:
-
Create - select New Items.
Tip: Alternatively, you can select Copies of an Existing Item in the Create field. See: To create copies of an existing item. If you have multiple similar items to create, consider creating the first item by selecting New Items in the Create field. After this item is thoroughly defined, created, and approved (if necessary), create the remaining items by creating multiple copies of the first item.
-
Item Catalog Category - find and select an item catalog category in which to create the new item.
Note: You can only create items within a particular item catalog category if you have the Catalog Category User role for that item catalog category.
Warning: If ICC versions are enabled, use any of the item creation options described above to create an item rather than the Forms interface to avoid data corruption. Forms behavior has not been enhanced to support ICC versions.
-
Number of Items - enter the number of items you want to create.
-
Style Item - select Style Item if you want to create a style item with related SKUs. For more information about style items, see: Overview of Style and SKU Items.
Note: You can only create a style item if the selected item catalog category includes at least one attribute group with variant attributes. You can only create SKUs from a style item within the style item's Overview page. See: To create SKU items from a style item:
-
GDSN Syndicated - select this box to permit synchronization with a GDSN datapool such as 1SYNC. See: Overview of the Global Data Synchronization Network, Oracle Product Information Management Implementation Guide
Important: You cannot send data directly from Oracle Product Information Management (PIM) to GDSN since PIM only maintains the master data, but does not validate the data for GDSN. To send data to GDSN, you must build a validation or use a third party software application to perform this function.
-
Engineering Item - if a new item request is not required for the item catalog category, you have the option to check the Engineering Item checkbox. If a new item request is required, the Engineering Item check box is automatically selected and displayed as read-only. See: Creating New Item Requests
-
Select Templates - optionally, select templates to set the operational and user-defined attributes for the item. The selected templates are applied to all of the items created in the order specified. See: Defining Item Templates, Oracle Product Information Management Implementation Guide
-
-
On the Create Item: Enter Number/Description page, enter the required information. Optionally, you can update the primary attribute values (for multiple items, click the Show link to view the primary attributes).
The item catalog category definition determines the new item's generation method. The item number already appears when the item catalog category specifies that it is Sequence-generated. If the category specifies that the item number or item description is User Entered, then enter an item number or item description. A Function-generated item number or item description is generated after the item and description attributes are entered.
-
Click Finish.
If you created one item, the system creates the item and returns you to the item Overview page (the item workbench) where you can further define the item or change attribute values. If you created more than one item, the system notifies you that the items have been submitted for creation and provides the Concurrent Request ID.
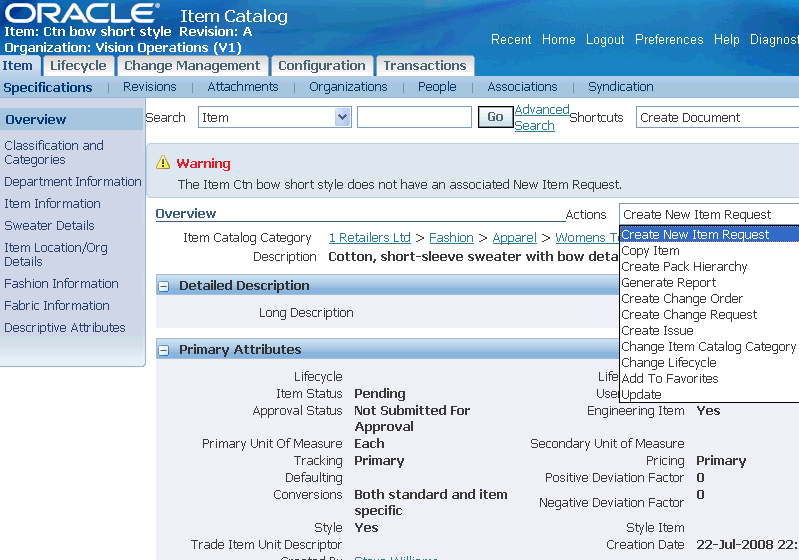
If the item's catalog category requires approval, a warning message appears in the item workbench stating that this item does not have an associated new item request. The item's status remains as Pending with an approval status of Not Submitted for Approval until a new item request is created and approved. See: Creating New Item Requests.
Optionally, you can now update item characteristics using the item workbench subtabs:
-
Specifications
View attributes associated with the item catalog category. You can also update or change attribute values, but, depending on your role privileges and the item's lifecycle phase, a change order may be required (see: Managing Item Specifications). You cannot add new attributes. Attribute associations with item catalog categories are performed at the administration level. For more information, see Defining Item Catalog Categories, Oracle Product Information Management Implementation Guide.
-
Revisions
-
Attachments
-
Organizations
-
People
See: Adding People, Oracle Product Information Management Implementation Guide
-
Associations
See: Assigning Suppliers to Items and Managing AMLs.
Caution: GTIN cross references are no longer supported for use with GDSN.
-
Syndication
Oracle Product Information Management no longer supports outbound product data synchronization with customers.
To create copies of an existing item
If you are familiar with an item in the same item catalog category in which you wish to create a new item, then you can save time by creating the new item from an existing item. When you copy an item, select the attribute groups and attachment categories to copy; also choose whether or not to copy people and organizational assignments (you can add new manufacturer part numbers, but you cannot copy existing ones). You can modify the copied information to define the new item's specifications.
Note that you must have the appropriate privileges to copy the item's user-defined attributes, operational attributes, attachments, people, and organizational assignments. For example, if you wish to copy the item's attachments, you must have--at a minimum--the View Item Attachments List privilege. Likewise, if you want to copy the item's people, you must have the View Item People List privilege for the base item.
-
Follow the same steps as described above in "To create a new item:", except in the Create field, select Copies of an Existing Item. You can then enter the item and revision to copy.
-
In the Copy Item Details region, select the sequence in which to copy the template item details and the copied item details. Select which specific item details (such as item attribute groups, attachment categories, and people) to copy.
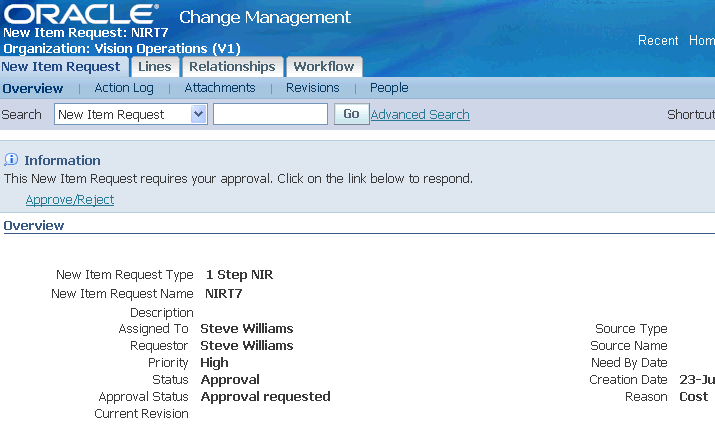
Creating New Item Requests
The create item process enables you to request new items through a standard approval and creation process. Using this process, companies can promote reuse of items and maintain tight controls over item/part creation, avoiding costly maintenance of duplicate items. The item request approval routing ensures that all relevant parties participate in the item's definition.
Note: If there is no item request associated with an item catalog category, then new items are created with an approval status of Approved. For items such as this, users can define the item status during item creation. If there is a new item request associated with the item catalog category, then the approval status of the item is either Not Submitted for Approval, Submitted for Approval, or Approved, depending upon the approval status of the corresponding new item request. The default approval status of the new item request (NIR) is Not Submitted for Approval. For such items, regardless of the default approval status, the item status is Pending (all status controlled flags are disabled). Only Oracle Product Information Management users can view items with the item status of Pending. Users cannot view these items in the Master Item window or in any other Oracle application. Users can manually update the item status after the new item request is approved.
| Item Creation Process Steps | Item Status | Approval Status (for the item) | Approval Status (for the NIR) |
|---|---|---|---|
| 1. Create item. | Pending | Not Submitted for Approval | - |
| 2.Create and save NIR. | Pending | Not Submitted for Approval | Not Submitted for Approval |
| 3. Submit NIR for approval. | Pending | Submitted for Approval | Not Submitted for Approval |
| 4. NIR in approval workflow. | Pending | Submitted for Approval | Approval Requested |
| 5. NIR is approved. | Pending | Submitted for Approval | Approved |
| NIR is implemented. | Pending | Approved | Approved |
Benefits associated with the new item request process:
-
Companies can standardize item numbers and descriptions
-
Prevents duplication and promotes reuse of item number that are functionally equivalent
-
You can automatically trigger actions based on the item creation business event. See: Item Business Events, Oracle Product Information Management Implementation Guide and Managing Business Events, Oracle Workflow Developer's Guide.
New item requests are change objects. See the Using Change Management chapter in the Oracle Product Information Management User's Guide for more information about managing change objects in general.
Prerequisites
- Associating New Item Requests with an Item Catalog Category, Oracle Product Information Management Implementation Guide
To create a new item request
-
Create a new item request from either the item Search Results page or the item Overview page.
In the Search Results page, select the item(s) that you want to add to a new item request. In the Select Items field, select Create New Item Request, then click Go. Using this method, you can create a new item request that contains one or many items.
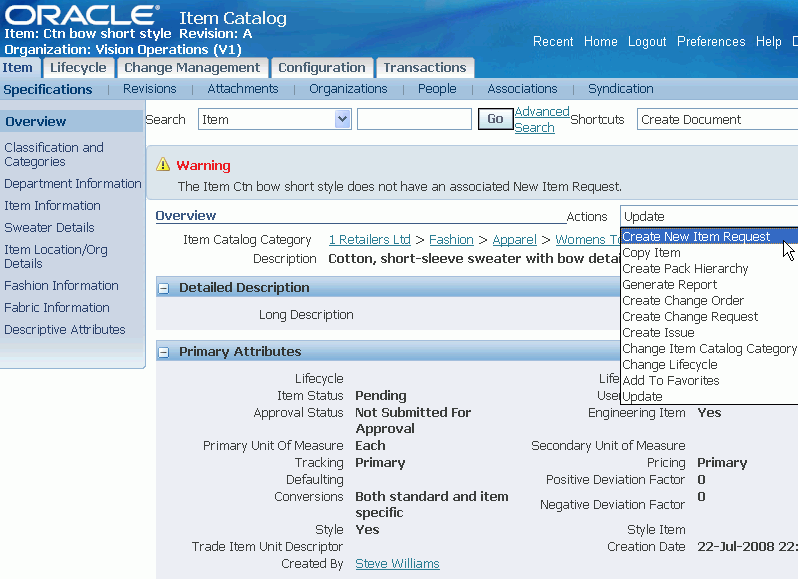
In the Overview page, select Create New Item Request in the Actions field, then click Go. Using this method, you create a new item request for only one item, the item displayed, or you can add this item to an existing new item request in the next step.
-
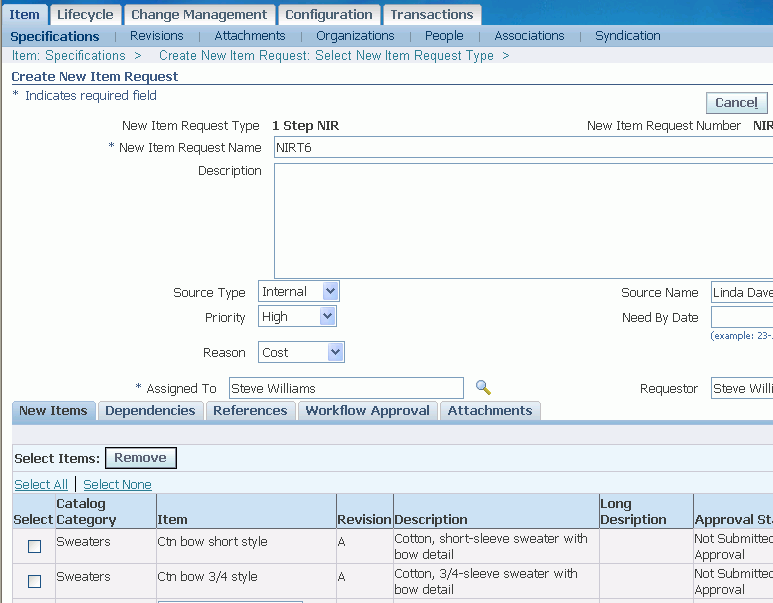
In the Create New Item Request: Select New Item Request Type page, choose whether to create a new item request or to add the selected item(s) to an existing new item request.
Click Continue.
-
On the Create New Item Request page you can customize/edit the new item approval request.
The following list provides additional information for some fields on this page.
-
New Item Request Name - required. Enter a descriptive name for the new item request.
-
Assigned To - the assignee is defaulted based on the item catalog category role specified in the assignment rule for new item requests.
-
Priority and Reason - use these fields to track the degree of urgency and the reason for requesting the new item.
-
Source Type and Name - use these fields to document who requested the new items.
You can also update information in the following tabs:
-
New Items (Lines) - lists all of the items included in the new item request. You can select items and remove them from the new item request or add additional items to the request.
Note: You can only add items that have a status of Not Submitted for Approval, Cancelled, or Rejected.
-
Dependencies and References - add change object dependencies and item reference information in these two tabs. See: Creating Relationships.
-
Workflow Approval - approval routing templates are available for routing the new item request definition/approval. Routing templates are typically defined for standard business processes associated with new item creation/approvals. You can also use the approval routing template to route the new item request to different functional groups, providing those groups the ability to participate in the creation and definition of new items. For example, the Design Engineer may be responsible for entering the item's user-defined attributes. See: Defining New Item Request Workflows, Oracle Product Information Management Implementation Guide.
If the new item request type has more than one workflow attached to a phase, the Switch Template button appears. Click Switch Template to choose a different workflow. To view workflows associated with a different phase, use the Phase pull down list.
-
Attachments - attach any supporting files, URLs, or text. See: Adding Attachments.
-
-
You can submit the new item request or save it if you wish to enter additional information later.
Submitting the NIR starts the workflow listed for the Open status. Once you submit it, you cannot add more items to it. If you save it for later, the new item request is saved with a Draft status. Upon submission, if set up, an assignment notification is sent via e-mail.
All new items requiring approval have the item status Pending. After the new item is approved, you can change the item status manually to enable the item for viewing/use outside of the system. You can also define or update its operational attributes.
To add SKUs to a new item request
First, create the SKUs as described in Creating Style and SKU Items. You can then add each SKU to a new item request individually as described above in "To create a new item request:" or you can add multiple SKUs all at once to the same new item request as described below.
-
In the Overview page for the style item, select the associated SKUs that you want to add to a new item request. Click Add to New Item Request.
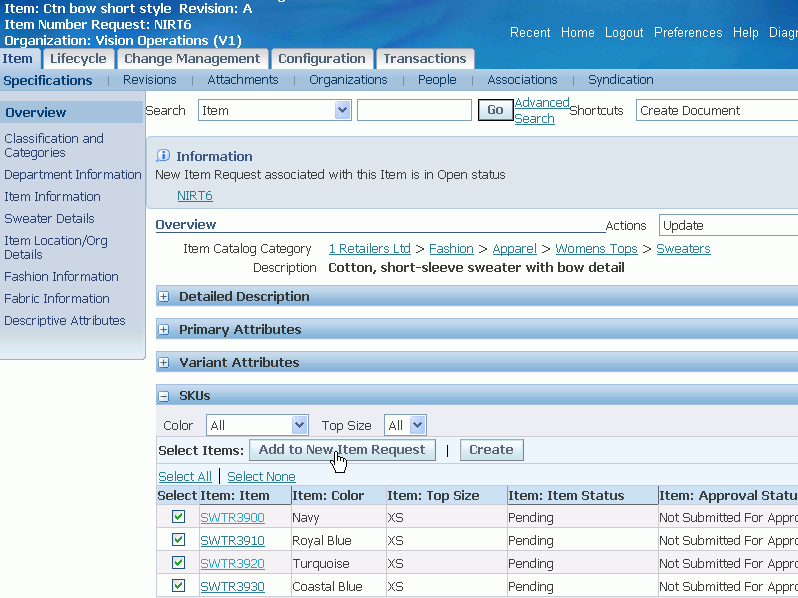
From this point on, refer to the steps in "To create a new item request:" above.
To update a new item request
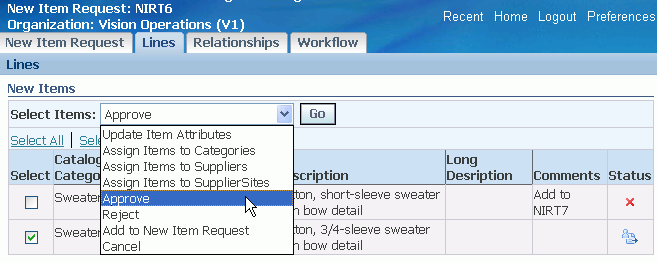
Within a new item request, you can perform the following updates on each individual line item or on all line items, depending on their status and your role:
-
Remove - you can remove an item from a new item request (NIR) as long as the NIR has not been submitted for approval (the NIR status is Draft).
-
Add Items - you can add new items to a NIR when the NIR status is Draft and the item you want to add meets one of the following criteria:
-
the item is not assigned to another NIR and the item's catalog category requires a NIR.
-
if the item is assigned to another NIR, the item's status is Cancelled or Rejected.
This action effectively copies the item from the original NIR into the NIR currently in view.
-
-
Update Item Attributes - you can export the item to a spreadsheet, update the attributes, and import the item. See: Mass Updating Items, Item Categories and Item Associations.
-
Add to Category - you can add approved items only to existing catalog categories.
-
Assign Items to Suppliers
-
Assign Items to SupplierSites
-
Approve - this action enables you to approve only certain lines in a NIR, while other lines may have a status of Cancelled or Rejected.
-
Reject or Cancel - you can add a rejected or cancelled line to another NIR at a later time, enabling other, approved lines to continue with the current NIR towards final approval.
-
Add to New Item Request - only available for rejected or cancelled items.
Adding a cancelled or rejected item from one NIR to another effectively copies the cancelled or rejected item to a new NIR.
To manage a new item request from Open to Approved status
A new item request can have many workflows to complete before reaching Approved status. After each workflow is complete, you must promote the NIR to the next workflow.
-
Navigate to the new item request's Overview page. Select the Workflow tab.
-
If a Workflow/Approval Status is Completed and the Workflow/Approval Status of the next workflow is Not Started, then click Promote.
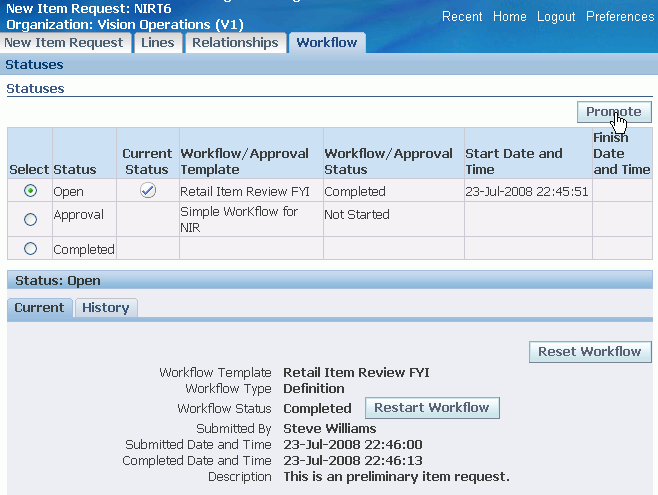
-
In the Promote Status: (NIR number) page, select the next status, then click Apply.
-
The approver can approve, reject, or transfer the new item request from the Notifications page to complete the workflow or perform these actions on each NIR line item individually from the New Items page.
Notifications Page
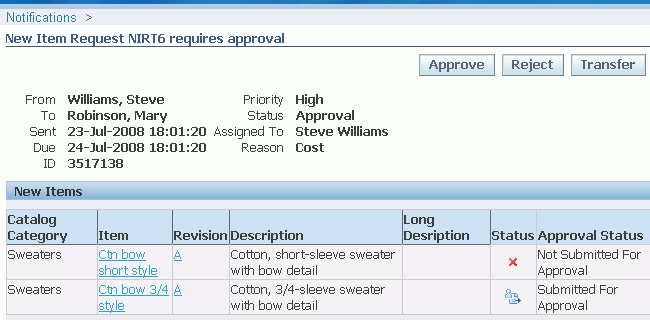
To navigate to the New Items page, click the New Item Request Details link in the Notifications page, then select the Lines tab.
You can now select each new item individually and perform the actions described above in "To update a new item request:", depending on your role.
New Items Page
-
Once you (the approver) are satisfied that each line item in the NIR is at the correct status (Approved, Rejected, or Cancelled), you must approve, reject, or cancel the entire NIR to complete the workflow.
From the new item request's Overview page, click on the Approve/Reject link, then approve or reject the NIR.
-
In the item Overview page, the approval status should now reflect the status of the new item request, but the item status remains at Pending. If the approval status is Approved, you can now update the item status to Active.
Related Topics
Associating New Item Requests with an Item Catalog Category, Oracle Product Information Management Implementation Guide
Defining Workflow Templates, Oracle Product Information Management Implementation Guide
Managing Item Imports
You can use any of the following methods to import items and item-related information:
-
Item Open Interface
-
Microsoft® Office Excel spreadsheet (see: Importing Items Using a Spreadsheet)
-
Import Workbench (see: Overview of Inbound Product Data Synchronization and Data Quality Management)
Caution: The Import Workbench is only available to customers who have licensed Oracle Product Information Management, and is not available to licensees of Oracle Product Lifecycle Management.
This topic discusses importing items using the Item Open Interface. The Open Interface program validates all data before importing it into the production tables. You can also import the following item-related data:
-
Item people.
-
User attributes.
-
Customer items.
-
Customer item cross references.
This topic discusses importing items and their associated data using interface tables. You can import and update items and their associated data from any source into Oracle Product Information Management using interface tables. When you import items through the item interface tables, you create new items in your Item Master organization or assign existing items to additional organizations. Validation of imported items is done using the same rules as the item definition pages, so you are insured of valid items.
Before you use the interface tables, you must write and run a custom program that extracts item and/or associated data from your source system and inserts it into the appropriate interface tables. After you load the interface tables, run the appropriate concurrent request(s) to import the data into the production tables. The concurrent request programs assign defaults, validates data you include, and then imports the new data.
You can use the following concurrent request programs to import data:
-
Import Items - imports items and item revisions.
-
Import Catalog Items - imports items, item revisions, and their related user defined attributes, item associations (the relationship between items and suppliers, supplier sites, and/or supplier site organizations), manufacturer part numbers, and item people.
-
Import Item/Item Revision User Attributes - imports user defined attributes for items and item revisions.
-
Import Item People - imports people associated to items.
-
Import Customer Items
-
Import Customer Item Cross References
-
Import Item Cross References - imports item cross references and GTIN cross references.
-
Import Related Items
-
Load the Item Open Interface table (MTL_SYSTEM_ITEMS_INTERFACE) with the data you want to import.
See:
-
Open Item Interface, Oracle Inventory User's Guide and Importing Items, Oracle Inventory User's Guide for a full description of how to import items.
-
My Oracle Support (http://metalink.oracle.com) Document ID 730164.1 for instructions on how to use the Oracle Product Information Management public APIs and sample code examples.
-
To import items and associated data
You can import items and their associated data from any source into Oracle Product Information Management using interface tables and the Import Catalog Item concurrent request program. Before you use the Import Catalog Item concurrent request program, you must write and run a custom program that extracts item information from your source system and inserts it into the following interface tables:
-
MTL_SYSTEM_ITEMS_INTERFACE - for items.
-
MTL_ITEM_REVISIONS_INTERFACE - for item revisions.
-
EGO_ITM_USR_ATTR_INTRFC - for user defined attribute values associated to items.
-
EGO_ITEM_ASSOCIATIONS_INTF - for suppliers, supplier sites, and supplier site organizations associated to items.
-
EGO_AML_INTF - for manufacturer part numbers associated to items.
-
EGO_ITEM_PEOPLE_INTF - for people associated to items.
The set_process_id and data_set_id values must be consistent across these tables to identify data related to a single batch.
After you load the data into the interface tables, run the Import Catalog Item concurrent request to import the data into the production tables. This program assigns defaults, validates data you include, and then imports the new data.
Tip: Alternatively, use the Catalog Item Maintenance API package to load most of the above information into the production tables. For more information on using the Catalog Item Maintenance API package, navigate to the Integrated SOA Gateway responsibility > Integration Repository > Product Lifecycle Management > Advanced Product Catalog > Catalog Item > Catalog Item Maintenance (Internal Name: EGO_ITEM_PUB). See: My Oracle Support (http://support.oracle.com) Document ID 730164.1 for instructions on how to use the Oracle Product Information Management public APIs and sample code examples.
-
Navigate to the Development Manager responsibility > Batch Import > Import Items > Import Catalog Items. This opens the Run this Request... window.
The Name field is automatically filled in with the name of the concurrent program, Import Catalog Items, and the Parameters window opens.
-
In the All Organizations field, indicate whether to run the interface for all organizations in the item interface table (MTL_SYSTEM_ITEMS_INTERFACE). If you choose No, the interface runs only for the current organization and interface table rows for other organizations are ignored.
-
In the Validate Items field, indicate whether to validate all items and their data residing in the interface table that have not yet been validated. If items are not validated, they are not processed into Oracle Inventory. You would choose No if you had previously run the item interface and responded Yes for Validate Items and No for Process Items, and now want to process your items.
-
In the Process Items field, indicate whether to process items. If you choose Yes, all qualifying items in the interface table are inserted into Oracle Inventory. You would choose No, along with Yes for Delete Processed Rows, to remove successfully processed rows from the interface table without performing any other processing.
-
In the Delete Processed Rows field, indicate whether to delete successfully processed items from the item interface tables. Choose No to leave all rows in the item interface tables for successfully processed items.
-
In the Process Set (Null for All) field, you can optionally enter a batch ID.
Use this field to process a particular batch. To process all records in the interface table, leave this field blank.
-
In the Create or Update Items field, select whether to:
-
Create New Items - only create new items. Do not update existing items.
-
Update Existing Items - only update existing items. Do not create new items.
-
Sync Items - Create new items and update existing items.
-
-
Choose OK to close the Parameters window, then choose Submit.
To import user attributes for items
-
Load the Item User-defined Attributes Open Interface table (EGO_ITM_USR_ATTR_INTRFC) with the data you want to import. For detailed help on loading the Open Interface tables, refer to:
-
My Oracle Support (http://metalink.oracle.com) Document ID 730164.1.
-
the Integration Repository. See: Oracle Integration Repository User's Guide.
-
-
Navigate to the Inventory Responsibility in Oracle Applications, and click the Inventory link. Then click the Items link
-
Click the Import link.
-
Click the Import Item/Item Revision User Attributes link.
Note: The Parameters form automatically appears when you select a request that requires parameter values.
-
After entering the values in the required parameter fields, click OK.
-
Click Submit.
-
Load the Item People Open Interface table (EGO_ITEM_PEOPLE_INTF) with the data you want to import. For detailed help on loading the Open Interface tables, refer to the Oracle Manufacturing Open Interfaces and APIs manual.
-
Navigate to the Inventory Responsibility in Oracle Applications, and click the Inventory link. Then click the Items link
-
Click the Import link.
-
Click the Import Item People link.
Note: The Parameters form automatically appears when you select a request that requires parameter values.
-
After entering the values in the required parameter fields, click OK.
-
Click Submit.
To import customer items and customer item cross references
-
In the Navigator menu under the Batch Import : Import Items heading, click the Import Customer Items link or the Import Customer Item Cross References link.
For more information, see:
-
Customer Item and Customer Item Cross Reference Interfaces, Oracle Inventory User's Guide
-
Importing Customer Items, Oracle Inventory User's Guide
-
Importing Customer Item Cross References, Oracle Inventory User's Guide
-
To import item cross references
You can import item cross references from any source into Oracle Product Information Management using the Item Cross Reference Interface. Before you use the Item Cross Reference Interface, you must write and run a custom program that extracts item cross reference information from your source system and inserts it into the MTL_CROSS_REFERENCES_INTERFACE table. After you load the item cross references into the interface table, run the Import Item Cross References concurrent request to import the data into the production table. This program assigns defaults, validates data you include, and then imports the new item cross references.
Note: : This program enables importing both seeded (for example, Customer, Vendor, and Substitute) and user defined cross reference types.
Tip: Alternatively, use the Import Item Cross References API to load the cross reference information into the production table. For more information on how to use the Import Item Cross References API, navigate to the Integrated SOA Gateway responsibility > Integration Repository > Product Lifecycle Management > Advanced Product Catalog > Catalog Item > Import Item Cross References (Internal Name: MTL_CROSS_REFERENCES_PUB).
-
Navigate to the Development Manager responsibility > Batch Import > Import Items > Import Item Cross References. This opens the Run this Request... window.
The Name field is automatically filled in with the name of the concurrent program, Import Item Cross References, and the Parameters window opens.
-
Optionally, in the Parameters window, enter the following values:
-
In the Process Set (Null for All) field, enter a batch ID to process a particular batch. To process all records in the interface table, leave this field blank.
-
In the Delete Processed Records field, enter No to retain all processed records. This field defaults to Yes, which deletes all processed records from the MTL_CROSS_REFERENCES_INTERFACE table.
-
-
Choose OK to close the Parameters window, then choose Submit.
You can import related items from any source into Oracle Product Information Management using the Related Items Interface. Before you use the Related Items Interface, you must write and run a custom program that extracts related item information from your source system and inserts it into the MTL_RELATED_ITEMS_INTERFACE table. After you load the related items into the interface table, run the Import Related Items concurrent request to import the data into the production table. This program assigns defaults, validates data you include, and then imports the new related items.
Note: This program does not support uploading planning details information.
Tip: Alternatively, use the Import Related Items API to load the related items information into the production table. For more information on how to use the Import Related Items API, navigate to the Integrated SOA Gateway responsibility > Integration Repository > Product Lifecycle Management > Advanced Product Catalog >Catalog Item > Import Related Items (Internal Name: MTL_RELATED_ITEMS_PUB).
-
Navigate to the Development Manager responsibility > Batch Import > Import Items > Import Related Items. This opens the Run this Request... window.
-
Optionally, in the Parameters window, enter the following values:
-
In the Process Set (Null for All) field, enter a batch ID to process a particular batch. To process all records in the interface table, leave this field blank.
-
In the Delete Processed Records field, enter No to retain all processed records. This field defaults to Yes, which deletes all processed records from the MTL_RELATED_ITEMS_INTERFACE table.
-
-
Choose OK to close the Parameters window, then choose Submit.
Related Topics
EGO_ITM_USR_ATTR_INTRFC Column Details
EGO_ITEM_PEOPLE_INTF Column Details
Importing Items Using a Spreadsheet
Importing Item Revisions Using a Spreadsheet
Importing Item Categories Using a Spreadsheet
Importing Item Organization Assignment Using a Spreadsheet
Importing Item People Assignment Using a Spreadsheet
Updating Existing Items Using a Spreadsheet
Updating Multi-Row Attributes in a Spreadsheet
Overview of Inbound Product Data Synchronization and Data Quality Management
EGO_ITM_USR_ATTR_INTRFC
The following table shows the columns in the EGO_ITM_USR_ATTR_INTRFC database table. For more details about the columns in EGO_ITM_USR_ATTR_INTRFC, see EGO_ITM_USR_ATTR_INTRFC Details.
| Column Name | Data Type | Required? |
|---|---|---|
| EGO_ITM_USR_ATTR_INTRFC | ||
| TRANSACTION_ID | NUMBER | Yes |
| PROCESS_STATUS | NUMBER | Yes |
| DATA_SET_ID | NUMBER | Yes |
| ORGANIZATION_CODE | VARCHAR2(3) | Yes |
| ITEM_NUMBER | VARCHAR2(81) | Yes |
| REVISION | VARCHAR2(30) | |
| ROW_IDENTIFIER | NUMBER | Yes |
| ATTR_GROUP_INT_NAME | VARCHAR2(30) | Yes |
| ATTR_INT_NAME | VARCHAR2(30) | Yes |
| ATTR_VALUE_STR | VARCHAR2(150) | |
| ATTR_VALUE_NUM | NUMBER | |
| ATTR_VALUE_DATE | DATE | |
| ATTR_DISP_VALUE | VARCHAR2(150) | |
| ATTR_UOM_DISP_VALUE | VARCHAR2(25) | |
| ATTR_VALUE_UOM | VARCHAR2(3) | |
| TRANSACTION_TYPE | VARCHAR2 | Yes |
| ORGANIZATION_ID | NUMBER | |
| INVENTORY_ITEM_ID | NUMBER | |
| ITEM_CATALOG_GROUP_ID | NUMBER | |
| REVISION_ID | NUMBER | |
| ATTR_GROUP_ID | NUMBER | |
| REQUEST_ID | NUMBER | |
| PROGRAM_APPLICATION_ID | NUMBER | |
| PROGRAM_ID | NUMBER | |
| PROGRAM_UPDATE_DATE | Date | |
| CREATED_BY | NUMBER(15) | Yes |
| CREATION_DATE | DATE | Yes |
| LAST_UPDATED_BY | NUMBER(15) | Yes |
| LAST_UPDATE_DATE | DATE | Yes |
| LAST_UPDATE_LOGIN | NUMBER(15) |
EGO_ITM_USR_ATTR_INTRFC Column Details
The Primary Key for this table; its value must be generated from the sequence EGO_IUA_TRANSACTION_ID_S.
PROCESS_STATUS
Whether this row has yet to be processed, is currently being processed, encountered an error, or was successfully processed; its value should correspond to the following constants in EGO_ITEM_USER_ATTRS_CP_PUB: G_PS_TO_BE_PROCESSED, G_PS_IN_PROCESS, G_PS_ERROR, and G_PS_SUCCESS.
DATA_SET_ID
The identifier for a group of rows to be processed together; all rows being processed as part of a single request must share the same DATA_SET_ID, whose value must be generated from the sequence EGO_IUA_DATA_SET_ID_S.
The following column values will be validated and used to populate the ORGANIZATION_ID, INVENTORY_ITEM_ID, ITEM_CATALOG_GROUP_ID, and REVISION_ID columns.
ORGANIZATION_CODE
The organization to which the Item belongs; currently, user-defined attributes are supported only for master organizations, and the organization code is validated to ensure that it refers to a master organization.
ITEM_NUMBER
The item number (such as, concatenated segments) for the item.
REVISION
The three-letter code for the current revision of the item (only used if the attribute group is associated at the item revision level; for attribute groups associated at the item level, leave NULL).
Because the user-defined attributes framework is so flexible, its structure must be flattened out for this interface table. To understand this flattening it is useful to first define a logical attribute group row. For single-row attribute groups, the logical attribute group row is just the collection of attributes in the attribute group, but for multi-row attribute groups, each row in the attribute group is a logical attribute group row. For example, the single-row attribute group "Dimensions," with Attributes "Width" and "Height," has only one logical attribute group row, but multi-row attribute group "Orders," with attributes "Date" and "Price" has as many logical attribute group rows as there are separate orders to be recorded.
Every interface table row contains data for one attribute in a logical attribute group row, and a logical attribute group row spans as many interface table rows as there are attributes in the logical attribute group row. To keep these flattened-out logical attribute group rows in order, there is the ROW_IDENTIFIER column, which uniquely identifies each logical attribute group row (for example, all attributes with the same ROW_IDENTIFIER value will belong to the same logical attribute group row). Thus, if a multi-row attribute group has ten attributes and three rows of values (for example, three logical attribute group rows), then there will be thirty interface table rows for the attribute group and three distinct ROW_IDENTIFIER values in those thirty rows.
ROW_IDENTIFIER
The grouping identifier for a logical attribute group row; its value must be the same for all interface table rows in the logical attribute group row, and no two logical attribute group rows in the same data set may share the same ROW_IDENTIFIER value.
ATTR_GROUP_INT_NAME
The internal name of the attribute group to which the current interface table row's attribute belongs.
ATTR_INT_NAME
The internal name of the attribute for which the current interface table row holds a value.
ATTR_VALUE_STR
The value for the current interface table row's attribute if its data type is string.
ATTR_VALUE_NUM
The value for the current interface table row's attribute if its data type is number.
ATTR_VALUE_DATE
The value for the current interface table row's attribute if its data type is date. Values will be converted to and from date data types using the format specified in EGO_USER_ATTRS_DATA_PVT.G_DATE_FORMAT.
ATTR_DISP_VALUE
The value for the current interface table row's attribute (as a string, regardless of its data type) if the attribute has a value set with separate display and internal values (for example, value sets with validation type of independent or table). In all other cases, use the preceding three columns.
ATTR_UOM_DISP_VALUE
The description of the unit of measure associated with the attribute.
ATTR_VALUE_UOM
The internal value of the unit of measure associated with the attribute.
TRANSACTION_TYPE
The mode of processing for a logical attribute group row; its value should correspond to the following constants in EGO_USER_ATTRS_DATA_PVT: G_DELETE_MODE, G_UPDATE_MODE, G_SYNC_MODE (which either creates or updates, as appropriate), and G_CREATE_MODE. Note that rows will be processed in the order they were just presented (for example, deletion first, followed by updates and synchronization, with creation last), in accordance with Oracle Applications standards. Typical values of these constants are: CREATE, SYNC, UPDATE, or DELETE.
ORGANIZATION_ID
This column is for internal use, and any user-entered values are ignored.
INVENTORY_ITEM_ID
This column is also for internal use, but the user may enter the inventory item ID if known. If the inventory item ID is passed for a given item number, it will save conversion time from item number into inventory item ID; the inventory item ID will still be validated internally, because it will be used with the organization ID to find the item catalog group ID (so rows with invalid inventory item IDs will time-out during the item catalog ID fetching step).
ITEM_CATALOG_GROUP_ID
This column is for internal use, and any user-entered values are ignored.
REVISION_ID
This column is for internal use, but the user may enter the revision ID if known (and if this interface table row belongs to an attribute group that is associated at the item revision level). Doing so will save conversion time.
ATTR_GROUP_ID
This column is provided in case the user knows the attribute group ID for this interface table row's attribute group. If left blank, the attribute group internal name is used to identify the attribute group.
REQUEST_ID
This column is for internal use (to record the concurrent program request that ordered the processing of this row).
PROGRAM_APPLICATION_ID
This column is for internal use (to record the application ID of the concurrent program that processed this row).
PROGRAM_ID
This column is for internal use (to record the ID of the concurrent program that processed this row).
PROGRAM_UPDATE_DATE
This column is for internal use (to record the time the concurrent program processed this row).
The remaining columns are the standard "Who" columns, and their values must be entered when you load the interface table.
EGO_ITEM_PEOPLE_INTF
The following table shows the columns in the EGO_ITEM_PEOPLE_INTF database table. For more details about the columns in EGO_ITEM_PEOPLE_INTF, see EGO_ITEM_PEOPLE_INTF Details.
| Column Name | Data Type | Required? |
|---|---|---|
| INVENTORY_ITEM_ID | NUMBER(15) | No |
| ORGANIZATION_ID | NUMBER(15) | No |
| GRANTEE_PARTY_ID | NUMBER(15) | No |
| INTERNAL_ROLE_ID | NUMBER(15) | No |
| INTERNAL_ROLE_NAME | VARCHAR2(30) | No |
| LAST_UPDATE_DATE | DATE | No |
| LAST_UPDATED_BY | No | |
| CREATION_DATE | DATE | No |
| CREATED_BY | NUMBER(15) | No |
| LAST_UPDATE_LOGIN | NUMBER(15) | No |
| REQUEST_ID | NUMBER(15) | No |
| PROGRAM_APPLICATION_ID | NUMBER(15) | No |
| PROGRAM_ID | NUMBER(15) | No |
| PROGRAM_UPDATE_DATE | DATE | No |
| ITEM NUMBER | VARCHAR2(81) | Yes |
| ORGANIZATION_CODE | VARCHAR2(3) | Yes |
| DISPLAY_ROLE_NAME | VARCHAR2(80) | Yes |
| GRANTEE_TYPE | VARCHAR2(8) | Yes |
| GRANTEE_NAME | VARCHAR2(360) | Yes |
| START_DATE | DATE | Yes |
| END_DATE | DATE | No |
| TRANSACTION_TYPE | VARCHAR2(10) | Yes |
| TRANSACTION_ID | NUMBER(15) | Yes |
| PROCESS_STATUS | NUMBER(15) | Yes |
| DATA_SET_ID | NUMBER(15) | Yes |
EGO_ITEM_PEOPLE_INTF Column Details
Identifier for the Inventory item on which the role is to be granted. The value is obtained from MTL_SYSTEM_ITEMS_B for a given item. This column is also for internal use, but the user may enter the inventory item ID if known. If the inventory item ID is passed for a given item number, it will save conversion time from item number into inventory item ID; the inventory item ID will still be validated internally.
ORGANIZATION_ID
The item ID and the organization ID form the unique key combination on which the role is to be granted.
GRANTEE_PARTY_ID
The person ID, group ID or part ID that gets the grant on the item ID and organization ID.
INTERNAL_ROLE_ID
The identifier of the role to be granted.
INTERNAL_ROLE_NAME
The internal role definition name; this name is unique.
LAST_UPDATE_DATE
One of the five standard "WHO" columns.
LAST_UPDATED_BY
One of the five standard "WHO" columns.
CREATION_DATE
One of the five standard "WHO" columns.
CREATED_BY
One of the five standard "WHO" columns.
LAST_UPDATE_LOGIN
One of the five standard "WHO" columns.
REQUEST_ID
The concurrent program submission request ID.
PROGRAM_APPLICATION_ID
The concurrent program application ID. This column is for internal use to record the application ID of the concurrent program that processed this row.
PROGRAM_ID
The concurrent program ID. This column is for internal use to record the ID of the concurrent program that processed this row.
PROGRAM_UPDATE_DATE
The concurrent program update date. This column is for internal use to record the time the concurrent program processed this row.
ITEM_NUMBER
The inventory item number (such as, concatenated segments) for the item. The INVENTORY_ITEM_ID is derived from the ITEM_NUMBER.
ORGANIZATION_CODE
The Inventory Organization Code. Should be one of the values in the MTL_PARAMETERS table column ORGANIZATION_CODE.
DISPLAY_ROLE_NAME
The display name for the role; this is one of the values in the FND_MENUS_VL table column USER_MENU_NAME.
GRANTEE_TYPE
The type of grantee. Has one of the following values: USER, GROUP, or GLOBAL.
GRANTEE_NAME
The name of the grantee. This name can be a user name, group name, or all users, depending on the grantee type specified (PERSON, GROUP or GLOBAL).
START_DATE
The grant start date. The grantee gains access to the item on this date.
END_DATE
The grant end date. The grantee loses access to the item on this date.
TRANSACTION_TYPE
The type of transaction. Valid values are: CREATE, SYNC, UPDATE, or DELETE.
TRANSACTION_ID
The unique identifier of the line. The value is retrieved from EGO_IPI_TRANSACTION_ID_S.
PROCESS_STATUS
Indicates the status of the line. Values are:
1 - To Be Processe, 2 - In Process, 3 - Error, 4 - Success, 5 - Warning
DATA_SET_ID
Unique identifier that indicates the subset of data to be processed (like the job ID). Each line that is newly uploaded in the interface table needs to be assigned a unique ID that is be used during the concurrent program request submission. The value is selected from the PL/SQL API: EGO_ITEM_PEOPLE_IMPORT_PKG.get_curr_dataset_id.
Importing Items Using a Spreadsheet
You can use a Microsoft Excel spreadsheet to import items into the system. Before doing so, you must first have defined import formats for the particular item catalog category you wish to use, and you must also have the appropriate version of the Excel spreadsheet installed.
You can use the same spreadsheet for multiple uploads, and also across different sessions for the same user. To upload the same spreadsheet during another session, open the spreadsheet you wish to upload, and select Upload from the Oracle menu in the menu bar. After you log in and choose the appropriate responsibility, you can immediately begin to upload this spreadsheet again.
Whenever you enter new or existing data in the spreadsheet, the Upl column displays a flag, making it easier to scan the spreadsheet and for rows that have been changed.
You can include multi-row attribute groups in your item import formats. To do so, make sure that the rows in the spreadsheet that you are using for updating multi-row attributes do not contain any attribute values other then the org code, item number, item revision (if applicable), and the user-defined multi-row attribute values. When importing sequence generated item numbers with multi-row attribute groups, use dummy strings for the item numbers, such as $$SG$$1, $$SG$$2, and so on, in the WebADI Excel field for the item number. The import program uses this dummy string to determine which row belongs to which item.
Caution: If you include values for other primary (for example, item status, or lifecycle) or single-row user-defined attributes in the same rows as the multi-row attributes, then the updates will fail.
Note: You can import items with multi-row attributes for multiple organizations during a single concurrent request.
Important: You cannot update transaction attributes using the Item Open Interface, the Microsoft® Office Excel spreadsheet, or the Import Workbench. You must update them directly. See: Defining Transaction Attributes, Oracle Product Information Management Implementation Guide.
Items uploaded to the system from a spreadsheet become, by default, Engineering items. If you wish to upload a non-Engineering item, then include an available primary attribute column called "Engineering Item Flag" in your import format. When uploading the spreadsheet, identify such items in this column by specifying the value "Yes" or "No" in this column. If you leave the column blank, the item once again defaults to an Engineering item.
Prerequisites
- Optionally, define an import format for the item catalog category you plan to use when importing items. See: Defining Item Catalog Import Formats, Oracle Product Information Management Implementation Guide
To import items using a spreadsheet
-
In the Applications tree menu, click the Import from Excel link.
-
On the Import page, select the Items object and click Continue.
Note: An import format should already be defined for items or item revisions. Item categories do not have a defined import format that is associated with an item catalog category. Instead, a predefined format is used for all item category imports. The columns in this format are identical to the interface table. Predefined formats matching the interface tables are used for item people, item organization assignment, and manufacturing part number imports, too.
-
On the Import: Item page, select an item catalog category and then click Go. The item catalog category determines which import formats are available for use.
Note: If you do not select an item catalog category, the default System Item Import Format is available for use. If an import format has not yet been defined for an item catalog category that you select, then the default System Item Import Format is available for use. The System Item Import Format does not appear if you select an item catalog category that already has import formats defined. Neither users nor the system administrator can modify the System Item Import Format.
-
When the Import: Item page refreshes with the import formats available for the item catalog category, select the import format you wish to use and click Import.
Note: If a default import format has been specified for the item catalog category, it will already be selected.
-
On the Select Viewer page, select the version of Excel that you are using and click Next. You cannot enable or disable Reporting. Also, Language has only one choice, which is already selected.
-
A Download window presents processing messages. Click Close when the transfer is complete. The Excel spreadsheet also opens.
-
In the spreadsheet, primary attributes are listed first (on the left), and user-defined attributes appear after (on the right). When entering values into the spreadsheet, you must use one of the following Transaction Types:
Sync
If the item already exists, the spreadsheet values are used to update it. If the item does not already exist, a new one is created using the spreadsheet values. If the Sync creates a new item, then the mandatory attributes for Create are also mandatory for the Sync. If the Sync updates an existing item, then the mandatory attributes for Update are also mandatory for the Sync.
Note: To delete an existing value in a record, enter the following data in the appropriate column of the spreadsheet:
For field type: Enter value: Date 31-DEC-9999 Character ! Numeric 9.99E125 If you want to retain an existing value in a record, leave it blank in the spreadsheet.
Exception: In the user defined attributes interface table, when you want to delete an existing value in any of the following fields, use the value !. If you want to retain an existing value in a record, no entry is necessary.
-
ATTR_DISP_VALUE
-
ATTR_VALUE_STR
-
ATTR_NUM_VALUE
-
ATTR_VALUE_DATE
Create
A new item is created using the values entered in the spreadsheet. The following attributes are mandatory when using this transaction type:
-
Item
-
Organization Code
-
Primary Unit of Measure
-
Description
Note: Description is a primary attribute, but appears on the right side of the spreadsheet among the user-defined attributes. It is placed here so that long descriptions will not disrupt the flow of the spreadsheet. If the description is function-generated, the system generates the description during the item creation process.
Some attribute columns also utilize poplists and LOVs, depending on the attribute definition. You can also make updates to multi-row attributes.
Make a note of the Result Format Usage ID at the top of the spreadsheet. You will need this ID later when you upload the spreadsheet in the system.
-
If the import format contains attributes from attribute groups that are associated with the supplier business entity, then you must enter a value in the key column Supplier Name. If the import format contains attributes from attribute groups that are associated with the supplier site or supplier site organization business entities, then you must enter a value in the key column Supplier Site as well as Supplier Name. If you need to enter a retail site, enter the retail site organization code in the existing Organization Code column.
-
When importing style and SKU item information:
-
Use the Style column to indicate if the item is a style item (Yes or No).
-
Use the Style Item column to identify the style item for an SKU item row.
-
You must define a style item before you define its child SKU items. You can define the style and SKU items within the same spreadsheet, but the new style item must be in a row above the new SKU items.
-
Variant attribute columns do not have a list of values in the spreadsheet to choose from. For style items, enter the child value set name in the variant attribute column. For SKU items, enter the variant attribute value in this column.
For example, assign the variant attribute group Color to a style item. Color has multiple value sets: fall, winter, and spring colors. Assign the value set Fall to the style item in the variant attribute column. For an associated SKU, enter a fall color attribute value, such as brown or orange, in the same column.
-
Tip: You can rename columns, wrap the column name text, or widen the columns so the column names are easier to read and understand. You must unprotect the spreadsheet before reformatting the columns.
-
-
After data entry is complete, select Upload from the Oracle menu in the toolbar.
-
In the Upload Parameters window, enter the Result Format Usage ID and check the Automatically Submit Concurrent Process box, and then click Proceed to Upload.
-
In the Oracle Web ADI window, click Upload. After the upload process completes, a message appears with the Concurrent Request number. Make a note of this number, as you will need it later when you access the view log for the concurrent request. Click Close when the process messages complete.
-
Return to the Applications tree menu and click the View Concurrent Requests link.
Note: It is recommended that you review the concurrent process view log to ensure that the upload process was successful.
-
On the View Concurrent Requests page, click the Details icon.
-
On the Request Details page, click View Log.
-
From the View Log, paste the URL string in a web browser to view any errors. If no errors appear, the upload was successful.
Related Topics
Importing Item Revisions Using a Spreadsheet
You can use a Microsoft Excel spreadsheet to import item revisions into the system. Before doing so, you must first have defined import formats (see: Defining Item Catalog Import Formats , Oracle Product Information Management Implementation Guide)for the particular item catalog category you wish to use, and you must also have the appropriate version of the Excel spreadsheet installed.
You can use the same spreadsheet for multiple uploads, and also across different sessions for the same user. To upload the same spreadsheet during another session, open the spreadsheet you wish to upload, and select Upload from the Oracle menu in the menu bar. After you log in and choose the appropriate responsibility, you can immediately begin to upload this spreadsheet again.
Whenever you enter new or existing data in the spreadsheet, the Upl column displays a flag, making it easier to scan the spreadsheet and for rows that have been changed.
Item revisions uploaded to the system from a spreadsheet become, by default, Engineering items. If you wish to upload a non-Engineering item, then include an available primary attribute column called "Engineering Item Flag" in your import format. When uploading the spreadsheet, identify such items in this column by specifying the value "Yes" or "No" in this column. If you leave the column blank, the item once again defaults to an Engineering item.
To import item revisions using an Excel spreadsheet
-
In the Applications tree menu, click the Import from Excel link.
-
On the Import page, select Item Revisions and click Continue.
An import format should already be defined for items or item revisions. Item categories do not have a defined import format that is associated with an item catalog category. Instead, a predefined format is used for all item category imports. The columns in this format are identical to the interface table.
-
On the Import: Item Revision page, select an item catalog category and then click Go. The item catalog category determines which import formats are available for use.
Note: If you do not select an item catalog category, the default System Item Revision Import Format is available for use. If an import format has not yet been defined for an item catalog category that you select, then the default System Item Revision Import Format is available for use. Neither users nor the system administrator can modify the System Item Revision Import Format.
-
When the Import: Item Revision page refreshes with the import formats available for the item catalog category, select the import format you wish to use and click Import. If a default import format has been specified for the item catalog category, it will already be selected.
-
On the Select Viewer page, select the version of Excel that you are using and click Next. You cannot enable or disable Reporting.
-
A Download window presents processing messages. Click Close when the transfer is complete. The Excel spreadsheet also opens.
-
In the spreadsheet, primary attributes are listed first (on the left), and user-defined attributes appear after (on the right). When entering values into the spreadsheet, you must use one of the following Transaction Types:
Sync
If the item revision already exists, the spreadsheet values are used to update it. If the item revision does not already exist, it is created using the spreadsheet values. If the Sync creates a new item revision, then the mandatory attributes for Create are also mandatory for the Sync. If the Sync updates an existing item revision, then the mandatory attributes for Update are also mandatory for the Sync
Create
A new item revision is created using the values entered in the spreadsheet. The following attributes are mandatory when using this transaction type:
-
Item
-
Organization Code
-
Revision
-
Revision Label
-
Effective Date
Note: Description is a primary attribute, but appears on the right side of the spreadsheet among the user-defined attributes. It is placed here so that long descriptions will not disrupt the flow of the spreadsheet.
Update
Existing item revisions are updated using the values entered in the spreadsheet. The following attributes are mandatory when using this transaction type:
-
Item
-
Organization Code
-
Revision
Note: To delete an existing value in a record, enter the following data in the appropriate column of the spreadsheet:
For field type: Enter value: Date 31-DEC-9999 Character ! Numeric 9.99E125 If you want to retain an existing value in a record, enter NULL in the appropriate column of the spreadsheet.
Exception: In the user defined attributes interface table, when you want to delete an existing value in any of the following fields, use the value !. If you want to retain an existing value in a record, no entry is necessary.
-
ATTR_DISP_VALUE
-
ATTR_VALUE_STR
-
ATTR_NUM_VALUE
-
ATTR_VALUE_DATE
Make a note of the Result Format Usage ID at the top of the spreadsheet. You will need this ID later when you upload the spreadsheet in the system.
You can also make updates to multi-row attributes.
-
-
After data entry is complete, select Upload from the Oracle menu in the toolbar.
-
In the Upload Parameters window, enter the following and then click Upload.
-
Batch Name
-
Import:
-
Immediately on data load - automatically updates the Oracle Item Master table with matched data.
-
Schedule Data and Time - select the date and time to import the confirmed items or structures in the batch.
-
None - leaves the data in the Import Workbench. You can manually import the data at a later time.
-
-
Select whether to create a new change order, add to an existing change order, or to not create a change order.
-
Select whether to create a new item request:
-
None
-
One per Item
-
One per Item Catalog Category
-
-
-
Click Upload. After the upload process completes, a message appears with the Concurrent Request number. Make a note of this number, as you will need it later when you access the view log for the concurrent request. Click Close when the process messages complete.
-
Return to the Applications tree menu and click the View Concurrent Requests link.
Note: It is recommended that you check the concurrent process view log to ensure that the upload process was successful.
-
On the View Concurrent Requests page, click the Details icon.
-
On the Request Details page, click View Log.
-
From the View Log, paste the URL string in a web browser to view any errors. If no errors appear, the upload was successful.
Note: If you created a new revision containing user defined attributes defined at the item revision level and enabling the change order option, then the new revision contains the item revision user defined attributes copied from the current revision. Any changed item revision user defined attributes appear in the new revision's change order attribute change section.
Importing Item Categories Using a Spreadsheet
You can use a Microsoft Excel spreadsheet to import new, delete old, or update existing item categories in the system. Before doing so, you must also have the appropriate version of the Excel spreadsheet installed.
Whenever you enter new or existing data in the spreadsheet, the Upl column displays a flag, making it easier to scan the spreadsheet for rows that have been changed.
To import item categories using an Excel spreadsheet
-
In the Applications tree menu, click the Import from Excel link.
-
On the Import page, select Item Categories and click Continue.
Item categories do not have a defined import format that is associated with an item catalog category. Instead, a predefined format is used for all item category imports. The columns in this format are identical to the interface table.
-
On the Import: Item Catalog Categories Assignment page, click Import.
When your spreadsheet opens, it displays the same item category columns that appear on this page, plus an old category column. Only use the old category column when updating existing item categories.
-
On the Select Settings page, select the version of Excel that you are using and click Next.
You cannot enable or disable Reporting. Also, Language has one choice, which is already selected.
-
A Download window presents processing messages. Click Close when the transfer is complete. The Excel spreadsheet also opens.
Note that the columns that appeared on the Import: Item Category Assignment page have been exported to the spreadsheet.
-
When entering values into the spreadsheet, use the one of the following Transaction Types:
-
Create
Creates a new item using the values entered in the spreadsheet.
-
Delete
Deletes the item specified in the spreadsheet row.
-
Update
Makes the changes specified to the item in the spreadsheet row.
The following attributes are mandatory when using these Transaction Types:
-
Item
-
Organization Code
-
Catalog
-
Category
-
Old Category - mandatory for the Update transaction type only.
Tip: You can rename columns, wrap the column name text, or widen the columns so the column names are easier to read and understand. You must unprotect the spreadsheet before reformatting the columns.
Make a note of the Record Set ID at the top of the spreadsheet. You will need this ID later when you upload the spreadsheet to the system.
-
-
After data entry is complete, select Upload from the Oracle menu in the toolbar.
-
In the Upload Parameters window, enter the Record Set ID.
In the Upload Processed Records menu, select Yes. If you select No, your data is sent to the user interface table only and is not processed; Consequently, debugging is not possible.
In the Delete Processed Records menu, select No. If you select Yes, all records corresponding to the current Record Set ID are cleared from the interface table.
Click Proceed to Upload.
-
In the Oracle Web ADI window, wait for the Ready message and click Upload.
Show Trace Messages is, by default, not selected. Do not change this setting unless you wish to have trace information provided via your parameters.
Clicking Parameters enables you to modify your parameters.
Important: When the Upload completes, a Concurrent Request Number appears in this window. Make note of this number, as you can later use it to view the results of the upload process (for example, to view whether or not the upload was successful).
-
If you do not wish to confirm that the upload was successful, you are finished. If you wish to view the results of the upload process, return to the Applications tree menu and click the View Concurrent Requests link.
It is recommended that you check the concurrent process view log to ensure that the upload process was successful.
-
On the Requests page, select Completed and click Go. Look for your Concurrent Request Number to locate your process. If it does not appear, wait and repeat this step. You can also select Pending and click Go to view pending requests. Locate your process in the Results table and click the Details icon.
-
On the Request Details page, click View Log.
-
From the View Log, paste the URL string in a web browser to view any errors. If no errors appear, the upload was successful.
Importing Item Organization Assignment Using a Spreadsheet
You can use a Microsoft Excel spreadsheet to import item organization assignments into the system.
You can use the same spreadsheet for multiple uploads, as well as across different sessions for the same user. To upload the same spreadsheet in another session, open the spreadsheet and select Upload from the Oracle menu in the tool bar. After you log in and select the appropriate responsibility, you can begin uploading the spreadsheet again.
Whenever you enter new or existing data in the spreadsheet, the Upl column displays a flag, making it easier to scan the spreadsheet for rows that have been changed.
Important: Users can only assign items to those organizations to which they have permission. See: Overview of Roles and Role Based Security, Oracle Product Information Management Implementation Guide
Tip: You can rename columns, wrap the column name text, or widen the columns so the column names are easier to read and understand. You must unprotect the spreadsheet before reformatting the columns.
Import Item Organization Assignment Using a Spreadsheet
-
In the Navigator page, click the Import from Excel link. This link is located under Batch Import : Import Items.
-
In the Import page, select Item Organization Assignment and click Continue.
-
In the Import: Item Organization Assignment page, click Import.
-
In the Select: Viewer page, select the appropriate version of Excel and click Next.
The Processing: Creating Document page appears. Wait until the Excel application is ready.
The Confirmation page appears. An Excel spreadsheet opens and the Confirmation page returns to the Navigator page. Alternately, click Return to return to the Navigator page.
Enter Data in the Spreadsheet
-
Enter the organization assignments for each item in the spreadsheet.
Organization Code - Select your organization from the drop down list.
Item - Enter the item number. For instance, M1000.
Primary Unit of Measure - Enter the display name of the unit of measure. For instance, Each.
Note the Set Process ID at the top of the spreadsheet. You will need it to upload the spreadsheet in the system.
-
Select Upload from the Oracle menu in the tool bar.
-
In the Upload Parameters window, enter the Set Process ID and click Upload.
-
After upload, a message appears with the Concurrent Request number. Note this number. You will need it to verify the view log for the concurrent request. Click Close when the process messages complete.
Tip: It is recommended that you review the concurrent process view log to ensure that the upload was successful.
View Concurrent Requests
-
Return to the Navigator page and click the View Concurrent Requests link. This link is located under Workflow and Request.
-
In the Requests page, click the Details icon.
-
In the Request Details page, click View Log. If no errors are declared in the view log, the upload was successful.
Importing Item People Assignment Using a Spreadsheet
You can use a Microsoft Excel spreadsheet to import item people assignments into the system.
You can use the same spreadsheet for multiple uploads, as well as across different sessions for the same user. To upload the same spreadsheet in another session, open the spreadsheet and select Upload from the Oracle menu in the tool bar. After you log in and select the appropriate responsibility, you can begin uploading the spreadsheet again.
Whenever you enter new or existing data in the spreadsheet, the Upl column displays a flag, making it easier to scan the spreadsheet for rows that have been changed.
Import Item People Assignment Using a Spreadsheet
-
In the Navigator page, click the Import from Excel link. This link is located under Batch Import : Item Imports.
-
In the Import page, select Item People Assignment and click Continue.
-
In the Import: Item People Assignment page, click Import.
-
In the Select: Viewer page, select the appropriate version of Excel and click Next.
The Processing: Creating Document page appears. Wait until the Excel application is ready.
The Confirmation page appears. An Excel spreadsheet opens and the Confirmation page returns to the Navigator page. Alternately, click Return to return to the Navigator page.
Enter Data in the Spreadsheet
-
Use one of the following Transaction Types when entering values into the spreadsheet:
-
Create
Select this option to create a new item people assignment using the values entered in the spreadsheet.
-
Delete
Select this option to delete an existing item people assignment.
-
Sync
Select this option to:
-
Create an item people assignment if it does not exist in the system.
-
Update an item people assignment if it exists in the system.
-
-
Update
Select this option to update an existing item people assignment using the values entered in the spreadsheet.
-
You can update the End Date only in an existing item people assignment.
-
For style and SKU items only:
People assignments default from style to SKU items. If you make an item people assignment for a style item, this assignment automatically defaults to the style item's SKUs. However, if you change the end date of the style item, the end date of the associated SKUs does not change. You must change the end date of each SKU.
-
Note the Data Set ID at the top of the spreadsheet. You will need it to upload the spreadsheet in the system.
-
-
Enter values for the attributes.
Transaction Type - Select the appropriate transaction type from the drop down list.
Organization Code - Select your organization from the drop down list.
Item - Enter the item number. For instance, M1000.
Role - Select the display name of the role from the drop down list. For instance, Design Engineer.
Type - Select the type of user from the drop down list. For instance, Group.
Name - Enter the name of the person, group, or company. Leave the cell empty for type 'All Users.'
Start Date - Enter the start date of the grants. Date format - mm/dd/yyyy.
End Date - Enter the end date of the grant. Date format - mm/dd/yyyy.
-
Select Upload from the Oracle menu in the tool bar.
-
In the Upload Parameters window, enter the Data Set ID and click Upload.
-
After upload, a message appears with the Concurrent Request number. Note this number. You will need it to verify the view log for the concurrent request. Click Close when the process messages complete.
Tip: It is recommended that you review the concurrent process view log to ensure that the upload was successful.
View Concurrent Requests
-
Return to the Navigator page and click the View Concurrent Requests link. This link is located under Workflow and Request.
-
In the Requests page, click the Details icon.
-
In the Request Details page, click View Log. If no errors are declared in the view log, the upload was successful.
Updating Existing Items
You can choose from two methods to update existing items. Both methods provide the same result.
-
Microsoft® Office Excel spreadsheet - use this method if any of the following apply:
-
You need time to determine the changes to make. You can save the spreadsheet and work on it later.
-
When you have less than 200 items to update.
-
You want to update many different types of item fields at once. For example, you want to update many items' attributes, organizations, and categories at the same time.
-
-
Mass update function - Use this method if any of the following apply:
-
Change control is necessary.
-
Your environment is characterized by many items and/or organizations.
-
You want to update certain fields for many items. Choose from the following mass update functions:
-
Update Master Item Attributes
-
Update Organization Item Attributes
-
Assign Items to Organizations
-
Assign Items to Categories
-
Unassign Items from Categories
-
Reassign Categories
-
-
Updating Existing Items Using a Spreadsheet
You can use a Microsoft® Office Excel spreadsheet to edit/update existing items. Before doing so, you must also have the appropriate version of the Excel spreadsheet installed.
Whenever you enter new or existing data in the spreadsheet, the Upl column displays a flag, making it easier to scan the spreadsheet for rows that have been changed.
Items uploaded from a spreadsheet become, by default, Engineering items. If you wish to upload a non-Engineering item, then include an available primary attribute column called "Engineering Item Flag" in your import format. When uploading the spreadsheet, identify such items in this column by specifying the value "Yes" or "No". If you leave the column blank, the item once again defaults to an Engineering item.
To update existing items, you must first search for the items, and then import the search results into the spreadsheet. Search results are limited to 200 items or less. Using this spreadsheet import/update saves you time, as the spreadsheet now contains the attributes/columns needed to update the specific items you wish to change.
To update existing items using an Excel spreadsheet
In the Applications tree menu, use either of the searches (Simple or Advanced) to locate the item you wish to update.
-
On the Search Results page, click Export All Items.
-
On the Select Viewer page, select the version of Excel that you are using and click Next. You cannot enable or disable Reporting.
-
An Information page and Download window present processing messages. Follow the instructions in these messages. Click Close when the transfer is complete. The Excel spreadsheet also opens. Note that all your search results have been exported to the spreadsheet.
-
In the spreadsheet, primary attributes are listed first (on the left), and user-defined attributes appear after (on the right). When entering values into the spreadsheet, you must use one of the following Transaction Types:
Sync
If the item already exists, the spreadsheet values are used to update it. If the item does not already exist, a new one is created using the spreadsheet values. If the Sync creates a new item, then the mandatory attributes for Create are also mandatory for the Sync. If the Sync updates an existing item, then the mandatory attributes for Update are also mandatory for the Sync.
Create
A new item is created using the values entered in the spreadsheet. The following attributes are mandatory when using this transaction type:
-
Item
-
Organization Code
-
Primary Unit of Measure
-
Description
Note: Description is a primary attribute, but appears on the right side of the spreadsheet among the user-defined attributes. It is placed here so that long descriptions will not disrupt the flow of the spreadsheet.
Update
Existing items are updated using the values entered in the spreadsheet. The following attributes are mandatory when using this transaction type:
-
Item
-
Organization Code
Note: To delete an existing value in a record, enter the following data in the appropriate column of the spreadsheet:
For field type: Enter value: Date 31-DEC-9999 Character ! Numeric 9.99E125 If you want to retain an existing value in a record, enter NULL in the appropriate column of the spreadsheet.
Exception: In the user defined attributes interface table, when you want to delete an existing value in any of the following fields, use the value !. If you want to retain an existing value in a record, no entry is necessary.
-
ATTR_DISP_VALUE
-
ATTR_VALUE_STR
-
ATTR_NUM_VALUE
-
ATTR_VALUE_DATE
Important: Make a note of the Result Format Usage ID at the top of the spreadsheet. You will need this ID later when you upload the spreadsheet in the system.
-
-
After data entry is complete, select Upload from the Oracle menu in the toolbar.
-
In the Upload Parameters window, enter the following and then click Upload.
-
Batch Name
-
Import:
-
Immediately on data load - automatically updates the Oracle Item Master table with matched data.
-
Schedule Data and Time - select the date and time to import the confirmed items or structures in the batch.
-
None - leaves the data in the Import Workbench. You can manually import the data at a later time.
-
-
Select whether to create a new change order, add to an existing change order, or to not create a change order.
-
Select whether to create a new item request:
-
None
-
One per Item
-
One per Item Catalog Category
-
-
-
After the upload process completes, a message appears with the Concurrent Request number. Make a note of this number, as you will need it later when you access the view log for the concurrent request. Click Close when the process messages complete.
-
Return to the Applications tree menu and click the "View Concurrent Requests" link. It is recommended that you check the concurrent process view log to ensure that the upload process was successful.
-
On the View Concurrent Requests page, click the Details icon.
-
On the Request Details page, click View Log.
-
From the View Log, paste the URL string in a web browser to view any errors. If no errors appear, the upload was successful.
Mass Updating Items, Categories and Associations
You can use the Mass Update functions to edit and update items, categories and item assignments when you want to change many items or categories and/or many organizations. Mass update item searches are not subject to the 200 item search limit like the spreadsheet option (see: Updating Existing Items Using a Spreadsheet).
Choose from the following mass update functions:
-
Update Master Item Attributes
-
Update Organization Item Attributes
-
Update Supplier Assignment Attributes
-
Update SupplierSite Assignment Attributes
-
Update SupplierSite-Org Assignment Attributes
-
Assign Items to Organizations
-
Assign Items to Categories
-
Unassign Items from Categories
-
Reassign Categories
-
Assign Items to Suppliers
-
Assign Items to SupplierSites
-
Assign Items to SupplierSite-Organizations
All mass update functions are located in the Mass Change folder/section in the navigation menu.
To mass update master item attributes
From the navigation menu, in the Mass Change section, select Update Master Item Attributes.
-
In the Update Master Item Attributes: Select Items page, use either Simple Search or Advanced Search to find the items you want to update. See: Searching for Items. The Update Master Item Attributes: Review Results page appears.
-
Review the search results. If the search results returned the expected items, click Export. If you need to refine the search criteria, click Back.
-
After clicking Export, the Select Viewer page appears. Select the version of Microsoft Office® Excel on your desktop.
Follow the instructions on your screen to download the file to your desktop. Update the spreadsheet, then upload it as described in Updating Existing Items Using a Spreadsheet.
To mass update organization item attributes
-
Navigate to the Update Organization Item Attributes: Select Items page.
-
Use either Simple Search or Advanced Search to find the items you want to update. See: Searching for Items. The Update Organization Item Attributes: Review Results page appears.
-
Review the search results. If the search results returned the expected items, click Next and the Select Organization page appears. If you need to refine the search criteria, click Back.
-
Search for an organization using one of the following fields:
-
Organization Code
-
Organization Name
-
Hierarchy
Click Next and the Update Organization Item Attributes: Review Organizations page lists all organizations matching your search criteria.
-
-
Select the organizations you want to update, then click Next and the Update Organization Attributes: Review Results page appears. If you want to refine the Organization search, click Back. Otherwise, click Export.
-
The Select Viewer page appears. Select the version of Microsoft Office® Excel on your desktop.
Follow the instructions on your screen to download the file to your desktop. Update the spreadsheet, then upload it as described in To update existing items using an Excel spreadsheet with the following exceptions in the Upload Parameters window:
-
Enter the Batch Name
-
Select an import option:
-
Immediately on data load - automatically updates the Oracle Item Master table with matched data.
-
Schedule Data and Time - select the date and time to import the confirmed items or structures in the batch.
-
None - leaves the data in the Import Workbench. You can manually import the data at a later time.
-
-
Select whether to create a new change order, add to an existing change order, or to not create a change order.
-
To mass update supplier, supplier site, and supplier site organization assignment attributes
The process for mass updating supplier, supplier site, and supplier site organization assignment attributes is almost the same. The only difference between mass updating assignment attributes for the three different supplier business objects is the page name. For example, when mass updating supplier assignment attributes, the first page name is Update Supplier Assignment Attributes: Supplier Assignment Search. When mass updating supplier site organization assignment attributes, the first page name is Update SupplierSite-Organization Assignment Attributes: SupplierSite-Organization Assignment Search. The following steps assume that you are mass updating supplier assignment attributes.
-
Navigate to the Update Supplier Assignment Attributes: Supplier Assignment Search page.
-
Use either Simple Search or Advanced Search to find the items you want to update. See: Searching for Items. The Update Supplier Assignment Attributes: Review Supplier Assignment page appears.
-
Review the search results. If the search results returned the expected items, click Export and the Select Viewer page appears. If you need to refine the search criteria, click Back.
-
Select the version of Microsoft Office® Excel on your desktop.
Follow the instructions on your screen to download the file to your desktop. Update the spreadsheet, then upload it as described in To update existing items using an Excel spreadsheet .
To mass assign items to organizations
-
Navigate to the Assign Items to Organizations: Select Items page.
-
Enter search criteria, then click Next. See: Searching for Items. The Assign Items to Organizations: Review Items page appears.
-
Review the search results. You can filter the search results and select the items that you want to assign. If the search results returned the expected items, click Next and the Assign Items to Organizations: Select Organizations page appears. If you need to refine the search criteria, click Back.
-
Search for an organization using one of the following fields:
-
Organization Code
-
Organization Name
-
Hierarchy
Click Next and the Assign Items to Organizations: Review Organizations page lists all organizations matching your search criteria.
-
-
Select the organization(s) you want to update, then click Next and the Assign Items to Organizations: Review Results page appears.
If you want refine the Organization search, click Back. Otherwise, click Finish.
-
Review the Item Organization Assignments.
If the items selected have associated packs or structures, the Select Options region appears. Select one of the following options:
-
Assign Packs
Enables the selected items to share their associated (common) packs across the selected organizations. See: Referencing Common Bills and Routings, Oracle Bills of Material User's Guide and Managing the Packaging Hierarchy
-
Assign Structures
Copies or uses a common structure associated with each of the selected items across the selected organizations. See: Referencing Common Bills and Routings, Oracle Bills of Material User's Guide
Click Back if you need to change your selected organization(s) or Finish to proceed with assigning the items to organizations.
-
-
After clicking Finish, the Assign Items to Organizations: Choose Action page appears. Choose one of the following actions:
-
Apply changes to Database (This option enables you to enter changes directly into the database.)
-
Export to Excel
Click Submit.
-
If you selected Apply changes to Database
-
The Schedule Request: Schedule page appears. Choose when you would like your request to run. You can choose the following:
-
Start Date - choose as soon as possible or a specific date and time.
-
Recurrence - select Never Repeat or Repeat on a certain interval, ending at a certain date and time.
-
Apply the Interval - apply the interval based on the start or completion date and time.
-
Schedule Name - optionally select a predefined schedule from the list. Select Increment Date Parameters to set the next date.
-
Save Schedule - define and save a new schedule by entering a new Schedule Name, Description, and selecting Save Schedule.
-
-
Click Next. The Schedule Request: Review page appears.
Review the schedule parameters. Click Back if you need to change any of the parameters.
-
Click Submit.
A message appears, saying your request for EGO Spreadsheet Java Concurrent Program has been scheduled and giving you the Request ID.
-
Click OK.
The Requests page appears. From here, you can find out the details and status of your request.
If you selected Export to Excel
-
The Select Viewer page appears. Select the version of Microsoft Office® Excel on your desktop.
Follow the instructions on your screen to download the file to your desktop. Update the spreadsheet, then upload it as described in To update existing items using an Excel spreadsheet.
To mass assign items to suppliers, supplier sites, and supplier site organizations
The process for mass assigning items to suppliers, supplier sites, and supplier site organizations is almost the same, and very similar to mass assigning items to organizations. The only difference between assigning items to the three different supplier business objects is the page name. For example, when assigning items to suppliers, the first page name is Assign Items to Suppliers: Select Items. When assigning items to supplier site organizations, the first page name is Assign Items to SupplierSite Organizations: Select Items. The following steps assume that you are assigning items to suppliers.
-
Navigate to the Assign Items to Suppliers: Select Items page.
-
Enter search criteria, then click Next. See: Searching for Items. The Assign Items to Suppliers: Review Items page appears.
-
Review the search results. You can filter the search results and select the items that you want to assign. If the search results returned the expected items, click Next and the Assign Items to Suppliers: Select Suppliers page appears. If you need to refine the search criteria, click Back.
-
Search for a supplier using one of the following fields:
-
Supplier
-
Supplier Number
-
DUNS Number
This field only appears when assigning items to suppliers.
-
Tax Payer ID
This field only appears when assigning items to suppliers.
-
Tax Registration Number
This field only appears when assigning items to suppliers.
You can also search for supplier sites. Select Show Supplier Sites, then search for supplier sites using the following fields:
Note: These fields automatically appear when assigning items to supplier sites or supplier site organizations.
-
Supplier Site
-
City
-
State
-
Country
Click Next and the Assign Items to Suppliers: Review Supplier Results page lists all suppliers matching your search criteria.
-
-
Select the supplier(s) you want to assign to the item(s), then click Next. The Assign Items to Suppliers: Review Results page appears.
-
Review the item supplier assignments.
Select a display format for export, then click Go.
Click Back if you need to change your selected supplier(s) or Finish to proceed with assigning the items to suppliers.
-
After clicking Finish, the Assign Items to Suppliers: Choose Action page appears. Choose one of the following actions:
-
Apply changes to Database (This option enables you to enter changes directly into the database.)
-
Export to Excel
Click Submit.
-
If you selected Apply changes to Database
-
The Schedule Request: Schedule page appears. Choose when you would like your request to run. You can choose the following:
-
Start Date - choose as soon as possible or a specific date and time.
-
Recurrence - select Never Repeat or Repeat on a certain interval, ending at a certain date and time.
-
Apply the Interval - apply the interval based on the start or completion date and time.
-
Schedule Name - optionally select a predefined schedule from the list. Select Increment Date Parameters to set the next date.
-
Save Schedule - define and save a new schedule by entering a new Schedule Name, Description, and selecting Save Schedule.
-
-
Click Next. The Schedule Request: Review page appears.
Review the schedule parameters. Click Back if you need to change any of the parameters.
-
Click Submit.
A message appears, saying your request for EGO Spreadsheet Java Concurrent Program has been scheduled and giving you the Request ID.
-
Click OK.
The Requests page appears. From here, you can find out the details and status of your request.
If you selected Export to Excel
-
The Select Viewer page appears. Select the version of Microsoft Office® Excel on your desktop.
Follow the instructions on your screen to download the file to your desktop. Update the spreadsheet, then upload it as described in To update existing items using an Excel spreadsheet.
To mass assign items to and unassign items from categories
The processes for mass assigning items to categories and unassigning items from categories are almost identical and following the same first three steps:
-
Select the catalog
-
Search for items
-
Review search results. Optionally, go back and search again if the results are unsatisfactory.
-
The next step differs depending on the process selected:
-
Assign Items to Categories
-
Unassign Items from Categories
-
-
The remaining steps are the same for both flows:
-
Find and select organizations
-
Review organization item search results. Optionally, go back and search again if the results are unsatisfactory.
-
Choose action:
-
Apply changes to the database immediately
-
Export items to change to Excel. Make changes, then upload the changes at a later time.
-
-
Caution: Only users with create/edit category privileges can create or edit category information in a catalog. A user can assign items to categories only if the user has item assignment privileges for the catalog side as well as the item. For example, a user can assign item A to category B in catalog C only if the user has item assignment privileges for the item as well as managing catalog item assignment privileges for the catalog.
-
Navigate to one of the following mass update functions:
-
Assign Items to Categories
-
Unassign Items from Categories
The (mass update function): Select Catalog page appears.
Search for and select a catalog. Click Next.
-
-
The (mass update function): Select Items page appears.
Use either Simple Search or Advanced Search to find the items you want to update. See: Searching for Items
The Assign Items to Categories: Assign Items or the Unassign Items from Categories: Unassign Items page appears.
-
Select the items you want to assign or unassign, then choose a category. Click Assign or Unassign, then click Next.
-
The (mass update function): Select Organizations page appears.
Search for an organization using one of the following fields:
-
Organization Code
-
Organization Name
-
Hierarchy
Click Next and the Assign Items to Organizations: Review Organizations page lists all organizations matching your search criteria.
-
-
The (mass update function): Review Results page appears.
Review the search results. If the search results returned the expected items, click Finish. If you need to refine the search criteria, click Back.
-
After clicking Finish, the (mass update function): Choose Action page appears. Choose one of the following actions:
-
Apply changes to Database - use this option to directly update the database
-
Export to Excel - use this option if you want to update more than the category information or need more time to determine the updates needed.
Click Submit.
-
-
If you chose Export to Excel, the Select Viewer page appears. Select the version of Microsoft Office® Excel on your desktop.
Follow the instructions on your screen to download the file to your desktop. Update the spreadsheet, then upload it as described in To update existing items using an Excel spreadsheet.
-
If you chose to Apply changes to Database, then the Schedule Request: Review page appears. Submit the concurrent program.
Caution: Only users with create/edit category privileges can create or edit category information in a catalog. A user can assign items to categories only if the user has item assignment privileges for the catalog side as well as the item. For example, a user can assign item A to category B in catalog C only if the user has item assignment privileges for the item as well as managing catalog item assignment privileges for the catalog.
-
Select Reassign Categories from the menu.
The Reassign Categories: Select Catalog page appears.
Search for and select a catalog. Click Next.
-
The Reassign Categories: Select Categories page appears.
Select an origin and a destination category. Click Next.
-
The Reassign Categories: Select Organizations page appears.
Enter an organization code, name, or hierarchy. Click Next.
-
The Reassign Categories: Review Organizations page lists all organizations matching your search criteria.
Select only those organizations for which you want to reassign categories. If you need to refine the search criteria, click Back.
-
The Reassign Categories: Review Categories page appears.
Review the results. If the results are as expected, click Finish. If you need to refine the categories, click Back.
-
After clicking Finish, the Reassign Categories: Choose Action page appears. Choose Apply changes to Database.
Click Submit.
-
The Schedule Request: Review page appears. Submit the concurrent program.
Deleting Items
You can delete or purge items from Oracle Product Information Management using deletion groups, deletion constraints, and deletion statements. Use deletion groups to specify the items that you want to delete. Deletion statements define what records to delete, for a particular deletion group, from a particular database table. Deletion constraints define the conditions when you can not delete a record from a database table. Oracle provides many predefined item deletion statements and deletion constraints, but you can also create custom deletion statements and deletion constraints. Other Oracle applications use deletion groups, statements, and constraints to delete other entities, too. For details on how to use deletion groups, statements, and constraints, see the Related Topics listed below.
The predefined item deletion statements specify that the following records are deleted, along with the master item record:
-
Item organizations
-
Item suppliers
-
Item supplier sites
-
Item organization supplier sites
-
Packaging hierarchy
-
Item associations, such as:
-
MPNs (manufacturing part numbers)
-
Related items
-
Customer item cross references
-
Source system cross references
-
Related documents
-
Cross references
-
GTIN cross references
-
-
Item operational and user-defined attributes, including style item variant attribute group value sets when deleting a style item.
Note: When you delete a SKU, that particular variant attribute combination becomes available again for the style item.
Predefined item deletion constraints created specifically for Oracle Product Information Management include:
-
Delete a style item only if the style item has no associated SKUs.
-
No deletion of unapproved items allowed.
-
No deletion of a Global Trade Item Number (GTIN) registered to 1SYNC allowed.
Related Topics
Deleting Items, Bills, Routings, Components, and Operations, Oracle Bills of Material User's Guide
Deletion Constraints and Statements, Oracle Bills of Material User's Guide
Creating Custom Deletion Statements and Constraints, Oracle Bills of Material User's Guide
Item Deletion, Oracle Inventory User's Guide
Delete Items Report, Oracle Bills of Material User's Guide
Updating Multi-Row Attributes in a Spreadsheet
When creating or updating items/item revisions using a spreadsheet, you can provide values for multi-row attributes. When updating an item/item revision's multi-row attributes, you only provide the values for the multi-row attributes; you cannot make changes to the primary or single-row attributes--doing so results in errors. Further, when selecting multi-row attributes from a display format for export to a spreadsheet, select which multi-row attribute to update from the search results page. Even though you can create a display format for more than one multi-row attribute, only the data for the single, selected multi-row attribute is exported to the spreadsheet.
When updating an item multi-row attribute in a spreadsheet, you must input values for the following primary attributes for each multi-row attribute row:
-
Transaction Type (Sync)
-
Item
-
Organization Code
When updating an item revision multi-row attribute in a spreadsheet, you must input the Revision Code for each multi-row attribute row.
To create or update an item's multi-row attributes in a spreadsheet
-
Perform steps 1-7 in the Importing Items Using a Spreadsheet procedure.
-
In the spreadsheet, copy the row for the item (or item revision) and paste it into the next row. Then, delete the values of the primary/single row attributes in the new row. You must delete the values of the primary/single row attributes; if you do not, errors will occur.
Note: By default, the spreadsheet is protected. To copy/paste rows, select the Tools menu, then select Protection, and then select Unprotect.
-
Ensure that the unique key remains the same. After you have a row containing the same unique key as the item (or item revision) whose multi-row attributes you wish to update, and the primary/single row attributes are removed, you can enter values for the multi-row attributes In the following spreadsheet the unique key (Org Code and Item) in the second and third rows remain the same; the single row attributes have been deleted, and the multi-row attribute (Product Name, Impact Classification) values are provided.
Note: To delete an existing value in a record, enter the following data in the appropriate column of the spreadsheet:
For field type: Enter value: Date 31-DEC-9999 Character ! Numeric 9.99E125 If you want to retain an existing value in a record, have it blank in the appropriate column of the spreadsheet.
Exception: In the user defined attributes interface table, when you want to delete an existing value in any of the following fields, use the value !. If you want to retain an existing value in a record, no entry is necessary.
-
ATTR_DISP_VALUE
-
ATTR_VALUE_STR
-
ATTR_NUM_VALUE
-
ATTR_VALUE_DATE
Sample Spreadsheet with Multi-Row Attribute

-
-
Make a note of the Result Format Usage ID at the top of the spreadsheet. You will need this ID later when you upload the spreadsheet in the systemk.
-
After data entry is complete, select Upload from the Oracle menu in the toolbar.
-
In the Upload Parameters window, enter the Result Format Usage ID and check the Automatically Submit Concurrent Process box, and then click Proceed to Upload.
-
In the Oracle Web ADI window, click Upload. After the upload process completes, a message appears with the Concurrent Request number. Make a note of this number, as you will need it later when you access the view log for the concurrent request. Click Close when the process messages complete.
-
Return to the Applications tree menu and click the "View Concurrent Requests" link. It is recommended that you check the concurrent process view log to ensure that the upload process was successful.
-
On the View Concurrent Requests page, click the Details icon.
-
On the Request Details page, click View Log.
-
From the View Log, paste the URL string in a web browser to view any errors. If no errors appear, the upload was successful.
Managing Item Specifications
The specifications of an item are divided into structured and unstructured information. The structured item information is captured in the form of numerous primary and operational attributes that are enabled at the master item or item organization level and in the form of user defined and transaction attributes that are inherited from the catalog category of the item. You can also add an unlimited number of descriptions and images about an item to enrich its specification. All unstructured item information can be added as an attachment to the item.
Most of the item specification information is available at the item revision level as well, which enables you to keep track of the specification information by item revision. For information that is tracked at the revision level, you can perform all of the following actions for each item revision.
Note: You can automatically trigger actions based on an item attribute change. See: Item Business Events, Oracle Product Information Management Implementation Guide and Managing Business Events, Oracle Workflow Developer's Guide.
To update an item's detailed description, images, and primary attributes
-
Locate the item whose description, images or primary attributes you wish to update.
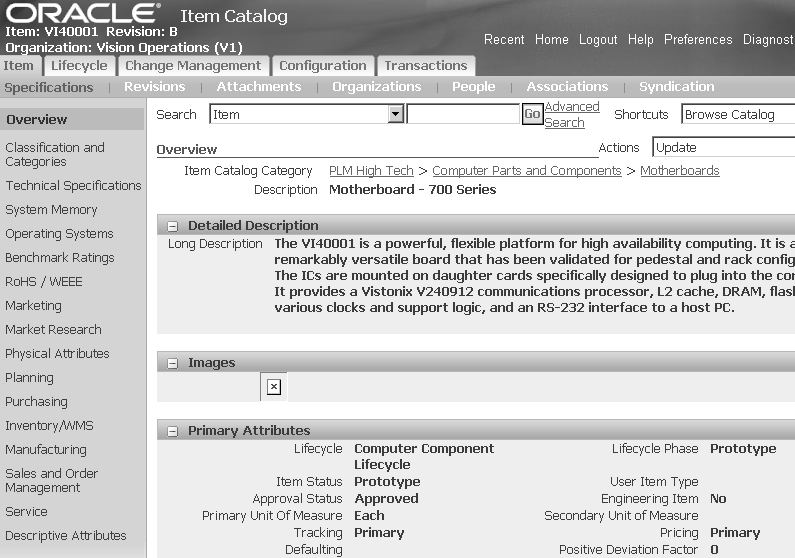
-
On the item's Overview page, select Update from the Actions list and click Go.
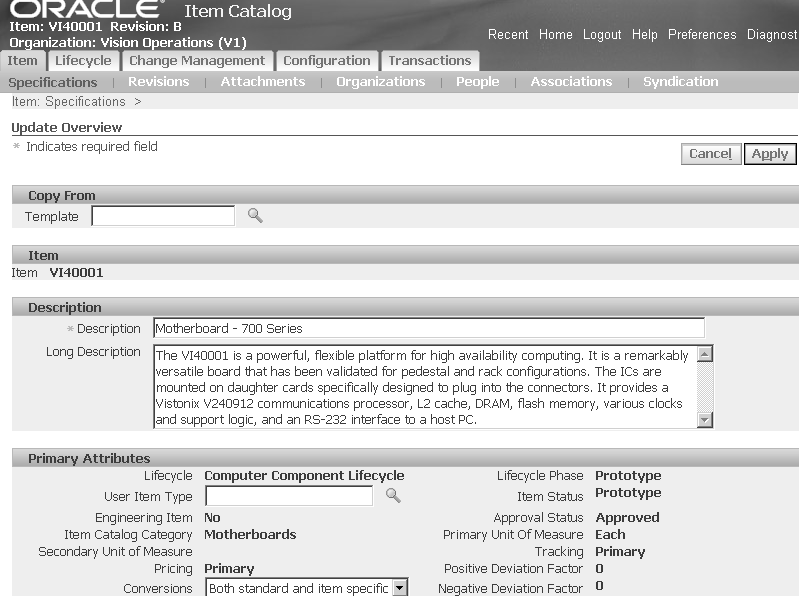
-
Optionally, on the Update Overview page, select a template from which to copy detailed descriptions, primary attributes, and images.
-
Optionally, update the description and long description.
-
Optionally, select a different User Item Type and Conversions option.
Important: The Primary UOM cannot be updated. If the lifecycle and lifecycle phase are not editable, it is because they have already been defined and are in use. If these fields are editable, it is because they have not yet been defined.
-
Optionally, add, update or delete an image.
-
Add
In the Images region, click Add Another Row. Provide the Sequence, a Translatable Label, and choose an attached file for the description. The Display Mode enables you to either display the contents of the image inline or as a link.
-
Update
Update the fields in the Images region.
Note: Files attached using Oracle's E-Business Suite are rendered inline. Files attached using Oracle Files Online are rendered as links, regardless of what is specified in the Display As list.
-
Delete
Click the Delete icon in the image row you want to delete.
-
-
Optionally, add, update, or delete a detailed description.
-
Add
In the Detailed Description region, click Add Another Row. Provide the Sequence, Description Source, Translatable Label and choose an attached file if the Description Source is Item Attachments. The Display Mode enables you to display the contents of the file inline or as a link.
Note: Use the Description Source list to select either an Item Attachments description or a Long Description. If you wish to select Item Attachments, then the list of values in the Attached File field is enabled. However, if you select the Long Description, then the Attached File field is disabled and the list of values returns no results. Also note that files attached using Oracle's E-Business Suite are rendered inline. Files attached using Oracle Files Online are rendered as links, regardless of what is specified in the Display Mode field.
-
Update
Update the fields in the Detailed Description region.
-
Delete
Click the Delete icon in the detailed description row you want to delete.
-
-
Click Apply to save your changes.
To update an item's operational and user-defined attributes
When you define or update an item's operational and user-defined attributes, you update them at the item's organization and revision level, not at the master item level. If you want to update an operational or user-defined attribute across all organizations, then see: Mass Updating Items, Categories and Associations.
-
Locate the item whose operational and user-defined attributes you want to update.
-
Click the attribute group you want to update.
For example, click Physical Attributes. In the Physical Attributes page, the Update button appears when:
-
a user's role has privileges to update the item and
-
the item is in a lifecycle phase where direct updates are allowed
The Create Change Order button appears when:
-
the attribute group's change policy is set to Change Order Required and the item is in a lifecycle phase that requires change orders. See: Defining Change Policies, Oracle Product Information Management Implementation Guide
If both the Update and the Create Change Order buttons appear, then you can choose whether to create a change order before updating the attributes or not.
Note: Change management is not supported for the following operational attributes. You must update them using the Update button:
-
Shipping Subinventory (Sales and Order Management attribute group)
-
Receiving Subinventory (Purchasing attribute group)
-
Move Order Receipts SubInventory (Inventory/WMS attribute group)
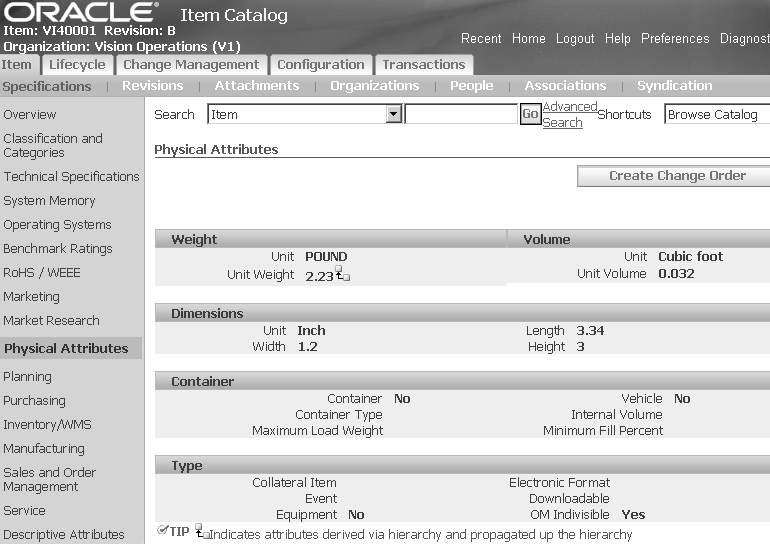
-
To update attributes without creating a change order
-
Click Update.
The Update (Attribute Group) Attributes page appears. Enter the new attribute values and units of measure, if applicable.
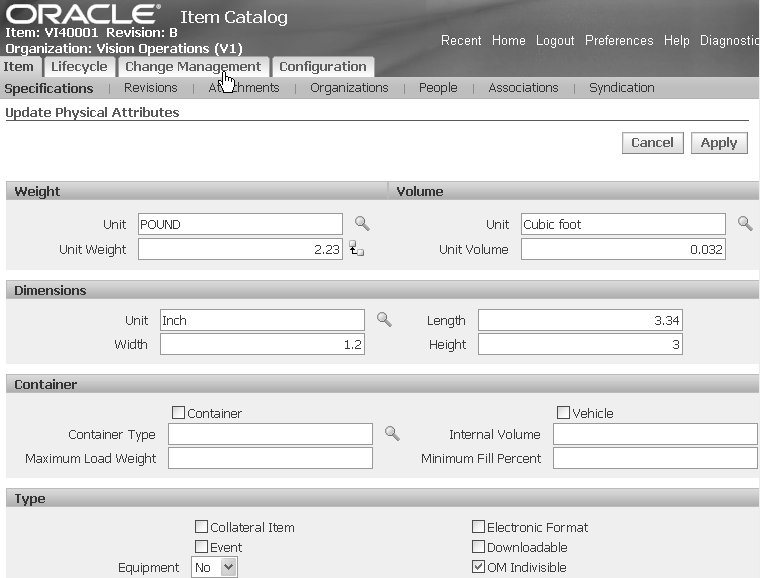
-
Click Apply.
To update attributes using a change order
-
Click Create Change Order.
To update an item's transaction attributes
When you update an item's transaction attributes, you update them at the item's organization and revision level, not at the master item level.
-
Locate the item whose transaction attributes you want to update.
-
From the item's Overview page, click Transaction Attributes.
-
For further instructions on how to update an item's transaction attributes, see: "To update a transaction attribute:" in Defining Transaction Attributes, Oracle Product Information Management Implementation Guide.
Related Topics
Managing Item Phases
Lifecycles enable you to model the lifecycle phases of your items in a flexible manner. You can pre-establish phase level controls that determine the behavior of an item in the different modules. You can also define a list of valid item statuses within each phase. The item status in turn controls the behavior of the item in eight functional areas. There is one lifecycle definition, which is the same for the item and the item revisions. However, an item and item revisions can be in different phases even if they are using the same lifecycle definition. It is not mandatory that an item have a lifecycle; however, if the item revisions have phases, then you must have a lifecycle defined for the item.
You can promote or demote an item from its current phase. When an item enters a new phase, based on the control factors of the new phase and status, the behavior of the item will change. For example, when you move an item from the engineering phase to the production phase, you may want to place tighter controls on changes to product specifications, since that will entail significant change management efforts and costs.
To promote an item to the next phase
-
Locate the item that you wish to promote to the next lifecycle phase.
-
On the item's Primary Attributes page, click the Lifecycle tab.
-
On the Item Phases page, click Promote.
The Promote button is available only if the item is under lifecycle control.
-
Provide the Effective Date.
-
Click Apply.
To demote an item to a previous phase
-
Locate the item that you wish to demote to the previous lifecycle phase.
-
On the item's Primary Attributes page, click the Lifecycle tab.
-
On the Item Phases page, click Demote.
The Demote button is available only if the item is under lifecycle control.
-
Provide the effective date.
-
Click Apply.
-
Locate the item for which you wish to view the change policy.
-
On the Item Detail page, click the Lifecycle tab.
-
Click the "Change Policy" link.
-
Locate the item for which you wish to change the status.
-
On the item's Primary Attributes page, click the Lifecycle tab.
-
On the Item Phases page, click the "Status" link.
-
Click Demote.
-
Click Change Status.
-
Update the status and effective date.
-
Click Apply.
To implement the phase/item status changes
-
Locate the item for which you wish to implement the phase/item status.
-
On the item's Primary Attributes page, click the Lifecycle tab.
-
On the Item Phases page, click the "History" link.
-
Click Implement.
Managing AMLs
You can associate a list of manufacturers and their corresponding part numbers with any item. You can also specify the manufacturer's approval status, preference level, and identify whether or not the first article has been completed. This list of manufacturers and part numbers is called an Approved Manufacturers List (AML). The AML for an item is often defined during the new item creation and request process. The AML is thereby reviewed and approved by all necessary people. An item AML may be updated after item creation either manually or through a change order. The item's change policy determines for each phase of an item's lifecycle whether or not an AML can be updated and if a change order is required.
For more details about item change policies, see Defining Change Policies , Oracle Product Information Management Implementation Guide.
To specify manufacturer part numbers when creating an item
-
On the Create Item: Review Item Information page (typically the second step in the create item process), click the Manufacturer Part Number tab.
-
When the page refreshes, click Add Another Row.
-
In the empty fields for the row, provide the required information.
Status
If you know the approval status of the manufacturer and manufacturer part number, select it. Otherwise, leave this field blank.
Preference Level
The Preference Level indicates whether or not the manufacturer has been designated as preferred in the item catalog category. Preference Levels range from High (most desirable) to Low (least desirable). A manufacturer can have different Preference Levels for different items--this is a result of the items being in different item catalog categories. Hence, the Preference Level is specified at the item catalog category and not editable in this context.
First Article Status
First Article Status is a milestone that indicates whether or not a manufacturer has built and/or provided the first article.
Creating Item Revisions
Items undergo changes that you may want to track using item revisions. You can associate both structured and unstructured information with item revisions.
Note: You can automatically trigger actions based on an item revision change. See: Item Business Events, Oracle Product Lifecycle Management Implementation Guide or Oracle Product Information Management Implementation Guide and Managing Business Events, Oracle Workflow Developer's Guide.
-
Locate the item for which you wish to create a revision.
-
On the item's Primary Attributes page, select the Revise action and click Go.
-
On the Revise Item page, provide in the required information and click Apply.
-
Locate the item for which you wish to create a revision.
-
On the item's Primary Attributes page, click the Revisions tab.
-
On the Revisions page, click the revision's name link.
-
Click Update.
-
On the Update Revision page, update the relevant information and click Apply.
Managing Item Attachments
The specifications of an item are divided into structured and unstructured information. You can add unstructured information to the item as an attachment. Attachments include files, folders, text, and URLs. All management of item attachments occurs from the Attachments page. To navigate to this page, locate the item. On the item's Primary Attributes page, click the Attachments tab.
You can add attachments to items at the item revision level as well, enabling you to track specification information by item revision. Most tasks related to item attachments are the same as those for attachments to any other business object. For an explanation of all tasks related to attachments to any business object, see: Using E-Business Suite Attachments.
You can also use a Change Management approval and review process to control the changes to item attachments. Change Management for item attachments provides change control functionality for all types of attachments, a crucial and important piece of non-structured information about the product.
Types of attachment changes supported using a change order include:
-
adding a specific version of an attachment at the item or item revision level
-
creating a new version for an existing attachment by checking out the current version and checking in a new version.
-
changing the attached version for an existing attachment.
-
changing attachment attributes. Supported attributes include Name, Description, and Attachment Category.
-
deleting attachments.
Change control is achieved by providing a mechanism to author, track and manage changes to attachments through a change order approval and implementation process. You can:
-
Specify items and attachments that are effected in a change order.
-
Author and specify the exact changes that are desired or required to resolve an issue or change request.
-
Route the change order for approval to the appropriate people responsible for the revised item based on item roles, change desired and lifecycle of item.
Once the change order is approved, implement the changes manually or automatically on the specified implementation date.
Change Management for item attachments is supported through the Change Management functionality. User can create a change order and specify changes to the attachments of a reviewed item. There are no additional steps required in the setting up of a change order to be able to do attachment changes for a revised item.
To request review or approval of an attachment
You can request approval or a review of a file version, URL, or text using workflows. Each approval or review consists of a number of phases; you can associate a workflow approval with each phase.
The workflow lists the steps in the approval process. You can add steps to the process only if a workflow routing is associated with the particular phase. You cannot delete predefined steps. You can add additional assignees to a step, but you cannot delete predefined assignees. For more details about approvals, see Managing Workflows.
When you send a file version stored in a Oracle Universal Content Management (UCM) or Content DB content repository through a review or approval process, the same status is reflected everywhere else this file version is attached. The process is the same for both reviews and approvals, but the following steps use the request approval action to explain the process.
-
In the Attachments page, find and select the files that you want to approve or review.
-
In the Select Attachments field, select either Request Approval or Request Review, then click Go.
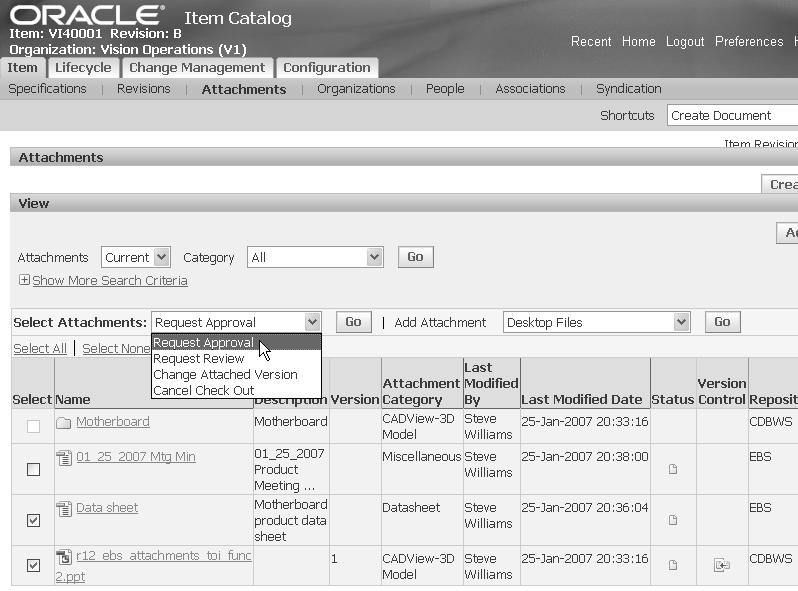
-
In the Create File Approval: Select File Approval Type page, select the file approval type from the dropdown list. Click Continue.
-
In the Create File Approval page, enter a file approval name.
Optionally, enter values in the following fields:
-
Description
-
Priority
-
Reason
-
Need By Date

-
-
In the Create File Approval page, click the Workflow Approval tab to add update, add, or delete any workflow steps. For more information about workflows, see:
-
Defining Workflow Templates, Oracle Product Information Management Implementation Guide
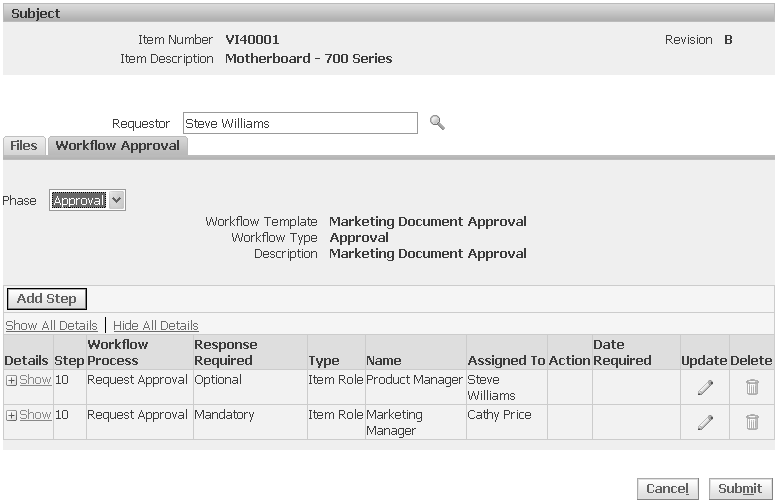
-
Click Submit.
In the Attachments page, the status of the selected files has changed to Submitted for Approval.
To view the status of a review or approval
You can view the review or approval status of a particular attachment from the Attachments page Status column. By moving your cursor over a status icon in the Status column, you can see the status of a particular attachment. If you click on the status icon for an attachment going through the review or approval process, the system takes you to a review or approval summary page
You can also view the status of a review or approval by clicking on the Attachment Details icon in the Details column for a particular attachment. From the Details page, click either the Reviews or Approvals tab. Each tab lists all reviews or approvals associated with the attachment.
View pending attachment changes
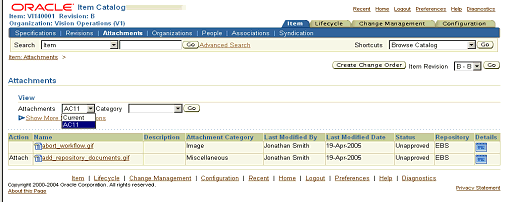
You can view pending attachment changes for an item from the attachments sub-tab in the item workbench. You can select a pending change from the attachments drop-down list in the View section and view change details.
Using Item Business Events
Using Oracle Workflow, you can automatically trigger actions after the following item business events occur:
-
item creation
-
item approval
-
item creation using bulkload
-
item role change
-
item update
-
related item change
-
item revision change
-
item cross reference change
-
customer item cross reference change
-
item attribute change
-
item approved manufacturer list change
-
item catalog assignment change
-
UCCNet Global Data Synchronization (registering an item with GDSN)
-
catalog category change (creating, updating, or deleting a catalog category)
-
GTIN attribute change
-
valid category change (adding or removing a category from a catalog)
-
pre-item attribute change (event raised before changing the item attribute)
In one case, business event oracle.apps.ego.item.preAttributeChange, you can trigger actions before a business event occurs. Before changing an item attribute, you can test a proposed attribute change against your validating criteria before committing the attribute value to the database. This business event requires one extra step: checking the Raise Pre Attribute Change Event box (see: Defining Item Attributes and Attribute Groups , Oracle Product Information Management Implementation Guide). Examples of actions you can trigger include issuing notifications or launching a workflow.
Business Event Examples
The following scenarios show how subscribing to a business event can simplify business processes:
-
A business needs to notify the people involved every time an item role change occurs. The business can set up Oracle Workflow to automatically send the people involved an email each time this occurs.
-
A business maintains items in the master organization. Every time an item is created in the master organization, the business needs to copy the item into the child organizations.
For more information about setting up and subscribing to business events, see the related topics listed below.
Related Topics
Item Business Events, Oracle Product Lifecycle Management Implementation Guide or Product Information Management Implementation Guide
Managing Business Events, Oracle Workflow Developer's Guide
Defining Procedures and Functions for Oracle Workflow, Oracle Workflow Developer's Guide
Enabling Organization Assignments
Items are engineered, manufactured, and distributed by physical facilities called "organizations". To enable an organization to perform one of these functions on an item, you have to first enable the item into that organization with the appropriate attributes. Some of the attributes are modifiable at the organization level. These are called organization-level attributes.
Note: When integrating a retail system such as Oracle Retail with Oracle eBusiness Suite, you must set up the retail sites as organizations. Refer to the retail site hierarchy and create a matching organization hierarchy. Model retail site clusters as single level organization hierarchies, with one of the sites defined as a parent (a dummy role). Once the organizations are defined, you can synchronize retail site data with the organizations.
See: Setting Up Organizations, Oracle HRMS Enterprise and Workforce Management Guide
Choose from the following methods of assigning organizations to items:
-
Manually. You can manually assign organizations to items from:
-
the Item Workbench, Organizations tab. See: "To enable an item in an organization:", listed below.
-
the Mass Update menu. See: "To mass assign items to organizations:" in Mass Updating Items, Item Categories and Item Associations.
-
the Item Workbench, Configuration tab, Packs subtab. See: "To assign a pack to an organization:", listed below.
-
-
Automated. Use API calls initiated by a retail system such as Oracle Retail to create and maintain item organizations synchronized with retail sites. See the Oracle Integration Repository for a list of organization APIs available for use. Separate organization APIs can assign organizations to items as well as keep the organizations synchronized with retail sites if you use a retail system such as Oracle Retail.
-
Manual and automated. You can choose to automate the synchronization of some portion of the organization hierarchy and maintain the rest manually. For example, Oracle Retail has a six level site hierarchy, the top levels of which usually remain static. The majority of the changes occur at the last level, the retail sites/organizations. You could set up the initial organization hierarchy from Oracle Retail manually in eBS. Automate the creation of the site and site clusters in eBS using APIs.
Important: Only those users with access to an organization can assign items to it.
To enable an item in an organization
-
Locate the item you wish to enable.
-
On the item's Overview page, click the Organizations tab.
-
On the Organization Assignments page, click Assign to Organization.
Note: When you are viewing an item within the master organization context, you can also click Mass Assign to Organization. This button is not available within child organizations. See: "To mass assign items to organizations:" in Mass Updating Items, Item Categories and Item Associations.
The Assign to Organization button enables you to copy the following item attribute values from the master organization context to the new organizations:
-
Status
-
Primary Unit of Measure
-
Tracking
-
Pricing
-
Secondary Unit of Measure
-
Defaulting
-
Negative Deviation Factor
-
Positive Deviation Factor
If you want to copy more attribute values, then use the Mass Assign to Organization button.
-
-
On the Update Organization Assignments page, select the Assigned checkbox in the row of each organization to which you want to assign the item. Click Assign All to assign the item to all organizations.
-
Click Apply.
A message appears, listing the concurrent request ID.
To assign a pack to an organization
You can assign any level in a packaging hierarchy to one or more organizations. All items below the pack item selected are assigned to the same organization(s) as the pack item.
-
Navigate to the Packs page of an item.
From the item's Overview page, click the Configuration tab, then the Packs subtab. The Packs page displays a list of each pack item of which this item is a member.
-
In the bottom table that displays the pack hierarchy, select the pack item that you want to assign to one or more organizations.
-
Click Assign Pack to Organization.
-
In the Assign Items to Organizations: Select Organizations page, search for the organizations to select using one or more of the following fields:
-
Organization Code
-
Organization Name
-
Hierarchy
Click Next.
-
-
In the Assign Items to Organizations: Review Organizations page, select one or more organizations, then click Next.
-
In the Assign Items to Organizations: Review Results page, review the items and the organization assignments. Click Back to change them or Finish to complete the organization assignment.
-
in the Assign Items to Organization: Choose Action page, choose to either apply the changes to the database or to export the changes to Excel.
Click Submit.
-
If you chose the apply to database option, follow the next steps that appear to schedule the concurrent request, choose a report layout, and review the options you have chosen. Click Submit to schedule the concurrent request.
If you chose the export to Excel option, follow the next steps that appear to download the changes into an Excel spreadsheet. Update the spreadsheet if necessary, then upload it as described in Updating Existing Items Using a Spreadsheet.
To change the organization context
You can change the organization context to look at item information in a different organization either from the main menu or from within the item workbench.
To change organizations from the main menu
-
From the menu, find and select Change Organization.
To change organizations from the item workbench
-
Navigate to the item's Overview page or to any page within the item workbench.
-
From the Shortcuts drop down list, select Organization, then click Go.
-
In the Choose Organization page, click the Quick Select icon next to the organization you want to select.
Alternatively, from the item's Overview page, select the Organizations tab. In the Change Organization drop down list, select an organization.
To view item organization assignments
Important: You can only view those organizations to which you have access.
-
Navigate to the item's Overview page.
-
Select the Organizations subtab.
The Organization Assignments page lists all of the organizations assigned to the item.
Managing Revision Phases
Lifecycles enable you to model the lifecycle phases of your item revisions in a flexible manner. You can pre-establish phase level controls that determine the behavior of an item revision in the different modules.
You can promote or demote an item revision from its current phase. When an item enters a new phase, based on the control factors of the new phase and status, the behavior of the item revision changes. For example, when you move an item from the engineering phase to the production phase, you may want to place tighter controls on changes to product specifications, since that will entail significant change management efforts and costs.
To promote an item revision to the next phase
-
Locate the item for which you wish to promote the item revision.
-
On the item's Primary Attributes page, click the Lifecycle tab.
-
On the Item Phases page, click the Revision Phases tab.
-
On the Revision Phases page, click Promote.
-
On the Promote Item page, provide the Effective Date.
-
Click Apply.
To demote an item revision to the previous phase
-
Locate the item for which you wish to demote the item revision.
-
On the item's Primary Attributes page, click the Lifecycle tab.
-
On the Item Phases page, click the Revision Phases tab.
-
On the Revision Phases page, click Demote.
-
On the Demote Item page, provide the Effective Date.
-
Click Apply.
To implement the phase changes
-
Locate the item for which you wish to implement phase changes.
-
On the item's Primary Attributes page, click the Lifecycle tab.
-
On the Item Phases page, click the Revision Phases tab.
-
On the Revision Phases page, click "Phase History" link.
-
Click Implement.
Viewing Item Transaction Information
Using the Oracle Transaction Viewer, you can present real-time item transaction information gathered from the entire Oracle E-Business Suite within the Item workbench. View transactions from various functional areas such as Sales, Inventory, Purchasing, Install Base, Service, Retail, and others. The Oracle Transaction Viewer, shared by Oracle Customer Data Hub, enables users to configure views of their product data across all spoke systems, providing a 360 degree transactional view of the product within a single Item Workbench tab.
Prerequisites
- To view transactions, you must set up the Oracle Transaction Viewer for use with the Item Workbench. Set up the Transaction Viewer as described in Transactions Viewer, Oracle Customer Data Hub Implementation Concepts and Strategies White Paper at My Oracle Support (http://metalink.oracle.com, Doc ID: 312811.1), except substitute the be_code field value of IMC_TXN_BE_PARTY with the value IMC_TXN_BE_ITEM.
To view item-related transaction information
-
Find the item for which you want to view item transaction information. See: Searching for Items.
-
On the item's Overview page, click the Transactions tab.
You can view transaction information under the following sections of the Transactions page.
-
Open Orders
-
Onhand Quantities
-
Open Returns
-
Open Service Requests
-
Installed Units Information
-
Open Purchasing Orders
Important: The Transactions tab remains hidden by default but becomes visible once you seed a transaction for IMC_TXN_BE_ITEM.
-
Generating Reports
Item reports can be generated for one or more items from Item search results, Browse Catalog category, and Item Detail pages. You can export these Item reports in various formats like Adobe Acrobat, Rich Text format, Web page, Microsoft Excel, or XML using custom report formats. You can design report formats using familiar desktop tools such as Adobe Acrobat and Microsoft Word.
Report security is consistent with search security. You can only generate reports for item objects on which you have the required role. Also, you can only export item information in the report on which you have the required role.
You can export or generate the following item-related reports:
-
Item primary and operational attribute groups
-
Item-level user defined attribute groups
-
GDSN attribute groups
Prerequisites
- Defining Report Templates Using XML Publisher, Oracle Product Information Management Implementation Guide
To generate a report
-
Using Item simple or advanced search, find the Items for which you want to generate the report.
-
Select Items from the search results, and click Generate Report.
-
Select the Report template and Output format.
-
If you want to include images in the report, select 'Include Item Overview Images'.
This option includes any images attached to an item's description.
-
Upon export, the report will be generated in the required format.
Note: You can also generate report from the Browse Catalog Category and Item detail pages.