Key Setups
This chapter describes the key setups such as the target service levels and performance indicators that you need to specify before you run your inventory plan.
This chapter covers the following topics:
- Setting Plan Level Default Service Level
- Setting Plan Level Default Demand Fulfillment Lead Time
- Service Level Set
- Defining Service Level Sets
- Item Simulation Set
- Defining Item Attribute Simulation Sets
- Defining User-specified Safety Stock
- Defining Budgets
- Enforcing a Plan Option Budget Name or Value
- Setting Default Lead Time Variability
- Setting Up Manufacturing Lead Time Variability for a Plan
- Setting Up Manufacturing Lead Time Variability for an Item
- Setting Up In-Transit Lead Time Variability
- Setting Up Supplier Lead Time Variability
- Setting Penalty Costs
- Setting Item Purchase Price by Supplier
- Setting Performance Indicators
- Setting Intermittent Demand
Setting Plan Level Default Service Level
Target service level is the percentage of demand that you plan to satisfy using your available inventory. The inventory planning engine uses the specified target service level to make recommendations such as target safety stock.
You can enforce target service levels to make sure that the plan meets the target service levels. To meet the enforced target service levels, the plan may violate budget or capacity constraints.
You can define the plan service level in the Service Level % field in the Constraints tabbed region of the Plan Options window.
Steps
-
From the Inventory Planner responsibility, navigate to the Plan Options window.
Inventory Plan > Options
-
Click the Constraints tab.
-
In the Plan Level Defaults region, set the default target Service Level for the plan.
-
(Optional) To ensure that these default values override any other specification or setting that may occur at a more detailed level, select the Enforce Plan Level Defaults check box.
Note: If the Enforce Plan Level Defaults' is unchecked, the most specific assignment of Service Levels in the Service Level Set associated with the plan is used for planning. If no value has been assigned in the associated Service Level Set, then the plan level default values, if set, are used. If the plan level default values are not set, then the system assumes a target service level of 50%.
-
Save your work.
Setting Plan Level Default Demand Fulfillment Lead Time
You can define the demand fulfillment service level in the Constraints tabbed region of the Plan Options window.
Steps
-
From the Inventory Planner responsibility, navigate to the Plan Options window.
Inventory Plan > Options
-
Click the Constraints tab.
-
In the Plan Level Defaults region, set the default Demand Fulfillment Lead Time for the plan.
-
(Optional) To ensure that these default values override any other specification or setting that may occur at a more detailed level, select the Enforce Plan Level Defaults check box.
Note: If the Enforce Plan Level Defaults' is unchecked, the most specific assignment of Fulfillment Lead Time in the Service Level Set associated with the plan is used for planning. If no value has been assigned in the associated Service Level Set, then the plan level default values, if set, are used. If the plan level default values are not set, then the system assumes a fulfillment lead time of zero days.
-
Save your work.
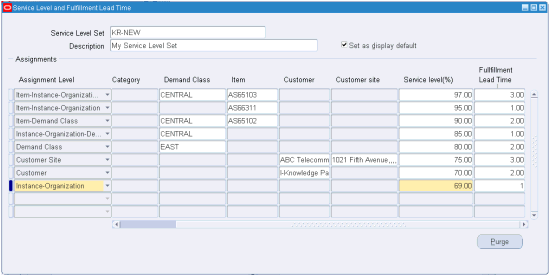
Service Level Set
Specific service level targets can be assigned to items, categories of items, customers, classes of demand, an organization or combinations of these. These are defined in a form titled Service Levels and Fulfillment Lead Time. This form serves as a central place to set service levels for items, categories, organizations, customers, and so on. It makes obsolete several ways that service levels could be set prior to Release 12.0, such as a flex field in Oracle Inventory, and the Allocations form.
When an item has target service levels assigned at different levels of specificity, the more specific setting overrides the less specific one. The various levels of assignment allowed in a Service Level Set are listed below in increasing order of specificity.
For example, Item-Demand Class is more specific than Customer Site. In the case where the scope of target service level overlaps Customer Site and Item-Demand Class, the settings for Item-Demand Class would be in effect.
-
Instance-Organization
-
Customer
-
Customer Site
-
Demand Class
-
Instance-Organization-Demand Class
-
Category
-
Category Demand Class
-
Item-Demand Class
-
Item-Instance-Organization
-
Item-Instance-Organization-Demand Class
See Defining Service Agreement Simulation Sets.
Defining Service Level Sets
A service level set needs to be associated with a plan to ensure that specific assignments of target service levels and fulfillment lead times are respected in the planning process. The Service Level Set is associated with a plan by clicking the constraints tab of the Plan Options folder, and then selecting the appropriate Service Level Set from the list of values to use with the plan.
Specific service level targets can be assigned to items, categories of items, customers, classes of demand, an organization or certain allowed combinations. These are done by choosing the appropriate assignment level, and then specifying the desired target service level and fulfillment lead time.
To set up a Service Level Set, use this procedure:
Prerequisites
- As part of the setup it is necessary to specify the value of the profile option MSC: Service Level Category Set. Only categories from this category set are available when assigning target service levels and fulfillment lead times at a category level during the setup of specific item or category level service levels and fulfillment lead times.
Steps
To set up a Service Level Set
-
From the Inventory Planner responsibility, navigate to the Service Levels and Fulfillment Lead Time window.
Inventory Planner > Setup > Service Levels & Fullment Lead Time
-
Define a Service Level Set name and description.
-
(Optional) Select the 'Set as display default' check box to indicate that this Service Level Set should appear as the default value in the header region of the Plan Options window.
-
In a row under the Assignment Level column, select an Assignment Level from the list of values.
-
For that same row, specify the applicable details, such as: Category, Demand Class, Item, Customer, and Customer site, to apply to the selected Assignment Level.
Note: The fields in the Assignment Level row in which you can add details varies, depending on the Assignment Level you selected.
-
For that same row, in the Service Level (%) column, specify the target service level, in percent, for the Assignment Level.
-
For that same row, in the Fulfillment Lead Time column, specify the Demand Fulfillment Lead Time, in days. See Demand Fulfillment Lead Time.
-
Repeat steps 4 - 7 for each additional Assignment Level in the Service Level Set.
-
Save your work.
To associate a Service Level Set with a Named Plan
-
Navigate to the Inventory Plan Options window:
Inventory Planner > Inventory Plan > Names
The Organizations window appears.
-
Select an organization and click OK.
The Inventory Plan Names window appears.
-
Select a plan and then click Plan Options
The Plan Options window appears.
-
Select the Constraints Tab.
The Service Level Set field located in the header region is enabled.
-
From the Service Level Set list of values, select a Service Level Set.
-
Save your work.
Item Simulation Set
Item Attribute Simulation Sets enable Inventory Optimization plans to more easily simulate changes to key item attributes. You to attach values of key attributes to item-organizations or to item-regions, and then save those assignments under an Item Attribute Simulation Set name.
Item Simulation Sets provide the ability to mass maintain planning-related item attributes. Planners can create multiple item simulation sets, with each simulation set addressing a set of "what-if" scenarios.
The Item Simulation Set field appears in the header region of the Plan Options window. When you specify a particular item attribute simulation set name in the Item Simulation Set field of the Plan Options window, the plan uses the item attribute values specified in the named simulation set.
Key setup steps are:
-
Identify the scenario to be simulated.
-
Determine the scope of the simulation.
-
Create a Query to identify Items that fit the scope.
-
Identify attributes that need to be modified to meet the simulation objective.
-
Modify the attributes according to the scenario to be simulated.
-
Save the attributes as a named Item Simulation Set.
-
Link the Item Simulation Set to a plan in the header region of the Plan Options form.
-
The simulation set holds only the changes for the collected planning item attributes.
-
When running a plan these changes overwrite the collected data values for that specific plan.
-
Collected data remains unaltered.
-
If there is no simulation set linked with a plan, the plan runs against the collected data.
See Defining Item Attribute Simulation Sets.
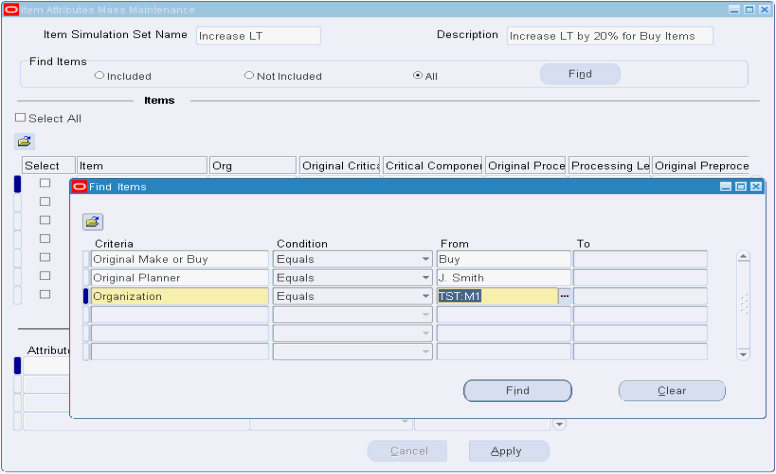
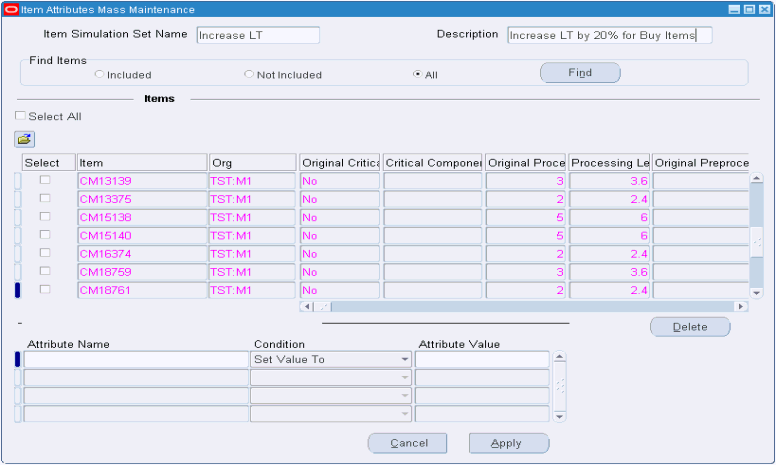
Defining Item Attribute Simulation Sets
-
From the Advanced Supply Chain Planner responsibility, navigate to the Item Attributes Mass Maintenance window.
Setup > Item Attributes Mass Maintenance
The Item Attributes Mass Maintenance window appears.
-
Define the Simulation Set Name and Description.
-
Find relevant items.
Example, using the Find Items - 'Included' radio button:
-
Item A:
-
Make/Buy: Make
-
Planner: J. Smith
-
Processing LT: 3 days
-
Item A was previously updated.
-
-
Item B:
-
Make/Buy: Buy
-
Planner: J. Smith
-
Processing LT: 2 days
-
-
Item C:
-
Make/Buy: Buy
-
Planner: J. Smith
-
Processing LT: 3 days
-
Item C was previously updated.
-
-
Query criteria:
-
Make/Buy: Buy
-
Planner: J. Smith
-
The 'Included' radio button is selected
-
Result: the query results return Item C only.
Note: Item B does not qualify since it has not been updated in this simulation set, and Item A does not qualify since it does not meet the query criteria
-
-
Use the 'Not included' radio button when finding those items that have not been updated as part of the simulation set. This is useful for adding new items to the simulation set. The results of the query filters out the items that have been updated in this simulation set.
Continuing the previous example, if the query is used in conjunction with the 'Not included' radio button, query results return Item B only.
Note: Item C does not qualify since it has been updated in this simulation set, and Item A does not qualify since it does not meet the query criteria.
-
Use the 'All' radio button for finding all items regardless of update status. This is useful in situations where a new simulation scenario is being developed and is applicable to all items.
Continuing the previous example, if the query is used in conjunction with the 'All' radio button, query results return Item B and Item C.
Note: Item A does not qualify since it does not meet the query criteria
-
-
Define the simulation set. Select the check boxes associated with relevant items.
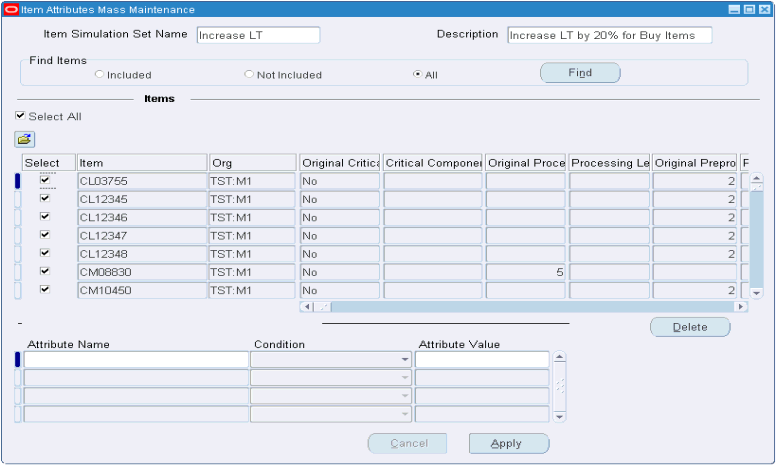
-
Modify attributes. The available conditions that can be used to update the Attributes are as follows:
-
Set value to: set the attribute to a specified value
-
Increase by value: increase the original attribute by a specified value
-
Increase by percentage: Increase the original attribute by a specified percentage (%)
-
Decrease by value: Decrease the original attribute by a specified value
-
Decrease by percentage: Decrease the original attribute by a specified percentage (%)
-
Set original value: Reset the attribute back to the original collected value
-
-
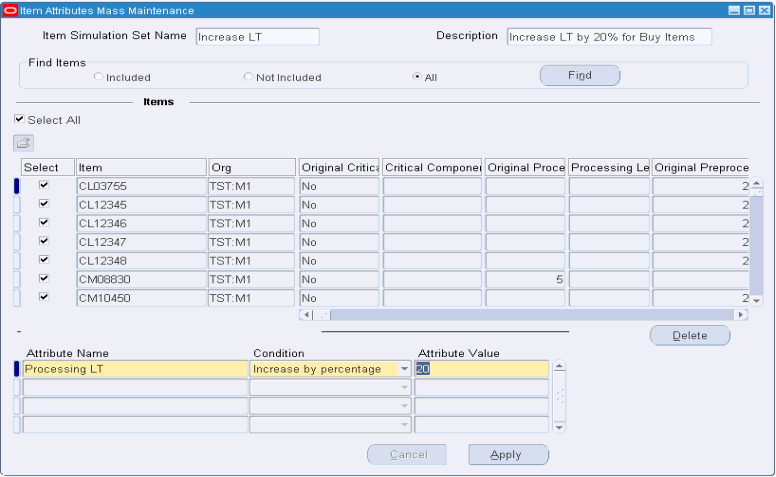
Repeat the preceding step for all attributes to be modified. Click Apply.
The form updates to show the original and modified values.
Note: The original set of values refer to the collected data, and hence cannot be updated.
-
Specify the simulation set in the Item Simulation Set field of the Plan Options window.
Note: If the Item Simulation Set field is left blank, then collected data will be used for planning.
Defining User-specified Safety Stock
Several factors may influence your decision related to the level of safety stock that you need to maintain. These include:
-
Contractual obligations
-
Vendor-managed inventory
-
Policies regarding service levels
-
Subjective experience
The inventory planning engine recommends optimal safety stock levels. However, you can override the recommendations that the inventory planning engine generates with your specific inputs. For more information, see User-Specified Safety Stock.
Defining Budgets
Prerequisites
- To define a budget, you need to set up a category set for budget purposes and associate categories to this category set. Both these tasks are done in Oracle Inventory. For more information on categories and category sets, see Oracle Inventory User's Guide.
Steps
-
Log on to Oracle Inventory Optimization.
-
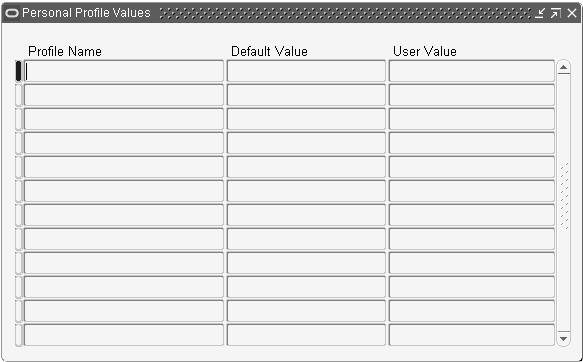
From the Navigator, choose Other > Profile.
-
The Personal Profile Values window appears.
Personal Profile Values window
-
-
Use the information in the following table to complete the fields in the Personal Profile Values window.
Field Description Profile Name Select the "MSR:Budget Category Set" profile name from the LOV. User Value Select the category set from the LOV to which the planned items belong. -
Save your work.
-
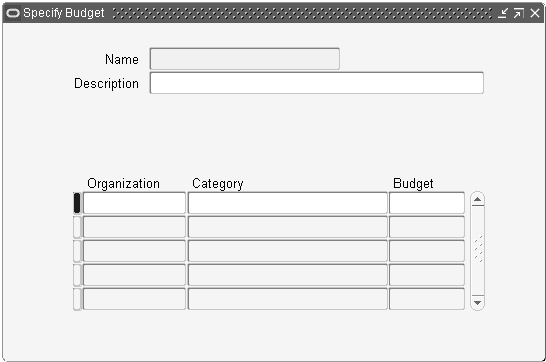
To define the budget at the organization or category level, choose Setup > Specify Budgets.
-
The Specify Budget window appears.
Specify Budget window
-
-
Use the information in the following table to complete the fields in the Specify Budget window.
Field Description Name Specify a name for the budget. Description Specify a description for the budget. Organization Select the organizations from the LOV for which you want to define the budget. Category Select the categories from the LOV for which you want to define the budget. Budget Specify the value for the budget. -
To define the budget at the plan level, navigate to the Constraints tabbed region of the Plan Options window. For more information, see The Constraints Tabbed Region.
Note: To exclude an item from your budget, clear the Exclude From Budget check box in the MPS/MRP Planning tabbed region of the Master Item window in Oracle Inventory. For more information, see Oracle Inventory User's Guide.
Enforcing a Plan Option Budget Name or Value
Select Enforce Budget Constraints on the Plan Options window if you want the plan to be constrained by a budget. To Enforce Budget Constraints, select the name of the budget that you want the inventory optimization planning process to use as the budget constraint.
Alternatively, you can leave this field empty if you want to specify the plan option Budget Value. Enter a value for the inventory optimization planning process to use as the budget constraint. Do not enter a Budget Value if you select a value for the plan option Budget Name.
If you enforce the budget that you have defined, the inventory planning engine makes sure that the inventory plan adheres to the budget at all levels. Consider that you plan for two organizations where $75,000 is the total budget for the plan, and $50,000 and $30,000 are the budgets for the first and second organizations respectively. If you enforce this budget in your plan, the inventory planning engine recommends an inventory of only up to $50,000 and $30,000 for the first and second organizations respectively. At the plan level, it recommends an inventory of only up to $75,000. If the plan level budget exceeds $75,000, then the engine optimizes the recommended inventory at the organization level so that the combined budget of the two organizations does not exceed $75,000.
Enforcing service level constraints or capacity constraints may violate budget constraints. Conversely, enforcing budget constraints may violate service level constraints and capacity constraints. You can enforce budget constraints at the plan level by specifying the budget name or the budget value in the Plan Options window. For information on enforcing constraints for a plan, see The Constraints Tabbed Region. The inventory planning engine reports any violations as exceptions. For information on plan exception messages, see Reviewing Exception Messages.
Usually, target safety stock and user-defined safety stock are enforced when there is adequate budget. The inventory planning engine's built-in logic makes sure that the budget is allocated accordingly to meet the enforced service levels for all items. The inventory planning engine allocates any surplus budget based on the following criteria:
-
Potential profitability
-
Service levels
-
Demand distribution
Note: If you enforce target safety stock or user-defined safety stock, it is assumed that you have specified an adequate budget. If the budget is not adequate, the engine violates the budget constraints even if you have enforced budget constraints.
The following example details how the inventory planning engine allocates the budget surplus.
Consider a plan for three items with a total budget of $10,000. Assume that you have specified a target service level of 85% for all three items. The inventory planning engine calculates the safety stock levels required to achieve a service level of 85% for the three items. Assume that the budget required for a service level of 85% for the three items is $7000. The inventory planning engine distributes the surplus $3000 proportionately for the three items based on their potential profitability and demand distribution. As a result, the actual service level for the three items may differ from one another even though you have specified a consistent service level of 85% for all the three items.
Setting Default Lead Time Variability
Plan-wide default values for manufacturing, in-transit, and supplier lead time variability are specified in the constraints tab of the Plan Options form. The values specified here are used as defaults in the case where users have not specified the value of the variability for specific items. Optionally a user can check the Enforce Plan Level Defaults check box to ensure that these defaults override any other detailed specification or setting.
Steps
-
Plan-wide default values for lead time variability are specified in the constraints tab of the Plan Options form. From the Inventory Planner responsibility, navigate to the Plan Options window.
Inventory Plan > Names
The Inventory Names window appears.
-
Click the Constraints tab.
-
In the Plan Level Defaults region, set the default lead time variability percentages for the plan.
-
(Optional) To ensure that these default values override any other specification or setting that may occur at a more detailed level, select the Enforce Plan Level Defaults check box.
-
Save your work.
Setting Up Manufacturing Lead Time Variability for a Plan
Manufacturing lead time variability for a plan is set in the Items window accessed from the Collections Workbench.
Steps
-
From the Inventory Planner responsibility, navigate to Inventory Planner > Collections >View Collected Data.
The Navigator window opens.
-
On the Plans tab of the Navigator, select View by Organization.
-
In the Navigation window, drill down to Plan Name: : Plans>Collection>Plan Name.
-
Drill down to the item for which you want to set manufacturing lead time variability.
-
Access the Items form: Right click the item and then choose Items from the menu.
-
Click the Item field and then select the item for which you want to set the manufacturing lead time variability from the menu.
-
Set the manufacturing lead time variability, in percent.
-
Save your work.
Setting Up Manufacturing Lead Time Variability for an Item
Manufacturing lead time variability for an item is set in the Item Attributes Mass Maintenance window, which is accessed from the Workbench.
Steps
-
From the Inventory Planner responsibility, navigate to Inventory Planner>Setup>Item Attributes Mass Maintenance.
The Item Attributes Mass Maintenance window opens.
-
In the Item Simulation Set window, enter the name of the Item Simulation Set.
-
Click the Item field and select the item from the drop-down menu and click OK. If necessary, enter a partial name in the Find field to locate the item and them click OK.
-
Click the Org field and select the organization that contains the item from the drop-down menu and click OK. If necessary, enter a partial name in the Find field to locate the organization and them click OK.
-
Click the Select checkbox to the left of the Item and Org.
-
In the Item attributes available for update section at the bottom of the window, click the Attribute Name field.
The Item Attributes window opens.
-
In Item Attributes window, select Manufacturing LT Variability and click OK.
-
Click the Condition field.
A window opens with a list of all the possible conditions.
-
Select the desired condition.
-
Click the Attribute Value field and enter the desired value.
-
Click Apply.
-
Save you work.
Setting Up In-Transit Lead Time Variability
In-transit lead time variability is setup in the transit times form accessed from the navigator. In addition to specifying the in-transit time, you can specify the variability of the transit time. This variability is expressed as a percent (%) variance for each ship method between a source and a destination organization.
Note: This form should be accessed only in the planning instance and not from the source (ERP) instance. The same form in the source instance does not allow setting of in-transit lead time variability.
Steps
-
From the Inventory Planner responsibility, navigate to the Transit Times window.
Inventory Planner > Setup > Transit Times
The Transit Times window appears.
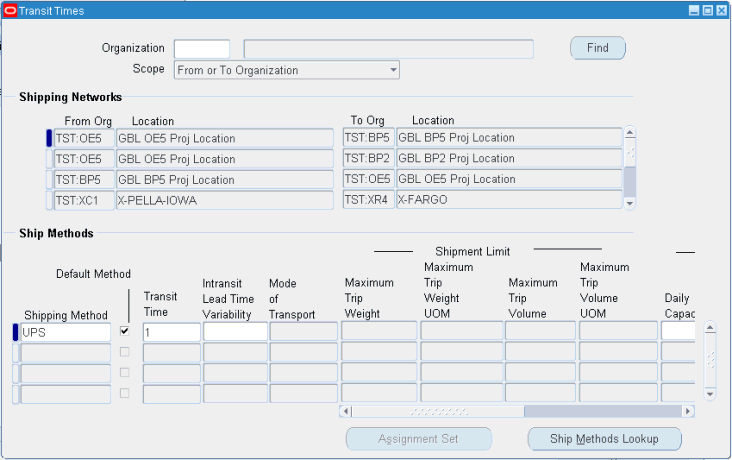
-
In the Shipping Networks region, select the row for the from - to organization combination for which you want to specify in-transit lead time variability.
The Ship Methods region populates with established shipment methods between the source and destination organizations.
-
In the Ship Methods region, set up the Transit Time and the In-transit Lead Time Variability as a percentage of the Transit Time.
-
Save your work.
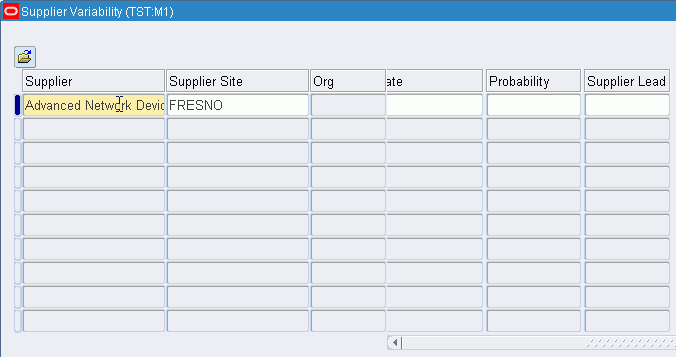
Setting Up Supplier Lead Time Variability
Supplier lead time variability represents the uncertainty in the availability of supplies. You need to set this up for the inventory planning engine to factor in this uncertainty when it calculates the safety stock levels.
You can specify supplier lead time variability either at the item-supplier level or at the supplier level. The inventory planning engine uses the information specified at the supplier level if you have not specified it at the item-supplier level.
Supplier lead time variability is set in the Suppliers window accessed from the Collections Workbench. Supplier variability can be specified either as a discrete distribution or as a percent (%) variance for a normal distribution.
Note: You can specify supplier lead time variability information only in the planning server.
To set supplier lead time variability
Steps
-
From the Inventory Planner responsibility, navigate to the Collections Workbench.
Inventory Planner > Collections > View Collected Data
The Navigator window opens.
-
On the Plans tab of the Navigator, select: View by Items.
-
Drill down to the item for which supplier lead time variability has to be associated.
Note: To assign supplier variability independent of a specific item, select the supplier in the Navigator. If an item does not have supplier-specific variability, the inventory planning engine defaults to the supplier level.
-
Right click the supplier and select Supplier Variability from the drop-down menu.
The Supplier Variability window appears.
-
Specify either the normal distribution Supplier Lead Time Variability percent, or use the Dates Late and Probability columns to define a discrete probability distribution representing supplier lead time variability.
Note: Supplier variability prior to Release 12.0 was modeled as a set of discrete probabilities. In the Dates Late and Probability columns, users set up the number of days that the supplier was expected to be late, along with an associated discrete probability for the occurrence. With Release 12.0, the user can specify a percent (%) variance in the Supplier Lead Time Variability column. Users can specify variance using one or the other methods, but not both.
Fields Description Supplier Supplier name Supplier Site Supplier site name Org Organization Days Late The number of days by which the item has been delivered late. You can enter only whole numbers. You can enter a negative whole number to indicate early delivery. Probability Specify a number between 0 and 1 corresponding to each estimation of days late for the item. The probabilities should sum to 1. Supplier Lead Time Variability Specify a percentage.
See Setting Plan-Level Lead Time Variability Default Values. -
Save your work.
Setting Penalty Costs
Penalty costs are what you think will be the costs for violating such things as supplier capacity and resource capacity. You set this up to indicate to the inventory planning engine how much it is going to cost when you exceed the capacities. For example, you can set up the cost of overloading your suppliers and the cost of overworking your production team.
You can set the penalty costs at either the plan options level or at the profile options level. The penalty costs at the plan options level takes precedence over the penalty costs set up at the profile options level.
The inventory planning engine uses the penalty costs or the service level or both in calculating safety stock quantities as shown in the following table:
| Plan Level Defaults | Enforce Service Level | Enforce Capacity |
|---|---|---|
| Service Level | Used | Used only for target safety stock calculation |
| Resource Penalty Costs | Used | Used only for target safety stock calculation. |
| Material Penalty Costs | Used | Used only for target safety stock calculation |
| Late Demand Penalty Costs | Not used | Used |
When you enforce service level constraints, the inventory planning engine calculates safety stock quantities for the specified service levels while minimizing penalty costs for exceeding material capacity, exceeding resource capacity, and exceeding transportation capacity.
Penalty costs for late demand is used only when you enforce capacity constraints.
Note: You can specify either input service level or input penalty costs for late demand.
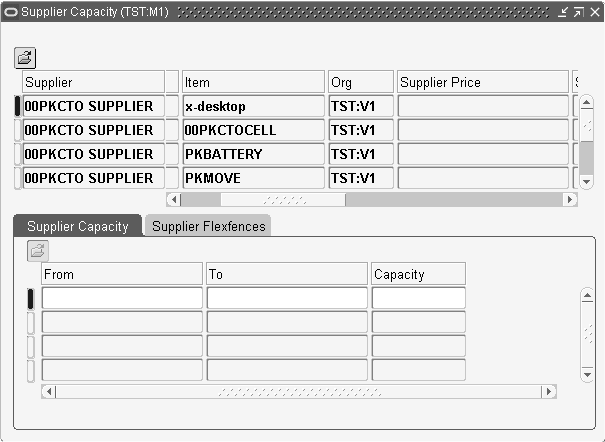
Setting Item Purchase Price by Supplier
During the collections process, Oracle Inventory Optimization captures the item purchase price by supplier and supplier site by taking the unit price from the most recent purchase order for each item. Oracle Inventory Optimization uses the item purchase price to calculate the purchasing cost for an item. You can view the item purchase price in the Supplier Capacity window. You can navigate to this window from both the Collections Workbench and the Planner Workbench.
To view item price by supplier:
Steps
-
Navigate to the Collections Workbench (Collections > View Collected Data) or Planner Workbench (Inventory Plan > Workbench).
-
View by Suppliers.
-
In the Navigator, drill down and select an item underneath a supplier.
-
Select Supplier Information from the right-click popup menu. The Supplier Capacity window appears.
Supplier Capacity window
-
Scroll to the right to view the Supplier Price field.
Setting Performance Indicators
You can compare inventory plan output to the following performance indicators:
-
Inventory turns
-
Service level
-
Planned utilization
-
Margin
-
Margin percentage
-
Cost breakdown
-
Inventory value
Note: You can set targets for all Performance Indicators except margin and cost breakdown.
For information on setting performance indicator targets, see the Oracle Business Intelligence System Implementation Guide.
Overview of Analysis Workbench
Setting Intermittent Demand
Oracle Inventory Optimization explicitly supports the computation of Safety Stock and service level calculations for Intermittent demands. Sparse or sporadic demands fed into Oracle Inventory Optimization from Service Parts Planning have been generated using a statistical method designated as being for intermittent demands, or forecasts that are designated via plan options to be of the intermittent demand variety, will now be assumed by Oracle Inventory Optimization to have a more appropriate Poisson distribution.
To define intermittent demand
-
Log on to Oracle Inventory Optimization.
-
From the Navigator, choose Inventory Planner> Item Attribute Mass Maintenance.
The Item Attribute Mass Maintenance table appears.
-
Populate the Item Attribute Mass Maintenance table as shown in the table below.
Field Values Description Intermittent Demand Yes, No Enter values at level ITEM-ORGANIZATION, ITEM-ZONE.
If set to YES, safety stock for the Item-Organization or Item-Zone is computed using POISSON distribution.
If set to NO, Safety stock for the Item-Organization or Item-Zone is computed using NORMAL distribution.Mean Inter Arrival Enter the mean inter arrival in days.
Example of Intermittent Demand
This example illustrates item-organizations with sporadic or intermittent demands.
| Item | Intermittent Demand | Mean Inter Arrival (time in days) | Forecast Rule for Demands |
| RMR_IO_B | Yes | 10 | |
| RMR_IO_C | No | 4 | St-1 |
| RMR_IO_D | No | 4 | St-1 |
In the above table, the safety stock for Item RMR_IO_B is computed using Poisson distribution because Intermittent Demand is set to Yes. For Items RMR_IO_C and RMR_IO_D, safety stock is computed using Normal distribution.
Safety Stock Calculations for Item: RMR_IO_B (Poisson distribution)
Item: RMR_IO_B; Since Intermittent Demand is set to YES; it is modeled as Poisson
Item Lead Time (L) = 5 days
Demand Rate (Lambda) = 1/(Mean Inter Arrival Time) = 1/10 = 0.1
Service Level (SL) = 90%