Invoicing and Payments
Invoice Processing
Invoice processing in Order Management is the process by which data from Orders and Returns is interfaced to Oracle Receivables for the creation of invoices and credit memos to recognize revenue and manage sales credits.
Within Oracle Order Management, invoice processing has been implemented as a workflow activity (Invoice Interface). The Invoice Interface activity collects order, return, and freight charges information from Order Management tables and transfers this information to Oracle Receivables Interface tables. Data elements such as item description, ordered quantity, unit list price, total amount, payment methods, warehouse id, and sales credit are transferred via Oracle Receivables Interface tables, and upon completion the Invoice Interface activity, the Oracle Receivables concurrent program AutoInvoice must be submitted to import the invoice and credit data into Oracle Receivables.
Note: Return orders without reference information of the sales order or invoice will result in on account credits.
For additional details on interfacing transactions to Oracle Receivables, please refer to Oracle Receivables Implementation Guideand Oracle Receivables Reference Guide.
For more information on Invoicing and Credit Memo creation, please refer to the Oracle Receivables User Guide and the Oracle Order Management Open Interfaces, API, & Electronic Messaging Guide.
Invoice Level Processing
Oracle Order Management supports invoice processing at 2 levels:
-
Order Header level Invoicing
The Order Level Invoice Interface workflow activity is part of the Order Header workflow process. It will interface data from the entire order or return to Oracle Receivables at the same time.
-
Order Line level Invoicing
The Order Line level Invoice Interface workflow activity is part of the Order Line workflow process. It will interface data from each line or set of lines as to Oracle Receivables as they become eligible for interface.
Note: Grouping of orders or order lines for invoicing or credit memos is dependent upon the mandatory Grouping Rules and optional Grouping Rules you setup in Oracle Receivables. There is no grouping done by the Order Management Invoice Interface Workflow activity.
Order Management Invoice Interface Activity
The Oracle Order Management' Invoice Interface workflow activity enables you to:
-
Interface Orders, Returns and Charges information to Receivables to create invoices, credit memos and credits on account, recognize revenue and manage sales credits
-
Interface an entire order at once or interface a line or set of lines as they become eligible for invoicing
-
Interface return lines as credits on account for the credit-to customer, in addition to creating credit memos from returns with reversed revenue and sales credits
-
Interface discount names and discount amounts. (Discount amount is interfaced and displayed as a negative number)
-
Interface ATO or PTO configured items such as Model, Option and Classes lines
-
Interfacing of partial quantity is only supported for Line Level Invoicing. Interfacing fully or partially fulfilled configuration lines is available for Required for Revenue lines only
-
Interface order header charges and order line charges as invoice header level charges
-
Interface more than one charge lines associated with one order header or one order line
-
Interface all charge lines associated with one shipment line with the same currency
-
Interface different types of information, such as (but not limited to)
-
Product information: item description or customer item description, ordered quantity, and unit of measure
-
Tax information: tax code, tax exempt flag, and warehouse ID
-
Pricing information: list price, extended amount, and discounts
-
Payment Method information: credit card information and commitment ID
-
Shipping information: delivery name
-
Sales Credits information: sales person names and sales credit percentage
-
Currency information: currency code, conversion type and conversion rate
Note: Order cost lines are not invoiceable.
Order Management Invoicing of Sales Order Lines
-
The Order Management Invoice Interface activity interfaces sales order line details to Oracle Receivables. Order lines with any of the following conditions are not eligible for invoice interface:
-
Item with Invoiceable attribute set to No or
-
Item with Enabled Invoicing attribute set to No or
-
Included item type or
-
Configure item type or
-
Service item where the serviced item is not serviceable or
-
Internal order
For all conditions listed above, the Invoice Interface workflow activity is completed with a status of Not Eligible.
Order or return lines will not be interfaced to Oracle Receivables if there is a hold on the line or on the order. When the invoice interface activity encounters a order or return line with a status of On Hold, the Invoice Interface workflow activity will also complete with a status of On Hold. You can perform the manual ‘Progress Order' concurrent program to continue with the order processing, or the order or return line will automatically be re-evaluated at a 12 hour interval after the hold is released.
The workflow activity Fulfillment must be placed prior to the Invoice Interface activity for Required for Revenue cases. Order Management performs the Invoice Interfacing activity for orders with partial shipped quantity in Required for Revenue cases at the order line level only.
-
The quantity information transferred to Oracle Receivables follows the following hierarchy:
-
Fulfilled quantity
-
Shipped quantity
-
Ordered quantity
-
Discount Information
Invoice Interface activity interfaces price adjustment information to Oracle Receivables. You have an option to print detail discount information.
-
You need to set profile option OM: Show Discount Details on Invoice to YES to print detail discount information on the invoice. The discount information gets printed on a separate invoice lines from the order information. The product line and the associated discount lines roll into the same revenue account.
-
Discount lines in the invoices include:
-
Discount Name: Displayed in the description field
-
Discount Amount: Displayed in negative quantity
-
For example, suppose you had an order line with the following example data and the profile option OM: Show Discount Details on Invoice is set to YES.
-
Description = Item A
-
Quantity = 2
-
Unit Price = 100
-
DiscountName1 = 10%
-
DiscountName2 = 15%
The table below lists example order line details and what will be displayed on a Oracle Receivable invoice for the data listed above.
| Line | Description | Quantity | Unit Price | Extended Amount |
|---|---|---|---|---|
| 1 | Item A | 2 | 100 | 200 |
| 2 | Discount Name 1 | 2 | < 10 > | < 20 > |
| 3 | Discount 2 | 2 | < 15 > | < 30 > |
| Order Total | - | - | - | 150 |
Note: Column Extended Amount for Line 1 within the table above does not include the discount amount on the invoice line.
Now, suppose the profile option OM: Show Discount Details on Invoice is set to NO. No detail information relating to discounts will be displayed on the Oracle Receivables invoice, but you will be able to view the Amount Paid per invoice Line. The table below lists example order line details and what will be displayed on a Oracle Receivable invoice for the example data listed above.
| Line | Description | Quantity | Unit Price | Extended Amount |
|---|---|---|---|---|
| 1 | Item A | 2 | 100 | 150 |
| Order Total | - | - | - | 150 |
Note: Column Extended Amount within the table for Line 1 does include discount on the invoice line, but no additional details.
Charges Information
The Invoice Interface activity also interfaces order or return charge information to Oracle Receivables. However, Order Management currently only interfaces the charge lines as invoice header level charges. With Order Management;
-
You can create different types of charges, and all charge lines are invoiceable. Cost lines are not invoiceable
-
You can have more than one charge lines associated with a single order header or a single order line
-
All charge lines associated with a single shipment lines must have the same currency
-
All charge lines are individually transferred to Oracle Receivables as invoice header level charges. Receivables will then consolidate the charges into 1 charge line to be displayed on the invoice
-
If any charges are updated manually or automatically, and if the line is closed, then the charges should be invoiced manually.
Order Management passes detail charges information to Receivables, but you will not be able to view individual charges on the invoice itself.
For Example, an order with the following information is invoiced:
Order #123 consisting of one order line with order Freight Charge of $5.
For Order #123, Line#1: Item Number = ItemXYZ, Qty = 1, Price = $100. The order line has a Freight charge $10, and additional charge (insurance charge) of $3.
Oracle Order Management will interface 3 charge lines:
-
$5 (order charge)
-
$10 (line charge)
-
$3 (line charge)
The 3 charge lines will be transferred individually to Receivables, and then be consolidated within Receivables as a single order charges. (total of $18)
Invoice #500 for Order #123:
-
Freight charge for the invoice is $18 (total of all the charges)
-
The table below describes the invoice line details for the example above. Notice the column Extended Amount does not include any charges.
Example Invoice Line Details Line Description Quantity Unit Price Extended Amount 1 Item XXZ 1 100 100 2 freight charges 18 Order Total 118
Delivery Based Invoice Numbering
The Invoice Interface activity interfaces invoice number based on delivery name to Oracle Receivables if the profile option OM: Invoice Numbering Method is set to Delivery.
-
All the lines that belong to the same delivery are interfaced to Oracle Receivables at the same time
-
Invoicing based on Delivery Name is only performed for Order Line level invoicing
-
Invoicing based on Delivery Name can not be performed for Order Header Level Invoicing. For Header Level Invoicing, the whole order is interfaced when it is eligible, and any delivery set information is ignored
Required for Revenue
The Invoice Interface activity interfaces full or partial quantity of a line where there is a Required for Revenue component on the Bill of Material. The activity also prevents the parent item from invoicing until the Required for Revenue component has been shipped.
-
If you have a model with a non-optional component and Required for Revenue property set to Yes, then the model can not be invoiced until the non-optional component has shipped. Only the immediate parent line of the Required for Revenue component is affected, with the exception of Classes. If any item below a class in a bill has the Required for Revenue property set to Yes, then that item must be shipped before the parent item and other items in the class are eligible to be interfaced to Oracle Receivables.
For additional details, please refer to the Oracle Order Management Open Interfaces, API, & Electronic Messaging Guide.
-
The Fulfillment workflow activity must be placed before Invoice Interface activity where there is a Required for Revenue component on the Bill of Material. If you place the Fulfillment workflow activity after the Invoice Interface activity, your invoices will be incorrectly generated.
-
Invoice Interface activity is completed with workflow status Partial if line is only partially interfaced to Receivables. The remaining quantity gets interfaced when the associated Required for Revenue component has been fulfilled.
Viewing Invoice Information
Invoice data, such as Invoice Number, Batch Source, Invoice Date, Amount and Balance, can be viewed under:
-
Additional Line Information: Invoices/Credit Memos tab. This displays invoice information for the active line
-
Additional Order Information: Invoices/Credit Memos tab. This displays invoice information for all of the lines within the order
Invoiced quantity can be viewed on the order lines.
Click Invoice Details to view the Oracle Receivables Transactions form.
Profile Options
The table below lists profile options that will affect the operation of the Order Management Invoice Interface activity.
The system parameter Overshipment Invoice Basis determines whether to interface ordered quantity or shipped quantity for overshipment.
For additional information surrounding the user of the profile options and system parameter listed above, see Order Management Profile Options in the Oracle Order Management Implementation Manual.
Detailed Order Statuses for Invoicing
The order line status is now enhanced to provide complete information concerning the status of the line with regard to the Invoicing Activity. Formerly the line status included Interfaced to AR and Partially Interfaced to AR, now the line status details the reasons why the line has not progressed.
Multiple and Partial Payments Overview
Multiple Payments enhances the payment options for orders, replacing the single payment type option at the order header (with the exception of Commitments) for example, cash, check, credit card, or null. Now you can specify multiple payment types for a single order. This change enables other payment options like Purchase-cards, direct bank transfer, etc. Other business situations include:
-
Where a consumer does not have sufficient credit on one card to cover all the items being ordered, so multiple cards may be used.
-
Prepayments (commitments) can be used as a payment type. However, if the prepayment doesn't cover the entire order total, another form of payment is requested at the time of ordering.
-
With the expanded use of eBusiness, different payment types such as P-cards, direct bank transfer, financing, and others are becoming more common.
-
The order taker can record all types of payment for an order, and if necessary, designate which lines are to be paid with each type of payment. They can also record the amount to be paid using each payment type.
-
The payment information is defined at the time of order entry.
-
When the order is credit checked, you can add other payment types when the primary payment type cannot cover the total order amount.
-
These payment types and the supporting data are sent to Receivables for accounting and collection purposes.
Order Management enforces that, if there is prepayment, you are not allowed to specify another payment type at the order line level. Order Management also enforces that credit check for commitment is set to No, the commitment applied (promised) amount is always excluded from credit check exposure.
Note that there is no enhanced payment support on EDI/XML standards.
Multiple and Partial Payments Major Features
Prepayments that are collected via the Receipts API do not make accounting entries for tax. This can be an issue in countries (especially VAT countries) where the receipt of money is a tax event. In those cases, to be totally correct from an accounting point of view, prepayments cannot be used.
Order Management will not disallow use of prepayments in these countries. It will be the responsibility of the deploying company to ensure they conform to tax law.
100% prepaid and the Multiple Payments Prepayment Functionality
In the multiple payment support, changes in order value will not automatically trigger receipt creation or refund. The process must be done manually, where users need to adjust the prepaid amount manually.
Note: We do not support automatic receipt creation or refund when order values change.
Payment Features
Multiple Payment Types Per Order
Order Management will allow orders to be paid for with multiple payment types or multiple occurrences of the same payment type (as in multiple credit cards) in a limited way in this release.
Note: Order Management will support Multiple Payment Types at the order level only and only for Prepayments.
-
Multiple payment instruments can be used for a prepayment or a down payment.
-
One payment instrument, in addition to commitment, can be used for the balance on the invoice.
-
You can choose a different payment instrument on an order line for orders without prepayment. Each order line can have only one payment instrument in addition to commitment.
-
Payment terms on the order header determines the prepayment amount. Order Management interfaces the line level payment terms to AR when interfacing an order line for invoice creation. Users can choose a different payment term on an order line, however, this will not affect the prepayment portion.
-
Each order has a unique payment set id that ties all the prepaid receipts for the order to the invoice.
-
Users are not required to provide payment instrument at the order entry time. Null is allowed as the Payment Type, and it is interpreted as ‘send me an invoice.' A constraint can be setup so that a non-null form of payment must be provided at order entry time.
Notes on Payment Terms in Order Management:
-
Payment terms on the line is allowed to be different from the ones on the header.
-
Payment term at the order header can be prepaid or non-prepaid.
-
For prepayment, Order Management is only considering the payment terms at the header only. This payment terms determines the default down payment amount. You can then manually adjust the down payment amount.
-
Prepayment can also be collected even if the header Payment Terms do not require it. In such cases, you will manually enter the prepayment amount.
-
When interfacing to AR, Order Management is interfacing payment terms of the line. Payment terms at the order lines can be of prepaid or non-prepaid type.
-
LOV of Payment Terms shows the prepaid flag.
-
You can specify what type of payment is being used for the order or order line.
Types of Payment
Order Management has a new window, Payment Types to enable you to set up Payment Types and indicate which ones will be accepted in each operating unit. This will be available only in Order Management.
Possible payment types currently supported include:
-
Check
-
Cash
-
Credit Card
-
Commitment
-
Blank or not specified – same as Invoice
-
Wire Transfer
-
Procurement Card - iPayment does support PCards to Level III for both Paymentech and FDMS
Order Management will only seed the payment types that AR and Oracle Payments supports.
These instruments are supported for prepayment collected in Order Management or invoice payment collected in AR.
-
Wire Transfer (EFT -- Electronic File Transfer, EDI -- Electronic Data Interface). For Invoice payment only.
In addition, you can enter a PO number on the order header.
Note on Commitment:
-
Commitment is available at the order line level only. Only one commitment can be specific per order line.
-
You can update the promised commitment amount.
The promised amount entered must be:
-
equal to or smaller than the total order line amount,
-
and equal to or smaller than the available balance on the commitment.
-
Commitment cannot be used for prepayment or down payment.
Down payment or prepayment can be paid using one or more supported instruments listed above. However, only one payment instrument, in addition to Commitment, can be used for the balance on an invoice.
-
Revenue is not recognized upon collection of down payment.
-
Tax is not accounted upon collection of down payment.
Payment Processing
During payment processing, the following occurs:
-
Process prepayment. One or more receipts is created in AR that will be matched against the invoice(s) of the order.
-
For credit card payment at the header level, authorize the open balance for the entire order (total order minus prepayment minus total lines covered by other instruments).
-
For credit card payment at the line level, authorize the balance of corresponding lines.
-
Notes on credit card authorization:
-
For authorization to occur, you must turn on credit check rule. To authorize at booking, credit check must be turned on for booking.
Note: Order Management does not perform credit card authorization on prepayments. AR will do the authorization and capture it during receipt creation.
How does Order Management calculate the amount for prepayment and credit card authorization?
Prepayment:
-
The Order Header Payment Term is used to determine the prepayment amount suggested. You need to define the payment term as Prepaid and set up the first installment to be the down payment.
-
For example, for 20/80 prepaid payment term, flag it to be prepaid, and create the first installment as 20% and due in 0 days.
-
When this payment term is used, the down payment calculated would be: 20% * total order (include charges and taxes). Please note that the total order will not exclude the commitment promised amount from the order lines.
-
A commitment can not be used for Prepayment, and commitment promised amount on order lines will not be accounted when calculating the down payment due.
-
Prepayment calculated is only the suggested amount. The Order Management user can lower or increase the prepayment amount to be collected.
Note: If the prepayment amount collected is higher than the total open balance, Order Management will issue a warning only, and the payment can still be processed successfully. This is the intended functionality of Over Prepayment. The over prepayment is resolved manually in AR.
-
Credit Card Authorization:
-
The amount to be authorized, at the order level, is calculated as follows:
Total order (including charges and taxes) minus total prepayment minus total order lines (i.e. commitment applied amount and amount covered by other instruments).
-
The amount to be authorized, at the order line level, is calculated as follows:
Total order line minus commitment applied amount.
Subsequent payment processing can be triggered only by the following:
-
Process Payment action.
-
Process Pending Payment concurrent program.
Changes that increase or decrease the order value will not automatically result in an additional receipt being created. Subsequent collection or refund is totally manual. You need to do the following:
-
Set the prepaid amount to higher value for more collection, or lower value for refund.
-
Choose the Process Payment action, or run the concurrent program.
Note: Credit checking is re-executed upon subsequent payment processing. Processing Constraints can be used to enforce entering a reason code and optional comments when canceling or decreasing quantities for lines on orders with prepaid payment terms. We have not seeded this constraint – you can add it if required.
There is an attribute on the Remittance Bank Account called Minimum Receipt Amount. Before creating a receipt, this amount is checked against the receipt amount. If the amount is smaller than the Minimum Receipt Amount, then a receipt is not created and the order is placed on Pending Payment Process hold. This small incremental amount can be collected by AR at Invoicing, or could be included in a subsequent receipt if further order changes are made. The Minimum Receipt Amount does not apply to refunds.
Activity Name: Payment Assurance.
Parameter: Frequency to check the status. Set this up according to your business requirement. Order Management will seed to run once in 24 hours.
In some business practices, especially retail, a prepayment or down payment is collected so a reasonable payment assurance before fulfilling the order is necessary.
You can place this activity at any point in the order flow between booking and invoicing, preferably before shipping. This activity will check the receipt status and hold the flow until the status shows a reasonable payment assurance.
For orders with prepayment, Order Management will check the status of the receipt. A unique Payment Set is assigned in AR, and all receipts for one order will have the same Payment Set. See the following table for status of receipt upon creation and the required status for Payment Assurance to pass.
| Creation Status Payment Instrument |
Approved | Confirmed | Remitted | Cleared | Status for payment assurance |
|---|---|---|---|---|---|
| Credit Card, Purchase Card | X | Remitted | |||
| ACH | X | Cleared | |||
| Direct Debit | X | Cleared | |||
| Wire Transfer (EFT/EDI) | X | ||||
| Check | X | Cleared | |||
| Cash | X | Cleared | |||
| Commitment |
Note: When payment from the customer has been remitted to the supplier's account, during account reconciliation, Cash Management will set receipt status to Cleared. Account reconciliation is normally done at the end of the month. You can also set up your system to set the receipt status when the payment has been deposited into the account. You can set the Clearing Method in the Receipt Class to be Automatic Clearing. Normal business practice is to wait for 3 days before checks are cleared, this is set up specific.
Order Management will provide multiple payment capability through the various Sales Order user interfaces, via Order Copy, Order Import, and the Process Order API.
Copy
-
A check box Payments is on the Copy window to copy payment information. The default value for the check box is checked.
-
This check box will be available on Copy header and Copy lines tabs.
-
Copying payment information is applicable to outbound orders only.
Note: Payment information on Returns is not being used by AR. AR gets the payment information from the referenced invoice. When there is no reference Invoice, and On-Account credit memo gets generated. Payment information is not copied to Returns.
Returns
Refund of an Order or Order Line:
When canceling an order, refunds of prepayments are generated automatically. Canceling an order line will not generate an automatic refund. The refund has to be done manually by setting the down payment to a lower value and activating Process Payment.
In a mixed order, that contains both inbound and outbound lines, the defaulting of the prepaid amount will be based on the outbound lines only. The prepayment functionality will not account for the inbound order lines in calculating the total order.
Credit due to customers:
-
Customer cancels an order, an order line, or a portion of the order line after the down payment has been collected, and no shipment has been made.
-
Customer returns (RMA) an order, an order line, or a portion of the order line after payment (including down payment) has been collected.
Credit processing in Receivables:
-
Return order or order line may or may not have reference to the paid invoice.
For Returns without reference information of the paid invoice, credit will placed into On-account Credit.
For Returns with reference information of the paid invoice, credit can be given out in different ways depending on how the invoice was paid. See the table below.
Return process:
Order Management interfaces the return order line to AR for credit memo creation.
-
For canceled order or order line, credit may be given out in different ways depending on how the prepayment was paid. See the table below.
Refund process:
Order Management calls the AR Refund API as follows:
Automatically for canceling the whole order.
Initiated manually or through concurrent program for other cases.
Note: When calling the Refund API, AR will refund the same credit card or purchase card up to the amount on the receipts. The delta will be credited using Check.
RefundsRefunds Credit
Paid ByCheck cut by Acct Payable Card Refund Commitment Reversed Comments Credit Card, Purchase Card X Delta is credited using Check. ACH X Direct Debit X Wire Transfer X Check X Cash X
Credit Card Authorization in Batch Mode
You can defer the credit card authorization. This is available at the Payment Type Setup level and the Payment Transaction level. To process the pending authorization, you can use Pending Process Payment concurrent program or Process Payment action.
Business Flows
Single Payment Type
-
Enter an order using the Sales Orders window. A default payment type appears on the header based on whatever Defaulting Rules have been set up. Enter additional data as required by the Payment Type – for example, if a check, then the bank account, routing number, and check number is recorded.
-
At booking or shipping, based on the set up of the order type and validate payment rules, the payment may be authorized and approved.
-
At invoicing, the payment information is passed to AR for invoicing or collection and accounting purposes.
Payment With Differing Types on One Order
-
Enter an order using the Sales Orders window. A default payment type appears on the header based on whatever Defaulting Rules have been set up. Enter additional data as required by the Payment Type – for example, if the payment type is PO, then the Customer PO number may be required.
-
Enter order lines as required. The customer wants to pay for one or more lines using a different payment type, for example credit card. Add the secondary payment information while on the order line it is to apply to. All other lines should be paid for using the Payment Type on the header. If a different line is to use a third payment type, it would be entered in a similar fashion.
-
At booking or shipping, based on setup of order type and validate payment rules, the credit card or other payment type may be authorized and approved. The approval information is recorded.
-
At invoicing, the payment information is passed to AR for invoicing or collection and accounting purposes. The line that was supposed to be paid from the credit card will have the credit card information passed to AR – other lines will get a payment type from the line or the header.
Prepayment Flow
-
Enter an order using the Sales Orders window. Payment terms that indicate a prepayment is needed are defaulted or chosen. A default payment type also appears on the header based on whatever Defaulting Rules have been set up. Enter additional data as required by the Payment Type – for example, if payment type is credit card, then the credit card number and expiration may be required.
-
Lines are entered for the order.
-
Book the order. Credit card collection and receipt creation is done for the amount that is a down payment. Credit card authorization is attempted for the balance if the payment type is credit card.
-
The order ships as usual.
-
At invoicing, the payment set id is passed to AR so that the balance can be collected on the account, and the receipt created in step 3 can be matched to the invoice.
Payment By Installments
-
Enter a customer and order type using either the Sales Orders or Quick Sales Orders windows.
-
A default payment type and payment terms appears on the header based on whatever Defaulting rules have been set up.
-
You can override payment terms and may choose one with installment payments.
-
Enter one or more items.
-
After entering all the items, view the payment information. Open the Payments window and see the amount of the first installment, and the amount outstanding.
-
Book the order.
-
At booking or shipping, based on setup of order type and credit check rules, the first installment payment or the total order amount may be authorized and approved. Credit Card authorization is done only if the credit check is set for Booking. The amount authorized (full amount or first installment) is controlled by the setting of the OM system parameter Authorize First Installment Only.
-
At invoicing, the payment information is passed to AR for Invoicing or collection and accounting purposes.
User Procedures
To order with a Check as Prepayment, with Payment Assurance, and print a receipt:
-
Navigate to the Sales Orders window and enter an order. Payment terms that indicate a prepayment is needed are defaulted or chosen. Assume the payment terms indicates a need for a 100% down payment. A default payment type also appears on the header based on whatever Defaulting Rules have been set up.
-
Enter all the lines for the order.
-
When finished, go to the order header and open the Payments window. The Payment window will have two entries in the multiline area, with the default Payment Type entered on each line. The percentages will be defaulted from the payment terms definition in this case, 100% for the down payment and 0% for the balance. The amounts are computed as well.
Payments Window
-
The down payment is with a check, and invoicing is for the remaining amount. Choose check as the down payment, payment type, enter the check number, and verify the amount. It may be more or less than the computed amount. Change the amount if necessary. Close the Payment window.
-
Book the order, choose Action Print Payment Receipt to print a receipt, to give to the customer as a receipt for the check.
-
The Order Management process creates a receipt for the check, passing the check information to AR. Order Management may credit check the remainder, if credit check conditions apply.
-
If you want to wait for the check to clear before the items can be shipped, as the items are ready to ship, the Payment Assurance workflow activity is reached, and that activity checks the AR Receipt to see if the check has cleared. If not, the goods are not released to Shipping, but instead the line status shows Awaiting Payment Assurance. Once the AR Receipt clears, the next time the Payment Assurance activity checks, it will succeed and the line will progress to the next activity (shipping).
-
Items are shipped, and the lines go to invoicing carrying the payment set id of the receipt created in step 6. AR will automatically apply the check receipt to the transaction, and send an actual invoice for the remaining balance due.
Lookups
Changes on existing Quick Codes:
-
Lookup type of Payment Type is no longer used.
-
Lookup type of OE_PAYMENT_TYPE has been extended to have the following:
Lookups in Multiple PaymentsLookups in Multiple Payments Lookup_Code Meaning Description Cash Cash Cash Check Check Non-electronic check. Credit_Card Credit Card, Purchase Card Credit Card of any type such as Visa, Master Card, etc. – may use ipayment integration. ACH ACH Vendor initiated electronic fund transfer – may use ipayment integration. Direct Debit Direct Debit Vendor initiated electronic fund transfer. Wire Transfer Wire Transfer Consumer initiated electronic fund transfer. Note: Commitment is not included as a payment type.
New Quick Codes:
-
Lookup type = OE_Payment_Collection_Type
Lookup_CodesLookup_Codes Lookup_Code Meaning Description Prepay Down Payment Payment collected in Order Management. Invoice Invoice Payment Payment collected in Receivables.
System Parameters
New Order Management System Parameter: Allow Multiple Payments can be set to NO to preserve the existing functionality. When set to NO, the payment information can only be entered at the order header. You can not navigate to the new Payments window. In this case only a single payment type at the header level without partial prepayment feature is allowed. With the parameter set to NO, you are allowed to enable more payment types. However, to use multiple payments per order and to use down payment feature, this parameter must be set to YES.
Note: Once this parameter is set to Yes it cannot be changed to No.
Authorize First Installment Only Authorize First Installment Only can be set to YES to authorize the first installment only. The default is No. The amount authorized (full amount or first installment) is controlled by the setting of the OM system parameter Authorize First Installment Only.
| Code | Name | Desc | Category | Value Set | Open Orders Check | Enabled | Comment |
|---|---|---|---|---|---|---|---|
| Multiple_Payments | Allow Multiple Payments | To enable Multiple Payments functionality | Payments | OM: Yes or No | W | Yes | Seeded with No |
| Authorize_First_Installment_Only | Authorize First Installment Only | To authorize first installment only. | Payments | OM: Yes or No | Y | Yes | Seeded with No |
Constraints
Order Management has seeded processing constraints to prevent updates to attributes once the order is booked and a prepayment receipt has been created, or for invoice payment using a credit card, data can not be changed when authorization has been completed.
For prepayments, when a payment has been processed and a receipt has been successfully created, the payment information cannot be updated except for the amount that can be adjusted to a lower or higher value.
For prepayments, when payment has been processed and a receipt has been successfully created, the payment information can not be deleted.
Order Header:
When order has been booked, and prepayment has been processed (i.e. payment set id is populated), these attributes cannot be changed by the user:
-
Transactional Currency
-
Invoice-to Customer
-
Invoice-to Address
-
Payment Method
-
Payment Term
-
Payment Set_id
-
Prepaid Amount
-
Payment Type, and its corresponding attributes, that are used for the prepayment. The Payment Type assigned for Invoice payment can be changed as long as no line has been interfaced yet, and no authorization code has been obtained for credit card invoice payment.
Order Line:
None
There are two new entities for constraints for oe_payments:
-
Order Payments
-
Line Payments
-
DELETE/UPDATE is not allowed to payment information used for prepayment (down payment) once prepayment has been collected (i.e. payment_set_id is populated).
-
INSERT of new payment type for prepayment is allowed, and will be used only for future lines added to the order.
-
DELETE is not allowed when at least one line is invoice interfaced
-
INSERT of new payment type for non-prepayment is also allowed, and will be used only for future lines added to the order.
-
Update of the following attributes is not allowed when at least one line is invoice interfaced.
-
PAYMENT_SET_ID => is not updateable at anytime and is view only.
-
RECEIPT_METHOD_ID
-
PAYMENT_TYPE_CODE
-
PAYMENT_TRX_ID
-
-
CREATE/DELETE/UPDATE of all the attributes is not allowed when a line is invoice interfaced.
-
CREATE/DELETE/UPDATE of payment attributes is allowed when there is no prepayment information and the line has not been invoiced. A maximum of one payment instrument, in addition to commitment, is allowed.
DELETE/UPDATE is not allowed for payment information used for prepayment (down payment) once a prepayment has been collected (i.e. payment_set_id is populated).
INSERT/DELETE is not allowed in the Payment Types window.
Payment_type_code is not updatable, others are updatable in the Payment Types window.
Only one payment instrument with a payment collection event as Invoice (for header or line payments) can be selected. When you add another one, an error will be raised upon saving.
Message Name: ONT_INVOICE_PAYMENT_INSTUMENT
Message Text: You cannot select more than one payment instrument for invoice.
Message Type: Error
Prepayment is not supported for line level payments. When you add a line level prepayment, an error will be raised upon saving.
Message Name: ONT_LINE_PREPAY_NOT_SUPPORTED
Message Text: Prepayment is not supported at line level.
Message Type: Error
Wire Transfer is not a supported prepayment instrument. When you select Wire Transfer as prepayment instrument then an error will be raised.
Message Name: ONT_NO_WIRE_TRANSFER_FOR_PREPAY
Message Text: 'Wire Transfer is not supported for prepayment.'
Message Type: Error
When multiple payments exist, you must use the Payments window to update payment information.
Message Name: ONT_MULTIPLE_PAYMENTS_EXIST
Message Text: ‘You cannot update payment attributes of the order header because multiple payments exist for the order. Please use Payments window to update payment attributes.'
Message Type: Error
Prepayments cannot co-exist with line level payments.
Message Name: ONT_LINE_PAYMENTS_EXIST
Message Text: ‘You cannot enter prepayments because payments exist at the line level.'
Message Type: Error
Message Name: ONT_LINE_INVOICE_NOT_SUPPORTED
Message Text: ‘You cannot enter payments at line level because prepayments exist at the order level.'
Message Type: Error
Line level payments must be associated with order lines.
Message Name: ONT_NO_LINES_FOR_PAYMENT
Message Text: ‘You cannot enter line level payments because there are no lines on this order.'
Message Type: Error
Using the Payments window to update payment information.
Message Name: ONT_GOTO_PAYMENTS_WINDOW
Message Text: ‘Please use Payments window to update the payment attributes for this order.'
Message Type: Error
Order Import - When payment reference information is invalid, an error will be raised.
Message Name: OE_OI_ORIG_SYS_PAYMENT_REF
Message Text: ‘Invalid ORIG_SYS_PAYMENT_REF. Please enter a non-null value.'
Message Type: Error
Data Requirements for AR
-
Commitment - commitment number
-
CC/P-Card - number, expiration date
-
ACH - normal business practice is to have an agreement on file with the customer that authorizes the originator of the ACH transfer (Oracle deploying company - merchant) to debit the customer’s bank account. One time phone ACH authorization is legally allowed provided we capture the following pieces of data:
-
The date on or after which the consumer’s account will be debited;
-
The amount of the debit entry to the consumer’s account;
-
The consumer’s name;
-
A telephone number that is available to the consumer and answered during normal business hours for customer inquiries;
-
The date of the consumer’s oral authorization; and
-
A statement by the Originator that the consumer’s authorization will be used to originate an ACH debit to the consumer’s account.
Theses 6 points are mandated by NACHA - the governing body of the ACH Network.
-
-
Wire
-
Check: We support 2 flows.
-
The check given to the Order Management clerk, which is then deposited directly to the bank. Checks mailed to the AR department.
-
Checks deposited via lockbox or mailed directly to the bank are not supported.
-
Retroactive Billing Overview
Retroactive billing refers to a business practice common in certain industries, especially the automotive industry, when a customer requests changes to amounts charged by a supplier on an invoiced order to receive credits.
Periodically, the price of an item on a sales agreement or purchase order will be changed, for example, a commodity will sharply increase or decrease in price. The customer will issue an amendment to the sales agreement or purchase order. If the price change is retroactive, shipment quantities are identified that occurred during the retroactive billing period, and the additional charges or credits are calculated and sent to the customer for billing.
Retroactive Billing Major Features
You can capture a new selling prices for an item, a range of items, or a particular customer price list. You can enter the new selling price (either as a unit price or a % of the previous price) with an effective date range.
You can use the Price List window to define or modify a unit list price for items or item categories with an effective date range. You can also add qualifiers to a price list to specify what kind of customers or orders will get the price from a particular price list. The Sales Agreements window are entry windows to capture price list line changes.
1. The difference in list price would be considered to determine whether the retrobill line would be of type 'ORDER' or 'RETURN'. If the difference in list price is zero, the difference in selling price would be considered. Example: If Invoiced ulp = $100 and latest ulp = $50, the retrobill line type is 'RETURN,' even if invoiced usp = $90 latest usp = $110 (due to some new modifiers in the setup)
2. If a modifier present in the original line (or previous retrobill line) is invalid in the setup during the retrobill run, this modifier would be shown in the View Adjustments window for the retrobill line and the following would be the value for adjusted_amount. Adjusted_amount corresponding to the retrobill line = -1 * adjusted_amount corresponding to the original line (or previous retrobill line) if the retrobill line type is 'ORDER.' The adjusted_amount corresponding to the retrobill line = adjusted_amount corresponding to the original line (or previous retrobill line) if the retrobill line type is 'RETURN.'
3. If a new modifier MOD_NEW is present in the setup and is returned by the pricing engine, the following would be the value of adjusted_amount for MOD_NEW in the View Adjustments window. If list_line_type_code = 'PBH', it will be changed to 'DIS'. Adjusted_amount = The amount returned by pricing engine corresponding to the latest list price, if the retrobill line type is 'ORDER'. Adjusted_amount = -1 * (amount returned by pricing engine corresponding to the latest list price) if the retrobill line is of type 'RETURN'. > >
4. In View Adjustments form, for the diff adjustments > sign(operand) = -1 * sign(adjusted_amount) if list_line_type_code = 'DIS' and sign(operand) = sign(adjusted_amount) if list_line_type_code = 'SUR.'
Identify Eligible Lines
You can identify eligible shipped/invoiced lines with a flexible list of criteria. You can identify invoice lines by:
-
Searching for all invoices made within a date range
-
Searching for all invoices for a particular item
-
Searching for shipments/invoices to a particular customer, or ship-to-location
-
Searching for a range of invoices by invoice number
Report Eligible Lines
You can report all eligible re-priced invoice lines. This report is intended to replace RLM's current Retrobilling Report. You can view the results of a Preview or Executed retrobill request online.
See: RetroBilling Report
Adjust Prices on Future Shipments
You can update pricing of all future shipments based on new price list information. You can mass change open orders, or re-price shipments before ship confirm to insure the latest price details.
This functionality is available in Order Management. You can mass select orders and use the Price Order action. Alternately, you can add the Reprice at Shipment workflow activity to the line workflows, so that repricing is automatically executed at shipping before invoicing.
You can identify all re-pricing actions against an invoice line when you search for eligible invoice lines. You can see the history of the re-priced lines, as well as the latest unit-selling price, and the debit/credit based off that price.
The Retrobill Report and the Inquiry Results show the eligible order lines. The ‘invoiced unit price' and ‘invoiced extended price' is the net of any existing executed Retrobill runs. In other words, if the original invoice unit price was $10, and there was already one retrobilling executed that reduced the price to $9, and now we are working on another retrobill request to lower the price to $8, we show $9 as the ‘unit invoiced price' on the report and the query.
Retrobilling Preview (Inquiry)
With retrobill criteria, you can preview a list of eligible invoice lines, the proposed price changes (with updated unit selling price, the invoice difference as a debit or credit) as well as any previous changes to a price that would impact the invoiced amount.
The process will allow for the retrobilling request to be run in Preview mode, and the results could be viewed on line. After Preview has been executed (either concurrently or real-time), the Adjustment/Credit part of the window is populated as well as the Summary tab. You can also print the Retrobilling Report to show retrobilling details including original price, new price and variance price.
Approve and Automatically Create Adjustments
Before creating any adjustments, you should be able to approve the set of re-priced lines. When you approve a list of eligible re-priced invoice lines, you can automatically create debit (invoice lines) or a credit (credit memo) for each line. You can group the new invoice lines onto an invoice by shipment, by customer ship-to location, or by customer. You can group the new credit memo lines onto a credit memo by shipment, by customer ship-to location, or by customer.
Approval Process
Approval will consist of the user viewing the Preview results and choosing to Execute the retrobill request. That activity will book the retrobill orders, which will then execute their workflows like any other orders/lines.
Note: If companies need a more formal approval process, they can insert a workflow approval step into the order or line workflow.
When a retrobilling event occurs, the adjusted amount is created as an open adjusting order line. If the price increases, this line will be bill-only and have an ORDER line category. If the price drops, this line will be credit-only and have a RETURN line category. A new seeded Retrobill source indicates that the line is an adjusted line, and refers to the current retrobilling request. See the following table to see how attributes on retrobill lines are populated.
| Columns on the retrobill line | Get value from |
|---|---|
| Item | Copy from original line |
| Quantity | Retrobillable quantity (ordered quantity of original line reduced by any return quantity |
| UOM | Copy from original line |
| Line Category Code | RETURN when the line is used for crediting customer ORDER when the line is used to bill customer |
| Line Type | Use the default ORDER or RETURN line type as setup in the order type definition. |
| Item Type Code | Always hard code as STANDARD |
| Calculate Price Flag | Default to N, which means Freeze Price |
| Unit List Price | Difference of the unit price on price list line |
| Unit Selling Price | Difference after discounts applied |
| Price List | If the price list on the original order line is no longer active, it will be defaulted based on defaulting framework. This could be different from the original order line based on defaulting or pricing engine output. |
| Pricing Date | Current date |
| Tax Code | Copy from original line |
| Shippable_Flag | N, means the line is not shippable |
| Return Reason Code | Default from system parameter ‘Default retrobill reason'. You can also override for each retrobilling request |
| Order_Source_ID | A new seeded order source type ‘Retrobill' |
| Orig_sys_document_ref | Store original order's header_id |
| Orig_sys_line_ref | Store original order line's line_id |
| Source_Document_shipment_ref | Not populated for retrobilling |
| Retrobill_Request_ID | Foreign key to retro request table |
| Reference_Line_Id | We are not going to use this column |
| Credit_Invoice_Line_Id | Store the retrobilled invoice line |
| Shipped_Quantity | Null |
| Reserved_Quantity | Null |
| Shipping_Quantity | Null |
| Shipping_quantity_UOM | Null |
| Actual_Shipment_Date | Null |
| Over_Ship_Reason_Code | Null |
| Over_Ship_Resolved_Flag | Null |
| Shipping_interfaced_Flag | Null |
| Option_Number | Null |
| Commitment_Id | Null |
| Other fields | Will be copied from original line |
These lines are grouped into orders by customer, currency, conversion type, conversion date, and conversion rate. These orders are bill only or credit only open orders. One or more invoices or credit memos can be generated from a retrobill order depending on AR grouping rules. See the following table to see how order attributes are populated.
| Columns on the Retrobill Order | Get value from |
|---|---|
| Order Type | Default from Order Management system parameter. You can override the default by choosing any order type for a retrobilling request |
| Other attributes | Defaulted |
| Order_Source_Id | Use new order source type ‘Retrobill' |
| Orig_sys_document_ref | Store retrobill_request_id |
Note: Agreement information on the original line will be copied over to the retrobill line.
Retrobilling Event Parameters
You can optionally give the following input parameters to retrobilling run:
| Parameter | Description | Required? | Defaulting source |
|---|---|---|---|
| Order Type | Retrobill orders will be created with this order type | No | From the Order Management System Parameter |
| Retrobill Reason | Credit memo reason to send to AR | Yes | From the Order Management System Parameter |
| Retrobill Event Name | Name to identify retrobilling run | Yes | |
| Description | Short description or comment of the retrobill request | No | |
| Mode | Preview or Execute | Yes | Determined by which action is chosen. Previewed retrobill orders if saved will be created in Entered status. Executed retrobill orders will be created in Booked Status |
A seeded Pricing Event, Retrobill determines the amount to bill or credit It is seeded with a pricing phase, List Line Base Price. If there are already discounts applied to the original order line, the discounts will be applied to the new list price to determine whether there is any price change.
For customers who also want the line level modifiers reevaluated, they can change the Advanced Pricing event phases mapping to activate line level phases. Only phases with modifier_level_code='LINE' should be attached. The Retrobilling engine will validate and raise an error if the wrong phases are attached. Only discounts, surcharges, and price break headers will be considered.
-
Recalculating line group level and order level discounts are not supported.
-
We will price the selected order lines with current date as pricing date.
-
Each adjustment is compared with the same modifier attached to original order line, and if it had been retrobilled before, the most recent (based on pricing date) retrobill line, and come up with an adjusted_amount difference. This adjustment is stored with the difference as applied. The application method is changed to Amount when needed. The View Adjustment for the retrobill line will only show these adjustments.
Sales Credits
The sales representative and sales credits are copied from the original order line. These are interfaced to AR and the sales credits are adjusted.
Workflow Considerations
Please assign the same workflow for both Order and Return lines for the Order Type that is used for Retrobill Orders. If you require different processing in the workflow for Order and Return lines, create the workflow which branches based on line category of the Retrobill Lines.
Typical Retrobilling Usage
The following are some typical examples of using the Retrobilling feature in this design. This is not intended to describe all business scenarios:
Retroactively Crediting to Customer Due to Item List Price Drop
-
Customer A and B have placed the following orders:
Customer Order Placement Ord # Cust Line Item Qty Line Cat Unit List Price Unit Selling Price Ext Price Invoice # 1000 A 1.1 X 10 Order 20 20 200 2000 1001 B 1.1 X 20 Order 20 20 400 2001 1000 A 1.1 X 5 Order 20 20 100 2002 -
The Unit List Price of Item X has dropped from $20 to $17. The user end-dated the Corporate Price List Line for Item X, and added another price list line for Item X:
Price List Changes Price List Item Start Date Active End Date Active Unit List Price Corporate X 1/1/2000 7/31/2003 20 Corporate X 8/1/2003 17
The user retrobills the three orders and the Retrobilling Engine generated the following orders:
| Ord # | Cust | Line | Item | Qty | Line Cat | Unit List Price | Unit Selling Price | Ext Price | Credit Memo Against |
|---|---|---|---|---|---|---|---|---|---|
| 2000 | A | 1.1 | X | -10 | Return | 3 | 3 | -30 | Invoice 2000 |
| 2001 | B | 1.1 | X | -20 | Return | 3 | 3 | -60 | Invoice 2001 |
| 2000 | A | 1.1 | X | -5 | Return | 3 | 3 | -15 | Invoice 2002 |
Retroactively Bill To Customer Due To Item List Price Increase
-
Customer A and B have placed the following orders:
Customer Order Placement Ord # Cust Line Item Qty Line Cat Unit List Price Unit Selling Price Ext Price Invoice # 1000 A 1.1 X 10 Order 20 20 200 2000 1001 B 1.1 X 20 Order 20 20 400 2001 1000 A 1.1 X 5 Order 20 20 100 2002 -
The Unit List Price of Item X has increased from $20 to $23. The user end-dated the Corporate Price List Line for Item X, and added another price list line for Item X:
Price List ChangesPrice List Changes Price List Item Start Date Active End Date Active Unit List Price Corporate X 1/1/2000 7/31/2003 20 Corporate X 8/1/2003 23 -
The user retrobills the three orders and the Retrobilling Engine generated the following orders:
Retrobill Generated OrdersRetrobill Generated Orders Order # Cust Line Item Qty Line Cat Unit List Price Unit Selling Price Ext Price Invoice Number 2000 A 1.1 X 10 Order 3 3 30 3000 2001 B 1.1 X 20 Order 3 3 60 3001 2000 A 2.1 X 5 Order 3 3 15 3000
User Procedures
To perform Retrobilling:
-
Navigate to the Retrobilling Organizer Find window.
Retrobilling Organizer Find Window
-
Enter the criteria for the orders to retrobill. Searching by item and customer is similar to the searches that you can carry out in the Order Organizer.The lines that match the criteria are displayed.
The Operating Unit field is folder enabled and available in all the tabs. It displays your default Operating Unit. You can choose a different Operating Unit that is accessible to you from the LOV. The Operating Unit selected should have Retro-Billing enabled (via System Parameters).
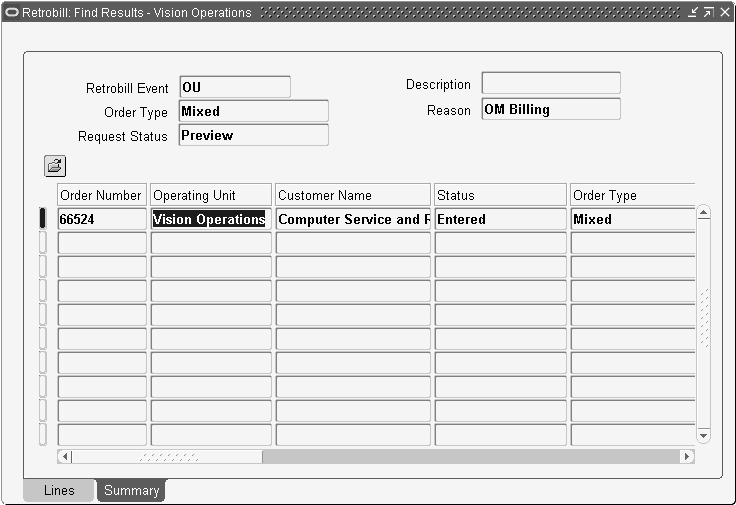
Retrobill Find Results Window
-
Choose the row(s) to Retrobill. If you do not choose any rows, then any action described in steps 4 through 6 will execute against all rows selected by the Find criteria.
-
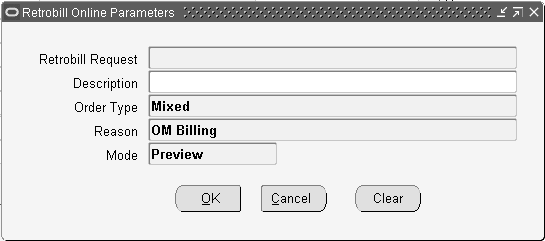
Click either Online or Concurrent Request to invoke retrobilling. A parameter window will pop up to accept parameters. You can give a retrobill event name, description, order type, reason and mode (either Preview or Execute).
Retrobilling Parameters window
-
Optionally perform a Preview Retrobilling activity. This will execute the retrobilling engine in preview mode. You can view the results of the Preview in the Retrobilling Organizer by querying up the request by name. You can see the amounts to be retrobilled for each line and also summary information. You can optionally run the Retrobilling Report to see the details as a standard report.
You cannot create a single Retro-Billing request for Orders from across Operating Units. However you can retrobill orders from different Operating Units that are accessible to you without changing responsibilities, thus creating multiple Retro-Billing requests (one or more) for each Operating Unit that you have access to.
Note: After preview or execution, the Lines tab will show the retrobill order lines created by the retrobilling engine. For previewed results, you can deselect retrobill order lines or change the retrobill quantity and do either preview or execution again.
You can input parameters and click OK. If this was invoked from the Concurrent Request button, a concurrent request id will be displayed and cursor back to the Retrobilling window. If it was invoked from the Online button, the results show in the Retrobilling window Lines tab for each retrobill line. An additional tab, Summary shows. You can choose the Summary tab to see retrobill orders. This summary tab has two regions.
The upper region displays the parameters: Retrobill Event, Description, Order Type, and Reason. Another field Request Status shows whether the retrobill request is previewed or executed.
The lower region is the same as the order organizer Summary tab and is folder enabled. The seeded default folder will have Order Number, Customer Name, Currency, Order Amount, Subtotal, Tax and Conversion Type, Conversion Rate, and Conversion Date. Operating Unit is a folder enabled field.
Retrobilling Results Summary Tab
-
You can choose to change the quantity on any retrobilling line, or delete lines from the Preview set of lines before executing.
-
You can finally choose an Execute Retrobilling activity. This will execute the retrobilling engine in ‘execute mode' against the selected lines. If not previewed before, this will create and book the retrobill orders and lines. If previewed previously and results were saved, this execution will update the retrobill orders to Booked status.
-
You can optionally exit without executing the request, and later return to the retrobilling request by querying it up in the Retrobilling Organizer.
-
To query previewed retrobilling requests by event name, you can go to the Retrobilling Organizer window Retrobill Requests tab to do that. This tab is also useful when users want to query retrobill requests by item, customer, request date. (Figure 7) When any information is entered in this tab, the ‘Order Information' and ‘Line Information' tab will be disabled. Item identifier type and ordered item will be available as hidden folder fields so that you can query by customer item also.
Note: Note: You can enter free text in the field where the query will run based on whatever was entered. If you select a request from the LOV, the query would run based on the retrobill_request_id corresponding to the selection.
-
When you click Find the following summary window shows. You can choose one retrobilling request and click Open to see individual retrobill requests.
Note: When only one retrobilling request is found, the retrobilling requests summary window is bypassed, and the Retrobilling window displays.
Seed Data
Several new Order Management Parameters related to Retrobilling have been added as follows:
-
Enable Retrobilling – values are Enabled or Disabled. The default is Disabled.
-
Default Retrobill Order Type – values will be based on all active Order Types that have been defined. This is used as the default order type for retrobill orders.
-
Default Retrobill Reason – values will be based on all active AR credit memo reasons. This is used as the default retrobill reason for retrobill orders.
These parameters will be added to a new category Retrobilling.
Constraints
A new seeded validation template Retrobill Line. It will be true for lines with retrobill_request_id populated.
A new seeded validation template Return Retrobilled Line. It will be true for Return Lines that have retrobill lines created after the Return Line is created.
Customer Acceptance
In different countries a number of companies prefer to accept goods formally before being invoiced by the supplier. To record and view customer acceptance, Oracle Order Management integrates with Accounts Receivables and Costing. The customer can accept the goods in any or in combination of the following ways:
-
Pre-Billing Acceptance (goods are accepted before Invoicing) – Implicit or Explicit
-
Post-Billing Acceptance (goods are accepted after Invoicing) – Implicit or Explicit
In Pre-Billing Customer Acceptance, once the goods are accepted, invoicing is carried out. In Post-Billing Acceptance, the revenue recognition process is deferred and linked to customers accepting the shipped goods. Only full acceptance is recorded; partial acceptance is not recorded. Post-billing acceptance is not supported for lines with deferred accounting rules.
Implicit Customer Acceptance
The field Acceptance Days on the Sales Order line (folder enabled on the Others tab), enables you to see the time limits specified on customer acceptance. This is set up in Receivables (Revenue Management) in the deferral reason definitions. For more information on setting up deferral reasons and Expire Activities, please refer to the Oracle Receivables User Guide.
Implicit Customer Acceptance
Implicit Acceptance of Pre-Billing and Post-Billing is checked using the Implicit Acceptance request set. This request set verifies the expiration of implicit acceptances.
Explicit Customer Acceptance
The Actions item Fulfillment Acceptance enables you to accept the goods explicitly. This is available in the Sales Orders Lines window and on selecting this option, the Order Details window of the Order Information Portal opens.
Explicit Acceptance is recorded in Order Information Portal, using which you can search and accept/reject multiple lines at a time.
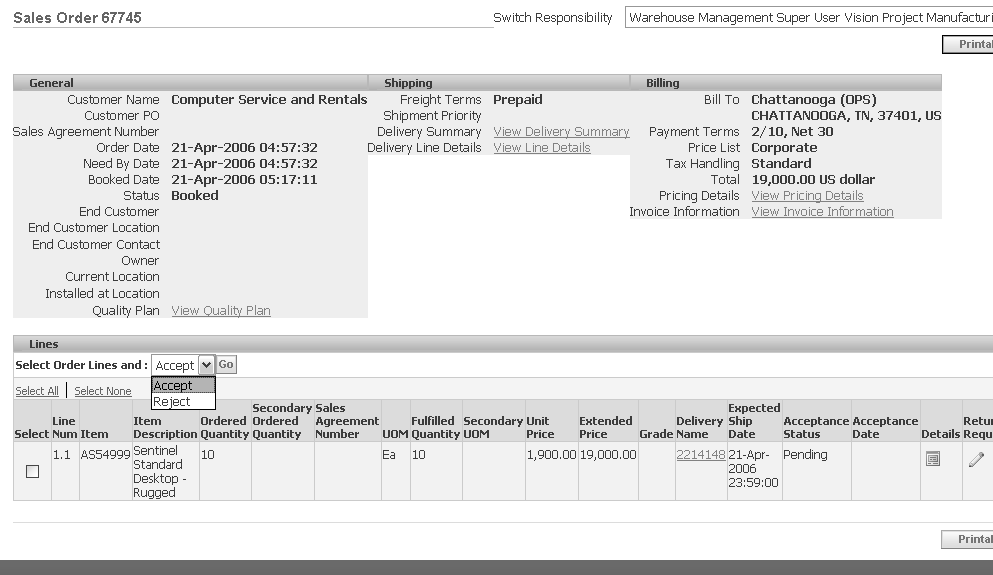
Once you select Accept or Reject, the Acceptance Status on the line in OIP changes to Accepted or Rejected. You need to specify an Acceptance Date, signature and other fields for the acceptance to be recorded in OIP. The order status in the Sales Order window also changes to Closed. The Sales Orders window has two other dates - Earliest Acceptable Date and Latest Acceptable Date - that are related to Scheduling and not to the Customer Acceptance functionality. Acceptance details like Acceptance Date, Acceptance Comments etc., are allowed for update only before the line is closed and are available for users who have the privilege (function security) to perform explicit acceptance.
Note: The acceptance date can be before the fulfillment date, however, it cannot be prior to the actual shipment date. If the actual shipment date is not available, then the application validates the acceptance date against the fulfillment date and does not allow the acceptance date to be prior to the fulfillment date.
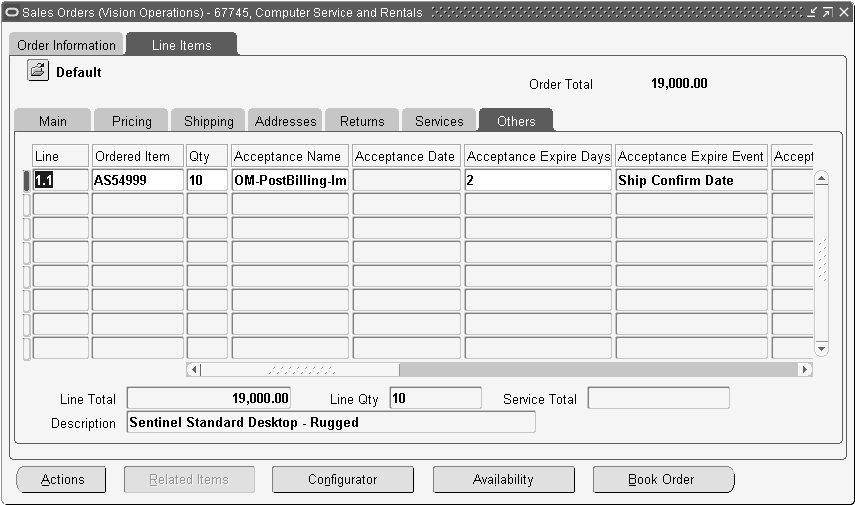
Though Customer Acceptance is available at both levels – header and line, the Sales Orders line (Others tab) contains the following Customer Acceptance related fields (folder enabled):
Specify an Acceptance Name in the field, this is also known as Deferral Reason and has been defined in Receivables, Revenue Management. If a number of days that the acceptance will expire in, has been defined in Receivables, then the Acceptance Number of Days will display the value. Similarly, the Acceptance Expire Event will display from the Receivables field. These will be populated in case of Implicit Acceptance.
Customer Acceptance for Promotional Goods
When the original item has promotional goods associated with it, both need to be individually accepted by the customer. The customer may accept one and reject the other.
Customer Acceptance for ATO/PTO/CTO Items
In the case of ATO models:
-
Model Lines are eligible for acceptance when the configured items have been fulfilled. The options lines are not enabled for customer acceptance.
-
When acceptance of a model line is recorded, the acceptance detail is copied for each child under that model.
In the case of PTO models:
-
Customer Acceptance is only available at the top model line only.
-
Top model lines are eligible for acceptance when all of the children lines requiring acceptance are at ‘Pending Fulfillment Acceptance’ status.
-
When acceptance is recorded for a top model line, the information is copied to all of the children including Included Items.
For kits (PTO items):
Acceptance only at the top model. All included items will be accepted when top model line is accepted.
-
Acceptance is available at the PTO item.
-
When acceptance is recorded for the PTO item, the information is copied to all of the included items in the kit.
Please note that in case of Sales Agreements, if the goods are rejected or treated as scrap, an RMA (Return Material Authorization) needs to be created. The sales agreement quantity and amount are always adjusted during pre-billing acceptance or rejection.
User Procedures
The following are the steps to record and view Customer Acceptance:
General Procedures
-
Enter orders that need to be accepted by the customer and this acceptance is to be recorded by the Customer Sales Representative.
-
View/update Acceptance fields on the order line. The Others tab of the sales orders line displays the folder enabled Acceptance fields.
-
Sales Order Acknowledgment Report prints Acceptance Required.
-
Ship Confim the items – view the line status ‘Pending Pre-Billing / Pending Post-Billing Acceptance’.
-
Perform Acceptance/Rejection.
-
View Acceptance Details in Sales Orders line.
-
Explicit Acceptance:
Acceptance through Order Information Portal (click on Sales Order Actions – Fulfillment Acceptance) from Header or Lines OR through Order Import.
-
Implicit Acceptance:
Deferral reason has to be defined in AR with event attribute as Ship Confirm date and expiration days.
An Implicit Acceptance Request set that records Implicit Acceptance consists of the following concurrent programs:
-
Generate Pre-billing Acceptance Program for Pre-billing, Implicit Acceptance
-
Revenue Contingency Analyzer for Post-billing, Implicit Acceptance
Customer Acceptance/Rejection Scenarios
Given below are different scenarios in which acceptance/rejection (implicit or explicit, pre-billing or post-billing) are specified:
Customer Acceptance prior to billing, full explicit acceptance
Customer Acceptance required prior to billing, with full explicit acceptance:
-
Customer Acceptance required prior to billing, with full explicit acceptance:
-
Order is picked and shipped.
-
Order lines status is Pending Pre-Billing Acceptance’.
-
Customer logs into Order Information Portal, queries their order and marks the lines as accepted for the full quantity shipped. Or, if the customer has called or faxed their acceptance to the call center, the CSR queries the order and uses the Sales Order form Action ‘Fulfillment Acceptance’ which brings up the OIP page, and records the acceptance there.
-
Order line proceeds to invoicing and revenue recognition. The invoice date for the line is the acceptance date.
-
CSR can query the lines to find out the details of the acceptance.
Customer Acceptance prior to billing, some goods not acceptable
Customer Acceptance required prior to billing, but some of the quantity on a line are not acceptable:
-
CSR enters order and books it.
-
Order is picked and shipped.
-
Order lines status is Pending Pre-Billing Acceptance’.
-
Customer calls or faxes to CSR indicating they cannot accept all the items that they have received - they have rejected part of one or more of the order lines. CSR instructs the customer to send back the items for replacement.
-
CSR raises an RMA for credit referencing the original order line (since the original order line has not been invoiced, the credit will go on account).
-
CSR also raises a new order for shipping replacement goods.
-
When the replacement items are shipped and received, the customer calls or faxes to indicate that the items are acceptable.
-
CSR logs into OIP, queries the original order line and marks it as accepted for the full quantity shipped. Or CSR uses the Sales Order form Action ‘Fulfillment Acceptance’ which brings up the OIP page, and records the full acceptance. When recording the acceptance, CSR can enter Comments to indicate what happened, and can reference the replacement order number if desired.
-
Order line proceeds to invoicing and revenue recognition.
-
CSR can query the lines to find out the details of the acceptance.
Customer Acceptance after billing, full implicit acceptance
Customer Acceptance after billing, with full implicit acceptance:
-
CSR enters order and books it. Revenue Management is set up to assume acceptance if explicit acceptance/rejection is not performed within 30 days of shipment.
-
Order is picked and shipped.
-
Order line is invoice interfaced.
-
Order lines status is Pending Post-Billing Acceptance.
-
Even after 30 days, there is no acceptance or rejection of the goods.
-
Acceptance is assumed. Order line closes and revenue recognition takes place.
-
Later, if there is a question, CSR can query the order lines and see that an automatic acceptance was generated on the 31st day after shipping.
Customer Acceptance after billing, full explicit rejection
Customer Acceptance required after billing, with full explicit rejection:
-
CSR enters order and books it.
-
Order is picked and shipped.
-
Order lines are invoice interfaced.
-
Order lines status is Pending Post-Billing Acceptance.
-
Customer calls or faxes to CSR indicating they have rejected the order lines. CSR instructs the customer to either send back the items or scrap them.
-
CSR logs into OIP, queries the order line and marks it as rejected for the full quantity shipped. Or CSR uses the Sales Order form Action ‘Fulfillment Acceptance’ which brings up the OIP page, and records the rejection.
-
Order lines close.
-
CSR creates an RMA order referencing the rejected order line, with a line flow indicating receipt of goods or scrap.
-
CSR can query the lines to find out the details of the acceptance.
Customer Acceptance prior to billing, full explicit acceptance, goods and service on same order
Customer Acceptance required prior to billing, with full explicit acceptance:
-
CSR enters order for a product and a service on that product (extended warranty) and books it.
-
Goods line is picked and shipped.
-
Both order lines (good and service) appear in status ‘pending pre-billing acceptance’.
-
Customer calls or faxes to CSR indicating they have accepted the goods.
-
CSR logs into OIP, queries the order line for the goods and marks it as accepted for the full quantity shipped. The Service line does not appear in the UI as a line that can be accepted. Or CSR queries the order in the Sales Order or Quick Sales Order form, then invokes Action Fulfillment Acceptance which brings up the OIP page, where the line is marked for acceptance.
-
Both order lines proceed to invoicing and revenue recognition – the invoice date for both the goods and the service is the acceptance date.
-
CSR can query the lines to find out the details of the acceptance.
Customer Acceptance prior to billing, delayed service
Customer Acceptance required prior to billing, for orders with delayed service:
-
CSR uses Order Management to enter order for service such as extended warranty for an item that was ordered on a different order. The service line can reference the serviceable item’s original order or its install base instance. CSR books order for service.
-
Service line status is Pending Pre-Billing Acceptance.
-
If the serviceable good has already been accepted, then the service line will be automatically accepted. There is no user action required. The acceptance details from the good line will be copied to the service line.
-
If the serviceable good has NOT be accepted, then the service line will wait at the invoice interface in status ‘pending pre-billing acceptance’ until the goods line is accepted. CSR will not be able to explicitly accept or reject the service line. Once the goods line is accepted, the acceptance details will be copied automatically to the service line and the service line will automatically proceed in the workflow.
-
Service line invoices and closes once acceptance of the good has been received.
-
Later, if there is a question as to when or how the service line was accepted, CSR can query the service line, as the acceptance details are copied to that line.
Customer Acceptance prior to billing, ATO or PTO models
Customer Acceptance required prior to billing, with full explicit acceptance, for ATO and PTO models, including ATO within PTO:
-
CSR enters order, configures as necessary and books it.
-
Acceptance attributes will be visible and updatable only on the top model lines of the order, not the child lines.
-
Order is picked and shipped.
-
All order lines status is Pending Pre-Billing Acceptance, including all child lines of the configurations.
-
Customer logs into OIP, queries their order. They will see only the model lines eligible for acceptance. They will mark them as accepted for the full quantity shipped.
-
All order lines proceed to invoicing and revenue recognition.
-
CSR can query the lines to find out the details of the acceptance.
Note: In the case of non-SMC PTO models and PTO models with imbedded ATO models, be aware that acceptance takes place at the top model level only. If a business is concerned with billing and collecting for options as they are shipped, then they should choose post-billing acceptance rather than pre-billing.
Credit Card Encryption
Funds Capture Enhancements is initiated by Oracle Payments and Cash Management and its objective is to use a centralized credit card and bank account information system. Vital and sensitive data such as the credit card number, the credit card security code (CVV2), bank account are encrypted and stored in this centralized model. This means that applications (such as Order Management) that have been locally storing information such as credit card details now integrate with the central model. This provides enhanced security and control over critical information. Credit card information such as credit card holder name is displayed in encrypted format and the expiration date appears without a value in the Sales Orders, Payments, and Quick Sales Orders windows. Additionally, you can view the status of a credit card as Unexpired or Expired in the credit card expiry status field in these windows, based on the encrypted expiry date. This encrypted format is customizable and has the following options:
-
Display last N digits (N – user defined)
-
Display first N digits (N – same as above)
-
Display all digits (no masking)
-
Mask all digits (complete masking)
Note: Such an option is available for masking the bank account too.
You are not allowed to enter line level credit card payment if the line has already been covered by the header level credit card, and a valid authorization exists for the header level credit card. The error message is displayed: Credit Card payment cannot be entered for this line, it is already authorized by the Credit Card specified at the Order Header.
For upgraded credit card orders coming from previous releases, if you have run the Audit History Consolidation program before upgrade, then the credit card numbers shown on the View Audit History window will be in the encrypted format, and the new credit card number masking setting will not be applied.
If you run the Audit History consolidation concurrent program after upgrading, then the credit card numbers shown on the View Audit History window will be in the format per current credit card masking setting.
If you have run the Audit History Consolidator for credit card orders in previous releases before upgrade, you can see the credit card numbers in masked format in the View Audit History window. You can delete the credit card related records in table oe_audit_attr_history then re-run the Audit History Consolidator concurrent program. The attribute ids for credit card records are 46,47,48,49.
Credit Card Security Code
To ensure that Internet-based transactions are protected from credit card fraud during buying and selling of goods and services, credit card companies such as Visa, Master Card, and American Express are required to include a security code number in addition to the credit card number. This is called as CVV2 (Card Verification Value) by Visa, CVC2 (Card Validation Code) by MasterCard and as CID (Card Identification #) by American Express. It is a 3 or 4 digit number printed on the back of the card.
The credit card companies use this verification code to provide greater security to merchants who process transactions in situations where their customers' cards are not present, such as over the Internet. This code is used to confirm that customers possess genuine credit cards, and that their account numbers are legitimate. The security code is not encoded in the card's magnetic stripe and is not printed on sales receipts.
In the Credit Card Security Code field of the Sales Orders window, you can enter a security code that is verified with the credit card number that is entered. The Security Code field is folder-enabled and its value is verified in Oracle Payments.
If a credit card authorization failure occurs (either the security code or the credit card number cannot be validated), the order is put on hold. In addition, if the card fails risk validation, Order Management puts the order on hold. Risk Management allows you to define any number of risk factors to verify the identity of your customers, assess their credit rating, and manage risk in a secure online environment.
Some considerations when using Credit Card Security Code that has been set as a required field in Oracle Payments:
-
You cannot copy an order that has credit card information.
-
When a sales order line with credit card information is split into one or more lines, you need to open the Payments window to re-enter the Security Code. However other information like the card holder name and expiration date will default on the Payments window.
For more information on credit card encryption and credit card security code, please refer to the Oracle Order Management Implementation Manual, Payments chapter.
Partial Period Revenue Recognition
Due to strict accounting standards, Revenue Management must account for revenue at a granular level, such as daily revenue or partial period revenue. The Partial Period Revenue Recognition feature enables you to recognize revenue for partial periods or daily rate accurately. The Accounts Receivables module initiates this; however, you can use it for rate calculation in Order Management and Service Contracts (for service items only). The revenue for a service sold needs to be distributed accurately over the duration of the service term (between start date of the service to end date of the service).
A calendar month is a standard month definition and consists of a number of specified days (for example 1-Jan to 31-Jan). A year has 12 standard months.
A service calendar month is started based on the day the user signs the contract. Therefore, if a contract is signed on 23-Feb-2004, a service month is defined as 23-Feb-2004 to 23-Mar-2004. If the customer wants to consider 23-Feb-2004 to 23-Mar-2004 as a single month, the customer should not use the partial period revenue recognition rule.
For example, if the customer does not use the partial period revenue recognition rule on a service line that is invoiced into Receivables, Receivables will recognize revenue for the whole month on 23-Feb-2004 (rule start date) in this example.
The available accounting rule types are:
The examples below show how partial period or daily rate is calculated.
Fixed Schedule
In this example, the revenue is not calculated based on daily rate. The revenue is distributed evenly over the duration provided.
The fixed schedule accounting type, the GL calendar is used, and duration is 6 months.
Revenue per period = $600/6 = $100. The revenue schedule is:
| GL Date | Period | Amount |
|---|---|---|
| April 17 | Month of April | 100 |
| May 17 | Month of May | 100 |
| June 17 | Month of June | 100 |
| July 17 | Month of July | 100 |
| August 17 | Month of August | 100 |
| September 17 | Month of September | 100 |
| 6 Monthly Periods | 600 |
Variable Schedule
| GL Date | Period | Amount |
|---|---|---|
| April 17 | Month of April | 85.71 |
| May 17 | Month of May | 85.71 |
| June 17 | Month of June | 85.71 |
| July 17 | Month of July | 85.71 |
| August 17 | Month of August | 85.71 |
| September 17 | Month of September | 85.71 |
| October 17 | Month of October | 85.71 |
| 6 monthly periods | 600 |
Daily Revenue Rate - All Periods
With this option, the revenue is calculated based on daily revenue rate. The calling applications, Order Management and Service Contracts, must interface either rule start date and duration number, or rule start date and rule end date.
Partial periods and full periods are based on the number of days in the periods.
-
Calculate daily rate based on the total number of days in the contract. Daily rate = 600/183 = 3.28.
-
First period = number of days * daily rate.
-
Middle period = number of days * daily rate.
-
Last period = the remainder. 600 – (45.92 +101.68+98.40+101.68+101.68+98.40) = 52.24
The revenue schedule is:
| GL Date | Period | Amount | Days |
| April 17 | Month of April | 45.92 | 14 |
| May 17 | Month of May | 101.68 | 31 |
| June 17 | Month of June | 98.40 | 30 |
| July 17 | Month of July | 101.68 | 31 |
| August 17 | Month of August | 101.68 | 31 |
| September 17 | Month of September | 98.40 | 30 |
| October 16 | Month of October | 52.24 | 31 |
| 7 monthly periods | 600 | 183 |
Daily Revenue Rate - Partial Periods
Partial periods are prorated based on the number of days in the periods. Full periods have equal revenue distributions.
-
Daily rate = Total amount / total no. of days = 600/183 = 3.28.
-
First period = number of days * daily rate.
-
Last period = number of days * daily rate.
-
Middle periods = (total amount - (first period + last period))/number of middle periods. (600 – (45.92 + 52.48)) / 5 = 100.32.
The revenue schedule is:
| GL Date | Period | Amount | Days |
| April 17 | Month of April | 45.92 | 14 |
| May 17 | Month of May | 100.32 | 31 |
| June 17 | Month of June | 100.32 | 30 |
| July 17 | Month of July | 100.32 | 31 |
| August 17 | Month of August | 100.32 | 31 |
| September 17 | Month of September | 100.32 | 30 |
| October 16 | Month of October | 52.48 | 16 |
| 7 Monthly Periods | 600 | 183 |
Windows using Partial Period Revenue Recognition
The Receivables window, Accounting Rules, enables you to set up accounting rules with attributes like Rule Type, Period, Number of Periods etc.

The sales orders window, Header > Others, displays the accounting rule field with an LOV that is populated from the Receivables Accounting Rule window.