Exchange Protocol Setup
Overview
Exchange Protocol provides a secured approval framework for separating the authorizing and accounts departments to ensure effective control over public finances. The authorizing department controls and executes the budget. The accounts department handles payments and financial accounting.
Exchange Protocol circulates accounting documents such as invoices and credit memos between authorizers through user-definable approval hierarchy workflows. Workflow ensures accounting transactions are approved before they are paid.
Exchange Protocol workflow handles document routing and approval based on defined approval profiles. Different approval cycles can be implemented for different organizations and transaction types.
These components must be set up for Exchange Protocol:
-
Approval profiles
-
Position actions
-
Dialog unit types
-
Transmission unit types
-
Numbering schemes
Dialog and transmission unit numbering schemes must be set up per operating unit for each fiscal year.
Exchange Protocol only handles transactions when grouped into dialog units per operating unit. A dialog unit can contain one or more accounting transactions of the same general ledger year.
Workflow circulates dialog units using transmission units. Each transmission unit can consist of one or more dialog units.
Exchange Protocol Numbering
Each dialog unit and transmission unit must be numbered uniquely and sequentially. The numbering is reset to one at the start of a new financial year.
An exchange protocol number consists of a prefix, a suffix, a number, and the fiscal year. A prefix, suffix, or both can be used. The combination of prefix, suffix, and fiscal year must be unique.
Each dialog and transmission unit can have two types of numbers:
-
Order numbers
-
Legal numbers
Order numbers are assigned when a dialog or transmission unit is created. Order numbers signify the start of an exchange protocol process.
Legal numbers are assigned when a dialog or transmission unit is approved by the legal numbering position defined in the approval profile. Legal numbers signify the transfer of legal responsibility from authorizer to accounts officer, and can be switched on or off with a profile option.
Approval Workflow
Exchange Protocol enables electronic approval on a hierarchical approval path known as an approval workflow. An approval workflow follows the approval path defined by the associated position hierarchy and is capable of updating document status and providing online notifications for user actions.
At each level, the approval workflow ensures the dialog units in the transmission unit are actioned before moving onto the next level.
A transmission unit is successfully approved if approved at each level of the approval path.
The scope of actions in a workflow depends on the position.
Approval Workflow Notification
Approval workflow sends online notifications to the dialog and transmission unit creators and approvers for further actions.
The creator submits a transmission unit to the exchange protocol workflow and approves it. If there is more than one person in the next position, the creator receives a notification listing the approvers. The creator must select an approver from the list and close the notification.
The approver receives a notification to validate dialog units in the transmission unit. After validating and closing the notification, the approver receives another notification listing the approvers if there is more than one person at the next level. The approver selects the next approver on the list and closes the notification.
Approvals continue for each level in the hierarchy until the final approver in the hierarchy is reached.
Prerequisites
Before setting up Exchange Protocol, you must:
-
Enable the Exchange Protocol feature.
-
Enable Oracle Workflow in the Oracle Applications environment.
-
Check Use Approval Hierarchies in the Human Resources region of the Financials Options window in Payables.
-
Check if setup is complete for each operating unit in case of multiple organizations support.
Related Topics
Defining Financials Options, Oracle Payables User Guide
Enabling Oracle Public Sector Financials (International) Features Procedure
Exchange Protocol Setup Steps
Complete the following steps before proceeding with the Exchange Protocol Setup Checklist.
| Step Number | Step Description | Required or Optional |
|---|---|---|
| 1 | Create Additional Users | Required |
| 2 | Set Profile Options | Required |
| 3 | Defining Jobs | Required |
| 4 | Define Positions, Oracle Human Resources User's Guide | Required |
| 5 | Fill Employee Hierarchy | Required |
Create Additional Users
Create new users having access to Oracle Public Sector Financials (International) or assign existing users access to Oracle Public Sector Financials (International).
A unique employee must be assigned to each user if exchange protocol is used.
Related Topics
Creating Users, Oracle Applications System Administrator's Guide
Fill Employee Hierarchy
The Fill Employee Hierarchy concurrent program creates a direct mapping between the defined position hierarchies and the employees holding positions in each hierarchy.
Related Topics
Filling Employee Hierarchy, Oracle Purchasing User Guide
Exchange Protocol Setup Checklist
The Exchange Protocol setup checklist is shown in this table.
All setup steps designated as required in this checklist must be completed.
All setup steps designated as Conditionally required are necessary for special conditions.
| Step Number | Setup Step | Type |
|---|---|---|
| Step 1 | Define Approval Profiles as follows: | Required |
| Step 1 | A. Define Jobs | Required |
| Step 1 | B. Define Positions | Required |
| Step 1 | C. Enter Employees | Required |
| Step 1 | D. Enter Users | Required |
| Step 1 | E. Define Position Hierarchies | Conditionally required |
| Step 1 | F. Define Approval Profiles | Required |
| Step 1 | G. Define Position Actions | Required |
| Step 2 | Define Dialog Unit Types | Required |
| Step 3 | Define Transmission Unit Types | Required |
| Step 4 | Define Exchange Protocol Numbering Schemes | Required |
| Step 5 | Assign Exchange Protocol Profile Values | Required |
Defining Jobs
Define specific Exchange Protocol jobs in Oracle Purchasing.
Note: Approval profiles can only be defined after relevant jobs, positions, and position hierarchies are defined.
Related Topics
Defining a Job, Oracle Human Resources Management Systems User's Guide
Defining Positions
Define Exchange Protocol positions in Oracle Purchasing.
Note: In the Job field, assign the relevant Exchange Protocol job to the position.
Related Topics
Defining a Position, Oracle Human Resources Management Systems User's Guide
Assigning Jobs and Positions to an Employee
To assign an Exchange Protocol job and position to an employee:
-
Enter the Exchange Protocol employee.
-
Use the People window in Human Resources if Human Resources is installed.
-
If Human Resources is not installed, use the Enter Persons window in Purchasing.
-
-
Query the Exchange Protocol employee.
-
Click Assignment.
-
Assign the appropriate Exchange Protocol job and position to the employee.
Related Topics
-
Entering New Persons, Oracle Human Resources Management Systems User Guide
-
Assigning Employees, Oracle Purchasing User Guide
Assigning Employees to Users
Assign a unique employee to each user in the Exchange Protocol process.
To assign an Exchange Protocol employee to a user:
-
In System Administration, navigate to the Users window.
-
If the Exchange Protocol user is not set up, define the user.
-
Query the Exchange Protocol user.
-
Assign the appropriate Exchange Protocol employee to the user.
Note: An employee must be assigned to one user.
Related Topics
Defining Users, Oracle Applications System Administrator's Guide
Defining Position Hierarchies
Define the hierarchy of positions for the same Exchange Protocol role in the Position Hierarchy window in Purchasing.
Note: The same user cannot belong to more than one position in a single position hierarchy.
Note: All positions designated in the approval workflow must be present in the position hierarchy.
Related Topics
Creating a Position Hierarchy, Oracle Human Resources Management Systems User Guide
Filling Employee Hierarchy
The Fill Employee Hierarchy concurrent program creates a direct mapping between the defined position hierarchies and the employees holding positions in each hierarchy.
For the Exchange Protocol process to recognize the latest hierarchy definitions, the Fill Employee Hierarchy process must be run before these changes take effect:
-
Employee addition or deletion
-
Employee name or position change
-
Position addition, deletion, or modification
-
Position hierarchy addition, deletion, or modification
Use the Standard Request Submission process to run the Fill Employee Hierarchy concurrent process.
Related Topics
Filling Employee Hierarchy, Oracle Purchasing User Guide
Using Standard Request Submission, Oracle Applications User Guide
Defining Approval Profiles
Identify legal and final positions to use in the Exchange Protocol position hierarchy.
Note: An approval profile cannot be modified or deleted after it has been attached to a transmission unit type or a transmission unit.
Approval Profiles Window
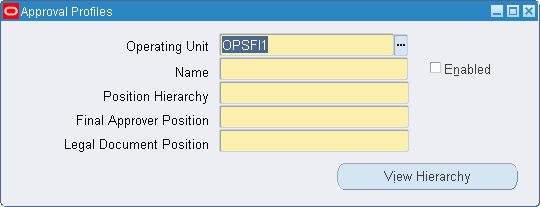
To define the approval profile:
-
Navigate to the Approval Profiles window.
-
Select the operating unit.
-
Enter an approval profile name.
-
Select the appropriate hierarchy.
-
Select the position of the person authorized to finally approve transmission units.
-
Select the position where legal numbering is attached to the dialog and transmission unit during the approval process.
Note: The position must be lower than or equal to the final approver position. The Legal Document Position field is required if the Exchange Protocol: Legal Numbering Required profile option is set to Yes.
-
select the Enabled check box to activate the approval profile.
-
Click View Hierarchy to display the Human Resources Position Hierarchy window to view details of the selected position hierarchy.
Related Topics
Creating Position Hierarchies, Oracle Human Resources User Guide
Defining Position Actions
Define at least one action for each of the positions in the Exchange Protocol position hierarchy.
Action Assignments Window
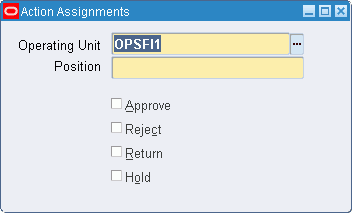
To define position actions:
-
Navigate to the Action Assignments window.
-
Select the operating unit.
-
Select a position name.
-
Select the Approve check box to enable the selected position to approve dialog units.
-
Select the Reject check box to enable the selected position to reject dialog units.
-
Select the Return check box to enable the selected position to return dialog units to the creator.
-
Select the Hold check box to enable the selected position to place dialog units on hold.
Defining Dialog Unit Types
Define the structure and content of dialog unit types.
Dialog Unit Types Window
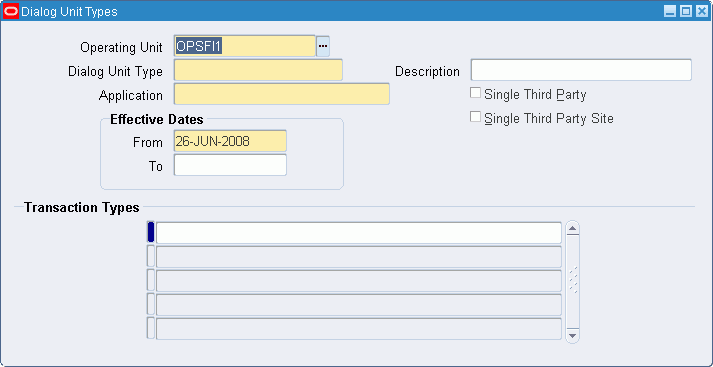
To define a dialog unit type:
-
Navigate to the Dialog Unit Types window.
The Dialog Unit Types window appears.
-
Select the operating unit.
-
Enter a name and description.
-
Select an application to attach the dialog unit type.
-
Select a date range.
-
Select the Single Third Party check box to restrict transactions for the dialog unit type to a single third party.
-
Select the Single Third Party Site check box to restrict transactions for the dialog unit type to a single third party site.
-
Select transaction types associated with the Dialog Unit Type.
Defining Transmission Unit Types
Transmission Unit Types Window
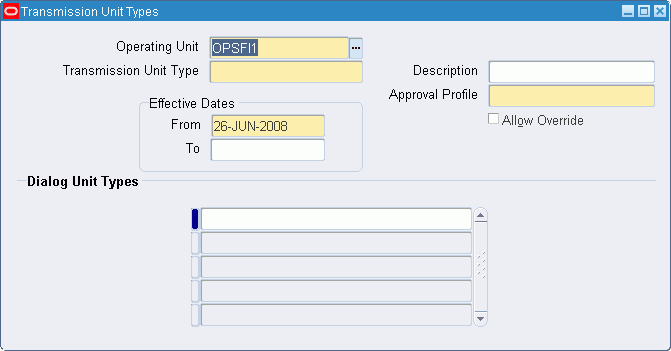
Create transmission unit types and attach one or more dialog unit types. You can also define an approval profile for the transmission unit type.
To define a transmission unit type:
-
Navigate to the Transmission Unit Types window.
-
Select the operating unit.
-
Enter a name and description for the transmission unit type.
-
Select a date range.
-
Select an approval profile for the transmission unit type.
-
Select the Allow Override check box to let the approval profile to be overridden when creating transmission units.
-
In the Dialog Unit Types field, select a dialog unit type.
Defining Exchange Protocol Numbering Schemes
Set up and format exchange protocol numbers in sequence. The exchange protocol numbers track dialog and transmission units as they pass the approval process.
Exchange Protocol Schemes Window

To define exchange protocol numbering:
-
Navigate to the Exchange Protocol Schemes window.
-
Select the operating unit.
-
Select a numbering type.
-
Select the numbering class.
-
Select the dialog unit or transmission unit type.
-
Enter either a prefix or suffix.
-
Select a fiscal year.
-
Enter the next available sequence number.
Note: Only one combination of numbering type, numbering class, dialog or transmission unit type, and fiscal year can be entered. The combination of prefix, suffix, and fiscal year must be unique.
The record cannot be deleted after transactions are entered against a record.