Agreements
This chapter covers the following topics:
- Overview of Creating Agreements
- Creating Agreements
- Revising an Existing Agreement
- Finding Agreements
- Deleting Agreements
Overview of Creating Agreements
Oracle Advanced Pricing enables you to establish agreements that you negotiate with your customers to define the prices, payment terms, and freight terms. You can:
-
Define your agreements using customer part numbers and inventory item numbers.
-
Make revisions to the original terms and maintain these changes and their reasons under separate revision numbers.
-
Define new prices or attach an already existing price list to the agreement.
-
Assign optional price breaks by quantity. Price lists are exclusive by agreement.
-
Set effectivity dates for agreement terms.
-
Set payment terms including invoice rule and accounting rule.
-
Set freight terms including the freight carrier.
-
Apply agreement terms to sales orders by reference agreements.
-
If you are using the multicurrency feature with agreements, see Attaching the Multi-Currency Conversion List to a Price List or Pricing Agreement.
-
You can view or update a price list on an agreement only in your pricing transaction entity. The profile QP: Pricing Transaction Entity must match the pricing transaction entity of the price list attached to the agreement.
-
You can view or update a price list on an agreement only in your source system. The profile QP: Source System Code must match the source system of the price list attached to the agreement. Otherwise, the price list on the agreement is view-only.
Types of Agreements
There are two types of agreements:
-
Standard Price List: Used, for example, to have one price list for all customers but to default special terms on to a sales order for a specific customer.
-
Agreement Price List: Used to offer a negotiated price for an item to a customer.
The following table compares the two agreement management methods:
| Standard Price Lists | Agreement Price Lists |
|---|---|
| Agreement lines not allowed. | Agreement lines required. |
| Associated with standard price list (type PRL). | Associated with agreement price list (type AGR). |
| Maintain and view price list lines through the Price List window. | Maintain and view price list lines through the Agreement window. |
| Use each standard price list with multiple standard agreements and price orders associated or not associated with an agreement. | Use each agreement price list with multiple pricing agreements. Not usable to price orders not associated with an agreement. |
| Cannot revise price list lines using agreement window. | Can revise price list lines using agreement window. |
| Agreement number not automatically created as a qualifier for the associated price list. | Agreement number automatically created as a qualifier for the associated price list. You can specify the pricing agreement on an order. |
Customer Merge in Oracle Receivables
When you merge customers in Oracle Receivables, you can merge:
-
The information from one customer (the From customer) with the information from another customer (the To customer).
-
The information from one or more customer sites of that customer (the From sites) with the site information from the other customer (the To sites).
If the From customer is party to agreements, the Oracle Receivables merge process runs an Oracle Advanced Pricing process to update the following agreements information:
-
If you merge customer: The process changes the customer name on the agreement from the From customer to the To customer. Verify this change in the Pricing Agreements window, Agreement tab, Customer, and Cust Number fields.
-
If you merge sites: The process changes the invoice address from the From customer site to the To customer site. Verify this change in the Pricing Agreements window, Payment tab region, Invoice To, and Address fields.
Creating Agreements
Use this process to create pricing agreements.
Note: In Order Management, the Agreement field does not appear by default on the order header. You must click the Folder icon to display it.
Security Privileges and Agreements
Pricing Security privileges affect pricing agreements by inheriting the security rules associated with any price lists. You can select a price list to associate with an agreement at setup if your privileges authorize view access to the price list. You cannot change the price list or change its relationship to an agreement if you do not have Maintain access to the price list.
If you have access issues, consult your Pricing Administrator.
To create a pricing agreement
-
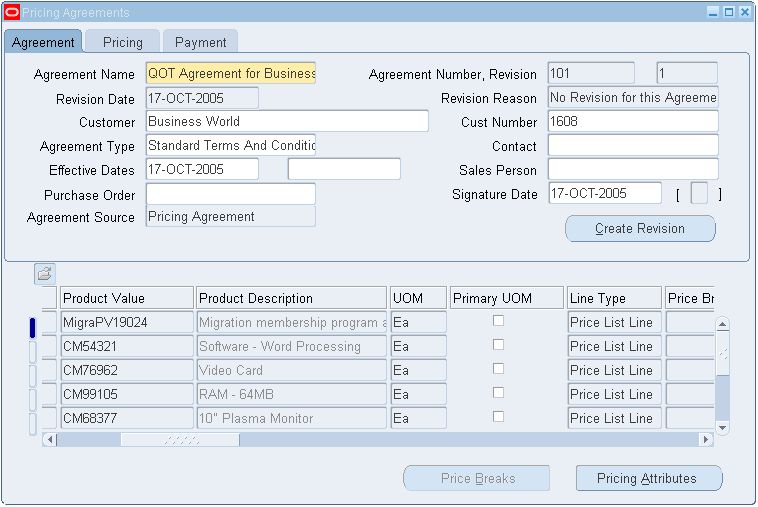
Navigate to the Pricing Agreements window.
Pricing Agreements window
-
Enter an agreement name to identify the agreement.
-
In the Agreement Number field, enter a value if one has been assigned to the agreement.
The Revision Number field defaults to 1. However, this number may change as new revisions are created (for example, from 1 to 2). The Revision Date defaults to the current system date.
-
Complete the Customer name and Cust Number fields.
-
In the Agreement Type field, select a value such as Standard Terms and Conditions.
-
Select a contact name.
-
Enter the effective date range for the agreement. If you do not enter an end date, the agreement will remain active for an indefinite period. However, if you are creating revisions, you must end the current agreement.
-
In the Sales Person field, enter a name.
-
Enter the customer's purchase order number.
-
Enter a signature date for the purchase order.
The Agreement Source field (view-only) displays the source of an agreement.
In the Pricing tab
-
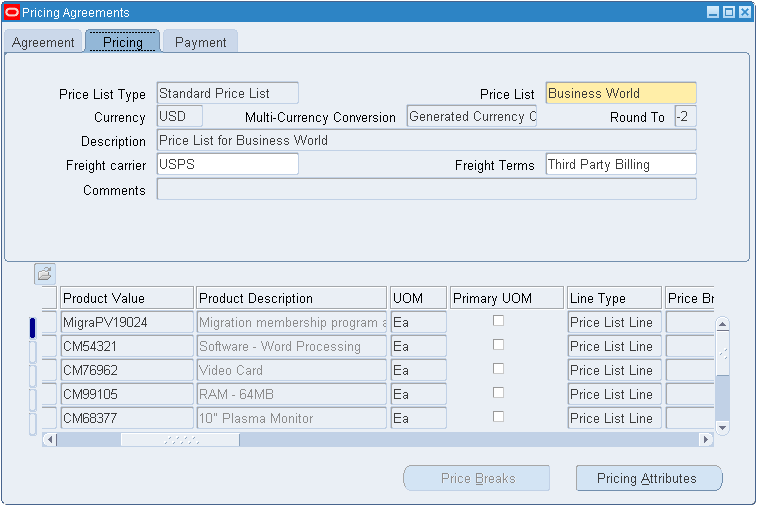
Select the Pricing tab.
Pricing Agreements window: Pricing tab
-
Select a value in the Price List Type field:
-
Select Standard Price List to associate an existing price list with the agreement.
-
Select Agreement Price List to associate an existing agreement price list to an agreement.
-
-
Select a value in the Price List field:
-
For Standard Price Lists, select Standard Price List. The Currency, Rounding Factor, Description, and Comments fields default from the standard price list selected. You cannot change these values in the Pricing Agreements window.
-
For Agreement Price Lists: You can create a new price list name or select an existing Pricing Agreement price list.
Agreement price lists are maintained only in the Pricing Agreements window. Unlike Standard Price Lists, you can adjust Agreement Price Lists.
Complete the following steps if creating an Agreement Price List:
If you choose an existing Agreement Price List, the Currency, Rounding Factor, Description, Freight Carrier, Freight Terms, and Comments fields default from the price list. However, if you change the values for any of these fields, the information is changed for all pricing agreements using this price list.
-
-
Select a currency.
-
Enter a round to value.
-
Enter a price list description.
Complete the following steps for both Standard and Agreement price lists:
-
Enter a default freight carrier.
-
Enter default freight terms.
-
Enter any comments.
In the Payment tab
-
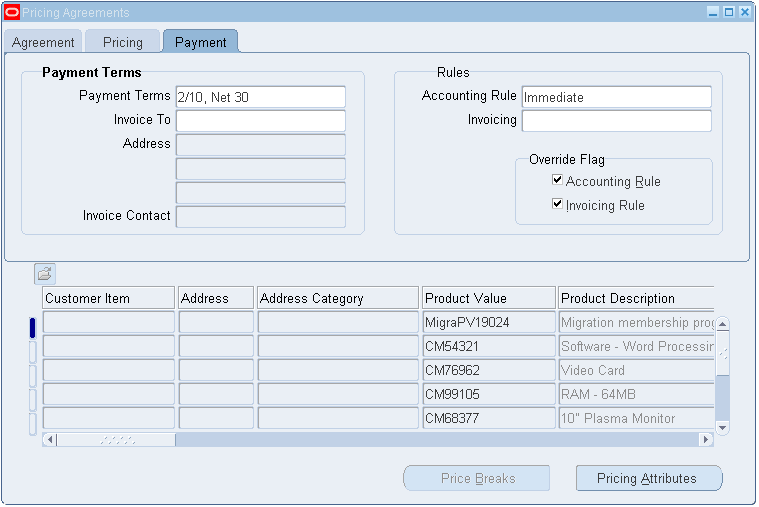
Select the Payment tab.
Pricing Agreements window
-
Select the payment terms:
-
When you enter a sales order in Oracle Order Management, and the agreement uses a standard price list, the payment terms default from that price list. You can override the price list terms on the agreement.
-
When you enter a sales order in Oracle Order Management, and the agreement uses an agreement price list, the payment terms default from those that you enter in this field.
-
-
Enter the bill-to name in the Invoice To field.
-
Enter a bill-to adress in the Address field.
-
Enter the bill-to contact in the Invoice Contact field.
-
In the Rules region, select a default accounting rule.
-
Select the invoicing rule:
-
Accounting and invoicing rules are set up in Oracle Receivables.
-
In the Override Flag region, the override check boxes for the Accounting and Invoicing Rules are for information only.
-
To create agreement lines
For Standard Price Lists: The agreement line details default from the Standard Price List entered in the Price List field in the Pricing tab. You cannot change these fields or enter additional lines from the agreement lines. You must make changes and additional price list lines on the price list from the Price List Setup window.
For Agreement Price Lists: If you attached an existing Agreement Price List, the agreement lines default from that price list. You can change the agreement line details, and add additional agreement lines. Any changes or additions that you make are reflected on the other agreements to which this price list is attached.
In the lowest region of the window, enter a product value. If there is a customer item associated, the customer item number defaults to the Customer Item field. Customer Item is a pricing attribute.
-
Do not change the defaulted values for customer item, address, and address category in this window. Make changes to these where the customer item relationship is maintained. Create the accounting and invoicing rules in Oracle Receivables.
-
When you have created a customer item relationship with an internal inventory item and you enter the inventory item product value, the customer item, address, and address category defaults.
-
Enter a unit of measure (UOM).
-
Select Primary UOM if this price list line UOM is the primary pricing UOM for the item. The pricing engine uses the primary pricing unit of measure and the Oracle Inventory UOM conversion information to price an order whose UOM does not have a price list line. For example, a price list has two price list lines for item A11111, one with UOM EA, the primary UOM, and one for boxes. When the pricing engine receives an order in UOM CS, it accesses the UOM conversion tables to convert CS to EA.
-
Select Price List Line in Line Type field.
-
Select Unit Price in the Application Method field.
-
Enter a base price in the Value field.
-
Enter the effectivity dates in the Start Date and End Date fields. Enter dates within the effectivity dates of the agreement.
-
Complete the Comments and Revision number fields.
Note: To create list of reasons, see Oracle Advanced Pricing Implementation Guide, Lookups.
-
Enter a revision date.
-
Save your work.
Note: You cannot enter an item category in the Product Value field.
To define pricing attributes
-
Click Pricing Attributes in the Pricing Agreements window to display the Pricing Attributes window.
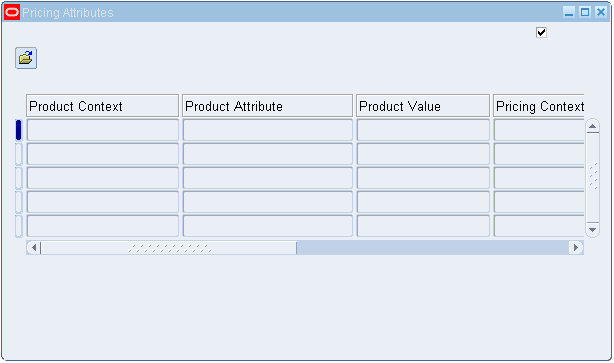
The Product Context, Product Attribute, and Product Value default from the Agreement Line that you are entering.
-
Complete the Pricing Context, Pricing Attribute, and Value From/To fields.
-
Save your work.
Note: The pricing attributes are joined as AND conditions because they apply to one price list line.
To create price breaks
-
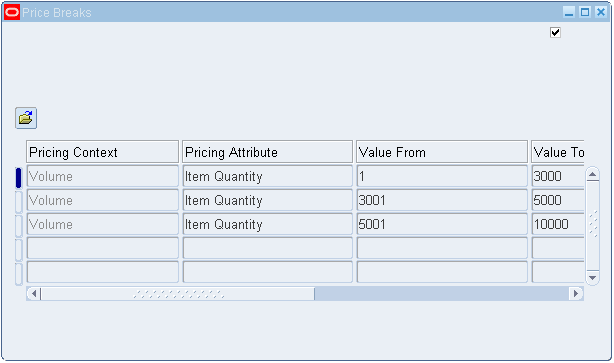
Click Price Breaks to display the Price Breaks window.
Note: The Price Breaks button is enabled when you select the following values:
-
Price Break Header in the Line Type field
-
Point or Range in the Price Break Type field
Price Breaks window
-
-
Complete the remaining steps for each price break that you define for the agreement line:
-
The Pricing Context field value defaults to Volume, and the Pricing Attribute field value defaults to Item Quantity. Optionally, select a different Pricing Attribute.
-
Complete the Value From and Value To fields. Price ranges for breaks must start with 0 with no gaps between breaks. If you leave the Value To field of the price break blank, a value of 999999... (15 digits) automatically defaults. This value is hidden from the end-user and does not appear in the Value To field.
-
Enter a Price:
-
For inventory items and item categories, enter the base list price of the item.
-
For service items: If the Application Method is Unit Price, enter the base list price of the item. If Application Method is Percent Price, enter a percent of another item's price.
-
-
Select an Application Method (the default value is Unit Price). For more information, see Application Method.
-
Unit Price: For inventory items and item categories.
-
Percent Price: For service items. You will only see Percent Price as an Application Method if the price list line is a service item.
-
Block Price: Using block pricing, you can apply a lumpsum price rather than a per unit price to a price list line. Block pricing also allows pricing setups that price by recurring values within blocks. For information on setting up price breaks with Block Price, see: Defining Price Breaks with Block Pricing (for application method Block Price).
Note: Block Price can only be selected if the line type is Price Break Header (PBH) and Block Price is selected as the Application Method for the agreement line.
-
-
Optionally, enter a recurring value for a block price. For example, if the value in the Recurring Value field is 100, then the range is priced for every 100 items within the block.
Note: The Recurring Value field is enabled when the following values are selected:
-
Break type is Range.
-
The application method of Block Price is selected for both the agreement line and price break line.
-
-
Save your work.
Related Topics
Defining Price Breaks for a Price List Line
To create a price break modifier line
Defining Price Breaks with Block Pricing (for application method Block Price)
Revising an Existing Agreement
If you must make minor changes to an existing agreement, such as changing the payment terms, you can simply change the agreement terms and save the changes. Doing so updates the existing agreement with your new changes.
However, if significant changes are required, and you want to keep a record of previous agreements, you can create a new revision. This does not overwrite the existing agreement but creates a new version of the original agreement. This is useful if you want to track and manage multiple versions of the same agreement.
You must determine when changes warrant a new agreement version, and then manually create a new revision and revision number. For tracking purposes, a logical revision numbering system, such as numbering the revisions 2, 3, 4 and so on, will help you better manage your agreements .
Once you create the new agreement revision, you can update the agreement header information.
Note: You must end the current revision before creating a new revision. An agreement can have multiple revisions but the effective dates cannot overlap. Only one revision can be effective for a given range of effective dates.
To revise an existing agreement
-
Find the original agreement that you want to revise.
Note: The original agreement must have an effective end date entered and saved before you can create a new revision. The end date can be past, current, or future; however, the date ranges for any revisions cannot overlap. Only one revision can be in effect for a given range of effective dates.
-
Click Create Revision to display the Create Revision window.
Create Revision window
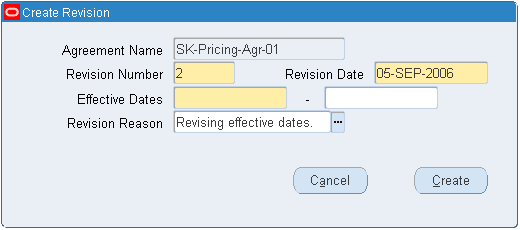
The Agreement Name defaults from the original agreement. Although you cannot change the agreement name, you can change the revision number. The Revision Date value defaults to the current date.
-
In the Revision Number field, identify the version of the agreement you are creating. This helps you track and manage different revisions of the agreement.
-
Enter the effective start and end dates for the agreement. Date ranges cannot overlap, and only one revision can be in effect for a given range of effective dates.
-
In the Revision Reason field, select a reason that describes why you are revising the agreement.
-
Click Create to display the new agreement in the Pricing Agreements window. The new revision number displays in the Revision field.
Note: Revisions to the agreement header do not revise the pricing lines for the agreement. A change to the price list lines affects all agreements to which the price lines are attached.
Finding Agreements
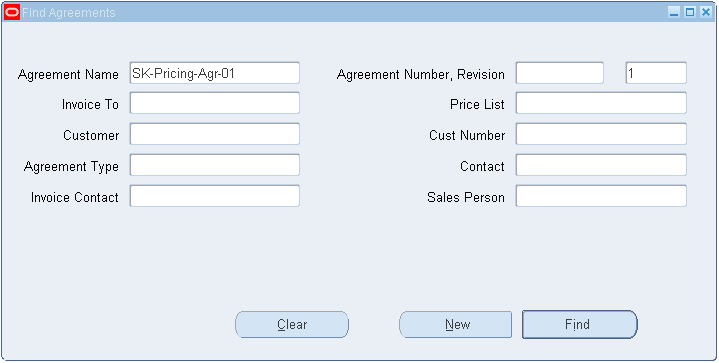
Use the Find Agreements windows to find agreements or agreement revisions by one or more of the following criteria: Agreement Name, Agreement Number/Revision, Invoice To, Price List, Customer, Cust Number, Agreement Type, Contact, Invoice Contact, or Sales Person.
To find agreements
-
Navigate to the Find Agreements window.
Find Agreements window
-
Enter your search criteria.
-
When you have completed your entries, click Find to display the search results.
Note: To create a new agreement, click the New button.
Deleting Agreements
You can delete pricing agreements if they have not been used in any previous order transactions. Once sales order lines are attached to an agreement, you cannot delete the agreement. If you attempt to delete an agreement with sales order lines attached, a warning note notifies you that you cannot delete the agreement.
To delete agreements
-
Navigate to the Pricing Agreements window.
-
Find the pricing agreement to delete.
-
From the Edit menu, click Delete to delete the pricing agreement.