Ship Confirm
This chapter covers the following topics:
- Overview of Ship Confirm
- Ship Confirm Features
- Running the Ship Confirm Process
- Automated Ship Confirmation
- Defining a Ship Confirm Rule
- Using a Ship Confirm Rule within the Release Sales Order Window
- Auto Ship Confirm from the Shipping Transactions Form
- Auto Ship Confirm from the Quick Ship Window
- Using the Ship Confirm Deliveries SRS to Ship Confirm
- Interface Trip Stop-SRS
- Assigning Serial Numbers to Delivery Line Items
Overview of Ship Confirm
Ship confirm is the process of confirming that items have shipped. When you ship confirm a delivery, Shipping Execution confirms that the delivery lines associated with the delivery have shipped.
You use the Confirm Delivery window to manually select or deselect ship confirm options. The options in the Confirm Delivery window provide flexibility for automating many tasks associated with processing deliveries with many delivery lines. For example, when the Ship Entered Quantities, Unspecified Quantities Ship option is selected at ship confirm, the shipped amounts are automatically processed so that each delivery line with a missing shipped quantity value is recorded as fully shipped. This saves you from manually entering each item as fully shipped.
Note: Oracle Shipping Execution supports up to 5 decimal points for order quantities created in Discrete Inventory organizations. Existing order quantities containing more than 5 decimal points should not be entered during ship confirm to avoid the ship confirm process from failing.
During ship confirm, you can also automatically create a trip and related stops for a delivery that has not been assigned to a trip.
Note: For a list of the actions that cause recalculating, see Freight Rate Recalculation Actions
During Ship confirm, the application validates the actual departure against the following:
-
Shipping calendar associated with the location of the organization.
If there is no assignment of a shipping calendar to the organization location, and if there is any assignment at organization level (shipping calendar), then the application defaults the shipping calendar of the assignment at the organization level and validates against that.
-
Receiving calendar for customer.
If there is any assignment of receiving calendar at customer location, then the application considers it for validation. Otherwise, the application defaults the calendar at customer level (if any).
-
Carrier calendar.
If there are any assignments at organization location or customer location, then the application considers these calendars. Otherwise, the application considers the calendar defined at organization level (for a particular carrier), and the one defined at customer level (if any).
Ship Confirm Features
Backordering
You might choose to partially backorder when a customer determines that they will have a down production line if you do not ship allocated material to them right away. You can ship a partial quantity to the intended customer and backorder the remaining quantity to accommodate the down line situation. You run pick release on the backordered delivery line to allocate it to the down-line customer.
If you decide to backorder at ship confirm, use either of the following ship confirm options:
-
Ship Entered Quantities, Unspecified Quantities Backorder: The ship confirm process splits the delivery line as follows:
-
The original line quantity is the detailed quantity. Its released status progresses--Released to Warehouse becomes Staged/Pick Confirmed and Staged/Pick Confirmed becomes Shipped.
-
The new line quantity is the difference between the requested quantity and the detailed quantity. Its line status is backordered. It has no move order line reference; it will have one after you pick release it.
-
-
Backorder All: The ship confirm process places the delivery line into backorder.
-
With either option, if the delivery detail is assigned to a trip in Contents Firm status, the ship confirm process keeps the delivery and container assignments. If the trip is not firm, the ship confirm process unpacks packed containers.
When you backorder at ship confirm, the inventory shows in a staging location. If you move the backordered material, you should perform a subinventory transfer transaction, if the material needs to be moved back to its original location, to record this movement.
If an Assemble to Order (ATO) item is backordered, the sales order line will be split (one part of the line contains the quantity that shipped and the other part of the line contains the backordered quantity) and the reservation for the item will be lost. You will have to re-reserve the item. However, by setting the profile option WSH:Retain ATO Reservations to Yes, you can avoid the redundancy of re-reserving the item. The inventory system retains the reservation and the reservation status changes from Staged to Unstage, while the delivery line status changes to Backordered.
Consolidating Backorders
Consolidation of backordered delivery details is done during Pick Release, Cycle Count, or Ship Confirmation. When a backorder occurs, Shipping Execution searches the database for existing delivery detail backorders for the particular source line. If an existing backorder is found, then the current backordered delivery detail is consolidated with the existing backordered delivery detail.
For example, a source line is split into two delivery details: DD1 and DD2, of a requested quantity of 5 each. A quantity of only 3 are available. If Pick Release is run for DD1 first, then the splits would be handled in the way depicted in the following table.
| Delivery Detail | Order Quantity | Status |
|---|---|---|
| DD1 | 3 | Staged |
| DD2 | 5 | Ready to Release |
| DD3 | 2 | Backordered |
Next, Pick Release is run for DD2 and Oracle Inventory does not find enough quantity to release and Shipping backorders the quantity. Shipping then consolidates DD2 with DD3 and deletes one of them altogether as represented in the following table.
| Delivery Detail | Order Quantity | Status |
|---|---|---|
| DD1 | 3 | Staged |
| DD3 | 7 | Backordered |
Whether or not your organization consolidates backorders is determined by selecting the Consolidate Backordered Lines parameter on the Global Shipping Parameters window.
Note: Only unassigned and unpacked backordered delivery details will be consolidated. Also, backordered delivery details with updated flexfield information or backordered delivery details with exceptions or attachments, will lose the flexfield, exceptions, and attachment information. Packing and shipping instructions will be inherited from the source line.
Non-Reservable Items
Non-reservable items require that you specify the subinventory and stock locator to pick the items from at ship confirm. You will also specify lot, serial, and revisions at ship confirm if applicable. You can also specify the subinventory and stock locator, to pick the item from, through the Item Transactions Default form. Using this method will also require that you specify lot, serial, and revision at ship confirm, if necessary.
Models
You can ship a model non-proportionately, for example:
-
You ship all of the components but not in the correct proportion.
-
You do not ship all of the components.
When you ship a model in this manner, Oracle Order Management breaks the model and treats each order line as an individual line. Non-shippable lines become fulfilled and eligible for invoicing. To prevent this, do either of the following:
-
Put the PTO model into a fulfillment set: none of the lines move beyond fulfillment until all the lines are fulfilled.
-
Use header level invoicing; none of the lines are eligible for invoicing until all of the lines are eligible for invoicing.
Ship Confirm Message Configuration
Message configuration enables you to change certain ship confirmation constraint messages from the default of Warning to Error. These constraint messages are displayed (Warning or Error) when you perform ship confirmation.
The ship confirmation messages that are applicable include:
-
Breaking Ship Sets: For example, your customer requests that you do not send partial ship sets. Setting this message to Error will prevent this by displaying an Error at ship confirm.
-
Missing Inventory Controls: For example, if a delivery contains a delivery line that is missing inventory controls (for example, serial number or lot number), then an error is displayed at ship confirm.
-
Breaking Proportionality of Ship Model Complete: For example, if your customer requires a specific percent to ship orders complete, then this will display an error at ship confirm if the proportion of the order is not shipping complete.
Message configuration is defined in the Shipping Execution Role Definition window. See the Shipping Execution Setup chapter of the Order Management Implementation Guide for information on defining message configuration.
Examples of Warning and Error Messages During Ship Confirmation
The following scenarios describe situations where Warning or Error messages are displayed for the following ship confirmation actions:
-
Broken Ship Set
-
Broken Ship Model Complete
-
Missing Inventory Controls
Third Party Warehouse Scenarios
The following scenarios apply if your system is configured with the third party warehouse feature:
Scenario 1: Warning message appears during ship confirmation at the supplier site.
When sending a shipment request, the system displays a warning message for any of the following conditions:
-
Broken ship set
-
Broken ship model complete
-
Missing inventory controls
If you ignore the warning messages and continue to send the shipment request, the ship confirmation process will complete successfully and the transactions will be sent back to the supplier side. When the shipping transactions are received from the third party warehouse, the ship confirmation process will complete successfully because these scenarios are configured as warnings (on the supplier side).
Scenario 2: Error message appears during ship confirmation at the supplier site.
When sending a shipment request, the system displays a warning message for any of the following conditions:
-
Broken ship set
-
Broken ship model complete
-
Missing inventory controls
If you ignore the warning message and continue to send the shipment request, then the ship confirmation process continues successfully and the shipping advice transactions will be sent back to the supplier. When the shipping advice is received from the third party warehouse, the ship confirmation process fails because these messages are configured as errors on the supplier side. To complete the ship confirmation process, you can ship confirm the delivery on the supplier side by configuring the messages as warning messages (message configuration done at the role level).
Carrier Manifesting Scenarios
The following scenarios apply during carrier manifesting:
Scenario 1: Warning message appears during ship confirmation.
During carrier manifesting (Send Shipment Advice, 940), the system displays a warning message for any of the following conditions:
-
Broken ship set
-
Broken ship model complete
-
Missing inventory controls
If you ignore the warning message and send the shipment advice, the shipment advice will get processed successfully. The carrier manifesting will return the shipping advice (945) transactions with the manifesting done successfully even if one or more of the preceding conditions occur. During ship confirmation, you will be warned again that a condition exists (such a broken ship set), and you can choose to either proceed or cancel the ship confirmation process.
Scenario 2: Error message appears during ship confirmation.
During carrier manifesting (Send Shipment Advice), the system displays a warning message for any of the following conditions:
-
Broken ship set
-
Broken ship model complete
-
Missing inventory controls
If you ignore the warning message and send the shipment advice, the shipment advice (940) will be processed successfully. The carrier manifesting system will return the shipping advice (945) transactions with the manifesting done successfully even if one or more of the preceding conditions occur.
During ship confirmation, if any of these conditions exist, an error message appears and you will be unable to complete ship confirmation because the messages are configured as errors. To complete the ship confirmation process, you can use a role that has the message configured as a warning. (You can set up the message configuration at the user role level.)
Running the Ship Confirm Process
Prerequisites
The following prerequisites are required to successfully run ship confirm:
-
Delivery lines must be Staged/Pick Confirmed.
-
Delivery must be open.
-
At least one delivery line must be assigned to the delivery.
-
For Oracle Warehouse Management organizations, the shipped quantity is disabled, unless the item is either non-reservable or non-transactable.
Considerations for the Material Onhand Status Feature (in Oracle Inventory)
-
If lines are not staged/pick confirmed or do not satisfy Inventory controls, a warning appears and they are unassigned from the delivery at Ship Confirm time.
-
You can enter only inventory controls (Sub-inventory, Locator, Lot and Serial Numbers) that have a valid material status. You cannot ship confirm if the delivery details inventory controls have material status that do not allow ship confirm. The following transaction types are evaluated when you enter inventory controls and during ship confirmation:
Transaction Type Description Sales order issue Ship confirm external sales order. Internal order issue Ship confirm internal order issue. Internal Order Xfer Subinventory transfer sourced by internal order. Int Order Intr Ship Ship to intransit sourced by internal order. Int Order Direct Ship Direct transfer between two organizations on a internal order. Miscellaneous issue Perform miscellaneous issue of material. Project Contract Issue Project contract Issue. -
Shipping deliveries: When a delivery is being ship confirmed, the material status of all delivery details for that delivery are validated. The validation process ensures that the material status allows appropriate inventory transactions on particular SKUs. If Material Status Check fails for any delivery detail, then one of the following actions occurs:
-
If the Roles definition setup for Ship confirm message Invalid Material Status is set to Warning, then that delivery detail will be unassigned from the delivery and remains in Staged status.
-
If the Roles definition setup for Ship confirm message Invalid Material Status is set to Error, then the delivery will not be ship confirmed.
-
To manually ship confirm a delivery
-
Navigate to the Query Manager window, and find the delivery.
-
From the Actions menu, select Ship Confirm to display the Confirm Delivery window.
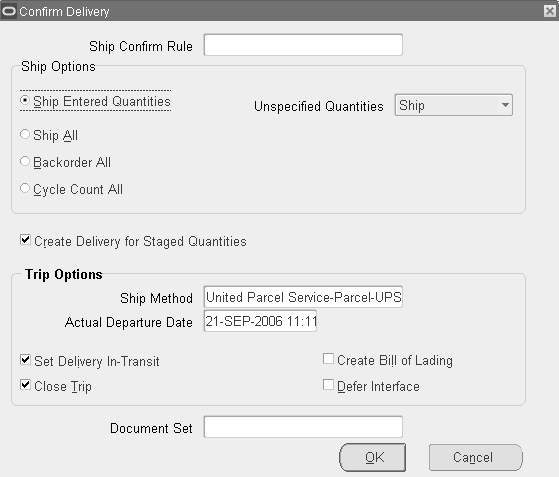
Confirm Delivery Window
-
Optionally, select a Ship Confirm Rule.
Note: A ship confirm rule is defaulted from the shipping parameters for the organization or from client parameters for the client. See Oracle Inventory User's Guide for setting up client.
Ship Confirm Rule offers a way to default the shipping options automatically. It eliminates the task of selecting the shipping options individually. If you select a ship confirm rule that meets your business needs, then you can skip the remaining steps, and click OK.
-
In the Ship Options region, select one of the following ship confirm options:
-
Ship Entered Quantities, Unspecified Quantities Ship: Ship confirms the quantity of items specified in the Shipped Quantity field and treats blank values as full quantity (shipped quantity = requested quantity). For example, if the Requested Quantity is 10 and the Shipped Quantity field is blank (no values entered), the full quantity (10) is shipped and displays in the Shipped Quantity field.
-
Ship Entered Quantities, Unspecified Quantities Backorder: Ship confirms the quantity of items specified in the Shipped Quantity field and treats blank quantities as full backorders (backorder quantity = requested quantity). For example, if the Requested Quantity is 10 and the Shipped Quantity field is blank (no values), the full quantity (10) is backordered and displays in the backordered Quantity field.
-
Ship Entered Quantities, Unspecified Quantities Stage: Leaves the unspecified delivery line quantity as staged and removes it from the delivery. For example, if the Requested Quantity is 10 and the Shipped Quantity field is blank (no values), the full quantity (10) remains in the Stage Quantity field and the line is no longer associated with a delivery.
Note: If a non-zero Stage Quantity exists on a line, it is split from the line and unassigned from the delivery. If the Create Delivery for Staged Quantities is enabled, all staged delivery lines are grouped together in a new delivery.
-
Ship Entered Quantities, Unspecified Quantities Cycle Count: Ship confirms the quantity of items specified in the Shipped Quantity field, treats blank quantities as full backorders (backorder quantity = requested quantity), and transfers the backorder reservation to cycle counting. For example, if the Requested Quantity is 10 and the Shipped Quantity field is blank (no values), the full quantity (10) is backordered and the reservation for quantity 10 is transferred to cycle counting. You can also transfer delivery quantities to cycle count prior to ship confirm by using the Shipping Transactions form, Cycle Count action. Transferring the reservation quantity to cycle count prevents this quantity of the item from being considered for selection during the next pick release.
-
Ship All: Ship confirms the entire quantity regardless of what was entered in the Shipped Quantity field (shipped quantity = requested quantity). For example, if the Requested Quantity is 10 and the Shipped Quantity field is 5, the full requested quantity is shipped (10) and displays in the Shipped Quantity field.
-
Backorder All: Backorders the entire quantity irrespective of what was entered (shipped quantity = 0, backorder quantity = requested quantity).
Note: If the delivery status is Closed, the delivery is unassigned from all trips and all lines will be unassigned from the delivery.
-
Cycle Count All: Backorders the entire quantity irrespective of what was entered (shipped quantity = 0, backorder quantity = requested quantity) and transfers the backorder reservation to cycle counting. You can also transfer delivery quantities to cycle count prior to ship confirm by using the Shipping Transactions form, Cycle Count action.
-
-
Enable the Create Delivery for Staged Quantities box (default setting), if you want all staged delivery lines grouped together in a new delivery.
If you do not want to create a trip for the delivery, click Go to ship confirm and save your work.
Note: Auto-create trip options are dimmed if the selected delivery is already assigned to a trip.
-
In the Trip Options region, select or update the Ship Method and the Actual Departure Date.
This enables you to specify the stop departure date which is the date Order Management Inventory interface will occur.
One way to ship confirm one or more deliveries is to enable the Set Delivery in-Transit and Close Trip fields in the Confirm Delivery window:
-
Set Delivery In-transit: Creates a trip and stops for the delivery. Closes the first stop of the delivery, but leaves second stop open. Sets status of delivery to In-transit and initiates Order Management (OM) and Inventory interfaces.
-
Close Trip: Creates a trip and stops for the delivery. Closes trip, all stops, and the delivery.
The Actual Departure Date default is the current date and time; however, you can change the date and time to any other date and time.
Note: If Allow Future Ship Date is not selected (in the Global Parameters window), then entering any future date will cause an error. You must enable Allow Future Ship Date if you want to enter future ship dates when ship confirming.
If you set the Allow Future Ship Date parameter in Global Parameter to Yes, enter a future date as the actual departure date, and try to interface the records to Inventory, then the Inventory Interface does not process the delivery line record with the future ship date. Instead, the program ends in a warning.
-
-
Enable the Create Bill of Lading box if you want to create a Bill of Lading. This generates a Bill of Lading number and prints it if it is part of a document set.
-
Choose one of the following:
-
If you disable the Defer Interface box and run Ship Confirm, inventory gets decremented and the order line is updated with the shipped quantity.
-
If you enable the Defer Interface box and run Ship Confirm, you need to run the Interface Trip Stop-SRS concurrent request to update the Inventory and the Order Line status. When the Defer Interface box is enabled, a request is not automatically submitted to interface the trip stops.
Note: The Defer Interface is defaulted by the Shipping Parameters setup.
-
-
Optionally, select the document set you want printed for the delivery and click OK.
-
Save your work
Note: If a delivery is in confirmed status, the pick-up stop has to be closed manually to update Inventory/Order Management (OM). The delivery can be re-opened at any time to make changes as long as the delivery is in confirmed status.
Note: If you are utilizing Oracle Project Contracts and your delivery or a delivery line requires inspection (per Oracle Project Contracts), the Inspection Status field, within the Shipping tab of the LPN window, will display Required. You must change this status to Inspected before Oracle Shipping Execution will ship confirm the delivery. A WARNING message will be displayed, at ship confirm, if this circumstance occurs.
You can also perform ship confirmation from the Quick Ship window. See: Quick Ship Window.
Automated Ship Confirmation
Automated Ship Confirm enables you to automatically ship confirm all deliveries that have all lines at status of staged. Automated Ship Confirm can be executed as a concurrent program (set to run at specific intervals) or it can be launched manually.
Each method of executing Automated Ship Confirm has its advantages. You can utilize either or both processes depending on your business needs.
-
Concurrent Submission: If you use a Ship Confirm Rule within the Ship Confirm SRS program and schedule this concurrent program to run periodically, you will not have to manually ship confirm each delivery. It is designed to support delivery selection based on range of parameters.
-
Ad Hoc (or one time) Submission: Submitting the Ship Confirm SRS program on an ad hoc basis enables you to control when each ship confirm process will be executed by invoking the process manually.
You can disable Automated Ship Confirm for any delivery by utilizing the Enable Auto Ship Confirm flag at the Delivery tab. If the check box is selected, the delivery will be considered for Automated Ship Confirm. If it is not selected the delivery will not be considered.
You can view the deliveries included in an Automated Ship Confirm batch by utilizing the Query Manager Window to search for Deliveries. In the Ship Confirm Batch field, find the batch number in the list of values.
Note: Only deliveries that do not need manual input or intervention can be automatically ship confirmed.
Within the Automated Ship Confirm parameters, you must choose a Ship Confirm Rule that you have pre-defined in the Ship Confirm Rule window. Using the Ship Confirm Rules window, you can define as many rules as you need depending on your business needs.
Auto Ship Confirm Report
The Auto Ship Confirm Report is submitted automatically at the end of Auto Ship Confirm.
Related Topics
Executing the Auto Ship Confirm Process
Executing the Auto Ship Confirm Process
The process of executing the auto ship confirm process includes the following:
Defining a Ship Confirm Rule
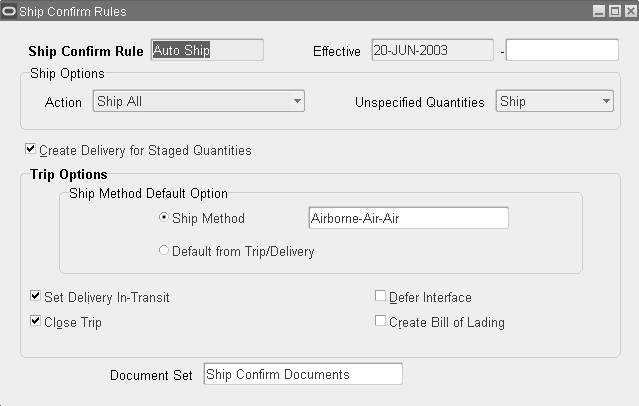
You define Ship Confirm Rules within the Ship Confirm Rules window.
To define a Ship Confirm Rule
-
Navigate to the Ship Confirm Rules window.
-
Enter a unique rule name in the Ship Confirm Rule field.
-
Optionally, select an Effective date.
Note: The default Effective date will be the current date. You can modify this date to suit your business needs. Also, you can enter an ending Effective date to disable the rule if needed.
-
Within the Ship Options region, select one of the following options from the Action list of values:
-
Ship Entered Quantities: To ship the quantities entered
-
Ship All: To ship all
-
Backorder All: To backorder all
-
Cycle Count All: To cycle count all
Note: If you want your rule to be eligible as the default rule in the Shipping Parameters window, you must select Ship All as your option.
-
-
The Ship Options region also enables you to determine the action to perform with Unspecified Quantities. Select one of the following options:
-
Ship
-
Backorder
-
Stage
-
Cycle Count
-
-
Determine whether you want to Create Delivery for Staged Quantities.
If this option is selected, the system will create deliveries for delivery lines that are staged but not yet assigned to a delivery, and subsequently perform the other operations defined by this Ship Confirm Rule. If this option is not selected, delivery lines not assigned to deliveries will not be considered for ship confirm using this rule.
Ship Confirm Rules Window
-
Within the Trip Options region, select a Ship Method using the list of values.
-
The remaining options within the Trip Options region also require attention. These options include the following:
-
Set Delivery In-Transit
-
Close Trip
-
Defer Interface
-
Create Bill of Lading
Note: If Close Trip is not enabled (if the Close Trip check box is not selected) all trips must be manually closed.
-
-
Optionally, select a Document Set that will print with the shipment.
Note: Current system date is used as the actual departure date for these deliveries
Using a Ship Confirm Rule within the Release Sales Order Window
You can manually execute Auto Ship Confirm within the Release Sales Orders for Picking window.
From the Release Sales Orders for Picking window, you can specify an individual sales order from which to perform Auto Ship Confirm. Auto Ship Confirm will be performed for all the deliveries assigned to the individual order.
To manually execute the Auto Ship Confirm process from the Release Sales Orders for Picking window
-
Navigate to the Release Sales Orders for Picking window.
-
Query the specific sales order, or query the batch number.
Note: For detailed information on running Pick Release and the Release Sales Orders for Picking window, refer to the topic Releasing Sales Orders for Picking.
-
Optionally, select a ship confirm rule.
Note: A ship Confirm Rule is defaulted from the shipping parameters for the organization or from the client parameters for the client. See Oracle Inventory User's Guide for setting up client.
-
Delete the dates that are in the Scheduled Ship Dates and Requested Dates regions. These dates must be deleted, otherwise the system will only look for shipments within those dates. If your order number does not fall within those dates, the lines will not be picked.
-
Within the Inventory tab, select the warehouse.
-
Pull Replenishment: For pull replenishment, a replenishment suggestion is auto-created as soon as a shortfall is detected during the order release process. This replenishment is useful for items with high uniform demand in forward pick areas.
-
Yes: Enables pull replenishment.
-
No: Disables pull replenishment.
Note: You cannot select the pull replenishment value if the value in the Allocation Method field is Cross Dock Only or Prioritize Inventory. The pull replenishment feature is valid only for Oracle Warehouse Management-enabled organizations. For more information on replenishment, see the Oracle Warehouse Management User's Guide.
-
-
Within the Inventory, in the Auto Pick Confirm field, select Yes.
-
Within the Shipping tab, in the Auto Ship Confirm Rule field, select the rule that you want to use for auto ship confirming.
-
From the list of values in the Autocreate Delivery field, select Yes.
-
Select Online to process the request.
Note: You can use a Ship Confirm Rule in the Release Rules window which can then be used in the Release Sales Orders -SRS concurrent program.
Auto Ship Confirm from the Shipping Transactions Form
From within the Shipping Transactions form, you can select deliveries or delivery lines that you want Auto Ship Confirm to run against.
To manually execute the Auto Ship Confirm process from the Shipping Transactions form
-
Navigate to the Query Manager window.
-
Find your delivery or order.
Note: For detailed information on using the Query Manager, refer to the topic Query Manager
-
Select the delivery or delivery lines for the shipment.
-
Within the Actions region, select Pick and Ship or Pick, Pack and Ship from the list of values depending on your needs.
Note: The action Pick, Pack, and Ship is used if an organization utilizes the packing features of Oracle Shipping Execution. The packing functionality is determined in the Autopack Deliveries field, within the Pick Release tab of the Shipping Parameters window.
-
Select Go.
Auto Ship Confirm from the Quick Ship Window
From within the Quick Ship Window, you can select deliveries that you want to Ship Confirm.
To Ship Confirm from the Quick Ship window
-
Navigate to the Quick Ship window.
-
Find your delivery or trip.
-
Click Ship Confirm.
-
Within the Confirm Delivery window, determine your ship confirm options.
-
Click OK.
Using the Ship Confirm Deliveries SRS to Ship Confirm
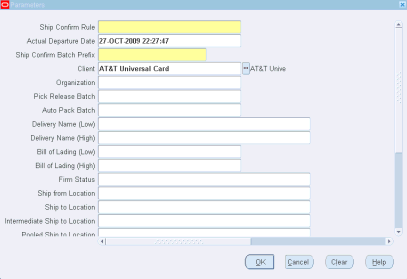
You use the Ship Confirm Deliveries SRS window to systematically ship confirm your deliveries.
To execute the Auto Ship Confirm process concurrently
-
Navigate to the Ship Confirm Deliveries SRS window.
Note: The Parameters window will be active immediately.
-
Populate the parameter fields as needed, including the following:
-
Ship Confirm Rule: Select the appropriate rule from the list of values. This field is required.
-
Actual Departure Date: Accept the system default date or change the default to the actual date that the shipment departs your facility. For example, you might ship confirm yesterday's deliveries today. In this case, you would enter yesterday's date in place of the default system date.
-
Ship Confirm Batch Prefix: Define a batch prefix to uniquely identify your request. Although this field is free form, it is required.
-
Client: Select the client name from the list if you have set LSP mode as the value for WMS: Deployment Mode profile option. See Oracle Inventory User's Guide for setting up client.
-
Organization: Optionally, select the organization that the shipment is originating from.
-
Pick Release Batch: Optionally, select the Pick Release Batch name that contains the deliveries that you are ship confirming.
-
Auto Pack Batch: Optionally, select the Auto Pack Batch name that contains the deliveries that you are ship confirming.
-
Delivery Name (Low): Optionally, select the low end of delivery names, if you choose to ship confirm based on a range of delivery names.
-
Delivery Name (High): Optionally, select the high end of delivery names, if you choose to ship confirm based on a range of delivery names.
-
Bill of Lading (Low): Optionally, select the low end of bill of ladings, if you choose to ship confirm based on a range of bill of ladings.
-
Bill of Lading (High): Optionally, select the high end of bill of ladings, if you choose to ship confirm based on a range of bill of ladings.
-
Firm Status: Optionally, select Yes/No to indicate whether the deliveries scheduled for auto ship confirm are: Not Firm, Contents Firm, or Routing and Contents Firm.
-
Ship From Location: Optionally, select a ship from location to ship confirm.
-
Ship To Location: Optionally, select a ship to location to ship confirm.
-
Intermediate Ship To Location: Optionally, select an intermediate ship to location to ship confirm.
-
Pooled Ship To Location: Optionally, select a pooled ship to location to ship confirm.
-
Consignee/Customer Name: Optionally, select a consignee or customer name to ship confirm.
-
Ship Method: Optionally, select a ship method to ship confirm.
-
FOB: Optionally, select a FOB terms to ship confirm.
-
Freight Terms: Optionally, select freight terms to ship confirm.
-
Pick-up Date (Low): Optionally, select the low end of a pick up date, if you want to use a range of pick up dates, to ship confirm.
-
Pick-up Date (High): Optionally, select the high end of a pick up date, if you want to use a range of pick up dates, to ship confirm.
-
Drop-off Date (Low): Optionally, select the low end of a drop off date, if you want to use a range of drop off dates, to ship confirm.
-
Drop-off Date (High): Optionally, select the high end of a drop off date, if you want to use a range of drop off dates, to ship confirm.
-
Log Level: Optionally, select log level for this run. This determines whether a debug file is created. Select zero for no debugging log, or one to create a debugging log.
Ship Confirm Deliveries SRS Window
-
-
Select OK.
-
Within the At These Times... region, use the Schedule to specify how often you require the process to run.
Note: Ship Confirm Deliveries SRS will not ship confirm a partial ship set. Ship Confirm Deliveries SRS will either ship all of a ship set or none.
Interface Trip Stop-SRS
The Interface Trip Stop-SRS process runs the interface to update Order Management sales order lines, initiates the generation of Departure Ship Notice Outbound (DSNO) generation, and calls a process to update Oracle Inventory. You can run this process one of two ways:
-
Automatically: The request will be executed upon ship confirm if the delivery is not assigned to a trip, or the Defer Interface check box is not selected. If the delivery is assigned to a trip, the Interface Trip Stop concurrent request program will be run automatically when the destination Trip Stop is closed. If the delivery is not assigned to a trip, and at the time of ship confirm the Defer Interface is checked, the Interface Trip Stop concurrent request will be automatically run when the destination Trip Stop is closed.
-
Manually: To manually execute the concurrent request, navigate to the Shipping Interfaces form and select Interface Trip Stop-SRS from the Name field. The parameters window will be displayed.
The Interface Trip Stop-SRS parameters window contains the following fields:
-
Mode: You select the interfaces that you want the process to run against. The list of values contains the following choices:
-
All
-
Inventory
-
OM and DSNO
-
-
Trip Stop: Select a trip stop that you want to run the process for. The list of values will display all open trip stops.
-
Delivery: Select a delivery that you want to run the process for. The list of values will display all open deliveries.
Note: If you selected a trip stop from the Trip Stop field, the Delivery field will default to the delivery associated with that trip stop when you select the list of values in the Delivery field.
-
Debug Level: This is the debug log level that is used when attempting to identify the cause of an error. You can enter zero (0) for Off and one (1) for On.
Note: When the debug log level is turned on, a debug file is generated for further analysis of the issue.
-
Organization: If you select an organization, then all eligible trip stops for the organization will be processed. Trip Stop and Delivery fields must be left blank if you use this option.
-
Number of Child Processes: The number of child concurrent programs that should be run in parallel and is defaulted to one. If the number is not greater than 1, then the Interface Trip Stop will not run the child processes in parallel, instead the Interface Trip Stop process itself will finish the process.
-
Stops per Batch: Indicates how many trip stops should be processed per child request and is defaulted to one.
Note: When the profile OM: Invoice Numbering Method is set to Delivery Name, then even if you specify the Stops per Batch in the Interface Trip Stop concurrent program with a number greater than 1, it is treated as only one stop per request and runs Interface Trip Stop for one stop at a time. If the profile is NOT set to Delivery Name, then it takes the Stops per Batch that you specify and processes accordingly.
Note: The Interface Trip Stop program does not validate the Number of Child Processes or the Stops per Batch fields.
When the Interface Trip Stop runs, you can view the status of your request. The status will be Error, Warning, or Success. The result will be Success if all child processes are successful. The result will be Error if all child processes errored. The result will be Warning if the child processes have any mixture of Error, Warning, or Success.
Assigning Serial Numbers to Delivery Line Items
At the Lines/LPNs tab, you can manage assignment of serial numbers to delivery line items. Serial numbers can be assigned singly or consecutively to a range of items depending on your requirements.
Items must already be set up in inventory so that serial numbers can be assigned at ship confirm. This is done in Oracle Inventory in the Master Item window (Inventory tab > Serial section > Generation > At Sales Order Issue).
After pick release is run, you must enter the shipped quantity in the Shipping Transactions form before you can enter the serial numbers at ship confirm.
If you enter multiple serial numbers in the Shipping Transactions form for a staged delivery line, the Interface Trip Stop concurrent process explodes the delivery line into multiple delivery lines, each having a serial number range. For example, you are shipping a delivery line with a quantity of 10,000. If you enter 10 ranges of 1000 serial numbers each, the Interface Trip Stop concurrent process splits the delivery line into ten delivery lines. You can view the deliveries' low and high serial numbers in the Shipping Transactions form, after a run of the Inventory Interface concurrent process, by:
-
Querying the Lines/LPNs folder
-
Querying the Lines/LPNs folder, clicking Detail, and selecting the Inventory Details tabbed region
To assign serial numbers to delivery line items
-
Navigate to the Query Manager window and query the order.
The order displays in the Shipping Transactions form.
-
From the Actions menu, select Launch Pick Release to pick release the order.
-
Click Detail.
-
Choose the Line/LPN tabbed region and confirm that the delivery line is in Staged/Pick Confirmed status.
-
In the Shipped Qty field, enter the shipped quantity.
-
Remove the cursor from the Shipped field; the process accepts the shipped quantity.
-
If you are shipping a quantity of one item:
-
Enter the Serial Number, if applicable.
-
Click Done.
Note: You must select Serial Numbers from the Tools menu in order to view serial numbers for Closed lines with shipped quantity greater than one.
Note: You cannot partially cancel lines from the Sales Order window that have Staged Delivery details with serial numbers assigned. You must delete the assigned serial numbers before canceling the line partially.
-
-
If you are shipping more then one of the items:
-
On the menu bar, select Tools > Serial Numbers.
-
To enter individual serial numbers for the item, in the Serial Number Entries Mode area, select Individual and enter the serial numbers.
To enter a range of serial numbers for the item, leave Range selected and enter the serial number range. The Range selection assumes that you are entering a consecutively numbered series beginning with the first serial number. For example, if you ship three and enter the serial number as 345, the series is 345, 346, and 347.
-
-
Click Done.
Note: If you reduce the quantity for a Staged line that has serial numbers assigned at ship confirm, then a warning message will indicate all serial numbers will be unmarked. It is suggested that you first unmark the serial numbers from the Serial Numbers window before reducing the quantity to be shipped.
Note: Also note that if you ship partial quantity of lines that are assigned serial numbers at ship confirm, and stage the remainder, you will be required to manually split the delivery and serial numbers assigned and then stage the delivery.
Lines with serial controlled items are not split automatically into multiple delivery lines during pick release or during inventory interface when the picked/shipped quantity is greater than 1. The table WSH_SERIAL_NUMBERS stores the serial numbers after the delivery line is interfaced. The delivery line will no longer contain the serial number if the picked/shipped quantity is greater than 1.
If the delivery lines shipped quantity is 1, then the serial number is stored on the delivery line.