Task Management
This chapter covers the following topics:
- Overview of Task Planning
- Set up Operation Plans
- Setup Task Filters
- Setting Up User Task Type Attributes
- Explaining Task Dispatch and Assignment
- Explaining Task Unloading
- Explaining Task Skipping
- Task Exceptions
- Explaining the Warehouse Control Board
- Navigating the Warehouse Control Board
- Managing Tasks
- Using the Oracle Warehouse Management Control Board for Task Planning
- Using the Oracle Warehouse Management Control Board for Outbound Operations
- Using the Oracle Warehouse Management Control Board for Inbound Operations
- Using the Oracle Warehouse Management Control Board for Manufacturing Operations
- Using the Oracle Warehouse Management Control Board for Warehousing Operations
- Performing Rough Cut Planning
- Using the Warehouse Control Board as a Monitoring Tool
- How to Perform Task Dispatched Cycle Counts
- Opportunistic Cycle Counting
Overview of Task Planning
Task planning is the release of work to the warehouse floor in order to optimally run the day-to-day warehousing operations. Tasks are comprised of demand pick tasks for sales orders, work orders, and replenishment. Tasks are also comprised of inbound receiving and put away tasks, slotting inventory transfer tasks, inventory control related cycle counting tasks, and inbound-outbound hybrid crossdocking tasks. Once multiple tasks are created from the various task creation sources, they are placed in one single pool and released appropriately to the warehouse floor for optimal operation of the warehouse. Optimization is performed by task interleaving and resource-workload balancing.
Wave planning in warehousing enables you to release waves of work to the warehouse to fulfill sales order demand.
You need to be able to plan the release of tasks in the warehouse on a day-to-day basis so that you can run operations optimally to minimize cost and maximize productivity. You can use the warehouse control board, to can query tasks based on multiple criteria, re-prioritize and interleave them, and release them to the warehouse floor in the form of task waves.
Using Application Program Interfaces for Task Planning
You can also use application program interfaces (APIs) for task planning. You can use APIs to update and delete inbound, outbound, move order and cycle count tasks. You can update the task status, task type, priority, operation plan, and LPN cartonization information You can:
-
Change the status from Unreleased to Pending or Queued
-
Change the status from Active to Pending or Unreleased
-
Change the status from Dispatched to Pending or Unreleased
-
Change the status from Pending to Queued
If you try to update a pending a task and change the status to queued, then you must enter the employee id of the user to which the task should be queued as and input parameter to the API. You can use APIs to split outbound tasks and cancel pending crossdocking tasks. You can also use API to query all types of tasks.
Related Topics
Explaining the Warehouse Control Board
Navigating the Warehouse Control Board
Using the Oracle Warehouse Management Control Board for Task Planning
Using the Oracle Warehouse Management Control Board for Outbound Operations
Using the Oracle Warehouse Management Control Board for Inbound Operations
Using the Oracle Warehouse Management Control Board for Manufacturing Operations
Using the Oracle Warehouse Management Control Board for Warehousing Operations
Set up Operation Plans
Operation plans define the material movement path and the sequence of operations to perform to complete an activity. You can use both inbound and outbound operation plans. Eight seeded outbound operation plans are available, they are:
-
LPN based consolidation in staging lane within delivery
-
Direct consolidation in staging lane across deliveries
-
Direct consolidation in staging lane within delivery
-
LPN based consolidation in consolidation locator, across deliveries in staging lane
-
LPN based consolidation in consolidation locator within delivery in staging lane
-
LPN based consolidation in staging lane across deliveries
-
Locator based consolidation in consolidation locator, across deliveries in staging lane
-
Locator based consolidation in consolidation locator within delivery in staging lane
You can create inbound operation plans using the following inbound operation plan types:
-
Inspect: Inspect operations plans apply to move order lines that have the Inspect Required flag set. The inspect step is the last step in the operation plan. Inspect operation plans do not allow drops to inventory locators.
-
Crossdock: Crossdock operation plans apply to crossdocked move order lines. The crossdock step is the last step in the operation plan. The crossdock step implies a load and a drop to a staging locator. The drop operation before a crossdock operation does not happen in inventory.
-
Standard: Standard operation plans apply to any move order lines that does not require inspection, or was not crossdocked. A standard operation plan can end in a receiving or inventory locator. It can also traverse multiple receiving and inventory locators. You cannot follow a drop to an inventory locator by a drop to a receiving locator, because once you drop material to an inventory locator, it is delivered to inventory.
Before you can put your operation plans into effect, you must complete the following setups:
-
Set up Zones: If you choose to segregate your material by zones, you must create zones.
-
Set up Operation Plan Assignment Rules: You must set up operation rules in the Rules window to tie your operation plans to your system rules.
-
Navigate to the Operations Plans window.
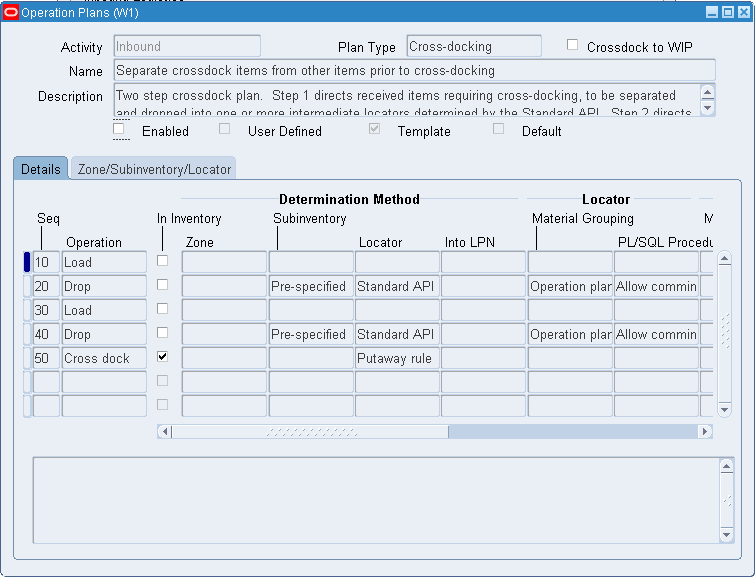
-
Select a Plan Type from the list of values. You choices are Standard, Inspection, or Crossdocking.
-
Enter a name for the operation plan in the Name field.
-
Select the Crossdock to WIP check box to use this operation plan to crossdock items to WIP instead of for outbound shipment.
-
Optionally, enter a description for the operation plan in the Description field.
-
Enter the first sequence number in the Sequence field. The operations performed within an operation plan follow the ascending sequence in which you define the operations.
-
Select Load from the Operation list of values. The first operation in all operation plans must be Load. The next sequence number defaults in the sequence field and Drop automatically populates in the Operations field.
-
Optionally, select the in Inventory check box. You can select this check box only if your operation plan type is Standard. Selecting this check box transfers the material to inventory at this step in the operation plan. All subsequent steps have this check box checked by default.
-
Select the determination method. You are required to enter a locator determination method, and optionally can enter a zone, subinventory, or Into LPN method. The determination methods are as follows:
-
Prespecified: If you choose prespecified, you can enter the subinventory, locator, and zone where you would like to drop the material. This is the only determination method for subinventories and zones.
-
Standard API- Standard API- If you choose Standard API as the locator determination method, you invoke an API that determines the locator. If you choose Standard API for locator, you must enter a pre-specified subinventory or zone. You can also choose Standard API as the LPN determination method.
-
Custom API- If you choose Custom API as the locator or LPN determination method, you provide the PL/SQL API. The API needs to conform to the signature as the seeded standard API and registered via Register custom API concurrent program.
-
-
If you selected Standard API as the locator determination method, select a Locator Material Grouping method from the list of values. The available choices are as follows:
-
Operation Plan Type: If you select Operation Plan type, the system derives the locator grouping method from the operation plan type such as inspection, Standard, or Crossdocking.
-
Destination Subinventory: This is the final inventory destination subinventory the putaways rule suggests.
-
Destination Locator: This is the final inventory destination locator the putaway rule suggests.
-
-
If you selected Standard API or Custom API as the locator determination method, enter a PL / SQL procedure. The available choices for Standard API are as follows:
-
Locator Determination with Item
-
Locator Determination without Item
-
-
If you selected an LPN Determination method, select an LPN Material grouping method from the list of values. The available choices are:
-
Operation Plan Type: If you select Operation Plan type, then the system derives the locator grouping method from the operation plan such as inspection, Standard, or Crossdocking.
-
Destination Subinventory: This is the final inventory destination subinventory the putaway rule suggests.
-
Destination Locator: This is the final inventory destination locator the putaway rule suggests.
-
-
If you selected an LPN Determination method enter a PL / SQL procedure in the Into LPN fields. The available choices for Standard API are as follows:
-
Locator Determination with Item
-
Locator Determination without Item
-
-
Select the Zone / Subinventory / Locator Tab.
-
Enter the Subinventory, Zone, or Locator if necessary.
-
Repeat Steps 6 through 15 to enter more load and drop information.
-
Optionally, if your plan type is Inspect, or Crossdocking, enter the Inspect or Crossdocking sequence. In an Inspect or Crossdocking plan, this is the last operation.
-
If you entered crossdock in the previous step, select a Crossdock Method to link the crossdock operation plan to an outbound operation plan. The choices are:
-
LPN based consolidation in staging lane within deliveries
-
Locator based consolidation in consolidation locator within deliveries
-
LPN based consolidation locator within deliveries
-
Direct consolidation in staging lane within delivery
-
LPN based consolidation in staging lane across deliveries
-
Direct consolidation in staging lane across deliveries
-
LPN based consolidation in consolidation locator across deliveries
-
Locator based consolidation in consolidation locator across deliveries
-
-
Select Enabled to enable the operation plan.
-
Save your work.
Related Topics
Setting Up Locator Zones, Oracle Warehouse Management Implementation Guide
Setup Task Filters
You can use Task Filters to control the types of tasks the system dispatches to users. For example, you can setup that a user can receive internal order tasks, but not replenishment tasks. It works in conjunction with the Pick Load Setup page.
-
Navigate to the Task Filters window.
-
Enter the filter name in the Name field.
-
Enter a brief description of the filter in the User Name field.
-
Enter a long description in the Description field.
-
In the Task Source alternative region, select the Include check box to include the associated task source. That task sources are as follows:
-
Internal Orders
-
Move Order Issues
-
Move Order Transfers
-
Replenishments
-
Sales Orders
-
Work Orders
-
Cycle Counting
-
-
Save your work.
Related Topics
Setting Up User Task Type Attributes
The User Task Type Attributes window enables you to specify a task type, pick load page type, and if you should honor the pick UOM you specified on the Subinventory window. If you choose to honor the pick UOM, then you can print Shipping Contents labels by case or pallet for the pick release business flow even if you do not enable cartonization To set up task type attributes:
-
Navigate to the User Task Type Attributes window.
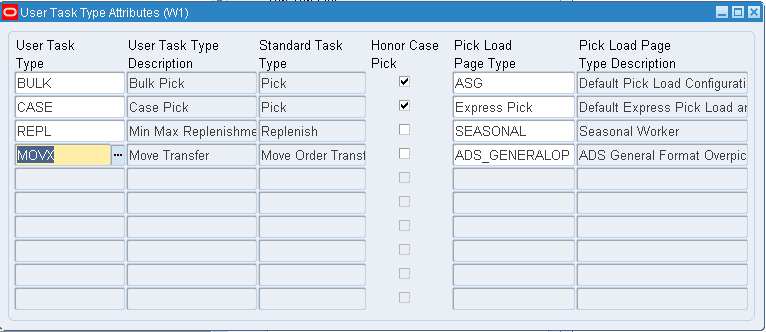
-
Select the desired User Task Type. The user task types represent picking replenishment, move order transfer, and move order issue tasks.
-
Optionally, select Honor Case Pick. If you select Honor Case Pick, then the system honors the pick UOM you specified on the Subinventory window.
-
Optionally, enter a Pick Load Page Type. This associates a pick load page temple with the user task type. This template will take effect when the task appears on the pick load page for tasks with this user task type.
Note: The setup you perform on this page overrides the from function parameter setup. However, if you do not define a user task type attribute for a particular user task type, then the system displays a pick load template from the user task type based on the form function parameter instead of the User Task Attributes window.
-
Save your work.
Related Topics
Explaining Task Dispatch and Assignment
This section covers the following topics:
-
Describing task management
-
Describing task management setup
Describing Task Management
Task management increase the efficiency of your warehouse operations by:
-
Dispatching tasks to qualified users with the right equipment
-
Splitting tasks based on the capacity of the equipment
-
Merging tasks based on the pick methodology of the wave
-
Optimizing the task sequence, based on task priority, locator pick sequence, and approximate distance between the locator x-y coordinates and the current location (last pick locator) of the warehouse operator who is currently logged onto the equipment
-
Minimizing the distance operators travel to complete assigned tasks
-
Minimizing dead-heading, or the number of trips operators make with an empty load
Task management is handled by two systems: The rules engine assigns task types, and the dispatch engine assists with task execution.
Describing the Task Type Rules
The Oracle Warehouse Management Rules Engine enables the system to assign task types to tasks. Like the picking and put away rules, task type assignment rules can be based on a variety of data, including the following:
-
Unit of measure (UOM) defined for the pick line: for example, if the pallets need to be picked, the Task Type Assignment engine can dispatch tasks to the pallet pickers
-
Ownership of the material: for example, if the item belongs to XYZ company, and XYZ requires that their hazardous material be handled by a resource that has hazardous material handling skills, then the Task Type Assignment engine will dispatch tasks associated with XYZ's hazardous material handling requirements
-
Type of material being handled: for example, the Task Type Assignment engine might handle refrigerated material different than hazardous material
Task type assignment rules are prioritized, based on their respective weights that you specify. For example, you might assign different weights for two rules to handle a specific tasks. In this case, the Task Type Assignment engine will execute the rule with the higher weight first.
Describing the Task Dispatch Engine
Whenever a new task is requested by the operator, the task dispatch engine handles the actual execution of a task. The task dispatch engine dispatches an appropriate tasks to a qualified operator. The task dispatch engine also handles exception management, and automatically triggers corrective actions whenever a discrepancy is recorded.
The task dispatch engine also performs the following functions:
-
Identifies resource and equipment requirements for a particular task
-
Evaluates skill sets
-
Filters appropriate tasks to resources
The Task Dispatch engine also includes a set of predefined exception messages and transaction reasons that handle all of the generic exceptions during task dispatching, and will trigger a set of actions and workflows, based on these exceptions.
Describing Task Splitting
The rules engine optimizes task dispatching by splitting tasks, based on equipment capacity, the maximum fill capacity of the equipment, and the locator pick UOM at the subinventory level.
The system makes the decision to split a task based on whether the available equipment can handle the task, and whether the volume and weight of the items in the pick line are within the equipment's capacity limits.
The system calculates equipment capacity based on the equipment volume, the maximum weight it can handle, the volume of the items that it is required to handle, and their corresponding weights.
Note: All material movement tasks can be split.
Describing Task Management Setup
Setting up task type assignment and dispatch includes setting up the following:
-
Resources,
-
Equipment items
-
Equipment resources
-
Departments
-
Setting up task types
-
Setting up task type assignment rules
Task Type Assignment and Dispatch
Assume that your warehouse has the following human resources, each assigned to the roles and equipment shown in the following table.
| Task Type | Resources | Equipment |
|---|---|---|
| EAPK (each pick) | Robert, Randy | Dolly, equipment number: DL-222 |
| CDPK (cold pick) | Judd | Forklift, equipment number: FL-12011 |
| CSPK (case pick) | Robert, Judd | Cart, equipment number: CRT-12232 |
Each task type requires the appropriate set of skills and equipment. For example, case picking tasks require a cart and an operator that can pick up the required cases. Alternatively, cold pick tasks require a forklift and a picker who can operate the forklift.
Based on the information provided above, task type assignment rules would need to be set up that assign the appropriate task type whenever the task has certain attributes. For example, picks of refrigerated items should be assigned the CDPK task type, while case picks should be assigned the CSPK task type.
Material Allocations
Assume that the sales order shown in the following figure has just been released to the warehouse for picking.

Based on the above scenario, the following occurs:
-
First, the system evaluates the picking rules to come up with a material allocation. In this case, picking rules that honor the pick unit-of-measure have been set up that allocate full case (where one case equals 12 eaches) picks of granola bars to the CASEPICK subinventory. Smaller order lines of granola bars are allocated from the EACHPICK subinventory, while strawberries are stored only in the COLDPICK subinventory.
-
Next, the system evaluates the task type assignment rules in the sequence indicated by the rule weight, and then assigns the task type of the first rule where the restrictions are met. In this example, the rules have been set up based solely on the subinventory of the task, resulting in the task type assignments indicated above.
-
Now the task will be split based on equipment capacity. Assume that each granola bar weights 4 ounces, and that the equipment that is used for this type of task, a cart, has a weight capacity of 225 pounds. Therefore, only 225 pounds can be moved onto the cart at a time, so the system splits the picking task for granola bars into the following two tasks:
-
One task for 900 eaches (or 75 cases)
-
One task for 300 eaches (or 25 cases)
Note: Calculation for granola bar weight: 900 bars @ 4 ounces = 3600 ounces. 3600 ounces / 16 ounces (16 ounces = 1 pound) = 225 pounds
-
Finally, after performing the material allocation, task type assignment, and task splitting, the Task Dispatch engine dispatches the tasks to each operator's mobile device, based on their equipment and task type assignment. When the operator completes the task and requests the next task, the system dispatches the next closest task that the operator is qualified to perform with the equipment that is currently available.
Note: The previous example provides a detailed view of picking tasks. However, the Oracle Warehouse Management performs replenishment tasks using an identical process.
Explaining Task Unloading
A task that has been loaded can be unloaded at any point prior to the task drop. Unloading a task enables you to reverse the task load, returning the material, or full LPN, to the same locator from which it was picked. If the material requirement that has created that task has been cancelled, then the task will be cancelled when it is unloaded. This is particularly for change management of sales orders and work orders.
You can use the Manual Unload page to unload tasks loaded using advanced pick load.
To unload a task:
-
Navigate to the Manual Unload page.
-
Enter the task to unload in the Current Task field.
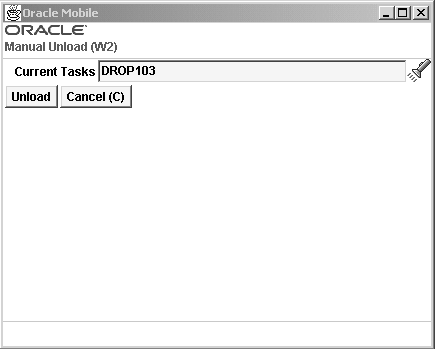
-
Choose <Unload> to unload the task, or <Cancel> to cancel the task unload.
-
If you choose <Unload> the Unload page appears. The unload page displays the From LPN, From Subinventory, From Locator, Item, UOM and Qty, or displays the Subinventory and Locator information if you are unloading the entire LPN.
-
Choose <Unload> to unload the task, or choose <Cancel> to cancel the unload.
Related Topics
Explaining Task Skipping
An operator may be unable to perform a task that has been dispatched to them due to conditions outside their control, and do not warrant another type of task exception. For example, the aisle to which he or she was directed may be temporarily blocked. The operator may skip the task it is returned to the pool of pending tasks and dispatched again.
Task Exceptions
If at any point during the pick process the user reports a discrepancy, warehouse manage can initiate a corrective action workflow. Discrepancies might include any of the following:
-
Picking a different quantity than the quantity suggested by the system
-
Dropping material into a different staging lane than the staging lane suggested by the system
If a discrepancy is reported, the system immediately directs the user to an audit screen, where he or she is prompted to indicate a reason for the mismatch.
Each reason has an associated corrective action workflow, which will be initiated immediately after an exception occurs. For example, a corrective action workflow might notify the warehouse supervisor, through pager, mail, or other alert mechanism, that an exception has occurred. Corrective actions can also notify customer service that a potential backordered situation exists on a sales order.
Corrective actions can also place a location on hold so that subsequent material allocations do not source material from that locator. These actions can also request a cycle count for a particular locator, or re-release the balance of the sales order line so that it can be sourced from another location.
When you enter an exception during the picking process, you can enter a reason for the exception. You setup the exception reasons in Oracle inventory. See: Defining Transaction Reasons, Oracle Inventory User's Guide.
Note: Reason codes and their related corrective action workflows are created during system set up. For more information about corrective actions, see the Oracle Workflow User's Guide.
Transactions reasons also have an associated reason context. Transaction reasons and the associated contexts are required when you enter an exception. The available reason contexts are as follows:
-
Pick Partial: Split the pick and confirm a quantity less than the requested quantity. You must pick the entire quantity, but you may pick it in stages.
-
Pick Over: Pick more than the requested quantity. This exception honors lot specific conversions, and enables you to pick the full quantity of an indivisible lot if necessary.
-
Pick None: End the pick immediately, load nothing, and move on to the next task. If the item is under dual UOM control, then the backorders must reflect both the primary and secondary quantities.
Note: When you perform a pick none against a task, the system automatically performs a pick none for all subsequent allocations for that locator. This occurs because the system assumes that there is no on-hand quantity available in the locator.
-
Curtail Pick: End the pick and load the material after you pick a few LPNs or lots.
-
Change Source Location: Change the material pick location.
-
LPN Exception: Allows you to select between the transfer or into LPN at the time of the pick.
-
Change UOM: Change the task transaction unit of measure. This refers to the transactional UOM if the item is under dual UOM control. You cannot change the secondary UOM. If you change the transactional UOM to the secondary UOM, the system recognizes this change.
-
Fix Previous LPN: For rapid scan configurations that do not require you to confirm the Into LPN or transfer LPN, as soon as a fully consumable LPN is scanned, the cursor is placed on LPN field (for the remaining quantity). You can perform exceptions on the scanned LPN. If you move past the LPN Field, 'Fix Previous LPN' is no longer available.
-
Change Lot Number: Change Lot Number enables you to substitute a different lot number than the allocated lot number during the picking process. The new lot you select may be any lot associated with the SKU which resides in the locator. The system does not adhere to (first in, first out) FIFO, life, or grade restrictions which were made during the allocation process. However, the system does honor existing allocations and reservations for lots. You cannot select a lot for which allocations and previous reservations exist.
Related Topics
For more information on setting up over picking and under picking, seeExplaining Pick Load Setup.
Explaining the Warehouse Control Board
Oracle Warehouse Management creates tasks such as picks, put away, moves, and replenishments and dispatches pending tasks on demand to mobile radio frequency devices.
The Warehouse Control Board is a tool that Oracle Warehouse Management and supervisors use to monitor, plan, control, and execute various warehouse operations, including the following:
-
Effectively use resources
-
Query tasks
-
Release tasks to the warehouse floor
-
Assign, reassign, and prioritize the progress of tasks
-
Perform manual scheduling
-
Cancel crossdock tasks
The Warehouse Control Board enables you to view workloads across the entire warehouse, manage exceptions, and review, release, reassign, and re-prioritize tasks. Specifically, the Control Board enables you to do the following:
-
View tasks: including unreleased, pending, queued, dispatched, active, loaded, completed, and exception tasks
Note: At the time of pick release (Sales Order or WIP), you can specify whether or not to plan the release of tasks. If planning is opted, pick tasks are created with a status of Unreleased so that you cannot perform or execute them immediately. If you do not want to plan the tasks, pick tasks are created with a status of Pending.
-
Manage task assignments: including mass selection/refinement through add, remove and filtering features, the mass change/update of task status, priority, resource assignments and sorting on various fields, for the resultant task record set view
-
View task exceptions: including a description of the cause for failure
You can also view the status of each task, including the time in which it was dispatched, the time it was picked up, and the time it was dropped into a staging lane. If any errors occurred in processing the task, you have full view of the error reported, and the task in question's current status.
Related Topics
Navigating the Warehouse Control Board
The Warehouse Control Board is comprised of the Find Tasks window and the Tasks window.
When you navigate to the Warehouse Control Board, the Find Tasks window appears first. This window provides you with the option of filtering tasks, before you view them. You can also use the Find Tasks window to save a query to use again, delete an existing query, or access the Manage Tasks window.
The following is a list of available tabs and query fields. The query criteria can be used in any combination:
Task Tab

-
Location region: Source Subinventory, Source Locator, Destination Subinventory, and Destination Locator
-
Resources region: Role, Employee, Equipment Type, and Equipment
-
Source region: Inbound, Outbound, Manufacturing, Warehousing, and Crossdock
Note: Source is a required field.
Note: If you search for crossdock tasks, you cannot search for inbound and outbound tasks. You use the Inbound, Inbound Plan, and Outbound tabs
-
Status region: Unreleased, Pending, Queued, Dispatched, Active, Loaded, and Completed
-
Task region: User Task Type, Priority, Creation Date, Age UOM, Age Minimum, and Age Maximum
-
Item region: Item, Item Type, Category Set, Category, and Quantity
Inbound Plan Tab
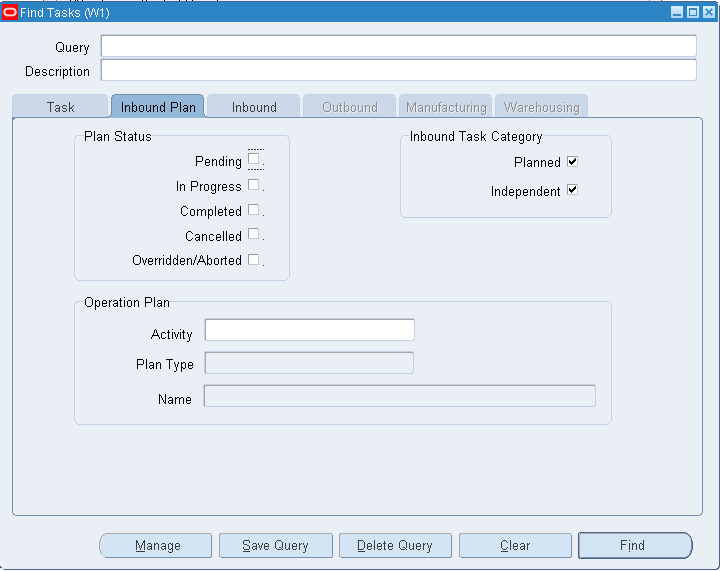
-
Plan Status- The status of the Inbound Plan
-
Pending
-
In Progress
-
Completed
-
Cancelled
-
Overridden / Aborted
-
-
Inbound Task Category
-
Planned
-
Independent
-
-
Operation Plan
-
Activity
-
Plan Type
-
Name
-
Inbound Tab
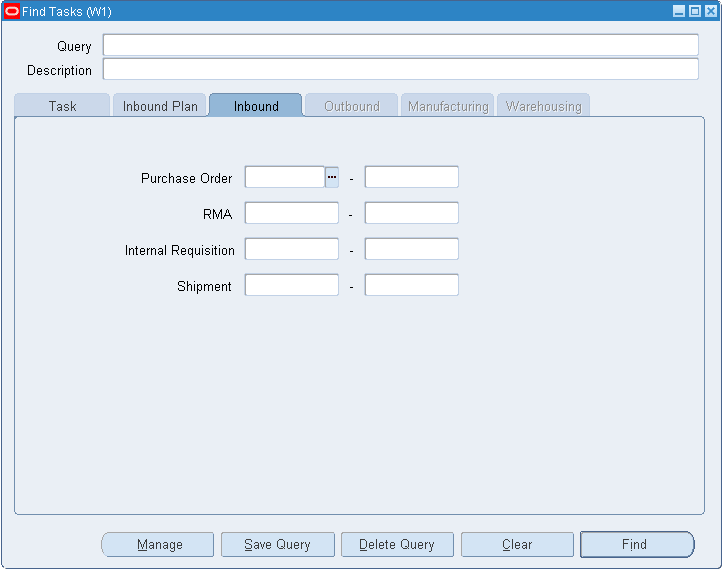
-
Purchase Order
-
RMA
-
Internal Requisition
-
Shipment
Outbound Tab
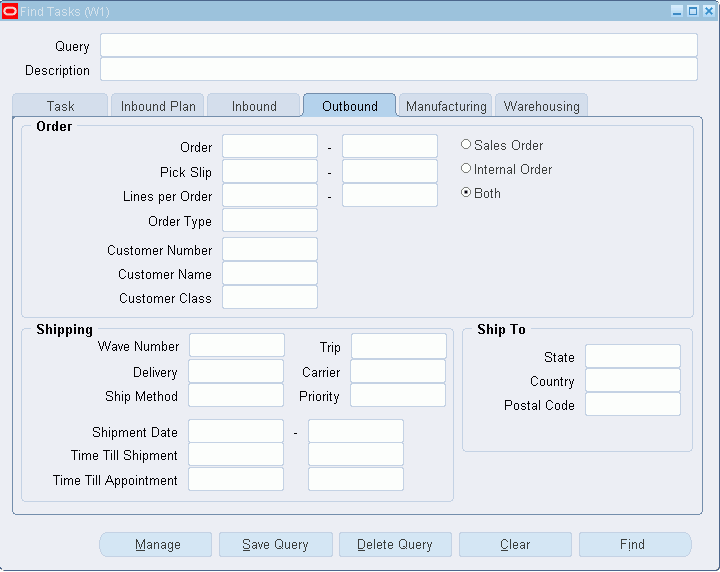
-
Order region: Order, Pick Slip, Lines per Order, Customer Number, Customer Name, Order Type, and Customer Class
-
Shipping region: Delivery, Ship Method, Trip, Shipment Date, Carrier, Priority, Shipment Date, Time Till Shipment, Time Till Appointment
-
Ship To region: State, Country, and Postal Code
Manufacturing Tab
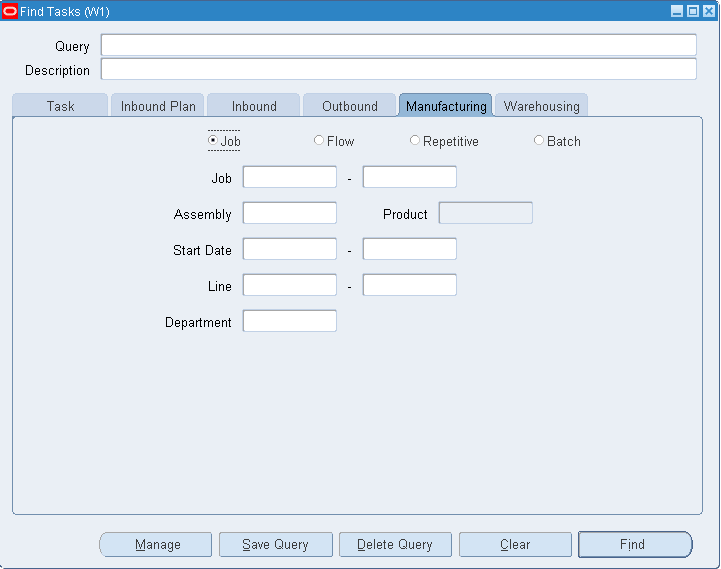
-
Manufacturing Type (Job, Flow, Repetitive, Batch)
-
Job (Job, Flow, Repetitive)
-
Batch (Batch)
-
Assembly (Job, Flow, Repetitive)
-
Start Date (Job, Flow, Repetitive, Batch)
-
Line (Job, Flow, Repetitive)
-
Department (Job, Flow, Repetitive)
Warehousing Tab
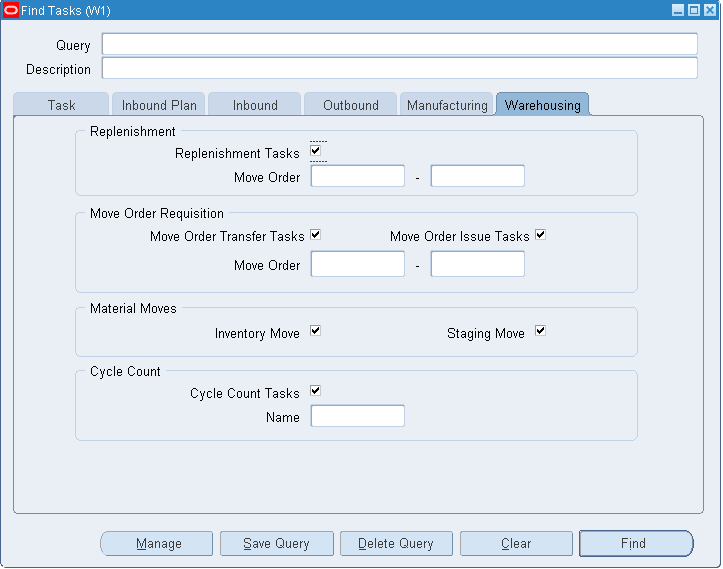
-
Replenishment region: Replenishment Tasks and Move Orders
-
Move Order Requisition region: Move Order Transfer Tasks, Move Order Issues Tasks, and Move Orders
-
Inventory Move region: Inventory Move and Staging Move
-
Cycle Count region: Cycle Count Tasks and Name
Tasks Window
After entering the desired search criteria, select Find and the Tasks window displays only the information related to the specified query criteria. You can save the queries and give them specified user names.
Note: Save your repetitive queries to quickly build waves. For example, you can save a query for a specific carrier or for one line orders.
Use the Tasks window to view, plan, and manage warehouse tasks.
The task information is segregated by Tasks, Exceptions, and Summary tabs located at the bottom of the window.
Tasks Tab
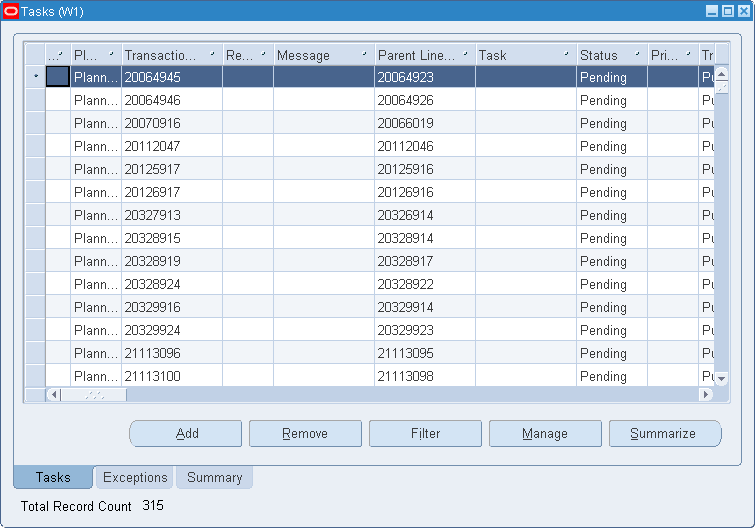
Select the Tasks tab to view information about the various warehouse tasks.
On the Tasks tab you can add, remove, filter, manage, and summarize tasks.
-
To see more tasks in the Tasks window, click Add.
-
To remove tasks from the Tasks window, click Remove.
-
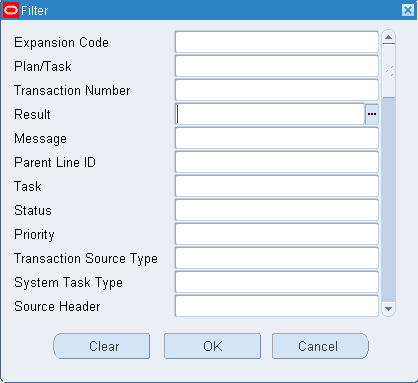
To narrow down the tasks by Results, Message, Status, Priority, Source Header, Line Number, Item, Subinventory, Locator, To Subinventory, To Locator, or Quantity, click Filter.
-
To update the task Status, Employee, User Task Type, or Priority, click Manage.
-
To cumulate Weight, Volume, or Time information for tasks, click Summarize.
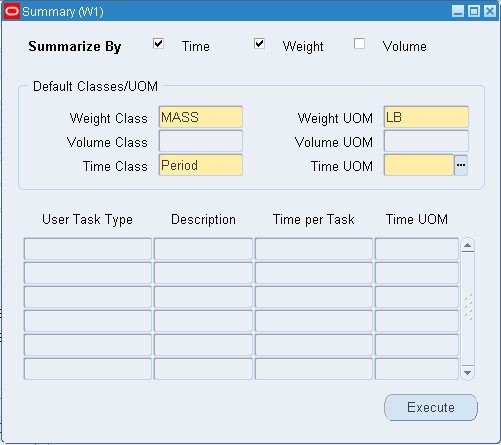
To summarize the tasks, highlight one or more tasks and click Summarize. The Summary window displays. In the Summary window select what you want to summarize by, you can choose Time, Weight, Volume, or any combination of these three. To create the summary, click Execute.
Exceptions Tab
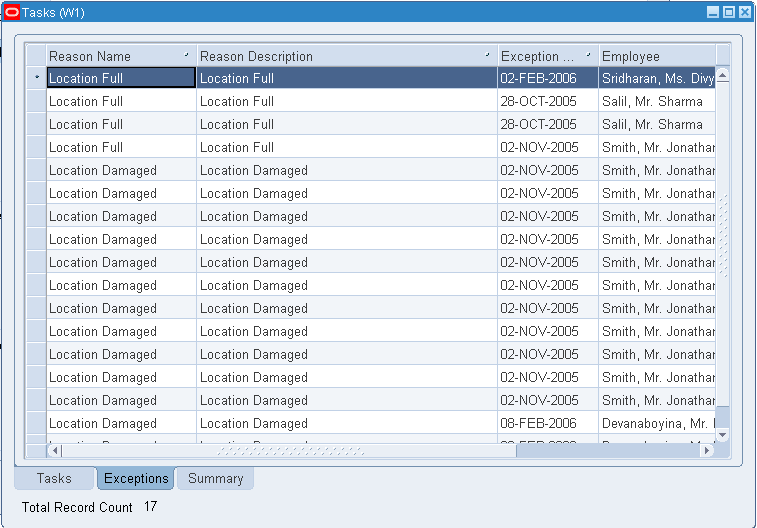
Use the Exceptions tab to view exceptions to a particular task. Anytime you record a discrepancy, such as picking less than the suggested quantity or putting away to a location that is different from the suggested location, you are required/prompted to enter a reason code for the discrepancy. This reason code, along with the task details, can then be viewed as exceptions.
Summary Tab
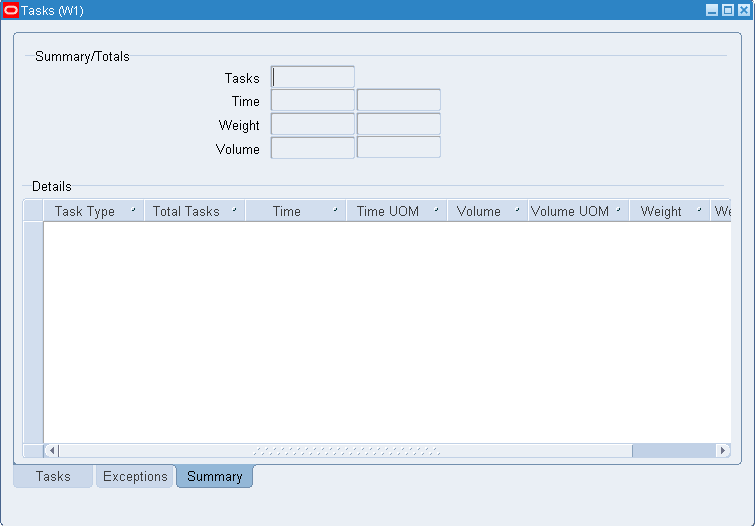
To summarize the tasks, highlight one or more tasks in the Tasks tab and select Summarize. The Summary window displays. In the Summary window select what you want to summarize by, you can choose Time, Weight, Volume or any combination of these three. To create the summary, click Execute.
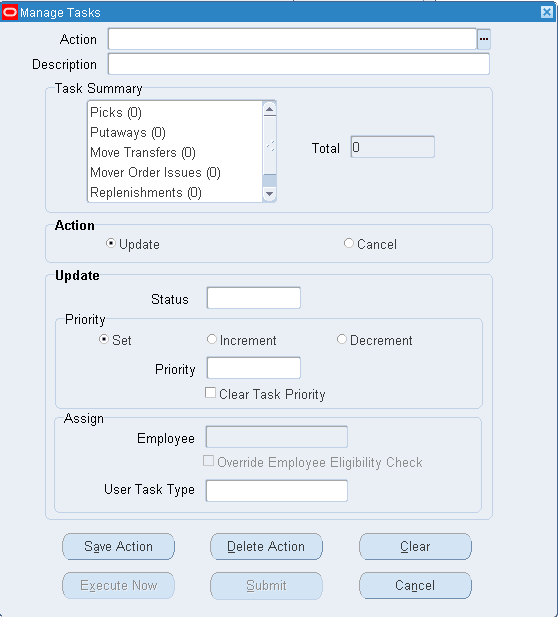
Managing Tasks
The Manage Tasks window helps you effectively manage tasks. You can use it to create and save actions to perform on tasks such as manage task priorities, control task assignments, and cancel crossdocking tasks. When you access the Manage Task window, you can perform an existing action or a one-time action. You can access the Manage Tasks window from either the Find Tasks window or the Tasks window. If you access the Manage Tasks window from the Find Task window, then the Manage Tasks window considers all of the tasks the query returns. If you access the Manage Tasks window from the Tasks window, then the Manage Tasks window considers only the tasks that you selected on the Tasks window.
The Task Summary area of the Manage Tasks window displays the number of tasks that you selected listed by system task type. If you choose to perform an action, these are the tasks the action affects.
To Manage Tasks:
-
Select Update or Cancel from the Action region. If you select Update, you can change the task status, priority, assigned employee, user task type, or override the employee eligibility check. If you select Cancel, you can delete tasks with the Source type crossdock. If you select Cancel, you cannot make changes to the Task Updates area of the window.
Note: If you cancel crossdocking tasks, then you must confirm the cancellation before the system executes the action.
-
Optionally, enter a new task status. If the tasks you select have the status Active or Dispatched, then you can change the status to Queued, Pending, or Unreleased.
Note: If you update the status to Queued, then you must enter an employee.
-
In the Priority area of the window, select the type of task prioritization to perform. The choices are:
-
Set Priority: Sets the actual priority of the tasks. For example, if the current task priority is 15, and you enter a new value of 30, then after you execute the action, the new task priority is 30.
-
Increment Priority: Increments the priority based on an integer. For example, if the current priority of task 1 is 15 and the current priority of task 2 is 25, and you enter an increment priority of 5, then the new priority of task 1 is 20, and the new priority of task 2 is 30.
-
Decrement Priority: Decrements the priority based on an integer: For example, if the current priority of task 1 is 10 and the current priority of task 2 is 20, and you enter a decrement priority of 5, then the new priority of task 1 is 5, and the new priority of task 2 is 15.
Note: The system prioritizes tasks in ascending order. Tasks with a larger number have a higher priority.
-
-
Click Clear Task Priority to remove the priority for the affected tasks.
-
Enter an employee for the affected tasks if you changed the status to Queued.
-
Optionally, select a new User Task Type if you updated the status to Pending or Unreleased.
-
Click one of the following buttons to complete the action:
-
Save Action: Saves the action in the system.
-
Delete Action: Deletes the action from the system.
-
Clear: Clears all the fields on the Manage Tasks window.
-
Execute Now: Performs the action immediately.
-
Submit: Performs the action in the background.
-
Cancel: Cancels the action.
-
Using the Oracle Warehouse Management Control Board for Task Planning
The workbench is a powerful management tool to manage inbound, outbound, manufacturing, and warehousing operations individually or in any combination.
Outbound, Manufacturing, and Warehousing Operations
You can use the following planning tools:
-
Select the task plan in Pick Release.
-
Select the task plan in Replenishment.
-
Select the task plan in Component Pick Release for manufacturing jobs.
To perform wave planning, you can:
-
Create plans dynamically or use saved plans (queries).
-
Plan waves by multiple methods including carrier, item, lines, order, etc.
-
Schedule waves based on priority.
-
Simulate with filtering capabilities. You can add or remove tasks to waves dynamically.
-
Summarize by time, weight, volume for all task types.
-
Accept waves.
-
Release waves.
You can manually assign tasks by assigning work to individuals (queuing).
You can perform mass updates to tasks, lines, orders, deliveries, or waves:
-
Reprioritize for expedited shipments.
-
Reprioritize waves, orders, deliveries, lines, or tasks based on business conditions.
-
Change statuses until the task is active (Unreleased, Pending, Queue).
-
Unrelease waves based on business conditions.
To use the Warehouse Control Board as an analytical tool, you can copy task details and summary results to a spreadsheet for analysis.
To perform rough cut planning, you can do the following:
-
Assign labor standards by task type (case pick, pallet pick, etc.).
-
Adjust standards dynamically based on current conditions.
-
Review tasks by time, weight, and volume.
-
Summarize labor requirements for selected tasks.
-
Summarize weight or volume to estimate carrier capacity or to build loads.
-
Dynamically adjust rough cut plans to meet requirements.
-
Accept and release waves.
To use the Warehouse Control Board as a monitoring tool, you can view the status of employees to determine who is active and review the performances of employees.
Inbound Operations
To use the Warehouse Control Board as an online reporting tool, you can summarize by weight and volume for all tasks completed in Receiving.
To use the Warehouse Control Board as an analytical tool, you can copy task details and summary to a spreadsheet for analysis or reporting.
To use the Warehouse Control Board as a monitoring tool, you can review the performance of employees.
Using the Oracle Warehouse Management Control Board for Outbound Operations
You can use the Warehouse Control Board to manage tasks.
-
Navigate to the Warehouse Control Board.
-
In the Find Tasks window, select a saved query.
-
If you do not use an existing query, select Outbound and the desired statuses of the tasks you want to view.
-
You can further restrict the tasks you want to see by selecting the Outbound tab and enter any of the following information to narrow the search:
-
Order region: Order, Pick Slip, Lines per Order, Customer Number, Customer Name, Order type and Customer Class
-
Shipping region: Delivery, Ship Method, Trip, Shipment Date, Carrier, and Priority
-
Ship To region: State, Country, and Postal Code
For example, you could only select orders which have 1 to 2 lines per order.
-
-
Select Find to view details of the plan (query) which meet your search criteria.
-
In the Tasks window, you can perform any of the following by right mouse clicking:
Copy task details and summary results to a spreadsheet for analysis.
Filter the plan for simulation and review the results.
Add tasks to the plan dynamically.
For example, you could add to the plan (query) by carrier or add to the carrier by state, etc.
Remove tasks from the plan (query) dynamically.
Select the tasks you want to remove and select Remove in the Tasks window.
-
Note: Removing a task logically removes the task record from the current task record set view.
-
If you want to summarize tasks, select the tasks to summarize. To select tasks, you can use the Shift key or right mouse click to select all the tasks.
You can summarize the workload (tasks) by Time, Weight, and/or Volume.
-
Select Summarize.
-
In the Summary window, select Time, Weight, and/or Volume.
-
Task types appear based on the tasks being summarized. You can dynamically change the following information:
-
Standards (time per task) based on current performance
-
Unit of Measure (Weight UOM, Volume UOM, Time UOM)
-
-
Execute the summary of the plan.
Select Execute.
-
View the Summary/Total based on the selected conditions (Time, Weight, and Volume).
-
Validate the summary totals by reviewing the Task tab.
Messages indicate if the tasks were summarized properly or gives an error message if the data was not available.
Using the Oracle Warehouse Management Control Board for Inbound Operations
You can use the Warehouse Control Board as an online reporting tool, an analytical tool, and a monitoring tool.
-
Navigate to the Warehouse Control Board.
-
In the Find Tasks window, select Inbound Operations and the Loaded/Completed status.
Inbound only looks at completed tasks.
-
Select Find to display the task details.
-
Select all the tasks in the Tasks window. To select all the tasks, right mouse click and choose Select All Tasks.
-
Select Summarize.
-
You can summarize by Weight or Volume.
-
Select Execute to summarize the plan (tasks).
-
View the summary to show the amount of work completed.
Using the Oracle Warehouse Management Control Board for Manufacturing Operations
Managing inbound manufacturing operations works the same as for outbound manufacturing operations.
-
Navigate to the Find Tasks window.
-
Select Manufacturing and the desired statuses.
-
You can further restrict the plan (query) based on the following manufacturing parameters:
-
Job, Flow, Repetitive
-
Job/Schedule
-
Assembly
-
Start Date
-
Line
-
Department
-
-
Review the task details.
-
Select the desired tasks.
Note: You can also dispatch tasks to users if the work order has an EAM WIP entity type.
-
Summarize the selected tasks.
-
In the Summary window, summarize by Time.
-
Select Execute.
-
View the summary of the manufacturing operations.
-
You can validate the summary total by reviewing the Task tab.
-
You can unrelease a manufacturing task to update the plan.
Using the Oracle Warehouse Management Control Board for Warehousing Operations
Managing inbound warehousing operations works the same as for outbound warehousing operations. Typically, warehousing operations are combined with outbound operations.
-
Navigate to the Find Tasks window in the Warehouse Control Board.
-
Select Warehousing and the desired statuses.
-
You can further restrict the plan (query) based on the following warehousing parameters:
-
Replenishment: Replenishment Tasks, Move Orders
-
Move Order Requisition: Move Order Transfer Tasks, Move Order Issue Tasks, Move Orders
-
Inventory Move: Inventory Move, Staging Move
-
Cycle Count: Cycle Count Tasks, Name
-
-
Review the task details.
-
Follow the same steps as for managing outbound operations.
Performing Rough Cut Planning
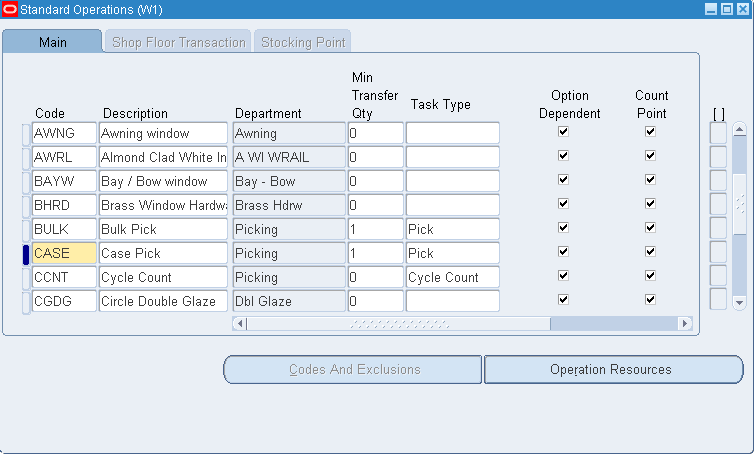
To perform rough cut planning you need to establish labor standards by task type.
-
Navigate to the Standard Operations window.
-
Highlight a Resource Code and select Operation Resources.
-
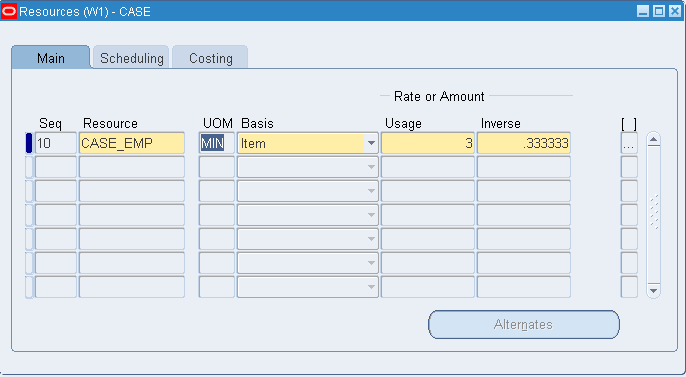
To assign a labor rate to the resource:
-
Choose Item for the Basis field from the list of values
-
Enter a Usage Rate/Amount
The Inverse Rate/Amount will be calculated automatically.
-
Using the Warehouse Control Board as a Monitoring Tool
You can monitor task statuses in the Warehouse Control Board by percentage, by number of tasks by organization, or by employee. To view the task statuses:
Monitor Task Exceptions
You can also monitor exceptions for the tasks. To view task exceptions:
-
In the Tasks window, select the Exceptions tab.
-
View the exceptions.
How to Perform Task Dispatched Cycle Counts
Cycle counting can be dispatched directly to qualified mobile users so that they need not be aided by a paper cycle count report to determine their tasks. Cycle count tasks can be interleaved with picking and replenishment tasks if the same operators that are qualified to do cycle count tasks are also qualified for other tasks, or the system can be set up so that cycle count tasks get dispatched only to certain dedicated counters.
When cycle counts are scheduled, if a cycle count task type has been defined, then tasks will automatically be generated for cycle counts. See, Setup Warehouse Task Types, Oracle Warehouse Management Implementation Guide.
For a given cycle count header, one task is generated for each item, revision, subinventory, and locator; a single task will be generated for multiple serials or lots. If a count has been performed on the desktop, or via a user directed count on the mobile device, then the task will no longer be available. In addition, only counts that are not past their due date are available as tasks.
The operator can skip tasks after entering partial information. This can be performed using the hot key <ESC-K>. If the task is skipped, it will be dispatched to the operator after a specific time, which is defined as one of the organization parameters. If the task is completed after it was skipped then it will not reappear as a task in the operators queue.
Note: Oracle Warehouse Management cycle count only supports one cycle count task type.
The system assigns the first cycle count task type defined in the organization to the task, so only one cycle count task type should be defined. If the organization does not wish to use dispatched cycle count tasks, then do not define a cycle count task type.
Follow these instructions to perform a task dispatched cycle count.
-
Log into the mobile user interface and navigate to the Task Menu.
-
Select Acc Next Task.
-
If the operator is qualified, and the cycle count task type is defined, a cycle count task will be dispatched to the operator.
-
Confirm each field as necessary.
Note: If Oracle Warehouse Management is enabled in a Project Manufacturing organization, two additional fields will be visible: Project and Task. The rest of the procedure is the same as shown here.
-
In the case of a discrepancy, confirm the actual quantity.
-
Skip the task if the count is unable to be made. For example, if an obstacle is preventing the operator from counting. See: Explaining Task Skipping.
Opportunistic Cycle Counting
Opportunistic cycle count enables users to perform an unscheduled cycle count in the middle of a picking operation if an item falls below a minimum quantity tolerance for the locator. If the resulting quantity is less than or equal to the specified quantity, then the system asks you whether or not you would like to perform a cycle count for this item at this locator. For instance, if the Opportunistic Cycle Count Trigger Quantity is set to5, then any time a pick from a locator leaves 5 or fewer pieces in the locator, the system prompts you to count the item.
Opportunistic cycle counting is controlled at the subinventory level. This means if you enable opportunistic cycle counting for the subinventory, then all items within the subinventory will be subject to opportunistic cycle counts. When you establish the parameters for the subinventory, enter the Opportunistic Cycle Count Days Threshold which is the number of days tolerance that controls whether or not redundant cycle counts are performed. If a cycle count has been performed at this location for this item within the specified number of days, then the system does not prompt you to perform another cycle count for this item or locator combination.
For example, if the Opportunistic Cycle Count Days Threshold is set to 14 days, then the system will only prompt you to count this item locator combination if there has not been a cycle count in this location within the past 14 days. If that item location combination was counted 10 days prior to the pick which would otherwise trigger a free cycle count, that trigger will not be invoked because of the days tolerance. If an opportunistic cycle count is performed and there is already a scheduled cycle count for that item location combination, then the system deletes the existing cycle count entry. This prevents redundant cycle counts from being performed.
Blind Counts
When you specify the Cycle Count header, you control whether or not the opportunistic cycle count will be blind. If the count is blind, then the system does not specify the system on-hand quantity during the count.
To perform an opportunistic cycle count
-
Navigate to the Load page.
-
Confirm the Subinventory, Locator, and item information.
-
Enter or scan the transfer LPN.
-
Select the Load or Load and Drop button. The opportunistic cycle count trigger will only appear if the picking task drives the on-hand quantity below the quantity threshold. You can choose to count the item within the locator at this time, or schedule a count to be performed at a later time.
-
Click Schedule Count to schedule the count for a later time, or select the down arrow to proceed with the opportunistic count.
-
Enter the desired information into the Qty field. Enter a valid value such as 0. Based on your setup parameters, the system can default the available quantity, or you can perform a blind count. This setting is based on the default cycle count header. You select the default cycle count header when you enable opportunistic cycle counting.
-
Press the down arrow.
-
Click Done. You can now complete the normal staging process.
Related Topics
Oracle Warehouse Management Implementation Guide, Setting Up Opportunistic Cycle Counting