Defining and Maintaining Item Information
This chapter covers the following topics:
- Overview of Items
- Master Level vs. Organization Level
- Defining Items
- Updating Item Attributes
- Assigning Items to Organizations
- Updating Organization Level Items
- Open Item Interface
- Importing Items
- Customer Item and Customer Item Cross Reference Interfaces
- Importing Customer Items
- Importing Customer Item Cross References
- Adding Attachments to Items
- Viewing Item Information
- Assigning Items to Catalogs
- Defining Item Relationships
- Defining Manufacturer Part Numbers
- Assigning Subinventories to an Item
- Assigning Items to a Subinventory
- Defining Item Revisions
- Defining Item Transaction Defaults
- Searching for Items
- Item Deletion
Overview of Items
You can define and control items that you stock in inventory. Once defined, you assign items to organizations. You choose whether to have centralized or decentralized control of your items through a variety of item attributes.
Steps Involved in Defining Items
-
Complete the Item Setup steps. See: Overview of Item Setup.
-
Use templates and existing items (copying items) to define items in the master organization. See Defining Items.
-
Enter values for item attributes. See: Defining Items.
-
Enable the item in other organizations. See: Assigning Items to Organizations.
You can also:
-
view attributes for an item in single or multiple organizations
-
define product families, Oracle Bills of Material User's Guide
-
delete items, Oracle Bills of Material User's Guide
Master Level vs. Organization Level
Item attributes are the collection of information about an item. Using the Item Attribute Controls window, you can designate whether an item attribute is defined/maintained at the Master level or the Organization level. Attributes at the Master level are the same across all organizations, giving you centralized control over the values assigned. If an attribute is maintained at the Organization level, you can have different values in each organization the item is assigned to and therefore have decentralized control over that attribute. See: Defining Item Attribute Controls.
For example, you can define and maintain an item's unit of measure at the Master level. This means that the unit of measure is always the same for the item, no matter in which organization you assign the item. Or, you can designate that an item's unit of measure is maintained at the Organization level. This means that each organization you assign the item to can have a different unit of measure for the item.
Some attributes can be maintained only at one of these levels. The following table lists the attributes that require control at a specific level:
| Attribute | Control Level |
|---|---|
| Base Model | Master |
| BOM Item Type | Master |
| Container | Master |
| Cost of Goods Sold Account | Organization |
| Create Configured Item, BOM | Master |
| Cumulative Total Lead Time | Organization |
| Cumulative Manufacturing Lead Time | Organization |
| Descriptive Flexfield | Organization |
| Downloadable | Master |
| Effectivity Control | Master |
| Electronic Format | Master |
| Encumbrance Account | Organization |
| Engineering Item | Organization |
| Equipment | Organization |
| Event | Master |
| Expense Account | Organization |
| Fixed Lead Time | Organization |
| Global Descriptive Flexfield | Organization |
| Lot Substitution Enabled | Organization |
| Match Configuration | Master |
| Over Return Tolerance | Organization |
| Over Shipment Tolerance | Organization |
| Planner | Organization |
| Planning Exception Set | Organization |
| Postprocessing Lead Time | Organization |
| Preprocessing Lead Time | Organization |
| Processing Lead Time | Organization |
| Sales Account | Organization |
| Source Organization | Organization |
| Source Subinventory | Organization |
| Under Return Tolerance | Organization |
| Under Shipment Tolerance | Organization |
| Variable Lead Time | Organization |
| Vehicle | Master |
| WIP Supply Locator | Organization |
| WIP Supply Subinventory | Organization |
Use the Master Item window to define and maintain Master level attributes. You assign default values for Organization level attributes in the Master Item window. Use the Organization Items window to update Organization level attributes. See: Defining Items and Updating Organization Level Items.
Using Statuses and the Search Items Window to Delete Items
An easy way to delete many unrelated items is to define a status such as delete-me and assign this status to items tagged for deletion. You can access the Item Search window from the Deletion Groups window and query your list of items to delete by item status and any other relevant search criteria. When your list is complete, simply return to the Deletion Groups window and Oracle Inventory automatically copies over all selected items. See: Defining Item Status.
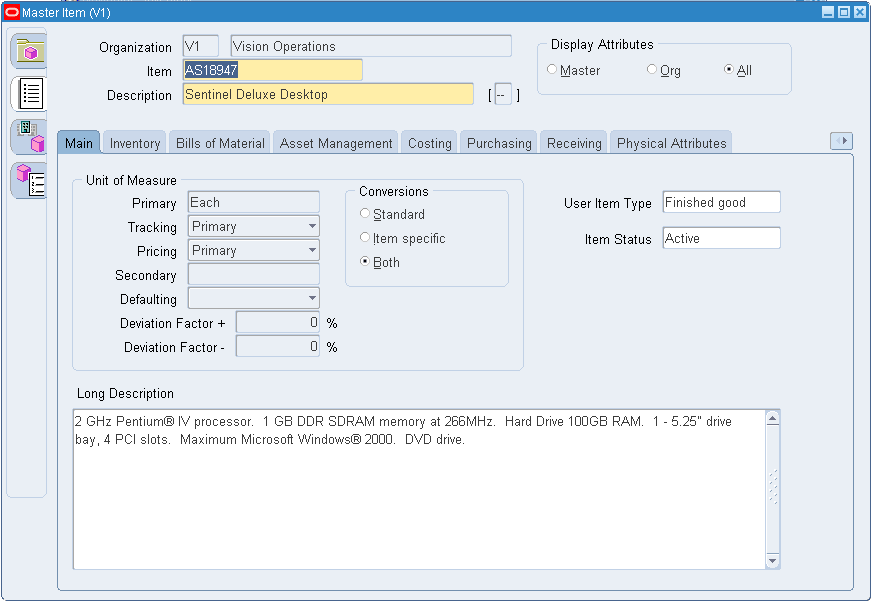
Defining Items
You can define items in the Master Item window using the following methods:
-
Attribute Groups tab: Select individual attributes, and use the Tool menu to apply templates and assign organizations.
-
Item Folder tab: Create an item, apply a default template, and assign the item to an organization all in one window.
Most of the item information is optional, and you should define only the information required to maintain the item. If an application is not installed on your system, then the tab is not enabled. For example, if Oracle Order Management is not installed on your system, you cannot access the Order Management tab.
Note: Throughout this document, engineering items are referred to generically as items.
Prerequisites
- Organization parameters
- Item attribute controls
- Units of measure
- Statuses
- Categories
- Other entities such as planners when you want to assign them to items
To define an item using the Attribute Groups Tab
-
Navigate to the Attribute Groups tab on the Master Item window.
-
Enter a unique designator for the item.
-
Optionally, select a Control Level to enable only Master level or Organization level attributes. The default is to enable all attributes.
-
Select an tabbed region to display an item attribute group where you can specify values for attributes in that group.
Note: To locate a particular attribute without manually looking through the tabbed regions choose Find Attribute from the Tools menu.
-
Save your work.
-
Choose Find from the Query menu and enter search criteria in the Find Master Items window. If you do not enter search criteria and choose Find, the search is made for all items. The results display in the Master Items Summary folder window.
To define an item by copying attribute information from an existing item
-
From the Master Item window choose Copy From on the Tools menu to open the Copy From window.
-
Enter the name of the item whose attribute information you want to copy.
-
Choose Cancel to close the Copy From window, choose Apply to copy attribute information, or choose Done to copy attribute information and close the Copy From window.
Item attribute information is copied from the copy item to the new item you are defining. You cannot use this process to copy attributes to an existing item.
Important: Category relationships, organization assignments, catalog group information, and costs are not copied.
-
Save your work.
To define an item using a template:
-
From the Master Item window choose Copy From on the Tools menu.
-
Enter the name of the template you want to apply.
-
Choose Cancel to close the Copy From window, choose Apply to copy template information, or choose Done to copy template information and close the Copy From window.
You can apply multiple templates to the item. The more recent attribute values (from the last template applied) override previous values unless the previous value is not updatable (such as the Primary Unit of Measure, which is never updatable). See: Item Templates.
-
Save your work.
To copy attributes from an existing item and apply a template at the same time
-
From the Master Item window choose Copy From on the Tools menu.
-
Enter the name of the template and the item you want to apply.
-
Choose Cancel to close the Copy From window, choose Apply to copy attribute and template information, or choose Done to copy attribute and template information and close the Copy From window.
Note that the item is copied first, and then the template is applied.
-
Save your work.
To copy/view item attributes across multiple organizations within a large organization structure
-
Navigate to the Find Items window.

-
Indicate the organization hierarchy where you want to copy attributes.
-
Indicate an item number, range of items, or an item category to which you wish to copy attributes.
-
Navigate to the Attributes tab and select the attributes to verify.
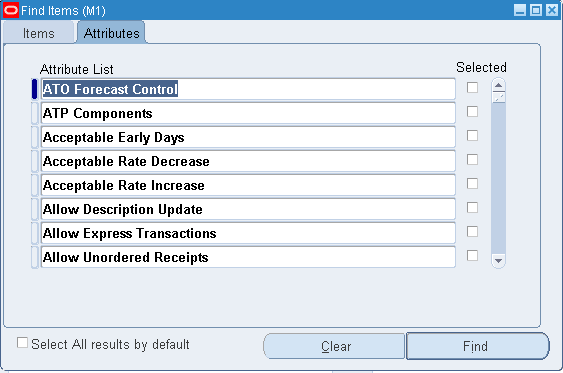
-
Click Find.
The Item Attribute Copy window lists all organizations for this item, according to the parameters you defined in the Find Items window.
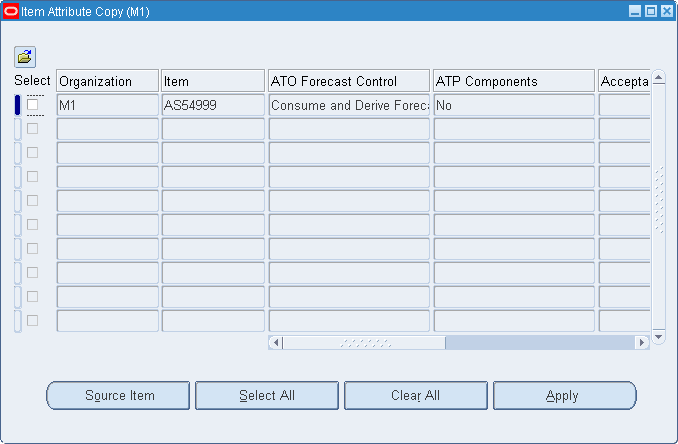
-
Choose the Select All button or select individual attributes.
-
Click Apply to apply the attribute values to the item across all organizations in the organization hierarchy where the item exists. You should see the updated value.
Note: The item attributes that you can view are set at the organization level. You can not modify or see attributes set at the master level.
-
Save your work.
To Define an Item Using the Item Folder Tab
-
Navigate to the Master Item window.
-
Select the Folder tab on the Master Item window.
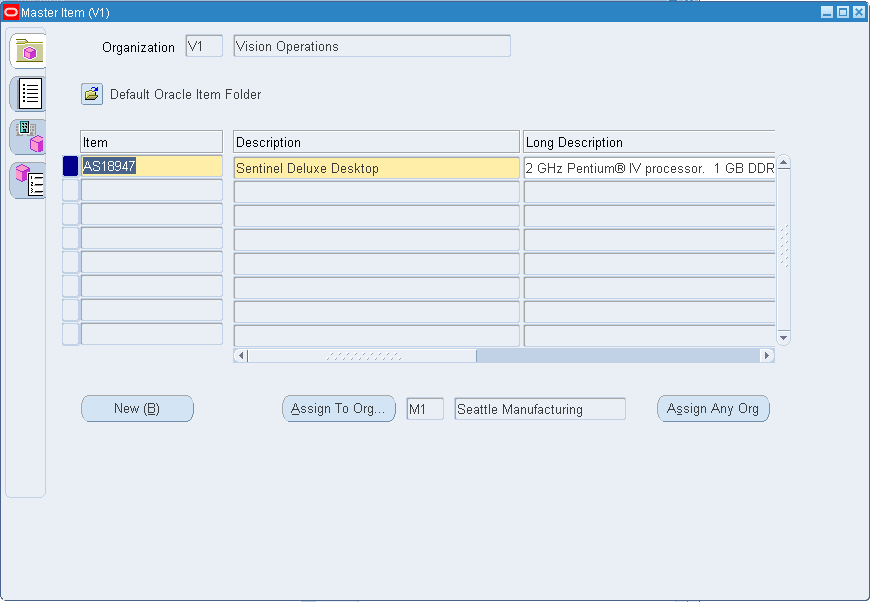
-
In the Default From region, select Template or Item.
-
Enter the template or item to copy, or select the item or template from the list of values.
-
Enter a unique designator for the item.
-
Enter a Description for the item.
-
Enter the Primary Unit of Measure, or select it from the list of values.
-
Save your work.
-
Select Assign to Org to assign the item to the current organization.
-
Select Assign to Any Org to assign the item to multiple organizations. See Assigning Items to Organizations
-
Save your work.
-
Select New to create another item, and repeat steps 3-11, or close the form when finished.
Related Topics
Updating Organization Level Items
Searching for Data, Oracle Applications User's Guide
Creating Organization Hierarchies, Using Oracle HRMS - The Fundamentals
Updating Item Attributes
To update Master level attributes use the Master Item window. If an attribute is controlled at the Master level, the value of the attribute applies for all organizations in which the item is assigned.
You can use the Organization Item window to update Organization level item attributes. This update window only updates Organization level attributes in your current organization. See: Updating Organization Level Items. If you change an Organization level attribute with the Master Item window, you are simply defining the default value for that organization level attribute (and changing the value in the master organization). This default is used when you assign an item to a new organization.
You can use the Item Attribute Copy form to update the value of an item attribute across multiple organizations in a given organization hierarchy. This program enables you to manage item attributes for many organizations in one place. You can examine selected item attributes across organizations, choose an organization that contains model attributes for an item, and copy those attributes to any other organizations at or below the designated hierarchy origin. This aids in the management of item setup and maintenance and is useful for companies that have a large number of inventory organizations utilizing the same item master.
Assigning Items to Organizations
You can enable your item in all organizations under the master organization, or you can choose to enable your item in specific organizations. You use the master item window in each organization to enter or change organization level attributes. For example you can select Reorder Point planning for an item in one organization, and select Min-Max planning for the same item in another organization.
To assign an item to an organization
-
Navigate to the Master Item window.
-
Choose Find from the Query menu to select an item.
-
Choose Organization Assignment from the Tools menu or select the Organization Assignment tab to the to navigate Organization Assignment window.
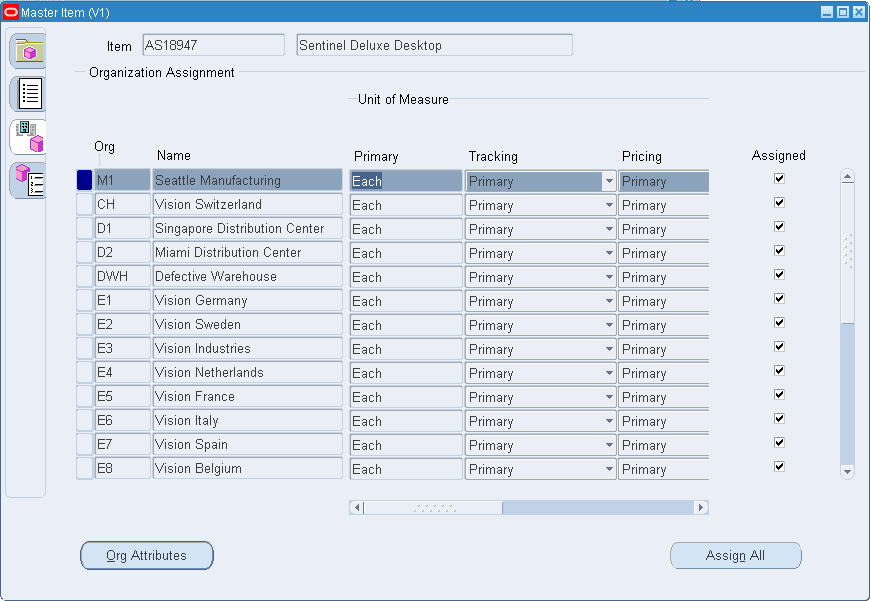
-
The Organization field displays all organizations with this Master Organization. If you want the item enabled in specific organizations click the Assigned field. The item will exist only in the Item Master and the child organizations specified here.
-
Enter the primary unit of measure for the item in this organization.
If the control level for the primary unit of measure attribute is set to the Master Item level, you cannot select another value here.
-
Save your work.
To enable the item in all organizations
-
Choose the Assign All button:
If you select this option the item exists in the Item Master and all child organizations. You can de-select organization assignments, however, once you save you cannot make changes. If you define additional organizations, you must rechoose this option if you want to associate the item with the new organizations.
If you do not select this option the item belongs to the item master organization only until you assign it to one or more child organizations.
Related Topics
Implementing the Item Master Organization
Updating Organization Level Items
Use the Organization Items window to update Organization level item attributes for your current organization. To update Master level attributes use the Master Items window. See: Defining Items.
Note: Throughout this document, we refer to engineering items generically, as items.
To update organization level attributes
-
Navigate to the Organization Items Summary folder window.
-
Choose Find from the Query menu to display the Find Items window.
-
Enter search criteria and choose Find to locate the item or items you want to update. Multiple items display in the Organization Items Summary window, a single item displays in the Organization Item window.
-
If you search returned multiple items, select an item and choose Open. The Organization Item window appears.
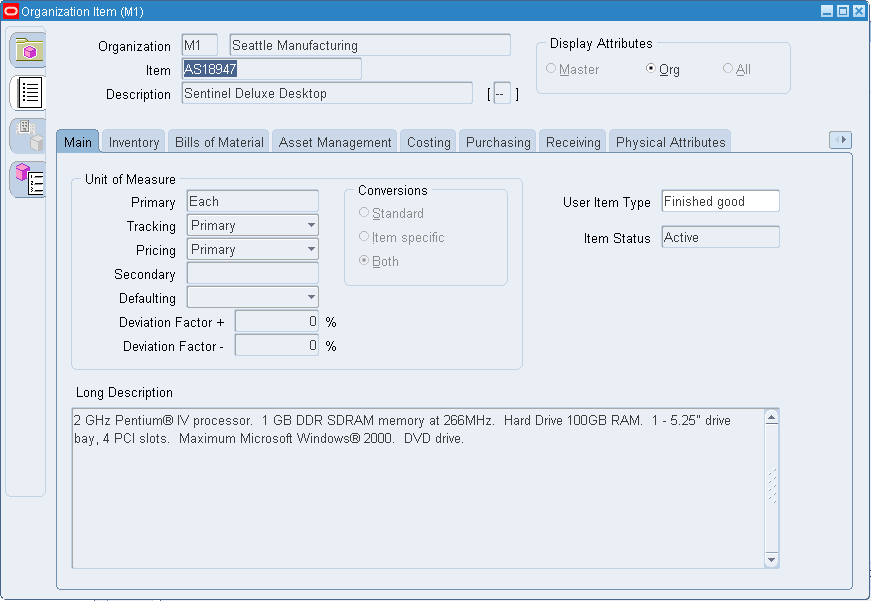
-
Select an alternative region to display an item attribute group where you can update values for organization level attributes in that group.
Note: To locate a particular attribute without manually looking through the tabbed regions choose Find Attribute from the Tools menu.
-
Save your work.
To update organization level attributes using a Template
-
From the Organization Item window choose Copy From on the Tools menu.
-
Enter the name of the template you want to apply.
-
Choose Copy. The template is applied immediately.
You can apply multiple templates to the item. The more recent attribute values (from the last template applied) override previous values unless the previous value is not updatable (such as the Primary Unit of Measure, which is never updatable). See: Item Templates.
-
Save your work.
Related Topics
Open Item Interface
You can import and update items, and their category assignments from any source into Oracle Inventory and Oracle Engineering using the Item Interface. With this interface, you can convert inventory items from another inventory system, migrate assembly and component items from a legacy manufacturing system, convert purchased items from a custom purchasing system, and import new items from a Product Data Management package.
When you import items through the Item Interface, you create new items in your Item Master organization or assign existing items to additional organizations. You can specify values for all the item attributes, or you can specify just a few attributes and let the remainder default or remain null. The Item Interface also lets you import revision details, including past and future revisions and effectivity dates. Validation of imported items is done using the same rules as the item definition forms, so you are insured of valid items.
The Item Interface reads data from two tables for importing items and item details. You use the MTL_SYSTEM_ITEMS_INTERFACE table for new item numbers and all item attributes. This is the main item interface table, and can be the only table you choose to use. If you are importing revision details for new items, you can use the MTL_ITEM_REVISIONS_INTERFACE table. This table is used only for revision information, and is not required. A third table, MTL_INTERFACE_ERRORS, is used for error tracking of all items that the Item Interface fails.
The following diagram illustrates what is described in the above text.
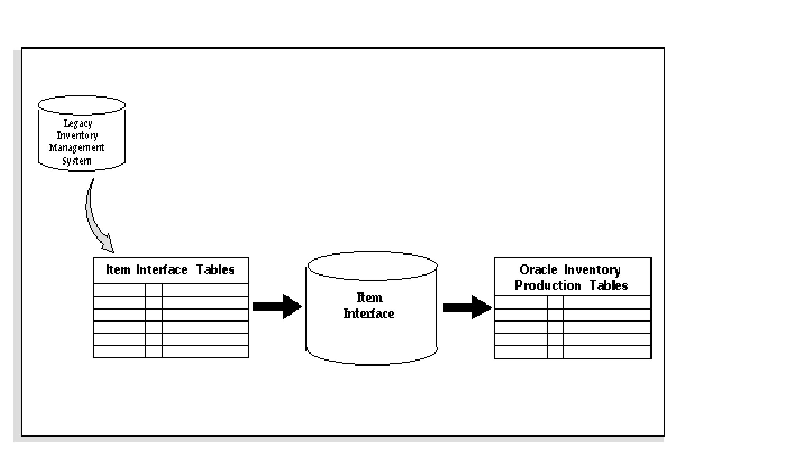
Before you use the Item Interface, you must write and run a custom program that extracts item information from your source system and inserts it into the MTL_SYSTEM_ITEMS_INTERFACE table, and (if revision detail is included) the MTL_ITEMS_REVISIONS_INTERFACE table. After you load the items into these interface tables, you run the Item Interface to import the data. The Item Interface assigns defaults, validates data you include, and then imports the new items.
Important: You must import items into the Item Master organization before you import items into additional organizations. You can accomplish this by specifying only your Item Master organization on a first pass run of the Item Interface. Once this has completed, you can run the Item Interface again, this time specifying an additional or all organizations.
You can also use the Item Interface to import item material cost, material overhead, and revision details.
Related Topics
Importing Items
To import items using the Item Interface
-
Navigate to the Import Items or All Reports window.
-
Enter Import Items in the Name field. The Parameters window appears.
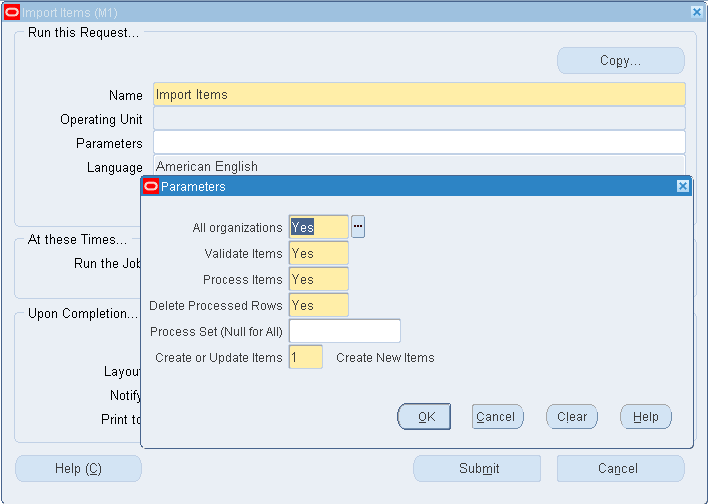
-
Indicate whether to run the interface for all organizations in the item interface table. If you choose No, the interface runs only for the current organization and interface table rows for other organizations are ignored.
-
Indicate whether to validate all items and their data residing in the interface table that have not yet been validated. If items are not validated, they are not processed into Oracle Inventory.
You would choose No if you had previously run the item interface and responded Yes for Validate Items and No for Process Items, and now want to process your items.
-
Indicate whether to process items. If you choose Yes, all qualifying items in the interface table are inserted into Inventory.
You would choose No, along with Yes for Delete Processed Rows, to remove successfully processed rows from the interface table without performing any other processing.
-
Indicate whether to delete successfully processed items from the item interface tables.
Choose No to leave all rows in the item interface tables for successfully processed items.
-
Choose OK to close the Parameters window, then choose Submit.
Related Topics
Integrating Your Systems, Oracle Manufacturing Implementation Manual
Customer Item and Customer Item Cross Reference Interfaces
You can import customer items and customer item cross references from any source into Oracle Inventory and Oracle Engineering using the Customer Item and Customer Item Cross Reference Interfaces, as illustrated in the following diagram.
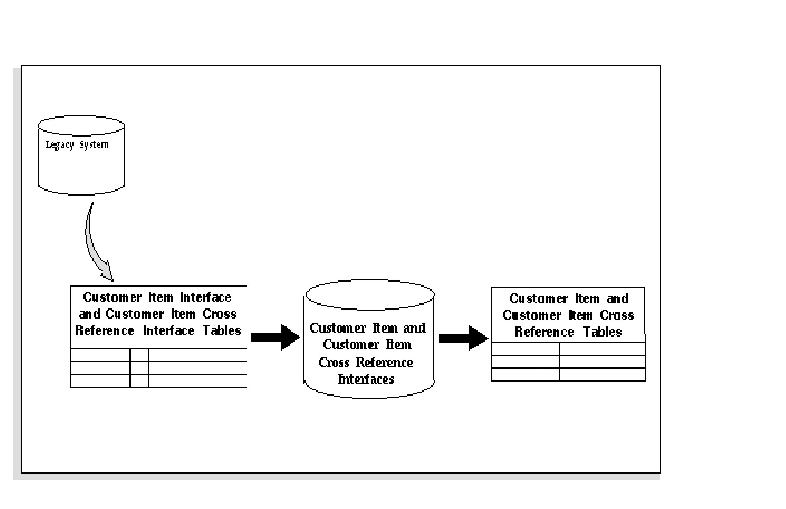
Before you use the Customer Item and Customer Item Cross Reference Interfaces, you must write and run custom programs that extract customer item and customer item cross reference information from your source system and insert it into the MTL_CI_INTERFACE and MTL_CI_XREFS_INTERFACE tables. After you load the customer items and customer item cross references into these interface tables, you run the Customer Item and Customer Item Cross Reference Interfaces to import the data. These interfaces assign defaults, validate data you include, and then import the new customer items and customer item cross references.
Note: The Importing Customer Item Cross References Interface Program does not support the transaction type Update. .
Related Topics
Importing Customer Items
-
Navigate to the All Reports window.
-
Enter Import Customer Items in the Name field. The Parameters window appears.
Note: The Import Customer Items concurrent program does not support the transaction type Update.
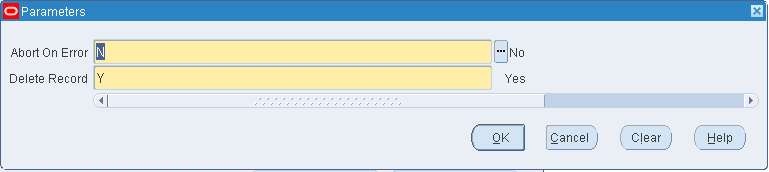
-
Indicate whether to Abort on Error:
Yes indicates that the interface will automatically abort execution if an error is encountered during validation of a record. No additional records will be processed. The ERROR_CODE and ERROR_EXPLANATION columns in the MTL_CI_INTERFACE table are populated with the appropriate error code and explanation for the record that caused the error. Successfully validated records are transferred to the Oracle Inventory MTL_CUSTOMER_ITEMS table.
No, the default, indicates that processing of the records in the interface table will continue until the end of the table is reached. If an error is encountered during validation of records, the ERROR_CODE and ERROR_EXPLANATION columns in the MTL_CI_INTERFACE table are populated with the appropriate error code and description. Successfully validated records are transferred to the Oracle Inventory MTL_CUSTOMER_ITEMS table.
-
Choose Yes or No to indicate whether to Delete Successfully Validated Records from the MTL_CI_INTERFACE table after they have been copied to the Oracle Inventory MTL_CUSTOMER_ITEMS table.
-
Choose OK to close the Parameters window, then choose Submit.
Related Topics
Integrating Your Systems, Oracle Manufacturing Implementation Manual
Importing Customer Item Cross References
To import customer item cross references
-
Navigate to the All Reports window.
-
Enter Import Customer Item Cross References in the Name field. The Parameters window appears.
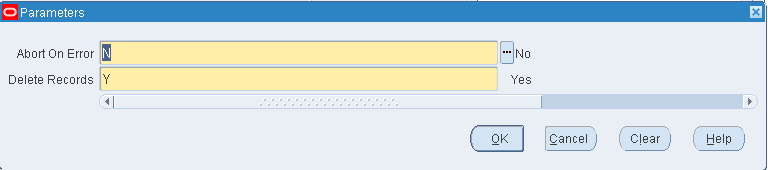
-
Indicate whether to Abort on Error:
Yes indicates that the interface will automatically abort execution if an error is encountered during validation of a record. No additional records will be processed. The ERROR_CODE and ERROR_EXPLANATION columns in the MTL_CI_XREFS_INTERFACE table are populated with the appropriate error code and explanation for the record that caused the error. Successfully validated records are transferred to the Oracle Inventory MTL_CUSTOMER_ITEMS_XREFS table.
No, the default, indicates that processing of the records in the interface table will continue until the end of the table is reached. If an error is encountered during validation of records, the ERROR_CODE and ERROR_EXPLANATION columns in the MTL_CI_XREFS_INTERFACE table are populated with the appropriate error code and description. Successfully validated records are transferred to the Oracle Inventory MTL_CUSTOMER_ITEMS_XREFS table.
-
Choose Yes or No to indicate whether to Delete Successfully Validated Records from the MTL_CI_XREFS_INTERFACE table after they have been copied to the Oracle Inventory MTL_CUSTOMER_ITEMS_XREFS table.
-
Choose OK to close the Parameters window, then choose Submit.
Related Topics
Integrating Your Systems, Oracle Manufacturing Implementation Manual
Adding Attachments to Items
You can attach text, images, or OLE objects to items. These attachments are referred to as documents. Documents are grouped into categories. You can attach documents from the Miscellaneous category to items.
When you create a document you can assign a security type limiting it to a particular organization and only to items assigned to that organization. You can also define documents that span organizations by selecting a security type of None or Ledger.
-
Choose the Attachments Icon.
Viewing Item Information
You can quickly view all attributes, categories, or revisions for an item.
Depending on the function security assigned to your responsibility, you can view the information for an item in a single organization only, a single organization and its master organization, or across all organizations. The function security assigned to your responsibility determines whether you have the ability to look across multiple organizations. See: Overview of Function Security, Oracle Applications User's Guide.
To view item attribute, category, or revision information
-
Navigate to the Find Item Information window.
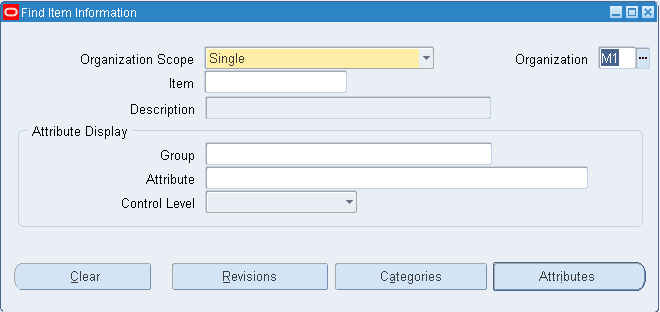
-
Select the organization scope to view depending on your function security.
Single: View information for an item in a single organization only.
Single with Master: View information for an item in a single organization and its master organization.
All: View information for an item in all organizations where it is defined.
-
Optionally, enter an organization to view depending on your function security.
-
Enter the item whose information you want to view.
-
Optionally, limit the attributes displayed by entering a particular attribute group, attribute, or control level to view.
-
Choose a button to initiate the search:
Revisions: Displays the Item Revisions window. You can view revision numbers, descriptions, organizations, date information, and engineering change order numbers.
Categories: Displays the Item Categories window. You can view category sets, organization categories, and control levels.
Attributes: Displays the Item Attributes window. You can view attribute names, groups, organizations, values, and control levels.
To navigate to the Items window from the Item Attributes window
-
Choose either Master Items or Org Items from the Tools menu.
Note: This function may not be available depending on your responsibility and function security.
Related Topics
Relationships Between Attributes
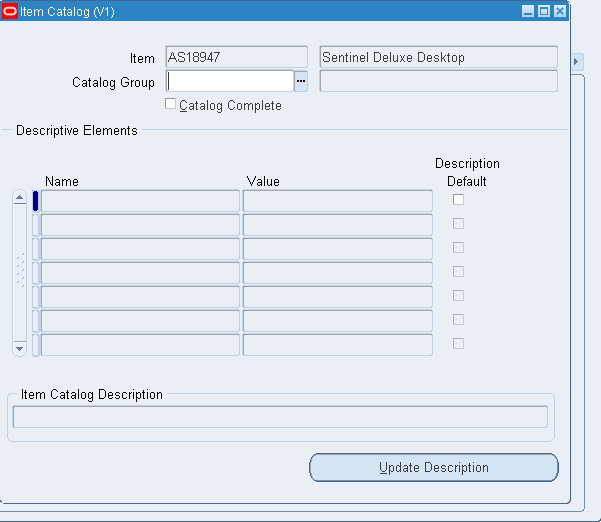
Assigning Items to Catalogs
To assign an item to a catalog
-
Navigate to the Master Items Summary window and select an item.
-
Choose Catalog on the Tools menu. The Item Catalog window appears
-
Enter a catalog group.
The descriptive elements for this catalog group display in the Name field. Assigning the item to this group means the item shares these descriptive elements.
Note: Item catalog information is defined/maintained at the Master level, not the Organization level. Otherwise, if a descriptive element is Color, for example, you could set up conflicting values, such as the item as Red in one organization and Blue in another.
-
Indicate whether the catalog is complete.
You can check this option only after defining values for all required descriptive elements. You determine which elements are required when you define the catalog group. Leave this option off if you have not finished defining values. This calls attention to the fact that some values are temporarily undefined.
-
Enter a specific value for each descriptive element that pertains to the item.
For example, if the descriptive element is Color, you might enter Blue.
-
Indicate whether to include a descriptive element in a catalog-derived item description.
If you turn this option on and choose Update Description, the value of the descriptive element is included in a concatenation that creates a catalog-derived item description.
The default is the Description Default value you defined for the descriptive element when you defined the catalog group.
-
Save your work.
To replace the existing item description with a catalog-derived item description
-
Choose Update Description.
This creates an item description by concatenating the item catalog group description (default) or the catalog group name with the descriptive element values you defined. The concatenated item description displays in the Item Catalog Description field.
Related Topics
Defining Item Relationships
You can define relationships between items. This allows you to search for items through these relationships. Except in Oracle Purchasing, these relationships are for inquiry and reporting purposes only.
Item Relationships with Oracle Purchasing
Within Oracle Purchasing you can define acceptable substitute items for receiving. You must define a list of substitutes before you receive a substitute item in place of an originally ordered item.
Important: If you receive a substitute item, you must have previously defined a unit of measure conversion between the unit of measure on the purchase order and the unit of measure on the receipt.
Tip: To receive a substitute item correctly, you should ensure that the ordered item and the substitute item share the same base unit of measure.
To define item relationships
-
Navigate to the Item Relationships window. The Find Item Relationships window appears.
-
Choose new to define a new relationship.
You can also enter search criteria and choose Find to display existing item relationships.
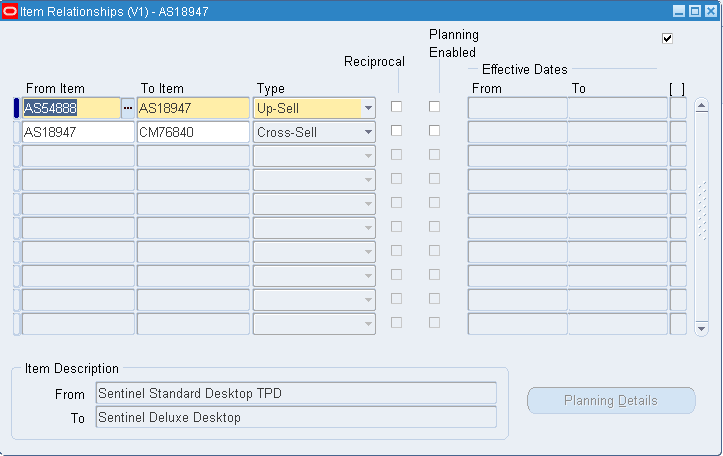
-
Enter an item that represents the From part of the relationship.
-
Enter an item that represents the To part of the relationship.
-
Select the Type of relationship between the items.
Related: The items are related in a non-specific way.
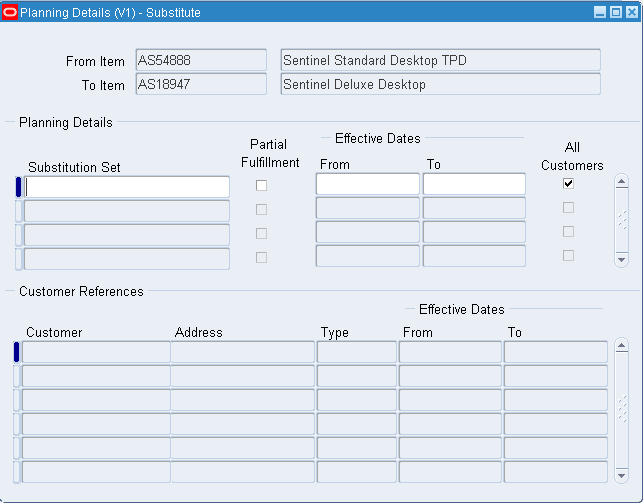
Substitute: One item is a substitute for another. To define the parameters for substitute item relationships, select the Planning Details button and see defining details for substitute item relationships below.
Important: The Planning Details button is enabled only for the item relationship type Substitute.
Cross-Sell: This relationship indicates that one item may be sold in lieu of another item.
Up-Sell: This relationship indicates that a newer version of the item exists, and can be sold in place of the older item.
Service: This relationship establishes service items for a repairable item.
Prerequisite: This relationship indicates that you must possess one of the items as a requirement to possessing the other item.
Collateral: This relationship indicates collateral, such as marketing brochures, that you possess for an item.
Superceded: This relationship indicates that one item has replaced another item that is no longer available.
Complimentary: This relationship indicates if a customer purchases one item, the other item is received for free.
Impact: This relationship is used to relate items to each other but only under special conditions.
Conflict: This relationship indicates that these items may never be used together.
Mandatory Charge: This relationship indicates a mandatory charge if the customer purchases both items.
Optional Charge: This relationship indicates an optional charge if the customer purchases both items.
Promotional Upgrade: This relationship enables a customer to upgrade from one item to another item or equal or higher value, without an additional charge.
Split: This relationship enables you to split support for an item so you do not have to manually split support at contract renewal. To use this relationship, you must be in a planning enabled organization.
Merge: This relationship enables rules based consolidation of contracts. You may use the earliest or latest target end date for consolidation. This allows you to choose how contracts are consolidated. To use this relationship, you must be in a planning enabled organization.
Migration: During contact renewal you are given the option of renewing contracts based on new licenses, or old licenses. To use this relationship, you must be in a planning enabled organization.
Repair to: You use the Repair to item relationship with field service operations that use spares management functionality. If a part has been superseded by another part, the Repair to item relationship determines the replacement part.
-
Indicate if the item relationship type is substitute, indicate if planning is enabled for the substitute item.
-
Enter the Effective Dates if the item relationship is Split, Merge, or Migration.
-
Save your work.
Note: You can also define Item relationships by choosing Item Relationships from the Tools menu on the Master Items window.
To define details for Substitute Item Relationships:
-
Navigate to the Planning Details Substitute window by choosing the Planning Details from the Item Relationships window.
-
Select the Partial Fulfillment check box if applicable.
-
Enter the Effective Dates for the Substitution.
-
Select the All Customers check box if the substitution applies to all customers.
-
, If you have not checked the All Customers check box, enter the customer information in the Customer References region.
-
Save your work.
Defining Manufacturer Part Numbers
You can define manufacturer part numbers for items. You can use this information for reporting purposes; and in catalog searches for particular items.
To define manufacturers
-
Navigate to the Manufacturers window.
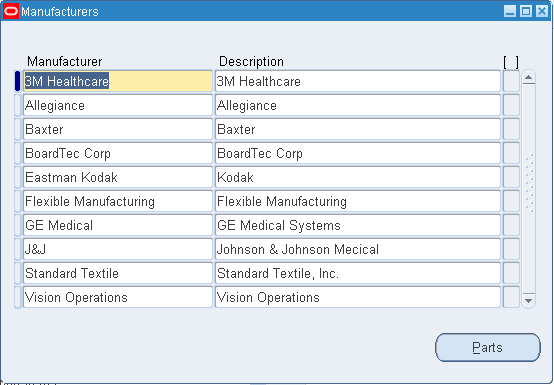
-
Enter the name of the manufacturer.
-
Save your work.
To enter an item and its associated manufacturer part number from the Manufacturers window
-
Navigate to the Manufacturers window.
-
Choose Parts.
-
Enter an item.
You can assign the same item to multiple manufacturer part numbers.
-
Save your work.
To associate an item with an existing manufacturer part number
-
Navigate to the Manufacturer Part Numbers window.
You can do this from the Navigator or from the Item window by choosing Manufacturer Part Numbers from the Tools menu.
-
Enter a manufacturer.
-
Enter a manufacturer part number.
-
Enter an item.
-
Save your work.
Assigning Subinventories to an Item
You can assign a list of subinventories to an item. You restrict an item to the list of subinventories by setting the Restrict Subinventories attribute when you define or update the item.
You also use the item/subinventory relationship to specify valid subinventories for zero quantity cycle counts for an item, and to specify items for an ABC analysis performed at the subinventory level. In these cases you do not have to set the Restrict Subinventories attribute, only establish the relationship between the item and subinventory.
You can also specify planning information and locators for the item in its assigned subinventories. This information is used to perform min-max planning and replenishment processing at the subinventory level.
To restrict an item to a list of subinventories
-
Navigate to the Master Items Summary or Organization Items Summary window.
-
Select an item.
-
Choose Item Subinventories from the Tools menu. The Item Subinventories window appears.
-
Enter a Subinventory to assign to the item.
-
Select the Planning tabbed region.
-
Indicate whether to use min-max planning for the item in this subinventory. If this subinventory uses PAR Level planning, this field is disabled.
If you do not check Min-Max Planning, the item is not planned at the subinventory level for this subinventory.
-
If you check Min-Max Planning, enter minimum quantity and maximum quantity on hand values.
Min Qty: `The on-hand quantity at which to place an order.
Max Qty: The suggested maximum quantity to maintain as on-hand inventory. This maximum displays on the min-max report, indicating that any order placed should not force the on-hand quantity of the item to exceed this quantity.
-
Optionally, enter a locator if you are using PAR Level planning for this subinventory. This field is disabled, if you do not enable PAR level planning on the Subinventories window. See: Defining Subinventories
-
Enter the PAR level if you entered a locator for the subinventory. You can assign an item to multiple locators within a subinventory, each with a different PAR level. However you cannot assign multiple PAR levels to the same locator.
-
Save your work.
To enter order modifier information for the item
-
Enter the fixed lot multiple quantity for the item.
-
Enter the minimum order quantity for the item in this subinventory.
Planning algorithms (min-max and replenishment) place orders of at least this quantity.
-
Enter the maximum order quantity of the item in this subinventory.
Planning algorithms (min-max and replenishment) place orders no greater than this quantity.
To enter sourcing information for the item
-
Select a source type.
Inventory: Fill requests for this item in this subinventory by creating internal requisitions that pull stock from existing inventory.
Supplier: Fill requests for this item in this subinventory by creating purchase requisitions that become purchase orders, procuring the material from a supplier.
Subinventory: Fill requests for this item in this subinventory by creating move order requisitions that become move orders, pulling the stock from an existing subinventory.
-
Enter the organization from which an internal requisition draws the item.
You must enter a value here when you select Inventory as the replenishment source type.
-
Enter the subinventory within the source organization from which an internal requisition draws the item.
You enter a value here only when you select Inventory as the replenishment source type and you specify a source organization.
To enter lead time information for the item in this subinventory:
-
Enter pre-processing, processing, and post-processing lead times.
Related Topics
Updating Organization Level Items
Assigning Items to a Subinventory
You can assign items to a given subinventory. Assigning items to a subinventory does not restrict the subinventory to that list of items. Rather, the items are restricted to that subinventory. Thus, you can always issue and receive unrestricted items to any subinventory, but you can only issue and receive restricted items to their list of subinventories. You activate the list of subinventories for a restricted item by setting the Restrict Subinventories attribute when defining or updating items.
You also use the item/subinventory relationship to specify valid subinventories for zero quantity cycle counts for an item, and to specify items for an ABC analysis performed at the subinventory level. In these cases you do not have to set the Restrict Subinventories attribute, only establish the relationship between the item and subinventory.
To restrict an item to a list of subinventories
-
Navigate to the Subinventories Summary window.
-
Select a subinventory.
-
Choose the Item/Subinventory button. The Item Subinventories window appears.
-
Enter an Item to assign to the subinventory.
-
Select the Planning tabbed region.
-
Indicate whether to use min-max planning for the item in this subinventory. If this subinventory uses PAR Level planning, this field is disabled.
If you do not check Min-Max Planning, the item is not planned at the subinventory level for this subinventory.
-
If you check Min-Max Planning, enter minimum quantity and maximum quantity on hand values.
Min Qty: `The on-hand quantity at which to place an order.
Max Qty: The suggested maximum quantity to maintain as on-hand inventory. This maximum displays on the min-max report, indicating that any order placed should not force the on-hand quantity of the item to exceed this quantity.
-
Optionally, enter a locator if you are using PAR Level planning for this subinventory. This field is disabled, if you do not enable PAR level planning on the Subinventories window. See: Defining Subinventories
-
Enter the PAR level if you entered a locator for the subinventory. You can assign an item to multiple locators within a subinventory, each with a different PAR level. However you cannot assign multiple PAR levels to the same locator.
-
Save your work.
To enter order modifier information for the item
-
Select the Order Modifiers tabbed region.
-
Enter the fixed lot multiple quantity or repetitive rate (units per day) for the item.
-
Enter the minimum order quantity or repetitive rate (units per day) for the item in this subinventory.
Planning algorithms (min-max and replenishment) place orders of at least this quantity.
-
Enter the maximum order quantity or repetitive rate (units per day) of the item in this subinventory.
Planning algorithms (min-max and replenishment) place orders no greater than this quantity.
To enter sourcing information for the item
-
Select the Sourcing tabbed region.
-
Select a source type.
Inventory: Fill requests for this item in this subinventory by creating internal requisitions that pull stock from existing inventory.
Supplier: Fill requests for this item in this subinventory by creating purchase requisitions that become purchase orders, procuring the material from a supplier.
Subinventory: Fill requests for this item in this subinventory by creating move order requisitions that become move orders, pulling the stock from an existing subinventory.
-
Enter the organization from which an internal requisition draws the item.
You must enter a value here when you choose Inventory as the replenishment source type.
-
Enter the subinventory within the source organization from which an internal requisition draws the item.
You enter a value here only when you choose Inventory as the replenishment source type and you specify a source organization.
To enter lead time information for the item in this subinventory
-
Select the Lead Times tabbed region.
-
Enter preprocessing, processing, and post-processing lead times.
To enter the locator to which to assign the item in the subinventory
-
Enter a locator.
You restrict an item to the list of locators you define here by setting the Restrict Locators attribute when you define the item.
Related Topics
Updating Organization Level Items
Defining Item Revisions
-
Navigate to the Item Revisions window from one of the following windows:
-
Master Items Summary folder or Master Item window
-
Organization Items Summary folder or Organization Item window
-
Bills of Material window
-
Engineering Change Orders window
-
-
Enter an alphanumeric revision for the item.
You can use letters, numbers, and characters (such as *, &, and #) to label revisions. Letters are always in upper case and numbers may include decimals. To ensure that revisions sort properly, decimals should always be followed by a number. Valid revisions can include: A, B, 01, 02, A1, B1, 1A, 1B, 0.0, 0.1, A.0, A.1, and so on. Revisions are sorted according to ASCII rules. Each revision must be greater than the previous revision. Therefore, you cannot use revision 10 after revision 9 because, according to ASCII sorting, 10 precedes 9.
The value you entered in the Starting Revision field in the Organization Parameters window displays as the starting revision for the item.
For revisions that have the same effective date, the revisions sort in descending order starting with the last revision you entered.
-
Enter the effective date (start date) of the item revision.
You can also define and update item revisions through engineering change orders (ECOs).
-
Save your work.
Related Topics
Defining Engineering Change Orders, Oracle Engineering User's Guide
Defining Item Transaction Defaults
Use this form to define a default subinventory and/or locator for an item for shipping, receiving, and move order transactions. Oracle Shipping Execution displays the default shipping information when you ship an item. Oracle Inventory displays the default receiving information when you receive an item. For move orders, Oracle Inventory derives the default put away locator when you transact an item into a locator controlled subinventory if no locator was specified by the creator of the move order.
Prerequisites
- Define at least one item
- Define at least one subinventory
- Define at least one locator for the subinventory
To define a default transaction subinventory for an item
-
Navigate to the Item Transaction Defaults window.
-
Select the Subinventories tabbed region.
-
Enter an item for which you want to assign a default transaction subinventory.
-
Shipping: Assign a default shipping subinventory to the item.
Receiving: Assign a default receiving subinventory to the item.
Move Order Receipt: Assign a default move order subinventory to the item.
Note: The Item Transaction Defaults window defaults the subinventory only for non-reservable items. Pick release defaults to this subinventory only for non-reservable items.
-
Enter a subinventory to use as the default transaction subinventory for the item.
If you restrict the item to specific subinventories using either the Subinventory Items window or the Item Subinventories window, you can only choose those subinventories in this field. See: Assigning Subinventories to an Item or Assigning Items to a Subinventory
-
Save your work.
To define a default transaction locator for an item in a subinventory
-
Select the Locators tabbed region.
-
Enter an item to assign a default transaction locator for the subinventory associated with the item.
-
Enter a subinventory to use as the default transaction subinventory for the item.
If you restrict the item to specific subinventories using either the Subinventory Items window or the Item Subinventories window, you can only choose those subinventories in this field. See: Assigning Subinventories to an Item or Assigning Items to a Subinventory
Important: If you already defined a default shipping and/or receiving subinventory in the Subinventories tabbed region, you should assign the same subinventory to the item in this field.
-
Select the type of default:
Shipping: Assign a default shipping locator to the item for this subinventory.
Receiving: Assign a default receiving locator to the item for this subinventory.
Move Order Receipt: Assign a default move order locator to the item for this subinventory .
-
Enter a locator to use as the default transaction locator for the item in this subinventory.
-
Save your work.
Related Topics
Searching for Items
Use the Item Search window to search for items based on any combination of criteria you specify. For example, you can view all items:
-
matching specified inventory detail, or having a specified descriptive element value
-
belonging to a specified category
-
related to or that are substitutes for a specified item
-
having a particular cross-reference
-
matching specified purchasing information
You can specify as much or as little criteria as you want. The search returns all items that match all the criteria you entered.
To specify the search criteria for an item
-
Navigate to the Item Search window. The Find Items window appears.
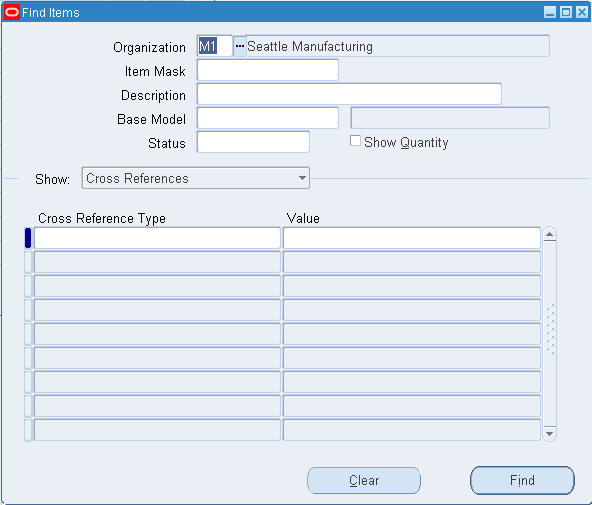
-
Enter an organization in which to search for an item. If you choose null you can search across organizations, but you must enter some other type of search criteria.
-
Enter an item value to use as search criteria. You can enter an item, a partial value with a wildcard, or leave the field blank. If you leave the field blank, the search is made for all items.
Note: This item field is for entering search criteria only. A list of items is not available and the value you enter is not validated. This allows you to enter partial values and wildcards to enhance search capabilities.
-
Optionally, enter a base model, to identify the model from which an ATO configuration was created.
Note: Oracle Purchasing does not use this field.
-
Optionally, enter an item status. See: Defining Item Status Codes.
-
Indicate whether quantity information should display. If you query on non-quantity criteria, quantity information is not displayed unless you check this option.
-
Optionally, enter search criteria into any combination of the following tabbed regions:
-
Cross References: Enter a cross-reference type (the group of cross-reference names) and a value (the entity you cross-reference to the item) that corresponds to the type you specified. See: Defining Cross-Reference Types.
-
Item Relationships: Enter the relationship type and the related item. Items can be Related in a non-specific way or they can Substitute for each other. See: Defining Item Relationships.
-
Purchase Details: Enter the manufacturer name and part number, the supplier name, item number and contract number, or a blanket agreement number. See: Defining Manufacturer Part Numbers.
-
Item Categories: Enter a category set and an associated category. See: Defining Category Sets and Defining Categories.
-
Quantity Types: Indicate whether to search for items using the Available to Reserve quantity or the On-Hand Quantity, choose a condition for comparing the quantity type to a specified quantity, and specify a quantity for which to search.
-
Item Catalogs: Enter a catalog group, descriptive element names and values, or indicate whether you want to search for items you have specified as having a complete catalog. You specify that an item has a complete catalog when you have entered values for all the required descriptive elements. See: Defining Item Catalog Groups and Defining Descriptive Elements.
-
-
When you have entered your criteria choose the Find button. The results of the search appear in the Item Search window.
Information for matching items displays including the item, description, organization, unit of measure, and quantity. The quantity is displayed only if you entered quantity related criteria.
To view more information about a matching item
-
Choose an option from the Tools menu to navigate to a new window providing further information about the item.
Item Deletion
The major use of item delete is to correct data entry errors. For example, if you defined an item with the wrong primary unit of measure, you can use the delete function to remove the item from your database. If you use an item (buy it, stock it, transact it, and so on) you can either obsolete the item and prevent its further use or you can first remove all references to the item and then delete it. Oracle Inventory checks all possible references to an item and does not allow it to be deleted until every reference is removed. Once an item is used, references to it are created. Using an item means buying it on a purchase order, creating on-hand quantity via cycle count or physical inventory, assigning the item to a bill of material, building the item on a job or repetitive schedule, and so on. This means that if you transact an item, for example, you must first purge the transactions before you can delete the item.
Note: Note that deleted items are not archived.
Define Delete Constraints
You can define your own delete constraints that are checked before deleting an item. User-defined delete constraints supplement the standard predefined item delete conditions that Oracle provides. Use the Delete Constraint window to define your own delete conditions.
You can check for references to an item before deleting it. You can also check for references without having to delete the item.
See: Creating Custom Delete Constraints, Oracle Bills of Material User's Guide.
Entities Checked When Deleting
The following table presents conditions that are checked before an item is deleted:
| Delete Constraint | Conditions checked |
|---|---|
| ITM_CON3 | Transaction history in MTL_MATERIAL_TRANSACTIONS |
| ITM_CON4 | Pending transactions in MTL_MATERIAL_TRANSACTIONS_TEMP |
| ITM_CON5 | On-hand balances in MTL_ONHAND_QUANTITIES |
| ITM_CON6 | Physical inventory history in MTL_PHYSICAL_ADJUSTMENTS |
| ITM_CON7 | Physical inventory tags in MTL_PHYSICAL_INVENTORY_TAGS |
| ITM_CON8 | Replenishment counts in MTL_REPLENISH_LINES |
| ITM_CON9 | Potential replenishment counts in MTL_REPLENISH_LINES_INT |
| ITM_CON11 | Uncounted cycle count requests for the item in MTL_CYCLE_COUNT_ENTRIES with status_code > 1 |
| ITM_CON12 | Planned receipts and intransit quantities in MTL_SUPPLY |
| ITM_CON13 | Pending transactions in MTL_TRANSACTIONS_INTERFACE |
| ITM_CON14 | A bill of materials for the item in BOM_BILL_OF_MATERIALS |
| ITM_CON15 | The item is a component on a bill in BOM_INVENTORY_COMPONENTS |
| ITM_CON16 | A routing exists in BOM_OPERATIONAL_ROUTINGS |
| ITM_CON17 | The item is a substitute component for a bill in BOM_SUBSTITUTE_COMPONENTS |
| ITM_CON18 | Any forecasts containing the item in MRP_FORECAST_ITEMS |
| ITM_CON19 | Master schedules containing the item in MRP_SCHEDULE_ITEMS |
| ITM_CON20 | A copy of an MRP planned item in MRP_SYSTEM_ITEMS |
| ITM_CON21 | The item appears as a revised component in ENG_REVISED_COMPONENTS |
| ITM_CON22 | The item appears as a revised item or a use up item on an engineering change order (ECO) in ENG_REVISED_ITEMS |
| ITM_CON23 | Discrete jobs or repetitive schedules for the item (assembly) in WIP_ENTITIES |
| ITM_CON24 | Discrete jobs or repetitive schedules that require the item in WIP_REQUIREMENT_OPERATIONS |
| ITM_CON25 | 'Blanket' or 'contract' Purchase Orders for the item in PO_LINES and PO_HEADERS |
| ITM_CON26 | Shipments of the item in RCV_SHIPMENT_LINES |
| ITM_CON27 | Requisitions for the item in PO_REQUISITION_LINES |
| ITM_CON28 | Potential requisitions for the item in PO_REQUISITIONS_INTERFACE |
| ITM_CON29 | Any ReqExpress template lines for the item in PO_REQEXPRESS_LINES |
| ITM_CON30 | An autosource rule for the item exists in PO_AUTOSOURCE_RULES |
| ITM_CON31 | Any PO lines for the item with a ship-to location in the current organization in PO_LINES and PO_LINE_LOCATIONS |
| ITM_CON32 | Receiving transactions for the item in RCV_TRANSACTIONS_INTERFACE |
| ITM_CON33 | Any discrete jobs to build the item in WIP_DISCRETE_JOBS |
| ITM_CON34 | Any potential discrete jobs or repetitive schedules for the item to be loaded into Oracle Work in Process in WIP_JOB_SCHEDULE_INTERFACE |
| ITM_CON35 | The item is identified as a purchased item resource in BOM_RESOURCES |
| ITM_CON36 | No invoices, or credit memo or commitment line transactions exist in RA_CUSTOMER_TRX_LINES |
| ITM_CON37 | Cost update adjustment details for the item in CST_STD_COST_ADJ_VALUES |
| ITM_CON38 | Cost roll up and cost type purge information in CST_COST_TYPE_HISTORY |
| ITM_CON39 | The item in any ABC compile in MTL_ABC_COMPILES |
| ITM_CON40 | The item in any ABC class assignments in MTL_ABC_ASSIGNMENTS |
| ITM_CON41 | Any demand for the item in MTL_USER_DEMAND |
| ITM_CON42 | Any supply for the item in MTL_USER_SUPPLY |
| ITM_CON43 | The item is included in a bill of resource set in CRP_BILL_OF_RESOURCE_ITEMS |
| ITM_CON44 | Sales order lines for the item exist in SO_LINES |
| ITM_CON45 | Sales order line details exist for the item in SO_LINE_DETAILS |
| ITM_CON46 | Picking lines exist in SO_PICKING_LINES |
| ITM_CON47 | Any upgrade history for the item in CST_STANDARD_COSTS |
| ITM_CON48 | Items in the master organization existing in a child organization where the item fails delete constraints for that child organization |
| ITM_CON49 | Pull sequence exists for this item (MTL_KANBAN_PULL_SEQUENCES) |
| ITM_CON50 | Kanban cards exist for this item (MTL_KANBAN_CARDS) |