Employment Agreements and Legal Compliance
Employment Agreements and Legal Compliance
In your agency, you may have employment agreements that govern employment terms and conditions. These agreements may cover a few, many, or all of your workforce and the terms that they define could vary, depending on the particular situation of an employee. For example, the employment terms and conditions such as pay, work schedules, vacations, and deductions from wages may vary for an employee or groups of employees. The employer and the representatives of the employees, for example union representatives, negotiate the working terms and conditions specified in the employment agreement
Apart from adhering to the employment agreements, an agency has to submit several reports to government authorities to ensure legal compliance. For example, Oracle HRMS enables you to submit CPDF and EHRI reports, and record details of occupational health and safety measures.
Complaint Tracking
Complaint tracking is the process of recording information about a charge of discrimination brought against an agency by one or more people. Using complaint tracking, you can track a complaint from the first contact of a complainant through the final decision. You can maintain an accurate history of the complaint as it progresses, including information such as claims, bases, and incidents associated with a complaint, corrective actions, and costs related to the complaint.
You can also produce the annual EEO Form 462 report, a summary of the complaints processed that year, as a formatted PDF file.
See: Complaint Tracking Overview
Representing Employment Agreements Using Oracle HRMS
In Oracle HRMS, you represent an employment agreement as a collective agreement. Using Oracle HRMS, you can:
-
Set up the collective agreement to contain the employment terms and conditions that apply to everyone covered by it
-
Specify the values your workforce receives for performing specific roles or at specific locations
-
Define the rules which ensure eligible workforce receive specific values such as one month of annual vacation that an employee completing minimum six months of employment in your enterprise receives
-
Automatically assign values to your eligible workforce, when they are eligible for multiple values, by calculating the most beneficial value for them
For more information about representing employment agreements using Oracle HRMS, see: Collective Agreements
Recording Occupational Health and Safety Details Using Oracle HRMS
Using Oracle HRMS, you can:
-
Record occupational health and safety measures such as medical assessments, disability information, and injuries at work (work incidents) for the people in your enterprise
-
specify the disability concessions such as tax reduction and special consideration in work schedules such as part-time work
-
record multiple medical assessments such as recruitment medical assessment or annual medical assessment
Oracle HRMS enables you to link this information together. For example, if a medical assessment is required as the result of a work accident, and that assessment then diagnoses a disability in the person, you can connect these records to one another.
Reporting for Legal Compliance
Oracle HRMS and Oracle HRMSi provide support for several countries to enable employers to fulfill their statutory reporting requirements. For example, you can submit the transmittal forms and files required by the Office of Personnel Management (OPM), including the Organizational Component Translation report, CPDF Status and Dynamics report, and the Standard Form 113-A Monthly Report of Federal Civilian Employment (SF113-A) report. You can also generate the required Enterprise Human Resources Integration Reports (EHRI) Status and Dynamic reports.
See: CPDF and EHRI Reports, SF-113A
If your agency uses the National Finance Center (NFC) as a provider for government reports, you can submit the necessary position and personnel information to the NFC for their use in preparing these reports.
See: National Finance Center Interface, Oracle HRMSConfiguring, Reporting, and System Administration Guide
Key Concepts
To effectively use Oracle HRMS for employee agreements and legal compliance, see:
Employment Agreements and Legal Compliance
Oracle HRMS enables you to record employment agreements, track complaints, submit CPDF reports, and record details of occupational health and safety measures.
What CPDF data can I submit to OPM?
You can submit the transmittal forms and files required by the Office of Personnel Management (OPM), including the Organizational Component Translation report, CPDF Status and Dynamics report, and the SF113-A report.
What phases of the complaint process can I manage?
Complaint tracking is the process of recording information about a charge of discrimination brought against an agency by one or more people. Using complaint tracking, you can track a complaint from the first contact of a complainant through the final decision. You can maintain an accurate history of the complaint as it progresses, including information such as claims, bases, and incidents associated with a complaint, corrective actions, and costs related to the complaint.
Can I have selected employees covered by an employment agreement in my enterprise?
Oracle HRMS enables you to have some employees covered by an employment agreement and few others not covered by any employment agreement. For the employees covered by an employment agreement, you record the collective agreement details.
In an enterprise, can different employment agreements cover different employees?
Oracle HRMS provides the flexibility to maintain multiple employment agreements to cover different groups of people in an enterprise. For example, if you have officer workers and factory workers in your enterprise, you can maintain two different employment agreements to suit the groups.
How do I represent employment agreements in Oracle HRMS?
You represent an employment agreement in Oracle HRMS as a collective agreement. You represent the terms and conditions, as entitlement items that employees covered by the employment agreement will receive.
Can I specify which employees can receive specific terms of employment, for example the vehicle allowance?
You can define eligibility profiles (rules) that ensure that only employees who meet the eligibility rules receive the specific terms of employment, in this case the vehicle allowance.
Can an employee continue to receive a specific employment term after an event makes the employee ineligible for it?
Yes, an employee can still receive an employment term even if they are no longer eligible for them. For example, if by transferring from a location an employee becomes ineligible for a location allowance, you can define it as a retained right if you still want them to receive it. The employee will continue to receive the allowance for the period you define in this window.
What are the terms of employment that I can represent in a collective agreement?
Oracle HRMS enables you to represent the terms of employment based on your business requirements. Some of the terms of employment you can represent are pay, work schedules, vacations, termination notice, maternity leave, and deductions from wages.
Which occupational health and safety details can I maintain in Oracle HRMS?
You can record occupational health and safety details such as medical assessments of your employees, any injuries caused during work, and employee disabilities. You can also specify if the disability is the result of an injury at work.
What types of work injuries can I record?
Oracle HRMS enables you to record work injuries that occur at work, on the way to or from work, and in other circumstances that your enterprise defines as work-related.
Can I link the medical assessments, disability information, and work incident details?
You link these occupational health and safety details by relating one to the other. For example, if you do a medical assessment because of a work incident, which in turn results in a disability, then you mention them in the medical assessments, disability information and work incidents records.
Can I generate government-mandated reports covering disabilities, occupational health, and safety details?
Oracle HRMS enables you to generate government-mandated reports concerned with employment opportunities for people with various types of disabilities (Americans with Disabilities Act reports) and reports about the extent and severity of work-related injuries and illnesses affecting employees (Occupational Safety and Health Administration reports).
CPDF and Other Government Reporting
CPDF and EHRI Reports
The Office of Personnel Management (OPM) requires agencies to submit data about their employees to the Central Personnel Data Files (CPDF) and to the Enterprise Human Resources Integration Reports (EHRI) server.
After contacting OPM and coordinating the transmission of the CPDF and EHRI files, you can generate the required EHRI Status and Dynamics reports as well as the CPDF files and transmittal forms. These files include:
-
CPDF Organizational Component Translation (OCT): A record of the organizational codes, titles, and hierarchical relationships for organizations within an agency as of the last day of the quarterly reporting period.
-
CPDF Status Data: A record or snapshot of each employee's personnel data as of the ending date of a fiscal quarter. Status Data submissions include all active employees, both in a pay and non-pay status, on the agency rolls as of the end of the quarterly reporting period.
-
CPDF Dynamics Data: A record of the personnel data changes that occurred for the employee during a reporting period.
Note: If you process and update a dual action RPA, the CPDF Dynamics report treats the NOACs individually, listing each on a separate row.
-
EHRI Status Data: A record of each employee's personnel data as of the ending date of a calendar month. Status data submissions consists of all active employees in a pay or non-pay status on the agency rolls as of the end of the pay period. The status data reflects the employee's position of record, the person's permanently assigned position. The monthly submission file includes Telework information.
-
EHRI Dynamics Data: A list of all the employee personnel actions that you processed during a bi-weekly reporting period.
The Cybersecurity Category or Specialty Area code is used to identify incumbents or positions for which the primary function is cyber security. The cybersecurity code is stored in the US Federal Position Group 1 Extra Position Information (EIT). To comply with OPM statutory requirements, the Enterprise Human Resources Integration (EHRI) Status and Dynamic reports include information on cybersecurity codes across occupational series for positions.
-
EHRI Organizational Component Translation (OCT): A record of the organizational codes, titles, and hierarchical relationships for organizations within an agency.
See: Running the EHRI Status Report
See: Running the EHRI Dynamics Report
See: Running the EHRI Organizational Component Translation Report
CPDF Edits
The OPM has established sets of criteria against which it checks each of the file submissions. The application incorporates the CPDF edit checks and runs these checks when you process a Request for Personnel Action and when you update the human resource database.
If the OPM decides that a submission does not meet its quality standards, OPM notifies you of the errors and either recommends that you resubmit the files or that you wait and have the corrections reflected in the next report.
Appropriated and Non-appropriated Fund Positions
CPDF Status and Dynamic reports only include appropriated fund positions. When you create a new position, the application automatically enters APPR (Appropriated Fund Position) as the default Position Type in Position Group 2 Extra Information.
See: Defining a Position
Security
The EHRI and CPDF Status and Dynamic reports retrieve all the position and employee records for the business group associated with your login responsibility. If you have set up cross-business group functionality, the application runs the report for all business groups.
See: Setting up Standard HRMS Security, Oracle HRMS Configuring, Reporting, and System Administration Guide
Retirement Data Reporting
The Office of Personnel Management (OPM) requires agencies to submit retirement data about their employees to process retirements for Federal employees in a timely and accurate manner. OPM has detailed data reporting requirements for the Electronic Retirement Record (ERR) Data Feed. Oracle Federal HR provides the 'Retirement Data Report' to accomplish the reporting needs of the Guide to Human Resources Reporting (GHRR).
The Guide to Human Resources Reporting (GHRR) can be found using the following link: http://www.opm.gov/feddata/ghrr/index.asp
See: Setting Up Information for the Retirement Data Report
See: Running the Retirement Data Report
Organizational Component Translation Report
The Organizational Component Translation Report (OCT) shows the organizational management reporting structure. The system builds this report using the US Federal Org Reporting Info entered for the position's organization.
When you run the OCT report, you choose an agency code and a position hierarchy. The report function accesses the position detail and produces the report.
For example, if you create a position hierarchy where a clerk (agency code XX01) reports to an accountant in a different organization (agency code XX09), when you run the report for agency XX01, the clerk position isn't included, because it reports to a different agency. If you run the report for agency XX09, the clerk position is included, but the accountant position is not.
For each position in the position hierarchy, the report checks the US Federal Org Report Info for the position's organization. If you have completed the OPM Org Component information for the US Federal Org Report Info, the report prints the following information:
-
Agency Code using the first two characters of the Position's Key Flexfield Agency Code/Subelement
-
OPM Organizational Component using the Position Group 1 flexfield
-
Organization Title using the Organization's Name field
The report indents the Organization Title for each level of the hierarchy.
If you have not entered the US Federal Org Report Info information, the report prints no information for the position and skips to the next position.
Standard Form 113-A Monthly Report of Federal Civilian Employment
Federal agencies complete and submit to the Office of Personnel Management (OPM) monthly reports on federal civilian employees. The Monthly Report of Federal Civilian Employment SF 113-A covers statistical information on work schedule, types of appointments, positions occupied, wage system, citizenship, payroll, turnover, and Office of Management and Budget ceiling related data. This report also summarizes monthly data about federal civilian employment, payroll, and turnover.
To report on earnings information, your agency must create a reverse interface to Payroll. The product does not automatically derive that information for you.
SF 113-A
The body of the SF 113-A consists of a header, four main sections, and a signature line. Each line item value within each section is also detailed by geographic area. The sections include:
-
Header: Details agency and reporting period information.
-
Current Status: Reports the current employment for an agency or reporting group at the end of the month. It covers the Work Schedule, Type of Appointment, Position Occupied, Wage System, and Citizenship of Federal civilian employees.
-
Payroll: Shows the monthly wages and salaries earned by Federal civilian employees during the reporting period, and lump sum amounts for annual leave paid to employees who have separated from the Federal Government during the reporting period. Employment totals relate to the report's "as of" date. The period for the preceding report starts the day after the "as of" date and ends the "as of" date of the current period. Payroll figures are reported in the nearest whole thousands of dollars.
-
Turnover: Covers personnel actions that result in additions to (accessions) and losses from (separations) an agency's workforce. The turnover data only reflects accessions and separations having effective dates during the period covered.
-
Data Excluding Special Employment Categories: Reports employment that excludes the former ceiling exempt employees. It is commonly referred to as Employment Ceiling Data.
-
Signature Line: Details person, position, and date information of submission.
Security
Your login responsibility and its corresponding security profile determine which records you can view and process. When generating the required reports, make sure that you login using a view-all responsibility.
If you have set up cross-business group functionality, the application runs the report for all business groups; otherwise, it runs the report for your current login's business group.
Creating CPDF Reports
The Office of Personnel Management (OPM) requires agencies to submit data about their employees to the Central Personnel Data Files (CPDF). When the application counts records before generating CPDF reports, it acts only on Appropriated positions.
You generate a file and transmittal form for each of the required CPDF reports from the Submit Processes and Reports window.
-
In the Name field, select CPDF Organizational Component Tracking Rpt.
-
Enter the Parameters field to open the Parameters window. Enter the required parameters:
-
Report Date, the
This date is the last day of a reporting period.
-
Agency name
-
Name of Position Hierarchy
If you have created more than one position hierarchy, you also enter the Position Hierarchy/Version Number.
-
File Name you want to assign to the output file
-
-
Click the Submit button.
To run the OCT Transmittal Form
-
In the Name field, select CPDF OCT Report Transmittal Form.
-
Enter the Parameters field to open the Parameters window. Enter the required parameters:
-
Report Date
This is the same date that you entered for the OCT report; that is, the last day of the reporting period.
-
Agency Code
-
Subelement
-
Name of Position Hierarchy
If you have created more than one position hierarchy, you also enter the Position Hierarchy/Version Number.
-
-
Click the Submit button.
-
In the Name field, select CPDF Status Report.
-
Enter the Parameters field to open the Parameters window. Enter the required parameters:
-
Report file name you want to assign to the output file
-
Report Date
This is the last date of the reporting period.
-
Agency Code
-
Subelement
-
-
Click the Submit button.
To run the Status Data Transmittal Form:
-
In the Name field, select CPDF Status Report Transmittal Form.
-
Enter the Parameters field to open the Parameters window. Enter the Report Date you entered for the Status Data report.
-
Click the Submit button.
To run the Dynamics Data report
-
In the Name field, select CPDF Dynamics Report.
-
Enter the Parameters field to open the Parameters window. Enter the required parameters:
-
Report Filename you want to assign to the output file
-
Report From and To dates
-
Agency Code
-
Subelement
-
-
Click the Submit button.
To run the Dynamics Data Transmittal Form
-
In the Name field, select CPDF Dynamics Report Transmittal Form.
-
Enter the Parameters field to open the Parameters window. Enter the Report To and From dates for the reporting period month.
-
Click the Submit button.
Running the EHRI Status Report
The Enterprise Human Resources Integration Reports (EHRI) Status report is a record of each employee's personnel data for the calendar month. The monthly submission file includes Telework information. To comply with OPM statutory requirements, the Enterprise Human Resources Integration (EHRI) Status report includes information on cybersecurity codes across occupational series for positions.
You can generate the EHRI Status report as a flat file ASCII or XML format with the reported data separated by a pipe delimiter. You transmit the report using the ASCII output. When running the EHRI Status report, you enter the same report parameters as the CPDF Status report.
Use the Request Submit window to generate the report.
To run the EHRI Status report
-
In the Name field, select EHRI Status Report.
-
Click the Parameters field to open the Parameters window.
-
Enter the report file name you want to assign to the output file.
-
Agency Code
-
Agency Sub-element
-
Report Date (the last date of the reporting period)
-
-
Click OK to accept the Parameters and close the window.
-
Click Submit to generate the report.
-
To locate the path of the ASCII and XML files, in the View Requests window, select the row for the report and click View Log.
The report generates an ASCII and an XML file. You can submit the resulting ASCII output to the OPM.
Running the EHRI Dynamics Report
The EHRI reports lists the employee personnel actions processed during a bi-weekly reporting period.. To comply with OPM statutory requirements, the Enterprise Human Resources Integration (EHRI) Dynamics report includes information on cybersecurity codes across occupational series for positions.
You can generate the EHRI Dynamic report as a flat file ASCII or XML format with the reported data separated by a pipe delimiter. You can transmit the report using the ASCII output.
Use the Request Submit window.
To run the EHRI Dynamics report
-
In the Name field, select EHRI Dynamics Report.
-
Click the Parameters field to open the Parameters window. Enter the required parameters:
-
Report Filename you want to assign to the output file
-
Agency Code
-
Subelement
-
Report Start Date
-
Report End Date
-
-
Click OK to accept the Parameters and close the window.
-
Click Submit to generate the report.
-
To locate the path of the ASCII and XML files, in the View Requests window, select the row for the report and click View Log.
The report generates an ASCII and an XML file. You can submit the resulting ASCII output to the OPM.
Running the EHRI Organizational Component Translation Report
The EHRI Organizational Component Translation Report (OCT) shows the organizational management reporting structure for a specified agency on or before the reporting date. The application builds this report using the US Federal Org Reporting Info entered for an HR organization created using the HR Organization classification. For the report to provide data, the HR organization must be associated with at least one active federal position.
If you have not entered the US Federal Org Report Info information, the report prints no information for the organization and skips to the next organization. For more information on entering the US Federal Org Report Info, see: HR Organizations: Entering US Federal Reporting Information
To run the EHRI Organizational Component Translation Report
-
In the Name field, select EHRI Organizational Component Translation Report.
-
Click the Parameters field to open the Parameters window.
-
Enter the required parameters:
-
Report date on which you want to run the report.
-
Report name you want to assign to the output file.
-
Agency Code using the first two characters of the Position's Key Flexfield Agency Code.
-
Subelement, which is the OPM assigned agency subelement.
-
Organization hierarchy for which you want to generate the report.
-
Organization hierarchy version number.
-
-
Click OK to accept the Parameters and close the window.
-
Click Submit to generate the report.
Report Output
Submitting agencies are responsible for providing the report. Each EHRI Organizational Component Translation data file name conforms to the following naming convention:
OYYYYMMDDAAAA_V_R
Each portion of the file name is explained in the following table.
| Name Segment | Description |
|---|---|
| O | Constant value of “O” indicating an Organizational Component Translation file. |
| YYYY | For file as of date, indicates century (20) and year (01-99). |
| MM | For file as of date, indicates month (01 to 12). |
| DD | For file as of date, indicates the day (01 to 31). |
| AAAA | Indicates the agency or agency/subelement code for the submitting agency. |
| N | Resubmission indicator. One the first submission for each as of date, N is a numeric zero. If the data is resubmitted for the same as of date, the value of N is increased by 1. |
| V_R | Version (V) and Release (R) numbers for the file specification. This will allow the data warehouse load program to identify the file layout during transmission and load of the file.
Note: The version and release numbers for this Guide is 1.1. |
Creating SF 113-A Monthly Report of Federal Civilian Employment Reports
To report employment information to the Office of Personnel Management, you run the Federal Civilian Employment Report SF 113-A and transmittal forms as of the last calendar day of the month. You can submit the report as a Microsoft Excel spreadsheet. You can then mail or fax the report using the address at the bottom of the form.
Use the Submit Processes and Reports window.
To run the SF 113-A Report
-
In the Name field, select SF-113A - Federal Civilian Employment Report.
Note: To create Excel reports, your system administrator must specify the browser settings at the site level for the following system profiles: Viewer: Application XML, Viewer: Application Text, and Viewer: Text.
-
Click the Parameters field to open the Parameters window, enter the required information, and then click OK:
-
Agency code and Agency/Subelement
-
Employment as of Date: the last calendar day of the month.
-
Pay From Date and Pay To Date: the pay period dates
-
Previous Report Date
-
Report Date: the date that you want to have appear on the report.
-
-
Click Options in the Upon Completion region to display the format choices. In the GHSF113AOUT template row, select Excel from the Format list of values and click OK.
-
Click Submit to process the request.
The application generates the data in an XML structure which it then merges with an RTF template to generate the output in a Microsoft Excel spreadsheet.
Completing the AA/EEO Breakdown Report
You can run the AA/EEO Breakdown report from the Submit Requests window or from the Breakdown folder. You use the Breakdown folder if you want to save your report criteria and customize the presentation of the data. The parameters you specify determine values such as the agency, organization, and pay plan that appear on the report.
Submit Requests
Use the Concurrent Manager Submit Requests window.
To run the AA/EEO Breakdown Report from the Submit Requests window
-
Choose the agency on which you are reporting in the Agency Code field.
-
Choose the agency's subelement in the Agency/Subelement field.
-
Choose a category on which you want to report in the By Clause field, for example Appointment Type or Occupational Category Code.
Note: The By Clause field is required.
-
Choose the Within Clause, either Pay Plan or Occupational Category Code (PATCOB).
-
Choose the organization type by which you want to view the report in the For Clause field.
The For Clause controls the page breaks for your report.
-
Enter the date for which you want to see report values in the Effective Date field.
-
Choose an Organization Hierarchy.
See: Organization Hierarchies , Creating Organization Hierarchies
-
Choose the Build Data button to run the report.
The report results display in the Breakdown window.
Breakdown Folder
Use the Breakdown window.
To run the AA/EEO report from the Breakdown Folder
-
Enter a Name for the report or query an existing report.
For example, you might name a report EEO By Grade that summarizes complaints by Grade Level.
-
Follow steps 2 through 8 above to generate the report as you would from the Submit Requests window.
Setting Up Information for the Retirement Data Report
Before you generate the Retirement Data report, ensure that the data for positions and employees is available using the following components:
Extra Person Information Types:
-
US Federal Retirement Data Reporting Info
-
US Federal Retirement Data Report Bank Details
-
US Federal Retirement Benefits
-
US Federal Retirement Data OWCP
-
US Federal Separation and Retirement
-
US Federal Uniformed Services
-
US Federal Person Benefit Information
-
US Federal Person Retirement System Information
Extra Position Information Types:
US Federal Position Group 2
RPA Extra Information Types:
-
US Federal Retirement Data Reporting
-
US Federal Retirement Benefits
-
US Fed Retire Data Report Separation and Retirement
-
US Federal IPA Tribal Org Union Official Transfer
-
US Federal Uniformed Services
-
US Fed Non Pay or Non Duty
-
US Fed Appointment with Transfer
-
US Federal Retirement System Info
Running the Retirement Data Report
The Office of Personnel Management (OPM) requires agencies to submit retirement data about their employees to process retirements for Federal employees in a timely and accurate manner. OPM has detailed data reporting requirements for the Electronic Retirement Record (ERR) Data Feed. Oracle Federal HR provides the 'Retirement Data Report' to accomplish the reporting needs of the Guide to Human Resources Reporting (GHRR).
Important: This report is unique to OPM requirements as both HR and Payroll data must be submitted in the same file. As US Federal HR customers do not process with integrated payroll functionality, the extract files reflect only the HR Data. The Payroll provided segments must be merged with this report format at the sending site. The customers' payroll system is responsible for taking the HR Data provided, adding the Payroll data and then submitting the final transmission to OPM.
You must run the Retirement Data Report program first in a 'Preview Mode'. The Preview Mode enables HR users to review the data for accuracy and completeness. Once the HR user completes this review, the program can be submitted in a 'Final Mode', which creates the data file that is then sent to payroll for merging and final transmittal to OPM. Reports created are in XML format. The HR User can view the reports as a text file when opened from the View Log.
Use the Request Submit window.
To run the Retirement Data Report:
-
In the Name field, select Retirement Data Report.
-
Click the Parameters field to open the Parameters window. Enter the required parameters:
-
File Name: Name that you want to assign to the output file
-
Business group: Business group for which you want to run the report.
-
Agency Code
-
Sub Element
-
Additional Agencies or sub Element
-
HR Data Provider Code
-
Report Start Date
-
Report End Date
-
Processing Mode: Run the Retirement Data Report program first in a 'Preview Mode'.
-
-
Click OK to accept the Parameters and close the window.
-
Click Submit to generate the report.
-
To locate the path of the ASCII and XML files, in the View Requests window, select the row for the report and click View Log. The report generates an ASCII and an XML file. You can submit the resulting ASCII output to the OPM.
Complaint Tracking
Complaint Tracking Overview
Complaint tracking is the process of recording information about a charge of discrimination brought against an agency by one or more people. Using complaint tracking, you can record information about a complaint from the first contact by the complainant through the final outcome. You can also produce the annual EEO Form 462 report, a summary of the complaints processed that year, as a formatted PDF file.
Complaint Record
The Complaints Tracking window includes a series of alternate regions and task flow windows that capture information related to the complaint. You can maintain an accurate history of the complaint as it progresses, including entering multiple records for:
-
People associated to a complaint
-
Claims, bases, and incidents associated with a complaint
-
Corrective actions that result from hearings or settlement meetings
-
Alternative Dispute Resolution sessions conducted in the pre-complaint or formal complaint stages
-
Complainant and agency appeals
-
Agency costs associated to the complaint process
Progress of the Complaint
The Complaint Tracking window contains alternate regions that follow a standard complaint sequence and maintain a detailed record of the complaint. Business rules assist you in entering data that is complete and accurate.
Use the Complaints Tracking window to:
List complaint officials and servicing organizations
-
Assign complaint officials to a complaint
You can list all the people associated with a single complaint, including everyone from witnesses to the Administrative Judges (AJ) who make the case decisions.
See: Displaying Complainant Information, Entering People Involved in Processing a Compliant, Ending Periods of Service
-
Enter the names of the organizations involved in servicing the complaint
See: Entering Complaint Office Names
Capture complaint details and the outcome of settlement agreements
-
Record pre-complaint information
You enter information about a complaint in the pre-complaint phase in a sequence of alternate regions, including information about the complaint, counseling efforts, and the outcome of the pre-complaint process.
See: Initiating a Pre-Complaint
-
Track complaint issues and bases
You can capture the reasons the complainant is filing a complaint by documenting the related claims, bases, and incidents.
See: Entering Claims
-
Record formal complaint information
If the complaint evolves to a formal complaint, you can record that information as well as the results of investigations, hearings, settlement offers, and final agency actions and decisions.
See: Entering a Formal Complaint, Investigating a Complaint, Recording the Offer of Resolution, Issuing a Final Decision with a Hearing, Issuing a Final Action after a Hearing
-
Capture the results of Alternative Dispute Resolution (ADR) sessions
During the pre-complaint or formal complaint stage, if the complainant engages in the ADR process, you can enter information about each session and its outcome.
See: Recording Alternative Dispute Resolutions
-
Manage multiple complaints or complainants
If the complainant has more than one complaint, you can create a consolidated record.
See: Consolidating a Complaint
If several complainants file a class action, you can record key dates and decisions involved in the processing of the class action suit.
See: Processing a Class Action
Record corrective actions, appeals, and further courses of action
-
List the required corrective actions resulting from hearings or settlement processes
You can enter any monetary or non-monetary corrective actions that the discriminating organization must fulfill before the agency can close a complaint.
-
Record appeal actions brought by the complainant or discriminating organization
If the complainant or the discriminating organization disagrees with the decision reached on a complaint, you can enter information about the appeal actions, and if necessary, any subsequent Request for Reconsideration (RFR) actions.
See: Entering a Complainant Appeal, Entering an Agency Appeal, Processing a Request for Reconsideration
-
Capture non-compliance information
If the discriminating organization does not perform a corrective action, the complainant may file a Petition for Enforcement (PFE). If the organization does not complete a corrective action or does not fulfill it in a timely manner, the complainant may file for Non-Compliance. The agency can capture the key dates and decisions involved in the filing of a PFE or Non-Compliance request.
See: Entering Non-Compliance Information, Entering a Petition for Non-Enforcement
Enter information about a civil action, if the complainant pursues that course of action.
See: Processing a Civil Action
Capture Complaint Costs
Agencies can capture costs associated to an EEO complaint. By capturing the direct costs such as administrative and legal costs as well as the indirect costs of the benefits the complainant receives, agencies can track costs at any point in the complaint process and quickly locate cost discrepancies.
The flexibility of obtaining cost information from detailed to total aggregate costs means that agencies can obtain the type of intelligence required in report preparation. Agencies can more fully evaluate the results of processing a complaint and use that data as a basis for predicting the costs involved in future complaint processing.
With these cost records, agencies can also more easily track the NO FEAR (Notification and Federal Employee Antidiscrimination and Retaliation Act of 2002) settlement costs for congressional reporting purposes.
See: Capturing Agency Complaint Costs
Conclude the complaint process
You can record the date the complaint process concludes and also describe details about the resolution of the complaint.
See: Closing a Formal Complaint, Reviewing Complaint Costs
Status of a Complaint
As the complaint progresses, you can record the stage or phase of the process in the header of the Complaint Tracking window. For example, you might note when the complaint is in the Pre-Complaint, Formal, or Hearing stage. The supplied list of values allows you to easily update the stage to reflect the current phase of the process.
Complaint Status
Most complaints involve a single complainant who initiates a complaint. Until you close the complaint, it is active. There are exceptions to this standard; for example, class actions involve multiple complainants, and consolidated complaints involve more than one complaint.
If you enter data that changes the complaint status from the standard description, for example, you close the complaint and it is now inactive, the application displays this status in the window title. The following is a list of statuses and the data item that when entered produce the change in status:
-
Class Action when you select Class Agent in the Pre-Complaint region
-
Consolidated when you enter a date in the Date Consolidated field of the Consolidated region
-
Mixed when you select the Mixed check box for a claim in the Claims window
-
Remanded when you enter Remand as the Office of Federal Operations (OFO) decision in the complainant Appeal window
-
Inactive when you enter a date in the Date Complaint Closed field of the Closure region
Complaint Tracking Security
Only appropriate agency personnel should have access to the system's complaint tracking data due to the sensitive nature of EEO complaints.
The complaint tracking functionality uses standard HRMS security which controls within a business group who the user can access such as names displayed in the Complainant Name list of values and what the user can access (menus, taskflows, windows). Your system administrator can define a secure responsibility for employees who maintain EEO complaint information, as well as security profiles that further restrict access.
Complaint Attachments
Managing the paper work associated with a complaint can represent a substantial portion of the time you spend tracking a complaint. By keeping documentation in the system, you reduce the need to keep track of documents on your desk. You can attach comments and documents to the Complaints Tracking window.
EEO Form 462 Report
You can generate and submit the annual EEO Form 462 report required by the US Equal Employment Opportunity (EEO) Commission that summarizes the details of each EEO complaint processed by your agency.
When you generate the report, you produce a PDF formatted version of the report that you can view with Adobe Acrobat Reader.
See: Producing a PDF EEO Form 462 Report
The complete EEO Form 462 Report you submit to OPM includes information not captured by the product. To complete the report with your agency's information, you can import the XML datafile output by the concurrent manager with the supplied PDF template and fill in the remaining information using a full version of Adobe Acrobat Reader.
See: Producing an Editable PDF EEO Form 462 Report
Processing a Complaint
Setting Up Complaint Tracking
Before your agency enters a complaint into the system, you must set up the Complaint Tracking. Setup may involve implementing security, adding agency-specific information, and entering people in the system associated with the complaint.
To set up complaint tracking
-
Define a secure responsibility for those users involved in complaint tracking.
See: Setting Up Security, Configuring, Reporting, and System Administration Guide
-
Add Lookup values for:
-
Serviced HR Office (GHR_US_HR_OFFICE)
-
Serviced EEO Office (GHR_US_EEO_OFFICE)
-
Servicing Organization (GHR_US_SERVICED ORG)
Servicing organizations are those involved in processing the complaints.
-
Discriminating organizations (GHR_US_DISCRIMINATING_ORG)
See: Adding Lookup Types and Values, Configuring, Reporting, and System Administration Guide, Removing Lookup Values, Configuring, Reporting, and System Administration Guide
-
-
Add Lookup values to the predefined lists of values.
See: Adding Lookup Types and Values, Configuring, Reporting, and System Administration Guide
-
Define person types.
By defining additional person types, such as ADR Facilitator or Administrative Judge, you can include information when you enter people in the system that allows you to query them by type of function.
-
Define a request group for EEO reporting users.
See: Request Groups, Configuring, Reporting, and System Administration Guide
-
Add agency-specific taskflows.
See: Defining Taskflows, Configuring, Reporting, and System Administration Guide
-
Enter the following people into the application:
-
Complainants
-
People frequently involved in the processing of complaints such as Administrative Judges
-
People involved in processing a specific complaint such as attorneys and management officials
-
-
Generate docket numbers.
If you do not want to enter docket numbers manually in the Complaint Tracking window, you can generate your own docket numbers using the same SQL operation that you do to generate numbers for Request Number field in an RPA (Request for Personal Action).
Using the Find Complaints Window
When you open the Complaint Tracking Window, the Find Complaints window automatically displays in front of it.
To begin a new complaint using the Find Complaints window:
-
Choose the New button.
To query a complaint using the Find Complaints window:
-
Enter a query on one or more of the following fields:
-
Docket Number
-
Complainant Name (complainant or class agent)
-
Complainant SSN (social security number)
-
Stage
-
-
To further narrow the search, you can also select the status of the complaint:
-
Class
-
Mixed
-
Remand
-
Consolidated
-
Active
Note: To locate an inactive complaint, deselect the Active check box.
-
-
Choose the Find button to display the complaint.
If the application locates more than one complaint that meets the selected criteria, it displays the complaints in the Complaint Tracking window. Choose Next Record from the Go menu to see the next complaint.
If you close the Find Complaints window, you can reopen it by choosing the Find icon on the toolbar or choosing Find from the Query menu.
Entering People Involved in Processing a Complaint
You can enter people associated to a complaint including complainants and officials, such as the facilitators and administrative judges.
You use the People window to enter applicants, contacts, contract workers, and other people associated to the complaint. When you create the person records for these people, the records must exist in the same business group as the complaint. You can display the People window either from the Navigator (Complaints People) or the Complaints window (Person button). If you are working in the Complaints window, and want to resume work there after entering a person record, click the Person button.
See: Entering a Person, Workforce Sourcing, Deployment, and Talent Management Guide
After you create a record for the person in the application, you can:
-
Enter that person in the Complaint window as the complainant and view information about that person.
-
Develop a list of officials and other participants in the complaint process in the EEO Complaint People window
This window is a more restricted view of the People window and contains basic information, such as the person's role, name, social security number and start and end dates.
Use the Complaint People window to list those people involved in processing a complaint.
To list participants
-
Query an existing complaint in the Complaint Tracking window.
-
Click the Complaint People button.
-
In the region list, choose All to view the entire list of roles that the official occupies.
-
In the Role column, choose the role that you want to assign the official.
-
In the name field, choose the name of the person you want to add to the list.
-
In the Start Date and End Date fields, enter the dates for their period of service.
-
Save your work.
Some participants may have more than one role in the process, such as a counselor who also serves as an Alternative Dispute Resolution facilitator. Repeat these steps to create an additional entry for that person and specify a different role.
When an official ends their period of service, you can capture the appropriate information, such as the last date of service. See: Ending Periods of Service.
Entering Complaint Office Names
The Offices region of the Complaint Tracking window stores the names of the offices involved in processing the complaint.
To enter an office name
-
Open the Complaint Tracking window and query the complainant in the Find dialog.
-
In the Complaint Agency field, select the agency from the list of values.
-
In the HR Office field, select the appropriate office from the list of values.
-
In the EEO Office field, select the appropriate office from the list of values.
-
In the Organization field, select the name of the servicing organization processing the complaint from the list of values.
Ending Periods of Service
When you maintain information about people involved in the complaint process, you enter the date on which the person began their period of service in the assigned role. When the participant concludes his or her involvement, you can end-date their record.
Use the Complaint People window to delete entries or end date them.
To end-date someone's role
-
Use the Find dialog or query the complaint in the Complaint Tracking window.
-
Choose the Complaint People taskflow button.
-
In the region list, choose All to display all the roles the person has ever occupied in the complaint process.
-
In the Name field, choose the name of the person whose role has ended.
-
In the End Date field, enter the date on which the person concluded their service.
-
Save your work.
Deleting Information
If you enter someone in error or that person never performs the role, you can delete that information. Select the row and choose Delete Record from the Edit menu. For information about deleting someone from the entire application, see Deleting People, Workforce Sourcing, Deployment, and Talent Management Guide.
Displaying Complainant Information
The Complaint Tracking window displays information about the complainant. To enter a complainant or someone else associated with the complaint process, use the People window provided with the system.
See: Entering a Person, Workforce Sourcing, Deployment, and Talent Management Guide
Once you have entered someone in the system, you can query that person as a complainant, or add that person to the list of people involved in processing the complaint.
See: Entering People Involved in Processing a Complaint
Use the Complainant region to display information about a person who has filed a complaint.
To display complainant information
-
Open the Complaint Tracking window and query the complainant in the Find dialog.
-
Choose the Complainant region to view information related to the person's employment.
The information corresponds to the date you enter in the Pre-Complaint Initiated field of the Pre-Complaint alternate regions.
Updating the Complainant's Personal Information
When entering data in the Complaint Tracking window, you can update information such as address and phone numbers for the complainant.
Complainant's Person Information
-
Choose the Person taskflow button.
-
Make any necessary changes to the person information stored in the alternate regions.
-
Save your work.
Complainant's Address
-
Choose the Person taskflow button.
-
Choose the Address button.
-
Display the address you want to update by querying the address or choosing Next Record from the Query menu.
You cannot change information in the primary address, but you can change information in other addresses maintained for the person.
-
Save your work.
Complainant's Phone Numbers
-
Choose the Person taskflow button.
-
Choose the Phones button.
-
To enter a new phone number, in the Type field, choose the kind of phone number, such as a business phone.
-
In the Phone Number field, enter the phone number.
-
In the Start and End Date fields, enter the dates when the phone number was in service.
-
Save your work.
To edit the existing information, select the row and change the information stored in the Type, Phone Number, and Date fields as needed.
Initiating a Pre-Complaint
You initiate a complaint by entering information in the Complaint Tracking window, such as the Docket number, Stage, or the complainant's name.
As the pre-complaint process unfolds, you may enter information relevant to pre-complaint process in three regions of the Complaint Tracking window:
-
Pre-Complaint
The Pre-Complaint region captures basic information such as the date the alleged discriminating incident occurred.
-
Pre-Complaint Counsel
In the pre-complaint stage, complainants can choose traditional counseling as described in this procedure or the Alternative Dispute Resolution (ADR) process. See: Record Alternative Dispute Resolutions: page lxvii
-
Pre-Complaint Closure
If during the pre-complaint process, the claimant chooses to settle the complaint, you can capture those results in the pre-complaint closure window as described in this procedure.
To further document the complaint, you can enter information about the complainant's claims, the basis for these claims, and the related incidents. See: Entering Claims
Use the Complaint Tracking window to enter pre-complaint information.
To begin a new complaint
-
Open the Complaint Tracking window and choose New in the Find window dialog.
-
In the Docket field, enter a Docket number assigned by the agency for tracking the complaint.
You enter docket numbers associated with other stages of the complaint elsewhere. For example, you record the AJ Hearing docket number in the Hearing window.
-
In the Complainant Name field, choose the Complainant or Class Agent's name from the list of values.
The application automatically enters the complainant's social security number, if available.
Note: Before you can enter complainant information, you must enter this person in the system. See: Entering People Involved in Processing a Complaint
-
From the Stage list of values, choose the description that represents the current phase of the complaint process.
-
Click additional details (the bracketed flexfield) to display the Additional Complaint Tracking Details window and complete the fields that your agency has defined.
-
Click OK to save your results and return to the Complaint window.
To begin a pre complaint
-
Click the Pre-Complaint tab.
-
In the Information Inquiry field, enter the date on which the complainant began the inquiry.
-
In the Pre-Complaint Initiated field, enter the date on which the complainant filed the complaint in the Pre-Complaint stage.
-
In the Alleged Incident field, enter the date on which the alleged discriminating incident occurred.
You can capture more specific details about the incident in the Claims window as explained in Entering Claims.
-
In the Rights/Responsibilities Letter Issued field, enter the date the agency sent this letter to the complainant.
-
In the Rights/Responsibilities Letter Received field, enter the date on which the complainant received the letter.
-
In Pre-Complaint Description, enter information about the complaint.
-
In the Pre-Complaint Election field, enter the method the complainant chooses to process the pre-complaint.
-
In the Alleged Discrim Org field, choose the name of the discriminating organization from the list of values.
-
In the Class Agent field, choose Yes if the complainant is also the class agent for a class action.
-
Save your work.
Pre-complaint counseling
-
Select the Pre-Compl Counseling tab.
-
Enter the dates on which the following actions occurred:
-
Counselor Assigned
-
Initial Counselor Interview conducted
-
Counseling Extension letter sent
-
-
In Anonymity Requested, choose Yes if the complainant requested anonymity.
Note: This field is for information purposes only.
-
In the Traditional Counsel Outcome field, indicate whether counseling resolved the complaint.
-
Save your work.
Pre-complaint closure
-
Click the Pre-Compl Closure tab.
-
Enter the dates on which the following actions occurred:
-
Final Interview conducted
-
RTF (Right to File notice) received by the complainant's representative
-
Pre-Complaint Closed
-
Counselor's Report Submitted
-
-
In the Pre-Complaint Closure field, choose a description from the list of values that describes the outcome.
-
Save your work.
Entering a Formal Complaint
If the complainant chooses to pursue a formal complaint, you can capture that information in the Formal Complaint region of the Complaint Tracking window.
To enter information about a formal complaint
-
Open the Complaint Tracking window and query the complaint in the Find dialog.
-
Click the Formal Complaint tab.
-
In the Formal Complaint Filed field, enter the date on which the complainant filed a formal complaint.
-
In the Acknowledgement Letter, enter the date on which the agency sent an acknowledgement letter to the complainant or the complainant's representative.
-
In the Clarification Letter, enter the date on which the agency sent a clarification letter.
-
In the Compl Resp to Clarification Letter, enter the date on which the agency received the complainant's response.
-
In the Forwarded for Legal Review field, enter the date on which the agency forwarded the complainant's response to the agency legal department.
-
In the Returned from Legal field, enter the date on which the agency received the reply from the legal department.
-
From the Letter Type list of values, choose the type of letter the agency sent to describe its next action on the complaint.
-
In the Letter Date field, enter the date on which the agency sent the agency's response to the formal complaint to the complainant.
-
In the Date Letter Received field, enter the date on which the complainant received the agency's letter.
-
Save your work.
Entering Claims
The claims, bases, and incidents that comprise a complaint document the reasons why a complainant filed a complaint. This documentation includes the claim or charge brought by the complainant, the basis or laws the complainant reports were violated, and the incidents that describe the actions which led to the claim.
A complaint may include one or more claims and each claim may arise from one or more incidents and have one or more bases. You add a claim to a complaint at the request of the complainant or administrative judge. If you add a claim or incident after entering the formal complaint process, the complaint is considered an amended complaint.
Use the Claims window to enter details on claims, bases, and incidents.
To enter a claim:
-
Open the Complaint Tracking window and query the complaint in the Find dialog.
-
Choose the Claims taskflow button.
-
In the Claim field, choose the type of claim from the list of values.
-
In the Claim Date field, enter the date you first recorded the claim.
-
In the Phase field, choose the stage the complaint had reached when you first recorded this claim.
-
Select the Mixed check box if the Equal Employment Opportunity Council (EEOC) defines this claim as a Mixed Claim.
When you designate mixed for a claim, the application adds the status of Mixed to the Complaint Tracking window title.
-
In the Claim Source field, choose the reason from the list of values that you are adding the claim at this time.
-
In the AG field, indicate whether the agency accepted or dismissed the claim.
-
In the AJ field, indicate whether the administrative judge accepted or dismissed the claim.
-
In the AG Appeal field, indicate whether or not the agency appealed the administrative judge's findings.
If the agency did appeal the decision, you can find out more information about the appeal by choosing the Agency Appeal taskflow button. See: Entering an Agency appeal.
-
Save your work.
Entering Bases
-
Select the claim for which you want to enter a basis.
-
Choose the Bases alternate region.
-
In the Basis field, choose the Basis of the complaint from the list of values.
-
In the Value field, choose an applicable value that describes the basis.
-
In the Statute field, choose the Statute that supports the basis.
-
In the AG Findings field, enter the agency's decision.
-
In the AJ Findings field, enter the administrative judge's decision.
-
Save your work.
Entering Incidents
-
Select the claim for which you want to enter an incident.
-
Choose the Incidents alternate region.
-
In the Incident Date field, enter the date on which the incident occurred.
-
In the Description field, enter information about the incident.
-
In the Amended Date field, enter the date on which the incident occurred.
If you are adding an incident prior to the first incident or that occurs after the case is under investigation, you can enter that incident as an amended incident.
-
In the Acknowledged Date field, enter the date on which the agency sent an acknowledgment letter.
-
Attach documentation that further describes the complaint, if necessary.
-
Save your work.
Investigating a Complaint
An agency may conduct an investigation, for example, upon the filing of a formal complaint or as a result of an administrative judge's decision. You can capture information about the investigation and the options that result in the Investigation region of the Complaint Tracking window.
To enter information about an investigation
-
Open the Complaint Tracking window and query the complaint in the Find dialog.
-
Choose the Investigation alternate region.
-
From the Investigation Source list of values, indicate who initiated the request, such as the agency or the Office of Federal Operations (OFO).
Investigator
-
In the Date Requested field, enter the date on which the agency sent a letter to the office that assigns investigators to request an investigator.
-
In the Date Request Received field, enter the date on which the agency office received the agency's request for an investigator.
-
In the Date Assigned field, enter the date on which the agency office assigned an investigator.
Report of Investigation (ROI)
-
In the Date Agency Received field, enter the date on which the agency received the ROI.
-
In the Date Compl-Rep Received, enter the date on which the complainant's representative received the ROI.
Investigation
-
In the Date Started field, enter the date on which the investigation began.
-
In the Date Ended field, enter the date on which the investigation ended.
-
If the investigation was extended, in the Date Extended field, enter the date on which the extension was approved.
-
In the Extension Description field, choose from the Extension Description list of values the reason for the extension.
Options Letter
-
In the Options Letter Date field, enter the Options letter states what the complainant can do next. Enter the date on which the agency sent the Options letter.
-
In the Date Compl-Rep Received field, enter the date the complainant's representative received the Options letter.
-
In the Compl-Rep Response field, choose the Compl-Rep Response from the list of values that describes the response of the complainant's representative to the Options letter.
If the complainant requests a final decision from the agency (FAD), you can record information about the FAD. See: Issuing a Final Decision without a Hearing. If the complainant requests a hearing, see: Documenting the Complaint Hearing.
Consolidating a Complaint
When you consolidate a complaint, for example prior to a hearing, you create one parent docket. As the complaint process continues, you record any further information about the complaint on this parent docket. For cross-reference purposes, you must enter the parent docket number on each complaint included in the consolidated set.
Use the Consolidation region of the Complaints Tracking window to record information about consolidated complaints.
To consolidate a complaint
-
Open the Complaint Tracking window and query the complaint that will serve as the parent complaint in the Find dialog.
-
Choose the Consolidated region.
-
The application automatically updates the Records in Set field as you enter the parent docket number in each of the complaints included in the set of consolidated complaints.
-
In the Date Consolidated field, enter the date on which you batched the individual complaints into one consolidated set.
-
In the Parent Docket Number, choose the docket number for the displayed complaint.
-
In the Stage Consolidated field, choose the point in the complaint process at which the complaint was consolidated.
-
In the Date Compl-Rep Notified field, enter the date on which you notified the complainant's representative that you consolidated the complaint.
-
In the Consolidation Description, enter any further information or explanation about the consolidated complaint.
-
Save your work.
Member Complaints
To display an accurate count of all records in the consolidated set, enter the parent docket number in each complaint included in the consolidated set.
To record consolidation information on each member complaint
-
Open the Complaint Tracking window and query one of the complaints included in the consolidated set.
-
Choose the Consolidated region.
-
In the Parent Docket Number, choose the docket number for the parent complaint.
The parent docket number serves as a reference field. You enter all subsequent information about the complaint on the parent complaint.
-
Optionally, enter the same information you entered in the parent complaint Consolidation region in the following fields:
-
Date Consolidated
-
Stage Consolidated
-
Date Compl-Rep Notified
-
Consolidation Description
-
Records in Set
-
-
Save your work.
Repeat this procedure until you have entered the parent docket number in all the complaints included in the consolidated set.
Closing a Formal Complaint
When a formal complaint process ends, you can record information about its outcome in the Closure region of the Complaint Tracking window.
To close a formal complaint
-
Open the Complaint Tracking window and query the complaint in the Find dialog.
-
Choose the Closure region.
-
In the Date Complaint Closed field, enter the date on which the formal complaint concluded.
After you enter this date, it is advisable not to update the complaint although the application does not prevent you from doing so.
-
In the Nature of Closure field, choose the action that brings the complaint to a conclusion.
-
In the Description field, enter any further information you want to record about closing the complaint.
-
In the Audited By field, select the person or the role of the person who performed the audit.
-
In the Record Received field, enter the date.
-
Save your work.
The Complaint Tracking window now displays a status of Inactive. Later, when you query this complaint in the Find window, deselect the Active check box to have the application locate and display the complaint.
Processing a Class Action
When you process a class action, you can begin at either the pre-complaint or formal complaint stage. As the class action proceeds, you can record pertinent information such as specifying the class agent and entering key dates about the filings, briefs, the hearing and its final outcome.
To process a class action
-
Open the Complaint Tracking window and query the complaint in the Find dialog.
-
Choose the Pre-Complaint region and select the Class Agent field to note that the complainant is the class agent.
-
Choose the Class Action region.
-
In the Filed Formal Class field, enter the date on which the complainant filed a Class Action.
-
In the Forwarded to EEOC field, enter the date on which the agency sent the class action request to the Equal Employment Opportunity Council (EEOC).
-
In the Date Class Members Notified field, enter the date on which the agency notified the class agent or complainant's representative of the administrative judge's decision on the certification of the class action.
-
In the Number of Complainants field, enter the total number of people who are complainants named in the class action.
-
In the Agency Brief to EEOC field, enter the date on which the agency sent its class action brief to the EEOC.
-
In the Date AJ Cert Decision field, enter the date on which the administrative judge issued a decision, certifying or dismissing the class action.
-
In the Decision field, choose the decision that summarizes the administrative judge finding on certification.
-
In the Date Agency Received field, enter the date on which the agency received the administrative judge's decision on certification.
-
In the Hearing Date field, enter the date scheduled for the hearing.
-
In the Date AJ Decision field, enter the date on which the administrative judge issued a decision on the class action.
-
In the Decision field, choose the decision that summarizes the administrative judge's finding on the class action.
-
In the Date Agency Received field, enter the date on which the agency received the administrative judge's decision on the class action.
-
Save your work.
Processing a Civil Action
After the agency, EEOC administrative judge, or the Office of Federal Operations releases a decision, the employee may choose to file a civil action. You can capture information about these proceedings in the Civil Action region of the Complaint Tracking window.
To enter information about a civil action
-
Open the Complaint Tracking window and query the complaint in the Find dialog.
-
Choose the Civil Action alternate region.
-
In the Civil Action Filed field, enter the date on which the complainant filed the civil action.
-
In the Agency Notified field, enter the date on which the complainant notified the agency that a civil action was filed.
-
In the Agency Closure Confirmed field, enter the date on which you confirmed that the complaint was closed and turned over to the civil courts.
The date you enter here is usually the same date entered as the Date Complaint Closed field in the Closure alternate region.
-
Save your work.
Reviewing Complaint Costs
During the complaint process, you can monitor the costs incurred to date by viewing a summary of the total agency costs and benefits received (costs stemming from monetary corrective actions).
Use the Complaints window to view a summary of all complaint costs.
To review complaint costs
-
Query an existing complaint.
-
Set your effective date to the current date to view the total costs entered as of that date.
-
Select the Costs tab.
The Costs block displays agency costs by for each phase and stage.
The Totals block displays the subtotals for all Agency Costs and Benefits Received, and a total of both these direct and indirect costs.
Capturing Agency Complaint Costs
The costs of processing an EEO Complaint include those costs the agency incurs, such as administrative costs, court reporter fees, and mediator payments. During the Pre Complaint or Formal Compliant, you can record details about each separate cost, including the stage of the process, the type of cost, the date, the amount, and a brief description. The Cost window also lets you query cost records according to different criteria. For example, you might view a list of Contract Mediator costs associated with the Investigation stage of the Formal Complaint phase.
Use the Complaint Agency Costs window to enter agency costs.
To record agency costs associated to a complaint
-
Query an existing Complaint in the Find Complaints window and click Agency Costs.
-
In the Agency Costs block, select the appropriate Phase, Stage and Category:
-
If you are entering a list of costs that span different phases, stages, and categories, select All for the Phase, Stage, and Category.
-
If you are entering several costs related to a specific phase, stage or category, select the appropriate value from Phase, Stage, and Category lists.
The application enters this information in the Agency Cost Details region.
-
-
In the Agency Cost Details block, each row corresponds to a different cost. Select the applicable Phase, Stage, and cost Category.
-
In the Cost Date field, select the date in the calendar on which you incurred the cost, for example the invoice date.
-
In the Amount field, enter the actual cost in dollars.
-
In the Description field, enter additional information about the cost.
-
Save your work.
-
Repeat these steps to enter further costs details.
Producing a PDF EEO Form 462 Report
You can generate and submit the annual EEO Form 462 report that summarizes the details of each EEO complaint processed by your agency. When you generate the report, you produce a PDF formatted version of the report that you can view with Adobe Acrobat Reader.
A complete EEO Form 462 Report includes information not captured by the product. You can produce a PDF file and enter the missing information using Adobe Acrobat.
See: Producing an Editable PDF EEO Form 462 Report
Use the Submit Request window to generate the PDF EEO Form 462 report:
To run the EEO Form 426 Report
-
In the Name field, choose EEO Form 462 Report.
-
In the Parameters dialog, complete the following:
-
Agency Code
-
Reporting Period Begins
-
Reporting Period Ends
-
-
Click OK to close the Parameters dialog.
-
Click Submit to run your report.
In the View Requests window, you can click View Output to view the resulting PDF file.
Producing an Editable PDF EEO Form 462 Report
When you generate the EEO Form 462 report from the concurrent manager, you produce a PDF formatted version that you can view with Adobe Acrobat Reader. The EEO Form 462 report that you submit requires other information not captured by the product:
-
Part III Agency Resources, Training, Reporting Line
-
Part IX Summary of Investigations Completed
-
Part XII Summary of ADR Program Activities
-
Certification and Contact Information
You can complete the required information by importing the XML datafile into the supplied PDF template, and then entering the remaining information using Adobe Acrobat.
To generate an EEO Form 462 Report you can edit
-
Run the EEO Form 462 concurrent manager report from the Submit Requests window.
-
Locate the XML datafile.
From the View Requests window, select the row for the EEO report and click View Log.
You can find the path for the XML datafile at the end of the log file.
-
Transfer the XML datafile to your home directory and rename the datafile, changing the extension from .xml to .xfdf
-
Locate the supplied report template (ghr_462_report.pdf) under $GHR_TOP/html and transfer it to the same directory where you moved the renamed XML datafile.
To import the datafile into Adobe Acrobat
-
Using the full version of Adobe Acrobat, open the Form 462 report template.
-
Select Import Form Data from the File menu. In the resulting Select File Containing Form dialog box, select Adobe XFDF Files from the Object of Types menu. Locate and select the datafile and click Select to close the dialog box and have the application import your data into the template.
-
Select Save As from the File menu and save the template with the imported data under a meaningful filename. (Using the Save As command preserves the original template in case you choose to repeat this procedure at a future time.)
To complete the final report
-
Enter any missing information required to complete the report.
-
Print and then submit the resulting report.
Recording Decisions and Appeals
Recording the Offer of Resolution
If you extend an Offer of Resolution to the complainant; for example, following an investigation, you can capture information about that offer, including key dates and the complainant's response.
Use the Offer of Resolution region of the Complaints Tracking window to enter information about the offer.
To enter information about an Offer of Resolution
-
Open the Complaint Tracking window and query the complaint in the Find dialog.
-
Choose the Offer of Resolution region.
-
In the Offer of Resolution field, enter the date on which the agency sent the Offer of Resolution.
-
In the Compl-Rep Received field, enter the date on which the complainant's representative received the offer.
-
In the Date Compl-Rep Response field, enter the date on which the complainant's representative responded to the offer.
-
In the Signed field, enter the date on which either the complainant or the complainant's representative signed the response.
-
In the Compl-Rep Response field, indicate whether the complainant accepted the Offer of Resolution.
-
In the Description field, summarize further information about the offer.
-
Save your work.
If the Offer of Resolution includes corrective actions, you can enter detailed information in the Corrective Actions window. See: Recording Corrective Actions.
If the complainant accepts the Offer of Resolution, you can close the complaint by completing the information in the Closure region as explained in Closing a Formal Complaint
Issuing a Final Decision without a Hearing
If you reach a Final Agency Decision (FAD) during the formal complaint process, you can document the findings, such as whether the complaint had merit, and any conclusions that brought the complaint to a close.
Use the Final Action No Hearing region of the Complaints Tracking window to enter information about the FAD.
To enter information about the Final Agency Decision
-
Open the Complaint Tracking window and query the complaint in the Find dialog.
-
Choose the Final Action No Hearing alternate region.
-
From the FAD Source list of values, choose the source that is requesting the FAD, for example the agency or administrative judge.
-
In the FAD Requested field, enter the date on which the source listed above requested the FAD.
-
In the EEO Recvd FAD Req field, enter the date on which the EEO office received the FAD request.
-
In the FAD Req Forwarded AG field, enter the date the FAD request was forwarded by the servicing organization to the agency.
-
In the Agency Received Req field, enter the date on which the agency received the FAD request.
-
In the FAD Due field, enter the date on which the FAD is due.
-
In the Forwarded to Compl-Rep field, enter the date you forwarded the FAD to the complainant or to the complainant's representative.
-
In the Received by Compl-Rep field, enter the date the complainant or the complainant's representative received the FAD.
-
In the Implementation Letter Forwarded to Org field, enter the date that you sent the letter to implement the FAD to the discriminating organization.
-
In the Decision Forwarded for Legal, enter the date you forwarded the FAD to the agency's legal department.
-
In the Decision Received from Legal, enter the date the legal department received the FAD.
-
In the FAD Type, choose the appropriate FAD check boxes to indicate whether:
-
the agency decides on the merit of the complaint
-
the agency decides to award the complainant's Attorney Fees
-
the agency decides to award the complainant's Compensatory Damages
-
the agency decides that the discriminating organization is in Non-Compliance, for example, with an EEO law, a negotiated agreement, or a previous complaint decision
-
-
In the FAD Date field, enter the date the agency issued the FAD.
-
In the Decision field, choose the action that describes the agency's decision contained in the FAD.
-
Save your work.
If the agency determines that there is no finding, you can conclude the complaint by completing the information in the Closure region as explained in Closing a Formal Complaint. If the agency determines that corrective actions are required, you can enter that information in the Corrective Actions window. See: Recording Corrective Actions
Documenting the Complaint Hearing
If a complainant requests a hearing, you can record pertinent information about the hearing, such as the hearing docket number, and the administrative judge's rulings on the merit of the complaint and corrective actions.
To enter information about the hearing:
-
Open the Complaint Tracking window and query the complaint in the Find dialog.
-
Choose the Hearing alternate region.
-
In the Date Hearing Requested field, enter the date on which the complainant requesting the hearing.
-
In the Source of Hearing field, choose a value that describes who is going to conduct the hearing, such as an administrative judge.
-
In the Date Agency Notified field, enter the date on which the agency received notice about the complainant's request for a hearing.
-
In the Date Agency Forwarded Files field, enter the date on which the agency forwarded the files to the administrative judge or Office of Federal Operations (OFO).
-
In the Hearing Docket Number field, enter the docket number for the hearing assigned by the administrative judge or OFO.
-
In the Date Hearing Completed field, enter the date on which the hearing concludes.
-
In the Date AJ Merit Decision field, enter the date the administrative judge ruled on the merit of the complaint.
-
In the Decision field, choose the outcome of the administrative judge's findings on the merit of the complaint.
-
In the Date Agency Recvd AJ Merit Decision, enter the date on which the agency received the administrative judge's decision on merit.
-
In the Date AJ CA Decision field, enter the date on which the administrative judge ruled on the corrective actions.
-
In the Decision field, choose the outcome of the administrative judge's decision on corrective actions.
If the decision includes corrective actions, you can enter detailed information in the Corrective Actions window. See: Recording Corrective Actions.
-
In the Date Agency Recvd AJ CA Decision, enter the date the agency received the administrative judge's decision on corrective actions.
-
Save your work.
Issuing a Final Action after a Hearing
When you reach a Final Agency Action (FAA) after a hearing, you can capture information about that decision as well as the dates for sending documentation to the complainant's representative, the discriminating organization, and your legal department.
To enter information about the Final Action
-
Open the Complaint Tracking window and query the complaint in the Find dialog.
-
Choose the Final Action After Hearing alternate region.
-
From the Final Action Source list of values, indicate who ordered the final action.
-
In the Final Action Due field, enter the date by which the agency must submit the final decision.
-
In the Forwarded to Compl-Rep field, enter the date you forwarded the decision to the complainant's representative.
-
In the Received by Compl-Rep field, enter the date the complainant's representative received the decision.
-
In the Implementation Letter to Org field, enter the date that you sent the letter to implement the decision to the discriminating organization.
-
In the Decision Forwarded to Legal field, enter the date you forwarded the decision to the agency's legal department.
-
In the Decision Received from Legal field, enter the date the agency's legal department received the decision.
-
In the Final Action Date, enter the date on which the source reached the Final Action Decision.
-
In the Decision field, choose a description that represents the agency's final decision.
-
Save your work.
If the agency determines that there is no finding, you can conclude the complaint by completing the information in the Closure region as explained in Closing a Formal Complaint.
If the agency determines that corrective actions are required, you can enter that information in the Corrective Actions window. See: Recording Corrective Actions
Entering a Petition for Non-Enforcement
If an agency has not yet performed a corrective action, the complainant can file a Petition for Non-Enforcement (PFE) against the agency with the Office of Federal Operations (OFO).
You enter information about the PFE and its outcome in the PFE and Non Compliance region of the Corrective Actions window.
To enter information about a PFE
-
Open the Complaint Tracking window and query the complainant in the Find dialog.
-
Choose the Corrective Actions taskflow button.
-
If you have not previously entered a corrective action, enter the Corrective Action header information. See Entering Corrective Actions.
-
If you have more than one corrective action, select the appropriate corrective action by choosing Next Record from the Query menu.
-
Choose the PFE and Non Compliance region.
-
In the Petition for Enforcement section, enter the PFE Docket Number.
-
In the Received field, enter the date on which the agency received the PFE from the OFO.
-
In the Agency Brief Due field, enter the date by which the agency must forward their brief to the OFO.
-
In the Agency Brief field, enter the date on which the agency sent their brief to the OFO.
-
In the Decision field, enter the date on which the OFO rendered a decision on the complainant's PFE.
-
In the AG Received field, enter the date on which the agency received the decision.
-
In the AG Brief Forwarded field, enter the date on which the agency forwarded the brief to the discriminating organization.
-
In the Decision field, choose a description that summarizes the OFO's decision on the PFE.
-
Save your work.
If the OFO determines that there is no finding, you can conclude the complaint by completing the information in the Closure region, as explained in Closing a Formal Complaint. If the OFO determines that further corrective actions are required, you can enter that information in the Corrective Actions region. See: Recording Corrective Actions
Entering Non-Compliance Information
If an agency does not complete a corrective action at the scheduled time, or the actions are unsatisfactory, the complainant can file for Non Compliance with the OFO.
You enter information about non-compliance in the PFE and Non Compliance region of the Corrective Actions window.
To enter information when an agency is non-compliant:
-
Open the Complaint Tracking window and query the complainant in the Find dialog.
-
Choose the Corrective Actions taskflow button.
-
If you have not previously entered a corrective action, enter the Corrective Action header information. See Entering Corrective Actions.
-
If you have more than one corrective action, select the appropriate corrective action by choosing Next Record from the Query menu.
-
Choose the PFE and Non Compliance alternate region.
-
From the Compl-Rep Req list of values, indicate whether the complainant filed based on the failure to implement the corrective action or the unsatisfactory results (reinstatement).
-
In the Agency Notified field, enter the date on which the OFO notified the agency of the complainant's filing for non-compliance.
-
In the EEO Req Data field, enter the date on which the EEO office requested data from the discriminating organization explaining why they are non-compliant.
-
In the Org Forwarded Data field, enter the date on which the discriminating organization forwarded the requested data to the agency's EEO office.
-
.In the Decision Implemented field, enter the date on which the EEO office implemented a decision on the non-compliance request.
-
In the Compl Reinstated field, enter the date on which the EEO reinstated the complaint.
-
In the Stage Compl Reinstated field, indicate at what stage in the complaint process the agency reinstated the complaint.
-
Save your work.
Processing a Request for Reconsideration
The complainant or agency can request that the Office of Federal Operations (OFO) reconsider the ruling on an appeal. If the complainant or agency requests a Request for Reconsideration (RFR) , you can capture the key dates involved in processing the RFR as well as the OFO's decision to deny or grant the RFR.
Use the Request for Reconsideration alternate region to enter RFR data.
To record a Request for Reconsideration:
-
Open the Complaint Tracking window and query the complaint in the Find dialog.
-
Choose the appropriate Appeals taskflow button:
-
If you are processing an RFR for a complainant, choose the Appeals taskflow button
-
If you are processing an RFR for an agency, choose the Agency Appeals taskflow button
-
-
If you have more than one appeal, query the appeal for which you want to process the RFR by choosing Next Record from the Query menu.
-
Choose the Request for Reconsideration region.
-
In the RFR Docket Number field, enter the docket number assigned by the OFO.
-
In the RFR Requested by field, indicate whether the complainant or agency is filing the complaint appeal.
-
In the Agency Filing Due field, enter the date by which the agency must file the complaint appeal.
-
In the RFR Date field, enter the date on which the agency filed for an RFR.
-
In the Agency RFR Brief Due field, enter the date on which the agency must submit the RFR to the OFO.
-
In the RFR Forwarded to Org field, enter the date on which the agency sent the RFR brief to the discriminating organization.
-
In the Orgn Forwarded RFR to Agency field, enter the date by which the discriminating organization must return the RFR brief to the agency.
-
In the Agency Forwarded RFR to OFO field, enter the date on which the agency sent the RFR brief to the OFO.
-
In the Date RFR Decision field, enter the date on which the OFO issued a decision on the RFR.
-
In the Decision field, choose the description that summarizes the OFO's decision.
-
In the Agency Received RFR Decision field, enter the date on which the agency received the OFO's decision on the RFR.
-
In the RFR Decision Forwarded to Org, enter the date on which the agency sent the OFO's decision to the discriminating organization.
-
Save your work.
If as a result of the RFR, the OFO determines that there is no finding, you can conclude the complaint by completing the information in the Closure region. See: Closing a Formal Complaint.
If the OFO determines that further corrective actions are required, you can enter that information in the Corrective Actions region. See Recording Corrective Actions.
Recording Alternative Dispute Resolutions
During the course of a complaint, the agency and the complainant may attempt to resolve the complaint through the Alternative Dispute Resolution (ADR) process.
You can record the results of each ADR session, noting at what stage of the process the ADR occurred, whether another agency or organization facilitated the session, the method of resolving the dispute, and the final outcome.
Use the Alternative Dispute Resolution window to enter information about each ADR session.
To enter information about an ADR session
-
Open the Complaint Tracking window and query the complaint in the Find dialog.
-
Choose the ADR taskflow button.
-
In the ADR Offered field, choose Yes if you offered the complainant the Alternative Dispute Resolution process as a method of resolving the complaint.
-
From the Stage Utilized list of values, indicate at what point in the complaint process the agency and complainant used the ADR process.
The ADR process may occur in the pre-complaint or formal complaint stage. If it occurs in the pre-complaint stage, you indicate that you have offered the complainant the choice of an ADR session in the Pre-Complaint region. See: Initiating a Pre-Complaint
-
Enter a Date Accepted.
-
Enter a Date Started.
-
Enter a Date Ended.
-
Choose the Resource for the ADR facilitation from the list of values.
-
Choose the Technique employed in resolving the complaint from the list of values.
-
Choose an Outcome from the list of values that describes the results of the ADR session.
-
Save your work.
If the ADR outcome includes corrective actions, you can enter detailed information in the Corrective Actions window. See: Recording Corrective Actions.
If the ADR outcome resolves the complaint, you can close the complaint by completing the information in the Closure region as explained in Closing a Formal Complaint
Creating Additional ADR Records
If you engage in subsequent ADR sessions later in the complaint process, you can create an ADR record for each session.
To create a new ADR record:
-
Open the Complaint Tracking window and query the complaint in the Find dialog.
-
Choose the ADR taskflow button.
-
Choose New Record from the Edit menu or position your cursor in the Stage Utilized field and press the down arrow key on your keyboard.
-
Follow the steps in the procedure above to enter information about the ADR session.
To view different ADR sessions, position your cursor in the Stage Utilized field and press the down arrow.
If you made an incorrect ADR entry, you can clear a field by choosing Clear Field from the Edit menu, or if necessary, delete the record by choosing Delete Record from the Edit menu.
Recording Corrective Actions
Settlement of a complaint may involve orders that describe monetary and non-monetary corrective actions that an agency must complete before closing a complaint. For example, a decision might include two actions such as a retroactive promotion for the complainant and EEO training for the discriminating manager. These corrective actions may result from an Offer of Resolution, Alternative Dispute Resolution (ADR) session, Hearing decision, Final Agency Decision, an Office of Federal Operations (OFO) or Merit Systems Protection Board (MSPB).
If a corrective action involves a monetary payment, you can record the amount and later view the total for all benefits received in the Costs tab. Here you can also find the total costs incurred by the agency in processing the complaint.
See: Reviewing Complaint Costs
You record each corrective action along with its accompanying details in the Corrective Actions window.
To record corrective actions
-
Open the Complaint Tracking window and query the complaint in the Find dialog.
-
Click the Corrective Actions button.
Corrective Action Header
-
From the Corrective Action Source list of values, indicate who ordered the corrective action.
-
In the Date Last Compl Report, enter the date of the last compliance report.
-
In the Date Closed field, enter the date by which the agency must complete the corrective action.
-
In the Complaint Docket Number field, enter the AJ Hearing docket number.
Note: A docket number is not required if the corrective action results from an Offer of Resolution, Alternative Dispute Resolution session, or Final Agency Decision.
-
In the Appeal Docket Number field, enter the:
-
OFO or MSPB appeal docket number, if the corrective action results from an OFO or MSPB appeal
-
RFR docket number, if the corrective action results from a RFR remand decision
Corrective Action Details
-
-
Choose the Corrective Action Details region.
-
In the Action Type field, choose a description for the corrective action.
-
In the Category field, choose whether the action is monetary or non-monetary.
-
In the Payment Type field, choose the description that corresponds to the type of payment.
-
In the Amount field, enter an amount if the action involves monetary compensation.
-
In the Phase field, choose the phase of the complaint during the corrective action occurred.
-
In the Description field, enter a description of the required action.
-
In the Due Date field, enter the date on which the agency must complete the action.
-
In the Order Date field, enter the date on which the source such as the OFO ordered the corrective action.
-
In the Request Date field, enter the date on which the administrative judge or the OFO requested that the agency complete the corrective action.
-
In the Complete Date field, enter the date on which the agency completes the action.
-
In the Category field, indicate whether the action involves monetary or non-monetary relief.
-
In the Type field, enter the description of the type of action to be taken.
-
In the Phase field, choose the stage of the complaint process at which this action is being taken, for example, as a result of an ADR process.
-
In the Description field, enter any further information required to describe the specific corrective action.
-
To add further Corrective Details, repeat the steps above for adding Corrective Action Details.
-
Save your work.
If you enter information in error, you can delete a corrective action detail by selecting the row that you want to delete and choosing Delete Record from the Edit menu.
Multiple Corrective Actions
If subsequent complaint procedures result in further corrective actions, you can create additional corrective action records by creating a new record, completing the header information and supplying the corrective action details as described in the steps above for recording corrective actions.
Entering a Complainant Appeal
If a complainant disagrees with a decision reached on a complaint, the complainant can appeal the decision to the Office of Federal Operations (OFO), or to the Merit Systems Protection Board (MSPB), if it is a mixed complaint. You can record information about the appeal process, such as key dates for case files and briefs, as well as the outcome of the appeal process.
Use the Appeals window to enter complainant appeal information.
To enter information about the complainant appeal:
-
Open the Complaint Tracking window and query the complaint in the Find dialog.
-
Choose the Appeals taskflow button.
Appeal Information
-
If you have not already done so, complete the appeal information. In the Appealed To field, choose the office to which you are requesting the appeal.
-
In the Appeal Reason field, choose the basis for the appeal from the list of values.
-
In the Docket Number field, enter the complainant appeal docket number assigned by the OFO or MSPB.
-
In the Appeal Date field, enter the date on which the complainant filed the appeal.
-
In the Source Decision Date field, enter the date on which the OFO or MSPB agreed to hear the appeal.
-
In the Date Org Notified field, enter the date on which you notified the discriminating organization that the complainant is filing an appeal.
-
Choose the Appeals Details alternate region.
Case Files
-
In the Agency Received Request field, enter the date on which the agency received the request from the OFO or MSPB for the case files.
-
In the Case Files Due field, enter the date by which the case files must arrive at the OFO or MSPB.
-
In the Case Files Forwarded field, enter the date on which the agency sent the case files to the OFO or MSPB.
Briefs
-
In the Agency Received Appellant Brief field, enter the date on which the agency received the complainant's brief.
-
In the Appellant Brief Forwarded to Org field, enter the date on which the agency sent the appellant brief to the discriminating org.
-
In the Org Forwarded Brief to Agency field, enter the date on which the discriminating organization sent the brief to the agency.
-
In the Agency Brief Due field, enter the date on which the agency must send its brief to the OFO or MSPB.
-
In the Agency Brief Forwarded field, enter the date on which the agency sent the brief to the OFO or MSPB.
Appeal Decision
-
In the Appeal Decision field, enter the date on which the OFO or MSPB reached a decision on the appeal.
-
In the Agency Received Decision field, enter the date on which agency received the decision.
-
In the Forwarded to Org field, enter the date on which the agency sent the decision to the discriminating organization.
-
In the Decision field, choose the result that summarizes the decision from the list of values.
-
Save your work.
If the complainant is appealing more than one corrective action or an entire decision, choose New Record from the Edit menu and repeat this procedure to enter data about each appeal.
If you disagree with the OFO's appeal decision, you can process a Request for Reconsideration. See Processing a Request for Reconsideration
Entering an Agency Appeal
If the discriminating organization disagrees with the decision reached on a complaint or on specific corrective actions, the agency can file an appeal to the Office of Federal Operations (OFO).
You can record information about the appeal process, such as key dates for case files and briefs in the Agency Appeals window.
To enter information about the agency appeal
-
Open the Complaint Tracking window and query the complaint in the Find dialog.
-
Choose the Agency Appeals taskflow button.
Appeal Information
-
In the Appeal Reason field, choose the basis for the appeal from the list of values.
-
In the Docket Number field, enter the appeal docket number assigned by the OFO or Equal Employment Opportunity Council (EEOC).
-
In the Appeal Date field, enter the date on which the agency filed the appeal.
-
In the Source Decision Date field, enter the date the OFO agreed to hear the appeal.
-
Choose the Agency Appeals Details alternate region.
Case Files
-
In the Agency Received Request field, enter the date on which the agency received the request from the OFO for the case files.
-
In the Case Files Due field, enter the date on which the agency should send the case files to the OFO.
-
In the Case Files Forwarded field, enter the date on which the agency sent the case files to the OFO.
Briefs
-
In the Agency Brief Due field, enter the date on which the agency must send its brief to the OFO.
-
In the Agency Brief Forwarded field, enter the date on which the agency sent the brief to the OFO.
-
In the Agency Received Appellant Brief field, enter the date on which the agency received the brief from the discriminating organization.
Appeal Decision
-
In the Appeal Decision field, enter the date on which the OFO or Merit System Protection Board (MSPB) reached a decision on the appeal.
-
In the Decision field, choose the result that summarizes the decision from the list of values.
-
In the Agency Received Decision field, enter the date on which agency received the decision.
-
In the Forwarded to Org field, enter the date on which the agency sent the decision to the discriminating organization.
-
Save your work.
If you are appealing more than one corrective action, choose New Record from the Edit menu, and repeat this procedure to enter information for each corrective action appeal.
Responding to the appeal decision
If as a result of the appeal, the OFO determines that there is no finding, you can conclude the complaint by completing the information in the Closure region. See: Closing a Formal Complaint.
If the OFO determines that further corrective actions are required, you can enter that information in the Corrective Actions region. See Recording Corrective Actions.
If you disagree with the OFO's appeal decision, you can process a Request for Reconsideration (RFR). See Processing a Request for Reconsideration
Collective Agreement Setup
Collective Agreements
A collective agreement is an agreement that defines the terms and conditions of employment for all employees that are covered by its terms. Agreements are typically negotiated and agreed by external bodies such as Trade Unions and Representatives of Employers.
The following sections describe the components you can use to represent the terms of a collective agreement in Oracle HRMS and to apply the correct entitlements to the primary assignments of eligible employees.
Entitlement Items
An entitlement item forms the basis for any entitlement that can be given to an employee as part of a collective agreement. For example, probation period, annual holiday, and car allowance are all entitlement items. For any entitlement you need to provide as part of a collective agreement, you must create an entitlement item.
You can create two types of entitlement item. These are:
-
An entitlement item that produces a value that is written to an employee's record.
-
An entitlement item that produces a value that is not written to an employee's record, but is held as part of the collective agreement results for that person. You could set up other areas of the application to reference this information if required.
For example, you could set up an item type called Paternity Leave Allowed that indicated whether an employee is eligible to take paternity leave. This would not be written to the employee's record, but could be seen in the collective agreement results for that person.
Eligibility Profiles
Use eligibility profiles to define the criteria that an employee must meet in order to receive a particular entitlement. The criteria that you can include in an eligibility profile are grouped into five factors:
-
Personal Factors
-
Employment Factors
-
Derived Factors
-
Related Coverages
-
Other Factors
Each factor contains a variety of criteria from which you select one or more criteria values.
For example, if a collective agreement states that people working in California should receive an extra allowance, you could define an eligibility profile using the Employment Factor criteria of Work Location. The value for the Work Location criterion would be California, (You need to define this work location using the Locations window). A person must meet this criterion in order to be given the associated allowance.
Eligibility profiles can be used in benefits plans, collective agreements, or both. The information you can enter against a profile differs slightly depending on whether you have accessed this window from the total compensation or collective agreements area of the application.
In addition to the eligibility profiles you define, there is a Default profile that you can select when defining entitlement values. You can use this to define a value to apply to everyone not eligible to receive something more beneficial.
Derived Factors
As part of the criteria for an eligibility profile you can set up derived factors. These are eligibility factors that are calculated by the application and can change over time. See: Derived Factors, Oracle HRMS Compensation and Benefits Management Guide for more information.
Collective Agreement Details
For each collective agreement recognized by your enterprise you can record information such as a name, number, and whether it is active. You can also indicate the parties by whom it has been agreed. You set these parties up using the organization classifications Employer and Bargaining Association.
Collective Agreement Entitlement Values
For each entitlement item to be included in a collective agreement you must select which eligibility profiles to use, and enter the values that employees who satisfy the criteria receive.
For some example setups of entitlements see: Example Entitlement Setups
Evaluation and Application of Collective Agreement Entitlement Values
To indicate which people are covered by the terms of a collective agreement you select the agreement as part of their primary assignment.
Note: You can select collective agreements as part of other assignments, but the evaluate and apply processes only calculate values for the primary assignment.
Once this has been done the application has to calculate what values the employee is eligible for and apply them to their record. How this is done depends on the settings of the following user profiles:
-
HR:Auto Apply Entitlements
-
HR:Auto Evaluate Entitlements
If the HR:Auto Evaluate Entitlements profile is set to Yes, then the values that an employee is entitled to are calculated as soon as the collective agreement is saved to their assignment. If it is set to No then you must run the evaluation process manually from the Collective Agreement Results window.
Note: If the HR:Auto Evaluate Entitlements profile is set to No, then the apply process will not run automatically, even if the HR:Auto Apply Entitlements is set to Yes
If the HR:Auto Apply Entitlements is set to Yes, then the values calculated for a person during the evaluation process are automatically applied to an employee's record. For any entitlements where the employee is entitled to more than one value but the application cannot determine which is most beneficial to the employee, you have to make a choice manually. If it is set to No you have to select and apply all values manually in the Collective Agreement Results window.
There is also a concurrent process called Collective Agreement Entitlement Evaluation that you can run from the Submit Request window to evaluate and apply an employee's entitlement values.
Value Sets for Collective Agreements
As part of the setup of your collective agreement entitlement items you may need to use value sets in order for your entitlement items to perform correctly.
Item Value Sets
If you are creating an entitlement item that populates one of the fields on the assignment included in the table below you need to select the corresponding item value set. This is so that when the entitlement item is selected in the Collective Agreement Entitlements window the values field displays a drop-down list of valid values.
The following table describes the fields on the assignment and the corresponding item value set:
| Field | Value Set |
|---|---|
| Bargaining Unit | CAGR_BARGAINING_UNIT |
| Employee Category | CAGR_EMPLOYEE_CATEGORY |
| Employment Category | CAGR_EMPLOYMENT_CATEGORY |
| Grade | CAGR_GRADES |
| Job | CAGR_JOBS |
| Organization | CAGR_ORGANIZATIONS |
| Payroll | CAGR_PAYROLL |
| Salary Basis | CAGR_SALARY_BASIS |
In addition to these a CAGR_YES_NO value set is provided to be used where the valid value for a field is Yes or No, or the field uses a check box, for example Union Member.
You can also use these supplied value sets as examples to set up your own should you need to. For example, if you want to create a value set to write a value to a descriptive flexfield column, you can define a value set that enforces the same validation that is used by the descriptive flexfield.
Beneficial Rule Value Sets
For entitlement items where the most beneficial value cannot be determined from the value itself, but can be determined from some other value associated with it, you can define a value set to enable the application to do this. An example of this would be grades where you can use the sequence number associated with a grade to determine which is most beneficial. This is presuming that you have set up your grades so that the higher the sequence number, the better the grade.
An example value set, CAGR_BR_GRADE has been supplied for you to use as a template for creating your own value sets.
Setups for Collective Agreement Value Sets
In order for the value set to work correctly with the collective agreement, it must conform to the following rules:
-
The item value set name must begin with CAGR_
-
The beneficial rule value set name must begin with CAGR_BR
-
The value set must be defined with a validation type of Table.
-
The value set must return two values, one ID and one value or description.
-
The following syntax is to be used if business_group_id is required in the sql. This example is for grades:
Where business_group_id = $PROFILES$.PER_BUSINESS_GROUP_ID AND GRADE_ID in ()
The important part of this syntax is that the ID column is restricted to a set of values that are inserted within the brackets. If the brackets are not there, the value set will not work.
Example Entitlement Setups
The following give an example setup for each of the categories supported in Oracle HRMS.
Assignment Category Example
Imagine that the notice period for employees is based on their employee category as shown in the following table:
| Employee Category | Notice Period |
|---|---|
| Default | 1 month |
| Blue Collar | 2 months |
| White Collar | 3 months |
To represent these collective agreement terms in Oracle HRMS you must complete the following steps:
1. Create an entitlement item called Notice Period and associate it with the Notice Period field.
2. Create two eligibility profiles based on the employment factor of Employee Category. In one select the employee category of Blue Collar and in the other select the employee category of White Collar.
3. Assuming you have already created your collective agreement, select the Notice Period entitlement item in the Collective Agreement Entitlements window and define the values for each of the eligibility profiles. Against White Collar, enter 3, and against Blue Collar, enter 2. Use the Default profile name to define the notice period of one month for all other employees.
Pay Scales Example
Imagine your enterprise uses the salary scale shown in the following table where employees' salary is based on their job and grade:
| Job | Grade | Point | Salary |
|---|---|---|---|
| Manager | M1 | 1.1 | 40000 |
| Manager | M1 | 1.2 | 45000 |
| Manager | M1 | 1.3 | 47500 |
| Manager | M2 | 2.1 | 50000 |
| Manager | M2 | 2.2 | 55000 |
| Executive | E1 | 3.1 | 65000 |
| Executive | E1 | 3.2 | 75000 |
To represent these collective agreement terms in Oracle HRMS you must complete the following steps:
1. Define jobs called Manager and Executive.
2. Define the grades M1, M2 and E2
3. Define a pay scale with points 1.1 through to 3.2.
4. Define a scale rate to associate the correct salary value with each point for the pay scale.
5. Define a grade scale to associate each grade to the correct points.
6. Create an entitlement item called Pay Scale and associate it with the Spinal Point field.
7. Create two eligibility profiles based on the employment factor of Job. In one select the job of Manager and in the other select the job of Executive.
8. Assuming you have already created your collective agreement, select the Pay Scale entitlement item in the Collective Agreement Entitlements window.
For each of the rows in the table you define a row in the Pay Scales tab. For the first row you would select the Manager eligibility profile, the grade M1, and the step 1.1.
Payroll Example
Imagine your enterprise uses the hourly rates shown in the following table where employees' rates are based on their grade:
| Grade | Standard Hourly Rate | Overtime Hourly Rate |
|---|---|---|
| A1 | 7.50 | 9.00 |
| A2 | 8.20 | 9.90 |
| A3 | 9.60 | 11.00 |
To represent these collective agreement terms in Oracle HRMS you must complete the following steps:
1. Define the grades A1 through to A3
2. Ensure the input values, element links and element entries have been defined for the Basic Salary Rate and Overtime elements.
3. Create two entitlement items, one called Standard Hourly Rate associated with the Basic Salary Rate element, and another called Overtime Hourly Rate associated with the Overtime element.
4. Create three eligibility profiles based on the employment factor of Grade. Select A1 in the first, A2 in the second, and A3 in the third.
5. Assuming you have already created your collective agreement, select the Standard Hourly Rate entitlement item in the Collective Agreement Entitlements window.
For each of the rows in the table you define a row in the values tabbed region. For the first row you would select the A1 Grade eligibility profile and enter the value of 7.50.
6. Select the Overtime Hourly Rate entitlement item in the Collective Agreement Entitlements window.
For each of the rows in the table you define a row in the values tabbed region. For the first row you would select the A1 Grade eligibility profile and enter the value of 9.00.
Setting Up a Collective Agreement
Follow these steps to enter a collective agreement, set up the eligibility criteria for the agreement, and to apply the values defined in the agreement to the eligible employees.
Note: Not all legislations utilise all the collective agreements functionality.
To set up a collective agreement
-
Define the entitlement items for your agreement.
See: Defining an Entitlement Item for a Collective Agreement
-
Define the eligibility profiles to be used with your collective agreement.
-
Create organizations to represent the two parties who have negotiated the agreement if required. Use the Employer and Bargaining Association organization classifications.
-
Create the collective agreement.
-
Define the entitlements for your collective agreement.
-
Assign the collective agreement to all employees who are covered by its terms.
See: Entering an Assignment, Oracle HRMS Workforce Sourcing, Deployment, and Talent Management Guide
-
Select and apply the entitlement values to be applied to an employee.
See: Selecting and Applying Collective Agreement Entitlement Values
Defining an Entitlement Item for a Collective Agreement
You create entitlement items using the Entitlement Item Definition window.
To define an entitlement item to generate values to be written to an employee's record:
-
Enter a name for your entitlement item. This must be unique within the category.
-
Select the category for your entitlement item. The category you select here determines the values you see in the Field Name field. For example, if you select a category of Assignment, you will only be able to select field names that relate to assignments.
If you select the Payroll category, then you can select an element name, rather than a field, to associate with the entitlement item.
Note: The category of Absence does not have any field names associated with it in the current release so therefore does not have any effect on current absence processing.
-
If you have selected the Payroll category, then you must select the element to which the entitlement item is associated. For example, if this item is to generate values for a person's salary you should select the Regular Salary element.
If the element has been defined to allow multiple entries, then you must indicate whether the value calculated using this item should be applied to all entries within the pay period or not. If you do not select this check box and there are multiple entries for the element then the collective agreement apply process will error.
If there are no element entries for an assignment to which the entitlement item applies, then select the Automatically Create Entries check box. This enables the Collective Agreement Entitlement Evaluation process to create the required element entries while processing and applying collective agreement entitlement results.
Note: You must select the Automatically Create Entries check box while defining new entitlement items as you cannot update this information for existing entitlement items.
You must also select an input value for the element. Once an element and input value combination has been associated with an entitlement item, it cannot be used again.
-
If you have selected any other entitlement category then you must select a field name and, if the field you select requires it, a unit of measure. This defines which field in the application will be populated with the value generated by this entitlement item. You can only associate each field with one entitlement item.
Defining a Beneficial Rule
-
Select the rule that defines which value is most beneficial for this entitlement item. For example, if the item was Holiday Allowance, then the beneficial rule should be Highest. The application will use this rule when an entitlement item produces multiple valid values for an employee.
If it is not possible for you to define a beneficial rule or the application cannot determine what is the most beneficial value then you are required to manually select a value if multiple values are returned.
-
Select an item value set for your entitlement item, if required.
For information on which entitlement items require item values sets see: Value Sets for Collective Agreements
-
Select a beneficial value set if your entitlement item requires a value set to determine the most beneficial value.
For information on setting up value sets for collective agreements see: Value Sets for Collective Agreements
-
Save your work.
To define an entitlement item to generate values held in the collective agreement results for an employee:
-
Enter a name for your entitlement item. This must be unique within the category.
-
Select a beneficial rule and value set if required.
-
Select a category and unit of measure for your entitlement item.
-
Save your work.
Defining an Eligibility Profile
You use the Participation Eligibility Profiles window to define an eligibility profile with an effective start date of your choice. Before defining the profile, define any derived factors (such as length of service or compensation level), or your own eligibility criteria, that you plan to use as eligibility criteria.
If you want to create your own criteria to include in the eligibility profile, click User Defined Eligibility Criteria and create new criteria, see: Creating your own Eligibility Criteria., Oracle HRMS Compensation and Benefits Management Guide To access these criteria, choose the Other tabbed region, and select User Defined Criteria from the list
You can use eligibility profiles to determine:
-
employee eligibility for compensation and benefits plans
-
entitlements in collective agreements
-
eligibility for grade/step progression
-
eligibility for various work schedules, and so on
The information you can enter differs slightly depending on whether you have accessed this window from the Total Compensation or Collective Agreements area of the application.
Note: If you use the Total Compensation Setup Wizard to set up grade ladders, programs and plans, and Total Compensation Statements, you can create or update eligibility profiles while you are working in the Wizard.
To define an eligibility profile
-
Enter the Name of the eligibility profile you are defining.
-
Enter a Description of this eligibility profile.
-
Select an Assignment Type to which this eligibility profile applies.
For example, you can define an eligibility profile for employee assignments if this profile is only used for employees.
Note: You can only select Employee Assignment Only for profiles to be used with collective agreements.
-
Select the profile Status.
Pending: This eligibility profile is currently proposed, but not active.
Active: This eligibility profile is in use.
Inactive: This eligibility profile is in use but cannot be associated with any new programs, plans, or options.
Closed: This eligibility profile was once Active or Pending, but is no longer in use.
-
Select whether this eligibility profile applies to benefits or collective agreements. If you are defining an eligibility profile for work schedules or grade step progression, then select benefits.
Choose the tabbed region that contains a criteria element that you want to include in your eligibility profile. Choose from:
-
Personal
-
Employment
-
Derived Factors
-
Related Coverages (Not applicable to collective agreements)
-
Other
-
-
Select a criteria element.
For example, you could choose Person Type as one of several eligibility criteria of the Personal type.
Note: When you define more than one value for a criterion, at least one of the values must be present in the person's record for them to be eligible. However, when you use multiple criteria in an eligibility profile (for example, a Work Location and an Organization), the person must meet at least one value for each criterion.
If you use a FastFormula eligibility rule as part of your eligibility profile, the participant must meet the criteria of the rule and one value from any other criteria that you include in the eligibility profile. If you use more than one FastFormula rule, by default the participant must meet the criteria of all the rules. If you change the user profile option BEN:Eligible Profile Rule from AND to OR, the participant need only meet the criteria of one rule.
-
Enter a Seq (sequence) number specifying the order the system processes this criteria element relative to any other criteria in this eligibility profile.
Note: You must assign a sequence number of a higher priority to all criteria that are used to exclude eligibility.
-
Select one or more values for the criteria element you have selected.
-
Check the Exclude field if a person becomes ineligible to participate in the compensation object, or to receive the collective agreement entitlement you associate with this eligibility profile if they meet this criterion.
You typically check the Exclude field when it is easier or faster to define which persons are excluded from eligibility, as opposed to defining which person are eligible.
If you are defining an eligibility profile for a grade ladder, and you want to rank your employees to determine the most eligible person to progress, enter an eligibility Score for this criteria.
The application calculates the eligibility rank based on the total score for all criteria that the person satisfies.
-
For grade ladders, you can also enter an eligibility Weight for a criteria.
The application multiplies the weight by the criteria value. You can only use weights with criteria that contain numeric values. If you enter a score and a weight for a criteria, the application adds the person's score to the weight to arrive at the final number.
-
Repeat steps 6 to 12 for each criteria element that you include in your eligibility profile.
-
Choose the Display All tabbed region to view the criteria elements in this eligibility profile.
-
Save your work.
Defining Derived Factors: Compensation Level
You can define a compensation level factor as part of an eligibility profile (to be used in determining benefits participation or collective agreement entitlements) or a variable rate profile. A compensation level factor can be based on either stated salary, balance type, or benefits balance type.
You define compensation level factors in the Derived Factors window. The values you can select in some of the fields depend on whether you have accessed the Derived Factors window from the Total Compensation or Collective Agreements area of the application.
To define a compensation level factor:
-
Enter a Name for this compensation level factor.
-
Select the Unit Of Measure for this compensation level factor.
Select the Source of the compensation level factor.
-
Select the Defined Balance for this compensation level factor if you selected a source of balance type.
-
Select a Benefits Balance Type if you selected a source of benefits balance type.
-
Select the compensation periodicity in the Stated Comp Periodicity field if you selected a source of stated compensation.
Note: If you have installed the Oracle Incentive Compensation patch 4409180 you can select either Oracle Incentive Compensation - Amount Earned or Oracle Incentive Compensation - Amount Paid as the source. If you select any of these sources, then the Incentive Compensation Information region displays, where you can enter the Start and End Dates, and select the Prorate if date range differs from OIC range check box
In the Values block:
-
-
Enter the Minimum amount under which the system does not calculate this compensation level factor.
-
Check the No Minimum field if there is no minimum compensation amount under which the system excludes participants when determining participation eligibility and activity rates.
-
-
Enter the Maximum amount above which the system does not calculate this compensation level factor.
-
Check the No Maximum Compensation field if there is no maximum compensation amount above which the system excludes participants when determining participation eligibility and activity rates.
-
-
Select a Determination Code or Rule to define when the system determines a participant's compensation level.
-
Choose a Rounding Code or Rounding Rule to specify the level to which the system rounds the results of this compensation level factor.
-
Save your work.
Defining Derived Factors: Percent of Full Time Employment
A percent full time factor derives an employee's percent of full time employment. The application uses this information to calculate activity rates, coverage amounts, or to determine participation eligibility for either benefits or collective agreement entitlements.
For example, you could define the 100% percent full-time factor to identify those employees who work 100% full-time (40 hours per week) and thus qualify for most benefits or entitlements.
You define percent full time factors in the Derived Factors window. The values you can select in some of the fields depend on whether you have accessed the Derived Factors window from the Total Compensation or Collective Agreements area of the application.
To define a percent full time factor:
-
Enter a Name for this percent full time factor.
-
Check the No Minimum field if there is no minimum percentage of full-time employment under which the application excludes employees when determining participation eligibility and activity rates.
-
Or, enter a Minimum Percent Value to define the minimum percentage of full-time employment to be used in this calculation.
-
-
Check the No Maximum field if there is no maximum percent of full-time employment beyond which the application excludes employees when determining participation eligibility and activity rates.
-
Or, enter a Maximum Percent Value to define the maximum percent of full-time employment to be used in this calculation.
-
-
Check the Use Primary Assignment Only field to specify that the application considers only an employee's primary assignment when determining percent of full time employment.
-
Check the Use Sum of All Assignments field to specify that the application considers all active assignments when determining percent of full-time employment.
-
Select a Rounding Code or Rule to specify the level to which the application rounds the results of this calculation.
-
Save your work.
Defining Derived Factors: Hours Worked In Period
An hours worked in period factor derives the number of hours a given employee has worked over a given period of time. The application uses this information to determine participation eligibility for either benefits or collective agreement entitlements, activity rates, and coverage amounts.
You define hours worked in period factors in the Derived Factors window. The values you can select in some of the fields depend on whether you have accessed the Derived Factors window from the Total Compensation or Collective Agreements area of the application.
To define an hours worked in period factor:
-
Enter a Name for this hours worked in period factor.
-
Select the calculation source for this hours worked in period factor in the Source field.
Balance Type: The application retrieves hours worked information from a balance.
Benefits Balance Type: The application retrieves hours worked information from a benefits balance.
-
Specify when the application calculates this hours worked in period factor in the Once or Continuing field.
Once: The application only calculates this hours worked in period factor following a life event or for open enrollment.
Continuing: The application calculates this hours worked in period factor each time you run the Participation batch process.
-
Select the Defined Balance for this compensation level factor if you selected a calculation source of balance type.
-
Select a Benefits Balance Type if you selected a calculation source of benefits balance type.
-
Check the No Minimum field if there is no minimum number of hours worked in period under which the application excludes employees when determining participation eligibility and activity rates.
-
Or, enter the Minimum hours worked in period under which the application does not calculate this hours worked in period factor.
-
-
Check the No Maximum field if there is no maximum hours worked in period above which the application excludes employees when determining participation eligibility and activity rates.
-
Or, enter the Maximum hours worked in period beyond which the application does not calculate this hours worked in period factor.
-
-
Select an hours worked Determination Code or Rule that defines how to calculate the hours worked in period.
-
Select a Rounding Code or Rule to specify the level to which the application rounds the results of this hours worked in period factor.
-
Save your work.
Defining Derived Factors: Age
An age factor derives a person's age in order to determine participation eligibility for either benefits or collective agreement entitlements, activity rates, and coverage amounts.
For example, you could define the Retire 65 age factor to identify those employees who are at least 65 years of age and thus qualify for a maximum benefit under your corporation's retirement plan. For collective agreements you could define the Age Less Than 21 age factor to identify those employees who are less than 21 and thus should be placed on a particular grade.
You define age factors in the Derived Factors window. The values you can select in some of the fields depend on whether you have accessed the Derived Factors window from the Total Compensation or Collective Agreements area of the application.
To define an age factor:
-
Enter a Name for this age factor.
-
Select the UOM to specify the unit of measure for this age factor.
-
Select an Age to Use code to indicate the kind of person, such as the participant or the participant's child, for whom you are defining a derived age factor.
Note: Derived factors to be used with collective agreements can only use the employee's age.
-
Select an Age Determination Code or Rule to specify the date the application uses to calculate age.
-
Check the No Minimum Age field if there is no minimum age under which the application excludes employees when determining participation eligibility and activity rates.
-
Or, enter the Minimum age beyond which the application does not calculate this age factor.
-
-
Check the No Maximum Age field if there is no maximum age beyond which the application excludes employees when determining participation eligibility and activity rates.
-
Or, enter the Maximum age beyond which the application does not calculate this age factor.
-
-
Select a Rounding Code or Rule to specify the level to which the application rounds the results of this age factor calculation.
-
Save your work.
Defining Derived Factors: Length of Service
A length of service factor derives the length of service for a given worker in order to determine participation eligibility for either benefits or collective agreement entitlements, activity rates, and coverage amounts.
You define length of service factors in the Derived Factors window. The values you can select in some of the fields depend on whether you have accessed the Derived Factors window from the Total Compensation or Collective Agreements area of the application.
To define a length of service factor:
-
Enter a Name for this length of service factor.
-
Select the unit of measure in the UOM field by which you are defining the length of service factor.
-
Select a Determination Code or Rule that defines how the system calculates an employee's length of service.
-
Check the No Minimum Applies field if there is no minimum length of service under which the system excludes employees when determining participation eligibility and activity rates.
-
Or, enter the Minimum length of service under which the system does not calculate this length of service factor.
-
-
Check the No Maximum Applies field if there is no maximum length of service above which the system excludes employees when determining participation eligibility and activity rates.
-
Or, enter the Maximum length of service beyond which the system does not calculate this length of service factor.
-
-
Select a length of service Date to Use Code or Rule to specify the date from which the system calculates the employee's length of service.
Hire Date: The system always uses the employee's hire date as the start date when calculating length of service.
Adjusted Service Date: The system first uses the employee's adjusted service date if one exists. If there is no adjusted service date, the system uses the employee's hire date.
-
Check the Use Override Service Date field to indicate that the system should override the person's service date when determining eligibility.
Note: You enter the Override Service Date for a person in the Participation Overrides window.
-
Select a Rounding Code or Rule to specify the level to which the system rounds the results of this length of service factor.
-
Save your work.
Defining Derived Factors: Combination Age and Length of Service
A combination age and length of service factor associates two factors you have already defined: an age factor and a length of service factor.
You define combination age and length of service factors in the Derived Factors window. The values you can select in some of the fields depend on whether you have accessed the Derived Factors window from the Total Compensation or Collective Agreements area of the application.
To define a combination age and length of service factor:
-
Enter a Name for the combination age and length of service factor you are defining.
-
Select an Age Factor.
-
Select a Length of Service Factor.
-
Enter the Minimum value for the combination of age and length of service that qualifies a person as eligible for the benefit, collective agreement entitlement, or activity rate with which this factor is associated.
-
Enter the Maximum value for the combination of age and length of service that qualifies a person as eligible for the benefit, collective agreement entitlement, or activity rate with which this factor is associated.
-
Enter an Order Number to specify the order in which the application processes and displays combined age and length of service records.
-
Save your work.
Entering a Collective Agreement
Use the Collective Agreements window to enter information about collective agreements used by your enterprise.
To enter a collective agreement:
-
Enter the name of the collective agreement. This must be unique to allow a collective agreement to be referenced across your business group.
-
Select a status for the collective agreement. Although you can still apply inactive collective agreements to employees, no values are calculated for it until you set it to Active.
-
Enter the number of the collective agreement.
-
Enter the start date of the collective agreement and enter its jurisdiction.
Note: An end date should only be entered once the collective agreement is no longer applicable to your enterprise. After the end date the collective agreement can no longer be applied to an assignment.
-
Select the employer and bargaining unit who have negotiated the collective agreement. These are defined using the employer classification and bargaining association classification in the Organization window. Enter the name of the signatory for each party.
-
Enter the name of the authorizing body and the date on which the collective agreement was authorized.
-
Save your changes.
What Next?
You can now define the entitlement values for the collective agreement using the entitlement items and eligibility profiles you have created. You do this in the Collective Agreement Entitlements window.
Defining Collective Agreement Entitlements
Use the Collective Agreement Entitlements window to define the values associated with all the entitlement items in your collective agreement. These are the values that employees covered by the terms of the collective agreement receive if they meet the criteria defined by the eligibility profile. Each value is held in an entitlement line.
Note: The Message Level, Range To, Range From, Non-Updateable, From Step, and To Step fields are to be used in future releases and are not currently active.
The following give an example setup for each of the categories supported in Oracle HRMS.
Assignment Category Example
Imagine that the notice period for employees is based on their employee category as shown in the following table:
| Employee Category | Notice Period |
|---|---|
| Default | 1 month |
| Blue Collar | 2 months |
| White Collar | 3 months |
To represent these collective agreement terms in Oracle HRMS you must complete the following steps:
-
Create an entitlement item called Notice Period and associate it with the Notice Period field.
-
Create two eligibility profiles based on the employment factor of Employee Category. In one select the employee category of Blue Collar and in the other select the employee category of White Collar.
-
Assuming you have already created your collective agreement, select the Notice Period entitlement item in the Collective Agreement Entitlements window and define the values for each of the eligibility profiles. Against White Collar, enter 3, and against Blue Collar, enter 2. Use the Default profile name to define the notice period of one month for all other employees.
Pay Scales Example
Imagine your enterprise uses the salary scale shown in the following table where employees' salary is based on their job and grade:
| Job | Grade | Point | Salary |
|---|---|---|---|
| Manager | M1 | 1.1 | 40000 |
| Manager | M1 | 1.2 | 45000 |
| Manager | M1 | 1.3 | 47500 |
| Manager | M2 | 2.1 | 50000 |
| Manager | M2 | 2.2 | 55000 |
| Executive | E1 | 3.1 | 65000 |
| Executive | E1 | 3.2 | 75000 |
To represent these collective agreement terms in Oracle HRMS you must complete the following steps:
-
Define jobs called Manager and Executive.
-
Define the grades M1, M2 and E2.
-
Define a pay scale with points 1.1 through to 3.2.
-
Define a scale rate to associate the correct salary value with each point for the pay scale.
-
Define a grade scale to associate each grade to the correct points.
-
Create an entitlement item called Pay Scale and associate it with the Spinal Point field.
-
Create two eligibility profiles based on the employment factor of Job. In one select the job of Manager and in the other select the job of Executive.
-
Assuming you have already created your collective agreement, select the Pay Scale entitlement item in the Collective Agreement Entitlements window.
For each of the rows in the table you define a row in the Pay Scales tab. For the first row you would select the Manager eligibility profile, the grade M1, and the step 1.1.
Payroll Example
Imagine your enterprise uses the hourly rates shown in the following table where employees' rates are based on their grade:
| Grade | Standard Hourly Rate | Overtime Hourly Rate |
|---|---|---|
| A1 | 7.50 | 9.00 |
| A2 | 8.20 | 9.90 |
| A3 | 9.60 | 11.00 |
To represent these collective agreement terms in Oracle HRMS you must complete the following steps:
-
Define the grades A1 through to A3.
-
Ensure the input values, element links and element entries have been defined for the Basic Salary Rate and Overtime elements.
-
Create two entitlement items, one called Standard Hourly Rate associated with the Basic Salary Rate element, and another called Overtime Hourly Rate associated with the Overtime element.
-
Create three eligibility profiles based on the employment factor of Grade. Select A1 in the first, A2 in the second, and A3 in the third.
-
Assuming you have already created your collective agreement, select the Standard Hourly Rate entitlement item in the Collective Agreement Entitlements window.
For each of the rows in the table you define a row in the values tabbed region. For the first row you would select the A1 Grade eligibility profile and enter the value of 7.50.
-
Select the Overtime Hourly Rate entitlement item in the Collective Agreement Entitlements window.
For each of the rows in the table you define a row in the values tabbed region. For the first row you would select the A1 Grade eligibility profile and enter the value of 9.00.
To define entitlements for a collective agreement
-
Select the category for the entitlement you are creating. Only entitlement items with this category can be selected in the Entitlement region.
Note: If you are defining entitlements for a payroll item type, then check that the following definitions have been entered:
-
The element and its input values
-
The element links
-
The element entries for all eligible employees
-
-
Select the entitlement item for which you want to create values. The remaining fields display the entries defined for the entitlement item in the Collective Agreement Entitlement Items window.
-
If you want to use a formula to calculate the value for this entitlement, then choose the Formula radio button and select the formula. If you want to define criteria to calculate the value, then ensure the Criteria radio button is selected.
Defining Entitlement Lines
-
Select the eligibility profile for which you want to define a value.
Note: In addition to the eligibility profiles you have created there is a DEFAULT profile. If you set up a value using this profile, then it is applied to all employees on the collective agreement, unless they are eligible for a more beneficial value.
-
Select whether this value is active. Inactive lines are ignored when calculating collective agreement values for an employee.
-
Do one of the following:
-
If you are entering values for a pay scale, then select the grade, and the step to be applied to employees that satisfy the criteria for this line. The pay scale for the grade is displayed automatically. The grade is used in association with the eligibility profile to determine the eligibility for pay scale entitlement items. To be eligible to be placed on the specified step, an employee must satisfy both the eligibility profile and be on the selected grade.
For example, if your eligibility profile is Age Less than 21, and you have selected grade SE01, then an employee must be less than 21 and be on grade SE01 to be placed on the step defined by this line.
-
Otherwise, enter the value to be applied to employees that satisfy this eligibility profile.
-
-
Add further entitlement lines until you have created all the required values for this entitlement, then save your work.
Setting up Collective Agreement Grades
Collective agreement grades enable you to define how an employee is graded or ranked in a collective agreement. A collective agreement grade is defined by a combination of values that you enter using grade factors. A grade factor is a user-defined field that you set up as part of the grade structure in the Collective Agreement Grades (CAGR) key flexfield. The grades that you predefine for a collective agreement are known as reference grades. To set up collective agreement grades:
To setup collective agreement grades:
-
Set up the Collective Agreement Grades key flexfield to define a grade structure and grade factors.
See: User-Definable Key Flexfields , Oracle HRMS Configuring, Reporting, and System Administration Guide
Note: If you are in Italy, do not set up this flexfield. You must use the predefined IT_CAGR flexfield structure.
-
Enter collective agreement grades. to link a grade structure to a collective agreement, and to define a set of reference grades.
What Next?
You can now define a collective agreement grade for an assignment using the Employment Terms tabbed region on the Assignment form.
See: Entering Additional Assignment Details, Oracle HRMS Workforce Sourcing, Deployment, and Talent Management Guide
Entering Collective Agreement Grades
You enter collective agreement grades to link a collective agreement to a grade structure and to define a set of reference grades that can be used in that collective agreement.
You enter this information using the Agreement Grades window.
To enter a collective agreement grade:
-
Query the collective agreement and select the grade structure. The reference grades entered will be recorded against the combination of collective agreement and grade structure selected.
-
Check the Override Allowed check box if you want to enable users to enter any combination of values for the selected grade structure in the Assignment window. If you leave the check box unchecked users will be forced to select a predefined reference grade.
-
Insert a sequence number and click the Name field. Enter values for the grade factors that are displayed. Each combination of values represents a reference grade.
-
Enter as many reference grades as required.
-
Save your changes.
You can now use the Assignment window to define the assignment's collective agreement grade.
See: Entering Additional Assignment Details, Oracle HRMS Workforce Sourcing, Deployment, and Talent Management Guide
Collective Agreement Administration
Collective Agreement Administration
After you set up the collective agreements in your enterprise, you need to evaluate and apply it for your required employees. Oracle HRMS provides you the evaluate and apply processes to enable your employees to receive the entitlements specified in the collective agreement.
To evaluate and apply, you must:
-
Indicate the people covered by a collective agreement by selecting the agreement as part of their primary assignment.
-
Set the HR:Auto Apply Entitlements and HR:Auto Evaluate Entitlements user profiles to calculate what values the employee is eligible for and apply them to their record.
If you set the HR:Auto Evaluate Entitlements profile to Yes, then the application calculates the values that an employee is entitled to as soon as the collective agreement is saved to their assignment. If you set it to No, then you must run the evaluation process manually from the Collective Agreement Results window.
Note: If you set the HR:Auto Evaluate Entitlements profile to No, then the apply process will not run automatically, even if you set the HR:Auto Apply Entitlements to Yes.
If you set the HR:Auto Apply Entitlements to Yes, then the application applies the values calculated for a person during the evaluation process automatically to the employee's record. For any entitlements where the employee is entitled to more than one value but the application cannot determine which is most beneficial to the employee, you have to make a choice manually. If you set it to No, then you have to select and apply all values manually in the Collective Agreement Results window.
There is also a concurrent process called Collective Agreement Entitlement Evaluation that you can run from the Submit Request window to evaluate and apply an employee's entitlement values.
Administering Retained Rights
Oracle HRMS enables an employee to continue to receive a specific entitlement item after an event makes the employee ineligible for the entitlement item. For example, if by changing the role an employee plays in your enterprise, the employee becomes ineligible for an education allowance, you can define it as a retained right if you still want them to receive it. The employee will continue to receive the allowance for the period you define in this window.
Selecting and Applying Collective Agreement Entitlement Values
How you use the Collective Agreement Results window depends on the settings of the profile options associated with collective agreements:
-
Setup A: If both HR: Auto Evaluate Entitlements and HR: Auto Apply Entitlements are set to No, then you use the Collective Agreement Results window to evaluate and manually select which of the generated values to apply to the employee.
-
Setup B: If HR: Auto Evaluate Entitlements is set to Yes, but HR: Auto Apply Entitlements is set to No, then the evaluation is done automatically once a collective agreement is selected for an employee. In this instance, you use the Collective Agreement Results window to manually select which of the generated values to apply to the employee.
If you set up your application like this you may experience a slight delay when saving an assignment record after selecting a collective agreement.
-
Setup C: If both profiles are set to Yes, then you use the Collective Agreement Results window to check that the application has applied the correct values, and also to manually select a value where the application cannot determine which is the most beneficial for the employee.
If you set up your application like this you may experience a delay when saving an assignment record after selecting a collective agreement.
Warning: Ensure that you have set up your collective agreement and associated information correctly before using this setup. Oracle recommends applying values generated by your collective agreements manually until you are sure that your setup works correctly.
The following procedures describe the behavior of the application following the selection of a collective agreement for the first time.
To select and apply entitlement values for setups A and B:
-
If your setup corresponds to Setup A, then in the Collective Agreement Results window, choose the Refresh Entitlements button. The Collective Agreement Evaluation process is run and the results are displayed.
If your setup corresponds to Setup B, then this evaluation will have been done automatically once you saved the collective agreement against the employee.
-
Choose the View Log button to look at the log file and ensure that the evaluation process has run correctly.
-
Use the category field to limit the entitlement items displayed in the Name fields by category if required. The results for the selected item are shown in the Entitlement Results region.
-
Choose which value to apply to the employee for each item by checking the Chosen check box. You must still check the Chosen check box even if only one value is displayed.
Where no values are displayed for an item then the employee is not eligible for that item.
Where the application has been able to calculate which of the values for an item is most beneficial to the employee, the Suggested check box is checked to show this. You must still check the Chosen check box for these values in order for them to be applied to the employee.
Any values that are included because they are retained rights are shown by a check in the Retained check box.
-
Save your work once you have chosen the value you want to apply to the employee for a particular item.
-
Repeat steps 3 to 5 until you have chosen values for all the entitlement items for which the employee is eligible.
-
Choose the Apply button to apply the values to the employee's record.
-
Choose the View Log button to look at the log and ensure that the values have been applied successfully. Any errors or warnings are shown in the Apply Process Log section.
Note: Every time you run the Apply process, a new Apply Process Log section is added to the end of the log, so ensure you are looking at the correct section.
-
Close the Collective Agreement Results window and requery the assignment in the Assignment window. The values applied from the collective agreement are displayed.
To select and apply entitlement values for setup C:
-
Choose the View Log button in the Collective Agreement Results window to look at the log file and ensure that the evaluation and apply processes have been run correctly.
-
Do one of the following to identify for which of the entitlement items the application has not been able to determine the most beneficial value for the employee:
-
Look through the log and check that the entry for each entitlement item that satisfies more than one eligibility profile contains the line Beneficial value is: You will have to choose a value manually for each of those that do not.
-
Navigate through the entitlement items in the Name fields. You will need to choose a value manually for each entitlement item that does not have the Suggested check box checked for one of its values.
-
-
Choose which value to apply to the employee for each item that has not been processed automatically by checking the Chosen check box. You must still check the Chosen check box even if only one value is displayed.
Note: If you want to override any of the values the application has applied, then you can still check the Chosen check box for items that have a suggested value.
-
Once you have chosen all the required values, then choose the Apply button to apply the values to the employee's record.
-
Choose the View Log button to look at the log and ensure that the values have been applied successfully. Any errors or warnings are shown in the Apply Process Log section.
Note: Every time you run the Apply process, a new Apply Process Log section is added to the end of the log, so ensure you are looking at the correct section.
-
Close the Collective Agreement Results window and requery the assignment in the Assignment window. The values applied from the collective agreement are displayed.
What Next?
If you make any changes to a person's employment record that may impact their entitlements, or you make changes to a collective agreement that may impact the entitlements of the employees covered by its terms, you must do one of the following:
-
Use the Collective Agreement Entitlement Evaluation process to re-evaluate and reapply the required values to each affected employee:
See: Running the Collective Agreement Entitlement Evaluation Process
-
Use the Collective Agreements Results window to re-evaluate and reapply the required values for each employee effected. Choose the Refresh Entitlements button to re-evaluate the entitlements the employee should receive and proceed as described in the procedure for setups A and B above.
Defining Retained Rights
Use the Collective Agreement Retained Rights window to define rights that an employee can still receive, even if they are no longer eligible for them. For example, if by transferring from a location an employee becomes ineligible for a location allowance, you can define it as a retained right if you still want them to receive it. The employee will continue to receive the allowance for the period you define in this window.
To define a retained right
-
Use the Category and Name fields to select the entitlement item that you want to retain for the employee.
-
Check the Retained check box for the value you want to retain.
-
Check the Freeze check box if you want to freeze the value of the entitlement. This means that even if the value of the entitlement item changes in the future due to a change in the collective agreement, the employee will still receive the value as it is now.
For example, if an employee receives a retained location allowance of $2000 that is frozen, even if the terms of the collective agreement increase the location allowance to $3000, then employee still receives $2000.
-
Enter the date from which the entitlement item is retained, and if required, enter the date when the item is no longer retained.
-
Save your work.
Running the Collective Agreement Entitlement Evaluation Process
The Collective Agreement Entitlement Evaluation process enables you to evaluate and apply collective agreement entitlements for an employee using the Submit Request window.
To run the Collective Agreement Entitlement Evaluation process:
-
Select the Collective Agreement Entitlement Evaluation process in the name field.
-
Click in the Parameters field to display the Parameters window, if it does not automatically open.
-
Select the date on which you want to run the process. This defaults to the system date.
-
Select the process mode. The options are:
-
Evaluate Only: Only the evaluation of possible results is performed.
-
Evaluate and Apply: Evaluate the possible results and apply them to the employee's record.
-
Apply Only: Apply the results already generated by the previous evaluation.
-
-
Select the processing level. The options are:
-
Single Assignment: Run the process for a single person.
-
Single Collective Agreement: Run the process for all people on a single collective agreement.
-
Single Entitlement: Run the process for a single entitlement item across all collective agreements.
-
-
Select the validation mode. The options are:
-
No Commit - Database Not Updated: The selected process runs and produces a log file indicating any errors that have occurred but does not save any information on the database. This enables you to run the Apply process without actually applying the results to your employee's record. This means you can correct any problems that may occur prior to amending any values.
-
Commit - Database Updated: The selected process runs and saves the information on the database.
-
-
Do one of the following:
-
If you have selected a processing level of Single Assignment, then select the person for whom you want to run the process.
-
If you have selected a processing level of Single Collective Agreement, then select the agreement for which you want to run the process.
-
If you have selected a processing level of Single Entitlement, then select the entitlement item for which you want to run the process.
Any changes that are made as a result of this process are made to the person's primary assignment.
-
-
Choose OK to return to the Submit Request window and choose Submit to run the report. You can view the log file generated from the Requests window. Use this file to identify any problems that have occurred during the running of the process.
Occupational Health
Occupational Health: Medical Assessments, Disabilities and Work Incidents
Oracle HRMS enables you to record medical assessments, disability information, and work incidents for the people in your enterprise. It also enables you to link this information together. For example, if a medical assessment is required as the result of a work accident, and that assessment then diagnoses a disability in the person, you could relate these records to one another.
Note: The Medical assessments, disabilities and work incidents functionality may not be used by your localization.
Medical Assessments
The Medical Assessment window enables you to enter information about the medical assessments (consultations) provided to the people in your enterprise. For example, you can record:
-
When the assessment took place, and the organization and person who performed it.
-
The result of the assessment, for example, if a disability was identified.
-
If the purpose of the assessment is to evaluate a particular disability, whether the person is considered fit for work.
-
Any work incident that was the reason for this assessment.
A person can have multiple medical assessment records. For example, a person may have a recruitment medical and several annual medicals.
Disabilities
Using the datetracked Disabilities window, you can enter information about a person's disabilities. For example, you can record:
-
The nature and severity of the disability
-
The full-time equivalent that this person represents towards your enterprise's quota of disabled employees
-
The details of the registration of this disability with an official organization
-
Any work incident that was the cause of this disability
-
The medical assessment that first identified this disability.
A person can have multiple disability records. Each disability can be linked to one work incident and to one medical assessment that diagnosed (or identified) the condition. Once a disability has been diagnosed and recorded, you can link it to multiple assessments that evaluate the disability.
Work Incidents
Oracle HRMS enables you to record work incidents, for example, accidents, that involve the people in your enterprise. Work incidents are incidents that occur:
-
at work
-
on the way to or from work
-
in other circumstances that are defined as work-related by your enterprise.
Using the Work Incidents window, you can record:
-
The details of the incident, for example, when and where it occurred.
-
The health and safety official and/or representative body that were notified of the incident
-
Medical details, such as any injury occurred, treatment given, and medical organizations involved
-
Whether any compensation was paid
-
Whether this person was absent as a result of the incident
-
The job the person was doing when the incident occurred
A person can have multiple work incident records.
The graphic illustrates the relationship between the medical assessment, disability and work incident tasks. It shows the full process that you could follow if you wanted to record:
-
A work incident that occurred
-
The medical assessment that was required as a result of the work incident
-
The disability record that was required as a result of a "Disability" result in the medical assessment
-
The subsequent "Disability type" medical assessments that were required to evaluate the disability on a regular basis
The "Start" boxes show the points at which you can start the process, depending on the task you need to perform.
Recording a Disability
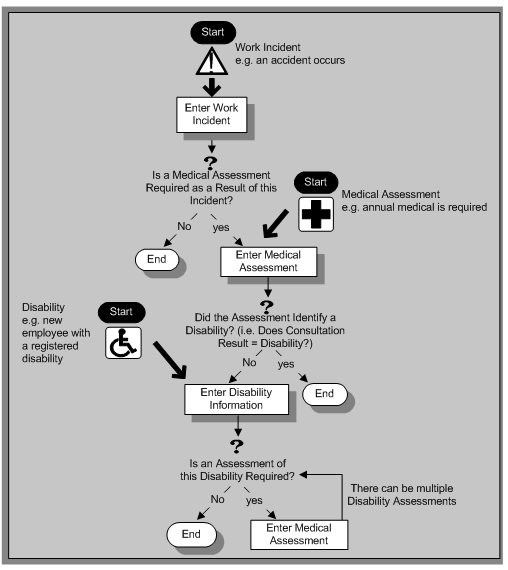
Entering Work Incident Information
You use the Work Incidents window to enter information about the work incident in which a person was involved.
To enter work incident information
-
Enter information about the incident:
-
Enter a unique reference number for this incident.
-
Enter the date on which the incident occurred.
-
If the incident occurred over time, enter the date on which the incident was identified or reported.
-
Select the type of incident that occurred.
-
Enter the time at which the incident occurred, if known.
-
Check the check box if the incident occurred over a period of time. For example, check this box if the incident was a gas leak.
-
Select the circumstances of the incident in the Activity field. For example, you can specify if the incident occurred en route to work.
For Russian users only: Activity is not required in Russia, so this field is not available to Russian users. Select the primary and secondary reasons for the incident. For example, you can select violation of industrial discipline as the primary reason and extreme temperatures as the secondary reason.
-
Enter the date on which the incident was reported.
-
Enter the reference number for a related work incident. The list is limited to incidents that involved this person and that occurred on or before the date of this incident.
-
Incident Description
-
Choose the Incident Description tab.
-
Enter more detail about the incident:
-
Select the main cause of the incident in the Hazard field.
-
Enter the location of this incident, for example, if the incident occurred in the workplace, identify the room and building.
-
Enter a further description of the incident, if required.
-
Incident Reporting
-
Choose the Incident Reporting tab.
-
Enter the reporting details:
-
Select the name of the person who reported this incident. You can only select a person who is on the system and who is in the same Business Group.
-
Select the method used to report this incident, for example, a voicemail.
-
Enter the date and time when the incident was reported. This cannot be earlier than the date and time recorded for the incident.
Note: You must select the name of the person who reported this incident before you can enter the date and time.
-
Enter the organization to whom the incident was reported, for example, the local fire station or police.
-
Enter contact details for anyone who witnessed the incident.
Note: For Russian users:The Incident Reporting tab is not applicable.
-
Official Notifications
-
Choose the Official Notifications tab.
-
Enter the official notification details:
-
Select the name of your organization's health and safety representative and enter the date on which they were notified of the incident
-
Describe any remedial action that was taken (or is planned) as a result of this incident.
-
Select the organization and person that are the representative body for this person and enter the date on which they were notified of the incident
Note: You must select the representative body organization before you can enter the person and reporting date.
-
Medical Details
-
Choose the Medical Details tab.
-
Enter any medical details:
-
Select the type of injury and/or disease caused by the incident.
-
Enter any further description of the injury or disease.
-
Check the box if the person received medical attention as a result of this incident. Then enter the name of the physician and/or the contact details for the hospital that was consulted or that provided treatment.
Note: If treatment was provided by an internal organization or person, for example, an occupational health organization or a first-aid officer, enter the details into the Hospital Details field.
Note: For Russian users:The Medical Details tab is not applicable.
-
Other Information
-
Choose the Other tab.
-
Enter other information about this incident:
-
If compensation was awarded for this incident, enter the amount. Then select the currency for the compensation amount. The Business Group's currency is shown as the default.
Note: If you enter a compensation amount, the Currency field cannot be left blank.
-
Enter the date on which the compensation was given.
-
Enter the job the person was doing at the time of the incident. The list is limited to jobs with effective start dates before the incident and effective end dates, if any, after the incident.
-
Enter the time the worker began work on the day of the incident.
See:Defining a Job, Oracle HRMS Enterprise and Workforce Management Guide
Note: If the person was involved in this incident prior to joining your enterprise, leave the Job field blank.
-
Check the Resulted in Absence? check box if the person was absent from work as a result of this incident.
-
-
Enter further information about this work incident in the Further Information field if it has been set up by your Oracle localization team.
For Russian users only, see: Entering Work Incident Information
For Mexican users only: Select the type of risk from the available list-of-values.
-
Save your changes.
What Next?
If a medical assessment is required as a result of this incident, you can choose the Medical Assessment button to open the Medical Assessment window and to enter the details of the assessment. If you enter a medical assessment in this way, its type is Occupational Assessment and it is automatically linked to this incident.
Entering Medical Assessments
Use the Medical Assessments window to record information about the medical examinations performed for the people in your enterprise.
To enter a medical assessment:
-
Enter the date on which the medical assessment was held.
-
Select the type of assessment, for example, Annual Medical Assessment.
-
If you opened the Medical Assessment window via the Disability window, the assessment type is Disability and cannot be changed.
-
If you opened the Medical Assessment window via the Work Incidents window, the assessment type is Occupational Assessment and cannot be changed.
-
-
Select the result of the assessment.
Note: If the assessment type is Disability Assessment, you can only select Unfit for Work or Fit for Work. You cannot select a Disability result for a Disability Assessment.
-
Select the name of the examiner and the name of the organization that performed the assessment.
If the organization is not listed, create the organization and select the Medical Service Provider classification.
See: Entering Organizations, Oracle HRMS Enterprise and Workforce Management Guide and Entering Organization Classifications.
-
Enter the date on which the next assessment is planned.
-
Select the work incident to which this assessment is related, if any. After you choose an incident, the date on which it occurred is automatically displayed.
You can only link an assessment to an incident if the assessment type is Occupational Assessment.
Note: If you have saved the assessment date, the list of incidents is limited to those that occurred before the assessment date. Otherwise, all incidents for that person are listed.
To enter a work incident for this person, see Entering Work Incidents.
-
Enter a description of the assessment.
-
Enter further details in the Further Information field if it has been set up by your Oracle localization team.
-
Save your work.
What Next?
If, as a result of this assessment, a disability was identified, you can enter the details of that disability and link it to this assessment.
See: Entering Disability Information
Note: Once a medical assessment is referenced in a disability record, you cannot change its result from Disability.
Entering Disability Information
HRMS enables you to enter detailed disability information for the people in your enterprise.
You use the Disability window to enter this information.
Note: If you want to record that a person is registered as disabled, but you do not need to hold information about that disability, you can just check the Registered Disabled check box on the Personal tab in the Person window.
See: Entering a New Person (People Window), Oracle HRMS Workforce Sourcing, Deployment, and Talent Management Guide
To enter disability information
-
Set your effective date early enough to handle any historical disability information that you want to enter.
Note: If you want to associate this disability record with an existing medical assessment or work incident, your current effective date must be later than the assessment and incident dates. Ask your system administrator to enable the Work Incidents and Medical Assessments windows if they are not available.
-
Select the category of disability, for example, Severely Disabled.
-
Enter into the FTE field the full-time equivalent that this person represents towards your enterprise's quota of disabled employees. If no quota scheme exists, then leave the default value as 1.00.
Note: You can enter a number that is greater than 1.00, depending on the level of disability.
The actual figure will normally be provided by the official disability organization.
-
Select the status of this disability information.
-
Active: This information will be included in reports. You cannot enter an Active status if the record has an end date.
-
Inactive: This information will not be included in reports.
-
Pending: This information is not yet complete because you entered it before you entered the medical assessment confirming this disability (where the consultation result was Disability.)
-
Closed: This information has an end date because the person no longer has this disability.
For Russian users only: Disability status is not applicable in Russia, so the Status field is not available to Russian users. Instead, select the type of disability. You can find this information in the disability certificate provided by the Office of Medical Examination. The application uses this information to calculate any tax benefits and deductions for the employee.
-
-
Select the reason for the disability, for example, Occupational Incident. If the disability was diagnosed as the result of a medical assessment, select Occupational Assessment.
-
Enter the percentage of disability as determined by the official assessment of this disability.
For Hungarian and Spanish users only: The degree of disability depends on the category of disability. For example, if the person's disability category states that the disability decreases the work capacity by 50%, enter 50 as the percentage.
-
Select the incident that is related to, or caused, this disability. The list of incidents is limited to incidents that occurred before the current effective date of this disability. When you select an incident, its date is displayed automatically.
-
Select the medical assessment that recorded this disability.
The list of assessments is limited to assessments that:
-
have a result of Disability
-
have a consultation date that is earlier than the current effective date of the disability
-
are not already linked to a disability record for this person
-
were linked to any incident that you selected in the previous step
To link an incident to an assessment, see: Entering Medical Assessments
This field is not datetracked.
-
Entering Disability Registration Information
-
Choose the Registration tabbed region to enter the disability registration details.
-
Enter into the ID field the registration number assigned by the disability organization.
-
Select the name of the official disability organization with whom the person's disability is registered.
You create disability organizations in the Organization window, selecting the Disability Organization classification.
See: Creating an Organization, Oracle HRMS Enterprise and Workforce Management Guide
-
Enter the date on which the employee was registered as disabled with the disability organization and the date on which this registration expires.
Entering Additional Disability Information
-
Choose the Other tabbed region to enter additional details about this disability.
-
Enter a description of the disability.
For Russian users only: Disability description is not applicable in Russia. Instead, enter the job conditions under which the disabled employee can work. You can find this information in the disability certificate provided by the Office of Medical Examination. You can use this information to identify suitable assignments for the disabled employee.
-
Enter information about the work restrictions that the employee is subject to as a result of their disability.
-
Enter further information about this disability if the Further Information field has been set up by your Oracle localization team.
For Hungarian users only: Record if the employee is blind. The application uses this information to calculate any additional holiday or tax benefit for the employee.
For Indian users only: Indicate if the employee has provided proof of disability, for claiming disability benefits.
For Mexican users only: Specify the following:
-
Disability ID of any related disabilities
The list-of-values displays all previous disabilities for your employee.
-
Number of disability days subsidized by the social security agencies
-
Type of disability
Valid values are:
-
General Disease
-
Maternity
-
Risk Incident
-
-
Result of the disability
The Consequence field provides the following options:
-
None
-
Temporary Disability
-
Provisional Initial Assessment
-
Definitive Initial Assessment
-
Death
-
Relapse
-
Assessment after start date
-
Provisional re-assessment
-
Relapse without medical discharge
-
Definitive re-assessment
-
-
Disability control
For Spanish users only: Record if the employee or dependent contact has a condition with reduced mobility. This information affects the employee's tax withholding rate.
For UAE users only: Indicate if the employee's disability will impact their social insurance contribution. Only one disability can be considered for calculating the social insurance contribution.
-
-
Save your work.
What Next?
To set up an assessment to evaluate this disability, choose the Medical Asse. (Assessment) button.
See: Entering a Medical Assessment for more information.
Maintaining Disability Information
You can make changes to the disability information that you saved previously, but if your disability record includes either incident or medical assessment information, you cannot change or delete this information once you have saved it.
Reporting Categories and Statuses
Reporting Categories and Statuses
Some reports place no restrictions on the employment category or assignment status of the employees to be included. However, other reports, such as VETS-100 and ADA, must include only non-temporary, full-time or part-time employees with a non-terminated assignment status.
To identify these employees, you register for the business group as Reporting Categories those employment categories that include non-temporary, full-time or part-time employees. You register as Reporting Statuses those assignment statuses that include non-terminated employees.
Registration of Reporting Categories and Statuses
You must limit the coverage of VETS-100 and ADA reports to employees who work either full or part time but are not temporary workers, and who have a non-terminated employment status as of the end date of the reporting period.
To establish the employment categories and assignment statuses of the employees that VETS-100 and ADA reporting must cover, you register Reporting Categories and Reporting Statuses for the Business Group:
-
Reporting Categories are the employment categories including employees who work full or part time on a non-temporary basis.
-
Reporting Statuses are the assignment statuses applicable to employees at a non-terminated status.
Start the registration of Reporting Categories and Statuses from the Organization window.
Registering Reporting Categories
Reporting Categories are employment categories that cover non-temporary, full-time, or part-time work. The categories you select here control which employees appear in the EEO-1 and VETs report.
To register reporting categories for the Business Group
-
In the Organization window, query the Business Group if it does not already appear there. With the cursor on Business Group in the Organization Classification region, choose the Others button. Select Reporting Categories.
-
Click in the first blank field in the Additional Information window to open the Reporting Categories window. Select an employment category to register employees who are non-temporary, full time or part time workers. Choose OK to transfer your selection to the Additional Information window.
-
To register another employment category, repeat step one.
-
When you finish registering categories, save your work. Choose OK to close the Reporting Categories window and the Additional Information window.
Registering Reporting Statuses
Reporting Statuses are those assignment statuses that cover non-terminated statuses. The statuses you select here control which employees appear in the EEO-1 and VETs reports.
To register reporting statuses for the Business Group
-
In the Organization window, query the Business Group if it does not already appear there. With the cursor on Business Group in the Organization Classification region, choose the Others button. Select Reporting Statuses.
-
Click in the first blank field in the Additional Information window to open the Reporting Statuses window. Register a status that covers employees at a non-terminated status. Choose OK to transfer your selection to the Additional Information window.
-
To register another assignment status, repeat step one.
-
When you finish registering statuses, save your work. Choose OK to close the Reporting Statuses window and the Additional Information window.
OSHA Reporting Setup
Reporting Organizations
You often must issue separate reporting for each GRE in your Business Group. Sometimes you must further break down data for a GRE by the establishments (hiring locations, units, or work sites) where its employees are based. A GRE can include employees working in several different establishments, and conversely, a given establishment can include employees in several different GREs.
For reporting purposes, an establishment may be a single physical location, a complex of work sites in a locality, or even all the sites included in a relatively large geographic area. For OSHA reporting, there may be two or more separate establishments at one physical work location if distinctly different types of operations are carried out at the location. To represent establishments for reporting, you give organizations the classification Reporting Establishment.
A GRE whose employees all work at the same establishment is simultaneously a GRE and a Reporting Establishment. For GREs with employees at different establishments you define a number of separate Reporting Establishments. To identify the establishment serving as the headquarters organization, you give a Reporting Establishment the additional classification of Corporate Headquarters.
AAP reporting requires breakdowns of employees by the affirmative action plans covering them, instead of breakdowns by establishment. To meet this requirement, you give organizations the classification AAP Organization, to represent individual affirmative action plans.
Establishment Hierarchies
To determine for reporting purposes which employees belong to a particular GRE and reporting organization, you construct establishment hierarchies, and supply them as parameters to the processes that produce particular reports.
A typical establishment hierarchy has a GRE at the top, Reporting Establishments at the next level, and HR Organizations subordinate to the Reporting Establishments. Report processes normally count employees as belonging to the Reporting Establishment to which their HR Organizations are subordinate in an establishment hierarchy.
Example Establishment Hierarchy
Looking at the example establishment hierarchy above, a report process with this hierarchy as a parameter counts the employees in the HR Organizations subordinate to the Thurbco Mfg. Reporting Establishment as based at that establishment, and those in HR Organizations subordinate to Thurbco Denver as based at that establishment.
Establishment Overrides
Report processes using establishment hierarchies can take exceptional cases into account. You can enter an override Reporting Establishment for any employee. When a process finds an override, it counts the employee as part of the override Reporting Establishment.
For example, if reports should include an employee in the count for Thurbco Denver, even though he is currently assigned to an organization subordinate to Thurbco Mfg, you simply enter Thurbco Denver as his override establishment.
Note: The establishment override functionality does not apply to AAP reporting. This is because the fundamental units of AAP reporting are affirmative action plans, not Reporting Establishments.
Varieties of Establishment Hierarchies
For most government-mandated HR reporting, you set up for a given GRE either a single-establishment hierarchy, or multiple-establishment hierarchies. If you have multiple establishments, you may also need a headquarters hierarchy for the establishment representing your enterprise headquarters.
The same basic rule applies to all the establishment hierarchies you build (but not to the AAP hierarchies used for AAP reporting). This rule is:
In a non-AAP establishment hierarchy, an organization classified as a Reporting Establishment can never be subordinate to another organization classified as a Reporting Establishment.
This means that in an establishment hierarchy, a GRE/Reporting Establishment can be the top organization, or Reporting Establishments can be subordinate to a GRE (and optionally to HR Organizations). But a Reporting Establishment cannot be subordinate to another Reporting Establishment.
AAP Establishment Hierarchies
Establishment hierarchies constructed for AAP reporting are exceptional because this reporting is based on the affirmative action plans existing within a GRE. This means that in AAP establishment hierarchies:
-
establishments appear as subordinates of AAP Organizations representing the affirmative action plans
-
AAP Organizations (which may also be Reporting Establishments) can appear at various levels in the hierarchy, and can be subordinate to other AAP Organizations (which may also be Reporting Establishments).
The Single-Establishment Hierarchy
In some cases, all the employees of a Business Group/GRE or a GRE work at, or from, a single establishment, and you use a single-establishment hierarchy as a parameter for production of an establishment report:
Example Single Establishment Hierarchy
The top organization of this type of hierarchy can be either a Business Group/GRE or a GRE, but must also be classified as a Reporting Establishment.
Multi-Establishment Hierarchies
For complex enterprises with multiple GREs and Reporting Establishments, you build multi-establishment hierarchies. For certain types of reporting you also require a special headquarters hierarchy, to cover the employees working in the Reporting Establishment that constitutes the enterprise headquarters. This section discusses multi-establishment hierarchies; the one following discusses headquarters hierarchies.
The top organization in a multi-establishment hierarchy can be either a Business Group/GRE or a GRE.
Note: For reporting that requires a separate report on your headquarters establishment, the top organization of a multi-establishment hierarchy must not be the headquarters organization. A headquarters organization always belongs in a special headquarters hierarchy.
An already existing organization classed as a GRE may be suitable for use as the top organization of a multi-establishment hierarchy. Alternatively, you can create a GRE for reporting purpose only, with a name similar to that of an operational GRE, and the same IRS identification number as the operational GRE.
Counting Establishment Employees
A report process can count of the number of employees in a particular Reporting Establishment, and alter its treatment of the establishment depending on the results of this count. For example, EEO-1 and VETS-100 reporting for establishments with fewer than 50 employees is different from that for larger establishments.
Looking at the example hierarchy above for MS Distributors, report processes with this hierarchy as a parameter are able to determine that the MS Distributors Detroit Reporting Establishment has fewer than 50 employees, and to produce the appropriate reporting for this establishment.
Preparing for Government-Mandated HR Reporting
In preparation for running the VETS-100 and ADA reports, you must register Reporting Categories and Reporting Statuses for the Business Group.
In preparation for all government-mandated HR reporting, you must set up one or more types of reporting organizations. These include:
-
Reporting Establishments
-
Corporate Headquarters
-
AAP Organizations
After setting up the reporting organizations you need, you can build establishment hierarchies and AAP establishment hierarchies that include these reporting organizations.
Before running EEO-1, VETS-100, ADA, or OSHA reports, you enter establishment overrides for individual employees as necessary.
Setting Up Reporting Organizations
A reporting organization is an organization that has, in addition to any other classifications, one or more of these classifications:
-
Reporting Establishment
-
Corporate Headquarters
-
AAP Organization
Before defining reporting organizations, determine the establishment hierarchies your enterprise needs for government-mandated HR reporting. This will in turn determine the particular reporting organizations you must set up.
See: Varieties of Establishment Hierarchies
Reporting organizations that do not have the classification Corporate Headquarters may be subordinate to other organizations in establishment hierarchies. You can quickly place a subordinate reporting organization in a hierarchy by entering its parent organization as additional information for its classification.
Note: When a reporting organization is the top organization in an establishment hierarchy, you always place it in the hierarchy when creating the hierarchy in the Organization Hierarchy window.
Example Multi-Establishment Hierarchies
Example Multi-Establishment Hierarchies
For examples of multi-establishment hierarchies, we can look at the hypothetical corporation Swanson Inc. Its Business Group includes two GREs, the parent company Swanson Inc. and a subsidiary, MS Distributors Detroit. The enterprise employs workers at four separate establishments:
-
Company headquarters in Cleveland, Ohio.
-
One factory in a Cleveland suburb and another in Dayton, Ohio.
-
The MS Distributors warehouse and shipping center in Detroit, Michigan.
This table summarizes the distribution of the 4,000 employees of Swanson Inc., by GRE and Reporting Establishment:
| Reporting Establishment | Swanson Inc. GRE | MS Distributors Detroit GRE |
|---|---|---|
| Swanson Inc. Headquarters | 500 | |
| Swanson Mfg. | 1,500 | |
| MS Distributors Detroit | 955 | |
| Swanson Dayton | 1,000 | 45 |
For reporting purposes, this enterprise needs two multi-establishment hierarchies, and requires a headquarters hierarchy. The multi-establishment hierarchies required are these:
When you run a report giving one of these hierarchies as a parameter, the report process includes as belonging in a particular Reporting Establishment, any employees assigned to that establishment, plus all the employees assigned to the HR Organizations subordinate to that establishment. The only employees in these organizations that are not covered are any that have establishment overrides entered for the other Reporting Establishment in the hierarchy.
Setup Steps for OSHA Reporting
-
Ensure that entry of information on each incident of work-related injury or illness is complete.
See: Entering Information about Work-Related Injury or Illness
-
Identify the establishments within each GRE that you need for OSHA reporting, and ensure that they are defined as Reporting Establishments.
See: OSHA Data and Reporting and Setting Up Reporting Establishments
-
Determine and build, if necessary, the establishment hierarchies you need to obtain OSHA reporting.
-
Manually enter any necessary establishment overrides for employees.
-
Run the OSHA report processes.
Set Up Establishment Hierarchies
Establishment hierarchies include:
-
single-establishment hierarchies
-
multi-establishment hierarchies
-
headquarters hierarchies
-
AAP establishment hierarchies.
Single-Establishment Hierarchies
To create a single-establishment hierarchy
-
Determine the top organization of the hierarchy. It must be a GRE and a Reporting Establishment. It may be a Business Group/GRE.
-
Build the hierarchy by placing all the HR Organizations in the Business Group/GRE or GRE at the second and lower levels under the top organization.
Multi-Establishment Hierarchies
To create a multi-establishment hierarchy
-
Determine the top organization of the hierarchy. It can be a Business Group/GRE or a GRE. It cannot be a Reporting Establishment or an HR Organization, and should not have the classification Corporate Headquarters.
-
Build the hierarchy by placing the appropriate establishments and the HR Organizations subordinate to the establishments at lower levels.
Headquarters Hierarchies
To create a headquarters hierarchy
-
The top organization is that classified as Corporate Headquarters. It must also have the classifications GRE and Reporting Establishment.
-
Build the hierarchy by placing all the HR Organizations in the headquarters organization at the second and lower levels under the top organization.
Placing Subordinate Reporting Organizations in Hierarchies
Reporting organizations with the classification Reporting Establishment and/or AAP Organization may exist in subordinate positions in establishment hierarchies. There is a convenient way to place these organizations in hierarchies when you set them up. You can name the hierarchies and parent organizations of the reporting organization in the Parent Organization window, accessible from the Organization window.
See: Setting Up Establishment Hierarchies
To put a reporting organization in a hierarchy
-
In the Organization window, query the reporting organization if it does not already appear there. Select Reporting Establishment or AAP Organization in the Organization Classifications region, choose the Others button, and select Parent Organization to open the Parent Organization window.
-
Select the hierarchy name.
-
Select the name of the parent organization to which the reporting organization is subordinate in this hierarchy.
-
To place the reporting organization in another hierarchy, repeat steps 2 and 3.
-
Save your work.
Enter Establishment Overrides
Use establishment overrides when employees who would normally be counted in one Reporting Establishment, should actually be counted as belonging to another in the same establishment hierarchy. Report processes with establishment hierarchies as parameters check whether Reporting Establishment overrides exist for the employees the hierarchies cover. If it finds overrides, it counts the employees as belonging to the override Reporting Establishments.
Note: Because the basic unit of AAP reporting within a GRE is its affirmative action plans (AAP Organizations), not its Reporting Establishments, you cannot enter establishment overrides for AAP reporting.
To enter an establishment override for an employee
-
Select the override establishment in the Establishment field.
Define Lines of Progression for Jobs
To define a line of progression for a series of jobs, you build entities called career paths in Oracle HRMS. Career paths are also useful for Building a line of progression, or career path, involves these two steps:
-
entering the name of the line of progression into the system as a career path name, using the Career Path Names window
-
entering the jobs comprising the line of progression, starting from the job with highest status and remuneration and working down, using the Map Career Path window.
A job can appear only once in any line of progression.
To define lines of progression
-
In the Career Path Names window, enter and save the names of the lines of progression you have determined for your enterprise.
-
Open the Map Career Path window. In the Name field, select the top job in a line of progression.
-
In the Career Path Name field, select the name of this line of progression.
-
In the Job Progression From block, select the job that is one level down from the job appearing in the Name field. Check the Down box. The window redisplays with the selected job now appearing in the Name field.
-
Repeat Step 4 until you have entered all the jobs in the line of progression.
To move back up the line of jobs, check the Up box.
-
Save your work.
OSHA Reporting
OSHA (Occupational Safety and Health Act) Reporting
The Occupational Safety and Health Act of 1970 and Title 29 of the Code of Federal Regulations, Part 1904 (29CFR Part 1904) require employers in certain industries to record and report on employees' work-related injuries and illnesses. The Bureau of Labor Statistics (BLS) administers this record keeping and reporting, often in cooperation with state agencies. Employers must consult with these agencies to determine if they are subject to additional state-level recording and reporting obligations.
Employers in relatively high-risk industries such as construction, manufacturing, and health services, must keep OSHA records for each individual establishment on an ongoing basis, if they have a combined total of 11 or more employees working at one or more establishments.
Employers in other industries that normally are not required to keep OSHA records must maintain these records when selected to participate in the Annual Survey of Occupational Injuries and Illnesses. This survey produces national estimates of occupational injuries and illnesses for all employers.
For a full list of industries required to maintain and report on OSHA information, and detailed instructions about OHSA record keeping, consult the document A Brief Guide to Recordkeeping Requirements for Occupational Injuries and Illnesses. To obtain copies of this publication, contact your regional office of the Bureau of Labor Statistics or write to:
Bureau of Labor Statistics
Division of Management Systems (1220-0029)
Washington, DC 20212
OSHA Data
Information needed for OSHA reporting includes a description of each work-related injury or illness and the date, place and circumstances of its occurrence or onset, as well as information on its physical effects and its outcome. For a nonfatal incident, you also maintain data showing its effects on the employee's ability to work.
The OSHA 300 Log report and OSHA 300A Summary report record information about work-related injuries and illnesses during the year, and present a summary of these injuries and illnesses at year end. An additional report, OSHA 301 Incident Report, provides further information about the cases you record.
OSHA Establishments
GREs with more than one establishment must maintain separate sets of OSHA records and reporting for each establishment. To represent these establishments and the employees within them, you use Reporting Establishments and establishment hierarchies.
Notice that for OSHA record keeping and reporting, clearly separate activities performed at the same physical location require treatment as separate Reporting Establishments. For example, if an enterprise has manufacturing facilities and sales offices in the same building, each activity constitutes a distinct establishment.
OSHA Categories of Illness
OSHA recognizes these categories of occupational injury or illness:
-
Injury: Examples are back strain, bone breaks, and head injury.
-
Skin diseases or disorders: Examples are eczema, oil acne, chrome ulcers, and chemical burns.
-
Respiratory conditions: Examples are pneumonitis, pharyngitis, rhinitis, acute congestion due to chemicals, dusts, and gases or fumes.
-
Poisoning (systemic effects of toxic materials): Examples are poisoning by lead, mercury, cadmium, arsenic or other metals; by carbon monoxide, hydrogen sulfide or other gases; by benzol, carbon tetrachloride or other organic solvents; by insecticide sprays; by other chemicals such as formaldehyde, plastics, and resins.
-
All other illnesses: Examples are anthrax, brucellosis, infectious hepatitis, malignant and benign tumors, food poisoning, and histoplasmosis.
Entering Information about Work-related Injury or Illness
When employees suffer work-related injuries or illnesses, you record information about these incidents in the Work Incidents window. You begin this entry from the Person window.
To enter data on an OSHA-reportable incident
-
In the Person window query the employee suffering the injury or illness, if he or she does not already appear here.
-
Choose the Others button.
-
Select Work Incidents/OSHA.
-
For incidents of work-related injury, you must select the category Injury in the Incident Category field. Otherwise select the category appropriate for a work-related illness.
-
If the employee has an existing incident record related to the new incident you are recording you can select a corresponding reference number in the Related Incident Ref field.
-
Enter the Incident date.
-
Enter the time the incident occurred.
-
If you want the incident to appear on your OSHA reports, choose the OSHA Recordable check box.
Incident Description
-
Choose the Description tab.
-
In the Activity at time of incident field, describe what the employee was doing when injured or taken ill.
-
In the Objects/Substances Involved field, list any tools, equipment, or materials being used or handled.
-
If the incident caused the employee to miss work or restricted the employee's activities, enter the number of days missed or restricted.
Do not include the day of injury or onset of illness, or days the employee would not have worked in any case. For employees without regular work schedules, estimate the number of missed days.
-
Indicate if the incident caused the termination or permanent transfer of the employee.
-
Select a hazard relative to the injury if appropriate.
-
Enter the location where the incident took place.
-
Enter a brief description of the incident.
-
Enter any additional incident details.
Reporting Information
-
Choose the Reporting tab.
Note: The information recorded in the Reporting tabbed region is not used by the OSHA reports.
-
Enter a report date. The date you enter must be a date on or before the incident date.
-
Enter a report time.
-
Enter brief details of who the incident was reported to.
-
. Briefly detail any witness accounts of the incident.
-
. Enter a name, title, and telephone number for the person responsible for the report.
Official Notifications
-
Choose the Official Notifications tab.
Note: This tabbed region is optional. The information recorded in this region is not used by the OSHA reports.
-
Select a health and safety representative name.
-
Enter a notification date for the health and safety representative.
Note: You must enter a health and safety representative name before you can enter the Date Notified field.
-
Briefly describe any remedial action taken as a direct result of the incident.
-
Select the representative body notified of the incident.
-
Select a representative name for the representative body.
Note: You must enter a representative body before you can enter a representative name.
-
Enter the date that the representative name was notified of the incident.
Note: You must enter a representative name before you can enter a notification date.
Medical Details
-
Choose the Medical Details tab.
-
If the employee was hospitalized as a result of the incident choose the Hospitalized check box.
-
If the employee required emergency treatment as a result of the incident choose the Emergency Room check box.
-
If the employee sustained an injury as a result of the incident select the injury sustained.
-
If the employee contracted a disease as a result of the incident select the disease contracted.
-
In the Body Parts Affected field, enter the injury or illness and the body part, for example, Fracture of ribs; Dermatitis of left hand; Lead poisoning.
-
Enter the name and address of the physician attending the employee, and if he or she was hospitalized, the name and address of the hospital.
Other Important Information
-
Choose the Other tab.
-
Enter the work start time of the employee.
-
If you do not want the employee to be identified on the OSHA reports choose the Privacy Issue check box.
-
If the injury or illness caused the employee's death, you must enter the date of death. Entry of a date in the Date of Death field signals that the injury or illness was fatal, and must be reported as such.
-
Enter compensation details of amount, currency and the date compensation was awarded.
-
Select the employee's job at the time of the incident.
-
If the incident resulted in an absence from work check the Resulted in Absence check box.
-
Save your work.
When you run the OSHA 300 and OSHA 301 reports, information entered in this window appears on one or both of these reports.
Note: The Case Number field populates when you save your work.
-
-
-
-
-
Running OSHA Reports
Computer-generated versions of OSHA 300, OSHA 300A, and OSHA 301 are acceptable, so long as they contain the same information and are as readable and comprehensible as the OSHA forms. The BLS advises employers using computer-generated forms to submit a sample report for review, to ensure compliance with BLS regulations.
Run report requests from the Submit Requests window.
See: Setup Steps for OSHA Reporting
To run OSHA 300, 300A or 301 Reports
-
Select OSHA 300 Log Report, OSHA 300A Summary Report, or OSHA 301 Incident Report in the Request Name field. Click in the Parameters field if the Parameters window does not open automatically.
-
Enter the start and end dates of the period this report covers.
The period end date is the date that appears on the report.
-
Select the name of the establishment hierarchy to use for the report.
-
Select a location for the report.
-
Select sort orders for the report in the Order by fields.
-
Choose the Submit button to run the report.
Workforce Intelligence for Employment Agreements and Legal Compliance
Compliance (United States Specific) Detail Workbook
This workbook provides US-specific compliance information. It enables you to:
-
View OSHA incident details.
-
View organization-wide disability information.
-
View details of accommodations made for disabilities across the organization.
-
View special information associated with people in the organization.
Parameters
This wookbook has no parameters.
Worksheets
This workbook has the following worksheets:
-
OSHA Incidents
-
Disabilities
-
Disability Accommodations
-
Detailed Special Information
OSHA Incidents Worksheet
This worksheet enables you to view details associated with recorded OSHA incidents within your organization.
Business Questions
What OSHA incidents have occurred?
Disabilities Worksheet
This worksheet enables you to view special information concerning employees with disabilities within your organization.
Business Questions
Which employees are disabled and in what way?
Disability Accommodations Worksheet
This worksheet enables you to view details about accommodations made for employees with disabilities across your organization.
Business Questions
What accommodations have been for disabled people?
Detailed Special Information Worksheet
This worksheet enables you to view special employee information for employees within your organization. The worksheet includes only current employees.
Business Questions
Show me the special information held against my employees.
Employee Equal Opportunity Exceptions (United States Specific) Detail Workbook
This workbook is provided to aid Ethnic Origin reporting requirements in the United States. It can be used to highlight the exceptions to employee data in your HRMS system that require action before you can produce legislative reports.
Worksheets
This workbook has the following worksheets:
-
Employees Outside an Establishment Hierarchy
-
Employees Without a Location
-
Employees With Missing Equal Opportunity Data
Employees Outside an Establishment Hierarchy Worksheet
The Employees Outside an Establishment Hierarchy worksheet enables you to analyze which employees are at a location that is not in a defined Reporting Establishment Hierarchy, on a given effective date.
Business Questions
Which employees are outside the establishment hierarchy?
Parameters
You must specify a value for the following parameter:
-
Effective Date
The report includes employees who have an assignment on the selected effective date.
Employees Without a LocationWorksheet
The Employees Without a Location Worksheet enables you to analyze which employee primary assignments are not assigned a location on a given effective date.
Business Questions
Which employees have no location specified for them?
Parameters
You must specify a value for the following parameter:
-
Effective Date
The report includes employees who have an assignment on the selected effective date, and who are not associated with a location.
Employees With Missing Equal Opportunity DataWorksheet
This worksheet enables your organization to discover which employee primary assignments have missing Ethnic Origin information on a given effective date.
For example, the report will show if an employee is missing data for employment category or ethnic origin.
Business Questions
Which employees have missing equal opportunity information?
Parameters
-
Establishment Hierarchy
-
Top Establishment
-
Effective Date
The report includes employees who have a primary assignment within the selected establishment hierarchy on the selected effective date.
Employee Equal Opportunity for New Hires (United States Specific) Detail Workbook
This workbook enables you to list new employee hires within a given period. The workbook output includes the employee primary assignment details, job name, employee number, ethnic origin, hire date, and age at hire date, hired annual salary and current annual salary.
Worksheets
This workbook has the following worksheets:
-
By Establishment Hierarchy
-
By Organization Hierarchy
By Establishment Hierarchy Worksheet
This worksheet enables you to list employee new hires within a given period. The worksheet output includes the following employee primary assignment details:
-
Job Name
-
Employee Number
-
Ethnic Origin
-
Hire Date
-
Age at Hire Date
-
Hired Annual Salary
-
Current Annual Salary
The list of employees is for a given establishment hierarchy.
Business Questions
What are the ethnic origin, gender, and hiredate of my new hires within a given establishment hierarchy?
Parameters
You must specify values for the following parameters:
-
Establishment Hierarchy
-
Top Establishment
-
Start Date
-
End Date
The report includes employees who have a primary assignment within the selected establishment hierarchy during the period from the selected Start Date to the selected End Date.
Headings and Calculations
This worksheet uses the following calculations:
-
Age at Hire Date
Calculates a persons age at their hire date.
-
Current Annual Salary
Calculates the annual salary as of the current date for an assignment.
-
Hired Annual Salary
Calculates the annual salary as at the hire date of an assignment.
By Organization Hierarchy Worksheet
This worksheet enables you to list employee new hires within a given period. The worksheet output includes the following employee primary assignment details:
-
Job Name
-
Employee Number
-
Ethnic Origin
-
Hire Date
-
Age at Hire Date
-
Hired Annual Salary
-
Current Annual Salary
The list of employees is for a given organization hierarchy.
Business Questions
What are the ethnic origin, gender, and hiredate of my new hires within a given organization hierarchy?
Parameters
You must specify values for the following parameters:
-
Organization Hierarchy
-
Top Organization
-
Start Date
-
End Date
The report includes employees who have a primary assignment within the selected organization hierarchy during the period from the selected Start Date to the selected End Date.
Headings and Calculations
This worksheet uses the following calculations:
-
Age at Hire Date
Calculates a persons age at their hire date.
-
Current Annual Salary
Calculates the annual salary as of the current date for an assignment.
-
Hired Annual Salary
Calculates the annual salary as at the hire date of an assignment.
Employee Equal Opportunity for Separations (United States Specific) Detail Workbook
This workbook enables you to report on employee separations within a given period. The workbook output includes the employees' job name, employee number, gender, hire date, separation date, and separation reason.
Worksheets
This workbook has the following worksheets:
-
By Establishment Hierarchy
-
By Organization Hierarchy
By Establishment Hierarchy Worksheet
This worksheet enables you to report on employee separations within a given period. The worksheet output includes the following employee primary assignment details:
-
Job Name
-
Employee Number
-
Gender
-
Hire Date
-
Actual Separation Date
-
Separation Reason
The list of employees is for a given establishment hierarchy.
Business Questions
What are the ethnic origin, gender, and separation reason of my employees separating from a given establishment hierarchy?
Parameters
You must specify values for the following parameters:
-
Establishment Hierarchy
-
Top Establishment
-
Start Date
-
End Date
The report includes employees who have a primary assignment within the selected establishment hierarchy during the period from the selected Start Date to the selected End Date.
By Organization Hierarchy Worksheet
This worksheet enables you to report on employee separations within a given period. The worksheet output includes the following employee primary assignment details:
-
Job Name
-
Employee Number
-
Gender
-
Hire Date
-
Actual Separation Date
-
Separation Reason
The list of employees is for a given organization hierarchy.
Business Questions
What are the ethnic origin, gender, and separation reason of my employees separating from a given organization hierarchy?
Parameters
You must specify values for the following parameters:
-
Organization Hierarchy
-
Top Organization
-
Start Date
-
End Date
The report includes employees who have a primary assignment within the selected organization hierarchy during the period from the selected Start Date to the selected End Date.
Employee Equal Opportunity with Salary (United States Specific) Detail Workbook
This workbook enables you to list employee primary assignment details including job name, employee number, gender, ethnic origin, hire date, and salary.
Worksheets
This workbook has the following worksheets:
-
By Establishment Hierarchy
-
By Organization Hierarchy
By Establishment Hierarchy Worksheet
This worksheet enables your organization to list employee primary assignment details including, Job Name, Employee Number, Gender, Ethnic Origin, Hire date and Salary. The list of employees is for a given Establishment Hierarchy.
Business Questions
What are the ethnic origin, gender, and salary of my employees in a given establishment hierarchy?
Parameters
You must specify values for the following parameters:
-
Establishment Hierarchy
-
Top Establishment
-
Effective Date
The report includes employees who have a primary assignment within the selected establishment hierarchy on the selected Effective Date.
Headings and Calculations
This worksheet uses the following calculations:
-
Annual Salary
Calculates a person's annual salary as of the current date.
By Organization Hierarchy Worksheet
This worksheet enables your organization to list employee primary assignment details including, job name, employee number, gender, ethnic origin, hire date, and salary.
The list of employees is for a given organization hierarchy.
Business Questions
What are the ethnic origin, gender, and salary of my employees in a given organization hierarchy?
Parameters
You must specify values for the following parameters:
-
Organization Hierarchy
-
Top Organization
-
Effective Date
The report includes employees who have a primary assignment within the selected organization hierarchy during the period on the selected Effective Date.
Headings and Calculations
This worksheet uses the following calculations:
-
Annual Salary
Calculates a person's annual salary as of the current date.