Recruitment and Hiring
Recruitment and Hiring Overview
Using Oracle HRMS, you can set up your recruitment process as your enterprise requires.
Oracle HRMS and the Recruitment Cycle
Recruitment follows a familiar cycle of tasks across most enterprises. The following graphic depicts the recruitment cycle:
The Recruitment Cycle
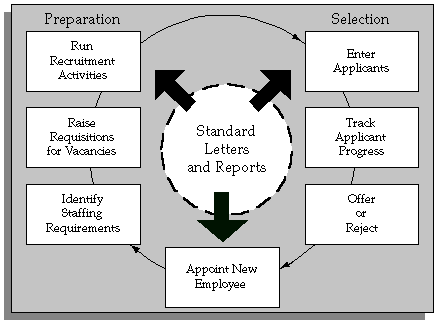
An analysis of your own detailed working practices will help you decide whether to use Oracle HRMS at a basic or an advanced level within each area of the recruitment cycle. You can identify the sequence of tasks your users perform to design the recruitment task flows.
Using Oracle HRMS, you can manage the phases of the recruitment cycle:
-
Recruitment Preparation: Identify vacancies in your agency and create recruitment activities such as posting the positions.
-
Selection Process : Receive and process applications and issue offer or reject letters. Yu can define your own stages of the selection process and track applicants' rogress.
Recruitment Using Oracle iRecruitment
You can use Oracle Self-Service Human Resources (SSHR) to hire successful applicants into your enterprise. You can configure SSHR's hire functionality to suit your business needs. For example, you can include only the modules you need, such as Personal Information and Employee Pay in your SSHR hire process. You can use the Applicant Hire function in SSHR to hire applicants created in Oracle HRMS and Oracle iRecruitment. To work with Oracle SSHR, you must purchase the license from Oracle. For information on licenses contact your Oracle sales representative.
Reporting on Recruitment
Oracle HRMS, Oracle HRMSi, and Oracle iRecruitment provide a range of reports to track your recruitment process. For example:
-
Oracle HRMS offers the Full Applicant Details report, listing the listing the person's applications and interviews.
-
Oracle iRecruitment offers the Applicant Efficiency report to show the average amount of time it takes to fill a vacancy.
For more information, see: Reports and Processes in Oracle HRMS, Configuring, Reporting, and System Administration Guide
Key Concepts
To effectively use Oracle HRMS for recruitment management, see:
Recruitment and Hiring
Oracle Human Resources gives you flexible control over the generation of standard letters to applicants at different stages of the recruitment process.
How can you match applicants to vacancies?
Oracle HRMS enables you to record both the competencies required for a position and those held by an applicant. Using the web-based Suitability Search tool, you can then identify which applicants are most suited to the position by making a comparison between the competencies required and the competencies held by each applicant.
How can you manage the interview process?
You can use Oracle HRMS to both schedule your interviews and to update the assignment status of applicants. You can also produce a report on applicants and their interview schedules.
Can you use standard letters to help manage your recruitment cycle?
You can create standard letters and link them to assignment statuses. For example, you can set up a standard letter that is triggered when an applicant's assignment status changes to "Rejected."
Does Oracle HRMS support the internal approval process for job offers?
Using Candidate Offers (part of SSHR), you can compose a job offer on the web and route it to the appropriate managers for approval. If approval is given, you can generate an offer letter and track the candidate's response.
How can you manage the hiring process?
By processing a Request for Personnel Action, you can convert your applicants or ex-employees to new employees with the minimum of effort.
In addition, the hiring process provides you with validation. For example, you cannot rehire an ex-employee if the final process date for the previous employment is still blank. This validation ensures that the information held in the database is always correct and datetracked.
Recruitment Preparation
Recruitment Preparation
Selecting applicants for recruitment is an extended process. You have to plan and coordinate a series of steps from identifying vacancies to organizing recruitment events.
Recruitment Preparation
Identification of Staff Requirements
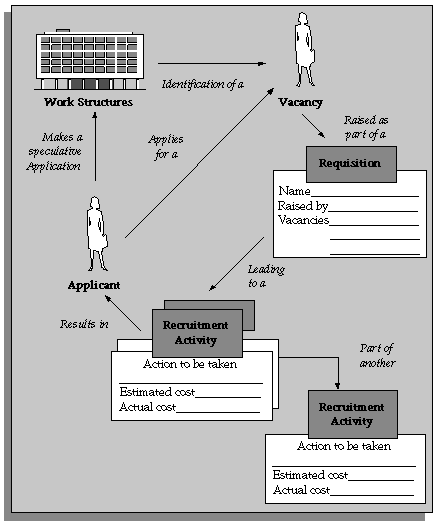
Using Oracle HRMS you can define budgets to reveal the headcount requirements within your enterprise, and then raise requisitions for the vacancies you require. You might have prior authorization to maintain your headcount or you might need to get authorization when you identify the vacancy.
Vacancy Requisitions
Oracle Human Resources lets you record and use the information you need to raise a requisition at the time you need it. This can be particularly useful where an applicant takes the initiative by making a speculative approach. Your authorized vacancy list is clear and up to date at all times.
You can view lists of vacancies of a particular status, or a selected organization, location, job, position, grade, group, recruiter, or recruitment activity using the Requisition and Vacancy window.
Raising a Requisition for a Vacancy
Use the Requisition and Vacancy window to record requisitions, vacancies, and openings within your enterprise. A requisition can be for one or more vacancies, and a vacancy can have one or more openings.
To raise a requisition for a vacancy
-
Enter the requisition and save it before beginning to define the vacancy.
-
Enter a name and number of openings for the vacancy.
-
Optionally enter a description and select a status.
-
You can select one or more assignment components to define the vacancy.
-
Optionally enter the name of the recruiter.
Note: You can update the recruiter field to change the recruiter and the recruiter's id at a later date if you want.
-
Optionally enter the budget measurement unit and value for the vacancy. The value you enter is for all the openings for that vacancy. For example, your vacancy could have the budget measurement unit of Headcount and a value of 2. If the number of openings for the vacancy is 4, each opening effectively has a Headcount of 0.5.
Note: If you decide to update vacancy details at a later date, the changes you make are reflected in existing applicant assignments for the specified vacancy.
You need to set up the budget measurement information if you want to use the OBIS Recruitment Analysis report and related OBIS PMFs and workbooks.
Defining a Recruitment Activity
Use the Recruitment Activity window to define either single recruitment activities or groups of activities. You can associate a recruitment activity with an organization and with one or more vacancies. You can record and monitor the cost effectiveness of any activity, or group of activities.
Before you can define recruitment activities, recruitment activity types must be defined as values for the Lookup Type REC_TYPE.
See: Adding Lookup Types and Values, Oracle HRMS Configuring, Reporting, and System Administration Guide
To define recruitment activities
-
Enter the details of the recruitment activity.
You can enter the name of a 'parent' recruitment activity in the Within Recruitment Activity region, if the activity you are defining is part of a campaign.
-
Choose the Recruiting For button to select one or more vacancies to associate with the activity.
Viewing Vacancies
Use the View Vacancies window to see lists of vacancies for an organization, location, job, position, grade, group, recruiter, or recruitment activity. You can also see all vacancies of a particular status.
To view vacancies
-
Enter selection criteria in any of the fields in the top half of the window.
Leave all these fields blank to see all vacancies in your Business Group.
-
Choose the Find button to see the vacancies that correspond to the criteria you have entered.
The Initial field shows the number of openings recorded in the vacancy. The Current field shows the number of unfilled openings at your effective date (that is, Initial minus number of employees hired into the vacancy).
The Applicant field displays the number of applicants with the status Active Applicant, First Interview, or Second Interview (or your user status equivalents). The First Interview, Second Interview, Offers, and Accepts fields show the number of applicants with these (or equivalent user) statuses. The Hires field shows the number of employees hired to fill the openings of this vacancy at your effective date.
The Budget Unit and Budget Values fields display the budget type (such as Headcount) and value recorded for the vacancy.
-
In the folder you can enter a query to further restrict the vacancies displayed. If you have access to the Folder menu, you can also rename, resize, and reorder the fields displayed.
Selection Processing
Selection Processing
The selection process begins with the receipt of applications and ends with the termination of an application or an offer letter.
The tasks involved in selection processing include:
-
Recording job offers with web based questionnaires and routing them for approval, using Oracle SSHR's Candidate Offers functionality.
-
Entering applicants' details
-
Scheduling interviews and other recruitment events
-
Matching applicants' details to vacancies using Suitability Matching
-
Terminating applications
The progress of applicants as they move through each stage of the process is monitored, controlled, and documented as required.
Applications and Assignments
Oracle Human Resources lets you record addresses, personal details, application information, competencies, qualifications, school and college attendances, and work choices for all applicants. You can track an application as one or more assignments for the applicant, similar to employee assignments. This has several advantages:
-
It speeds up hiring the successful applicant since most of the important information is already on the system.
-
It makes it easy to track several applications from one applicant as separate assignments.
Additional Application Information
If you want to hold further details of the applicant's skills, experience, or current situation, you can choose how to do this when you implement Oracle Human Resources. For example:
-
Enter qualifications, deployment choices, and a personal competency profile for applicants. You can then perform suitability matches on these people using the Oracle Self-Service Human Resources (SSHR) Suitability Match option.
See: Competency Profiles
-
Use attachments to hold free text information.
-
Set up segments of the Additional Application Details descriptive flexfield to hold the information you require.
See: User Definable Descriptive Flexfields, Oracle HRMS Configuring, Reporting, and System Administration Guide
-
Set up Special Information Types to hold skills information to use for skills matching.
Application Entry Methods
Oracle HRMS gives you the flexibility to enter an applicant's details in one of two ways:
-
Quick entry using the Applicant Entry window. This enables you to enter basic person information and a single assignment for an applicant. To make this window quick and easy to use, you can only enter one address and one assignment for the applicant.
-
Detailed entry using the People window and the Application window. This enables you to enter an application if you need to record multiple assignments for an applicant, enter Government Extra Information, record more than one address for an applicant, or update applicant information.
Back-to-Back Applications
Oracle HRMS supports back-to-back applications where ex-applicants can apply for a job a day after their previous application ends. For example, you terminate an applicant on 31-Jan-2004 (applicant now becomes ex-applicant). This applicant can submit a new application on 01-Feb-2004.
Suitability Matching
If you want to match applicants with skill requirements during the selection process, you can enter competency requirements for jobs, positions and organizations. You can then use the web-based suitability search tool to compare the competency profiles of your applicants against the requirements of the vacancy.
See: Suitability Matching
You can also enter work choices (such as relocation and willingness to travel) against jobs and positions. In the same way, you can record the work choices of your applicants.
You can hold a person specification or a job description on the system as attachments or using user-defined fields (called descriptive flexfield segments). As with requirements, these can be held at both job and position level.
Applicant Assignment Group Updates
The Mass Update of Applicants window contains a folder in which you can view all applicants and their assignment components and status. You can query groups of applicant assignments and update them as a group. You can perform two types of mass update:
-
You can refer a group of applicants from one recruiter to another. The recruiter is the person responsible for handling the application.
-
You can change the status of the applicant assignments.
Updating Vacancies
You can update vacancy details in the Requisition and Vacancy window and the changes you make are automatically applied to all existing applicant assignments for the specified vacancy.
Full Applicant Details Report
The Full Applicant Details report enables you to get a comprehensive report about an applicant.
Applicant Assignment Statuses
The progress of all applicants through the selection process is controlled by applicant assignment statuses. Each stage of the selection process is identified by a single assignment status. It is by changing the status that you can record the progress of any applicant assignment.
The Applicant Assignment and Its Status
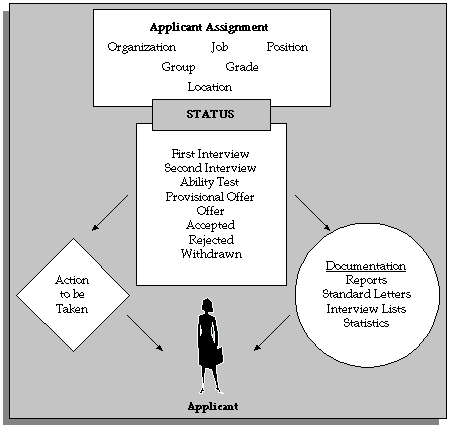
As with employee assignment statuses, there is a set of system statuses that are used in various internal processes:
-
Active Application: This is the normal status of an application as it progresses through the selection stages.
-
Offer: Use this status for your preferred candidate when an offer has been made.
-
Accepted: Update the preferred candidate's assignment to Accepted status when you are ready to hire him or her in the People window.
Note: To use the RPA to process an Appointment action for an applicant, the applicant must have an Accepted status.
-
Terminate Application. Use this status to end an applicant's assignment. You can only do this if the applicant has one or more other assignments in progress.
Note: The Terminate Application status is not recorded on the applicant assignment; it causes the assignment to end.
On your system, you can give these statuses different names (called User Statuses), appropriate to your enterprise.
See: Defining Assignment Statuses
Primary Applicant Assignment Statuses
Primary statuses determine how the assignment is processed and handled by the system. An assignment must have one, and only one, primary status.
You can update an applicant assignment status in the following windows:
-
Application
-
Applicant Interview
-
Terminate Applicant
Changing a primary applicant assignment status can trigger the generation of a standard letter.
Secondary Applicant Assignment Statuses
There may also be Secondary statuses set up on your system. You can use secondary statuses for analysis and reporting, but they are not used for processing.
You can give an assignment multiple secondary statuses. You enter secondary statuses in the Secondary Statuses window.
Interviews and Other Recruitment Events
Interviews
Typically, you track applicant progress through a series of interviews and update the status of the application after each interview.
You can schedule these interviews and update the applicant assignment status using the Applicant Interview window.
Recruitment Events
You can also manage events attended by multiple applicants, such as tests or presentations. You define types of applicant event as values for the Lookup Type APL_EVENT_TYPE. You create the events and book applicants onto them using the Event Bookings window.
See: Event and Attendance Administration
You can view all the events an applicant has attended or is scheduled to attend by querying the applicant in the People window and opening the Book Events window. You can also enter new bookings here.
Applicant and Interview Reports
The Requisition Summary Report enables you to see lists of applicants and their interview schedules.
See: Running the Requisition Summary Report
Application Termination
If you have rejected an applicant assignment, you can simply update its status to Terminate Application. However, an applicant must be left with one active assignment. To reject an applicant's last assignment, you must terminate the applicant. Terminating the applicant updates their person type to Ex-applicant. See: Workforce and Applicant Termination
Recording an Application Quickly
Use the Applicant Entry window to enter basic personal information and one assignment for an application.
If you need to update this information or add further information, use the People and Application windows.
To record an application quickly
-
Select a title and a gender for the applicant.
-
Select the person type you want to use for this applicant. The list of available person types shows all the user person types that can be used to identify applicants.
-
Enter the applicant's name and an identifying number recognized by the system.
Note: If your Business Group uses automatic number generation, the applicant number automatically displays when you save your entries in this window.
-
Enter information in the Further Information field if it has been set up by your Oracle localization team.
-
To enter an address, select a US address style.
A window opens with the address format for the country you select. Enter the address lines and choose OK.
-
The Date Received defaults to your effective date, but you can change it. This is the date the applicant's record will begin.
-
You can enter the name of the applicant's current employer.
-
You can select a recruitment activity. If there is only one vacancy for the activity, the vacancy details appear automatically.
-
If you select a vacancy, applicant assignment information is displayed from the vacancy record. You can add to this information or change it. However, if you change it, the vacancy field clears.
-
If you do not select a vacancy, you can enter assignment information in the Vacancy Applied For region. If you do not enter an organization, it defaults to the Business Group.
-
Select a status for the application. By default a new application has the status Active Application (or an equivalent user status defined on your system).
-
Save your work.
If a person already exists on your application with the same surname and a first name that is either the same or not entered, then a list of values is displayed that shows all the people who share the details. See: Multiple Person Records
Entering Full Application Information
Use the People window and the Application window to enter detailed applicant information.
For other applications, you can use the Applicant Entry window.
If you want to use your own status names to record the stages of your selection process, user statuses must have been previously entered for the predefined applicant assignment statuses.
See: Applicant Assignment Statuses, Oracle HRMS Workforce Sourcing, Deployment, and Talent Management Guide
If you want to record reasons for giving a status to an applicant assignment, valid reasons must be defined as values for the Lookup Type APL_ASSIGN_REASON.
See: Adding Lookup Types and Values, Oracle HRMS Configuring, Reporting, and System Administration Guide
To enter an application in full
-
Set your effective date to the date you want the applicant assignment to begin, such as the closing date for applications.
-
Enter personal information for the applicant in the People window.
See: Entering a New Person, Oracle HRMS Workforce Sourcing, Deployment, and Talent Management Guide
-
Open the Application window. If you change the Date Received, this changes the effective start date for the applicant. You can enter the date you expect to hire the new recruit.
You cannot enter a Termination date in this window. You must use the Terminate Applicant window.
-
You can enter the name of the applicant's current employer.
-
If the application is for a specific vacancy, select the recruitment activity and vacancy. Assignment information from the vacancy is displayed. You can add more assignment details.
-
Select an applicant assignment status and the reason for giving this status. The applicant assignment status is the key to processing the application.
-
Optionally you can enter information, in the tabbed regions, about the following:
-
The recruiter who is responsible for handling the application
-
The supervisor of the assignment and the supervisor assignment number
-
The standard conditions and probation period for the assignment
-
The source of the application, such as the type of recruitment activity, or the organization that recommended the applicant, or the employee who referred the application
-
The employment terms under which the applicant would be hired, such as the contract or collective agreement that would be applicable
Note: If you update the applicant assignment in the Assignment window, further changes made in the Requisition and Vacancy window are not applied to the applicant assignment.
-
Scheduling an Interview
Follow this procedure to schedule an interview for an applicant and to update the applicant assignment status.
You perform this task using the Applicant Interview window.
Before you can schedule interviews, interview types, such as First Interview, or Selection Test, must be defined as values for the Lookup Type APL_INTERVIEW_TYPE.
See: Adding Lookup Types and Values, Oracle HRMS Configuring, Reporting, and System Administration Guide
To schedule applicant interviews
-
Select an interview type, and enter the date of the interview in the Start Date field.
You can also select a location and enter times and an end date. If you select a location that has a time zone associated with it, the Timezone field displays the time zone with that location, regardless of your location.
-
If you want to associate an applicant assignment status change with the interview, enter it in the New Status field. This creates a datetracked update to the applicant assignment.
You cannot enter a status when:
-
There are future changes to the assignment
-
The interview date is the date when the active application status began
-
You are updating an existing interview record
-
Cancelling an Applicant Record
If you have entered an application in error for a person, you can cancel the applicant record from the Application window or the People window.
You are only able to delete an applicant record if there are no future-dated person changes and the person existed in the application prior to becoming an applicant. To remove an applicant record for a person who has not existed in the application prior to becoming an applicant you should delete the entire person record.
You can only cancel an applicant record if your System Administrator has given you access to the functionality using the HR: Cancel Application profile.
To cancel an application in the Application window
-
Query the person's records, if they do not already appear.
-
Ensure the cursor is outside the Assignment block.
-
Choose Delete Record to cancel the applicant record.
Note: This action will delete all applicant assignments and will remove any reference to the person being an applicant. It will also delete any changes made to personal information after the applicant record received date. If you want to reapply these changes you must make a note of them before cancelling the applicant record.
-
Save your work.
-
Close the Application window.
-
Re-query the person's records in the People window to view the changes.
To cancel an application in the People window
-
Query the person's records, if they do not already appear.
-
Select Cancel Application in the Action field.
-
Save your work.
Updating Applicant Assignments by Group
You query and update groups of applicant assignments using the Mass Update of Applicants window.
To update a group of applicant assignments
-
Select Find from the Query menu to open the Find Applications window. Enter selection criteria for the group of applicants you want to update and choose the Find button.
-
Do one of the following:
-
If you want to update all or most of these applicant assignments, choose the Select All button. Then uncheck the Mark check box for any assignments that you do not want to update.
-
If you want to update less than half of this group of assignments, check the Mark check box for each assignment you want to update.
-
-
Choose the Update button.
-
In the Update window:
-
If you want to update the status of the selected assignments, select the new status.
-
If you want to refer these applicants to a new recruiter, select the name of the Recruiter.
-
-
Choose OK to effect the update.
Rejecting an Application
If you want to terminate a single application from an applicant with multiple applications you can do this by updating the applicant assignment status to Terminate Application.
If you want to terminate all applications for an applicant you do this by terminating the applicant in the Termination Application window.
If you want to hold reasons for rejecting applicants, valid reasons must be defined as values for the Lookup Type TERM_APL_REASON.
See: Adding Lookup Types and Values, Oracle HRMS Configuring, Reporting, and System Administration Guide
If you have entered an application in error, you can simply cancel the application. This will delete the application, and correct the person record to remove reference to applicant status.
See: Canceling an Applicant Record
To terminate an applicant
-
Enter the termination date.
-
Enter the status Terminate Application, or your User Status equivalent.
This is not required, but you might use it to trigger generation of a rejection letter.
See: Letter Generation, Oracle HRMS Configuring, Reporting, and System Administration Guide
Note: This status is not recorded on the applicant assignment, so it is not displayed if you re-query the termination.
-
Select a user person type in the Type field.
Note: The Type field is only enabled when the termination date has been entered in the Terminated field. When you enable the Type field it is populated by the default value for your system person type of Ex-applicant.
-
If you want to record the reasons for rejecting applicants, select a reason.
-
Choose the Terminate button.
Canceling a Termination
If you have terminated an applicant in error, you can cancel the termination in the Terminate Applicant window. Simply choose the Reverse Termination button.
Note: You cannot cancel a termination if there are any future changes to the applicant's personal record. You must delete these changes first.
Running the Requisition Summary Report
The Requisition Summary Report enables you to see lists of applicants and their interview schedules for:
-
All vacancies in a requisition
-
All vacancies associated with a recruitment activity
-
Vacancies in a particular organization, location, job, position, grade, and/or group, and vacancies of a selected status
Each page of the report lists the applicants for one vacancy. This is defined as a unique combination of assignment components (organization, location, job, position, grade, and group). The vacancy has a name if you have set up vacancies on the system using the Requisition and Vacancy window, but this is not essential for running the report.
You run reports from the Submit Requests window.
To run the Requisition Summary Report
-
In the Name field, select Requisition Summary.
-
Enter the Parameters field to open the Parameters window.
-
Restrict the applicants to appear in the report by selecting:
-
A requisition
-
A recruitment activity
-
A particular organization, location, job, position, grade, and/or group
-
-
Specify the start and end dates for the applicant assignments to further restrict the applicants listed in the report.
-
Select an applicant assignment status, if required.
-
Choose the Submit button.
Appointment
Appointments and the Hiring Process
The appointment process takes the applicant from the recruitment process to employee administration where the initial tasks include entering terms and conditions and payroll information.
If you are an Oracle US Federal HRMS user, you use the Request for Personnel Action (RPA) to appoint employees.
If you are using Oracle SSHR, you can use the Candidate Offers functionality to generate offer letters.
Hire Dates and Future-Dated Changes
Oracle HRMS enables you to make future-dated changes to a person's details.
If you make future-dated changes to an applicant's details, such as changing their name, and you subsequently hire the person, the earliest hire date you can enter is the day following the date of the last change. The hire date can, of course, be a future date (providing it is at least 1 day after the date of the last change). For example, if you received an application on January 10th and you changed the applicant's details using future dates, say on January 22nd and February 10th, and you subsequently hire the applicant, the earliest hire date you can enter is February 11th (the date of the last change plus one day).
Alternatively, you could hire the applicant (change their person type to Employee), and then make the changes to their details with the status of Employee.
Back-to-Back Employment and Placements
Back-to-back employment and placements occur when a previous period of employment or a previous placement ends 1 day before a new period of employment or a new placement begins.
Oracle HRMS supports back-to-back employment and placements even where there is a difference in person types. That is, an ex-employee can begin a placement on the day following termination of their employment, and an ex-contingent worker can begin employment on the day following the end of their placement.
An ex-employee starting new employment or a placement on April 1st must have an actual termination date and a final processing date (for payroll processing) for their previous employment of March 31st. (If your enterprise does not have Oracle Payroll, the final processing date automatically defaults from the actual termination date).
An ex-contingent worker starting employment or a new placement on April 1st must have an actual termination date of March 31st for their most recent placement.
In both cases, there can be no future-dated changes.
Note: You cannot change the hire date of any back-to-back employment. Instead, you must cancel the employment and rehire the employee.
Earliest Hire Dates
-
An applicant's earliest hire date is either 1 day after you accept the application or the day after the last of any future-dated changes, whichever is later.
-
An ex-employee's earliest hire date is either 1 day after the final process date for the previous employment or the day after the last of any future-dated changes, whichever is later. For back-to-back employment, the final process date must be the actual termination date, and there can be no future-dated changes.
Note: Australia, Canada, China, Denmark, Hong Kong, India, Ireland, Korea, Kuwait, Mexico, New Zealand, Norway, Saudi Arabia, Singapore, South Africa, Russia, UK, US, United Arab Emirates, and International Payroll users can rehire ex-employee before the final process date. See: Rehire Before Final Process Date
-
An ex-contingent worker's earliest hire date is either 1 day after the actual termination date of the most recent placement or the day after the last of any future-dated changes, whichever is later. For back-to-back hiring, there can be no future-dated changes.
Rehire before Final Process Date
Australia, Canada, China, Denmark, Hong Kong, India, Ireland, Korea, Kuwait, Norway, Mexico, New Zealand, Saudi Arabia, Singapore, South Africa, Russia, UK, US, United Arab Emirates, and International Payroll Only: To provide greater flexibility in the hiring process, Oracle HRMS enables you to rehire a terminated employee before the Final Process (and after the Last Standard Process) date for their previous period of service.
Rehire before Final Process Date
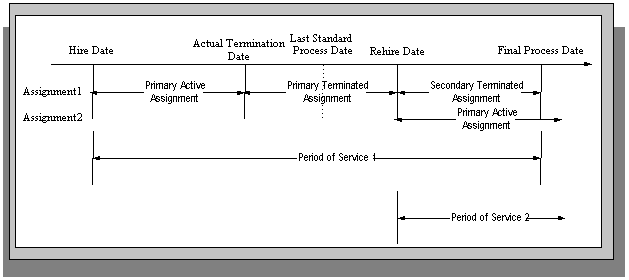
As illustrated in the diagram, when you complete the rehire, the application changes the existing, terminated assignment into a secondary assignment. The new, active assignment becomes the primary. You can then process payments from both assignments during the overlapping periods of service.
Note: When you cancel the rehire, the application changes the secondary terminated assignment back to a primary terminated assignment. The application however retains the date changes to the primary terminated assignment even after a cancellation. For example, if the actual termination date is 20 April, the final process date is 31 April, and you rehire the person on 25 April, the application updates the primary terminated assignment for the period 21 April to 24 April and creates a new one for the period 25 April to 31 April. If you subsequently cancel the rehire, then the application retains the primary terminated assignment for the period 21 April to 24 April as well as the one for the period 25 April to 31 April.
When you rehire before the final process date, the employee has overlapping periods of service between the rehire date and the final process date. The Terminate window displays the service dates for all the overlapping periods of service. The latest period of service appears by default. You can scroll down to view the earlier periods of service.
Valid Person Types for Applicants
You can convert an applicant to an employee but not to a contingent worker. However, an applicant can become a contingent worker (a Contingent Worker.Applicant) while their application for employment remains active. Subsequently, you can either cancel the application, and allow the contingent worker placement to continue, or end the contingent worker placement prior to hiring the applicant.
Hiring an Applicant (People and RPA Windows)
You perform all hiring-related actions with an RPA, such as Appointment, Transfer, and Promotion personnel actions.
To hire an applicant
-
Update the applicant assignment status to Accepted in the Application window.
Note: You cannot appoint someone on the same day that you update that person's applicant record.
-
Use the Mass Update of Applicants window to update the assignment status of multiple applicants.
Note: Do not enter or update an employee's hire date in the Hire Date field. The application automatically enters the Hire Date field based on the effective date of the Appointment action.
-
Appoint the person with a Request for Personnel Action.
Upon update to HR, the application enters the information captured in the RPA and RPA extra information to the appropriate Person, Assignment, and Position windows and extra information types.
The application creates elements in the Element window. You can also enter other non-RPA compensation information in the Element window. The application assigns the employee the default payroll (biweekly), unless you specified another payroll when appointing that person in the US Federal Payroll Type RPA Extra Information.
Rehiring an Ex-Employee
The ex-employee's and ex-contingent's records remain in the database. If you decide to rehire an ex-employee, you can process an Appointment or Conversion personnel action for that person.
You can hire the person to the same position or to a different one. For example, if you're transferring employees between agencies within the same business group, you can transfer the employees into the new positions with an effective date that begins the day after the transfer's effective date.
If you decide to rehire an ex-contingent worker as an employee, you make that person an applicant and process an Appointment action. If you decide to rehire an ex-contingent worker as a contingent worker, you create a placement for that person.
See: US Federal Contingent Workers
To rehire an ex-employee
-
Process an Appointment action with an effective date that begins at least one day after the termination's effective date.
When the application updates the new Appointment action, the person's assignment record consists of two Appointments: the former end-dated assignment and the current assignment. (You can only view the current one.)
Conversion of Ex-Employees and Element Entries
When you process a Conversion action for an ex-employee, the number of calendar days between the effective date of the Separation and the Conversion must be equal to or less than three days.
When you convert an ex-employee, the application only updates those elements processed as part of the Conversion RPA.
If the employee had federal employee health benefits under the previous end-dated assignment, and the application had processed the Termination Life Event de-enrolling the ex-employee from FEHB, upon rehire, the initiates an Initial Opportunity to Enroll life event that permits the employee to choose a plan.
If you rehire the employee before processing the Termination of Life Event, the application detects this life event and creates a Change in Employment Status life event. Before the employee can make their new elections, you must process the previous Termination Life Event.
See: Terminating Employee Assignment
Use the Element Entries window.
To reinstate elements
-
In the Element Entries window, add each element, entering the Start Date for the element that is equal to the Conversion's Effective Date.
Note: You must enter health benefits through an RPA, self-service, or the professional user interface.
Filling a Position
You appoint someone to a position with an RPA. You can appoint someone to a:
-
Vacant position
-
Encumbered position
Note: In encumbered positions, current occupants retain the right to return to their positions.
-
Future end-dated position
To fill a vacant position
-
Process an RPA, such as an Appointment or Reassignment.
If you separate an employee, you can appoint someone else to that position with an Effective Date that begins the day after the separation's Effective Date.
To appoint a person to an encumbered position
-
Process an RPA with a future effective date that falls after the effective date of the action that moves the current occupant from the position.
For example, if you want to fill a position on the day following someone's temporary reassignment, you can process an Appointment action with an Effective Date of the day after the separation.
If someone still occupies the position when the system updates the Appointment action, the system returns the action to the person who updated it where it can be Canceled or Corrected.
To assign a person to a future end-dated position
-
Process an RPA with an effective date that falls between the start and the end date of the position (the date when the hiring status changes to Deleted or Eliminated).
You may not process an RPA with an Effective Date that occurs later than the end date of the position. For example, if a Position's end date is December 31 but an employee occupying that position remains beyond that date, the system display an error message when you update any RPA with an effective date later than December 31.
Note: If you process an RPA for an employee who is on a Not-to-Exceed (NTE) assignment, you must also manually change the Position end date if the NTE date exceeds the Position end date.
Recruitment Using People Management
Recruitment Using People Management Templates
Oracle HRMS provides predefined templates such as Hire Applicants that support effective and easy applicant deployment. Using the Hire Applicants template you can complete the tasks from applicant entry to applicant hire.
The template enables you to:
-
Enter personal and professional details of applicants
-
Record application information
-
Schedule interviews
-
Track the applicant's progress and update the status of the application after each recruitment stage
-
Terminate applications
-
Make offers to applicants
-
Hire successful applicants and record details such as new terms and conditions and payroll information for the new hire
You can work with your system administrator to modify the predefined template and create windows that best suit your recruitment process.
For details about using the predefined templates, see: Predefined People Management Templates, Oracle HRMS Configuring, Reporting, and System Administration Guide
For details about designing your own template, see: People Management Templates, Oracle HRMS Configuring, Reporting, and System Administration Guide
You can make future dated changes to a person's details using the Hiring Applicants template. However you cannot hire an applicant prior to the future dated changes. For example, if you change the applicant's details on February 10th, then you can hire the applicant only on or after February 11th (the date of the last change plus one day).
Entering a New Applicant
You can enter a new applicant and then track that person up to the point of hire using the Hiring Applicants windows.
To enter a new applicant
-
Display the Summary window of the Hiring Applicants form.
-
Choose the New icon in the toolbar or right-click on People By Name in the Data Organizer and choose New from the right mouse menu.
-
Select New Applicant and choose OK.
The Personal tab is displayed for you to start entering information about the applicant.
-
Set your effective date to the date when you want the applicant assignment to begin, such as the closing date for applications. You can enter a date in the Date field next to the timeline bar and choose Go.
-
Enter personal information for the applicant.
-
Choose the Communication tab if you want to enter contact information, such as addresses and phone numbers.
-
Enter application information in the All Assignments, Compensation, and Schedule tabs, as required.
-
Your localization team may have setup other tabs for you to complete.
-
Save your work. If you have missed any mandatory information, you are prompted to enter it before the new record is saved.
If a person already exists on your application with the same national identifier, or with the same surname and a first name and date of birth that is either the same or not entered, then a list of values is displayed that shows all the people who share the details. See: Multiple Person Records, Oracle HRMS Workforce Sourcing, Deployment, and Talent Management Guide
Recording an Application
You record applications for jobs using the Hiring Applicants window. Use this procedure for employees applying for internal vacancies, applicants applying for another vacancy, and external people who are currently neither employees nor applicants.
To enter an applicant who is not yet recorded on your system, see: Entering a New Applicant.
To record an application
-
In the Summary window, use the Data Organizer to select the person. Use the Find window if you need to search for the person.
-
Set your effective date to the start date for the new application.
-
Choose the Actions button.
-
Select one of the following and choose Next:
-
Apply for Internal Vacancy (if the person is an employee)
-
New Application (if the person is already an applicant)
-
Apply for Job (if the person is external - neither an employee nor applicant)
-
-
For employees and external people, select the correct person type and choose Next. For example, for an employee you might select Employee and Applicant.
-
Choose Finish.
A new default application is created for the person.
-
Select the new application in the Data Organizer and choose Show Details to view and edit this application.
Note: Remember to choose Correction when you are correcting information that was created by default.
For information about the fields on the Application, Compensation, and Schedule tabs, see: Entering Application Information.
Entering Application Information
After entering a new applicant or recording a new application, you can edit the default application information entered by the system. You can use the Hiring Applicants windows.
To enter or update application information
-
In the Summary window, use the Data Organizer to select the application and choose Show Details.
-
If you are updating an application, set your effective date to the date the information should change.
-
Choose the All Assignments tab.
-
Enter the date the application was received.
-
Select an Application Status and the reason for giving this status.
-
If the application is for a specific vacancy, select the recruitment activity and vacancy. Assignment information from the vacancy is displayed. You can add more assignment details.
-
Optionally, you can enter information about the following:
-
The recruiter who is responsible for handling the application
-
The source of the application, such as the type of recruitment activity, or the source organization that recommended the applicant, or the employee who referred the application.
-
-
Choose the Compensation tab if you need to enter a payroll, salary basis, or proposed salary. The salary basis is the duration for which salary is quoted, such as per month or per year.
-
Choose the Schedule tab to enter information about normal working hours or probation period for the assignment.
-
Enter information in any other tabs that may have been created for your localization. For example, many localization teams will include an Extra Information tab to enable you to enter country-specific information.
-
Choose Correction or Update. Remember to choose Correction if you are correcting information that was created by default.
-
Save your work. If you have missed any mandatory information, you are prompted to enter it before the new record is saved.
Making an Offer to an Applicant
In the Hiring Applicants window, you can quickly make a job offer to an applicant.
To make an offer to an applicant
-
In the Summary window, use the Data Organizer to select the applicant. Use the Find window if you need to search for the person.
-
Set your effective date to the date of the offer.
-
Choose the Actions button.
-
Select Make an Offer and choose Next.
-
Select the assignment status and choose Finish.
-
Choose the Checklist tab and update the Send Offer checklist item to reflect that the offer has been made, if required.
-
Save your work.
Changing an Applicant's Status to Accepted Offer
When an applicant has accepted a job offer, you can update the applicant's details in the Hiring Applicants window to show that they have accepted the offer of employment.
To change the applicant's status to Accepted Offer
-
In the Summary window, use the Data Organizer to select the person you want to update. Use the Find window if you need to search for the person.
-
Choose the Actions button.
-
Select Applicant Accepted and choose Next.
-
Choose Next to view a summary of what you have done or choose Finish to save your changes.
Hiring an Applicant
Follow the procedure described below to enter a hiring date for an applicant, change the applicant's person type to Employee and hire them into a specified assignment. Use the Hiring Applicants window to do this.
To hire an applicant
-
In the Summary window, use the Data Organizer to select the person you want to hire. Use the Find window if you need to search for the person. If you want to hire the person into one specific application then select this.
-
Choose the Actions button.
-
Select one of the following actions and choose the Next button:
-
Hire Applicant into all accepted assignments. Select this action if you want to hire the applicant into all the applications that have been accepted, and to delete all other applications for this person.
-
Hire Applicant into current assignment only. Select this action if you only want to hire the person into the application you currently have selected, and to leave all other applications as they are.
-
-
If you have selected Hire Applicant into all accepted assignments, enter the hire date and choose Next.
A list of accepted applications is displayed.
-
If the applicant is already an employee, Oracle HRMS presents the question 'Do you want to update the primary assignment'. You can select one of the following options:
-
Yes. Make existing assignment secondary:
The application makes the new applicant assignment the employee primary assignment. The existing employee primary assignment becomes the secondary assignment.
-
Yes. Merge with existing primary assignment:
The application copies information from the applicant assignment to the employee primary assignment, but does not copy empty fields. For example, if you have defined London as the location for the employee primary assignment but not entered a location in the applicant assignment, then London remains the location for the new employee assignment.
-
Yes: Replace existing primary assignment:
The application overwrites all fields in the existing employee primary assignment with equivalent fields from the new applicant assignment, even if those fields are empty. For example, if Employee A is a supervisor for the existing employee assignment, but the applicant assignment includes no supervisor information, then the new employee assignment contains no supervisor information.
-
No. Create new secondary assignment:
The application makes the applicant assignment the employee's secondary assignment. The application makes no change to the existing employee primary assignment.
-
-
Choose Next to view a summary of what you have done or choose Finish to save your changes.
Ending an Application
You can end a person's applications using the Hiring Applicants window.
To end an application
-
In the Summary window, use the Data Organizer to select the person whose application you want to end. Use the Find window if you need to search for the person.
-
Set your effective date to the date for ending the application.
-
Expand the person's node and select the application.
-
Choose the Actions button.
-
Select End Application and choose Next.
If the applicant has more than one application, go to step 8. Otherwise, select a new person type, such as ex-applicant and choose Next.
-
If you want to record reasons for rejecting applicants, select a reason and choose Next.
-
Choose Finish.
Reactivating an Application
You can reactivate an application that was previously ended Use the Hiring Applicants window.
To reactivate an application
-
In the Summary window, use the Data Organizer to select the applicant. Use the Find window if you need to search for the person.
-
Set your effective date to the date when the application becomes active again.
-
Expand the person's node and select the application.
-
Choose the Actions button.
-
Select Apply for Job and choose Next.
-
Select the Applicant person type and choose Next.
-
Choose Finish.
The applicant's assignment status is Active Application. The Application Received field shows the effective date (the date from which the application was reactivated).
Terminating an Applicant
You can end the progress of an applicant using the Hiring Applicants window.
To terminate an applicant
-
In the Summary window, use the Data Organizer to select the applicant. Use the Find window if you need to search for the person.
-
Set your effective date to the date when you want to terminate the applicant.
-
Choose the Actions button.
-
Select Terminate Applicant and choose Next.
-
Select a new person type, such as ex-applicant and choose Next.
-
If you want to record reasons for rejecting applicants, select a reason and choose Next.
-
Choose Finish.