Configuring and Personalizing HTML Modules
This chapter, which is relevant to all HTML-based modules, describes how you can configure the HTML user interface to support your business processes.
This chapter covers the following topics:
- HTML Module Architecture Overview
- Configuring and Personalizing HTML Modules Process Overview
- Enabling HTML Page Personalization
- Exposed and Hidden Flexible Content in Application Pages
- About Personalizing the Advanced Search Page
- Replicating Seeded Responsibility-Level Personalizations for Case Management
- About Modifying the Content of Drop-down Lists
- Available Search Criteria for Advanced Search Page
HTML Module Architecture Overview
Customer Support, Service Desk, and Case Management are based on the same HTML user interface built with the Oracle Applications Framework.
Each module exposes different elements of the interface appropriate for the intended use. The others are hidden through personalization at the Function level. Customer Support is designed for providing support to customers so it includes regions and fields that display the customer name, contracts, and billing information, for example. The Service Desk, a module targeted to provide support for employees within an organization, hides these regions.
Case Management adds capabilities for capturing information on parties associated to a case, for example, the suspects and the charges against them. This capability is hidden in the other modules.
The seeded personalizations for each module are stored on a template.
At implementation time, you specify which application template you want to use in your implementation by setting the system profile Service: Application Template.
You can then use personalization to hide or expose content, rename tabs and fields, and make any of the other changes personalization permits.
For example, Customer Support implementations may choose to expose My Tasks and Unassigned Tasks on the Agent Dashboard if agents are using tasks in the resolution of service requests.
For Case Management, you must expose the customer-related content in the template if you are creating a case management application for social services agencies that want to use the Oracle Installed Base to track benefits, for example.
The default Case Management application is targeted for investigative agencies resolving cases that have no client or customer, so these regions are hidden by default. (For details about which content to expose, see About Personalizing Case Management for Social Service Agencies. )
If you do expose hidden content, be aware that exposing one region may require you to expose other hidden regions as well. For example, you cannot expose Oracle Installed Base information without also exposing customer information.
Note: While Oracle Application Framework personalization makes it possible for you to make additional fields mandatory, doing so does not guarantee agents are always required to make an entry. This is because the application verifies entry in the additional mandatory field only when that field is exposed on the user interface. If the field is hidden in a subtab when the user saves, for example, the application does not enforce the entry.
Agent Dashboard Variations for Work Assignment and Distribution Models
Agents track their work and accept new assignments on the Agent Dashboard page.
Each application module includes a fully configured Agent Dashboard page with all of the available content exposed as well as three different designs personalized for common work assignment and distribution modes.
Each of these four designs is represented by a function mapped to the responsibility where you want that design to be used. To choose the design you want, you must exclude the functions you do not want in the Menu Exclusions tab of the Responsibilities window.
The following table describes each of the four available dashboard designs (functions) and specifies the work assignment and distribution mode they were designed for. (For more details about the common work assignment and distribution modes, see Implementing Work Assignment and Distribution.)
| Dashboard Function Name | Description | Assignment and Distribution Modes |
|---|---|---|
| Agent Dashboard | Choose this fully configured agent dashboard design if you are setting up a work assignment and distribution model of your own. Use application personalization to hide the regions and fields you do not use. |
Custom assignment and distribution. |
| Agent Dashboard Push | The application assigns work to agents' personal work queues. Agents choose what item to work on next by selecting its link in their work queue. | Automatic assignment to individuals Manual distribution (agents choose their work from work queues) |
| Agent Dashboard Pull | The application decides which task or service request is the most urgent by examining both the pool of unassigned work and that already assigned to the agents' personal work queues. To get their work assignment, agents click the Get Next Work button on the dashboard. (If they already have a service request or a task open, they instead use Apply and Next or Snooze and Next to get the next most urgent work item. See Automated Work Distribution User Considerations. |
Automatic assignment to groups Automated work distribution via the Get Next Work and Apply and Next buttons |
| Agent Dashboard Cherry Pick | The application assigns work only to groups. This means that all work shows up in the unassigned work queues on the Agent Dashboard. Agents choose their own assignments. Before working on an unassigned service request or its tasks, agents must first assign ownership of the service request to themselves using the Assign to Me function on the Actions drop-down list. |
Automatic assignment to groups Manual distribution |
If you are planning to develop a work assignment and distribution model that is different from the common variations listed here, you must use the fully configured agent dashboard for your personalizations.
For a listing of regions in all the different dashboard designs, see Exposed and Hidden Content in Application Pages.
Automated Work Distribution User Considerations
If you implement automated work distribution, letting the application decide on the most important item for an agent to work on, then you must instruct agents to use the Get Next Work, Apply and Next, and Snooze and Next buttons to get their work rather than opening an item in a work queue by selecting its link.
When agents click the Get Next Work button on the Agent Dashboard, the application opens up the most urgent work item either in the Update Service Request page or the Update Task page, depending on which type of work is most urgent.
If the service request is opened via the Get Next Work button, the Service Request Update page includes the Update and Next button and the Snooze and Next choice in the Actions drop-down list (both highlighted in the image of the top right corner of the page below).
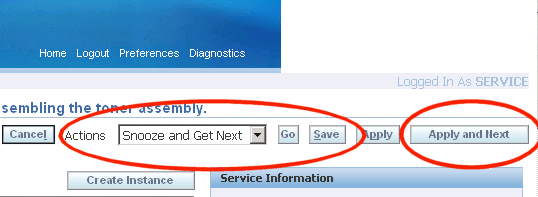
When agents complete work on the service request, they can click the Update and Next button to request the next most important work item.
If they cannot work the service request for some reason, they can instead choose Snooze and Get Next from the Actions drop-down list and have the application open the next most urgent work item.
The application automatically delays reopening up the “snoozed” work item for 30 minutes.
If agents instead open up the same Service Request by clicking on the service request link directly from the Agent Dashboard, the application does not include the Apply and Get Next button or the Snooze and Get Next action.
To have the application suggest another item, users must return to the dashboard and click the Get Next Work button.
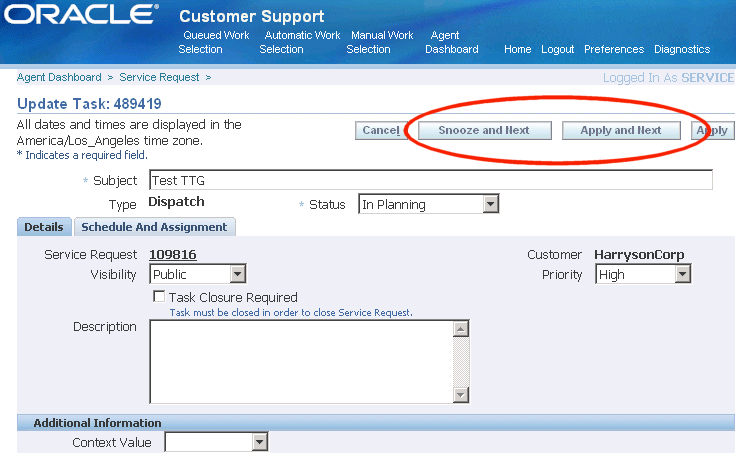
The Update Task page works the same way except that the Snooze and Get Next page appears as a button rather than an action as shown in the image below:
Configuring and Personalizing HTML Modules Process Overview
Use this procedure as a guideline for setting up the user interface and other common setups for the Customer Support, Case Management, and Service Desk modules. Follow references in steps for more details. For more information about personalization, please see the Oracle Application Framework Personalization Guide.
To configure and personalize your HTML module
-
Under the System Administrator responsibility, navigate to Security, Responsibility.
-
Create a new responsibility. You can base it on a seeded responsibility, such as Customer Support Analyst or Case Worker.
-
Create a user and associate it to the new responsibility.
-
Switch to the Functional Administrator responsibility, and navigate to Core Services, Profiles.
-
Set the system profile Service: Application Template to the template you wish to implement: Customer Support, Case Management, or Service Desk.
-
Navigate to Core Services, Caching Framework, Tuning.
-
Clear the system profile option cache.
-
Specify which Agent Dashboard design you wish to use by excluding those you do not want from the responsibility:
-
Under the System Administrator responsibility, navigate to the Security, Responsibility, Define.
-
In the Responsibilities window query the new responsibility you have created and on the Menu Exclusions tab exclude the agent dashboard designs you do not want to use. (For an explanation of these designs, see Agent Dashboard Variations to Support Different Work Assignment and Distribution Models.)
The functions are:
-
Agent Dashboard
This is the fully configured agent dashboard design you must use for personalizations if you are setting up a work assignment and distribution model different from those supported by seeded designs.
-
Agent Dashboard Cherry Pick
-
Agent Dashboard Push
-
Agent Dashboard Pull
-
-
-
Log in as the new user.
-
Make sure that personalization is enabled by setting the following system profiles to “Yes”:
-
FND: Personalization Region Link Enabled
-
FND: Personalization WYSIWYG Enabled
-
Personalize Self-Service Defn
-
-
Now you are ready to personalize your application module according to the procedures described in the Oracle Application Framework Personalization Guide.
For a list of hidden flexible content you can expose, see Exposed and Hidden Content in Application Pages.
On the Advanced Search page you can expose different search parameters as described in Personalizing the Advanced Search Page.
-
Modify the content of drop-down lists, such as the available actions in the Service Request Update page, by modifying the underlying lookup types. You must do this to reflect the features you have implemented. For example, if you have not implemented Oracle Web Collaboration integration, then you must hide the Web Conferencing action in the Service Request Update page. For details, see Modifying the Content of Drop-down Lists.
-
If you are implementing Case Management, you must personalize pages from other application modules to conform with case management terminology and features. The required personalizations are seeded under the Case Worker responsibility, but must be repeated for every new responsibility. For details, see Replicating Seeded Responsibility-Level Personalizations for Case Management .
Enabling HTML Page Personalization
You can turn on the HTML page personalization feature by setting the following system profiles to “Yes”:
-
FND: Personalization Region Link Enabled
-
FND: Personalization WYSIWYG Enabled
-
Personalize Self-Service Defn
See Oracle Application Framework Personalization Guide for further details.
Exposed and Hidden Flexible Content in Application Pages
The tables in this section list the exposed and hidden flexible content for each application page for each of the seeded application templates.
Please note that some templates exclude regions available in others as indicated. You can only display a hidden feature; not an excluded one.
You can add most of the hidden content by the usual personalization procedures. However, some pages require additional setup. For example:
-
To add the Contracts region to the Update Service Request page, you must not only add it, but also specify its rendered property as true.
-
The Agent Dashboard comes in four different design variations, so you must first specify which one you want to use before making any changes using personalization.
-
The Advanced Search page requires yet additional setups to display or hide fields (see Personalizing the Advanced Search Page.)
Please note that adding flexible content to a page layout does not by itself guarantee that the regions and fields within it display on the page. If the desired content does not appear, please check that the rendered property of the flexible content and the rendered properties of its constituent regions and fields are all set to "True".
If you add flexible content with a region that does not have its rendered property set to “True”, for example, that specific region does not display on the page.
Some application content does not display unless the application requires it, regardless of your setting. For example, the Service Request Update page does not display Instance Notes or Previous Service Requests unless you enter an Oracle Installed Base item instance into the service request and save.
Agent Dashboard Page
Each application module includes four variations of the agent dashboard design. You must select one of these variations as the Agent Dashboard for your implementation before personalizing it. (This is accomplished by excluding all of the others with menu exclusions for your responsibility. For details, see Setting Up the User Interface and Other Common Setups.)
Note: You must expose the hidden flexible content in all dashboard designs by setting their rendering properties to True. The content does not appear in the list of values in the Add Region button.
Hidden and Exposed Content on the Customer Support Agent Dashboard
The following table lists the available (A), hidden (H), and excluded (X) content of the four different Agent Dashboard designs for Customer Support:
| Flexible Content or Region | Agent Dashboard (All Content Exposed) |
Agent Dashboard Pull | Agent Dashboard Push | Agent Dashboard Cherry Pick |
|---|---|---|---|---|
| Get Next Work | A | A | H | H |
| My Service Requests | A | A | A | A |
| My Tasks | A | H | H | H |
| Unassigned Service Requests | A | H | H | A |
| Unassigned Tasks | A | H | H | H |
| Party Search | X | X | X | X |
| Create Case | X | X | X | X |
| KPI Bin | A | A | A | A |
| Create SR Bin | A | A | A | A |
| My Links | A | A | A | A |
| Assignment Region | A | H | A | H |
| Advanced Search | A | A | A | A |
| Workflow Notification | X | X | X | X |
Hidden and Exposed Content on the Service Desk Agent Dashboard
The following table lists the available (A), hidden (H), and excluded (X) content of the four different Agent Dashboard designs for the Service Desk:
| Flexible Content or Region | Agent Dashboard (All Content Exposed) |
Agent Dashboard Pull | Agent Dashboard Push | Agent Dashboard Cherry Pick |
|---|---|---|---|---|
| Get Next Work | A | A | H | H |
| My Service Requests | A | A | A | A |
| My Tasks | A | A | A | A |
| Unassigned Service Requests | A | H | H | A |
| Unassigned Tasks | A | H | H | A |
| Party Search | X | X | X | X |
| Create Case | X | X | X | X |
| KPI Bin | A | A | A | A |
| Create SR Bin | A | A | A | A |
| My Links | A | A | A | A |
| Assignment Region | A | H | A | H |
| Advanced Search | A | A | A | A |
| Workflow Notification | X | X | X | X |
Hidden and Exposed Content on the Case Management Agent Dashboard
The following table lists the available (A), hidden (H), and excluded (X) content of the four different Agent Dashboard designs for the Service Desk:
| Flexible Content or Region | Agent Dashboard (All Content Exposed) |
Agent Dashboard Pull | Agent Dashboard Push | Agent Dashboard Cherry Pick |
|---|---|---|---|---|
| Get Next Work | A | A | H | H |
| My Cases | A | A | A | A |
| My Tasks | A | A | A | A |
| Unassigned Cases | A | H | H | A |
| Unassigned Tasks | A | H | H | A |
| Party Search | A | A | A | A |
| Create Case | A | A | A | A |
| KPI Bin | H | H | H | H |
| Create SR Bin | X | X | X | X |
| My Links | A | A | A | A |
| Assignment Region | A | H | H | H |
| Advanced Search | A | A | A | A |
| Workflow Notification | A | A | A | A |
Create Service Request Page Exposed and Hidden Content
The following table lists the available (A), hidden (H), and excluded (X) page components for the Create Service Request page for each of the three application modules.
| Flexible Content or Region | Customer Support | Case Management | Service Desk |
|---|---|---|---|
| Customer Search page | X | A | X |
| Customer service keys | A | H | A |
| Customer contact | A | X | A |
| Subject region | A | H | A |
| Summary and notes | A | A | A |
| Flexfields | H | H | H |
| Extensible attributes | A | A | A |
| Service request type extensible attributes | A | A | A |
| Request header information | A | A | A |
| Assignment region | A | A | A |
| Incident address region | A | A | H |
| Bill-to address region | A | H | H |
| Ship-to address region | A | H | H |
| Contract region | A | H | X |
| Relationship plans region (Service Info.) | A | H | X |
| Associated party roles region | X | A | X |
| Associated party search | X | A | X |
| Create associated party information | X | A | X |
| Update associated party information | X | A | X |
Update Service Request Page Exposed and Hidden Content
The following tables list the available (A), hidden (H), and excluded (X) page content for the Update Service Request page for each of the three application modules.
Please note that you must expose hidden content marked with an asterisk (*) by changing that regions rendered property to “True”. These regions do not appear in the list of values for adding regions.
If you are using the HTML charges feature you can use either the Charges region in the Update Service Request page or the standalone Charges page.
If you opt to use the Charges region in the Update Service Request page, then disable the Charges and Service Logistics option in the Actions list by specifying an end date for the lookup code Charges and Service Logistics, which is part of the CSZ_GLOBAL_ACTIONS lookup type.
If you opt to use the standalone Charges page, then hide the Charges region in the Update Service Request page through OA Personalization.
If you are using the new charges feature in HTML, then disable the existing Charges tab in the Forms interface by adding the Access Charges Tab function to the list of Menu Exclusions for that responsibility.
Header Region
The following table lists the page content in the page header region:
| Flexible Content or Region | Customer Support | Case Management | Service Desk |
|---|---|---|---|
| Issue region | A | A | A |
| Subject region | A | H | A |
| Summary region | A | A | A |
| Flexfields region | H | H | H |
| Global extensible attributes | A | A | A |
| Service request type extensible attributes | A | A | A |
Information Bins
The following table lists the information in page containers:
| Flexible Content or Region | Customer Support | Case Management | Service Desk |
|---|---|---|---|
| Service information | A | H | H |
| Search knowledge | A | A | A |
| Primary contact | A | H* | A |
| My Links | A | A | A |
Subtabs
This table lists the information in the subtabs:
| Flexible Content or Region | Customer Support | Case Management | Service Desk |
|---|---|---|---|
| Service request log | A | A | A |
| Additional service request attributes | A | A | A |
| Contracts region* | A | H | H |
| Bill-to address region | A | H | H |
| Ship-to address region | A | H | H |
| Incident address region | A | A | H |
| Tasks region | A | A | H |
| Linked solutions | A | A | A |
| Attachments region | A | A | A |
| Related service requests | A | A | A |
| Related objects | A | A | H |
| Instance notes | A | H | H |
| Instance service requests | A | H | H |
| Associates parties region | X | A | X |
| Resolutions region | A | A | A |
| Request dates region | A | A | A |
Notes
This table lists the information in the notes region:
| Flexible Content or Region | Customer Support | Case Management | Service Desk |
|---|---|---|---|
| Notes region | A | A | A |
Read-Only Service Request Information Page
The following table lists the available (A), hidden (H), and excluded (X) page content for the Read-Only Service Request page for each of the three application modules.
Please note that for you must expose the hidden Subject Region in Case Management, marked with an asterisk (*), by changing that region's rendered property to “True”. This content does not appear in the list of values for adding regions.
| Flexible Content or Region | Customer Support | Case Management | Service Desk |
|---|---|---|---|
| Issue Region | A | A | A |
| Subject Region | A | H* | A |
| Summary Region | A | A | A |
| Flex Fields Region | H | H | H |
| Global Extensible Attributes | A | A | A |
| Service Request Type Extensible Attributes | A | A | A |
| Primary Contact Region | A | H | A |
| All Notes | A | A | A |
| Contracts Region | A | A | A |
| Incident Address Region | A | A | H |
| Attachments Region | H | H | H |
| Related Service Request | A | A | A |
| Related Objects | H | H | H |
| Associates Parties Region | X | A | X |
Advanced Search Page Exposed and Hidden Content
The following tables list the available (A), hidden (H), and excluded (X) page content for the Advanced Search page for each of the three application modules.
| Flexible Content and Region | Customer Support | Case Management | Service Desk |
|---|---|---|---|
| Service request attributes | A | A | A |
| Global and context sensitive index attributes | A | A | A |
| Other extensible attributes | H | A | H |
| Associated party region | X | A | X |
| Key word region | A | A | A |
| Dates region | A | A | A |
| Display columns region | H | H | H |
| Sort order columns region | H | H | H |
| Results without associated party roles | A | X | A |
| Results with associated party roles | X | A | X |
Saved Search Page Exposed and Hidden Content
The following tables list the available (A), hidden (H), and excluded (X) page content for the Saved Search page for each of the three application modules.
| Flexible Content or Region | Customer Support | Case Management | Service Desk |
|---|---|---|---|
| Title region | A | A | A |
| Advanced search | A | A | A |
| Results without associated party roles | A | X | A |
| Results with associated party roles | X | A | X |
Party Information Page Exposed and Hidden Content
The following tables list the available (A), hidden (H), and excluded (X) page content for the Party Information page for each of the three application modules.
| Component or Region | Customer Support | Case Management | Service Desk |
|---|---|---|---|
| Profile tab | A | A | A |
| Address Book tab | A | A | A |
| Relationships and Classifications tab | A | A | A |
| Service Request/Cases tab | X | A | X |
About Personalizing the Advanced Search Page
This topic outlines different ways you can personalize the Advanced Search page in Customer Support, Service Desk, and Case Management. It shows how you can specify:
-
Which attributes display as the default search criteria.
-
Which attributes agents can select as their search criteria from the Add Criteria drop-down list.
-
Which columns appear in the search results.
You may want to hide the contract-related search criteria if you are not using Oracle Service Contracts, for example.
About Specifying Search Criteria for the Service Request Attributes Region
The Service Request Attributes region at the top of the Advanced Search page (shown in the image below) contains the most frequently used search criteria.
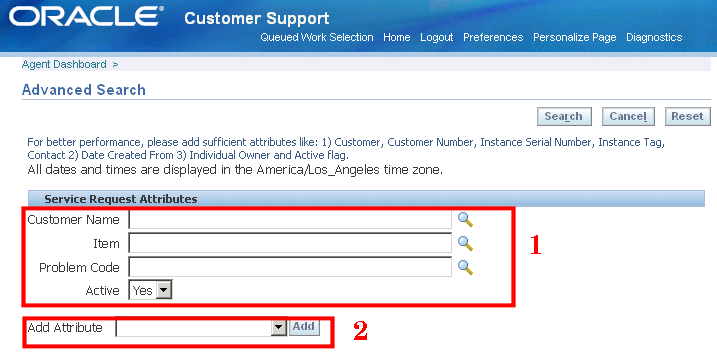
The page displays some of the search parameters as fields by default (region 1 in the above image).
Users can add additional search criteria with the Add Attribute drop-down list (region 2). For example, to search by contact phone, an agent chooses contact phone from the Add Attribute drop-down list and clicks Add:
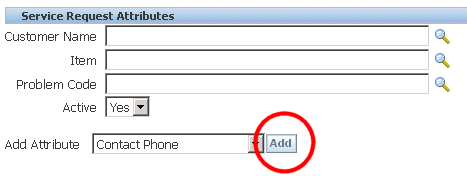
The Contact Phone appears as a new field right below the default parameters (as highlighted in the image below):
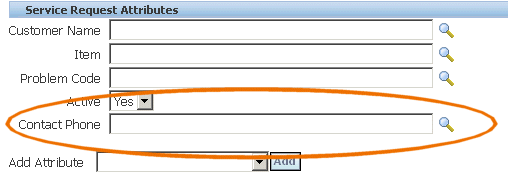
You can specify which search fields:
-
Are displayed in the region by default.
-
Appear in the drop-down list and must be added by agents manually.
-
Do not appear at all.
The behavior is controlled by the setting of two personalization properties:
-
Read only
-
Rendered
The following table shows how to set the two parameters Read Only and Rendered to get the desired behavior:
| Search Parameter Behavior | Read Only | Rendered |
|---|---|---|
| Displayed as one of the default fields | False | True |
| Listed in the Add Attribute drop-down list | False | False |
| Hidden completely | True/False | False |
Exposing the search parameter as a field on the page automatically removes it from the drop-down list and vice versa. Hiding a field removes it from both the drop-down list and the page.
For an example of how you can expose one of the search parameters as a default search field, see Displaying Internal Severity as One of the Default Search Criteria.
For an example of how you can remove a search parameter from use see Attribute drop-down list see Removing Problem Code from the Search Criteria.
Note: The method of using a combination of Rendered and Read Only personalization parameters to display and hide fields discussed in this section applies only to the Service Request Attributes region of the Advanced Search page.
Different application modules expose different search criteria. For the list of displayed and hidden search parameters for each module see Available Search Criteria.
Example: Displaying Internal Severity as One of the Default Search Fields
This example shows how you can display the field Internal Severity as one of the default search fields in the Service Request Attributes region of the Advanced Search Page.
To add Internal Severity as one of the default search fields:
-
Navigate to the Advanced Search Page.
-
Select the Personalize Page link at the very top of the page.
-
Choose the site or a responsibility for the Personalization level and click Go.
-
Select the Content subtab.
-
Click on the Personalize Properties icon for the Service Request Attributes region.
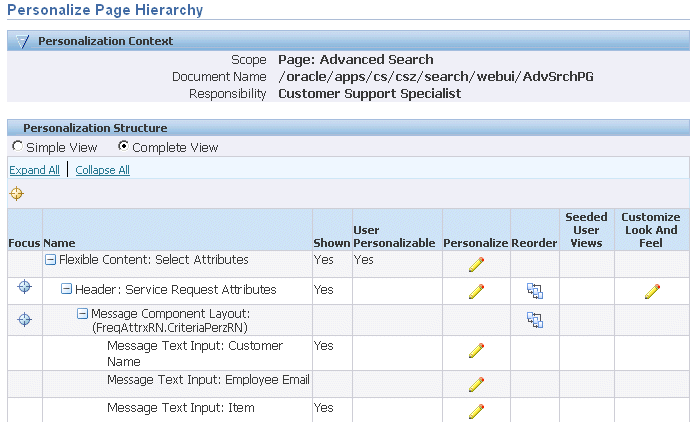
The Personalize Page Hierarchy page displays.
-
Select Complete View and Expand All.
-
Using your browser's search utility, find “Internal Severity” on the page and click the Personalize icon.
The Personalize Message Text Input: Internal Severity page appears.

-
Set Rendered to "True".

-
Click Apply.
To view the new search criteria, you must log out and log in again.
Example: Removing Problem Code from the Search Criteria
The following example explains how you can remove Problem Code from the Add Criteria drop-down list. The application automatically removes this parameter from the search results page as well.
To remove Problem Code from the Add Criteria drop-down list:
-
Under the responsibility you want to personalize, navigate to the Advanced Search Page.
-
Click the Personalize Page link (located at the very top of the page).
-
Choose the site or a responsibility as the personalization context and click Go.
-
Select the Content tab.
-
Click the Personalize Properties icon for the Service Request Attributes region.
The Personalize Page Hierarchy page displays.
-
Select Complete View and Expand All.
-
Using your browser's search utility, find “Problem Code” and click the Personalize icon.
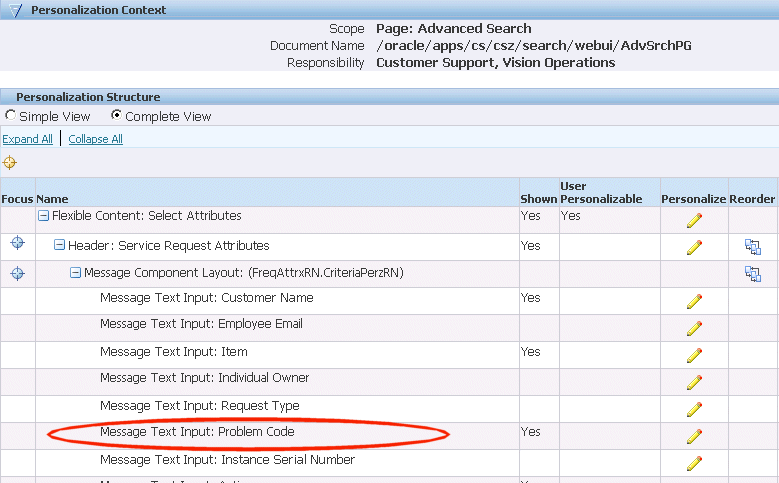
The Personalize Message Text Input: Problem Code page appears.
-
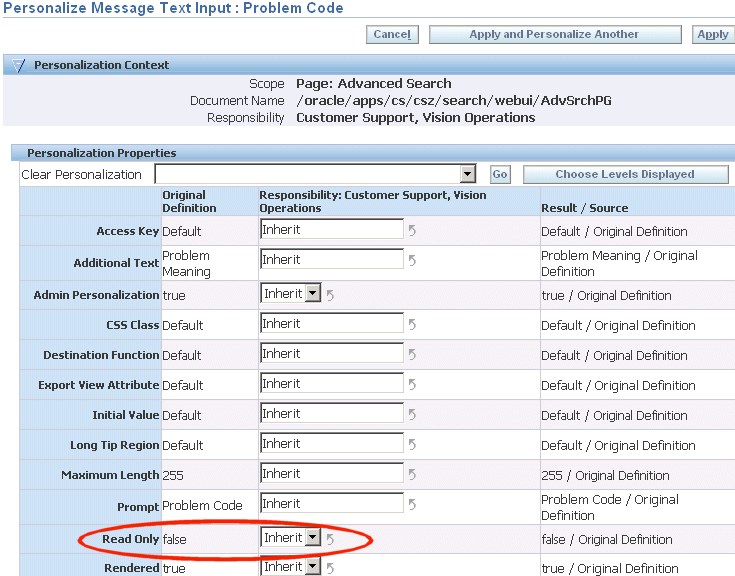
Set the ReadOnly property (highlighted in the image below) to “True".
-
Click Apply.
To verify the search parameter is removed from use, you must log out and log in again.
Replicating Seeded Responsibility-Level Personalizations for Case Management
For Oracle Case Management, some application pages (knowledge management and advanced search) have been personalized at the Responsibility level to change the terminology from “service request” to “case”, for example.
You must replicate these seeded personalizations for every responsibility you create.
Perform the following responsibility-level personalizations
-
Under the Service responsibility, navigate to Agent Dashboard, Update SR Page, KM Search, Advanced Solution Search.
-
Hide the Products and Platforms regions.
-
Navigate to Agent Dashboard, Update SR Page, KM Search, Create Solution.
-
Hide the Products and Platforms regions.
-
Navigate to Agent Dashboard, Update SR Page, KM Search, Personalize Table Layout: (SearchCriteriaRN).
-
Hide the Item field.
-
Navigate to Agent Dashboard, Advanced Search, Personalize Problem Code LOV and personalize the following elements:
-
<modify element="TopRN" text="Search and Select: Issue Type"/>
-
<modify element="SearchText" prompt="Issue Type"/>
-
<modify element="ProbCodeNameHdr" prompt="Issue Type"/>
-
<modify element="SelectedRN" text="Search Issue Types"/>
-
<modify element="ProbCodeNameSelHdr" prompt="Issue Type"/>
-
-
Navigate to Agent Dashboard, Advanced Search, Personalize Resolutions Code LOV and personalize following elements:
-
<modify element="TopRN" text="Search and Select: Resolution Type"/>
-
<modify element="SearchText" prompt="Resolution Type"/>
-
<modify element="ResCodeNameHdr" prompt="Resolution Type"/>
-
<modify element="SelectedRN" text="Selected Resolution Types"/>
-
<modify element="ResCodeNameSelHdr" prompt="Resolution Type"/>
-
-
Navigate to Agent Dashboard, Advanced Search, Personalize Service Request Type LOV and personalize following elements:
-
<modify element="TopRN" text="Search and Select: Case Type"/>
-
<modify element="SearchText" prompt="Case Type"/>
-
<modify element="SRTypeHdr" prompt="Case Type"/>
-
<modify element="SelectedRN" text="Selected Case Types"/>
-
<modify element="SRTypeSelHdr" prompt="Case Type"/>
-
About Modifying the Content of Drop-down Lists
You can modify the content of the drop-down lists in your application by hiding or exposing content. You must hide a selection, for example, when you have not implemented the corresponding feature.
Except for the Add Criteria drop-down list on the Advanced Search page, the drop-down lists in the user interface are controlled by lookups.
(The Add Criteria drop-down values are part of the application code and must be modified through personalization as described in a separate topic.)
There is a separate lookup type for the same feature in each application module.
Note: The lookup type internal names for all the modules start with CSZ and are similar. Case Management lookups contain a “_CASE” suffix. For Service Desk they contain “_SDESK”.
You can disable or expose different values (lookup codes) in the lookups by logging in under the Functional Administrator responsibility and navigating to the Core Services tab and the Lookups subtab.
You must disable lookup codes for features that you have not implemented in your application and ensure that those that are used are enabled.
Example of When You Must Disable Codes
For example, by default the Actions drop-down list on the Service Request Update page (highlighted in the image below) includes the Generate Report code which generates a service request report.
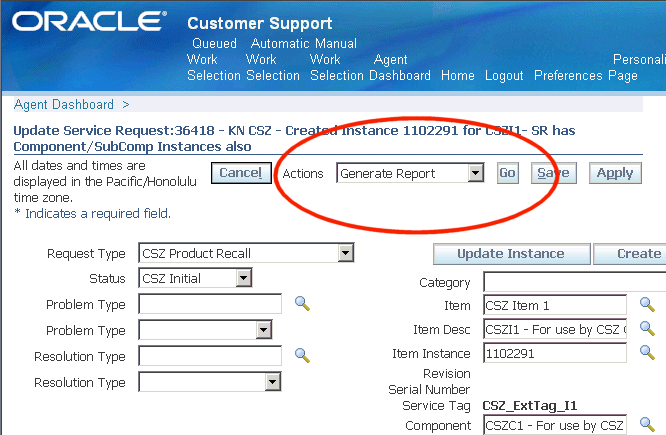
If you have not implemented Oracle XML Publisher integration for generating reports, as described in Enabling Service Request Reports, then you must end-date this code in the lookup so it does not appear as a selection for agents.
Example of When You Must Enable Codes
If you have enabled Web conferencing, as described in Setting Up Web Collaboration, then you must enable the Start Conference entry in the Actions drop-down by deleting the end-date of the lookup code.
The following sections provide the lookup types for the drop-down lists in Customer Support, Service Desk, and Case Management.
Customer Support Lookups
The following table lists the Customer Support drop-down lists and their corresponding lookup types and codes. The Enabled/Disabled Codes column, which lists the codes by their meaning, specifies those codes that are enabled and disabled by default.
Note: Adding additional attributes for use with the Quick Find may degrade search performance.
| Drop-Down List | Lookup Type | Enabled/Disabled Codes |
|---|---|---|
| Agent Dashboard, QuickFind | CSZ_SRCH_QUICKFIND_CODE | Enabled:
|
| Agent Dashboard, Create Service Request bin, Service Key | CSZ_INCIDENT_SKTYPES | Enabled:
|
| Update Service Request, Global Actions | CSZ_GLOBAL_ACTIONS | Enabled:
Disabled:
|
Service Desk Lookups
The following table lists the Service Desk drop-down lists and their corresponding lookup types and codes. The Enabled/Disabled Codes column, which lists the codes by their meaning, specifies those codes that are enabled and disabled by default.
Note: Adding additional attributes for use with the Quick Find may degrade search performance.
| Drop-Down List | Lookup Type | Enabled/Disabled Codes |
|---|---|---|
| Agent Dashboard, QuickFind | CSZ_SRCH_QUICKFIND_CODE_SDESK | Enabled:
Disabled:
|
| Agent Dashboard, Create Service Request bin, Service Key | CSZ_INCIDENT_SKTYPES_SDESK | Enabled:
Disabled:
|
| Update Service Request, Global Actions | CSZ_GLOBAL_ACTIONS_SDESK | Enabled:
Disabled:
|
Case Management Lookups
The following table lists the Case Management drop-down lists and their corresponding lookup types and codes. The Enabled/Disabled Codes column, which lists the codes by their meaning, specifies those codes that are enabled and disabled by default.
Note: Adding additional attributes for use with the Quick Find may degrade search performance.
| Drop-Down List | Lookup Type | Enabled/Disabled Codes |
|---|---|---|
| Agent Dashboard, QuickFind | CSZ_SRCH_QUICKFIND_CODE_CASE | Enabled:
Disabled:
|
| Update Case, Global Actions | CSZ_GLOBAL_ACTIONS_CASE | Enabled:
Disabled:
|
| Filter By (Party Information page, Cases subtab) |
CSZ_CASE_FILTER_BY | Enabled:
|
| Search For Type (Party Search page) |
CSZ_CASE_SEARCH_FOR_TYPE | Enabled:
|
Available Search Criteria for Advanced Search Page
The different application modules expose different choices for search criteria on the Advanced Search page as described in this section.
Note: Extensible attributes you set up appear automatically among the search criteria. You cannot hide or expose them using Oracle Applications Personalization. For details, see Where Extensible Attributes Are Displayed.
Available Search Criteria for Customer Support
The following table lists the exposed search criteria on the Advanced Search Page:
| Search Criteria Exposed as Fields | Description |
|---|---|
| Customer Name | The person or organization that is the customer for the service request. |
| Item | Inventory item. |
| Problem Code | Service request problem code. |
| Active | Has not been end-dated. |
The following table lists the search criteria on the Add Attribute drop-down list:
| Search Criteria on the Add Attribute List | Description |
|---|---|
| Assigned Group | Assigned group owner of the service request. |
| Channel | Service request creation channel. |
| Contact Email | E-mail of the customer contact (not to be confused with the service request contact). |
| Contact Name | Customer contact name. |
| Contact Phone | Customer contact phone number. |
| Contact Number | The ID for the customer contact record. |
| Employee Name | Employee in HRMS who has been set up as a resource. |
| Employee Email | Employee e-mail address. |
| Employee Number | The HRMS ID for the employee. |
| Employee Phone | Employee phone number. |
| Escalated | The service request has been escalated through the Escalation Manager. |
| Individual Owner | Agent currently assigned ownership of the service request. |
| Serial Number | Serial number of a customer product (instance) tracked by Oracle Installed Base. |
| Service Tag | Internal ID for the Oracle Installed Base instance. |
| Internal Severity | Service request severity. |
| Jeopardy | Service requests in jeopardy of missing due dates. See Setting Up Jeopardy for Service Requests. |
| Maintenance Org | Maintenance organization in Oracle Inventory. |
| Missed Deadline | Returns service requests with any missed deadline. |
| Number | Service request number. |
| Platform | Oracle Installed Base platform. |
| Request Type | Service request type. |
| Resolution Code | Service request resolution code. |
| Status | Service request status. |
| System | Oracle Installed Base system name. |
| Unowned | Not owned by any individual. |
| Urgency | Service request urgency. |
Available Search Criteria for Case Management
The following table lists the search criteria exposed on the Advanced Search page for Case Management:
| Search Criteria Exposed as Fields | Description |
|---|---|
| Owner | Case owner. |
| Case Type | Uses the same setups as service request type. |
| Issue Type | Uses the same setups as problem code. |
The following table lists the available search criteria in the Add Attribute drop-down list:
| Search Criteria on the Add Attribute List | Description |
|---|---|
| Active | Active cases. |
| Escalated | Cases escalated via the Escalation Manager. |
| Jeopardy | Cases in jeopardy of missing due dates. See Setting Up Jeopardy for Service Requests. |
| Missed Deadline | Cases with any missed deadline. |
| Resolution Type | Case resolution type. Uses the same setups as service request resolution type. |
| Internal Severity | Case severity set up as service request severity. |
| Status | Case status. Set up as service request status. |
| Unowned | Case not owned by any individual. |
| Urgency | Case urgency. Set up as service request urgency. |
You can expose additional criteria listed in the table below in the Add Attribute drop-down list. These are hidden by default:
| Hidden Search Criteria on the Add Attribute List | Description |
|---|---|
| Item | Oracle Inventory item. |
| Account | Customer account. |
| Channel | Service request creation channel. |
| Contact Name | Customer contact name. |
| Contact Email | Customer contact e-mail address. |
| Contact Phone | Customer contact phone number. |
| Contract Number | Number of the associated contract created in Oracle Service Contracts. |
| Customer Name | The person or organization that is the customer for the case. |
| Customer Email | Customer e-mail address. |
| Customer Number | Customer ID. |
| Customer Phone | Customer phone number. |
| Employee Name | Employee name. |
| Employee Email | Employee e-mail address. |
| Employee Number | Employee HRMS ID number. |
| Employee Phone | Employee phone number. |
| Serial Number | Serial number of a customer product (instance) tracked by Oracle Installed Base. |
| Service Tag | Internal ID for the Oracle Installed Base instance. |
| Instance System | Oracle Installed Base system name. |
| Platform | Oracle Installed Base platform name. |
Available Search Criteria for Service Desk
The following table lists the exposed search criteria on the Advanced Search page for the Service Desk:
| Search Criteria Exposed as Fields | Description |
|---|---|
| Employee Email | Employee e-mail address. |
| Item | Oracle Inventory item. |
| Serial Number | Serial number of a customer product (instance) tracked by Oracle Installed Base. |
| Active | Searches only search requests that have not been closed. |
The following table lists the available search criteria in the Add Attribute drop-down list:
| Search Criteria on the Add Attribute List | Description |
|---|---|
| Assigned Group | Assigned group owner of the service request. |
| Channel | Service request creation channel. |
| Employee Name | Name of employee in HRMS who has been set up as a resource. |
| Employee Number | The HRMS ID for the employee. |
| Employee Phone | Employee phone number. |
| Escalated | The service request has been escalated through the Escalation Manager. |
| Individual Owner | Agent currently assigned ownership of the service request. |
| Internal Severity | Service request severity. |
| Jeopardy | Service requests in jeopardy of missing due dates. See Setting Up Jeopardy for Service Requests . |
| Maintenance Org | Maintenance organization in Oracle Inventory. |
| Missed Deadline | Returns service requests with any missed deadline. |
| Number | Service request number. |
| Platform | Oracle Installed Base platform. |
| Problem Code | Service request problem code. |
| Request Type | Service request type. |
| Resolution Code | Service request resolution code. |
| Service Tag | ID of the Oracle Installed Base instance. |
| Status | Service request status. |
| System Name | Oracle Installed Base system name. |
| Unowned | Not owned by any individual. |
| Urgency | Service request urgency. |
You can expose additional criteria listed in the table below in the Add Attribute drop-down list for Service Desk. These are hidden by default:
| Hidden Search Criteria on the Add Attribute List | Description |
|---|---|
| Account | Customer account. |
| Customer Number | Customer ID. |
| Customer Name | The person or organization that is the customer for the service request. |
| Customer Phone | Customer phone number. |
| Customer Email | Customer e-mail address. |
| Contact Name | Customer contact name. |
| Contact Email | Customer contact e-mail address. |
| Contact Phone | Customer contact phone number. |
| Contract Number | Number of the associated contract created in Oracle Service Contracts. |
| Employee Email | Employee e-mail address. |
| Employee Number | Employee HRMS ID number. |
| Employee Phone | Employee phone number. |
| Serial Number | Serial number of a customer product (instance) tracked by Oracle Installed Base. |
| Service Tag | Internal ID for the Oracle Installed Base instance. |
| Instance System | Oracle Installed Base system name. |
| Platform | Oracle Installed Base platform name. |