Manage Supplier Quality
This chapter describes how to manage goods and services purchased from suppliers using:
-
Receipt, transfer, inspection, internal delivery, return, and correction transactions in Oracle Purchasing
-
Quality result entry by suppliers in Oracle iSupplier Portal
-
Skip lot and inspection sampling in Oracle Quality
This chapter covers the following topics:
- Supplier Quality Collection Points
- Quality Data Collection in Oracle Purchasing
- Collection Plans for Receiving Inspections
- Collection Plans for Receiving Transfers and Deliveries
- Entering Quality Results: Receiving Transfers and Deliveries
- Entering Quality Results for Receiving Inspections
- Oracle Purchasing Business Example
- Setting Up Oracle Quality for Use with iSupplier Portal
- Entering and Viewing Supplier Quality Results in iSupplier Portal
- Performing Skip Lot Inspections
- Performing Inspection Sampling
Supplier Quality Collection Points
When managing supplier quality, you can collect quality data from:
-
Oracle Purchasing Receiving Transactions window
-
Oracle iSupplier Portal
Additional Oracle Quality features designed specifically for collecting supplier quality data include:
-
Skip lot inspections
-
Inspection sampling
Purchasing Versus Quality Inspections
In this release of Oracle Purchasing, you can collect quality data from Purchasing's Receiving Transactions window, where you can use Oracle Quality in one of two different ways:
-
Receiving Transfers and Deliveries: You can use Oracle Quality to collect quality data on items as you transfer them internally within Oracle Purchasing, or before you deliver them to their final locations. To use Oracle Quality for Receiving Transfers or Receiving Deliveries, select the Quality button on Oracle Purchasing's toolbar in the Receiving Transactions window.
-
Receiving Inspections: You can choose to use Oracle Quality instead of Oracle Purchasing to accept or reject item quantities in a Receiving Inspection. By using Oracle Quality in place of Oracle Purchasing, you can also collect additional quality data in your Receiving Inspection using customized collection plans. To use Oracle Quality for Receiving Inspections, you will need to first ensure that the QA:PO Inspection profile option is set to Oracle Quality; then, when you are in the Receiving Transactions window, select the Inspect button.
If you choose to use Oracle Quality in place of Oracle Purchasing to conduct your Receiving Inspections, you will be able to perform every task that is available in a Purchasing Inspection in addition to some other tasks not supported in Purchasing. Quality Inspections functionality is a superset of Purchasing Inspections functionality.
For more information on collecting quality data from the Receiving Transactions window, see:
Purchasing Inspections
If you use Oracle Purchasing, you can enter the number of items that were accepted or rejected items and enter information about your inspection results. You can review your inspection results on-line by receipt number, purchase order number, supplier, item, and/or transaction date range. You can also print summary and detail reports to help you analyze your suppliers' performance. Reports can be printed by buyer, supplier, and item. The receiving inspection register can be used to review your inspection results by receipt. See: Inspecting Received Items, Oracle Purchasing User's Guide
Quality Inspections
If you use Oracle Quality for inspections, you can collect the same data as in Purchasing plus data for any other collection elements included on the collection plan. You can create charts, descriptive statistic views, and custom reports with the data collected using Quality. Similar to Purchasing Inspections, Quality Inspections allow to Accept and Reject shipments. However, using Quality enables you to trigger additional actions based upon your inspection results.
Collecting Quality Data in iSupplier Portal
With Oracle iSupplier Portal installed, you can associate collection plans with transactions linked to your suppliers' purchase orders. Your suppliers can then access the collection plans from the iSupplier Portal web pages, and use them to enter and submit Quality results.
The supplier logs on, selects the appropriate web page, and queries the system for their purchase orders. If a collection plan has been associated with any of the purchase order shipments listed, a hypertext link titled Available is visible in the Quality Plans column. Through this link, suppliers can enter and view quality results. For more information, see: Setting Up Oracle Quality for Use with iSupplier Portal and Entering and Viewing Supplier Quality Results in iSupplier Portal.
Access to iSupplier Portal
To access iSupplier Portal , all your suppliers need is a browser, a user ID for the application, and the Internet address or URL (Uniform Resource Locator). The user ID determines which application they can log on to and which menus are available. See: Registration, Oracle iSupplier Portal User's Guide.
Attachments
If attachments such as instructions or other documents are available for a collection plan, suppliers can view them online or print them on a local printer.
Skip Lot Inspections
Quality practitioners are faced with many choices regarding quality assurance procedures. A lot-by-lot inspection plan assumes that every lot received is inspected. Skip Lot inspection is a technique often utilized as an alternative to lot-by-lot inspection plan. The Skip Lot procedure enables the inspection of a set number of receipts and the skipping of inspection for another set number of receipts.
Skip lot inspection offers the following advantages:
-
Cost reduction
-
Reduced material handling
-
Faster material throughput
-
Less redundant and destructive testing
-
Inspect a receipt using more than one collection plan at a time
Skip Lot inspection is used when goods are received from a supplier and inspection is reduced based on a predefined Skip Lot plan. Quality managers set up a plan to define the ratio of inspected lots to skipped lots. When material is received, the receipt is evaluated to see if inspection can be skipped and the skipping status of the receipt is determined by the system. Material that does not require inspection can be put away; it does not need to move to an inspection area.
When a lot is received, there are two alternatives; it can be inspected, or moved to direct delivery. This is determined during the receiving transaction. If more than one inspection collection plan is applicable, then you can inspect the receipt using more than one collection plan at a time, treating each plan as a test performed on the receipt. Within the Receiving transaction window, a lot that needs to be inspected displays a status of Pending until the inspection is performed. The acceptance enables subsequent lots to skip inspection. For example, if the lot displays a Pending status, then until is has been inspected and dispositioned, all subsequent lots will display a Pending status, indicating a need for inspection.
For more information, see: Performing Skip Lot Inspections.
Inspection Sampling
Sampling is the procedure of drawing a number of units from a lot at random, and inspecting those units. The size of the samples to be inspected is first determined, and lots' pass or fail statuses are determined by their sample inspections. The inspection results of the entire lot are based on the results of the sample. The number of units selected is in proportion to the size of the lot, identified by a specified, rational criterion.
Sampling enables lot-by-lot inspection, as opposed to unit-by-unit inspection. This decreases costs, handling damage, and inspection errors.
Oracle sampling complies with industry accepted sampling standards, including MTL-STD-105E (Military Standards set by the Department of Defense), and its civilian counter part, ANSI/ASQC, c=0, and ISO 9000 series. They provide the conceptual guidelines for sampling procedures. ANSI/ASQC standard sampling plans are classified as three types: single sampling, double sampling, and multiple sampling. The single sampling plans are further divided into single sampling plans for normal inspection, single sampling plans for reduced inspection, and single sampling plans for tightened inspection.
Note: The current implementation of sampling does not support double and multiple samples.
For more information, see: Performing Inspection Sampling.
Related Topics
Overview of Receiving , Oracle Purchasing User's Guide
Receiving Transactions, Oracle Purchasing User's Guide
Quality Data Collection in Oracle Purchasing
In Oracle Purchasing, you can manage goods and services purchased from suppliers using receipt, transfer, inspection, internal delivery, return, and correction transactions. See: Overview of Receiving, Oracle Purchasing User's Guide.
By using Oracle Quality and Oracle Purchasing together, you can directly control quality at the supply end of the supply chain. You can, for example, do all of the following:
-
inspect, then accept or reject, products from a supplier
-
collect historical data on items, lots, and serial numbered items received from suppliers
-
report failure analysis by problem and product
-
place a supplier on hold when their product quality falls below a prescribed level
-
place a document on hold until supplier product problems are resolved
-
update a supplier's “approved supplier" status based on the quality results entered
-
notify buyers automatically when an action, such as placing a supplier or a supplier's document on hold, takes place
Related Topics
Supplier Quality Collection Points
Collection Plans for Receiving Inspections
Collection Plans for Receiving Transfers and Deliveries
Entering Quality Results: Receiving Transfers and Deliveries
Entering Quality Results for Receiving Inspections
Oracle Purchasing Business Example
Collection Plans for Receiving Inspections
When you decide to inspect item quantities and make a decision as to whether or not to accept or reject them, you can use Oracle Quality in place of Oracle Purchasing to conduct an inspection (called a Receiving Inspection).
Inspection collection plans must be associated with the Receiving Inspection collection transaction and are unique in several ways:
-
Receiving Inspection collection transactions must be set as mandatory for items that have inspection required attributes. They are not mandatory for items with direct delivery or standard receipt attributes. Also, because Accept and Reject actions cannot be performed when the data collection is background, Receiving Inspection collection transactions cannot be set as background.
Note: You can override a mandatory collection plan. For example, you can change the inspection required attribute to direct delivery within the purchase order.
Receiving Inspections collection plans used for Receiving Inspections must be enabled.
-
Receiving Inspection collection plans must include the following collection elements:
-
Inspection Result
-
Quantity
-
UOM Name
-
Transaction Date
Note: These collection elements must be defined as Displayed, Mandatory and Enabled. If you disable any of these required collection elements or make them non-mandatory, the collection plan cannot be used for inspections.
-
-
The Accept the shipment and Reject shipment actions should be associated with the Inspection Result collection plan element.
To ensure that these conditions are met, when you associate the Receiving Inspection collection transaction with an enabled collection plan, the system prompts you to complete the setup. You cannot save your work until you have entered quality results or had them defaulted in.
Creating an Inspection Collection Plan from a Template
To simplify the process of creating inspection collection plans, two template collection plans, PO Inspection (for discrete manufacturing organizations) and Template OPM Receiving Inspection Collection Plan (for process manufacturing organizations), are pre-seeded in Oracle Quality. See: Creating Collection Plans from Templates.
You can copy the elements from either template collection plan to the inspection collection plan you have created to ensure that the required collection elements are included. Both template collection plans also include collection elements that are not required. Once copied over to your own collection plan, you can delete those collection plan elements - Comments, Quality Code, Reason Code, Supplier Lot Number - that are copied but are not required. You can also add user-defined and additional context elements.
Specifications
You can optionally define specifications and specification sub-types. When quality data is collected, you can choose a specification to be used during quality data collection.
Return Material Authorization (RMA) Receiving and Inspections
RMAs are created in Order Management, and distinguished from sales orders via the Order Type field on the Sales Order form. When an item is returned in Order Management, the original sales order number is used as the RMA number.
RMA receiving and inspection is performed in Oracle Purchasing, and uses the same process as Oracle Purchasing receiving and inspection transactions. The receipt sources are distinguished by Source Type. Oracle Quality's existing receiving and inspection functionality supports RMA. You can define collection plans and associate them with receiving and inspection transactions.
Related Topics
Supplier Quality Collection Points
Quality Data Collection in Oracle Purchasing
Collection Plans for Receiving Transfers and Deliveries
Entering Quality Results: Receiving Transfers and Deliveries
Entering Quality Results for Receiving Inspections
Oracle Purchasing Business Example
Completing Receiving Inspection Based on Sample Results within Understanding Results, Oracle Process Manufacturing Quality Management User's Guide
Collection Plans for Receiving Transfers and Deliveries
When you transfer items within Oracle Purchasing both internally (called Receiving Transfers) and right before delivering them to their final destinations (called Receiving Deliveries), you can use Oracle Quality to collect quality data on these items.
In Oracle Purchasing, you can use Receiving Transfers to transfer items from receiving and inspection to inventory or the shop floor, or to transfer items to different locations in the receiving and inspection area. For example, you might need to move refrigerated items from the receiving dock into a cold storage area while you are waiting to inspect them.
In Oracle Purchasing, you can use Receiving Deliveries to deliver items to their final destinations. For example, you can deliver items in receiving and inspection to stock or expense.
Oracle Quality allows you to collect quality data on items during transfers and deliveries and trigger actions.
Collection Plan Elements
The context elements that can be added to Receiving transfer and delivery collection plans are listed in the Collection Transaction and Context Element Relationships table. See: Collection Transactions and Context Element Relationships.
You can also add user-defined collection elements to these collection plans so that you can collect data that is not dependent on the transaction itself. See: Collection Elements and Defining Collection Elements.
Creating a Transfer or Delivery Collection Plan from a Template
To simplify the process of creating transfer and delivery collection plans, a template collection plan, Template PO Receiving, is pre-seeded in Oracle Quality. See: Creating Collection Plans from Templates .
You can copy the elements from the PO Receiving template collection plan to the transfer or delivery collection plan you have created to ensure that certain collection elements are included. Once copied over to your own collection plan, you can delete certain collection elements that are copied. You can also add user-defined collection elements to these collection plans.
Actions
You can specify actions specific to purchasing transactions in your collection plan. See: Application Specific Actions. However, when you are creating a collection plan for a receiving transfer or delivery, we suggest that you not include the Accept the Shipment or Reject the Shipment actions as these actions have no effect in a receiving transfer delivery.
In addition to these actions, you can add message actions, alert actions, and actions that determine a value based on a user-defined formula. See: Quality Actions, Message Actions, Alert Actions, and User-Defined Actions.
Collection Transactions and Collection Triggers
The Receiving Transaction collection transaction must be associated with the collection plans you use for receiving transactions. Also, Receiving Transactions collection plans used for Receiving Transfers or Receiving Deliveries must be enabled.
You can make the entry of quality data mandatory for the receiving transaction by setting its Mandatory option. If data entry is required, you cannot save the parent transaction, in this case the receiving transaction, without entering quality data. See Mandatory Data Collection.
You can also specify that data should be collected in the background. See: Background Data Collection.
You can define one or more collection triggers for each collection transaction. Collection triggers allow you to specify the conditions under which quality data collection is invoked as receiving transactions are entered. See: Quality Data Collection During Transactions and Associating Collection Plans with Transactions.
Related Topics
Supplier Quality Collection Points
Quality Data Collection in Oracle Purchasing
Collection Plans for Receiving Inspections
Entering Quality Results: Receiving Transfers and Deliveries
Entering Quality Results for Receiving Inspections
Oracle Purchasing Business Example
Entering Quality Results: Receiving Transfers and Deliveries
This section describes how you can use Oracle Quality for Receiving Transfers or Receiving Deliveries.
If Oracle Quality is installed and at least one collection plan that is associated with the Receiving transaction exists, the Enter Quality Results Tools menu option and the Quality button are enabled and quality results can be entered.
Warning: The Tools menu option is enabled even if, based upon the transaction information entered, the collection triggers conditions for this collection plan are not met.
In fact, based upon the receiving transaction entered, quality results entry may be required. See: Mandatory Data Collection.
Background data collection occurs automatically if valid background collection plans are found when you save receiving transactions.
Cascade, Express, and Lot and Serial Functions
The Cascade function, which distributes a receiving transaction quantity to multiple lines, is compatible with Oracle Quality. Quality enforces quality data collection as you enter each line. See: Cascading Receipts and Receiving Transactions, Oracle Purchasing User's Guide
To save Receiving Transactions quickly and automatically with a minimal amount of data entry, you can choose the Express button to put Oracle Purchasing in Express mode. However, when you are in Express mode, Oracle Purchasing prevents you from manually entering data for those collection elements that you have defined as mandatory in Oracle Quality. For this reason, choosing the Express button disables the toolbar's Quality button, as well as the Enter Quality Results Tools menu option.
Lot and serial entry quality data collection is not enabled in this release.
Prerequisites
- Define the relevant collection plan in Oracle Quality, enable it and associate it with a Receiving Transaction.
- Enter receiving transaction line and transaction detail information but do not save your work. See: Entering Receiving Transactions, Oracle Purchasing User's Guide.
To enter receiving quality data for receiving transactions
-
Before saving your work, choose Enter Quality Results from the Tools menu or choose the Quality button. The Find Collection Plans window appears.
Important: If you attempt to save a receiving transaction and the system finds one or more mandatory collection plans, you must enter quality results before proceeding.
-
Navigate to the Enter Quality Results window. The first applicable plan will appear by default.
-
Select a collection plan.
To switch to another plan, choose one from the selections in the List of Values (LOV). You can select any collection plan that is associated with and enabled for the Receiving Transaction collection transaction.
To find and assign specifications
If the selected collection plan is associated with a supplier or customer specification type, the Find Specifications window automatically appears. If the selected collection plan is associated with an item specification type, the system searches for a specification defined for that item. If a valid item specification cannot be found, the system searches for a specification based on the item's category. The default category set you defined using the QA:Quality Category Set profile option is used to determine the item category. See: QA:Quality Category Set.
If the collection plan is not associated with a specification type, you can invoke the Find Specifications window using the Find Specs button. See: Finding Specifications During Transactional Data Collection.
The Enter Quality Results window reappears after you select a specification or cancel selection.
To enter quality results
-
In the Results region of the Quality Results window, enter one or more results records.
If the collection plan selected requires mandatory data collection, you must enter quality results. You cannot save the receiving transaction line until you do so. If data collection is not mandatory, you can skip quality results entry.
Important: The Prompts entered when defining the collection elements are displayed as the column headings.
You must enter results values for mandatory collection plan elements.
-
Save your work. See: Saving Changes, Oracle E-Business Suite User's Guide.
If you save your work, the current results are cleared and the Collection Number counter is incremented. You can continue to enter results for the same collection plan and, if assigned, specification.
To view collection plan or specification attachments while entering quality data
See: Viewing Attachments Associated with Quality Results.
Related Topics
Entering Quality Results Directly
Supplier Quality Collection Points
Quality Data Collection in Oracle Purchasing
Collection Plans for Receiving Inspections
Collection Plans for Receiving Transfers and Deliveries
Entering Quality Results for Receiving Inspections
Oracle Purchasing Business Example
Entering Quality Results for Receiving Inspections
This section describes how you can use Oracle Quality for Receiving Inspections.
If you have Oracle Quality installed, you have the option of entering receiving inspection information using the Inspections window in Oracle Purchasing or the Enter Quality Results window in Oracle Quality.
If you require receiving inspections using Oracle Quality, data collection is mandatory since you must opt to either accept or reject items and cannot save your receiving transaction information without doing so. See: Mandatory Data Collection. This is also the reason background data collection cannot be used.
Prerequisites
- Define the relevant collection plan in Oracle Quality, enable it and associate it with a Receiving Inspection transaction.
- Set the QA:PO Inspection profile option to Oracle Quality.
- Enter a receiving transaction. See: Enter Receiving Transaction, Oracle Purchasing User's Guide.
To enter quality results as you enter receiving transactions
-
Before saving the line, choose the Inspect button. The Enter Quality Results window appears.
When you select the Inspect button, the system searches for all applicable inspection plans; the plan which comes first alphanumerically appears by default and you cannot select another applicable plan until after you save the first plan. See: Associating Transactions with Collection Plans.
-
If the selected collection plan is associated with a supplier or customer specification type, the Find Specifications window automatically appears.
If the selected collection plan is associated with an item specification type, the system searches for a specification defined for that item. If a valid item specification cannot be found, the system searches for a specification based on the item's category. The default category set you defined using the QA:Quality Category Set profile option is used to determine the item category. See: QA:Quality Category Set.
If the collection plan is not associated with a specification type, you can invoke the Find Specifications window using the Find Specs button. See: Finding Specifications During Transactional Data Collection.
After selecting a specification, the Enter Quality Results window appears.
To enter quality results values
-
In the Results region of the Quality Results window, enter one or more results records.
If the data collection for the collection plan selected is mandatory, you must always enter quality results.
Important: The Prompts entered when defining the collection elements are displayed as the column headings.
You must enter results values for mandatory collection plan elements. See: Context Element Dependencies.
-
Save your work. See: Saving Changes, Oracle E-Business Suite User's Guide.
To view collection plan or specification attachments while entering result values
See: Viewing Attachments Associated with Quality Results.
Related Topics
Transactional Data Collection Fundamentals
Entering Quality Results Directly
Supplier Quality Collection Points
Quality Data Collection in Oracle Purchasing
Collection Plans for Receiving Inspections
Collection Plans for Receiving Transfers and Deliveries
Entering Quality Results for Receiving Inspections
Entering Quality Results: Receiving Transfers and Deliveries
Oracle Purchasing Business Example
Oracle Purchasing Business Example
The following example describes how you might use Oracle Quality with Oracle Purchasing. This example illustrates a common application of Oracle Quality in the area of Purchasing control.
Supplier Product Analysis
Your company manufactures refrigerators. Your receiving department conducts inspection (receiving inspection) on components that are purchased, among them: compressors, plastic parts, and steel shelves.
Let's consider a representative purchased part - a plastic pan cover for a refrigerator. The inspection process could be as follows:
-
Purchased parts are staged in the receiving area. If the person staging uses a mobile client device such as a bar code scanner, they can enter the subinventory and locator using Oracle Mobile Supply Chain Applications.
-
Inspector retrieves the part file to conduct the inspection. The part file contains the following:
-
a current engineering drawing
-
a control plan which describes the sample size, dimensions to measure and gauges to use, critical attributes such as color and smooth edges, and other applicable information. (example below)
The following table delineates the specifications to which your item should adhere:
Part Number: 1107943 Description Pan Cover Sample Size 5 pieces per shipment Specification Location Method Sample 1 Sample 2 length: 17.000 +/- 0.05 in. G3 24" caliper 17.015 in. 16.999 in. radius: 0.250 +/- 0.005 in. H5 radius gauge 0.250 in. 0.252 in. diameter: 1.625 +/- 0.05 in. H1 3" caliper 1.622 in. 1.625 in. check for scratches A2 visual appearance OK OK
-
Setup in Quality
Based upon the above information, you have determined that you must create a collection plan that includes the following collection elements:
-
Item
-
Supplier
-
Quantity
-
Transaction Date
-
UOM Name
-
Subinventory
-
Locator
-
Inspection Result
-
Sample Size
-
Length
-
Radius
-
Diameter
-
Appearance
Collection Elements
Four of the collection elements listed above (Quantity, Transaction Date, UOM Name and Inspection Result) are pre-seeded and mandatory for all inspection plans. Four of the collection elements listed above are also pre-seeded context elements (Item, Supplier, Subinventory and Locator). Five of them (Sample Size, Length, Radius, Diameter and Appearance) will have to be user-defined.
Specifications
Create an item specification, pan cover, specifically for the pan cover. Add the collection elements length, radius and diameter to the specification and specify that they conform to the requirements delineated above in Table 8-1.
Collection Plan
Next, create a Receiving Inspection collection plan called "Supplier Quality." The collection plan can be assigned any collection plan type.
Your collection plan should contain the collection elements listed above. You should define all of them to be displayed. You must define the four required collection elements (Quantity, Transaction Date, UOM Name and Inspection Result) to be both mandatory and enabled.
Note: Copying collection elements from the template collection plan: Template PO Inspection will ensure that the required collection elements are included.
Collection Plan Element Actions
For all Receiving Inspection collection plans, you must associate two actions ('Accept the shipment' and 'Reject the shipment') with the collection element called Inspection Result Action.
Next, define appropriate actions for your other collection plan elements. For example, you can associate actions for the collection elements length, radius and diameter which fire when the length, radius or diameter do not fall within the specifications you define. For example, you can define an action which, when the length is not within your specification, displays the message: “Reject the item" or “Remeasure the length." See: Defining Collection Element Actions.
Inspection Transactions
Next, associate the Supplier Quality collection plan with the Receiving Inspection transaction. The Receiving Inspection must be both enabled and mandatory to ensure that quality data is collected before the receiving transaction is saved.
After you have finished setting up your collection plan in Quality and associated it with a Purchasing transaction, navigate to Oracle Purchasing. You can conduct your inspection by selecting the Inspect button in Purchasing's Receiving Transactions window. This will enable you to collect quality data for the elements defined in your 'Supplier Quality' collection plan.
Note: Before you can view and analyze your quality results, the PO Transaction Processor must successfully process and deliver your inspection input.
Results Analysis
Once a representative sample of data is collected, you can analyze the data using a trend chart to determine which suppliers are lowering your overall product quality.
To do this you can create a trend chart using the length, radius or diameter as the Y-axis element (element to be analyzed). You can create charts showing all the following:
-
trends over time of the dimension specifications for all suppliers
-
trends over time of the dimension specifications for specific suppliers
Periodic analysis of the data will reveal any trends pertaining to product quality. For example, you may observe a drift in diameter over time. If different suppliers supply the same item, your Oracle Quality analysis can reveal if one can maintain closer tolerances than the other.
Related Topics
Defining Collection Plan Elements
Associating Specification Types with Collection Plans
Defining Actions that Assign a Value: User-Defined Formulas
Associating Transactions with Collection Plans
Creating and Viewing Pareto Charts
Viewing Quality Results Details
Using the Quality Results ReportWriter
Enter Receiving Transaction, Oracle Purchasing User's Guide
Setting Up Oracle Quality for Use with iSupplier Portal
In order for your suppliers to be able to enter quality results for items on purchase orders, you first need to create one or more collection plans and associate them with either of the following two transactions:
-
Self-Service Shipments (Suppliers Management Portal) - associate your collection plan with this transaction when you want a supplier to enter quality results upon shipment.
-
Self-Service Outside Processing (Suppliers Management Portal) - associate your collection plan with this transaction when you have outsourced an Oracle Work in Process operation and want the outside processor (supplier) to enter quality results upon shipment. See: Supplier Access to Outside Processing Purchase Orders, Oracle Work in Process User's Guide
You create collection plans for iSupplier Portal transactions the same way that you create them for other transactions, including defining collection triggers. See: Associating Collection Plans with Transactions. The collection elements that you define for the collection plan become the columns on the web page that you use to enter quality results.
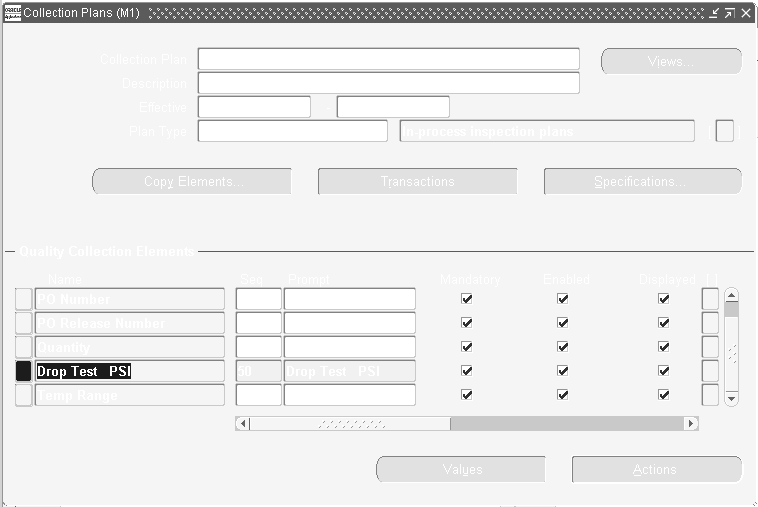
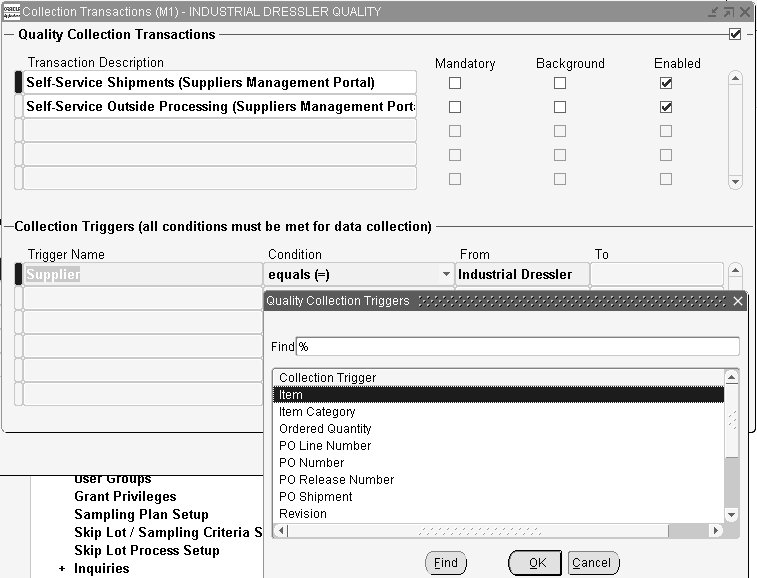
Once a supplier enters quality results, the buyer (or whoever you choose) is notified. This notification is controlled by the QA:Self-Service Buyer Notification profile option. See: Profile Options. If the value of this profile option is null, no notification is sent.
Related Topics
Supplier Quality Collection Points
Entering and Viewing Supplier Quality Results in iSupplier Portal
Entering and Viewing Supplier Quality Results in iSupplier Portal
A supplier can enter as well as view quality results by shipment in iSupplier Portal. For entering and viewing quality results associated with a Self-Service Shipments (Suppliers Management Portal) transaction, see: Quality Information in the Shipping Information chapter, Oracle iSupplier Portal User's Guide. For entering and viewing quality results associated with a Self-Service Outside Processing (Suppliers Management Portal) transaction, see: Supplier Access to Outside Processing Purchase Orders, Oracle Work in Process User's Guide
To enter and view quality results in iSupplier Portal
-
Navigate to the Shipments tab in Oracle iSupplier Portal when filling a purchase order. Navigate to the Orders tab when filling a manufacturing order.
Note: Quality results are entered for purchase orders as a result of the Self-Service Shipments (Suppliers Management Portal) transaction Enter quality results for manufacturing orders as a result of the Self-Service Outside Processing (Suppliers Management Portal) transaction.
-
Select Quality in the task bar directly below the tabs if filling a purchase order. Select Manufacturing Orders if filling a manufacturing order.
-
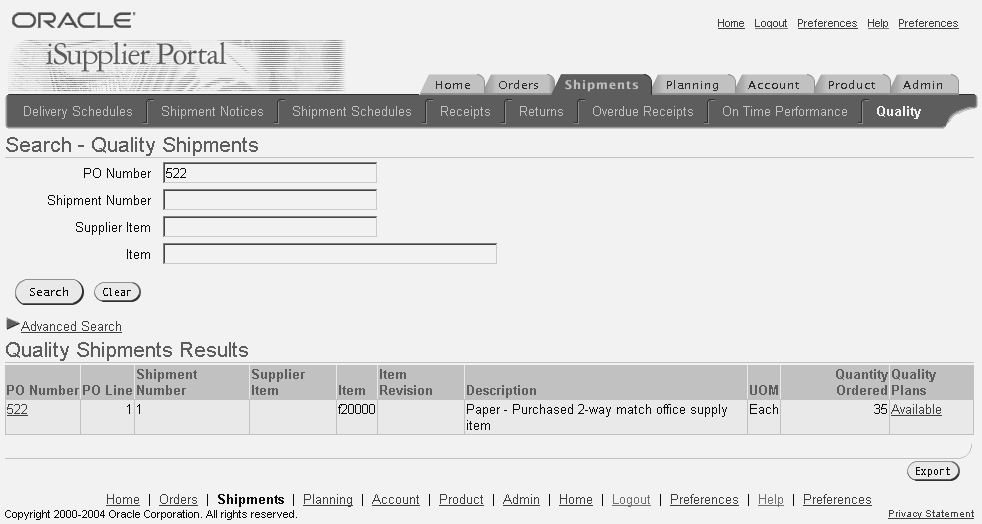
On the Quality Shipment Results page, search for a shipment.
-
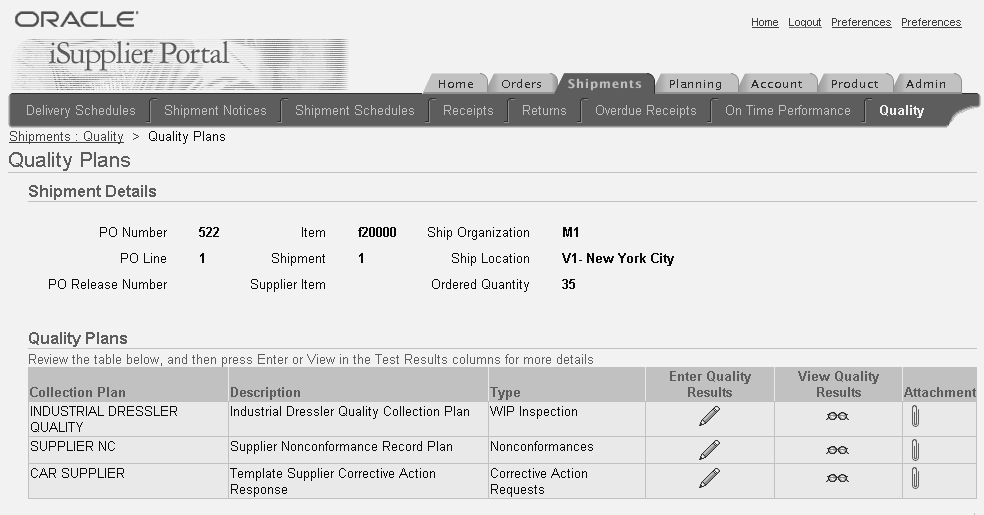
To view the quality plans available for a shipment, select Available in the Quality Plans column.
-
On the Quality Plans page, select the Enter Quality Results pencil icon. To view existing quality results, select the View Quality Results eyeglasses icon. To view attachments, select the Attachment paper clip icon.
-
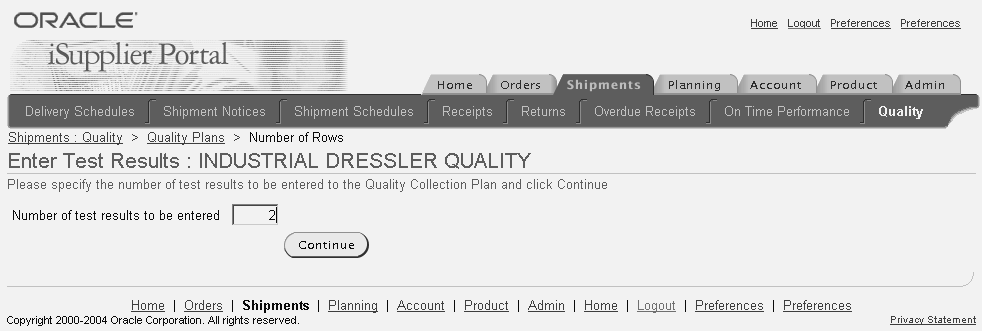
On the Enter Test Results page, enter the number of quality results you want to enter and select the Continue button.
You can enter up to 25 rows of quality results at a time.
-
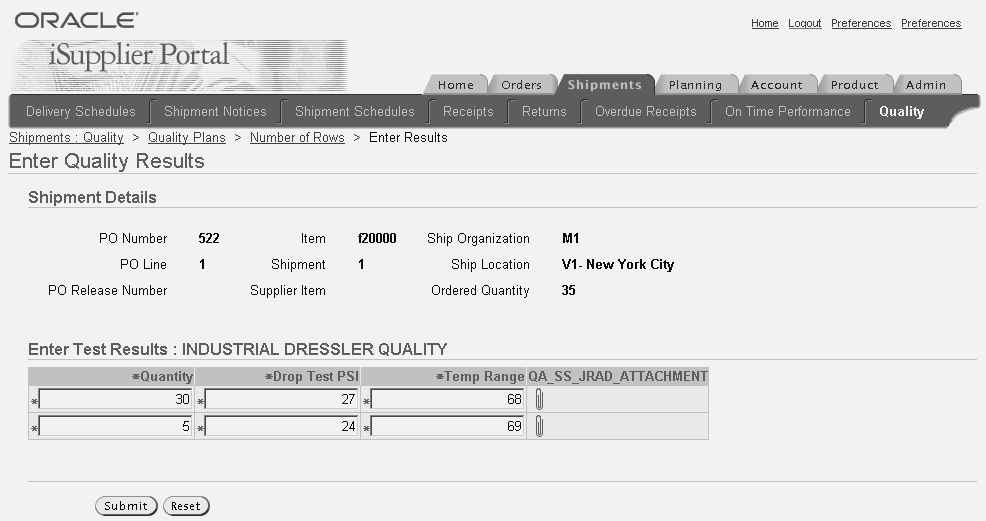
On the Enter Quality Results page, enter your quality results information and select the Submit button.
Once you submit the quality results, a notification is sent to the buyer.
Related Topics
Supplier Quality Collection Points
Setting Up Oracle Quality for Use with iSupplier Portal
Performing Skip Lot Inspections
To perform skip lot inspections, you must first enable skip lot inspections, then set them up by defining their parameters.
Prerequisites
- Set the profile option QA:PO Inspection to Oracle Quality.
To enable skip lot inspections
You must activate an organization parameter to enable the Skip Lot process to evaluate your Skip Lot criteria. You will set up the Skip Lot criteria later (See: To set up skip lot inspections).
-
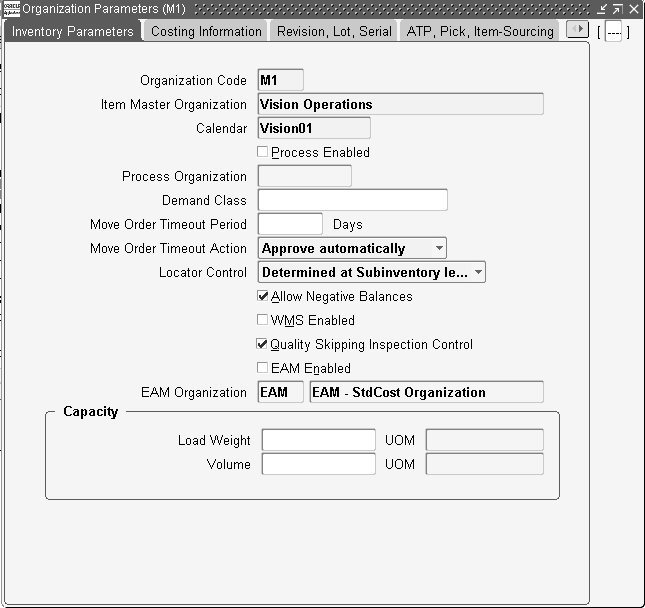
Navigate to the Organization Parameters window.
-
Enter a valid organization code. For information on how to create a valid organization, See: Creating an Organization, Using Oracle HRMS - The Fundamentals.
-
Select the Quality Skipping Inspection Control check box to enable the evaluation of Skip Lot criteria for the current organization.
-
Save your work.
For information on the remaining fields within the Inventory Parameters, see Defining Default Inventory Parameters, Oracle Inventory User's Guide.
To set up skip lot inspections
Skip Lot inspections are generally used with suppliers that have achieved a specified level of conformity and reliability in their relationship with you. To model this process, you can set up qualification controls for your skip lot procedure. These controls can specify how many good receipts must be processed before skip lot is initiated and/or a specific time limit within which the good receipts must be received.
-
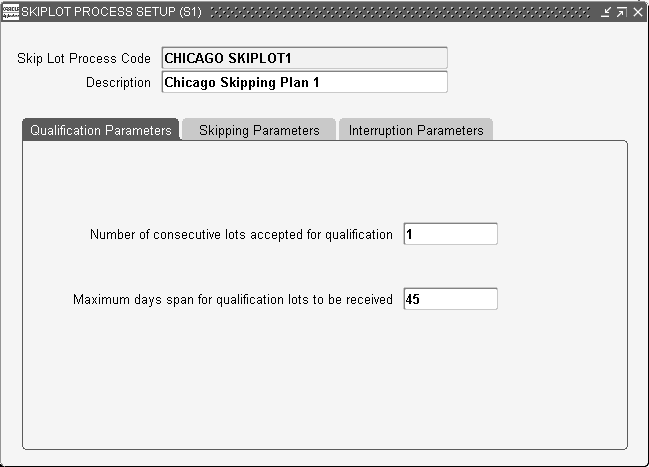
Navigate to the Skiplot Process Setup window.
-
Enter a Skip Lot Process Code name.
-
Optionally, enter a Description for the Skip Lot Process Code.
-
Enter a Number of consecutive lots accepted for qualification. This number indicates the number of good lots received before skip lot inspection begins.
-
Optionally, enter a Maximum days span for qualification lots to be received. This is the number of days that the indicated Number of consecutive lots accepted for qualification needs to be within, before skip lot inspection can begin. For example, if the Number of consecutive lots accepted for qualification is 2, and the Maximum days span for qualification lots to be received is 45, then two good lots must be received within 45 days before skip lot inspection will begin.
To define skipping parameters
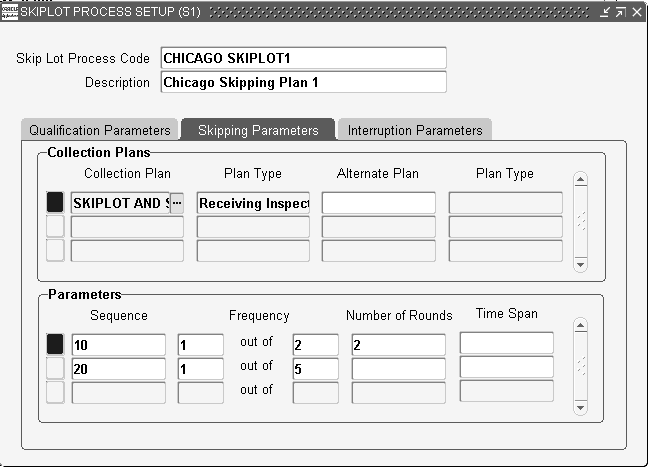
Skipping Parameters define how skip lot inspections will be conducted for a specific Skip Lot Process Code. Each set of parameters consists of a collection plan (optionally, an alternate plan) and skipping frequency values. The frequency values specify how many inspections will be performed for a given number of receipts. For example, inspect one of every three receipts. The Number of Rounds value specifies how many times the frequency is repeated before the next set of values are used. For example, if the Number of Rounds was set to three (3), we would expect to inspect one of every three receipts. Therefore, over a period of nine receipts, we would inspect three receipts. The Time Span value specifies that the rounds must be completed within a certain time frame or the next set of values are not used.
The Alternate Plan enables you to define a collection plan to be used on the skipped receipt. In this case, every receipt is inspected but two different inspection plans are used. For example, with normal inspections, we might employ a destructive testing plan, while on the skipped receipts, we might use a dimensional test.
-
Select the Skipping Parameters tabbed region.
-
In the Collection Plans region, select a valid Collection Plan from the list of values. See: Overview of Collection Plans. You can have multiple collection plans selected for the current Skip Lot Process Code. For example, you can carry out a materials test 25 percent of the time, and a dimensional test 50 percent of the time. The Plan Type will default based on the Collection Plan selected. If it is not a Receiving Inspection plan type, the system will issue a warning message indicating that some elements will be added. See: Collection Plan Types.
-
Optionally, select an Alternate Plan from the list of values. This plan will be used for the inspection of the skipped receipts.
-
In the Parameters region, enter a Sequence. This determines the sequential order that the frequency parameters are considered by the inspection sampling process.
-
Enter a Frequency for the sequence. For example, you can specify to inspect one out of every two lots submitted.
-
Optionally, enter the Number of Rounds. This specifies how many times the frequency will be executed.
-
Optionally, enter a Time Span. This enables you to indicate a number of days that the frequency must be completed within.
To define interruption parameters
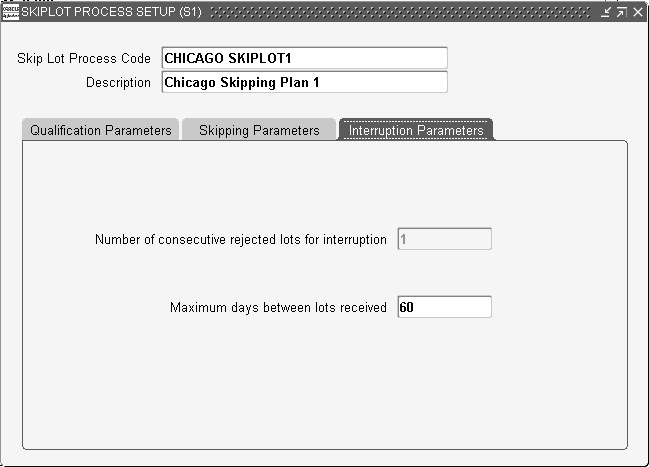
Skip Lot inspection is performed with suppliers on a predictable schedule. Interruption parameters are values that define when that schedule is no longer predictable. If the interruption values are exceeded, that skip lot process reverts to the qualification stage.
-
Select the Interruption Parameters tabbed region.
-
You cannot update the Number of consecutive rejected lots for interruption field. This field specifies that skip lot inspection is interrupted if even one lot is rejected. If interrupted, you can either perform lot-by-lot inspection, or set the skip lot inspection qualification parameters to be more stringent.
-
Enter the Maximum days between lots received. If you have not received a lot within the maximum number of days specified, skip lot inspection will be interrupted. If needed, you can obtain a more frequent inspection process by either assuming a lot-by-lot inspection, or by setting the qualification parameters to a lower number.
-
Save your work.
Using notifications for skip lot inspections
After you have set up skip lot inspections, you can set notifications to be informed of any skip lot frequency changes.
-
Navigate to the Skip-Lot/Sampling Criteria Setup window.
-
Enter skip lot criteria, and choose the Skip Lot Association button.
-
Use the Skip-Lot association to criteria window to enter details of the skip lot process and effective to and from dates.
-
Enter the lot size information and the person to be notified in case of skip lot frequency change. Save your work.
Related Topics
Performing Inspection Sampling
Before performing inspection sampling, you need to first set up a sampling plan and the plan criteria. For more information on inspection sampling, see: Inspection Sampling.
To set up a sampling plan
-
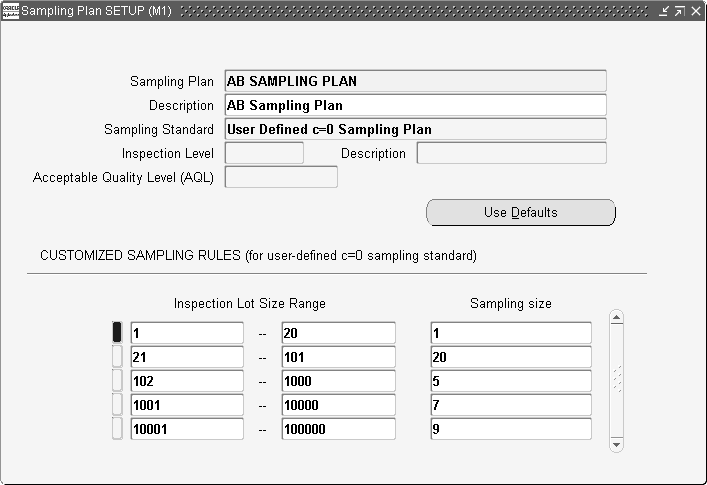
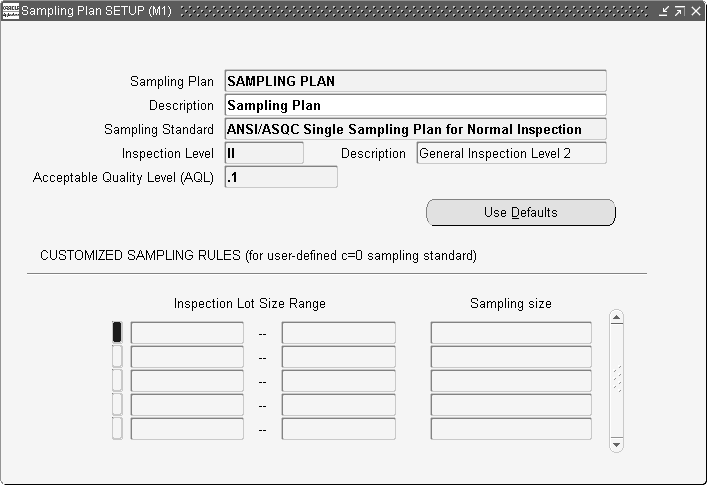
Navigate to the Sampling Plan SETUP window.
-
Enter a name for the sampling plan in the Sampling Plan field.
-
Enter a Description for the sampling plan.
-
Select a Sampling Standard from the list of values, for example, Normal, Tightened, or Reduced. Sampling Standard is based on ANSI/ASQC Z.4-1993. When beginning a sampling plan, you should start with Normal inspection. You can also define your own valid sampling standards.
-
If you selected a normal Sampling Standard, select an Inspection Level from the list of values. Valid values are I, II, III, and S-1 through S-4.
I: inspection level for reduced inspection plans
II: inspection level for normal inspection plans
III: inspection level for tightened inspection plans
S1 - S4: inspection levels for small sample sizes
-
If you selected a normal Sampling Standard, select an Acceptable Quality Level from the list of values. This value indicates the maximum percentage of nonconforming units acceptable. The quality management team generally sets this value based upon a detailed analysis of acceptable risk to your organization.
-
If you selected a c=0 Sampling Standard, you can define sampling rules within the Customized Sampling Rules region.
-
Save your work.
To set up sampling plan criteria
Several criteria can be used to limit what items will be sampled. After you have set up your sampling plan (See: To set up a sampling plan), you need to set up specific criteria that will be referenced before the sampling plan is invoked.
-
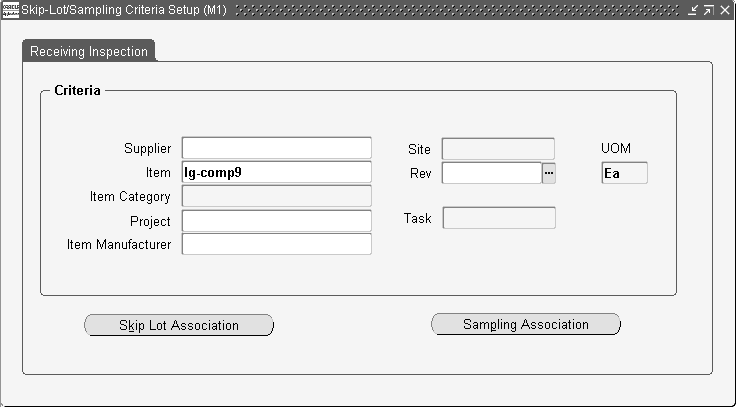
Navigate to the Skip-Lot/Sampling Criteria Setup window.
-
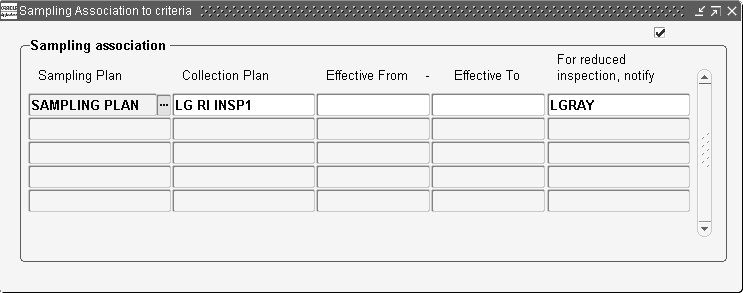
Enter sampling criteria, then choose Sampling Association.
-
Within the Sampling Association to criteria window, select a Sampling Plan from the list of values. This is the sampling plan to which you want the criteria linked.
-
Optionally, select a quality data Collection Plan that will be used to collect the data from Receiving Inspection.
-
Optionally, enter Effective From and Effective To dates to indicate the time period that the current sampling plan/criteria relationship is valid.
-
Optionally, select a user from the For reduced inspection, notify list of values, to notify if reduced inspection is required. A workflow notification is sent to this user.
-
Save your work.
To execute inspection sampling
Sampling plans are invoked from Receiving Transactions. Once the lot to be inspected is selected, you are required to enter quality results. Upon inspecting the sample, you can accept or reject the lot. If part or all of the sample is rejected, the sample plan setup determines whether the amount rejected will reject the entire lot, or not. Rejected lots are then transferred to the Material Review Board subinventory.
-
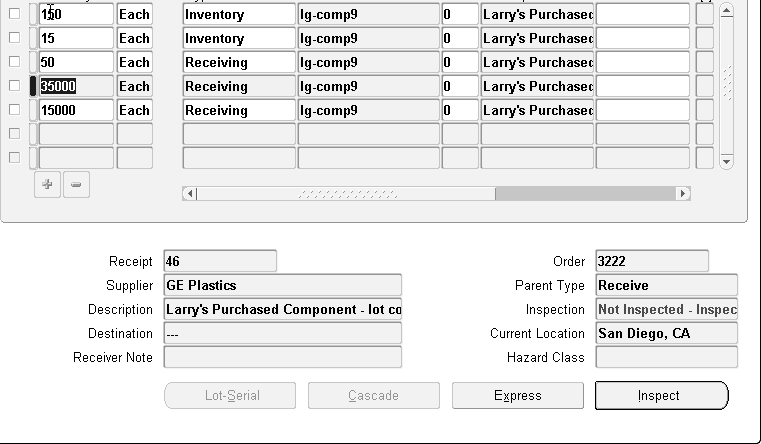
Navigate to the Receiving Transactions window.
-
Select the line containing the lot needing inspection.
-
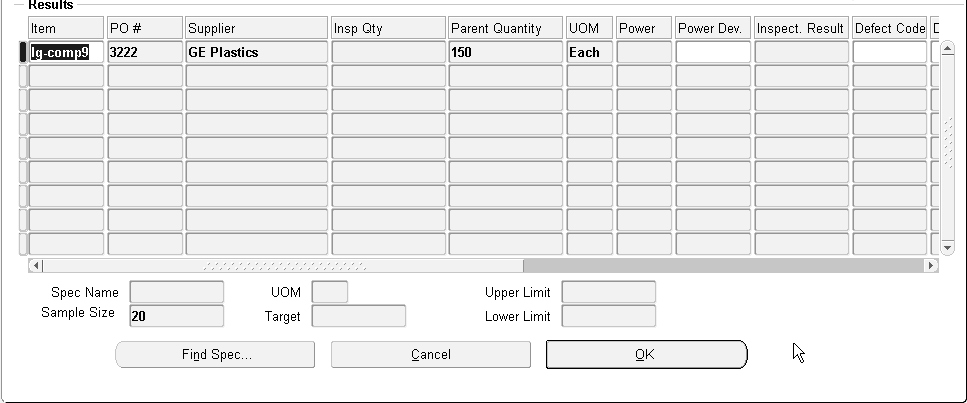
Choose Inspect to invoke the Sample Plan to inspect the lot quantity selected.
-
Within the Enter Quality Results window, enter the Inspection Quantity for the amount of the sample. The sample amount is populated in the Sample Size field. You need to enter the entire sample quantity (in one or multiple rows) before you can exit the window.
-
After sampling the units, select the Inspection Result from the list of values. Valid values are Accept and Reject. If part or all of the sample is rejected, the sample plan setup determines whether the amount rejected will reject the entire lot, or not (Acceptable Quality Level field). See: To set up a sampling plan.
Note: You can enter multiple rows to separate the Inspection Quantities. This enables you to track what will happen to the rejected lot.
-
Choose OK.
-
Save your work. Within the Receiving Transactions window, the lot now displays its status in the Inspection field, for example, Accepted - Inspection.
-
Rejected lots are moved to the MRB (Material Review Board) subinventory.

Related Topics
Receiving Transactions, Oracle Purchasing User's Guide