Demand Plan Administration: Setting Up the User Environment
This chapter covers the following topics:
- About Setting Up the User Environment
- Measures
- Calculating Dependent Demand for Input Parameters
- Events
- Planner Assignments
- Scenarios
- Comment Reason Codes
- Predefined Reports
- Workflow Settings
- Batch Log
- Collaboration History
About Setting Up the User Environment
You use Demand Planning Administration to set up and maintain the environment for demand planners and the Demand Plan Manager. This includes the following functions:
-
Measures — Define and maintain shared measures (including forecasts) for planners and the Demand Plan Manager.
-
Scenarios — Set or change the default measure association for each scenario in the demand plan. Planners see this default when they submit a forecast for a scenario.
-
Events — Define and maintain factors such as promotions, product introductions, and product phase outs that are expected to have a quantifiable impact on demand.
-
Planner Assignments — Set up and maintain planner assignments. Assignments determine the dimension value combinations (measures and dimension values) that will be visible to planners and the values that each planner is responsible for forecasting.
-
Comment Reason Codes — Set or modify comment reason codes in the shared database. Planners and the Demand Plan Manager use these codes to enter comments when they modify data in worksheets.
-
Predefined Reports — Set defaults for predefined reports and select the predefined reports for planners and the Demand Plan Manager.
-
Workflow Settings — Set or change the number of Workflow engines to use when the Workflow background engines run Demand Planning deferred activities.
-
Collaboration History — View a history of actions related to sharing data between users.
-
Batch Log — View detailed status information about stages in the forecast cycle that have run for the demand plan.
Getting help
To view information that is specific to the current function, choose the Help button at the bottom of the page.
To access the full Oracle Demand Planning online Help system for Demand Plan Administration, choose the large Help button at the top of the page.
You can use your browser's print function to print Help topics.
To close an open Help window, choose the Exit button at the top of the page. You will be returned to the current function.
Accessing version and system information
To access version and system information, choose About Demand Planning at the bottom left of the page to access version and system information.
Measures
Input parameters such as such as Booking History and Customer Forecast are associated with a demand plan in the Demand Planning Server. Custom data streams might also be associated with the plan. When data is downloaded from the Demand Planning Server these inputs are read into the shared database where they are stored as measures.
You can use Demand Plan Administration to view input parameters. You can also use them as a basis to define new measures (including forecasts), edit measures, delete measures, and specify which measures should be rebuilt in the next planning cycle.
When the Populate Measures stage runs, measures are populated in the shared database where they are available to the Demand Plan Manager. When a distribution runs, the shared measures become available to planners whose assignments include the measures. All assigned measures will be available to planners when a full distribution runs; only selected measures will be available when a quick distribution runs. Planners and the Demand Plan Manager use measures when they analyze data and select final forecasts to submit or upload. They can also use them as a basis for creating their own measures.
Interface for maintaining measures as a Demand Plan Administrator
Use the main Demand Planning Administrator page to access the page for maintaining measures.
To access the Demand Plan Administrator page for maintaining measures:
-
Log into Oracle Demand Planning as a Demand Planning System Administrator.
-
In the Navigator, choose Demand Plan Administration.
Result: A list of demand plans appears; each is a link.
-
Select the plan with which you want to work by clicking the link for that plan.
Result: The Demand Planning Administrator page for the plan opens.
-
Choose Measures in the Navigation list.
Creating measures in Demand Plan Administration
You can define two types of measures: stored measures and formula measures.
A stored measure is a variable for which calculations and properties are permanently stored in the database. A formula measure calculates values on the fly and is not stored in the database.
To create a measure:
-
Access the Demand Plan Administrator page for maintaining measures.
Result: Current measures and their source (Planning Server or Shared) are displayed in the grid.
-
Choose New.
Result: The Create Measure dialog box opens.
-
Select the measure type: Stored or Formula.
Result: If you chose Stored, the Measure Wizard opens. If you chose Formula, the New Formula Measure dialog box opens.
-
Define the measure using the Measure Wizard.
Editing measures in Demand Plan Administration
When you want to change some aspect of a measure, you can edit the measure definition.
When the Populate Measure stage runs, modified measures are populated in the shared database where they are available to the Demand Plan Manager.
When the Distribute to Planners stage runs, the modified measures become available to planners whose assignments include the measure. All assigned measures will be available to planners when a full distribution runs; only selected measures will be available when a quick distribution runs.
To edit a measure:
-
Access the Demand Plan Administrator page for maintaining measures.
Result: Current measures and their source (Planning Server or Shared) are displayed in the grid.
-
Highlight the measure that you want to modify and choose Edit.
Result: If you are editing a stored measure, a tabbed page opens. If you are editing a formula measure, the Edit Formula Measure dialog box opens.
-
To edit a stored measure use the tabs, the Next button, and the Back button to move through the measure definition to make your changes. You can also change the measure name.
If the measure is a stored accuracy measure or a measure from the Planning Server, you can only edit the measure name, specify the numeric format, and change the property that determines whether data for the measure will be editable in worksheets.
-
Choose Finish to save the measure.
-
To edit a formula measure, use the Edit Formula Measure dialog box to modify the formula. You can also change the measure name.
Choose OK to save the measure.
Rebuilding measures in Demand Plan Administration
When you start a new planning cycle, measure definitions from the previous cycle are maintained in the shared database.
A Rebuild option for each stored measure enables you to indicate whether the measure will be recalculated based on current data in the Demand Planning Server the next time that the Populate Measure stage runs. When you define a new stored measure, the Rebuild option is checked by default.
Note: You cannot explicitly rebuild a formula measure. However, if the stored measure on which the formula measure is based is rebuilt, then the dependent measures will also be rebuilt.
To understand the effect of rebuilding a measure, consider the case in which you define and distribute a measure that copies regions of data from two measures: History for Q1 and Forecast for Q2. At the start of the next planning cycle the download process reloads your measure.
-
If you rebuild this measure, then the measure will be recalculated using updated data from the measures on which the copy is based.
-
If you do not rebuild the measure, then the measure will not be recalculated. The values for the previous cycle will persist through the next cycle.
To change the Rebuild option for a stored measure:
-
Access the Demand Planning Administrator page for maintaining measures.
Result: Current measures and their source (Planning Server or Shared) are displayed in the grid.
-
Identify the measure for which you want to change the Rebuild setting and take one of the following actions:
-
To recalculate the measure in the new cycle using the updated data, check the Rebuild box.
-
To maintain the data values calculated for the previous cycle, clear the Rebuild box.
-
-
Choose Apply to save the current settings.
Viewing measure information in Demand Plan Administration
You can view information about measures.
For a Planning Server measure, the following properties are displayed:
-
Name — Measure name
-
Source — Planning Server
-
Type — Quantity, Amount, or Quantity and Amount
-
Aggregate — Yes or No
-
Allocate — Yes or No
-
Editable — Yes or No
-
Price List — None
-
Events — None
-
Lowest Allocation Levels — For each dimension, specifies the lowest level of each dimension to which data will be allocated
For a stored measure that is a forecast or a copy of one or more measures, the following properties are displayed:
-
Name — Measure name
-
Transformation — Method used to create the measure; for example: Forecast
-
Source — Shared
-
Type — Quantity, Amount, or Quantity and Amount
-
Aggregate — Yes or No
-
Allocate — Yes or No
-
Editable — Yes or No
-
Price List — Price list name or None
-
Events — Event names or None
-
Lowest Allocation Levels — For each dimension, the lowest level to which data will be allocated (depends on the data stream on which the forecast or copy is based)
For a stored accuracy measure, the following properties are displayed:
-
Name — Measure name
-
Source — Shared
-
Accuracy Measure Type — Type of accuracy measure, for example, Mean Absolute Percentage Error (MAPE)
-
Base Measure — Base measure for accuracy calculation
-
Comparison Measure — Comparison measure for accuracy calculation
-
Editable — Yes or No
For a formula measure, the following properties are displayed:
-
Name — Long name for the measure
-
Transformation — Formula
-
Source — Shared
To view information about a measure:
-
Access the Demand Planning Administrator page for maintaining measures.
Result: Current measures and their source (Planning Server or Shared) are displayed in the grid.
-
Highlight the measure for which you want to view information and choose Properties.
Result: Measure information is displayed.
-
Choose OK to exit.
Deleting measures in Demand Plan Administration
When you no longer want users to have access to a measure, you can delete the measure definition.
The Demand Plan Manager will lose access to the measure the next time that he or she logs in to Oracle Demand Planning. Planners will lose access to the measure the next time that the Demand Plan Administrator runs a full distribution.
Note: Before you delete a measure, ensure that your user community does not maintain saved objects that reference the measure. Failure to do so can cause warning messages and errors to occur when users work with reports, graphs, worksheets, or alerts that contain the deleted measure.
To delete a measure:
-
Access the Demand Plan Administrator page for maintaining measures.
Result: Current measures and their source (Planning Server or Shared) are displayed in the grid.
-
Highlight the measure that you want to delete and choose Delete.
Result: You are prompted to confirm the deletion.
-
Choose OK to delete the measure.
Calculating Dependent Demand for Input Parameters
The Demand Planning System Administrator can enable dependent demand for input parameters. This enables users, in both customer and manufacturing forecasts, to explode the independent demand of a model to the options' dependent demand.
Enabling Dependent Demand for Data Streams
If you are logged in as the Demand Planning System Administrator, you can calculate dependent demand for a data stream by following the procedure described below.
-
From the Navigator for the System Administrator, select Setup.
-
Select Data Streams.
-
Select Define -- Advanced.
-
In the Define Data Stream - Advanced form, choose a data stream.
-
Click Next to display the Define Characteristics form.
-
Check the Dependent Demand box.
-
Select Read or Calculate.
-
Select Read when the data stream already contains dependent demand data. This is often appropriate for sales history data streams when they contain the dependent sales history of options and option classes. Booking history and shipment history can also contain dependent demand data. They are set to bring the dependent demand (Read) by default. Custom data streams can be used to read dependent demand data.
-
Select Calculate when the data stream does not contain dependent demand data. No data stream is set to calculate the dependent demand by default.
Data streams that include only independent demand for models should be exploded to the options and option classes on the basis of model bills of material and existing planning percentages, both of which are collected from the source ERP.
-
The Demand Planning System Administrator must also check the Calculate Demand Plan box in the Demand Plans form. If these selections are not made, bills of materials, planning percentages, or dependent sales history will not be used by the Demand Planning Engine for that demand plan.
-
Enabling Dependent Demand for Demand Plans
The Demand Planning System Administrator enables dependent demand calculations for a demand plan by checking a box on the Demand Plans form.
If this option is not selected for a particular plan, the following will be not available for use in the Demand Planning Engine: bills of materials, planning percentages, dependent sales history.
If you are logged in as the System Administrator, you can calculate dependent demand for a data stream by following the procedure described below.
-
From the Navigator for the System Administrator, select Demand Plans.
-
Select the appropriate organization from the LOV.
-
Select a demand plan.
-
In the Demand Plans form, check the Calculate Dependent Demand box.
-
Click in the Explode Demand Using box.
-
Select a mode of exploding the forecast, as described below.
-
Organization-specific Bills of Material - This choice enables the planning percentage to be applied to the organization that was selected from the LOV.
-
Global Bills of material - This choice determines that the same planning percentages are used for all the inventory organizations.
-
Events
Events are factors such as promotions, product introductions, and product phase outs that are expected to have a quantifiable impact on demand.
Global events may be associated with scenarios and demand plans in the Demand Planning Server. When data is downloaded from the Planning Server, these events are read into the shared database. You can use Demand Plan Administration to view global events. You can also define new events, edit events, delete events, and apply event factors to measures.
When the Populate Measures stage runs, events are populated in the shared database where they are available to the Demand Plan Manager. When a distribution runs, events become available to planners. All events will be available when a full distribution runs; only events associated with distributed measures will be available when a quick distribution runs. Planners and the Demand Plan Manager can apply the events to measures and use them as a model for creating their own events.
Note: Events are downloaded with four user dimensions: geography, product, time, and organization. Collapsed dimensions like demand class are downloaded as a hierarchy of one of the user dimensions (like geography). Although the event works with the collapsed dimension, the collapsed dimension name is not shown as the event qualification in the shared database.
Interface for maintaining events in Demand Plan Administration
Use the main Demand Planning Administrator page to access the page for maintaining events.
To access the Demand Plan Administrator page for maintaining events:
-
Log into Oracle Demand Planning as a Demand Planning System Administrator.
-
In the Navigator, choose Demand Plan Administration.
Result: A list of demand plans appears.
-
Select the demand plan that you want to work with, scroll to the bottom of the page, and choose Start Demand Planning.
Result: The Demand Planning Administrator page for the plan opens.
-
Choose Events in the navigation list.
The Demand Planning Administrator page for maintaining events opens.
Creating events in Demand Plan Administration
You can define three types of events: promotions, product introductions, and product phase outs.
-
A promotion is an event that is expected to impact demand for an existing product.
-
A product introduction is an event for a product that does not have any historical or forecast data, but for which you anticipate that sales will be similar to some product or products that have a known history or forecast.
-
A product phase out is an event for an existing product for which sales are expected to become flat or be reduced to zero.
To create an event:
-
Access the Demand Plan Administrator page for maintaining events.
Result: Existing events and their source (Planning Server or Shared) are displayed in the grid.
-
Choose New.
Result: The Event Wizard -- Name page opens.
-
Use the Event Wizard to define the event.
Modifying events in Demand Plan Administration
When you want to change some aspect of an event, you can edit the event. When the Distribute to Planners stage runs, modified events become available to planners. All event modifications will be available when a full distribution runs; only modified events that are associated with distributed measures will be available when a quick distribution runs.
To modify an event:
-
Access the Demand Plan Administrator page for maintaining events.
Result: Existing events and their source (Planning Server or Shared) are displayed in the grid.
-
Highlight the event that you want to modify and choose Edit.
Result: A tabbed page opens.
-
Use the tabs, the Next button, and the Back button to move through the event definition and make the desired changes. You can also change the event name.
Note: You cannot change the event type.
-
Choose Finish to save the event.
Deleting events in Demand Plan Administration
When you no longer want users to have access to an event, you can delete the event.
The Demand Plan Manager will lose access to the event the next time that he or she logs in to Oracle Demand Planning. Planners will lose access to the event the next time that a full distribution runs.
Note: Before you delete an event, ensure that your user community does not maintain measures that reference the event.
To delete an event:
-
Access the Demand Plan Administrator page for maintaining events.
Result: Existing events and their source (Planning Server or Shared) are displayed in the grid.
-
Highlight the event that you want to delete and choose Delete.
Result: You are prompted to confirm the deletion.
-
Choose OK to delete the event.
Applying events to measures in Demand Plan Administration
As you define a measure, you have the option to apply one or more events, event groups, or a combination of events and event groups to the measure.
If you apply an event to a measure before a distribution runs, the distributed measure will include the event factor.
If you apply an event after a distribution runs, the measure will not include the event factor until the measure is repopulated. Similarly, if you modify an event that has been applied to a measure after distribution, the modification will not take effect until the measure is repopulated.
Planner Assignments
Planner assignments determine the dimension value combinations (measures and dimension values) that each planner can forecast and view. In a collaborative planning environment, assignments also establish the areas in which planners can collaborate.
When you run a distribution, the data slices defined by assignments are created in planners' personal databases. A full distribution distributes all data. A quick distribution distributes updates to selected measures.
Note: When you choose values for planner assignments, you select measures as well as values from the other dimensions. If you want to define new measures or edit measures, do so before you set up assignments.
Users can collaborate on assignments
You can set up assignments so that planners are responsible for forecasting specific slices of the data, but yet can view the work of planners who are forecasting other values. You establish areas of collaboration by setting view scopes and assignment scopes. The view scope includes all of the combinations (measures and dimension values) that will be visible in the planner's personal database. The assignment scope includes all of the combinations (measures and dimension values) that the planner is responsible for forecasting and submitting to the shared database. As planners modify their forecasts, they can use collaboration tools to share updated values in their assignment scopes with the Demand Plan Manager and with other planners who have the values in their view scopes.
For example, you might set up assignments so that Planner A is responsible for forecasting one set of products, but can view data (and shared updates to that data) for another set of products, for which Planner B is responsible. Planner B can view Planner A's data (and shared updates to that data) but can only submit forecasts for products in his or her assignment scope. This example is a simple one; in reality, you can set up assignment scopes and view scopes to support your business needs.
Note: If planners will be collaborating, ensure that you inform them about the extent of their scopes. Although a planner will be able to view and modify data that is in his or her view scope, only the data in the assignment scope will be submitted to the shared database and shared with other planners.
Cautions to observe when dependent demand is enabled
Do not break out planner assignments by geography and assign identical product sets. Planning percentages are not dimensioned by Geography; that is, they are not calculated based on the geographic level values. If planner assignments are broken out by geography, then every planner will be modifying the global planning percentages.
Also take dependent demand into account when setting up assignment scopes and view scopes in a collaborative environment. Planners who share items that are related through dependent demand should be able to view each other's items (view scope), but should only be able to submit data for their own items (assignment scope). If a planner is responsible for options while another is responsible for its parent model, the parent model should be in the view scope of the first planner and in the edit scope of the second planner.
Interface for working with planner assignments as a Demand Plan Administrator
Use the main Demand Planning Administrator page to access the page for maintaining planner assignments.
To access the Demand Plan Administrator page for maintaining planner assignments:
-
Log into Oracle Demand Planning as a Demand Planning System Administrator.
-
In the Navigator, choose Demand Plan Administration.
Result: A list of demand plans appears.
-
Select the demand plan that you want to work with, scroll to the bottom of the page, and choose Start Demand Planning.
Result: The Demand Planning Administrator page for the plan opens.
-
Choose Demand Planner Assignments in the navigation list.
The page for maintaining planner assignments opens.
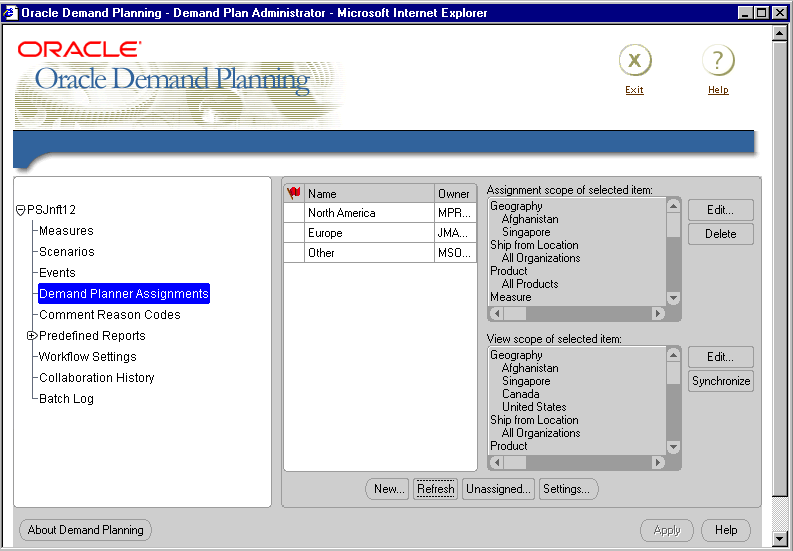
Example: Demand Plan Administrator page for maintaining planner assignments
Consider an example, where you specify the State level for the Geography dimension. In that case, assignments for all planners will be some set of available states. Planners will have access to all data below the specified level. If an assignment consists of multiple values, then planners will also have access to data above the specified level.
Setting levels for assignments
Before you assign data to individual planners, you must specify the default level at which assignments for all planners will be created in each dimension other than Time and Measure.
Before setting levels for assignments, use the Demand Plan Administration> Measures> Properties option to view the lowest allocation level for each measure that you intend to include in planners' assignments. If you set the default assignment level below the allocation floor for a dimension, then the measure will not be distributed to planners.
Note: Ensure that you set levels before you create planner assignments. If you change the level setting for a dimension after you assign data to planners, then you will have to re-enter all assignments.
To specify levels for planner assignments:
-
Access the Demand Planning Administrator page for maintaining planner assignments.
-
Choose Settings.
Result: The System Settings dialog box opens. Each of the dimensions in your database, other than Time and Measure, is present in the dialog box.
-
In each dimension box, select a level.
You can select the level that currently appears in the box for each dimension or you can click the arrow in each box to display a list of levels and select a level from the list.
-
When you have selected a level for each dimension, choose OK.
Creating assignments
When you create an assignment you choose values for the planner's assignment scope and view scope. The view scope includes all of the dimension value combinations (measures and dimension values) that will be visible in the planner's personal database. The assignment scope includes all of the dimension value combinations that the planner is responsible for forecasting and submitting to the shared database.
A planner can have more than one assignment.
To create an assignment:
-
Access the Demand Planning Administrator page for maintaining planner assignments.
-
Choose New.
Result: A new assignment row appears in the grid. The Name column displays an entry called “Untitled Assignment.” Your Oracle user ID appears in the Owner column.
-
In the Name column for the new assignment, enter a name up to 70 characters long.
-
In the Owner column for the new assignment, select the user ID of the planner who will have the assignment.
-
To select values for the planner's assignment scope (the values that this planner will forecast and submit to the shared database), choose the Edit button next to the Assignment scope of selected item box.
Result: The Select Data dialog box opens. The Available box lists values for a dimension in your database.
Note: It is not mandatory to select values for the assignment scope. For example, if you want an individual to be able to review but not submit data, then you can select values for the view scope, but leave the assignment scope empty.
-
Choose values for the current dimension by moving values between the Available box and Selected box until the Selected box displays the values that you want to keep for the current dimension.
Note: You must select one or more values for this dimension before you can select values for another dimension.
-
In the Select Values for box, choose another dimension and repeat the previous step.
-
Choose OK to save the current selections. The OK button is enabled only if the assignment scope includes selections for each dimension including Measure.
Note: For Measure, you can select stored measures, forecast measures, and input parameters from the Demand Planning Server. If you do not want users to collaborate on a measure, do not include that measure in assignment scopes. For example, you might exclude input parameters from planners' assignment scopes, but make them available in planners' view scopes.
Result: You are returned to the page for maintaining planner assignments.
A red flag to the left of an assignment indicates that the assignment scope includes one or more dimension value combinations that are in the assignment scope for another owner.
-
-
To select values for the planner's view scope (the values that this planner will view), in the View scope of selected assignment box proceed as follows:
-
If you want to make the values in the planner's view scope identical to the values in his or her assignment scope, choose Synchronize (this is the default for a new assignment).
-
To choose values for the planner's view scope that are not identical to those in the user's assignment scope, choose the Edit button next to the View scope of selected item box.
Result: The Select Data dialog box opens. The Available box lists values for a dimension in your database.
-
Choose values for the current dimension by moving values between the Available box and Selected box until the Selected box displays the values that you want to keep for the current dimension.
-
To change the values for another dimension, repeat Steps c and d.
Note: You might save time by initially synchronizing the view scope with the assignment scope. Then add and remove values as desired.
-
Choose OK to save the current selections. The OK button is enabled only if the view scope includes selections for each dimension including Measure.
-
Automatic Assignment Maintenance
When you are working with the Assignments page of the Demand Plan Administrator interface, you can use chose settings for Collaboration Options. One of these options lets you automatically maintain assignments using dependent demand.
Automatic assignment maintenance is controlled by an option on the Demand Plan Administrator’s Assignments page. The checkbox label says, Automatically maintain assignments using dependent demand.
The checkbox is only visible if dependent demand is enabled for the plan. It is on by default. When the System Administrator enables it, it impacts scopes assigned in the future, as opposed to those that have already been assigned.
Dependencies and dependent demand data are visible for a planner’s assignment items. If items in a planner’s assignment or view scope are dependent on other items, the parent items are automatically added to the planner’s view scope.
For example, if a new item, Option2, is added to the planner’s assignment scope, and that item is dependent on Model2, which has not been explicitly added to the assignment, then Model2 will automatically be added to the planner’s view scope at the time of planner distribution, because Option2 is dependent on it.
If an item is dependent on more than one item, all the parent items will be added to the view scope. These relationships exist through more than one level. In other words, if an item is dependent on multiple levels of items, then parent values through all levels of dependencies are added to the assignment.
The ability of a planner to see, in the view scope, all the values that are ancestors or parents of the values in the assignment scope is an important factor in explaining how data totals are derived. This is important, for example, in aggregation.
It is important to note that the parent-child relationships remain operational for the purposes of deriving data even if the other collaboration option, limiting a planner to the assignment scope, is checked. In this case, the values in a planner's view scope that are related to values in the assignment scope are used in all calculations – they are just not visible in worksheets or in the Select Data dialog box.
How to Set Up Automatic Assignment Maintenance
Follow the procedure below to set up automatic assignment maintenance for demand planners.
-
Log into Demand Planning as a System Administrator.
-
In the page for Demand Planning Administration, select the option for Demand Planner Assignments. This is the function that lets you set up and maintain planner assignments by selecting the dimension value combinations that will be visible to planners. It also lets you select the values that each planner will be responsible for forecasting.
-
The Demand Planner Assignments page shows the names, owners, and scopes of assignments in your plan. Select the assignment with which you want to work and choose Settings to access the System Settings dialog box.
-
If the assignment is for a plan in which dependent demand has been set for the data stream or measure, you can see, in the Collaboration Options frame, a checkbox labeled Automatically maintain assignments using dependent demand. This checkbox determines whether new items are automatically added to the planner's assignments according to dependent demand relationships.
If you choose the Automatic option, the planner's assignments are maintained according to the assignment selections of the administrator.
-
If a dependent item is added to the planner’s assignment scope, then an assignment maintenance process runs automatically when you exit the Select Data dialog box. That process adds the dependent item’s parent item or items to the assignment scope.
If a dependent item is added to the planner’s view scope, then an assignment maintenance process runs automatically when you exit the Selector; it adds the dependent item’s parent item or items to the view scope.
-
If assignments are created at the item level of the product dimension, dependent parents will be considered at that level.
If assignments are created at a higher level of the product dimension, the descendants of the assigned dimension values will be considered.
Once any dependent parents of all descendants are determined, the ancestors of those items at the assignment level will be automatically added to the assignment.
Assignment-Scope-Specific Planning
The Administrator's interface for demand planning assignments has a collaboration option that limits planners to a particular scope. If the administrator chooses the option of assignment-scope-specific planning, only dimension values in the assignment scope will be available to planners. In this case, the behavior described in the following paragraphs will apply.
In standard documents, such as worksheets, reports, and graphs, the planner can access and manipulate only dimension values in the assignment scope. Dimension values that are only in the planner’s view scope are not displayed in these documents.
-
Selecting Data: Only dimension values in the planner’s assignment scope are available in the Select Data dialog box.
-
Aggregation: Parent totals for dimensions in the assignment do not include data for values that are in the view-only scope or are otherwise outside the assignment scope.
Data for dimension value combinations that are only in the view scope will never aggregate above the leaf level.
-
Allocation: Edits made to higher levels do not allocate down to view-only values.
-
Locking: View-only dimension values are automatically locked in worksheets.
-
Planning Percentages Worksheet: In the planning percentages worksheet, the planner has full selection and data visibility. In other words, view scope dimension values are visible, and dependent demand data can be calculated from view scope data.
Setting Up Assignment-Scope-Specific Planning
To transform a planner's assignment into a scope-specific assignment, you use the procedure outlined above in the topic Automatic Maintenance of Scopes.
When you have accessed the Collaboration Options frame in the System Settings dialog box, check the box labeled Limit planners to assignment-scope-specific planning.
When you leave the System Administration page, any changes that you have made in regards to planners’ scopes will not take place until the demand plan in question is rebuilt and the measures are distributed.
Editing assignments
Edit an assignment when you want to change dimension values, including measures, that are currently in a planner's assignment scope or view scope. For example, you might edit assignments when you want to give planners access to a new measure that has been created by the Demand Plan Manager.
Edits take effect when a distribution runs. A full distribution distributes all changes. A quick distribution distributes modifications to measures that have been selected for distribution.
To edit an assignment:
-
Access the Demand Planning Administrator page for maintaining planner assignments.
-
To change the values in a planner's assignment scope (the values that this planner will forecast and submit to the shared database), choose the assignment that you want to change and then choose the Edit button next to the Scope of assignment box.
The Select Data dialog box opens, showing the current selections for the assignment scope for each dimension including Measure. Proceed as follows:
-
In the Select values for box, choose the dimension for which you want to modify values.
-
Choose values for the dimension by moving values between the Available box and Selected box until the Selected box displays the values that you want to keep for the current dimension.
-
To change the values for another dimension, repeat Step 2.
-
Choose OK to save the current selections.
Note: If you add new values to the assignment scope, the same values will automatically appear in the view scope. You can then decide whether to keep or remove them.
-
-
To change the values in a planner's view scope (the values that this planner will view), choose the assignment that you want to modify.
-
If you want to make the values in the planner's view scope identical to the values in his or her assignment scope, choose Synchronize.
-
To choose values for the planner's view scope that are not identical to those in the user's assignment scope, choose the Edit button next to the View scope of selected item box.
Result: The Select Data dialog box opens.
-
In the Select Values for box, select a dimension for which you want to change value selections.
-
Choose values for the current dimension by moving values between the Available box and Selected box until the Selected box displays the values that you want to keep for the current dimension.
-
To change the values for another dimension, repeat Steps c and d.
-
Choose OK to save the current selections. The OK button is enabled only if the view scope includes selections for each dimension including Measure.
-
Changing assignment names
You can give a new name to an assignment. The change takes effect immediately. A distribution is not required.
To change the name of an assignment:
-
Access the Demand Planning Administrator page for maintaining planner assignments.
-
Identify the assignment whose name you want to change.
-
In the Name column, enter a new name, up to 70 characters long.
Changing assignment owners
As the result of staff changes or reassignments, you might want to enable a user to access an assignment that is currently associated with another owner. The change takes effect immediately. A distribution is not required.
To change the owner of an assignment:
-
Access the Demand Planning Administrator page for maintaining planner assignments.
-
Identify the assignment whose owner you want to change.
-
In the Owner column, select the user ID for the planner who will have this assignment.
Viewing unassigned data
You can view data values that have not yet been assigned to any planner's view scope.
To view unassigned data:
-
Access the Demand Planning Administrator page for maintaining planner assignments.
-
Choose Unassigned.
Result: The Unassigned Data Slices dialog box opens, displaying data slices that have not been associated with any planner's view scope.
Checking assignments for overlapping values
As you create assignments, you can identify check to see if there are planners who have dimension value combinations in their assignment scopes that overlap with values that have been assigned to other planners.
Note: Overlapping values are technically allowed, but are not recommended as sound business practice. This is because data values that are submitted to the shared database by one planner will be overwritten by another planner's data for those values where their assignment scopes intersect.
To check for overlapping values in assignments:
-
Access the Demand Planning Administrator page for maintaining planner assignments.
-
Choose Refresh.
Result: A red flag appears in the column next to any assignment for which the assignment scope includes value combinations (dimension values and measures) which are the same as the values in another user's assignment scope.
Deleting assignments
You can delete a planner's assignment. The planner who is associated with the assignment immediately loses access to the data slice.
To delete an assignment:
-
Access the Demand Planning Administrator page for maintaining planner assignments.
-
Highlight the assignment that you want to delete.
-
Choose Delete.
Scenarios
A scenario is a repository for maintaining, archiving, and viewing the final forecasts for a demand plan. There are scenarios defined for each demand plan. If your organization requires an optimistic, a pessimistic, and a realistic forecast, for example, these scenarios might be part of a demand plan definition. The demand plan is created by the System Administrator.
A planner can submit a forecast for each scenario in the demand plan. It can be a baseline forecast or a personal variant.
Although scenarios become a repository for the final forecasts in a demand plan, they are present during much of the planning cycle, and have a role in the cycle that changes over time, as described below.
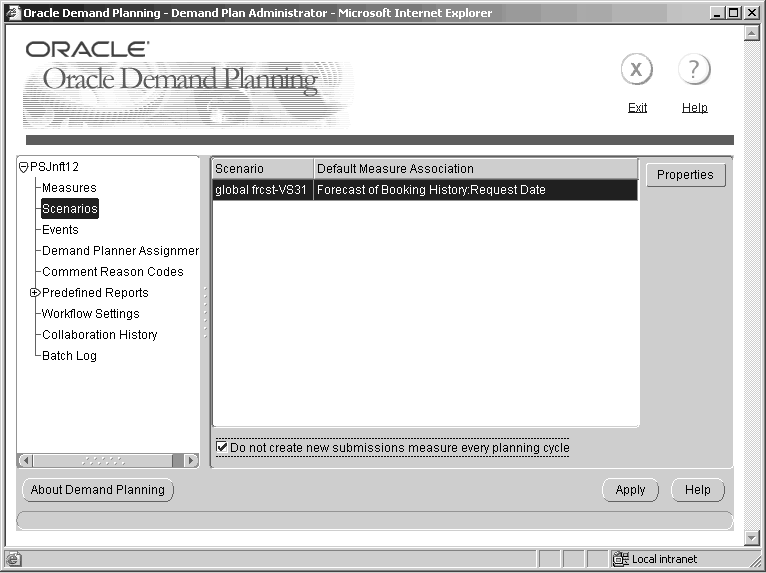
Default Measure Associations
The System Administrator uses the Scenarios screen in the Administrator interface to specify the default measure association for a scenario. The measures from which the selection is made are part of the plan definition. Because of the need for a default association value, a baseline forecast is often used. The default association, for example, may be "Forecast of Booking History."
-
A copy of the default measure associated with the scenario is often used as the initial Submissions measure.
-
You can think of a scenario, at the beginning of the planning process, as a placeholder for the forecasts that will subsequently be created.
If a planner using this plan later decides not to submit a forecast for the scenario, the data will not be collected.
Scenarios and Submissions
If an input parameter such as a history, previous forecast, or custom data stream has been associated with a scenario in the Demand Planning Server, this association is downloaded to the shared database when the Download from Planning Server stage runs.
Note: The Demand Planning System Administrator can use the Scenarios function to change the default measure that planners see when they submit data for a scenario, or to set a default if there is no default. However, once a Submissions measure exists, changing the default measure association or its properties in the Demand Plan Administrator's module does NOT automatically create a new Submissions measure or change the existing Submissions measure.
After planners generate forecasts for their assignments, each planner selects final forecasts to submit to the shared database. The Planning Manager reviews the submission measure before the manager or the System Administrator uploads the consolidated forecast to the Demand Planning Server. This process is described in detail in the chapter for "Selecting Measures to Submit or Upload." The submissions measure is now no longer a placeholder, but a repository of forecast data that can be maintained, viewed, and archived.
Example: Demand Plan Administrator page for working with scenarios
The scenarios section of the Demand Plan Administrator page allows you to set or change the default measure for a scenario and view scenario properties.
Setting a default measure for a scenario
Set a default measure for a scenario when you want planners to see a specific default when they submit data for that scenario.
When you change the default measure for a scenario, remember that you will not change an existing Submissions measure.
To set the default measure for a scenario:
-
Access the Demand Planning Administrator page.
-
In the navigation list, choose Scenarios.
The Administrator's interface opens to the page for working with scenarios.
The Scenarios/Default Measure Association grid displays a row for each scenario in the demand plan.
-
The Default Measure Association column shows the current default measure for each scenario in the demand plan.
-
If there is no default measure for a scenario, the Default Measure Association is set to "None."
-
-
Double-click the Default Measure Association column for the scenario for which you want to set a default measure.
A list of available measures appears.
-
Select a measure from the list.
The measure that you selected is now displayed as the default measure for the scenario.
-
Choose Apply to save the current settings.
Scenarios and Data Collection
Demand planners submit final forecast numbers for each scenario in the demand plan. The data is marked for consolidation in the shared database, where it will be reviewed by the Planning Manager.
Planners accomplish this by using the Submit Measures dialog box, accessed from the Submit Measures command on the Tools submenu.
The Planning manager, after reviewing the data, uploads the submissions measure to transfer the data to the Planning Server.
The Planning manager accomplishes the upload by using the Upload Measures dialog box, accessed from the Upload Measures command on the Tools submenu.
Before the Submissions measure is uploaded, the Planning Manager can remove cycle-persistent locks that planners have placed on the submitted measures.
Viewing scenario properties
You can view the following information about the properties that have been associated with a scenario in the Demand Planning Server:
-
Name
-
Horizon Range
-
Accuracy Measure Type
-
Upload Measure (if measure has been uploaded)
-
Output levels for each dimension
To view scenario properties:
-
Access the Demand Planning Administrator page.
-
In the navigation list on the Demand Planning Administrator page, choose Scenarios.
Result: The page for working with scenarios opens. The grid displays a row for each scenario in the demand plan.
-
Select the row for the scenario whose information you want to view and choose Properties.
Alternatively, you can double-click the Scenarios column.
Result: Scenario properties are displayed.
-
Choose OK to exit.
Comment Reason Codes
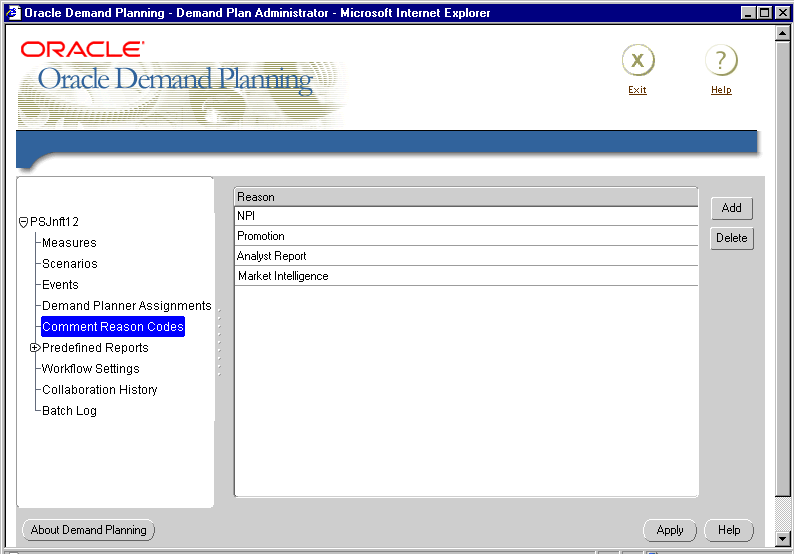
As planners and the Demand Plan Manager adjust forecast data in worksheets, they can enter free text to describe modifications that they have made to a cell or group of cells. Each text entry must be associated with a comment reason code, which categorizes the reason for the modification. Use the Comment Reason Codes function to set up and maintain these codes in the shared database.
Note: Users will only be able to enter comments if you have defined comment reason codes. If you expect to implement commenting, you must define comment codes before distributing data.
Comments persist in Oracle Demand Planning across planning cycles when the following conditions are met:
-
The measure that includes the comment is submitted for a scenario by the planner and the submission measure is not deleted.
-
The comment is at the same level as the output level specified for the scenario in the Planning Server Plan Definition form.
Example: Demand Plan Administrator page for maintaining comment reason codes
The Comment Reason Codes section of the Demand Plan Administrator page allows you use to view, define, edit, and delete comment reason codes.
Defining a comment reason code
Define a comment reason code when you want to provide a designation that planners and the Demand Plan Manager can use to annotate data modifications in a worksheet.
To define a comment reason code:
-
Access the Demand Planning Administrator page.
-
In the navigation list on the Demand Planning Administrator page, choose Comment Reason Codes.
Result: The page for maintaining comment reason codes opens, displaying current codes.
-
Choose Add.
Result: A blank row appears in the Reason area.
-
In the blank row, type the text for the code. The text can be up to 70 characters long.
-
Choose Apply to save the current settings.
Modifying a comment reason code
Modify a comment reason code when you want to change a code that planners and the Demand Plan Manager use to annotate data modifications in a worksheet.
To modify a comment reason code:
-
Access the Demand Planning Administrator page.
-
In the navigation list on the Demand Planning Administrator page, choose Comment Reason Codes.
Result: The page for maintaining comment reason codes opens, displaying current codes.
-
Select the row for the code that you want to edit and modify the text. The text can be up to 70 characters long
-
Choose Apply to save the current settings.
Deleting a comment reason code
Delete a comment reason code when you no longer want planners and the Demand Plan Manager to use the code.
To delete a comment reason code:
-
Access the Demand Planning Administrator page.
-
In the navigation list, choose Comment Reason Codes.
Result: The page for maintaining comment reason code opens, displaying current codes.
-
Select the code that you want to delete and choose Delete.
Result: The code is immediately deleted. You are not prompted to confirm the action.
Predefined Reports
Predefined reports are documents that enable users to conduct structured business analyses along a specific dimension. Two special Forecast reports enable users to evaluate the accuracy of their forecasts.
Use the Predefined Reports function to specify the settings for predefined reports and select the reports that you want to make available to your user community.
You perform two functions to set up predefined reports:
-
Specify default hierarchy, measure, and dimension settings. These settings determine the defaults that appear in each predefined report.
-
From among all of the predefined report types that the application provides, select the reports that will be available to your users. All users will have access to these reports.
Note: You must specify default settings before you select reports. If you reverse the order, the predefined reports will not function properly.
Specifying default settings for predefined reports
Specify default report settings to establish the defaults that planners and the Demand Plan Manager will initially see for predefined reports.
To specify default settings for predefined reports:
-
Access the Demand Planning Administrator page.
-
In the navigation list, choose Predefined Reports.
-
From the submenu, choose Default Report Settings.
Result: The page for setting defaults for predefined report opens, displaying current default settings.
-
In the Hierarchy box, select the time hierarchy that you want to use.
Note: If the demand plan has a single Time hierarchy, then you cannot select a hierarchy.
-
In the Year Level, Quarter Level, and Month Level boxes, use the arrows to select the time levels that you want to use.
You can select Year, Quarter, and Month, or, if your Time hierarchy is not structured precisely in terms of these levels, you can select three levels in descending order, such as Quarter, Month, and Week.
-
In the Base box, select the base measure for all predefined reports. This is the default measure that will be displayed when a document focuses on a single measure.
-
In the Comparison box, select the comparison measure. This is the default comparison measure that will be displayed when a document compares two measures.
-
Choose Apply to save the current settings.
Selecting predefined reports
Selecting predefined reports determines the set of documents that will be available to planners and the Demand Plan Manager, and specifies the dimensions for which each document will be generated.
Note: The documents that you select will be available to all of your users. You cannot select specific documents for individual users.
To select predefined reports:
-
Access the Demand Planning Administrator page.
-
In the navigation list, choose Predefined Reports.
-
From the submenu, choose Report Selection.
Result: The page for selecting predefined reports opens. The list displays all document types.
-
Check the box in the Available column beside each document that you want to select.
-
For each document that you select, specify the dimension or dimensions for which you want to generate the document by checking the box where a report and dimension coincide.
-
Choose Apply to save the current settings.
Note: Some documents, because of the nature of the information that they are set up to display, are generated with default values. For these documents, you cannot select the dimensions on which you want to base these reports.
Types of predefined reports
Following is a list of the predefined reports that you can select for your user community. The documents are grouped according to the name of the folder in which they appear in the navigation list when a user logs in with the responsibility of Demand Planner or Demand Plan Manager.
-
Comparison folder
Comparison document — Compares two dimension values for specified time periods. The comparison is based on a specified measure. The analysis shows difference and percentage difference.
Percentage Share document — Compares a dimension value to its aggregate for specified time periods. The comparison is based on a specified measure. The analysis shows percentage share.
-
Distribution folder
Increasing/Decreasing Demand document — Identifies dimension values for which activity has increased or decreased by a specified percentage between two time periods. Activity is based on average values for a specified measure. The analysis shows difference and percentage difference.
-
Exception folder
80/20 Rule document — Display dimension values that show a specified percentage of activity within specified time periods, such as the top 20% of the products that drive 80% of the value (often identified as Category A products in ABC classification). Activity is based on a specified measure. The analysis shows cumulative percentage.
-
Forecast folder
Comparison Accuracy document — Compares two measures for specified time periods and quantifies the difference and percent difference between them. Includes statistics for MAD, MAPE, RSME, S.D, AV, C.V.
Aged Accuracy document — Quantifies the accuracy of a specific measure over a specified lag or lead time range. Includes statistics for Minimum., Maximum, MAD, AV, and MAPE.
For more information and examples of Forecast documents, see "Comparison Accuracy Document" and "Aged Accuracy Document"
-
Growth folder
Growth document — Shows the difference in a dimension value's performance between two time periods. Performance is based on a specified measure. The analysis shows amount change and percentage change.
-
Ranking folder
Ranking document — Ranks dimension values in terms of performance during specified time periods. Performance is based on a specified measure. The analysis shows the share of total.
Top/Bottom document — Ranks a specified number of top or bottom dimension values for two time periods in terms of performance. Performance is based on a specified measure. The analysis shows difference and percentage difference.
-
Trend folder
-
Moving Average/Total document — Shows moving averages and totals for specified dimension values over a series of time periods. The averages and totals are based on a specified measure.
-
Trend document — Shows performance trends within a specified time range for specified dimension values. Performance is based on a specified measure.
-
Workflow Settings
Oracle Demand Planning uses Oracle Workflow to manage the stages of the planning cycle that are composed of deferred activities. When the Distribute to Planners stage runs, Oracle Demand Planning's default behavior is to sequentially process each planners' assignment. Depending on your site's environment and implementation of the software, it may be efficient to process more than one assignment distribution concurrently.
Use the Workflow Settings function to specify the number of Workflow background engines to use when Workflow opens a connection to Express Server to build the personal database for planner assignments. You can also use Workflow Settings to test the connection to Oracle Workflow and specify the minimum number of days that the system will retain alert and batch notifications in the Workflow worklist.
Note: Users can experience the workflow sticking in a deferred status between assignment distribution, if there are insufficient workflow engines selected within the demand planning system administrator responsibility. Basic rule is workflow engines WE = (Number of Assignments + 1).
Maintaining Workflow settings
You can modify Workflow settings by changing the number of background engines to run when building planners' assignments, modifying the minimum number of days that the system will retain alert and workflow notifications, and indicating whether you want to test the Workflow configuration each time that data is downloaded from the Demand Planning Server.
To maintain Workflow settings:
-
Access the Demand Planning Administrator page.
-
In the navigation list, choose Workflow Settings.
Result: The page for maintaining Workflow settings opens.
-
The Number of Workflow engines to use box displays a numeric value. The value specifies the number of secondary Workflow engines that will run when Workflow opens Express Server sessions to build planners' personal databases, which are based on their assignments. To change the value, type a new number or click the arrow next to the box and scroll to the number that you want to use.
The default for a new installation is 1. If you retain this value, the system starts a Workflow process that starts a single Express session and builds the assignments sequentially. If you select a larger value, Workflow starts the specified number of secondary processes, each of which opens an Express Server session and builds one or more assignments concurrently. The default value will work in all circumstances. However, building personal databases is a resource-intensive process. If there are many assignments and you have a lot of Express engine power, you might want to select a larger value. Oracle recommends that you consider the resources provided by your Express configuration.
-
The Ad-Hoc Role Expiration Period (in days) box, specifies the minimum number of days that you want the system to retain alert and workflow notifications in the Workflow worklist.
You can type a new number, or you can click the arrow next to the box to scroll to the number that you want.
-
If you want to test the Workflow configuration each time you download data from the Demand Planning Server, in the Workflow Test box, check the Enable Workflow Loop Test box.
Note: The Workflow test runs automatically the first time that data is downloaded from the Demand Planning Server. You might only need to run it again if you suspect that there is a problem.
-
Choose Apply to save the current settings.
Batch Log
The Batch Log displays detailed date and time information about the status of the batch processes in the planning cycle. The log documents the stages involved in building a new plan, downloading data from the Demand Planning Server, populating measures, distributing to planners, collecting data from planners, and uploading data to the Demand Planning Server. The log displays automatically while a stage is running. You can also view the log on an ad hoc basis.
To view the batch log:
-
Access the Demand Planning Administrator page.
-
In the navigation list, choose Batch Log.
Result: The frame for viewing the batch log opens.
-
Scroll through the log to view activity detail.
-
To exit, select another item in the navigation list or close the page.
Note: If the Distribute to Planner stage does not complete successfully, restart the process from the beginning.
Collaboration History
The Collaboration History log enables you to view and sort information about actions that are related to data sharing.
The Collaboration History log includes the following information:
-
Action - The action that occurred.
-
Send - The measure was sent.
-
Receive - The measure was received.
-
Download - The measure was downloaded from the Demand Planning Server.
-
Distribution - The measure was distributed.
-
-
Measure - The measure affected by the action.
-
Timestamp - The date on which the action occurred.
-
Assignment - For an action initiated by a planner, this is the name of the planner's assignment. For an action initiated by the Demand Plan Manager, this is always Planning Manager; for an action initiated by the Demand Planning System Administrator, this is always Administrator.
-
User - For an action initiated by a planner or Demand Plan Manager, this is the user ID of the user who initiated the action. For an administrator, this is always Demand Plan Administrator.
To view collaboration history:
-
Access the Demand Planning Administrator page.
-
In the navigation list, choose Collaboration History.
To sort collaboration history:
Note: By default, collaboration history is sorted by date.
With the Collaboration History page open, choose the label of the column by which you want to sort the information. For example, to sort by assignment name, choose the Assignment column label.
To clear collaboration history:
With the Collaboration History page open, choose Clear All History.