Working with Events
This chapter covers the following topics:
- About Events
- Creating Promotion Events
- Creating Product Introduction Events
- Creating Product Phase out Events
- Modifying Events
- Viewing Event Properties
- Deleting Events
- Applying Events to Measures
- Using the Events Calendar
About Events
Events are factors such as promotions, product introductions, and product phase outs that are expected to have a quantifiable impact on demand. You can apply events to forecasts to model the effect on demand.
You can view existing events, define new events, edit events, delete events, and apply event factors to measures.
Note: Events are downloaded with four user dimensions: geography, product, time, and organization. Collapsed dimensions like demand class are downloaded as a hierarchy of one of the user dimensions (like geography). Although the event works with the collapsed dimension, the collapsed dimension name is not shown as the event qualification in the shared database.
Working with events as Demand Plan Manager
If your responsibility is Demand Plan Manager, you work with events in the shared database. When you create a new event, the event exists in the shared database. You have access to the event, but it will only become available to planners when the Demand Plan Administrator runs a distribution. All events will be available to planners when a full distribution runs; only events associated with distributed measures will be available when a quick distribution runs.
Working with events as Demand Planner
If your responsibility is Demand Planner, you work with events in your personal database. You can use events that have been distributed to you. You can also create new events, to which only you have access.
Creating Promotion Events
A promotion is an event that is expected to impact demand for an existing product. You characterize a promotion as mandatory or optional. A mandatory promotion is always applied, whether or not other promotions have been applied. An optional promotion is applied only when there is there is no other optional promotion for the same portion of the data (product and other dimension values).
To create a promotion event:
-
Access Oracle Demand Planning as a Demand Planner or Demand Plan Manager.
-
On the Navigation toolbar, choose the New button.

-
Choose New Event from the popup menu.
Alternatively, you can click the right mouse button on the Events folder in the Navigation list. Then choose New Event from the popup menu.
If you see the Event Wizard - Introduction page, choose Next to continue.
Note: To suppress the display of this page in the future, clear the Show this page next time box before you continue.
Result: The Event Wizard - Name page opens.
-
Complete the Event Wizard - Name page.
-
Enter a name for the event, up to 70 characters long.
-
Choose Promotion as the event type.
-
In the date boxes for Event Range, specify the starting date and the ending date for the promotion. Select the part of the date (month, day, or year) that you want to change and then click the arrow to increase or decrease the value.
-
Choose Next to continue.
Result: The Event Wizard - Type page opens.
-
-
Complete the Event Wizard - Type page.
-
Select the promotion type. The promotion type determines the circumstances in which the event will be applied to a measure.
-
Optional Promotion — The event will be applied only when no other optional promotions for the same portion of the data (product and other dimensions) have been applied.
-
Mandatory Promotion — The event will always be applied for the specified portion of the data.
-
-
Choose Next to continue.
Result: The Event Wizard - Group page opens.
-
-
Use the Event Wizard - Group page to specify a grouping option for the event. You can use groups to organize similar types of events into event folders in the Navigation list.
-
Choose one of the following grouping options:
-
Do not group — The event is not in any group. It will be displayed as an independent event object in the Navigation list. This is the default for a new event.
-
Create new event group — The event is in a new group. Enter a name for the group, up to 70 characters long. The event will be displayed in an event folder in the Navigation list. The folder will have the name that you enter for the group.
-
Use existing event group — The event will be displayed in the group folder that you choose. (If no event groups have been defined, this option will not be available.)
Note: You can group a mandatory promotion with other mandatory promotions and an optional promotion with other optional promotions. However, you cannot put a mandatory promotion and an optional promotion in the same group.
-
-
Choose Next to continue.
Result: The Event Wizard - Priority page opens.
-
-
Use the Event Wizard - Priority page to specify the priority for the event when another event of the same type is applied to the same measure. The priority will be evaluated relative to the priorities of other events.
-
Examine the Promotion/Priority grid to view the priority settings for other events.
-
Using the slider, set a priority for the new event.
For mandatory promotions, the priority setting determines the order in which the events will be applied.
For example, if two mandatory promotions are defined for the same time period, one at the All Product level with a 10% modification factor (priority 1) and the second for Product A with a 20% modification factor (priority 2), the result would be a lift of 10% for all products except for Product A, which would have a 20% lift on top of the 10% lift.
For optional promotions, the priority setting determines the order in which multiple promotions will be applied when there is an overlap.
For example, suppose that a soda vendor has a 10% discount on cans in North America (priority 1), and a 5% worldwide discount on all products (priority 2). This means that North American buyers will get 10% off cans, and 5% off other products, while consumers in the rest of the world will still get 5% off everything.
Note: If you set the same priority for two events, then Oracle Demand Planning will assign the priority to the event that was created first.
-
Choose Next to continue.
Result: The Event Wizard - Properties page opens.
-
-
Use the Event Wizard - Properties page to specify the product to which the promotion applies and set optional qualifying values. Proceed as follows:
-
Select a product:
-
Click the ellipsis button next to the top box.
Result: The Dimension Value Selector dialog box opens, listing the products in the hierarchy displayed in the Organize by box.
-
You can change the hierarchy in the Organize by box to view values in another product hierarchy.
-
Select a product from the list. To apply the event to all products, choose All Products. You can use the Find button to search for a specific product.
Note: If you want to apply the event to multiple products, you can define similar events for the products and group the events together.
-
-
You can qualify the event by values in dimensions other than Product. For example, you might limit the event to a specific geography. Proceed as follows:
-
In the Dimension column of the Dimension/Value grid, highlight the dimension for which you want to set qualifying values and choose Edit.
Result: The Dimension Value Selector dialog box opens. The list displays values for the hierarchy in the Organize by box.
-
You can select an alternate hierarchy and view its values.
-
Choose a value and choose OK.
Result: You are returned to the Properties page.
Note: To change a qualifying value, highlight it and choose Edit. To delete a qualifying value, highlight it and choose Delete.
-
-
To select a qualifying value for another dimension, repeat the procedure described above.
-
Choose Next to continue.
Result: The Event Wizard - Action page opens.
-
-
Use the Event Wizard - Action page to specify the effect that the promotion event will have when it is applied to a measure.
-
In the Quantities box, specify the effect of the event on quantity. Choose one of the following options:
-
No effect — The event will have no effect on quantity.
-
Increase value by — The event will increase quantity by a number or percentage that you specify.
-
Decrease value by — The event will decrease quantity by a number or percentage that you specify.
-
Set to absolute value — The event will set quantity to a number that you specify.
-
-
If you chose Increase value by, Decrease value by, or Set to absolute value, enter a number. For Increase value by and Decrease value by, check the percent box to indicate that the number is a percentage.
Result: The Example box shows the effect that your choice will have on a quantity of 1000.
-
In the Price box, specify the effect of the event on price. Choose one of the following options:
-
No effect — The event will have no effect on price.
-
Increase value by — The event will increase price by a number or percentage that you specify.
-
Decrease value by — The event will decrease price by a number or percentage that you specify.
-
Set to absolute value — The event will set price to a figure that you specify.
-
-
If you chose Increase value by, Decrease value by, or Set to absolute value, enter a number. For Increase value by or Decrease value by, check the percent box to indicate that the number is a percentage.
Result: The Example box shows the effect that your choice will have on a price of $1000.
-
Choose Next to continue.
Result: The Event Wizard - Summary page opens, showing the choices that you have made.
-
-
Choose Finish to save the event.
Distinguishing Promotional Demand from Regular Demand
After promotional sales history has been collected into Demand Planning, it is possible to compute the baseline demand history by subtracting promotional demand from total demand.
Deriving this measure provides a useful basis for generating an undistorted, accurate baseline demand forecast upon which proposed promotional lifts by brands, territories, and sales channels can be applied.
This process can prevent excess inventory or stock outs. The normal forecasts of booking or shipment histories may not be sufficient if a reduction in future promotions causes excess inventory, or an increase in future promotions causes stock-outs.
Promotional History
The System Administrator uses the Custom Stream Collection form to select Promotional History. Oracle Demand Planning has promotional history pertaining to the following:
-
Discounts
-
Price Break Headers (Such as a 5% discount on orders of more than 50 tons)
-
Promotional Goods
The sales history that drives the identification of the data stream will either be booking history or shipping history.
Note: Promotional History is described in the chapter on Data Collection .
Differentiating Promotional and Regular Demand
Differentiating promotional from regular demand is a process that begins outside Oracle Demand Planning.
-
Sales orders from customers’ ERP systems provide source data; promotional discounts and adjustments are applied and weighed in Oracle Advanced Pricing.
-
The next step is to bring promotional history into Oracle Demand Planning.
-
Promotional history is treated as a data stream in the Demand Planning Server.
-
The Demand Planning System Administrator uses the Input Parameters tab in the Demand Plans form.
-
The Administrator can build the input parameter by using various combinations of booking or shipping histories.
-
The demand plan is built.
-
-
If your enterprise has a forecasting process based on historical sales, it is very useful to evaluate demand for product sales by using promotional history to create an analysis. The general steps for this analysis are:
-
Analyze the promotional history and forecast it.
-
The demand planner will use this plan with promotional history to analyze promotional sales, and then to forecast them. The object is to forecast promotional lifts, and then compare them to the baseline forecasts.
-
Once the demand plan is built, a demand planner can use it to analyze and forecast promotional history and then can publish the forecast for use in supply planning. First however, several measures must be created for use as analytical tools, as described below.
-
-
Create a formula measure for baseline sales. The methodology for creating formula measures is discussed in the chapter on working with measures. The current formula is a difference measure created by subtracting promotional history from booking history.
-
Create a formula measure for historical promotional lifts. This is a ratio measure, expressed as a percentage, which is created by dividing promotional history booking by baseline sales.
-
Use the Measure Wizard to forecast baseline sales. The process of creating a forecast measure is described in the chapter on working with measures.
-
Open a Demand Planning worksheet that displays the three measures described above (baseline sales, promotional lifts, and baseline forecast) in a configuration that enables you to estimate future promotional lifts and apply them to the baseline forecast. Two approaches are described below.
-
Create events with the Events Wizard that represent appropriate modification factors for promotional lift. Then rerun the forecast, using the Events page of the Measure Wizard to apply the events to the existing forecast measure.
-
Increase the baseline forecast by applying the appropriate percentages manually. This can be done in a the demand planning worksheet by using the data modification tools.
-
Creating Product Introduction Events
A product introduction is an event for a product that does not have any historical or forecast data, but for which you anticipate that sales will be similar to some product or products that have a known history or forecast. You characterize a product introduction as a lifecycle event or a supersession event. For a lifecycle event, the historical sales data for one or more base products is used as the basis of demand for the new product. For a supersession event, the forecast for one or more base products is used to determine demand for the new product. You can also indicate whether the event is expected to cannibalize sales for one or more existing products.
To create a product introduction event:
-
Access Oracle Demand Planning as a Demand Planner or Demand Plan Manager.
-
On the Navigation toolbar, choose the New button.
-
Choose New Event from the popup menu.
Alternatively, you can click the right mouse button on the Events folder in the Navigation list. Then choose New Event from the popup menu.
If you see the Event Wizard -- Introduction page, choose Next to continue.
Note: To suppress the display of this page in the future, clear the Show this page next time box before you continue.
Result: The Event Wizard - Name page opens.
-
Complete the Event Wizard - Name page.
-
Enter a name for the event, up to 70 characters long.
-
Choose Product Introduction as the event type.
-
In the date boxes for Event Range, specify the starting date and the ending date for the product introduction. Select the part of the date (month, day, or year) that you want to change and click the arrow to increase or decrease the value.
-
Choose Next to continue.
Result: The Event Wizard - Type page opens.
-
-
Complete the Event Wizard - Type page.
-
Select the product introduction type. The product introduction type determines the basis for predicting demand for the new product. Choose one of the following:
-
Lifecycle— Uses the history for a specified base product to derive demand for the new product.
-
Supersession — Uses the forecast for a specified base product to predict demand for the new product.
There are two radio buttons beneath the Supersession choice. These are described below.
Based on the individual histories of base products — These introductions assume that a forecast for the new product can be based solely on the history of the base product.
Based on combined histories of new and base products — These introductions assume that a forecast for the new product must be based on a combination of data for new and base products.
-
-
Choose Next to continue.
Result: The Event Wizard - Group page opens.
-
-
Use the Event Wizard - Group page to specify a grouping option for the event. You can use groups to organize similar types of events into event folders in the Navigation list.
-
Choose one of the following grouping options:
-
Do not group — The event is not in any group. The event will be displayed as an independent event object in the Navigation list. This is the default for a new event.
-
Create new event group — The event is in a new group. Enter a name for the group, up to 70 characters long. The event will be displayed in an event folder in the Navigation list. The folder will have the name that you enter for the group.
-
Use existing event group — The event will be displayed in the group folder that you choose. (If no event groups have been defined, this option will not be available.)
Note: You can group a lifecycle product introduction with other lifecycle product introductions and a supersession product introduction with other supercsession introductions. However, you cannot put a lifecycle product introduction and a supersession product introduction in the same group.
-
-
Choose Next to continue.
Result: The Event Wizard - Properties page opens.
-
-
Use the Event Wizard - Properties page to specify the product to which the product introduction event applies and set optional qualifying values. Proceed as follows:
-
Select a product:
-
Click the Ellipsis button next to the top box.
Result: The Dimension Value Selector opens, listing available products.
-
Choose a product from the list. You can use the Find button to search for a specific product.
Note: If you want to apply the event to multiple products, you can define similar events for these products and group the events together.
-
-
You can qualify the event by values in dimensions other than Product. For example, you might limit the event to a specific geography. Proceed as follows:
-
In the Dimension column of the Dimension/Value grid, highlight the dimension for which you want to set qualifying values and choose Edit.
Result: The Dimension Value Selector dialog box opens. The list displays values for the hierarchy in the Organize by box.
-
You can select an alternate hierarchy and view its values.
-
Select a value and choose OK.
Result: You are returned to the Properties page.
Note: To change a qualifying value, highlight it and choose Edit. To delete a qualifying value, highlight it and choose Delete.
-
-
To select a qualifying value for another dimension, repeat the procedure described above.
-
Choose Next to continue.
Result: The Event Wizard - Action page opens.
-
-
Use the Event Wizard - Action page to specify the effect that the product introduction event will have when it is applied to a measure.
Note: The action that you specify on this page will be applied on top of the weight that you will assign to the base product's history (for a lifecycle event) or forecast (for a supersession event) in Step 8.
-
In the Quantities box, specify the effect of the event on quantity. Choose one of the following options:
-
No effect — The event will have no effect on quantity.
-
Increase value by — The event will increase quantity by a number or percentage that you specify.
-
Decrease value by — The event will decrease quantity by a number or percentage that you specify.
Result: The Example box shows the effect that your choice will have on a quantity of 1000.
-
-
If you chose Increase value by or Decrease value by, enter a number. Check the percent box to indicate that the number is a percentage.
-
Choose Next to continue.
Result: The Event Wizard - Base Products page opens.
-
-
Use the Event Wizard - Base Products page to or products that will be used to predict demand for the new product. If you chose Lifecycle in an earlier step, then Oracle Demand Planning will base the calculation on the product's history. If you chose Supersession, then Oracle Demand Planning will base the calculation on data from whichever choice you make among the two Supersession options.
The Based on individual histories of base products option uses the historical demand of the products you kept from the Base Products step. The Based on combined histories of new and base products option takes advantage of the feature that enables you to transfer the history of a superseded service part to the new product that replaces it. You can then create forecast of a item based on the history of the superseded item, then Oracle Demand Planning will base the calculation on the product's forecast.
-
Choose Add.
Result: The Dimension Value Selector dialog box opens showing available products.
-
Select a product from the list and choose OK.
Result: The Dimension Value Selector dialog box closes. The product that you chose is displayed in the grid.
-
In the Weight (%) column, enter a number that specifies the percentage of the product's forecast (for a supersession event) or history (for a lifecycle event) to consider when calculating demand for the new product. The default is 100.
Examples: If 0.0 applies no weight to the product's forecast or history; 50.0 applies 50% of the value to the product's forecast or history; 100.0 applies the full value of the forecast or history; 150.0 applies 150% of the value of the forecast or history.
-
You can enter dates in the History Start and History End columns. When you click in a blank history cell, Demand Planning enters the current date and a spinner that enables you to scroll forward or backward in time.
-
If you do not enter information in some columns in this step, Demand Planning will attempt to provide intelligent defaults.
-
You can qualify the forecast or history for the base product by values in dimensions other than Product. For example, you might limit the forecast or history by geography. Proceed as follows:
-
Highlight the column for the dimension for which you want to set qualifying values and choose Edit.
Result: The Dimension Value Selector dialog box opens. The list displays values for the current hierarchy in the Organize by box.
-
You can select an alternate hierarchy and view its values.
-
Select a value and choose OK.
Note: To change a qualifying value, highlight it and choose Edit. To delete a qualifying value, highlight it and choose Delete.
-
-
When your selections are complete, choose OK.
Result: The Event Wizard - Cannibalized Products page opens.
-
-
If you expect that demand for the new product will decrease demand for one or more existing products, use the Event Wizard - Cannibalized Products page to specify the affected products and quantify the impact.
-
Choose Add.
Result: The Dimension Value Selector dialog box opens.
-
Select a product from the list and choose OK. You can use the Find button to search for a specific product.
Result: The Dimension Value Selector dialog box closes. The product that you chose is displayed in the grid.
-
In the Modification Type column, select a choice from among Decrease by Percentage and Decrease by Percentage of New Item.
.
-
In the Decrease (%) column, enter a number that specifies the percentage that demand for this product is expected to decrease within a specified time frame.
Note: The decrease percentage will be applied to the new product and the result subtracted from the quantity for the "cannibalized" product.
-
In the From and To columns, select the start and end dates for the decrease.
-
To add another cannibalized product, repeat the earlier steps.
-
Choose Next to continue.
Result: The Event Wizard - Summary page opens, showing the choices that you have made.
-
-
Choose Finish to save the event.
New Product Introduction Event Allocation
Oracle Demand Planning enables managers and planners to plan new product introductions based on the life cycle of base products. Base products are first modified in such a way that the allocation of new product demands is restricted to the base products’ customers and markets. For example, if you introduce a new product and allocate its demand based on a base product that sells to 15 out of your customer base of 2000, the new product’s forecast will be reflect demand only for those 15 customers.
The Benefits of New Product Introduction Event Allocation
Restricting the new product demand allocation as described above has two distinct advantages:
-
It allows a new product to be introduced for only the geographic regions, sales channels, and customers that apply to the base products.
-
It provides more accurate allocation of new product demand across regions, sales channels, and customers.
Aggregation Rules for New Product Introduction Allocation
The aggregation rules for base products in a new product introduction are sometimes different from the base products. Several different methods, described below, are used to remedy problems that may arise from this situation.
In the forecast measure for Lifecycle events, data at the application levels for the new product are a weighted combination of data for base products at specified dimension levels, for corresponding history periods in the historical measure.
The copied data value are allocated down non-time, non-product dimensions based on the historical data of the base products in the specified regions and history period.
In the forecast measure for Supersession events, which are based on forecast instead of history, data at the application levels for the new product are a weighted combination of the data for the base products at specified dimension levels.
The copied data values are allocated down non-time, non-product dimensions based on data of the base products in the specified regions. There is no shift in the time dimension.
Using New Product Introduction Allocation
To use New Product Introduction Allocation, use the steps described in the procedure for Creating Product Introduction Events. When you get to the Properties Page of the Event Wizard, perform the actions described below.
-
Next to the box labeled Choose the product to which this event will apply, click the Ellipsis button to select a product value from the Dimension Value Selector dialog box.
-
In the Dimension/Value grid, you can specify a qualifying value that will limit the event to a particular geography. If the Value cell for the Geography dimension is blank, the default value, All Geographies is used.
-
Select the Value cell for Geography and choose Edit. You access the Dimension Value Selector dialog box for the geography dimension, where you can select a geography value. If there is another dimension in the grid, such as Ship from Location, you can select a qualifying value for that dimension as well.
The Delete button removes the displayed value from the cell you have selected.
-
Click Next to proceed to the Action step of the Event Wizard. Continue creating your new product introduction event.
-
When you select the base product in the Base Products step, the following will be true for the product you selected at the beginning of the Base Products step:
-
The new product introduction event will limit the introduction to the geographic regions that apply to the base product.
-
The new product’s forecast will be allocated based on the history of the base product instead of All Products.
Creating Product Phase out Events
A product phase out is an event for an existing product for which sales are expected to become flat or be reduced to zero.
A single phase out event models a linear decrease in which demand for the product decreases evenly over the event time period. To model a situation in which demand decreases in a non-linear fashion, you can define multiple phase out events for the same product and group the events together. For example, you can use multiple events to handle a situation in which demand is expected to decline 10% in October, 20% in November, and 30% in December.
To create a product phase out event:
-
Access Oracle Demand Planning as a Demand Planner or Demand Plan Manager.
-
On the Navigation toolbar, choose the New button.
-
Choose New Event from the popup menu.
Alternatively, you can click the right mouse button on the Events folder in the Navigation list. Then choose New Event from the popup menu.
If you see the Event Wizard - Introduction page, choose Next to continue.
Note: To suppress the display of this page in the future, clear the Show this page next time box before you continue.
Result: The Event Wizard - Name page opens.
-
Complete the Event Wizard - Name page.
-
Enter a name for the event, up to 70 characters long.
-
Choose Product Phase out as the event type.
-
In the date boxes for Event Range, specify the starting date and the ending date for the product phase out. Select the part of the date (month, day, or year) that you want to change and click the arrow to increase or decrease the value.
-
Choose Next to continue.
Result: The Event Wizard - Group page opens.
-
-
Use the Event Wizard - Group page to specify a grouping option for the event. You can use groups to organize similar types of events into event folders in the Navigation list.
-
Choose one of the following grouping options:
-
Do not group — The event is not in any group. The event will be displayed as an independent event object in the Navigation list. This is the default for a new event.
-
Create new event group — The event is in a new group. Enter a name for the group, up to 70 characters long. The event will be displayed in an event folder in the Navigation list. The folder will have the name that you enter for the group.
-
Use existing event group — The event will be displayed in the group folder that you choose. (If no event groups have been defined, this option will not be available.)
Result: The Event Wizard - Properties page opens.
-
-
-
Use the Event Wizard - Properties page to specify the product to which the product phase out event applies and set optional qualifying values.
-
Select a product:
-
Click the ellipsis button next to the top box.
Result: The Dimension Value Selector opens, listing the products in the hierarchy displayed in the Organize by box.
-
You can change the hierarchy in the Organize by box and view values in another product hierarchy.
-
Choose a product from the list. To apply the event to all products, choose All Products. You can use the Find button to search for a specific product.
-
-
You can qualify the event by values in dimensions other than Product. For example, you might limit it by geography. Proceed as follows:
-
Highlight the column for the dimension for which you want to set qualifying values and choose Edit.
Result: The Dimension Value Selector dialog box opens. The list displays values for the current hierarchy in the Organize by box.
-
You can select an alternate hierarchy and view its values.
-
Select a value and choose OK.
Note: To change a qualifying value, highlight it and choose Edit. To delete a qualifying value, highlight it and choose Delete.
-
-
Choose Next to continue.
Result: The Event Wizard - Action page opens.
-
-
Use the Event Wizard - Action page to specify how the product phase out event will decrease quantity when it is applied to a measure.
-
In the Quantities box, enter a number. Check the percent box to indicate that the number is a percentage.
Result: The Example box shows the effect that your choice will have on a quantity of 1000.
-
Choose Next to continue.
Result: The Event Wizard - Summary page opens, showing the choices that you have made.
-
-
Choose Finish to save the event.
Modifying Events
When you want to change some aspect of an event, you can edit the event.
If your role is Demand Plan Manager, the modified event will be made available to planners when a distribution runs. All events will be available when a full distribution runs; only events applied to distributed measures will be available when a quick distribution runs.
To edit an event:
-
Access Oracle Demand Planning as a Demand Planner or Demand Plan Manager.
-
In the Navigation list, identify the event that you want to change.
Note: To search for an event, click the right mouse button on the Events folder in the Navigation list and choose Find from the popup menu. Then enter a name or name fragment. Alternatively, you can choose the Find button on the Navigation toolbar.
-
Select the event and choose Edit.
Result: A tabbed page opens.
-
Use the tabs, the Next button, and the Back button to move through the event definition to make your changes. You can also change the event name.
Note: You cannot change the event type.
-
Choose Finish to save the event.
Viewing Event Properties
In the Navigation list, you can view the following information about events:
-
Name
-
Start Date
-
End Date
-
Event Type
To view event properties:
-
Access Oracle Demand Planning as a Demand Planner or Demand Plan Manager.
-
In the Navigation list, identify the event whose information you want to view.
Note: To search for an event, click the right mouse button on the Events folder in the Navigation list and choose Find from the popup menu. Then enter a name or name fragment. Alternatively, you can choose the Find button on the Navigation toolbar.
-
Click the right mouse button on the event object and choose Properties from the popup menu.
Deleting Events
When you no longer want to maintain an event, you can delete the event.
Note: If you delete an event as a Demand Plan Manager, planners will lose access to the event the next time that a full distribution runs. Before deleting, ensure that planners do not maintain measures that reference the event.
To delete an event:
-
Access Oracle Demand Planning as a Demand Planner or Demand Plan Manager.
-
In the Navigation list, identify the event that you want to delete.
-
Highlight the event and choose Delete.
Result:You are prompted to confirm the deletion.
-
Choose OK.
Applying Events to Measures
As you define a measure, you have the option to apply one or more events, event groups, or a combination of events and groups to the measure.
If you are working as a Demand Plan Manager and apply an event to a measure before a distribution runs, then the distributed measure will include the event factor.
If you apply an event after a distribution runs, the measure will not include the event factor until the measure is repopulated. Similarly, if you modify an event that has been applied to a measure after distribution, the modification will not take effect until the measure is repopulated.
For information about the effect of events on measures, see "Effect of Events on Measures".
Using the Events Calendar
The Events Calendar enables you to view information about events that are currently associated with your demand plan. You can view events by month and by week. You can also view events that have been associated with specific measures. This can be useful when you are defining a stored measure or working with a measure that has an event component.
Viewing a monthly display of events
You use the Events Calendar to view a monthly display of events.
To view events by month:
-
Access Oracle Demand Planning as a Demand Planner or Demand Plan Manager.
-
On the Navigation list toolbar, choose the Tools button.

-
From the submenu, choose Events Calendar.
Result: The Events Calendar display is opened.
The Month tab displays event information for the current month.
-
Ensure that the View events list button is active.
-
Choose Previous to go back one month. Choose Next to go forward one month.
-
To view more information about a specific event, proceed as follows:
-
Choose the event in the calendar.
Result: The selected event is highlighted in the right frame.
-
Double-click the event.
Result: The Event Wizard opens, where you can view (and optionally edit) the event definition.
-
-
To expand the calendar display, disable the View events list button.
Result:The right frame closes and the calendar display enlarges.
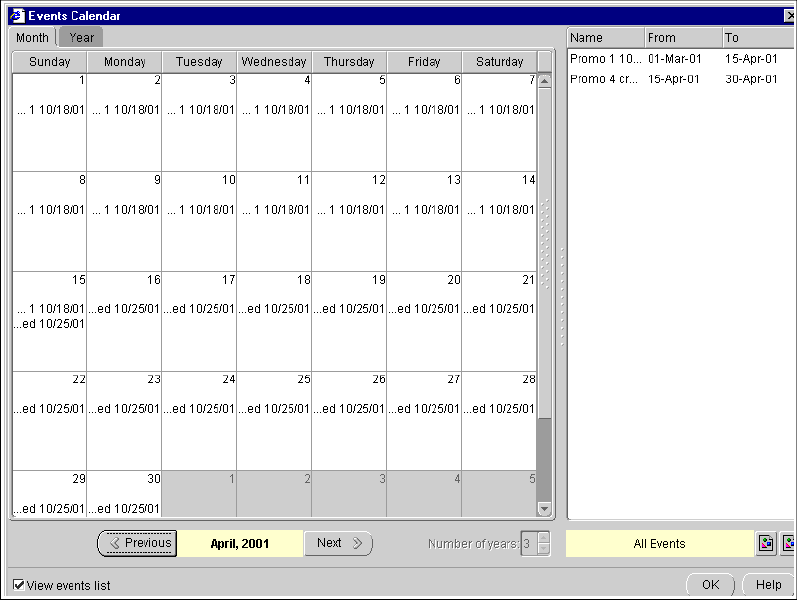
Example: Display of events by month
You can view the events for a selected month in the Events Calendar. In this example, the View Events list option is enabled. The left frame displays the daily events for the month. The right frame displays all events that have been associated with the demand plan.
Viewing events by year
You can use the Events Calendar to view a yearly display of events.
To view events by year:
-
Access Oracle Demand Planning as a Demand Planner or Demand Plan Manager.
-
On the Navigation list toolbar, choose the Tools button.
-
From the submenu, choose Events Calendar.
Result: The Events Calendar opens. The Month tab displays event information for the current month.
-
Make the Year tab active.
Result:The calendar frame on the left displays the events by year.
-
In the Number of years box, choose the number of years for which to display events.
Result: Each event that falls within the selected time period displays as a colored horizontal bar beneath the appropriate year. The event time span is indicated by the placement of the bar.
-
Ensure that the View events list button is active.
-
Choose Previous to go back one year. Choose Next to go forward one year.
-
To view more information about an event, proceed as follows:
-
Choose the event in the calendar.
Result: The selected event is highlighted in the right frame.
-
Double click the event.
Result: The Event Wizard opens, where you can view (and optionally edit) the event definition.
-
-
To expand the calendar display, disable the View events list button.
Result:The right frame closes and the calendar display enlarges.
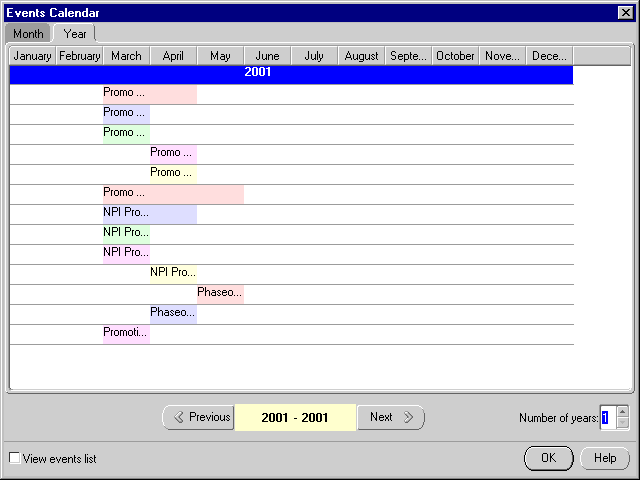
Example: Events calendar for year
In the Events Calendar, you can view the events for a selected year too. In this example, the View Events list option has been disabled so that only the calendar displays.
Viewing events for a measure
You can use the Events Calendar to view all of the events that are related to a specific measure.
To view the events for a measure:
-
Access Oracle Demand Planning as a Demand Planner or Demand Plan Manager.
-
On the Navigation list toolbar, choose the Tools button.
-
From the submenu, choose Events Calendar.
Result: The Events Calendar opens. The Month tab displays event information for the current month.
-
Ensure that the View events list button is enabled.
Result: The right frame displays all events that are linked to the demand plan.
-
Choose the Filter Events by Measure button.

-
Result:The Choose a Measure dialog box opens. The list shows measures that have been defined for the demand plan. These might be Planning Server measures or measures in the shared database. If your responsibility is Demand Planner, they might be measures that you have defined.
-
Select a measure from the list and choose OK.
Result:The right panel now displays only those events that have been linked to the selected measure. The measure name appears at the bottom of the frame.
-
To view more information about the event, double-click it.
Result: The Event Wizard opens, where you can view (and optionally edit) the event definition.